

Page 1

Before using your washing machine, please read this
manual carefully and keep it for future reference.
Twin Tub Washing Machine
OWNER’S MANUAL
MSW-7118P
Read This Manual
Insid e you w ill fi nd ma ny hel pfu l hint s on ho w to
use and m aintain y our w ashi ng ma chin e pro perl y.
Just a li ttl e prev ent ativ e car e on you r par t can
save yo u a gre at dea l of ti me and m one y over t he
life of y our w ashi ng ma chin e. You'll fin d many
answe rs to c ommo n pro blem s in th e char t of
troub les hoot ing t ips. I f you r evie w the c hart o f
troub les hoot ing t ips fi rst , you ma y not n eed to c all
for ser vic e.
Page 2

CONTENTS
SAFETY INSTRUCTIONS
Safety precaution ....................................................
Explanation of the symbols:...................................
INSTALLATION
Product description ..................................................
Unpacking the washing machine ...............................
Installation area ......................................................
Change the position of the drain hose ........................
.
OPERATIONS
Control panel ............................................................
Preparation before washing ......................................
Washing...................................................................
Rinse.......................................................................
Spin..........................................................................
Refer to the following table to select spinning time....
Reference of laundry quantity corresponding to different capacities..
Laundry volume and detergent dosage reference........
Special functions.........................................................
Maintenances
Cleaning and Care .....................................................
Cleaning the cabinet..................................................
Cleaning the inlet filter...............................................
Anti-freezing protection...........................................
Operation when objects are dropped into the outside of the spin tub.....
Trouble shooting.......................................................
Technical specifications.............................................
2
2
4
4
5
5
6
6
6
6
7
7
7
7
9
10
10
10
10
11
11
12
1
Page 3

SAFETY INSTRUCTIONS
Safety precaution
For your safety, the information in this manual must be followed
to minimize the risk of fire or explosion, electric shock, or to
prevent property damage, personal injury or loss of life.
This appliance is not intended for use by persons (including children) with reduced physical,
or mental capabilities, or lack of experience and knowledge, unless they have been given
supervision or instruction concerning use of the appliance by a person responsible for their safety.
Children should be supervised to ensure that they do not play with the appliance.
If the supply cord is damaged, it must be replaced by the manufacturer, its service
agent or similarly qualified persons in order to avoid a hazard.
The new hose-sets supplied with the appliance are to be used and that old hose-sets should not
be reused.
The openings must not be obstructed by a carpet.
This appliance is intended to be used in household and similar applications such as:
− staff kitchen areas in shops, offices and other working environments;
− farm houses;
− by clients in hotels, motels and other residential type environments;
− bed and breakfast type environments;
− areas for communal use in blocks of flats or in launderettes.
sensory
WAS H RATE D CAPACIT Y
SPIN RATED CAPAC ITY
MAXIM UM WATE R PRESSUR E
7.0 kg
3.6kg
0.6MPa
Explanation of the symbols:
Warning!
!
This combination of symbol and signal word indicates a potentially
dangerous situation which may result in death or serious injuries
unless it’s avoided.
Caution!
This combination of symbol and signal word indicates a potentially
dangerous situation which may result in slight or minor injuries
or damage to property and the environment.
Note!
This combination of symbol and signal word indicates a potentially
dangerous situation which may result in slight or minor injuries.
2
Page 4

SAFETY INSTRUCTIONS
Do not d is man tl e the mac hi ne
by you rs elf .
For bid dis mantl ing
D
o n
o
t wa
s
wi
o
Do
or s
Do no
o
a
Do not p
it s
h c
th
ker
o
se
th
r
cc
n
er f
la
mm
a
n
ot
was
h
d
i
mil
ar cl
o
t
waterp roof
t le
t b
a
p l
b
a
y
n e a
r
i
d
en
t
.
u
t ha
t
op
pi
n
g ru
e
o
n
nn
b
h
l
ot
,
le s
wn
y cl
run
d
p
es.
s i
ing
h
et ro
-
im
n
e
u
fi
n
s t
bs
l
le
b t
i
n
to th
.
ha
l,
ta
d
g
! ! !
t a
re st
a
in
a
lc
oh
ol
,
an
n
ce
.
coa
t, ra
in
c
o the m
ac
hi
t
ub
to
a
v
o
e tu
b b
e
f
o
This appliance is for indoor use only.
Do not install the machine in damp or rainy
environment to avoid electric shock, fire,
machine failure, or deformation.
Do no t spray w ate r direc tly to th e machi ne.
ed
Make s ur e tha t th e water i nl et
hose i s co nne ct ed and th e ta p
d
is ope ne d bef or e washi ng .
oa
t
+
n
e
If use w ar m wat er, t he wate r
i
d
temp er atu re s hould n ot
exce ed 5 0℃.
r
e
Do not place inflammable materials
like burning candle, mosquito incense,
cigaret etc. or heating source like electric
stove, calorifier etc. on the machine.
Do not let baby sit on it or place heavy
things on it.
Do not e xc eed t he m ax. wat er
leve l to a voi d wa ter ove rf low in g
and ma ch ine f ai lure.
! !!
To avoid e le ctr ic s hock
resu lt ing f ro m elect ri c lea ka ge,
plea se c onn ec t groun di ng wi re
of the p lu g pro pe rly.
Gro undin g
+
Wi
pe of
f dirt
y a
n
d d
ust o
n t
h
plu
c
g o
fte
n to pre
v
e
o
n
t
a
ct wit
h po
n
w
e
r s
e
t p
oor
u
p
p
ly
.
If the supply cord is damaged, it mu st
be replaced by the manufacture r, its
service agent or similarly qua lified
persons in order to avoid a hazard .
Do not i ns ert o r un plug th e pl ug
with w et h and s to a void el ec tri c
shoc k.
Insert the plug tightly when use.
Unplug the plug from socket after use.
3
Do not replace power cord by
yourself.
Do not p ul l the c or d when
unpl ug t he pl ug .
Page 5

INSTALLATION
Product description
Control panel
Lint filter
Wash cover
Wash tub
Pulsator
Base
Drain hose
Spin cover
Safety cover
Frame
Power plug
Cabinet
Or
Note!
• The product line chart is for reference only, please refer to real product as standard.
Accessories
Inner spin cover
Water inlet hose
manual
Unpacking the washing machineUnpacking the washing machine
!
Warning!
•
Packaging material (e.g. Films, Styrofoam) can be dangerous for children.
•
There is a risk of suffocation ! Keep all packaging well away from children.
1. Remove the cardboard box and styrofoam packing.
2. Lift the washing machine and remove the base packing.
3. Remove the tape securing the power supply cord and drain hose.
4. Remove the inlet hose from the drum.
44
Page 6
INSTALLATION
Installation area
!
Warning!
Stability is important to prevent the product from
• wandering!
Make sure that the product should not stand on the power cord.
•
Before installing the machine, the location characterized
as
follows shall be selected:
1.Rigid, dry, level surface
2.Sufficient ventilation
and Avoid direct sunlight
, Room temperature is above 0 C
3.Keep far away from the heat resources such as coal or gas.
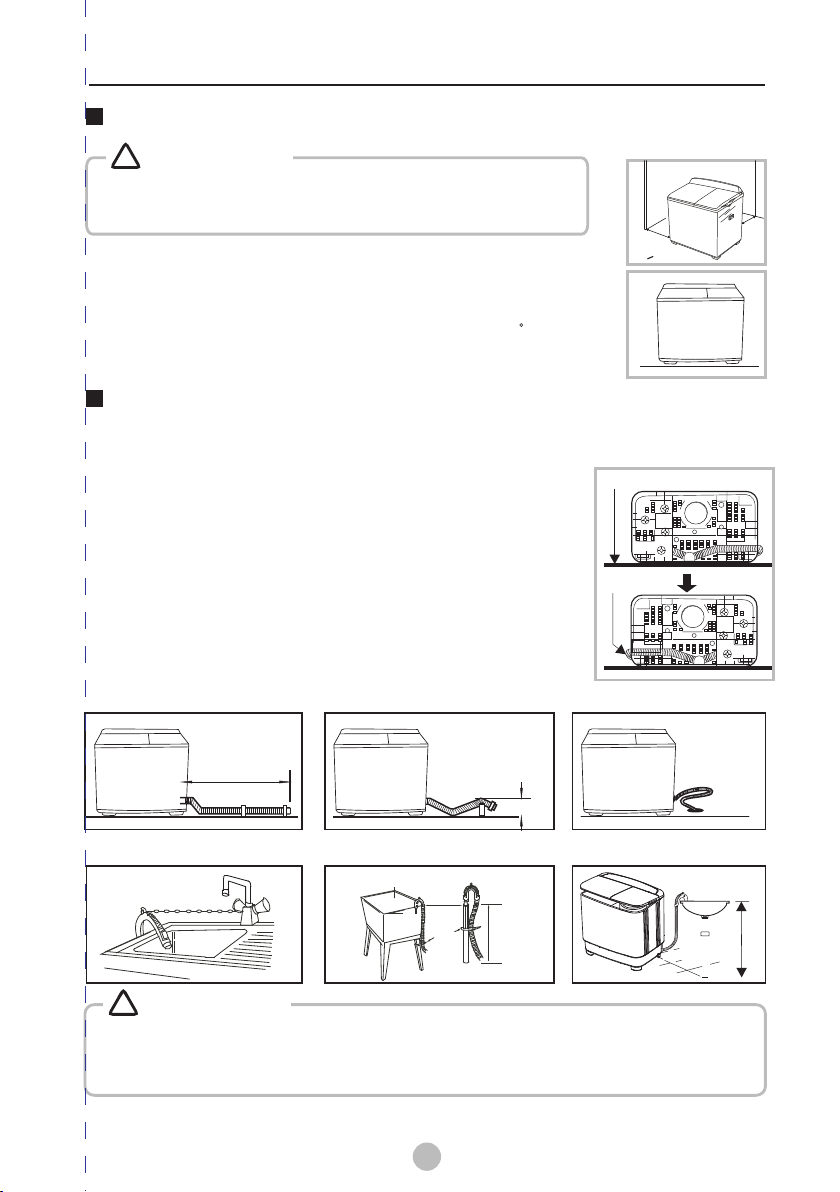
Change the position of the drain hose
The ex-factory installation position of the drain hose is located the spin side .
According to the installation site, the drain hose can also be at the wash
side of the machine . The method is as follows:
.
1 Unplug the power cord and empty water in the drain hose
completely.
.
2 Spread a piece of soft cloth on the floor (e.g. a blanket)
and place the washing machine on it gently.
3.
Take the drain hose out from the buckle at the spin side,
and
put it into the buckle at the wash side.
4.
Hang up the drain hose kit.
There are two ways to place the end of drain hose:
1.For lower drain system
installed
W> 2 0m m
at
Blanket
Drain hose
w
Front
w
Under3m
Under 15cm
wate r trough
2.For upper drain system
Trough
Hos e
Ret ainer
d
n
i
B
!
!
Warning!
Warning!
Do not kink or protract the drain hose.
•
• Position drain hose properly ,otherwise damage might result of water leakage.
• If drain hose is too long, do not force it into machine as it will cause abnormal noises.
5
Max.100cm
m
c
100
.
x
a
M
Page 7

OPERATIONS
Control panel
D
.
HeavyHeavyHeavyHeavy
Wash-Drain SelectorWash-Drain SelectorWash-Drain SelectorWash-Drain Selector
rai
n s
NormalNormalNormalNormal
el
DrainDrainDrainDrain
ector
Spin timer
Washing
Spinning
Was
h in
l
e
t s
el
e
ct
o
r
Water inlet selector
5
35
Soak
10
15
Wash timer
Note!
Note!
• The product line chart is for reference only, please refer to real product as standard.
• The product line chart is for reference only, please refer to real product as standard.
Wash timer: be used to select required washing time.
●
Spin timer: be used to select required spinning time.
●
● Wash-Drain selector: For washing or rinsing, select “ Normal”or“ Heavy”. For
draining ,select “Drain”
● Water inlet: be used to inject water.
Preparation before washing
!
Warning!
•
The maximum gradient of the supporting surface for the washing machine should not exceed 2º.
•Do not tear down electrical wires and components in the machine by yourself.
•There are holes on the base for ventilation. These holes should not be blocked by
foreign objects (carpets, etc.).
•Never connect the grounding wire with the live wire, or it may lead to an electric shock.
•Check that there are no objects such as coins, hairpins, mud or sand in the pocket.
•Strings should be knotted in advance to prevent entanglement.
•Clothes can be classified for washing according to the texture, dirty degree and color.
•For small pieces (e.g.,stockings) or fluffy clothes, put them into a nylon net for washing.
Plug in
Washing
Open the door
Add detergent
Put down the drain
Arrived after the water
level, Close the ta p
Normal
Heavy
Drain
Wash-Drain Selector
Choose washi ng
program
6
Open tap
Choose the was hing time
To start was hing clot hes
load and Close door
Normal
Heavy
Drain
Wash-Drain Selector
Drain
Page 8

OPERATIONS
Rinse
Normal
Heavy
Drain
Normal
Heavy
Drain
Wash-Drain Selector
Open tap
Arrived after the water
level, Close the ta p
Choose washi ng
program
Choose the was hing time
To start was hing clot hes
Spin
Shake out the laundry and
put them into the spin tub.
spin cover
Spin tub
Correct
Put the inner spin cover on .
Confirm the inner spin cover is placed
horizontally.
Incorrect
the laundry
Spin cover
Safety cover
Close the safety cover
and the spin cover.
Refer to the following table to select spinning time
Washing
materials
Spin time
Silk
About 50
seconds
Light clothes
About 1
minute
Knitwear
(fiber)
(fiber/blended)
About 1-2
minutes
Underwear
(cotton)
About 2-3
minutes
Slipover
(cotton/linen)
About 3-4
minutes
Toweling coverlet
(cotton)
About 5
minutes
Reference of laundry quantity corresponding to
different capacities
Laundry
Capacity
2.0kg Capa city abou t 4 pcs. abo ut 3 pcs. about 2 pcs. abo ut 1 pcs.
3.0kg Capa city abou t 6 pcs. abo ut 4 pcs. about 3 pcs. abo ut 1 pcs.
3.6kg Capa city abou t 7 pcs. abo ut 5 pcs. about 4 pcs. abo ut 2 pcs.
4.6kg Capa city abou t 9 pcs. abo ut 6 pcs. about 5 pcs. abo ut 2 pcs.
5.0kg Capa city abou t 10 pcs. ab out 7 pcs. about 5 pcs. ab out 3 pcs.
5.5kg Capa city abou t 11 pcs. ab out 8 pcs. about 6 pcs. ab out 3 pcs.
6.0kg Capa city abou t 12 pcs. ab out 9 pcs. about 6 pcs. ab out 3 pcs.
7.0kg Capa city abou t 14 pcs. ab out 10 pcs. about 7 pcs. a bout 4 pcs.
7.5kg Capa city abou t 15 pcs. ab out 11 pcs. about 8 pcs. a bout 4 pcs.
8.0kg Capa city abou t 16 pcs. ab out 11 pcs. about 8 pcs. a bout 4 pcs.
8.5kg Capa city abou t 17 pcs. ab out 12 pcs. about 9 pcs. a bout 5 pcs.
10.0kg Cap acity abo ut 20 pcs. a bout 15 pcs. about 10 pcs. about 6 pc s.
12.0kg Cap acity abo ut 24 pcs. a bout 18 pcs. about 13 pcs. about 7 pc s.
.... .. .... .. .... .. .... .. .... ..
Shirt
about 500 g
Uniform
about 650 g
Jeans
about 900 g
Jacket
about 1600 g
Wash-Drain Selector
Drain
7
Page 9

OPERATIONS
Laundry volume and detergent dosage reference
Fabric ty pe
Synthetics, s ilk,
Delicate fabric s
Cotton or linen
Heavy soils
Laundry
capacity( kg)
0-3.0
3.0-4.5
0-4.5
4.5-7.0
0-4.5
4.5-7.0
Water
level
Low
Mid
Mid
High
Mid
High
Water flow
Normal
Normal
Heavy
Wash time
(minu tes)
3
3-5
7
7-10
10
10-35(soak 20)
Detergent
amount( g)
About 36
About 46
About 46
About 55
About 46
About 55
8
Page 10

OPERATIONS
Special functions
For machines having the function only
Soak function
For seriously stained clothes, soak wash is useful to achieve better wash result.
15-35 minutes of the wash timer is for soak wash:(illustrate as follows)
35
abo ut 5 abo ut 5 abo ut 5
abo ut 1.5 abou t 1.5 abo ut 2
Total: 3 5 (mins)
Work time
Buzzer function
Function of the buzzer is to alarm finish of washing, and it is helpful to control
wash process. Buzzer will alarm the completion of washing.
15
Sta ti c ti me
(un it: )min s
Wash timer
Soak
35
5
10
15
9
Page 11

MAINTENANCES
Cleaning and care
!
Warning!
• Before your maintenance starts, please unplug the machine and close the tap.
Cleaning the cabinet
Proper maintenance on the washing machine can extend its
working life. The surface can be cleaned with diluted
non-abrasive neutral detergents when necessary. If there is
any water overflow, use the wet cloth to wipe it off immediately.
No sharp items are allowed.
Note!
Formic acid and its diluted solvents or equivalent are forbidden, such as
•
solvents or chemical products,etc.
alcohol,
Cleaning theinlet filter
Note!
• Inlet filter must be cleaned if there is less water.
Lint filter clean
Press the button head, and pull the lint filter out.
1.
Turn the filter net inside out, and rinse it in water.
2.
After inserting the claw, press the button to insert it into place.
3.
A sound of “ba” means proper installation.
4.
Button head
Claw
Anti-freezing protection
To prevent from freezing:
Turn off the water tap, remove the water inlet hose and empty water in the
1. water
inlet
hose completely.
2.
Lay the drain hose and turn the drain selector knob to the “Drain”position to empty
the water in the tub.
If the water is frozen, please take the following steps:
1
.Put the water inlet hose into warm water of about 50℃.
2
.Keep about 2 liters of warm water below 50℃ in the wash
tub for about 10 minutes and then lay the drain hose and
turn the wash drain selector knob to the “Drain”position
to empty the water .
10
Page 12

MAINTENANCES
3. Fit the water inlet hose and turn on the water tap to
confirm water filling and draining work properly.
Operation when objects are dropped into the
outside of the spin tub
1.Remove all screws on the frame with a screw driver and
loosen the connector of the brake belt .
Frame
Cabinet
2.Pull up the frame with both hands and turn it backwards.
3.Take out the clothes dropped into the outside of the spin tub.
4.Fasten the connector of the brake belt ,Press the frame to
reset and tighten screws.
Trouble shooting
If the following symptoms occur, please disconnect the power plug and
perform the following checks:
Symptom
The washing
machine does
not work.
The drain hose
does not work.
There is abnormal
noise during washing.
There is abnormal
noise and violent
vibration durin g
spinning.
Check that the powe r supply is i n good cond ition.
●
Check that the powe r plug is ins erted pro perly.
●
● Check that the wash timer k nob or the spin timer knob is not
in the "0" position .
●
Check that the drai n hose is not l aid too hig h.
●
Check that the drai n hose is not f rozen.
●
Check that the drai n hose is not b locked b y foreign m atter.
Check that there ar e no coins or a ny other fo reign obj ects
●
dropped into the wash tub.
Check that the washing ma chine is placed on flat, stab le floor.
●
Check that clothe s are evenl y distrib uted in the s pin tub.
●
Check that there ar e no was hing materials or foaming d ebris
●
dropped into the ou tside of th e spin tub.
Reason
11
Page 13

MAINTENANCES
Technical specifications
Power Supply
240V~,50Hz
Model
MSW-7118P
Maximum Water Pressure
0.6MPa
Washing Capacity
Wash
7.0 kg 3.6kg
Spin
Rated Power
Wash
320W 125W
Spin
Dimension
W*D*H mm)(
735*430*845
Maximum Time
soak wash:35 m inwas h:15 min
Water volume
H:/M:/L:(L)
H:55 M:46 L:36
Net
Wei ght
18.0kg
Spin:5 min.
Pump Rated
Power
12
 Loading...