

Page 1
ROBOT
INSTRUCTION
Please read this manual carefully before operating, and keep it properly.
Page 2

Contents
Safety Instructions
Precautions
Product Description
Instructions for Use
Maintenance
Troubleshooting
After-sales Service
21
23
25
31
35
38
39
Do not place this product in a place where it drops easily (such as a table
or chair).
The product may not work properly under strong light.
Do not bend the wires excessively or place heavy objects and sharp
objects on the machine.
Safety Instructions
Do not bring the vacuum cleaner close to the heat source, radiation or
burning cigarettes. Do not absorb the following objects:
1. All liquids such as water and solvents;
2. Construction dust and garbage such as lime and cement ash;
3. Heating objects, such as carbon heads and cigarette butts still burning;
4. Sharp fragments, such as glass;
5. Flammable and explosive materials, such as gasoline or alcohol
products.
Only authorized technicians can disassemble the machine.
Children, people with disabilities or lack of common sense and experience
in household appliances mustn’t use this product without the guidance of
dedicated personnel.
This product is only intended for indoor use.
Do not touch the power cord, outlet or power adapter with wet hands.
Please empty the dust bin when it is full before using the product.
The power must be turned off before cleaning or repairing, or the vacuum
cleaner isn’t used temporarily.
Do not immerse the vacuum cleaner in water and avoid exposure to heat
or the sun to avoid fire.
Only use genuine power adapter, or else it may damage the product.
Cut off the power before taking out the battery. Do not disassemble the
battery of the main unit. For replacement, please contact the after-sales
personnel.
Recycle the battery pack before disposing of the product.
Keep the pole or connector away from conductors to avoid short circuit.
Before using the product, remove all fragile items (such as glasses,
lamps, etc.) and items that may wrap around the side brush, suction
channel and drive wheels (such as wires, curtains, etc.) from the floor.
Charging tips:
1. Charging time may be extended in the following cases:
a. When the room temperature exceeds 30°C;
b. Charge immediately after stop running.
2. Regardless of the time of use, please charge after cleaning.
3. When not charging, it is recommended to unplug the power plug in time.
4. If your machine is not used for a long time (over 2 months), please unplug
the power cord; however, in order to ensure the battery life, please fully
charge it every 2 months.
5. In the charging process, the body or power adapter may be hot, which is
normal. Please feel free to use it.
1 2
Page 3
PRECAUTIONS
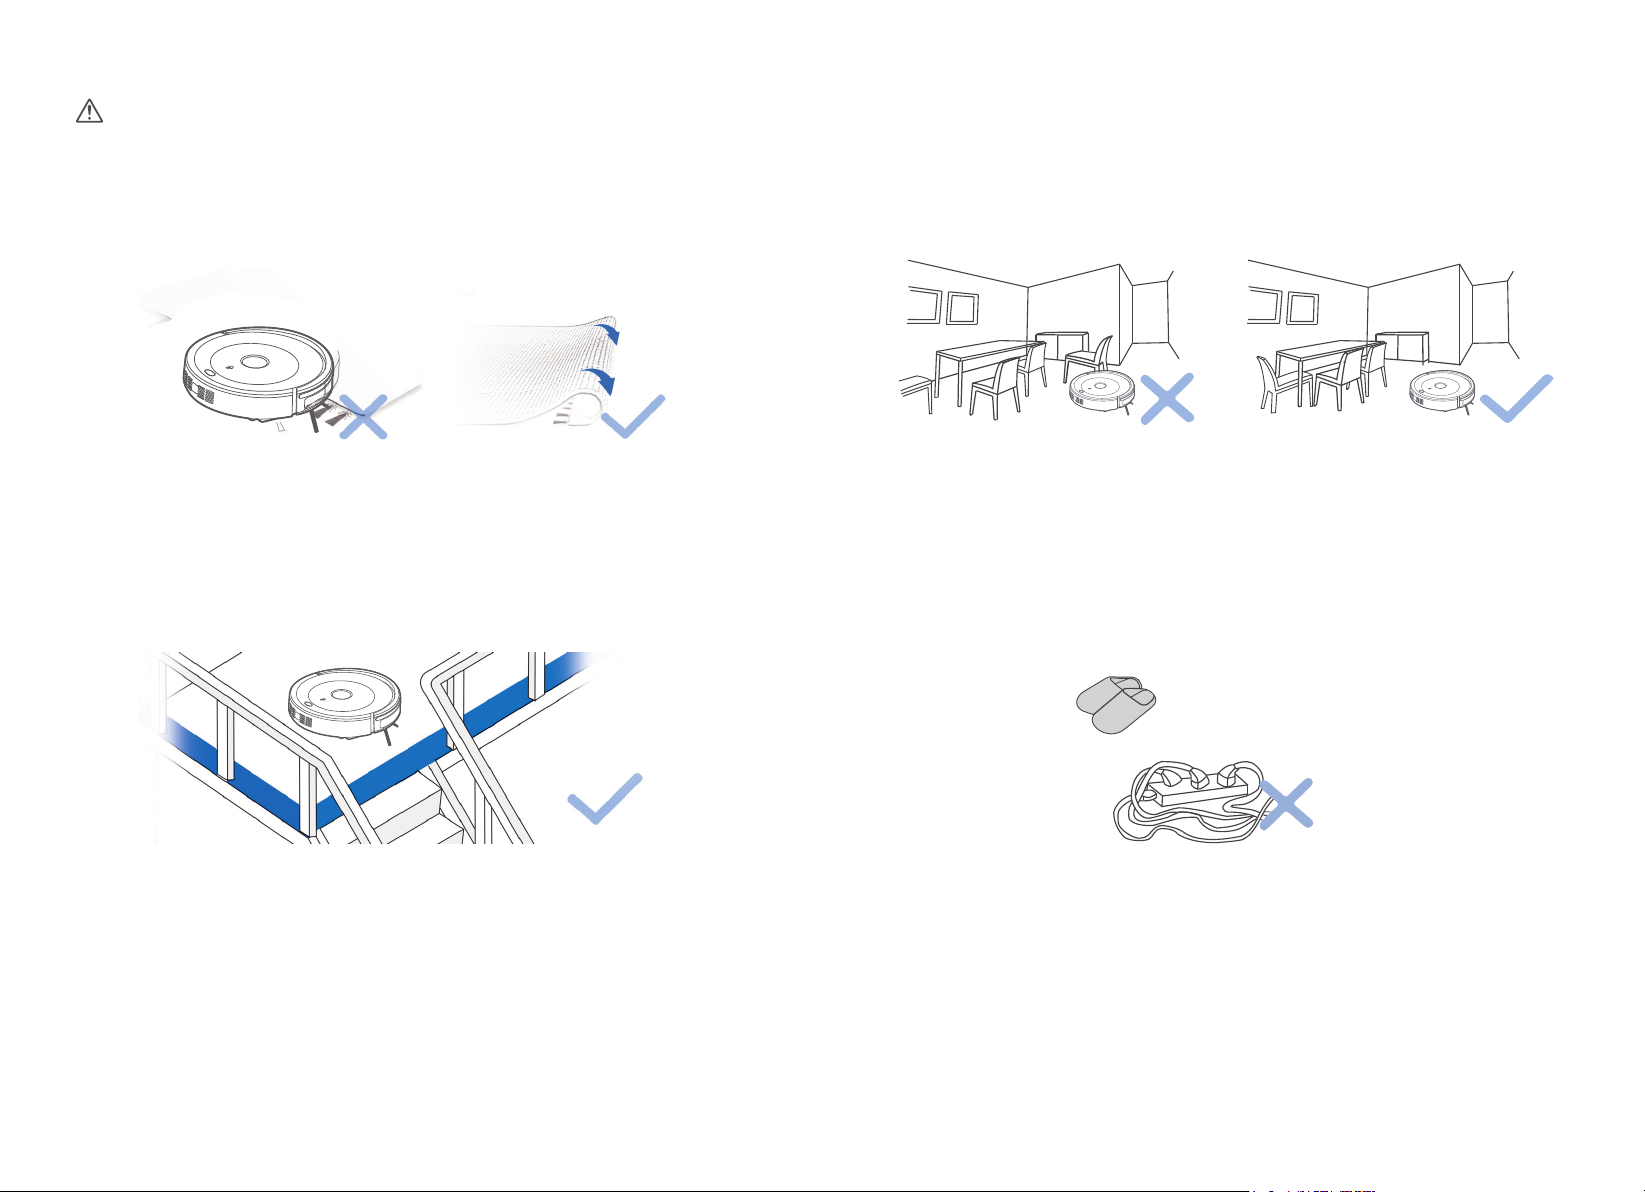
Warning:
1. Do not use the product in wet or watery areas.
Roll up the edges of the carpet or use it on a short-haired carpet.
3. Please arrange the location to be cleaned, and put the furniture and
chairs in the proper position to avoid the machine being trapped.
2. It is recommended to add a protective fence to the suspended area
to prevent the product from falling.
4. Be sure to remove the power cords and other debris scattered on the
ground before use to avoid catching or blocking the product.
3 4
Page 4

Product Description
Charging dock X1
Remote control X1
HEPA
X 1
Cleaning tool X1
Batteries for remote
control X2
MR02 only:
Dry cloth X1 Cloth bracket X1
Instruction manual
Side brush X4 Power adapter X1
package X1
5 6
Page 5

Product Description
Illustration of Main Unit
Bumper
Upper flip cover
Power button
Automatic charging
pole piece
Right brush
Battery cover
Right wheel
Power switch
Dust bin
Primary filter
HEPA bracket
HEPA
PUSH
Dust bin
Charging dock
Steering wheel
Left brush
Vacuum port
Left wheel
Lower cover
IR signal transmitting station
Signal indicator
IR pilot signal transmitting window
Top case
Power socket
Charging pins
Upper flip cover
Dust bin
Power socket
7 8
Page 6

Product Description
Description of Remote Control Panel
On/Off
Direction Control button
Return to Charge Mode
Button
1 You can use the remote control like the remote control of the TV. Turn on the switch on the
bottom of the machine and press the “ ” button to control the machine with the buttons on
the remote control. (The machine enters sleep state if there is no operation in one minute;
you can press “ ” to wake it up. If there is no operation in 15 minutes, the machine power
turns off, and you need to press the “ ” button on the machine to turn it on)
2 : When the machine is in standby state, press to make it enter cleaning mode. Press
the direction buttons to control the direction in which the machine travels
3 : When the machine is in standby or cleaning state, press to make it enter return mode
and look for the charging dock.
4 : When the machine is in standby state, press to make it enter the cleaning state directly.
When the machine is in cleaning state, you can press to switch the cleaning mode. For
details, see P33-P34.
Mode Settings button
Strong button
Note
Install two AAA batteries before use. In the vicinity of the charging dock, the machine may not be able to
recognize the commands from the remote control. If you do not use the remote control for a long time,
remove the batteries.
Buttons and Indicators
Description of “ ” button and indicators
1 Turn on the power switch at the bottom of the machine. If the machine is on the ground and
working normally, the indicator will flash slowly in blue.
2 “ ” clean button, the buzzer beeps, and the indicator first flashes quickly in blue; if the
machine runs normally, the indicator stays blue, or else the machine resumes standby and
the indicator restores the original state;
3 In case of failure during operation, the indicator reacts according to different faults. See
5 : Press on the remote control to enter strong cleaning mode. (Strong cleaning mode is
to increase the suction power in spot cleaning mode.)
Troubleshooting on P38 below;
4 When the battery is low, the indicator flashes quickly in red;
5 In charging state (when the machine is placed on the charging dock or connected with the
adapter), the indicator flashes slowly in red; when fully charged, the buzzer beeps 5 times,
the red indicator goes out, and the blue indicator turns on.
9 10
Page 7

Instructions for Use
Battery Charging
Turn on the power switch at the bottom of the machine. If the machine is on the ground
1
and working normally, the indicator will flash slowly in blue;
1 M
Note
A. Make sure that the power switch is on before charging, or else the red indicator will flash rapidly,
accompanied by the buzzer sound;
B. When the machine is charging, the “ ” clean button changes to slowly changing red color;
C. After charging, the buzzer will beep 5 times (each charging time does not exceed 5 hours);
D. When the machine is used for the first time, please run out the electricity of the machine;
E. After the power is used up, please recharge the machine as soon as possible;
F. If you do not use the machine for a long time, turn off the power switch.
1 M
Turn on the power switch at the bottom of the machine, press the “ ” button, the
2
2 M
indicator flashes slowly in blue, and the machine enters standby mode.
You can charge the machine in either method below:
3
A. Plug the power adapter directly into the machine and turn on the power at the other
end.
B. Plug the power adapter to the charging dock and turn on the power, point the remote
control at the machine and press the “ ”, and the machine will recharge automatically.
A
B
Auto charging: When the cleaning is completed or the battery is too low, the machine will
4
automatically find the charging dock to charge.
Note
1. Please keep the charger base powered. Otherwise, the machine can’t find the charging dock for
charging. This product complies with the European ERP energy consumption standard.
2. High-speed flow sound of the airflow is normal when the machine is running.
Product Operation
1 When cleaning without using a dry cloth, place the machine on the ground, turn on the
power switch at the bottom of the machine, press the “ ” button or press the On/Off button
on the remote control to start the machine; press the “ ” button or the On/Off button again
to pause the machine; when cleaning with a dry cloth, first turn on the power switch at the
bottom of the machine, put the rag bracket (including rag) on the base of the machine, put
the machine on the ground, turn on the power switch at the bottom of the machine, press the
“ ” button or press the On/Off button on the remote control to start the machine; press the
“ ” button or the On/Off button again to pause the machine. (Dry cloth cleaning is only
available for MR02)
11 12
Page 8

Press and hold the On/Off button on the remote control or the “ ” button on the
2
machine for 3 seconds to put the machine into sleep mode. Press and hold the “ ”
button to wake up the machine. The remote control can be activated by pressing the
On/Off button on the remote control in the first 15 minutes when the machine enters
sleep state.
Note
1. Use dry mopping method with the rag; (MR02 only)
2. Make sure that the dust bin has been installed before cleaning.
3. If there is no operation within 1 minute, the machine will automatically enter the sleep state. After 15
minutes, the machine automatically turns off to prevent the battery from being over-discharged and
damaging the battery life. If you do not use the machine for a long time, turn off the power switch.
Cleaning Mode Operation
Auto cleaning Spot cleaning
Random cleaning
Press on the remote control to switch to random cleaning mode.
Edge cleaning
Press on the remote control to switch to Edge cleaning mode, and the machine
will clean the edges of the obstacle with its brush.
In auto cleaning mode, the machine auto
cleans the room and adjusts the cleaning
mode according to the environments. You
can press the “ ” button on the main unit
or the remote control to enter the auto
cleaning mode.
Press on the remote control to switch
to spot cleaning mode.
Zigzag cleaning
Zigzag cleaning is mainly used for quick and efficient cleaning in large areas without
furniture.
13 14
Page 9

Maintenance
Dust Bin and Filter Cleaning
Please empty the dust bin after each use; the specific steps are as follows:
Press the “ ” mark on the middle cover to open it
1
Press
6. Rinse the dust bin and primary
filter with water and clean the
7. Reinstall the primary filter and
HEPA back into the dust bin
HEPA with cleaning tool
Tip:
A. Check whether the side brush is damaged or whether there is any foreign matter on it.
B. Clean the side brush with the cleaning tool or rag.
C. Replace the side brush in time if it is damaged and can’t be used:
1. Pull out the old side brush directly;
2. Press the new side brush on the bottom of the machine.
Take out the dust bin
2
Take out the HEPA
3
NOTE
1. It is recommended to wash the filters after using for 15-20 days. The maximum life of the HEPA is 24
months.
2. Make sure that the filters are dry before installation.
3. HEPA and primary filter are all replaceable accessories. For accessories, please contact Midea
after-sales service: RoboticVC@midea.com.
4. Do not expose the filters to sunlight.
Open the dust cover and remove the
4
Pour out the garbage in the dust bin
5
primary filter
15 16
Page 10

Cleaning Machine
1
Cleaning sensor and wheels: Gently wipe the sensor and the wheels with the
cleaning tool or soft cloth, as indicated on the right.
Troubleshooting
Please refer to the table below if the product has any problem during use.
Problem
Possible cause
Solution
Clean the charging terminals: Clean the charging terminals on the charging dock with the
2
cleaning tool or soft cloth, as indicated below.
3
Clean the suction channel: Clean the suction channel with the cleaning tool or soft cloth,
as indicated on the right.
During work, the machine
stops suddenly and the
blue LED stays on
Place the machine on the
ground, turn on the power
switch, press the “ ”
button, the blue LED stays
on (the machine is not
connected to the charging
dock or adapter)
The machine doesn’t
change direction when it
hits an obstacle
When charging, the red
LED flashes quickly,
accompanied by a buzzer
sound
Red LED flashes quickly
Blue LED flashes once,
red LED flashes once
Blue LED flashes once,
red LED flashes two times
Blue LED flashes once,
red LED flashes three
times
The main unit is suspended (cliff
sensor detects continuous falling
hazard or any wheel is floating).
Cliff sensor failure or wheel
suspension switch failure
Bumper sensor error
The machine’s power switch is not
turned on.
The battery voltage is too low
The side brush of the main unit is
wrapped or jammed
The main unit bumper is not flexible
Main wheel set is blocked
Re-position the main unit back to the
ground and restart it.
Clean the cliff sensor, if it still doesn’t
restore, send it to the After-sales Service
Center
Check the sensitivity of the bumper, and
whether there is a foreign object
Turn on the power switch
Charge the machine
Move the machine to flat ground and
remove the wrap
Loosen the bottom screws of the bumper
Clear the blockage
17 18
Page 11

After-sales Service
Midea Smart Vacuum Cleaner provides users with the most perfect
after-sales service. In the case of normal use of the product, you are
entitled to free return and replacement service for the machine within
one year from the date of purchase. The service must meet the
following conditions:
1. This product is only for household use. Please operate according to the
instructions strictly. We are not responsible any failure caused by violation to the
instructions and household purpose.
2. Consumables (side brushes, adapter, filters, batteries, cleaning brush, mop cloth,
etc.) are not covered by one-year free service. To purchase consumables, please
contact Midea After-sales Service: Email: RoboticVC@midea.com
3. Any failure caused by violation to the instructions or disassembly by unqualified
personnel is not covered by the warranty.
4. For maintenance beyond the warranty and purchase of spare parts, please
contact Midea After-sales Service: RoboticVC@midea.com
5. When contacting After-sales Service, please fill in the warranty information, take
a photo and attach to the email so that you can get a reply as soon as possible.
If the product fails to meet your expectations, please contact Midea After-sales
Service:
Email: RoboticVC@midea.com
Jiangsu Midea Cleaning Appliances Co., Ltd.
No. 39, Caohu Avenue, Xiangcheng Economic Development Zone, Suzhou,
Jiangsu, China, 215131
19
 Loading...