

Page 1
User Manual
Electric Pressure Cooker
MPC176-SS
(Pictures in the text are for reference only,
please refer to the actual product)
Thank you for purchasing Midea electric pressure cooker.
Please read the User Manual carefully before use and keep it in
a convenient place for future reference.
Page 2

1
Important Safeguards........................................................................................2
Specifications ....................................................................................................4
Product Structure ..............................................................................................4
Controls and State of the Cooker......................................................................5
Control Panel.................................................................................................5
State of the Cooker........................................................................................5
Operation Keys..............................................................................................5
Function Keys................................................................................................6
Before the First Use ..........................................................................................6
Remove and Install the Anti-Block Shield......................................................6
Remove and Install the Sealing Ring ............................................................6
Safe Lid Opening...........................................................................................7
Cooking Preparation..........................................................................................7
Cooking with Your Cooker.................................................................................8
Pressure Cooking..........................................................................................8
Preset Cooking..............................................................................................10
Browning/Sauté .............................................................................................11
Making Parfait................................................................................................11
Slow Cook .....................................................................................................12
Warming ........................................................................................................12
Care and Maintenance ......................................................................................12
Cleaning ........................................................................................................13
Electrical Circuit Diagram ..................................................................................13
Troubleshooting.................................................................................................14
TABLE OF CONTENTS
Page 3

2
When using electrical appliances, basic safety precautions should always be
followed including the following, please read all instructions.
1. This product is for household use only. Do not use outdoors.
2. Do not use pressure cooker for other than intended use.
3. Do not place the unit on or near a hot gas or electric burner, or in a heated oven.
4. Do not use it in a place which is near splash water or fire. Do not use it in a place
exposed to directly to sunshine or oil splash. Put it in a place out of the reach of
children.
5. Do not place the unit on an unstable location. It is strictly prohibited to use it on a
newspaper, foam or other object that may easily block the vent hole at the
bottom.
6. Close supervision is necessary when the pressure cooker is used by or near
children. The adult should supervise the children in order to make sure the
children cannot play with the appliance.
7. This appliance is not intended for use by persons (including children) with
reduced physical, sensory or mental capabilities, or lack of experience and
knowledge, unless they are accompanied by a person responsible for their
safety.
8. To protect against electrical shock, do not immerse cord, plugs, or appliance in
water or other liquid.
9. Be sure that handles are assembled and fastened properly before each use.
Cracked, broken or charred handles should be replaced.
10. Do not operate any appliance with a damaged cord or plug or after the appliance
malfunctions or has been damaged in any manner. Return appliance to the
Service Center for examination, repair, or adjustment.
11. Do not make unauthorized replacement of any spare part inside the pressure
cooker, as this may cause electric shock, fire or injury.
12. The use of accessory attachment not recommended by the appliance
manufacturer may cause injuries.
13. Do not let cord hang over edge of table or counter, or touch hot surfaces.
14. Caution: to reduce the risk of electric shock, cook only in the provided removable
container (cooking pot).
15. Before use each time, be sure to check the anti-block shield, float valve and
exhaust valve for obstruction, wipe the surface of the inner pot and the heating
plate to confirm they are free of any foreign object, make sure the exhaust valve
IMPORTANT SAFEGUARDS
Page 4

3
is in sealing location.
16. Always check the pressure release devices for clogging before use. Do not cover
the pressure valves.
17. Please soak the dry foods before cooking them in the product.
18. Be aware that certain food, such as applesauce, cranberries, pearl barley,
oatmeal or other cereals, split peas, noodles, macaroni, rhubarb, or spaghetti
can foam, froth, and sputter, and clog the pressure release device. These foods
should only be cooked in a pressure cooker with caution with the inner pot never
more than 1/2 full and using natural release.
19. Do not fill the unit over MAX level (2/3 full). When cooking foods that expand
during cooking such as rice or dried vegetables, do not fill the unit over 1/2 full.
Over filling may cause a risk of clogging the vent pipe and developing excess
pressure. Please see "Cooking Preparation".
20. This appliance cooks under pressure. Improper use may result in scalding injury.
Make certain unit is properly closed before operating. Please see "Cooking
Preparation".
21. Never deep fry or pressure fry in the unit with oil. It is dangerous and may cause
a fire or serious damage.
22. Do not move this product or force to remove the lid when the unit is in operation.
23. Extreme caution must be used when moving the unit containing hot oil or other
hot liquids.
24. Do not touch hot surfaces. Use handles or knobs. Do not place your hands or
face over the exhaust valve or float valve to avoid scald when the unit is in
operation.
25. After cooking, use extreme caution when removing the lid. Serious burns can
result from stream inside the unit.
26. When opening the lid after cooking, do not touch the inner pot and cover inside
with hands directly to avoid scald.
27. Do not open the pressure cooker until the unit has cooled and all internal
pressure has been released. If the handles are difficult to push apart, this
indicates that the cooker is still pressurized-do not force it open. Any pressure in
the cooker can be hazardous. Please see “Cooking Preparation”.
28. To disconnect, turn any control to "off" then remove plug from wall outlet.
29. Always unplug from outlet when not in use, before removing parts and cleaning.
Allow to cool before putting on or taking off parts, and before cleaning.
IMPORTANT SAFEGUARDS
Page 5

4
1) Intended for countertop use only.
2) WARNING: Spilled food can cause serious burns. Keep appliance and cord
away from children. Never drape cord over edge of counter, never use outlet
below counter, and never use with an extension cord.
A short power-supply cord is used to reduce the risk resulting from it being grab
bed by children, becoming entangled in, or tripping over a longer cord
30. This appliance has a polarized plug (one blade is wider than the other). To
reduce the risk of electric shock, this plug is intended to fit into a polarized outlet
only one way. If the plug does not fit fully into the outlet, reverse the plug. If it still
does not fit, contact a qualified electrician. Do not attempt to modify the plug in
any way.
PLEASE SAVE THESE INSTRUCTIONS
IMPORTANT SAFEGUARDS
Page 6
5
120V~60HZ
22cm
70kPa
1000W
6L
60°C~80°C
Max
CUP
SPECIFICATIONS
Voltage/Frequency
Inner Pot Caliber
Working Pressure
Power
Inner Pot Volume
Warm Temperature
Rice paddle, soup spoon, measuring cup, user manual.
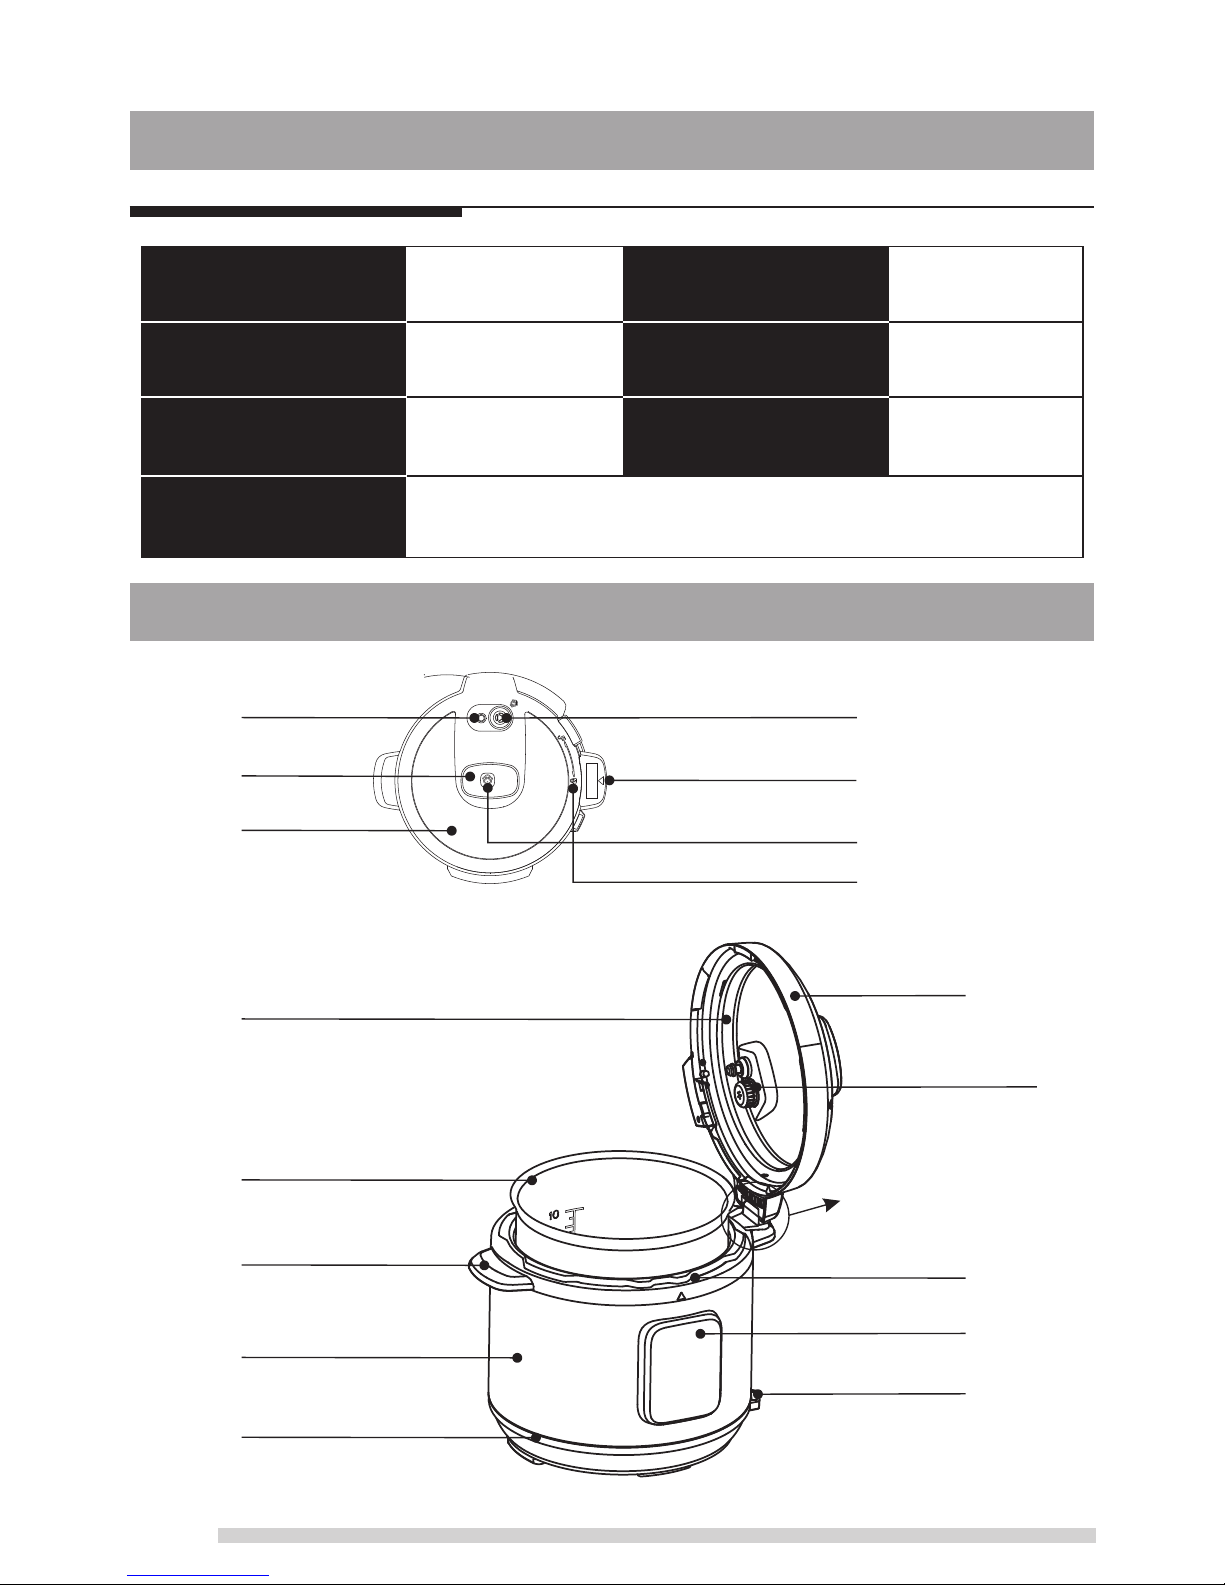
Exhaust valve
Lid position mark
Steam release key
Lid open/close mark
Accessories
PRODUCT STRUCTURE
Float valve
Lid handle
Lid
Sealing ring
Inner pot
Cooker handle
Cooker housing
Base & Heating unit
Lid
Anti-block shield
Special lid
location design
Exterior pot
Control panel
Spoon shelf
Page 7
6
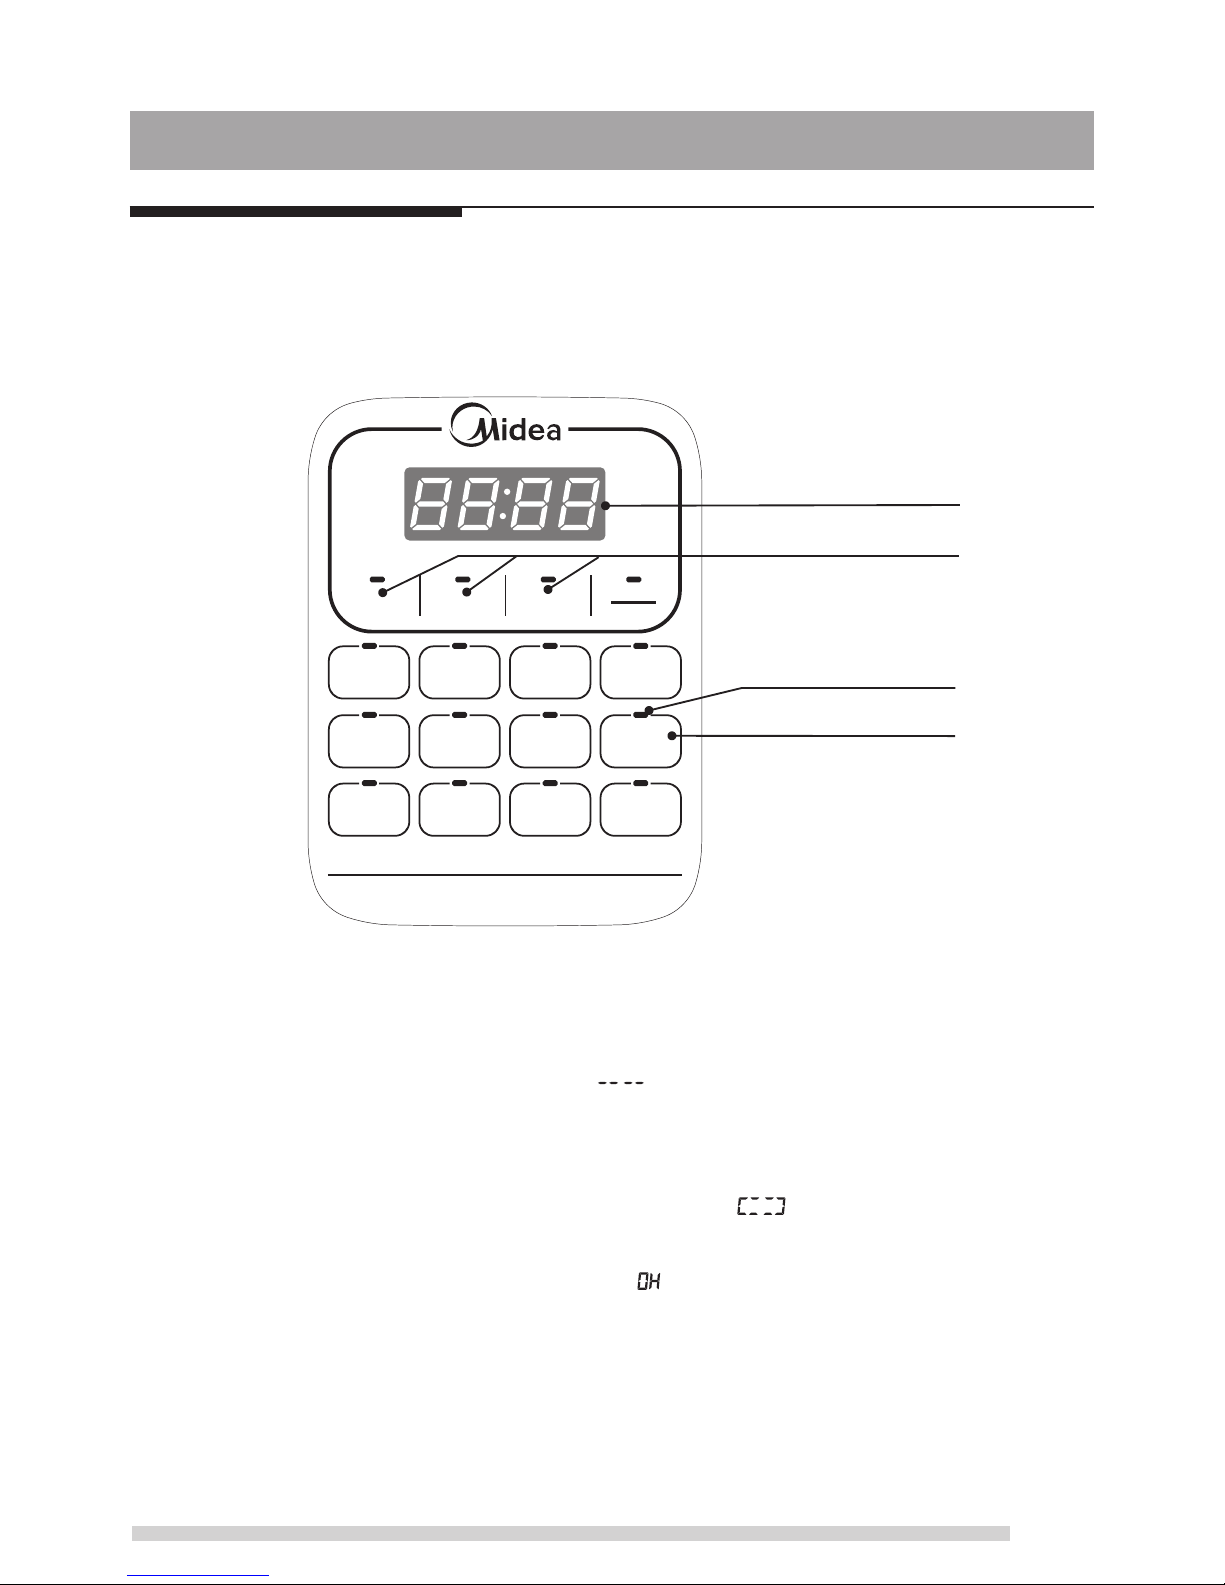
Control Panel
The control panel of your electric pressure cooker consists of an LED display, 3 operation
keys and 11 function keys. Each function key has a function indicator light.
LED display
Operation keys
Function indicators
Function keys
States of the Cooker
Your electric pressure cooker has 4 states which are shown on the LED display and
function indicators.
●
Standby state: the LED display shows “ ”.
●
Preset state: the LED display shows “preset” time and the time counts down, and the
activated function indicator lights up.
●
Program operating state: the LED display shows “ ” and the activated function
indicator lights up.
●
Keep-Warm state: the LED display shows “ ” and the time counts up, and the “Keep
Warm” function indicator lights up.
Operation Keys
There are three function buttons including Timer, Manual and Adjust. Button Timer is for
presetting, button Manual is for adjusting the pressure maintaining time, and button Adjust
is for adjusting the time.
Timer
Start Rice
Slow Cook
Soup/
Stew
Browning/
Sauté
Chicken Meat Fish
Pasta Steam Parfait
Chili/
Beans
Manual Adjust
Keep Warm
Cancel
CONTROLS AND STATES OF THE COOKER
Page 8
7
Function Keys
The most important key is “Keep Warm/Cancel”. When the cooker is being programmed or
any program is in effect, press this key will cancel the program and take the cooker to
standby state. When the cooker is in standby state, pressing this key activates the
keep-warm program.
The other function keys include “Rice”, “Soup/Stew”, “Slow Cook”, “Browning/Sauté”,
“Chicken”, “Meat”, “Fish”, “Pasta”, “Steam”, “Parfait”, “Chili/Beans”, “Start” keys.
Before the first use, please take out all accessories from the package and read this manual
carefully. Please pay particular attention to operational instructions and cautions to avoid
any injury or property damage. Please wash the inside of the lid and the inner pot with warm
soapy water, rinse and dry thoroughly. Wipe the outer housing with a clean damp cloth.
Never immerse the cooker housing in water or any other liquid. The inner pot, sealing
ring and exhaust valve and all accessories are dishwasher safe. But never clean the lid and
housing in a dishwasher.
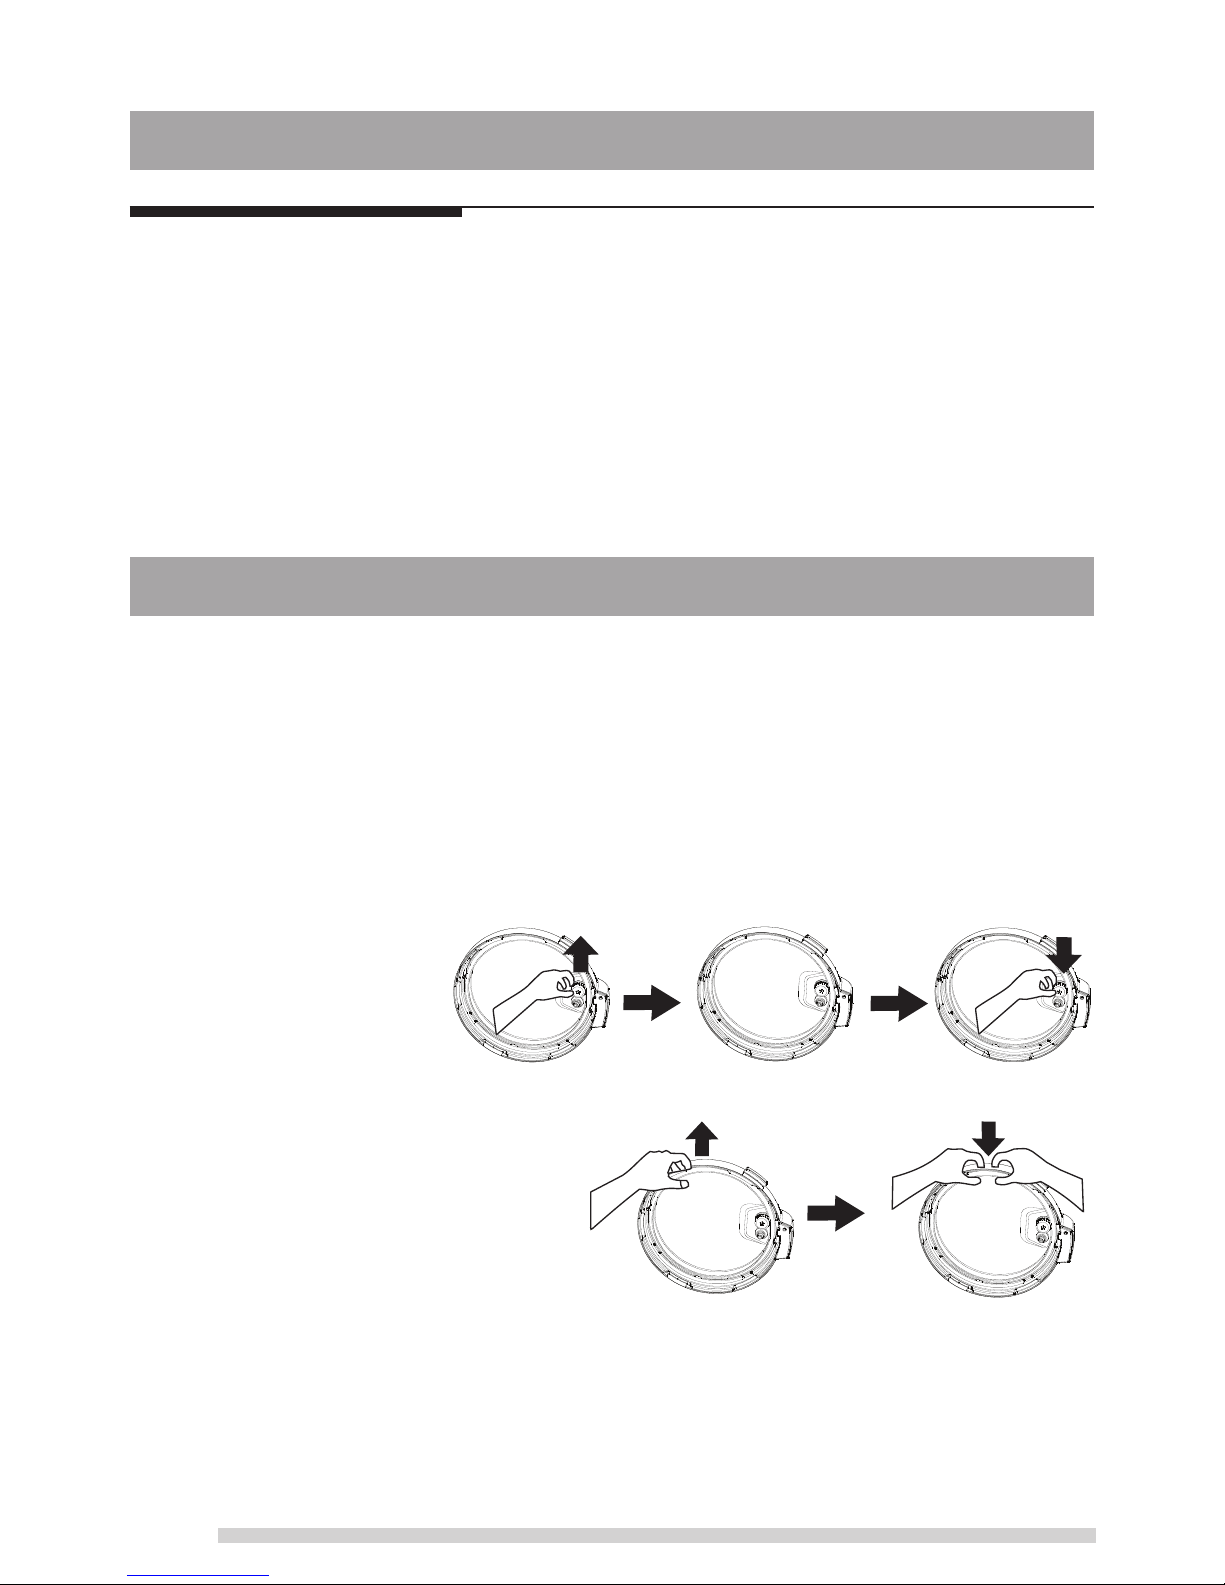
Remove and Install the Anti-Block Shield
The anti-block shield can be
removed by pushing it on the
side to lift it up. To install the
anti-block shield, position it
in place and press it down.
Remove and Install the Sealing Ring
The sealing ring can be removed by
pulling upwards from the sealing ring
rack in sections. To install the sealing
ring, pressing it down into the rack
section by section. The sealing ring can
be installed on either side facing up.
Please note the following:
●
Prior to each use, inspect to make sure the sealing ring is well seated in the sealing ring
rack and the anti-block shield is mounted properly on the steam release pipe.
●
After use, remove any foreign objects from the sealing ring and anti-block shield.
BEFORE THE FIRST USE
CONTROLS AND STATES OF THE COOKER
Page 9

8
●
Keep the sealing ring clean to avoid odor. Washing the sealing ring in warm soapy water
or dishwater can remove odor. However, it is normal for the sealing ring to absorb the
smell of certain acidic foods. That is why it is always a good idea to have more than one
sealing ring on hand.
●
Never pull the sealing ring by force, as the pulling may cause deformation and affect its
function in sealing the pressure.
●
A sealing ring with cracks, cuts or other damages should not be used. A new sealing ring
replacement should be used.
BEFORE THE FIRST USE
Safe Lid Opening
1. Make sure the pressure cooking program has completed or press “Keep Warm/Cancel”
key to terminate the program.
2. Releasing pressure in one of the following approaches.
Quick Release:
●
Press the “Steam Release ” key on the lid handle to let out steam until the float valve
drops down.
Caution:
●
Please keep hands and face away from the hole on the top of the exhaust valve when
using Quick Release. The escaping steam is very hot and can cause scalding.
●
Never pull out the exhaust valve when it is letting out steam.
●
Please be aware that Quick Release is not suitable for food in large liquid volume or with
high starch content (e.g. porridge, congee, sticky liquids, soup, etc.). Food content may
splatter out with steam. Use Nature Release instead.
Nature Release:
●
Allow the cooker to cool down naturally until the float valve drops down. This may take
10 to 15 minutes after cooking is finished and the cooker is in Keep-Warm mode.
●
Putting a wet towel on the lid can speed up cooling.
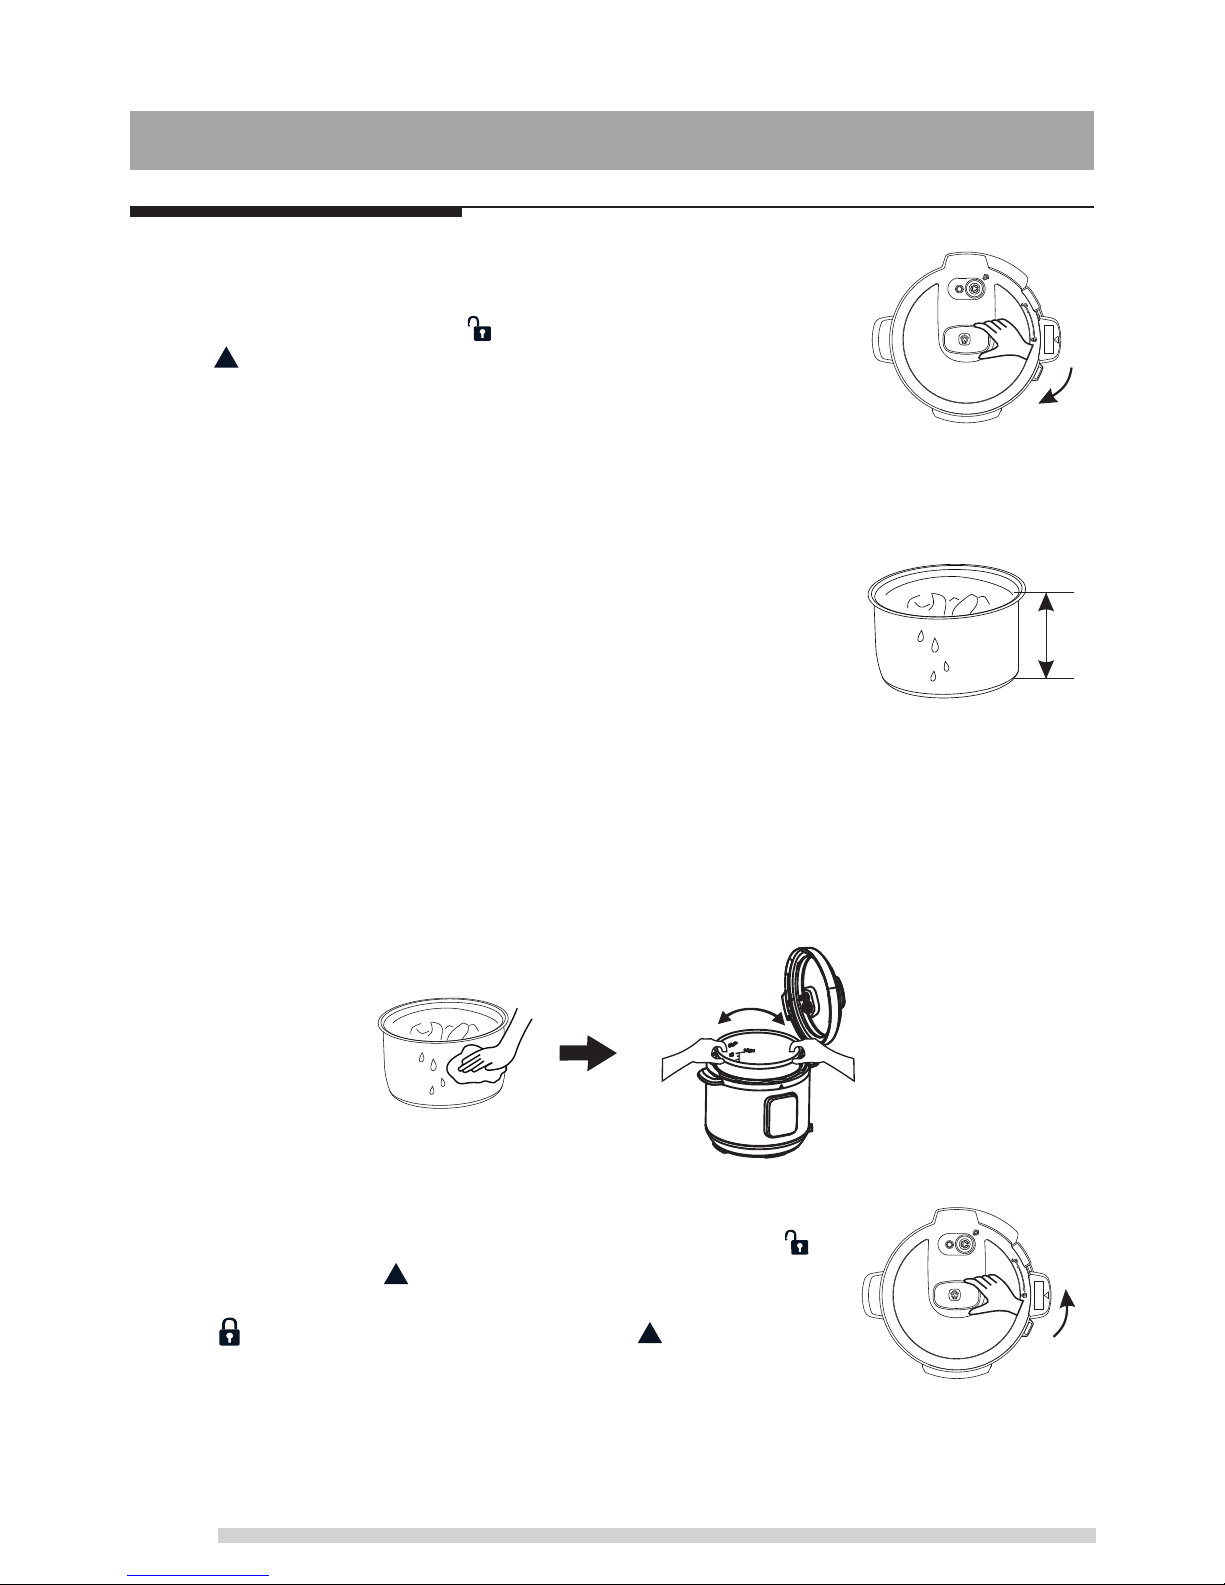
3. Open the lid: Hold the lid handle, turn the lid counterclockwise to the open position, and
lift the lid up to open.
●
Caution: Do not open the lid until pressure inside the pot is completely released. As a
safety feature, until the float valve drops down, the lid is locked and cannot be opened.
●
If the float valve is stuck due to food debris or stickiness, you can push it down with a pen
or chopsticks when you are certain the pressure has been released by pressing the
“Steam Release ” key on the lid handle.
Page 10
9
1. Open the lid
Holding the lid handle with your hand, rotate approximately 30
degrees clockwise until the “ ” mark on the lid is aligned with
the “ ” mark on the cooker housing rim.
2. Check whether all parts on the lid are assembled properly
Check the float valve and exhaust valve for obstructions. Make
sure that the sealing ring is well seated inside its holding rack,
the anti-block shield is installed properly and the float valve
can move up and down easily.
COOKING PREPARATION
Max
3. Take out inner pot, and put in food and liquid
The total amount of food and water should NEVER exceed the
maximum level marking of the inner pot. It is recommended
that you do not fill the unit over 2/3 full. When cooking foods
that expand during cooking such as rice, beans or dried
vegetables, do not fill the unit over 1/2 full. Over filling may risk
clogging the vent pipes and developing excess pressure. This
could also cause spillage and may damage to the unit.
4. Place the inner pot inside the cooker housing
Before that, be sure to remove foreign objects and wipe dry the outside of the inner pot
and the heating element inside of the cooker.
After putting the inner pot inside the housing, rotate the inner pot slightly to ensure
good contact between the inner pot and the heating element.
5. Close the lid completely
Hold the lid handle and put the lid on the cooker, with the “ ”
mark on the lid and “ ” mark on the housing rim are aligned.
Rotate the lid counterclockwise approximately 30 degrees until
the “ ” mark on the lid is aligned with the “ ” mark on the
housing rim.
Page 11
10
Timer
Start Rice
Slow Cook
Soup/
Stew
Browning/
Sauté
Chicken
Meat Fish
Pasta Steam Parfait
Chili/
Beans
Manual Adjust
Keep Warm
Cancel
Pressure Cooking
This following procedure is “Rice”, “Soup/Stew”,
“Chicken”, “Meat”, “Fish”, “Pasta”, “Steam”,
“Chili/Beans” functions.
1. Follow steps in the “Cooking Preparation” section of
this manual.
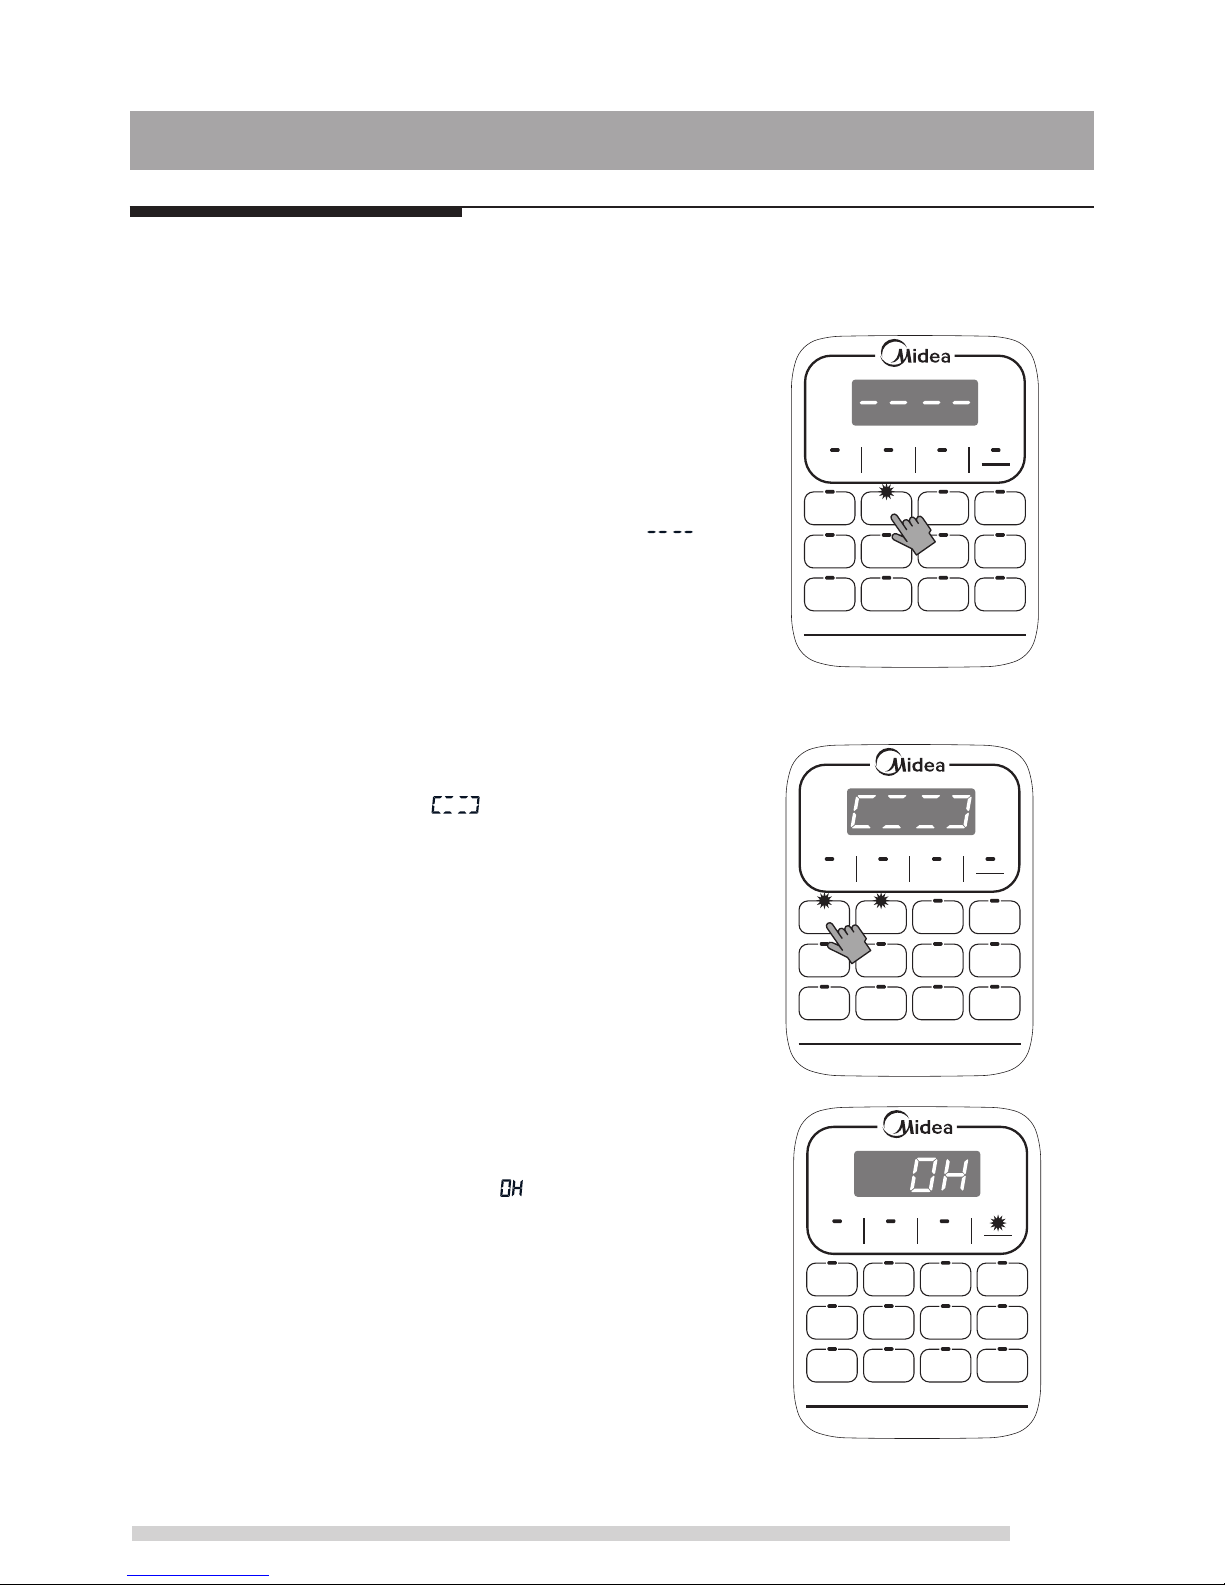
2. Contact power cord. The LED display shows “ ”
indicating that it is in standby state.
3. Select a cooking function button, e. g. Rice. Once a
function button is pressed, its indicator light will
flash, as well as the light of button Start.
COOKING WITH YOUR COOKER
Timer
Start Rice
Slow Cook
Soup/
Stew
Browning/
Sauté
Chicken
Meat Fish
Pasta Steam Parfait
Chili/
Beans
Manual Adjust
Keep Warm
Cancel
Timer
Start Rice
Slow Cook
Soup/
Stew
Browning/
Sauté
Chicken
Meat Fish
Pasta Steam Parfait
Chili/
Beans
Manual Adjust
Keep Warm
Cancel
4. Press Start to turn on the cooking mode Rice.
Button Rice and Start stays lighted.
5. The LED display shows “ ” indicating that the
pre-heating state is in progress.
●
As the pressure increase inside the cooker, it is
perfectly normal for traces of steam to escape from
the float valve until the float valve pops up.
●
At any time, you can cancel the cooking program in
progress and return to standby mode by pressing
the “Keep Warm/Cancel” key.
6. When the cooking program finishes, the cooker
beeps and automatically goes into the “Keep Warm”
cycle, The LED display shows “ ”.
●
It is not recommended to leave cooked rice in “Keep
Warm” state for too long as it may affect the texture
or the taste of the food.
7. To serve the food, press “Keep Warm/Cancel” key to
stop the keep-warm cycle and open the lid
according to the “Safe Lid Opening” section of this
manual.
Page 12

11
●
When opening the lid, the inner pot may appear to
be stuck on the lid by vacuum. This is caused by
contraction of air due to cooling. Please press the
“Steam Release ” key on the lid handle to let in
air to release the vacuum.
Timer
Start Rice
Slow Cook
Soup/
Stew
Browning/
Sauté
Chicken
Meat Fish
Pasta Steam Parfait
Chili/
Beans
Manual Adjust
Keep Warm
Cancel
Preset Cooking
Your pressure cooker has the preset function, can be the end of the cooking time setting
with 24 hours to 2 hours clock between. The preset function does not apply to the “Keep
Warm/Cancel”, “Slow Cook”, “Browning/Sauté” and “Parfait” functions. The following
shows how to program for preset cooking.
1. Follow steps in the previous “Pressure Cooking” section to set a cooking program.
2. Press button Timer to enter the presetting mode. At
this time, the button Timer blinks, then press Adjust to
adjust the presetting time.
3. Finally press button Start to conduct Timer function.
Then the time which is shown on the LED screen will
be counted down and the button Timer lights on.
●
To cancel the Timer operation, press the “Keep
Warm/Cancel” key at any time.
4. Your cooker finishes cooking when the preset time counts down to 0, then the cooker
beeps and automatically goes into the Auto “Keep Warm” cycle for hours. Please Note:
●
We highly discourage using the preset function for perishable foods, such as meat and
fish, which may go bad when left at room temperature for hours. Cooked rice may yield
overly soft texture due to long soaking time. It may also cause a layer of burned rice at
the bottom of the cooker if it is left in Keep-Warm mode for too long.
●
Care should be taken when using Preset function for porridge, oatmeal or other foamy
and sticky foods. Because of the possibility of these foods gumming up the float valve,
if your cooker is overfilled, causing it to never seal and leading to overflowing food
content, it is highly recommended that your cooker not be filled more than 1/2 full and
ideally not be left unattended during the preheat cycle.
COOKING WITH YOUR COOKER
Page 13
12
Timer
Start Rice
Slow Cook
Soup/
Stew
Browning/
Sauté
Chicken
Meat Fish
Pasta Steam Parfait
Chili/
Beans
Manual Adjust
Keep Warm
Cancel
Timer
Start Rice
Slow Cook
Soup/
Stew
Browning
/Sauté
Chicken
Meat Fish
Pasta Steam Parfait
Chili/
Beans
Manual Adjust
Keep Warm
Cancel
Browning/Sauté
1. Follow steps in the “Cooking Preparation” section of
this manual. Keep the lid open to avoid pressure from
building up inside the cooker.
2. Contact power cord. The LED display shows “ ”
indicating that it is in standby state.
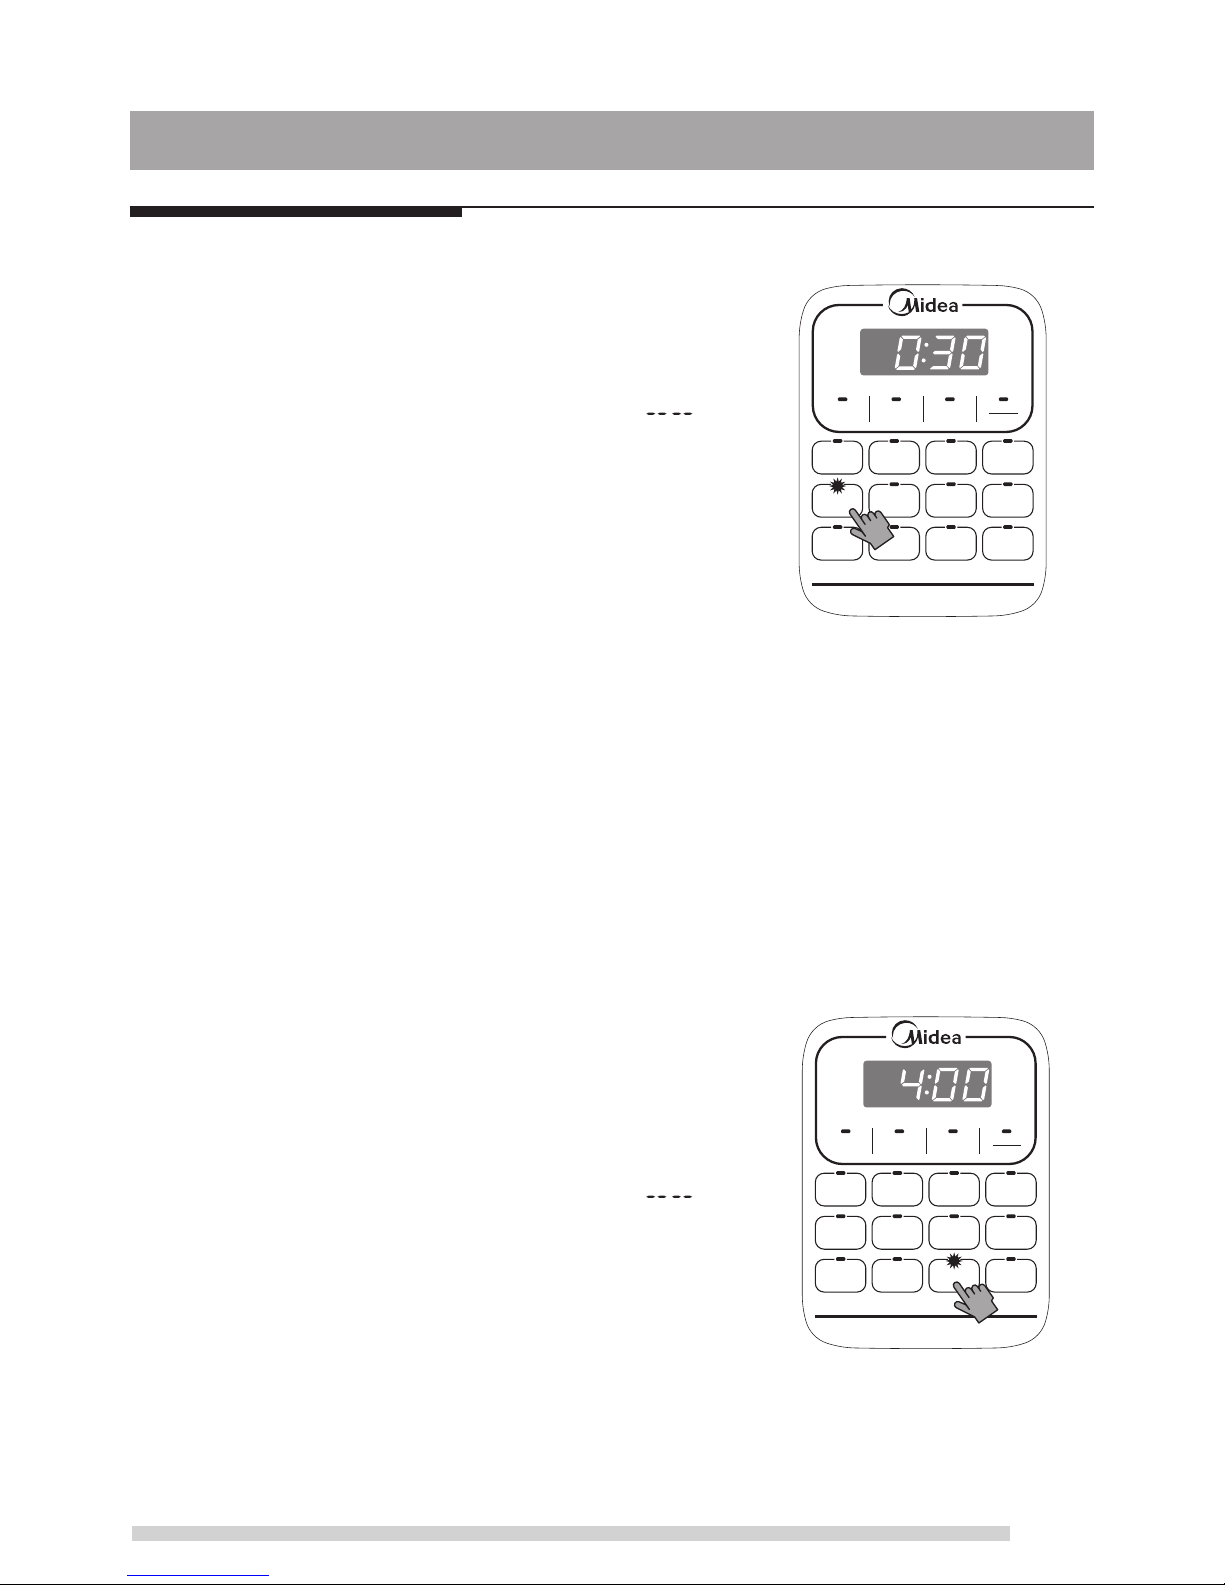
3. Press button Browning/Sauté. For safety reason, the
maximum cooking time for a Browning/Sauté process
is 30 minutes.
4. It will heat up automatically after pressing button Start.
It is heating up as the LED screen shows 0:30.
●
To avoid pressure building up, the lid cannot be closed. Or else this can be hazardous.
●
The “Browning/Sauté” program can be cancelled by pressing the “Keep Warm/Cancel”
key at any time.
5. When cooking finishes, the cooker beeps and automatically goes into standby state.
Parfait
1. Follow steps in the “Cooking Preparation” section of
this manual.
●
The temperature of cooled fresh milk and yogurt are
about 20°C. Stir them in proportion of 10:1, then put
the mixture in the inner pot.
2. Contact power cord. The LED display shows “ ”
indicating that it is in standby state.
3. After pressing button Parfait, the LED screen will show
4:00, then press Start, it will heat up automatically.
Once the time shown on LED screen starts
countdown, the key Parfait and Start lights.
●
The “Parfait” program can be cancelled by pressing the “Keep Warm/Cancel” key at
any time.
4. When cooking finishes, the cooker beeps and automatically goes into standby state.
COOKING WITH YOUR COOKER
Page 14
13
Timer
Start Rice
Slow Cook
Soup/
Stew
Browning/
Sauté
Chicken
Meat Fish
Pasta Steam Parfait
Chili/
Beans
Manual Adjust
Keep Warm
Cancel
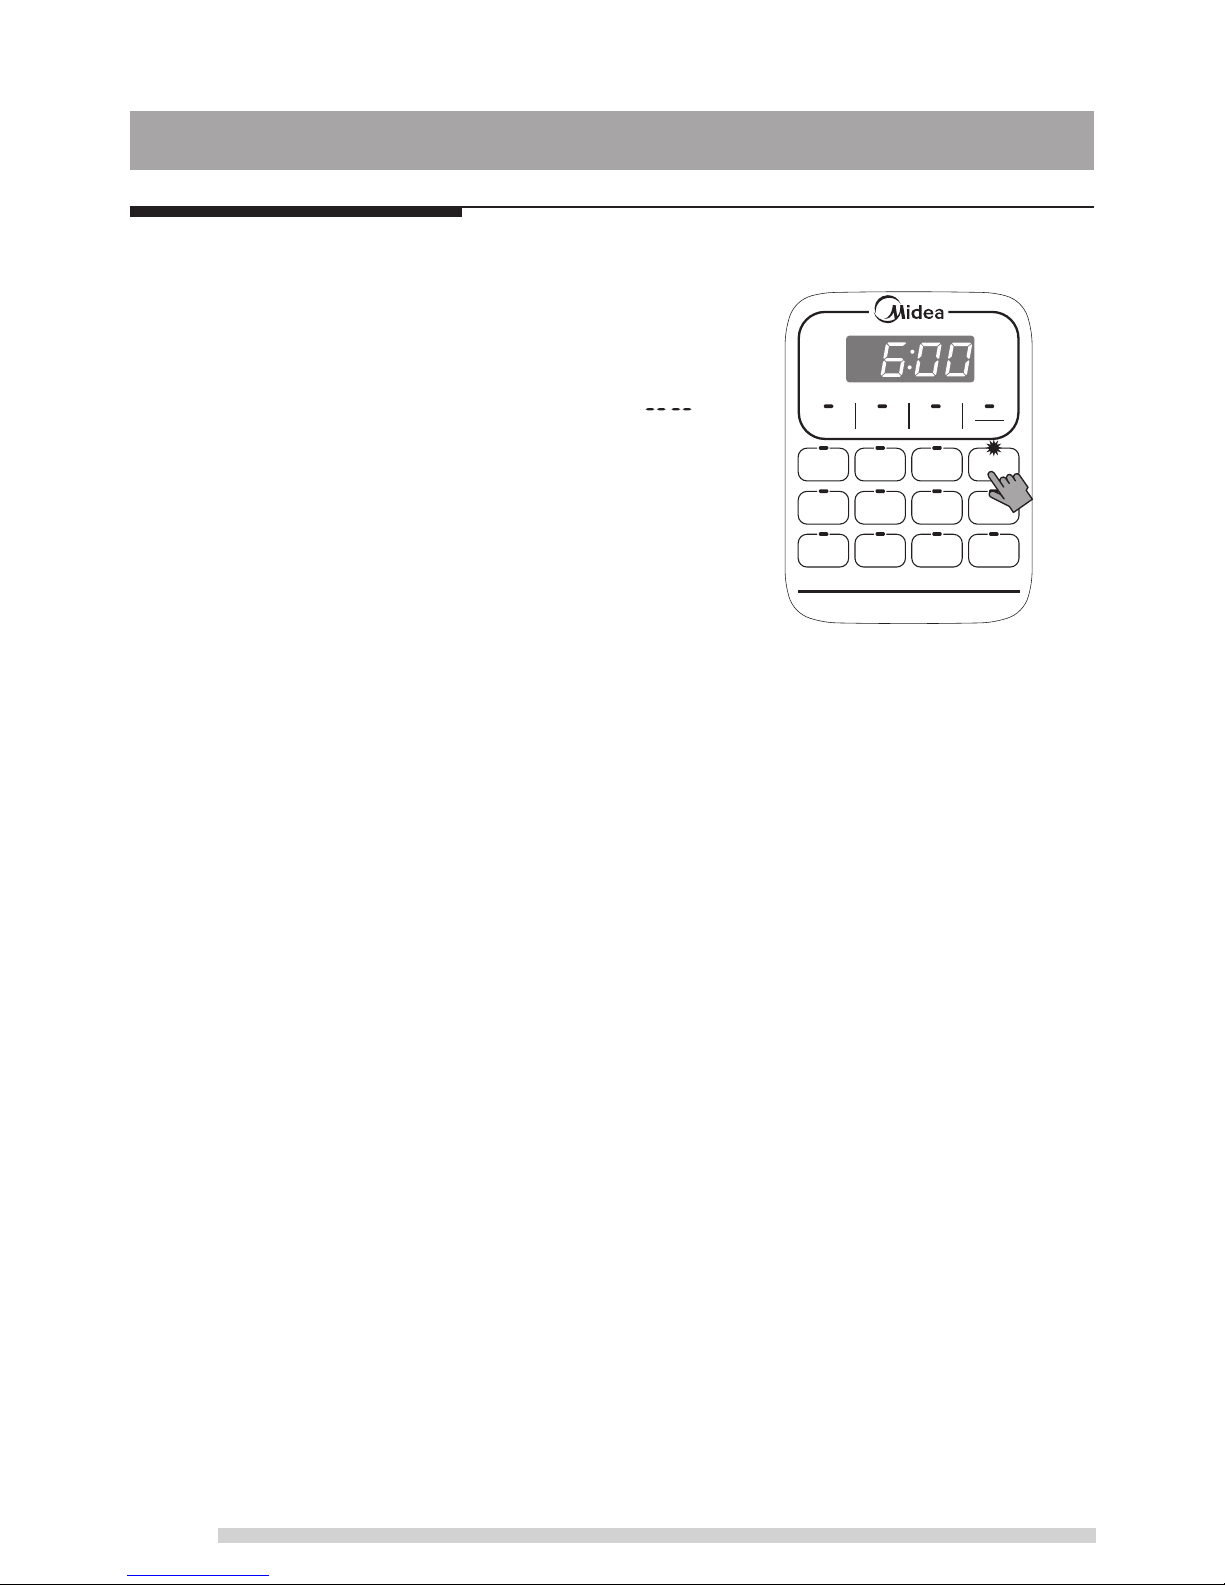
Slow Cook
1. Follow steps in the “Cooking Preparation” section of
this manual.
2. Contact power cord. The LED display shows “ ”
indicating that it is in standby state.
3. Press key Slow Cook. The maximum cooking time for
a Slow Cook process is 6 hours.
4. It will heat up automatically after pressing button Start.
It is preheating as the LED screen shows 6:00.
●
The “Slow Cook” program can be cancelled by pressing the “Keep Warm/Cancel” key
at any time.
5. After cooking is over, the Slow Cook mode will be ended and it will turn into
warm-keeping mode.
Warming
Pressing the “Keep Warm/Cancel” key in standby state activates the “Keep Warm”
function. When “Keep Warm” function starts, the keep warm indicator is bright, and “OH”
is shown on the screen, counting time in hours, does not display the holding time after
time more than 24 hours, display “----”. The “Keep Warm” function can be used with or
without the lid closed.
COOKING WITH YOUR COOKER
Page 15
14
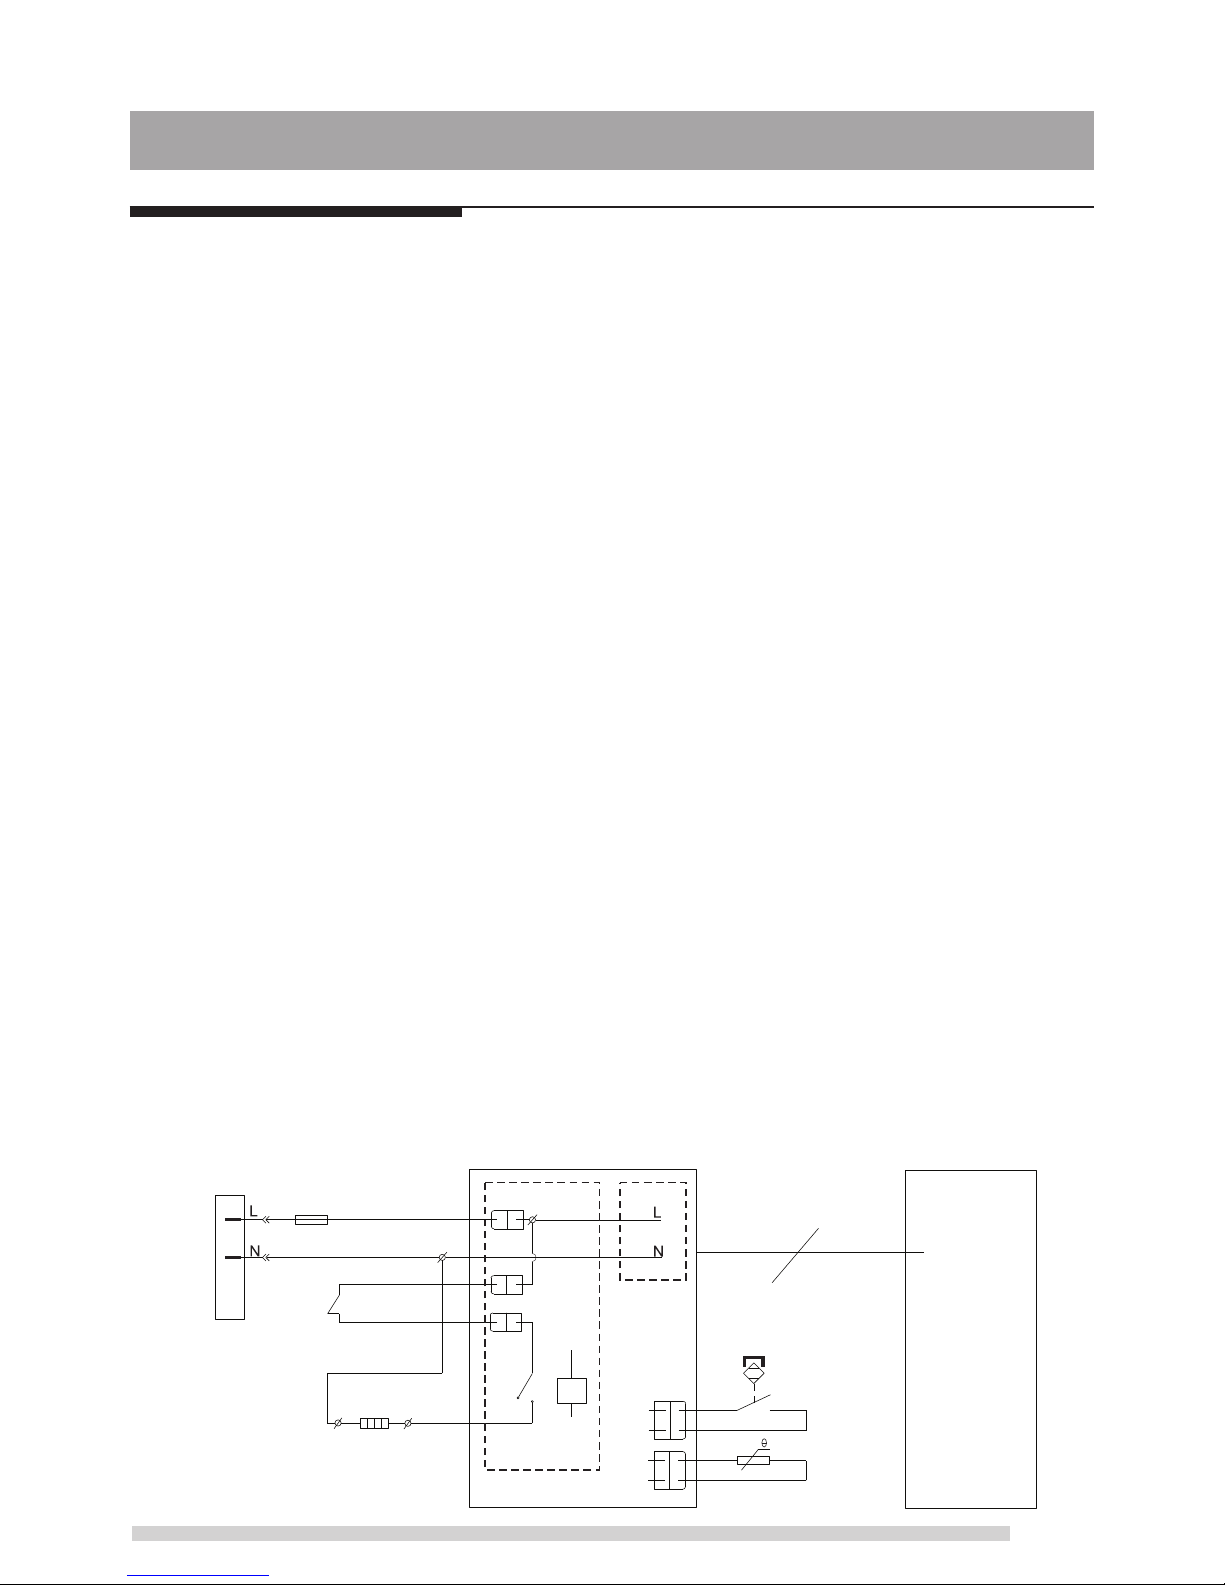
120V~60Hz
Temperature fuse
Socket
Pressure
switch
Cooking plate
Power board
Power panel
power supply
Connecting line
Detective switch
Temperature sensor
Display panel
Regular care or maintenance is essential in ensuring that this product is safe for use. If
any of the following circumstances take place, please stop using the appliance
immediately and contact authorized service representative.
●
Power cord and plug suffer from expansion, deformation, discoloration, damages, etc.
●
A portion of the power cord or the plug gets hotter than usual.
●
Electric pressure cooker heats abnormally, emitting a burnt smell.
●
When power on, there are unusual sounds or vibrations.
If there is dust or dirt on the plug or socket, please remove dust or dirt with a dry brush.
Cleaning
Caution: please make sure the appliance has cooled down and is unplugged before
cleaning.
1. Clean the product after each use. Wipe the black inner housing rim and slot dry with
cloth to prevent rusting on the exterior pot rim.
2. Remove the lid and take out the inner pot, wash them with detergent, rinse with clear
water and then wipe dry with a soft cloth.
3. Use water to clean the lid, including the sealing ring (which can be removed), exhaust
valve, anti-block shield, and wipe them clean with dry soft cloth. Do not take apart the
steam release pipe assembly.
4. Clean the cooker body with clean damp cloth. Do not immerse the cooker into water.
Do not use a wet cloth to clean the pot while the power cord is plugged into the power
outlet.
Electrical Circuit Diagram
CARE AND MAINTENANCE
Page 16
15
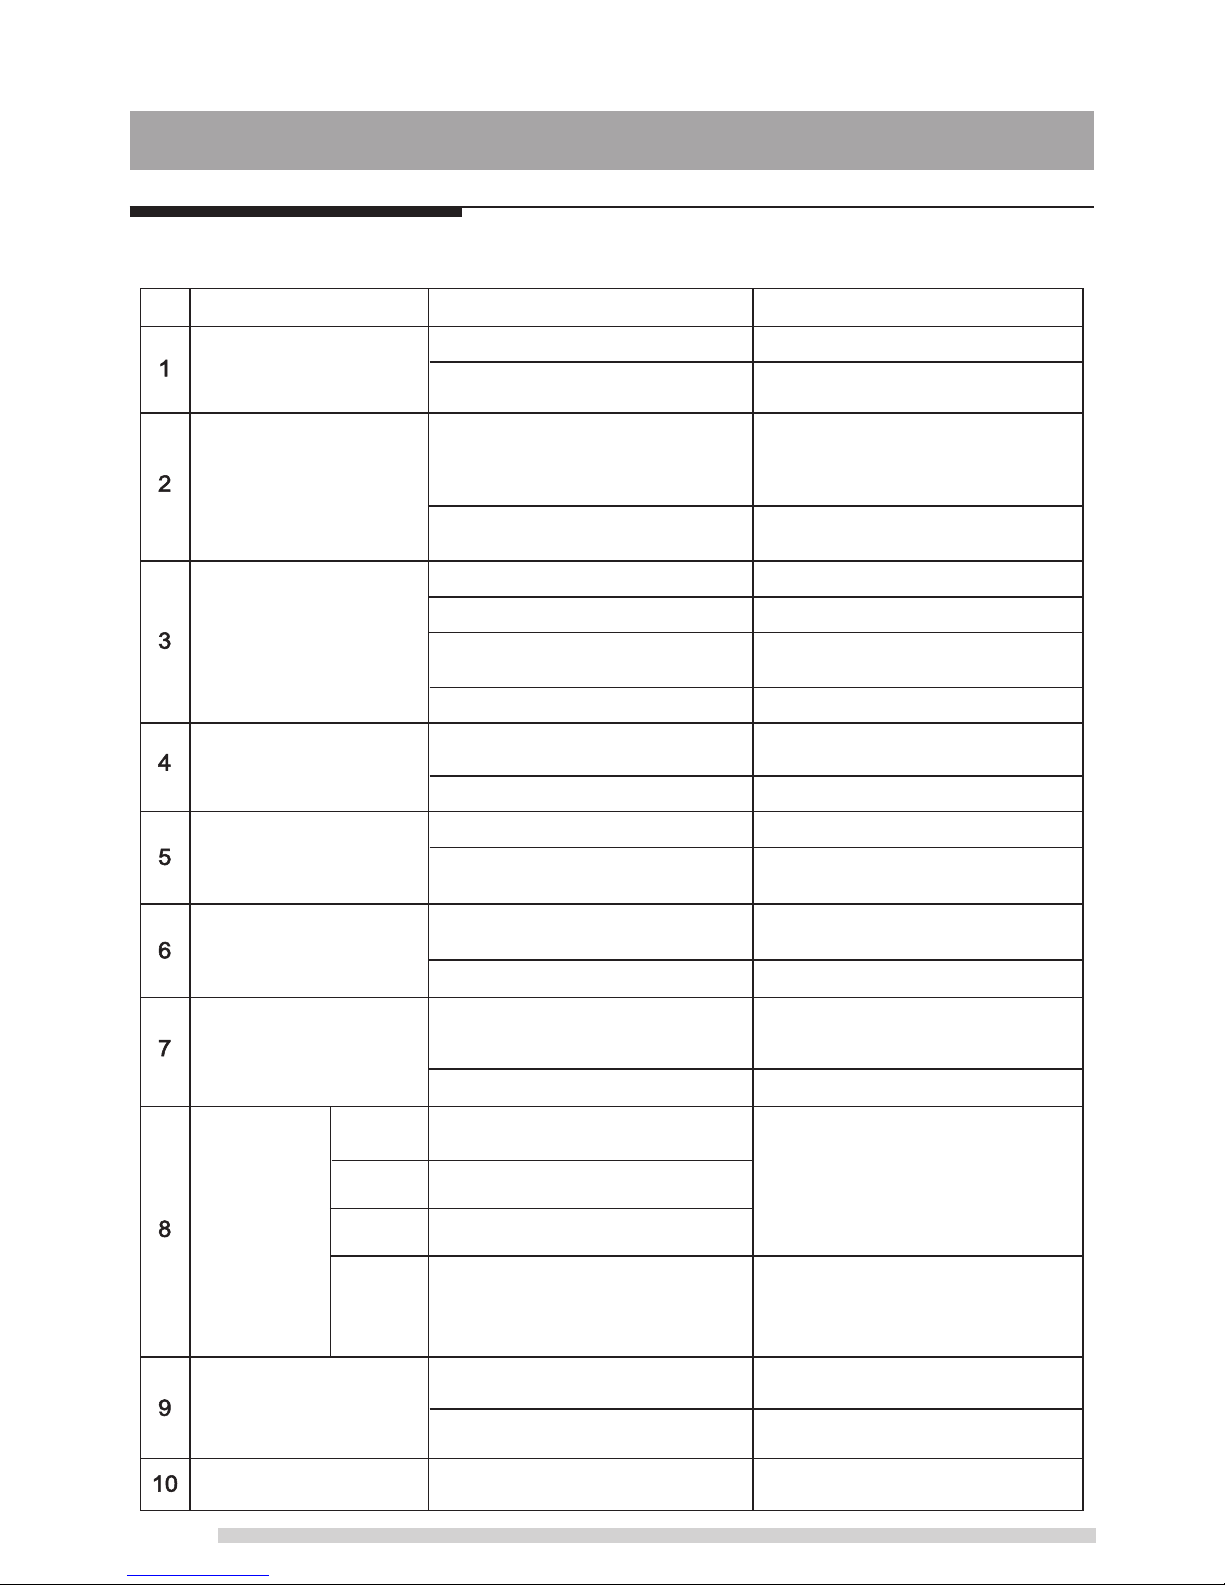
Problem
Difficult to close the lid
Difficult to open the lid
Steam leaks from the
side of the lid
Steam leaks from float
valve for over 2 minutes
Float valve unable to
rise
Steam comes out from
exhaust valve non-stop
Display remains blank
after connecting the
power cord
E1 code
E2 code
E8 code
C1 code
Rice half cooked or too
hard
Rice too soft
Display
Sealing ring not installed properly
No sealing ring
Sealing ring damaged
Lid not closed properly
Float valve silicone ring worn-out
Too little food or water in inner pot
Pressure control fails
Bad power connection or no
power
Cooker’s electrical fuse was blown
Open circuit of bottom sensor
Short circuit of bottom sensor
Pressure switches break down
Over temperature protection
Too litter water
Cover opened prematurely
Too much water
Float valve in the popped-up
position
Pressure exists inside the cooker
Food debris attached to the
sealing ring
Food debris on the float valve
silicone seal
Float valve obstructed by the lid
locking pin
Steam release handle not in
sealing position
Install the sealing ring
Replace the sealing ring
Open then close the lid again
Replace the float valve silicone seal
Add water according to the recipe
Contact support online
Inspect the power cord to ensure
a good connection, check the
power outlet is active.
Contact support online
Please return the appliance to
service center for repairing
Please check whether there is water
or food in the pot; after adjustment,
the appliance can be normally used
after beep stops; otherwise, send it
to service center.
Adjust dry-rice and water ratio
according to recipe
After cooking cycle completes, leave
the cover on for 5 more minutes.
Adjust dry-rice and water ratio
according to recipe
Clean the sealing ring
Clean the float valve silicone
seal
Close the lid completely
Turn the release handle to the
sealing position
Float valve stuck at the
popped-up position
Press the float valve lightly with
a pen or chopstick.
Press the float valve lightly
downwards
Position the sealing ring well
Use the steam release handle to
reduce the internal pressure.
Open the lid after the pressure is
completely released.
Possible Reason Solution
The cases in the following tables do not always indicate a faulty cooker. Please examine
the cooker carefully before contacting the support for repair.
TROUBLESHOOTING
Page 17

16
For any technical improvement or change in appearance
or name plate, changes shall be placed in the revised manual
without further notice. In case of changes in appearance and
color, please refer to the actual product for detailed information.
Page 18

17
Page 19

Mode d’emploi
Cuiseur électrique à pression
MPC176-SS
(Les images ne sont données qu’à titre indicatif,
reportez-vous au le produit réel pour toute référence.)
Merci pour votre achat de cuiseur Midea électrique à pression.
Veuillez attentivement lire le mode d’emploi avant de l’utiliser,
et le conserver dans un endroit sûr pour s’y référer plus tard.
Page 20

1
Protections Importantes ....................................................................................2
Caractéristiques ................................................................................................4
Structure du produit...........................................................................................4
Touches de commande et états de l’autocuiseur ..............................................5
Panneau de commande ................................................................................5
États de l’autocuiseur....................................................................................5
Touches de fonctionnement...........................................................................5
Touches de fonction.......................................................................................6
Avant la première utilisation ..............................................................................6
Enlever et installer la capsule antiblocage ....................................................6
Enlever et installer le joint d’étanchéité .........................................................6
Ouverture du couvercle en toute sécurité......................................................7
Préparation pour la cuisson...............................................................................7
Cuisiner avec votre autocuiseur........................................................................8
Cuisson sous pression ..................................................................................8
Cuisson préréglée .........................................................................................10
Brunissement/Sauté ......................................................................................11
Préparer du parfait.........................................................................................11
Cuisson lente.................................................................................................12
Réchauffage ..................................................................................................12
Entretien et nettoyage .......................................................................................12
Nettoyage ......................................................................................................13
Schéma électrique.............................................................................................13
Dépannage........................................................................................................14
SOMMAIRE
Page 21

2
Lors de l’utilisation des appareils électriques, des précautions de sécurité basiques
doivent toujours être suivies y-compris les points suivants; veuillez lire toutes les
instructions.
1. Ce produit n’est prévu que pour l’usage domestique. Ne pas utiliser à l’extérieur.
2. Ne pas utiliser le cuiseur à pression autrement que pour ce qu’il est prévu.
3. Ne pas placer l’unité sur ou à proximité d’un brûleur à gaz ou électrique, ou dans un four.
4. N’utilisez pas l’appareil dans un endroit près d’éclaboussures d’eau ou de source de
flammes. N’utilisez pas l’appareil dans un endroit exposé directement aux rayons du
soleil ou aux éclaboussures d’huile. Mettez l’appareil dans un endroit hors de la
portée des enfants.
5. Ne placez pas l’appareil sur une surface instable. Il est strictement interdit de l’utiliser
sur un journal, un matériau en mousse ou tout autre objet qui peut facilement bloquer
les trous d’évacuation situés sous l’appareil.
6. Une surveillance rapprochée est nécessaire quand le cuiseur à pression est utilisé à
proximité des enfants. Les enfants doivent être surveillés pour s’assurer qu’ils ne
jouent pas avec l’appareil.
7. Cet appareil n’est pas destiné à être utilisé par des personnes (y compris des
enfants) dont les capacités physiques, sensorielles ou mentales sont diminuées, ou
qui ne disposent pas des connaissances ou de l’expérience nécessaires, à moins
qu’elles ne soient accompagnées par une personne responsable de leur sécurité.
8. Pour se protéger d’une électrocution, ne pas immerger le cordon d’alimentation, la
fiche ou l’appareil dans l’eau ou dans un autre liquide.
9. S’assurer que les poignées sont montées et bien serrées avant chaque utilisation.
Les poignées fissurées, cassées ou brûlées doivent être remplacées.
10. Ne pas faire fonctionner l’appareil ayant le cordon ou la fiche endommagé, ou après un
dysfonctionnement de l’appareil ou qu’il ait été endommagé de quelque manière que ce
soit. Renvoyer l’appareil au Service Après-vente pour examen, réparation ou réglage.
11. Ne pas effectuer le remplacement non-autorisé d’une pièce à l’intérieur du cuiseur à
pression, car cela peut entrainer une électrocution, un incendie ou une blessure.
12. L’utilisation d’accessoires non-recommandés par le fabricant de l’appareil peut
entrainer des blessures.
13. Ne pas laisser pendre le cordon d’alimentation de la table ou du comptoir, ou toucher
une surface chaude.
14. Attention : pour réduire le risque d’électrocution, effectuer la cuisson uniquement
dans le conteneur amovible fourni (bassine).
15. Avant chaque utilisation, vérifier que l’écran antiblocage, le flotteur et la vanne
d’échappement ne sont pas bouchés, essuyer la surface de la bassine interne et la
plaque de chauffage qu’ils ne comportent pas de corps étrangers, s’assurer que la
vanne d’échappement est en position fermée.
PROTECTIONS IMPORTANTES
Page 22

3
16. Toujours vérifier que les dispositifs de détente de pression ne sont pas bouchés avant
l’utilisation. Ne pas recouvrir les vannes de pression.
17. Il est recommandé de tremper les aliments secs avant de les cuire avec l’appareil.
18. Faire attention à ce que certains aliments comme la compote de pomme, les
canneberges, les flocons d’avoine ou autres céréales, les pois cassés, les nouilles,
macaronis, la rhubarbe ou les spaghettis peuvent faire de la mousse, de l’écume et
éclabousser, et boucher le dispositif de détente de pression. Ces aliments ne doivent
être cuits au cuiseur à pression qu’avec précautions avec la bassine remplie à moitié
et avec le dégagement libre naturel.
19. Ne jamais remplir l’unité au-dessus du niveau MAX (remplie aux 2/3). Lors de la cuisson
d’aliments qui prennent du volume durant leur cuisson, tels que riz et légumes secs, ne
remplissez pas plus de la moitié de la cuve. Le sur-remplissage peut entrainer le
bouchage de l’évent et développer trop de pression. Voir « Préparation des aliments ».
20. Cet appareil cuit sous pression. Une utilisation incorrecte peut provoquer des
brûlures. S’assurer que l’unité est bien fermée avant l’utilisation. Voir « Préparation
des aliments ».
21. Ne jamais frire ou frire sous pression avec de l’huile dans l’unité. Cela est dangereux
et peut provoquer un incendie ou de graves dégâts.
22. Ne pas déplacer le produit ou forcer l’ouverture du couvercle quand l’unité est en
fonctionnement.
23. Il faut faire extrêmement attention quand l’unité contient de l’huile ou d’autres liquides
chauds.
24. Ne pas toucher les surfaces chaudes. Employer les poignées ou les boutons. Ne pas
mettre les mains ou le visage au-dessus de la vanne d’échappement ou du flotteur
pour éviter les brûlures quand l’unité est en fonctionnement.
25. Après la cuisson, faire extrêmement attention en soulevant le couvercle. De graves
blessures peuvent être provoquées par la vapeur dans l’unité.
26. En ouvrant le couvercle après la cuisson, ne pas toucher à la bassine interne
directement avec les mains pour éviter les brûlures.
27. Ne pas ouvrir le cuiseur à pression jusqu’à ce que l’unité ait refroidi et que toute la
pression interne est libérée. Si les poignées sont difficiles à écarter, cela indique que
le cuiseur est toujours sous pression, ne pas forcer pour l’ouvrir. Une pression dans
le cuiseur peut être dangereuse. Voir « Préparation des aliments ».
28. Pour débrancher, tourner toute commande sur la position d’arrêt, puis retirer la fiche
de la prise de courant.
29. Toujours débrancher de la prise de courant quand il n’est pas utilisé, lors du
démontage de pièces et pour le nettoyage. Laisser refroidir avant de démonter ou
remonter des pièces, et avant le nettoyage.
1) Prévu que pour une utilisation sur un plan de travail.
2) MISE EN GARDE : Le déversement des aliments peut provoquer de graves
brûlures. Tenir l’appareil et le cordon à l’écart des enfants. Ne jamais enrouler le
PROTECTIONS IMPORTANTES
Page 23

4
cordon sur le bord du comptoir, ne jamais utiliser une prise sous le comptoir et ne
jamais utiliser avec une rallonge.
Une courte rallonge est utilisée pour réduire le risque qu’elle ne soit attrapée par des
enfants, qu’elle étrangle ou que l’on trébuche avec une rallonge plus grande.
30. Cet appareil à une prise polarisée (une lame est plus large que l’autre). Pour réduire
le risque d’électrocution, la fiche est prévue pour une prise de courant polarisée qui
ne s’insère que dans un sens. Si la fiche ne rentre pas complètement dans la prise
de courant, l’inverser. Si elle ne rentre toujours pas, faire appel à un électricien
qualifié. Ne pas essayer de modifier la fiche de quelque façon que ce soit.
VEUILLEZ CONSERVER CE GUIDE D’UTILISATION
PROTECTIONS IMPORTANTES
Page 24

5
120V~60HZ
22cm
70kPa
1000W
6L
60°C~80°C
Max
TASSE
CARACTÉRISTIQUES
Tension/Fréquence
Diamètre de la
cuve intérieure
Pression de
fonctionnement
Puissance
Volume de la
cuve intérieure
Température de
chauffage
Spatule en bois, cuillère à soupe,
tasse à mesurer, guide d’utilisation.
Vanne d’échappement
Marque de la
position du couvercle
Bouton de
libération de vapeur
Marque d’ouverture/
fermeture du couvercle
Accessoires
STRUCTURE DU PRODUIT
Valve témoin
de la pression
Poignée du
couvercle
Couvercle
Joint d’étanchéité
Cuve intérieure
Poignée de
l’autocuiseur
Corps de l’autocuiseur
Base et unité de
chauffage
Couvercle
Capsule
antiblocage
Emplacement
spécial du couvercle
Cuve extérieure
Panneau de
commande
Porte-cuillère
Page 25

6
Panneau de commande
Le panneau de commande de votre autocuiseur électrique se compose d’un écran LED,
3 touches de fonctionnement et de 11 touches de fonction. Chaque touche de fonction
comporte un témoin de fonction.
États de l’autocuiseur
Votre autocuiseur électrique comprend 4 états qui sont affichés sur l’écran LED et témoins
de fonction.
●
État de veille : l’écran LED affiche « ».
●
État prédéfini : l’écran LED affiche l’heure « préréglée » et le décompte de temps et le
témoin de la fonction activée allumé.
●
État de fonctionnement du programme : l’écran LED affiche « » et le témoin de la
fonction activée allumé.
●
État Garde au chaud : l’écran LED affiche « » et le décompte de temps et le témoin
de la fonction « Garde au chaud » allumé.
Touches de fonctionnement
Il existe trois touches de fonctionnement : Minuteur, Manuel et Réglage. La touche
Minuteur est pour le préréglage, la touche Manuel permet de régler le temps de maintien
de la pression et la touche Réglage permet de régler l’heure.
Écran LED
Touches de fonctionnement
Témoins de fonction
Touches de fonction
Minuteur
Démarrer Riz
Cuisson lente
Soupe/
Ragoût
Brunissement/
Sauté
Poulet Viande Poisson
Pâtes Vapeur Parfait
Piments/
Haricots
Manuel Réglage
Garder au chaud
Annuler
TOUCHES DE COMMANDE ET ÉTATS DE L’AUTOCUISEUR
Page 26

7
Touches de fonction
La touche la plus importante est « Garde au chaud/Annuler ». Lorsque l’autocuiseur est
programmé ou un programme est en cours, appuyez sur cette touche pour annuler le
programme et faire passer l’autocuiseur à l’état de veille. Lorsque l’autocuiseur est en état
de veille, appuyez sur cette touche pour activer le programme de Garde au chaud.
Les autres touches de fonction comprennent « Riz », « Soupe/Ragoût », « Cuisson lente »,
« Brunissement/Sauté », « Poulet », « Viande », « Poisson », « Pâtes », « Vapeur »,
« Parfait » « Piments/Haricots », « Démarrer ».
Avant la première utilisation, retirez tous les accessoires de l’emballage et lisez
attentivement ce manuel. Soyez particulièrement attentif aux consignes d’utilisation et aux
avertissements afin d’éviter toute blessure et dommage matériel. Lavez l’intérieur du
couvercle et la cuve interne avec de l’eau savonneuse chaude, les rincer et les sécher
complètement. Essuyez l’extérieur avec un chiffon propre et humide. Ne plongez jamais
le corps de l’autocuiseur dans de l’eau ou dans un autre liquide. La cuve intérieure, le
joint d’étanchéité, la valve régulatrice de la pression et tous les accessoires peuvent être
lavés au lave-vaisselle. Mais ne lavez jamais le couvercle et le corps au lave-vaisselle.
Enlever et installer la capsule antiblocage
La capsule antiblocage peut
être retirée en la poussant
sur le côté puis en la
soulevant. Positionnez la
capsule antiblocage en
place et appuyez dessus
pour la réinstaller.
Enlever et installer le joint d’étanchéité
Le joint d’étanchéité peut être enlevé
en le tirant vers le haut de sa fente.
Pour réinstaller le joint d’étanchéité,
appuyez dessus dans sa fente. Le joint
d’étanchéité peut être installé de
n’importe quelle face.
Remarques importantes :
●
Avant chaque utilisation, vérifiez que le joint d’étanchéité est bien en place dans sa fente et
que la capsule antiblocage est correctement montée sur le tuyau de dégagement de vapeur.
●
Après chaque utilisation, enlevez tout corps étranger du joint d’étanchéité et de la
capsule antiblocage.
AVANT LA PREMIÈRE UTILISATION
TOUCHES DE COMMANDE ET ÉTATS DE L’AUTOCUISEUR
Page 27

8
●
Veillez à ce que le joint d’étanchéité soit toujours propre pour éviter le dégagement des
odeurs de cuisson. Lavez le joint d’étanchéité dans de l’eau chaude savonneuse ou au
lave-vaisselle peut éliminer les odeurs. Il est tout à fait normal que le joint d’étanchéité
absorbe l’odeur de certains aliments acides. C’est pourquoi il est recommandé d’avoir
toujours un joint d’étanchéité de rechange.
●
Ne forcez jamais le joint d’étanchéité lors de son retrait, car il risque de se déformer et
perdre sa fonction d’étanchéité à la pression.
●
Il ne faut jamais utiliser un joint d’étanchéité présentant des fissures, craquelures ou
autres signes de détérioration. Un joint d’étanchéité de rechange neuf doit être utilisé.
Avant la première utilisation
Ouverture du couvercle en toute sécurité
1. Assurez-vous que le programme de cuisson sous pression est terminé ou appuyez sur
la touche « Garde au chaud/Annuler » pour arrêter le programme.
2. Libérez la pression en suivant l’une des méthodes ci-dessous.
Libération rapide :
●
Appuyez sur le bouton « Libération de vapeur » de la poignée du couvercle pour
laisser la vapeur se jusqu’à ce que la valve témoin de la pression tombe.
Attention :
●
Gardez vos mains et votre visage loin du trou d’échappement de vapeur lorsque vous utilisez
la Libération rapide. La vapeur qui sort est très chaude et peut provoquer des brûlures.
●
Ne retirez jamais la valve régulatrice de la pression tant que la vapeur n’est pas terminée.
●
Sachez que la « Libération rapide » n’est pas adaptée aux aliments dans un grand volume de
liquide ou avec une forte teneur en amidon (extrémité. gruau, congee (bouillie de riz), liquides
collants, soupe, etc.). De telles préparations alimentaires peuvent produire des éclaboussures
sous la pression de la vapeur. Utilisez plutôt la méthode « Libération naturelle ».
Libération naturelle :
●
Laissez l’autocuiseur refroidir naturellement jusqu’à ce que la valve témoin de la
pression tombe. Cela peut prendre de 10 à 15 minutes après la fin de la cuisson et
l’autocuiseur est en mode Garde au chaud.
●
Une serviette mouillée placée sur le couvercle peut accélérer le refroidissement.
3. Ouverture du couvercle : Tournez la poignée du couvercle dans le sens antihoraire
jusqu’à la position ouverte et soulevez le couvercle pour l’ouvrir.
●
Attention : N’ouvrez pas le couvercle tant que la pression n’est pas totalement tombée.
Par mesure de sécurité, tant que la valve témoin de la pression n’est pas tombée, le
couvercle reste verrouillé et ne pourra pas être ouvert.
●
Si la valve témoin de la pression reste coincée à cause de particules d’aliments ou autre,
vous pouvez la pousser avec la pointe d’un stylo ou un objet similaire lorsque vous êtes
certain que la pression a été libérée, que vous pouvez d’ailleurs vérifier en appuyant sur
le bouton « Libération de vapeur » de la poignée du couvercle.
Page 28

9
1. Ouverture du couvercle
Tournez la poignée du couvercle d’environ 30 degrés dans le
sens horaire jusqu’à ce que la marque « » du couvercle
soit alignée avec la marque « » du bord supérieur du corps
de l’autocuiseur.
2. Vérification que toutes les pièces sur le couvercle
sont correctement assemblées
Vérifiez si la valve témoin de la pression et la valve régulatrice de la pression sont
obstruées. Assurez-vous que le joint d’étanchéité est bien installé à l’intérieur de sa
fente, la capsule antiblocage est installée correctement et la valve témoin de la pression
peut se mouvoir facilement et rapidement.
PRÉPARATION POUR LA CUISSON
Max
3. Retrait de la cuve intérieure, et ajout d’aliments et de liquides
Le volume total d’aliments et de liquides NE DOIT JAMAIS
dépasser la marque maximum de la cuve intérieure. Il est
recommandé de ne pas dépasser les 2/3. Lors de la cuisson
d’aliments qui prennent du volume durant leur cuisson, tels que
riz, haricots et légumes secs, ne remplissez pas plus de la moitié
de la cuve. Le sur-remplissage peut entrainer le bouchage de
l’évent et développer trop de pression. Cela pourrait également
provoquer des éclaboussures et endommager l’appareil.
4. Placez la cuve intérieure dans l’autocuiseur
Avant cela, veillez à enlever tout corps étranger et essuyez l’extérieur de la cuve
intérieure et l’élément chauffant situé à l’intérieur de l’autocuiseur.
Une fois la cuve intérieure placée dans l’autocuiseur, la tourner légèrement pour
assurer son bon contact avec l’élément chauffant.
5. Fermeture complète du couvercle
Placez le couvercle sur l’autocuiseur en le tenant par la
poignée tout en alignant sa marque « » avec la marque
« » du bord supérieur du corps de l’autocuiseur. Tournez la
poignée d’environ 30 degrés dans le sens antihoraire jusqu’à
ce que la marque « » du couvercle soit alignée avec la
marque « » du bord supérieur du corps de l’autocuiseur.
Page 29

10
Minuteur
Démarrer Riz
Cuisson lente
Soupe/
Ragoût
Brunissement/
Sauté
Poulet
Viande Poisson
Pâtes Vapeur Parfait
Piments/
Haricots
Manuel Réglage
Garder au chaud
Annuler
Cuisson sous pression
Cela concerne les fonctions « Riz », « Soupe/Ragoût »,
« Poulet », « Viande », « Poisson », « Pâtes »,
« Vapeur », « Piments/Haricots ».
1. Suivez les étapes de la section « Préparation pour la
cuisson » du présent manuel.
2. Branchez le cordon d’alimentation. L’écran LED
affiche « » indiquant qu’il est en mode veille.
3. Sélectionnez une touche de fonction de cuisson, ex.
Riz. Une fois qu’une touche de fonction est
appuyée, son témoin se met à clignoter, ainsi que
celui de la touche Démarrer.
CUISINER AVEC VOTRE AUTOCUISEUR
Brunissement/
Sauté
Minuteur
Démarrer Riz
Cuisson lente
Soupe/
Ragoût
Poulet
Viande Poisson
Pâtes Vapeur Parfait
Piments/
Haricots
Manuel Réglage
Garder au chaud
Annuler
Minuteur
Démarrer Riz
Cuisson lente
Soupe/
Ragoût
Brunissement/
Sauté
Poulet
Viande Poisson
Pâtes Vapeur Parfait
Piments/
Haricots
Manuel Réglage
Garder au chaud
Annuler
4. Appuyez sur Démarrer pour lancer la cuisson en mode
Riz. Les touches Riz et Démarrer restent allumées.
5. L’écran LED affiche « » indiquant l’état de
préchauffage est en cours.
●
Au fur et à mesure que la pression augmente à
l’intérieur de l’autocuiseur, de la vapeur s’échappe
par la valve témoin de la pression jusqu’à ce que
celle-ci remonte.
●
Vous pouvez, à tout moment, annuler le programme
de cuisson en cours et retourner en mode veille en
appuyant sur la touche « Garde au chaud/Annuler ».
6. Lorsque le programme de cuisson se termine,
l’autocuiseur émet un bip et passe automatiquement en
mode « Garde au chaud », l’écran LED affiche « ».
●
Une fois le riz cuit, il n’est pas recommandé de le
laisser longtemps dans l’état « Garde au chaud »
car cela affecte sa texture et son goût.
7. Pour servir, appuyez sur la touche « Garde au
chaud/Annuler » pour arrêter le mode « Garde au
chaud », et ouvrez le couvercle selon les consignes
de la section « Ouverture du couvercle en toute
sécurité » du présent manuel.
Page 30

11
●
Lors de l’ouverture du couvercle, la cuve intérieure peut sembler coincée contre le
couvercle à cause du vide. Cela est dû à la dilatation de l’air due au refroidissement.
Appuyez sur la touche « Libération de vapeur » de la poignée du couvercle pour
que l’air libère le vide.
Cuisson
lente
Soupe/
Ragoût
Minuteur
Démarrer Riz
Brunissement/
Sauté
Poulet
Viande Poisson
Pâtes Vapeur Parfait
Piments/
Haricots
Manuel Réglage
Garder au chaud
Annuler
Cuisson préréglée
Votre autocuiseur comprend des fonctions préréglées pouvant différer le temps de
cuisson de 24 heures à 2 heures. Les fonctions préréglées ne s’appliquent pas aux
fonctions « Garde au chaud/Annuler », « Cuisson lente », « Brunissement/Sauté » et
« Parfait ». Voici comment programmer des préparations préréglées.
1. Suivez les étapes de la section précédente « Cuisson sous pression » pour préparer
un programme de cuisson.
2. Appuyez sur la touche Minuteur pour accéder au mode
préréglage. Lorsque la touche Minuteur se met à clignoter,
appuyez sur Réglage pour fixer le temps de préréglage.
3. Appuyez enfin sur la touche Démarrer pour appliquer
la fonction Minuteur. Le compte à rebours du temps
affiché sur l’écran LED commence et la touche
Minuteur reste allumée.
●
Vous pouvez, à tout moment, appuyer sur la touche
« Garde au chaud/Annuler » pour l’operation Minuteur.
4. L’autocuiseur arrête la cuisson lorsque le temps fixé devient 0, il émet un bip et passe
automatiquement en mode « Garde au chaud » pendant plusieurs heures. Remarque
importante :
●
Il n’est pas recommandé d’utiliser la fonction préréglage pour les aliments fragiles, tels
que viande et poisson, car ils peuvent s’altérer s’ils restent pendant des heures à la
température ambiante. La texture d’un riz cuit devient trop molle si le riz est laissé
longtemps tremper. Une couche de riz brûlé peut également rester au fond de
l’autocuiseur si le reste longtemps en mode Garde au chaud.
●
Des précautions doivent être prises lors de l’utilisation de la fonction préréglage pour le
gruau, la farine d’avoine et d’autres aliments bulleux et collants. En raison de leur
CUISINER AVEC VOTRE AUTOCUISEUR
Page 31

12
caractère collant, ces aliments peuvent bloquer le mouvement de la valve témoin de la
pression si votre autocuiseur est rempli à fond produisant ainsi un débordement de
nourriture; il est donc fortement recommandé de ne pas remplir l’autocuiseur à plus de
sa moitié et de ne pas le laisser sans surveillance pendant le préchauffage.
Pâtes Vapeur Parfait
Minuteur
Démarrer Riz
Cuisson
lente
Soupe/
Ragoût
Brunissement/
Sauté
Poulet
Viande Poisson
Piments/
Haricots
Manuel Réglage
Garder au chaud
Annuler
Minuteur
Démarrer Riz
Cuisson lente
Soupe/
Ragoût
Brunissement/
Sauté
Poulet
Viande Poisson
Pâtes Vapeur Parfait
Piments/
Haricots
Manuel Réglage
Garder au chaud
Annuler
Brunissement/Sauté
1. Suivez les étapes de la section « Préparation pour la
cuisson » du présent manuel. Laissez le couvercle
ouvert pour éviter l’accumulation de pression à
l’intérieur de l’autocuiseur.
2. Branchez le cordon d’alimentation. L’écran LED affiche
« » indiquant qu’il est en mode veille.
3. Appuyez sur la touche Brunissement/Sauté. Pour des
raisons de sécurité, le temps de cuisson maximal pour un
programme de Brunissement/Sauté est de 30 minutes.
4. Le chauffage démarre automatiquement dès que la
touche Démarrer est appuyée. Le chauffage dure tant
que l’écran LED affiche 0:30.
●
Laissez le couvercle ouvert pour éviter l’accumulation de pression. Autrement, cela
risque d’être dangereux.
●
Vous pouvez, à tout moment, annuler le programme « Brunissement/Sauté » en
appuyant sur la touche « Garde au chaud/Annuler ».
5. Lorsque la cuisson se termine, l’autocuiseur émet un bip et passe automatiquement en
mode veille.
Parfait
1. Suivez les étapes de la section « Préparation pour la
cuisson » du présent manuel.
●
La température du lait fraîchement refroidi et du yaourt
est d’environ 20°C. En faire un mélange dans la
proportion 10/1, puis le mettre dans la cuve intérieure.
2. Branchez le cordon d’alimentation. L’écran LED affiche
« » indiquant qu’il est en mode veille.
3. Après avoir appuyé sur la touche Parfait, l’écran LED
s’affiche 4:00; appuyez sur Démarrer pour que le
chauffage commence.
CUISINER AVEC VOTRE AUTOCUISEUR
Page 32

13
Le compte à rebours du temps affiché à l’écran LED
commence, les touches Parfait et Démarrer restent
allumées.
●
Vous pouvez, à tout moment, annuler le programme « Parfait » en appuyant sur la
touche « Garde au chaud/Annuler ».
4. Lorsque la cuisson se termine, l’autocuiseur émet un bip et passe automatiquement en
mode veille.
Poulet
Viande Poisson
Minuteur
Démarrer Riz
Cuisson lente
Soupe/
Ragoût
Brunissement/
Sauté
Pâtes Vapeur Parfait
Piments/
Haricots
Manuel Réglage
Garder au chaud
Annuler
Cuisson lente
1. Suivez les étapes de la section « Préparation pour la
cuisson » du présent manuel.
2. Branchez le cordon d’alimentation. L’écran LED affiche
« » indiquant qu’il est en mode veille.
3. Appuyez sur la touche Cuisson lente. Le temps de
cuisson maximal pour un programme de cuisson lente
est de 6 heures.
4. Le chauffage démarre automatiquement dès que la
touche Démarrer est appuyée. Le chauffage dure tant
que l’écran LED affiche 6:00.
●
Vous pouvez, à tout moment, annuler le programme « Cuisson lente » en appuyant sur
la touche « Garde au chaud/Annuler ».
5. Une fois la cuisson terminée, le mode cuisson lente sera terminé et l’appareil passe en
mode Garde au chaud.
Réchauffage
Vous pouvez activer la fonction « Garde au chaud » en mode veille en appuyant sur la
touche « Garde au chaud/Annuler ». Lorsque la fonction « Garde au chaud » démarre, le
témoin Garde au chaud s’allume et « OH » s’affiche à l’écran, le comptage deu temps en
heures, n’indique pas le temps de maintien après 24 heures, où « ---- » sera affiché. La
fonction « Garde au chaud » peut être utilisée avec ou sans le couvercle fermé.
CUISINER AVEC VOTRE AUTOCUISEUR
Page 33

14
120V~60Hz
Fusible thermique
Prise
Pressostat
Plaque de cuisson
Tableau
d’alimentation
Boîtier
d’alimentation
électrique
Câble de connexion
Interrupteur de
détection
Capteur de
température
Panneau
d’affichage
Le nettoyage et l’entretien réguliers de l’appareil sont essentiel pour le maintenir en bon
état et sans risque. Cessez immédiatement d’utiliser l’appareil si l’un des problèmes
suivants se produit, puis contactez un représentant de service agréé.
●
Le cordon et la fiche d’alimentation sont déformés, décolorés, endommagés, etc.
●
Une partie du cordon ou de la fiche d’alimentation devient plus chaude que d’habitude.
●
L’autocuiseur électrique chauffe anormalement, émettant une odeur de brûlé.
●
Existence de bruit ou vibrations inhabituels lors de la mise sous tension.
Si la fiche est poussiéreuse ou sale, la nettoyer à l’aide d’une brosse sèche.
Nettoyage
Attention : assurez-vous que l’appareil a bien refroidi et qu’il est débranché avant de le
nettoyer.
1. Nettoyez l’appareil après chaque usage. Essuyez et séchez le bord du corps intérieur
noir et la fente avec un chiffon pour éviter la formation de rouille.
2. Enlevez le couvercle et sortez la cuve intérieure, les laver avec du détergent, rincez à
l’eau de robinet puis le essuyer avec un chiffon doux.
3. Nettoyez le couvercle, le joint d’étanchéité (qui peut être retiré), la valve régulatrice de
la pression, le capsule antiblocage à l’eau et les essuyer avec un chiffon doux et sec.
Ne démontez pas le système de libération de vapeur.
4. Nettoyez le corps de l’autocuiseur avec un chiffon propre et humide. Ne plongez jamais
l’autocuiseur dans l’eau. N’utilisez pas un chiffon humide pour nettoyer la cuve lorsque
le cordon d’alimentation est branché.
Schéma électrique
ENTRETIEN ET NETTOYAGE
Page 34

15
Problème
Fermeture difficile du
couvercle
Difficulté pour ouvrir le
couvercle
La vapeur fuit par le bord
du couvercle
Fuite de vapeur au niveau de
la valve témoin de la pression
pendant plus de 2 minutes
Le flotteur ne peut pas
remonter
La vapeur fuit sans arrêt par
la vanne d’échappement
L’écran reste noir après la
connexion du cordon
d’alimentation
Code E1
Code E2
Code E8
Code C1
Riz à demi-cuit ou trop dur
Riz trop mou
Affichage
Joint d’étanchéité mal installé
Pas de joint d’étanchéité
Joint d’étanchéité endommagé
Le couvercle ne ferme pas correctement
Joint en silicone du flotteur usé
Trop peu d’eau et d’aliments dans le
pot interne
Le contrôle de pression ne
fonctionne pas
Mauvaise connexion électrique ou la
prise secteur n’est pas sous tension
Le fusible de l’autocuiseur est grillé
Circuit du capteur inférieur ouvert
Court-circuit du capteur inférieur
Interrupteurs de pression en panne
Protection contre la surchauffe
Quantité d’eau insuffisante
Le couvercle s’ouvre prématurément
Trop d’eau
Flotteur en position de pop-up
Pression existante dans le cuiseur
Débris d’aliment collés sur le joint
d’étanchéité
Débris d’aliments collés au joint en
silicone de la valve témoin de la pression
La valve témoin de la pression est
obstruée par la goupille de verrouillage
du couvercle
La poignée de libération de vapeur n’est
positionnée sur étanchéité
Installez un joint d’étanchéité
Remplacer le joint d’étanchéité
Ouvrez puis refermez le couvercle
Remplacez le joint en silicone de la valve
témoin de la pression
Ajouter de l’eau selon la recette
Contactez le support en ligne
Vérifiez le cordon d’alimentation
assurez-vous que la prise secteur est
sous tension.
Contactez le support en ligne
Ramenez l’appareil à un centre de
services pour réparation
Vérifiez s’il y a de l’eau ou des aliments
dans la cuve; une fois le nettoyage effectué,
l’appareil peut normalement être utilisé
après le bip; autrement, ramenez l’appareil à
un centre de services pour réparation.
Ajustez la quantité de riz sec par rapport
à l’eau selon la recette
Quand le cycle de cuisson est terminé,
laisser le couvercle encore 5 minutes.
Ajustez la quantité de riz sec par rapport
à l’eau selon la recette
Nettoyer le joint d’étanchéité
Nettoyez le joint en silicone de la valve
témoin de la pression
Fermeture complète du couvercle
Positionnez la poignée de libération de
vapeur sur étanchéité
La valve témoin de la pression reste
coincée en haut
Poussez la valve témoin de la pression
avec la pointe d’un stylo ou un objet
similaire.
Appuyez légèrement sur la valve témoin
de la pression
Bien positionner le joint d’étanchéité
Utilisez la poignée de libération de vapeur
pour réduire la pression intérieure. Ouvrir
le couvercle après avoir complètement
libéré la pression.
Raison possible Solution
Les cases dans le tableau suivant n’indiquent pas toujours un cuiseur en panne. Veuillez
examiner attentivement le cuiseur avant de contacter le service de réparation.
DÉPANNAGE
Page 35

16
Toute amélioration technique ou modification de
l’apparence ou de la plaque signalétique, sont répercutées sur
le manuel révisé sans préavis. En cas de modification de
l’apparence ou de la couleur, consultez le produit réel pour plus
d’informations.
Page 36

17
Page 37

Manual del Usuario
Olla a presión eléctrica
MPC176-SS
Gracias por comprar la olla a presión eléctrica de Midea. Por favor
lea atentamente este manual del usuario antes de usar el
producto y guárdelo en un lugar seguro para referencia futura.
(Las fotos del texto solo son de referencia,
remítase al producto real)
Page 38

1
Instrucciones de seguridad importantes............................................................2
Especificaciones................................................................................................4
Estructura del producto .....................................................................................4
Controles y estado de la olla .............................................................................5
Panel de control.............................................................................................5
Estado de la olla............................................................................................5
Teclas de accionamiento ...............................................................................5
Teclas de función...........................................................................................6
Antes de usar por primera vez ..........................................................................6
Extraiga e instale la cubierta antibloqueo......................................................6
Extraiga e instale el anillo de sellado ............................................................6
Apertura segura de la tapa............................................................................7
Preparación para cocinar ..................................................................................7
Cocinar con tu olla.............................................................................................8
Cocción a presión..........................................................................................8
Cocción predeterminada ...............................................................................10
Dorar/saltear..................................................................................................11
Hacer parfait..................................................................................................11
Cocción lenta.................................................................................................12
Calentar.........................................................................................................12
Cuidados y mantenimiento................................................................................12
Limpieza ........................................................................................................13
Diagrama del circuito eléctrico ..........................................................................13
Solución de problemas......................................................................................14
ÍNDICE
Page 39

2
Al usar electrodomésticos siempre se deben tomar algunas medidas de seguridad básica,
incluidas las que se encuentran a continuación. Lea todas las instrucciones.
1. Este artefacto es solo para uso doméstico. No utilice este artefacto eléctrico en
exteriores.
2. Utilice el artefacto solo para el fin previsto.
3. No coloque el artefacto sobre o cerca de una hornalla de gas o eléctrica ni de un
horno caliente.
4. No lo use cerca del fuego o donde pueda salpicar agua. No lo use en un lugar
expuesto directamente a la luz solar o a salpicaduras de aceite. Colóquelo lejos
del alcance de los niños.
5. No la coloque en un lugar inestable. Queda terminantemente prohibido usarlo
sobre papel de periódico, espuma u otro objeto que pueda bloquear el orificio de
la ventilación del fondo.
6. Se requiere estricta supervisión cuando se utilice el artefacto cerca de los niños.
Los adultos deberían supervisar a los niños para asegurarse de que no jueguen
con el electrodoméstico.
7. Este electrodoméstico no está previsto para que lo usen personas (incluidos los
niños) con capacidades reducidas, sensoriales o mentales o falta de experiencia
y conocimiento, a menos que los acompañe otra persona responsable que vele
por su seguridad.
8. Para protegerse contra descargas eléctricas, no sumerja el cable, el enchufe ni
el artefacto eléctrico en agua ni en ningún otro líquido.
9. Asegúrese de que las asas estén montadas y sujetas de manera adecuada
antes de usarlo. Las asas ajadas, rotas o quemadas se deben sustituir.
10. No utilice el artefacto si el cable de alimentación o el enchufe están dañados o si
el artefacto no funciona correctamente o ha sido dañado de alguna manera.
Devuelva el electrodoméstico al Centro de Servicios de Mantenimiento para que
lo examinen, reparen o ajusten.
11. No sustituya ningún repuesto dentro de la olla a presión sin autorización ya que
esto podría provocar un cortocircuito, un incendio o causar lesiones.
12. El uso de accesorios no recomendados por el fabricante del artefacto puede
causar lesiones personales.
13. Evite que el cable cuelgue por el borde de una mesa o mostrador o entre en
contacto con superficies calientes.
14. Precaución: para reducir el riesgo de descarga eléctrica, solo cocine en el
recipiente extraíble (el recipiente para cocinar).
15. Cada vez, antes de usar, asegúrese de verificar que ni la cubierta antibloqueo, ni la
válvula flotante, ni la válvula de escape estén obstruidas; limpie la superficie del
recipiente interior y la placa de calentamiento para confirmar que no tienen objetos
extraños; asegúrese de que la válvula de escape se encuentra en el lugar de sellado.
INSTRUCCIONES DE SEGURIDAD IMPORTANTES
Page 40

3
16. Verifique siempre que los dispositivos que liberan la presión no estén tapados.
No cubra las válvulas de presión.
17. Remoje los alimentos secos antes de cocinarlos en el producto.
18. Tenga en cuenta que algunos alimentos, como la compota de manzana, los
arándanos, la cebada perlada, la avena u otros cereales, las arvejas partidas, los
fideos, los macarrones, el ruibarbo u otros espaguetis pueden hacer espuma,
salpicar y tapar el dispositivo de liberación de presión. Estos alimentos solo se
pueden cocinar en una olla a presión con precaución, con el recipiente interior
lleno solo hasta la mitad y con la liberación natural.
19. No llene el artefacto por encima del nivel MAX (máx.) (2/3 lleno). Cuando cocine
alimentos que se expanden durante la cocción, tales como el arroz o las verduras
deshidratadas, no llene el artefacto más de la mitad (1/2). Al llenarlo demasiado
se corre el riesgo de hacer que se tape la tubería de ventilación y que por ello se
genere una presión excesiva. Consulte la sección «Preparación para cocinar».
20. Este electrodoméstico cocina a presión. El uso inadecuado puede causar lesiones
por quemaduras. Asegúrese de que el artefacto esté debidamente cerrada antes
de empezar a funcionar. Consulte la sección «Preparación para cocinar».
21. Nunca haga frituras sumergidas en aceite ni frituras a presión con aceite.
Es peligroso y puede iniciar un incendio o causar daños graves.
22. No mueva este producto ni lo fuerce para extraer la tapa mientras se encuentra
en funcionamiento.
23. Tenga especial cuidado cuando mueva un artefacto que contenga aceite caliente
u otros líquidos calientes.
24. Evite tocar las superficies calientes. Utilice asas o perillas. No coloque las manos ni
la cara sobre la válvula de escape o la válvula flotante a fin de evitar escaldaduras.
25. Después de cocinar, extraiga la tapa con sumo cuidado. El vapor que se
encuentra dentro puede causar quemaduras graves.
26. Cuando abra la tapa después de cocinar, no toque el recipiente ni la cubierta
interiores con las manos directamente para evitar escaldaduras.
27. No abra la olla a presión antes de que se haya enfriado y se haya liberado toda
la presión interna. Si se dificulta la separación de las asas, es un indicador de
que la olla aún está presurizada, no fuerce la apertura. Cualquier presión que
tenga la olla puede ser peligrosa. Consulte «Preparación para cocinar».
28. Para desconectar el artefacto, apague el control y retire el enchufe del tomacorriente.
29. Siempre que no lo use, desenchúfelo antes de extraer las piezas para limpiarlo.
Deje enfriar el artefacto antes de colocar o retirar sus piezas, y antes de limpiarlo.
1) Solo para uso en un mueble o mostrador.
2) ADVERTENCIA: Tenga cuidado al derramar los alimentos ya que pueden
provocar quemaduras graves. Mantenga el artefacto y el cable de
alimentación fuera del alcance de los niños. No deje que el cable cuelgue
INSTRUCCIONES DE SEGURIDAD IMPORTANTES
Page 41

4
sobre el borde de un mostrador ni utilice un tomacorriente que se encuentre
debajo de un mostrador ni utilice un cable de extensión.
Se provee un cable eléctrico corto para evitar que los niños jalen el cable y
reducir los riesgos de enredos o tropiezos que pueda causar un cable largo.
30. Este artefacto tiene un enchufe polarizado (un contacto es más ancho que el
otro). Para reducir el riesgo de una descarga eléctrica, este artefacto cuenta,
este enchufe está diseñado para entrar en un tomacorriente polarizado de una
sola manera. Si el enchufe no entra correctamente en el tomacorriente,
colóquelo al revés. Si aun así no entra, póngase en contacto con un electricista
calificado. No intente modificar el enchufe de ninguna manera.
GUARDE ESTAS INSTRUCCIONES
INSTRUCCIONES DE SEGURIDAD IMPORTANTES
Page 42

5
120 V~60 HZ
22 cm
70 kPa
1000 W
6 L
60 °C~80 °C
Máx
TAZA
ESPECIFICACIONES
Voltaje/frecuencia
Calibre del
recipiente interior
Presión de trabajo
Alimentación
Volumen del
recipiente interior
Temperatura media
Paleta para arroz, cuchara para sopa,
taza medidora, manual del usuario.
Válvula de escape
Marca de posición
de la tapa
Llave de liberación
del vapor
Marca que indica
tapa abierta/cerrada
Accesorios
ESTRUCTURA DEL PRODUCTO
Válvula flotante
Asa de
la tapa
Tapa
Anillo de sellado
Recipiente interior
Asa de la olla
Carcasa de la olla
Base y dispositivo
calentador
Tapa
Cubierta
antibloqueo
Diseño especial de la
ubicación de la tapa
Olla exterior
Panel de control
Soporte para
cuchara
Page 43

6
Panel de control
El panel de control de la olla a presión eléctrica está compuesto por una pantalla de LED,
3 teclas de accionamiento y 11 teclas de función. Cada tecla de función tiene una luz
indicadora de dicha función.
Pantalla de LED
Teclas de accionamiento
Indicadores de función
Teclas de función
Estados de la olla
La olla de presión eléctrica tiene 4 estados que se muestran en la pantalla de LED y en los
indicadores de función.
●
Estado en espera: La pantalla de LED muestra « ».
●
Estado predeterminado: La pantalla de LED muestra el tiempo «predeterminado» y el
tiempo que corre en cuenta regresiva, y se enciende el indicador luminoso de la función.
●
Estado de funcionamiento del programa: La pantalla de LED muestra « » y se
enciende el indicador luminoso de la función activa.
●
Estado para mantener caliente: La pantalla de LED muestra « » y el tiempo que
corre, y se enciende el indicador luminoso de la función «Mantener caliente».
Teclas de accionamiento
Hay tres botones de función incluidos, el Temporizador (Temp.), el Manual y el de Ajuste.
El botón Temporizador sirve para predeterminar, el botón Manual sirve para ajustar la
presión y el tiempo de mantenimiento, y el de Ajuste para ajustar el tiempo.
Temp.
Iniciar Arroz
Cocción lenta
Sopa/
guisado
Dorar/
saltear
Pollo Carne Pescado
Pasta Al vapor Parfait
Pimientos/
legumbres
Manual Ajuste
Mantener caliente
Cancelar
CONTROLES Y ESTADOS DE LA OLLA
Page 44

7
Teclas de función
La tecla más importante es «Mantener caliente/cancelar». Si pulsa esta tecla mientras se
programa la olla o mientras algún programa está activo, dicho programa se cancelará y la
olla volverá al estado «En espera». Si pulsa esta tecla cuando la olla esté en estado
«En espera», se activa el programa para mantener caliente.
Entre las demás teclas de función se encuentran: «Arroz», «Sopa/guisado», «Cocción
lenta», «Dorar/saltear», «Pollo», «Carne», «Pescado», «Pasta», «Al vapor», «Parfait»,
«Pimientos/legumbres» e «Iniciar».
Antes de usar por primera vez, saque todos los accesorios del paquete y lea este manual con
atención. Preste particular atención a las instrucciones de funcionamiento y precaución para
evitar lesiones o daño a la propiedad. Lave la parte interna de la tapa y el recipiente interior
con agua jabonosa tibia, enjuague y seque a fondo. Limpie la carcasa exterior con un paño
húmedo limpio. Nunca sumerja la carcasa de la olla en agua ni en ningún otro líquido.
El recipiente interior, el anillo de sellado y la válvula de escape y todos los accesorios se
pueden lavar en lavavajilla. Pero nunca lave la tapa ni la carcasa en un lavavajilla.
Extraiga e instale la cubierta antibloqueo
La cubierta antibloqueo se
puede extraer empujándola
del costado para levantarla.
Para colocar la cubierta
antibloqueo, póngala en el
lugar y presione hacia abajo.
Extraiga e instale el anillo de sellado
El anillo de sellado se puede extraer
levantándolo hacia arriba del bastidor
del anillo por partes. Para colocar el
anillo de sellado, presiónelo hacia abajo
dentro del bastidor parte por parte. El
anillo de sellado se puede colocar de
cualquier lado mirando hacia arriba.
Tenga en cuenta lo siguiente:
●
Todas las veces, antes de usar, inspeccione para asegurarse de que el anillo de sellado
esté bien asentado en su bastidor y que la cubierta antibloqueo esté debidamente
montada en la tubería de liberación del vapor.
●
Después de usar, quite cualquier objeto extraño del anillo de sellado y de la cubierta
antibloqueo.
ANTES DE USAR POR PRIMERA VEZ
CONTROLES Y ESTADOS DE LA OLLA
Page 45

8
●
Mantenga el anillo de sellado limpio para evitar malos olores. Para quitar el mal olor lave
el anillo de sellado en agua jabonosa o en el lavavajilla. Sin embargo, es normal que el
anillo de sellado absorba el olor de ciertos alimentos ácidos. Ese es el motivo por el cual
siempre es una buena idea tener más de un anillo de sellado a mano.
●
Nunca tire del anillo de sellado por la fuerza ya que con ello podría deformarlo y afectar
su función de sellar a presión.
●
No se debería usar si el anillo de sellado está roto, tiene cortes o está dañado. Se
debería reemplazar por un anillo de sellado nuevo.
Apertura segura de la tapa
1. Asegúrese de que el programa de cocción a presión haya terminado o pulse la tecla
«Mantener caliente/cancelar» para dar por finalizado el programa.
2. Liberación de la presión en una de las siguientes formas.
Liberación rápida:
●
Pulse la tecla «Liberación del vapor » del asa de la tapa para dejar salir el vapor hasta
que la válvula flotante caiga.
Precaución:
●
Mantenga las manos y la cara lejos del orificio que se encuentra en la parte superior de
la válvula de escape cuando use la «Liberación rápida». El vapor que sale es muy
caliente y puede causar escaldaduras.
●
Nunca retire la válvula de escape mientras está dejando salir el vapor.
●
Tenga en cuenta que la Liberación rápida no es la apropiada para los alimentos en
grandes volúmenes de agua o con alto contenido de almidón (p. ej., papillas, potajes,
líquidos pegajosos, sopa, etc.). Los alimentos pueden salpicar con el vapor. En su lugar
use la «Liberación natural».
Liberación natural:
●
Deje que la olla se enfríe naturalmente hasta que la válvula flotante caiga. Puede llevar
entre 10 y 15 minutos después de que la cocción esté terminada y cuando la olla esté
en el modo «Mantener caliente».
●
El enfriamiento se puede acelerar colocando una toalla húmeda sobre la tapa.
3. Abra la tapa: Tome el asa de la tapa, gírela en sentido contrario a las agujas del reloj
hasta llegar a la posición abierta y levante la tapa hasta abrirla.
●
Precaución: No abra la tapa hasta que la presión dentro de la olla se haya liberado por
completo. Por seguridad, la tapa está bloqueada y no se puede abrir hasta que la válvula
flotante no caiga.
●
Si la válvula flotante está trabada por restos de alimentos o sustancias pegajosas, puede
empujarla hacia abajo con un bolígrafo o con un palillo cuando esté seguro de que la
presión se ha liberado al pulsar la tecla de «Liberación del vapor » del asa de la tapa.
ANTES DE USAR POR PRIMERA VEZ
Page 46

9
1. Abra la tapa
Mientras sostiene el asa de la tapa con la mano, gire
aproximadamente 30 grados en sentido horario hasta que la
marca « » del asa esté alineada con la marca « » del
borde de la carcasa de la olla.
2. Verifique que todas las partes de la tapa estén
debidamente montadas
Verifique que ni la válvula flotante ni la válvula de escape estén obstruidas. Asegúrese de
que el anillo de sellado esté bien asentado dentro de su bastidor de soporte, que la
cubierta antibloqueo esté debidamente colocada y que la válvula flotante se pueda
mover hacia arriba y hacia abajo con facilidad.
PREPARACIÓN PARA COCINAR
Máx
3. Extraiga el recipiente interior y llénelo con los alimentos y el líquido
La cantidad total de alimentos y de agua NUNCA debe exceder
la marca de nivel máximo del recipiente interior. Se recomienda
no llenar el artefacto más de 2/3. Cuando cocine alimentos que
se expandan durante su cocción tales como el arroz, las
legumbres o los vegetales deshidratados, no llene el artefacto a
más de 1/2. Llenarla en exceso puede poner a las tuberías de
ventilación en riesgo de taparse y de generar presión excesiva.
También podría provocar derrames y dañar el artefacto.
4. Coloque el recipiente interior dentro de la carcasa
Antes de hacerlo, asegúrese de retirar los objetos extraños y de limpiar en seco la parte
externa del recipiente interior y el dispositivo calentador que se encuentra dentro de la olla.
Al colocar el recipiente interior dentro de la carcasa, gire el recipiente interior
levemente para asegurarse de que el contacto entre el recipiente interior y el
dispositivo calentador sea bueno.
5. Cierre la tapa completamente
Tome el asa de la tapa y coloque la tapa en la olla, con la
marca « » de la tapa y la marca « » del borde de la
carcasa alineadas. Gire la tapa aproximadamente 30 grados
en sentido contrario a las agujas del reloj hasta que la marca
« » de la tapa esté alineada con la marca « » del borde
de la carcasa.
Page 47

10
Temp.
Iniciar Arroz
Cocción
lenta
Sopa/
guisado
Dorar/
saltear
Pollo
Carne Pescado
Pasta Al vapor Parfait
Pimientos/
legumbres
Manual Ajuste
Mantener caliente
Cancelar
Cocción a presión
El siguiente es el procedimiento para las funciones
«Arroz», «Sopa/guisado», «Dorar/saltear», «Pollo»,
«Carne», «Pescado», «Pasta», «Al vapor», «Parfait» y
«Pimientos/legumbres».
1. Siga los pasos que se encuentran en la sección
«Preparación para cocinar» de este manual.
2. Cable de alimentación. La pantalla de LED muestra
« » con lo que indica que se encuentra en espera.
3. Seleccione un botón de función de cocción, p. ej.,
«Arroz». Una vez pulsado el botón su indicador
luminoso va a parpadear y también lo hará la luz del
botón «Iniciar».
Dorar/
saltear
Temp.
Iniciar Arroz
Cocción
lenta
Sopa/
guisado
Pollo
Carne Pescado
Pasta Al vapor Parfait
Pimientos/
legumbres
Manual Ajuste
Mantener caliente
Cancelar
Temp.
Iniciar Arroz
Cocción
lenta
Sopa/
guisado
Dorar/
saltear
Pollo
Carne Pescado
Pasta Al vapor Parfait
Pimientos/
legumbres
Manual Ajuste
Mantener caliente
Cancelar
4. Para poner en marcha el modo de cocción «Arroz»,
pulse «Iniciar». Tanto el botón de «Arroz» como de
«Iniciar» permanecen encendidos.
5. La pantalla de LED muestra « » lo cual indica que
se encuentra activo el estado de precalentamiento.
●
A medida que aumenta la presión dentro de la olla,
es absolutamente normal que escape algo de vapor
de la válvula flotante hasta que dicha válvula emerja.
●
Pulsando la tecla «Mantener caliente/cancelar» se
puede cancelar y volver al modo de espera a cualquier
programa de cocción que se encuentre en marcha.
6. Cuando el programa de cocción termina, la olla
emite un bip y pasa automáticamente al ciclo
«Mantener caliente». La pantalla de LED muestra
« ».
●
No se recomienda dejar al arroz cocido en el estado
«Mantener caliente» durante demasiado tiempo ya
que puede modificar la textura o el sabor del alimento.
7. Para servir los alimentos, pulse la tecla «Mantener
caliente/cancelar» para detener el ciclo con el que se
mantiene caliente y abra la tapa según se indica en la
sección «Apertura segura de la tapa» de este manual.
COCINAR CON TU OLLA
Page 48

11
●
Cuando abra la tapa, es probable que el recipiente interior parezca estar atascado en
la tapa por el vacío. A esto lo causa la contracción del aire por el enfriamiento. Para
dejar entrar aire a fin de liberar el vacío, pulse l tecla «Liberación del vapor ».
Sopa/
guisado
Temp.
Iniciar Arroz
Cocción
lenta
Dorar/
saltear
Pollo
Carne Pescado
Pasta Al vapor Parfait
Pimientos/
legumbres
Manual Ajuste
Mantener caliente
Cancelar
Cocción predeterminada
Su olla a presión tiene una función predeterminada que puede ser la de terminar el
tiempo de cocción con entre 24 y 2 horas de reloj entre medio. La función
predeterminada no se aplica a las funciones «Mantener caliente/cancelar»,
«Cocción lenta», «Dorar/saltear» ni «Parfait». A continuación se muestra cómo programar
la cocción predeterminada.
1. Para definir un programa de cocción siga los pasos de la anterior sección
«Cocción a presión».
2. Para ingresar el modo predeterminado, pulse el botón
«Temp.». En este momento, el botón del temporizador
parpadea, después pulse «Ajuste» para ajustar el
tiempo predeterminado.
3. Finalmente pulse el botón «Iniciar» para llevar a cabo
la función del temporizador. Entonces, el tiempo que
se muestra en la pantalla de LED correrá en cuenta
regresiva y se encenderá el botón «Temp.».
●
Para cancelar el funcionamiento del temporizador,
pulse la tecla «Mantener caliente/cancelar» en
cualquier momento.
4. Su olla termina de cocinar cuando la cuenta regresiva del tiempo predeterminado llega
a 0, entonces la olla hace un bip y pasa automáticamente al ciclo automático
«Mantener caliente» durante horas. Tenga en cuenta:
●
Desaconsejamos enfáticamente usar la función predeterminada para alimentos
perecederos tales como la carne y el pescado, los cuales pueden ponerse en mal
estado cuando se los deja a temperatura ambiente durante horas. El arroz cocido
puede tomar una textura demasiado blanda por permanecer tanto tempo en remojo.
Incluso puede hacer que se forme una capa de arroz quemado al pie de la olla si se lo
deja en el modo «Mantener caliente» durante demasiado tiempo.
COCINAR CON TU OLLA
Page 49

12
●
Se debe tener cuidado al usar la función predeterminada para papillas, avena u otros
alimentos espumosos y pegajosos. Dado que es posible que estos alimentos se
adhieran a la válvula flotante, en caso que la olla esté excesivamente llena, y que esto
haga que nunca se selle y que los alimentos se rebosen, se recomienda enfáticamente
no llenar la olla en exceso, más de la mitad y, en lo posible, no dejarla sin supervisión
durante el ciclo de precalentamiento.
Dorar/
saltear
Al vapor
Temp.
Iniciar Arroz
Cocción
lenta
Sopa/
guisado
Pollo
Carne Pescado
Pasta Parfait
Pimientos/
legumbres
Manual Ajuste
Mantener caliente
Cancelar
Temp.
Iniciar Arroz
Cocción
lenta
Sopa/
guisado
Dorar/
saltear
Pollo
Carne Pescado
Pasta Al vapor Parfait
Pimientos/
legumbres
Manual Ajuste
Mantener caliente
Cancelar
Dorar/saltear
1. Siga los pasos que se encuentran en la sección
«Preparación para cocinar» de este manual. Para
evitar que la presión se acumule dentro de la olla,
mantenga la tapa abierta.
2. Cable de alimentación. La pantalla de LED muestra
« » con lo que indica que se encuentra en espera.
3. Pulse el botón «Dorar/saltear». Por motivos de
seguridad, el tiempo máximo de cocción para el
proceso de dorar/saltear es de 30 minutos.
4. Se va a calentar automáticamente después de pulsar
el botón «Iniciar». Cuando la pantalla de LED muestra
0:30, se está calentando.
●
Para evitar que se acumule presión, la tapa no se puede cerrar. De lo contrario, sería
peligroso.
●
El programa «Dorar/saltear» se puede cancelar en cualquier momento pulsando la
tecla «Mantener caliente/cancelar».
5. Cuando termina la cocción, la olla emite un bip y pasa automáticamente al estado de
espera.
Parfait
1. Siga los pasos que se encuentran en la sección
«Preparación para cocinar» de este manual.
●
Las temperaturas de la leche fresca y el yogur
refrigerados es de 20 °C. Revuélvalos en una
proporción 10:1, luego coloque la mezcla en el
recipiente interior.
2. Cable de alimentación. La pantalla de LED muestra
« » con lo que indica que se encuentra en espera.
COCINAR CON TU OLLA
Page 50

13
3. Después de pulsar el botón «Parfait» en la pantalla de
LED se mostrará 4:00, a continuación pulse «Iniciar»,
se va a calentar automáticamente.
Una vez que el tiempo que se muestra en la pantalla
de LED inicia la cuenta regresiva, se encienden las
teclas «Parfait» e «Iniciar».
●
El programa «Parfait» se puede cancelar en cualquier momento pulsando la tecla
«Mantener caliente/cancelar».
4. Cuando termina la cocción, la olla emite un bip y pasa automáticamente al estado de
espera.
Cocción
lenta
Pescado
Temp.
Iniciar Arroz
Sopa/guis
ado
Dorar/
saltear
Pollo
Carne
Pasta Al vapor Parfait
Pimientos/
legumbres
Manual Ajuste
Mantener caliente
Cancelar
Cocción lenta
1. Siga los pasos que se encuentran en la sección
«Preparación para cocinar» de este manual.
2. Cable de alimentación. La pantalla de LED muestra
« » con lo que indica que se encuentra en espera.
3. Pulse la tecla «Cocción lenta». El tempo máximo para
el proceso de cocción lenta es de 6 horas.
4. Se va a calentar automáticamente después de pulsar
el botón «Iniciar». Cuando la pantalla de LED muestra
6:00, está precalentando.
●
El programa «Cocción lenta» se puede cancelar en cualquier momento pulsando la
tecla «Mantener caliente/cancelar».
5. Al terminar la cocción, el modo «Cocción lenta» se dará por terminado y volverá al
modo para mantener caliente.
Calentar
Si se pulsa la tecla «Mantener caliente/cancelar» en el estado «en espera», se activa la
función para mantener caliente. Cuando se inicia la función «Mantener caliente», se
enciende el indicador de mantener caliente y en la pantalla se muestra «OH» (On Hold,
en espera), con el conteo del tiempo en horas. No se muestra el tempo de espera
después de más de 24 horas, se muestra «----». La función «Mantener caliente» se
puede usar con la tapa cerrada o abierta.
COCINAR CON TU OLLA
Page 51

14
120 V~60 Hz
Fusible de la temperatura
Toma
Interruptor
de presión
Placa para cocción
Tablero de
distribución
eléctrica
Suministro eléctrico
del tablero de
distribución
Línea de enlace
Interruptor de
detección
Sensor de
temperatura
Panel de
visualización
El cuidado o mantenimiento regular es esencial para garantizar que este producto sea
seguro para usar. Si sucede cualquiera de los siguientes casos, deje de usar el
electrodoméstico inmediatamente y póngase en contacto con un representante de
servicio de mantenimiento autorizado.
●
El cable de alimentación y el enchufe están expandidos, deformados, decolorados,
dañados, etc.
●
Una parte del cable de alimentación o del enchufe se calienta más de lo normal.
●
La olla a presión eléctrica no calienta de forma normal y emana olor a quemado.
●
Cuando se enciende, se perciben ruidos o vibraciones inusuales.
Si hay polvo o suciedad en el enchufe o en la toma, extraiga el polvo o la suciedad con
un cepillo seco.
Limpieza
Precaución: asegúrese de que el electrodoméstico se haya enfriado y esté
desenchufado antes de limpiarlo.
1. Limpie el producto siempre después de usar. Limpie en seco el borde y la ranura de la
carcasa interior negra con un paño para evitar que se oxide el borde exterior del recipiente.
2. Extraiga la tapa y saque el recipiente interior, lávelos con detergente, enjuáguelos con
agua limpia y después de limpiarlo séquelo con un paño suave.
3. Lave con agua la tapa, el anillo de sellado (que se puede extraer), la válvula de
escape, la cubierta antibloqueo y séquelos con un paño suave seco. No desarme el
montaje de la tubería de liberación del vapor.
4. Limpie el cuerpo de la olla con un paño húmedo limpio. No sumerja la olla en agua. No
use un paño húmedo para limpiar el recipiente mientras el cable de alimentación está
enchufado en la toma de corriente.
Diagrama del circuito eléctrico
CUIDADOS Y MANTENIMIENTO
Page 52

15
Problema
Dificultad para cerrar la tapa
Dificultad para abrir la tapa
El vapor se escapa por el
costado de la tapa
Sale vapor por la válvula
flotante durante más de
2 minutos
La válvula flotante no se
eleva
El vapor sale de la válvula de
escape sin parar
La pantalla sigue vacía
después de conectar el
cable de alimentación
Código E1
Código E2
Código E8
Código C1
Arroz semicocido o
demasiado duro
Arroz demasiado blando
Pantalla
El anillo de sellado no está
debidamente colocado
No está el anillo de sellado
El anillo de sellado está dañado
La tapa no está correctamente cerrada
El anillo de silicona de la válvula flotante
está desgastado
Hay pocos alimentos o agua en el
recipiente interior
Falla el control de la presión
Mala conexión eléctrica o falta de
electricidad
El fusible eléctrico de la olla se fundió
Abra el circuito del sensor inferior
Cortocircuito del sensor inferior
Rotura de los interruptores de presión
Protección para el sobrecalentamiento
Agua demasiado sucia
La cubierta se abrió con
anticipadamente
Exceso de agua
La válvula flotante está en la
posición emergente
Hay presión dentro de la olla
Hay restos de alimentos adheridos al
anillo de sellado
Hay restos de alimentos en el sello de
silicona de la válvula flotante
El pasador de bloqueo de la tapa
obstruye la válvula flotante
El asa de liberación del vapor no se
encuentra en la posición de sellado
Coloque el anillo de sellado
Sustituya el anillo de sellado
Vuelva a abrir y cerrar la tapa
Sustituya el sello de silicona de la válvula
flotante
Agregue agua según lo indique la receta
Póngase en contacto con el servicio de
asistencia en línea
Inspeccione el cable de alimentación
para asegurarse de que la conexión sea
correcta, verifique que el toma de
corriente esté activa.
Póngase en contacto con el servicio de
asistencia en línea
Devuelva el electrodoméstico al centro
de servicios de mantenimiento para que
lo reparen
Verifique si hay agua o alimentos en el
recipiente; normalmente, después del ajuste,
el electrodoméstico se puede usar cuando el
bip se detiene; de lo contrario envíelo al centro
de servicios de mantenimiento.
Ajuste la relación de arroz en seco y
agua según la receta
Después de que se complete el ciclo de
cocción, deje la tapa colocada durante
5 minutos más.
Ajuste la relación de arroz en seco y
agua según la receta
Limpie el anillo de sellado
Limpie el sello de silicona de la
válvula flotante
Cierre la tapa completamente
Gire el asa de liberación a la posición de
sellado
La válvula flotante está atascada en la
posición emergente
Presione suavemente la válvula flotante
con un bolígrafo o un palillo.
Presione suavemente la válvula
flotante hacia abajo
Ubique bien el anillo de sellado
Use el asa de liberación del vapor para
reducir la presión interna. Abra la tapa
después de que la presión se haya
liberado por completo.
Motivo posible Solución
Los casos que se encuentran en las tablas a continuación no siempre indican que la olla está
averiada. Examine la olla minuciosamente antes de solicitar asistencia para la reparación.
SOLUCIÓN DE PROBLEMAS
Page 53

16
Por cualquier mejora técnica o cambio en el aspecto o en
la placa de identificación, dichos cambios se deben colocar en
el manual revisado sin previo aviso. En caso de cambios en el
aspecto y el color, consulte el producto real para acceder a
información detallada.
Page 54

 Loading...