

Page 1

Top-Load Washer
Power supply: 120V
Frequency: 60Hz
Capacity: 4.5 cu ft
en
USER MANUAL &
INSTALLATION
INSTRUCTIONS
Warning:
Before using this product,
please read this manual carefully
and keep it for future reference.
The design and specifications
are subject to change without
prior notice for product
improvement. Consult with your
dealer or manufacturer for
details.
version A
1-844-224-1614
MODEL NUMBERS
MLV45N1B**
MLV45N3B**
www.midea.com
Page 2

Dear user
THANK YOU for letting Midea help you “make yourself at home.”
This manual is part of our commitment to your total satisfaction.
Please read this manual carefully before use and keep it in a
convenient place for future reference.
To help us serve you better, please consider registering your
product using our convenient Midea app Msmartlife, by visiting
www.midea.com, or by texting a picture of your proof of purchase
to 1-844-224-1614.
By using the text option you will earn an additional 3 month
warranty extension immediately following the completion of the
following the completion of the product’s original warranty.
SAFETY INSTRUCTIONS.................................................................. 4
FEATURES
.........................................................................................11
Package contents ...................................................................................11
Main components ...................................................................................12
OPERATION REQUIREMENTS.........................................................13
Electrical requirements
Water requirements
Drainage requirements
INSTALLATION INSTRUCTIONS
.........................................................................13
................................................................................14
.........................................................................14
........................................................15
Unpacking your washer .......................................................................15
Choosing a location ...............................................................................16
Tools you will need ................................................................................18
Connect the water ho ses ....................................................................
19
Connect the drain hose .......................................................................21
Level your washer ................................................................................24
Power on ..................................................................................................25
Run a test cycle .....................................................................................26
WASHER USE ..................................................................................27
Control panel ........................................................................................... 27
Washing a load of laundry.................................................................. 30
Setting the child lock ...........................................................................34
Washer options and settings ............................................................ 35
Page 3
WASHER CARE ............................................................................... 37
Cleaning and maintenance
.................................................................
37
BEFORE YOU CALL FOR SERVICE ..............................................39
Error codes ..............................................................................................42
WARRANTY .....................................................................................
PRODUCT REGISTRATION ............................................................
44
46
READ AND KEEP THESE INSTRUCTIONS FOR FUTURE
REFERENCE
This manual c
and care of your appliance. Please read this manual carefully before
installation and operation of this machine to prevent injury and property
damage.
Warnings and Important Safety Instructions in this manual DO NOT
cover all possible conditions and situations that may occur. It is your
responsibility to use common sense, caution and care when installing,
maintaining and operating your washer.
ontains important information on the installation, use,
CAUTION
RISK OF ELECTRIC SHOCK
DO NOT OPEN
Instructions
Safety
Features
Requirements
Operation
Instructions
Installation
Washer Use Washer Care
Troubleshooting
3
Page 4

Instructions
Safety
SAFETY INSTRUCTIONS
YOUR SAFETY AND THE SAFETY OF OTHERS ARE VERY
IMPORTANT
To prevent injury to the user or other people and property damage, the
instructions shown here must be followed. Incorrect operation due to
ignoring of instructions may cause harm or damage, including death.
The level of risk is shown by the following indications.
Features
Requirements
Operation
Instructions
Installation
Washer Use
Washer Care
Troublesho
This indicates that hazards or unsafe practices may cause
serious personal injury or death.
To reduce the risk of fire, explosion, electric shock or
WARNING
personal injury when using your washing machine, you
SHOULD follow these basic safety precautions.
This indicates that hazards or unsafe practices may cause
CAUTION
minor personal injury or property damage.
This symbol indicates that there are important operating
and maintenance instructions in the literature accompanying
WARNING
your washing machine
WARNING
State of California Proposition 65 Warnings.
The california Safe Drinking Water and Toxic Enforcement Act requires the
Governor of California to publish a list of substances known to the State of
california to cause cancer, birth defects or other reproductive harm and
requires businesses to warn of potential exposure to such substances. This
product contains a chemical known to the State of California to cause
cancer, birth defects or other reproductive harm. This appliance can cause
low-Ievel exposure to some of the substances listed, including benzene,
formaldehyde and carbon monoxide.
Cancer and Reproductive Harm - www.P65Warnings.ca.gov.
o
ting
WARNING
Do not store or use gasoline or other f1ammable vapors and liquids in the
vicinity of this or any other appliance.
4
Page 5

IMPORTANT SAFETY INSTRUCTIONS
WARNING
Read all instructions before using the appliance.
•
Use this appliance only for its intended purpose as described in this
•
Owner’s Manual.
Before use, the washer must be properly installed as described in
•
this manual.
ALWAYS follow the fabric care instructions supplied by the garment
•
manufacturer.
Do not wash articles that have been previously cleaned in, washed
•
in, soaked in, or spotted with gasoline, dry-cleaning solvents, other
flammable or explosive substances as they give off vapors that could
ignite
•
•
•
•
•
•
•
•
•
•
•
•
•
or explode.
Do not allow children to play on or in the appliance. Close supervision
of children is necessary when the appliance is used near children.
Before the appliance is removed from service or discarded, remove
the lid of the washing compartment.
Do not reach into the appliance if the tub is moving.
Do not install or store this appliance where it will be exposed to the
weather or freezing temperatures.
Do not tamper with the controls.
Do not repair or replace any part of the appliance or attempt any
servicing unless it is specifically recommended in the user
maintenance instructions or in published user repair instructions
that you understand.
Hydrogen gas is explosive. If the hot water system has not been used
for two weeks or more, before using a washer, turn on all hot water
faucets and let the water flow from each for several minutes. This will
release any accumulated hydrogen gas. The gas is flammable, so do
not smoke or use an open flame during this time.
Keep the area underneath and around your appliance free of
combustible materials (lint, paper, rags and so on), gasoline
chemicals, and other flammable vapors and liquids.
Do not place items exposed to cooking oil in your washer. ltems
contaminated with cooking oil may contribute to a chemical reaction
that could cause a load to catch fire.
Tis washer is not designed for maritime use or for mobile installations
such as in RVs aircraft and other mobile platforms.
Turn off the water faucets and unplug the washer if the machine is to
be left for an extended period of time, such as during vacations.
Packaging material can be dangerous for children. There is a risk of
suffocation! Keep all packaging away from children.
Always check the inside ofthe washer for foreign objects before
loading laundry. Keep the lid closed when not in use.
Instructions
Safety
Features
Requirements
Operation
Instructions
Installation
Washer Use
Washer Care
Troubleshooting
5
Page 6

Instructions
Safety
Features
Requirements
Operation
Instructions
Installation
Washer Use
Washer Care
Troublesho
o
ting
WARNING
Installation Warnings and Precautions
•
Plug the power cord into an AC 120V/60Hz wall socket rated at 15
amps or higher. Use the socket for this washer only. Do not use an
extension cord.
- Sharing a wall socket with another appliance, using a power strip,
or extending the power cord may result in electric shock or fire.
- Do not use an electric transformer. lt may result in electric shock or
fire.
- Make sure that the power voltage, frequency and current match
the product's specifications. Failing to do so may result in electric
shock or fire.
Remove all foreign substances such as dust or water from the power
•
plug terminals and contact points using a dry cloth on a regular basis.
- Unplug the power plug and clean it with a dry cloth.
- Failing to do so may result in electric shock or fire.
Plug the power plug into the wall socket in the right direction so that
•
the cord runs towards the floor.
- If you plug the power plug into the socket in the opposite direction,
the electric wires within the cable may be damaged and this may
result in electric shock or fire.
Plug the power plug into the wall socket firmly. Do not use a damaged
•
power plug or loose wall socket, because this may result in electric
shock fire.
Do not pull or excessively bend the power cord. Do not twist or tie
•
the power cord.
Do not hook the power cord over a metal object. Place a heavy object
•
on the power cord, insert power cord between objects, or push the
power cord into the space behind the appliance, because this may
result in electric shock or fire.
Do not pull the power cord when unplugging the power plug.
•
- Unplug the power plug by holding the plug.
- Failing to do so may result in electric shock or fire.
If the power plug or power cord is damaged, contact your nearest
•
service center.
Do not install on carpet. Install the washer on a level and solid floor
•
that can support its weight. Failure to do so may result in abnormal
vibration, noise or problems with the product.
The washer is heavy. Two or more people may be needed to install
•
and move the appliance. Failure to do so may result in bodily or other
injuries.
•
Store and install the washer where it will not be exposed to
temperatures below freezing or exposed to outdoor weather
conditions. Failure to do so may result in serious leak damage.
Position the appliance so that the power plug is easily accessible.
•
Failure to do so may result in electric shock or fire due to an electrical
short circuit.
Failure to follow all of the safety warnings in this guide may result in
•
property damage or injury to persons.
6
Page 7

WARNING
Use and Maintenance warnings and Precautions
• If the appliance is flooded, cut the power immediately and contact
your nearest service center.
If the appliance emits a strange noise, a burning smell or smoke,
•
unplug the power plug immediately and contact your nearest service
center. Failure to do so may result in electric shock or fire.
In the event of a gas leak (such as propane or LP gas) ventilate the
•
area immediately. Do not turn any appliance or light on or off.
- Do not use a ventilating fan.
- A spark may result in an explosion or fire.
Do not force the washer lid open while the washer is operating
•
(high-temperature washing, drying or spinning).
- Water flowing out of the washer may cause burns or cause the
floor to be slippery. This may result in injury.
- Forcing the lid open can damage the product or cause injury.
Make sure to remove the packaging (sponge, styrofoam) attached to
•
the bottom of the washer before using it.
Do not insert your hand or a metal object under the washer. This may
•
result in injury.
Do not attempt to operate this appliance if it is damaged,
•
malfunctioning, partially disassembled or has missing or broken parts,
including a damaged cord or plug. This may result in electric shock,
fire or death.
Do not touch the power plug with wet hands. This may result in
•
electric shock.
•
Do not turn the appliance off by unplugging the power plug while the
washer is in operation. Plugging the power plug into the wall socket
again may cause a spark and result in electric shock or fire.
Keep all packaging material well out of the reach of children, as
•
packaging materials can be dangerous to children. lf a child places a
bag over his or her head ,he or she may suffocate.
Do not let children or infirm persons use this washer unsupervised.
•
•
Failure to do so may result in electric shock, burns or injury.
Do not attempt to repair, disassemble or modify the appliance
•
yourself.
- Do not use any fuse (such as copper, steel wire etc.) other than the
standard fuse.
- If you need to repair or reinstall the appliance, contact your nearest
service center.
- Failure to do so may result in electric shock, fire, problems with the
product or injury.
If any foreign substance such as water enters the appliance in any
•
•
area other than the tub, unplug the power plug and contact your
nearest service center. Failure to do so may result in electric shock
or fire.
If the water supply hose comes loose from the faucet and floods the
•
appliance, unplug the power plug. Failure to do so may result in
electric shock or fire.
Instructions
Safety
Features
Requirements
Operation
Instructions
Installation
Washer Use Washer Care
Troubleshooting
7
Page 8

Instructions
Safety
Features
Requirements
Operation
Instructions
Installation
Washer Use
Washer Care
Troublesho
o
ting
Do not mix chlorine bleach with ammonia or acids such as vinegar.
•
Incorrect usage can produce poisonous gas, resulting in serious injury.
Do not reach into the washer while parts are moving. Before loading,
•
unloading or adding items, press the Start Pause button and allow
the tub to come to a complete stop before reaching inside. Failure to
do so may result in electric shock injury or fire.
Do not allow children to play on or in the washer. Close supervision of
•
children is necessary when the washer is used near children. As
children grow, teach them the proper, safe use of all appliances.
Failure to do so may result in serious injury.
Keep laundry products out of reach of children. Observe all warnings
•
on product labels and follow them. Failure to do so may result in
serious injury.
Disconnect this appliance from the power supply before attempting
•
any user maintenance. Pressing the Power button does not
disconnect this appliance from the power supply. Failure to do so
may result in electric shock, injury or fire.
Do not clean the appliance by spraying water directly onto it.
•
Do not use benzene, thinner or alcohol to clean the appliance. This
•
may result in discoloration, deformation, damage, electric shock or fire.
Unplug the power plug when the appliance is not being used for long
•
periods of time or during a thunder/lightning storm. Failure to do so
may result in electric shock or fire.
Keep hands and foreign objects clear of the lid and latch area when
•
closing the lid. Failure to do so may result in personal injury.
If the washer is contaminated by a foreign substance such as
•
detergent, dirt, or food waste, unplug the power plug and clean the
washer with a damp, soft cloth. Failure to do so may result in
discoloration, deformation. Damage or rust.
The clear portion of the lid can be broken by a strong impact. Take
•
care when using the washer. If the clear portion is cracked or broken,
it may result in injury.
After a water supply failure or when reconnecting the water supply
•
hose, open the faucet slowly.
Open the faucet slowly after a long period of non-use. The air pressure
•
in the water supply hose or the water pipe may result in damage to a
part or in water leakage.
If a drain error occurs during an operation, check if there is a draining
•
problem. If the washer is used when it is flooded because of a draining
problem, it may result in electric shock or fire due to an electrical short
circuit. Do not insert your hand or a metal object under the washer.
This may result in injury.
Insert laundry into the washer completely so that the laundry does not
•
get caught in the lid. lf laundry gets caught in the lid, it may result in
damage to the laundry or the washer, or result in water leakage.
Make sure that the faucet is turned off when the washer is not being
•
used.
Make sure that the water supply hose connectors are properly
•
tightened. Failure to do so may result in property damage or injury.
Open the faucet and check if the water supply hose connector is firmly
•
tightened and that there is no water leaking before using the product.
If the water supply hose connectors are loose, it may result in water
leakage.
8
Page 9

Do not stand on top of the appliance or place objects (such as
•
laundry, lighted candles, lighted cigarettes, dishes, chemicals, metal
objects, etc.) on the appliance. This may result in electric shock, fire,
problems with the product, or injury.
Do not operate the appliance with wet hands. This may result in
•
electric shock.
Do not spray volatile material such as insecticide onto the surface of
•
the appliance. As well as being harmful to humans, it may also result
in electric shock, fire or problems with the product.
Do not place an object that generates an electromagnetic field near
•
the washer. This may result in injury due to a malfunction.
Since the water drained during a high temperature wash or drying
•
cycle is hot, do not touch the water. This may result in burns or injury.
Do not wash, spin or dry water-proof seats, mats or clothing.
•
Do not wash thick, hard mats even if the washer mark is on the care
•
label. This may result in injury or damage to the washer, walls, floor
or clothing due to abnormal vibrations.
Do not operate the washer when the detergent dispenser is removed.
•
This may result in electric shock or injury due to water leakage.
Do not insert your hand into the detergent dispenser after opening it.
•
This may result in injury because your hand may be caught.
Do not place any non-Iaundry objects, such as shoes, food waste or
•
animals into the washer. This can cause abnormal vibrations that can
damage the washer, and in the case of pets, cause severe injury or
death.
Do not press the buttons using sharp objects such as pins, knifes, or
•
fingernails. This may result in electric shock or injury.
Do not wash laundry contaminated by oils, creams or lotions usually
•
found in skin-care shops or massage clinics. This may result in the
rubber seal becoming deformed and water leakage.
Make sure that the water inlet pipe is connected and the tap is
•
opened before washing clothes.
Do not leave metal objects (safety pins, hair pins, and so on) or
•
bleach in the tub for long periods of time. This may cause the tub to
rust.
- If rust appears on the surface of the tub, apply a neutral cleansing
agent to the surface and use a sponge to clean it. Never use a metal
brush.
Do not use hot water from water cooling/heating devices. This may
•
result in problems with the washer.
Do not use natural hand-washing soap in the washer. lf it hardens
•
and accumulates inside the washer, it may cause problems with the
product, discoloration, rust or bad odors.
If using a washing net with this machine (not provided), do not wash
•
laundry items such as bedding in the washing net. Doing so may
•
result in injury due to abnormal vibrations. Place only smaller items
such as lace socks and lingerie in the washing net.
Do not use hardened powdered detergent. If it accumulates inside
•
the washer, it may result in water leakage.
Do not wash throw rugs or doormats. Doing so may cause sand to
•
accumulate inside the washer, resulting in mechanical problems.
Instructions
Safety
Features
Requirements
Operation
Instructions
Installation
Washer Use
Washer Care
Troubleshooting
9
Page 10

Instructions
Safety
Features
WARNING
Grounding/Earthing
•
This appliance must be properly grounded.
Do not ground the appliance to a gas pipe, plastic water pipe or
•
telephone line.
- Improper grounding may result in electric shock, fire, explosion or
problems with the product.
- Never plug the power cord into a socket that is not grounded
correctly. Make sure that the socket you use is grounded in
accordance with local and national codes.
WARNING
Requirements
Operation
Instructions
Installation
Washer Use
Washer Care
Troublesho
o
ting
Choosing a Proper Location
Do not install this appliance near a heater or inflammable material.
•
Do not install this appliance in a humid, oily or dusty location, or in a
•
location exposed to direct sunlight or water (rain drops).
Do not install this appliance in a location where gas may leak. Failure
•
to do so may result in electric shock or fire.
If the washer is moved to a new location, have it checked and
•
reinstalled by a qualified service technician. Failure to follow this
warning may result in electric shock or fire.
Do not pull power cord or drain outlet hose to move appliance to
•
desired location place.
10
Page 11

FEATURES
Package Contents
Make sure that the following items came with your washer
Clamp (x2)
Drain Hose
Drain Hose Guide
Manual
Instructions
Safety
Features
Requirements
Operation
Instructions
Installation
Washer Use
Washer Care
Filter (x2)
NOTE:
Use the clamps to secure the drain hose to the washer rear panel.
•
Use the filters to replace the rubber washers in the water hoses (faucet
•
sides).
Troubleshooting
11
Page 12

Instructions
Safety
Main Components
Control panel
Faucet and water inlet hose
Features
Requirements
Operation
Instructions
Installation
Washer Use
Washer Care
Troublesho
Drain hose and holder
Top lid
Cabinet
Adjustable leg
(Four legs)
Look through window
Power cord
Water inlet valve
Drain hose outlet
Softener compartment
o
ting
Bleach compartment
12
Detergent compartment
Door lock
Page 13

INSTALLATION REQUIREMENTS
Electrical requirements
Instructions
Safety
WARNING
To reduce the risk of ire, electric shock, or injury to persons, read the
SAFETY INSTRUCTIONS before operating this appliance.
Use a 120 Volt, 60Hz, 15 amp fuse or circuit breaker. We recommend an
individual branch circuit that serves only your washer.
WARNING
Never use an extension cord.
Electrical grounding is required for your washer.
You must ground your washer. IN the event of a malfunction or
breakdown, grounding reduces the risk of electric shock by providing a
path of least resistance for the electric current.
Your washer is equipped with a power cord with a three-pronged
grounding plug for use in a correctly installed and grounded outlet.
The outlet must be correctly installed and grounded in accordance with
all local codes and ordinances.
Features
Requirements
Operation
Instructions
Installation
Washer Use Washer Care
WARNING
You are responsible for providing adequate electrical services for
•
your washer.
An incorrectly connected equipment-grounding conductor can
•
increase the risk of electrical shock. Check with a qualified electrician
or serviceman if you are not sure whether your washer is grounded
correctly.
Do not modify the power cord plug that came with your washer. lf
•
the plug does not fit the outlet, have the correct type outlet installed
by a qualified electrician.
To prevent unnecessary risk of fire, electrical shock or personal
•
injury, all wiring and grounding must be done in accordance with the
National Electrical Code ANSI/FNPA, No.70 Latest Revision and local
codes and ordinances.
Never connect the ground wire to plastic plumbing lines, gas lines or
•
hot water pipes.
Troubleshooting
13
Page 14

Water requirements
To fill your washer in the correct amount of time, the water pressure needs
Instructions
Safety
to be between 14 and 116 psi (100 to 800 kPa).
If the water pressure is less than 14 psi (100 kPa):
•
•
Features
•
Requirements
Operation
To avoid the possibility of water damage:
•
•
•
Instructions
Installation
Drainage requirements
The recommended height for the drain standpipe is 48 in. (122 cm).
Washer Use
The drain hose must be routed through the drain hose clip to the standpipe.
The standpipe must be large enough to accept the outside diameter of
the drain hose.
The water valve may fail or may not shut off completely.
The time it takes to fill your washer may be longer than the time your
washer controls allow. Your washer will turn off and report an error. A
time-limit is built into the controls to prevent flooding in your home if
a hose becomes loose.
Water inlet hoses must be purchased separately. You can buy inlet
hoses in various lengths up to 8 ft. (240 cm).
Make sure that the water faucets are easily accessible.
Turn off the faucets when you are not using your washer.
Periodically check to make sure that water is not leaking from the
water hose fittings.
Washer Care
Troublesho
o
ting
14
Page 15

INSTALLATION INSTRUCTIONS
Unpacking your washer
WARNING
•
Packing materials can be dangerous to children. Keep all packing
materials (plastic bags, polystyrene, and so on) well out of the reach
of children.
Do not operate your washer on the foam base cushion. Doing so will
•
result in serious vibration, which could cause equipment damage or
result in physical injury.
Remove the packing box and lift the washer up and away from the foam
base cushion. Open the lid of the washer to take out all accessories
including the protective foam.
Instructions
Safety
Features
Requirements
Operation
Instructions
Installation
Washer Use
Washer Care
Base foam cushion
Troubleshooting
Protection foam
15
Page 16

Choosing a location
Instructions
Safety
Features
For best performance, you must install your washer on a solid, level floor.
Wooden floors may need to be reinforced to minimize vibration or
unbalanced load situations.
Requirements
Operation
Carpeting and soft tile surfaces can contribute to excessive vibration,
which can cause your washer to move slightly during the spin cycle.
Washer dimensions and installation measurements
Instructions
Installation
Washer Use
WARNING
•
Do not install your washer in ares where water may freeze, because
your washer always retains some water in its water valve, pump and
hose areas. Frozen water can damage the valve, pump, hoses and
other components.
Never install on a platform or weakly supported structure.
•
45.7 in.
40.8 in.
103.5 cm
116.0 cm
Washer Care
Troublesho
o
ting
16
27.0 in.
68.6 cm
29.0 in.
73.6 cm
45.7 in.
116.0 cm
58.7 in.
149.0 cm
Page 17

If you install your washer in an alcove or closet, the front of the closet
must have two unobstructed air openings for a combined minimum total
area of 72 sq.in. (465 sq.cm) with a minimum clearance of 3 in. (7.6 mm)
at the top and bottom. A slatted door with equivalent space clearance is
acceptable.
3 in.
(7.6 cm )
Instructions
Safety
48 square inches
(310 cm )
24 square inches
(155 cm )
2
2
3 in.
(7.6 cm )
Installing in an alcove or closet
Minimum clearances between your washer and adjacent walls or other
surfaces are:
Either side: 1 in. (2.5 cm)
•
Rear: 6 in. (15.2 cm)
•
Closet Front: 2 in. (5.1 cm)
•
Top: 24 in. (61 cm)
•
Gap between the end of water valve and the wall:
•
6 in. (15.2 cm)
If you install your washer and dryer side-by-side in a closet, the closet front
must have an unobstructed air opening of at least 72 square inches
(465 square cm).
Features
Requirements
Operation
Instructions
Installation
Washer Use
Washer Care
Troubleshooting
17
Page 18

Instructions
Safety
Features
A B
1 in. (2.5 cm)
24 in.
61 cm
Requirements
Operation
1 in.
2.5 cm
A. Recessed area
B. Side view - closet or confined area
Instructions
Installation
Washer Use
Washer Care
Troublesho
Tools you will need
o
ting
27 in.
68.6 cm
27 in.
68.6 cm
1 in.
2.5 cm
2 in.
5.1 cm
29 in.
73.6 cm
WARNING
Before you install your washer, make sure that the location:
Is a hard, level surface without carpeting or soft flooring that can
•
obstruct ventilation.
Is away from direct sunlight.
•
Has adequate ventilation.
•
Is not exposed to freezing temperatures (32 F or 0 C).
•
Is away from heat sources such as oil or gas.
•
Has enough space so that the washer does not rest on its power cord.
•
°
°
6 in.
15.1 cm
18
Pliers
Phillips
screwdriver
Level
Flat-head
screwdriver
Pliers
Page 19

Connect the water hoses
NOTE: The water supply hoses are not supplied with your washer and
must be purchased separately.
Caution
Use new water supply hoses. Using old hoses can result in leakage or
•
overflow that can damage your property.
Do not connect multiple water supply hoses together to increase the
•
length of the hose. Hoses connected this way can leak and cause
electrical shock. If a hose is too short, replace the hose with a longer,
high-pressure hose.
1.
Make sure that there are rubber washers inside the fittings at both ends
of each new water hose. Remove the rubber washers in faucet side and
replace with filters. Installing the water supply hoses without rubber
washers can cause water leakage.
Instructions
Safety
Features
Requirements
Operation
Filters
Faucets side
must be present
Use only
Rubber washers
new hoses
must be present
Inlet valves side
2. Tighten the hose and faucet fittings by hand until they are snug, then
tighten them an additional two-thirds of a turn with pliers or a wrench.
Pull the water supply hoses downwards to make sure that they are
connected securely.
Cold Hot
Instructions
Installation
Washer Use
Washer Care
Troubleshooting
19
Page 20

Do not overtighten the fittings or apply tape or sealant to the faucets or
water supply intake. This can damage the fittings.
Instructions
Safety
3. Place the unconnected ends of the hoses into a bucket and turn on the
Features
Requirements
Operation
Instructions
Installation
4. Connect the ends of the water supply hoses to the water supply intake
Washer Use
Caution
faucets connected to the water supply hoses for 10 or 15 seconds to
remove any foreign substances. Turn off the faucets.
connections at the top of the washer. Make sure that the rubber washers
are in place. The water supply hose connected to the hot faucet must be
connected to the hot water supply intake and the water hose connected
to the cold faucet must be connected to the cold water supply intake.
Washer Care
Troublesho
o
ting
20
NOTE: If you do not want to use the hot water supply hose, insert a
water intake cap into the hot water supply intake hole. In this case you
must select the Tap Cold option for the water temperature.
NOTE: No intake cap is provided with your washer. It must be purchased
separately.
Page 21

5.
Tighten the fittings by hand until they are snug, and then tighten them
an additional two-thirds of a turn with a pliers.
Instructions
Safety
Features
Caution
Do not overtighten the fittings or apply tape or sealant to the faucets
•
or water supply intakes. This can damage the fittings.
Make sure that the water supply hoses are not twisted or bent. A bent
•
or twisted hose can leak and cause an electric shock due to the water
leakage. To ensure the correct water usage, connect both hot and
cold water faucets. lf either or both are not connected, an error code
could occur.
6. Turn on the hot and cold water supplies and check all the water supply
intake connections and the faucets for water leaks.
Connect the drain hose
Caution
Failure to slide the drain hose completely over the washer’s drain pipe
•
may result in water leakage.
Failure to move the clamp or hoop onto the washer’s drain pipe will
•
result in water leakage.
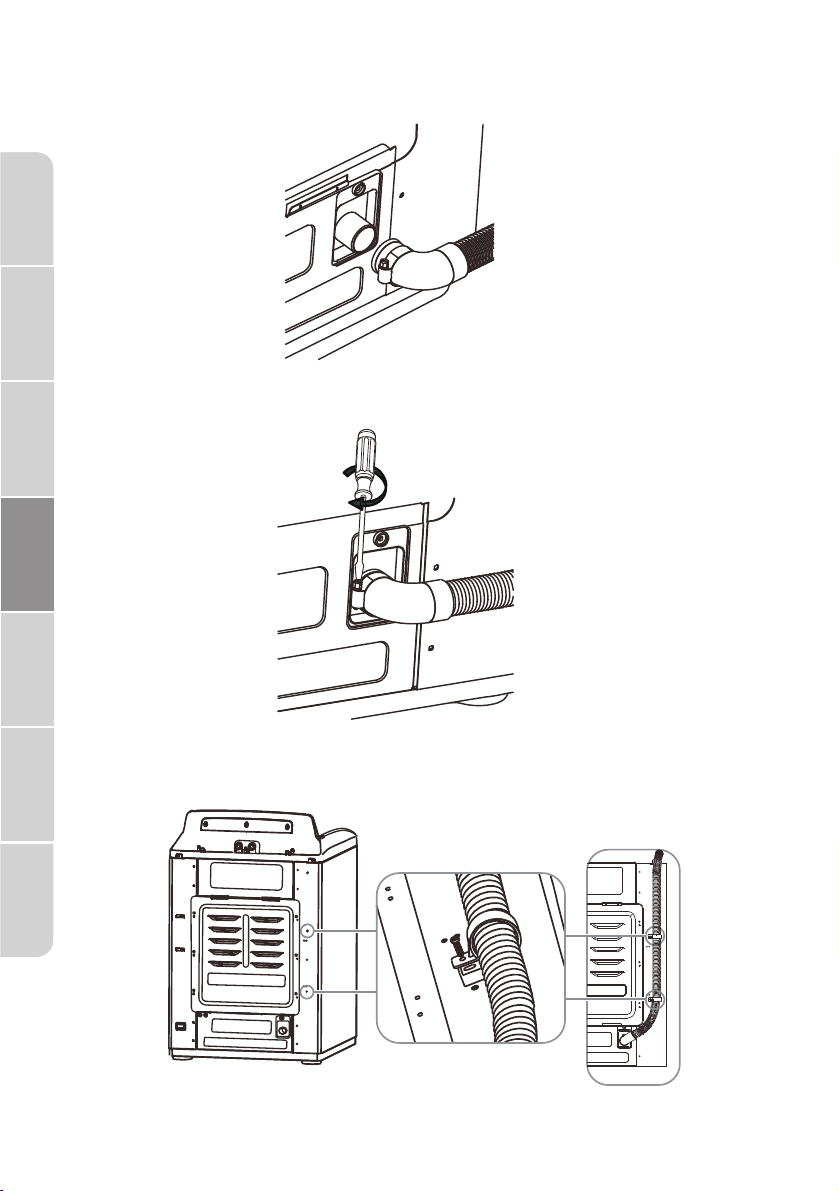
1. Find the end of the drain hose that has the clamp, then slide the clamp
away from the end of the hose.
Requirements
Operation
Instructions
Installation
Washer Use Washer Care
Troubleshooting
21
Page 22
Instructions
Safety
Features
2. Insert the drain hose with the clamp onto the washer's drain pipe.
Make sure that the drain hose completely covers the end of the drain
pipe.
Requirements
Operation
Instructions
Installation
Washer Use
Washer Care
Troublesho
o
ting
3. Move the clamp toward the drain pipe outlet. Tighten the clamp with a
4. Fasten the drain hose to the washer frame at the indicated directions
flat blade screwdriver.
with the hose clamps (2) provided, using a phillips screwdriver.
22
Page 23

5. Position the other end of the drain hose (the loose end) in one of the
following way:
Caution
Make sure that the connection between the drain hose and the wash
basin, standpipe or laundry tub is not airtight.
0ver the edge of wash basin - Secure the guide to the side of the basin
•
wall with a hook, tape it or tie it with a piece of cord to prevent the
drain hose from moving.
Instructions
Safety
Features
Requirements
Operation
Instructions
Installation
In a standpipe - The standpipe must be no shorter than39 in. (99 cm)
•
and no longer than 96 in. (244 cm).
Washer Use
Washer Care
Troubleshooting
23
Page 24

•
Instructions
Safety
Features
Requirements
Operation
Instructions
Installation
Level your washer
In a laundry tub - The laundry tub must be no shorter than 39-in. (99 cm)
and no higher than 96-in (244 cm) maximum.
Washer Use
Do not use your washing machine without leveling. If your washer is not
level, it may:
•
Washer Care
Troublesho
o
ting
24
•
•
Extend the leveling feet only as much as is necessary. If the feet are
extended too much, your washer may vibrate.
Determine if the washer is level by checking the position of the tub or by
using a level.
1. Slide the washer into position.
2. Open the lid of the washer, then pour water into the tub to the leveling
Caution
Vibrate excessively which can cause your washer to malfunction.
Make excessive noise.
Indicate error codes E3, E4 or E5 when the washer is running.
circle. If the washer is level, the water will touch the leveling circle all
the way around. If the washer is not level, the water will only touch part
of the leveling circle.
Page 25

Instructions
Safety
Leveling circle
Washer is level – the
water touches the
leveling circle all
the way around.
Washer not level - the
water does not touch
the leveling circle all
the way around.
3. If your washer is not level, carefully tilt your washer just enough to
adjust the leveling feet on the bottom front of your washer. Extend the
feet only as much as is necessary. If the feet are extended too much,
your washer may vibrate.
loosen lock
Adjustable legs
Features
Requirements
Operation
Instructions
Installation
Washer Use
Washer Care
Power on
Plug the power cord into a well-grounded, 3-prong, 120 Volt 60 Hz
approved electrical outlet, protected by a 15-amp fuse or comparable
circuit breaker. Your washer is grounded through the third prong of the
power cord.
Troubleshooting
25
Page 26

Run a test cycle
Run a test cycle to make sure that your washer is properly installed.
Instructions
Safety
Features
Requirements
Operation
Instructions
Installation
Washer Use
1.
2.
3.
4.
Load about 6 pounds (2.7 kg) of laundry into the tub.
Press the Power button to turn on your washer.
Turn the cycle selector to select the Rinse & Spin cycle.
Press the Start Pause button to start the test cycle. Your washer should
not rock or vibrate excessively when water fills the tub or when washing
or spinning. The washer should drain well during the spin cycle.
Caution
If you detect any water leaks while the washer is filling or draining,
•
check the water connections. See Connect the water hoses on page 19
or Connect the drain hose on page 21.
If the washer rocks and/or vibrates excessively, level it again. See
•
Level your washer
on page 24.
Washer Care
Troublesho
o
ting
26
Page 27

WASHER USE
Control panel
MLV45N1BWW
1
6
7
MLV45N3BWW
Instructions
Safety
2
3
8 9 11 14
5
4
Features
Requirements
Operation
Instructions
15131210
Installation
Washer Use Washer Care
1
POWER
Press to turn on your washer. Press again to turn off your washer. If you
leave your washer on and do not press the START PAUSE button within
10 minutes, your washer will automatically turns off.
2
Cycle selector
Turn to select a wash cycle. The cycle you select determines the wash
pattern for the cycle. For more information, see Washer options and
settings on page 35.
Troubleshooting
27
Page 28

3
Instructions
Safety
Features
Requirements
Operation
Instructions
Installation
Washer Use
Washer Care
Troublesho
o
ting
4
5
6
7
8
Digital display
The initial display for Quick Wash, Delicates, Tub Clean, and spin only is
the total time for the cycle you select. All other cycles will display 3
dashes ( - - - ) until the load sensing routine is completed, which can take
up to 60 seconds.
While your washer is running, the display shows the cycle process and
time remaining in the cycle.
NOTE
: the time shown is an estimate based on normal operating conditions.
External factors (such as the load size, room temperature, incoming water
temperature, and water pressure) can affect actual time.
If you set a delay time for the start of the cycle, the display shows the time
when the cycle will start.
SOAK
Press to select the SOAK option. Press again to cancel. Select this option
for heavily soiled items that need to soak to remove stains and heavy dirt.
Soak occurs after the tub fills and detergent is added, but before the wash
process. The agitator or impeller will rotate several times during the
beginning of the soak process.
Delay
Press to select a time when you want the cycle to begin. You can set the
time up to 24 hours in advance in one-hour increments. The display shows
the time when the cycle will start. For more information, see Set a delayed
start time on page 32.
MY CYCLE
Press and hold for 3 seconds to remember your favorite washing cycle.
Press once to load your favorite cycle settings.
START PAUSE
Press once to start the wash cycle. Press again to pause the cycle. If you
pause the cycle, you can add or remove items, but you cannot change any
settings. Press again to restart the cycle.
WATER PLUS
Press once to increase one higher water level. Press again to cancel this
function. If the water level is already set to the highest, the level will not
change.
When using water plus in the normal/colors cycle, it automatically
changes cycle to Heavy duty.
28
Page 29

9
FABRIC SOFTENER
Add liquid fabric softener to the fabric softener compartment, and then
press this button. The fabric softener will be added to the cycle at the
correct time.
10
EXTRA RINSE
Press to add an extra rinse to the wash cycle. Press again to cancel.
11
SIGNAL
The sound off function can be selected during all courses.
12
SOIL LEVEL
Press to select the soil level. Different soil levels result in different
washing times and wash cycle settings. For more information, see
Washer options and settings on page 35.
13
Control lock
Press and hold the SOIL LEVEL and Temp. buttons at the same time
for 3 seconds to turn on the child lock function. Press and hold these
buttons again for 3 seconds to turn off the function. When the child
lock function is turned on, the only button that works is the POWER
button and the SOIL LEVEL and Temp. buttons you use to turn off
the child lock.
14
WASH TEMP.
Press to select the washing water temperature. The rinse water
temperature is always cold.
Instructions
Safety
Features
Requirements
Operation
Instructions
Installation
Washer Use Washer Care
15
SPIN LEVEL
Press to select the spin level to increase spin time or short the spin
time. This function can not be selected with Normal/Colors
Wash
and
Tub
Clean cycle.
,
Quick
Troubleshooting
29
Page 30

Instructions
Safety
Washing a load of laundry
WARNING
To reduce the risk of fire, electric shock, or injury to persons, read the
SAFETY INSTRUCTIONS before operating this appliance.
Selecting a detergent
Features
Your washer is designed to use high efficiency (HE) detergents.
•
Requirements
Operation
Instructions
Installation
Washer Use
•
1. Turn on your washer
Press the Power button to turn on your washer. Your washer's initial
settings are:
•
•
•
2. Load your washer
Washer Care
Before loading your laundry, make sure that you remove coins, keys,
and other hard objects and close zippers. These items may damage
clothes and the washer.
Troublesho
o
ting
NOTE:
For the best cleaning results, use an HE detergent. We recommend
that you do not use a regular detergent. HE detergents contain
suppressors that reduce or eliminate suds. When fewer suds are
produced, the load tumbles more efficiency and cleaning is maximized.
Reducing the amount of detergent may reduce the quality of cleaning.
Make sure that you:
- Pre-treat stains.
- Sort carefully by color and soil level.
- Avoid overloading.
Normal on cycle selector with -- displayed on the digital display.
Medium for the Soil Level.
Warm for the Wash Temp.
Caution
•
Sort laundry by fabric type, soil level, color, and load size.
Fill the tub with dry, unfolded clothes. Load the tub no more than 3/4
•
full.
Overloading may reduce washing efficiency, cause excess wear, and
•
possibly cause creasing or wrinkling of the load.
Wash delicate items such as bras, hosiery and other lingerie on the
•
Delicates cycle with similar lightweight items.
30
Page 31

When washing big, bulky items (such as rugs or pillows) or a few
•
smaller items (such as stuffed toys or one or two sweaters) that do not
fill the tub completely, add a few towels to improve spin performance.
Always use the Bulky cycle for bulky items.
•
When washing heavily soiled loads, do not overload your washer to
•
ensure good cleaning results.
3. Add detergent and additives to the compartment
Instructions
Safety
Detergent
compartment
Loading the liquid or powder detergent compartment
Pour the recommended amount of laundry detergent directly into the
•
compartment before starting your washer.
If you are using color-safe bleach, add it with the detergent to the
•
detergent compartment.
Bleach
compartment
Softener
compartment
NOTE:
When adding color-safe bleach with detergent, both laundry products
•
should be in the same form (liquid).
If no detergent compartment, you should add the detergent into the
•
tub.
Loading the bleach compartment (liquid bleach only)
Add chlorine bleach to the bleach compartment. Do not over-fill the
•
compartment.
IThere is no water inlet to the bleach dispenser, so the bleach will
•
directly load into the tub when you pour it in.
Features
Requirements
Operation
Instructions
Installation
Washer Use
Washer Care
Troubleshooting
Caution
Avoid splashing or over-filling the compartment.
•
Never pour undiluted liquid chlorine bleach directly onto the load or
•
into the tub. Doing so can damage fabrics, by weakening of the fibers
or stripping the color.
NOTE: Do not pour color-safe bleach into the bleach compartment.
Instead, add it to the detergent compartment.
31
Page 32

Loading the fabric softener compartment
•
Instructions
Safety
•
•
Features
•
•
Requirements
Operation
4. Select the appropriate cycle and options for the load
•
Instructions
Installation
Pour the recommended amount of liquid fabric softener into the
softener compartment. The dispenser automatically releases liquid
fabric softener at the correct time during the rinse cycle.
Caution
Use the softener compartment ONLY for liquid fabric softeners.
Do not use the Downy Ball in the fabric softener compartment.
Do not use liquid fabric softener that is too thick as it may not mix
with the water sufficiently.
Be sure to select the Fabric Softener option when using fabric
softener so that it is released in the rinse portion of the cycle.
Turn the cycle selector to select a washing cycle. For information on
wash cycles, see Washer options and settings on page 35.
Washer Use
•
Washer Care
5. (Optional) Set a delayed start time
Troublesho
You can program a wash cycle, then set a time when you want a wash
cycle to begin.
•
o
ting
32
*MLV45N1BWW
*MLV45N3BWW
Optional: Use the control panel buttons (like Fabric Softener) to
customize the washing cycle. For descriptions of buttons, see Control
panel on page 27. For information about which buttons are available for
each cycle type, see Washer options and settings on page 35.
Press the
DELAY WASH +
button to turn on the delay start time
and
-
function.
Page 33

Press the Delay button repeatedly to select the delay time you want.
•
The delay start time, in hours, will be shown on the display, in sequence,
from 0 to 24, then back to 0. You can also press and hold the Delay
button to quickly adjust the time until the desired time appears on the
display.
If you want to change the wash cycle settings while you are setting the
•
delay start time, turn the cycle selector. To return to setting the delay
start time function, repeat Steps 2 if new cycle setting requires load
adjustment.
NOTE:
Once the number of delay hours is reached by pushing the Delay
•
button, release the button for three seconds and it will be set. The
delay light will remain on.
After the delay time is set, if you wish to change the delay setting,
•
press the Delay button again until the desired hour is reached.
Release the button for three seconds and it will be set.
If you decide to cancel the delay setting, you can either turn the
•
cycle selector or push the Delay button until 0 is reached.
Ideally, you should set your cycle before setting the Delay, because
•
turning the cycle selector after the delay is set cancels the delay.
The Delay Start Time cannot be changed after the program has
•
started.
To cancel the delay start time function before you save the setting,
•
press the Delay button until 0 appears on the display, or turn the cycle
selector knob.
IMPORTANT:
You can change settings or cancel the delay start time function
•
anytime before you press the Start Pause button by turning the
cycle selector. The delay start time cannot be changed after you
press the Start Pause button.
If you pressed the Start Pause button, you can cancel the delay
•
start time function by pressing the Power button to turn off your
washer, then pressing the Power button again to turn it back on.
Instructions
Safety
Features
Requirements
Operation
Instructions
Installation
Washer Use Washer Care
6. Start your washer
Press the Start Pause button.
•
NOTE:
If you have not set a delayed start time or if the delay time has
•
expired, your washer starts the cycle and the Wash light turns on.
As your washer moves from stage to stage in the wash cycle,
•
the related light turns on (such as Rinse or Spin).
If you set a delayed start time, the Delay light turns on and your
•
washer starts counting down the start time.
Troubleshooting
33
Page 34

Instructions
Safety
Features
Soak
If you need to pause the cycle (for example to add or remove items or
•
Wash
Rinse
Spin Done Tub Clean
adjust the load), press the Start Pause button, then open the lid. Your
washer stops. When you are ready to resume washing, close the door,
then press the Start Pause button.
7. Unload your laundry
Requirements
When the wash cycle is complete:
Operation
•
•
Instructions
Installation
•
Washer Use
Setting the child lock
Your washer has a child lock function to prevent children from playing with
your washer. When you turn on the child lock, the only buttons that work
Washer Care
are the Power button and the Soil Level and Temp. buttons you use to turn
off the child lock.
•
Troublesho
o
ting
•
Your washer beeps six times and flashes after the cycle is done. 0:00
The light turns off.
Done
Your washer unlocks the lid.
Soak
Wash
Rinse
Spin Done Tub Clean
Open the lid and remove the laundry.
Press and hold both the Soil Level and Temp. buttons for three seconds.
The child lock light turns on.
To turn off the child lock, press and hold both the Soil Level and Temp.
buttons for three seconds.
34
NOTE:
If your washer is not turned on, the child lock can still remain set.
•
Press the Power button, turn on the child lock function, then press
the Power
your washer, you need to turn off the lock function.
button to turn off your washer. When you want to use
Page 35

If you turn on the control lock function while the washer lid is open
Double beep when button pressed means option not livable for the cycle.
**
See page 37
Page 36

Instructions
Safety
**
Features
Requirements
Operation
Instructions
Installation
Washer Use
Washer Care
Troublesho
See page 37
o
ting
36
Page 37

WASHER CARE
Caution
Turn off the water faucets after final use. This shuts off the water supply
to your washer and prevents the possibility of damage from escaping
water. Leave the lid open to let the inside of your washer dry out.
CLEANING AND MAINTENANCE
Cleaning the exterior
Use a soft cloth to wipe up all detergent, bleach, or other spills as they
occur.
Cleaning the interior
Clean the interior of your washer periodically to remove any dirt, soil,
•
odor, mold, mildew, or bacterial residue that may remain in your washer
as a result of washing clothes.
Failure to follow these instructions may result in unpleasant conditions,
•
including odors or permanent stains in your washer or on your laundry.
To remove hard water deposits, use a cleaner labeled "Washer safe".
•
Cleaning the control panel
Clean with a soft, damp cloth. Do not use abrasive powders or cleaning
•
pads.
Do not spray cleaners directly on the panel. The control panel finish may
•
be damaged by some laundry pre-treatment soil and stain remover
products. Apply such products away from your washer and wipe up any
spills or over-spray immediately.
Instructions
Safety
Features
Requirements
Operation
Instructions
Installation
Washer Use Washer Care
Cleaning the detergent, bleach, or softener compartment
To remove laundry product residue, wipe with a damp cloth and towel
•
dry.
You can remove the bleach detergent and softener compartments to
•
clean them.
Cleaning the tub
The Tub Clean cycle is a self-cleaning cycle that removes the causes of
odors that may occur inside your washer without using a cleaning agent.
We suggest cleaning the tub about once a month.
Troubleshooting
37
Page 38

Never use the tub clean cycle when laundry is in your washer. This may
damage the laundry or your washer.
Instructions
Safety
•
•
•
Features
•
Storing your washer
Requirements
You can damage your washer if you do not remove water from hoses and
Operation
internal components before storage.
To prepare your washer for storage:
•
Instructions
Installation
•
•
Washer Use
If your washer has been stored in below-freezing temperatures, allow
time for any leftover water in your washer to dry out before use.
Caution
With the tub empty, add one cup of chlorine bleach to the bleach
dispenser.
Press the Power button.
Turn the cycle selector to Tub Clean. When you select Tub Clean, the
only options you can change is the delay option.
Press the Start Pause button.
Select the Quick Wash cycle and add bleach to the washer. Run your
washer through the cycle without a load.
Turn the water faucets off and disconnect the inlet hoses.
Unplug your washer from the electrical outlet and leave your washer
lid open to let air circulate inside the tub.
Caution
Washer Care
Troublesho
o
ting
38
Page 39

BEFORE YOU CALL FOR SERVICE...
Troubleshooting Tips
Save time and money! Review the charts on the following pages first and
you may not need to call for service.
Problem Solutions
Washer does
not start
No water or
not enough
water
Make sure that your washer is plugged in.
•
Make sure that the lid is closed.
•
Make sure that the water source faucets are open.
•
Make sure that you press the Start Pause button to
•
start your washer.
Before your washer starts to fill, it makes a series of
•
clicking noises to make sure that the lid is locked. The
washer doesn't drain after the lid locks. For automatic
cycles: Before filling, and after the lid locks, a load
sensing program starts. Washer will agitate clothing
without water to determine load type, water level, and
cycle time. Then it fills. This can take up to one minute.
Its normal. For non automatic cycles the washer fills
after the lid locks.
Make sure that the Child Lock is not activated. See
•
Setting the child lock on page 34.
Make sure that the Delay option is not turned on. See
•
(Optional) Set a delayed start time
Check the fuse or reset the circuit breaker.
•
Make sure that both faucets are fully turned on.
•
Make sure that the water pressure is in the range listed
•
in Water requirements on page 14.
Make sure that the water inlet hoses are not kinked.
•
Straighten if necessary.
Disconnect the hoses and clean the screens. The hose
•
filter screens may be clogged
This is a water efficiency washer. It does not fill to the
•
levels of a standard washer. Low water levels are
normal. It is normal for parts of clothing to stick out of
the water.
For automatic cycles: Before filling, and after the lid
•
locks, a load sensing program starts. Washer will
agitate clothing without water to determine load type,
water level, and cycle time. Then it fills. This can take
up to one minute. Its normal. For non automatic cycles
the washer fills after the lid locks.
on page 32.
Instructions
Safety
Features
Requirements
Operation
Instructions
Installation
Washer Use Washer Care
Troubleshooting
39
Page 40

Problem Solutions
When washer
has excessive
Instructions
Features
Requirements
Instructions
Washer Use
Washer Care
vibration or
noise
Safety
Operation
Installation
Washer stops Make sure that the power outlet is a working outlet.
Make sure that your washer is set on a level surface. If
•
the surface is not level, adjust your washer's feet to
level your washer.
Make sure that your washer is not touching any other
•
object.
Make sure that the laundry load is balanced.
•
During the spin process, if clothes are piled to one side
•
of the tub, your washer may stop because of the
imbalance. Your washer tries up to three times to solve
the problem automatically. If the washer cannot solve
the problem, try to manually redistribute clothes inside
the tub.
Check to make sure packaging pieces of base foam
•
cushion are not stuck under washer.
•
Check the fuse or reset the circuit breaker.
•
Close the lid, then press the Start Pause button to start
•
your washer. For your safety, your washer does not spin
unless the lid is closed.
Before your washer starts to fill, it makes a series of
•
clicking noises to make sure that the lid is locked. The
washer doesn't drain after the lid locks. For automatic
cycles: Before filling, and after the lid locks, a load
sensing program starts. Washer will agitate clothing
without water to determine load type, water level, and
cycle time. Then it fills. This can take up to one minute.
Its normal. For non automatic cycles the washer fills
after the lid locks.
Sometimes your washer may pause between stages in
•
the cycle. Wait to see if your washer starts again.
Disconnect the inlet hoses and clean the screens
•
periodically. The hose filter screens may be clogged.
Press the Start Pause button to pause the washer. You
Troublesho
o
ting
40
Lid is locked
or will not
open
•
cannot open the lid if the washer is running.
After you pause the washer, it may take a few seconds
•
for the lid lock to release.
If the lid is locked when your washer is not running,
•
press the Power button to turn on your washer.
If power fails while your washer is running, when power
•
is restored, the lid unlocks. Your washer waits three
minutes then runs the rest of the cycle.
Page 41

Problem Solutions
Washer does
not drain or
spin
Check the fuse or reset the circuit breaker.
•
Close the lid, then press the Start Pause button to start
•
your washer. For your safety, your washer does not spin
unless the lid is closed.
Make sure that the drain hose is not kinked. Straighten
•
as necessary.
Make sure that the height of the drain hose is within
•
specified limits. See
The pipes to your sewer system may be clogged.
•
Contact a plumber or qualified repair professional.
Drainage requirements on page 14.
Instructions
Safety
Features
The water
temperature
is not correct
Load is too
wet at the end
of the cycle
Water leaks
Oversuds
condition
Make sure that you have selected the correct temp.
•
Make sure that the water source faucets are fully
•
opened.
Make sure that the hoses are connected to the correct
•
faucet and water intake connections on your washer,
then flush the lines. See Connect the water hoses on
page 19.
Disconnect the hoses and clean the screens. The hose
•
filter screens may be clogged.
Use a high-efficiency detergent to reduce over-sudsing
•
See Selecting a detergent on page 30.
The load may be too small. Very small loads (one or
•
two items)may become unbalanced and not spin out
completely.
Make sure that all hose connections are tight. See
•
Connect the water hoses on page 19 and Connect the
drain hose on page 21.
Make sure that the end of the drain hose is correctly
•
inserted and secured to the drainage system. See
Connect the drain hose on page 21.
Avoid overloading.
•
Use a high-efficiency detergent to reduce over-sudsing.
•
See Selecting a detergent on page 30.
Use a high-efficiency detergent to reduce over-sudsing.
•
See Selecting a detergent on page 30.
If you have"soft" water, reduce the amount of detergent.
•
For small or lightly soiled loads, reduce the amount of
•
detergent.
Requirements
Operation
Instructions
Installation
Washer Use Washer Care
Troubleshooting
41
Page 42

Prevent odor
Instructions
Safety
Features
Requirements
Operation
ERROR CODES
Problem Solutions
Periodically run a Tub Clean cycle to clean the tub. See
•
Cleaning the tub on page 37.
Use a high-efficiency detergent to reduce over-sudsing.
•
Excessive suds collect in nooks and crannies and cause
odor. See Selecting a detergent on page 30.
Dry the interior of your washer after the total cycle has
•
finished.
Instructions
Installation
Washer Use
Washer Care
Troublesho
o
ting
Description Reason Solutions
E1
E2
E3
E4
E5
Your washer takes more
than 30 minutes to fill
with water. After water
finishes entering your
washer, the water level
has not changed in five
minutes.
The unit takes more
than 10 minutes to drain.
The lid is open.
The washer is not evel.
Your washer is out of
balance more than three
times in spin operation.
Your washer is not level.
Impact switch failed.
Make sure that the lid is not
•
open.
Make sure that water is not
•
leaking. See No water or not
enough water on page 39.
Contact midea service
•
center.
See Washer does not drain
•
or spin on page 41.
Close the lid.
•
Level the washer see Level
•
your washer on page 24.
See Washer vibrates or is
•
too noisy on page 40
Contact Midea service
•
center
Adjust the washer level
•
refer to installation.
If the situation continues
•
call Midea service center.
42
Page 43

Description Reason Solutions
F2
F5
The EEPROM failed Contact Midea service
Load sensing failed. Contact Midea service
•
center.
•
center.
Instructions
Safety
F8
Fd
C9
CL
Water level sensor
failed.
Lid lock failed. Contact Midea service
The PCB failed. Contact Midea service
The lid has been open
for over 20 seconds
with the Child Lock
function activated.
Contact Midea service
•
center.
•
center.
•
center.
Press the Power button to
•
turn off your washer.
Turn off the Child Lock
•
function see Setting the
child lock on page 34.
Contact Midea service
•
center.
Features
Requirements
Operation
Instructions
Installation
Washer Use Washer Care
43
Troubleshooting
Page 44

ATTACH YOUR RECEIPT HERE. PROOF OF PURCHASE
MIDEA
LAUNDRY
WASHER
LIMITED
WARRANTY
IS REQUIRED TO OBTAIN WARRANTY SERVICE.
Please have the following information available when
you call the Customer Service Center:
■ Name, address and telephone number
■ Model number and serial number
■ A clear, detailed description of the problem
■ Proof of purchase including dealer or retailer
name and address
IF YOU NEED SERVICE:
1. Before contacting us to arrange service, please determine whether your product requires
repair. Some questions can be addressed without service. Please take a few minutes to review
the Troubleshooting section of the User Manual, or email customerserviceusa@midea.com
2. All warranty service is provided exclusively by our authorized Midea Service Providers, in the
U.S. and Canada.
Midea Customer Service
In the U.S.A. or Canada, call 1-866-646-4332 or email customerserviceusa@midea.com.
If outside the 50 States of the United States or Canada, contact your authorized Midea dealer to
determine whether another warranty applies.
LIMITED WARRANTY
WHAT IS COVERED
FIRST YEAR LIMITED WARRANTY (PARTS AND LABOR)
For one year from the date of purchase, if this major appliance is installed, operated and
maintained according to instructions attached to or furnished with the product, Midea America
Corporation (hereafter “Midea”) will pay for factory specified replacement parts and repair
labor to correct defects in materials or workmanship that existed when this major appliance was
purchased, or at its sole discretion replace the product. In the event of product replacement, your
appliance will be warranted for the remaining term of the original unit’s warranty period.
LIFETIME LIMITED WARRANTY (STAINLESS STEEL TUB)
For the lifetime of the product from the date of original purchase, when this major appliance is
installed, operated and maintained according to instructions attached to or furnished with the
product, Midea will pay for factory specified parts and repair labor for the following components
to correct non-cosmetic defects in materials or workmanship that existed when this major
appliance was purchased:
■ Stainless steel tub
YOUR SOLE AND EXCLUSIVE REMEDY UNDER THIS LIMITED WARRANTY SHALL BE PRODUCT
REPAIR OR REPLACEMENT AS PROVIDED HEREIN. Service must be provided by a Midea
designated service company. This limited warranty is valid only in the 50 States of the United
States or Canada and applies only when the major appliance is used in the country in which it
was purchased. This limited warranty is effective from the date of original consumer purchase.
Proof of original purchase date is required to obtain service under this limited warranty.
44
Page 45

LIMITED WARRANTY
WHAT IS NOT COVERED
1. Commercial, non-residential or multiple-family use, or use inconsistent with published user,
operator or installation instructions.
2. In-home Instruction on how to use your product.
3. Service to correct improper product maintenance or installation, installation not in accordance
with electrical or plumbing codes or correction of household electrical or plumbing (i.e. house
wiring, fuses, plumbing or water inlet hoses).
4. Consumable parts (i.e. light bulbs, batteries, air or water filters, etc.).
5. Defects or damage caused by the use of non-genuine Midea parts or accessories.
6. Damage from accident, misuse, abuse, fire, floods, electrical issues, acts of God or use with
products not approved by Midea.
7. Repairs to parts or systems to correct product damage or defects caused by unauthorized
service, alteration or modification of the appliance.
8. Cosmetic damage including scratches, dents, chips, and other damage to appliance finishes
unless such damage results from defects in materials and workmanship and is reported to
Midea within 30 days.
9. Routine maintenance of the product.
10. Products that were purchased “as is” or as refurbished products.
11. Products that have been transferred from its original owner.
12. Discoloration, rust or oxidation of surfaces resulting from caustic or corrosive environments
including but not limited to high salt concentrations, high moisture or humidity or exposure to
chemicals.
13. Pick-up or delivery. This product is intended for in-home repair.
14. Travel or transportation expenses for service in remote locations where an authorized Midea
servicer is not available.
15. Removal or reinstallation of inaccessible appliances or built-in fixtures (i.e. trim, decorative
panels, flooring, cabinetry, islands, countertops, drywall, etc.) that interfere with servicing,
removal or replacement of the product.
16. Service or parts for appliances with original model/serial numbers removed, altered or not
easily identified.
The cost of repair or replacement under these excluded circumstances shall be borne by the
customer.
DISCLAIMER OF IMPLIED WARRANTIES
IMPLIED WARRANTIES, INCLUDING ANY IMPLIED WARRANTY OF MERCHANTABILITY OR
IMPLIED WARRANTY OF FITNESS FOR A PARTICULAR PURPOSE, ARE LIMITED TO ONE
YEAR OR THE SHORTEST PERIOD ALLOWED BY LAW. Some states and provinces do not allow
limitations on the duration of implied warranties of merchantability or fitness, so this limitation
may not apply to you. This warranty gives you specific legal rights, and you also may have other
rights that vary from state to state or province to province.
DISCLAIMER OF REPRESENTATIONS OUTSIDE OF WARRANTY
Midea makes no representations about the quality, durability, or need for service or repair of this
major appliance other than the representations contained in this warranty. If you want a longer
or more comprehensive warranty than the limited warranty that comes with this major appliance,
you should ask Midea or your retailer about buying an extended warranty.
LIMITATION OF REMEDIES; EXCLUSION OF INCIDENTAL AND CONSEQUENTIAL DAMAGES
YOUR SOLE AND EXCLUSIVE REMEDY UNDER THIS LIMITED WARRANTY SHALL BE
PRODUCT REPAIR AS PROVIDED HEREIN. MIDEA SHALL NOT BE LIABLE FOR INCIDENTAL OR
CONSEQUENTIAL DAMAGES. Some states and provinces do not allow the exclusion or limitation
of incidental or consequential damages, so these limitations and exclusions may not apply to you.
This warranty gives you specific legal rights, and you also may have other rights that vary from
state to state or pr
ovince to province.
45
Page 46

REGISTRATION INFORMATION
PROTECT YOUR PRODUCT:
We will keep the model number and date of purchase of your new Midea product
on file to help you refer to this information in the event of an insurance claim such
as fire or theft.
Product registration is not mandatory. Failure to complete and return the card or
form does not diminish the consumer’s warranty rights.
Register online at https://us.midea.com/product-registration
OR
Please fill out and return it to the following address:
Midea America Corp. 759 Bloomfield Ave #386, West Caldwell, NJ 07006-6701
----------------------------------------------- (detach here) ----------------------------------------------
Name: Model#: Serial #:
Card:
Address: Date Purchased: Store / Dealer Name:
City: State: Zip: E-mail Address:
Area Code: Phone Number: Occupation:
Did you purchase an additional warranty: As your Primary Residence:
How did you learn about this product:
❑ Advertising
❑ In Store Demo
❑ Personal Demo
Information collected or submitted to us is only available to company internal employees for
purposes of contacting you or sending you emails, based on your request for information and to
company service providers for purposes of providing services relating to our communications with
you. All data will not be shared with other organizations for commercial purposes.
Age:
Marital Status:
Please consider leaving a customer review at www.midea.com.
Midea America Corp.
Parsippany, NJ 07054
Customer Service 1-866-646-4332 Made in China
46
Page 47

Top-Load arandela
Fuente de alimentación: 120V
Frecuencia: 60Hz
Capacidad: 4,5 pi cu
sp
Manual del Propietario &
Instrucciones de Instalación
Advertencia:
Antes de utilizar este producto,
lea atentamente este manual y
guárdelo para consultarlo
posteriormente. El diseño y las
especificaciones están sujetos a
cambios sin previo aviso para
mejoras de los productos.
Consulte con su distribuidor o
fabricante para obtener detalles.
version A
Extensión gratuita
de 3 meses*
de la garantía limitada original.
Simplemente envíe una foto de
su comprobante de compra
por mensaje de texto al:
*La extensión de la garantía es por
los tres meses inmediatamente
después de la finalización del
período de la garantía
original del producto.
del período
1-844-224-1614
NÚMERO DE MODELO
MLV45N1B**
MLV45N3B**
www.midea.com
Page 48

Estimado usuario
GRACIAS
Este manual es parte de nuestro compromiso con su satisfacción
total. Lea detenidamente este manual antes de utilizar este producto,
y guárdelo en un lugar conveniente para su consulta futura.
Para ayudarnos a brindarle un mejor servicio, considere registrar
su producto con nuestra práctica aplicación Midea MSmartlife,
visitando
texto una foto de su comprobante de compra al 1-844-224-1614.
Al utilizar la opción de texto, obtendrá una extensión de la garantía
de 3 meses adicionales inmediatamente después de la finalización
de la garantía original del producto.
por permitir que Midea le ayude a “hacerlo sentir en casa”.
http://www.midea.com
o enviando por mensaje de
INSTRUCCIONES DE SEGRIDAD ....................................................4
TIENE .................................................................................................
Paquete cotents ...................................................................................... 11
Componentes principales ....................................................................12
REQUISITOS OPERATIVOS ............................................................13
Eléctricos requisitos
El agua requisitos
Drenaje requisitos
...............................................................................13
....................................................................................14
....................................................................................14
INSTRUCCIONES DE INSTALACIÓN11.............................................15
Desentrañar la lavadora........................................................................15
Elegir una ubicación...............................................................................16
Las herramientas que se necesitan.................................................. 18
Conecte las mangueras .......................................................................
19
Conecte la manguera de drenaje ....................................................21
Nivel la lavadora ...................................................................................24
Encendido ...............................................................................................25
Pase un ciclo de prueba......................................................................26
USAR LA LAVADORA..................................................................... 27
El panel de control ................................................................................ 27
Lavarse una carga de ropa................................................................. 30
Configuración del bloqueo para niños...........................................34
Lavadora opciones y especificaciones ......................................... 35
Page 49

CUIDADO DE LA LAVADORA........................................................37
Limpieza y mantenimiento
.................................................................
37
ANTES DE SOLICITAR SERVICIO TÉCNICO................................39
Códigos de error....................................................................................42
GARANTÍA.......................................................................................
REGISTRO DE PRODUCTO............................................................
44
46
LEA Y CONSERVE ESTAS INSTRUCCIONES PARA
INVESTIGACIONES REFERENCIA
Este manual contiene información importante sobre la instalación, uso, y el
cuidado de su aparato. Lea este manual detenidamente antes de la
instalación y la operación de esta máquina para evitar lesiones y daños a
la propiedad.
Advertencias e Instrucciones de seguridad importantes de este manual NO
cubra todas las posibles condiciones y situaciones que pueden ocurrir. Es
su responsabilidad usar el sentido común, atención y cuidado al instalar,
mantener y usar su secadora.
PRECAUCIÓN
RIESGO DE DESCARGA
ELÉCTRICA
NO ABRIR
de seguridad
Instrucciones
Tiene
Operativos
Requisitos
de Instalación
Instrucciones
Lavadora
Usar La
Cuidado de la
Lavadora
Solución de
Problemas
3
Page 50

INSTRUCCIONES DE SEGRIDAD
SU SEGURIDAD Y LA SEGURIDAD DE OTROS ES MUY IMPORTANTE
de seguridad
Instrucciones
Tiene
Operativos
Requisitos
de Instalación
Instrucciones
Lavadora
Usar La
Cuidado de la
Lavadora
Solución de
Problemas
Para evitar lesiones al usuario u otras personas y daños a la propiedad, las
instrucciones que se muestran aquí deben seguirse. Incorrecto operación
por ignorar de instrucciones puede provocar daños o lesiones, incluida la
muerte.
El nivel de riesgo se muestra en las siguientes indicaciones.
ADVERTENCIA
PRECAUCIÓN
ADVERTENCIA
Esto indica que los peligros o prácticas inseguras puede
provocar lesiones personales graves o la muerte.
Para reducir el riesgo de incendio, explosión, descarga
eléctrica, o lesiones personales al usar su lavadora, usted
DEBE siga estas precauciones básicas de seguridad.
Esto indica que los peligros o prácticas inseguras puede
provocar lesiones personales o daños a la propiedad.
Este símbolo indica que no son importantes las instrucciones
de funcionamiento y mantenimiento en el Iiterature que
acompaña su lavadora.
ADVERTENCIA
Estado de la Proposición 65 de California Advertencias.
El California Safe Drinking Water and Toxic Enforcement Act) requiere el
Gobernador de California para publicar una lista de sustancias que el estado
de California sabe que provocan cáncer, defectos de nacimiento, u otros
daños reproductivos, y requiere empresas para advertir sobre la posible
exposición a tales sustancias. Este producto contiene una sustancia química
que el estado de California sabe que provocan cáncer, defectos de
nacimiento, u otros daños reproductivos. Este artefacto puede causar un
nivel bajo de la exposición a algunas de las sustancias enumeradas,
incluidas benceno, formaldehído, y monóxido de carbono.
Cancer reproductivos y daños - www.P65Warnings.ca.gov.
ADVERTENCIA
No almacenar ni use gasolina ni otros vapores y líquidos inflamables cerca
de este o cualquier otro aparato.
4
Page 51

INSTRUCCIONES IMPORTANTES DE
SEGURIDAD
ADVERTENCIA
Lea todas las instrucciones antes de usar el aparato.
•
Use este aparato solamente para el propósito previsto como se
•
describe en esta Guía del usuario.
Antes de usar, la lavadora debe estar instalado correctamente según
•
se describe en esta guía.
Siempre siga del cuidado de la tela instrucciones suministradas por
•
el fabricante de la prenda.
No lave ni seco artículos que han sido limpiados previamente en,
•
lavarse en, empapado en, o con manchas con gasolina, solventes de
limpieza en seco, u otras sustancias inflamables o explosivas a medida
que emanar vapores que podría inflamable o si puede explotar.
No permita que los niños jueguen sobre o en el aparato. Cierre la
•
supervisión de los niños es necesaria cuando el electrodoméstico se
utilice cerca de niños.
Antes de que el aparato se retire del servicio o desechada, quite la
•
tapa del compartimiento de lavado.
No meta las manos en el aparato si la bañera esté en movimiento.
•
No instale o guarde este aparato en lugares donde se estén
•
expuestas a la intemperie o temperaturas de congelación.
10 No altere los controles.
•
No repare o reemplace cualquier parte del aparato o intenten
•
cualquier servicio a menos que se recomiende específicamente en el
user-maintenance instrucciones o publicados user-repair las
instrucciones que usted comprenda.
El gas hidrógeno es explo sivos. Si el sistema de agua caliente no se
•
ha usado durante dos semanas o más, antes de usar una arandela,
encienda todas los grifos de agua caliente y deje que el agua fluya de
cada durante varios minutos. Esto liberará todos los gas hidrógeno. El
gas es inflamable, así que no fume ni use una llama abierta durante
este tiempo.
Mantenga el área debajo y alrededor de su aparato libre de
•
materiales combustibles (pelusas, papel, trapos, y así sucesivamente),
gasolina, productos químicos, y otros vapores y líquidos inflamables.
No coloque objetos expuestos a aceite de cocina en el lavado oferta.
•
Los artículos contaminados con aceite de cocina puede contribuir a
una reacción química que podría causar una carga para prenderse fuego.
Este arandela no está diseñado para marítima o para instalaciones
•
móviles como en vehículos, aeronaves, y otras plataformas móviles.
Apague los grifos de agua y desenchufe la lavadora si la máquina no
•
se utilizará durante un período prolongado oftime, como durante las
vacaciones.
Los materiales de envasado puede ser peligroso para los niños.
•
Existe un riesgo de asfixia. Mantenga todos los envases lejos del
alcance de los niños.
Siempre verifique el interior de la lavadora para objetos extraños
•
antes de cargar la ropa. Mantenga la tapa cerrada cuando no esté en
uso.
de seguridad
Instrucciones
Tiene
Operativos
Requisitos
de Instalación
Instrucciones
Lavadora
Usar La
Cuidado de la
Lavadora
Solución de
Problemas
5
Page 52

de seguridad
Instrucciones
Tiene
Operativos
Requisitos
de Instalación
Instrucciones
Lavadora
Usar La
Cuidado de la
Lavadora
Solución de
Problemas
ADVERTENCIA
Instalación Advertencias y precauciones
Enchufe el cable de alimentación en un tomacorriente de pared de CA
•
120V/60Hz un valor nominal de 15 amperios o más. Utilice el conector
hembra para este lavadora solamente. No usar un cable de extensión.
- Compartir un enchufe de la pared con otro dispositivo, utilizando
una extensión múltiple, o extender el cable de alimentación puede
provocar una descarga eléctrica o incendio.
- No use un transformador eléctrico. Se puede provocar una descarga
eléctrica o incendio.
- Asegúrese de que el voltaje, frecuencia, y actuales coincidan con las
especificaciones producto. No hacerlo puede provocar una descarga
eléctrica o incendio.
Retire todas las sustancias extrañas como el polvo o agua del
•
enchufe terminales y puntos de contacto con un paño seco en forma
regular.
- Desconecte el enchufe y limpie con un paño seco.
- No hacerlo puede provocar una descarga eléctrica o incendio.
Conecte el enchufe en el tomacorriente de pared en la dirección
•
correcta de manera que corre hacia el piso.
- Si usted conecte el enchufe en el tomacorriente en la dirección
opuesta, los cables eléctricos dentro del cable puede estar dañado y
esto puede provocar una descarga eléctrica o un incendio.
Conecte el enchufe en el tomacorriente de pared con firmeza. No
•
utilice un enchufe dañado, sueltas o enchufe de pared, porque esto
puede provocar una descarga eléctrica o Iire.
No tire ni excesivamente doble el cable de alimentación. No tuerza
•
ni ate el cable de alimentación.
No enganche el cable de alimentación durante un objeto metálico,
•
coloque un objeto pesado en el cable de alimentación, inserte el cable
de alimentación entre los objetos, o empuje el cable de alimentación
en el espacio detrás del aparato, ya que esto puede causar una
descarga eléctrica o incendio.
No tire del cable de alimentación al desconectar el enchufe.
•
- Desconecte el enchufe sosteniendo el enchufe.
- No hacerlo puede provocar una descarga eléctrica o incendio.
Si el enchufe o el cable de alimentación está dañado, comuníquese
•
con su centro de mantenimiento más cercano.
No instale sobre la alfombra. Instale la arandela en un nivel y sólidos
•
piso que puede soportar su peso. No hacerlo puede dar lugar a
vibraciones anormales, ruido, o problemas con el producto.
La lavadora es pesado. Dos o más personas pueden ser necesarios
•
para instalar y mueva el artefacto. No hacerlo puede provocar
corporales u otras lesiones.
Almacene e instalar la arandela donde no quede expuesto a
•
temperaturas bajo cero o expuestos a la intemperie condiciones. No
hacerlo puede resultar en serias fuga daño.
Coloque el aparato para que el enchufe es fácilmente accesible. No
•
hacerlo puede provocar una descarga eléctrica o incendio debido a
un cortocircuito eléctrico.
No seguir todas las advertencias de seguridad en esta guía puede
•
resultar en daños a la propiedad, o lesiones a las personas.
6
Page 53

ADVERTENCIA
Mantenimiento y uso Advertencias y precauciones
• Si el electrodoméstico está inundada, corte el poder de inmediato y
comuníquese con su centro de mantenimiento más cercano.
Si el aparato emite un ruido extraño, una sensación de ardor olor,
•
o humo, desconecte el enchufe de inmediato y comuníquese con su
centro de mantenimiento más cercano. No hacerlo puede provocar
una descarga eléctrica o incendio.
En caso de una fuga de gas (como propano o de gas LP), ventilar
•
el área de inmediato. No apague aparatos o luz.
- No use un ventilador de ventilación.
- Una chispa puede producirse una explosión o incendio.
No fuerce la lavadora tapa abierta mientras la lavadora está en
•
marcha (para alta temperatura lavar, secar, o spinning).
- el agua sale de la lavadora puede causar quemaduras o causar el
piso a estar resbaloso. Esto puede provocar lesiones.
- Forzar la tapa abierta puede dañar el producto o causar lesiones.
Asegúrese de quitar el envase (esponja, espuma de poliestireno)
•
unida a la parte inferior de la lavadora antes de usarlo.
No inserte su mano o un objeto metálico en la lavadora. Esto puede
•
provocar lesiones.
No intente operar este aparato si está dañada, mal funcionamiento,
•
parcialmente desmontados, o tiene piezas faltantes o rotas, incluido
un cable o el enchufe están dañados. Esto puede provocar una
descarga eléctrica, incendio, o la muerte.
No toque el enchufe con las manos mojadas. Esto puede provocar
•
una descarga eléctrica.
No apagar el aparato al desconectar el enchufe mientras la lavadora
•
está en funcionamiento. Enchufar el enchufe en el tomacorriente de
pared nuevamente puede generar una chispa y provocar una
descarga eléctrica o incendio.
Mantenga todo el material de empaque fuera del alcance de los
•
niños, como materiales de embalaje pueden ser peligrosas para los
niños. Si un niño coloca una bolsa por encima de su cabeza, él o ella
pueden asfixiarse.
No permita que niños o personas enfermos usar este lavadora sin
•
supervisión. No hacerlo puede provocar una descarga eléctrica,
quemaduras, o lesión.
No intente reparar, desarme, o modificar el electrodoméstico usted
•
mismo.
- No use ningún fusible (como cobre, cable de acero, etc.) que no sea
el fusible estándar.
- Si necesita reparar o desinstalar el aparato, comuníquese con su
centro de mantenimiento más cercano.
- No hacerlo puede provocar una descarga eléctrica, incendio,
problemas con el producto, o lesión.
Si cualquier sustancia extraña, como agua ingresa el aparato en
•
cualquier área que no sea la bañera, desconecte el enchufe y
comuníquese con su centro de mantenimiento más cercano. No
hacerlo puede provocar una descarga eléctrica o incendio.
Si el agua de la manguera de suministro se desprende de la llave y
•
las inundaciones el aparato, desconecte el enchufe. No hacerlo puede
provocar una descarga eléctrica o incendio.
de seguridad
Instrucciones
Tiene
Operativos
Requisitos
de Instalación
Instrucciones
Lavadora
Usar La
Cuidado de la
Lavadora
Solución de
Problemas
7
Page 54

de seguridad
Instrucciones
Tiene
Operativos
Requisitos
de Instalación
Instrucciones
Lavadora
Usar La
Cuidado de la
Lavadora
Solución de
Problemas
No mezcle el blanqueador con cloro con amoníaco o ácidos, como
•
el vinagre. El uso incorrecto puede producir gas venenoso, ocasionar
lesiones graves.
No trate de llegar a la lavadora mientras las piezas estén en
•
movimiento. Antes de cargar, descargar, o agregar artículos, presione
el Start Pause botón y permitir que el tubo se detenga por completo
antes de llegar dentro. No hacerlo puede provocar una descarga
eléctrica, lesión, o incendio.
No permita que los niños jueguen en o en la lavadora. Cierre la
•
supervisión de los niños es necesario cuando la lavadora se utilice
cerca de niños. A medida que los niños crecen, enseñarles el correcto,
uso seguro de todos los electrodomésticos. No hacerlo puede provocar
lesiones graves.
Mantenga los productos de lavado fuera del alcance de los niños.
•
Observe todas las advertencias en las etiquetas de los productos y
siga ellos. No hacerlo puede provocar lesiones graves.
Desconecte este aparato de la fuente de alimentación antes de
•
intentar cualquier usuario mantenimiento. 6 Al presionar el botón de
encendido (Power) no desconecte el aparato de la fuente de energía.
No hacerlo puede provocar una descarga eléctrica, lesión, o incendio.
No limpie el aparato rociando agua directamente sobre él.
•
No use benceno, más delgada, o alcohol para limpiar el aparato. Esto
•
puede ocasionar decoloración, deformación, daño, descarga eléctrica,
o incendio.
Desconecte el enchufe cuando el electrodoméstico no se utiliza
•
durante largos períodos de tiempo o durante un trueno/tormenta
eléctrica. No hacerlo puede provocar una descarga eléctrica o incendio.
Mantenga las manos y objetos extraños alejados de la tapa y coloque
•
el pestillo de área cuando cierre la tapa. No hacerlo puede provocar
lesiones personales.
Si la lavadora está contaminada por una sustancia extraña como
•
detergente, suciedad, o los residuos de alimentos, desconecte el
enchufe y limpie la lavadora con un paño húmedo, paño suave. No
hacerlo puede ocasionar decoloración, deformación, daño, u óxido.
La capa transparente parte de la tapa se puede romper con un fuerte
•
impacto. Tenga cuidado cuando use la lavadora. Si la capa transparente
parte está rajado o roto, esto puede derivar en lesiones.
Después de un fallo de suministro o cuando vuelva a conectar el
•
suministro de agua manguera, abra la llave lentamente.
Abra el grifo lentamente después de un largo período de inactividad.
•
La presión de aire en el suministro de agua manguera o el tubo de
agua puede ocasionar daños a una parte o en las filtraciones de agua.
Si un drenaje error ocurre durante una operación, verifique si hay un
•
drenaje problema. Si la lavadora se usa cuando es inundada debido a
un problema de drenaje, puede provocar una descarga eléctrica o
incendio debido a un cortocircuito eléctrico. No inserte su mano o un
objeto metálico en la lavadora. Esto puede provocar lesiones.
Inserte la ropa en la lavadora por completo para que la ropa no
•
quedar atrapado en la tapa. Si la ropa pueden atascarse en la tapa,
esto puede derivar en daño a la lavandería o la lavadora, o pueden
provocar la pérdida de agua.
Asegúrese de que la llave esté apagada cuando la lavadora no se
•
utiliza.
8
Page 55

Asegúrese de que el suministro de agua conectores de mangueras
•
estén ajustados adecuadamente. No hacerlo puede resultar en daños
a la propiedad o lesión.
Abra el grifo y verificar si el suministro de agua conector para
•
manguera esté bien ajustado y que no hay agua se está fugando
antes de usar el producto. Si el suministro de agua conectores de
mangueras estén flojas, esto puede derivar en la pérdida de agua.
No se pare en la parte superior del aparato o coloque objetos
•
(como ropa, las velas encendidas, iluminado cigarrillos, platos,
productos químicos, objetos de metal, etc.) en el aparato. Esto puede
provocar una descarga eléctrica, incendio, problemas con el
producto, o lesión.
No opere el aparato con las manos mojadas. Esto puede provocar
•
una descarga eléctrica.
No rocíe volátiles material como insecticida sobre la superficie del
•
aparato. Además de ser perjudiciales para los seres humanos, también
puede provocar una descarga eléctrica, incendio, o problemas con el
producto.
No coloque un objeto que genera un campo electromagnético
•
cerca de la lavadora. Esto puede ocasionar lesiones debido a un mal
funcionamiento.
Dado que el agua durante una alta temperatura o jabón líquido
•
para el ciclo de secado está caliente, no toque el agua. Esto puede
provocar quemaduras o lesiones.
No lave, girar, o seco agua asientos, tapetes, o la ropa.
•
No lave in de espesor, duro tapetes incluso si la lavadora marca se
•
encuentra en la etiqueta de instrucciones de cuidado. Esto puede
ocasionar lesiones o dañar la lavadora, paredes, pisos, o la ropa
debido a vibraciones anormales.
No haga funcionar la lavadora cuando el dispensador de detergente
•
se retira. Esto puede provocar una descarga eléctrica o lesiones
debido a las filtraciones de agua.
No introduzca la mano en el dispensador de detergente después de
•
abrirla. Esto puede ocasionar lesiones debido a que su mano pueden
quedar atrapadas.
No coloque ninguna non-laundry objetos, como zapatos, los
•
residuos de alimentos, o animales en la lavadora. Esto puede producir
resultados anormales en las vibraciones que puede dañar la lavadora,
y, en el caso de las mascotas, provocar lesiones graves o la muerte.
No presione los botones usar objetos filosos como hormigueo,
•
cuchillos, o las uñas. Esto puede provocar una descarga eléctrica o
lesiones.
No lave la ropa contaminada por aceites, cremas, o lociones que
•
generalmente se encuentra en producto para el cuidado de la piel o
masaje clínicas. Esto puede dar como resultado el cierre de goma
quedar deformados y pérdida de agua.
Asegúrese de que el agua tubo de admisión está conectado y el
•
grifo se abre antes de lavar la ropa.
No deje objetos metálicos (alfileres de seguridad, cabello
•
contactos, y así sucesivamente) o blanqueador en la tina durante
largos períodos de tiempo. Esto puede causar la tina al óxido.
- Si el óxido aparece en la superficie de la bañera, se aplica un color
neutro agente de limpieza a la superficie y use una esponja para
limpiarla. Nunca use un cepillo de metal.
de seguridad
Instrucciones
Tiene
Operativos
Requisitos
de Instalación
Instrucciones
Lavadora
Usar La
Cuidado de la
Lavadora
Solución de
Problemas
9
Page 56

de seguridad
Instrucciones
Tiene
Operativos
Requisitos
de Instalación
Instrucciones
Lavadora
Usar La
No use agua caliente del agua de refrigeración/calefacción
•
dispositivos. Esto puede provocar problemas con la lavadora.
No use natural para el lavado de jabón en la lavadora. Si se
•
endurece y se acumula dentro de la lavadora, puede causar problemas
con el producto, decoloración, óxido, o malos olores.
Si usa un lavado red con esta máquina (no provisto), no lave la ropa
•
para lavar artículos como ropa de cama en el lavado neto. Hacerlo
puede causar lesiones debido a la vibración anómala s. Coloque sólo
los artículos más pequeños, como calcetines de encaje y lencería, en
el lavado neto.
•
No use detergente en polvo endurecidos. Si se acumula dentro de
la lavadora, esto puede derivar en agua leakag e.
No lave los tapetes o alfombrillas. Hacerlo podría causar que arena
•
para acumular dentro de la lavadora, lo que resulta en problemas
mecánicos.
ADVERTENCIA
Conexión a tierra/puesta a tierra
•
Este electrodoméstico debe estar conectado a tierra adecuadamente.
No conecte a tierra el aparato a una tubería de gas, plástico tubo de
•
agua, o línea telefónica.
- conexión a tierra incorrecta puede provocar una descarga eléctrica,
incendio, explosión, o problemas con el producto.
- nunca enchufe el cable de alimentación en un conector que no está
conectado a tierra correctamente. Asegúrese de que el conector
hembra usa esté conectado a tierra de acuerdo con los códigos
locales y nacionales.
Cuidado de la
Lavadora
Solución de
Problemas
10
ADVERTENCIA
Elegir un lugar apropiado
No instale este artefacto cerca de la calefacción o inflamable, material.
•
No instale este artefacto en un húmedo, grasosa, o polvo ubicación,
•
o en un lugar expuesto a la luz solar directa o agua (lluvia sin usar).
No instale este aparato en un lugar donde el gas pueden gotear. No
•
hacerlo puede provocar una descarga eléctrica o incendio.
Si la lavadora se mueva a una nueva ubicación, revísela e instalado
•
nuevamente por un técnico de servicio calificado. El incumplimiento
de esta advertencia puede provocar una descarga eléctrica o incendio.
No tire del cable de alimentación ni drene manguera de salida de
•
mover el aparato a la ubicación deseada lugar.
Page 57

FEATURES
Paquete cotents
Asegúrese de que los siguientes elementos viene con la lavadora:
Abrazadera (x2)
Drene la
manguera
Soporte de la
manguera
Guía del usuario
de seguridad
Instrucciones
Tiene
Operativos
Requisitos
de Instalación
Instrucciones
Lavadora
Usar La
Cuidado de la
Lavadora
Filtrar (x2)
NOTA:
Utilice las abrazaderas para fijar la manguera de drenado a la parte
•
trasera.
Utilice los filtros para reemplazar el empaque de las mangueras (del
•
lado de la llave de paso).
Solución de
Problemas
11
Page 58

Componentes principales
de seguridad
Instrucciones
El panel de control
Faucet y manguera
de entrada de agua
(no suministrado)
Tiene
Operativos
Requisitos
de Instalación
Instrucciones
Pierna ajustable
Lavadora
Usar La
Cuidado de la
Lavadora
Drene la manguera y
soporte
Cubre la tapa
Gabinete
(cuatro piernas)
Mire por la ventana
Cable de alimentación
Agua de la válvula
de entrada
Drene la manguera
de salida
Solución de
Problemas
12
Suavizante
compartimento
Bleach
compartimento
Detergente
compartimiento
Cerradura de puertas
Page 59

REQUISITOS OPERATIVOS
Eléctricos requisitos
ADVERTENCIA
Para reducir el riesgo de incendio, descarga eléctrica, o lesiones a las
personas, lea las INSTRUCCIONES DE SEGURIDAD IMPORTANTES antes
de operar este aparato.
Use un 120 voltios, 60 Hz, 15 amperios de fusibles o el disyuntor.
Recomendamos una persona del circuito de derivación que solo sirve la
lavadora.
ADVERTENCIA
Nunca utilice un cable prolongador.
Se requiere de conexión a tierra eléctrica para su lavadora.
Usted debe conectar a tierra la lavadora. En el caso de un mal
funcionamiento o falla, la conexión a tierra reduce el riesgo de descarga
eléctrica al brindarle una ruta de menor resistencia de corriente eléctrica.
Su lavadora está equipado con un cable con conexión a tierra con tres
clavijas plug. For uso en un instalado correctamente y tomacorriente
conectado a tierra.
La salida deben estar correctamente instalado y conectado a tierra de
acuerdo con todos los códigos y ordenanzas locales.
ADVERTENCIA
Usted es responsable de proporcionar los servicios eléctricos
•
adecuada para su lavadora.
Un conectadas de manera incorrecta del conductor puede aumentar
•
el riesgo de sh ock. Consulte a un electricista calificado o serviceman
si no está seguro de si su lavadora está conectado a tierra
correctamente.
No modifique el enchufe del cable de alimentación que vino con la
•
lavadora. Si el enchufe no calza en el tomacorriente, tienen el tipo
correcto de salida instalado por un electricista calificado.
Para evitar un riesgo de incendio, descarga eléctrica, o lesiones
•
personales, todo el cableado y el cable a tierra debe realizarse de
acuerdo con el Código de Electricidad Nacional ANSI/FNPA, No.70
última revisión y los códigos y ordenanzas locales.
Nunca conecte el cable a tierra de plástico cañerías, líneas de gas,
•
o las tuberías de agua caliente.
de seguridad
Instrucciones
Tiene
Operativos
Requisitos
de Instalación
Instrucciones
Lavadora
Usar La
Cuidado de la
Lavadora
Solución de
Problemas
13
Page 60

El agua requisitos
Para llenar la lavadora en la cantidad de tiempo correcta, la presión del
de seguridad
Instrucciones
agua debe ser de entre 14 y 116 psi (100 a 800 kPa).
Si la presión del agua es menos de 14 psi (100 kPa):
•
•
Tiene
•
Operativos
Requisitos
longitudes hasta 8 pies. (240 cm). Para evitar la posibilidad de daño
por agua:
•
•
•
de Instalación
Instrucciones
Drenaje requisitos
La válvula de agua puede fallar o no apague completamente.
El tiempo que necesitan para llenar la lavadora puede ser mayor que
el tiempo la lavadora controles permitir. Su lavadora se apagará e
informar un error. Una sobre plazos se basa en los controles para
prevenir desbordamientos en su hogar si una manguera se suelta.
De entrada de agua mangueras se deben adquirir por separado.
Puede comprar las mangueras de entrada en varias
Asegúrese de que los grifos de agua son fácilmente accesibles.
Apague las llaves cuando no lo esté usando la lavadora.
Revise periódicamente para asegurarse de que el agua no tiene
fugas del agua los accesorios de la manguera.
Lavadora
Usar La
Cuidado de la
Lavadora
Solución de
Problemas
14
La altura recomendada para el drenaje tubo vertical es 48 pulg. (122 cm).
La manguera de drenaje debe dirigirse a través de la manguera de drenaje
clip al tubo vertical.
El tubo vertical debe ser lo suficientemente grande como para aceptar el
diámetro externo de la manguera de drenaje.
Page 61

INSTRUCCIONES DE INSTALACIÓN
Desentrañar la lavadora
ADVERTENCIA
•
Preparar materiales pueden ser peligrosos para los niños. Mantenga
todos los materiales de embalaje (bolsas de plástico, poliestireno, y
así sucesivamente) fuera del alcance de los niños.
No haga funcionar la lavadora en la espuma base cojín. Hacerlo
•
provocará graves vibración, que podría causar daño a los equipos o
provocarle una lesión física.
Retire la caja de embalaje y levante la lavadora hacia arriba y hacia afuera
de la espuma base cojín. Abra la tapa de la lavadora para sacar los
accesorios, incluso la espuma protectora.
de seguridad
Instrucciones
Tiene
Operativos
Requisitos
de Instalación
Instrucciones
Lavadora
Usar La
Cuidado de la
Lavadora
Base cojines de espuma
Protección de espuma
Solución de
Problemas
15
Page 62

Elegir una ubicación
de seguridad
Instrucciones
Tiene
Para obtener el mejor rendimiento, debe instalar la arandela en una sólida,
nivel piso.
Pisos de madera es posible que se deba reforzado para minimizar la
vibración o carga desequilibrada situaciones. Alfombras y suave las
Operativos
Requisitos
superficies de azulejos pueden contribuir a vibraciones excesivas, que
puede provocar la lavadora para que se mueve levemente durante el ciclo
de lavado.
Lavadora las dimensiones y la instalación mediciones
de Instalación
Instrucciones
Lavadora
Usar La
ADVERTENCIA
•
No instale la lavadora en áreas donde el agua puede congelarse,
debido a que su lavadora siempre conserva un poco de agua en la
válvula de agua, bomba, y manguera áreas. Frozen agua puede
dañar las correas, bomba, mangueras, y otros componentes.
Nunca instale sobre una plataforma o levemente admite estructura.
•
103,5 cm
116,0 cm
45,7 pulg.
40,8 pulg.
Cuidado de la
Lavadora
Solución de
Problemas
16
27,0 pulg.
68,6 cm
29,0 pulg.
73,6 cm
116,0 cm
45,7 pulg.
149,0 cm
58,7 pulg.
Page 63

Si instala la lavadora en un nicho o armario, la parte delantera del armario
deben tener dos sin obstrucciones las aberturas de ventilación para una
combinación mínima área total de 72 sq.in. (465 sq.cm) con una separación
mínima de 3 in. (7,6 mm) en la parte superior e inferior. Una puerta persiana
con equivalente espacio de liquidación es aceptable.
3 pulg.
(7,6 cm )
de seguridad
Instrucciones
48 pulgadas cuadradas
(310 cm )
24 pulgadas cuadradas
(155 cm )
2
2
3 pulg.
(7,6 cm )
Instalación en un nicho o armario
Mínimo los espacios entre la lavadora y paredes adyacentes u otras
superficies son:
de cualquier lado: pulg. (2,5 cm)
•
trasero:
•
armario frente: 2 plug. (5,1 cm)
•
cubra: 24 plug. (61 cm)
•
el espacio entre el extremo de la válvula de agua y la pared:
•
6 plug. (15,2 cm)
6 plug. (15,2 cm)
Si instala la lavadora en un nicho o armario, la parte delantera del armario
deben tener dos sin obstrucciones aire abertura para una combinación
mínima área total de 72 pulgadas cuadradas (465 cm cuadradas).
Tiene
Operativos
Requisitos
de Instalación
Instrucciones
Lavadora
Usar La
Cuidado de la
Lavadora
Solución de
Problemas
17
Page 64

A B
de seguridad
Instrucciones
Tiene
Operativos
Requisitos
1 plug.
2,5 cm
A. Área rebajada
de Instalación
Instrucciones
Lavadora
Usar La
Cuidado de la
Lavadora
B. Vista lateral - armario o confned área
27 plug.
68,6 cm
1 plug. (2,5 cm)
27 plug.
68,6 cm
1 plug.
2,5 cm
2 plug.
5,1 cm
24 in.
61 cm
29 plug.
73,6 cm
ADVERTENCIA
Antes de instalar su lavadora, asegurarse de que la ubicación:
Es un duro, superficie nivelada sin alfombras o pisos blandos que
•
puede obstruir ventilación.
Es lejos de la luz solar directa.
•
Tiene una ventilación adecuada.
•
No exponerse a temperaturas de congelación (32° Para 0° C).
•
Es lejos de fuentes de calor como el petróleo o gas.
•
Tiene espacio suficiente para que la lavadora no resto en su cable
•
de alimentación.
6 plug.
15,1 cm
Solución de
Problemas
18
Las herramientas que le need
Alicates
Phillips
destornillador
Nivel
Destornillador
de cabeza plana
Alicates
Page 65

Conecte las mangueras
NOTA: El suministro de agua mangueras no se suministran con la lavadora
y se deben adquirir por separado.
PRECAUCIÓN
Use las mangueras de suministro de agua nuevo. Con de edad
•
mangueras puede ocasionar pérdidas o desbordamiento que puede
dañar su propiedad.
•
• No conecte muchos suministro de agua mangueras juntos para
aumentar la longitud de la manguera. Las mangueras conectadas de
esta forma puede tener fugas y causar descargas eléctricas. Si una
manguera es demasiado corto, reemplace la manguera con más,
alto - pressu ref.: manguera.
1.
Asegúrese de que haya arandelas de caucho dentro de los accesorios
en ambos extremos de cada nueva manguera de agua. Retire las
arandelas de goma en el lado del grifo y reemplácelas con filtros.
Instalar el suministro de agua mangueras sin arandelas de caucho
puede provocar pérdida de agua.
Los filtros
deben estar instalados
Deben colocarse
las arandelas de
goma
Lado de las llaves
de paso
Utilice solo
mangueras nuevas
Lado de las válvulas
de entrada
de seguridad
Instrucciones
Tiene
Operativos
Requisitos
de Instalación
Instrucciones
Lavadora
Usar La
2. Ajuste la manguera y llave racores de mano hasta que estén ceñidas,
después apriételos un adicional de dos tercios de la vuelta, con pinzas
o una llave. Tire el suministro de agua mangueras hacia abajo para
asegurarse de que estén conectados firmemente.
Frío Caliente
Cuidado de la
Lavadora
Solución de
Problemas
19
Page 66

No ajuste demasiado los accesorios o coloque cinta adhesiva o sellador a
las llaves o suministro de agua ingestas. Esto puede dañar los accesorios.
de seguridad
Instrucciones
3. Coloque el desconectados extremos de las mangueras en un balde y
Tiene
Operativos
Requisitos
de Instalación
Instrucciones
4. Conecte los extremos del suministro de agua de las mangueras para el
Lavadora
Usar La
Cuidado de la
Lavadora
PRECAUCIÓN
encender las llaves conectado al suministro de agua mangueras durante
10 o 15 segundos para eliminar cualquier sustancia extraña. Apague las
llaves.
suministro de agua de conexiones de la parte superior de la oferta de
lavado. Asegúrese de que las arandelas de caucho estén en su lugar.
El suministro de agua manguera conectada a la fuente llave debe estar
conectado al suministro de agua caliente ingesta de alimentos y el
agua manguera conectada al frío llave debe estar conectado al
suministro de agua fría ingesta.
Solución de
Problemas
20
NOTA: Si no desea usar el suministro de agua caliente manguera,
inserte un consumo de agua tapa en el suministro de agua caliente de
que el orificio de entrada. En este caso, debe seleccionar la Tap Cold
opción para la temperatura del agua.
NOTA: No la tapa de entrada se proporciona con la lavadora. Debe
adquirirse por separado.
Page 67

5.
Ajuste los accesorios a mano hasta que estén ceñidas, después
apriételos un adicional de dos tercios de su turno con una llave.
de seguridad
Instrucciones
Tiene
PRECAUCIÓN
No ajuste demasiado los accesorios o coloque cinta adhesiva o
•
sellador a las llaves o suministro de agua ingestas. Esto puede dañar
los accesorios.
Asegúrese de que el suministro de agua mangueras no estén
•
torcidas o dobladas. Un doblada o enredada manguera pueden tener
fugas y causar una descarga eléctrica debido a la pérdida de agua.
Para garantizar la correcta el uso del agua, conecte el agua fría y
caliente llave s. Si uno o ambos no estén relacionadas, un código de
error podría ocurrir.
6. Encienda los suministros de agua caliente y fría y controle todo el
suministro de agua de conexiones y las llaves para fugas de agua.
Conecte la manguera de drenaje
PRECAUCIÓN
No deslice la manguera de drenaje completamente sobre el drenaje
•
lavadora tubería puede resultar en pérdida de agua.
No mueva la abrazadera o aro en el drenaje lavadora tubo puede
•
resultar en pérdida de agua.
1. Encuentre el extremo de la manguera de drenaje que tiene la
abrazadera, luego deslice la abrazadera desde el extremo de la
manguera.
Operativos
Requisitos
de Instalación
Instrucciones
Lavadora
Usar La
Cuidado de la
Lavadora
Solución de
Problemas
21
Page 68

2. Inserte la manguera de drenaje con la abrazadera en el drenaje lavadora
de seguridad
Instrucciones
Tiene
tubería. Asegúrese de que la manguera de drenaje cubra completamente
el extremo de la tubería de desagüe.
Operativos
Requisitos
de Instalación
Instrucciones
Lavadora
Usar La
Cuidado de la
Lavadora
Solución de
Problemas
3. Mueva la abrazadera hacia la tubería de drenaje tomacorriente. Ajuste la
4. Ajuste la manguera de drenaje para el bastidor del limpiador en los
abrazadera con un destornillador de hoja plana.
lugares indicados con la manguera abrazaderas (2) proporcionado, con
un destornillador Phillips.
22
Page 69

5. Coloque el otro extremo de la manguera de drenaje (el extremo suelto)
en una de las siguientes maneras:
PRECAUCIÓN
Asegúrese de que la conexión entre la manguera de drenaje y la cuenca,
tubo vertical, o lavadero no es hermético.
Durante el borde de una cuenca - Asegure la guía para el lado del
•
embalse pared con un gancho, cinta, o la atan con un trozo de cordón
para prevenir la manguera de desagote en movimiento.
En un tubo vertical - el tubo vertical debe estar a 39 pulg. (99 cm) y
•
no más de 96 pulg. (244 cm).
de seguridad
Instrucciones
Tiene
Operativos
Requisitos
de Instalación
Instrucciones
Lavadora
Usar La
Manguera
retenedor
Ata correa
96 pulg. Máx.
39 pulg. Min
Cuidado de la
Lavadora
Solución de
Problemas
23
Page 70

•
de seguridad
Instrucciones
Tiene
Operativos
Requisitos
de Instalación
Instrucciones
Nivel la lavadora
En un lavadero - el lavadero no debe ser más cortos que 39-in . (99 cm)
y no más de 96-in (244 cm) máximo.
Retenedor de
manguera
96 pulg. Máx.
39 pulg. Min
Ata correa
Lavadora
Usar La
Cuidado de la
Lavadora
Solución de
Problemas
24
PRECAUCIÓN
No use su lavadora sin nivelación. Si su lavadora no está nivelado, puede:
Haga vibrar excesivamente que puede provocar la lavadora a un mal
•
funcionamiento
Haga excesiva noi se.
•
Indique los códigos de error E3, E4 o ES cuando la lavadora está en
•
marcha.
Extienda las patas niveladoras solo en la medida que sea necesario. Si los
pies se extiende demasiado, la lavadora puede vibrar.
Determine si la lavadora esté nivelada marcando la posición de la bañera
o utilizando un nivel.
1. Deslice la arandela en positi en.
2. Abra la tapa de la lavadora, luego vierta agua en la tina para la
nivelación con un círculo. Si la lavadora esté nivelada el agua le toque
la nivelación círculo toda la vuelta. Si la lavadora no está nivelado, el
agua solamente tocará parte de la nivelación con un círculo.
Page 71

de seguridad
Instrucciones
Nivelación
círculo
Arandela nivel: agua
toca la nivelación
círculo toda la vuelta.
Lavadora no nivel:
el agua no toque la
nivelación círculo
toda la vuelta.
3. Si su lavadora no está nivelado, cuidadosamente incline la lavadora
sólo lo suficiente como para ajustar las patas niveladoras en la parte
inferior delantera de la lavadora. Extienda los pies solo en la medida
que sea necesario. Si los pies se extiende demasiado, la lavadora
puede vibrar.
afloje bloqueo
Patas ajustables
Tiene
Operativos
Requisitos
de Instalación
Instrucciones
Lavadora
Usar La
Cuidado de la
Lavadora
Encendido
Conecte el cable de alimentación a un well-grounded, 3 clavijas, 120
voltios, 60Hz aprobado tomacorriente, protegido por una 15 fusible o
comparable disyuntor. Su lavadora está conectado a tierra a través de
la tercera clavija del cable de alimentación.
Solución de
Problemas
25
Page 72

Pase un ciclo de prueba
Pase un ciclo de prueba para asegurarse de que la lavadora está instalado
de seguridad
Tiene
Operativos
de Instalación
Lavadora
Usar La
correctamente.
Instrucciones
1.
2.
3.
4.
Requisitos
Instrucciones
Cargue alrededor de 6 libras (2.7 kg) de ropa en la bañera.
Presione el Power botón para encender la lavadora.
Gire el selector de ciclo para seleccionar el Rinse & Spin cycle.
Presione el START PAUSE botón para iniciar el ciclo de prueba. Su
lavadora no debe mecerse o vibra excesivamente cuando el agua llena
la bañera, o al lavar o spinnin g. La lavadora debe drenar bien durante
el ciclo de lavado.
PRECAUCIÓN
Si detecta fugas de agua mientras la lavadora se llena o drenando,
•
verificar las conexiones de agua. Consulte Conecte las mangueras en
la página 19 or Conecte la manguera de drenaje en la página 21.
Si la lavadora rocas y/o vibra excesivamente, nivel de nuevo. Consulte
•
Nivel la lavadora en la página 24.
Cuidado de la
Lavadora
Solución de
Problemas
26
Page 73

USAR LA LAVADORA
El panel de control
MLV45N1BWW
1
6
7
MLV45N3BWW
de seguridad
Instrucciones
2
3
8 9 11 14
5
4
Tiene
Operativos
Requisitos
de Instalación
15131210
Instrucciones
Lavadora
Usar La
1
POWER
Presionar para encender la lavadora. Presione el botón nuevamente
para apagar la lavadora. Si abandona la lavadora y no presione el
START PAUSE botón en el término de 10 minutos, la lavadora se apaga
automáticamente.
2
Ciclo selector
Gire para seleccionar un ciclo de lavado. El ciclo que elija determinan el
patrón del ciclo. Para obtener más información, consulte Lavadora
opciones y especificaciones en la página 35.
Cuidado de la
Lavadora
Solución de
Problemas
27
Page 74

3
de seguridad
Instrucciones
Tiene
Operativos
Requisitos
4
de Instalación
Instrucciones
Lavadora
Usar La
Cuidado de la
Lavadora
5
Mostrar digital
La pantalla inicial para Quick Wash (lavado rápido), Delicates (tejidos
delicados), Tub Clean (limpiar la tina) y solo centrifugado muestra el
tiempo total del ciclo que usted seleccione. Todos los demás ciclos
mostrarán 3 guiones ( - - - ) hasta que se complete la rutina de
detección de carga, que puede tardar hasta 60 segundos.
La primera pantalla se mostrará el tiempo total para el ciclo usted
seleccione.
Mientras la lavadora está en marcha, la pantalla muestra el ciclo proceso
y el tiempo restante en el ciclo.
NOTA: El tiempo que se muestra es una estimación basada en
condiciones normales de funcionamiento. Algunos factores externos
(como el tamaño de carga, temperatura ambiente, agua entrante
temperatura, y presión de agua) puede afectar tiempo real.
Si establece una demora tiempo para el comienzo del ciclo, la pantalla
muestra la hora cuando el ciclo comenzará.
SOAK
Presionar para seleccionar el SOAK option. opción. Presione el botón
nuevamente para cancelar. Seleccione esta opción para lavadas de ropa
muy sucia artículos que necesita en remojo para limpiar las manchas y
la suciedad.
Remoje se produce después de la bañera llena y detergente se agrega,
pero antes del proceso de lavado. El agitador rotará varias veces
durante el remojo proceso
Delay
Presione para seleccionar un horario cuando desea que la ciclo para
comenzar. Puede seleccionar el tiempo hasta 24 horas de anticipación
en incrementos de una hora. La pantalla muestra la hora cuando el ciclo
comenzará. Para obtener más información, consulte (opcional)
Establezca una hora de inicio retrasado en la página 32.
Solución de
Problemas
28
6
MY CYCLE
Pulse y manténgalo presionado durante 3 segundos para recordar su
ciclo de lavado. Presionar una vez para cargar su ciclo configuraciones.
7
START PAUSE
Presione una vez para comenzar el ciclo de lavado. Presione el botón
nuevamente para detener el ciclo. Si hace una pausa el ciclo, usted
puede agregar o quitar artículos, pero no puede cambiar cualquier
configuración. Presione el botón nuevamente para reiniciar el ciclo.
Page 75

8
WATER PLUS
Presionar una vez para aumentar un mayor nivel de agua. Presione el
botón nuevamente para cancelar esta función. Si el nivel de agua está
listo para la más alta, el nivel no cambiará.
Cuando se utiliza Water Plus (agua extra) en el ciclo normal/colores,
cambia automáticamente a ciclo Heavy Duty (trabajo pesado).
9
FABRIC SOFTENER
Agregue un suavizante para ropa líquido el suavizante de ropa
compartimiento, luego presione este botón. El suavizante para ropa
es agregado al ciclo a la hora correcta.
10
EXTRA RINSE
Presionar para agregar un adicional de enjuague para el ciclo de
lavado. Presione el botón nuevamente para cancelar.
11
SIGNAL
El sonido la función de apagado pueden seleccionarse durante todos
los cursos
12
SOIL LEVEL
Presionar para seleccionar el nivel del suelo. Diferentes los niveles de
suciedad causar diferentes lavar veces y ciclo de lavado
configuraciones. Para obtener más información, consulte lavadora
opciones y especificaciones en la página 35.
de seguridad
Instrucciones
Tiene
Operativos
Requisitos
de Instalación
Instrucciones
Lavadora
Usar La
13
Control de bloqueo
Presionar para seleccionar el SOIL LEVEL y Temp. botones al mismo
tiempo durante 3 segundos para encender el niño función de bloqueo.
Presione y mantenga estos botones nuevamente para apagar la función.
Cuando el niño función de bloqueo esté encendido, el único botón que
funciona es el POWER button and el SOIL LEVEL y Temp. botones que
usa para apagar el bloqueo para niños.
14
WASH TEMP.
Presionar para seleccionar el agua de lavado temperatura. El agua de
enjuague temperatura siempre está frío.
15
SPIN LEVEL
Presionar para seleccionar el nivel gira para aumentar girar tiempo o
la vez. Esta función no se puede seleccionar con ,
Quick Wash
y Tub
Clean ciclos.
Normal / Colors
Cuidado de la
Lavadora
Solución de
Problemas
29
Page 76

Lavarse una carga de ropa
de seguridad
Instrucciones
personas, lea las INSTRUCCIONES DE SEGURIDAD IMPORTANTES antes
de operar este aparato.
Seleccionar un detergente
Tiene
Operativos
de Instalación
Su lavadora está diseñado para uso de alta eficiencia (HE) detergentes.
•
Requisitos
Instrucciones
•
1. Convierte un la lavadora
Presione el Power botón para encender la lavadora. Su lavadora inicial
de los ajustes:
•
Lavadora
Usar La
•
•
2. Cargue su lavadora
ADVERTENCIA
Para reducir el riesgo de incendio, descarga eléctrica, o lesiones a las
Para obtener los mejores resultados de limpieza, utilizar un detergente
HE. Le recomendamos que no use un detergente normal. detergentes
HE contienen supresores que reducir o eliminar la espuma. Cuando
menos espuma se producen, la carga volteretas mayor eficiencia y
limpieza óptima.
Reducir la cantidad de detergente puede reducir la calidad de
limpieza. Asegúrese de que usted:
- Trate previamente las manchas
- Ordenar cuidadosamente por color y nivel del suelo
- Evite sobrecargar
Normal en el ciclo selector with-- muestran en la pantalla digital.
Medium para el Soil Level.
Warm para el Wash Temp.
Cuidado de la
Lavadora
Solución de
Problemas
30
PRECAUCIÓN
Antes de cargar la ropa, asegúrese de retirar monedas, llaves, y otros
objetos duros, y cerrar cremalleras. Estos artículos pueden dañar la ropa
y la lavadora.
•
Clasificar la ropa a tipo de tela, nivel del suelo, color, y tamaño de carga.
Llene la bañera con seco, desdoblada ropa. Cargue la bañera no más
•
de 3/4 completo.
NOTA:
La sobrecarga puede reducir lavar la eficiencia, provocar desgaste
•
excesivo, y posiblemente provocar la formación de pliegues y arrugas
de la carga.
Lave los artículos delicados como sostenes, medias, y otros lencería
•
en el Delicates ciclo con artículos ligeros.
Page 77

Cuando se lave grandes, artículos voluminosos (como alfombras o
•
almohadas) o algunos artículos más pequeños (como juguetes de
peluche o una o dos suéteres) que no llenar la bañera por completo,
agrega algunas toallas para mejorar girar el desempeño.
Siempre use el ciclo que pese para artículos voluminosos.
•
Cuando se lave lavadas de ropa muy sucia, no sobrecargue la
•
lavadora para asegurar una buena limpieza resultados.
3. Agrega detergente y aditivos para los compartimientos
de seguridad
Instrucciones
Detergente
compartimiento
Cargar el detergente líquido o en polvo compartimiento
Pour la cantidad recomendada de detergente para ropa directamente
•
en el compartimiento antes de comenzar la lavadora.
If utiliza lejía para ropa de color, agrega con el detergente para el
•
detergente compartimiento.
Bleach
compartimento
Suavizante
compartimento
NOTA:
Al agregar lejía para ropa de color con detergente, ambos productos
•
para lavar la ropa debe estar en el mismo formulario (líquido).
Si no el compartimiento para detergente, debe agregar el detergente
•
en la bañera.
Carga de la lejía compartimiento (lejía líquida únicamente)
Agregue Cloruro ine de blanqueador con cloro por el blanqueador
•
compartimiento. No llene el vaso picador en exceso compartimiento.
No hay agua entrada de la lejía dispensador, para el blanqueador se
•
carga directamente en la bañera cuando vierta en.
Tiene
Operativos
Requisitos
de Instalación
Instrucciones
Lavadora
Usar La
Cuidado de la
Lavadora
Solución de
Problemas
PRECAUCIÓN
Evite salpicar o protección el compartimiento.
•
Nunca vierta sin diluir cloro líquido directamente en la carga o en la
•
bañera. Si lo hace, puede dañar las telas, por el debilitamiento de las
fibras o quitarle el color.
NOTA: No vierta lejía para ropa de color en la lejía compartimiento.
En su lugar, agregue el detergente compartimiento.
31
Page 78

Cargar el suavizante de ropa compartimiento
•
de seguridad
Instrucciones
•
•
Tiene
•
•
Operativos
Requisitos
4. Seleccione el ciclo y opciones para la carga
•
de Instalación
Instrucciones
Lavadora
Usar La
Vierta la cantidad recomendada de suavizante para ropa líquido en el
suavizante compartimiento. El dispensador libera automáticamente
suavizante para ropa líquido en el horario correcto durante el ciclo de
enjuague.
PRECAUCIÓN
Use el suavizante compartimiento SOLO para suavizantes para ropa
líquidos.
No use la bolita Downy en el suavizante de telas compartimiento.
No utilice suavizante para ropa líquido que es demasiado pegajosa
porque puede no mezcle con el agua lo suficiente.
Asegúrese de seleccionar la opción Suavizante para ropa cuando
utilice suavizante para ropa, de modo que se divulga de enjuague de
la parte del ciclo.
Gire el selector de ciclo para seleccionar un ciclo de lavado. Para obtener
información sobre ciclos de lavado, ver Lavadora opciones y settings en
la página 35.
*MLV45N1BWW
*MLV45N3BWW
Cuidado de la
Lavadora
Solución de
Problemas
32
Opcional: Use el panel de control botones (como Fabric Softener) para
•
personalizar el ciclo de lavado. Para ver las descripciones, perotoneladas,
ver Control de panell en la página 27. Para obtener información sobre
qué botones están disponibles para cada ciclo tipo, see Lavadora
opciones y especificaciones en la página 35.
5. (opcional) Establezca una hora de inicio retrasado
Puede programar un ciclo de lavado, luego establezca un momento cuando
desea un ciclo de lavado para comenzar.
Oprima the and DELAY WASH + - botón para encender el inicio
•
postergado la función hora.
Page 79

Presione el Delay repetidamente para seleccionar el tiempo de retardo
•
desea. La demora hora de inicio, en horas, se mostrará en la pantalla,
en secuencia, de 0 para 24, luego hacia atrás 0. También puede
presione y mantenga presionado el Delay botón para ajustar
rápidamente la vez hasta que el tiempo deseado aparece en la pantalla.
Si desea cambiar el ciclo de lavado configuración mientras está
•
configurando la demora hora de inicio, gire el selector de ciclo. Para
volver a establecer el inicio postergado la función hora, Repita los
pasos 2, si la nueva configuración del ciclo requiere un ajuste de la
carga.
de seguridad
Instrucciones
NOTA:
Una vez que el número de demora horas al empujar el Delay botón,
•
suelte el botón durante tres segundos y se establecerá. El retardo
luz permanecerá encendida.
Después de la demora tiempo, si desea cambiar el ajuste del
•
retardo, presione el Delay botón nuevamente hasta obtener la hora
de alcanzar. Suelte el botón durante tres segundos y se establecerá.
Si decide cancelar el ajuste del retardo, puede girar el selector de
•
ciclo o presione el Delay botón hasta que 0 se alcanza.
Idealmente, debería establecer su ciclo antes de colocar el
•
retardo, porque gira el selector de ciclo después del retardo se
cancela la demora.
El retardo hora de inicio no puede cambiarse después de que el
•
programa ha comenzado.
To cancel the delay start time function before you save the setting,
•
press the Delay button until 0 appears on the display, or turn the cycle
selector knob.
IMPORTANTE:
Puede cambiar asistencia o cancelar la demora hora de inicio
•
función en cualquier momento antes de presionar el Start Pause
botón girando el ciclo de selección. La demora hora de inicio no
puede modificarse una vez que presione el Start Pause button.
Si pulsó el Start Pause botón, podrá cancelar el inicio postergado
•
Función del tiempo presionando el Power botón para apagar la
lavadora, luego Power botón nuevamente para volver a abrirlo.
6. Comience su lavadora
Oprima el Start Pause botón.
•
Tiene
Operativos
Requisitos
de Instalación
Instrucciones
Lavadora
Usar La
Cuidado de la
Lavadora
Solución de
Problemas
NOTA:
Si no ha configurado una hora de inicio retrasado o si el tiempo de
•
retardo ha vencido, la lavadora comienza el ciclo y el Wash se
encienda la luz.
Como la lavadora se mueve de etapa en el ciclo de lavado, la
•
relativa se encienda la luz (como Rinse or
Si usted fijó un tiempo de inicio retrasado, el Delay
•
luz y la lavadora comienza la cuenta regresiva la hora de inicio.
Spin
).
se encienda la
33
Page 80

de seguridad
Instrucciones
Tiene
7. Descargue la ropa
Remoje
Si necesita hacer una pausa en el ciclo (por ejemplo, para agregar o
•
Lave
Enjuague
Spin Listo Limpie para bañera
quitar artículos o ajustar la carga), presione el Start Pause botón, luego
abra la tapa. Su lavadora se detenga. Cuando esté listo para volver a
lavar, cierre la puerta, luego presione el Start Pause botón.
Operativos
Requisitos
•
•
Cuando el ciclo de lavado esté completa:
de Instalación
Instrucciones
•
Lavadora
Usar La
Configuración del bloqueo para niños
Ynuestro lavadora tiene un hijo función de bloqueo para evitar que los
niños jueguen con la lavadora. Cuando se enciende el bloqueo para niños,
la única botones que trabajan son los Power botón y el Soil Level and
Cuidado de la
Lavadora
Temp. botones que usa para apagar el bloqueo para niños.
•
Solución de
Problemas
•
La lavadora emite seis pitidos y muestra 0:00. La lus del Done se
apaga.
Su lavadora desbloquea la tapa.
Remoje
Lave
Enjuague
Spin Listo Limpie para bañera
Abra la tapa y quite la ropa.
Presione y sostenga la Soil Level Temp. botones durante tres
segundos. El bloqueo para niños se encienda la luz.
Sostenga 3 s. Para Centrol
bloqueo
To apague el bloqueo para niños, pulse y sostenga los Soil Level y
Temp. botones durante tres segundos.
NOTA:
Si su lavadora no está encendido, el bloqueo para niños aún puede
•
estar preparado. Presione el Power botón, encienda el niño función
de bloqueo, luego presione el Power botón para apagar la lavadora.
Cuando desee utilizar la lavadora, necesite desactivar la función de
bloqueo.
34
Page 81

Un doble pitido al pulsar el botón significa que la opción no está
habilitada para el ciclo.
**
page 37
Page 82

de seguridad
Instrucciones
**
Tiene
Operativos
Requisitos
de Instalación
Instrucciones
Lavadora
Usar La
Cuidado de la
Lavadora
Solución de
Problemas
page 37
Toallas
36
Page 83

CUIDADO DE LA LAVADORA
PRECAUCIÓN
Apague los grifos de agua después del uso final. Esto se apaga el
suministro de agua de la lavadora y evita la posibilidad de daño la fuga
de agua. Deje la tapa abierta para permitir que el interior de la lavadora
seque.
Limpieza y mantenimiento
Limpiar el exterior
Use un paño suave para limpiar el detergente, lejía, u otros derrames a
medida que surgen.
Limpiar el interior
Limpie el interior de la lavadora periódicamente para quitar la suciedad,
•
la tierra, el olor, el moho, hongos, o bacteriana residuos que puede
permanecer en la lavadora como resultado de lavar la ropa.
El incumplimiento de estas instrucciones puede tener como resultado
•
desagradables condiciones, incluidos los olores o manchas permanentes
en la lavadora o en la ropa.
•
Para eliminar los depósitos de agua dura, use un limpiador etiquetados
"Washer seguro".
Limpieza del panel de control
Limpie con una toalla suave, paño húmedo. No utilice abrasivos polvos
•
ni almohadillas de limpieza.
No limpiadores en aerosol directamente en el panel. El panel de control
•
acabado puede ser dañado por algunos ropa del suelo y quitamanchas
productos. Aplique estos productos lejos de la lavadora y limpie los
derrames o rociado de inmediato.
de seguridad
Instrucciones
Tiene
Operativos
Requisitos
de Instalación
Instrucciones
Lavadora
Usar La
Cuidado de la
Lavadora
Limpieza del detergente, lejía, o suavizante compartimiento
Para retirar la ropa para lavar los residuos del producto, limpie con un
•
paño húmedo y sécalo con una toalla.
Puede eliminar el blanqueador, detergente y suavizante
•
compartimentos para limpiarlos.
Limpieza de la bañera
El Tub Clean ciclo es un ciclo de limpieza que elimina las causas de los olores
que pueden ocurrir dentro de la lavadora sin usar un agente de limpieza. Le
sugerimos limpiar la bañera aproximadamente una vez al mes.
Solución de
Problemas
37
Page 84

Nunca utilice el Tub Clean ciclo cuando la ropa está en la lavadora. Esto
de seguridad
Instrucciones
puede dañar la ropa o la lavadora.
•
•
•
Tiene
Operativos
•
Almacenamiento de su lavadora
Requisitos
Usted puede dañar la lavadora si no eliminar el agua de las mangueras y
componentes internos antes de guardarlo.
Para preparar la lavadora para almacenamiento:
•
de Instalación
Instrucciones
•
•
Lavadora
Usar La
Si su lavadora ha guardado en belowfreezing temperaturas, dé tiempo a
las sobras de agua en la lavadora que se descongelen antes de usar.
PRECAUCIÓN
Con la bañera vacío, agregue una taza de lejía de cloro para el
blanqueador dispensador.
Presione el Power button.
Gire el selector a ciclo Tub Clean. Cuando seleccione Tub Clean, las
únicas opciones puede cambiar es el retardo opción.
Presione el Start Pause button.
Seleccione el Quick Wash ciclo y agregue lejía para el lavado oferta.
Haga funcionar la lavadora a través del ciclo sin una carga.
Gire el agua grifos y desconecte la entrada mangueras.
Desenchufe la lavadora del tomacorriente y deje su lavadora tapa
abierta para que circule aire dentro de la bañera.
PRECAUCIÓN
Cuidado de la
Lavadora
Solución de
Problemas
38
Page 85

ANTES DE SOLICITAR SERVICIO TÉCNICO
Consejos para solucionar problemas
¡Ahorre tiempo y dinero! Revise primero los cuadros de las páginas a
continuación y tal vez no necesite solicitar servicio técnico.
Problema Solución
Lavadora no
comienza
No agua o no
suficiente
agua
Asegúrese de que la lavadora está enchufado.
•
Asegúrese de que la tapa esté cerrada.
•
Asegúrese de que la fuente de agua llaves están abiertas
•
Asegúrese de presionar el Start Pause botón para
•
iniciar la lavadora.
Antes de la lavadora comienza a llenar, es una serie de
•
clics para asegurarse de que la tapa esté cerrada y a
hacer una rápida drenaje. La lavadora no drena después
de que la tapa se cierra. Para los ciclos automáticos:
Antes del llenado, y después de que la tapa se bloquee,
se inicia un programa de detección de carga. La
lavadora agitará la ropa sin agua para determinar el
tipo de carga, el nivel de agua y la duración del ciclo.
Luego se llenará. Esto puede tardar hasta un minuto.
Es normal. Para los ciclos no automáticos, la lavadora
se llena después de que se bloquea la tapa.
Asegúrese de que el niño bloqueo no está activado.
•
Consulte Configuración del bloqueo para niños en la
página 34.
Asegúrese de que el Delay opción no está encendido.
•
Consulte (opcional) Establezca una hora de inicio
retrasado en la página 32.
Verifique el fusible o reinicie el interruptor automático.
•
Asegúrese de que ambos grifos estén completamente
•
encendido.
Asegúrese de que la presión del agua se encuentra en
•
el rango que aparece en El agua requisitos en la
página 14.
Asegúrese de que la entrada de agua mangueras no se
•
doblen. Enderece si es necesario.
Desconecte las mangueras y limpie las pantallas. La
•
manguera filtro pantallas podría estar obstruido.
Esta es una lavadora que aprovecha al máximo el agua.
•
No se llena a los niveles de una lavadora estándar. Es
normal que los niveles de agua sean bajos. Es normal
que partes de la ropa sobresalgan del agua.
Para los ciclos automáticos: Antes del llenado, y
•
después de que la tapa se bloquee, se inicia un
.
de seguridad
Instrucciones
Tiene
Operativos
Requisitos
de Instalación
Instrucciones
Lavadora
Usar La
Cuidado de la
Lavadora
Solución de
Problemas
39
Page 86

Problema Solución
de seguridad
Instrucciones
Cuando
lavadora tiene
Tiene
Operativos
Requisitos
de Instalación
Instrucciones
Lavadora
Usar La
Cuidado de la
Lavadora
Solución de
Problemas
vibraciones
excesivas o
ruido
Lavadora se
detiene
programa de detección de carga. La lavadora agitará
la ropa sin agua para determinar el tipo de carga, el
nivel de agua y la duración del ciclo. Luego se llenará.
Esto puede tardar hasta un minuto. Es normal. Para
los ciclos no automáticos, la lavadora se llena después
de que se bloquea la tapa.
Asegúrese de que la lavadora está configurado en una
•
superficie nivelada. Si la superficie no está nivelada,
ajuste los pies lavadora para nivelar la lavadora.
Asegúrese de que la lavadora no esté tocando
•
cualquier otro objeto.
Asegúrese de que la ropa carga esté equilibrada.
•
Durante el giro proceso, si la ropa está cubierto a un
•
lado de la bañera, la lavadora puede interrumpir debido
a la desequilibrio. Su lavadora trata hasta tres veces
para resolver el problema automáticamente. Si la
lavadora no puede resolver el problema, intente
manualmente redistribuir la ropa dentro de la bañera.
Compruebe que las piezas de embalaje del protector
•
de la base no estén atascadas debajo de la lavadora.
Asegúrese de que el tomacorriente es un tomacorriente
•
que funcione.
Verifique el fusible o reinicie el interruptor automático.
•
Cierre la tapa, luego presione Start Pause botón para
•
iniciar la lavadora. Para su seguridad, la lavadora no gire
a menos que la tapa esté cerrada.
Antes de la lavadora comienza a llenar, es una serie de
•
clics para asegurarse de que la tapa esté cerrada y a
hacer una rápida drenaje. La lavadora no drena después
de que la tapa se cierra. Para los ciclos automáticos:
Antes del llenado, y después de que la tapa se bloquee,
se inicia un programa de detección de carga. La
lavadora agitará la ropa sin agua para determinar el
tipo de carga, el nivel de agua y la duración del ciclo.
Luego se llenará. Esto puede tardar hasta un minuto.
Es normal. Para los ciclos no automáticos, la lavadora
se llena después de que se bloquea la tapa.
A veces, la lavadora puede pausar entre etapas del
•
ciclo. Espere a ver si la lavadora comienza nuevamente.
Desconecte la entrada mangueras y limpie las
•
pantallas periódicamente. La manguera filtro pantallas
podría estar obstruido.
40
Page 87

Problem Solutions
Presione el Start Pause botón para pausar la lavadora.
La tapa está
bloqueado o
no se abren
Lavadora no
drenaje o giro
La temperatura
del agua no es
correcta
Cargue está
demasiado
húmedo al
final del ciclo
•
No puede abrir la tapa si la lavadora está en marcha.
Después de una pausa en la lavadora, que puede
•
tardar unos segundos para el cierre de la tapa para
liberar.
Si la tapa esté cerrada con llave cuando la lavadora
•
no está funcionando, presione el Power botón para
encender su washer.
Si la alimentación eléctrica falla mientras la lavadora
•
está en marcha, cuando se restablezca la energía, la
tapa desbloquea. Su lavadora espera tres minutos,
luego corre el resto del ciclo.
Verifique el fusible o reinicie el interruptor automático.
•
•
Cierre la tapa, luego presione el /Start Pause botón
para iniciar la lavadora. Para su seguridad, la lavadora
no gire a menos que la tapa esté cerrada.
Asegúrese de que la manguera de drenaje no esté
•
doblado. Enderece según sea necesario.
Asegúrese de que la altura de la manguera de drenaje
•
es dentro de los límites especificados. Consulte
requisitos en la página 14.
El interior de las tuberías para su sistema de
•
alcantarillado podría estar obstruido. Comuníquese
con un plomero o profesional de reparaciones calificado.
Asegúrese de haber seleccionado la temperatura
•
correcta.
Asegúrese de que la fuente de agua llaves estén
•
completamente abiertas.
Asegúrese de que las mangueras están conectadas a
•
la llave y consumo de agua en la lavadora, y
luego purgue las líneas. Consulte Conecte las
mangueras en la página 19.
Desconecte las mangueras y limpie las pantallas. La
•
manguera filtro pantallas podría estar obstruido.
Utilice un detergente de alta eficiencia para reducir
•
over-sudsing. ConsulteSelecting a detergent en la
página 30.
La carga puede ser demasiado pequeños. Muy
•
pequeñas cargas (uno o dos puntos) puede
desequilibrarse y no escurra completamente.
Drenaje
de seguridad
Instrucciones
Tiene
Operativos
Requisitos
de Instalación
Instrucciones
Lavadora
Usar La
Cuidado de la
Lavadora
Solución de
Problemas
41
Page 88

de seguridad
Instrucciones
Tiene
Operativos
Requisitos
de Instalación
Instrucciones
Lavadora
Usar La
Problem Solutions
Asegúrese de que todas las conexiones de las
Las pérdidas
de agua
Oversuds
afección
Prevenir el
mal olor
•
mangueras estén ajustados. Consulte Conecte las
mangueras en la página 19 y Conecte la manguera de
drenaje en la página 21.
Asegúrese de que el extremo de la manguera de
•
drenaje se inserta correctamente y asegurada al
drenaje system. Consulte Conecte la manguera de
drenaje en la página 21.
Evite sobrecargar.
•
Utilice un detergente de alta eficiencia para reducir
•
over-sudsing. Consulte Seleccionar un detergente en
la página 30.
Utilice un detergente de alta eficiencia para reducir
•
over-sudsing. Consulte Seleccionar un detergente en
la página 30.
Si tiene "suave" agua, reducir la cantidad de detergente.
•
Para pequeñas o ligeramente sucios cargas, reducir la
•
cantidad de detergente.
Periódicamente ejecutar una Tub Clean ciclo para
•
limpiar la bañera. Consulte Limpieza de la bañera en la
página 37.
Utilice un detergente de alta eficiencia para reducir
•
over-sudsing. El exceso de espuma en recovecos y
causar olor. Consulte Seleccionar un detergente en la
página 30.
Seque el interior de la lavadora después del ciclo total
•
ha terminado.
Cuidado de la
Lavadora
Solución de
Problemas
42
Códigos de error
Descripción
E1
Razón
Su lavadora toma más de
30 minutos para llenarla
con agua. Después de
que el agua acabados
ingresar su lavadora, el
nivel de agua no ha
cambiado en cinco
minutos.
Solución
Asegúrese de queel lidis no
•
está abierto.
Asegúrese de que el agua no
•
tiene fugas. Consulte No
agua o no enoughwater en
la página 39.
Comuníquese con Midea
•
centro de servicio.
Page 89

Description Reason Solutions
E2
E3
E4
E5
F2
La unidad tarda más de
1O minutos para escurrir.
La tapa está abierta.
La lavadora no está
nivelado
Su lavadora está
fuera de balance más
de tres veces en girar
operación.
Su lavadora no está
nivelado.
Impacto interruptor
falló.
El EEPROM falló. Comuníquese con Midea
Consulte Lavadora no drena
•
o giro
Cierre la tapa.
•
Nivel la lavadora. Consulte
•
Nivel la lavadora en página
24.
Consulte Lavadora vibra o
•
si son demasiado ruidosa en
página
Comuníquese con Midea
•
centro de servicio.
Ajuste la lavadora nivel
•
consulte la instalación.
Si la situación continúa, llame
•
a Midea centro de servicio.
•
centro de servicio.
en página 41.
40
de seguridad
Instrucciones
Tiene
Operativos
Requisitos
de Instalación
Instrucciones
F8
C9
CL
Carga de detección le
haya resultado ineficaz.
El nivel del agua sensor,
fallado.
La tapa bloqueo falló. Comuníquese con Midea
El PCB falló. Comuníquese con Midea
La tapa ha estado
abierta durante más
de 20 segundos con la
Hijo función de bloqueo
activada.
Comuníquese con Midea
•F5
centro de servicio.
Comuníquese con Midea
•
centro de servicio.
•Fd
centro de servicio.
•
centro de servicio.
Oprima the Power botón
•
para apagar la lavadora.
Apague la función
•
de bloqueo. Consulte
Configuración del bloqueo
para niños en la página 34.
Comuníquese con Midea
•
centro de servicio.
Lavadora
Usar La
Cuidado de la
Lavadora
Solución de
Problemas
43
Page 90

ADJUNTE SU RECIBO AQUÍ. SE REQUIERE
GARANTÍA
LIMITADA DE
LA LAVADORA
DE LAVANDERÍA
MIDEA
COMPROBANTE DE COMPRA PARA OBTENER UN
SERVICIO DE GARANTÍA.
Tenga a disposición la siguiente información cuando llame al
Centro de servicio al cliente:
■ Nombre, domicilio y número de teléfono
■ Número de modelo y número de serie
■ Una descripción clara y detallada del problema
■ Comprobante de compra, incluido el nombre y
domicilio del distribuidor o vendedor
SI NECESITA SERVICIO TÉCNICO:
1. Antes de contactarse con nosotros para programar servicio, por favor determinar si su producto
requiere reparación. Algunas preguntas pueden resolverse sin servicio. Tómese unos minutos para
revisar la sección Resolución de problemas del manual de usuario, o por correo electrónico
customerserviceusa@midea.com
2. Todo servicio técnico de garantía se provee exclusivamente por parte de prestadores de servicio
técnico autorizados de Midea, en los EE. UU. y Canadá.
Servicio al cliente de Midea
En los EE. UU. O Canadá, llame 1-866-646-4332 o correo electrónico
customerserviceusa@midea.com.
Si se encuentra fuera de los 50 estados de los Estados Unidos o de Canadá, comuníquese con su
distribuidor autorizado de Midea para corroborar si aplica una garantía distinta.
GARANTÍA LIMITADA
LO QUE CUBRE
PRIMER AÑO DE GARANTÍA LIMITADA (PIEZAS Y MANO DE OBRA)
Durante un año a partir de la fecha de compra, si este electrodoméstico se instala, opera y mantiene
conforme a las instrucciones adjuntas o provistas con el producto, Midea America Corporation (en
adelante, “Midea”) cubrirá las piezas de repuesto especificadas de fábrica y la mano de obra de
reparación para corregir defectos en los materiales o el trabajo realizado cuando se adquirió este
electrodoméstico, o reemplazará el producto, a su exclusivo criterio. En caso de reemplazo del producto,
su electrodoméstico quedará cubierto por la garantía por el período restante correspondiente a la
garantía de la unidad original.
GARANTÍA LIMITADA DE POR VIDA (TINA DE ACERO INOXIDABLE)
Para la garantía de por vida del producto desde la fecha de compra original, cuando se instale, opere o
mantenga este electrodoméstico conforme a las instrucciones adjuntas o provistas con este producto,
Midea cubrirá las piezas específicas de fábrica y la mano de obra para los siguientes componentes a fin
de corregir los defectos no cosméticos de materiales o trabajo realizado que existían cuando se compró
el electrodoméstico:
■ Tina de acero inoxidable
SU ÚNICO RECURSO EXCLUSIVO CONFORME A ESTA GARANTÍA LIMITADA SERÁ LA REPARACIÓN
O EL REEMPLAZO DEL PRODUCTO SEGÚN SE INDICA. El servicio técnico debe ser provisto por una
empresa de servicio técnico designada por Midea. Esta garantía limitada es válida solamente en los
50 estados de los Estados Unidos o Canadá y aplica únicamente cuando el electrodoméstico se utiliza en
el país en el que se adquirió. Esta garantía limitada entra en vigencia a partir de la fecha de compra original
del consumidor. Se requiere comprobante de la fecha de compra original para obtener el servicio técnico
conforme esta garantía.
44
Page 91

GARANTÍA LIMITADA
LO QUE NO CUBRE
1. Uso comercial, no residencial o de múltiples familias, o un uso incoherente con las instrucciones de
instalación, de funcionamiento o para el usuario.
2. Instrucciones en el hogar sobre cómo usar el producto.
3. Servicios para corregir un mantenimiento o instalación inadecuados, una instalación que no se
adhiere a los códigos de electricidad o plomería, o la corrección de trazados eléctricos o de plomería
en el domicilio (es decir, cableado, fusibles, cañerías o mangueras de entrada de agua de la vivienda).
4. Piezas consumibles (es decir, bombillas, filtros de agua o de aire, etc.).
5. Defectos o daños causados por el uso de piezas o accesorios no originales de Midea..
6. Daños a causa de accidentes, uso indebido, incendio, inundación, problemas eléctricos, actos de
fuerza mayor o el uso de productos no aprobados por Midea.
7. Reparaciones a piezas o sistemas para corregir daños o defectos del producto causados por servicios
técnicos no autorizados, alteraciones o modificaciones del electrodoméstico.
8. Daños cosméticos, incluidos rayones, abolladuras, astillados u otros daños al acabado del
electrodoméstico, a menos que dichos daños son el resultado de defectos en los materiales o la mano
de obra y se informan a Midea dentro de los 30 días de la compra.
9. Mantenimiento de rutina del producto.
10. Productos que fueron comprados “como están” o como productos restaurados.
11. Productos que han sido transferidos de su propietario original.
12. Decoloración, corrosión u oxidación de las superficies como resultado de ambientes corrosivos o
cáusticos, incluidos, entre otros, aquellos con altas concentraciones de sal, altos niveles de humedad
o de exposición a sustancias químicas.
13. Recogida o entrega. Este producto está destinado para la reparación en el domicilio.
14. Gastos de viaje o transporte para realizar el servicio técnico en ubicaciones remotas donde no se
encuentra disponible un representante autorizado del servicio técnico de Midea.
15. Remoción o reinstalación de electrodomésticos inaccesibles o accesorios empotrados (es decir,
molduras, paneles decorativos, pisos, ebanistería, islas, encimeras, mampostería, etc.) que interfieran
con el servicio técnico, la remoción o el reemplazo del producto.
16. Servicio técnico o piezas para electrodomésticos cuyos números de serie/modelo originales se hayan
quitad o, alterado o no puedan identificarse fácilmente.
El costo de la reparación o reemplazo conforme a estas circunstancias excluidas correrá a
cargo del cliente.
EXENCIÓN DE RESPONSABILIDAD DE LAS GARANTÍAS IMPLÍCITAS
LAS GARANTÍAS IMPLÍCITAS, INCLUIDA CUALQUIER GARANTÍA IMPLÍCITA DE COMERCIABILIDAD O
GARANTÍA IMPLÍCITA DE IDONEIDAD PARA UN PROPÓSITO ESPECÍFICO, SE LIMITAN A UN AÑO O
EL PERÍODO MÁS BREVE PERMITIDO POR LEY. Algunos estados y provincias no permiten limitaciones
a la duración de las garantías implícitas de comerciabilidad o idoneidad, de manera que esta limitación
podría no aplicar para usted. Esta garantía le otorga determinados derechos legales, y usted cuenta
además con otros derechos que varían según el estado o la provincia.
EXENCIÓN DE RESPONSABILIDAD DE LAS DECLARACIONES AJENAS A LA GARANTÍA
Midea no hace ninguna declaración respecto de la calidad, durabilidad o necesidad de servicio
técnico o reparaciones para este electrodoméstico, salvo las declaraciones incluidas en esta garantía.
Si desea obtener una garantía más extensa o integral que la garantía limitada que se ofrece con este
electrodoméstico, consulte con Midea o su vendedor sobre la posibilidad de adquirir una garantía
extendida.
LIMITACIÓN DE RECURSOS; EXCLUSIÓN DE RESPONSABILIDAD
POR DAÑOS OCASIONALES E INDIRECTOS
SU ÚNICO RECURSO EXCLUSIVO CONFORME A ESTA GARANTÍA LIMITADA SERÁ LA REPARACIÓN
DEL PRODUCTO SEGÚN SE INDICA. MIDEA NO SERÁ RESPONSABLE POR DAÑOS OCASIONALES
O INDIRECTOS. Algunos estados y provincias no permiten la exclusión o limitación de responsabilidad
respecto de los daños ocasionales o indirectos, de manera que esta limitación podría no aplicar para
usted. Esta garantía le otorga determinados derechos legales, y usted cuenta además con otros derechos
que varían según el estado o la provincia.
45
Page 92

INFORMACIÓN DE REGISTRO
PROTEJA SU PRODUCTO:
Mantendremos archivados el número de modelo y la fecha de compra de su
nuevo producto Midea para ayudarlo a consultar esta información en caso de una
reclamación de seguro, como incendio o robo.
El registro del producto no es obligatorio. El no completar y devolver la tarjeta o
el formulario no disminuye los derechos de garantía del consumidor.
Regístrese en línea en https://us.midea.com/product-registration
O
Por favor, complete y envíe a la siguiente dirección:
Midea America Corp. 759 Bloomfield Ave #386, West Caldwell, NJ 07006-6701
----------------------------------------------- (separar aquí) ----------------------------------------------
Nombre: Modelo No.: Serie No.:
Tarjeta:
Dirección: Fecha de compra:
Ciudad: Estado: Código postal:
Código de área: Número de teléfono: Ocupación:
¿Compró una garantía adicional?: Como su residencia principal:
¿Cómo conoció sobre este producto?:
❑ Publicidad ❑ Demostración en la tienda
❑ Demostración personal
La información recopilada o enviada a nosotros solo está disponible para los empleados internos
de la compañía con el fin de contactarle o enviarle correos electrónicos, en función de su solicitud
de información, y de los proveedores de servicios de la compañía con el fin de proporcionar
servicios relacionados con nuestras comunicaciones con usted. No se compartirán todos los datos
con otras organizaciones, con fines comerciales.
Nombre de la tienda/distribuidor:
Dirección de correo electrónico:
Edad:
Estado civil:
Por favor considere dejar un comentario del cliente en: www.midea.com.
Midea America Corp.
Parsippany, NJ 07054
Servicio al cliente 1-866-646-4332 Hecho en China
46
Page 93

Page 94

Page 95

Page 96

1-844-224-1614
 Loading...