

Page 1

version A - 1 - 2020
MLE52N3AWW
MLE52N3AGS
www.midea.com/ca
Page 2

THANK YOU and CONGRATULATIONS on your purchase of
this high-quality Midea product. Your Midea dryer is designed
for reliable, trouble-free performance. Please take a moment to
register your new dryer.
Register your new dryer at
https://www.midea.com/ca/support/Product-registration
For future reference, record your product model and serial
numbers located on the inside frame of the dryer.
Model Number________________________________________
Serial Number_________________________________________
Level the Dryer ....................................................................................... 28
Power On .................................................................................................. 28
Page 3

Final Check .............................................................................................. 28
Door Reversal Procedure....................................................................29
Change the dryer vent location........................................................30
DRYER USE ...................................................................................... 33
Control Panel ........................................................................................... 33
Drying a Load of Laundry .................................................................. 36
Using the Drying Rack .........................................................................39
Special Laundry Tips ............................................................................40
DRYER CARE ...................................................................................42
Cleaning and Maintenance .................................................................42
TROUBLESHOOTING .....................................................................43
Check These Solutions if Your Dryer... ...........................................43
Error Codes .............................................................................................. 45
APPENDIX .......................................................................................46
Fabric Care Chart ..................................................................................46
WARRANTY ..................................................................................... 47
PRODUCT REGISTRATION ............................................................ 49
Page 4

Page 5

Page 6

Page 7

Page 8

Page 9

This dryer is factory-ready for the rear exhaust option.
If you want to change the vent location, see "Change the dryer vent
location" on page 30.
Page 10

Page 11

Page 12

Page 13

Page 14

Page 15

Gas dryer are equipped with a for use with natural gas. If youburner orifice
Page 16

Page 17

Page 18

Page 19

Page 20

Page 21

Duct tape
Cutting knife
Pipe wrench
(gas only)
/" ratchet wrench
Page 22

to the gas, electrical, and exhaust connections.
To move the dryer easily, lay the carton cushions from the packaging
on the floor. Tip the dryer on its side so it lies across both cushion-tops.
Push the dryer so that it is near its final location, and then set the
dryer upright.
Page 23

Page 24

Page 25
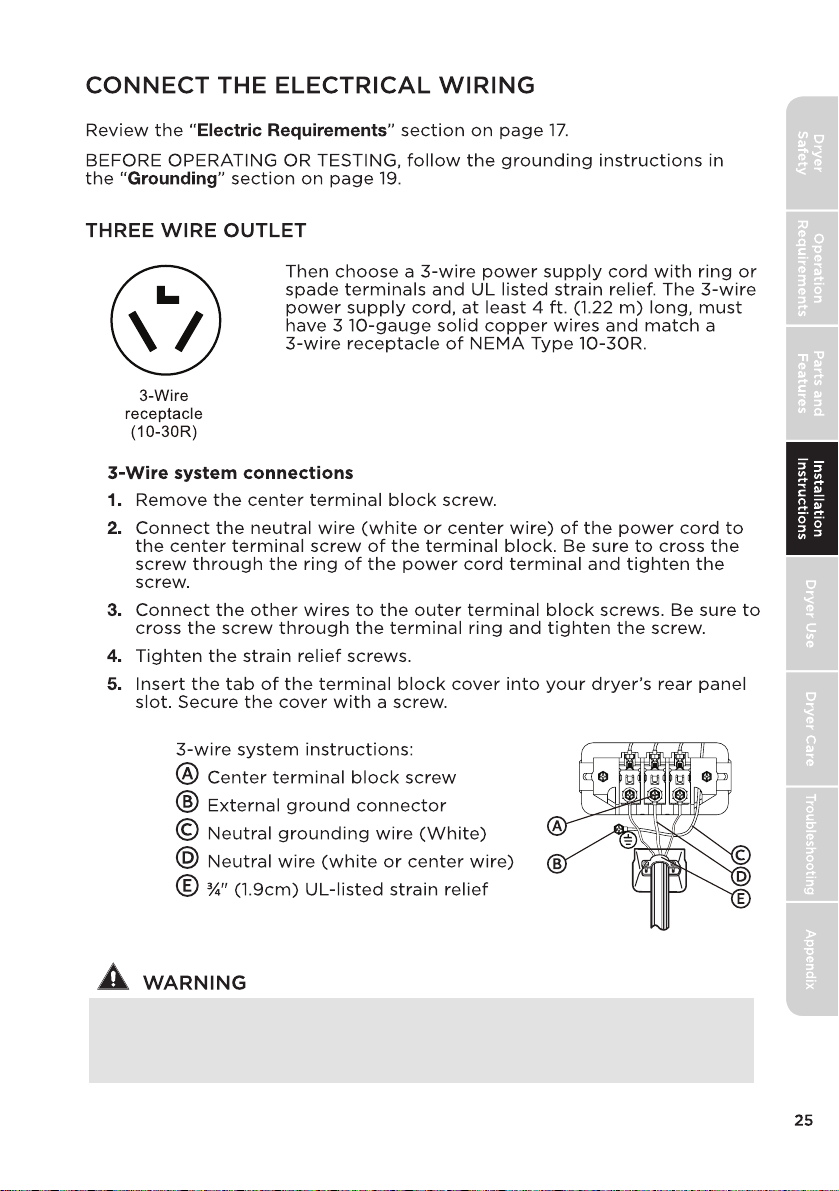
If converting from a 4-wire electrical system to a 3-wire, the neutral
grounding wire must be connected to the external ground connector
to ground the dryer frame to the neutral conductor. Ring-type terminals
are recommended. If using strap terminals, make sure they are tightened.
Page 26

Connect the neutral wire (white ) of power cord and the appliance
neutral grounding wire (white) under the center screw of terminal
block. Be sure to cross the screw through the ring of the power
cord and appliance neutral grounding wire. Tighten screw.
Neutra
l wire (wh
ite)
Page 27

the provided in the cabinet near the terminal block.hole
Be sure they are tight. Use a /"(1 cm) deep-well socket.
Page 28

A plastic flexible duct is NOT used.
Page 29

Page 30

CHANGE THE DRYER VENT LOCATION
Your new dryer is shipped to vent to the rear. It can also be configured to
vent to he bottom or left side (see from the front).
An Adapter kit is standard component which you can purchase from local
market.
Tools and materials you will need
Rigid or UL-listed
Phillips screwdriver
Duct tape
flexible metal
4'' (10.2 cm) duct
1. Remove the rear exhaust retaining screws. Pull out the exhaust duct.
Elbow 4'' (10.2 cm)
Retaining
Screw
Gloves
Rear
Exhaust Duct
Option 1: Side venting
2. ress P the tabs on the knockout and carefully remove the knockout for
t he desired vent opening.
Press the adapter duct onto the blower housing of the dryer as shown.
Adapter
Duct
Knockout
Page 31

3. Preassemble a 4 inches (10.2cm) elbow to the next 4 inches (10.2cm)
duct section, and secure all joints with duct tape. Be sure that the
male end of the elbow faces AWAY from the dryer.
Insert the elbow/duct assembly through the side opening and press it
onto the adapter duct.
Secure in place with duct tape. Be sure that the male end of the duct
protrudes 1.5 inches (3.8cm) to connect the remaining ductwork.
Duct tape the knockout removed to the opening in the back of the dryer.
Duct
Tape
Safety
Dryer
Requirements
Operation
Parts and
Features
Elbow
1/2
1 ''
(3.8 cm)
Option 2: Bottom venting
2. Press the tabs on the knockout and carefully remove the knockout for
the desired vent opening.
Press the adapter duct onto the blower housing of the dryer as shown.
Adapter
Duct
Knockout
3. Insert the 4 inches (10.2cm) elbow through the rear opening and press
it onto the adapter duct.
Be sure that the male end of the elbow faces down through hole in the
bottom of the dryer.
Secure in place with duct tape.
Duct tape the knockout removed to the opening in the back of the dryer.
Instructions
Installation
Dryer Use
Dryer Care
Troubleshooting
Appendix
Duct
Tape
31
Elbow
Page 32

Safety
Dryer
Requirements
Operation
Dimensions for installation
Rear Venting (Default)
Parts and
Features
Instructions
Installation
Dryer Use
Dryer Care
Troubleshooting
Side Venting
Bottom Venting
14.96"
38cm
12"
30.5cm
1.5"
3.8cm
3.67"
9.3cm
3.67"
9.3cm
5"
12.9cm
Appendix
4.7"
12.1cm
3.67"
9.3cm
12"
30.5cm
3.8cm
1.5"
32
Page 33

DRYER USE
CONTROL PANEL
Safety
Dryer
WARNING
To reduce the risk of fire, electric shock, or injury to persons, read the
IMPORTANT SAFETY INSTRUCTIONS before operating the appliance.
3
8
1
Power button
4 5 6 7 7
Press to turn your dryer on or off. If your dryer is on for more than
10 minutes without any buttons being pressed, it automatically
turns off.
2
Start/Pause button
Press to start or pause the program. You can’t change any setting
except add a garment.
3
Cycle selector
Select your desired cycle for the type of load.
The cycle you select determines the heat control for the cycle.
The Normal, Delicates, Bulky, Towels, Heavy Duty and Sanitize cycles
are Sensor Dry cycles.
The Air Fluff, Time Dry, Quick Dry andTowel Warmer cycles are
Manual Dry cycles.
11 12
91014 15
13
Requirements
Operation
1
Parts and
Features
Instructions
Installation
Dryer Use
2
Dryer Care
Troubleshooting
Appendix
33
Page 34

Safety
Dryer
Requirements
Operation
Parts and
Features
Instructions
Installation
Dryer Use
Dryer Care
Troubleshooting
Appendix
4
Signal
Press once to stop the sound.beeping
Press again to activate the sound.
Your selection will be kept until next pressing.
A double beep means selection not available.
5
Wrinkle Care
Press once to add the Wrinkle Care step into the operating program.
Press again to cancel selection.
Wrinkle Care provides approximately 90 minutes of intermittent
tumbling in unheated air at the end of the cycle to reduce wrinkling.
The load is already dry, and can be removed at any time during the
Wrinkle Care cycle.
6
Damp Dry Signal
This function is useful when you want to take some garments out for
ironing. The unit will beep 6 times when the moisture in the clothes is
good for ironing. At this time, you can take those garments out and
continue drying the other by pressing the “START/PAUSE” button
once.
NOTE: The unit will not stop operating if you don’t take those
garments out for ironing.
7
Time adjust
These buttons are effective only for Manual cycles. Push these buttons
to change the drying time you prefer. Push repeatedly to get your
desired drying time.
8
Control lock
Press the “Time Adjust-” and “Time Adjust+” together to activate the
Control lock function. Press again for another 3 seconds to deactivate
the function. All buttons except the “Power” will be out of function
when Control lock is activated.
9
My cycle
Press and hold for 3 seconds to remember your favorite drying cycle.
Press once to load your favorite cycle setting.
10
Eco Dry
Press to select the Eco Dry cycle. This function will reduce the
energy consumption by reducing drying temp but increasing
operation time.
34
Page 35

11
Digital display
This digital will display the time of cycle you are setting or remaining
time of cycle operating.
12
Cycle status display
The relative indicator graphic or text will be lit when the dryer is in its
drying program, When the whole program is finished, the “Done”
indicator graphic will flash to remind you to unload your laundry.
13
Dry Level
Press the button to select the dryness level. Different dryness level
will result in different drying time. For clothes to be ironed manually, a
lower dryness level should be selected.
14
Dry Temp
Press the button to select the drying temperature.
High - For sturdy cottons or those labeled Tumble Dry.
Medium - For permanent press, synthetics, lightweight cottons, or
items labeled Tumble Dry Medium.
Low - For lower heat than Medium to dry synthetic or washable knit
fabrics.
Ultra Low - For heat sensitive items labeled Tumble Dry Low or Tumble
Dry Warm.
No Heat - Provides just the air cycle without any heat.
15
Time Dry
This button is a quick selection for Time Dry setting.
Safety
Dryer
Requirements
Operation
Parts and
Features
Instructions
Installation
Dryer Use
Dryer Care
35
Troubleshooting
Appendix
Page 36

Safety
DRYING A LOAD OF LAUNDRY
Dryer
1. Power on your dryer.
• Press this Power button to power your dryer on.
Requirements
Operation
Parts and
Features
Instructions
Installation
Dryer Use
Dryer Care
Troubleshooting
Appendix
36
• The “ ” (Clean Filter) indicator graphic in the display
will flash 10 times when your dryer is powered on.
• You should clean the filter before the dryer is loaded.
2. Load your dryer.
• Place only one wash load in your dryer at a time.
• Mixed loads of heavy and light weight fabrics will dry
differently, which may result in lightweight fabrics being
dry while heavy fabrics remain damp at the end of a
drying cycle.
• Add one or more similar items to your dryer when
only one or two articles of clothing need drying. This
improves the tumbling action and drying efficiency.
• Overloading restricts tumbling action, resulting in
uneven drying as well as excessive wrinkling of some
fabrics.
3. Select the appropriate cycle and options for the load.
• Select the appropriate cycle by using the
Cycle Selector according to the cycle
chart on page 37.
• Select the appropriate optional function
by buttons according to the using the
chart on page 37.
Note: A double beep means selection not
available.
• Your favorite drying Cycle
On c e y ou have set th e c ycle sel e ctor an d o p tion
fu n ction , y ou can push an d h o ld the “My Cy c le” butt on
fo r 3 se c onds to thi s s e tting as yo ur favor i tesa v e
cy c le before the un i t. The ligh t b eside th e k n obst a rting
wi l l f lash to con firm se t ting was sa ved to memo r y
wi t h b eeps.
• You can finish this Step by just pushing the “My Cycle”
button once to use your favorite cycle or make some
additional change.
4. Start your dryer.
Pressing Start/Pause button will start the selected cycle.
To PAUSE cycle press Start/Pause button then open the
door. To resume operation after closing the door always
press Start/Pause. Opening the door during the operation
will instantly stop operation and will require to press Start/
Pause button to resume operation.
Page 37

Under
wear
Linen
Sheets
Heavy
cottons
Jeans
Work
clothes
Curtains
items
Dry Temp
Dry Level
Medium Extra Dry
Medium Extra Dry
More Dry
Normal Dry
Less Dry
Damp Dry N
More Dry
Normal Dry
Less Dry
Damp Dry
High Extra Dry 50min 50min
More Dry
Normal Dry
Less Dry
Damp Dry N
High Extra Dry 54min 54min
More Dry
Normal Dry
Less Dry
Damp Dry N
High Extra Dry 62min 62min
Low Extra Dry 25min 25min
More Dry
Normal Dry
Less Dry
Damp Dry N
WRINKLE
Time
Dry CARE
N
N
N Y Y N Y
N Y Y N Y
N Y N N N
N Y Y N Y
Y N N Y N
DAMP
TIME
ADJUST
ECO
DRY
DRY
SIGNAL
Y Y N Y
Y N N Y
Default
time
(Elec.)
61min
42min 42min
Default
time
(Gas)
61min
Fabric type
Cycle
Normal Cotton
Bulky Blankets
Comforters
Towels Towels
Heavy
Duty
Corduroys
Sanitize Bedding
Delicates Sensitive
Air Fluff No Heat 20min 20min
Maximum
Amount
Safety
Dryer
Requirements
Operation
Parts and
Features
Instructions
Installation
Dryer Use
Time Dry / High 40min 40min
Quick
Dry
Towel
Warmer
* Table in grey is an initial setting. “Y” are all optional functions you can select.
* For even better drying effect, please select higher dryness level.
* To save energy, the default setting for Normal cycle is Normal+Medium+Normal Dry+ECO DRY.
If you have a large quantity of clothing, and want a faster drying speed, you can press “ECO DRY”
once to cancel this option.
* FOLLOW GARMENTS LABELS REQUIREMENTS.
Medium
Low
Ultra Low
No Heat
High
Medium
Low
Ultra Low
No Heat
Towels High
Medium
Low
Ultra Low
No Heat
Load Size Recommendations:
For best results, follow the wet load
size recommendations noted for each
cycle.
Small load: Fill the dryer drum with
3-4 items, not more than 1/4full.
Y Y N Y N
/
Y Y N Y N
/
Y N N Y N
30min 30min
20min 20min
Medium load: Fill the dryer drum
up to about 1/2 full.
Large load: Fill the dryer drum up
to about 3/4 full. Do not overload.
Items need to tumble freely.
Dryer Care
Troubleshooting
Appendix
37
Page 38

Safety
Dryer
Requirements
Operation
Parts and
Features
Instructions
Installation
Dryer Use
Dryer Care
5. Unloading your laundry.
• After the cycle is done, the “Done” indicator
graphic will flash, and the dryer will beep 6
times.
CONTROL LOCK
Your dryer has a control lock feature to prevent
children from playing with your dryer. When you
turn on the control lock, the only button that
works is Power.
• You can turn on your dryer, set this function,
then turn it off.
When you do so, even if the unit is powered on, •
you still cannot start it before the Control Lock
function is deactivated.
This function will not be cancelled if your unit •
loses power, such as when you unplug it or the
power turns off.
Press and hold both the “TIME ADJUST +” and
“TIME ADJUST -” buttons for three seconds.
The control lock ico turns on.
To turn control lock, press and hold both the off the
“TIME ADJUST +” and “TIME ADJUST -” buttons for
three seconds.
ECO DRY
Troubleshooting
Appendix
• This function will reduce the energy consumption
by reducing drying temp but increasing operation
time.
38
Page 39

The rack is designed for use with manual cycles only, not sensor cycles.
39
Page 40

Select Time Dry. Select the No Heat, Low or Ultra Low Temp setting.
or by using the setting.No Heat temp
40
Page 41

414243
Page 42

Page 43

Page 44

Household odours from paiting, varnishing, strong
When these odours linger in the air, ventilate the room
44
Odours remain
Fabrics containing strong odours should be washed
example, a pair of linen parts).black
Page 45

45
Page 46

46
Page 47

ATTACH YOUR RECEIPT HERE. PROOF OF PURCHASE
IS REQUIRED TO OBTAIN WARRANTY SERVICE.
MIDEA
LAUNDRY
DRYER LIMITED
WARRANTY
Please have the following information available when
you call the Customer Service Centre:
■ Name, address and telephone number
■ Model number and serial number
■ A clear, detailed description of the problem
■ Proof of purchase including dealer or retailer
name and address, and date of purchase
IF YOU NEED SERVICE:
1.
Before contacting us to arrange service, please determine whether your product requires
repair. Some questions can be addressed without service. Please take a few minutes to review
the Troubleshooting section of the User Manual, or email customerserviceusa@midea.com.
2. All warranty service is provided exclusively by our authorized Midea Service Providers, in the
U.S. and Canada.
Midea Customer Service
In the U.S.A. or Canada, call 1-866-646-4332 or email customerserviceusa@midea.com.
If outside the 50 States of the United States or Canada, contact your authorized Midea dealer to
determine whether another warranty applies.
LIMITED WARRANTY
WHAT IS COVERED
FIRST YEAR LIMITED WARRANTY (PARTS AND LABOUR)
For one year from the date of purchase, if this major appliance is installed, operated and
maintained according to instructions attached to or furnished with the product, Midea America
(Canada) Corp.
labour to correct defects in materials or workmanship that existed when this major appliance was
purchased, or at its sole discretion replace the product. In the event of product replacement, your
appliance will be warranted for the remaining term of the original unit’s warranty period.
YOUR SOLE AND EXCLUSIVE REMEDY UNDER THIS LIMITED WARRANTY SHALL BE PRODUCT
REPAIR OR REPLACEMENT AS PROVIDED HEREIN. Service must be provided by a Midea
designated service company. This limited warranty is valid only in the 50 States of the United
States or Canada and applies only when the major appliance is used in the country in which it
was purchased. This limited warranty is effective from the date of original consumer purchase.
Proof of original purchase date is required to obtain service under this limited warranty.
(hereafter “Midea”) will pay for factory specified replacement parts and repair
47
Page 48
48
Page 49

REGISTRATION INFORMATION
PROTECT YOUR PRODUCT:
We will keep the model number and date of purchase of your new Midea product
on file to help you refer to this information in the event of an insurance claim such
as fire or theft.
Register online at www.midea.com/ca/support/Product-registration
OR
Please fill out and return it to the following address:
Midea America Corp. 759 Bloomfield Ave #386, West Caldwell, NJ 07006-6701
----------------------------------------------- (detach here) ----------------------------------------------
Name: Model#: Serial #:
Card:
Address: Date Purchased: Store / Dealer Name:
City: State: Zip: E-mail Address:
Area Code: Phone Number:
Did you purchase an additional warranty: As your Primary Residence? (Y/N)
How did you learn about this product:
❑ Advertisin g
❑ In Store Dem o
❑ Pers onal Demo
Information collected or submitted to us is only available to company internal employees for
purposes of contacting you or sending you emails, based on your request for information and to
company service providers for purposes of providing services relating to our communications with
you. All data will not be shared with other organizations for commercial purposes.
Midea America (Canada) Corp.
Markham, ON L3R 8V2
Customer Service 1-866-646-4332
Made in China
49
Page 50

Page 51

NUMÉRO DE MODÈLE
MLE52N3AWW
MLE52N3AGS
www.midea.com/ca
Page 52

MERCI and FÉLICITATIONS à l’achat de ce produit Midea de haute
qualité. Votre sécheuse Midea est conçue pour offrir un rendement
fiable et sans problème. Veuillez prendre un moment pour
enregistrer votre nouveau sécheuse.
Enregistrez votre nouveau sécheuse à
https://www.midea.com/ca/fr/support/Product-registration
Pour référence future, notez votre modèle de produit et les
numéros de série situés sur le cadre intérieur de la sécheuse.
Numéro de modèle _______________________________
Numéro de série _________________________________
Page 53

Équilibrer la sécheuse ..........................................................................28
Mise sous tension .................................................................................. 28
Vérification finale .................................................................................. 28
Procédure d’inversion de porte ....................................................... 29
Changer l’emplacement de l’évent de la sécheuse ....................30
UTILISATION DE LA SÉCHEUSE .................................................... 33
Panneau de contrôle ............................................................................. 33
Séchage d’un chargement de linge ................................................ 36
Support de séchage ............................................................................. 39
Conseils spéciaux pour la lessive ..................................................... 41
ENTRETIEN DE LA SÉCHEUSE .....................................................42
Nettoyage et entretien ........................................................................42
DÉPANNAGE .................................................................................... 43
Vérifiez ces solutions si votre sécheuse... ..................................... 43
Codes d’erreur ........................................................................................45
ANNEXE ...........................................................................................46
Tableau de soin de tissu ......................................................................46
GARANTIE ....................................................................................... 48
ENREGISTREMENT DU PRODUIT .................................................50
Page 54

Page 55

Page 56

Page 57

Page 58

Page 59

Page 60

Page 61

Page 62

Page 63

Page 64

Page 65

Page 66

Page 67

Page 68

Page 69

Page 70

Page 71

Niveau
/" clé à cliquet
Page 72

Pour déplacer facilement le sèche-linge, posez les coussins en carton
de l'emballage sur le sol. Inclinez la sécheuse sur le côté pour qu'elle
repose sur les deux coussins. Poussez la sécheuse pour qu'elle soit près
de son emplacement final, puis placez la sécheuse en position verticale.
Page 73

Page 74

Page 75

Page 76

Page 77

Page 78

Page 79

Page 80

CHANGER L’EMPLACEMENT DE L’ÉVENT DE LA SÉCHEUSE
Votre nouveau sécheuse est expédié pour s’échapper à l’arrière. Il peut
également être configuré pour s’évacuer vers le bas ou le côté gauche
(comme vu à l’avant).
Il est possible d’acheter des trousses d’adaptateur auprès de n’importe
quel détaillant.
Outils et matériaux dont vous aurez besoin
Rigide or UL listed métal -
Tournevis Phillips
Supprimer les vis de retenue d’échappement arrière. Tirer out le conduit
1.
Ruban pour
conduits
souple
4 10 2 cm duct (’’ ( . )
d’echappement.
Coude 4 10 2 cm (’’ ( . )
Vis de retenue
Gants
Arrière
conduit
d’échappement
Option 1 : Aération latérale
2.
Appuyez sur les languettes de le boite de jonction et retirez
soigneusement le boite de jonction de l’ouverture desiree. Fixez le
conduit d’adaptateur sur le boitier du souffleur de la secheuse comme
Conduit
d’adaptateur
Boite de jonction
Page 81

3. Préassembler un coude de 10,2 cm (4 po) à la section suivante de conduit
de 10,2 cm (4 po) et fixer tous les joints avec du ruban adhésif. S’assurer
que l’extrémité mâle du coude se trouve LOIN de la sécheuse.
Insérez l’ensemble coude/conduit dans l’ouverture latérale et fixez-le sur
le conduit d’adaptateur.
Fixez en place avec du ruban adhésif. S’assurer que l’extrémité mâle du
conduit dépasse 3,8 cm (1,5 po) pour ra ccorder le reste de conduits. Fixez
le ruban adhésif à l’arrière de la sécheuse.
Ruban
adhésif
Coude
1/2
1 ''
(3,8 cm)
Option 2 : Aération inférieure
2. Appuyez sur les languettes de le bo ît e de jonction et retirez
soigneusement le boîte de jonction de l’ouverture désirée.
comme illustré.
Conduit
d’adaptateur
Boîte de jonction
3 Insérez le coude de 10,2 cm (4 po) dans l’ouverture arrière et fixez-le sur .
le conduit d’adaptateur.
Assurez-vous que l’extrémité mâle du coude se trouve dans le trou au
fond de la sécheuse.
Fixez en place avec du ruban adhésif. Fixez le ruban à conduits à l’arrière
de la sécheuse.
Ruban
adhésif
Coude
31
Page 82

Dimensions pour l’installation
Arrière
Côté
Ventilation
Ventilation
(
Par défaut
)
12"po
30,5cm
1,5"po
3,8cm
3,67" po
9,3cm
32
Aération inférieure
4,7"po
12,1cm
12"po
30,5cm
14,96"po
38cm
3,67"po
9,3cm
5"po
12,9cm
3,67"po
9,3cm
3,8cm
1,5"po
Page 83

3
11 12
1
4 5 6 7 7
8
91014 15
13
2
Les cycles Normal, Linge délicat, Linge épais, Serviettes, Linge ultra
résistant et Aseptisant sont des cycles capteur à froid.
Les cycles d’air froid, Séchage de longue durée, Séchage rapide et
chauffe-serviette sont des cycles de séchage manuel.
333435
Page 84

Page 85

Le graphique ou le texte de l’indicateur relatif s’allumera lorsque la
sécheuse est dans son programme de séchage. Lorsque l’ensemble
du programme est terminé, le graphique "Terminé " clignote
pour vous rappeler de décharger votre lessive.
Page 86

La lumiere "Clean filter " dans la barre de processus
clignotera 10 fois lorsque votre sécheuse est sous
tension
Vous devez nettoyer le filtre avant de charger la
sécheuse.
36
de cycle selon le tableau de cycles de la page 37.
au sélecteur
appropriée à
l'aide des boutons, conformément au tableau de
Remarque : Un double bip signifie que la sélection
n'est pas disponible.
Page 87

Cycle Type de tissu Tempér-
Normal Coton
Bulky
(Volumineux)
Towels
(Serviettes)
Heavy Duty
(Tissus ultrarésistants)
Sanitize
(Aseptisant)
Delicates
(Délicats)
Air fluff
(Flocon d’air)
Time Dry
(Temps de
séchage)
Quick Dry
(Séchage
rapide)
Towel
Warmer
(Serviettes
chaudes)
* Le tableau en gris est un réglage initial. “Oui” sont toutes des fonctions optionnelles que vous pouvez sélectionner.
* Pour un meilleur séchage, veuillez sélectionner un niveau de séchage plus élevé.
Pour économiser de l'énergie, le réglage par défaut du cycle Normal est Normal+Moyen+Séchage Normal+
*
SÉCHAGE ÉCO. Si vous avez une grande quantité de vêtements et souhaitez une vitesse de séchage plus rapide,
vous pouvez appuyer une fois sur "ECO DRY" pour annuler cette option.
* SUIVRE VÊTEMENTS ÉTIQUETTES EXIGENCES.
Sous
vêtement
Lin
Couvertures
Draps
Couvre-lits
Serviettes
Coton lourd
Jeans
Velours côtelés
Vêtements de
travail
Literie
Rideaux
Éléments -
sensibles
/ Haut /
Serviettes Haut /
Aucune
Chaleur
Ultra Bas
Aucune
Chaleur
Ultra Bas
Aucune
Chaleur
Ultra Bas
Aucune
Chaleur
Niveau de
ature
séchage
sèche
Moyen Extra Sec Non
Moyen Extra Sec Non
Moyen
Moyen
Moyen
Plus Sec
Normalement Sec
Moins Sec
Sec Humidifié Non
Plus Sec
Normalement Sec
Moins Sec
Sec Humidifié
Haut Extra Sec Non
Plus Sec
Normalement Sec
Moins Sec
Sec Humidifié Non
Haut Extra Sec Non
Plus Sec
Normalement Sec
Moins Sec
Sec Humidifié Non
Haut Extra Sec Non
Bas Extra Sec Non
Plus Sec
Normalement Sec
Moins Sec
Sec Humidifié Non
Bas
Haut /
Bas
Bas
Temps
PRÉVENTION
de
DES PLIS
séchage
/ Oui Non Non Oui Non 20min 20min
Oui Oui Non Oui 37min 37min
Oui Non Non Oui 42min 42min
Oui Oui Non Oui 50min 50min
Oui Oui Non Oui 54min 54min
Oui Non Non Non 62min 62min
Oui Oui Non Oui 25min 25min
Oui Oui Non Oui Non 40min 40min
Oui Oui Non Oui Non 30min 30min
Oui Non Non Oui Non 20min 20min
SIGNAL
SEC ET
HUMIDE
RÉGLAGE
DE
L’HEURE
ECO
DRY
Durée par
défaut
(Elec.)
Durée par
défaut
(gaz)
Quantité
maximale
37
Page 88

Une fois le cycle terminé, le voyant "Terminé"
clignotera et la sécheuse émettra six bips.
Votre secheuse est dotee d’une fonction de
verrouillage de commande pour empecher les enfants
de jouer avec votre secheuse. Lorsque vous activez
le verrou de commande, le seul bouton qui fonctionne
est POWER.
• Vous pouvez allumer votre secheuse, regler cette
fonction, puis la desactiver.
• Lorsque vous le faites, meme si l’appareil est sous
tension, vous ne pouvez toujours pas le demarrer
avant la desactivation de la fonction de verrouillage
de commande.
• Cette fonction ne sera pas annulee si votre appareil
perd de l’energie, comme lorsque vous le debranchez
ou si la mise hors tension s’arrete.
Appuyez sur la touche et maintenez-la enfoncee
Réglage du temps+ et Réglage du temps- pendant trois
secondes.
Le verrou de commande s’allume.
Pour desactiver le verrouillage de controle, appuyez
sur la touche et maintenez-la enfoncee
Réglage du temps+ et Réglage du temps- pendant trois
secondes.
38
Page 89

394041424344454647
Page 90

Page 91
Page 92

Page 93

Page 94

Page 95

Page 96

Page 97

Page 98

MIDEA
BUANDERIE
SÉCHEUSE
GARANTIE
LIMITÉE
JOIGNEZ VOTRE REÇU ICI. UNE PREUVE D’ACHAT EST
REQUISE POUR OBTENIR LE SERVICE DE GARANTIE.
Veuillez avoir les renseignements suivants disponibles
lorsque vous appelez le Centre de service à la clientèle :
■ Nom, adresse et numéro de téléphone
■ Numéro de modèle et numéro de série
■ Une description claire et détaillée du problème
■ Preuve d’achat, y compris le nom et l’adresse du
dépositaire ou du détaillant, et la date d'achat
SI VOUS AVEZ BESOIN DE SERVICE :
Avant de communiquer avec nous pour organiser le service, veuillez déterminer si
1.
votre produit nécessite une réparation. Certaines questions peuvent être abordées
sans service. Veuillez prendre quelques minutes pour consulter la section Dépannage
du manuel d’utilisation ou envoyer un courriel à customerserviceusa@midea.com.
Tous les services de garantie sont fournis exclusivement par nos fournisseurs de
2.
services Midea autorisés, aux États-Unis et au Canada.
Aux États-Unis ou au Canada, composez le 1-866-646-4332 ou envoyez un courriel à
Si vous êtes à l’extérieur des 50 États des États-Unis ou du Canada, communiquez avec votre
concessionnaire autorisé Midea pour déterminer si une autre garantie s’applique.
Service à la clientèle Midea
customerserviceusa@midea.com.
48
Page 99

49
Page 100

RENSEIGNEMENTS SUR L’INSCRIPTION
PROTÉGEZ VOTRE PRODUIT :
Nous conserverons le numéro de modèle et la date d’achat de votre nouveau
produit Midea dans le dossier pour vous aider à consulter ces renseignements en
cas de réclamation d’assurance comme un incendie ou un vol.
Inscrivez-vous en ligne à
https://www.midea.com/ca/fr/support/Product-registration
OU
Veuillez remplir et retourner l’adresse à l’adresse suivante :
Midea America Corp. 759 Bloomfield Ave #386, West Caldwell, NJ 07006-6701
---------------------------------------(détacher ici) ------------------------------------------
Nom Modèle : Numéro de série :
Carte :
Adresse : Date d’achat : Nom du magasin/dépositaire :
Ville : État : Code postal : Adresse de courriel :
Indicatif régional : Numéro de téléphone :
Avez-vous acheté une garantie supplémentaire : Comme résidence principale :
Comment avez-vous appris ce produit :
❑ Publicité
❑ Démonstration en magasin
❑ Démonstration personnelle
Les renseignements recueillis ou soumis à nous sont uniquement offerts aux employés internes
de la société aux fins de communiquer avec vous ou de vous envoyer des courriels, selon votre
demande d’information et les fournisseurs de services de la société aux fins de prestation de
services liés à nos communications avec vous. Toutes les données ne seront pas partagées avec
d’autres organisations à des fins commerciales.
Midea America (Canada) Corp.
Markham, ON L3R 8V2
Service à la clientèle : 1-866-646-4332
50
Fabriqué en Chine
 Loading...