


Washer Dryer Combo
Power supply: 120V
Frequency: 60 Hz
en
USER MANUAL &
INSTALLATION
INSTRUCTIONS
Warning:
Before using this product,
please read this manual carefully
and keep it for future reference.
The design and specifications
are subject to change without
prior notice for product
improvement. Consult with your
dealer or manufacturer for
details.
version A
MODEL NUMBER
MLC31N5AWW
www.midea.com/ca

Dear user
THANK YOU and CONGRATULATIONS on your purchase of
this high-quality Midea product. Your Midea washer dryer combo
is designed for reliable, trouble-free performance. Please take a
moment to register your new washer dryer combo.
Register your new washer dryer combo at
www.midea.com/ca/support/Product-registration
For future reference, record your product model and serial
numbers located on the inside frame of the machine.
Model Number________________________________________
Serial Number_________________________________________
SAFETY INSTRUCTIONS.................................................................. 4
FEATURES
Package contents ................................................................................... 9
Main components ...................................................................................10
OPERATION REQUIREMENTS..........................................................11
Electrical requirements
Water requirements
Drainage requirements
INSTALLATION INSTRUCTIONS
Unpacking your washer........................................................................13
Choosing a location................................................................................14
Tools you will need ................................................................................18
Connect the water ho ses ....................................................................
Connect the drain hose ......................................................................20
Level your washer ................................................................................22
Power on ..................................................................................................23
Run a test cycle .....................................................................................24
OPERATION INSTRUCTIONS ........................................................25
Control panel ........................................................................................... 25
Washing a load of laundry.................................................................. 27
Setting the child lock ........................................................................... 31
Washer options and settings ............................................................ 32
......................................................................................... 9
..........................................................................11
................................................................................12
.........................................................................12
........................................................13
18

CARE AND CLEANING ................................................................... 33
Cleaning and maintenance
.................................................................
33
BEFORE YOU CALL FOR SERVICE ..............................................39
Error codes ..............................................................................................41
WARRANTY .....................................................................................
PRODUCT REGISTRATION............................................................
42
44
READ AND KEEP THESE INSTRUCTIONS FOR FUTURE
REFERENCE
This manual c
and care of your appliance. Please read this manual carefully before
installation and operation of this machine to prevent injury and property
damage.
Warnings and Important Safety Instructions in this manual DO NOT
cover all possible conditions and situations that may occur. It is your
responsibility to use common sense, caution and care when installing,
maintaining and operating your washer.
ontains important information on the installation, use,
CAUTION
RISK OF ELECTRIC SHOCK
DO NOT OPEN
Instructions
Safety
Features
Requirements
Operation
Instructions
Installation
Instructions
Operation
Care and
Cleaning
Troubleshooting
3

Instructions
Safety
SAFETY INSTRUCTIONS
YOUR SAFETY AND THE SAFETY OF OTHERS ARE VERY
IMPORTANT
To prevent injury to the user or other people and property damage, the
instructions shown here must be followed. Incorrect operation due to
ignoring of instructions may cause harm or damage, including death.
The level of risk is shown by the following indications.
Features
Requirements
Operation
Instructions
Installation
Instructions
Operation
Care and
Cleaning
Troublesho
o
ting
4
This indicates that hazards or unsafe practices may cause
serious personal injury or death.
To reduce the risk of fire, explosion, electric shock or
WARNING
personal injury when using your washing machine, you
SHOULD follow these basic safety precautions.
This indicates that hazards or unsafe practices may cause
CAUTION
minor personal injury or property damage.
This symbol indicates that there are important operating
and maintenance instructions in the literature accompanying
WARNING
your washing machine
WARNING
Do not store or use gasoline or other f1ammable vapors and liquids in the
vicinity of this or any other appliance.
WARNING
Basic precautions
To reduce the risk of fire, electric shock, or injury to persons when
using your appliance, follow basic precautions:
•
Read all instructions before using the appliance.
Do not wash articles that have been previously cleaned in, washed in,
•
soaked in, or spotted with gasoline, dry-cleaning solvents, or other
flammable or explosive substances, as they give off vapors that could
ignite or explode.
Do not add gasoline, dry-cleaning solvents, or other flammable or
•
explosive substances to the wash water. These substances give off
vapors that could ignite or explode.
•
Never stop a tumble dryer before the end of the program and spread
out so that the heat is dissipated.
Use copper conductors only.
•
To reduce the risk of electric shock or fire, do not use a flexible power-
•
supply cord with this appliance.

Always unplug the washing machine from the power supply before
•
attempting any service. Disconnect the power cord by grasping the
plug, not the cord.
To reduce the risk of fire, clothes, cleaning rags, mop heads and the
•
like which have traces of any flammable substance, such as vegetable
oil, cooking oil, petroleum based oils or distillates, waxes, fats, etc.
must not be placed in the washing machine.These items may contain
flammable substances which, even after washing, may smoke or catch
fire.
Never place items in the washer that have been dampened with
•
gasoline or any combustible or explosive substance. Do not wash or
dry anything that has been soaked in or spotted with any type of oil
(including cooking oils). Doing so can result in fire, explosion, or death.
Do not allow children to play on or in the appliance. Close supervision
•
of children is necessary when the appliance is used near children.
Glass door or protector may be very hot during the operation. Keep
•
kids and pets far away from the machine during the operation.
This machine is not intended for use by persons (including kids) with
•
reduced physical, sensory or mental capabilities, or lack of experience
and knowledge, unless they have been given supervision or instruction
concerning use of the machine by a person responsible for their safety.
Do not machine wash fiberglass materials (such as curtains and
•
window coverings that use fiberglass materials.) Small particles may
remain in the washing machine and stick to fabrics in subsequent wash
loads causing skin irritation.
Before the appliance is removed from service or discarded, remove
•
the door and cut off the power cord.
Do not reach into the appliance if the tub or agitator is moving.
•
Do not install or store this appliance where it will be exposed to the
•
weather.
Do not tamper with controls.
•
Do not repair or replace any part of the appliance or attempt any
•
servicing unless specifically recommended in the user-maintenance
instructions or in published user-repair instructions that you
understand and have the skills to carry out.
Make sure that all pockets are emptied. Sharp and rigid items such
•
as coin, brooch, nail, screw or stone etc. may cause serious damages
to this machine.
Pull out its plug and cut off the water supply after the operation.
•
Make sure that the water inside the drum has been drained before
•
opening its door. Please do not open the door if there is any water
visible.
Do not try to repair the machine by yourself. The machine may be
•
damaged or more troublesome repair work may be needed and even
dangerous operation may take place if it is repaired by any
inexperienced or unqualified staff.
If the plug (power cord) is damaged, it shall be replaced by the
•
manufacturer or a service agent to avoid any danger.
Take care that power voltage and frequency shall be identical to
•
those of washing machine.
Instructions
Safety
Features
Requirements
Operation
Instructions
Installation
Instructions
Operation
Care and
Cleaning
Troubleshooting
5

Instructions
Safety
Features
Requirements
Operation
Instructions
Installation
Instructions
Operation
Care and
Cleaning
Troublesho
o
ting
Do not use any socket with rated current less than that of the
•
washing machine. Never pull out a power plug with a wet hand.
To ensure your safety, the power cord plug must be inserted into an
•
grounded three-pole socket. Check carefully and make sure that your
socket is properly and reliably grounded.
This washing machine should only be repaired and serviced by
•
qualified technicians.
If connected to a circuit protected by fuses, use time-delay fuses
•
with this appliance.
To reduce the risk of electric shock, disconnect this appliance from
•
the power supply before attempting any user maintenance other than
cleaning the lint trap. Turning the controls to the OFF position does
not disconnect this appliance from the power supply.
Certain internal parts are intentionally not grounded and may present
•
a risk of electric shock only during servicing. Service Personnel - Do
not contact the following parts while the appliance is energized:
electrical value, drain pump, door lock, fan motor (combo).
WARNING
Grounding
This appliance must be grounded. In the event of a malfunction or
•
breakdown, grounding will reduce the risk of electric shock by
providing a path of least resistance for the electric current. This
appliance is equipped with a cord that has an equipment grounding
conductor and a grounding plug. The plug must be plugged into an
appropriate outlet that is properly installed and grounded in
accordance with all local codes and ordinances.
Improper connection of the equipment grounding conductor can
•
result in electric shock. Connect to an individual branch circuit. Check
with a qualified electrician or serviceman if you are in doubt as to
whether the washer is properly grounded.
DO NOT modify the plug provided with the appliance if it will not fit
•
the outlet. Please have a proper outlet installed by a qualified
electrician.
Risk of Electric Shock: Appliance grounded to neutral conductor
•
through a link. Grounding through the neutral conductor is prohibited
for (1) new branch-circuit installations, (2) mobile homes, (3)
recreational vehicles, and (4) areas where local codes prohibit
grounding through the neutral conductor.
For installations where grounding through the neutral conductor is
prohibited: (1) disconnect the link from the neutral, (2) use grounding
terminal or lead to ground appliance, and (3) connect neutral terminal
or lead to branch-circuit neutral in usual manner (where the appliance
is to be connected by means of a cord kit use 4-conductor cord for
purpose).
For installations where grounding through the neutral conductor is
prohibited, the 3-conductor cord or cable assembly must be replaced
by a 4-conductor cord or cable assembly. See manufacturer's
instructions.
6

WARNING
To reduce the risk of fire, do not use heat when drying articles containing
foam rubber or similarly textured rubber-like materials.
WARNING
Instructions
Safety
Before operating this machine
Packing materials may be dangerous to the kids. Please keep all packing
•
materials (plastic bags, foams, etc.) far away from kids.
Washing machine shall not be installed in a bath room or very wet
•
rooms as well as in rooms with explosive or caustic gases.
Make sure that the water and electrical devices must be connected by
•
a qualified technician in accordance with the manufacturer's instructions
and local safety regulations.
Before operating this machine, all packages and transport bolts must
•
be removed. Otherwise, the washing machine may be seriously
damaged while washing the clothes.
Before washing the clothes the first time, the washing machine shall be
•
operated in Cotton and hot water procedures without the clothes inside.
This washing machine is for indoor use only.
•
WARNING
Attention shall be paid to protecting the machine
•
Do not climb up and sit on the top cover of the machine.
Do not lean against the machine door.
•
Please do not close the door with excessive forces. If it is found
•
difficult to close the door, please check if the excessive clothes are
put in or distributed well.
WARNING
Cautions during handling machine
•
Transport bolts shall be reinstalled to the machine by a specialized
person.
The accumulated water shall be drained out of the machine.
•
Handle the machine carefully. Never hold each protruded part on
•
the machine while lifting.
Machine door can not be used as the handle during the conveyance.
•
Features
Requirements
Operation
Instructions
Installation
Instructions
Operation
Care and
Cleaning
Troubleshooting
7

Cautions when washing clothes
Instructions
Safety
Features
•
•
•
•
•
•
Requirements
Operation
•
•
•
•
Instructions
Installation
Instructions
Operation
•
NOTE:
WARNING
Cold city water shall be used and hot water may also be connected
according to the local situations.
Your washing machine is only for home use and is only designed for
the textiles suitable for machine washing.
Flammable and explosive or toxic solvents are forbidden. Gasoline
and alcohol etc. shall not be used as detergents. Please only select the
detergents suitable for machine washing, especially for front loading.
Do not wash carpet in this machine.
Never refill the water by hand during washing.
Always follow the fabric care instructions recommended by the
clothing manufacturer.
Do not use the washing machine if it has a worn power cord or loose
plug. Contact an authorized service agent.
Do not operate the washing machine if any guards, panels and/or
fasteners, except transport fixing bolts, have been removed. Check
the fill hose connections on a regular basis to ensure that they are
tight and not leaking.
Do not operate the washing machine if parts are missing or broken.
Do not touch the door if washing at high temperatures.
The IMPORTANT SAFETY INSTRUCTIONS indicated in this manual do
•
not cover all possible conditions which may occur. Common sense,
caution, and care must be exercised when installing, maintaining, or
operating the washing machine.
Always contact your dealer, distributor, service agent, or the
•
manufacturer about any problems or conditions that you do not
understand.
Care and
Cleaning
Troublesho
o
ting
8
WARNING
Installation requirements
This machine must be grounded properly. If there is any short circuit,
•
grounding can reduce the danger of electrical shock. This machine is
equipped with power cord, which includes plug, grounding wire at
grounding terminal.
Washing machine shall be operated in a circuit separate from other
•
electrical appliances. Otherwise, the power protector may be tripped
or the fuse may be burned out.
NOTE: Environmental Protection
If you plan to dispose of this machine, please comply with the local
•
waste disposal regulations. Cut off the power cord so that it will not be
put into reuse.
Remove the door so that kids and animals will not be trapped in the
•
machine.
•
Do not use excessive detergents.


Main components
Instructions
Safety
Features
Requirements
Operation
Instructions
Installation
Front
compartment
Detergent
Door
Control panel
Filter door
Instructions
Operation
Care and
Cleaning
Troubl
esho
o
ting
10
Back
Water supply
inlets
Drain hose
Power plug

INSTALLATION REQUIREMENTS
Electrical requirements
WARNING
To reduce the risk of fire, electric shock, or injury to persons, read the
SAFETY INSTRUCTIONS before operating this appliance.
WARNING
Connect to grounded 3-prong outlet with an individual 12 amp branch
•
circuit protected by a 12 amp circuit breaker.
Connect to individual branch circuit.
•
Do not remove the ground prong.
•
Do not use an adapter.
•
Failure to follow these instructions can result in electrical shock, fire, or
death.
Electrical grounding is required for your washer.
You must ground your washer. In the event of a malfunction or
•
breakdown, grounding reduces the risk of electric shock by providing
a path of least resistance for the electric current.
A 120 v, 60 Hz, AC-only,15 or 20 amp, fused electrical supply is
•
required. We recommend that you use a time-delay fuse or provide a
circuit serving only your washer.
Your washer is equipped with a power cord that has a 3-prong
•
grounding plug. To minimize possible shock hazard, the cord must be
plugged into a matched 3-prong, grounding type outlet, grounded in
accordance with local codes and ordinances. If a 3-prong outlet is not
available, contact a qualified electrician to install one. Do not use an
adapter.
If codes permit and you use a separate ground wire, we recommend
•
that a qualified electrician determine that the ground path is adequate.
Check with a qualified electrician if you are not sure your washer is
•
correctly grounded.
Do not have a fuse in the neutral or ground circuit.
•
Certain internal parts are intentionally not grounded and may present
•
a risk of electric shock only during servicing. When servicing, do not
contact the following parts while the appliance is energized: electrical
valve, drain pump and door lock.
Instructions
Safety
Features
Requirements
Operation
Instructions
Installation
Troubleshooting
11

Instructions
Safety
WARNING
You’re responsible for providing adequate electrical services for your
•
washer.
Never connect the ground wire to plastic plumbing lines, gas lines,
•
or hot water pipes.
Features
Requirements
Water requirements
To fill your washer in the correct amount of time, the water pressure needs
to be between 0.05 MPa~1 MPa.
Operation
If the water pressure is lower than 0.05 MPa:
•
•
Instructions
Installation
•
To avoid the possibility of water damage:
•
•
•
Drainage requirements
The recommended height for the drain standpipe is 48 in. (122 cm).
Troublesho
The drain hose must be routed through the drain hose clip to the standpipe.
The standpipe must be large enough to accept the outside diameter of
the drain hose.
The water valve may fail or may not shut off completely.
The time it takes to fill your washer may be longer than the time your
washer controls allow. Your washer will turn off and report an error. A
time-limit is built into the controls to prevent flooding in your home if
a hose becomes loose.
Water inlet hoses must be purchased separately. You can buy inlet
hoses in various lengths up to 8 ft. (240 cm).
Make sure that the water faucets are easily accessible.
Turn off the faucets when you are not using your washer.
Periodically check to make sure that water is not leaking from the
water hose fittings.
o
ting
12

INSTALLATION INSTRUCTIONS
Unpacking your washer
WARNING
•
Packing materials can be dangerous to children. Keep all packing
materials (plastic bags, polystyrene, and so on) well out of the reach
of children.
Do not operate your washer on the foam base cushion. Doing so will
•
result in serious vibration, which could cause equipment damage or
physical injury.
CAUTION
Your washer is heavy. You may need help to unpack and move it.
•
1
Remove your washer from the packaging.
2
Make sure that the small, triangular piece of foam comes off with the
packaging base. If it doesn’t, lay your washer on its side, remove the
foam, then set your washer upright.
Instructions
Safety
Features
Requirements
Operation
Instructions
Installation
Instructions
Operation
Triangular foam
3
Remove the four transport bolts on the back of your washer.
CAUTION
If you do not remove the four bolts, your washer will make loud noise
and vibrate excessively or move. This can damage your washer.
Care and
Cleaning
Troubleshooting
13

Instructions
Safety
Features
Requirements
Operation
Instructions
Installation
Instructions
Operation
Choosing a location
Care and
Cleaning
Troublesho
Troublesho
Transport bolt
4
Cover the holes with the transport hole plugs. Keep the four bolts for
future use. You need them if you want to transport your washer to
another location.
Transport
hole plug
W
ARNING
•
Do not install your washer in areas where water may freeze, because
your washer always retains some water in its water valve, pump and
hose areas. Frozen water can damage the valve, pump, hoses and
other components.
Never install on a platform or weakly supported structure.
•
o
o
ting
ting
Selecting a correct location for your washer improves performance and
minimizes noise and possible washer “walk.” Your washer can be installed
under a custom counter or in a basement, laundry room, closet, or recessed
area. See Drainage requirements on page 12. You should also consider a
companion appliance (dryer) location requirements.
For best performance, you need:
A water heater set to deliver 120° F (49° C) water to the washer.
•
14

A grounded electrical outlet located within 6 ft. (1.8 m) of where the
•
power cord is attached to the back of the washer. See Electrical
requirements on page 11.
Hot and cold water faucets located within 4 ft. (1.2 m) of the hot and
•
cold water fill valves, and water pressure of between 0.05MPa~1MPa.
A level floor with a maximum slope of 1 in. (25 mm) under entire
•
washer. Don’t install your washer on soft floor surfaces, such as
carpets or surfaces with foam backing.
A sturdy and solid floor to support the washer with a total weight
•
(water and load) of 200 lbs. (90 kg)
Make sure that the location is:
Away from direct sunlight. Direct sunlight can raise the water
•
temperature, which may cause safety risks.
An area where the temperature is above 32° F (0° C).
•
Away from the heat resources such as coal or gas. Heat sources can
•
raise the water temperature, which may cause safety risks.
Washer dimensions and installation measurements
23.5 in. (59.5 cm)
Instructions
Safety
Features
Requirements
Operation
Instructions
Installation
42.5 in. (108 cm)
25.6 in. (65 cm)
33.5 in. (85 cm)
Instructions
Operation
Care and
Cleaning
Troubleshooting
15

Installing under a counter
Instructions
Safety
Features
Requirements
Operation
Instructions
Installation
Installing in an alcove or closet
If you install your washer in an alcove or closet, the front of the closet must
have two unobstructed air openings for a combined minimum total area of
72 sq. in. (465 square cm) with a minimum clearance of 3 in. (7.6 mm) at the
Instructions
Cleaning
top and bottom. A slatted door with equivalent space clearance is
Operation
acceptable.
Care and
2 in. (5 cm)
33.5 in. (85 cm)
48 square inches
(310 cm )
2
1 in. (2.5 cm) 1 in. (2.5 cm)
23.5 in. (59.5 cm)
(7.6 cm )
3 in.
Troublesho
o
ting
24 square inches
2
(155 cm )
3 in.
(7.6 cm )
16

Minimum clearances between your washer and adjacent walls or other
surfaces are:
Either side: 1 in. (2.5 cm)
•
Rear: 6 in. (15.2 cm)
•
Closet Front: 2 in. (5.1 cm)
•
Top: 2 in. (5.1 cm)
•
If you install your washer and dryer side-by-side in a closet, the closet front
must have an unobstructed air opening of at least 72 square inches
(465 square cm).
2 in. (5 cm )
Instructions
Safety
Features
Requirements
Operation
Instructions
Installation
1 in.
(2.5 cm )
23.5 in.
(59.5 cm )
1 in.
(2.5 cm )
2 in.
(5.1 cm )
25.6 in.
(65 cm )
(15.2 cm )
WARNING
Before you install your washer, make sure that the location:
Is a hard, level surface without carpeting or soft flooring that can
•
obstruct ventilation.
Is away from direct sunlight.
•
Has adequate ventilation.
•
Is not exposed to freezing temperatures (below 32 F or 0 C).
•
Is away from heat sources such as oil or gas.
•
Has enough space so that the washer does not rest on its power cord.
•
°
°
6 in.
Instructions
Operation
Care and
Cleaning
Troubleshooting
17

Instructions
Safety
Features
Tools you will need
3/8” open-end wrench
Level
Adjustable wrench or 7/16”
socket with ratchet
Requirements
Operation
Connect the water hoses
Instructions
Installation
Instructions
Operation
1.
2. Tighten the hose and faucet fittings by hand until they are snug. Tighten
Care and
Cleaning
Troublesho
o
ting
Pliers Nut driver with ratchet
Adjustable wrench or 9/16”
open-end wrench
Caution
Use new water supply hoses. Using old hoses can result in leakage or
•
overflow that can damage your property.
Do not connect multiple water supply hoses together to increase the
•
length of the hose. Hoses connected this way can leak and cause
electrical shock. If a hose is too short, replace the hose with a longer,
high-pressure hose.
Connect the water hoses to the hot and cold water faucets.
them an additional two-thirds of a turn with pliers or a wrench. Pull the
water supply hoses downwards to make sure that they are connected
securely.
18
Water supply hose

Caution
Don’t overtighten the fittings or apply tape or sealant to the faucets or
water supply intakes. This can damage the fittings.
3. Place the unconnected ends of the hoses into a bucket and turn on the
faucets connected to the water supply hoses for 10 or 15 seconds to
remove any foreign substances. Turn off the faucets.
4. Connect the ends of the water supply hoses to the water supply intake
connections at the top of the washer. The water supply hose connected
to the hot faucet must be connected to the hot water supply intake
and the water hose connected to the cold faucet must be connected
to the cold water supply intake.
Instructions
Safety
Features
Requirements
Operation
Instructions
Installation
Instructions
Operation
Back of washer
Hot water supply
Cold water supply
Water supply hoses
NOTE:
If you don't want to use the hot water faucet or you don't have a hot
•
water faucet, you have to adjust the Temp. setting to cold, or your
washer will have an Error code E10.
If you only have cold water faucet, we recommend that you buy and
•
install a T-branch pipe.
Care and
Cleaning
Troubleshooting
19

5. Tighten the fittings by hand until they are snug, then tighten them an
additional two-thirds of a turn with pliers or a wrench.
Instructions
Safety
Features
6. Turn on the hot and cold water supplies, then check all the water supply
Requirements
Operation
Connect the drain hose
Instructions
Installation
Connect the drain hose in one of the following ways.
Instructions
In a wall standpipe
Operation
NOTE: The wall standpipe drain requires a minimum diameter standpipe
Place the drain hose into the wall standpipe. You can use a nylon ties (not
included) to bundle the hoses and the drain pipe together.
Care and
Cleaning
Caution
Don’t overtighten the fittings or apply tape or sealant to the faucets
•
or water supply intakes. This can damage the fittings.
Make sure that the water supply hoses aren’t twisted or bent. A bent
•
or twisted hose can leak and cause an electric shock because of water
leakage.
intake connections and the faucets for water leaks.
Caution
Make sure that the connection between the drain hose and the wash
•
basin, standpipe, or laundry tub is not airtight.
of 2" (5 cm).
Wall standpipe
Troublesho
o
ting
Drain hose
Nylon tie
20

In a floor standpipe
NOTE:
For a floor standpipe, the capacity must be at least 17 gal. (64 L)
per minute. The top of the standpipe must be between 2 ft. (60 cm)
and 3.3 ft. (100 cm) from the bottom of your washer.
Place the drain hose into the standing floor standpipe. You can use nylon
ties (not included) to attach the drain hose to the standpipe.
3.3 ft. (100 cm) max.
2 ft. (60 cm) min.
Floor standpipe
In a laundry tub
NOTE:
The laundry tub needs a minimum capacity of 20 gal. (76 L).
•
The top of the laundry tub must be between 2 ft. (60 cm) and 3.3 ft.
•
(100 cm) above the floor.
Instructions
Safety
Features
Requirements
Operation
Instructions
Installation
Instructions
Operation
3.3 ft. (100) max.
2 ft. (60 cm) min.
Care and
Cleaning
Troubleshooting
21

In a floor drain system
NOTE:
•
Instructions
Safety
Features
Requirements
Operation
Instructions
Installation
Instructions
Operation
•
Place the drain hose into the floor drain system. The weight of the hose and
gravity keep the drain hose in the drain.
A floor drain system requires a siphon break (not included). The siphon
break must be a minimum of 28 in. (71 cm) from the bottom of the
washer.
If the drain hose on the washer is shorter than the siphon break
distance, attach an extra drain hose (not included) to the washer’s
drain hose.
28 in. (71 cm) min.
Care and
Cleaning
Troublesho
o
ting
22
Level your washer
Caution
Don’t use your washer without leveling it. If your washer isn’t level, it may:
Vibrate excessively which can cause your washer to malfunction
•
Make excessive noise
•
Extend the leveling feet only as much as is necessary. If the feet are
extended too much, your washer may vibrate.
1. Make sure that the legs are flush with the washer cabinet. If needed,
use a wrench to loosen the lock nut on a leg, slide the leg up, then
tighten the bolt.

2. Slide your washer into position.
3. Press the four top corners of your washer. If your washer moves when
you press a corner, the leg for that corner needs to be adjusted.
4. Loosen the lock nut on the bottom of your washer, pull the leg down
until it touches the floor, then tighten the nut. Extend the feet only as
much as necessary. If the feet are extended too much, your washer
may vibrate.
5. Press the four corners again to make sure that your washer is level. If
your washer is still not level, repeat step 4.
6. Use a level to make sure that all four sides of your washer are level.
Instructions
Safety
Features
Requirements
Operation
Instructions
Installation
Instructions
Operation
Power on
Plug the power cord into a well-grounded, 3-prong, 120 Volt 60 Hz
approved electrical outlet protected by a 12-amp fuse or comparable
circuit breaker. Your washer is grounded through the third prong of the
power cord.
Care and
Cleaning
Troubleshooting
23

Instructions
Safety
Features
WARNING
Make sure that the power voltage at your location is the same as the
•
voltage on your washer's rating label.
Do not use a multi-purpose plug or socket.
•
Do not use an adapter.
•
•
Do not use an extension cord.
Do not touch or pull out the plug with a wet hand.
•
When you unplug the power cord, hold the plug not the power cord.
•
If power cord is damaged or has any sign of being broken, replace
•
the cord.
Requirements
Instructions
Instructions
Cleaning
Troublesho
o
ting
Run a test cycle
Operation
Run a test cycle to make sure that your washer is correctly installed.
Installation
Operation
Care and
Leave the tub empty.
•
Press the Power button to turn on your washer.
•
Turn the cycle selector to select the Rinse&Spin cycle.
•
Press the Start/Pause button to start the test cycle. Your washer
•
shouldn’t rock or vibrate excessively when water is filling the tub, or when
washing or spinning. Your washer should drain well during the spin cycle.
CAUTION
If you detect any water leaks while your washer is filling or draining,
•
check the water connections. See Connect the water hoses on page
18 or Connect the drain hose on page 20.
If your washer rocks or vibrates excessively, level it again. See Level
•
your washer on page 22.
24

OPERATION INSTRUCTIONS
Control panel
No bizzer
Door Lock
Speed Wash
1
8 9 10
7
1
Status indicators
Child Lock Prewash
Extra Rinse
Add a Garment
3
Wash
Rinse
My Cycle
Spin
Extra Dry Normal Dry
Gentle Dry
524 6
11
These indicators appear when you select settings and options.
2
Digital display
The initial display is the total time for the cycle you select.
While your washer is running, the display shows the cycle process
and time remaining in the cycle.
Note: The time shown is an estimate based on normal operating
conditions. External factors (such as the load size, incoming water
temperature, and water pressure) can affect actual time.
If you set a delay time for the start of the cycle, the display
shows the time when the cycle will start.
Instructions
Safety
Features
Requirements
Operation
Instructions
Installation
Instructions
Operation
Care and
Cleaning
3
Spin speed
Press to select the spin speed. You can select Highest, High, Med,
Low, or No Spin.
4
Soil type
Press to select the soil type.
5
Dry
Press the Dry button continuously to choose the dry level: Extra Dry /
Normal Dry/Gentle Dry
Extra Dry
Normal Dry
Gentle Dry
Troubleshooting
25

6
Power
Press to turn your washer on or off.
Instructions
Instructions
Safety
Safety
Features
Requirements
Operation
10
Instructions
Installation
11
Instructions
Operation
7
Time Save
Press to shorten the washing time. See Step 7: (Optional) Decrease
the wash time on page 30.
8
Delay
Press to set a delayed start time. See Step 6: (Optional) Set a delayed
start time on page 30.
9
Temp.
Press to select the water temperature. You can select Hot+, Hot, Warm,
Eco, or Cold. For more information, see Washer options and settings
on page 32.
Cycle selector
Turn to select a cycle. For more information, see Washer options and
settings on page 32.
Start/Pause
Press to start or pause the cycle.
Care and
Cleaning
Troublesho
o
ting
26

Washing a load of laundry
If this is the first time you are washing an item, make sure that it is
•
color-fast. Use a white rag or towel with a little detergent to wash a
hidden part of the item. If the rag or towel is stained, the item is not
color-fast.
If an item has stains, use a spot remover or gently apply a small
•
amount of detergent to the stains, then gently scrub the stains with a
brush.
Check the manufacturer's label for special washing instructions.
•
Make sure that you remove all items from pockets. Hard items, like
•
coins, can damage your washer.
Never wash clothes stained with chemicals such as gasoline,
•
petroleum, benzene, paint thinner and alcohol.
Consider using a pillow case you can close or a washing bag to
•
protect items like bras, lacy items, and delicate items.
Wash whites and colors separately.
•
•
Turn items that can pill (like sweaters and sweatshirts) inside out.
NOTE:
Never leave wet items to be washed in your washer for long periods of
•
time. Items may mold and cause stains.
Make sure that you check the manufacturer's label for water
•
temperature instructions.
Don’t wash items, like ties or items with decorations, that may stretch
•
or distort.
Don’t wash waterproof items, like rain coats, ski suits, shower curtains,
•
and mattress pads. These items don’t absorb water and may cause
excessive vibration.
Instructions
Safety
Features
Requirements
Operation
Instructions
Installation
Instructions
Operation
Care and
Cleaning
WARNING
To reduce the risk of fire, electric shock, or injury to persons, read the
SAFETY INSTRUCTIONS before operating this appliance.
1. Select a detergent
Your washer is designed to use high efficiency (HE) detergents.
For the best cleaning results, use an HE detergent. We recommend
•
that you do not use a regular detergent. HE detergents contain
suppressors that reduce or eliminate suds. When fewer suds are
produced, the load tumbles more efficiency and cleaning is maximized.
Troubleshooting
27

Instructions
Safety
Features
Reducing the amount of detergent may affect the quality of cleaning.
•
Make sure that you:
- Pre-treat stains.
- Sort carefully by color and soil level.
- Avoid overloading.
2. Turn on your washer
Press the Power button to turn on your washer. Your washer's initial
settings are:
Normal cycle
•
Warm temperature
•
Medium spin speed
•
Requirements
Instructions
Instructions
Cleaning
Troublesho
o
ting
3. Load your washer
Operation
Installation
Operation
NOTE:
Care and
Caution
Before loading your laundry, make sure that you remove coins, keys,
and other hard objects and close zippers. These items may damage
clothes.
Sort laundry by fabric type, soil level, color, and load size.
•
Fill the tub with dry, unfolded clothes. Load the tub no more than 3/4
•
fill. For best performance, the maximum load size should be less than
12 lbs. (5.4 kg).
Overloading may reduce washing efficiency, cause excess wear, and
•
possibly cause creasing or wrinkling of the load.
Wash delicate items such as bras, hosiery and other lingerie on the
•
Delicates cycle with similar lightweight items.
Don't overfill your washer with too many big, bulky items This could
•
lead to unwanted vibration during the spin cycle. If this happens,
remove some items and restart the washing cycle.
Always use the Bulky cycle for bulky items.
•
When washing heavily soiled loads, do not overload your washer to
•
ensure good cleaning results.
Your washer is not suitable for washing comforters. Your washer may
•
not reach high spin speed and may result in a the wet load after
spinning.
Sometimes your washer can't reach a high spin speed because the
•
load is out of balance. Rearrange the clothes, then try the Spin Only
mode again.
28
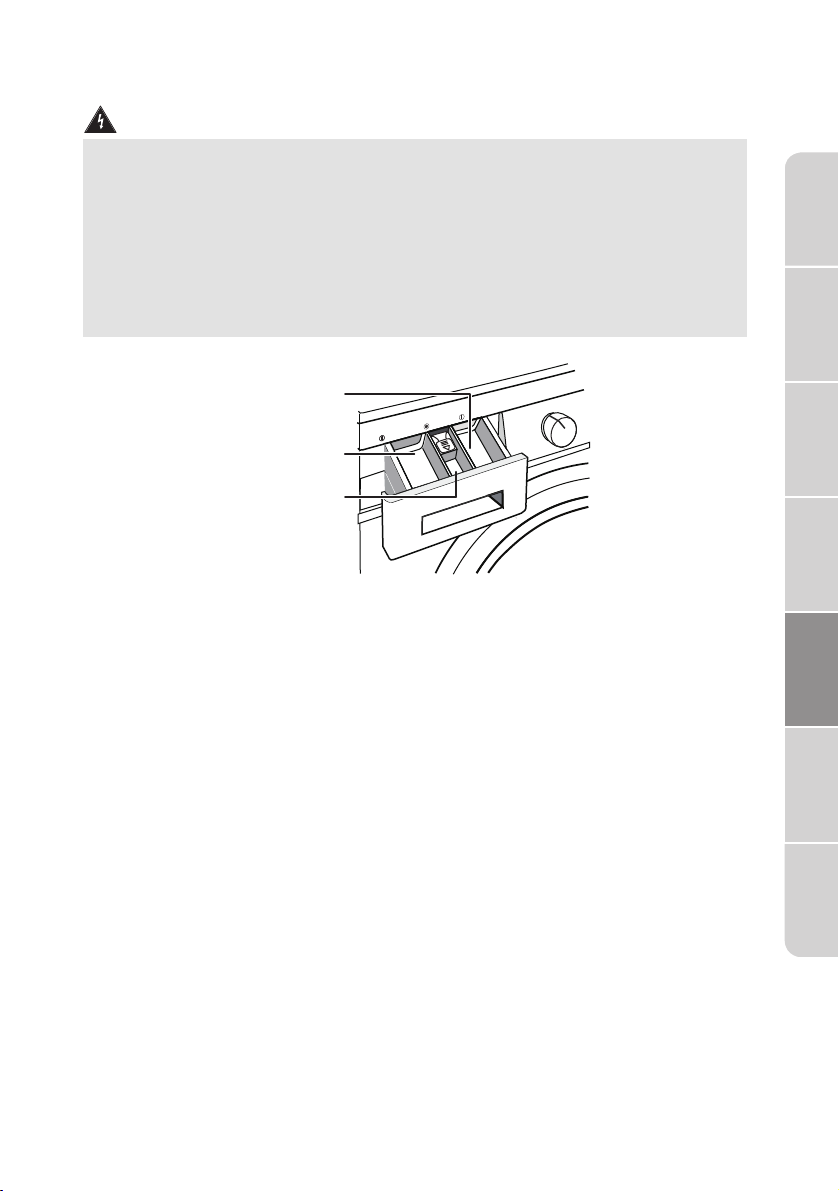
4. Add detergent and additives to the compartments
Caution
Avoid splashing or over-filling the compartment.
•
•
Never pour undiluted liquid chlorine bleach directly onto the load or
into the tub. Doing so can damage fabrics by weakening of the fibers
or stripping the color.
You can pour less than 1.7 oz. (50 ml) of liquid bleach in the main
•
detergent compartment before your press the Start button. if you
want to use more bleach, we recommend that you pour the bleach in
the main detergent compartment when water flows into detergent
compartment after you start your washer.
Instructions
Safety
Features
Pre-detergent
compartement
Detergent
t So
gen
r
e
t
ain-wash de
M
t
n
ge
re-wash deter
t P
detergen
er
ften
compartement
Fabric softener
compartement
If you are using the Pre-Wash option, pour the recommended amount
•
of laundry detergent directly into the pre-detergent compartment
before starting your washer.
Pour the recommended amount of laundry detergent directly into
•
the detergent compartment before starting your washer.
If you’re using color-safe bleach or liquid chlorine bleach, add it with
•
the detergent to the detergent compartment.
NOTE:
When adding color-safe bleach with detergent, both laundry
•
products must be in the same form (liquid).
If you are using powder detergent, add it to the bottom of the tub
•
before you add the load.
Pour the recommended amount of liquid fabric softener into the
•
softener compartment. The dispenser automatically releases liquid
fabric softener at the correct time during the rinse cycle.
Requirements
Operation
Instructions
Installation
Instructions
Operation
Care and
Cleaning
Troubleshooting
5. Select the appropriate cycle and options for the load
Turn the cycle selector to select a washing cycle. For information on wash
cycles, see Washer options and settings on page 32.
29

6. (Optional) Set a delayed start time
You can program a wash cycle, then set a time when you want a wash
cycle to begin.
Instructions
Safety
•
Features
•
•
Requirements
Operation
•
•
NOTE:
Your washer stores your settings in memory. If the power fails, press
the Start/Pause button when power is restored. Your washer continues
the Delay function you set.
Turn the cycle selector knob to the cycle type you want.
Press the Delay button repeatedly to select the delay time you want.
The delay start time, in hours, appears on the display, in sequence,
from 0 to 24, then back to 0. When you reach the time setting you
want, hold the Delay button for three seconds to confirm the setting.
The Delay light turns on.
Press and hold the Start/Pause button for three seconds to start the
delay timer.
To cancel the delay start time function before you save the setting,
press the Delay button until 0H appears on the display.
Instructions
Installation
Instructions
Operation
Care and
Cleaning
Troublesho
o
ting
NOTE:
After the delay time is set, if you want to change the delay setting,
•
press the Delay button again until the hour you want is reached.
Release the button for three seconds.
If you decide to cancel the delay setting, you can either turn the
•
cycle selector or press the Delay button until 0 is reached.
Ideally, you should set your cycle before setting the delay time
•
because turning the cycle selector after you set the delay time
cancels the delay function.
You can change settings or cancel the delay start time function
•
anytime before you press the Start/Pause button by turning the
cycle selector.
You can’t change the delay start time after you press the
•
Start/Pause button. If you pressed the Start/Pause button, you
can cancel the delay start time function by pressing the Power
button to turn off your washer, then pressing the button again to
turn it back on.
You can’t change the Delay Start Time after the program has
•
started.
7. (Optional) Decrease the wash time
Press the Time Save. The light turns on and the wash time decreases.
NOTE:
Time Save works for Normal/Cotton, Perm Press, Heavy Duty, Bulky/Large,
and Sport Wear cycles.
30

8. Start your washer
Press the Start/Pause button.
•
NOTE:
If you haven’t set a delayed start time or if the delay time has
•
expired, your washer starts the cycle and the Wash light turns on.
As your washer moves from stage to stage in the wash cycle, the
•
related light turns on (such as Rinse or Spin).
If you set a delayed start time, the Delay light turns on and your
•
washer starts counting down the start time.
If you need to pause the cycle (for example to add or remove items),
•
press and hold the Start/Pause button for 3 seconds. Wait for the drum
to stop, then open the door. When you’re ready to resume washing,
close the door, then press the button again.
Caution
Don’t try to force the door open if:
The drum is moving. You will damage your washer.
•
The water level is above the edge of the inner tub. Water will spill on
•
the floor.
The water temperature is too hot. You may scald yourself.
•
If you press and hold Start/Pause button for three seconds, the door
•
won't open because the door can't match the above conditions. You
should wait until the perfect time.
Instructions
Safety
Features
Requirements
Operation
Instructions
Installation
Instructions
Operation
Setting the child lock
Your washer has a child lock function to prevent children from playing with
your washer. When you turn on the child lock, the only buttons that work
are the Power button and the Delay and Temp. buttons you use to turn
off the child lock.
Press and hold both the Delay and Temp. buttons for three seconds.
•
The child lock light turns on.
To turn off the child lock, press and hold both the Delay and Temp.
•
buttons for three seconds.
NOTE:
If your washer is not turned on, the child lock can still remain set.
•
Press the Power button, turn on the child lock function, then press
the Power button to turn off your washer. When you want to use
your washer, you need to turn off the lock function.
Care and
Cleaning
Troubleshooting
31

4:2 7
1:4 0
1:2 3
0:57
0:1 3
0:2 3
1:2 9
4:1 9
2:1 8
1:0 1
0:5 8
2:1 6

CARE AND CLEANING
W
ARNING
•
Don't use solvents to clean your washer. They can damage the finish
and create toxic gases that can harm you or explode.
Don't sprinkle or spay water or other liquids directly on your washer.
•
Don't use detergents containing PCMX to clean your washer. PCMX
•
can damage the finish.
SERVICE PERSONNEL—Some internal parts are intentionally not
grounded and may present a risk of electric shock during servicing. Do
not contact the following parts while the appliance is energized:
electrical valve, drain pump, door lock, dry heater, fan motor.
Instructions
Safety
Features
Caution
Before performing any maintenance, turn off your washer, unplug the
power cord, and turn off the water faucets.
CLEANING AND MAINTENANCE
Cleaning the exterior
Use a soft cloth to wipe up all detergent, bleach, or other spills as they
occur.
Cleaning the interior
Clean the interior of your washer periodically to remove any dirt, soil,
•
odor, mold, mildew, or bacterial residue that may remain in your washer
as a result of washing clothes.
Failure to follow these instructions may result in unpleasant conditions,
•
including odors or permanent stains in your washer or on your laundry.
To remove hard water deposits, use a cleaner labeled "Washer safe".
•
Cleaning the control panel
Clean with a soft, damp cloth. Do not use abrasive powders or cleaning
•
pads.
Do not spray cleaners directly on the panel. The control panel finish
•
may be damaged by some laundry pre-treatment soil and stain remover
products. Apply such products away from your washer and wipe up any
spills or over-spray immediately.
Requirements
Operation
Instructions
Installation
Instructions
Operation
Care and
Cleaning
Troubleshooting
33

Cleaning the detergent and softener compartments
•
Instructions
Safety
Features
Requirements
Operation
•
Instructions
Installation
Instructions
Operation
Open the drawer, then press down the arrow located on softener cover
inside the drawer.
Lift the clip up and pull out the drawer.
Care and
Cleaning
Troublesho
o
ting
34
Wash the compartments and grooves with water, then dry with a cloth.
•
Restore the softener cover and push the drawer into position.
•

Cleaning the inlet filters
If water flows too slowly or not at all, you need to clean the inlet filter.
Machine filter
Turn off the water faucets.
•
Unscrew the inlet pipe on the back of your washer from the tap.
•
Pull out the filter with long nose pliers.
•
Bakc of washer
Inlet filter
Use water to wash the filter.
•
Reinstall the filter, then reconnect the inlet pipe.
•
Turn on the water faucets and make sure there is no water leakage.
•
Instructions
Safety
Features
Requirements
Operation
Instructions
Installation
Instructions
Operation
Care and
Cleaning
Cleaning the drain filter
Caution
Clean the filters frequently. Blocked filters may:
•
Keep your washer from draining water
Keep your washer from spinning
•
Cause loud or unusual noises from object caught in the filters
•
Troubleshooting
35

•
Instructions
Safety
•
Features
Use a flat blade screwdriver to open the filter door located on the
bottom right of the front of your washer.
Filter door
Rotate the cap 90° clockwise, then pull the emergency drain hose out
and remove the hose cap.
Requirements
Operation
Instructions
Installation
•
Instructions
Operation
Care and
Cleaning
•
•
Troublesho
o
ting
Emergency
drain hose cover
Drain water into a bowl or bucket.
Reset the drain hose.
Rotate the filter counter-clockwise, then pull it out of your washer.
36

Remove lint and other objects from the filter.
•
Slide the filter back in and rotate is counter-clockwise to lock it in
•
place.
Instructions
Safety
Features
Requirements
Operation
Instructions
Installation
Cleaning the drain filter
The Tub Clean cycle is a self-cleaning cycle that removes the causes of
odors that may occur inside your washer without using a cleaning agent.
We suggest cleaning the tub about once a month.
Caution
Never use the Tub Clean cycle when laundry is in your washer. This may
damage the laundry or your washer.
With the tub empty, add one cup of chlorine bleach to the bleach
•
dispenser.
Press the Power button.
•
Turn the cycle selector to Tub Clean. When you select Tub Clean,
•
the only option you can change is the Delay option.
Press the Start/Pause button.
•
Using the emergency door release
If the power fails or other circumstances prevent you from opening the
door, you can use the emergency cord to open the door.
Instructions
Operation
Care and
Cleaning
Troubleshooting
37

Instructions
Safety
•
•
Features
Requirements
Operation
WARNING
You can't use the emergency cord when your washer is running. If you
must open the door, turn your washer off and wait for the water to cool
before you use the emergency cord.
Open the filter door located on the bottom right of the front of your
washer.
Gently pull the emergency cord down.
Emergency
release cord
Instructions
Installation
Instructions
Operation
Care and
Cleaning
Troublesho
o
ting
NOTE: Don’t pull hard on the cord. You might break it. Pull gently.
Open the your washer’s door.
•
Restore the cord to its original position, then close the filter door.
•
Unfreezing your washer
If the ambient temperature drops to freezing (32° F /0°C), any water in
the pipes or water hoses may freeze.
Unplug the power cord.
•
Wash the water faucets with warm water to loosen the inlet hose.
•
Remove the water hoses and immerse them in warm water.
•
Pour warm water into the washing drum and wait for 10 minutes.
•
Reconnect the water hoses to the water faucets and make sure that
•
there are no leaks.
Run your washer on the Drain Only cycle to remove any water you
•
added.
Storing your washer
You can damage your washer if you don’t remove water from hoses and
internal components before storage.
To prepare your washer for storage:
Select the Quick Wash cycle and add bleach to your washer. Run
•
your washer through the cycle without a load.
Turn the water faucets off and disconnect the inlet hoses.
•
Unplug your washer from the electrical outlet and leave your
•
washe’s door open to let air circulate inside the tub.
38

BEFORE YOU CALL FOR SERVICE...
Troubleshooting Tips
Save time and money! Review the charts on the following pages first and
you may not need to call for service.
Problems Solutions
Washer does
not start
Door is locked
or does not
open
The water isn’t
hot.
Make sure that your washer is plugged in.
•
Make sure that the door is closed.
•
Make sure that the water source faucets are open.
•
Make sure that you press the Power button to start
•
your washer.
Make sure that you press the Start/Pause button.
•
Make sure that the Child Lock isn’t turned on. See
•
Setting the child lock on page 31.
Make sure that the Delay option isn’t turned on. See
•
(Optional) Set a delayed start time on page 30.
Check the fuse or reset the circuit breaker.
•
You can’t open the door if your washer is running.
•
Press the Start/Pause button for three seconds. When
the washer drum has stopped, open the door and add
clothing. Close the door, then press the Start/Pause
button again to restart the load.
Note: Don't use the pause function when the water
surface is over the edge of the inner tub or when the
temperature is too hot.
If the door is locked when your washer isn’t running,
•
unplug the power cord, then plug it back in.
Contact a qualified plumber to check the hot water
•
pipe.
Note: You can still wash clothes in cold water only.
Instructions
Safety
Features
Requirements
Operation
Instructions
Installation
Instructions
Operation
Care and
Cleaning
Water leaks
Make sure that all hose connections are tight. See
•
Connect the water hoses on page 18 and Connect the
drain hose on page 20.
• Make sure that the end of the drain hose is correctly
•
inserted and secured to the drainage system. See
Connect the drain hose on page 20.
Make sure that the drain hose is not clogged.
•
Avoid overloading.
•
Use a high-efficiency detergent to reduce over-sudsing.
•
See Select a detergent on page 27.
Troubleshootin
g
39

Instructions
Safety
Features
Requirements
Operation
Problems Solutions
Water
overflows
from the
bottom
of washer.
No water or not
enough water
OR detergent /
softener is still
in its
compartment
after the wash
cycle is
completed
Make sure that the inlet hose is connected firmly.
•
Make sure that the leak is not coming from the drain
•
hose. Replace the hose if needed.
Make sure that both faucets are fully turned on.
•
Make sure that the water pressure is in the range listed
•
in Water requirements on page 12.
Make sure that the water inlet hoses aren’t kinked.
•
Straighten if necessary.
Instructions
Installation
Instructions
Operation
Care and
Cleaning
T
roublesho
o
ting
Washer
vibrates
or is too noisy
Washer stops
Washer doesn’t
drain or spin
There is soap
residue in the
drawer
Make sure that your washer is set on a level surface. If
•
the surface isn’t level, adjust your washer’s feet to level
your washer. See Level your washer on page 22.
Make sure that your washer isn’t touching any other
•
object.
Make sure that you remove the transport bolts.
•
Make sure that the power outlet is a working outlet.
•
Close the door, then press the Start/Pause button to
•
start your washer. For your safety, your washer doesn’t
spin unless the door is closed.
Sometimes your washer may pause between stages in
•
the cycle. Wait to see if your washer starts again.
Check the fuse or reset the circuit breaker.
•
Close the door, then press the Start/Pause button to
•
start your washer. For your safety, your washer doesn’t
spin unless the door is closed.
Make sure that the drain hose isn’t kinked. Straighten
•
as necessary.
Make sure that the height of the drain hose is within
•
specified limits. See Drainage requirements on page 21.
Check the fuse or reset the circuit breaker.
•
The pipes to your sewer system may be clogged.
•
Contact a plumber or qualified repair professional.
Clean the drawer.
•
Use a liquid detergent.
•
40

Problems Solutions
The display
panel
does not light
Items are still
dirty after
washing
Load is too
wet at the end
of the cycle
Load has too
many suds
Make sure that the power cord is connected to a
•
working outlet.
Contact a qualified repair professional to check the
•
display panel wiring.
Make sure that you do not overload your washer.
•
Make sure that you use the correct amount of detergent.
•
If items are extremely dirty, try washing them a second
•
time.
Use a high-efficiency detergent to reduce over-sudsing.
•
See Select a detergent on page 27.
The load may be too small. Very small loads (one or two
•
items) may become unbalanced and not spin out
completely.
Use a high-efficiency detergent to reduce over-sudsing.
•
See Select a detergent on page 27.
If you have “soft” water, reduce the amount of
•
detergent.
For small or lightly soiled loads, reduce the amount of
•
detergent.
ERROR CODES
Instructions
Safety
Features
Requirements
Operation
Instructions
Installation
Instructions
Operation
Code
E30
E10
E21
E12
EXX
Reason
Door open
Water injecting
problem while
washing
Washer doesn’t
drain
Water overflow
Other
Solutions
Open, then close the door.
•
Make sure that no items are caught between the
•
door and your washer.
Make sure that the water pressure is not too low.
•
Straighten the water hose, if necessary.
•
•
Make sure that the inlet valve filter isn’t blocked.
Make sure that the drain hose is not blocked.
•
Restart you washer.
•
Try restarting your washer. If the error remains
•
or a different error code is displayed, contact
qualified service personnel.
Care and
Cleaning
Troubleshooting
41

ATTACH YOUR RECEIPT HERE. PROOF OF PURCHASE
MIDEA
LAUNDRY
WASHER
LIMITED
WARRANTY
IS REQUIRED TO OBTAIN WARRANTY SERVICE.
Please have the following information available when
you call the Customer Service Centre:
■ Name, address and telephone number
■ Model number and serial number
■ A clear, detailed description of the problem
■ Proof of purchase including dealer or retailer
name and address, and date of purchase
IF YOU NEED SERVICE:
1. Before contacting us to arrange service, please determine whether your product requires
repair. Some questions can be addressed without service. Please take a few minutes to review
the Troubleshooting section of the User Manual, or email customerserviceusa@midea.com
2. All warranty service is provided exclusively by our authorized Midea Service Providers, in the
U.S. and Canada.
Midea Customer Service
In the U.S.A. or Canada, call 1-866-646-4332 or email customerserviceusa@midea.com.
If outside the 50 States of the United States or Canada, contact your authorized Midea dealer to
determine whether another warranty applies.
LIMITED WARRANTY
WHAT IS COVERED
FIRST YEAR LIMITED WARRANTY (PARTS AND LABOUR)
For one year from the date of purchase, if this major appliance is installed, operated and
maintained according to instructions attached to or furnished with the product, Midea America
(Canada) Corp. (hereafter “Midea”) will pay for factory specified replacement parts and repair
labour to correct defects in materials or workmanship that existed when this major appliance was
purchased, or at its sole discretion replace the product. In the event of product replacement, your
appliance will be warranted for the remaining term of the original unit’s warranty period.
TEN YEAR WARRANTY INVERTER MOTOR ONLY - LABOUR NOT INCLUDED
In the second through tenth years from the date of original purchase, when this major appliance is
installed, operated and maintained according to instructions attached to or furnished with the
product, Midea will pay for factory parts to replace the inverter motor if it fails and prevent an
essential function of this major appliance and that existed when this major appliance was purchased.
This is a 10 -year warranty on the parts only and does not include repair labour.
LIFETIME LIMITED WARRANTY (STAINLESS STEEL TUB)
For the lifetime of the product from the date of original purchase, when this major appliance is
installed, operated and maintained according to instructions attached to or furnished with the
product, Midea will pay for factory specified parts and repair labour for the fo
to correct non-cosmetic defects in materials or workmanship that existed when this major
appliance was purchased:
■ Stainless steel tub
YOUR SOLE AND EXCLUSIVE REMEDY UNDER THIS LIMITED WARRANTY SHALL BE PRODUCT
REPAIR OR REPLACEMENT AS PROVIDED HEREIN. Service must be provided by a Midea
designated service company. This limited warranty is valid only in the 50 States of the United
States or Canada and applies only when the major appliance is used in the country in which it
was purchased. This limited warranty is effective from the date of original consumer purchase.
Proof of original purchase date is required to obtain service under this limited warranty.
llowing components
42

LIMITED WARRANTY
WHAT IS NOT COVERED
1. Commercial, non-residential or multiple-family use, or use inconsistent with published user,
operator or installation instructions.
2. In-home Instruction on how to use your product.
3. Service to correct improper product maintenance or installation, installation not in accordance
with electrical or plumbing codes or correction of household electrical or plumbing (i.e. house
wiring, fuses, plumbing or water inlet hoses).
4. Consumable parts (i.e. light bulbs, batteries, air or water filters, etc.).
5. Defects or damage caused by the use of non-genuine Midea parts or accessories.
6. Damage from accident, misuse, abuse, fire, floods, electrical issues, acts of God or use with
products not approved by Midea.
7. Repairs to parts or systems to correct product damage or defects caused by unauthorized
service, alt
eration or modification of the appliance.
8. Cosmetic damage including scratches, dents, chips, and other damage to appliance finishes
unless such damage results from defects in materials and workmanship and is reported to
Midea within 30 days.
9. Routine maintenance of the product.
10. Products that were purchased “as is” or as refurbished products.
11. Products that have been transferred from its original owner.
12. Discoloration, rust or oxidation of surfaces resulting from caustic or corrosive environments
including but not limited to high salt concentrations, high moisture or humidity or exposure to
chemicals.
13. Pick-up or delivery. This product is intended for in-home repair.
14. Travel or transportation expenses for service in remote locations where an authorized Midea
servicer is not available.
oval or reinstallation of inaccessible appliances or built-in fixtures (i.e. trim, decorative
15. Rem
panels, flooring, cabinetry, islands, countertops, drywall, etc.) that interfere with servicing,
removal or replacement of the product.
16. Service or parts for appliances with original model/serial numbers removed, altered or not
easily identified.
The cost of repair or replacement under these excluded circumstances shall be borne by the
customer.
DISCLAIMER OF IMPLIED WARRANTIES
IMPLIED WARRANTIES, INCLUDING ANY IMPLIED WARRANTY OF MERCHANTABILITY OR
IMPLIED WARRANTY OF FITNESS FOR A PARTICULAR PURPOSE, ARE LIMITED TO ONE
YEAR OR THE SHORTEST PERIOD ALLOWED BY LAW. Some states and provinces do not allow
limitations on the duration of implied warranties of merchantability or fitness, so this limitation
may not apply to you. This warranty gives you specific legal rights, and you also may have other
rights that vary from state to st
ate or province to province.
DISCLAIMER OF REPRESENTATIONS OUTSIDE OF WARRANTY
Midea makes no representations about the quality, durability, or need for service or repair of this
major appliance other than the representations contained in this warranty. If you want a longer
or more comprehensive warranty than the limited warranty that comes with this major appliance,
you should ask Midea or your retailer about buying an extended warranty.
LIMITATION OF REMEDIES; EXCLUSION OF INCIDENTAL AND CONSEQUENTIAL DAMAGES
YOUR SOLE AND EXCLUSIVE REMEDY UNDER THIS LIMITED WARRANTY SHALL BE
PRODUCT REPAIR AS PROVIDED HEREIN. MIDEA SHALL NOT BE LIABLE FOR INCIDENTAL OR
CONSEQUENTIAL DAMAGES. Some states and provinces do not allow the exclusion or limitation
of incidental or consequential damages, so these limitations and exclusions may not apply to you.
This warranty gives you specific legal rights, and you also may have other rights that vary from
state to sta
te or province to province.
43

REGISTRATION INFORMATION
PROTECT YOUR PRODUCT:
We will keep the model number and date of purchase of your new Midea product
on file to help you refer to this information in the event of an insurance claim such
as fire or theft.
Register online at
www.midea.com/ca/support/Product-registration
OR
Please fill out and return it to the following address:
Midea America Corp. 759 Bloomfield Ave #386, West Caldwell, NJ 07006-6701
----------------------------------------------- (detach here) ----------------------------------------------
Name: Model#:
Serial #:
Address: Date Purchased: Store / Dealer Name:
City:
Province: Postal Code: E-mail Address:
Phone Number:
Did you purchase an additional warranty: As your Primary Residence? (Y/N)
How did you learn about this product:
❑ Advertising
❑ In Store Demo
❑ Personal Demo
Information collected or submitted to us is only available to company internal employees for
purposes of contacting you or sending you emails, based on your request for information and to
company service providers for purposes of providing services relating to our communications with
you. All data will not be shared with other organizations for commercial purposes.
Midea America (Canada) Corp.
Markham, ON, Canada L3R 8V2
Customer Service 1-866-646-4332 Made in China
44

Laveuse-sécheuse
tout-en-un
Alimentation en électricité :
120V
Fréquence : 60 Hz
fr
Manuel du propriétaire &
Instructions d’installation
Avertissement :
Avant d’utiliser ce produit,
veuillez lire le présent guide avec
soin et le conserver aux fins de
consultation ultérieure. Le
concept et les spécifications
peuvent changer sans préavis à
titre d’amélioration de produit.
Consultez votre concessionnaire
ou fabricant pour obtenir des
précisions.
version A
NUMÉROS DE MODÈLE
MLC31N5AWW
www.midea.com/ca

Aux utilisateurs
MERCI et FÉLICITATIONS de votre achat de ce produit Midea
de première qualité. Votre laveuse-sécheuse tout-en-un Midea est
conçue pour des performances fiables et sans problèmes. Veuillez
prendre quelques instants pour enregistrer votre nouveau laveusesécheuse tout-en-un.
Enregistrez votre nouveau laveuse-sécheuse tout-en-un sur
www.midea.com/ca/support/Product-registration
En vue d’une consultation ultérieure, consignez les numéros de
modèle et de série de votre produit qui se trouvent sur le cadre
intérieur de la machine.
Numéro de modèle ______________________________________
Numéro de série _________________________________________
INSTRUCTIONS DE SÉCURITÉ ....................................................... 4
CARACTÉRISTIQUES .......................................................................
Contenu du colis ..................................................................................... 9
Principaux composants ........................................................................10
EXIGENCES OPÉRATIONNELLES .................................................. 11
Exigences électriques
......................................................................... 11
Exigences en matière d’eau ................................................................12
Exigences en matière de drainage ...................................................12
INSTRUCTIONS D’INSTALLATION
................................................13
Déballage de votre laveuse ................................................................13
Choisir un emplacement .....................................................................14
Outils dont vous aurez besoin .......................................................... 18
Raccorder les boyaux d’eau ..............................................................
18
Brancher le tuyau de vidange ..........................................................20
Mettez votre laveuse au niveau ......................................................22
Mise sous tension ..................................................................................23
Exécuter un cycle d’essai ..................................................................24
DIRECTIVES D’UTILISATION ........................................................ 25
Panneau de commande ...................................................................... 25
Lavage d’une brassée de lessive...................................................... 27
Réglage du verrouillage parental .................................................... 31
Options et réglages de la laveuse ................................................... 32
9

ENTRETIEN ET NETTOYAGE .........................................................33
Nettoyage et entretien ......................................................................... 33
AVANT DE FAIRE APPEL AU SERVICE ...................................... 39
Codes d’erreur .......................................................................................41
GARANTIE .....................................................................................
ENREGISTREMENT DU PRODUIT ................................................
42
44
LIRE ET CONSERVER CES INSTRUCTIONS POUR
CONSULTATION ULTÉRIEURE
Ce manuel contient des renseignements importants sur l’installation,
l’utilisation et la prise en charge de votre appareil. Veuillez lire ce manuel
attentivement avant l’installation et le fonctionnement de cette machine
pour éviter les blessures et les dommages matériels.
Les avertissements et les consignes de sécurité importantes dans ce
manuel NE COUVRENT PAS toutes les conditions et situations possibles
qui peuvent survenir. Il vous incombe d’utiliser un bon sens, une attention
et des soins lorsque vous installez, maintenez et utilisez votre sécheuse.
MISE EN GARDE
RISQUE DE CHOC ÉLECTRIQUE
NE PAS OUVRIR
Instructions
de sécurité
Caractéristiques
Fonctionnement
Exigences
d’installation
Instructions
d’utilisation
Directives
Entretien et
nettoyage
Dépannage
3

INSTRUCTIONS DE SÉCURITÉ
VOTRE SÉCURITÉ ET LA SÉCURITÉ DES AUTRES SONT TRÈS
IMPORTANTES
Instructions
de sécurité
Caractéristiques
Exigences
d’installation
Pour éviter toute blessure à l’utilisateur ou à d’autres personnes et
dommages matériels, les instructions présentées ici doivent être suivies.
Une mauvaise utilisation en raison d’une omission des instructions peut
causer des dommages ou des dommages, y compris la mort.
Le niveau de risque est indiqué par les indications suivantes.
AVERTISSEMENT
Fonctionnement
MISE EN GARDE
Instructions
AVERTISSEMENT
Cela indique que les dangers ou les pratiques dangereuses
peuvent causer des blessures graves ou la mort.
Pour réduire le risque d’incendie, d’explosion, de choc
électrique ou de blessure personnelle lors de l’utilisation de
votre laveuse, vous DEVEZ suivre ces consignes de sécurité
de base.
Cela indique que les dangers ou les pratiques dangereuses
peuvent causer des blessures corporelles mineures ou des
dommages matériels.
Ce symbole indique qu’il existe des instructions d’utilisation
et d’entretien importantes dans l’odyature accompagnant
votre laveuse.
d’utilisation
Directives
Entretien et
nettoyage
Dépannage
4
AVERTISSEMENT
Ne pas entreposer ou utiliser de l’essence ou d’autres vapeurs et liquides
inflammables dans les environs de ce ou de tout autre appareil.
AVERTISSEMENT
Précautions d’utilisation de base
Afin de réduire les risques d'incendie, d'électrocution ou de
blessures lors de l'utilisation de l'appareil, des précautions élémentaires
doivent être prises :
•
Il est impératif de lire toutes les instructions avant d’utiliser cet appareil
électroménager.
Ne pas laver des articles qui ont été antérieurement nettoyés, lavés,
•
trempés ou tachés avec de l'essence, des solvants de nettoyage à sec ou
d'autres matières inflammables ou explosives, car elles émettent de la
vapeur susceptible de s'enflammer ou d'exploser.
Ne pas ajouter de l’essence, de solvants de nettoyage à sec ou toute
•
autre substance inflammable ou explosive à l'eau de la lessive. De telles
substances émettent des vapeurs qui peuvent s’enflammer ou exploser.
Ne jamais arrêter une sécheuse avant la fin du cycle, et attendre que la
•
chaleur soit dissipée.
Utiliser seulement des conducteurs en cuivre.
•
Pour réduire les risques de choc électrique ou d'incendie, ne pas utiliser
•
un cordon d'alimentation souple avec cet appareil.

Toujours débrancher la laveuse de l'alimentation avant tout entretien.
•
Déconnecter le câble d'alimentation en tirant sur la fiche, pas le câble.
Afin de réduire les risques d'incendie, les vêtements, chiffons de
•
nettoyage, têtes de balai à franges et autres articles similaires
contenant des traces de substances inflammables, telles que de l'huile
végétale, de l'huile de cuisine, des huiles ou distillats à base de pétrole,
des cires, des graisses, etc. ne doivent pas être mis dans la laveuse.
Ces articles peuvent contenir des substances inflammables qui, même
après avoir été lavées, peuvent fumer ou prendre feu.
Ne jamais placer dans la laveuse des objets qui ont été humidifiés
•
avec de l'essence ou toute autre substance combustible ou explosive.
Ne pas laver ou sécher tout ce qui a été trempé ou taché par un type
d'huile (y compris les huiles de cuisson). Cela peut provoquer un
incendie ou une explosion, voire la mort.
Ne pas autoriser les enfants à jouer sur ou à l'intérieur de cet appareil.
•
Lorsque l'appareil est utilisé à proximité des enfants, ces derniers
doivent être surveillés avec attention.
La porte en verre ou de protection peut être très chaude pendant le
•
fonctionnement. Conserver les enfants et les animaux domestiques à
l'écart de la machine pendant son fonctionnement.
Cet appareil n'est pas conçu pour être utilisé par des personnes (y
•
compris des enfants) à capacités physiques, sensorielles ou
intellectuelles réduites ou sans expérience et connaissances, à moins
qu'elles ne soient sous surveillance ou qu'elles aient été informées
quant à l'utilisation de l'appareil, par une personne responsable de
leur sécurité.
Ne pas laver en machine les matériaux en fibre de verre (tels que les
•
rideaux et les couvre-fenêtres qui utilisent des matériaux en fibre de
verre). De petites particules peuvent rester dans la laveuse et se coller
aux tissus lors des lavages suivants, provoquant une irritation de la peau.
Avant la mise hors service de cet appareil ou de sa mise au rebut,
•
retirer la porte et couper le câble d'alimentation.
Ne pas accéder à l'intérieur de l'appareil si la cuve ou l'agitateur est
•
toujours en mouvement.
Ne jamais installer ni entreposer cet appareil dans un endroit exposé
•
aux intempéries.
Ne pas modifier les commandes de l'appareil.
•
Ne pas réparer ou remplacer un quelconque élément de l’appareil ou
•
tenter de le réparer si ce n’est pas spécifiquement recommandé dans
les instructions d’entretien par l’utilisateur ou dans un manuel publié
sur les réparations qui peuvent être effectuées par un utilisateur, si
celui-ci est en mesure de les effectuer.
Vérifier que toutes les poches sont vides. Les objets tranchants et
•
rigides tels que les pièces de monnaie, les broches, les clous, les vis ou
les pierres, etc. peuvent causer de graves dommages à cet appareil.
Retirer la fiche et couper l'alimentation en eau après l'opération.
•
S'assurer que l'eau à l'intérieur de la cuve a été vidée avant d'ouvrir
•
la porte. Ne pas ouvrir la porte si de l'eau est encore visible.
L'utilisateur ne doit pas tenter de réparer la machine lui-même. La
•
machine peut être endommagée ou des réparations plus difficiles
Instructions
de sécurité
Caractéristiques
Fonctionnement
Exigences
d’installation
Instructions
d’utilisation
Directives
Entretien et
nettoyage
Dépannage
5

Instructions
de sécurité
•
•
Caractéristiques
•
•
Fonctionnement
Exigences
•
•
•
d’installation
Instructions
•
d’utilisation
Directives
peuvent être nécessaires et même une opération dangereuse peut
avoir lieu si elle est réparée par un personnel inexpérimenté ou non
qualifié.
Si la prise du câble d'alimentation a été endommagée, elle doit être
remplacée par le fabricant, son service d'assistance technique ou du
personnel qualifié afin d'éviter tout danger.
Veiller à ce que la tension et la fréquence du courant soient
identiques à celles de la laveuse.
Ne pas utiliser de prise d'alimentation dont le courant nominal est
inférieur à celui de la laveuse. Ne pas tirer la prise du câble
d'alimentation avec des mains humides.
Pour assurer plus de sécurité, la fiche du câble d'alimentation doit
être insérée dans une prise tripolaire mise à la terre. Vérifier
soigneusement et s'assurer que la prise de courant est correctement
mise à la terre en toute sécurité.
Cette laveuse ne doit être réparée et entretenue que par des
techniciens qualifiés.
Si elle est connectée à un circuit protégé par des fusibles, utiliser
des fusibles à retardement avec cet appareil.
Pour réduire les risques de choc électrique, déconnecter cet appareil
avant de procéder à tout entretien autre que le nettoyage du filtre à
charpie. Placer les commandes à la position ARRÊT ne coupe pas
l'alimentation.
Certaines pièces internes ne sont pas mises à la terre
intentionnellement et peuvent présenter un risque de choc électrique
pendant l'entretien seulement. Personnel d'entretien: Ne pas toucher
les pièces suivantes lorsque l'appareil est sous tension: valeur
électrique, pompe de vidange, serrure de porte, moteur de ventilateur
(combo).
Entretien et
nettoyage
Dépannage
6
AVERTISSEMENT
Mise à la terre
Cet appareil doit être mis à la terre. En cas de mauvais fonctionnement
•
ou de défaillance, la mise à la terre réduit le risque de choc électrique
en fournissant un circuit de faible résistance au courant électrique. Cet
électroménager est muni d’un câble électrique comportant un fil et
une prise de mise à la terre. La prise doit être branchée sur une prise
secteur appropriée, correctement installée et mise à la terre
conformément aux dispositions et aux réglementations en vigueur.
Une connexion incorrecte du connecteur de mise à la terre de
•
l'équipement peut être source de choc électrique. Se connecte à un
circuit de dérivation individuel. Demander conseil à un électricien ou
un réparateur agréé en cas de doutes quant à la mise à la terre
correcte de la machine.
NE PAS modifier la fiche fournie avec l'appareil si elle ne s'adapte
•
pas à la prise secteur. Si elle ne rentre pas dans la prise secteur,
contacter un électricien qualifié pour installer une prise adéquate.

Risque de choc électrique, appareil mis à la terre au conducteur
•
neutre par un lien. La mise à la terre par le conducteur neutre est
interdite dans le cas 1) de nouvelles dérivations, 2) de maisons mobiles,
et 3) de véhicules de camping, et 4) là où les codes locaux interdisent
la mise à la terre par le conducteur neutre.
Si la mise à la terre par le conducteur neutre est interdite
1) débrancher le lien avec le neutre, 2) utiliser la borne de mise à la
terre ou le conducteur de raccordement pour mettre l'appareil à la
terre et 3) raccorder la borne neutre ou le conducteur de
raccordement au neutre de la dérivation de la façon habituelle
(si l'appareil doit être branché au moyen d'un cordon amovible,
utiliser un conducteur quadrifilaire).
Si la mise à la terre par le conducteur neutre est interdite, remplacer
le conducteur ou le câble trifilaire par un conducteur ou câble
quadrifilaire. Voir les instructions du fabricant.
AVERTISSEMENT
Pour prévenir les risques d'incendie, ne pas utiliser de chaleur pour le
séchage des articles contenant du caoutchouc mousse ou d'autres
matériaux similaires texturés caoutchouteux.
AVERTISSEMENT
Avant toute utilisation de la machine
Les matériaux d'emballage peuvent être dangereux pour les enfants.
•
Conserver tous les matériaux d'emballage (sacs en plastique, mousses,
etc.) hors de la portée des enfants.
La laveuse ne doit pas être installée dans une salle de bain ou dans des
•
pièces très humides ainsi que dans des pièces où se trouvent des gaz
explosifs ou caustiques.
S'assurer que l'eau et les appareils électriques sont raccordés par un
•
technicien qualifié conformément aux instructions du fabricant et aux
règles de sécurité locales.
Avant de faire fonctionner cette machine, tous les emballages et
•
boulons de transport doivent être retirés. Dans le cas contraire, la
laveuse peut être sérieusement endommagée pendant le lavage du
linge.
Avant le premier lavage, la laveuse doit fonctionner selon les
•
procédures de coton et d'eau chaude sans les vêtements à l'intérieur.
Pour utilisation intérieure uniquement.
•
Instructions
de sécurité
Caractéristiques
Fonctionnement
Exigences
d’installation
Instructions
d’utilisation
Directives
Entretien et
nettoyage
Dépannage
7

Une attention particulière doit être utilisée pour la protection de la
machine
Instructions
de sécurité
Caractéristiques
•
•
•
Précautions à prendre lors de la manipulation de l'appareil
• Les boulons de transport doivent être réinstallés sur la machine par
Fonctionnement
Exigences
•
•
•
AVERTISSEMENT
Ne pas monter ni s'asseoir sur le dessus de l'appareil.
Ne pas s'appuyer contre la porte de la machine.
Ne pas fermer la porte avec des forces excessives. S'il s'avère difficile
de fermer la porte, vérifier si les vêtements en trop sont bien rangés
ou distribués.
AVERTISSEMENT
une personne spécialisée.
L'eau accumulée doit être évacuée de la machine.
Manipuler la machine avec précaution. Ne jamais tenir les parties
saillantes sur la machine pendant le levage.
La porte de la machine ne peut pas être utilisée comme poignée
pendant le transport.
d’installation
Instructions
d’utilisation
Directives
Entretien et
nettoyage
Dépannage
8
AVERTISSEMENT
Précautions lors du lavage des vêtements
•
L'eau froide de la ville doit être utilisée et l'eau chaude peut également
être raccordée selon les règles locales.
Cette laveuse est uniquement destinée à un usage domestique et
•
n'est conçue que pour les textiles qui se prêtent au lavage en machine.
Les solvants inflammables et explosifs ou toxiques sont interdits.
•
L'essence et l'alcool, etc. ne doivent pas être utilisés comme
détergents. Ne sélectionner que les détergents adaptés au lavage en
machine, en particulier pour le chargement frontal.
Ne pas laver les tapis dans cette machine.
•
Ne jamais remplir l'eau à la main pendant le lavage.
•
Toujours observer les instructions d'entretien du fabricant de vêtements.
•
•
Ne pas utiliser la laveuse si son câble d'alimentation ou sa prise ont été
endommagés. Contacter un réparateur agréé.
Ne pas faire fonctionner la laveuse si les protections, panneaux ou
•
fixations, à l'exception des boulons de fixation pour le transport, ont
été enlevés. Vérifier régulièrement les raccords des tuyaux de
remplissage pour s'assurer qu'ils sont bien serrés et qu'ils ne fuient pas.
Ne pas faire fonctionner la laveuse si des pièces sont manquantes ou
•
cassées.
Ne pas toucher la porte en cas de lavage à haute température.
•
REMARQUES :
Les CONSIGNES DE SÉCURITÉ IMPORTANTES décrites dans ce manuel
•
ne sont pas exhaustives. Il faut faire preuve de bon sens, de prudence
et d'attention lors de l'installation, de l'entretien ou du fonctionnement
de la laveuse.
Toujours contacter le concessionnaire, le distributeur, l'agent de
•
service ou le fabricant pour tout problème ou condition qui n'est pas
comprise.

Support de
tuyau (1)

Composants principaux
Panneau avant
Instructions
de sécurité
Compartiment pour
Caractéristiques
Fonctionnement
Exigences
détergent
Porte
Panneau de
commandes
d’installation
Instructions
d’utilisation
Directives
Entretien et
nettoyage
Dépannage
Ouverture du
filtre
Panneau arrière
Entrées de
l'alimentation en eau
Tuyau d e
vidange
Prise d’alimentation
10

EXIGENCES OPÉRATIONNELLES
Exigences électriques
AVERTISSEMENT
Pour réduire le risque d’incendie, de choc électrique ou de blessure aux
personnes, lire les CONSIGNES DE SÉCURITÉ IMPORTANTES avant
d’utiliser cet appareil.
AVERTISSEMENT
Connecter à une prise secteur à 3 plots avec un circuit individuel de
•
12 A protégé par un disjoncteur de 12 A.
Se connecte à un circuit de dérivation individuel.
•
Ne pas retirer le plot de mise à la terre.
•
Ne pas utiliser d'adaptateur.
•
L'inobservation de ces instructions peut être source de choc électrique,
d'incendie ou de blessures mortelles.
Une mise à la terre du circuit électrique est requise pour cette laveuse.
Il est important de mettre à la terre la laveuse. En cas de mauvais
•
fonctionnement ou de défaillance, la mise à la terre réduit le risque de
choc électrique en fournissant un circuit de faible résistance au
courant électrique.
Une alimentation électrique de 120 V, 60 Hz, c.a. uniquement, de 15 à
•
20 A avec fusible est requise. Il est recommandé d'utiliser un fusible à
fusion temporisée ou de fournir un circuit réservé uniquement à la
laveuse.
La laveuse est équipé d'un câble d'alimentation doté d'une prise de
•
terre à 3 plots. Pour minimiser les risques d'électrocution, le câble doit
être branché sur une prise à trois plots, mise à la terre conformément
aux codes et ordonnances locaux. Si une prise secteur à 3 plots n'est
pas disponible, contacter un électricien qualifié pour en installer une.
Ne pas utiliser d'adaptateur.
Si les codes le permettent et en cas d'utilisation d'un câble mis à la
•
terre séparé, il est recommandé qu'un électricien qualifié détermine
que le chemin de terre est adéquat.
Vérifier avec un technicien qualifié en cas de doute sur la mise à la
•
terre correcte de la laveuse.
•
Absence de fusible sur le circuit neutre ou mis à la terre.
Certaines pièces internes ne sont pas mises à la terre volontairement
•
et peuvent présenter un risque de choc électrique pendant l'entretien.
Au cours de l'entretien ne pas entrer en contact avec les pièces
ci-après pendant que appareil est alimenté : vanne électrique, pompe
de vidange ou fermeture de porte.
Instructions
de sécurité
Caractéristiques
Fonctionnement
Exigences
d’installation
Instructions
d’utilisation
Directives
Entretien et
nettoyage
Dépannage
11

Instructions
de sécurité
AVERTISSEMENT
L'utilisateur a la responsabilité de fournir des facilités électriques
•
adéquates pour sa laveuse.
Ne jamais connecter le fil de masse aux conduites d'eau en plastique
•
ou à des tuyaux d'eau chaude.
Caractéristiques
Exigences
Besoins en eau
Pour remplir correctement la laveuse dans des délais appropriés, une
pression d'eau de 0,05 MPa à 1 MPa est requise.
Si la pression d'eau est inférieure à 0,05 MPa :
Fonctionnement
•
•
d’installation
Instructions
d’utilisation
Directives
•
Comment éviter le problème de dégât des eaux :
•
•
•
Entretien et
nettoyage
Dépannage
Exigences en matière de vidange
La hauteur recommandée pour le tuyau d'évacuation est de 122 cm (48 po).
Le tuyau de vidange doit être acheminé à travers le collier prévu à cet
effet jusqu'au tuyau d'évacuation.
Le tuyau de vidange doit être suffisamment large pour accommoder le
diamètre extérieur du tuyau de vidange.
Le robinet d'eau peut être défaillant ou ne pas se fermer complètement.
Le temps de remplissage de la laveuse peut être plus long que les
commandes de la laveuse ne le permettent. La laveuse s'éteindra et
affichera une erreur. Un délai maximal est intégré aux commandes pour
éviter l'inondation du domicile si un tuyau se desserre.
Les tuyaux d'admission d'eau doivent être achetés séparément. Les
tuyaux d'admission d'eau peuvent être achetés de différentes longueur
jusqu'à 240 cm (8 pi).
Vérifier que les robinets d'eau sont facilement accessibles.
Fermer les robinets quand la laveuse n'est pas utilisée.
Vérifier régulièrement l'absence de fuite au niveau des joints du tuyau
d'eau.
12

INSTRUCTIONS D’INSTALLATION
Déballage de votre laveuse
AVERTISSEMENT
•
Les matériaux d'emballage peuvent être dangereux pour les enfants.
Conserver tous les matériaux d'emballage (sacs en plastique,
polystyrène, etc.) hors de la portée des enfants. Se référer aux
réglementations locales pour la mise au rebut.
•
• Ne pas utiliser cette laveuse sur une base en mousse. Cela pourrait
être source de vibrations et endommager l'appareil ou provoquer
des blessures.
ATTENTION
La laveuse est lourde. De l'aide peut être nécessaire pour la déballer
•
ou la déplacer.
1
Retirer la laveuse de l'emballage.
2
Vérifier que le petit morceau de mousse triangulaire se détache avec
le fond de l'emballage. Si ce n'est pas le cas, étendre la laveuse sur le
côté, retirer la mousse, puis remettre la laveuse à la verticale.
Instructions
de sécurité
Caractéristiques
Fonctionnement
Exigences
d’installation
Instructions
d’utilisation
Directives
Triangular foam
3
Retirer les quatre boulons de transport à l'arrière de la laveuse.
ATTENTION
Si les quatre boulons ne sont pas retirés, la laveuse fera beaucoup de
bruit et vibrera excessivement ou se déplacera. Cela pourrait
endommager la laveuse.
Entretien et
nettoyage
Dépannage
13

Instructions
de sécurité
Caractéristiques
4
Fonctionnement
Exigences
d’installation
Instructions
d’utilisation
Directives
Choisir un emplacement
Boulon de
transport
Recouvrir les orifices avec les caches des orifices pour le transport.
Conserver les quatre boulons pour utilisation ultérieure. Il sont
nécessaires pour transporter la laveuse vers un autre endroit.
Caches des orifices
pour le transport
Entretien et
nettoyage
Dépannage
14
AVERTISSEMENT
•
Ne pas installer la laveuse dans des emplacements ou l'eau peut geler,
car la laveuse retient toujours une petite quantité d'eau dans le robinet
de prise d'eau, la pompe et la tuyauterie. L'eau gelée peut endommager
les courroies, la pompe, les tuyaux et autres composants.
Ne jamais l'installer sur une plateforme ou une structure à faible support.
•
Le choix du bon emplacement pour la laveuse améliore les performances
et minimise le bruit et le « déplacement » éventuel de la laveuse. La laveuse
peut être installée sous un comptoir aménagé ou dans un sous-sol, une
buanderie, un placard ou une zone encastrée. Voir Exigences en matière de
vidange à la page 12. Il faut également tenir compte des exigences relatives
à l'emplacement d'un appareil associé (sécheuse).
Pour des performances optimales, sont nécessaires :
un chauffe-eau pour fournir de l'eau à 49 °C (120 °F) à la laveuse.
•

une prise électrique avec mise à la terre, située à environ 1,8 m (6 pi)
•
de l'endroit où le câble d'alimentation est fixé au dos de la laveuse.
Voir Exigences électriques à la page 11.
Des robinets d'eau chaude et froide situés à moins de 1,2 m (4 pi) des
•
vannes de remplissage d'eau chaude et froide, et une pression d'eau
comprise entre 0,05 MPa à 1 MPa.
Un sol plat avec une dénivellation maximale de 25 mm (1 po) sous la
•
laveuse. Ne pas installer la laveuse sur des sols à surface souple, tels
que des tapis ou des surfaces avec un support en mousse.
Un plancher robuste et solide pour supporter la laveuse avec un poids
•
total (eau et charge) de 90 kg (200 lb).
Vérifier que l'emplacement est :
À l'écart de la lumière solaire directe. La lumière directe du soleil peut
•
augmenter la température de l'eau, ce qui peut entraîner des risques
pour la sécurité.
Un emplacement où la température est supérieure à 0 °C (32 °F).
•
À l'écart de sources de chaleur telles que du charbon du gaz. Les
•
sources de chaleur peuvent augmenter la température de l'eau, ce qui
peut entraîner des risques pour la sécurité.
Dimensions et mesures clés pour l'installation de la laveuse
Instructions
de sécurité
Caractéristiques
Fonctionnement
Exigences
d’installation
Instructions
42.5 po (108 cm)
25,6 po (65 cm)
23.5 po (59,5 cm)
33,5 po (85 cm)
d’utilisation
Directives
Entretien et
nettoyage
Dépannage
15

Installation sous un comptoir
Instructions
de sécurité
Caractéristiques
Fonctionnement
Exigences
2 po (5 cm)
33,5 po (85 cm)
d’installation
Instructions
d’utilisation
Directives
Entretien et
nettoyage
Dépannage
1 po (2,5 cm) 1 po (2,5 cm)
23,5 po (59,5 cm)
Installation dans un compartiment ou une armoire
Si la laveuse est installée dans un compartiment ou une armoire, le devant
de l'armoire doit disposer de deux ouvertures de ventilation non obstruées,
soit une zone combinée minimale de 465 cm
2
(72 po2) avec un espace
minimum de 7,6 mm (3 po) pour la partie supérieure et inférieure. Une
porte à lattes avec un espace libre équivalent est acceptable.
3 po
(7,6 cm )
2
48 po
24 po
2
2
2
3 po
(7,6 cm )
(310 cm )
(155 cm )
16

L'espace libre minimum entre la laveuse et les murs adjacents ou d'autres
surfaces sont :
De chaque côté : 1 po (2,5 cm)
•
À l'arrière : 6 po (15,2 cm)
•
Devant de l'armoire : 2 po (5,1 cm)
•
Dessus : 2 po (5,1 cm)
•
Si la laveuse et le séchoir sont installés côte à côte dans une armoire, le
devant de l'armoire doit disposer d'une ouverture de ventilation non
obstruée d'environ 72 po
2 po (5 cm )
2
(465 cm2).
Instructions
de sécurité
Caractéristiques
Fonctionnement
Exigences
d’installation
Instructions
1 po
(2,5 cm )
23,5 po
(59,5 cm )
1 po
(2,5 cm )
2 po
(5,1 cm )
25,6 po
(65 cm )
(15,2 cm )
AVERTISSEMENT
Avant d'installer la laveuse s'assurer que l'emplacement :
Est sur une surface dure et plane sans moquette ni revêtement de sol
•
souple, ce qui pourrait obstruer la ventilation.
Est à l'écart de la lumière solaire directe
•
A une ventilation adéquate.
•
N'est pas exposée à des températures glaciales (en dessous de 0 °C
•
ou 32 °F).
Est à l'écart de sources de chaleur telles que de l'essence ou du gaz.
•
Dispose de suffisamment d'espace afin que la laveuse ne repose pas
•
sur son câble d'alimentation.
6 po
d’utilisation
Directives
Entretien et
nettoyage
Dépannage
17

Installation de votre laveuse
Instructions
de sécurité
Clé à douille de 9,5 mm
Caractéristiques
(3/8 po)
Niveau
Clé à cliquet du type à bague de
11,1 mm (7/16 po)
Fonctionnement
Exigences
Connecter les tuyaux d'eau
d’installation
Instructions
d’utilisation
Directives
1.
2. Serrer le tuyau et les raccords au robinet à la main jusqu'à ce qu'ils soient
Entretien et
nettoyage
Dépannage
Pince Tournevis à douille
avec cliquet
Clé à molette ou clé à douille
de 13 mm (9/16 po)
ATTENTION
Utiliser des tuyaux d'alimentation en eau neufs. L'utilisation de vieux
•
tuyaux peut être source de fuites ou de débordement ce qui peut
endommager la propriété.
Ne pas connecter plusieurs tuyaux d'alimentation en eau ensemble
•
pour augmenter la longueur du tuyau. Des tuyaux connectés de cette
façon peuvent fuir et être source de choc électrique. Si le tuyau est
trop court, le remplacer par un plus long à haute pression.
Connecter le tuyau d'alimentation en eau aux robinets d'eau chaude et
d'eau froide.
serrés à fond. Puis les serrer de deux tiers de tours supplémentaires avec
des pinces ou une clé hexagonale. Tirer les tuyaux d'eau vers le bas pour
vérifier qu'ils sont correctement connectés.
18
Tuyau d'alimentation en eau
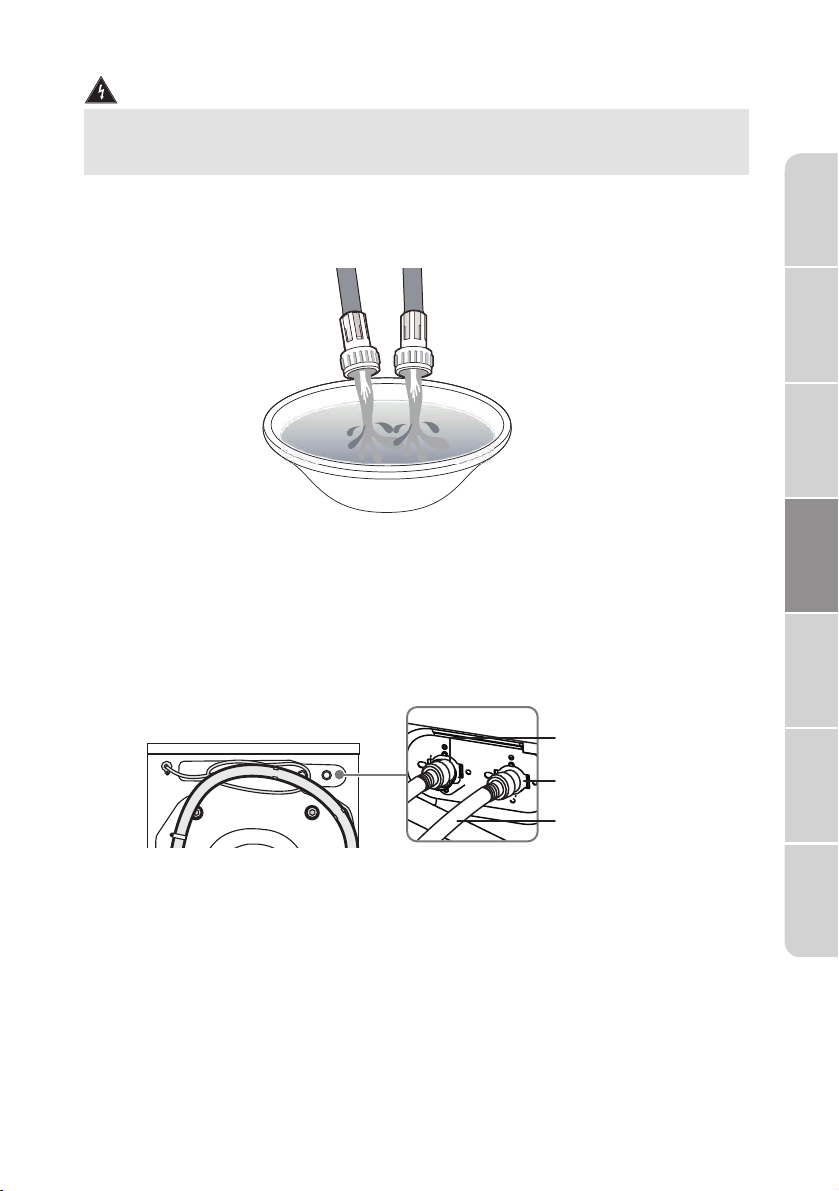
ATTENTION
Ne pas trop serrer les raccords ou mettre une bande adhésive ou du
mastic sur les robinets ou les prises d'alimentation en eau. Cela pourrait
endommager les raccords.
3. Placer les extrémités non connectées des tuyaux dans un seau et ouvrir
les robinets connectés aux tuyaux d'eau pendant 10 à 15 secondes pour
éliminer les dépôts éventuels. Fermer les robinets.
4. Connecter les extrémités des tuyaux d'eau aux connexions de la prise
d'eau au dos de la laveuse. Le tuyau d'alimentation en eau connecté
au robinet d'eau chaude doit être connecté à l'admission d'eau
chaude et le tuyau d'eau connecté au tuyau d'eau froide doit être
connecté à l'admission d'eau froide.
Instructions
de sécurité
Caractéristiques
Fonctionnement
Exigences
d’installation
Instructions
d’utilisation
Directives
Arrière de la laveuse
Alimentation en
eau chaude
Alimentation en
eau froide
Tuyaux d'alimentation
en eau
REMARQUES :
Si le robinet d'eau chaude n'est pas utilisé ou il n'en existe pas, il faut
•
régler le paramètre Temp. sur froid, sinon la laveuse aura un code
d'erreur E10.
S'il n'existe qu'un robinet d'eau froide, il est recommandé d'acheter
•
et d'installer un tuyau en T.
Entretien et
nettoyage
Dépannage
19

5. Serrer les raccords à fond à la main, puis les serrer de deux tiers de
Instructions
de sécurité
•
•
Caractéristiques
6. Ouvrir les robinets d'eau froide et d'eau chaude et vérifier l'absence de
Fonctionnement
Exigences
Brancher le tuyau de vidange
•
d’installation
Instructions
Connecter le tuyau de vidange selon l'une des possibilités ci-après.
tours supplémentaires avec une clé.
ATTENTION
Ne pas trop serrer les raccords ou mettre une bande adhésive ou du
mastic sur les robinets ou les prises d'alimentation en eau. Cela
pourrait endommager les raccords.
Vérifier que les tuyaux d'alimentation en eau ne sont pas tordus ni
courbés. Un tuyau tordu ou courbé peut fuir et causer un choc
électrique en raison d'une fuite d'eau.
fuites d'eau au niveau de toutes les connections et des robinets.
ATTENTION
Vérifier que la connexion entre les tuyaux de vidange et le bassin de
lessive, le tuyau d'écoulement ou la cuve pour le linge n'est pas
hermétique.
d’utilisation
Directives
Entretien et
nettoyage
Dépannage
20
Dans un tuyau d'évacuation mural
REMARQUES
Le tuyau d'évacuation mural exige un diamètre minimum de 2 po (5 cm).
Insérer le tuyau de vidange dans le tuyau d'évacuation mural. Il est
possible 'utiliser une attache en nylon (non incluse) pour relier ensemble
les tuyaux et le tuyau de vidange.
Tuyau
d'évacuation
mural
Tuyau de vidange
Attache en nylon

Avec un tuyau d'évacuation au plancher
REMARQUES :
Pour un tuyau d'évacuation au plancher, la capacité doit être d'au moins
64 l (17 gal) par minute. La partie supérieure du tuyau d'évacuation doit
être entre 60 cm (2 pi) et 100 cm (3,3 pi) du fond de la laveuse.
Insérer le tuyau de vidange dans le tuyau d'évacuation au plancher. Il est
possible d'utiliser une attache en nylon (non incluse) pour relier le tuyau
de vidange et le tuyau d'évacuation.
Instructions
de sécurité
Caractéristiques
100 cm (3,3 pi) au max.
60 cm (2 pi) au min.
Tuyau d'évacuation
au plancher
Dans la cuve pour le linge
REMARQUES :
La cuve pour le linge doit avoir une capacité minimale de 20 gal (76 L).
•
Le dessus de la cuve pour le linge doit être entre 2 pi (60 cm) et 3,3 pi
•
(100 cm) au-dessus du plancher.
3.3 pi (100 cm) au max.
2 pi (60 cm) au min.
Fonctionnement
Exigences
d’installation
Instructions
d’utilisation
Directives
Entretien et
nettoyage
Dépannage
21

Avec un système de vidange au plancher
REMARQUES :
•
Instructions
de sécurité
•
Caractéristiques
Exigences
d’installation
d’utilisation
Directives
Insérer le tuyau de vidange dans le tuyau d'évacuation au plancher. Le
poids du tuyau de vidange et la gravité maintiennent le tuyau de vidange
dans la sortie de vidange.
Fonctionnement
Instructions
Un système de vidange au plancher nécessite une rupture de siphon
(non incluse). La rupture de siphon doit être au minimum à 28 po (71
cm) de la partie inférieure de la laveuse.
Si le tuyau de vidange de la laveuse est plus court que la distance de
rupture du siphon, fixer un tuyau de vidange supplémentaire (non
inclus) au tuyau de vidange de la laveuse.
28 po (71 cm) au min.
Entretien et
nettoyage
Dépannage
22
Mettez votre laveuse au niveau
ATTENTION
Ne pas utiliser la laveuse sans la mettre de niveau. Si la laveuse n'est pas
de niveau, elle peut :
Vibrer excessivement provoquant un mauvais fonctionnement de la
•
laveuse.
Émettre un bruit excessif.
•
Ne prolonger les pieds de nivellement qu'autant que nécessaire. Si les
pieds sont trop prolongés, la laveuse peut vibrer.
1. Vérifier que les pieds sont au ras de l'armoire de la laveuse. Si
nécessaire, utiliser une clé pour desserrer l'écrou de blocage d'un pied,
puis faire glisser le pied vers le haut, puis serrer le boulon.

2. Faire glisser la laveuse en position.
Instructions
de sécurité
Caractéristiques
3. Appuyer sur les quatre coins supérieurs de la laveuse. Si la laveuse
bouge lorsque lorsqu'un coin est appuyé, le pied de ce coin doit être
ajusté.
4. Desserrer l'écrou de blocage de la partie inférieure de la laveuse, tirer
le pied vers le bas jusqu'à ce qu'il touche le sol, puis serrer l'écrou. Ne
prolonger les pieds qu’autant que nécessaire. Si les pieds sont trop
prolongés, la laveuse peut vibrer.
5. Appuyer sur les quatre coins de nouveau pour vérifier que la laveuse
est de niveau. Si la laveuse n'est pas de niveau, répéter l'étape 4.
6. Utiliser un niveau pour vérifier que les quatre côtés de la laveuse sont
de niveau.
Mise sous tension
Brancher le câble d’alimentation sur une prise secteur certifiée mise à la
terre, à trois broches, de 120 V, 60 Hz, protégée par un fusible de 12 A
ou un disjoncteur similaire. La laveuse est mise à la terre par
l'intermédiaire du troisième plot du câble d'alimentation.
Fonctionnement
Exigences
d’installation
Instructions
d’utilisation
Directives
Entretien et
nettoyage
Dépannage
23

•
Instructions
de sécurité
•
•
•
Caractéristiques
•
•
•
Fonctionnement
Exigences
Exécuter un cycle d’essai
Effectuer le programme d'essai pour vérifier que la laveuse est
correctement installée.
d’installation
Instructions
•
•
•
d’utilisation
Directives
•
AVERTISSEMENT
Vérifier que la tension d'alimentation dans la localité est la même que
celle indiquée sur l'étiquette de la laveuse.
Ne pas utiliser une prise multiple.
Ne pas utiliser d'adaptateur.
Ne pas utiliser de rallonge.
Ne pas tirer la prise du câble d'alimentation avec des mains humides.
Pour débrancher le câble d’alimentation, tirer la prise et non pas le
câble.
Si le câble d'alimentation est endommagé ou présente des signes de
rupture, le remplacer.
Laisser la cuve vide.
Appuyer sur le bouton Power (Marche-Arrêt) pour mettre en marche
la laveuse.
Régler le sélecteur de programme sur Rinse & Spin (Rinçage et
essorage).
Appuyer sur le bouton Start/Pause (Démarrage/Pause) pour
commencer le programme d'essai. La laveuse ne doit pas bouger ni
vibrer de façon excessive quand la cuve se remplit d'eau ou pendant le
lavage ou l'essorage. La laveuse doit se vidanger correctement
pendant le programme d'essorage.
Entretien et
nettoyage
Dépannage
24
ATTENTION
Si une quelconque fuite d'eau se produit pendant le remplissage ou la
•
vidange, vérifier les connexions des tuyaux d'eau. Voir Connecter les
tuyaux d'eau à la page 18 ou Connexion du tuyau de vidange à la
page 20.
Si la laveuse bouge ou vibre de façon excessive, recommencer la mise
•
de niveau. Voir Mise de niveau de la laveuse à la page 22.

DIRECTIVES D’UTILISATION
Panneau de commande
Wash
Rinse
My Cycle
No bizzer
Speed Wash
1
7
1
Témoins d'état
Child Lock Prewash
Door Lock
Extra Rinse
Add a Garment
3
Extra Dry Normal Dry
524 6
8 9 10
Ces témoins apparaissent quand la configuration et les options sont
sélectionnées.
2
Affichage numérique
L'affichage initial correspond à la durée totale du programme
sélectionné.
Quand la laveuse est en fonctionnement, l'affichage montre le
programme en cours et la durée restante du programme.
REMARQUES : La durée affichée est une estimation basée sur des
conditions de fonctionnement normales. Des facteurs externes (tels
que la taille de la charge, la température de l'eau d'alimentation et la
pression de l'eau) peuvent affecter la durée réelle.
Si un décalage de démarrage est programmé pour le programme,
l'affichage montre l'heure à laquelle débutera le programme.
3
Vitesse d'essorage
Appuyer pour sélectionner le niveau d'eau. Les sélections possibles
sont Highest (Le plus élevé) ou High (Élevé), Med (Moyen), Low (Bas)
ou No Spin (Pas d'essorage).
Spin
Gentle Dry
11
Instructions
de sécurité
Caractéristiques
Fonctionnement
Exigences
d’installation
Instructions
d’utilisation
Directives
Entretien et
nettoyage
Dépannage
4
Dry
Appuyer en continu le bouton Séchage afin de choisir le degré souhaité :
Séchage extra/Séchage normal/Séchage délicat.
Séchage extra
Séchage normal
Séchage délicat
25

5
Instructions
de sécurité
Caractéristiques
Fonctionnement
Exigences
d’installation
Instructions
d’utilisation
Directives
6
7
8
9
10
Fonctions spéciales de charge
Permet de sélectionner les fonctions supplémentaires pour une charge.
Sélections possibles :
rinçage supplémentaire
repassage facile
prélavage
Power
Permet de mettre en marche ou d'arrêter la laveuse.
Time Save
Permet de diminuer la durée de lavage. Voir Étape 7 : (Option)
Diminution de la durée de lavage à la page 30.
Démarrage différé
Permet d'effectuer une mise en marche différée. Voir Étape 6 :
(Facultatif ) Mise en marche différée à la page 30.
Température
Permet de sélectionner la température de l'eau. Il est possible de
sélectionner Hot+ (Très chaud), Hot (Chaud), Warm (Tiède), Eco
(Économie d'énergie) ou Cold (Froid). Pour plus d’informations,
voir Options de lavage et configuration à la page 32.
Sélecteur de programme
Le tourner pour sélectionner un programme de lavage. Pour plus
d’informations, voir Options de lavage et configuration à la page 32.
Entretien et
nettoyage
Dépannage
26
11
Démarrage/Pause
Permet de lancer le programme ou de le mettre en arrêt momentané.

Lavage d’une brassée de lessive
Si c'est la première fois qu'un article est lavé, s'assure qu'il est sur le
•
réglage grand-teint. Utiliser un chiffon ou une serviette blanc avec un
peu de détergent pour laver une partie cachée de l'article. Si le chiffon
ou la serviette est taché, les couleurs de l'article ne sont pas grand-teint.
Si un article présente des taches, utiliser un détachant ou appliquer
•
doucement une petite quantité de détergent sur les taches, puis frotter
doucement les taches avec une brosse.
Vérifier l'étiquette du fabricant pour des instructions de lavage
•
spéciales détaillées.
S'assurer d'avoir retiré tous les éléments des poches. Les éléments
•
durs, tels que les pièces de monnaie, pourraient endommager la laveuse.
Ne jamais laver des vêtements tachés par des produits chimiques tels
•
que l'essence, le pétrole, le benzène, le diluant à peinture et l'alcool.
Penser à utiliser une taie d'oreiller qui peut être fermée ou un sac de
•
lavage pour protéger des articles comme les soutiens-gorges, les
articles en dentelle et les articles délicats.
Laver les articles blancs et de couleur séparément.
•
Retourner les articles qui peuvent se mettre à l'envers (comme les
•
pulls et les chandails molletonnés).
REMARQUES :
Ne jamais laver des articles mouillés dans la laveuse pendant des
•
périodes prolongées. Les articles peuvent moisir et provoquer des
taches.
Vérifier l'étiquette du fabricant pour des instructions sur la température
•
de lavage.
Ne pas laver les objets, comme les cravates ou les objets avec des
•
décorations, qui peuvent s'étirer ou se déformer.
Ne pas laver les articles hydrofuges, comme les imperméables, les
•
combinaisons de ski, les rideaux de douche et les matelas. Ces articles
n'absorbent pas l'eau et peuvent provoquer des vibrations excessives.
Instructions
de sécurité
Caractéristiques
Fonctionnement
Exigences
d’installation
Instructions
d’utilisation
Directives
Entretien et
nettoyage
AVERTISSEMENT
Pour réduire le risque d’incendie, de choc électrique ou de blessure aux
personnes, lire les CONSIGNES DE SÉCURITÉ avant d’utiliser cet appareil
1. Sélection d'un détergent
Cette laveuse est conçue uniquement pour des détergents à haute
efficacité (HE).
Pour des résultats optimaux, utiliser un détergent HE. Il est recommandé
•
de ne pas utiliser un détergent classique. Les détergents HE contiennent
des suppresseurs qui diminuent ou supprime la mousse. Lorsque qu'il y
a moins de mousse, la charge est secouée de façon plus efficace et le
nettoyage est optimisé.
.
Dépannage
27

•
Instructions
de sécurité
2. Mise en marche de la laveuse
Appuyer sur le bouton Power (Marche-Arrêt) pour mettre en marche la
Caractéristiques
laveuse. La configuration d'origine de la laveuse est :
•
•
•
3. Charge de la laveuse
Fonctionnement
Exigences
Avant de charger la lessive, s'assurer d'en enlever les pièces de monnaie,
les clés et autres objets durs et de fermer toutes les fermetures à glissière.
d’installation
Instructions
Ces articles pourraient endommager les vêtements.
•
•
d’utilisation
Directives
REMARQUES :
•
Entretien et
nettoyage
•
•
Dépannage
•
•
•
•
La réduction de la quantité de détergent peut réduire la qualité du nettoyage.
Vérifier que :
- Les taches ont été traitées au préalable
- Les articles ont été triés avec soin par couleur et niveau de saleté
- La machine n'est pas surchargée
Programme normal
Température tiède
Vitesse d'essorage moyenne
ATTENTION
Répartir la lessive par type de tissu, niveau de saleté, couleur et taille
de charge.
Remplir la cuve avec des vêtements secs, non pliés. Charger la cuve
aux 3/4 maximum. Pour une performance optimale, la taille maximale
de la charge doit être inférieure à 12 lb (5,4 kg).
Une surcharge peut réduire l'efficacité du lavage, causer une usure
excessive et éventuellement froisser ou créer des faux plis pour les
éléments de la charge.
Laver les articles délicats tels que les soutiens-gorges et d'autres
articles de lingerie en utilisant le programme Delicates (Délicat) avec
des articles légers similaires.
Ne pas remplir la laveuse avec trop d'objets volumineux et
encombrants. Cela pourrait entraîner des vibrations indésirables
pendant le programme d'essorage. Si cela se produit, retirer du linge
et relancer le programme de lavage.
Toujours utiliser le programme Bulky (Volumineux) pour les articles
importants.
Lors du lavage de charges très sales, ne pas surcharger la laveuse
pour obtenir de bons résultats de nettoyage.
Cette laveuse n'est pas adaptée au lavage des couettes. La laveuse
pourrait ne pas atteindre une vitesse d'essorage élevée, ce qui peut
résulter en une charge humide après l'essorage.
Parfois, la laveuse ne peut pas atteindre une vitesse d'essorage
élevée parce que la charge est déséquilibrée. Réorganiser les
vêtements, puis essayer de nouveau le mode d'essorage seul.
28

4. Ajouter du détergent et des additifs dans les compartiments
ATTENTION
Éviter d'éclabousser ou de trop remplir le compartiment.
•
•
Ne jamais verser du liquide javellisant non dilué directement sur les
vêtements ou dans le tuyau. Cela pourrait endommager les tissus en
affaiblissant les fibres ou en affectant les couleurs.
Il suffit de verser moins de 50 ml (1,7 oz) de Javel dans le compartiment
•
principal du détergent avant d'appuyer sur le bouton de mise en marche.
Pour utiliser plus de Javel, il est recommandé de verser la Javel dans le
compartiment principal du détergent quand l'eau s'écoule dans le
compartiment à détergent après avoir démarré la laveuse.
Instructions
de sécurité
Caractéristiques
Compartiment
pré-détergent
Compartiment
t So
gen
r
e
t
n-wash de
ai
M
t
n
ge
ter
e
d
re-wash
P
t
n
rge
dete
r
e
en
ft
pour détergent
Compartiment pour
assouplissant
En cas d'utilisation de l'option de prélavage, ajouter la quantité
•
recommandée de détergent directement dans le compartiment de
pré-détergent (I) avant de démarrer la laveuse.
Ajouter la quantité recommandée de détergent directement dans le
•
compartiment (II) avant de démarrer la laveuse.
En cas d'utilisation de Javel qui n'affecte pas les couleurs, l'ajouter
•
avec le détergent dans le compartiment réservé à cet usage.
REMARQUES :
Lors de l'ajout de Javel qui n'affecte pas les couleurs avec du
•
détergent, les deux produits de lavage doivent être de la même
forme (liquides).
En cas d'utilisation de détergent en poudre, le mettre au fond de
•
la cuve avant d'ajouter la charge.
Ajouter la quantité recommandée d'assouplissant liquide pour les tissus
•
dans le compartiment prévu à cet effet. Le distributeur libère
automatiquement l'assouplissant liquide pour les tissus au moment
adéquat pendant le programme de rinçage.
Fonctionnement
Exigences
d’installation
Instructions
d’utilisation
Directives
Entretien et
nettoyage
Dépannage
5. Sélection du programme de lavage approprié et des options pour la
charge
Tourner le sélecteur de programme pour sélectionner le programme de
lavage. Pour toute information sur les programmes de lavage, consulter
Options de lavage et configuration à la page 32.
29

6. (Facultatif) Mise en marche différée
Il est possible de programmer un programme de lavage et de le régler
pour un démarrage à une heure précise.
Instructions
de sécurité
•
Caractéristiques
•
•
Fonctionnement
Exigences
•
•
d’installation
Instructions
d’utilisation
Directives
Entretien et
nettoyage
Dépannage
7. (Option) Diminution de la durée de lavage
Appuyer sur le bouton Time Save (Rapide). Le témoin lumineux Rapide
s'illumine et la durée de lavage diminue.
REMARQUES :
La fonction Rapide fonctionne pour les programmes Normal, Perm Press
(Sans repassage), Heavy Duty (Très sale), Bulky (Volumineux) et Active
Wear (Vêtements de sport).
30
REMARQUES :
La laveuse mémorise les réglages. Si l'alimentation ne fonctionne pas,
appuyer sur le bouton Start/Pause (Démarrage/Pause) dès que
l'alimentation est rétablie. La laveuse continue la fonction de
retardement qui a été définie.
Tourner le bouton de sélection des programmes sur le programme
souhaité.
Appuyer sur le bouton Delay (Démarrage différé) de façon répétée pour
sélectionner la durée souhaitée pour le démarrage différé. L'heure de
démarrage différé (en heures) s’affiche sur l'écran par séquence de 0 à
24, puis de nouveau à 0. Quand la durée souhaitée est atteinte, appuyer
sur le bouton Delay (Démarrage différé) pendant trois secondes pour
confirmer le réglage. Le témoin lumineux du Démarrage différé s'allume.
Appuyer sur le bouton Start/Pause (Démarrage/Pause) pendant trois
secondes pour lancer la mise en marche différée.
Pour annuler la fonction de l'heure de démarrage différé avant de
l'enregistrer, appuyer sur le bouton Delay (Démarrage différé) jusqu'à
ce que 0H s'affiche à l'écran.
REMARQUES :
Après avoir réglé le démarrage différé, il est possible de modifier le
•
réglage de ce dernier en appuyant de nouveau sur le bouton Delay
(Démarrage différé) jusqu'à ce que l'heure souhaitée soit atteinte.
Relâcher le bouton pendant trois secondes.
Si l'utilisateur décide d'annuler le réglage du démarrage différé,
•
tourner le sélecteur de programme ou appuyer sur le bouton Delay
(Démarrage différé) jusqu'à ce que 0 soit atteint.
Idéalement, vous devriez régler votre programme avant de régler
•
le démarrage différé, car le fait de tourner le sélecteur de programme
après avoir réglé le démarrage différé annule la fonction de
démarrage différé.
Il est possible de changer le réglage ou d'annuler la fonction de
•
l'heure de démarrage différé à tout moment avant d'appuyer sur le
bouton Start/Pause (Démarrage/Pause) en tournant le sélecteur
de programme.
L'heure de démarrage différé ne peut pas être modifiée une fois
•
que le bouton Start/Pause (Démarrage/Pause) a été appuyé. Si le
bouton Start/Pause (Démarrage/Pause) a été appuyé, il est possible
d'annuler la fonction de l'heure de démarrage différé en appuyant
sur le bouton Power (Marche-Arrêt) pour éteindre la laveuse, puis
en appuyant de nouveau sur le bouton pour la remettre en marche.
L'heure de démarrage différé ne peut pas être modifiée une fois
•
que le programme a été lancé.

8. Démarrage de la laveuse
Appuyer sur le bouton Start/Pause (Démarrage/Pause).
•
REMARQUES :
Si une heure de démarrage différé n'a pas été programmée ou
•
si l'heure de démarrage différé a expiré, la laveuse commence le
programme et le témoin lumineux Wash (Lavage) s'allume.
Au fur à mesure que la laveuse passe d'une étape à l'autre dans le
•
programme de lavage, le témoin lumineux concerné s'illumine (tel
que Rinse [Rinçage] ou Spin [Essorage]).
Si une heure de démarrage différé a été programmée le témoin
•
lumineux de démarrage différé (Delay) s'illumine et la laveuse
commence à décompter l'heure de démarrage.
S'il est nécessaire de suspendre le programme (par exemple pour
•
ajouter ou retirer un article ou régler la charge), appuyer sur le bouton
Start/Pause (Démarrage/Pause) pendant trois secondes. Attendre que
la cuve cesse de tourner, puis ouvrir la porte. Pour redémarrer le lavage,
fermer la porte, puis appuyer de nouveau sur le bouton de démarrage.
ATTENTION
Ne pas forcer pour ouvrir la porte, si :
Le tambour est en mouvement. Cela pourrait endommager la laveuse.
•
Le niveau de l'eau est au-dessus du bord de la cuve intérieure. L'eau
•
se déversera sur le sol.
La température est trop élevée. L'utilisateur pourrait se brûler.
•
Si le bouton Start/Pause (Démarrage/Pause) est appuyé pendant
•
trois secondes, la porte ne s'ouvrira pas car elle ne correspond pas
aux conditions précitées. Il convient d'attendre le bon moment.
Instructions
de sécurité
Caractéristiques
Fonctionnement
Exigences
d’installation
Instructions
d’utilisation
Directives
Réglage du verrouillage parental
La laveuse dispose d'une fonction de verrouillage enfant pour éviter que
les enfants ne jouent avec elle. Quand le verrouillage enfant est activé, les
seuls boutons qui fonctionnent sont : Power (Marche-Arrêt), Delay
(Démarrage différé) et Temp. (Température) qui servent à désactiver la
fonction de verrouillage enfant.
Appuyer sur les boutons Delay (Démarrage différé) et Temp.
•
(Température) pendant trois secondes. Le témoin lumineux de
verrouillage enfant s’allume et la laveuse émet un bip.
Pour désactiver le verrouillage enfant, appuyer sur les boutons Delay
•
et Temp. pendant trois secondes.
REMARQUES :
Si la laveuse n'est pas en marche, il est également possible de
•
régler la fonction de verrouillage enfant. Appuyer sur le bouton
PowerMarche-Arrêt), activer la fonction de verrouillage enfant et
appuyer sur le bouton Power pour éteindre la laveuse. Pour pouvoir
utiliser la laveuse, il sera nécessaire de désactiver la fonction de
verrouillage.
Entretien et
nettoyage
Dépannage
31

Instructions
de sécurité
Options et réglages de la laveuse
(points) indiquent options fonctions que vous pouvez sélectionner.
•
Caractéristiques
Fonctionnement
Exigences
d’installation
Instructions
d’utilisation
Directives
Entretien et
nettoyage
Remarque :
Dépannage
Les paramètres de ce tableau sont pour consultation par l’utilisateur.
Les paramètres actuels pourraient varier.
La fonction de séchage peut être choisie pour ces programmes avec .
4:2 7
1:4 0
1:2 3
0:57
0:1 3
0:2 3
1:2 9
4:1 9
2:1 8
1:0 1
0:5 8
2:1 6
32

ENTRETIEN ET NETTOYAGE
AVERTISSEMENT
Ne pas utiliser de solvants pour nettoyer la laveuse. Cela pourrait
•
endommager la finition et créer des gaz toxiques dangereux pour
l'utilisateur ou qui peuvent exploser.
Ne pas saupoudrer ni pulvériser de l'eau ou d'autres liquides
•
directement sur la laveuse.
Ne pas utiliser de détergents contenant du chloroxylénol pour
•
nettoyer la laveuse. Cela pourrait endommager la finition.
SERVICE PERSONNEL—Certaines pièces internes ne sont pas mises à la
terre volontairement et peuvent présenter un risque de choc électrique
pendant l'entretien. Ne pas entrer en contact avec les pièces ci-après
pendant que l'électroménager est alimenté : toute pièce relative à
l’électricité, pompe, verrou, élément, ventilateur du moteur.
ATTENTION
Avant d'effectuer tout entretien, mettre la laveuse hors tension, puis
débrancher le câble d’alimentation et fermer les robinets d'eau.
NETTOYAGE ET ENTRETIEN
Nettoyage de l’extérieur
Utiliser un chiffon doux pour essuyer le détergent, le produit javellisant ou
d'autres dépôts le cas échéant.
Instructions
de sécurité
Caractéristiques
Fonctionnement
Exigences
d’installation
Instructions
d’utilisation
Directives
Nettoyage de l'intérieur
Nettoyer l'intérieur de la laveuse régulièrement pour enlever toute
•
saleté, terre, odeur, moisissure ou résidu de bactéries qui peuvent
rester dans la laveuse après le nettoyage des vêtements.
Si ces instructions ne sont pas observées, il peut en résulter des
•
conditions désagréables, telles que des odeurs ou des taches
permanentes dans la laveuse ou sur la lessive.
Pour retirer les dépôts de calcaire, utiliser des produits de nettoyage
•
étiquetés « Pour laveuse ».
Nettoyage du panneau de commandes
Nettoyer avec un chiffon doux humide. Ne pas utiliser de nettoyants
•
abrasifs ni tampons de nettoyage.
Ne pas vaporiser de produit nettoyant directement sur le panneau de
•
commandes. Le panneau de commandes peut être endommagé par
des produits de traitement préalable du linge sale et les détachants.
Appliquer ces produits à l'écart de la laveuse et nettoyer tous les
déversements ou les éclaboussures immédiatement.
Entretien et
nettoyage
Dépannage
33

Nettoyage des compartiments du détergent et de l'assouplissant
•
Instructions
de sécurité
Caractéristiques
Fonctionnement
Exigences
•
d’installation
Instructions
d’utilisation
Directives
Ouvrir le tiroir, puis appuyer sur la flèche située sur le couvercle de
l'assouplissant à l'intérieur du tiroir.
Soulever le crochet et retirer le tiroir.
Entretien et
nettoyage
Dépannage
34
Laver les compartiments et les rainures à l'eau, puis les sécher avec un
•
chiffon.
Rétablir le couvercle de l'assouplissant et pousser le tiroir en position.
•
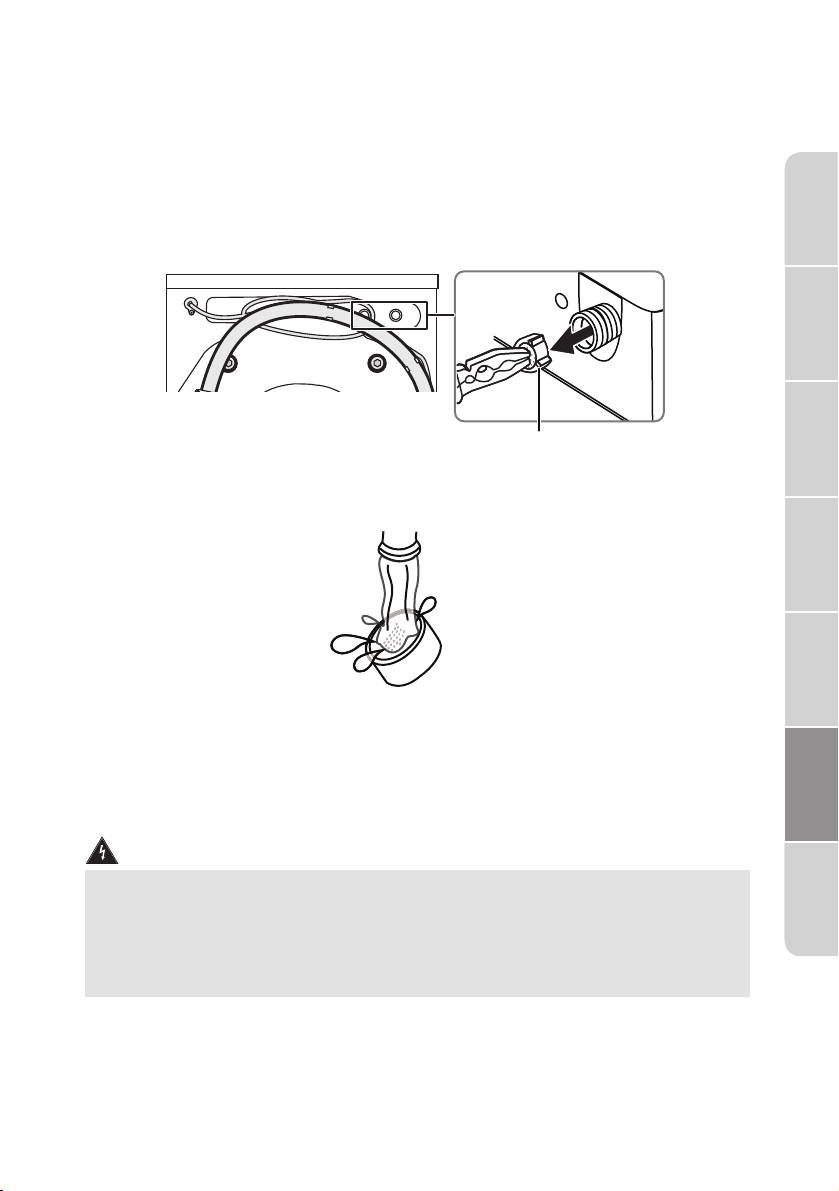
Nettoyage des filtres d'entrée d'eau
Si l'eau coule trop lentement ou pas du tout, il est nécessaire de nettoyer
le filtre d'entrée.
Filtre de la machine
Fermer les robinets d'eau.
•
Dévisser le tuyau d'entrée à l'arrière de la laveuse du robinet.
•
Retirer le filtre à l'aide de pinces à long bec.
•
Arrière de la laveuse
Filtre d'entrée
Utiliser de l'eau pour laver le filtre.
•
Instructions
de sécurité
Caractéristiques
Fonctionnement
Exigences
d’installation
Instructions
d’utilisation
Directives
Réinstaller le filtre, puis reconnecter le tuyau d'entrée.
•
Ouvrir les robinets d'eau, puis s’assurer de l’absence de toute fuite
•
d'eau.
Nettoyage du filtre de vidange
ATTENTION
Nettoyer les filtres régulièrement. Des filtres obstrués peuvent :
•
Empêcher la vidange de l'eau de la laveuse.
Empêcher l'essorage de la laveuse.
•
Provoquer des bruits forts ou inhabituels provenant d'objets pris dans
•
les filtres.
Entretien et
nettoyage
Dépannage
35

•
Instructions
de sécurité
Caractéristiques
•
Utiliser un tournevis à lame plate pour ouvrir la porte du filtre située en
bas à droite de l'avant de la laveuse.
Ouverture
du filtre
Tourner le bouchon à 90° dans le sens horaire, puis retirer le tuyau de
vidange d'urgence et enlever le bouchon du tuyau.
Fonctionnement
Exigences
d’installation
Instructions
•
d’utilisation
Directives
Entretien et
nettoyage
•
•
Dépannage
Cache du tuyau de
vidange d'urgence
Vidanger l'eau dans un bol ou un godet.
Rétablir le tuyau de vidange.
Faire tourner le filtre dans le sens anti-horaire et le retirer de la laveuse.
36
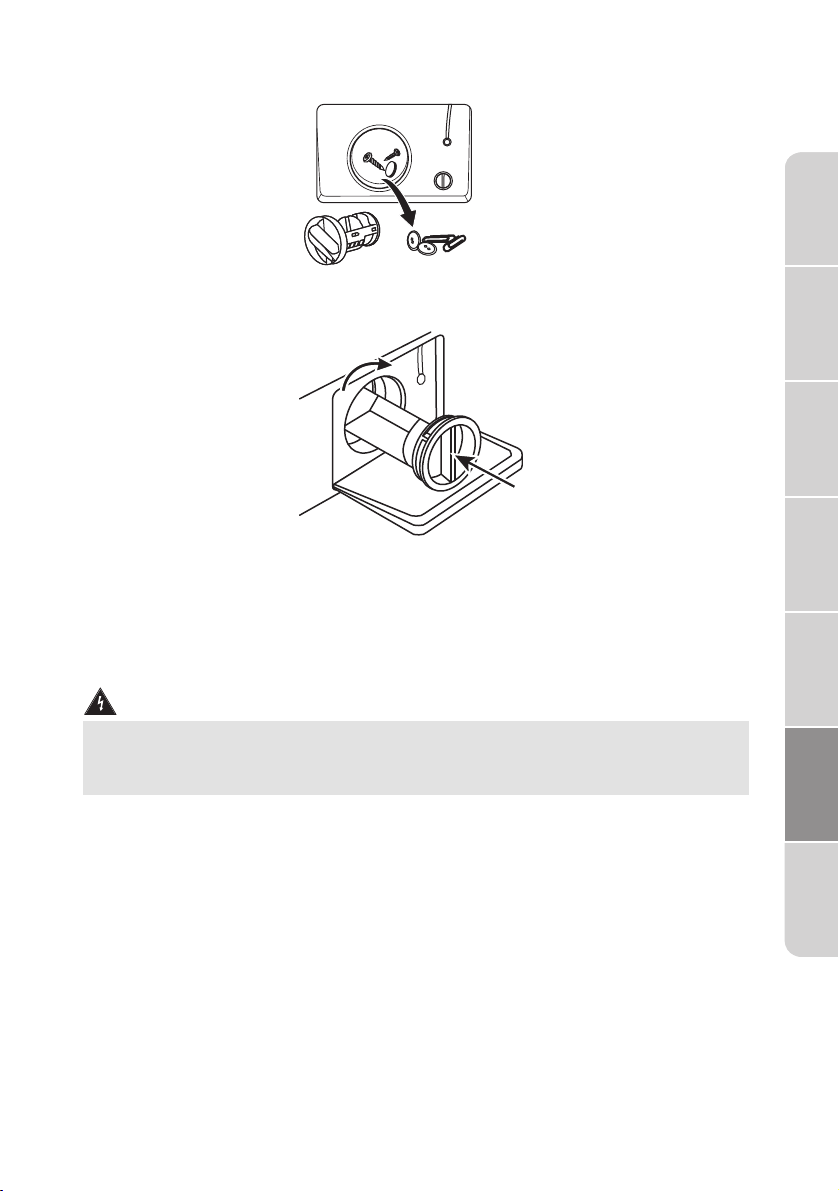
Retirer les peluches et autres objets du filtre.
•
Faire glisser le filtre et le faire tourner dans le sens anti-horaire pour le
•
verrouiller en place.
Nettoyage de la cuve
Le programme Tub Clean (Nettoyage de la cuve) est un programme
autonettoyant qui supprime les odeurs qui peuvent se produire dans la
laveuse sans requérir l'utilisation d'un produit de nettoyage. Nous
suggérons de nettoyer la cuve environ une fois par mois.
Instructions
de sécurité
Caractéristiques
Fonctionnement
Exigences
d’installation
Instructions
d’utilisation
Directives
ATTENTION
Ne jamais utiliser le programme Tub Clean (Nettoyage de la cuve) quand
le linge est dans la laveuse. Cela pourrait endommager le linge ou la
laveuse.
Quand la cuve est vide, ajouter une tasse de javellisant dans le
•
distributeur de Javel.
Appuyer sur le bouton Power (Marche-Arrêt).
•
Mettre le sélecteur de programme sur Tub Clean (Nettoyage de la
•
cuve). Quand le programme Tub Clean est sélectionné, la seule option
qui peut être modifiée est celle du démarrage différé (Delay).
Appuyer sur le bouton Start/Pause (Démarrage/Pause).
•
Utilisation de l'ouverture d'urgence de la porte
Si le courant électrique fait défaut ou si d'autres circonstances empêchent
d'ouvrir la porte, il est possible d'utiliser le câble d'urgence pour ouvrir la
porte.
Entretien et
nettoyage
Dépannage
37

Instructions
de sécurité
fonctionnement. Si la porte doit être ouverte, arrêter la laveuse et
attendre que l'eau se refroidisse avant d'utiliser le câble d'urgence.
•
Caractéristiques
Fonctionnement
Exigences
d’installation
Instructions
•
•
•
Dégivrage de la laveuse
d’utilisation
Si la température ambiante tombe à zéro (0 °C [32 °F]), l'eau contenue
Directives
dans les tuyaux ou les flexibles peut geler.
•
•
Entretien et
nettoyage
•
•
•
•
Dépannage
AVERTISSEMENT
Il n'est pas possible d'utiliser le câble d'urgence lorsque la laveuse est en
Ouvrir la porte du filtre située dans la partie inférieure droite de l'avant
de la laveuse.
Tirer doucement le câble d'urgence vers le bas.
Câble d'ouverture
d'urgence
REMARQUES :
Ne pas tirer trop fort sur le câble. Il pourrait se casser. Tirer délicatement.
Ouvrir la porte.
Remettre le câble dans sa position initiale, puis fermer la porte du filtre.
Débrancher le câble d'alimentation.
Nettoyer les robinets d'eau avec de l'eau chaude pour détendre les
tuyaux d'admission.
Retirer les tuyaux d'eau et les tremper dans de l'eau tiède.
Verser de l'eau tiède dans le tambour de nettoyage et attendre une
dizaine de minutes.
Reconnecter le tuyau d'alimentation en eau aux robinets d'eau en
s'assurant qu'il n'existe aucune fuite.
Faire fonctionner la laveuse sur le programme Drain OnlyVidange
uniquement (Vidange uniquement) pour éliminer l'eau qui a été ajoutée.
Entreposage de la laveuse
La laveuse peut être endommagée si de l'eau reste dans les tuyaux et les
composants internes avant l'entreposage.
Pour préparer la laveuse pour l'entreposage :
Sélectionner le programme Quick Wash (Lavage rapide) et ajouter
•
de la Javel dans la laveuse. Faire fonctionner la laveuse pendant le
programme complet sans la charger.
Fermer les robinets d'eau et déconnecter les tuyaux d'admission.
•
Débrancher la laveuse de la prise secteur et laisser la porte de la
•
machine ouverte pour que l'air puisse circuler dans la cuve.
38

AVANT DE FAIRE APPEL AU SERVICE...
Des conseils de dépannage
Gagnez du temps et de l’argent! Examinez d’abord les tableaux des pages
suivantes et vous n’avez peut-être pas besoin d’appeler le service.
Problèmes
La laveuse ne
démarre pas
La porte est
verrouillée ou
ne s'ouvre pas
L'eau n'est pas
chaude.
Fuites d'eau
Solutions
Vérifier que la laveuse est branchée sur le secteur.
•
Vérifier que la porte est bien fermée.
•
Vérifier que les robinets d'eau sont ouverts.
•
Veiller à appuyer sur le bouton Power (Marche-Arrêt)
•
pour démarrer la laveuse.
Veiller à appuyer sur le bouton Start/Pause
•
(Démarrage/Pause).
Vérifier que la sécurité pour enfant n’est pas activée.
•
Voir Réglage du verrouillage enfant à la page 31.
•
S’assurer que l'option Delay (Démarrage différé) n’est
pas activée. Voir (Facultatif ) Mise en marche différée
à la page 30.
Vérifier le fusible ou réinitialiser le disjoncteur.
•
La porte ne peut pas être ouverte si la laveuse est en
•
fonctionnement. Appuyer sur le bouton Start/Pause
(Démarrage/Pause) pendant trois secondes. Quand le
tambour de la laveuse s'arrête, ouvrir la porte et ajouter
le linge. Pour redémarrer le lavage, fermer la porte, puis
appuyer de nouveau sur le bouton Start/Pause
(Démarrage/Pause).
Remarque : Ne pas utiliser la fonction pause lorsque la
surface de l'eau dépasse le bord de la cuve intérieure
ou quand la température est trop élevée.
Si la porte est verrouillée quand la laveuse est en
•
fonctionnement, débrancher le câble d'alimentation et
le rebrancher.
Contacter un plombier qualifié pour vérifier le tuyau
•
d'eau chaude. Il se peut qu'il soit cassé.
Remarque : Il est toujours possible de laver du linge en
eau froide uniquement.
Vérifier que toutes les connexions des tuyaux sont bien
•
serrées. Voir Connecter les tuyaux d'eau à la page 18
et Connexion du tuyau de vidange à la page 20.
Vérifier que l'extrémité du tuyau de vidange est
•
correctement insérée et fixée au système de vidange.
Voir Connexion du tuyau de vidange à la page 20.
Vérifier que le tuyau de vidange n’est pas obstrué.
•
Éviter de surcharger.
•
Utiliser un détergent à haute efficacité pour réduire
•
l'excès de mousse. Voir Sélection d'un détergent à la
page 27.
Instructions
de sécurité
Caractéristiques
Fonctionnement
Exigences
d’installation
Instructions
d’utilisation
Directives
Entretien et
nettoyage
Dépannage
39

De l'eau
déborde
Instructions
de sécurité
Caractéristiques
Fonctionnement
Exigences
d’installation
Instructions
d’utilisation
Directives
Entretien et
nettoyage
Dépannage
de la partie
inférieure de
la laveuse.
Pas d'eau ou
une quantité
insuffisante OU
Du détergent ou
de l'assouplissant
sont toujours
dans le
compartiment
alors que le
programme de
lavage est
terminé.
La laveuse
vibre ou est
trop bruyante
La laveuse
s'arrête
La laveuse ne
vidange pas ni
n'essore
Il reste des
résidus de
savon dans le
tiroir
SolutionsProblèmes
Vérifier que le tuyau d'admission est fermement
•
connecté.
Vérifier que la fuite ne vient pas du tuyau de vidange.
•
Remplacer le tuyau si besoin est.
Vérifier que les deux robinets sont ouverts à fond.
•
Vérifier que la pression d'eau est dans la gamme listée
•
dans Besoins en eau à la page 12.
Vérifier que les tuyaux d'admission d'eau ne sont pas
•
entortillés. Les étirer si besoin est.
Vérifier que la laveuse est installée sur une surface de
•
niveau. Si la surface n'est pas de niveau, régler les pieds
de la laveuse pour la mettre de niveau. Voir Mise de
niveau de la laveuse à la page 22.
Vérifier que la laveuse n'est pas en contact avec un
•
autre objet.
Vérifier d'avoir bien retiré les boulons de transport.
•
Vérifier que la prise secteur fonctionne correctement.
•
Fermer la porte et appuyer sur le bouton Start/Pause
•
(Démarrage/Pause) pour démarrer la laveuse. Pour des
raisons de sécurité, cette laveuse ne démarre pas tant
que la porte n'est pas fermée.
•
Parfois la laveuse effectue une pause entre les
différentes étapes du programme. Attendre de voir si
la laveuse démarre de nouveau.
Vérifier le fusible ou réinitialiser le disjoncteur.
•
Fermer la porte et appuyer sur le bouton Start/Pause
•
(Démarrage/Pause) pour démarrer la laveuse. Pour des
raisons de sécurité, cette laveuse ne démarre pas tant
que la porte n'est pas fermée.
Vérifier que le tuyau de vidange n’est pas entortillé.
•
Étirer le tuyau si besoin est.
Vérifier que la hauteur du tuyau de vidange est dans
•
les limites spécifiées. Voir Exigences en matière de
vidange à la page 21.
Vérifier le fusible ou réinitialiser le disjoncteur.
•
Les tuyaux du réseau d'égouts peuvent être obstrués.
•
Contacter un plombier ou un réparateur professionnel.
Nettoyer le tiroir.
•
Utiliser un détergent liquide.
•
40

Problèmes Solutions
L'affichage du
panneau de
contrôle ne
s'allume pas
Les articles
sont toujours
sales après
avoir été lavés
La charge est
trop mouillée
à la fin du
programme
La charge a
trop de
mousse
Vérifier que le câble d’alimentation est branché sur une
•
prise secteur opérationnelle.
Contacter un plombier ou un réparateur professionnel
•
pour vérifier le câblage du panneau de contrôle.
Vérifier que la laveuse n'a pas été surchargée.
•
Veiller à utiliser la quantité correcte de détergent.
•
Si les articles sont extrêmement sales, essayer de les
•
laver une seconde fois.
Utiliser un détergent à haute efficacité pour réduire
•
l'excès de mousse. Voir Sélection d'un détergent à la
page 27.
La charge est peut-être trop petite. Des charges très
•
petites (un ou deux articles) peuvent être
déséquilibrées et ne pas tourner complètement.
Utiliser un détergent à haute efficacité pour réduire
•
l'excès de mousse. Voir Sélection d'un détergent à la
page 27.
Utiliser moins de détergent si l'eau est douce.
•
Pour des petites charges peu sales, diminuer la quantité
•
de détergent.
CODES D’ERREUR
Instructions
de sécurité
Caractéristiques
Fonctionnement
Exigences
d’installation
Instructions
d’utilisation
Directives
E30
E10
E21
E12
EXX
RaisonCode
Door open
(Porte mal
fermée)
Problème
d'injection d'eau
lors du lavage
La laveuse ne
vidange pas
Débordement
d'eau
Autres
Solutions
Ouvrir et fermer la porte.
•
Vérifier qu'aucun article n'est coincé entre la
•
porte et la laveuse.
Vérifier que la pression d'eau n'est pas trop
•
basse.
Ajuster le tuyau d'eau, si besoin est.
•
Vérifier que le filtre de la vanne d'admission
•
n'est pas obstrué.
Vérifier que le tuyau de vidange n’est pas
•
entortillé.
Redémarrer la laveuse.
•
Essayer de redémarrer la laveuse. Si le code
•
d'erreur persiste ou si un code d'erreur différent
s'affiche, contacter un réparateur qualifié.
Entretien et
nettoyage
Dépannage
41

ATTACHEZ VOTRE REÇU AUX PRÉSENTES. UNE
PREUVE D’ACHAT EST REQUISE POUR OBTENIR UN
SERVICE TECHNIQUE COUVERT PAR LA GARANTIE.
GARANTIE
LIMITÉE DE LA
LAVEUSE MIDEA
Veuillez disposer des renseignements suivants lorsque vous
appelez le Centre des services à la clientèle :
■ Vos nom, adresse et numéro de téléphone
■ Le numéro de modèle et le numéro de série de
votre appareil
■ Une description claire et détaillée du problème
■ Preuve d’achat, y compris le nom et l’adresse du
dépositaire ou du détaillant, et la date d'achat
SI VOUS AVEZ BESOIN D’UN SERVICE TECHNIQUE :
Avant de communiquer avec nous pour organiser le service, veuillez déterminer si votre
1.
produit nécessite une réparation. Certaines questions peuvent être abordées sans service.
Veuillez prendre quelques minutes pour consulter la section Dépannage du manuel d’utilisation
ou envoyer un courriel à customerserviceusa@midea.com.
2. Tout service technique couvert par la garantie est assuré exclusivement par nos prestataires de
service technique Midea autorisés, aux États-Unis et au Canada.
Aux États-Unis ou au Canada, appelez le 1-866-646-4332. ou envoyez un courriel à
Si vous résidez hors des 50 États des États-Unis ou hors du Canada, communiquez avec votre
concessionnaire Midea autorisé pour déterminer si une autre garantie s’applique.
GARANTIE LIMITÉE POUR LA PREMIÈRE ANNÉE (PIÈCES ET MAIN-D’ŒUVRE)
Pendant un an à compter de la date d’achat, si cet appareil ménager est installé, utilisé et entretenu
conformément aux instructions qui sont ci-jointes ou fournies avec le produit, Midea America (Canada)
Corporation (ci-après appelée “Midea”) paiera le coût de toute pièce de rechange spécifiée par l’usine
et de la main-d’œuvre liée à la réparation, qui sont nécessaires pour corriger les défauts de matériaux
et de fabrication qui étaient présents à l’achat de cet appareil ménager, ou remplacera le produit à sa
seule discrétion. En cas de remplacement du produit, votre appareil ménager sera garanti pour la durée
résiduelle de la période de garantie de l’appareil original .
GARANTIE DE DIX 10 ANS, UNIQUEMENT SUR LE MOTEUR INVERSEUR —
Entre la deuxième et dixième année, à compter de la date d’achat original, lorsque cet appareil
est installé, utilisé et entretenu selon les instructions fournies avec le produit, Midea paiera pour le
remplacement des pièces d’usine du moteur inverseur dans la présence d’une défectuosité, afin de
poursuivre son bon fonctionnement, comme au premier jour de l’achat. Cette garantie de 10 ans ne
couvre que les pièces seulement, et n’inclut pas la main-d’œuvre.
GARANTIE À VIE LIMITÉE (CUVE EN ACIER INOXYDABLE)
Pendant la durée de vie du produit à compter de la date de l’achat original, si cet appareil ménager est
installé, utilisé et entretenu conformément aux instructions qui sont ci-jointes ou fournies avec le produit,
Midea paiera le coût des pièces de rechange spécifiées par l’usine et le coût de la main-d’œuvre de
réparation des éléments précisés ci-dessous pour corriger les défauts non superficiels de matériaux ou
de fabrication qui étaient présents à l’achat de l’appareil ménager en question :
■ Cuve en acier inoxydable
VOTRE REMÈDE UNIQUE ET EXCLUSIF EN VERTU DE LA PRÉSENTE GARANTIE LIMITÉE EST LA
RÉPARATION OU LE REMPLACEMENT DU PRODUIT, COMME PRÉVU AUX PRÉSENTES. Le service
technique doit être assuré par une entreprise d’entretien désignée par Midea. La garantie limitée est
valide uniquement dans les 50 États des États-Unis ou au Canada et s’applique uniquement si l’appareil
ménager est utilisé dans le pays où il a été acheté. La présente garantie limitée entre en vigueur à compter
de la date de l’achat original de l’appareil ménager par le consommateur. Une preuve de la date de l’achat
original doit être présentée pour obtenir un service technique en vertu de la présente garantie limitée.
Services à la clientèle Midea
customerserviceusa@midea.com.
GARANTIE LIMITÉE
CE QUE LA GARANTIE COUVRE
LA MAIN-D’ŒUVRE N’EST PAS INCLUSE
42

GARANTIE LIMITÉE
CE QUI N’EST PAS COUVERT
1.
Usage commercial, non résidentiel ou multifamilial, ou utilisation incompatible avec les
instructions d’utilisateur, d’opérateur ou d’installation publiées.
2.
Instructions à domicile sur la façon d’utiliser votre produit.
3.
Service pour corriger l’entretien ou l’installation inappropriée des produits, installation non
conforme aux codes électriques ou correction du système électrique domestique (p. ex.
câblage interne, fusibles, etc.).
Pièces consommables (c.-à-d. ampoules, piles, filtres à air ou à eau, etc.).
4.
Défauts ou dommages causés par l’utilisation de pièces ou d’accessoires Midea non
5.
authentiques.
Les dommages causés par un accident, une mauvaise utilisation, un abus, un incendie, des
6.
inondations, des problèmes électriques, un cas de force majeure ou une utilisation avec
des produits non approuvés par Midea.
7.
Réparations des pièces ou systèmes pour corriger les dommages ou défauts du produit
causés par un entretien, une modification ou une modification non autorisés de l’appareil.
8.
Les dommages esthétiques, y compris les égratignures, les bosses, les éclats et autres
dommages aux finis d’appareils, à moins que ces dommages ne résultent de défauts de
matériaux et de fabrication et qu’ils soient signalés à Midea dans les 30 jours.
9.
Entretien régulier du produit.
10.
11.
Produits transférés de son propriétaire initial.
12.
Décoloration, rouille ou oxydation des surfaces résultant d’environnements caustiques ou
corrosifs, y compris, mais sans s’y limiter, des concentrations élevées de sel, une humidité
élevée ou une humidité ou une exposition aux produits chimiques.
13. Ramassage ou livraison. Ce produit est destiné à la réparation à domicile.
14. Frais de déplacement ou de transport pour le service dans des endroits éloignés où un
servicer autorisé Midea n’est pas disponible.
Retrait ou réinstallation d’appareils inaccessibles ou de dispositifs intégrés (p. ex.,
15.
garnitures, panneaux décoratifs, planchers, armoires, îles, comptoirs, cloisons sèches, etc.)
qui interfèrent avec l’entretien, le retrait ou le remplacement du produit.
Service ou pièces pour appareils avec numéros de modèle/série originaux enlevés,
16.
modifiés ou mal identifiés.
Le coût de réparation ou de remplacement dans ces circonstances exclues sera assumé par
le client.
EXONÉRATION DE GARANTIES IMPLICITES
LES GARANTIES IMPLICITES, Y COMPRIS TOUTE GARANTIE IMPLICITE DE QUALITÉ
MARCHANDE OU D’ADAPTATION À UN USAGE PARTICULIER, SONT LIMITÉES À UN AN
OU À LA PÉRIODE LA PLUS COURTE PERMISE PAR LA LOI. Certains États et provinces
ne permettent pas de limiter la durée des garanties implicites de qualité marchande ou
d’adaptation à la condition physique, de sorte que cette limitation peut ne pas s’appliquer à
vous. La présente garantie vous confère des droits précis reconnus par la loi et vous pouvez
également avoir d’autres droits qui varient d’une juridiction à l’autre.
EXCLUSION DE DÉCLARATIONS HORS GARANTIE
Midea ne fait aucune déclaration sur la qualité, la durabilité ou le besoin d’
réparation de cet appareil majeur autre que les déclarations contenues dans la présente
garantie. Si vous désirez une garantie plus longue ou plus complète que la garantie limitée
qui accompagne cet appareil majeur, vous devez demander à Midea ou à votre détaillant
d’acheter une garantie prolongée.
LIMITATION DES RECOURS; EXCLUSION DES DOMMAGES ACCESSOIRES ET INDIRECTS
VOTRE SEUL RECOURS EXCLUSIF EN VERTU DE LA PRÉSENTE GARANTIE LIMITÉE EST
LA RÉPARATION DE PRODUITS, TEL QU’IL EST PRÉVU AUX PRÉSENTES. MIDEA NE PEUT
ÊTRE TENUE RESPONSABLE DES DOMMAGES ACCESSOIRES OU INDIRECTS. Certains États
et certaines provinces n’autorisent pas l’exclusion ou la limitation des dommages accessoires
ou consécutifs, donc la limitation ou l’exclusion ci-dessus peut ne pas s’appliquer à votre
cas. La présente garantie vous confère des droits précis reconnus par la loi et vous pouvez
également avoir d’autres droits qui varient d’une juridiction à l’autre.
entretien ou de
43

RENSEIGNEMENTS SUR L’INSCRIPTION
PROTÉGEZ VOTRE PRODUIT :
Nous conserverons le numéro de modèle et la date d’achat de votre nouveau
produit Midea dans le dossier pour vous aider à consulter ces renseignements en
cas de réclamation d’assurance comme un incendie ou un vol.
Inscrivez-vous en ligne à www.midea.com/ca/support/Product-registration
OU
Veuillez remplir et retourner l’adresse à l’adresse suivante :
Midea America Corp. 759 Bloomfield Ave #386, West Caldwell, NJ 07006-6701
---------------------------------------(détacher ici) ------------------------------------------
Nom Modèle :
Numéro de série :
Adresse : Date d’achat : Nom du magasin/dépositaire :
Ville :
Province : Code postal : Adresse de courriel :
Numéro de téléphone :
Avez-vous acheté une garantie supplémentaire : Comme résidence principale :
Comment avez-vous appris ce produit :
❑ Publicité
❑ Démonstration en magasin
❑ Démonstration personnelle
Les renseignements recueillis ou soumis à nous sont uniquement offerts aux employés internes
de la société aux fins de communiquer avec vous ou de vous envoyer des courriels, selon votre
demande d’information et les fournisseurs de services de la société aux fins de prestation de
services liés à nos communications avec vous. Toutes les données ne seront pas partagées avec
d’
autres organisations à des fins commerciales.
Midea America (Canada) Corp.
Markham, ON, Canada L3R 8V2
Service à la clientèle : 1-866-646-4332
44
Fabriqué en Chine


make yourself at home
chez nous, c'est chez vous
 Loading...