

Page 1

PLEASE
READ THIS MANUAL
OWNER’S MANUAL FOR MODELS
MIS26, MIS35, MIS50, MIS70 & MIS80
PROUDLY DISTRIBUTED BY
48a Radford Road
RESERVOIR VIC 3073
PH: 03 94952899
MIDEA CUSTOMER & TECH
SUPPORT
PH: 1300 726 002
Inside you will find many helpful hints on
how to use and maintain your air
conditioner properly. Just a little
preventative care on your part can save
you a great deal of time and money over
the life of your air conditioner. You'll find
many answers to common problems in the
chart of troubleshooting tips. If you review
the chart of Troubleshooting Tips first, you
may never need to call for service.
Page 2

2
CONTENTS
Safety Precautions & Warning 3
Caution 4
NAMES OF PARTS
Indoor unit 4
Outdoor unit 4
Display window 5
OPERATING INSTRUCTIONS
Operating temperatures 5
Manual operation 6
Airflow directional control 6
How the air conditioner works 7
Special functions 8
CARE & MAINTAINENCE
Care & Maintainence 9
Cleaning the unit 9
Cleaning the air filter and air freshening filter 9
Preparation for extended non-operation 9
Pre-season inspection 9
TROUBLESHOOTING TIPS
Troubleshooting tips 10
Troubleshooting guide 11
REMOTE CONTROLLER FUNCTIONS
Operation of Remote Control Buttons 12-14
Indicators on Remote LCD screen 15
Auto operation 16
Cooling/Heating/Fan & Dehumidifier operation 16
Timer operation 17-19
Remote Controller Handling 20
Page 3

3
CONGRATULATIONS ON THE PURCHASE OF
•
YOUR MIDEA MISSION SERIES INVERTER AIR
CONDITIONER;..THANK YOU.
SAFETY PRECAUTIONS
DISPOSAL: Do not dispose of this product as
unsorted municipal waste. Collection of such waste
separately for special treatment is necessary.
It is prohibited to dispose of this appliance in domestic
household waste. For disposal, there are several
possibilities:
A) The municipality has established collection
systems, where electronic waste can be disposed of
by the user.
B) When buying a new product, the installer will
dispose of the old product.
C) As old products contain valuable resources, they
can be sold to scrap metal dealers.
Unrestricted disposal of waste into forests and natural
landscapes endangers peoples health when
hazardous substances leak into the ground-water and
find their way into the food chain.
It is suggested that this appliance can be used by
children aged from 8 years and above and persons
with reduced physical, sensory or mental
capabilities, or lack of experience and knowledge if
they have been given supervision or instruction
concerning use of the appliance in a safe way and
understand the hazards involved. Children should
not play with the appliance. Cleaning and user
maintenance should not be done by children
without supervision.
To prevent injury to the user or other people and
also property damage, the following instructions
must be followed. Incorrect operation due to
ignoring of instructions may cause harm or
damage.
The seriousness is classified by the following
indications.
Do not expose your body directly
to the cool air for a prolonged
NAMES OF PARTS
period.
• Never poke fingers or other
objects in the air inlet and outlet
vents.
• Never attempt to repair, relocate,
and modify the air conditioner
yourself. Always contact your
service provider if required.
• Do not operate your air
conditioner in a wet room such as
a bathroom or laundry room.
• In the event of any abnormalities
such as a burning smell,
immediately switch off the device
and contact your service provider.
• Always switch off the device
before you start to clean it.
• Contact an authorized installer for
installation of this unit.
• Contact an authorized service
technician for repair or
maintenance of this unit.
Page 4
4
NAMES OF PARTS
•
Never activate any switches with
wet hands as it may cause an
electric shock.
• Never use the device for any other
purpose than the intended use.
Never place objects on the unit.
• Do not expose plants or animals
directly to the air flow.
• Never use combustible cleaning
agents as these could cause a fire
or deformation of the unit.
• Never place any burning objects
close to the device if they could be
directly affected by the emitted
air. (Candles etc)
• Never step onto the outdoor unit
and never place anything on it.
• Never use an unsteady or rusty
base for the outdoor unit
mounting.
• Never install the air conditioner in
places where combustible gas can
be emitted as emitted gas may
collect and cause an explosion.
• Never allow the air conditioner to
run for too long with the doors or
windows open.
• If the air conditioner is to be used
in conjunction with other heating
appliances, the air in the room
should be refreshed periodically,
• Always switch the unit off at the
Mains switch if the unit is not
going to be used for any lengthy
period of time.
• Always switch off the air
conditioner during an electrical
storm otherwise, electrical parts
may get damaged.
• Check that the condensate
drainage line is correctly
connected. If not, water will
escape onto furnishings in the
room
• For electrical safety purposes it is
recommended that unit is
installed with an earth leakage
circuit-breaker.
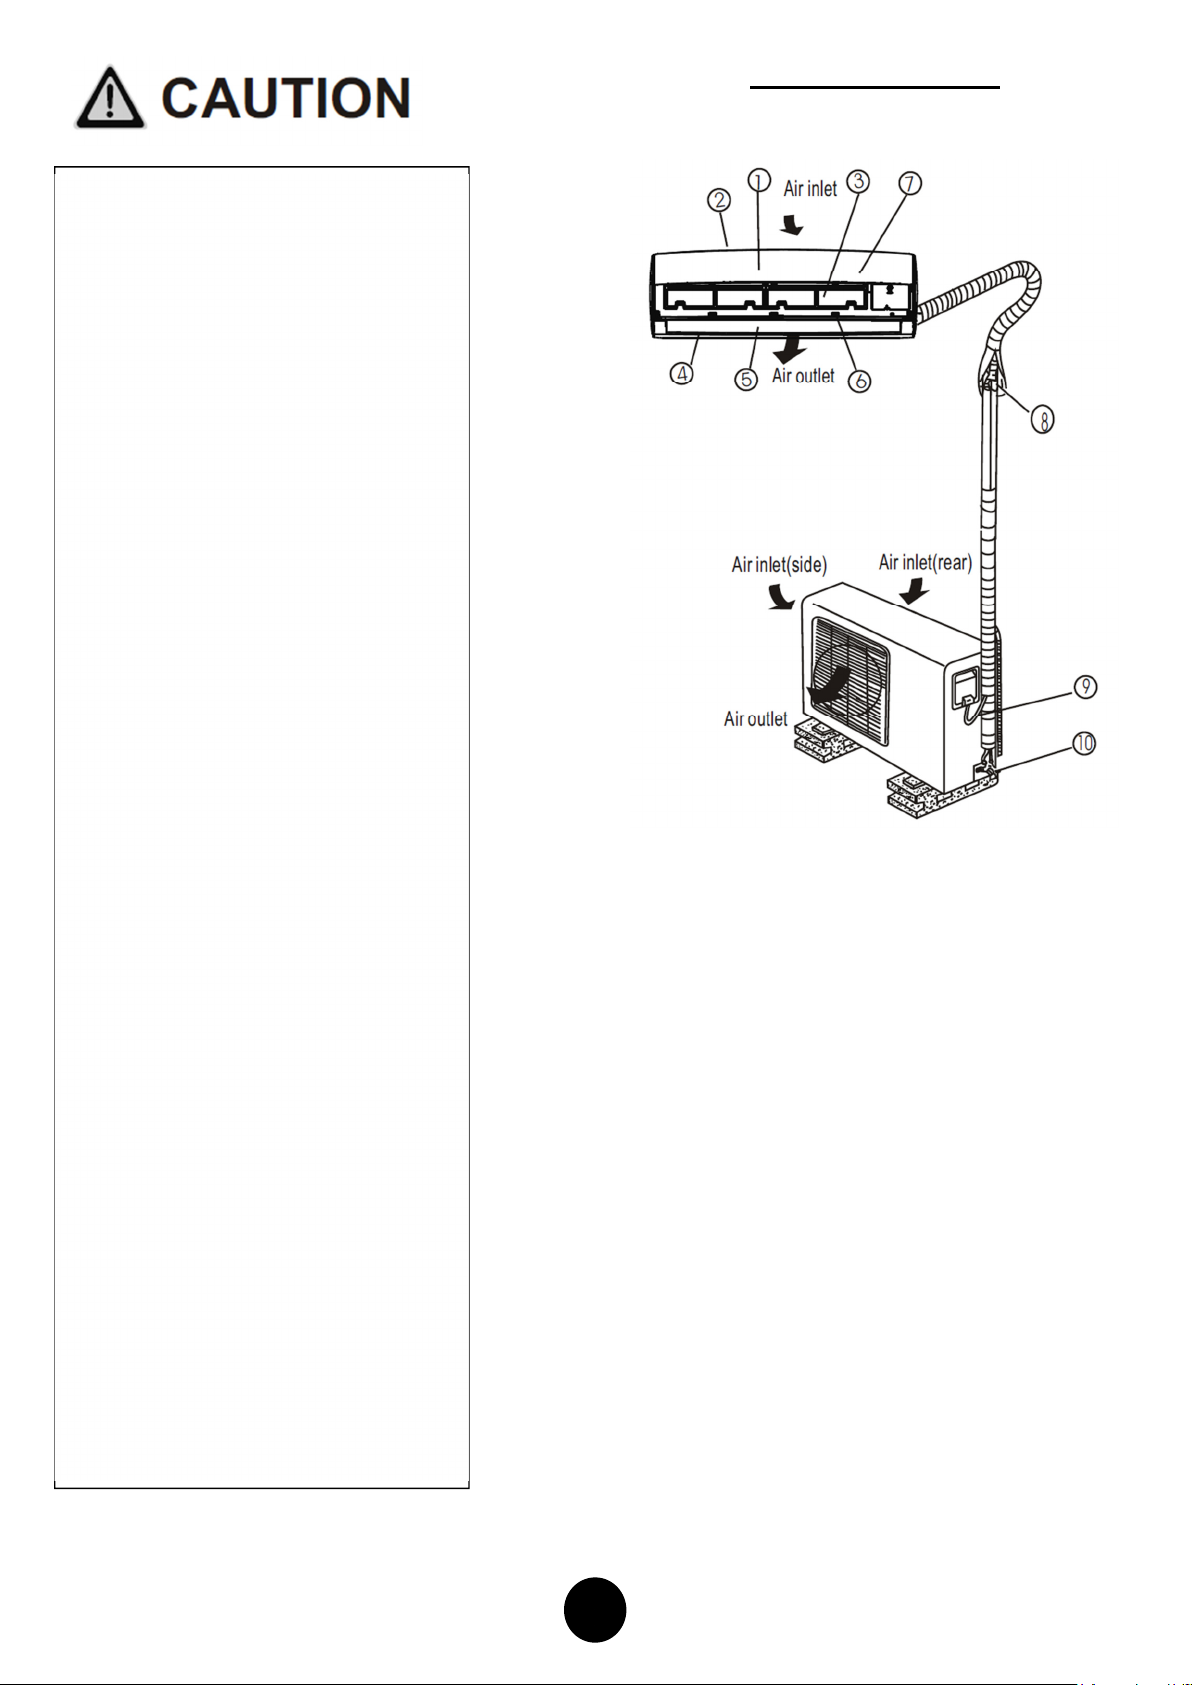
NAME OF PARTS
INDOOR UNIT:
1. Front panel
2. Air inlet
3. Air filter
4. Air outlet
5. Horizontal air flow grille
6. Vertical air flow louver (inside)
7. Display window
OUTDOOR UNIT:
8. Connecting pipe
9. Connecting cable
10. Stop valve
(Installertosupply)
(Installertosupply)
Page 5
5
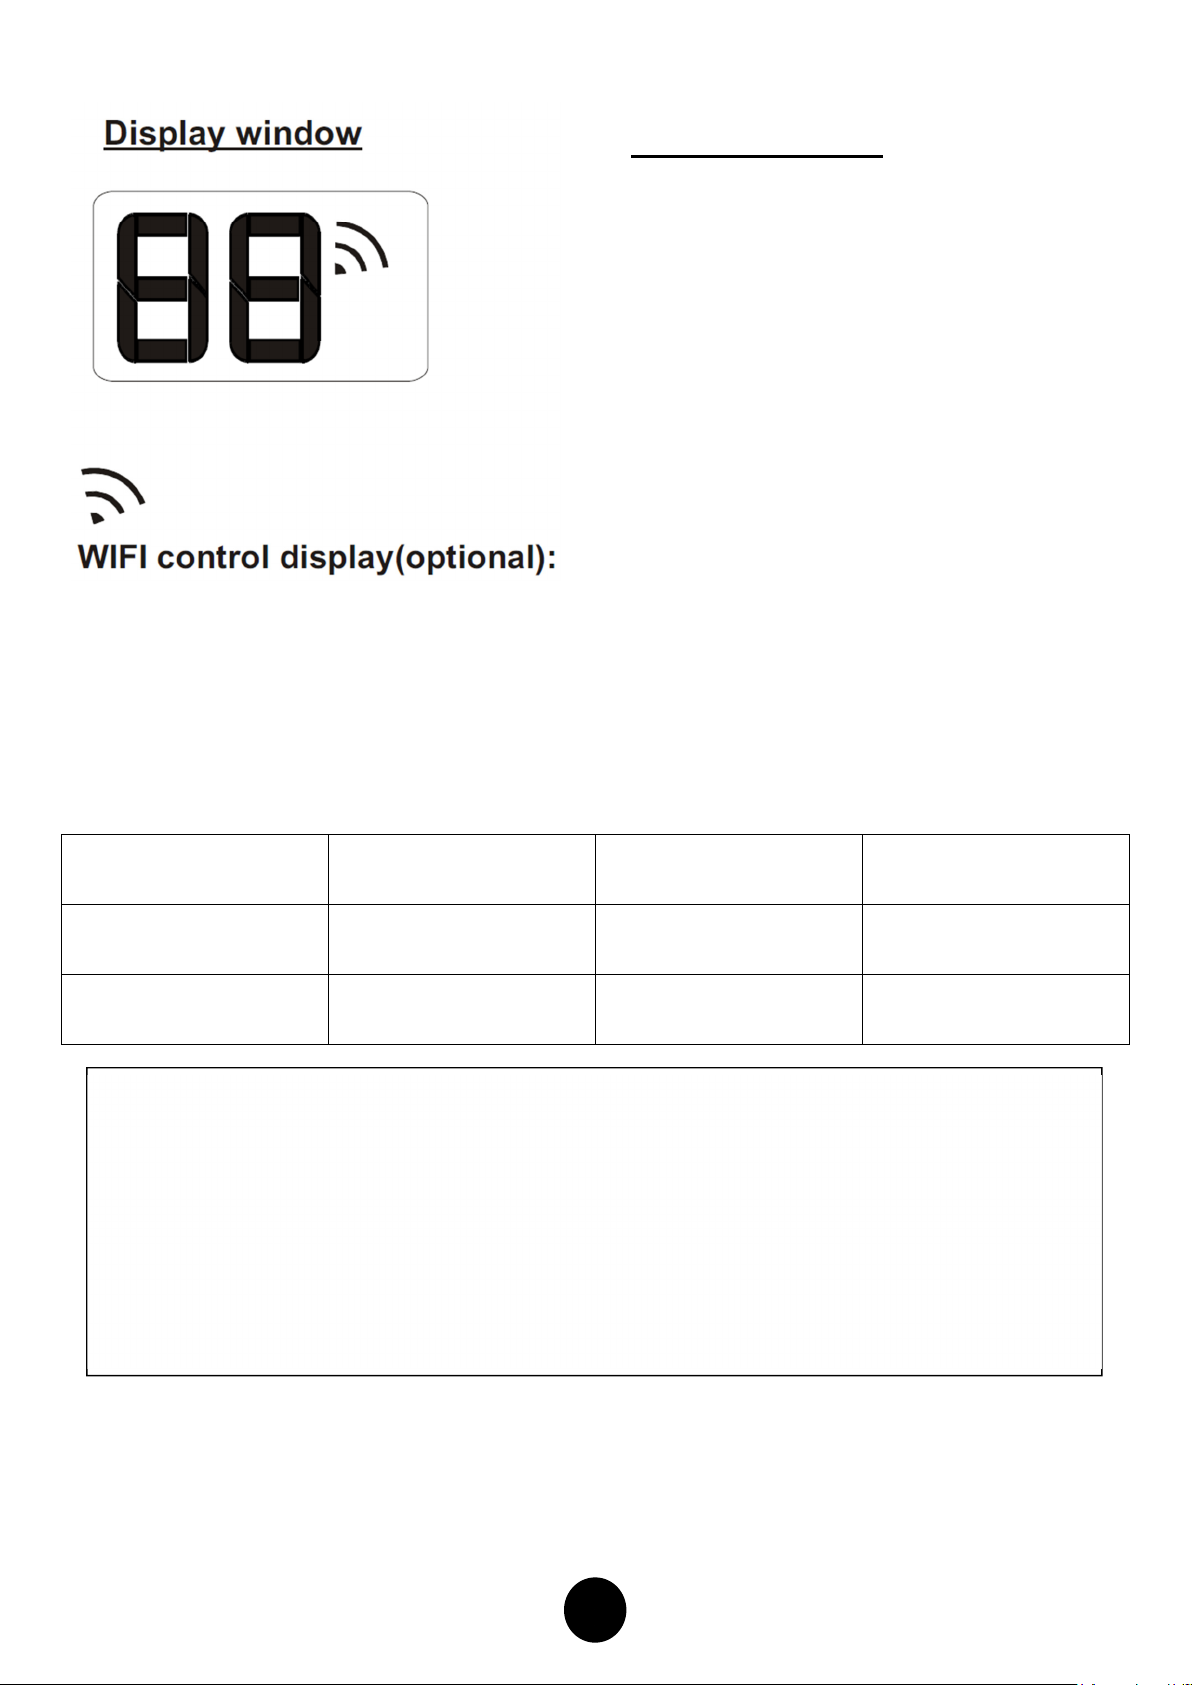
Displays when the WIFI control feature is activated.
(Not available when the unit does not have this
optional kit installed)
DISPLAY WINDOW
Digital display:
• Displays the temperature settings when the
air conditioner is operational.
• Displays the room temperature in FAN mode.
• Displays the self-diagnostic codes.
ON
• Displays
ON or when Swing, Turbo or Silence feature is
activated.
• Displays
OFF is set.
• Displays
Turbo or Silence feature is cancelled.
• Displays
• Displays
activated under heating mode.
• Displays
applicable).
• When ECO function is activated, the
the display window illuminates gradually one
by one as
→
E.... in one second intervals
for three seconds when Timer
OF
for three seconds when Timer
OF
for three seconds when Swing,
df
under defrosting operation.
cf
when anti-cold air feature is
SC
during self clean operation (if
88 in
E→ C → O→Set temperature
TEMPERATURE\MODE
Room Temperature
Outdoor Temperature
NOTE:
1. Optimum performance will be achieved within these operating temperatures however capacities
reduce as Outdoor ambient approaches the limits. If air conditioner is used outside of the above
conditions, certain safety protection features might come into operation and cause the unit to
function abnormally.
2. If the air conditioner runs for a long time in cooling mode and the humidity is high (over 80%),
condensed water may drip from the unit. In this instance please set the vertical air flow louver to its
maximum angle (vertically to the floor) and set HIGH fan mode.
Cooling Operation
O
17
C ~32OC
O
0
C ~50OC
Heating Operation
0OC ~30OC
-15OC ~30OC
Drying Operation
10OC ~32OC
0OC ~50OC
Page 6

6
Manual Operation (Continued)
1) Open and lift the front panel up to an angle
until it remains fixed with a clicking sound.
2) One press of the manual control switch will
lead to the forced AUTO operation. If pressed
twice within five seconds, the unit will operate
under forced COOL operation.
3) Close the panel firmly to its original position.
CAUTION:
This switch is normally used for testing purposes only.
Please do not use it unless necessary. To restore the
remote controller operation, use the remote controller
directly.
• Adjust the air flow direction properly, otherwise
it might cause discomfort or cause uneven
room temperatures.
• Adjust the horizontal louver using the remote
controller.
Adjusting vertical air flow (Up--Down)
Perform this function while the unit is in
operation. Use the remote controller to adjust
the vertical air flow direction by pressing the
Manual Operation
Units are equipped with a switch to run an emergency
operation mode. It can be accessed by opening the
front panel. This switch is used for manual operation in
case the remote controller fails to work or maintenance
is necessary.
NOTE:
The unit must be turned off before operating the
manual control button. If the unit is operational,
continue pressing the manual control button until the
unit is off.
Swing button The horizontal louver will
start non-stop up/down swing. The indoor unit
displays “on” for a second then reverts back to
Adjusting horizontal air flow (left - right)
IMPORTANT: Do not put your fingers into the air vents
as the high-speed fan inside may cause injury.
Do not operate the air conditioner for long periods with
the air flow direction set downward in cooling or
dehumidifying mode otherwise condensation may
form on the surface of the horizontal louver causing
moisture to drop on to the floor or on furnishings.
After a quick restart, the horizontal louver may remain
static for approximately 10 seconds. Open angle of the
horizontal louver should not be set too small, as
COOLING or HEATING performance may be reduced
due to too restricted air flow area. Do not move the
horizontal louver manually, otherwise the horizontal
louver will be out of sync. If this happens, please
cease operating, disconnect power for a few seconds
and then restart the air conditioner.
the Temperature display. If you press the
button again, horizontal louver stops at the
angle it as of that moment and unit displays
“of” for a second.
Again, press this button for 2 seconds
to start/stop vertical louver movement (Left to
right). Pressing again for 2 seconds will stop
left to right movement at angle when button
was pressed.
Page 7
7
How the Air Conditioner Works.
Basic operation modes:
AUTO/COOL/DRY/HEAT
When you set the air conditioner in AUTO mode, it will
automatically select cooling, heating or fan only
operation depending on your required SET
temperature and the current room temperature.
The air conditioner will control room temperature
automatically to the temperature point you set.
If you feel uncomfortable in the AUTO mode, you can
set your desired temperature.
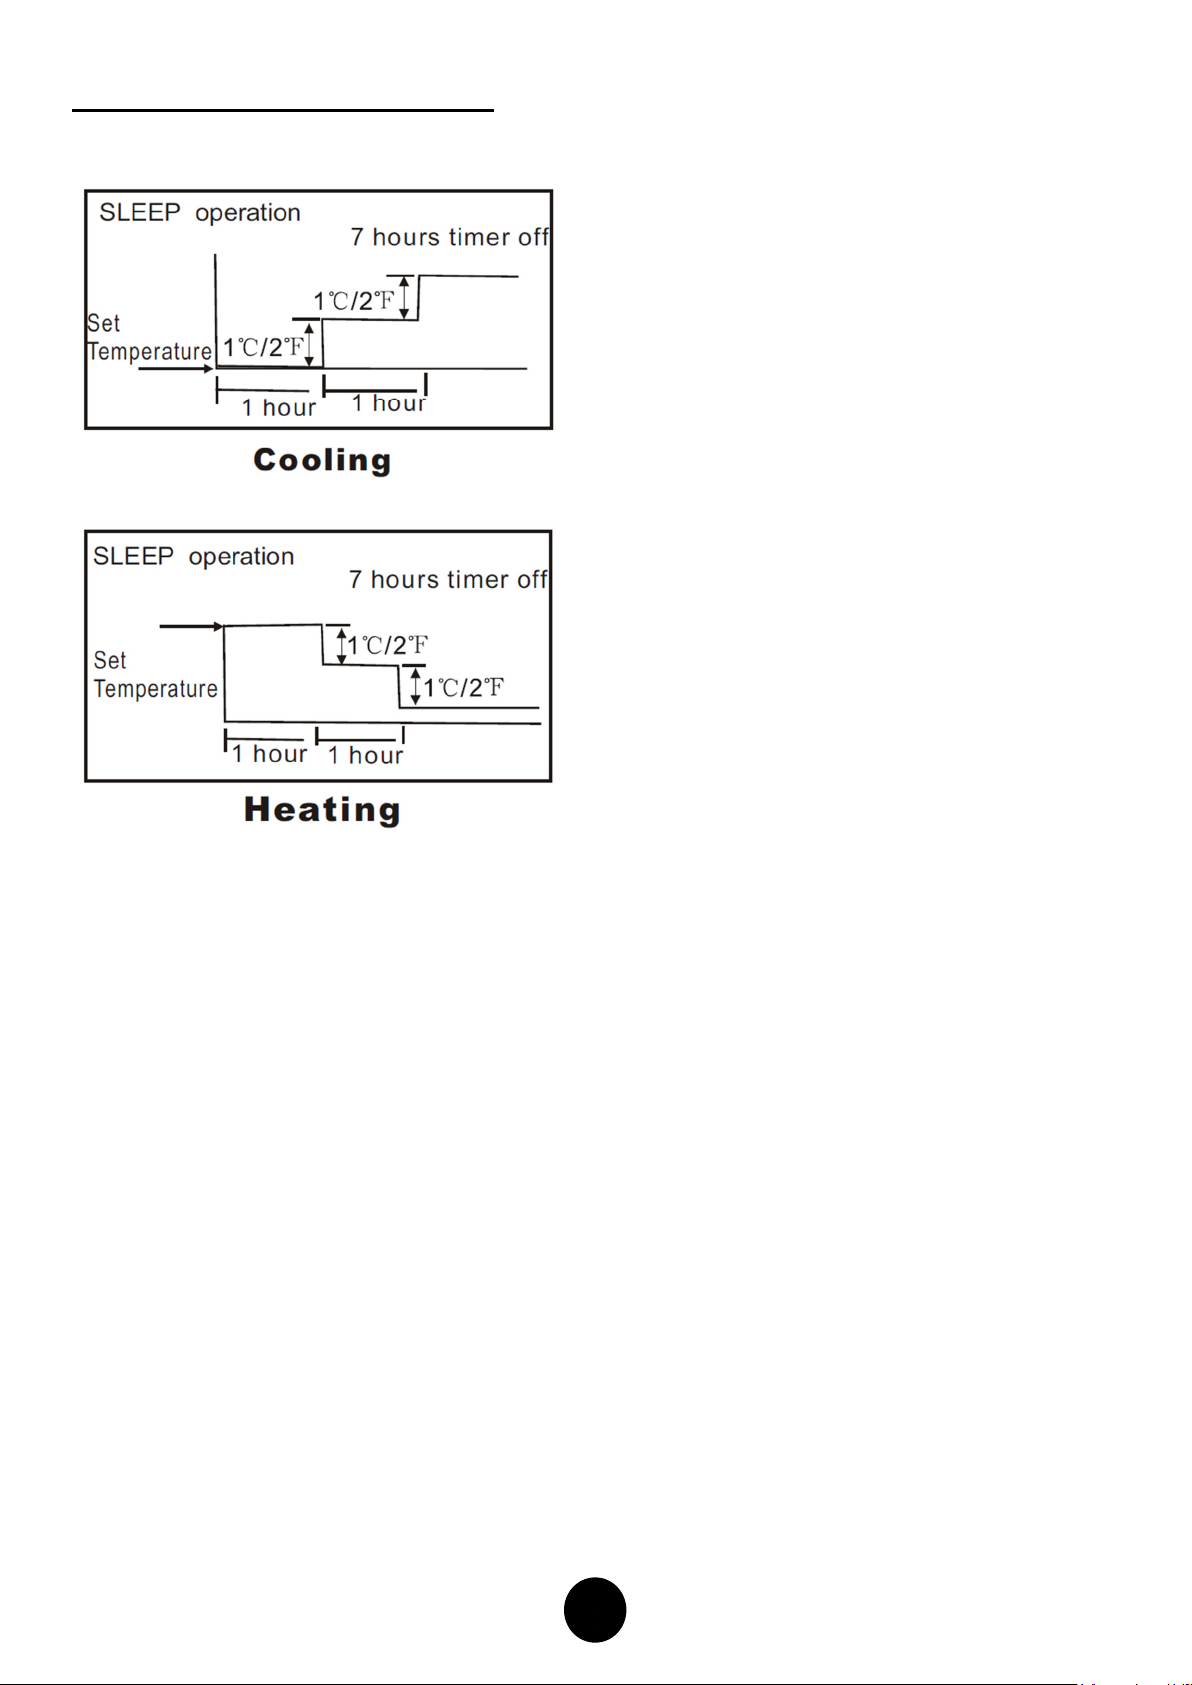
SLEEP OPERATION
When selected, the set temperature will increase
(cooling) or decrease (heating) by 1OC per hour for the
first 2 hours. Thereafter it keeps this new temperature
for 5 hours before switching off.
This operation saves energy and improves night time
comfort by synchronising with the body’s metabolism.
DRYING OPERATION
The temperature is regulated while dehumidifying by
The unit repeating turning on and off the cooling
operation or fan only. The fan speed is set to LOW.
HEATING OPERATION
This air conditioner operates on the heat-pump
principle, absorbing heat from air outdoors and
transferring that heat to the indoor unit. As a result, the
operating performance is reduced as outdoor air
temperature drops.
.
OPTIMAL OPERATION
To achieve optimal performance, please note the
following:
Adjust the air flow direction correctly so that it is not
torwards people.
Adjust the temperature to achieve moderate comfort
levels. Excessively low or high temperature waste
energy.
Improve performance by keeping windows and doors
closed.
Limit energy usage (run time) by using the TIMER
function.
Do not put any object near air inlet or air outlet, as the
efficiency of the air conditioner may be reduced and
may cause the air conditioner to stop running.
Inspect the air filters periodically, and clean them when
needed.
Page 8

8
Special functions
Louver Angle Memory Function:
Within the scope of louver angle safety, the
horizontal louver angle is memorised and will return to
the position last selected by the user.
If last angle exceeds the believed safe angle, it will
memorise as close as possible to last position
selected. This will not happen when Turbo or manual
control buttons are pressed or after a power
interruption.
We strongly suggest that the open angle of the
horizontal louver should not be set too small, in case
condensed water forms and drips from the horizontal
louver.
SELF CLEAN function
Airborne bacteria use the moisture on the indoor heat
exchanger (Evaporator) to grow. Regular drying of the
exchanger (Evaporator) prevents this growth.
By simply
system will automatically manage the process. This
cleaning action may be done as frequently as desired.
The unit will operate in the following sequence:
FAN mode at Low fan speed—Heating operation with
LOW fan speed ---FAN operation--Stop Operation--Turn off.
Note:
Anti-mildew function
When unit is turned off in COOL, DRY,AUTO (Cool)
mode, the air conditionerwill continue operating for
about 10 minutes with very low airflow. This will help to
dry up the condensed water inside the evaporator,
and help prevent mildew growth. Under Anti-mildew
operation, do not restart the air conditioner until the
unit is completely off.
Anto-restart function
After a power interruption such as a
blackout, the air conditioner stops but it restarts
automatically and performs previous operation when
the power supply returns.
choosing the SELF CLEAN function, the
• This function is only activated in COOLING
or DRY mode.
• Before activation it is recommended the air
conditioner has been running for 30 minutes
under cooling operation.
• Pressing the SELF CLEAN or ON/OFF
button again during the cleaning cycle will
cancel the operation and turn the unit off.
WIFI Control Function (optional)
If optional WIFI Kit has been installed, the unit can be
controlled either by the supplied remote controller or
by Smart phone.
(Instructions are supplied with optional WIFI kit)
Air Filter Reminding Function
Cleaning filter reminding function:
After 240 hours of operation, the indoor
unit display window will display and flash
This is a reminder to clean the Air Filters for more
efficient operation. After 15 seconds, the system will
revert back to the previous display again. When the
CL
indicator appears and flashes, please press
button on remote controller for 4 times or press
the Manual control button for 3 or more times to clear
the registered hours, otherwise the
display and flash again for another 15 seconds the
next time the unit is started
Replacing filter reminding function:
After 2880 hours of operation, the indoor
display window will display and flash
This feature is a reminder to replace the Air
Filter for more efficient operation. After 15 seconds,
the system will revert back to the previous display
again. When the
please press the button on remote controller for 4
times or press the Manual control button for 3 or more
times to clear the registered hours, otherwise the
indicator will display and flash again for another 15
seconds the next time the unit is started
Mute operation
DO NOT DISTURB BUTTON
Press this button on the remote to turn off the indoor
screen display and also to turn off the Air conditioner
Buzzer. The fan speed shifts to low which creates a
comfortable and quiet environment.
Pressing the button again cancels this function.
nF
indicator appears and flashes,
CL
CL
indicator will
nF.
.
nF
Page 9

9
Care & Maintainence.
1) Clean the indoor unit and filters and operate the fan for
about half a day to dry the inside of the unit.
2) Stop the air conditioner and disconnect power.
3) Remove the batteries from the remote controller.
WARNING:
Servicing shall only be performed as recommended by
the equipment manufacturer.
Basic maintenance can be done by the consumer
however any Repairs to this equipment requires skilled
personnel competent in the use of flammable
refrigerants.
Please Contact MIDEA CUSTOMER & TECH
SUPPORT on 1300 726 002 for further advice.
Before any maintainence, please ensure unit is
switched off:
Do not use any chemically treated cloth or duster to
clean the unit.
Do not use benzine, thinners, polishing powder or
similar solvents for cleaning. These may cause
the plastic surface to crack or deform.
Never use water hotter than 40
the front panel (or air filters) as it could cause
deformation or discoloration.
Cleaning the air filter and air freshening filter
A clogged air filter reduces the cooling efficiency of
this unit. It is reccomended to clean the filter once
every 2 weeks.
1. Open the front panel by carefully lifting both
ends at the same time. At a certain angle, a
clicking sound is heard and it becomes selfsupporting. For some models please use the
suspension bars to prop up the panel.
2. Use the tab provided to move the filter first up
a little, then slightly towards you. Now extract
the filter by gently drawing downwards.
3. Unclip the small air freshening filter from the
large air filter. Clean it with vacuum, and
replace it occasionally.
4. Clean the large air filter with soapy water.
Rinse with fresh water. Shake off excess water
and dry it in a cool place. (May shrink if put
into sunny position)
Preparation for extended non-operation
Pre-season inspection
If the unit has been idle for a long time, please check
andcleanthe indoorunitanditsfilters.
The outdoor unit requires periodic maintenance
and cleaning. It is suggested you contact your dealer
or service provider who will inspect for damaged or
disconnected wires, check for water or oil leaks and
check if the air outlets or inlets have been blocked
while unit has been idle.
O
C to clean
Page 10

10
Troubleshooting Tips
The following events may occur during normal operation, and may not indicate malfunction.
SYMPTOM
Operation is delayed
after restart
Fan speed changes to off, very slow and then normal
Heating operation stops suddenly and defrost-light
blinks on indoor unit
Mist coming out of the indoor unit
Low volume sounds are emitted by the air
conditioner
Dust discharges from indoor unit
Emits a peculiar odour
Changes to fan speed only while cooling or heating
mode
Operation is erratic, unpredictable or unresponsive
NOTE: If any problems are not resolved, please contact either your dealer or a local dealer or
MIDEA CUSTOMER & TECH SUPPORT on 1300 726 002 for further advice. Be sure to inform them details of the
malfunctions and unit model number..
To prevent fuses blowing, the compressor will not operate
while the protection circuit is working for about 3 minutes
after sudden OFF—ON operation of the power supply
This automatically happens in heating mode :
-- prevents cold air blowing onto occupants when the
heating operation is first started.
-- during automatic defrosting operation,
-- during low temperature heating operation
In HEAT mode, the indoor unit may temporarily stop for
maximum of 10 minutes to perform the automatic
defrosting operation
In COOL mode, a mist generated by condensation
formed by sudden cooling process may be emitted.
Mist may also be seen due to moisture generated from
defrosting process when the air conditioner restarts in
HEAT mode operation after defrosting.
Hissing sound-- during operation or immediately after
stopping the air conditioner a refrigerant flowing sound
may be heard
Squeaking sound-- normal expansion and contraction of
plastic and metal parts caused by temperature change
during operation.
Rushing air-- when louver resets its position.
May occur when air conditioner is used for the first time or
has not been used for a long time.
Various smells generated from interior textiles, furniture,
or cigarette smoke absorbed into the air conditioner may
be emitted. Any burning smell must be reported
immediately.
Room temperature has reached the temperature setting
of the remote control.
If not the case call the contact TECH support..
Interference from cell phone towers and remote boosters
may cause the unit to malfunction. Flourescent lighting
can also interfere with signal transmission from Remote.
Disconnect the power and then re-connect.
Press the ON/OFF button on the remote controller to
restart operation.
Possible Cause
Page 11

11
Indicator lamps continue flashing
Troubleshooting Guide
Before you call for or request servicing, troubleshoot a problem by performing following checks:
SYMPTOM
-- Is there a power failure?
-- Has a switch been turned off, a circuit breaker tripped
or a fuse blown?
-- Is the timer operating?
Unit will not operate
Poor cooling or heating performance
Error code appears on the indoor unit such as:
E0,E1,E2.... P1,P2,P3.....or F1, F2,F3
If the problem persists after you have performed these checks or diagnostics, immediately stop operation
and contact the authorized service center. Be sure to inform them details malfunctions and unit model number.
-- Are the batteries used in the remote controller
exhausted?
-- Are the batteries used in the remote controller loaded
properly?
-- Are the air filters dirty?
-- Is air flow unrestricted in & out of indoor & outdoor
units?
-- Are the temperature and mode settings correct?
-- Have the windows or doors been left opened?
-- Is fan speed on high and louvers allowing maximum
flow?
-- Is direct or strong sunlight shining into the room in
cooling operation?
-- Are there other heating devices or computers
operating, or too many people in the room in cooling
operation?
-- Is the SILENCE function is activated? Under SILENCE
operation, noise reduction is prioritized and the air -
conditioning performance may become lower.
-- The unit may stop operation or continue to run in a
safety condition (depending on models). Waiting for about
10 minutes, the fault may be recovered automatically. if
not, disconnect the power and then connect it again. If
the problem still exists, disconnect the power and contact
the customer service center.
Diagnostic
In the case of ANY of the following, turn off the unit immediately!
-- Power cord is damaged or abnormally warm.
-- Burning odous are smelled.
-- Loud or abnormal sounds are heard.
-- Power fuse keeps blowing or a circuit breaker trips frequently.
-- Water or other objects fall into or out of the unit.
DO NOT ATTEMPT TO CORRECT THESE ITEMS YOURSELF!
CONTACT THE AUTHORIZED SERVICE PROVIDER!
Page 12

12
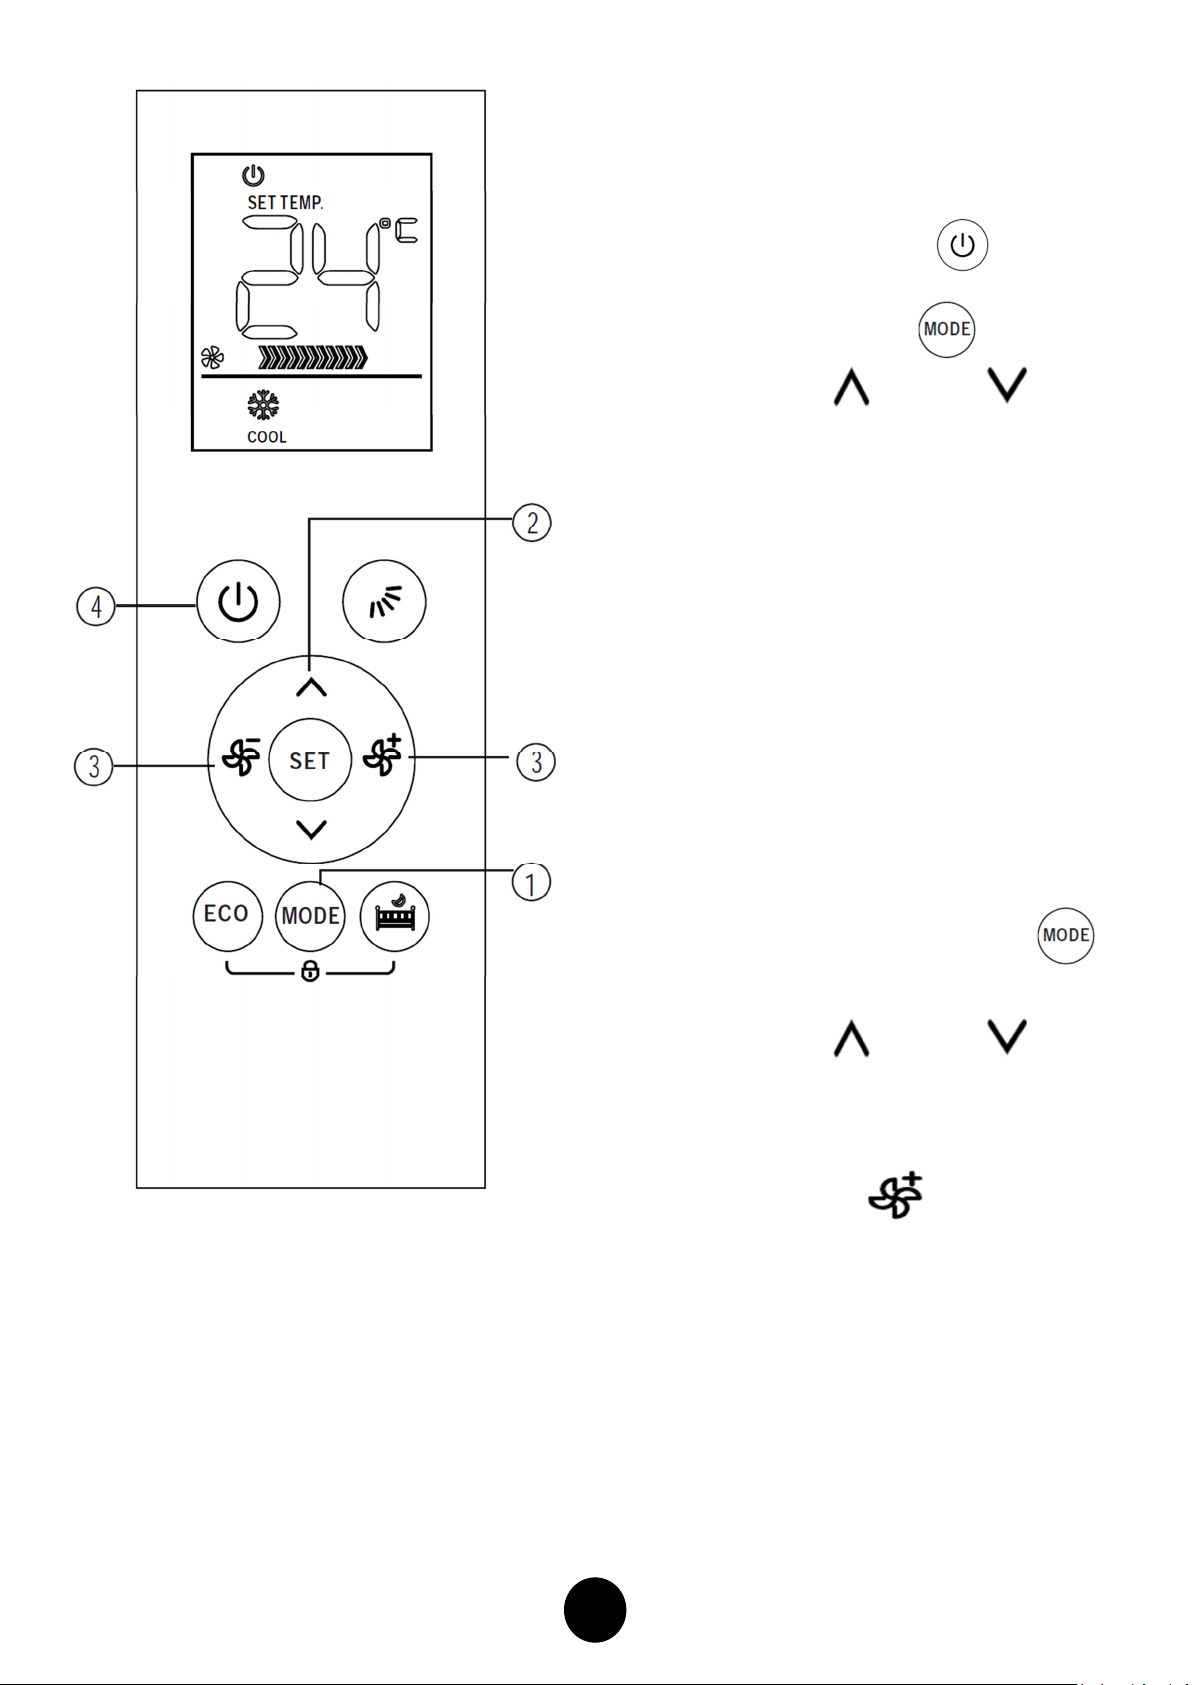
Operation of Remote Control
Buttons.
DOWN BUTTON
Press this button to decrease the desired SET
temperature of the Air Conditioner or to
decrease the Timer setting hours.
3. FAN BUTTON
Used to select the fan speed in four steps:
HIGH→MED→ LOW→ AUTO
NOTE:
• Hold down this button for at least 2
seconds to activate or cancel Silent
mode. Due to low frequency operation
of the compressor, Silent mode may
result in insufficient cooling and
heating performance.
• Pressing the Fan butto
MODE button , ON/OFFbutton
or ECO buttonwillcancelthe
Silentmode.
4. FAN BUTTON
Used to select the fan speed in four steps:
AUTO→LOW→ MED→ HIGH Fan speeds
cannot be altered when unit is running in
AUTO or DRY mode.
NOTE:
• Hold down this button for at least 2
seconds to activate or cancel Turbo
mode. Turbo function enables the unit
to reach the pre-set temperature in
cooling or heating operation in the
shortest time.
n ,
1. ON/OFF BUTTON.
This button turns the Air Conditioner ON or
OFF
2. UP BUTTON
Press this button to increase the desired SET
temperature of the Air Conditioner or to
increase the Timer setting hours.
5. SWING BUTTON
Used to stop or start horizontal louver
movement (Up & Down). Pressing alternates
either continuous swing up & down or at angle
when button is pressed. Hold down this button
for 2 seconds to start/stop vertical louver
movement (Left to right). Pressing again for 2
seconds will stop left to right movement at
angle when button was pressed.
Page 13

13
6. SET BUTTON
Used to initiate the following functions in the
sequences below when used in conjunction
with the & buttons.
Timer on → Timer off → Self clean → Fresh
→ Sleep → Follow me
Press the SET button to select the desired
function, the selected symbol will flash on the
remote’s display area and then press the
or buttons to confirm.
SLEEP function
This function maintains the most comfortable
temperature while sleeping and saves energy as well.
This function is available in COOL, HEAT and AUTO
modes only.
When selected, the set temperature will increase (in
cooling mode) or decrease (in heating mode) by 1OC
per hour for the first 2 hours. Thereafter it keeps this
new temperature for 5 hours before switching off.
This operation saves energy and improves night time
comfort by synchronising with the body’s metabolism.
FRESH function (not enabled for Australian
models)
SELF CLEAN function
Under SELF CLEAN mode, the air conditioner will
automatically clean and dry the Evaporator and keep it
fresh for the next operation period.
Airborne bacteria use the moisture on the indoor
Evaporator to grow. Regular drying of the Evaporator
prevents this growth.
By simply selecting the SELF CLEAN function, the
system will automatically manage the process. This
cleaning action may be done as frequently as desired.
For Australian Reverse Cycle models the unit will
operate in the following sequence:
FAN mode at Low fan speed—Heating operation with
LOW fan speed ---FAN operation--Stop Operation--Turn off.
Note:
This function is only activated in COOLING or DRY
modes.
It is recommended to run the air conditioner under
cooling operation for at least 30 minutes before this
function is activated.
Selecting SELF CLEAN or pressing the ON/OFF
button again during the cleaning cycle will cancel the
operation and turn the unit off.
FOLLOW ME
When the Follow Me function is activated, the remote
display is actual temperature at the remotes location.
The remote control will send this signal to the air
conditioner at 3 minute intervals until Follow Me is
turned off.
Page 14

14
7. ECO BUTTON
Used to enter the energy efficient mode.
When in cooling mode and after pressing this
button the remote controller will adjust the
temperature automatically to 24OC and a fan
speed of Auto to save energy (but only if the
previous set temperature was less than 24OC)
If the user selected set temperature is between
24OC and 30OC, after the ECO button is
pressed, the fan speed will change to Auto but
the set temperature will remain unchanged.
NOTE:
Pressing the ON/OFF button, changing the mode or
adjusting the set temperature to less than 24OC will
stop ECO operation.
Under ECO operation, the set temperature should be
24OC or more. If you feel uncomfortable due to
insufficient cooling in this mode then just press the
ECO button again to stop it.
8. MODE BUTTON
Press this button to modify the air conditioner
mode in a sequence of following:
AUTO → COOL → DRY → HEAT → FAN
9. DO NOT DISTURB BUTTON
Press this button to turn off the indoor screen
Display and also to turn off the Air conditioner
Buzzer. The fan speed shifts to low which
creates a comfortable and quiet environment.
Pressing the button again cancels this
function.
Under DO NOT DISTURB mode, the display
will illuminate for 10 seconds while adjusting
the mode, set temperature or fan speed, etc.
10. LOCK FUNCTION
Locking and unlocking the remote is done by
pressing the ECO and the
DO NOT DISTURB buttons together at
the same time.
A symbol appears in the remote
control display window.
Page 15
15
Displayed when data
is
transmitted.
Indicates
that the air conditioner is
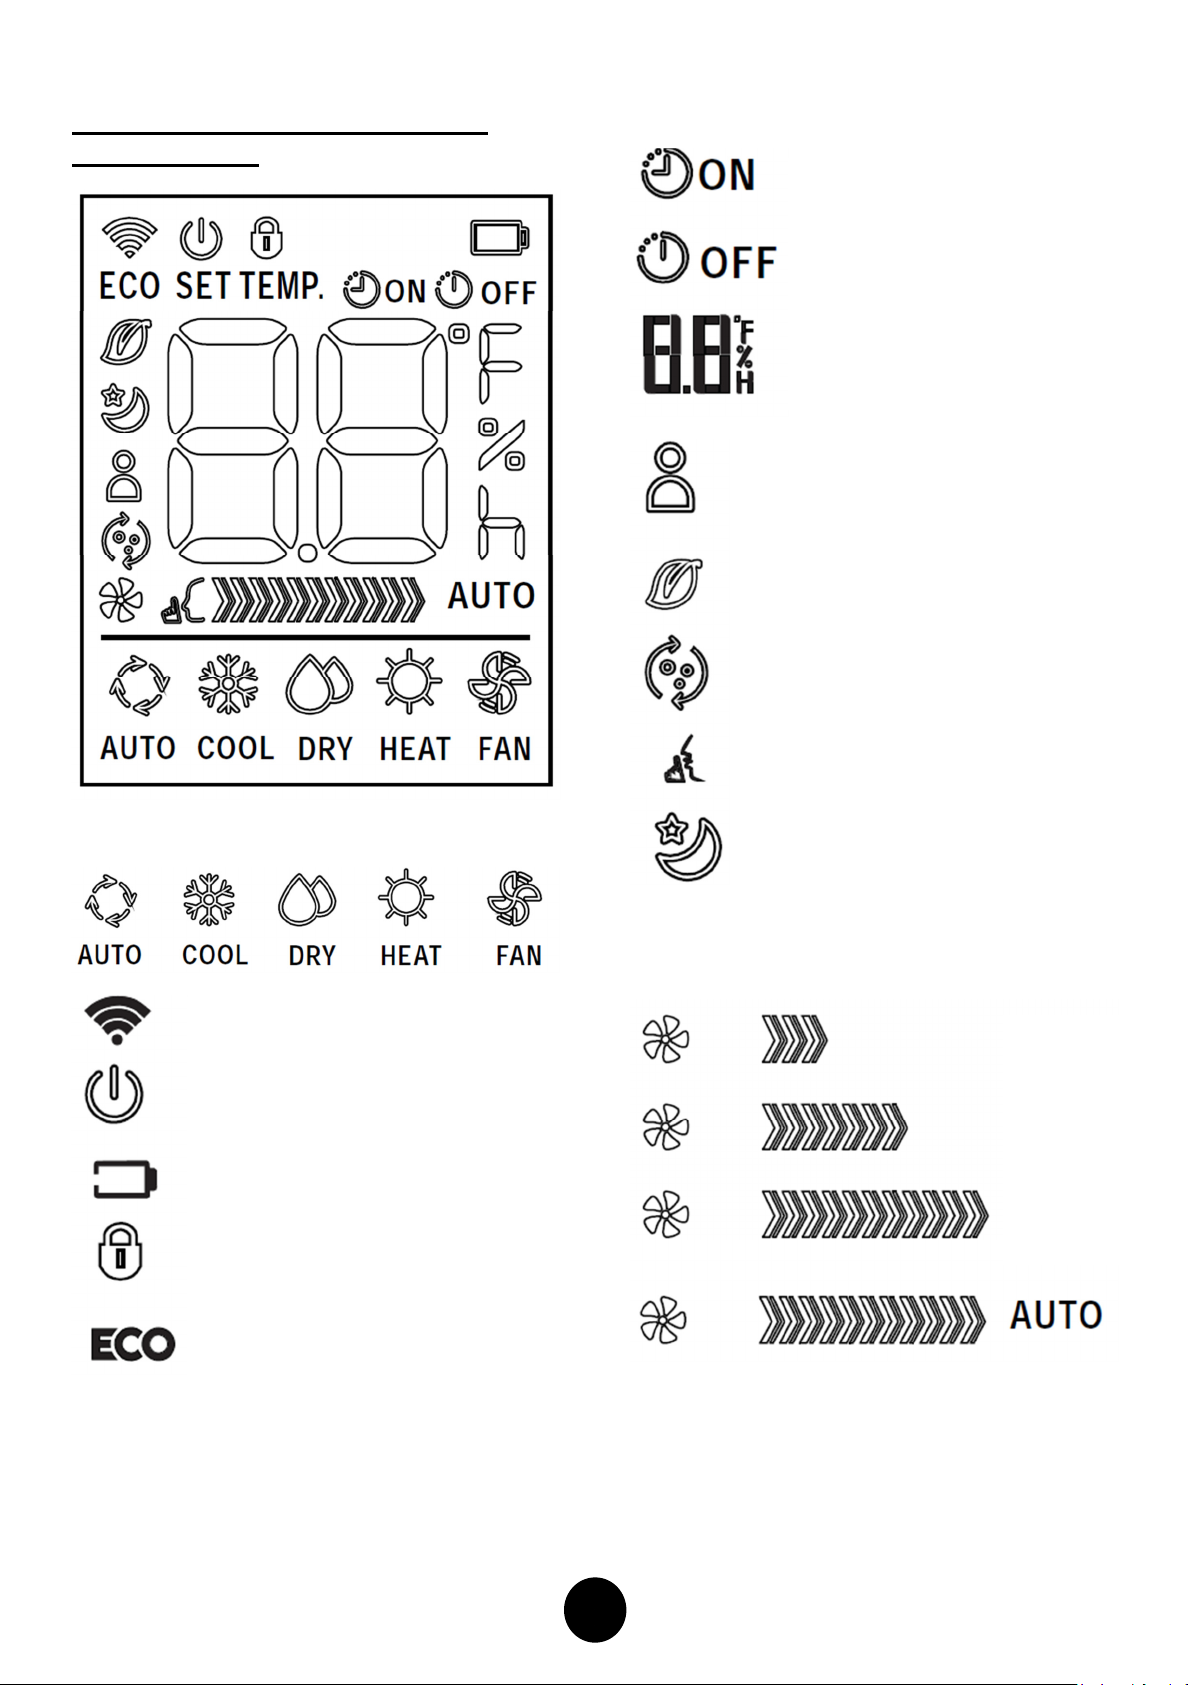
INDICATORS ON THE REMOTE
DISPLAY LCD
Mode Display
Displayed when TIMER ON time is set.
Displayed when TIMER OFF time is set.
Shows set temperature or room
temperature. Also shows time under
TIMER setting.
FAN SPEED INDICATIONS
operating in Follow me mode
Displayed when in Fresh operation
(not enabled for Australian models)
Displayed when in Self clean operation.
Displayed when Silent feature is
activated
Displayed in Sleep Mode operation
Displayed when remote controller is ON.
Battery display (low battery detection)
LOW
MEDIUM
HIGH
Indicates LOCK feature is activated
Displayed when in ECO mode operation
Note:
All indicators shown in the figure are for the
purpose of clear presentation. During actual
operation only the relative functional signs are
shown on the display window.
Page 16
16
Auto operation
When unit is first installed and connected to power the
OPERATION indicator on the display panel of the
indoor unit starts flashing.
1. Press the ON/OFF button to start the air
conditioner.
2. Press the MODE button to select Auto.
3. Press the UP or DOWN button to
set the desired temperature. The temperature
can be set within a range of 17OC~ 30OC in
1OC increments.
NOTE:
1. When AUTO mode is selected, the air
conditioner chooses the appropriate mode of
either Cooling, Fan, or Heating modes by
sensing the difference between the actual
ambient room temperature and the setting
temperature on the remote controller.
2. When In the Auto mode, you cannot change
fan speeds as they are set automatically.
3. If the Auto mode is not comfortable for you, the
desired mode can be selected manually.
Cooling /Heating/Fan or Dehumidifying operation
1. As above, pressing the MODE button
allows you to select COOL, HEAT, Fan or
Dehumidify modes.
2. Press the UP or DOWN buttons
to set the desired temperature. The
temperature can be set within a range of
17OC~ 30OC in 1OC increments.
3. Press the FAN button to select fan speed in
four steps - Auto, Low, Med, or High.
NOTE:
In the Dehumidifying mode, you cannot
change the fan speeds as they are set
automatically.
In the FAN mode, the setting temperature is
not displayed on the remote control and you
are not able to control the room temperature
either
Page 17
17
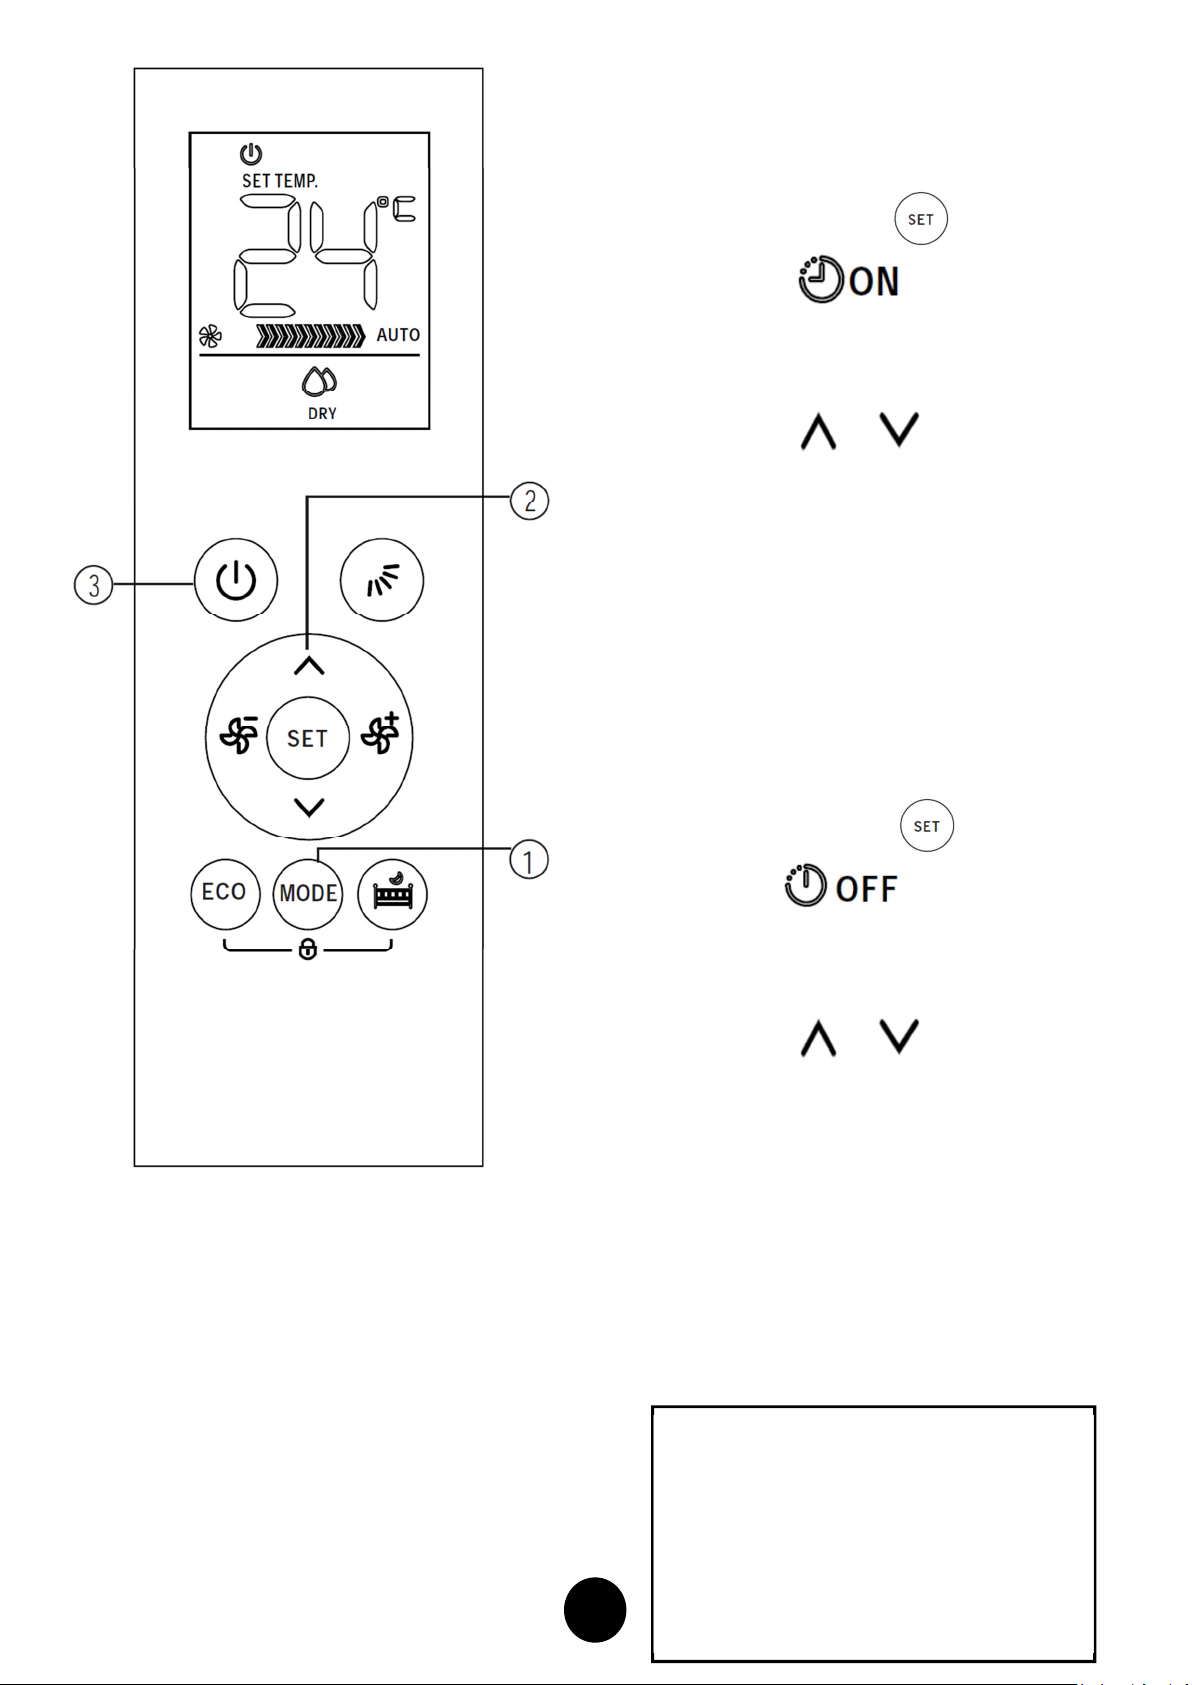
Timer operation
NOTE:
To Set the Auto - On Time
Pressing the SET button is used to set the auto-on/off
time of the unit.
1. Press the SET button , the Timer on
indicator " " displays and flashes,
the last Auto-on setting time and the signal
"h"
will be shown on the LCD display area.
Now it is ready to reset the Auto-on time to
START the operation.
2. Press the or button to your
desired Auto-on time. Each time you press the
button, the time increases/decreases by half
hour increments between 0 and 10 hours and
by one hour increments between 10 and 24
hours.
3. Once your desired time on is reached there will
be a three second delay before the remote
controller transmits the signal to the air
conditioner. Then the signal
disappear, the Timer on indicator will remain
on and the Set temperature will re-appear on
the LCD display window.
To Set the Auto - Off Time
"h"
will
1. Press the SET button until the Timer on
indicator" “displays and flashes,
the last Auto-off setting time and the signal
"h"
will be shown on the LCD display area.
Now it is ready to reset the Auto-off time to
STOP the operation.
2. Press the or button to set desired
Auto-off time. Each time you press the button,
the time increases/decreases by half hour
increments between 0 and 10 hours and by
.
one hour increments between 10 and 24
hours.
3. Once your desired time off is reached there will
be a three second delay before the remote
controller transmits the signal to the air
conditioner. Then the signal
disappear, the Timer off indicator will remain
on and the Set temperature will re-appear on
the LCD display window.
When you select the timer operation, the
remote controller automatically transmits
the timer signal to the indoor unit for the
specified time. Therefore, keep the remote
controller in a location where it can
transmit the signal to the indoor unit
properly.
"h"
will
Page 18
18
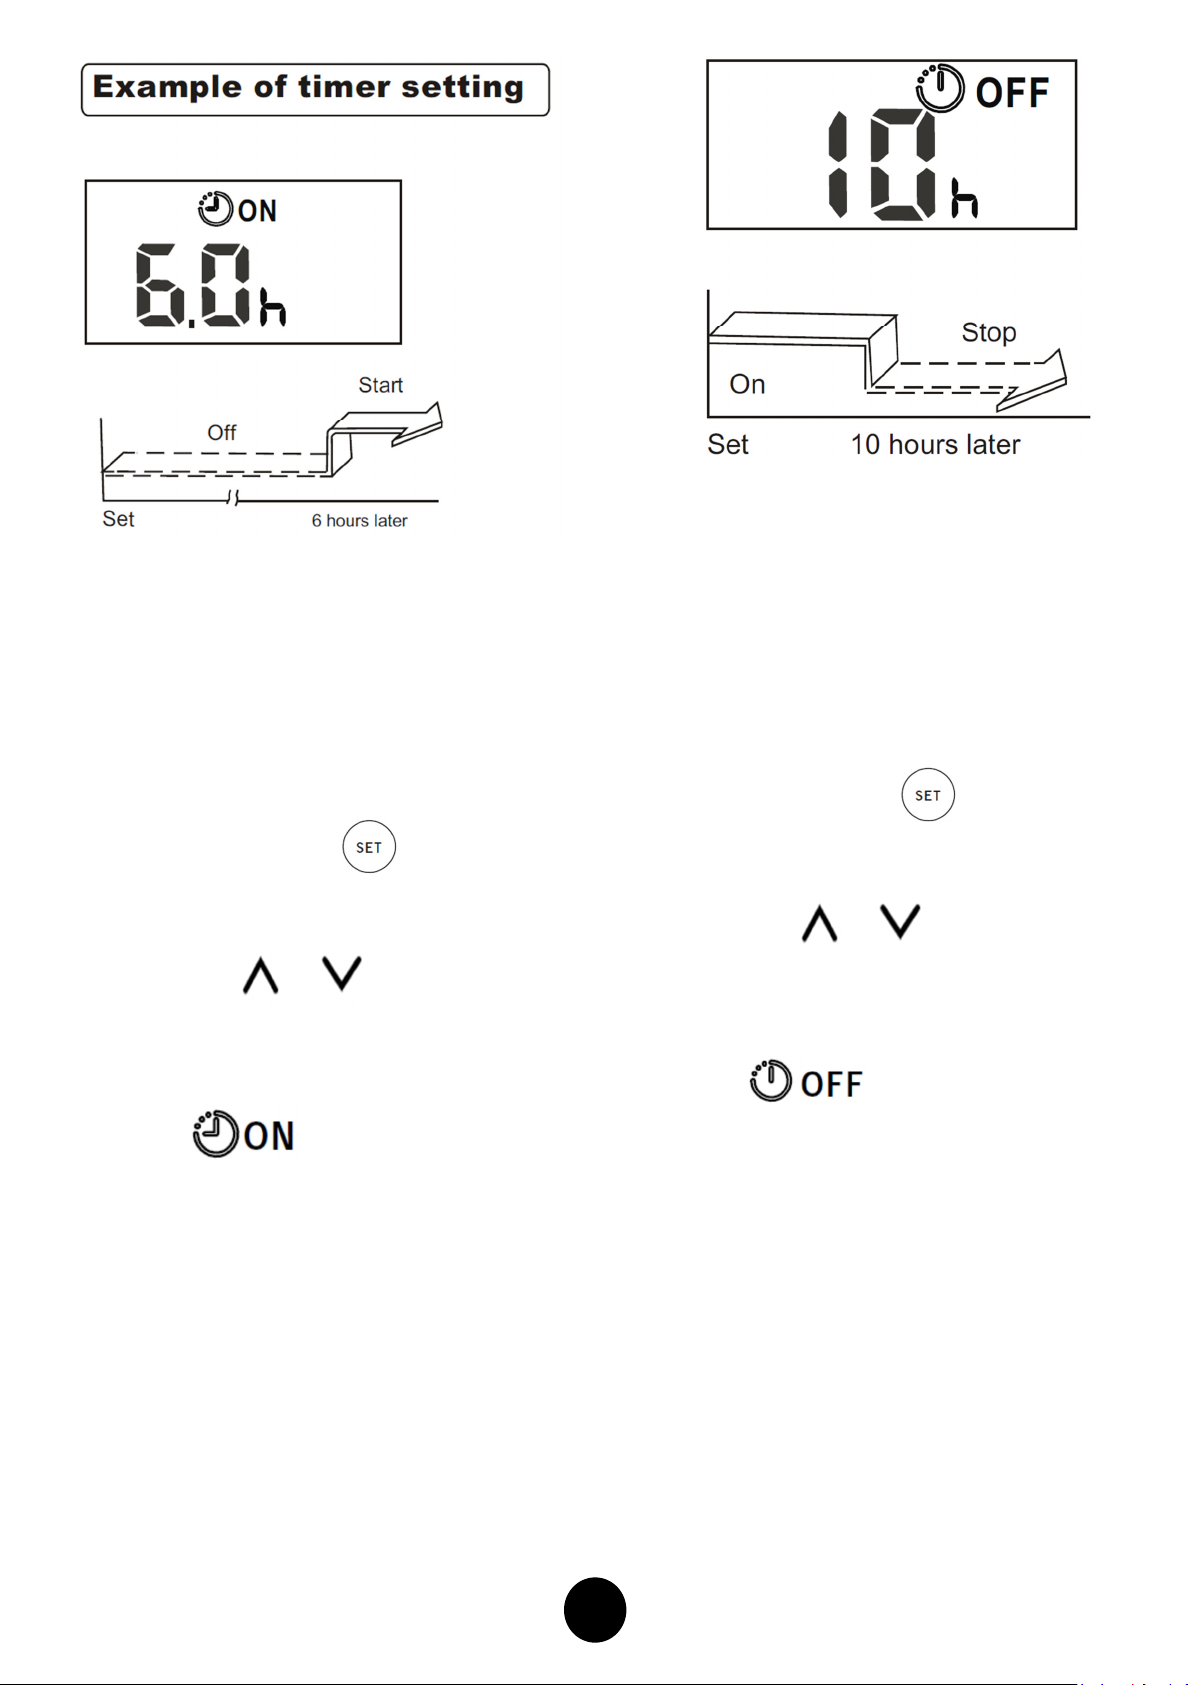
TIMER ON
(Auto on operation)
The TIMER ON feature is useful when you want
the unit to turn on automatically before you return
home. The air conditioner will automatically start
operating at the set time.
Example:
To start the air conditioner in 6 hours.
1. Press the SET button to select TIMER
ON, the last setting of starting operation time
and the signal
area.
2. Press the or button to display
"6.0h " on the TIMER ON display of the remote
controller.
3. Wait for three seconds and the digital display
area will show the temperature again.
The " " indicator remains on and
this function is activated
"h"
will show on the display
.
TIMER OFF
(Auto off operation)
The TIMER OFF feature is useful when you want
the unit to turn off automatically, maybe after you go to
bed. The air conditioner will automatically stop
operating at the set time.
Example:
To stop the air conditioner in 10 hours.
1. Press the SET button to select TIMER
OFF, the last setting of stopping operation time
and the signal
area.
2. Press the or button to display
"10.0h " on the TIMER OFF display of the
remote controller.
3. Wait for three seconds and the digital display
area will show the temperature again.
The " " indicator remains on and
this function is activated
"h"
will show on the display
.
Page 19

19
COMBINED TIMER
(Setting both ON and OFF timers simultaneously)
TIMER OFF → TIMER ON
(On→ Stop→ Start operation)
This feature is useful when you want to stop the air
conditioner after you go to bed and start it again in
the morning when you wake up or when you return
home.
Example:
To stop the air conditioner 2 hours after setting and
start it again 10 hours after setting.
1. Press the SET button to select TIMER
OFF.
2. Press the or button to display
2.0h on the TIMER OFF display.
3. Press the SET button to select TIMER
ON.
4. Press the or button to display 10h
on the TIMER ON display
.
5. Wait for three seconds and the digital display
area will show the temperature again.
The " & " indicators
remain on and this function is activated.
TIMER ON → TIMER OFF
(Off→ Start→ Stop operation)
This feature is useful when you want to start the air
conditioner before you wake up and stop it after you
leave the house.
Example:
To start the air conditioner 2 hours after setting and
stop it again 5 hours after setting.
1. Press the SET button to select TIMER
ON.
2. Press the or button to display
2.0h on the TIMER ON display.
3. Press the SET button to select TIMER
OFF.
4. Press the or button to display 5h
on the TIMER Off display
.
5. Wait for three seconds and the digital display
area will show the temperature again.
The " & " indicators
remain on and this function is activated.
Page 20

20
Make sure the remote controller is always used within
CAUTION:
a distance of 8 meters from the air conditioner indoor
unit, pointing it towards the receiver. Reception is
confirmed by a beep.
The air conditioner will not operate if curtains,
doors or other materials block the signals from
the remote controller to the indoor unit.
Prevent any liquid from entering into the
remote controller. Do not expose the remote
controller to direct sunlight or heat.
If the infrared signal receiver on the indoor
unit is exposed to direct sunlight, the air
conditioner may not function properly. Use
curtains to prevent the sunlight from falling on
The following cases signify exhausted batteries.
the receiver.
Replace old batteries with new ones.
If other electrical appliances interfere with the
remote controller, either move these
Receiving beep is not emitted when a signal
appliances or consult your local dealer.
is transmitted.
Be careful not drop the remote controller,
Indicator fades away.
place heavy objects on it or step on it.
Location of the remote controller.
Handle with care.
REPLACING THE BATTERIES:
The following situations signify exhausted batteries.
Always replace old batteries with new ones.
Receiving beep is not emitted when a signal
is transmitted or the screen on the controller fades.
The remote controller is powered by two dry cell
batteries (AAA) housed in the back rear part and
protected by a cover.
1) Remove the cover at the rear of the
remote controller.
2) Remove the old batteries and insert the new
batteries, placing the (+) and (-) ends
correctly.
3) Re-Install the cover back on.
NOTE: When the batteries are removed, the
remote controller erases all programming. After
inserting new batteries, the remote controller must
be reprogrammed.
 Loading...