

Page 1

Washing Machine
OWNER’S MANUAL
Before using your washing machine, please read
this manual carefully and keep it for future reference.
Ins ide you wil l fi nd m any h elpfu l hi nts o n ho w
to us e and mai ntain y our was hing ma chine p roper ly.
Jus t a l ittle p rev ent ati ve ca re on yo ur pa rt ca n
sav e you a gre at de al o f tim e and mo ney ov er
the lif e of yo ur wash ing machi ne. You' ll f ind many
ans wers to c ommon p roble ms in t he ch art of
tro ubles hooti ng t ips. If you r evie w t he c hart o f
Tro uble sho otin g T ips f irst , yo u ma y not n eed
to ca ll for se rvice .
Read Th is Manu al
MODEL:MFW-V1100DDi
Page 2
Technical sp ec if ic at io ns .. .. .. .. .. .. .. .. .. .. .. .. .. .. .. .. .. .. .. .. .. .. .. .. .. .. .. .. .. ......................
18
18
Malfunction di sp la y an d so lu ti on s. .. .. .. .. .. .. .. .. .. .. .. .. .. .. .. .. .. .. .. .. .. .. .. .. .. .. .. .. .
17
Identify usual trouble of washer..................................................................................
16
Cleaning and M ai nt en an ce o f th e wa sh in g ma ch in e. .. .. .. .. .. .. .. .. .. .. .. .. .. .. .. .. .. .
15
............................................ .. .. .. .. .. .. .. .. .. .. .. .. .. .. Add fabric care products
15
............................................ .. .. .. .. .. .. .. .. .. .. .. .. .. .. .. .. .. .. .. How to use I-Add
14
.................................................................................. Special featur es
13
....................................................................................Other progra m
12
The main wash................................................................ .. .. .. .. .. .. .. .. .. ..
11
Quick start..........................................................................................
Instruction of the w as he r op er at io n pa ne l. .. .. .. .. .. .. .. .. .. .. .. .. .. .. .. .. .. .. .. .. .. .. ..
9
8
............................................................................... Par ts i de ntification
7
Preparation be fo re w as hi ng .. .. .. .. .. .. .. .. .. .. .. .. .. .. .. .. .. .. .. .. .. .. .. .. .. .. .. .. ..........
5
Installation o f th e wa sh er. .. .. .. .. .. .. .. .. .. .. .. .. .. .. .. .. .. .. .. ...............................
2
Safety and preca ut io ns .. .. .. .. .. .. .. .. .. .. .. .. .. .. ............................................
1
2
Contents
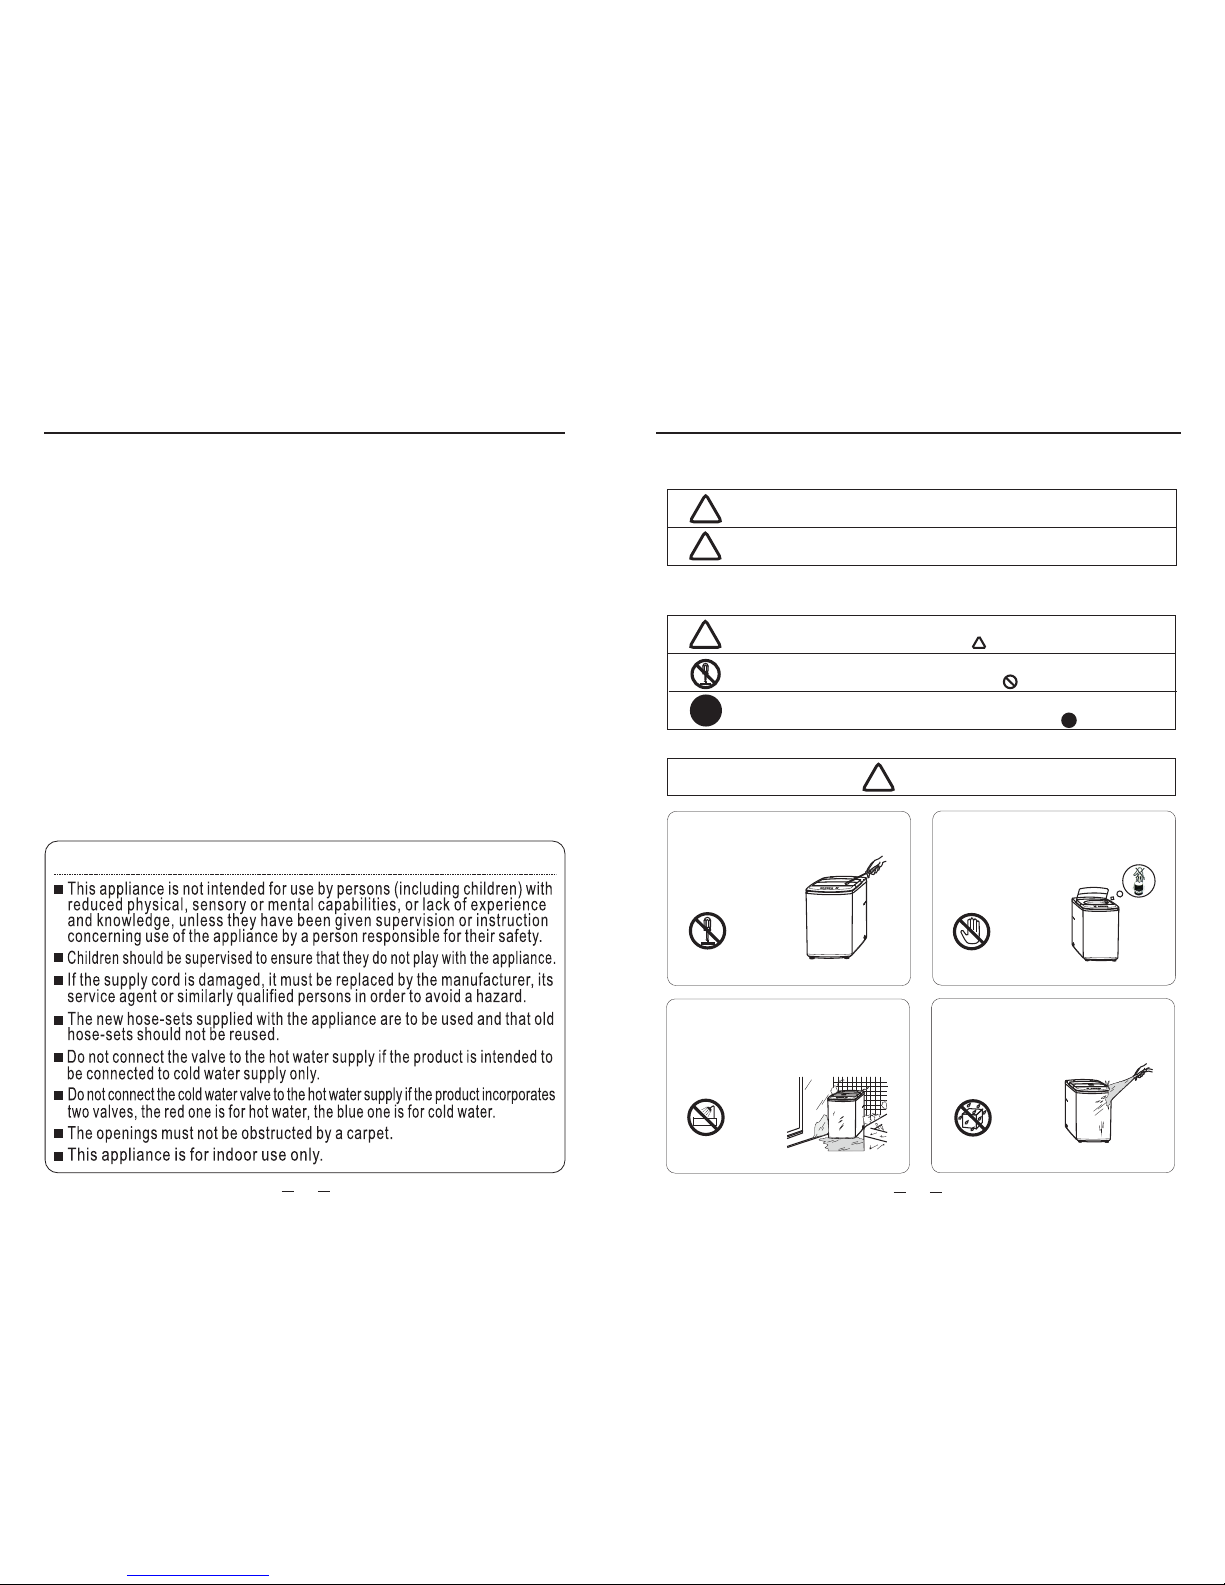
Observe the following items in order to prevent from injuring yourself, others and the
damage of property:
Please observe following contents of graphics.
!
!
!
!
Warning
Warning
Caution
This indicates serious injury or death to human being
may be caused.
This will remind you that injury to people and damage
to property may occur.
Please do not directly rinse the
machine with water when
cleaning.
Please do not install the machine in
damp and raining environment to avoid
electric shocking, catching fire, faults
and distortion
accidents.
No dismantling
No touching
No dampness
No rinsing
!
This graphics represents[operation prohibited], and detailed prohibitive
items will be displayed inside the graphics.
This graphics represents[cause attention],and detailed cautions
will be displayed inside the graphics.
This graphic represents [forcible execution], and detailed forcible
execution items will be displayed inside the graphics.
Please do not disassembly
and assembly the
machine without
authorization.
Please do not insert your hand
and take out clothes inside the
spin barrel before
it is fully stopped.
Safet y and precautions
Safet y and precautions
...............................................14 The instructions of Children-Lock function
Page 3
3
4
Please do not let children climb the
machine or peer into the rotating
spin barrel to avoid accidents.
It is prohibited to wash the clothes
touching with kerosene, gasoline,
alcohol and other flammable materials.
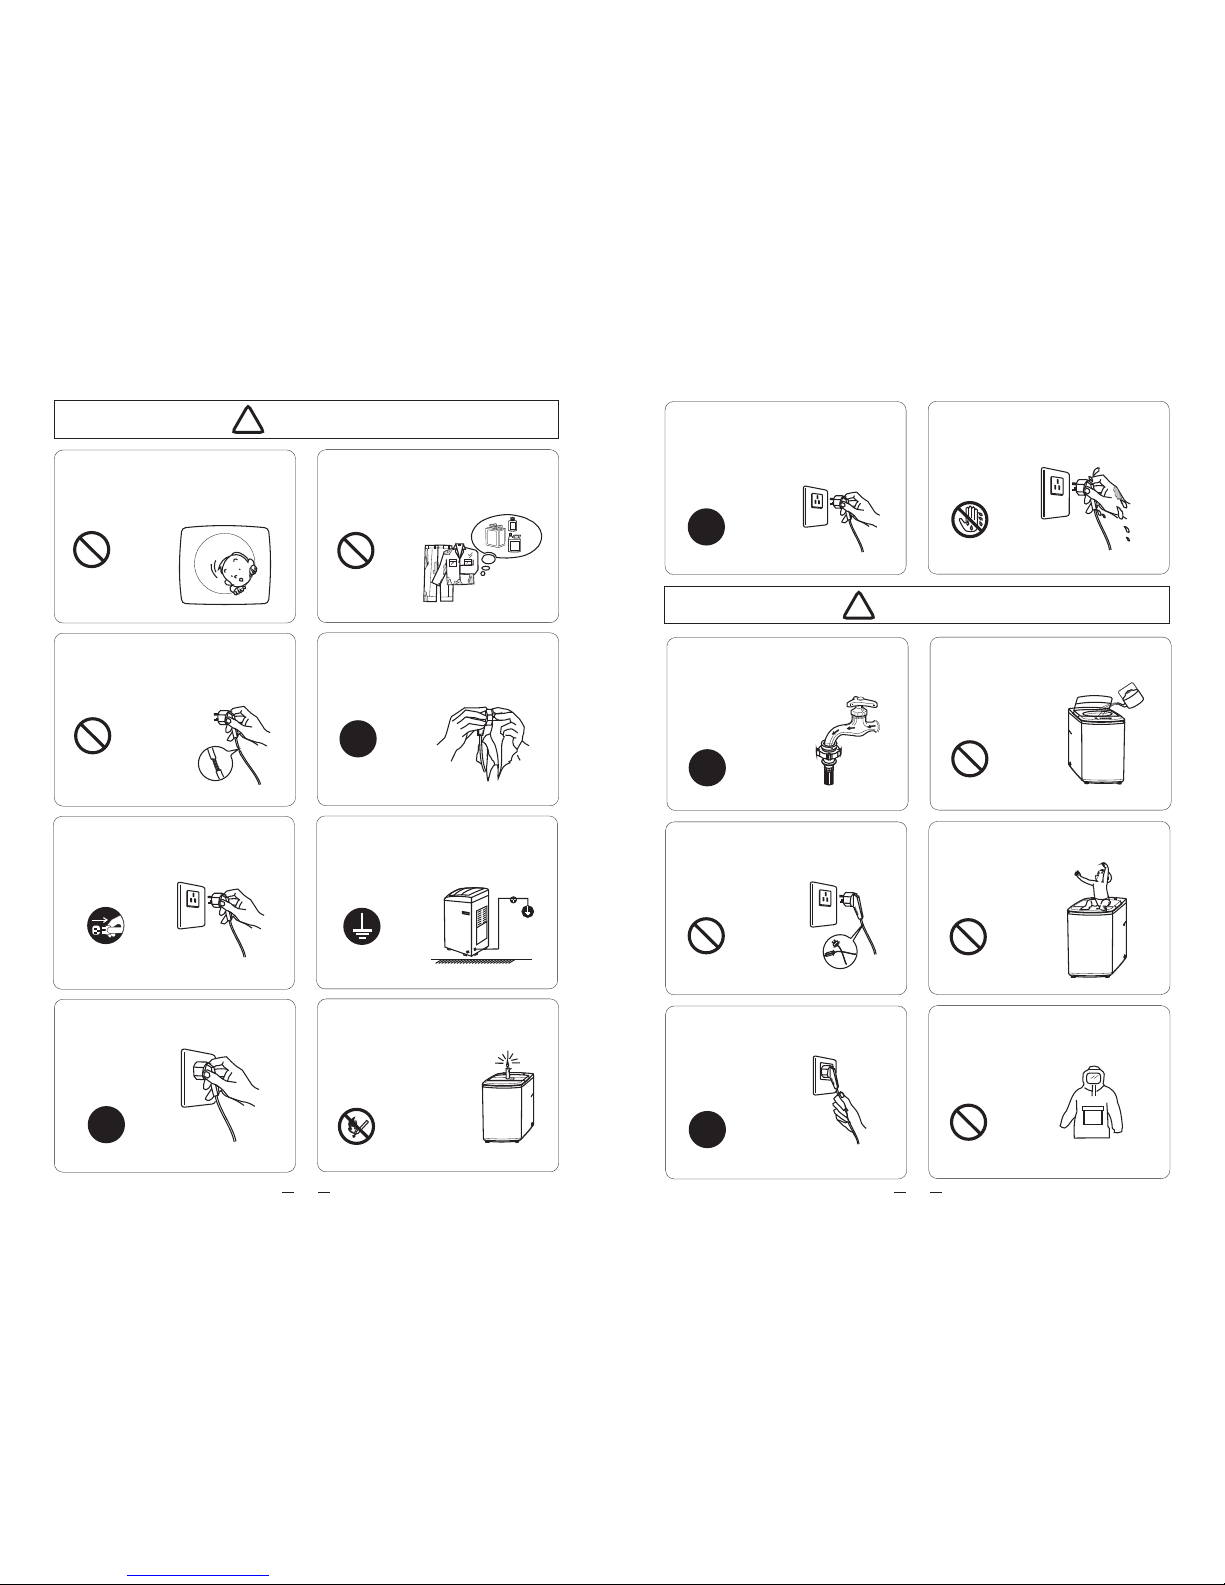
Please do not damage power flexible
cord and power plug to avoid electric
shocking, short circuit and catching
fire.
Regularly clean the power plug to
remove dust and dirt to avoid contact
failure.
Please pull out plug from the socket
if the machine is not in use.
Please well connect the earth line of
socket to avoid electric shocking by
accidental leakage.
(earthing)
Please insert the power plug tightly.
!
!
!
Prohibited
Prohibited
Prohibited
Smoke and fire prohibited
Earthing
Pull out the plug
Warning
Please do not place on the washer
burning candle, mosquito-repellent
incense, cigarette and other
flammable things, as well
as electric stove, air
heating fan and other
heating
sources.
Please use correct power source.
Please do not pull out or insert the
plug with wet hands to avoid electric
shocking.
Please ensure that the water inlet pipe
is connected and the tap is opened
before washing
clothes.
Customers are not allowed to change
the power line without permission.
It is strictly prohibited to place and sit
children or lay
weights on the
washer.
Please do not pull the electric cord
when pulling out the
plug.
Please do not wash down jacket,
raincoat, fishing coat and similar
clothes in the
washer.
!
!
!
!
Wet hands are
prohibited
+
+
The water temperature shall not exceed
50℃ when washing
with warm water.
Prohibited
Prohibited
Prohibited
Prohibited
Caution
Page 4

5
6
+
+
+
+
Water inlet hose
Clamping nut
Installa tion of the washer Installa tion of the washer
Remove package
! Remove package and take out the bottom board of
the cabinet on the foam cover.
! Open the lid of washer's door and take out accessories.
! A trial operation or washing on the foamed cushion is
strictly forbidden.
Base foamed cushion
Installation of water inlet hose
Put the water inlet pipe(which has
metallic filtering bag) screw on to the tap.
Tightly screw another end of water
inlet hose on water inlet valve .
(with rubber seal ring inside).
Note: When tightening the
clamping nut, evenly apply the
force and do not twist the water
inlet valve to avoid breaking of
water inlet valve joint.
Installation of water inlet hose
Water inlet adapter
Connector socket
Fastening screw
Lock nut
Speedy connector
Slide jacket
The water inlet consists
of connection socket and
speedy connector.
+
+
+
+
+
+
+
+
Small ball
Junk ring
Connect: Push down the slide jacket of
speedy connector ( 4 small
balls must be exposed ),
insert it into the connection
socket and then push upward
Release the connection of
water tap with speedy
connector is completed. If it
is required to feed water,
simply open the water tap.
Separate: Close the water tap, push down
the slide jacket of speedy
connector and pull out the
speedy connector.
Unscrew four screws of part
A and sleeve part A horizontally
over the mouth at the end of
water tap (the mouth at the end
of water tap must be flat and
smooth. Flatten it by filing if it is
not flat) and push it upward with
force making the rubber washer
firmly press the plane center of
water tap mouth. Then tighten
the screw sequentially.
After that, tightly screw on part B.
Connect
Separate
The connection socket
consists of A and B two
parts. Before installation,
A and B two parts must
be unscrewed to about
5mm, or directly
disconnected. If the
bore of water tap is
larger, remove the
plastic junk ring of
part A.
Push down the slide jacket
to expose the small ball and
enable separation of connector
socket from speedy connector.
5mm
+
+
A
B
+
+
+
+
1
6
+
+
7
5
4
3
2
Installation of water inlet pipe
Tightly screw another end of water inlet hose on
water inlet valve . (with rubber seal ring inside).
Note: When tightening the clamping nut, evenly apply the
force and do not twist the water inlet valve to avoid breaking
of water inlet valve joint.
Installing the Anti-Rat Cover
1 Lay down the washing machine on a
soft fabrics or cushion.
2 Insert the anti-rat cover to be firmly
fixed from the back or front of washing
machine and screw it.
Sof t fab rics
FRONT
Water inlet hose
Clamping nut
Page 5

7
1
2
3
4
+
+
5
6
+
+
Accessories
8
+
+
Adjustable foot (extend when
turning clockwise and shorten
when turning anti clockwise )
(Slightly tilt the machine. Adjust the foot knob
to ensure four corners of the machine are steadily
contacted with the ground. If the ground is
obviously not flat, correction should be made on
the ground surface, otherwise the washer barrel
will incline and knock the cabinet)
Adjust the feet to level the machine
Preparation before washin g
Install the water
inlet hose.
one inlet hose
two inlet hoses
Before washing, please do take out coins,
keys and other hard goods, and pull to close
the zip fastener to prevent clothes and
barrel from damage.
!
NOTICE
Connect to
the power
source.
Open the
water tap.
Put in clothes and suitable amount
of washing powder.
Put down the drain hose.
Parts identification
Inlet hose 1pc
Top lid
Water inlet valve
Drain hose
Power line
Handle
Cabinet
Cabinet handle
Adjustable foot knob
Wash·Spin barrel
Filter Holder
Control panel
Impeller
FRONT
1 .La y dow n the w ashin g mac hin e on a so ft fa brics or
cus hio n.
2 .To cha nge the dire cti on
of th e hos e, pu ll ou t the
hos e and c han ge the
dir ect ion. In sta ll th e
hos e pro perly at the
slo t.
Change the directi on of the dra in hose
Pow der compar tme nt
Sof ten compar tme nt
Liq uid deterg ent
Page 6

10
9
Instruction of the washer operation panel
DET E R G E N T BUT T O N
SOF T E N E R BUTT O N
WAS H L E V EL BU T T O N
OPT I O N B UTTON
POW E R B U TTON
DEL A Y B U TTON
STA R T P A USE BU T T O N
WAS H R I N SE SP I N B U T TON
WAS H S P E ED/SP I N S P EED BU T T O N
PRO G R A M BUTTO N
RIN S E L E VEL BU T T O N
After progra m selec tion, p ress th e
butto n to st art was h cycle .
Press this button to pause a nd resu me
the wash cyc le.
By pr essing this bu tton yo u could
selec t wash or spin s peed.
Afte r Progr am Sele ction ,
Press the wa sh leve l butto n
to Se lect th e prope r water
level for wa sh.
Pre ss th e Deter gen t but ton, The aut o
dos ing s ystem will t ake r igh t amo unt of
det erg ent.
You can a lso p res s the Deterg ent b utton
to ad d mor e or le ss de terge nt ac cor ding
to th e soi l lev el
Pre ss th e Softe ner b utt on, the
aut o dos ing sys tem w ill t ake
rig ht am ount of soft ene r, At the
las t rin se tm e.
Aft er ch oosin g the w ash ing pro ced ure,
was hing time, r ins ing times an d spi n tim e
als o hav e def ault va lue s, You can cho ose
any p ara meter s acc ordin g to yo ur
req uirem ent .
Bef ore start, C ont inuou s pre ss th e
opt ion button , You can choo se Me mor y,
Les s Tangling , Dru m Cle an an d Air Dr y
pro ced ures.
Sta rt de fault t o the s tan dard proce dur e,
Bef ore start, p res s the p roced ure b utt on,
You can c hoo se an y proce dur es wh ich
you w ant .
Aft er us er pres s the s tar t/pau se bu tto n to
sta rt, you can also pr ess t he de lay a nd wa sh
but ton in the same tim e to st art t he ch ild renloc k fun ction , if yo u wan t to cl ear t his functi on,
you j ust n eed to press the de lay a nd wa sh
but ton in the same tim e aga in, r ema rk: the
fun ction of the chil d-l ock is eff ectiv e onl y aft er
the p roc edure w as st art .
The r ins ing water level butt on is alte rna tiv e
for u ser s, ch ang ing the wa ter level fo r rin sin g,
The c orr espon din g pil ot la mp is o n whe n
you c hoo se wh ich water level , The de fault
rin sin g wat er le vel is one g ear h igher than
was hin g level exce pt th e hig hes t wat er le vel .
Page 7

11
12
Quick start
The main was h
The wa sh s to ps
Prog ra mm e selecti on
1 Install the washing
machine
3 measure out the
detergent
7 Plug the power supply
6 Turn on the water tap
8 Select the desired
programme
5 Put down (hang up)
the drain pipe
4 Close the
machine door
9 Press the
[start/pause] key
When the wash stops, the buzzer will bu zz c on ti nu ou sl y fo r 6 ti me s an d
then the power will be automaticall y cu t of f.
Tur n off the water tap.
Although the power can be cut off automatically, the power plug must be pull
out as well for the safety.
1
Press the POWER button.
3
To press the start/pause key.
2
Select the proper water level or other at ta ch ed f un ct io ns .
2 Load the laundry
! Close the lid when machine is running, otherwise, it will automatically
stop working during spin process and send out abnormal warning.
!The washer will not work when the filled water does not reach the set water level.
! The selection of rinse water level: the level is equal to wash water level.
Press [Rinse Level] button, the indicator light which stand for rinse level flickered.
User can select the rinse water level according to needs. Rinse level exceed that
wash level all the time. It shows the wash level if not press this button. And only
show rinse level when rinse.
! After pressing down [ Power Switch ], if the [Start / Pause ] button is not pressed,
the power will be automatically cut off after 10 minutes.
NOTICE
!
Use rs ca n fre ely set up wash ,ri nse a nd sp in' s separ ate p roc ess or Proce ss co mbina tio n
acc ord ing to own need. The specif ic op era tion as belo w:
The op erati on of o ne to uch spin
1.P res s the Power butto n.
2.P res s the spin button t o cho ose t he sp in ti me.
3.P res s the start/ pau se bu tton.
Wash ing machin e wil l ope rate the sin gle s pin p roces s.
The op erati on of s ing le wash
1.P res s the Power butto n.
2.F irs t Press the spin bu tto n to ma ke th e spi n param ete r to re turn to zero , Then Press
was h but ton to cho ose the wash t ine .
3.P res s the start/ pau se bu tton.
Wash ing machin e wil l ope rate the sin gle w ash p roces s.
The op erati on of ' was h and rinse'
1.P res s the Power butto n.
2.F irs t Press the spin bu tto n to ma ke th e spi n param ete r to re turn to zero . Then Press
rin se bu tton, wash butt on to c hoo se the requi red p ara meter.
Wash ing machin e wil l ope rate the 'wa sh an d rin se' proces s. Any othe r pro cess
com bin ation s are s imi lar with the abov e
3.P ress the sta rt/ pause butt on.
The Operation of Wa sh ing proce ss
Norm al p ro gram
1.Press the power .
2.
3.Press the button.
button
Press the button to select .Program Normal program
Start/Pause
Normal program is the easiest, most convenient and most common washing
program.
Page 8

13
14
3.DR UM C LE AN
4.AI R DRY
AIR DRY program is that the formation of the swing of the wind within the barrel
through high-speed rotation, which can dry the clothes barrel, and user can select
different stage you need.
It will be adhere to wash powder's residue inside and outside the barrel because of
The pollution and the problem of the water quality. It will take smelly and the drain
will not be flowing. Otherwise, the adhering residue will take off during the wash
process. And the clothing will be dirty. User should clean the tub monthly.
NOTICE
! Please do not start the program continuously.
! You should take few chloric bleacher to enhance the effect of tub clean.
! This program is used for clean the barrel and do not put the clothes in.
!
1.QU IC K
2.ST RO NG WA SHING
To wash light dirty cloths with only one rinsing cycle.
3.WO OL
5.KI DS W EA R
The water flow is infirmly. It is used for washing woollens, thin clothes or cleaner
clothes.
4.SO AK
SOAK program is with strong water flow similar to normal washing program .
However , there is a motional soak process lasting about 30 minutes just
before the washing process , Thus it is used for washing more dirty clothes.
6.JE AN S
This program is used for washing .Jeans
Other program
Special features
DELAY
! This washer has the functions of delay start for 24 hours.
! After the DELAY program start to work, the digital tube show the delay start time.
And the indicator light which stand for delay lightened. When the time arrive, the
indicator light which stand for delay goes out. And the indicator light which stand
for remain lightened. Showing the remain time.
! The DELAY time stand for washing clothes after [XX] hours.
Thi s pro gram is spec ial d esign ed fo r fab ric s you don't wa nna g et ta ngled .
Use t his p rogra m whe n was hing heavy duty c lot hes like Jea ns an d bla nket
Use t his p rogra m for w ash ing kids fabric s.
ECO i s a des ign ed pr ogram f or a norma lly s oiled load , tha t ena bles you to wash
lau ndr y eff ectiv ely w ith l ess w ater and ene rgy.
7.ECO
Mem ory proced ure , It ca n remem ber a ll th e was hing param ete rs whic h use rs ha ve se t up,
suc h as wa ter lever, washi ng ti me, rinsin g tim es et c. Me mory pr oce dure is ef fec tive af ter
you p res s the start/ pau se butt on, n ext s tar t when you cho ose t he Me mory proce dur e, You
can s ee al l the s tat e which you choos e las t tim e.
1.MEMORY
2.LESS TANGLI NG
Whe n the w ashin g mac hin e start to wash, If a kid open th e cov er li d, Th e Buz zer w ill
be co nti nuous s ing ing, Remin din g user to cl ose the cove r lid . if no o ne to c los e the
cov er li d excee d 20 se con ds, Defaul t the k id ha ve dr opped into t he tu b, The was hin g
mac hine will fo rce t o dra in of f all t he wa ter o f the t ub.
For ce to d rain off wat er' s con ditio n:
Abn ormal cond iti on. The buzz er si ngi ng, The di gital w ind ow di splay “CL ”, Pl s che ck
the t ub.
Abn ormal cond iti on's so lut ion:
whe n the “ CL” alarm ha ppe ns, Pls po wer off 5 se conds , Lat er yo u can r est art(t he
oth er bu tton is usel ess ).Pls user s res et th e washi ng pa ram eters a cco rding
req uirem ent .
The instructions of Children-Lock function
Page 9

15
16
Cleaning a nd Maintenance of the wa shing machine
!
! Please keep the washer with neat appearance and perform correct
maintenance to prolong the service life of washer.
Make sure to pull out the power plug before the cleaning and maintenance.
Cleaning of water inlet hose joint
Unscrew and remove the water inlet hose joint from the washer and clean the filtering
screen of inlet valve with brush.
!
NOTICE
The special circulation water flow is designed for this washer, thus the flock powder
and flock residues will be automatically collected into the filtering bag. After application,
the user shall regularly clean the filtering bag to remove the flock powder and flock residues.
Detail operation methods are following:
Cleaning of filtering bag
Jack
Press it according to the arrowhead
point . And you can discharge the
frame of filtering bag.
Put the frame of filtering bag into the
two jacks and push into emphatically
as shown in figure above.
Don 't us e high foam de ter gent. Read the sp eci fic instru cti ons on how to use the dete rge nt.
DO NO T EXC EED S TATED DO SE, O VER . E xce ssive d ete rgent will caus e too m uch
foa m, wi ll over flo w fro m the unit, and wil l spe nd mo re ti me for rinsi ng. Wa shing powd er ma y
gat her and bloc k the b ox, p lea se pa y atten tio n to Cl ean.
Liqui d de te rgent s to ra ge box.
Ope n the l id, Add the l iquid
det ergen t int o the L igu id
Sto rage box slo wly.
Fabri c so ft ener st or ag e box.
Ope n the l id, Add the s often er in to
the S oft ener St ora ge bo x slowl y.
This bo x no t us ed for au to -d osing .
Add L aun dry pow der i n thi s box .
DO NO T EXC EED S TATED DO SE, O VER .
How to use I-Add
Kind ti ps
1 Fir st ti me us e, the amoun t of au to- dosin g may be no t suf fic ient.
2 It wi ll be f roz en wh en the tempe rat ure below 0 ℃.
3 Ple ase a dd de terge nt an d sof tener liqu id wh en th e ADD li ghts alarm .
How to clean the I-A dd box
The d ete rgent a nd so fte ner box may get stu ck, (long -ti me no u se)
You sho uld clean the I-A dd bo x:
1 Flu sh wa rm wa ter int o the b ox.
2 Pre ss th e pow er butt on to t urn p owe r on.
3 Pre ss bo th th e"opt ion "and "w ash s pee d".
4 Pre ss "d eterg ent " and " softe ner "to pump out the liqui d.
5 Run a comp let e cycle of “Dr um cl ean ”to clean th e dru m.
I-A DD is a Au to do sin g syste m, it will t ake r igh t amoun t of de ter gen t and soften er.
You can a lso p res s the Deterg ent b utton to add more or les s det erg ent acc ord ing t o the
soi l lev el. )(I- ADD only app ly to l iqu id de terge nt, s oft ener. Don't a dd po wde r into the
I-A DD bo xes.
Page 10

17
18
220-240V~50HZ
390W
10.0kg
10.0kg
X
X
580 640 990
42kg
0.03MPa~0.8MPa
E1
When the washer couldn’t work well, being abnormal or in alarm, please check and correct
it as follows.
Malfunction display and soluti ons
Causes
Solutions
Display
E2
E3
E4
F1-F8
Check the water tap is opened or not.
Check the water level sensor and
drain pump.
Closed the lid.
Manually balance clothes in the barrel
by hands.
Rated power supply
Input power of motor
Rated washing capacity
Rated spin capacity
Overall dimensions
Application water pressure
Weight of whole machine
Washing mode
Draining mode
Spin mode
Technical specificat ions
New water flow
Centrifugal spin
Identify usual trouble of washer
No
washing
Abnormal
draining
Abnormal
spin
List of faults and inspection
Faults
Inspection Items
No water
flows in
! If the power is off or the fuse is burned out.
! If the water supply is cut off or the water pressure is too low.
! If the inlet hose is properly connected and the water tap is opened.
! If the filtering screen of inlet valve is blocked by dirt.
! If the coil of inlet valve is damaged. (The slight electromagnetic
sound is normal phenomenon when the inlet valve is switched on)
! If the "Start / Pause" button is pressed after the power
switch is pressed.
! If the door lid is closed.
! If all clothing piled largely at one side of barrel or the clothing
is excessively placed.
! If the washer is not placed in stable condition or it is placed in
inclination state. (The ground is not flat).
! If the motor belt is loosened.
Note: During the de spin process, if washing are piled at one side of the spin barrel,
it will cause unbalance of spin barrel resulting in striking. At this moment, the
computer inside the washer will feel this unbalance phenomenon and will automatically
correct it ( fill in water Washing ). However, if unbalance situation is not removed after
continuous three corrections, which means the computer auto-correction can not
resolve the problem. Then the user has to manually and evenly place the clothing
inside the barrel to solve the problem.
If the washer can not work normally, or appear abnormal or alarms, please check and
correct as follows.
! If the water drain hose is placed very high.
! If the end of water drain hose is sealed in pond.
! If the internal rubber ring of drain valve is blocked by dirt.
! If the power is off or the fuse is burned out.
! If the power supply voltage is too low.
! If the water amount reaches to the required water level.
(The washer will not work if the water amount does not reach the
required water level)
! If it is set to "Delay" washing mode. (It will only start to work
until the reservation time reached)
Chi ldren -Lo ck Ala rm if t he co ver lid open .
Pow er of f 5 sec ond s and Restar t.
Any o the r abnor mal .
Any o the r abnor mal .
1.p ower off 5 s eco nds and Rest art . 2.s ubmit r epa ir.
1.p ower off 5 s eco nds and Rest art . 2.s ubmit r epa ir.
The l igh t of ad ding
det ergen t is on
Ala rm if t he de terge nt is n ot en oug h.
Add l iqu id de terge nt.
Alarm for abnormal water intaking.
Alarm for water drain has not finished.
Alarm for lid not closed before spin.
Alarm for washing stay at one side.
Gravity drain
 Loading...