

Page 1
Dish Washer
MDWFS014LSO
OWNER'S MANUAL
Inside you will find many helpful hints on how to use and maintain
Dish Washer cooler properly. Jus t a little preventive care on your part
can save you a great deal of time and money over the life of your
Dish Washer
"
Frequently asked questions . If you read this section you may not
need to call for service.
. You will find many answers to common problems in the
"
Page 2
Dea r Cu stomer,
Ple as e care fully rea d thi s ma nual bef or e using the
dish w asher, it wi ll he lp yo u to us e and main tain t he
dish w asher pro perly.
Keep it to r e fer t o it at a later date.
Pass it on to a ny sub sequ ent owne r of the ap pl ianc e.
Thi s ma nual con tains se c t ion s on safe ty In stru ct io n s ,
Ope rati n g Instru ction s, In stal l at io n Ins truc tion s an d
Trou bleshoo ting Tip s , et c .
To re vie w the section on tro ubleshooting Tip s
wil l h el p you to solve s om e co mmon pro blem s
by yourse lf .
If yo u can not so lv e the pro blem s by yo u rs elf ,
plea se ask for the help of p rof e ss i onal te chn i cia n s.
Co ntrol Pa nel.. .. .... ...... ... ...... ...... ... ...... ......... ....6
Dishw as her Feature s.. .... ...... ... . ... ........... .... .. ...6
A Wat er So f ten er... ... .... .... ....... ........... . ... .... . . 7、
B Loadi ng the Salt into t he So ft en er... ... . ... .......8、
C Fill the Rinse Aid Dispenser.... . ... ........... . .....8、
D Function of Dete rge nt . .... . . ... . ......... .. ... . ... ....9、
Att ention befor e o r after load ing the Dish wa s h er
Baske ts... . ..... . ..... ....... ...... ..... . ..... .... . .......... . . 12
Load i n g th e upp e r Ba s ket.......... .. ...... . ...... .. .... 13
Loa ding th e Low e r Bask et . .... ..... .... . . . ... ......... .. 13
Cutlery Bask et.... ... . ........... ....... ........ . . ..... . . .. 1 3
Wash Cyc l e Table.... ... . . .......... ... . . .. ........ ... . ... .. 14
Turning on th e Appl ianc e... ....... ........... . ..........1 5
Ch ange the pro gr a m..... . ... ........... ... . . ............. . 15
At the end of the Wash Cycle ... ........ ... . .. . .........15
The man ufac tu re r, fo l lo w ing a policy of con stant
dev elopment and up d at i n g of the product, may
make mo di ficatio ns witho ut g i vi ng pr ior no t ice .
This user ma nu a l sh a ll al s o be got from the
manufac tur e r or respons i ble ven d or.
Filt e ring Syst e m. .......... . .... .............. . .. ............ 16
Caring for t he Di shw ash er. .... ..... .... . . .... ..... .... .. 17
Posit ioning the Appl iance... ...................... ...... 18
About P ower C o nnec tion.. .. .... ..... .......... ......... 1 8
Water Co nnec tion.... . ...... ..... . ..... . ............ ..... . .1 9
Start of dishwasher. . .. . ... ....................... .. . . ... ..20
Be f ore c al ling for se rvi ce. ... . .. . ... . ... . ... ... .... .......21
Er r or code s. . ......... .............. ......... . ......... ..... ..2 2
Tech nical information... ... ............ ... . .............. . 23
Page 3

When using your dishwasher,
follow the precautions listed below:
This appliance is intended to be used in household
and similar applications such as:
-staff kitchen areas in shops, offices and other
working environments;
-farm houses;
-by clients in hotels, motels and other residential type
environments;
-bed and breakfast type environments.
This appliance can be used by children aged from 8
years and above and persons with reduced physical,
sensory or mental capabilities or lack of experience
and knowledge if they have been given supervision
or instruction concerning use of the appliance in a
safe way and understand the hazards involved.
Children shall no t play with the appliance. Cleaning
and user maintenance shall not be made by children
without supervision. For EN60335-1
( )
This appliance is not intended for use by persons
(including children )with reduced physical, sensory
or mental capabilities, or lack of experience and
knowledge ,unless they have been given supervision
or instruction concerning use of the appliance by a
person responsible for th eir safety. For IEC60335-1
( )
This appliance is for indoor use only, for household
use only.
To protect against the risk of electrical shock, do not
immerse the unit, cord or plug in water or other liquid.
Please unplug before cleaning and maintenance the
appliance .
Use a soft cloth moisten with mild soap, and then use
a dry cloth to wipe it again.
Page 4

This appliance must be earthed. In the event of a
malfunction or breakdown, earthing will reduce the risk
of anelectric shock by providing a path of least
resistance of electric current. This appliance is equipped
with a cord having an equipment-earthing conductor
and a grounding plug.
The plug must be plugged into an appropriate outlet that
is installed and earthed in accordance with all local
codes and ordinances.
Improper connection of the equipment-earthing
conductor can result in the risk of an electric shock.
Check with a qualified electrician or service
representative if you are in doubt whether the appliance
is properly grounded.
Do not modify the plug provided with the appliance;
If it does not fit the outlet.
Have a proper outlet installed by a qualified electrician.
Do not abuse, sit on, or stand on the door or dish rack of
the dishwasher.
Do not operate your dishwasher unless all enclosure
panels are properly in place.
Open the door very carefully if the dishwasher is
operating, there is a risk of water squirting out.
Do not place any heavy objects on or stand on the door
when it is open. The appliance could tip forward.
When loading items to be washed:
1) Locate sharp items so that they are not likely to
damage the door seal;
Page 5

2) Warning: Knives and other utensils with sharp points
must be loaded in the basket with their points down or
placed in a horizontal position.
Check that the detergent powder is empty after
completion of the wash cycle.
Do not wash plastic items unless they are marked
dishwasher safe or the equivalent.
For plastic items n
recommendations.
Use only detergent and rinse additives designed for
an automatic dishwasher.
Never use soap, laundry detergent, or hand washing
detergent in your dishwasher.
Children should be supervised to ensure that they do not
play with the appliance.
The door should not be left open, since this could increase
the risk of tripping.
If the supply cord is damaged, it must be replaced by the
manufacturer or its service agent or a similarly qualified
person in order to avoid a hazard.
During installation, the power supply must not be
ot so marked,
check the manufacturer's
excessively or dangerously bent or flattened.
Do not tamper with controls.
The appliance is to be connected to the water mains using
new hose sets and that old hose-sets should not be reused.
The maximum number of place settings to be washed
is 14.
The maximum permissible inlet water pressure is 1MPa.
The minimum permissible inlet water pressure is 0.04MPa.
Page 6
Dispose of the dishwasher packaging material
correctly.
All packaging materials can be recycled.
Plastic parts are marked with the standard
international abbreviations:
PE for polyethylene, e.g. sheet wrapping material
PS for polystyrene, e.g. padding material
POM polyoxymethylene, e.g. plastic clips
PP polypropylene, e.g. Salt filler
ABS Acrylonitrile Butadiene Styrene, e.g. Control
Panel .
Packaging material could be dangerous for children!
For disposing of package and the appliance please
go to a recycling centre. Therefore cut off the power
supply cable and make the door closing device
unusable.
Cardboard packaging is manufactured from recycled
paper and should be disposed in the waste paper
collection for recycling.
By ensuring this product is disposed of correctly, you
will help prevent potential negative consequences
for the environment and human health, which could
otherwise be caused by inappropriate waste handling
of this product.
For more detailed information about recycling of this
product, please contact you
household waste disposal service.
DISPOSAL: Do not dispose this product as unsorted
municipal waste. Collection of such waste separately
for special treatment is necessary.
r local city office and your
Page 7
For detailed o perating method read the co rre s pondi ng content o n t h e instruc t io n man ual.
Switch on the appliance Press the Power switch button to switch on the appliance, Open the door.
With each wash cy cle.
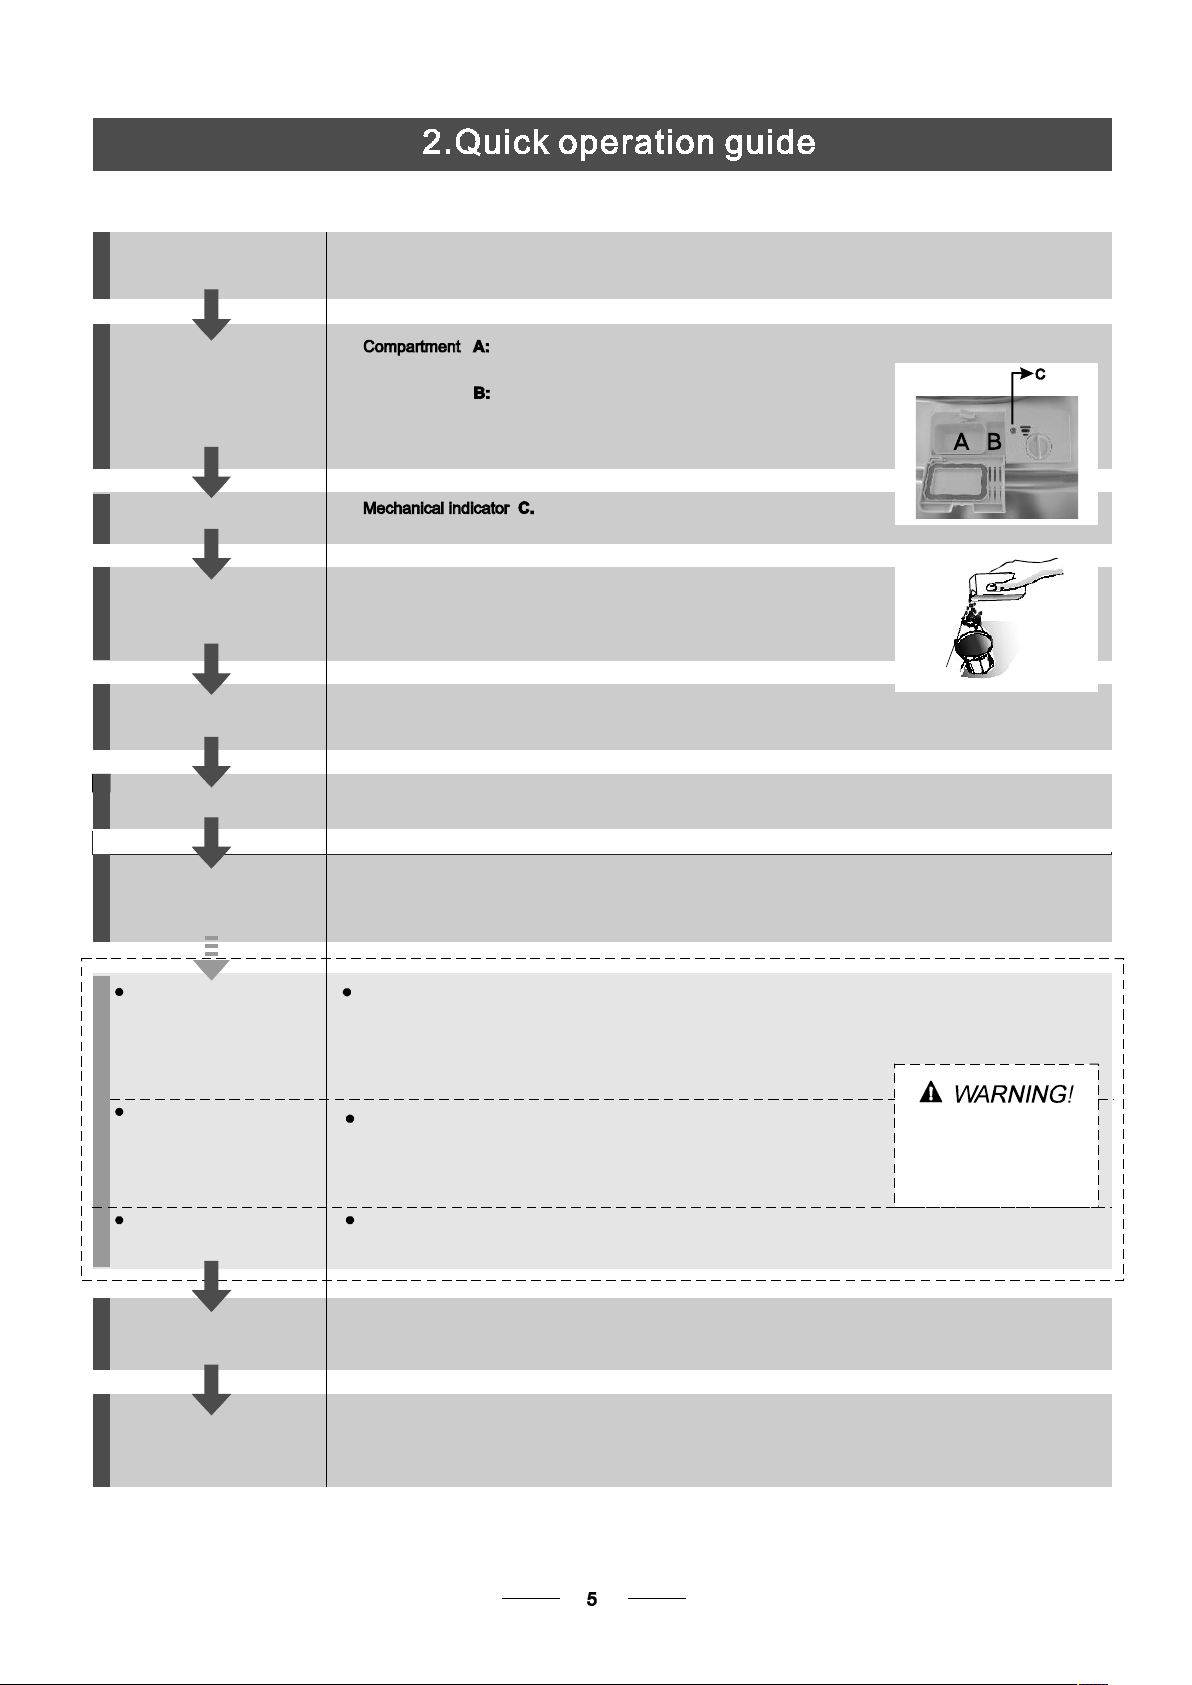
Fill the detergent dispenser
Compartment
For programs with pre-wash only.
(Follow the user instructions!)
Check the rinse aid level
Check the regeneration
salt level
Load the baskets
Select a program
Running the dish washer
Changing the program
Add forgotten dishes in the
dishwasher.
If the appliance is switched
off during a wash cycle.
Electric indicator on control panel (if provided).
(On m odels with water softener system only.)
Electric indicator on control panel (if provided).
If there is no salt warning light in the control panel
(for some models), you can estimate when to fill the salt into
the softener by the number of cycles the dishwasher has run.
Scrape off any large amount of leftover food. S often r emnants of burnt food in pans,
then load the baskets. Refer to the dishwasher loading instructions.
Close the door,press the p rogram button until the selected program lights up.
( See the section entitled Operation instruction )“ ”
Turn on the water tap and press the St art/Pause button. The machine will start working
after about 10 seconds.
1. A running cycle can only be modified if it has been running for a short time. Otherwise the detergent
may have already been released and the water already dr ained. If this is the case, the detergent
dispenser must be refilled.
2. P ress the Start/Pause button ,then press the program button more th an 3 seconds to cancel the
running program.
3. S elect a new program.
4. R estart the dishwasher.
1.Press the start/pause button to stop the machine.
2.Open the door.
3.Add the forgotten dishes.
4.Close the door, then press t he start/pause button, the dishwasher will
start running again after 10 seconds.
If the appliance is switched off during a wash cycle, when switched
on again, please re-select the washing cycle and operate the dishwasher
according to the original Power-on state ).
Open th e do or care fu lly.
Hot s t eam may esc ape
when the door is open ed!
Switch off the appliance
Turn off the water tap,
unload the baskets
When the working cycle has fin ished, the buzzer of the
dishwasher will sound 8 times, then stop.
Turn off th e appliance using the Power button.
It will shut off automaticly after 30 minutes without any operation
Wa rning: wait a few minutes (about 15 minutes) before unloading the dishwasher to avoid handling
the dishes and utensils while they are still hot and more susceptible to break.
They will also dry better.Unload the a ppliance, starting from the lower b asket.
Page 8

To g e t the best perform ance from your di shwas her, read all operat ing ins t ructions
bef ore using it for the first tim e.
1. On/Of f Bu t ton : to switch On/O ff th e appliance;
2.4Child lock f unc t ion : pr es s Dela y bu tto n and Half- load
button sim u lta neo u sl y to lock the pro gram;
3.Delay Butt on : Press the button to ad d th e de lay time ;
.Alt Button : Dua l zo n e w as h functio n, press th e butt on
to sele ct ei the r up per bas ket o r lower bas ket lo aded;
5.Dis play sc r een: to sho w the remin ding time an d t he
state(running stat e, de l ay ti me etc );
Rinse A id indi cator:
Indicates whe n the dispe nse r ne eds to be refi l le d ;
Add salt in dic a t or:
Indicates whe n the di spen ser n eeds t o be refil l ed;
Upper s pr ay indicato r:
Lower s pr ay indicato r:
Child lock i ndi c at or :
Water faucet indic ato r:
Extra dryi n g i ndi c ators:
Extra c lea ning i ndi ca to rs :
Fr ont view
1
2
3
8
6.Sta rt /Pause bu t ton: To s t ar t the selected washing
program or pa use the was h ing p ro g ram when th e
mach ine i s worki n g starti n g up or n ot ;
7.Ext ra dryingand extr a cl ean i n g Butt o n : To s e l ect ext r a
drying and ex r a cleaning fu nction.
Extra drying fu nction Only be used wi th Inte ns iv e,
Normal, EC O, G las s,9 0 min . ) ,e x tra c l ea n i ng func t io n
Only b e us ed with Intensive, Norma l, EC O,G las s.);
8.Pro gram Bu tton : To Pre s s th e button to select
appropriat e Program;
Ba ck Vie w
4
5
6
9
10
7
12
Top spra y arm
1
Cutlery ra ck
2
Upper ba sket
3
Inner pipe
4
Lower b ask e t
5
Salt container
6
11
Disp e nser
7
Cup s helf
8
Spray arms
9
Fil t e r assem bly
10
11
Inl e t pipe conne cto r
12
Drain pipe
Page 9
Before using you r di shwashe r for the first time :
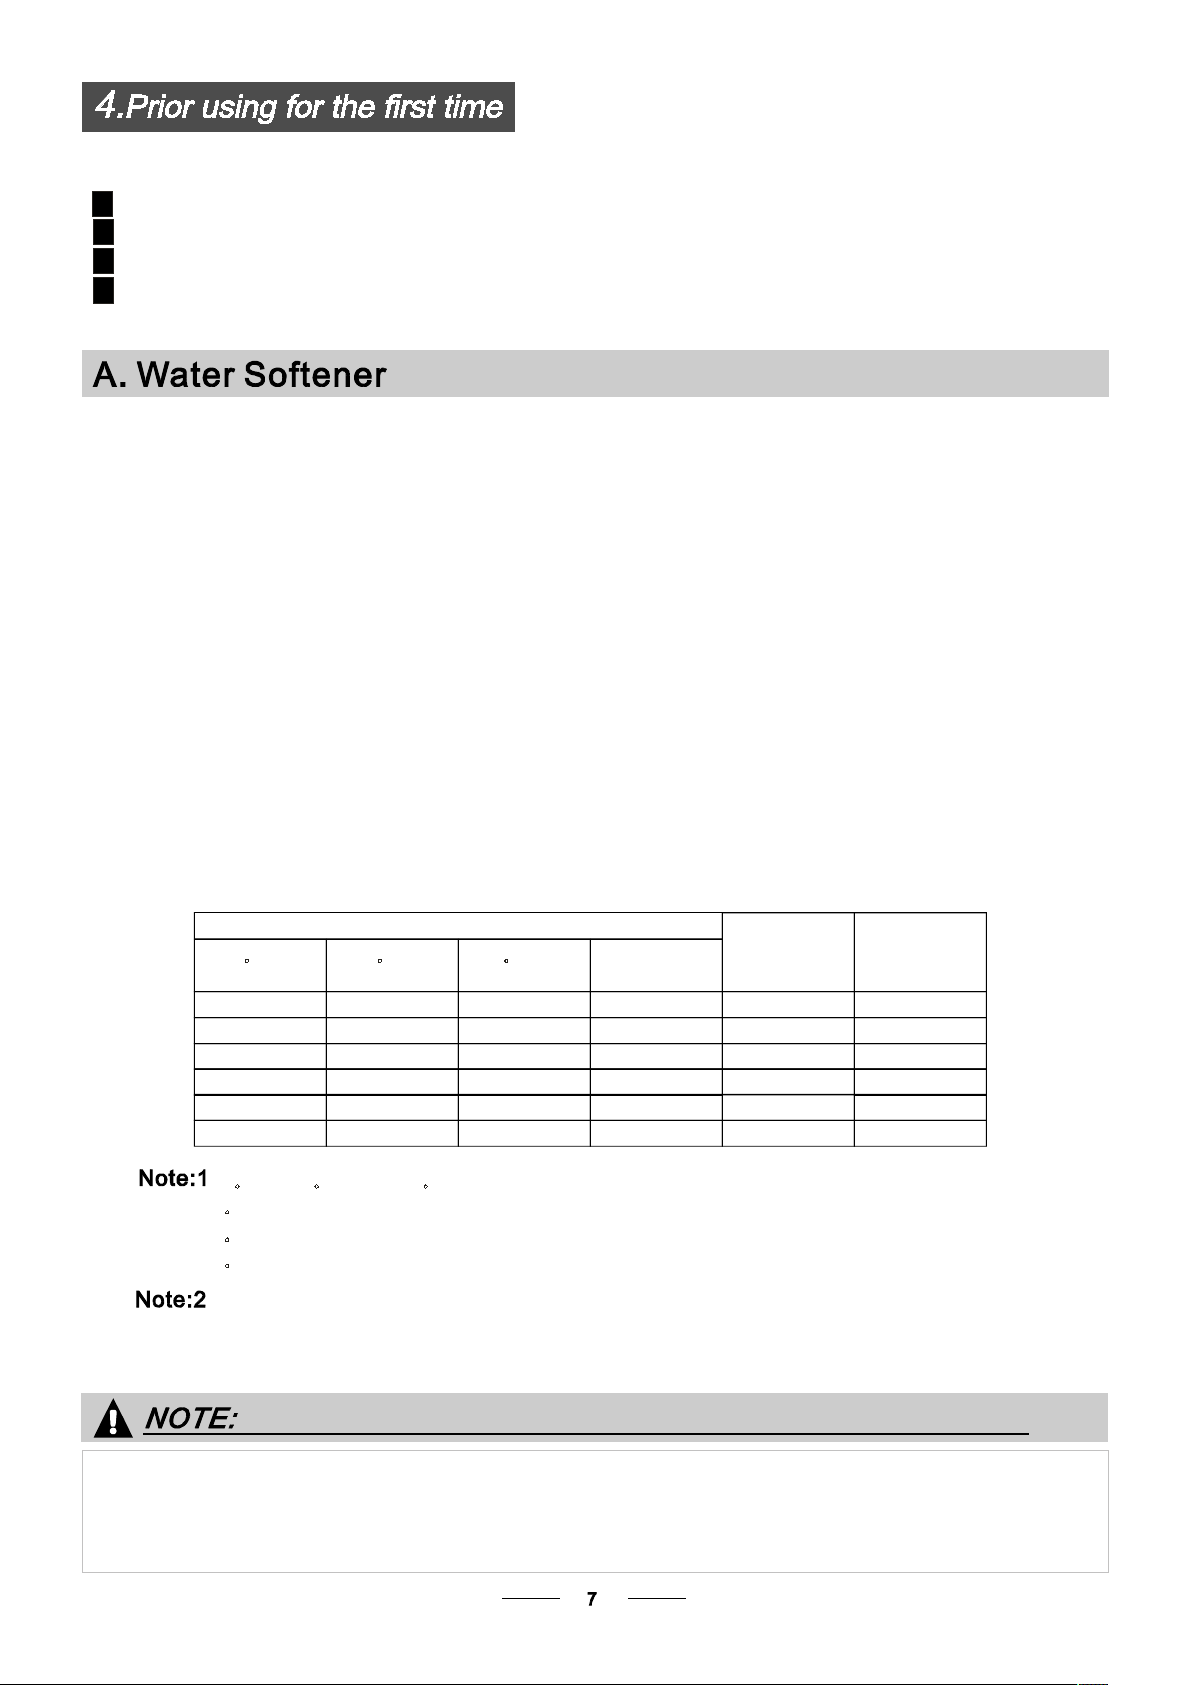
A. Set the wa t e r sof te ne r
B. Add 1. 5Kg dishw asher salt an d th en full fi l l th e sal t container with w at er
C. Fill t he rinse aid disp enser
D. Fill i n d eterg ent
The wat er soft ener must be set m an ually, usi n g th e water ha rd ne ss dial.
The wat er soft ener is de s ign ed to rem ov e min erals and sa l ts f rom t he water, wh ic h woul d ha ve
a detrim ental or ad vers e effe ct o n the ope ration of the app lian ce.
The higher the c ont e nt o f these m ine rals and salts, the har der yo u r wat er is.
The softener sho uld be adjus ted according to the hard ness of t he wate r in your ar ea. Your lo cal Water Au thor it y
can advise you o n the ha rdne ss o f the water in yo ur ar ea.
Adjusting Salt Consumption
The dishwashe r is desig ned to allow for a dj u s tment in the am o unt of salt co nsumed bas ed o n the ha rdness of
the water us ed. This is in te n d ed to optimise and cus to mis e the level o f sa lt co nsumption.
Ple ase follow the st e ps bel o w for ad justmen t in sal t consump tion .
1. Switch on t h e ap plia nce ;
2. Press the St ar t/Pa use b utto n for more than 5 seconds to s tar t th e water
softener set model withi n 6 0se cond s after th e app l ian c e was
sw itc hed on;
3. Press the button to select the pr ope r set a ccording to
your lo cal environment, the se t s will change in the fo ll o w ing
sequence: H1->H2-> H3- > H 4- > H5-> H6;
4. Press the to end the s et up m ode l .
St ar t/Pau se
On/O ff bu tto n
WATER HAR DN ESS
dH
6- 11
18-22 31-40 22-28 3.1 -4. 0
35-55 61-98 43-69 6.1 -9. 8
dH =1. 2 5 Clark e=1.78 fH =0.178 mmol/l
1
fH
0~90~ 5 0~0 .9 4
10-20
21-3012-17 2.1-3.0
41-6023-34 4.1-6.0 H5 30
Clarke
0~6
7-1 4
15-21
29-42
1.0 -2. 0
mm ol /l
Selec to r Position
H1
H2
H3
H4
H6
Sa lt con su m pt io n
(gra m/ cyc le)
0
9
12
20
60
dH: German degr ee
fH : Fre nch degr e e
Clark : Bri tish degree
The manufa c tory setting : H 4 (EN 50242 )
Contact your loc al wat er board for information on th e hardne ss of your w ater supply.
If your model doe s not have any water so ftener, you may skip this secti on.
WATER SO FT E NER
The har dne ss o f the wa ter v ar ie s fr o m place to pla c e. If hard wa te r i s used i n the dishwasher, de pos its w ill
for m on th e dis h es and ute n si ls .
The applian ce i s equipp ed with a sp ecial softener that u se s a salt c on t a iner spe cifi c al ly de s ign e d to el imi na te
lim e and mi ne ra ls fr om the wat e r.
Page 10
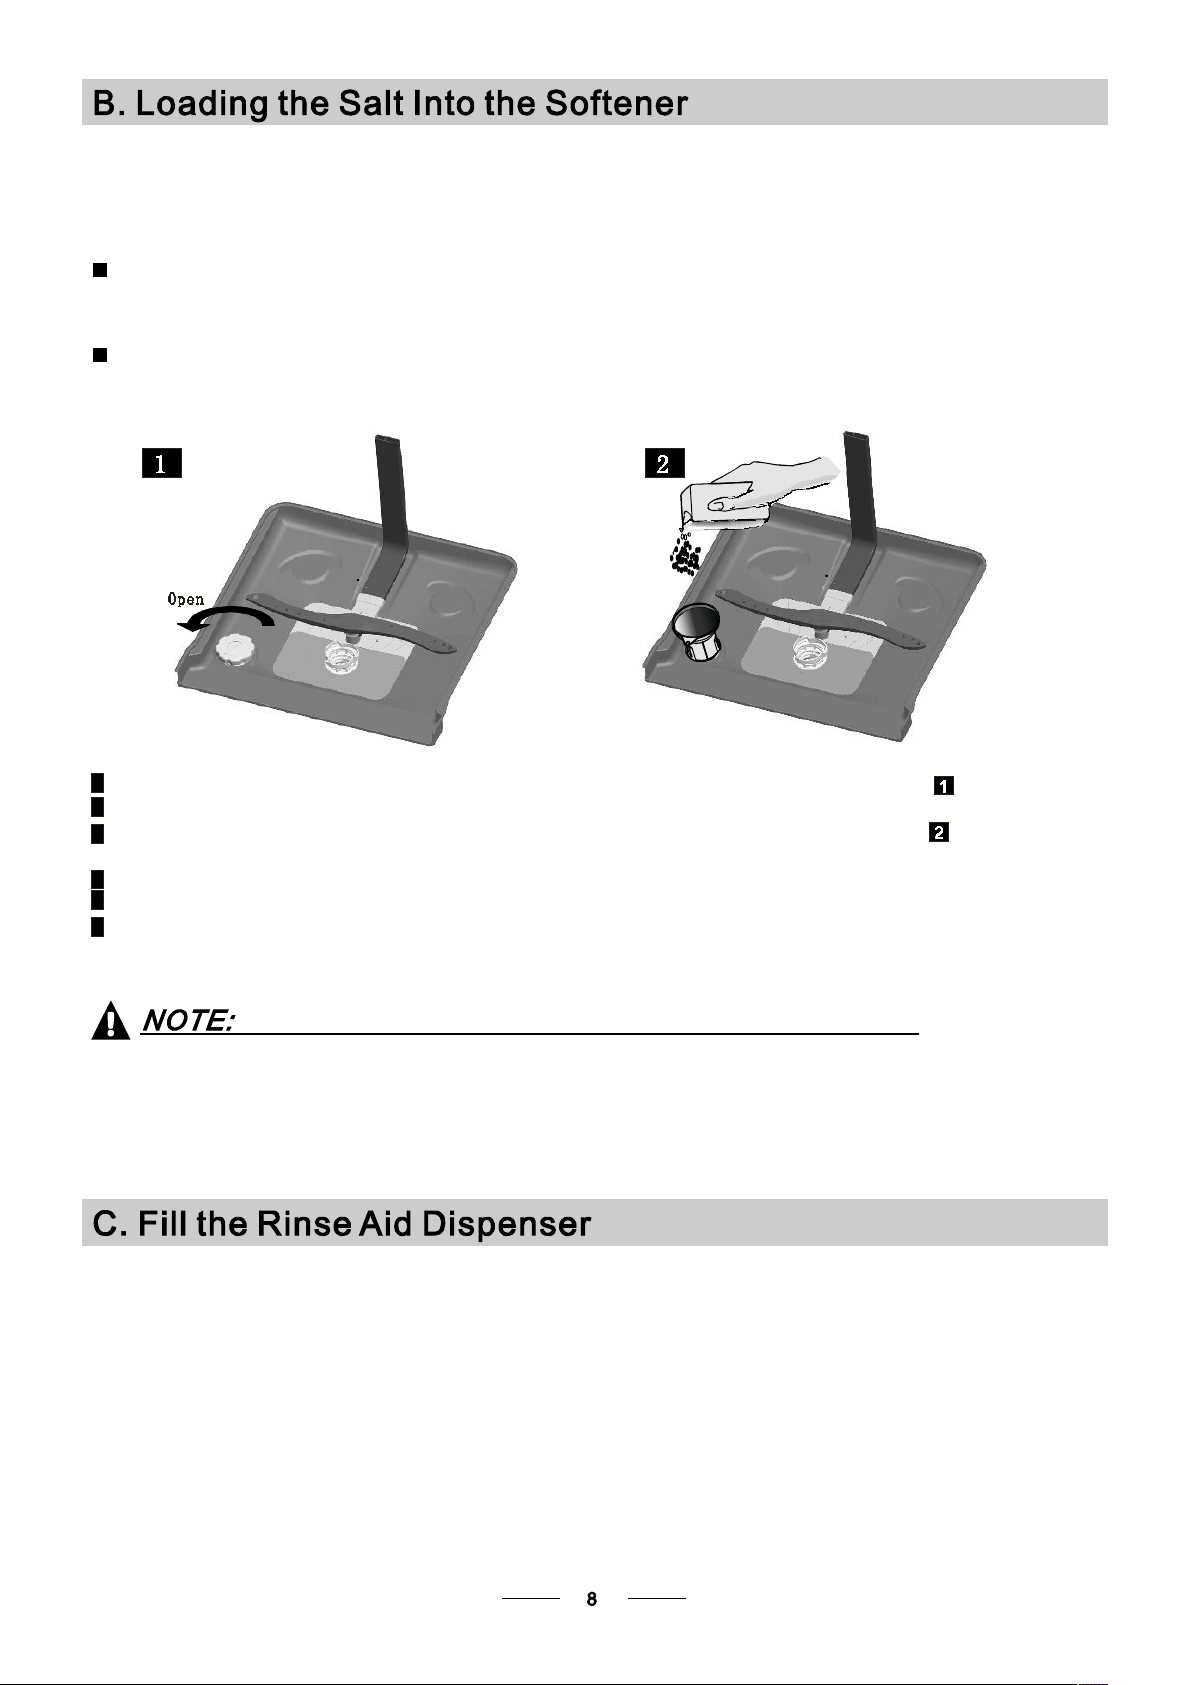
Always use the salt int end ed fo r use wi th di shw a sher.
The sa lt co ntain er is located benea th the lowe r bas ket and sh ould be fil l ed as explaine d
in the foll owing:
Attention!
Onl y use salt spe cif i call y designe d for the use in dishw ashers! E very other type of
salt n o t speci fical ly des ig ned fo r the use in a dishwasher, espe cially tab le s alt, wi ll
damage the w ater sof t ene r. In case of d a mages caused b y the use of unsuitab le
salt t he ma nuf acturer doe s not give any wa rranty no r is li abl e for a ny damag e s cau s ed.
Onl y fil l wi th sa lt ju st before s ta rt ing one of the co mp lete wa shing pro gra ms.
Th is wi ll pre ve nt any g rai ns of sa lt or sa lty wa te r, wh ich ma y have been spi lled,
remai nin g on th e bo ttom o f the machi ne fo r any pe riod of t i me, which may cau se
corrosi on.
A Afte r the low er basket ha s been remo v ed, unscr ew a nd rem ove the cap from the salt c onta ine r.
B Place th e en d o f th e fu n n el (supp lied) int o the ho le and introd uce about 1. 5 kg of d i shw ashe r sal t.
Full fil l th e salt container wit h wa ter,It is normal for a sm all a mount of water to com e out o f th e
C
sal t containe r.
D Af te r fil ling the co ntainer , scr ew th e cap tightly back clo c kwise .
E The sal t wa rning ligh t wi l l sto p being af ter th e sa lt co nta in er ha s been fill ed wi t h sa lt .
F Imm ed i at ely aft e r fil ling the sa lt into th e sa lt co ntain er, a washing pr ogram sho uld be started
pro gram O t her wise the filt er sys tem, p ump or ot her impor t a nt p a rts of the machine may be damag e d
by salt y wate r. This is out o f warranty.
).
1. The salt con tai ner mu st only be r efil led when the sal t warning ligh t in the con trol panel c om es on.
Depending on ho w well the sa lt dissolve s, t h e sa lt wa rni n g lig ht may still be on eve n though the
salt conta iner is fi lled .
If the r e is no salt w ar n i ng li ght i n the control panel (for so me Mode ls),you can e st im at e when to f ill
the salt into the soft ener b y th e cycles that the dish w ash e r has run.
2. If ther e are spills o f the salt , a soak or a rap id program s hould be run to remo v e th e exc essiv e salt.
(We su gge st to use a short
Rinse Aid Dispenser
Th e ri nse aid is rel e ased durin g the final ri nse to prevent water fro m forming dr oplets on y our di s he s, w hic h can
leave spots and s treaks. I t also improv es dry i ng by allowing wate r to roll off the dishes. Your d ishwasher is
design ed to use liquid rins e aids. The ri nse aid dis pen ser is l ocated i nside the door next to the d eter gen t di s pense r.
To fi ll the di spenser, ope n the cap and pour the rin se ai d into th e disp enser unt il the l e vel i ndi cator turns com plete l y
black . The vol ume of the ri nse a id co ntainer is about 110m l.
Function of Rinse Aid
Rinse ai d is au t oma t ically adde d d uri ng the las t rins e, ens uring thorou gh rin sing , and spo t an d streak free dryi n g.
Attention!
Onl y use bran d ed ri nse aid fo r dishw ash er. Never fi ll th e rin se ai d dis pens e r wi th any ot her sub s tanc es
(e.g. Di shwas her cleaning ag en t, liq u id deterge nt ) . Th is would damag e the app liance.
Page 11

When to Refill the Rinse Aid Dispenser
If th er e is no rinse-aid wa r nin g ligh t in th e control panel, you c an est imat e the amount f rom the colour
of th e optical level indicator C loc a ted ne xt to the cap. Whe n the rinse-aid co nta i ner i s fu l l, the wh ole
indi cato r wil l be dark .As t he rinse -aid d i min i sh es, t h e size of the dar k do t decreases. You should neve r l et
the ri ns e aid level fall 1 / 4 ful l .
As the rinse aid d imi n ish e s, t h e size of th e blac k do t
on the rinse aid le ve l ind icato r ch a ng es, as illustra ted below.
Ful l
3 / 4 full
1 / 2 full
1 / 4 full - Sh o ul d refi l l to e lim i n ate sp ottin g
Emp ty
" "
To open the dispense r, turn the cap to the "o pen" ( left) ar row an d lif t it out.
1
Po ur the rinse aid into the dispe nser, being car eful not to overfill .
2
Re plac e the cap by inserti ng it align ed with "open " arrow and t urning it to the closed (righ t) arrow.
3
Clea n up a ny ri ns e aid spilled while dur ing f illin g with an abs orb ent cloth to avoid exc e ss i v e foaming
during the nex t wa sh. Don't forget to re pla c e the cap be fore you clos e dis hwasher do o r.
Adjusting Rinse Aid Dispenser
Th e rinse aid dis p ens e r ha s six or fou r s et t ing s. Always st art wi th th e dispe ns er
set on "4". If spot s and p oo r d r yin g ar e a prob lem, increase the a moun t of rinse
ai d disp ensed by r emoving the dispe nser l id an d rot atin g the d ial to "5". If the
di shes stil l are not drying prop erl y o r are show spots , adj ust the di al to t he next
hi gh e r leve r un til your di shes a re sp ot- f r ee. The r ecommen ded se tti ng is "4".
(Factory val ue is "4" . )
Inc r ea se th e dose if th ere are drop s of wate r or lime sp ots on the di shes a f te r was h ing .
Re duce i t if th ere a r e st i ck y whitis h stain s on yo ur di sh es o r a b l uis h fil m on glassware or
kn i fe bl ad es .
Det e rge nts with its che m ical ingred ie nt s a r e ne cess ary to remove dirt, crush dir t an d tr ans port it out of t he di sh washe r.
Mos t of th e co mme rci al qu ality dete rge nts ar e su ita ble fo r this p urpose.
Attention!
Pro per Use of Detergent
Use only det ergent s pe ci fic ally m ade for the use i n dis hwashers. Keep you r deterge nt fr esh and dr y.
Don't put powde red deter gen t int o the dis pe nse r u ntil you 're re ady to was h dis h es.
Page 12

Detergents
Ther e are 3 sor ts of d etergents
1.With phosp hate an d with ch lorine
2.W ith phosphat e and wit hout chlori ne
3.Withou t phos phate an d with out chlorine
Normall y new pu l ve r ise d det e rge n t is with out phosph a t e. T hus the water softener function of
pho s pha te is not giv e n. I n th i s case we re c om mend to f ill s alt in th e sal t con tain e r even w he n
the hardness of w at e r is only 6 d H . If dete rgen ts without phosp hate ar e used in the cas e of hard wat er
oft e n white spots ap p ea r on dishes an d gl a sse s. In this case pl ea se ad d mo re dete r gen t to reach
bet t er re su lt s. Detergent s without ch lorine do onl y blea ch a little. Strong an d colour ed spots wil l not
be remo ved c om plet e ly. In t h i s case please ch oo s e a program wi t h a hi gher temperature.
°
Concentrated Detergent
Based on th e ir c h em ical c omposition, detergents can b e split in two bas ic ty pes :
co nventional, alkaline dete rgents w ith c aus tic c omp onents
lo w alkalin e co nce nt rated d et e r gen ts with natural enzymes
Detergent Tablets
Dete rgent tablet s of diffe rent bran ds disso lve at di fferent spe e ds. F or t his reason so me
det e r ge n t tablets cannot dissolve an d de velop their full cleaning po we r during short
pro g rams. There fore please use l on g prog ram s wh en u sin g de terg ent t ablets, t o
ens u re the comp l et e r em oval of deterge nt res i dua ls.
Detergent Dispenser
The dispenser mus t b e refill e d before the star t of e ac h wash cy cle f ol lo wi n g th e inst ructi on s
pro v i de d in the was h cycl e table . Your dis hwa sher us e s le ss detergent an d rin s e aid than
Conventiona l dis hwa sher. Ge ner ally, onl y one tab lespoon of deter g en t is needed fo r
a norma l wa s h lo ad. More hea vi ly so i led i t em s need more d ete rge nt. Alway s ad d th e
det e r ge n t jus t before starting the dish wa s her, otherwise it coul d ge t damp a nd w ill not
diss ol v e proper l y.
Amount of Detergent to Use
If the lid is close d: pr ess re leas e but ton. The lid wi ll spring open.
Al ways add th e deterg e nt ju st before starting each w ash cycle.
Only use bran de d de terg en t aid for dishwa sher.
Dishwasher detergent is corrosive!
Take care to keep it out of reach of children.
Page 13

A
B
Fill in Detergent
Fi ll the deter ge nt disp enser with deter gen t.
Th e marking indicate s the dosi ng le vels , as
illus t rated on t he righ t:
The pla ce o f ma in wash cy c le de terg ent plac ed.
A
The pla ce o f pr e-w a sh cycle deterge nt p l ace d.
B
Pl ea se observe th e ma nufa ct urer s dosing and sto r age
Recomm enda tions as sta te d on the de t erg e nt pac kagi ng .
Clos e the lid and pr es s un til it lock s in place.
If the d ishes are he av ily soile d , pl a c e an additiona l
dete r gen t dose in the p re - w as h detergent cha m be r. This deter gent will take e ffect durin g the pr e - wash phas e .
You find information abou t the a mount o f de t er g ent for th e si ngle program on t he last page .
Please aware , tha t ac c or d i n g to the lev el so iling an d the specific hardness of wa ter d iffer enc e s ar e possible.
Please ob serve th e ma nufacturer's rec ommen d ati o ns on the de tergent pack a gi n g.
Page 14

Consi der buyi n g utens ils which are iden t ified as dish w ash er- p ro o f.
Use a mild detergent th at is desc rib e d as 'kind t o dish es'. If nece s sary, seek further
information from th e deterg ent man ufacturers.
For pa rticular items, se lect a program with as lo w a temp e rat u re as p ossible.
To p rev ent da mage , do no t take gla s s and c utl ery out of the di shw a she r immediately
after the pr ogr am has ende d .
Are not suitable
Cutlery wi th woode n, hor n china or
mother-of-pearl handle s
Plastic items that are not heat resistant
Older cut l ery with glue d parts that a re not
temperature re sistant
Bonded cu t l er y i te m s or dishes
Pewt er or copp er ite ms
Crystal glass
Steel items su bj ec t t o rusting
Wooden pl att e rs
Items m ade from synthetic fibres
(F or best performance of t he dishwasher, f ollow th e se lo ading guide lines.
Feat u res and ap pea r a nce of baskets and c utl e r y ba sket s may v ary fr om your model.)
Sc rape off any la rg e amoun ts of leftover food. S often re mnants of burnt f ood i n pans.
It i s not necess ar y to ri nse t he dishes unde r running water.
Pl ace objects in the dis hwa sher in following wa y :
1.I tem s such a s cups, glasses, po ts /pans, e tc . a re fa ced downw a rd s.
2.Curv ed items, o r ones with reces s es , sh ould be loaded aslant s o th at water ca n run off.
3.All utensils are stacked s ecu r ely and can no t ti p over.
4.All utensils are placed in t he way t ha t t he s pray arms can rotat e freely durin g wa shing.
Very sm al l it em s should not be washe d in the dis h was her as they c ould easily fall out of th e bas k et .
Are of limited suitability
Some ty pes of g las ses can b ecome
dul l aft e r a large nu m ber of washes
Sil v er and aluminum part s have a
ten dency to di sc ol our durin g was hing
Gla zed patte rns may fa de if machine
washed fr eque ntly
Load ho ll ow it e ms suc h as c ups, glasse s, p ans et c. W ith the opening f ac i ng downwa rds so t hat
water can n ot co l le c t in th e con tainer or a de ep b ase.
Dis hes an d ite m s of cutlery mu st no t lie insid e one anot h er, or cover e ac h oth e r.
To avoi d da mage to gl a sse s, th ey must not t ouc h.
Load large ite ms which are mo st difficult to c lea n in t o th e lower bask et.
The uppe r bas k et is designed to ho ld mor e delicate and ligh ter dishw a re suc h as glas ses , cof f ee
and tea cu p s
Long blad ed kn i ve s sto red in an up r igh t p osit ion are a potential haza rd!
Long and/ or sha rp it em s o f cutlery such as carv ing knives must be positi on ed
hori zon tall y in the upp er bas ke t .
Please do n ot ove rl o ad yo ur di shwa she r. T his is important for goo d re sult s and for
reasonab le consu m pt i on of energy.
To p re ven t wa ter dr ippi ng fr om the upp e r basket into t he lo w er ba ske t, we re c om mend that you
empty the lower ba sk et fir s t an d the n the up per ba sket.
Page 15

The uppe r ba s k et is designed t o ho l d more delicate
and light e r dishware such as glasses, coffee a n d
te a cups a nd saucers, as wel l a s pl ates , small bowls
and sh allow pa ns (as long as they a r e not too di r ty).
Posit i on the dishe s an d cookw are so th a t th e y will
not get mo ve d by the spray of wate r.
Ple ase be r e mi n de d that:
Pots, serving bo w l s, e t c, mus t always be place d top do wn .
Deep po t s shoul d be s lan ted t o al l o w water to flow o ut .
The B ot to m Basket features fo lding sp ikes so th at larg er or mo r e po t s and pans can be lo ade d .
We sug ges t tha t yo u place large i te m s and t he mo st
difficu lt to c lea n ite ms are to be plac ed into the lo wer
basket: su ch as pots, pans, lids, se rvin g di s he s and
bowls, as s h ow n i n the figure be low. I t is pre fera ble to
place serv ing dish e s an d lids on the s id e of the rack s
in order to a vo id bl ocki ng the ro tation of t he t op spray
arm.
Adjusting the Upper Basket
The h eigh t of t he upper ba sk et can be ad justed in o r der to
creat e mo re s pac e for larg e uten sils bo th for the upp er
/l ow e r basket. The hei ght of t h e upper ba s ket c an b e
adjus ted by pla c ing t h e wheels on di fferent he igh t of th e
rails . Long items, se rving cut l e ry, s al ad ser ver s and knive s
should be pl ace d on the sh el f s o th at they do no t obstru ct
the rotati on of the sp r ay arms. .
Cutle ry should be pla ced in the cu t lery rac k se p ar a tel y
from each ot h er i n th e ap p ro p r ia te po s i ti on s, a nd do
make sur e th e ute nsil s do no t n es t togethe r, this ma y
cause ba d pe rfor mance.
Folding back the cup shelives
For better stacking o f po ts and pa ns ,
the spikes c an b e f o l de d down as
sho w in th e pic t u re ri gh t .
Foldin g Spikes of Lower Basket
Fo r better stacking of pots and pa ns,
th e spikes can be folde d down a s
show in t he pictu re righ t.
Do not let any item extend through the bottom.
Always load sharp utensils with the sharp
point down!
Page 16

( )
Means : need to fill rins e into the Rinse -Ai d Dispense r.
Auto
In ten si ve
Normal
(* EN 50 24 2)
Gl ass
Auto sensing wash, light ly,
norm all y or heavi ly soi led
crockery, w i th or w ith ou t
dri ed-o n foo d
Fo r hea viest soi led cr ockery,
and normall y soiled po ts
pan s di shes etc wi th dr ied
、
、
on soil ing.
Fo r normal ly soile d load s,
such as , plates,glasses
pots
and li ghtly soiled pans.
This is standar d progr a mm e , it is
su it abl e to clea n no rm ally s oi l ed
tableware and it is the most eff icient
prog ra m me in ter ms of its combi ned
ener gy and w ater con su m p ti o n for
that type of ta bl eware .
Fo r lightl y soiled cr ock er y
and gl ass
Pre - was h (45 )
Auto was h(45-55 )
℃
℃
Rin s e
Rin s e (65 )
℃
Dry i ng
Pre was h 50
Was h 6 2
(
(
℃)
℃)
Rinse
Rinse
(
℃)
Rinse 65
Dry in g
Pre was h(4 5 )
Was h (55 )
℃
℃
Rinse
Rinse (65 )
℃
Dry in g
Pr ewash
Wash (45 )
Rinse ( 6 5 )
℃
℃
Dr yin g
Pr e-w a sh
wash(4 0 )
℃
Ri nse
Ri nse( 6 0 )
℃
Dr yin g
5/30 g
(Or )3i n1
5/30 g
(Or )3i n1
5/30 g
(Or )3i n1
5/30 g
(Or )3i n1
5/30 g
(Or )3i n1
150
175
185
195
115
0.9 ~1.5
1. 6
1. 3
0. 9 3
0. 8 7 14
10~1 5
17
14
10
Wash 65
For normal ly soile d loads
that need qui ck wash.
( ℃)
Rin se
Rin se (65 )
℃
35 g
90 12 . 51.35
Dry in g
Rapi d
A sh o rte r wash for light ly
so iled loads that do not
need dryi ng.
Was h (45 )
Rin se
Rin se (45 )℃℃
20 g
40
0. 7 5
*E N 5024 2 : Th is program is the te s t cyc le. The information for c o mp arabi lity t est
in acc ord ance with EN 502 42, as f ollows:
Capa city: setti ng
14
Position Uppe r ba sket: upper w he els on rails
Rinse aid set t i ng: 6
PI:0.49W; P : 0.45 W.
o
Le ft- on mod e dur a tio n: Power will be c ut off aut omatically after prog ram finished for 30 minutes.
Start ing a cycl e w as h
Draw out t he l o we r and up p er b aske t, load th e dish es and push them bac k .
1
It is co mm en d ed to load the low er b aske t firs t, t h en the upper one (se e the secti on en t itl ed
Loading the Dish was her ).
“ ”
Pour in the deterge nt ( see the s ecti on e nt itled Salt, Detergent and R in se Aid ).
2
In sert the plug in to th e soc k et . The power su pply is 2 20- 2 40 VAC / 50 HZ, the speci ficat ion
3
“ ”
of the so c ket i s 10A 25 0VA C. Make sur e tha t the wa ter s up p ly is turn ed on to f ull p re ss ur e .
Close the do o r, press the P but to n, to switch on the mac hine .
4
Press the pr og ra m but t on , the wa sh pro gra m wi ll be ch ange d as follows d ire c tion :
5
ower
ECO->G l ass->90m in-> Rapid->Au to ->Intensive->Normal;
If a p rogram is se lect e d, th e response l igh t wi ll l i ght. Then pr es s the S tar t /Pau se button, the
dishwasher be gins to start.
11.5
Page 17

When yo u press th e St art/Pause bu tton to pau s e during washing, the running indicator will
stop blinking and the dis hwasher w ill mo oin g ev e ry minute u n less you pr e ss the
but t on to s ta rt .Start/Pause
Pr emis e:
A cycle th at is un de r w ay can on ly be mod ified if it ha s onl y bee n r un n ing for a short time. Otherwis e, th e
1
detergent m ay hav e already be en relea s ed, a nd the ap pli an ce may have already dr ained the wa sh wa ter.
If t his is the case , the detergent disp enser must be re filled (see the sec tion entitled " Load ing the
Deterg ent " ).
Press the Start/Pause button , the mac h in e wil l be in s tan d by state , pre ss the prog ram b utto n more than
2
3s then you can cha n ge the program to the desired cycle s etting (s ee th e section e n ti tled " S t ar ting a wash
cy cle . . ." ).
If you o p en the do or , the ma chine wil l pause. Th e program li g h t will
stop blinking and the bu zz er w ill moo in g every minu t e u n less yo u close the door . Aft er
yo u close the doo r ,the m achin e will keep on wor king after 10 sec onds.
If you r model has bro ke n remember functi o n, the ma ch ine wil l go on to finish the sele c t ed
pro g r am .after the pow e r cut
A forgotten dish can be added any time before the detergent cup opens.
Press the Start/Pause button
1
Open the door a little to stop the w ashing.
2
After the spray arms stop working,you can open the door
3
completely.
When the working cycle h as fi ni s h ed, the b uzzer of th e dish wa s her will sound fo r 8 seconds, then sto p. Turn off
the a ppliance usi ng th e Powe r sw itc h but ton, s hu t off t h e water su ppl y a nd open the do o r of the d i shwas h er.
Wai t for a few mi n ut es bef ore unlo ading th e dis hw a sh er to av oi d ha nd l in g th e dishes and ut e ns i ls while th ey
are s till hot and m ore suscept ible to br eak ag e. Th e y w i l l al s o dry better.
during a wash cyc le
Add forgotten dishes.
4
Close the door
5
Press the button, the dishwasher will run
6
after 10 seconds.
Start/Pause
Switch Off the Dishwasher
The pro gram l ig h t is on but is not b l in k ing, o nl y in th is case the progr amme has e nded .
2.Tur n off th e water tap!
Po wer1.Switch off the dish wash er by pressing the button.
Open the door carefully.
Hot dishes are sensit ive to knocks. The di shes sho uld therefore be all owed to cool down ar o u nd 15 minutes
befor e removing fro m the appli ance.
Open th e dish wa s her' s door, leave it aj ar and wai t a fe w minutes befor e rem ovin g the dishes. In this way they
will be cool er an d the drying will be im p rov ed.
Unloa ding th e d ishwa sher
It is normal that the di s hw a she r is we t insid e.
Empty the lo w er basket fir st and then the upper one. This will a voi d wate r drippin g fro m the upper Basket on to
the dis hes in the l ower one.
It is dangerous to open the door when washing,
because the hot water may scald you.
Page 18

The filter prevent s lar ger rem n ant s of food or o t he r obj ects from getting inside th e pu mp.
The residue s may block the fi l ter, in th is ca s e they mus t be rem oved .
The fi lte r syst em con sists of a coar se filter,a flat (Main f il ter)
And a mic ro filter(Fine filter ).
1
2
3
2
1
3
Main filter
Fo od and soi l par t icles trap p ed in this filter ar e pulverize d by a
sp e cia l jet on the lo we r spr ay arm an d washed do wn to drain.
Coarse filter
La rger items, s uch as p ieces of bon e s or glass, that c ou l d bl o ck
th e drain are trapp ed in the coarse f ilter. To remo ve the ite ms
ca u ght by t he fi lter, ge n t ly s qu e eze the t ap on th e top of t h is
fil ter and lif t ou t .
Fin e filter
This filter holds so i l an d foo d residues in t he sum p area an d
pr eve nts it from be ing r ede po si t on the di s h es d uri n g wa sh c ycle.
Filter assembly
The filter eff i cien tly
For best p er f o rm a nce and res ults, the f ilter mu s t be cleaned re g ul a r ly. this r eason, it is a goo d idea to
remove th e la r ge r foo d particl es tr app ed in th e f ilter aft er each was h cy c le by ri n s in g the sem icircular filte r and
cup und e r ru n nin g water. To r e move th e filter de vice, pu ll th e cup handle in t h e upward direction.
re moves food p ar t icle s fro m th e wash wat e r, all o wi n g it to be rec y cle d during the cycl e.
For
The d ishw ash er m ust nev er b e u sed without the fi l ters.
Impro per replac e me n t of the filter may re d uce the perform anc e level o f the appliance
and dama ge dishes and ut en s i ls.
1
2
Ste p 1 Turn the filter i n ant i-cl o ck w i se direc tio n ,:
St ep 2 lift th e filter assy up:
When following this procedure from step1 to step 2, the filter system will be removed;
when following it from Step 2 to Step 1, the filter system will be installed.
Page 19

Remarks:
- Ins pect the filters for blocking after e ve r y time the di s hwa sh e r has be en us ed.
- By uns crew ing the coar se filter, you can rem ove the filter sys t em . Re move an y fo o d r e mna nts and
clean the fi lters unde r ru nn i ng water.
The entire filter assembly should be cleaned once a week.
Cleaning the Filter
To clean the coar se fi lt er and the f ine f ilter, use a cleaning b rus h. Reas s emb le the fi lter p arts as s ho w n in the f i gu r es
on the last pa ge a nd reinsert the e ntire assem b ly in the dis hwa s her, po sitio ning i t in its s eat and p res sing do w nwards.
When cle aning the filters, don't k noc k on them. O ther w i se , the fil t e rs could b e
contorted an d the pe rform ance o f the dis hw asher cou ld be d ecre ased.
The control pane l ca n be cleaned by using a lig htly damp ened clot h .
Aft e r cl e an in g, make su r e to dry it thoroughly.
For t he exter ior, use a good a ppliance pol ish w ax.
Never use s har p obje cts, sco urin g pads o r har sh cleaners on a ny part of the di s hw a she r.
Cleaning the Door
To clean th e edge around th e doo r, you shoul d use only a soft warm, d amp clot h.
To avoid pe ne trat i on of water into t he do or lo ck and electrical co m po nents , do not
use a sp ray cleaner of any ki nd.
Never u se a spr ay cleaner t o cl e an the d oor pan el as it m ay d amage t he doo r loc k
and electric al comp on e nt s .
Abrasiv e ag ent s or som e pa pe r tow els shou ld not be used becau se o f the ris k of
scr atch ing or leaving sp ot s on th e stainl ess st e e l su r fac e.
Protect Against Freezing
please take frost pr ote ction mea sures on the dishwas her in winter. Ev ery fter wa shi n g cycles,
please op erat e as f o ll o w s
1.Cut off the electrical power to the dishwasher.
2.Turn off th e water su ppl y and disco nnec t the water i nlet pipe from the wa te r v alve .
3.Drain th e wat e r fro m the inlet pipe an d water valve. (U s e a pan to ga the r the water)
4.Reconne ct th e wat er inlet pipe to the water valve.
5.Remove t he fil te r at the bottom of the tu b and use a spong e to so ak up wat e r in the sump .
:
If yo ur dishwa s her cannot w o rk because of the ice,
please contact pro fes siona l ser vice perso n s.
time a
Cleaning the Spray Arms
It is necessary to cl ean the spra y arm s re gularly fo r hard
wate r che micals will clog the sp ra y arm jets and be ar i n gs.
To r e mov e the up pe r s pra y arm, hold t he n ut, r otat e the arm
clock wise to remove it.
To r e mov e the lowe r s pr ay arm , pull out the sp r ay arm u pwa rd.
Wash th e ar ms in soap y and warm water and use a soft brus h to
cl ean th e jets. Replace the m aft e r rin sin g the m thor ough ly.
Page 20

After Every Wash
Aft er ev ery wa sh, t urn off the wa ter supply to th e
appli a n ce and lea ve th e do or slight ly open so th a t
moisture and odou r s are not trapped in s ide .
Remove the Plug
Before cleaning o r perfo rming maintenance, always
remove the p lug f rom the soc k et .
No Solve nts or Abrasive Cleaning
To cle an the exterior a nd r ubb er parts of the di s hw ash e r,
do not us e solven ts o r abrasive cle ani ng prod u cts .
Only use a clo th with warm so apy water.
To rem ove sp ots o r st ains from the sur f ace of t he
in teri o r, use a clo t h da mpened wit h wa ter an a little
vineg ar, or a clea n ing pro duct mad e specifica l ly for
dishw ashers.
Position the app liance in t he desir ed location. The back sh o uld r est against the w al l b ehin d it, and the sides,
along the ad j ac en t ca bine ts or walls. The d is hwas h er i s equ ippe d with wat er su p pl y and drain ho s es th at c an
be pos itio ned ei ther to th e rig h t or the left s ides to fac il itate prop er in st allation.
When not in Use for a LongTime
It is r eco mmend t ha t y ou run a wa s h c y cle with the
dish was her empt y an d th e n remove th e pl u g f r o m the
soc k et, turn o ff th e wa ter supp ly and le ave the do or of
the appl i ance sli g htl y open. This will help the d oor
sea l s to last longer and pr ev e n t od ours from fo r min g
wit h i n th e applian ce.
Moving the Appliance
If the app liance m ust be mo v e d, t r y to keep it in th e
vertical positi on . If absolutely nec essar y, i t ca n be
posit i one d on its bac k .
Seals
One of the fa c to rs th a t ca u se odours to fo rm in the
dish w as h er is food th a t re mai n s tr app ed in the sea l s .
Peri o dic cle a ning with a damp spo nge wi ll prevent t his
from occ urri n g.
Once th e appl ian ce is positioned f or lev e llin g, the height of the di s hw ashe r
may be a lter ed via adjustment of the screwing level o f the feet.
For personal safety:
Do not use an extension cord or an adapter plug
with this appliance.
Do not, under any circumstances, cut or remove the
earthing
Connection from the power cord.
Please look a t th e r a t ing lab el to know th e rating voltage and c on nect t he dishw ash er to the app ro pr iate pow er s uppl y.
Use the r eq u i red fuse 10 amp , tim e delay fuse or c ircu i t br e ak er recomme nded and pr ovide sep a ra te cir c uit s ervi ng
only th is app l ia nce.
Ensure the vo lt a g e and frequ enc y of the p ow e r be ing cor respond s to
those on t he rati n g pla te . Only in s er t the plug into an elec t rica l so c ke t which is ea rthe d
properly. If the el ectrical sock et t o which the a pp l ianc e must b e conn ected is n ot
appropriate f or the pl ug , rep lace the soc k et, rath e r than u si n g a adaptors or t h e like as
they cou ld ca us e overheating an d burns.
Page 21

Connect the co ld water supply hose to a thre ad ed 3/4(in ch) conne ctor and mak e su re
that it is fastened t ight ly in plac e.
If the wat er pi pes ar e new o r ha ve not been used for an extended pe riod of ti me, let th e
water run to mak e sure that the wat e r i s clear. This precaution is needed to avoid th e
ris k of the w ate r in let to b e blocked and da mage the appliance.
Ple a se cl ose the h ydrant after u sing.
In se r t th e drain hose into a drain pipe with a minimum diam e te r o f 40mm , or l et i t run into the sink, ma k ing sur e to
avo i d bendin g or c rim pin g it. T he to p of the ho s e must be les s than 100 0mm .
Front
NOTE
The top of the hose
must be less than
1000mm.
Drain pipe
Counter
A
B
φ 40m m
Page 22

How to Drain Excess Water From Hoses
If th e sin k is 100 0 hig h er from the floor, th e ex ce ss wat er in h os es cann ot be dr a i ned dire ctl y
in to th e sink. It will be ne c e ss a ry to drain exces s water from hoses i nto a bowl or sui table
con t a i ne r tha t is held out side and lower than the si n k.
Water Outlet
Connect the wa t e r dra in hose. The drain hose must be cor r ect ly fit ted to av o i d water leaks.
Ensure that the wa te r dra in hose i s no t kin ked or squashed .
Extension Hose
If yo u need a dra in h ose extension, ma ke sure to use a simil ar dr ain hose.
It must be no lon ger than 4 met re s ; ot herw ise the cleaning e ffect of the di sh w as her could be red u c ed .
Syphon Connection
The waste co nne cti o n must be at a he ight less than 10 00 mm (m ax imum) from th e bottom of the dish .
The wat er dr ain ho se sho uld be fi xed .
The following th ings should be checked before starting the dishwa sher.
The dishwasher is level and fixed properly
1
The inle t valve is ope n
2
Fill h ose connections are fully tightened and not leaking
3
The wires are tightly connected
4
The power is switched on
5
The inle t an d drain hoses a re knotted
6
All packing materials and printings should be taken out from the dishwash er
7
Af ter ins tallation, please make sure to k eep this manua l.
The conten t of this manual is very helpf ul to the users .
Page 23

Fuse blown, or the
circuit breaker acted
Replace fuse or reset circuit breaker. Remove any other
appliances sharing the same circuit with the dishwasher
Power supply is not
turned on
Water pressure is low
Door of dishwasher
not properly closed.
Kink in drain hose
Filter clogged
Kitchen sink clogged
Improper detergent
Spilled rinse-aid
Make sure the dishwasher is turned on and the door is
closed securely.
Make sure the power cord is properly plugged into the
wall socket.
Check that the water supply is connected properly and
the water is turned on.
Make sure to close the door properly and latch it.
Check drain hose.
Check coarse the filter
(see section titled )" Cleaning The Filter "
Check the kitchen sink to make sure it is draining well.
If the problem is the kitchen sink not draining ,you may
need a plumber rather than a serviceman for dishwashers.
Use only the special dishwasher detergent to avoid suds.
If this occurs, open the dishwasher and let suds evaporate.
Add 1 gallon of cold water to the tub. Close and latch the
dishwasher, then select any cycle. Dishwasher will drain
out the water at the first step.Open the door after draining
is stop and check if the suds is disappeared.
Repeat if necessary.
Always wipe up rinse-aid spills immediately.
Detergent with
colourant was used
Hard water minerals
The affected items are
not corrosion resistant.
A program was not
run after dishwasher
salt was added.
Traces of salt have
gotten into the wash cycle.
The lid of the softer
is loose
A sp ay arm is
r
knocking against
an item in a basket
Items of crockery
are loose in the
wash cabinet
This may be caused
by on-site installation
or the cross-section of
the piping.
Make sure that the detergent is the one without
colourant.
To clean the interior, use a damp sponge with
dishwasher detergent and wear rubber gloves.
Never use any other cleaner than dishwasher
detergent for the risk of foaming or suds.
Always run the quick wash program .
without any crockery in the dishwasher and
without selecting the Turbo function (if present),
after adding dishwasher salt.
Check the lip .Ensure the fix is fine.
Interrupt the program, and rearrange the items
which are obstructing the sp ay arm.r
Interrupt the program,
and rearrange the items of crockery.
This has no influence on the dishwasher function.
if in doubt, contact a suitably qualified plumber.
Page 24

The dishes were not
loaded correctly.
See notes in " Loading the Dishwasher Baskets ".
The program was
not powerful enough.
Not enough detergent
was dispensed.
Items are blocking
the path of sp ay arms.r
The filter combination
in the base of wash
cabinet is not clean or
is not correctly fitted.
This may cause
the sp ay arm jets
r
to get blocked.
Combination of soft
water and too much
detergent.
Aluminum utensils
have rubbed against
dishes.
Dishes block
detergent cups.
Improper loading
Too little rinse-aid
Select a more intensive program.
See" Wash Cycle Table ."
Use more detergent, or change your detergent.
Rearrange the items so that the sp ay can rotate freely.r
Clean and/or fit the filter combination correctly.
Clean the sp ay arm jets. See "Cleaning the Spray
Arms".
Use less detergent if you have soft water and select
a shortest cycle to wash the glassware and to get
them clean.
Use a mild abrasive cleaner to eliminate those marks.
Re-loading the dishes properly.
Load the dishwasher as suggested in the directions.
Increase the amount of rinse-aid/refill the rinse-aid
dispenser.
r
Dishes are removed
too soon
Wrong program
has been selected
Use of cutlery with
a low-quality coating
Do not empty your dishwasher immediately after
washing. Open the door slightly so that the steam can
escape. Begin unloading the dishwasher only once t
he dishes are barely warm to the touch. Empty the low
basket first. This prevents water form dropping off
dishes in the upper basket.
In short program the washing temperature is lower.
This also lowers cleaning performance. Choose
a program with a long washing time.
Water drainage is more difficult with these items.
Cutlery or dishes of this type are not suitable for
washing in the dishwasher.
When some malfunctions come on, the appliance will display error codes to warn you:
E1
E4
E8
Longer inlet time.
Overflow.
Divider vale failed
Faucets is not opened, or water intake is
restricted,or water pressure is too low.
Some element of dishwasher leaks .
Divider vale failed
If overflow occurs, turn off the main water supply before calling a service.
If there is water in the base pan because of an overfill or small leak,
the water should be removed before restarting the dishwasher.
Page 25

Hei ght : 845mm
Width : 598 mm
with th e door closed
Depth : 610mm
( )
Water pressur e: 0.04-1.0M Pa
Pow er s upply: see rating label
Capacity: 14 place settings
Page 26

Page 27

Cut lery basket could be have 5 positions:
Mode 1
Positi on one: li ft th e lef t basket up, bot h left and ri ght
baskets are s ide l in g .
Mode 2
Positi on two: ad jus t the left basket to lower posit ion, l eft
basket is fla t an d right bask et i s sid elin g.
Mode 3
Mode 4
Mode 5
Positi on three : lift the ri ght bask et up, bot h left and ri ght
baskets are flat .
Positi on Four: M ove the ri ght ba sket from righ t to le ft, two
basket are ov erl app ing.
Positi on Five: R emo ve the right bas ket from th e tray,
only ha s the l eft basket.
Page 28

E-WASTE MANAGEMENT GUIDELINES
PROPER HANDLING AND/OR RECYCLING OF THE DISH WASHER
Under the E-Waste (Management & Handling) Rules, 2011 (hereafter referred to as the “E-Waste Rules”), it is
incumbent for all consumers, including the purchaser of this dish washer, to properly recycle and dispose of all
electrical and electronic equipment through authorized recyclers.
E-Waste has been defined as “waste electrical and electronic equipment, whole or in part or rejects from their
manufacturing and repair process, which are intended to be discarded”.
E-Waste contains various hazardous materials like lead, mercury, cadmium, hexavalent chromium, polybrominated
biphenyls and polybrominateddiphenyls ethers. Hence, improper handling and disposal of e-waste releases these
hazardous material in the environment causing pollution, contamination of soil and water and various health hazards.
Though the product purchased by you does not contain any hazardous material above the prescribed limit under the E-
Waste Rules, it is imperative that the product should be handled with utmost caution and as per the guidelines
mentioned in this manual including the following Do's and Don'ts –
Do's Dont's
Hand over the E-Waste to the Company / Authorised
recycler.
E-Waste should never be thrown in household bins.
Keep the product in isolated area, after it becomes
non-functional/un-repairable so as to prevent its
accidental breakage.
The product should not be opened by the User himself/
herself, but only by authorised service personnel.
The following marking/symbol on the product or carton indicates that the product and its accessories/parts (e.g. remote
controller, batteries, spare parts etc.) should not be disposed of with other household waste at the end of their working
life. Please separate these items from other types of waste and recycle them responsibly for conservation of the
environment and collective well-being.
Never sell the e-waste to any unauthorized agencies,
scrap dealer/kabadiwalahs.
Never throw E-Waste in bins as part of
household waste.
Never keep E-Waste in open and exposed area,
accessible by all.
Never open/dismantle any e-waste on your own.
E-WASTE RECYCLING PROGRAM
We have tied up with government approved e-waste recycler for facilitating the collection of e-waste from our channel
partners and customers for recycling. You are simply required to call our toll free number 1800 30 00 00 11 and register
your request for collection of e-waste. Once your request is received, the representatives of the authorized recycler
would collect the e-waste from your house/premises after paying the value of the same to you. For more details and
information on our E-Waste Recycling Program kindly visit our website www.carriermidea.com.
Page 29

Product Warranty Terms & Conditions (Dishwasher)
CARRIER MIDEA INDIA PRIVATE LIMITED (hereinafter referred to as the "Company"), hereby warrants to the original
domestic purchaser (here in after called the "Purchaser") of the product (as detailed within the Warranty
Registration Card and here in after referred to as the "said unit") that the said unit is free from defects in materials
and workmanship under normal use and service and under specified voltage conditions, and that during a period of
twenty four (24) months commencing from the date of invoice, as provided in the Warranty Registration Card, the
Company undertakes to repair or to replace as it deems fit in sole discretion, free of charge, any part or parts of the
said unit (including accessories) which proves to be defective in materials or workmanship.
CONDITIONS OF WARRANTY
1. The warranty shall be valid and that the Purchaser can have the benefit of this warranty, if and only if the
Purchaser has duly intimated the fault to the Company or its authorized dealer and that the unit is in the
possession of and is used by the Purchaser.
2. The Warranty will shall be valid only for the said period as specified above, irrespective of whether the said unit
has been in use or not for any reason whatsoever, or the unit is moved from one location to another. The
warranty period specified above shall include time taken for repairs, replacements, testing of unit, technical
breakdowns, transit time etc. This warranty shall automatically expire by efflux of time on completion of the
period indicated herein above and no notice of such expiry will be given by the Company.
3. This warranty shall stand automatically terminated in the event of the said unit being serviced, repaired,
installed, de-installed, re-installed or otherwise attended to by and person or organization or agency or by the
Purchaser himself (by whatever name called), other that the authorized representative / Dealer of the Company.
4. Parts of the units replaced or repaired under the terms of this warranty are warranted only for the remaining
period of the original warranty period.
5. For attending any service call under this warranty beyond the Municipal limits of the locality in which the
authorized representative/dealer is situated (outstation locations), all to and fro traveling and other incidental
expenses as prevailing from time to time incurred in connection with the visit of the service personnel,
technicians etc., shall be borne by the Purchaser and shall be payable in advance. Additionally, all expenses
incurred by the authorized representative/dealer in collecting the unit or any part thereof from such outstation
locations and its return to the original location shall be borne exclusively by the Purchaser.
6. Any damage/fault caused due to sabotage, improper handling or treatment, carelessness, accident, fire, flood,
earthquake or any act of God, or any corrosive action on the original fittings, valves etc. for whatever reason,
shall not be covered under this warranty.
7. While the Authorized Dealers/Company will make every effort to carry out repairs/replacement of parts under
this warranty as soon as the complaint is received, it is expressly made clear that the Authorized
Dealer/Company shall not be liable to do so within any specified period of time.
8. It shall be absolute discretion of the Company to (a) effect the repairs or replacement of parts whether at the
site of installation or at any service center; and (b) have the job attended to either by the Company's service
personnel or of its authorized dealers. (c) This warranty shall be strictly limited to the repairs or replacement of
defective parts specified in the warranty. This warranty shall not cover any consequential of resulting liability. (d)
This warranty shall not, in any case, extend towards payments of an monetary consideration whatsoever of
replacement or return of the product. (e) The company may repair/ supply parts free of cost during the warranty
period. This warranty does not cover any Excise Duty, Central or Sales Tax, Octroi and other local taxes or levies
on the components/parts. (f) The parts shall be replaced by functionally operating equivalent material only and
not necessarily brand new ones and are to be different from the one originally fitted. The parts thus removed
shall be taken back by the company. (g) The company reserves the right to retain any part or components
replaced at its sole discretion during the warranty period.
9. This warranty is in the nature of and for the purposes as set forth herein above and in particular, the Company
shall not in any event be liable for any direct, indirect, incidental or consequential loss or damages to either the
said purchaser and/or his property or any other third party in course of attending to any complaint.
10. Limitation of Warranty: Company shall not be responsible for providing any warranty under the following
situations:
i. If the appliance is not used in accordance with manufacturer’s instruction given in the “User’s Manual”.
ii. Service engineers visits to place of product installation to teach/instruct on how to use the product.
Page 30

iii. Noise or vibration that is considered normal for product operations like warning beeps, water shower sound,
utensil sound etc.
iv. Correcting the installation, for example leveling the product, adjustment of inlet tap/drain hose etc
v. Normal maintenance which is recommended by the user’s manual
vi. Removal of foreign objects / substances from the machine, including the pump and inlet hose filter for
example grit, food wastage, utensils etc.
vii. Replace fuses in or correct house wiring or correct house plumbing
viii. If the product is used for commercial purpose, it is not warranted (example : Public places such as
restaurants, lodging house, dormitory etc)
ix. Any damage caused by accident, mishandling, tampering with installation, or negligent in following
instructions of the user manual issued by the Company. If the products has been installed/serviced / repaired/
opened or tampered by any unauthorized personnel.
x. Any damage caused by power surges and dips, improper electrical circuit outside the unit or by any defective
electrical supply. If defects arise/caused by accidents, alteration, misuse, substitution of original components
with spurious/non-genuine components attacked by household pest/ rodent, fire, flood, earthquake, lighting
and/or any other act of God/ natural calamities.
xi. At any time, during the currency of the warranty period, if any part of the unit is tampered with, altered,
repaired or serviced by any unauthorized person, not being the authorized representative of the Company or
its authorized dealers.
xii. If defects arising with optional accessories like trolleys, machine cover, on-line filter, inlet/ exhaust extension
hoses, tap adapter, extended power supply cable, adjustment feet cover, etc. thereof
xiii. The serial number on the unit or any part thereof is damaged, defaced, altered, obliterated, or tampered
with or removed for any reason whatsoever.
xiv. If sea water or any substandard detergent/salts has been used in the appliance.
xv. The product is shifted outside India.
xvi. Damage to the product due to operation in an abnormally corrosive alkaline / acidic atmosphere.
Product/Parts is found defective if the product is installed/operated in abnormally corrosive alkaline / acidic
atmosphere or near muddy sewages because toxic gases are harmful for the product.
xvii. This warranty does not cover any type of painting, plating including rusting etc., or defects thereof
11. None of the employees and/or Authorized dealers of the Company have the authority whatsoever to vary the
terms and conditions of this warranty.
12. This warranty shall be deemed to have been issued at Gurgaon in the State of Haryana, and Courts at Gurgaon
shall have exclusive jurisdiction on matters covered by or following from this warranty, and the Purchaser alone
shall have cause of action arising out of the transaction.
Page 31

Midea Copy
Invoice No. :
Customer Name:
Address:
Product Name:
Sr. No of the unit :
Dealer Name & Address:
Signature of the dealer with seal:
Carrier Midea India Pvt. Ltd.
Date of Purchase:
Model No :
Invoice No. :
Customer Name:
Address:
Product Name:
Sr. No of the unit :
Dealer Name & Address:
Signature of the dealer with seal:
Customer Copy
Date of Purchase:
Model No :
Carrier Midea India Pvt. Ltd.
Page 32

 Loading...