

Page 1
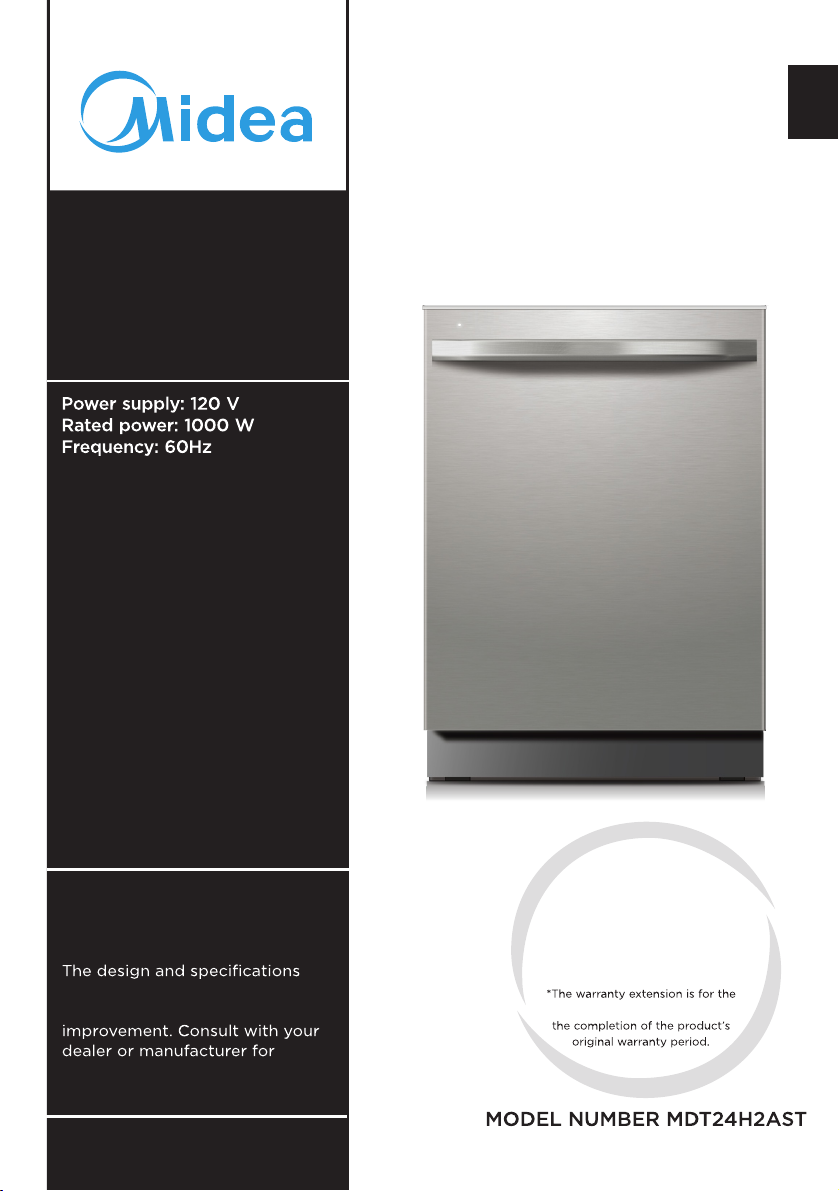
Dishwasher
Capacity: 14 Place Settings
en
USER MANUAL
Warning:
Before using this product,
please read this manual carefully
and keep it for future reference.
are subject to change without
prior notice for product
details.
version A - 06 - 2020
Free 3 months
extension* of the
original limited warranty
period! Simply text a
picture of your proof of
purchase to:
1-8 44- 224 -161 4
three months immediately following
www.midea.com
Page 2
Dear user
dishwasher.
Register your new dishwasher at https://www.midea.com/
us/support.
Model Number________________________________________
Serial Number_________________________________________
DISHWASHER SAFETY ......................................................................3
OPERATING REQUIREMENTS ...........................................................7
START UP GUIDE ..............................................................................10
8
LED Indicator Lights...............................................................................14
Cycle and Option Charts ......................................................................15
Upper Rack ..............................................................................................19
Load Upper Rack ....................................................................................21
Lower Rack ...............................................................................................22
Recommended Load Patterns ..........................................................26
11
Page 3

DISHWASHER USE ......................................................................... 28
DISHWASHER CARE .......................................................................32
CLEANING ............................................................................................... 32
Storing .......................................................................................................34
TROUBLESHOOTING ..................................................................... 35
40
WARRANTY .....................................................................................41
Safety Parts and Start Up
YOUR SAFETY AND THE SAFETY OF OTHERS ARE VERY
IMPORTANT
WARNINGWARNING
CAUTION
WARNING
This
injury.
This symbol indicates the possibility of injury or damage
property.
Guide
Dishwasher
Loading
Dishwasher
Use
Dishwasher
3
Page 4

Safety
Parts and
Start Up
Guide
Dishwasher
Loading
Dishwasher
Use
Dishwasher
WARNING/GROUNDING INSTRUCTIONS
Improper connection of the equipment-grounding conductor can result
in a risk of electric shock. Check with a qualified electrician or service
electrician.
For a grounded, cord-connected appliance:
breakdown, grounding will reduce the risk of electric shock by providing
with a cord having an equipment-grounding conductor and a grounding
and grounded in accordance with all local codes and ordinances.
For a permanently connected appliance:
This appliance must be connected to a grounded metal, permanent wiring
circuit conductors and connected to the equipment-grounding terminal or
WARNING
•
•
•
a dishwasher and keep them out of the reach of children.
When loading items to be washed:
•
•
seal.
•
type injuries.
Do not wash plastic items unless they are marked “Dishwasher
•
•
fire hazard.
•
•
4
Page 5
Do not tamper with controls.
•
•
•
dishwasher.
•
•
unqualified service technicians or non-original replacement parts.
only original equipment factory replacement parts.
•
Safety Parts and Start Up
•
Do not use the dishwasher if it has a damaged power line or plug,
•
and do not plug the dishwasher into a damaged outlet. Failure to
•
may occur.
•
old dishwasher from service or discarding it.
WARNING
Do not use dishwasher until completely installed.
•
Do not push down on open door.
•
Doing so can result in serious injury or cuts.
•
Guide
Dishwasher
Loading
Dishwasher
Use
Dishwasher
5
Page 6
Safety
Parts and
Start Up
Guide
WARNING
Suffocation Hazard
•
•
CAUTION
•
health hazards!
•
consequences.
•
Dishwasher
Loading
•
•
Dishwasher
Use
•
•
•
Dishwasher
6
Page 7

OPERATING REQUIREMENTS
ELECTRICAL REQUIREMENTS
WARNING
Electrical Shock Hazard
Electrically ground dishwasher.
•
•
•
•
electrical shock.
individual 120 V, 60 Hz, 15- or 20-amp fused electrical supply with copper
an outlet is used, the outlet should be placed in adjacent cabinet.
LOCATION REQUIREMENTS
Install where dishwasher is protected from the elements. Protect
•
“Storing” in the “Dishwasher Care” section.
•
Safety Parts and Start Up
Guide
Dishwasher
Loading
WATER SUPPLY REQUIREMENTS
•
66°C).
•
Dishwasher
Use
Dishwasher
7
Page 8
Safety Parts and Start Up
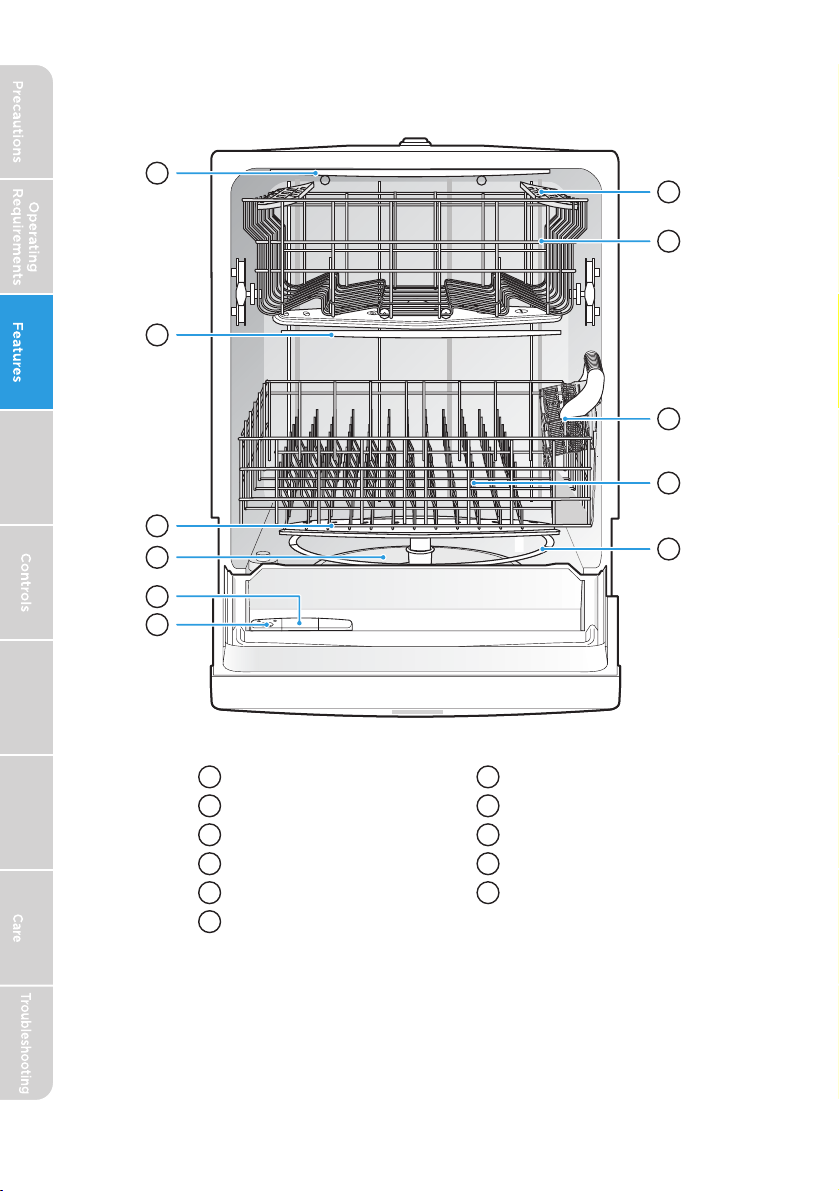
PARTS AND FEATURES
Guide
Dishwasher
Loading
A
G
H
B
I
J
C
D
K
E
F
Dishwasher
Use
Dishwasher
8
Upper Spray Arm
A
Middle Spray Arm
B
Lower Spray Arm
C
Cleanable Filters
D
Detergent Dispenser
E
Rinse Aid Dispenser
F
Cup Shelf
G
Upper Rack
H
Silverware Basket
I
Lower Rack
J
Heating Element
K
Page 9

SPECIFICATIONS
Capacity: 14 Place Settings
Dimensions (WxDxH): 23
7/8
1/2
" x 33
88 lb (40 kg)
Power Supply:
A
Safety
3/4
Parts and
Start Up
Guide
A
Filter Location
Dishwasher
Loading
Dishwasher
Use
Dishwasher
9
Page 10
Safety Parts and Start Up
Guide
Dishwasher
Loading
through the spray arms against soiled surfaces.
pumped through the multiple filters and spray arms. Soil particles are
1.
2.
1.
Dishwasher
Use
2. Add detergent. See “Proper Use of Detergent.”
3.
Light above each selected Cycle and Option will illuminate to indicate they
Dishwasher
are selected.
4.
closed within 4 seconds after pressing Start/Cancel.
5.
Upon the completion of the cycle. The indicator light on the front of
6.
the door will illuminate blue and remain on for 30 minutes. After 30
minutes the dishwasher will enter a low power mode and all lights
will turn off.
10
Page 11
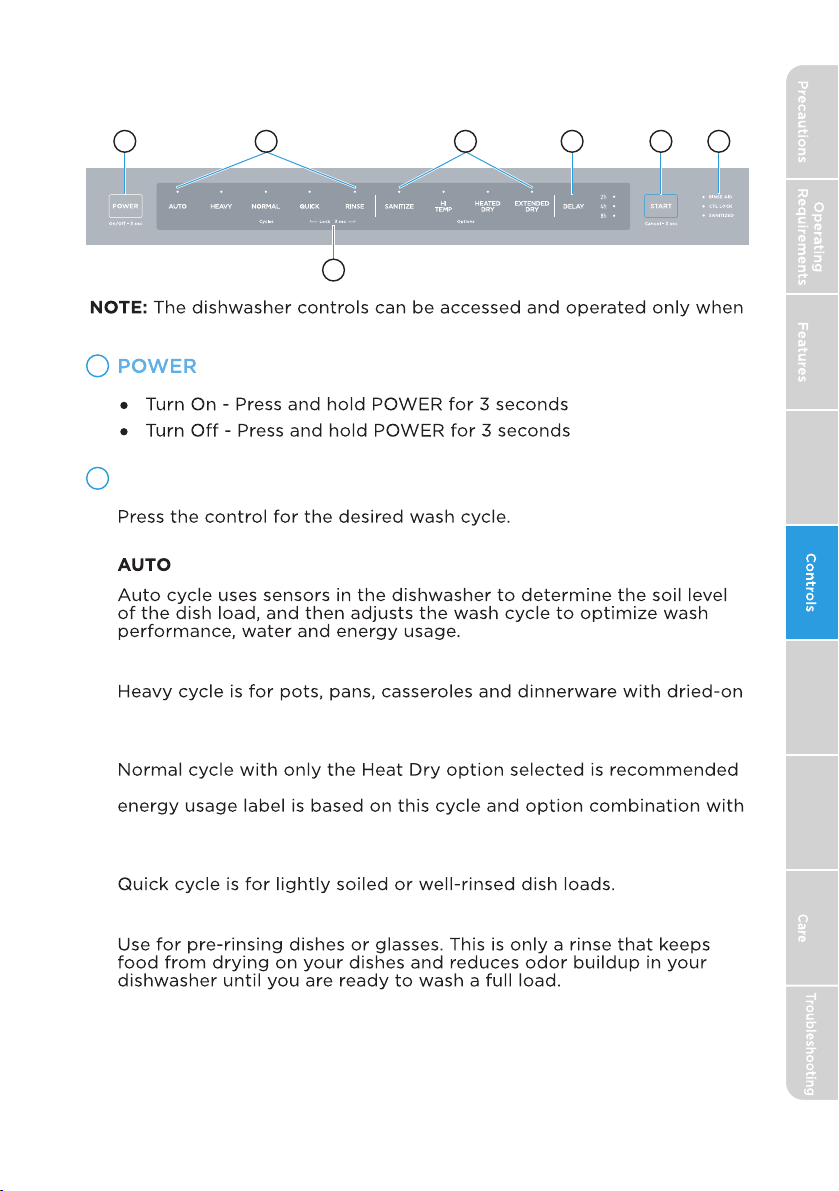
CONTROLS
Safety Parts and Start Up
A
B E FDC
D
the dishwasher is open.
A
B
CYCLES
selected wash cycle illuminates to indicate the cycle selected.
HEAVY
or baked on soil.
NORMAL
to completely wash and dry a full load of normally soiled dishes. The
the upper rack in the raised position.
QUICK
RINSE
The light above the
Guide
Dishwasher
Loading
Dishwasher
Use
Dishwasher
11
Page 12
Safety Parts and Start Up
C
OPTIONS
Guide
Dishwasher
Loading
Dishwasher
Use
option(s) illuminates to indicate which option(s) have been selected.
The light above the selected
SANITIZE
the Sanitize option is completed. The light will turn off after the door
HI TEMP
the drying process. The Heated Dry process adds 24 minutes to the
wash cycle.
Dishwasher
66 minutes.
D
A DDITIONAL FEATURES
DELAY
12
Page 13
E
START
1.
2.
3.
4.
action stops.
Safety Parts and Start Up
Guide
Dishwasher
Loading
F
Rinse Aid
Rinse Aid should be added to the Rinse Aid dispenser.
Sanitized
Sanitize option is finished.
The light turns off 30 seconds after the door is opened.
Dishwasher
Use
Dishwasher
13
Page 14

Safety Parts and Start Up
Guide
Dishwasher
Loading
LED INDICATOR LIGHTS
status of the current cycle.
Blue and White Flashing
The dishwasher is indicating an abnormal condition.
technician.
Dishwasher
Use
Dishwasher
14
Page 15

and options selected.
the main wash.
Safety Parts and Start Up
required to clean the load.
“O”: Can be selected, but cannot be selected if the other Dry option is
selected
Wash
Second
Wash
•
Main
Wash
•
118° -
126°F
(48° -
Rinse Rinse Final
Heated
Rinse
156.2°F
(58° -
Dry
(min)
121
Water
Usage
(gal. [L])
AVAILABLE OPTIONS
Sanitize Hi Temp Heated Dry Extended Dry
X X O O
3 to
5.9 gal.
(11.4 to
22.5 L)
Guide
Dishwasher
Loading
Dishwasher
Use
Dishwasher
15
Page 16

Safety Parts and Start Up
HEAVY
Guide
Dishwasher
Loading
Wash
Second
Wash
•
Sanitize Hi Temp Heated Dry Extended Dry
X X O O
Main
Wash
•
131°F
(55°C)
Rinse Rinse Final
•
•
AVAILABLE OPTIONS
• •
Heated
Rinse
143.6° -
156.2°F
(62° -
Dry
(min)
NORMAL
Wash
Second
Wash
•
Main
Wash
•
107° -
125.6°F
(42° -
Rinse Rinse Final
•
Heated
Rinse
156.2°F
(58° -
Dry
(min)
116
Water
Usage
(gal. [L])
6.9 gal.
(26.2 L)
Water
Usage
(gal. [L])
3 to
5.9 gal.
(11.4 -
22.5 L)
Dishwasher
Use
Dishwasher
16
Sanitize Hi Temp Heated Dry Extended Dry
X X O O
AVAILABLE OPTIONS
Page 17

QUICK
Safety Parts and Start Up
Wash
Second
Wash
•
Sanitize Hi Temp Heated Dry Extended Dry
X O O
Main
Wash
131°F
(55°C)
Rinse Rinse Final
•
AVAILABLE OPTIONS
•
Heated
Rinse
•
136° -
156.2°F
(58° -
Dry
(min)
RINSE
Wash
Second
Wash
•
Sanitize Hi Temp Heated Dry Extended Dry
Main
Wash
Rinse Rinse Final
AVAILABLE OPTIONS
Heated
Rinse
Dry
(min)
20
Water
Usage
(gal. [L])
4 gal.
(15.5 L)
Water
Usage
(gal. [L])
2 gal.
(7.5 L)
Guide
Dishwasher
Loading
Dishwasher
Use
Dishwasher
17
Page 18

Safety Parts and Start Up
Guide
Dishwasher
Loading
into the dishwasher.
LOAD DISHES
steel interior of the door if they are dropped or bumped.
Make sure pot lids and handles, pizza pans, cookie sheets, etc., do not
•
Dishwasher
Use
Dishwasher
QUIET OPERATING TIPS
NOTE: For built-in models, keep sink drain plugs closed during
18
Page 19

Top rack in upper position.
Safety Parts and Start Up
Guide
Dishwasher
Loading
Top rack in lower position.
Dishwasher
Use
Dishwasher
19
Page 20

Safety Parts and Start Up
Guide
Dishwasher
Loading
UPPER RACK SHELF
To Engage the Shelf:
1.
2.
Dishwasher
Use
Dishwasher
20
Page 21

shown.
14 Place Setting
Safety Parts and Start Up
Guide
Dishwasher
Loading
Dishwasher
Use
Dishwasher
21
Page 22

Safety Parts and Start Up
Guide
Dishwasher
Loading
the lower rack.
14 Place Setting
Dishwasher
Use
because the spray will not reach all surfaces.
Do not load items between the bottom rack and the side of the
•
Dishwasher
22
Page 23

and back of the lower rack.
ADJUSTABLE RACK TINES
hard-to-fit items such as serving bowls and roasters. The tines may be left
Safety Parts and Start Up
Guide
Dishwasher
Loading
23
Dishwasher
Use
Dishwasher
Page 24

Safety Parts and Start Up
Guide
Dishwasher
Loading
LOADING SILVERWARE
THREE-PIECE SILVERWARE BASKET
keyhole slots in the side sections.
countertop and then replace the basket in the bottom rack.
A
B
B
A
Dishwasher
Use
Dishwasher
24
Page 25

nested items.
Safety Parts and Start Up
Guide
Dishwasher
Loading
25
Dishwasher
Use
Dishwasher
Page 26

Safety Parts and Start Up
Guide
Dishwasher
Loading
RECOMMENDED LOAD PATTERNS
Upper Rack 8 place settings
Upper Rack 10 place settings
Dishwasher
Use
Dishwasher
Upper Rack 12 place settings
Upper Rack 14 place
settings
26
settings
Page 27

1 2 3 4 65
Safety Parts and Start Up
1. Spoons
2.
3. Salad Forks
4. Forks
5. Large Spoons
6. Large Forks
2
4
2
2
2
333
4
4
4
1
11111
3
1
1
1
1
1
11111
5
6
5
3
3
3
3
2
4
4
2
4
2
2
4
Guide
8 Place Setting
2
2
2
2
2
2
2
222
244
3
4
3
3
4
3
4
1
11111
3
5
1
1
1
1111
1
111111
6
5
4
3
3
3
3
3
10 Place Setting
4
4
3
1
1
1
4
4
3
3
4
3
3
4
3
111
1
1
5
1
1
1
1
1
1
6
1
1
1
1
1
1
1
5
3
1
11
4
3
4
3
3
3
3
2
4
4
2
2
4
2
2
4
Dishwasher
Loading
2
4
4
2
2
4
2
22
4
Dishwasher
Use
12 Place Setting
Dishwasher
2
2
2
222
3
4
4
2
3
4
4
3
4
3
4
1
3
4
3
3
1
111
1
1
1
1
1
1
1
5
1
1
1
1
1
6
1
1
1
1
1
1
1
1
5
4
1
3
11
3
4
3
3
3
3
3
2
4
2
4
2
2
4
4
2
22
4
14 Place Setting
27
Page 28

Safety Parts and Start Up
Guide
dishwasher detergent results in better cleaning.
DETERGENT DISPENSER
1.
Dishwasher
Loading
A
Cover
Blue Cover Latch
B
2.
B
Dishwasher
Use
Dishwasher
A
Detergent Cup
A
28
Page 29

3.
Safety Parts and Start Up
Guide
Dishwasher
Loading
streaks. A small amount of the rinse aid is released into the final rinse
or bar-type rinse aid.
Dishwasher
Use
Dishwasher
29
Page 30

Safety Parts and Start Up
Guide
Dishwasher
Loading
RINSE AID DISPENSER
1. Open the dishwasher door.
2. Turn the rinse aid dispenser cap counterclockwise and pull up to
Full
Add
3.
4.
setting.
Dishwasher
Use
A
B C
Dishwasher
A
Dispenser Cap
Less
B
C
More
5. Clean up any spilled rinse aid with a damp cloth.
6.
30
Page 31

Safety Parts and Start Up
Material
Dishwasher
Safe
Comments
Aluminum Possible
Unfinished aluminum will be discolored.
Disposable
Aluminum
No Do not wash disposable aluminum pans in
the dishwasher These might shift during
and other items.
Bottles and
No
cans
spray arms or pump and reduce washing
Cast Iron No
China /
Always check manufacturer’s
Stoneware
Crystal
Gold No
Glass
washing.
Hollow-
No
Handle
washed in the dishwasher.
Pewter
Brass,
No
discolor or pit the finish.
Bronze
Disposable
Plastics
No
and detergents.
Plastics Always check manufacturer’s
Guide
Dishwasher
Loading
Dishwasher
Use
Dishwasher
Stainless
Steel
salt, vinegar, milk products, or fruit juice can
damage finish.
31
Page 32

Safety Parts and Start Up
Material
Dishwasher
Safe
Comments
Sterling
Tin No Can rust.
No
Guide
Dishwasher
Loading
Dishwasher
Use
Dishwasher
CLEANING
CLEANING THE EXTERIOR
In most cases, regular use of a soft, damp cloth or sponge and a mild
Clean the stainless steel door and handle regularly with a clean, soft cloth
containing chlorine to clean the stainless steel door.
Gently clean the control panel with a clean, soft cloth.
CLEANING THE INTERIOR
The tub is made of stainless steel designed to resist rust and corrosion if
DOOR GASKET
Clean the steel inner door and tub with a clean, soft damp cloth.
32
Page 33

CLEANING THE FILTERS
1.
2.
A
Cylinder Filter
Safety Parts and Start Up
3.
4.
5.
6.
A
A
Fine Filter
Guide
Dishwasher
Loading
A
Dishwasher
Use
A
Micro Filter
Dishwasher
A
7.
debris.
33
Page 34

DRAIN AIR GAP
Safety Parts and Start Up
dishwasher.
the dishwasher.
To Clean the Drain Air Gap:
Clean the drain air gap periodically to ensure proper drainage of
Guide
Dishwasher
Loading
Dishwasher
Use
Dishwasher
manufacturer.
1. Turn off the dishwasher.
2.
3. Clean the plastic cap with a toothpick.
STORING
WINTERIZING YOUR DISHWASHER
winterized by authorized service personnel.
1. Turn off electrical power to the dishwasher.
2.
3.
34
4.
Page 35

1.
2.
3.
4.
PROBLEM SOLUTION
Dishwasher
does not
run or stops
There is no power to the
dishwasher. circuit breaker.
The door is not closed
Safety Parts and Start Up
Guide
Dishwasher
does not start
Dishwasher
will not fill
5 minutes near the start
soak.
during the main wash.
selected.
Door not closed within
button being pressed
not turned on.
The door is not closed
This is normal, and reduces
the energy required to
clean the dishes.
This is normal.
To reset, see “Options” in
the Controls section.
in the Controls section.
Close door within
4 seconds of pressing
Verify a minimum of
maintained during the
Ensure the dishwasher is
not sitting on top of the
water line causing a
restriction.
Dishwasher
Loading
Dishwasher
Use
Dishwasher
35
Page 36

Safety Parts and Start Up
Guide
PROBLEM SOLUTION
Dishwasher
seems to run
too long
the dishwasher is not hot
enough.
The dishwasher runs
adjacent sink until it gets
dishwasher.
occurs in some wash
The Sanitize option is
selected.
sanitizing.
When heavy soil is
Dishwasher is connected Verify the dishwasher is
connected correctly to the
Water
dishwasher
NOTE: A small
Dishwasher
Loading
amount of
around the
outlet in the
bottom of
the tub is
Dishwasher
Use
normal. It
keeps the seal
Detergent
The drain hose is kinked.
The knockout plug is still
in the garbage disposal.
Drain hose is connected to
the garbage disposal, and
the garbage disposal is
Drain is clogged.
Run the garbage disposal
Close the door and press
completed.
dispenser
Dishwasher
The detergent is damp or
has clumped. replace with fresh dry
dishwasher detergent.
An item was blocking the
dispenser. detergent and replace
with fresh dry dishwasher
detergent.
The spray arm is blocked.
block the spray arm from
36
Page 37

PROBLEM SOLUTION
Grinding,
A hard object or powder
grating,
crunching
or buzzing
and could result in a cut
wound.
sounds
hard object. If the noise
was caused by detergent
granules, the noise should
stop once the detergent is
NOTE: If the noise persists
Safety Parts and Start Up
Beeps
completed.
NOTE: A rapid beep
condition.
Suds in the
Used wrong type of
detergent.
Dishwasher
using improper detergent.
Rinse Aid
light is on
PROBLEM SOLUTION
Food
on the
dishes
Dishwasher is not
The wrong wash
most difficult soil in the dishwasher load.
load was selected.
This is normal.
further direction.
Use only detergent
dishwashers.
Use only detergent
dishwashers.
If the dishwasher is mounted
with the sides screws, ensure
the screws are not too tight.
Add liquid Rinse Aid.
Guide
Dishwasher
Loading
Dishwasher
Use
Dishwasher
low.
Used incorrect
amount of
detergent.
detergent per load. Heavy soil and/or
detergent.
37
Page 38

Safety Parts and Start Up
Guide
Dishwasher
Loading
PROBLEM SOLUTION
Food
on the
dishes
(cont.)
Detergent is too
old.
Store detergent in a cool, dry area.
Detergent is
caked in the
dispenser. dispenser and refill with fresh, dry
detergent.
The pump or
spray arm is
clogged with
labels from
bottles and cans.
The pressure of
into the home is
too low. supply can be added if pressure is too
low.
High suds are
slowing the wash
arm.
the dishwasher. Do not use soap or
laundry detergents.
PROBLEM SOLUTION
Spotting and
filming on dishes
Rinse Aid dispenser
Add a liquid rinse aid to the
dispenser.
Use a rinse aid and keep
mineral content in
the dispenser filled to help
filming. Increase setting on
Dishwasher
Use
Rinse aid dispenser 1 number
is 13 grains (223 ppm)
Dishwasher
is too low. should be a minimum 120°F
dishwasher.
Did not use enough
detergent.
(15 g) of detergent per
load. Heavy soil and/or hard
detergent.
38
Page 39

PROBLEM SOLUTION
Spotting and
Detergent is too old. Detergent must be fresh and
filming on dishes
(cont.)
detergent in a cool, dry area.
Safety Parts and Start Up
pressure is too low
should be 20 to 80 psi
to fill dishwasher
dishwasher fill. A booster
can be added if pressure is
too low.
Silica film or
etching
Using too much
detergent
less detergent, but do not
per load.
(65°”C).
Black or gray
marks on dishes
Aluminum items
rubbing dishes
Hand wash aluminum items.
during washing.
Disposable
cleaner.
aluminum items
can break down in
the dishwasher and
cause marking.
Orange stains
Large amounts of
on plastic dishes
or dishwasher
interior
on dishes placed in
the dishwasher.
PROBLEM SOLUTION
Dishes are not
completely dry
NOTE: Plastics
often need towel
loaded properly
Place glasses and cups in
surface is slanted to allow
drying.
Rinse Aid not used
or dispenser is
Use a liquid rinse aid to
speed drying and keep the
dispenser full.
Used an air dry
or energy-saving
option.
Dry option.
Guide
Dishwasher
Loading
Dishwasher
Use
Dishwasher
39
Page 40

Safety Parts and Start Up
Guide
Dishwasher
Loading
Dishwasher
Use
DISHES ARE DAMAGED DURING A CYCLE
PROBLEM SOLUTION
Dishes not loaded
NOTE: Some types of
hand.
Moving the rack
in or out of the
dishwasher too
When the dishwasher fails, there will be the following prompts:
You will hear a prompt tone from the machine for a few seconds.
1.
2.
The indicator light on the outer door will continue to flash "white
light-blue light" alternately.
3.
The indicator lights on the operation panel will continue to flash, and
different combinations of lighting indicate different faults, refer to the
following table:
Code Meanings Cause Solution
E1
Incorrect water
fill amount
Low or No
water flow, or
too much water
flow during
Rinse light
filling process.
flashing.
E4
Too much
leak sensor
tub or a leak.
glasses so they are
stable and will not strike
together from washing
action.
Minimize chipping by
moving the rack in and
turned on to the
dishwasher. Verify
supply must
pressure between
sufficient flow.
First, turn off
dishwasher. Check
Dishwasher
40
Normal light
flashing.
in the filter. If
Page 41

MIDEA
LIMITED
IF YOU NEED SERVICE:
ATTACH YOUR RECEIPT HERE. PROOF OF PURCHASE
■
■ Model number and serial number
■ A clear, detailed description of the problem
■ Proof of purchase including dealer or retailer
us/support.
2.
U.S. and Canada.
In the U.S.A. or Canada, call 1-866-646-4332. OR customerserviceusa@midea.com
LIFETIME LIMITED WARRANTY
■
■ Inner door liner
https://www.midea.com/
41
Page 42

7.
9
10.
chemicals.
easily identified.
LIFETIME LIMITED WARRANTY
WHAT IS NOT
customer.
DISCLAIMER OF IMPLIED WARRANTIES
IMPLIED WARRANTIES, INCLUDING ANY IMPLIED WARRANTY OF MERCHANTABILITY OR
DISCLAIMER OF REPRESENTATIONS OUTSIDE OF WARRANTY
42
06/20
Page 43

43
Page 44

Free 3 months
extension* of the
original limited warranty
period! Simply text a
picture of your proof of
purchase to:
1-844-224-1614
*The warranty extension is for the
three months immediately following
the completion of the product’s
original warranty period.
 Loading...