

Page 1

Use & Care Guide
Manual de Uso y Cuidado
English / EspaSol
I<enmore Elite_
....... _;77
Sears Brands Management Corporation
Hoffman Estatest IL 60179 U.S.A.
www.kenmore.com
www, sears.com
www.kmart.com
Page 2
Before Using Your New Dehumidifier ................................................................................ 2
Warranty ................................................................................................................................. 2
Important Safety Instructions .......................................................................................... 3-4
Electrical Requirements ........................................................................................................ 5
Product Specification ............................................................................................................ 5
Parts And Features ................................................................................................................ 6
Installation .............................................................................................................................. 7
Operation .......................................................................................................................... 8-14
Care and Cleaning .............................................................................................................. 15
Troubleshooting .................................................................................................................... 16
Master Protection Agreements .......................................................................................... 17
Read this guide. It will help you to operate your new Kenmore Elite dehumidifier in
the safest and most effective way.
Keep this book and your sales check (receipt) in a safe place for future reference.
Kenmore Elite One Year Limited Warranty When installed, operated and maintained according to
all supplied instructions, if this appliance fails due to a defect in material and workmanship within
one year from the date of purchase, call 1-800-4-MY-HOME _ to arrange for free repair. If this
appliance is ever used for other than private family purposes, this warranty applies for only 90
days from the date of purchase.
This warranty covers ONLY defects in material and workmanship, and will NOT pay for:
1. Expendable items that can wear out from normal use, including but not limited to
filters, belts, incandescent light bulbs and bags.
2. A service technician to instruct the user in correct product installation, operation or maintenance.
3. A service technician to clean or maintain this product.
4. Damage to or failure of this product if it is not installed, operated or maintained according to all
instructions supplied with the product.
5. Damage to or failure of this product resulting from accident, abuse, misuse or use for other than
its intended purpose.
6. Damage to or failure of this product caused by the use of detergents, cleaners, chemicals or
utensils other than those recommended in all instructions supplied with the product.
7. Damage to or failure of parts or systems resulting from unauthorized modifications made to this
product.
Disclaimer of implied warranties; limitation of remedies Customer's sole and exclusive remedy
under this limited warranty shall be product repair as provided herein. Implied warranties,
including warranties of merchantability or fitness for a particular purpose, are limited to one
year or the shortest period allowed by law. Sears shall not be liable for incidental or consequential
damages. Some states and provinces do not allow the exclusion or limitation of incidental or
consequential damages, or limitation on the duration of implied warranties of merchantability or
fitness, so these exclusions or limitations may not apply to you.
This warranty applies only while this appliance is used in the United States.
This warranty gives you specific legal rights, and you may also have other rights which vary from
state to state.
Sears Brands Management Corporation, Hoffman Estates, IL 60179
2
Page 3
Readallinstructionsinthisguidebeforeusingyourdehumidifier.Thisproductis
intendedforindoorresidentialuseonly,not for industrial or other commercial
apptications. Use only with electrical wiring that is in good working order and
that meets appNcable codes and ordinances. If you have any questions whether
your wiring is adequate, consult a qualified electrician.
While using your dehumidifier, you should follow the iMPORTANT SAFETY
INSTRUCTIONS listed below. As part of those instructions, we have used the
word +'_fkWARNtNG " to indicate the level of hazard: _kWARNtNG:
indicates a hazard which, if not avoided, could result in injury or death.
IMPORTANT INSTRUCTIONS
When using electrical appliances, basic precautions should always be followed to
reduce the risk of fire, electric shock, and injury to persons, including the following:
1. Read a[I instructions before using this dehumidifier.
2. Use this dehumidifier only as described in this manual. Any other use not
recommended by the manufacturer may cause electrical shock, fire, or injury
to persons.
3. Do not operate the dehumidifier with a damaged power cord.
4. This appliance is not intended for use by persons (including children) with
reduced physical, sensory or mental capabilities, or lack of experience and
knowledge, unless they have been given supervision or instruction concerning
use of the appliance by a person responsible for their safety.
5. Do not place the dehumidifier on a small, unIevel, uneven or any surface
which might allow it to tip or fail.
6. For proper operation, dehumidifier should be placed on a smooth,
non combustible surface.
7. Always unplug dehumidifier when not in use.
8. Do not operate dehumidifier with any safety devices removed.
9. Do not run power cord under carpeting. Do not cover cord with throw rugs,
runners or the like. Arrange cord away from trafflc area where it wiII not be
tripped over.
10. Avoid the use of extension cords due to risk of fire. If an extension cord must
be used, the cord must be a minimum 14AWG and rated not less than 1875 watts.
11. Do not insert or allow any object to enter any openings on the dehumidifier.
Doing so may cause electric shock and!or fire hazard.
12. This product is intended for indoor residential use only_ not for industrial or
other commercial applications. This warranty is void if this product is ever
used for other than private household purposes.
13. You wiII need a level surface at least 6" (15.2 cm) from heat sources such as
ranges or heaters.
Page 4
14. Donotblockairopeningsorplacedehumidifieronasoftsurfacesuchasa
bedorsofa.
15.Thedehumidifiershould be connected to a 115V, 60 Hz, 15- or 20-amp fused
3 prong grounded outlet.
15. Always insert the filters securely. Clean them every two weeks. Operation
without filters may cause failures.
, ,WARNING: SHOCK HAZARD
Never pJace dehumidifier where it may faJJ into a bathtub, sink, flooded area l
or any receptacJe or pool of water.
,WARNING: FiREHAZARD
Dehumidifiers have arcing or sparking parts inside. Do not use near combusfJbJe
materials or fiammabJe gases or sources of heat. DO NOT USE in areas where
gasoJine, paint or flammabJe materiaJs are used or stored. To prevent a possibJe
fire, do not bJock air intakes or exhaust in any manner. Do not insert or aJJow
foreign obiecfs to enter any intakes or exhaust opening as this may cause an
eJectric shock, fire, or damage the fan.
,WARNING: HOT SURFACES
Do not touch dehumidifier motor when in use. This motor is hot when in use. To
avoid burns, do not let bare skin touch hot surfaces.
SAVE THESE INSTRUCTIONS!
Page 5
OBSERVE ALL LOCAL CODES
AND ORDI NANCES.
DO NOT, UNDER ANY CIRCUMSTANCES,
REMOVE THE POWER SUPPLY CORD
GROUND PRONG.
ELECTRICAL GROUND IS REQUIRED ON
THiS APPLIANCE
A 1]5-VOLT 60Hz, AC ONLY, 15A or 20A
FUSED AND PROPERLY GROUNDED
ELECTRICALSUPPLYIS REQUIRED.
A time delay fuse or time delay circuit
breaker is recommended. Use a dedicated
circuit serving only this appliance.
RECOMMENDED GROUNDING
METHOD
For your personal safety, this appliance
must be grounded. This appliance has a
power supply cord with a 3-prong ground-
ed plug. To minimize possible shock haz-
ard the cord must be plugged into a
matching grounded electrical outlet that
complies with the latest edition of the
National Electrical Codes and all local
codes and ordinances.
If a grounded 3-prong electrical outlet is
not available_ it is the personal responsibil-
ity and obligation of the customer to have
one installed by a qualified electrician.
ELECTRICAL SHOCK HAZARD
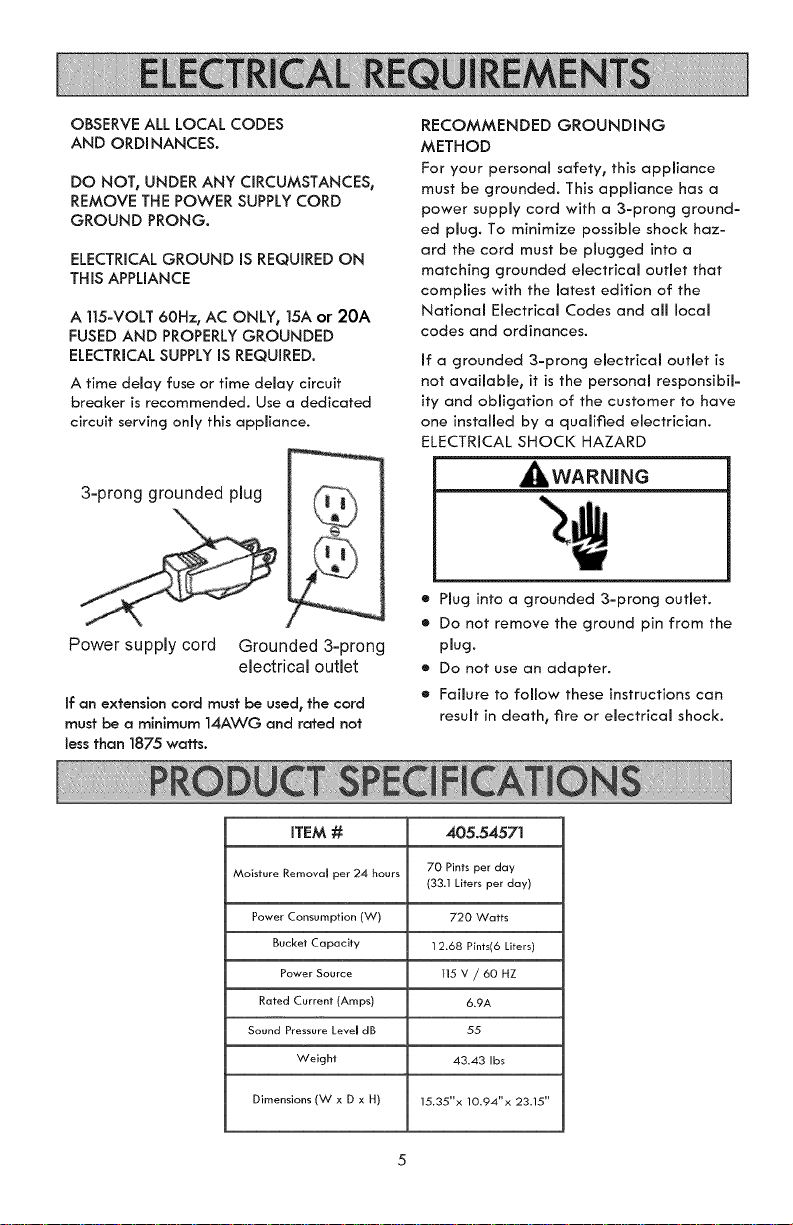
3-prong grounded plug
Power supply cord
If an extension cord must be used, the cord
must be a minimum 14AWG and rated not
less than 1875 watts.
Grounded 3-prong
electrical outlet
iTEM # 405.54571
Moisture Removal per 24 hours 70 Pints per day
Power Consumption (W) 720 Watts
Bucket Capacity 12.68 Pints(6 Liters)
Power Source 115V / 60 HZ
Rated Current (Arnps) 6.9A
Sound Pressure Level dB 55
Weight 43.43 Ibs
_WARNING
• Plug into a grounded 3=prong outlet,
• Do not remove the ground pin from the
plug.
• Do not use an adapter.
o Failure to follow these instructions can
result in death, fire or electrical shock.
(33.1 Liters per day)
Dimensions (W x D x H) 15.35"x 10.94"x 23.15"
Page 6
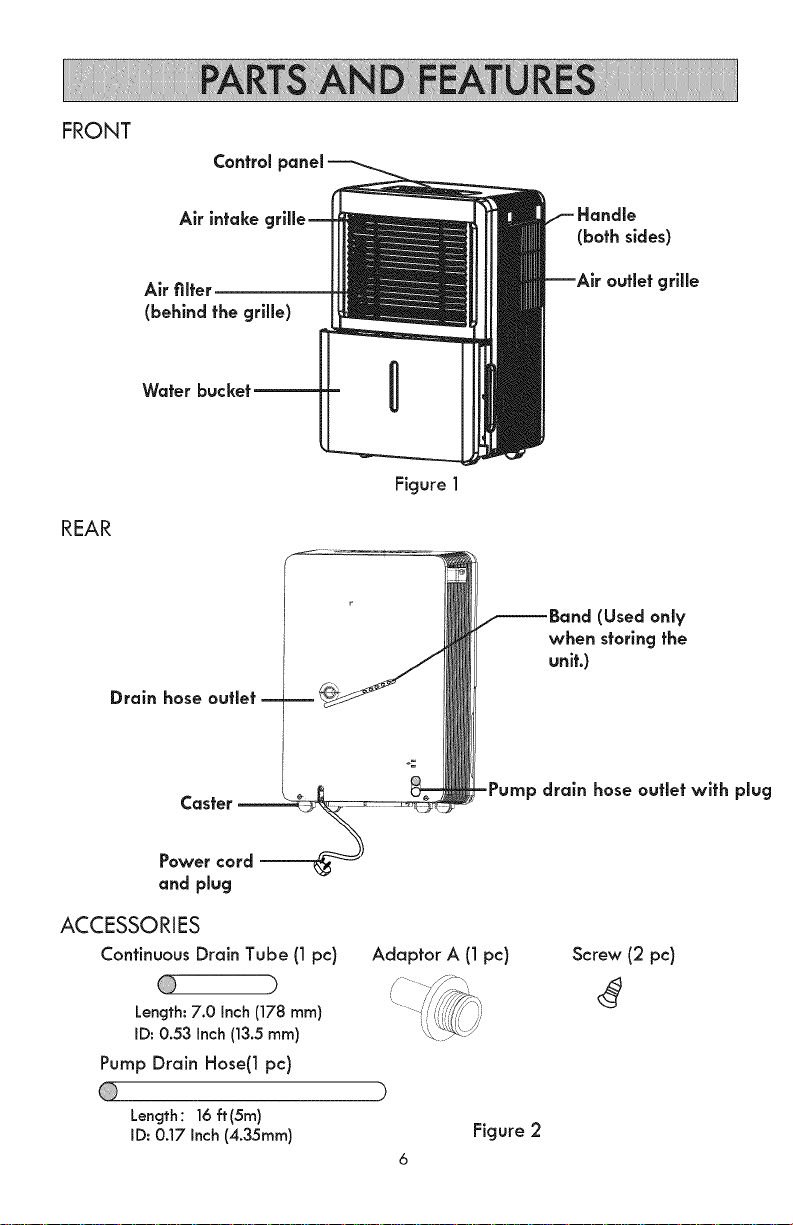
FRONT
REAR
Figure 1
ACCESSORIES
Continuous Drain Tube (1pc}
Length:7.0 Inch (178 ram)
ID: 0.53 Inch (13.5mm)
Pump Drain Hose(1 pc)
Length: 16 ft(5m)
ID: 0.17 Inch (4.35mm)
Adaptor A (1pc)
Screw (2 pc)
)
)
Figure 2
6
Page 7
POSITIONING THE UNIT
A dehumidifier operating in a basement will have little or no effect in drying an
adjacent enclosed storage area, such as a closet, unlessthere isadequate
circulation of air in and out of the area.
* Do not use outdoors.
* This dehumidifer is intended for indoor residential applications only.
This dehumidifier should not be used for commercial or industrial applications.
* Place the dehumidifier on a smooth, level floor strong enough to support the
unit with a full bucket of water.
• Allow at least 8" of air space on all sides of the unit for good air circulation.
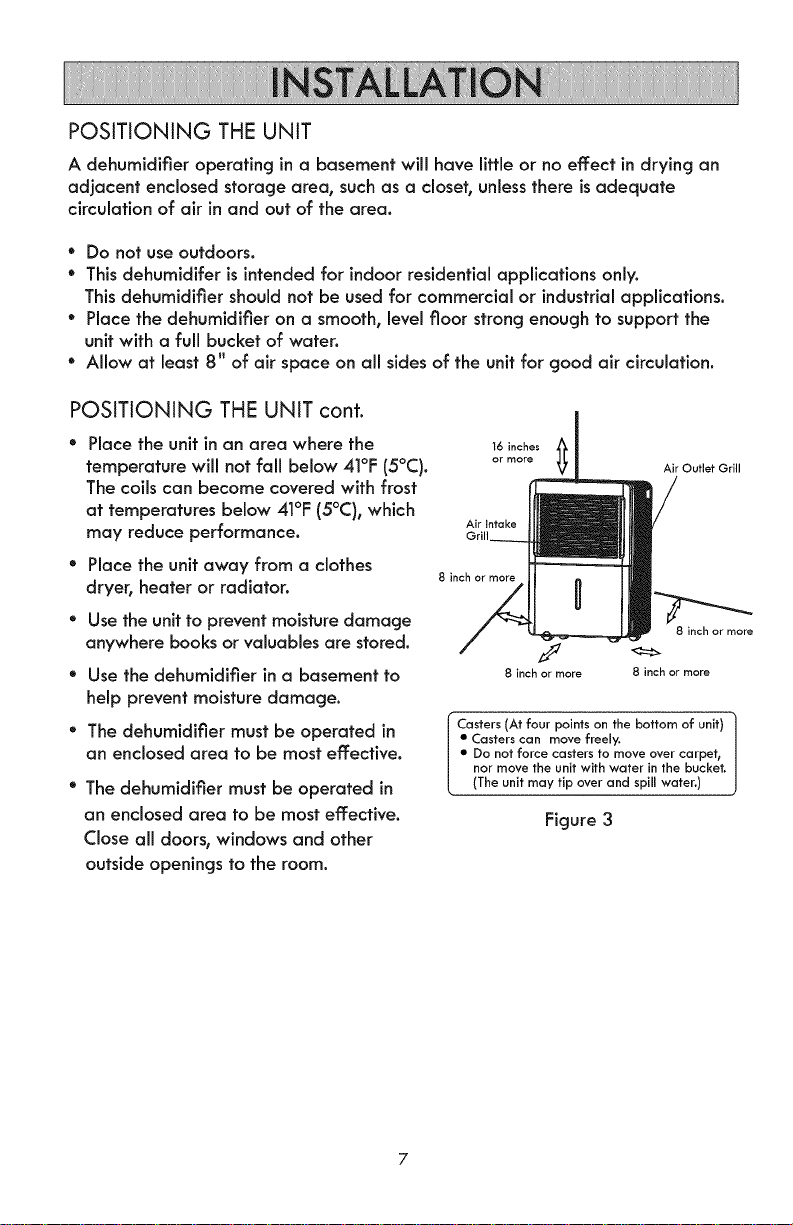
POSITIONING THE UNIT cont.
• Placetheunitinan area where the
temperature will not fall below 41°F 15°C).
Air Outlet Grill
The coils can become covered with frost
at temperatures below 41°F (5°C), which
may reduce performance.
• Place the unit away from a clothes
dryer, heater or radiator.
• Use the unit to prevent moisture damage
anywhere books or valuables are stored.
• Use the dehumidifier in a basement to
Air Intake
Grill
8 inch or more
8 inch or more
J
8 inch or more 8 inch or more
help prevent moisture damage.
• The dehumidifier must be operated in
an enclosed area to be most effective.
• The dehumidifier must be operated in
an enclosed area to be mosteffective.
Casters (At four points on the bottom of unit)
• Casters can move freely.
• Do not force casters to move over carpet,
nor move the unit with water in the bucket.
(The unit may tip over and spill water.)
Figure 3
Close all doors, windows and other
outside openings to the room.
Page 8
Itisimportanttoknowyourdehumidifier'scontrolsandfeaturestoensureits
properandsafeuse.Reviewtheseinstructionsbeforeusingtheproduct.
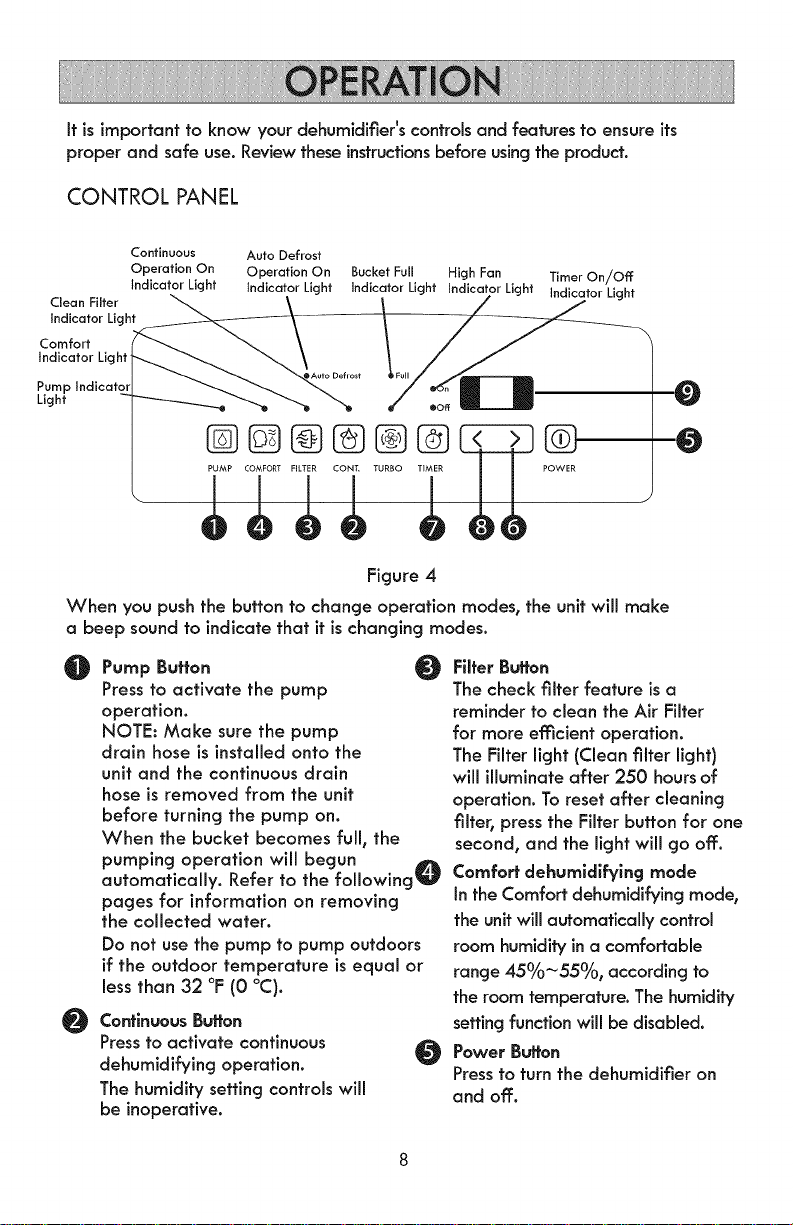
CONTROL PANEL
Continuous Auto Defrost
Operation On Operation On Bucket Full High Fan Timer On/Off
Indicator Light Indicator Light Indicator Light Indicator Light Indicator Light
Indicator Light
Comfort
Indicator Light
Clean Filter 1_
@@%%%@ @
POWER
Figure 4
When you push the button to change operation modes, the unit will make
a beep sound to indicate that it is changing modes.
@
Pump Button 0
Press to activate the pump
operation.
NOTE: Make sure the pump
drain hose is installed onto the
unit and the continuous drain
hose is removed from the unit
before turning the pump on.
When the bucket becomes full, the
pumping operation will begun _'L
automatically. Refer to the following_
pages for information on removing
the collected water.
Do not use the pump to pump outdoors
if the outdoor temperature is equal or
less than 32 °F (0 °C).
Continuous Buffon
@
Pressto activate continuous
dehumidifying operation.
The humidity setting controls will
be inoperative.
Filter Button
The check filter feature is a
reminder to clean the Air Filter
for more efflcJent operation.
The Filter light (Clean filter light)
will illuminate after 250 hours of
operation. To reset after cleaning
filter, press the Filter button for one
second, and the light will go ofF.
Comfort dehumldi_ing mode
In the Comfort dehumidifying mode,
the unit will automatically control
room humidity ina comfortable
range 45%~55°/0, according to
the room temperature. The humidity
setting function will be disabled.
Power Button
O
Pressto turn the dehumidifier on
and ofF.
Page 9
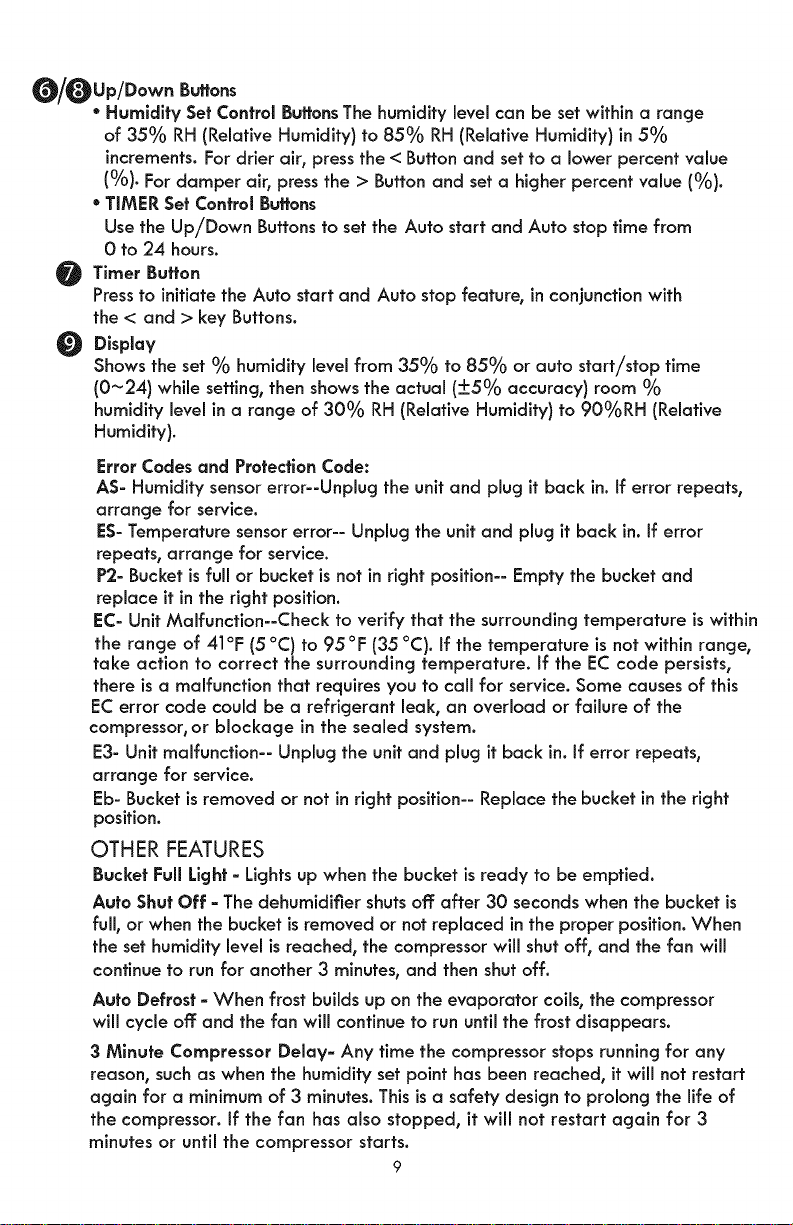
_/_Up/Down Buffons
* Humidify SetControlBuffonsThe humidity levelcan be setwithin a range
of 35°/0 RH(Relative Humidity) to 85°/0 RH(Relative Humidity) in5°/0
increments.For drier air, press the < Buttonand setto a lowerpercent value
{°/0).For damper air, press the > Button and set a higher percent value (°/0).
"TIMER SetControlBuffons
Use the Up/Down Buttonsto set the Auto start and Auto stoptime from
0 to 24 hours.
O Timer Button
Pressto initiatethe Auto start and Auto stop feature, in conjunction with
the < and > key Buttons.
Display
Showsthe set % humidity levelfrom 35% to 85% or auto start/stop time
{0~24) while setting, then showsthe actual (+5°/0 accuracy) room °/0
humidity levelina range of 30°/0 RH(Relative Humidity) to 90°/0RH (Relative
Humidity).
Error Codes and Protection Cede:
AS- Humidity sensor error--Unplug the unit and plug it back in. If error repeats,
arrange for service.
ES- Temperature sensor error-- Unplug the unit and plug it back in. If error
repeats, arrange for service.
P2- Bucket is full or bucket is not in right position-- Empty the bucket and
replace it in the right position.
EC- Unit Malfunction--Check to verify that the surrounding temperature is within
the range of 41°F: (5 °C) to 95 °F (35 °C). If the temperature isnot within range,
take action to correct the surrounding temperature. If the EC code persists,
there is a malfunction that requires you to call for service. Some causes of this
EC error code could be a refrigerant leak, an overload or failure of the
compressor, or blockage in the sealed system.
E3- Unit malfunction-- Unplug the unit and plug it back in. If error repeats,
arrange for service.
Eb- Bucket is removed or not in right position-- Replace the bucket in the right
position.
OTHER FEATURES
Bucket Full Light - Lights up when the bucket is ready to be emptied.
Auto Shut Off - The dehumidifier shuts off after 30 seconds when the bucket is
full, or when the bucket is removed or not replaced in the proper position. When
the set humidity level is reached, the compressor will shut off, and the fan will
continue to run for another 3 minutes, and then shut off.
Auto Defrost - When frost builds up on the evaporator coils, the compressor
will cycle off and the fan will continue to run until the frost disappears.
3 Minute Compressor Delay- Any time the compressor stops running for any
reason, suchas when the humidity set point has been reached, it will not restart
again for a minimum of 3 minutes. This is a safety design to prolong the life of
the compressor. If the fan has also stopped, it will not restart again for 3
minutes or until the compressor starts.
9
Page 10
Check Filter Feature -The unit tracks the amount of time that the fan runs. The
Filter light will start to flash once a second after 250 hours of operation. After
cleaning the air filter, press the Filter buffon for one second to reset this timer.
Auto-Restart - If there isa power failure, the unitwill return to the same operating
condition when the power is restored.
Setting the Timer
* With the unit on, press the Timer button, and the Off light indicates that the Auto
Stop function may be programmed. Within 5 seconds press the UPor DOWN
buttons to select a period of time after which operation will stop. Press the Timer
button twice and the On light indicates that the Auto Start function may be
programmed. Within 5 seconds press the UP or DOWN buttons to select a period
of time after which operation will resume;With the unit off, press the Timer button,
and the On light indicates that the Auto Start function may be programmed. Within
5 seconds press the UP or DOWN buttons to select a period of time after which
operation will start. Press the Timer button twice and the Off light indicates that the
Auto Stop function may be programmed. Within 5 seconds press the UP or DOWN
button to select a period of time after which operation will stop.
* Press or hold the UP or DOWN button to change the Auto time by 0.5 hour
increments, up to 10 hours, then at 1hour increments up to 24 hours. The control
will count down the time remaining until start or stop.
* The selected time will register for 5 seconds and the system will automatically
revert back to display the previous humidity setting.
" When the Auto start & Auto stop times are set within the same program
sequence, TIMER ON OFF indicator lights illuminate, identifying that both
ON and OFF times are now programmed.
* Turning the unit ON or OFF at any time or adjusting the timer setting to 0.0 will
cancel the Auto Start/Stop function.
* The Auto Start/Stop function will also be cancelled when the protection code
P2 (bucket full) appears in the control panel display window.
WHEN USING THE UNIT
* This unit is designed to operate with a working environment between
41°F/5C ° and 95°F/35C °.
* 3 minute compressor delay - Any time the compressor stops running for any
reason, such as when the humidity set point has been reached, it will not
restart again for a minimum of 3 minutes. This is a safety design to prolong the
life of the compressor. If the fan has also stopped, it will not restart again for
3 minutes or until the compressor starts.
* Do not connect the dehumidifier to a multiple socket outlet that is also being
used for other electrical appliances.
* Select a suitable location, making sure you have easy access to an electrical outlet.
* Plug the unit into a electrical socket-outlet with a ground connection.
Make sure the water bucket is correctly fitted; otherwise the unit will not
operate properly.
NOTE: Be careful to avoid tipping the unit over while moving it when there is water
in the bucket.
10
Page 11

REMOVING THE COLLECTED WATER
There are three ways toremove collectedwater.
1. Use the bucket
* If the bucket is full when the unit is turned off,
the unit will beep 4 times, the Full indicator
light will turn on, and the display will show P2.
* When the bucket becomes full when the unit is
turned on, the compressor turns off, the fan runs
for another 30 seconds to dry water off of the
evaporator coil, the unit will beep 4 times, the
Full indicator light will turn on, and the display
will show P2.
* Slowly pull out the bucket. Grip the left and
right handles securely, and carefully pullout
straight so water does not spill. Refer to
Figures 5 & 6. Do not put the bucket on the
floor because the bottom of the bucket is
uneven_ causing it to fall over and spill the
water.
° Empty the bucket and replace it. The bucket
must be in place and securely seated for the
dehumidifier to operate.
° The machine will re-start when the bucket
is restored inits correct position,assuming
that the 3 minutes safety delay for the
compressor has passed.
NOTES:
* When you remove the bucket, do not touch
any parts inside of the unit. Doing so may
damage the product.
* Be sure to push the bucket gently all the
way into the unit. Banging the bucket against
anything or failing to push it in securely may
cause the unit not to operate.
* If the pump drops when you remove the bucket (See
Fig.7), you must reinstall the pump properly before
replacing the bucket into the unit (See Fig.8). There is
a removable cleanable filter on the end of the pump.
* When you remove the bucket, if there is some
water in the unit you must dry it up before continuing.
* When the unit ison, if the bucket is removed,
compressor will turn off immediately, fan will run
additional 30 seconds, then the unit will beep 4 times
and the digital display shows Eb error code.
* When the unit isoff, if the bucket is removed, the unit
will beep 4 times and the digital display shows Eb error
code.
Pull out the bucket o liffle.
Figure 5
Hold both sides of the bucket
with even strength, and pull it
out from the unit.
Figure 6
Pourthe water out.
Pump drops
Figure 7
Reinstall
pump properly
Figure 8
11
Page 12

2. Continuous draining
* Water can be continuously drained into a floor drain
by attaching a length of garden hose (ID > 5/16", with
a female threaded end ID 1", not included, ) onto the unit.
* Affach the drain tube to the adaptor A securely.
(See Fig.9, placed in the bucket).
* Remove the rubber plug from the back
drain outlet of the unit and set aside and
remove bucket, then insert the drain tube
through the drain outlet of the unit and
securely press it into the connector on the
front of the unit (See Fig.]0 and Fig.]1).
* Use the two supplied screws to screw adaptor
A to the back of the unit.
*Screw the female threaded end of the garden
hose into the adaptor A (See Fig.]2). Lead the
hose to a floor drain.
* Make sure the hoseis secure so there are no
leaks.
* Direct the hose toward the drain, making sure
that there are no kinks that will stop the
water flowing.
* Place the end of the hose into the drain and
make sure the end of the hose is level or below
the drain outlet on the unit. Never let the hose
run upwards.
* Place the bucket back in the unit and make
sure that it is correctly in place.
* Continuous draining will begin once the unit
begins operation.
3. Pump draining
Water can be automatically emptied into a floor
drain or a suitable drainage facility by attaching
the pump drain out with a pump drain hose
(OD :1/4", supplied ).
* Remove the continuous drain hose and the drain hose
subassembly from the unit. Install the plastic cover to
the continuous drain hose outlet of the unit by using two
screws.(See Fig.13)
Figure 9
Rubber plug
Figure 10
Infernal Connector
Drain hose
Figure 11
Garden__
Female /
threaded end
Figure 12
Garden hose
Female
threaded end
Figure 13
12
Page 13

REMOVENG THE COLLECTED WATER cont
• Remove the plug from the pump drain hose outlet. This plug
prevents water from spilling out if the pump is accidentally
activated before the pump drain hose is installed. When not
using the pump feature, replace this plug.
• Insert the pump drain hose into the pump drain hose outlet,
making sure it goes in at least 3/4 (15mm). Considerable
force is needed to push the hose into the outlet, make sure
it "pops" in the full 3/4 inch. See Fig. 14. Lead the water drain
hose out to the floor drain or other suitable drainage location
at a maximum vertical height of 14 1/2 feet higher than the
pump drain hose outlet.
° Press the PUMP button on the control panel. The PUMP indicator
light will turn on. The pump will now operate automatically when
the bucket becomes full. If you press the PUMP button again, the
PUMP light will turn off. If the PUMP light is OFF, the pump will
not run.
• If the PUMP light is off and the bucket becomes full, the unit
will produce 4 beeps, and the P2 error code will show on the
display. If the PUMP light is on, the unit will start pumping water
out of the bucket. The pump will run automatically for 10 minutes
and then stop. IMPORTANT: The pump does not empty the bucket,
it only empties enough water so that the bucket remains about
3/4 full. The pump will not start again until the bucket becomes
full. if the bucket is still full after the 10 minutes of pumping, the
unit will pump again for 10 minutes.
° If the 10 minute cycle repeats itself 6 times with bucket remaining
full, this indicates a possible blockage or other problem which is
preventing the water from pumping. The unit will stop operation,
the pump light will flash, and the P2 error code will show in the
display. If this occurs, there are 2 options to clear the flashing
light and the P2 error code. But first, look for the cause of the
problem, such as a kink or blocked hose, or dirt around the
pump filter, and correct it.
- Turn the power off and then turn the power back on. Press
the PUMP button to turn the pump off, then press it again to
turn the pump back on. This will clear the P2 error code, and
resume the pumping operation.
-Press the PUMP button for one second. This will clear the flashing
light. Press the PUMP button again. This will turn the pump on,
clear the P2 error code, and resume the pumping operation.
• If you pull out the bucket during pumping operation, the fan will
stop immediately, and the error code Eb will show in the display.
Replace the bucket to clear the Eb error code and resume operation.
NOTE: The pump will make a load noise for 3 to 5 seconds when first
starting up, this is normal until any air in the pump is replaced by water.
• Make sure the hose is secure so there are no leaks.
Pump drain Pump drain
hose hose outlet
2,Take the pump
drain hose out
\
Figure 14
Filter of the pump
Figure 15
drain
hoseoutlet in
Figure 16
13
Page 14

REMOVING THE COLLECTED WATER cont
° Direct the hose to the drain area, making sure there are no kinks that will block the
water flow.
° Select the desired humidity setting and fan speed on the unit. The pump will start when
the bucket isfull.
° The pump operation light will blink once per second if there isan operational failure.
Check the following steps if the light blinks:
-Remove the water bucket from the unit, pull down the pump inlet, remove the filter
and clean it
-Check that the pump drain hose is not kinked or blocked
-Empty the water bucket
-Reinstall the pump and bucket properly. Turn on the unit. If the error repeats, call
for service.
NOTE: Do not place the pump drain hose in a location that can become less than
32°F (O°C). The water can freeze in the hose and cause unit failure.
° Make sure to empty the bucket once a week when using the pump draining feature.
The bucket will always be between 3/4 full and full while using this feature, so it
should be periodically emptied and cleaned out to eliminate any possibility of
mold or mildew. Refer to Section 2 on the next page, "Clean the bucket '.'
° When the pump draining feature is not being used, remove the pump drain hose from
the outlet by squeezing the outlet and pulling the drain hose out. Avoid leaking
water from the hose onto the floor. Reinstall the plug that was removed from
the outlet.
14
Page 15

Turn the dehumidifier off and remove the plug from the wall outlet before cleaning.
1. Clean the Grille and Case
* Use water and a mild detergent. Do not use bleach or abrasives.
* Do not splash water directly onto the main unit. Doing so may cause an electrical
shock, cause the insulation to deteriorate, or cause the unit to rust.
* The air intake and outlet grilles get soiled easily, so use a vacuum attachment
or brush to clean.
2oClean the bucket
* Every few weeks, clean the bucket to prevent growth of mold, mildew and
bacteria. Partially fill the bucket with clean water and add a little mild detergent.
Swish it around in the bucket, empty and rinse.
* After cleaning, the bucket must be in place and securely seated for the dehumidifier
to operate.
NOTE: Do not place the bucket in an automatic dishwasher to clean it.
3. Clean the air filter
* Remove the filter every two weeks based
on normal operating conditions,
* Remove bucket then pull filter downwards (See Fig. 17).
* Wash the filter with clean water then dry.
* Re-install the filter.
CAUTION: DO NOT operate the dehumidifier without
a filter because dirt and lint will clog it and reduce
performance.
Figure 17
4. Clean the pump filter
* The pump input hose is tucked up inside on the
right hand side of the bucket area. When the
bucket is in place, it automatically drops down
into the bucket to be in pump position. When
the bucket is removed, it automatically retracts
out of side. This hose has a filter on the end that
should be cleaned every 2 weeks.
oRemove the bucket, reach up and gently pull down
the pump input hose. Gently pry the filter off the
end of the hose and clean it, then replace if, and push
Pump Pilfer
Figure 18
the input hose back up in the locked position (See Fig. 18).
5. When not using the unit for long
periods of time:
* After turning the unff off, waft one day before
emptying the bucket so that all the water will
drain from the unit,and totally dry out.
* Clean the main unit, water bucket and air filter.
* Wrap the cord and bundle it with the band (Fig.19).
* Store the unit upright in a dry, well-ventilated place.
Figure 19
15
Page 16

Beforecalling for service, review
PROBLEM
Unit does not start
Dehumidifier does not
dry the air as it should
The unit makes a loud
noise when operating
Frost appears on the coils
the chart below first yourself.
SOLUTION
* Make sure the dehumidifier plug ispushed
completely into the outlet.
* Check the house fuse/circuit breaker box.
, Dehumidifier has reached its preset level
or bucket is full.
* Water bucket is not inthe proper position.
* The 3 minute compressor safety delay has
not expired.
* Did not allow enough time to remove the
moisture.
* Make sure there are no curtains, blinds or
furniture blocking the front or back of the
dehumidifier.
The humidify control may not be set low enough.
* Check that all doors, windows and other
openings are securely closed.
Room temperature is too low, below 41°F (5°C).
* There is a kerosene heater or something giving
off water vapor in the room.
° The air filter is clogged.
* The unit is tilted instead of upright as it should be.
, The floor surface is not level.
* This is normal. The dehumidifier has an auto
defrost feature.
Water on floor
Drain hose is connected, but
water fills up in the bucket.
ES,AS, P2and EC
appear inthe display
The PUMP operation light blinks
on and off every second
Pump does not empty bucket
* Hose to connector or hose connection may be
loose.
* The unit is set up for the bucket to collect water,
but the back drain plug is removed as if set up
for continuous drain. Replace the drain plug.
* Check drain hose, tube, and internal connector for
blockage.
* These are error codes and protection code.
See CONTROL PANEL section.
• Clean the pump filter.
• Check that the pump hose is not kinked or blocked.
• Empty the water bucket.
° Pump runsfor 10minutesand may lower water level
inbucket by 1inch.Thisis normal. Water level in bucket
will appear to be between three-quarters full and full
during normal operation.
16
Page 17

[]Congratulationsonmakingasmart purchase. Your new I<enmore ®product is designed
and manufactured for years of dependable operation. But like all products, it may require
preventive maintenance or repair from time to time. That's when having a Master Protection
Agreement can save you money and aggravation.
The Master Protection Agreement also helps extend the life of your new product. Here's
what the Agreement _"includes:
[] Parts and labor not just for repairing defects, but to help keep products operating
properly under normal use. Our coverage goes well beyond the product warranty.
No deductibles, no functional failure excluded from coverage--- real protection.
[] Expert service by a force of more than 10,000 authorized Sears service technicians,
which means someone you can trust will be working on your product.
[] Unlimited service calls and nationwide service, as often as you want us, whenever
you warlt us.
[] "No-lemon" guarantee - replacement of your covered product if four or more product
failures occur within twelve months.
[] Product replacement if your covered product can't be fixed.
[] Annual Preventive Maintenance Check at your request - no extra charge.
[] Fast help by phone - we call it Rapid Resolution - phone sup-port from a Sears
representative on all products. Think of usas a "talking owner's manual."
[] Power surge protection against electrical damage due to power fluctuations.
[] $250 Food Loss Protection annually for any food spoilage that is the result of
mechanical failure of any covered refrigerator or freezer.
[] Rental reimbursement if repair of your covered product takes longer than promised.
[] 25% discount off the regular price of any non-covered repair service and related
installed parts.
Once you purchase the Agreement, a simple phone call is all that it takes for you to schedule
service. You can call anytime day or night, or schedule a service appointment online.
The Master Protection Agreement is a risk free purchase. If you can-cel for any reason during
the product warranty period, we will provide a full refund. Or, a prorated refund anytime after
the product warranty period expires. Purchase your Master Protection Agreement today!
[] Some limitations and exclusions apply. For prices and additional information in the U.S.A.
call 1-800-827-6655.
[] Coverage inCanada varies on someitems.For full detailscall SearsCanada at
1-800-361-6665.
[] Sears Installation Service
For Sears professional installation of home appliances, garage door openers, water heaters,
and other major home items, in the U.S.A.or Canada call 1-800-4-MY-HOME _.
17
Page 18

Antes de Utilizar Su Nueva Deshumidificador ......................................................................2
Garantia .....................................................................................................................................2
Instruccianes Importantes de Seguridad .............................................................................3-4
Requisitos El_ctricas ......................................................................................................................5
Especificaciones del Producto....................................................................................................5
Piezas y Faracteristicas ..............................................................................................................6
Instalaci6n ...................................................................................................................................7
Operaci6n ...............................................................................................................................8-14
Mantenimiento y Limpieza .......................................................................................................15
Soluci6n de Problemas ..............................................................................................................16
Acuerdo Maestro de Pratecci6n ..............................................................................................17
Lea este manual. Estole ayudar6 a operar sunuevo deshumidificador Kenmore en la
manera m6s segura y efectiva.
Guarde este libro y sufactura (recibo) en un lugar seguro para futura consulta.
Kenmore Elite un afo de garanfia limitada Cuando instalado, operado y mantenido de acuerdo
con todas las instrucciones provistas, si el aparato falla debido a un defecto en material o mano de
de obra durante un afro desde la fecha de compra, Name al 1-800-4-MY-HOME para organizar
para la reparaci6n de forma gratuita. Si este aparato se utiliza para otros fines que no sean
privados de familia, esta garantia es v6 lida solamente dentro de 90 d_ desde la fecha de compra.
Esta garantia cubre s6lo defedos en material y mano de obra_ y no pagar6:
1. Articulos no reutilizables que pueden gastarse pot el uso normal, incluyendo, pero no limitado a
filtros, correas, bombillas de luz incandescente y bolsas.
2. Un t_cnico de servicio que instruya al usuario en la instalaci6n, operaci6n o mantenimiento correcto
del producto.
3. Un t_cnico de servicio para limpiar o mantener este producto.
4. Dafo o falla en este producto si no est6 instalado, operado y mantenido de acuerdo con todas las
instrucciones suministradas con el producto.
5.Dafo o falla en este producto pot accidente, abuso, mal uso o uso para otto fin que no sea previsto.
6. Dafo o falla en este producto causado pot el uso de detergentes, limpiadores, productos quimicos
o utensilios diferentes de los recomendados en todas las instrucciones suministradas con el producto.
7. Dafo o falla en piezas o sistemas causado pot modificaciones no autorizadas hechas a este
producto.
Exenci6n de responsabilidad de garantias impffcitas; Limitaci6n de recursos El 6nico y exclusivo recurso
del cliente bajo esta garantia limitada ser6 la reparaci6n del producto como se describe aqui.
Las garantias implicitas, incluyendo garantias de comerciabilidad o idoneidad para un prop6sito
particular, est6n limitadas a un afo o al periodo m6s corto permitido pot la ley. Sears no ser6
responsable pot dafos incidentales o indirectos. Algunos estados y provincias no permiten la exclusi6n o
limitaci6n de dafos incidentales o indirectos, ola limitaci6n de la duraci6n de las garantias implicitas de
comerciabilidad o idoneidad, pot Io que estas exclusiones o limitaciones pueden no aplicarse en su caso.
Esta garantia se aplica s61o mientras este producto se utiliza en los Estados Unidos.
Esta garantia le otorga derechos legales especificos, y usted tambi_n puede tener otros derechos que
varian segOn el estado.
Sears Brands Management Corporation, Hoffman Estates, IL 60179
Page 19

Lea todas las instruccionesen este manual antes de utilizar et deshumidificador. Este
producto est6 disefiado s61opara uso dom@stico del interior, no para uso industrial o
arras aplicaciones comerciales. Use s61ocon el cableado el@ctrico que se encuentra en
buen estado de funcionamiento y que cumpla con los c6digos y reglamentos
aplicables. Si usted tiene alguna pregunta sobreel cableado, consulte a un
electricista calificado.
AI utilizar el deshurnidificador, usted debe seguir las INSTRUCCIONES
IMPORTANTES DE SEGURIDAD que se indican a continuad6n. Como una
parte de esas instrucdones, se ha utilizado mapalabra "_ ADVERTENCIA"
par indicar el nivel de peligro:_ILADVERTENCIA: indica un peligro que, si
no evitarse, puede provocar lesiones o muertes.
INSTRUCCIONES IMPORTANTES
Cuando se utilizan aparatos el_ctricos, las precauciones b6sicas siempre se deben
seguir parareducir el riesgo de incendio, descarga el_ctrica y lesiones a personas,
incluyendo 1osiguiente:
1. Lea todas las instrucciones antes de utilizar el deshumidificador.
2. Utilice el deshumidificador s61ocomo se describe en este manual. Cualquier otro
uso no recomendado por el fabricante puede causar descarga el_ctrica, incendio o
lesiones a personas.
3. No haga funcionar el deshumidificador con un cable de alimentaci6n dafiado.
4. Esteaparato no est6 disefiado para ser usado por personas (incluidos nifios) con
capacidad fisica, sensorial o mental reducida, o a falta de experiencia y
conocimiento, a menos que se les ha dado la supervisi6n o instrucci6n acerca del el
uso del aparato por una persona responsable de su seguridad.
5. No coloque el deshumidificador en una superficie pequefia, desnivelada o
desigual, o cualquier superficie que podria hacer que se vuelque o caiga.
6. Para un funcionamiento adecuado, el deshumidificador debe colocarse sobre
una superficie lisa y no combustible.
7. Siempre desenchufe el deshumidificador cuando no est_ en uso.
8. No utilice el deshumidificador con los dispositivos de seguridad retirados.
9. No coloque el cable de alimentaci6n debajo de alfombra. No cubra el cable con
tapetes, alfombras de pasillo o similares. Coloque el cable lejos del 6rea de tr6fico
de manera que no tropezar6 con el cable.
10. Evite el uso de cables de extensi6n debido al riesgo de incendio. Si un cable de
extensi6n necesita ser utilizado, el cable debe ser al menos de14 AWG y con una
potencia nominal de no inferior a 1875 vatios.
11. No inserte ni permita que ning0n obieto entre en cualquier abertura del
deshumidificador. Si 1o hace, puede provocar descarga el_ctrica y/o riesgo de
incendio.
3
Page 20

12. Este producto est6 disefiado s61o para usodom@sticodel interior, no para uso
industrial o otras aplicaciones comerciales. Estagaranfia noes v61ida siel producto es
utilizado alguna vez para prop6sitos que no sean de hogar privado.
13. Usted necesitar6 una superficie plana a por Io menos 6 "(1 5.2 cm) de fuentes de
calor como calentadores.
14. No bloquee aberturas de aire o coloque el deshumidificador sobre una
superficie blanda, como una cama o sol6.
15. El deshumidificador debe estar conectado a una toma a tierra tres orificios, 15 o
20 A con fusible, 115 V y 60 Hz.
16. lnserte siempre el filtro correctamente. Limpielos cada dos semanas. La
operaci6n sin filtros puede causar fallos.
,_ ADVERTENCIA: PELIGRO DE DESCARGA
Nunca coloque el deshumidificador donde pueda caer en una bafiera, lavabo, 6rea
inundada, o cualquier recipiente o estanque de agua.
ADVERTENCIA: PELIGRO DE INCENDIO
Deshumidificadores tienen partes que produzcan chispas o arcos en el interior. No
utilice el deshumidificador cerca de materiales combustibles, gases inflamables o
fuentes de calor. No 1ouse en 6reas donde gasolina, pintura o materiales inflamables
se utilicen o almacenen. Para evitar un posible incendio, no cubra las entradas o
salidas de aire de cualquiera manera. No inserte ni permita que objetos extrafios
penetren en reiillas de ventilaci6n o abertura de escape ya que esto puede causar
descarga el_ctrica, incendio o dafio al ventilador.
ADVERTENCIA: SUPERFICIES CALIENTES
No toque el motor deshumidificador cuando est6 en uso. Este motor es caliente
cuando est6 en uso. Para evitar quemaduras, no permita que la piel desnuda toque
superficies calientes.
GUARDE ESTAS INSTRUCCIONES!
Page 21

OBERV_ TODOS LOS COD|GOS Y
ORDENANZAS LOCALES.
BAJO NiHGUNA CIRCUNSTANCiA_ NO
SAQUE LA CLAVIJA A TIERRA DEL CABLE
DE ALIMENTACION.
LA CONEXIOH A TtERRA SE REQUtERE EN
ESTE APARATO.
SE REQUIERE UH SUM|H|STRO EL_CTR|CO
115% 60HZ, SOLO CA, 15A O 20 A CON
FUSIBLE Y COHEX|6H A TtERRA.
Se recomlenda un fusible de retardo o un
interruptor de clrculto de retardo. Utilice un
clrculto dedlcado que slrve solamente a este
aparato.
Enchufe de 3 clavijas
/
METODO DE CONEX|6N A TtERRA
RECOMENDADO
Para su segurldad personal, este aparato
debe estar conectado a tlerra. Esteaparato
tlene un cable de allmentaci6n con un
enchufe de 3 clavljas. Para reduclr al m_nlmo
el pellgro de descarga poslble, el cable
debe ser enchufado en una tomacorrlente a
tlerra emparejada que cumple con la 61tlma
edlci6n de los C6dlgos El@ctrlcos Naclonales
y todos los c6dlgos y ordenanzas locales.
Si la tomacorrlente 3 orlflclos a tlerra no
est6 dlsponlble, es la responsabilldad y
bllgaci6n del cllente para tener una
instalada por unelectricista callficado.
PELIGRO DE DESCARGA ELI_CTRICA
ADVERTENCIA
Cable de alimentaci6n Tomacorriente 3
orificios puesta
a tierra
Si es necesarlo utillzar uncable de extensi6n,
el cable debe ser de al menos 14 AWG y
con una potencla no menos de 1875 vatios.
NO. DE [TME 405.54571
Deshumidificaci6qpor24 horas (33.1 litrospor dla)
Consumode Energi_(W) 720 Vatios
Volumende Cubo 12.68 Pintas(6 Litros)
FuentedeEnergi_ 115v / 60 HZ
Corrientenominal (Amps) 6.9A
Nivel de presi® sonora dB 55
Peso 43.43 ]bs
DJmensJones(AXPXA) 15.35"x 10.94"x 23.15"
Enchufe en una tomacorrlente 3 orificlos a
tierra
No retire la clavlja a tierra del enchufe.
No utillce un adaptador.
No segulr estas instrucclones puede causar
muerte, incendlo o descarga el_ctrica.
70 pintaspor dla
Page 22

PARTEDELANTERA
Panel de control
Rejilla de toma de aire
Asa
(ambos lados)
Filtro de aire
(detr6s de la rejilla)
Cubo de agua
PARTEPOSTERIOR
Salida de manguera
de drenaje
Rueda
Cable de
y enchufe
Rejilla de salida de aire
Figura 1
Banda (s61ousado al
almacenar la unidad.)
de la manga de desagQe
de bomba con el enchufe
ACCESORIOS
Tubo de drenaje continuo (1 pieza)
Longltud:7.0 pulgadas(178 ram)
ID:0.53 pulgadas(13.5 mm)
Manga de DesagOede Bomba (1pieza)
Longitud: ] 6 pie (5m)
ID: 0.17 pulgadas (4.35mm)
Adaptador A (1 pieza)
)
Figura 2
Tornillo (2 piezas)
Page 23

POSICIONAR LA UNIDAD
Un deshumidificador que est6 funcionando en un s6tano tendr6 poco o ningOnefecto
en el secado de un 6rea cerrado adyacente de almacenamiento, tal como unarmario,
a menos que haya una adecuada circulaci6n de aire dentro y fuera de la zona.
* No 1ouse al aire libre.
* Este deshumidificador est6 disefiado s61opara uso residencial en el interior.
Este deshumidificador no debe ser utilizado para aplicaciones comerciales o
industriales.
* Coloque el deshumidificador en un suelo piano y lisoque es suficientemente fuerte
para soportar la unidad con un cubo lleno de agua.
" Deje al menos 8" de espacio por todos lados de la unidad para una buena
circulaci6n de aire.
POSICIONAR LAUNIDAD Cont.
• Coloque la unidad en un 6rea donde la
1 6 pulgadas o m6s
_1 Rejilla de salidade aire
temperatura no descender6 por debaio
de 41°F (5°C). Las bobinas pueden lJegar
a ser cubiertas por la escarcha a de a re
Re ilia de toma
temperaturas inferiores a 41°F (5°C),
toque puede reducir el redimiento. 8pulgadas m6s
• Coloque la unidad Jejosde secadora
de ropa, calenfador o radiador.
8 pulgadas o m6s
• Utilice la unidad para evitar dafios
por humedad en cualquier lugar que
8 pulgadas o m6s 8 pulgadas o m6s
se guardan libros u objetos de valor.
• Utilice el deshumidificador en un
s6tano para ayudar a evitar daSos
por humedad.
" El deshumidificador debe utilizarse en un
espacio cerrado para ser m6 s efectivos.
• Cierre todas maspuertas, ventanas y otras
Ruedas (A los cuatro puntos en la parte inferior de la unidad
* Ruedas pueden moverse libremente.
* No fuerce ruedas moverse sobre la alfombra, nl
mueva ta unidad con agua en el cubo. (El equtpo
podr[a volcarse y derramar el agua.)
Figura 3
aberturas amexterior de mahabitaci6n.
Page 24

Es importante conocer los controles y caracter[sticas de su deshumidificador para
garanfizar su uso correcto y seguro. Revise estas instruccionesantes de usar el
proclucto.
PANEL DE CONTROL
Continuous Auto Defrost
Operation On Operation On Bucket Full High Fan Timer On/Off
Indicator Light _ndlcator Light _ndlcator Light _ndicator Light Indicator Light
Indicator Light
Comfort
Indicator Light
Clean Filter !__-----_----
Q
POWER
Figura 4
Cuando usted presiona el bot6n para cambiar el modo de funcionamiento, la unidad
har6 un sonido hip para indicar que el modo est6 cambiandose.
_) Bot6n de PUMP
Pumsepara acfivar el funcionamiento
de mabomba. NOTA: AsegOrese de
que mamanguera de drenaie de ma
bomba se instala en maunidad y ma
manguera de drenaje confinuo se
refira de la unidad antes de encender
mabomba.
0 Bot6n Filter
La funci6 nde verificaci6n de filtro es
un recordatorio para limpiar el filtro de
aire para unfuncionamiento m6s eficiente.
La luz Filter (Luzlimpieza filtro) se
iluminar6 despu6s de 250 horas de
funcionamiento. Para reinicializar despu6s
de limpiar el filtro, pulse el bot6n filter y
la luz se apagar6.
Cuando el cubo se mlena,se inicia la O Modo Contort Deshumidificaci6n
operaci6n de bombeo autom6ficamente. Enel modo de deshumidificaci6n Contort,
Consumtemasp6ginas siguientes para maunidad controlar6 autom6ficamente
obtener informad6n sobre la eliminaci6n humedad de mahabitaci6n en un rango
de agua acumulada, confortable 45% - 55%, de acuerdo a
No utilice la bomba para bombear al
aire Hbre si la temperatura exterior es
iguam o inferior a 32 °F (0 °C).
Bot6n Cont.
Pulse para acfivar el funcionamiento de
deshumidificaci6n continua. El Control de
adjuste de humedad set6 inoperante.
matemperatura ambiente. La funci6n de
ajuste de humedad se desacfivar6.
Bot6n Power
Pulse para poner en marcha y parar el
deshumidificador.
Page 25

O/O BotonesArriba/Abaio
* Botones de control de aiuste de humedad
El nivel de humedad se puede aiustar dentro de un rango de 35% de HR
(Humedad relativa) a 85% de HR (Humedad relativa)en incrementos de 5%.
Para aire m6s seco, pulse el bot6n < y establece un valor menor porcentaje
(%).Para el aire hOmedo, pulse el bot6n >y establece un valor m6s alto
porcentaje (%).
* Botones de control de ajuste de timer
Use los botones Arriba/Abaio para aiustar el tiempo dearranque autom6tico
y parada autom6tica de 0 a 24 horas.
O Bot6n Timer
Pulse para iniciar la funci6n de arranque autom6tico y parada autom6tica,
junto con Los botones > y <.
0 Visualizaci6n
Muestra el nivel de humedad % establecido de 35% a 85% o el tiempo de
arranque autom6tico y parada autom6tica (0-24) mientras se ajusta, y luego
muestra el nivel actual de humedad % de la habitad6n (+ 5% de exactitud)
en un rango de 30% de HR (Humedad relativa) a 90% de HR (Humedad
relativa)
C6digos de error y c6digo de protecci6n:
AS- Error en el sensorde humedad - Desenchufe la unidad y vuelva a enchufarla. Si
el error se repite, soliciteel servicio t_cnico.
ES-Error en el sensorde temperatura - Desenchufe la unidad y vuelva a enchufarla. Si
el error se repite, soliciteel servicio t_cnico.
P2-EI cubo est6 lleno o no est6 en la posici6n correcta - Vacie el cubo y vuelva a
colocarlo en la posici6n correcta.
EC- Mal funcionamiento de la unidad - Compruebe s! la temperatura ambiente est6
dentro del rango de 41°F (5°C) a 95°F (35°C). S! la temperatura no est6 dentro del
rango, tome medidas para corregir la temperatura ambiente. S! el c6digo de EC
persiste, hay un mal funcionamiento que requiere que usted Ilame al servicio t_cnico.
La causa de este c6digo de error EC podria ser una fuga de refrigerante, una
sobrecarga o fallo del compresor, o bloqueo en el sistema sellado.
E3-Mal funcionamiento--Desenchufe la unidad y vuelva a conectarla. Si se
repite el error, ofrecer6 servicio t_cnico.
Eb-EI cubo se retira o no est6 en la posici6n correcta - Vuelva a colocar el
cubo en posici6n correcta.
OTRAS CARACTERISTICAS
Luz Cubo Ileno - Se ilumina cuando el cubo est_ Ileno y listo para ser vaciado, o
cuando se retire el cubo o no se coloque en la posici6n correcta.
Parada Autom6tica - El deshumidificador se parar6 30 segundos despu@sde que el
cubo sea Ileno, o que el cubo se retire o no se coloque en la posici6n adecuada.
Cuando se alcanza el nivel de humedad establecido, el compresor apagar6, y el
ventilador continuar6 funcionando por otros 3 minutos, y despu_s apagando.
Descongelaci6n Autom6tica - Cuando la escarcha se genera en los serpentines del
evaporador, se detendr6 el ciclo del compresor y el ventilador seguir6 funcionando
hasta que la escarcha clesaparece.
3 Minutos de Retardo de Compresor - Cada vez que el compresor deja de funcionar
por cualquier raz6n, pot ejemplo cuando se ha alcanzado el valor de humedad
establecido, no se reiniciar6 de nuevo durante un minimo de 3 minutos. Esto es un
Page 26

disefio de seguridad para prolongar la vida del compreson Si el ventilador tambi@n
ha parado, no recomenzar6 otra vez por 3 minutos o hasta que el comienzo del
compresor.
Verificaci6n de Funcionesde Filtro - La unidad seguir6 el tiempo total durante el que
el ventilador funciona. La luz Filter comenzar6 a parpadear una vez por segundo
despu_s de 250 horas de funcionamiento. Despu_s de limpiar el filtro de aire, pulse el
botbn Filter para un segundo para reinicializar este timer.
Rearranque Autom6tico - Si hay un corte de energia, la unidad volver6 alas mismas
condiciones de funcionamientocuando se restablezca la alimentaci6n.
Ajuste clel Timer
* Con la unidad encendida, pulse el botbn Timer y la luz Off indica que la funci6n de
Parada Autom6tica se puede programar. Dentro de los 5 segundos pulse el bot6n
ARRIBA o ABAJO para seleccionar un peHodo de tiempo tras el que se detendr6 el
funcionamiento. Pulse el botbn Timer dos veces y la luz On indica que la funci6n de
arranque autom6tico se puecle programar. Dentro de los5 segundos,pulse el bot6n
ARRIBA o ABAJO para seleccionar un peHodo de tiempo tras el que volver6 a
funcionar;Con la unidad apagada, pulse el bot6n Timer y la luz On indica que la funci6n de
Arranque Autom6tico se puede programar. Dentro de los 5 segundos pulse el bot6n
ARRIBA o ABAJO para seleccionar un peHodo de tiempo tr6s el que el funcionamiento
se iniciar6. Pulse el bot6n Timer dos veces y la luz Off indica que la funci6n de
parada autom6tica se puede programar. Dentro de los 5 segundos pulse el bot6n
ARRIBA o ABAJO para seleccionar un peHodo de tiempo tr6s el que dejar6 de
funcionar.
. Pulse o mantenga pulsado el bot6n ARRIBA o ABAJO para cambiar el tiempo de
Auto por incrementos de 0.5 horas hasta 10 horas, y luego por incrementosde 1 hora
hasta 24 horas. El control contar hacia atr6s el tiempo restante hasta iniciar o detener.
. El tiempo seleccionado se registrar6 durante 5 segundos y el sistema
autom6ticamente volver6 a mostrar el valor de humedad anteriormente establecido.
* Cuando los tiempos de arranque autom6tico y parada autom6tica se establecen
dentro de la misma secuencia de programa, las luzs indicadoras TIMER ON OFF se
iluminan, esto indica que los tiempos ON y OFF son programados ahora.
* Elencendido o apagado de la unidad en cualquier momento o el ajuste del timer a
0.0 cancelar6 la funci6n de Arranque Autom6tico/Parada Autom6tica
. La funci6n de Arranque Autom6tico/Parada Autom6tica tambi_n se cancelar6
cuando el c6digo de protecci6n P2 (cubo lleno) aparece en la ventana de
visualizaci6n del panel de control.
AL UTILIZAR LA UNIDAD
* Esta unidad est6 disefiada para funcionar en un entorno de trabajo entre 41 °F/5
°C y 95 °F/35 °C.
* 3 minutos de retardo de compresor - Cada vez que el compresor deja de funcionar
por cualquier raz6n, por ejemplo cuando se ha alcanzado el valor de humedad
establecido, no se reiniciar6 de nuevo durante un mfnimo de 3 minutos. Esto es un
disefio de seguridad para prolongar la vida del compresor. Si el ventilador tambi_n
ha parado, no recomenzar6 otra vez por 3 minutoso hasta que el comienzo del
compresor.
10
Page 27

* Noconecteeldeshumidificadora unatoma mOltiple que tambi@n est6 utilizado
para otros aparatos el_ctricos.
. Seleccione un lugar adecuado, asegOrese de que tiene f6cil acceso a una
tomacorriente.
. Enchufela unidad a una toma corriente el_ctrica con conexi6n a tierra.
* AsegOrese de que el cubo de agua est6 instalado correctamente, de Io contrario la
unidad no funcionar6 correctamente.
NOTA: Tenga cuidado de no volcar la unidad mientras se mueve cuando hay agua en
el cubo. Tire el cubo hacia fuera un poco.
ELIMINAR EL AGUA RECOGIDA
Hay cuatro maneras de eliminar el agua acumulada.
1. Utilice el cubo
* Cuando la unidad est6 apagada, si el cubo es Ileno,la
uniclad sonar6 4 veces y la luz inclicadora Full parpadear6;
la pantalla digital muestra P2.
* Cuanclo la uniclad est6 encenclida, si el cubo es Ileno, el
compresor se apaga y el ventilador se apaga clespu6s de 30
segundos para secar el serpentin evaporador, a continuaci6n, _ Ficjura5
la unidad sonar6 4 veces y la luz indicadora Full parpadear6; Suieteambos lados del cubo,conuna
la pantalla digital muestra P2. fuerza uniforme, y tire el cubo hacia
° Retire lentamente el cuba. Agarre de farina segura las asas
izquierda y derecha, y con cuidado tire hacia fuera y de Vierta el aguafuera.
manera recta que el agua no se derrame. Consulte las Figuras
4 y 5. No coloque el cubo en el suelo debido a que el fondo
del cubo es desigual haciendo que se caiga y se derrame el agua.
°Vacie el cubo y vuelva a colocarlo. Elcubo debe estar en su
lugar y firmemente asentado de manera que el dehumidfier
funciona.
* La m6 quina se reiniciar6 cuando el cubo se restaura en su
posici6n correcta,suponiendo que los 3 minutos de retardo de
seguridad para el compresor hart pasado.
Notas:
* Cuando se retire el cubo, no toque ninguna pieza dentro de
la unidad. Si Io hace, puede da_ar eJproducto.
° Aseggrese de empujar el cubo con cuidado en la unidad hasta el
final. Golpear el cubo contra algo o dejar de empujarlo en forma
segura puede causar que la unidad no funciona.
° Si la bomba cae cuando usted retire el cubo (V_ase la Fig. 7),
usted debe volver a instalar la bomba correctamente antes de
volver a coJocar el cubo en la unidad (V_ase Ja Fig. 8). Hay
un filtro JimpiabJeextraible en eJ extremo de Ja bomba.
* Cuando usted retire eJcubo, debe secarlo antes de confinuar
si hay un poco de agua en Ja unidad.
* Cuando Ja unidad est6 encendida, si se refira el cubo, eJ
compresor se apagar6 inmediatamente, eJvenfilador
funcionar6 30 segundos m6s, y luego Ja unidad sonar6 4
veces y Ja pantalJa digitat mostrar6 el c6digo de error Eb.
* Cuando Jaunidad est6 apagada, si se refira el cubo, la
unidad sonar6 4 veces y Ja pantaHa digitaJ mostrar6 eJ
error de c6digo Eb.
]]
fuera de la unidad.
/x
Ficjura 6
Figura 7
Vuelva a instalar la
bomba adecuadamente.
Figura 8
Boml cae
Page 28

2. Drenaje continua
* El agua puede ser drenada de forma continua en un
Tubo de drenaje
desagiJ e en el suelo por unir de una Iongitud de
manguera de jardin (ID _ 5/1 6"con unextremo
roscado hembra ID 1", no incluido)a la unidad.
* Una firmemente el tubo de drenaje al adaptador
A (V_ase Fig.9, colocado en el cubo).
*Retire el tap6n de goma de la salida de drenaje
posterior de la unidad y deje de lado.
, Retire el cubo e inserte el tubo de clrenaje a
trav@ sde la salida de drenaje en la parte Tap6nde goma
posterior de la unidad. Con seguridad presione -_
el extremo del tubo en el conector interno en
el interior de la unidad (V_ase la Fig. 10 y Fig.1 1).
* Utilice los dos tornillos suministrados para atornillar
el adaptaclor A a la parte posterior de la uniclad.
*Atornille el extremo roscado hembra de la manguera Tubo de drenaje
de jardin en el adaptador A (V@asela Fig. 11).Guie
el manguera a un desagiJe en el suelo.
, Aseggrese de que la manguera es segura para que no
hay fugas.
oDirija la manguera hacia el drenaje, asegur6 ndose
de que no existan dobleces que detengan el flujo
clel agua.
* Coloque el extremo de la manguera en el desagiJe y
asegOrese de que el extremo de la manguera es el Conector
nivel o pot debajo de la salida de drenaje de la
unidad. Nunca haga la manguera correr hacia arriba.
inferno
Tubo de drenaje
* Vuelva a colocar el cubo en la unidad y aseggrese
de que que est6 bien colocaclo.
* El drenaje continuo comenzar6 una vez que la unidad (_
comienza la operaci6n. Manguerade
jardln
3. Drenaie de la bomba
El agua se puede vaciar autom6ticamente a trav_s de un
desagge en el suelo o en un centro de drenaie adecuado
Roscahembra
conectando la toma de drenaie de la bomba con una
manguera de drenaje de la bomba. (O D = 1,/4 ", induido).
* Retire la manguera de drenaje continuo y el subconiunto
de [a manguera de drenaie desde la unidad. Instale la
cubierta de pl6stico a la toma manguera de drenaje
continua de la unidad utiJizando dos tornillos. (V_ase la Manguera de(_
jardln
Fig. 13)
* Retire el enchufe desde la toma manguera de drenaje de
la bomba. Este enchufe evita que el agua se derrame si
la bomba es accidentalmente activada antes de instalar Rosca hembra
la manguera de clrenaje de la bomba. Cuando no se utilice
la funci6n de bomba, vuelva a colocar este enchufe.
_adorA
Figura 9
Figura10
Ficjura 11
Figura 12
Figura 13
12
Page 29

EXTRACCIONDELAGUAACUMULADAcont.
• Insertelamangueradedrenaiedelabombaenlatoma
mangueradedrenajedelabomba,asegur6ndosedequeva
enalmenos3/4pulgadas(15mm). Se necesita una fuerza
considerable para empujar la manguera en la toma, asegOrese
de que "salte" en el pleno de 3/4 pulgadas. V6ase la Fig. 14.
Diriia la manguera de drenaie de agua hacia el desagLie en
el suelo o en otro lugar de drenaje adecuado, a una altura
vertical m6xima de 14 1/2 pies m6s alto que la toma manguera
de drenaje de la bomba.
° Pulse el bot6n de PUMP en el panel de control, y la luz
indicadora de PUMPse encender6. La bomba se pondr6 en
funcionamiento autom6ticamente cuando el cubo se Ilena.
Si usted pulsa el bot6n de PUMP de nuevo, la luz de PUMP
se apagarc_. Si la luz de PUMP estc_apagada, la bomba no
correr_.
° Si la luz de PUMP est6 apagada y el cubo se Ilena, la
unidad producir6 4 pitidos, y el c6digo de error P2 se
mostrar6 en la pantalla. Si la luz de PUMP est6 encendida,
la unidad pondr6 en marcha el bombeo de agua del cubo. La
bomba funcionar6 autom6 ticamente durante 10 minutos y
luego parar6. IMPORTANTE: la bomba no vada el cubo, sino
s61ovada el agua suficiente para que el cubo se mantiene
alrededor de 3/4 de su capacidad. La bomba no se reanudar6
hasta que el cubo se Ilena. Si el cubo est6 todavia Ilenodespu6s
del bombeo durante 10 minutos, la unidad bombearc_ de nuevo
durante 10 minutos.
° Siel ciclo de 10 minutos se repite 6 veces cuando el cubo
se mantiene Ileno, esto indica un posible bloqueo u otro
problema que est6 impidiendo el bombeo del agua. La unidad
dejarc_ de funcionar, la luz de PUMP parpadearc_, y el c6digo
de error P2 se mostrar6 en la pantalla. Si esto ocurre, hay
2 opciones para eliminar la luz intermitente y el c6digo de
error P2. Pero en primer lugar, busque la causa del problema,
como torcedura o manguera bloqueada o suciedad alrededor
del filtro de la bomba, y corrijalo.
- Apague la energia y luego encienda de nuevo la energia.
Pulse el bot6n de PUMP para apagar la bomba, y vuelva a
pulsarlo para encender la bomba de nuevo. Esto borrarc_ el
c6digo de error P2, y reanudar6 la operaci6n de bombeo.
" Pulse el bot6n de PUMP durante un segundo, esto borrarc_
la luz intermitente. Pulse el bot6n de PUMP de nuevo, esto
encenderc_ la bomba, borrarc_ el c6digo de error P2, y
reanudar6 la operaci6n de bombeo.
• Si usted retira el cubo durante el funcionamiento de bombeo,
el ventilador pararc_ inmediatamente y el c6digo de error Eb
se mostrarc_ en la pantalla. Vuelva a colocar el cubo para
borrar el c6digo de error Eb y reanudar el funcionamiento.
NOTA: La bomba harc_ un ruido de carga durante 3 a 5 segundos en la
primera puesta en marcha, esto es normal hasta que todo el aire en la
bomba es reemplazada por agua.
• AsegOrese de que la manguera es segura de forma que no haya fugas.
guera de Toma manguera
drenaje de la de drenaje de
bomba la bombaa
2, Retire la
manguera de
drenaje de la
Figura14
Filtro de la bomba
Figura 15
1,Pulse la toma manguera
de drenaje de la bomba
Figura16
13
Page 30

EXTRACCIONDELAGUAACUMULADAcont.
• Dirijaeltuboal6readedrenaje,asegurc'_ndosedequenohayatorceduras
quebloqueanelflujodeagua.
° Seleccioneelajustedehumedaddeseadoylavelocidaddelventiladordela
unidad.Labombasepondrc'_enmarchacuandoelcuboest_Ileno.
• Laluzdefuncionamientodepumpparpadearc'_unavezporsegundosiseproduce
unfallodefuncionamiento.
Compruebelossiguientespasossilaluzparpadea:
-Retireelcubodeaguadesdelaunidad,tirehaciaabajodelaentradadela
bomba,quiteelfiltroylimpielo
-Compruebequelamangueradedrenajedelabombanoest6dobladaobloqueada
-Vacieelcubodeagua
-Vuelvaa instalarlabombay elcubocorrectamente.Enciendalaunidad.Siel
errorserepite,Ilamealserviciot_cnico.
NOTA:NocoloquelamangueradedrenajedelabombaenunlugarquepuedeIlegar
asermenosde32°F(0°C).Elaguasepuedecongelarenlamangueraycausar
falladelaunidad.
•AsegOresedevaciarelcubounavezporsemanacuandoseutilizalafunci6nde
drenajedelabomba.Elcuboestarc_siempreentreIlenadodel3/4y Ilenadoen
elusodeestafunci6n,porIoquedebeservaciadoy limpiadoperi6dicamente
paraeliminarcualquierposibilidaddelaaparici6ndemoho.ConsultelaSecci6n
2delap6ginasiguiente,"Limpieelcubo".
•Cuandonoseest6utilizandolafunci6ndedrenajedelabomba,retirelamanguera
dedrenajedelabombadesdelatomaapretandolatomaytirandohaciafuerala
mangueradedrenaje.Evitefugasdeaguadesdelamangueraalsuelo.Vuelvaa
instalarelenchufequeseharetiradodelatoma.
14
Page 31

Apague el deshumidificad0r y retire el enchufe de la t0mac0rriente antes de limpiarl0.
1. Limpiar rejillas y caja
• Use agua y un detergente suave. No utilice leiia ni abrasivos.
o No salpique agua directamente en la unidad principal. Si Io hace_ puede causar una
descarga el6 ctrica porque el aislamiento se deteriore, o causar que la unidad se oxida.
• Las reiillas de toma de aire y de salida de aire se ensucian con facilidad, asique use un
accesorio de aspiradora o cepillo para limpiar.
2. Limpiar el cubo
e Cada pocas semanas, limpie el cubo para evitar el crecimiento de moho_ hongo y
bacteria Llene parcialmente el cubo con agua limpia y a_ada un poco detergente suave.
Agite el liquido del cubo, vacie y eniuague el cubo.
• Despu6s de la limpieza, el cubo debe estar en su lugar y bien suieto de manera
que el deshumidificador funciona.
NOTA: No coloque el cubo en un lavavaiillas automStico para limpiarlo.
3. Limpiar el filtro de aire
• Retire el filtro cada dos semanas en base a condiciones
normales de funcionamiento.
Retire el filtro de la parte superior de la unidad (V6ase la Fig. 17).
• Lave el filtro con agua limpia y sequelo.
oVuelva a instalar el filtro_ vuelva a colocar el cubo.
PRECAUCION: NO opere el deshumidificador sin filtro ya que la
suciedad y las pelusas Io obstruirSn y reducir su rendimiento.
4. Limpie el filtro de la bomba
Figura 17
• La manguera de entrada de la bomba est8 escondida en el
interior en el lado derecho del 8rea de cubo. Cuando el cubo
est8 en su lugar, se cae automSticamente en el cubo para
estar en la posici6n de la bomba. Cuando se retire el cubo, se
retrae automSticamente de lado. Fsta manguera fiene un filtro
en el extremo que se debe limpiar cada 2 semanas.
• Retire el cubo, tire suavemente hacia abaio la manguera de
entrada de la bomba. Retire suavemente el filtro desde el
extremo de la manguera y limpielo, y luego vuelva a
colocarlo, y empui e la manguera de entrada a la posici6n de
bloqueo (V6ase la Fig. ] 8).
Filtro de la bomba
Figura 18
5. Cuando no se utilizara la unidad durante mucho tiempo:
oDespu6s de apagar la unidad, espere un dia antes vaciar el
cubodemaneraquetoda elagua sedrenar8 dela unidad,
y totalmente sequela ciudad.
• Limpie la unidad principal, cubo de agua y filtro de aire.
• Enrolle el cable y li e con la banda (Fig. ] 9).
eAImacene la unidad de forma vertical en un lugar seco y bien
ventilado.
15
Figura 19
Page 32

Antes de Ilamar al servicio t_cnico
PROBLEMAS
La unidad no se enciende
Deshumidificador no seca el
aire como debe
La unidad hace un ruido fuerte
cuando funciona
La escarcha aparece en
las bobinas
Agua en el suelo
La tubeHa de desagLie est6
conectada, pero el agua se
Ilena en el cubo
revise la siguiente tabla primero por si mismo.
SOLUCION
Aseg6rese de que un enchufe del deshumidificador
se empuja completamente en la tomacorriente.
Revise fusible/caia de interruptores de circuito de
la casa.
• El deshumidificador ha alcanzado su nivel
preestablecido o el cubo est6 Ileno.
°El cubo de agua no est6 en la posici6n correcta.
• La 3 minutos de retraso seguridad del compresor
no ha expirado.
°No se permite ei tiempo suficiente para eliminar ia
humedad.
Aseggrese de que no haya cortinas, persianas o
muebles bloquean el frente o la parte
posterior qdu_ deshumidificador.
El valor de humedad establecido no es
suficientemente bajo.
Revise que todas las puertas, ventanas y otras
aberturas est_n cerradas completamente.
• La temperatura ambiente es demasiado baja, por
debajo de 41 °F (5 °C).
sHay un caientador de kerosene o aigo que genera
vapor de agua en la habitaci6n.
El filtro de aire est6 obstruido.
oLa unidad est6 indinada en lugar de vertical
como debe ser.
,La superficie de suelo no est6 nivelado.
Esto es normal. Eldeshumidificador tiene una
funci6n de descongelaci6n autom_tica.
_La conexi6n de manguera a conector o de
manguera puede ser suelta.
•La unidad est6 configurada de manera que el cubo
recoge ei agua, pero el tap6n de drenaje posterior
est6 retirado como configurar para ia drenaje
continua. Vueiva a coiocar ei tap6n de drenaje.
oRevise la manguera de desagLie, tubo y conector
interno de bloqueo.
ES,AS,P2 y EC apparecen en la
_antalla
La luz de funcionamiento de
PUMP parpadea, encendiendo
y apagando cada segundo.
Vade el cubo de agua
• Estos son c6digos de error y c6digo de protecci6n.
V_ase la secci6n de PANEL DE CONTROL.
Limpie el filtro de la bomba.
Compruebe que la manguera de la bomba no
est6 doblada o bloqueada.
Vacie el cubo de agua.
La bomba funciona durante 10 minutos y puede
disminuir el nivel de agua en el cubo en 1
pulgada. Esto es normal. Elnivel de agua en
el cubo estar6 entre Ilenado del 3/4 y Ilenado
durante el funcionamiento normal.
16
Page 33

• Felicitaciones por hacer una compra inteligente. Su nuevo producto Kenmore Elite ®
est6 dise_ado y fabricado para a_os de funcionamiento confiable° Pero como todos
los productos, puede requerir mantenimiento preventivo o reparaci6n de vez en cuando°
Eneste caso tener un acuerdo maestro de protecd6n puede ahorrarle din ero y molestia°
El Acuerdo Maestro de Protecd6n tambi_n ayuda a extender la vida de su nuevo
producto° Estoes Io que el acuerdo _induye:
DPiezas y mano de obra no s61opara reparar defectos, pero para ayudar a mantener
los productos funcionando correctamente en unuso normal Nuestra cobertura va mucho
m6s all6 de la garanfia del producto°Fallos no deducibles ni funcionales est6n exduidos
de la cobertura- protecci6n real.
[] Servido t6cnico con una fuerza de m6s de 10.000 t6cnicos de servicio autorizados por
Sears, Io que significa que alguien usted confianza va a trabajar en su producto.
[] Llamadas de servicio ilimitado y servicio en todo el pals, con la frecuencia que desee,
cuando usted nos quiere.
[]"No-lemon'garantiza - reemplazo de su producto cubierto si ocurren cuatro o m6s
fallas del producto dentro de los doce meses.
[] Reemplazo del producto si su producto cubierto no puede set reparado
[] Revisi6n anual de mantenimiento preventivo a susolicitud - sin costo adicional.
[] Ayuda r6pida por tel_fono - Io Ilamamos Resoluci6n R6pida - asistencia telef6nica a
todos los productos a trav_s de un representante de Sears. Piense en nosotros coma
un "manual parlante del usuario."
[] Protecci6n de sobrevoltaje contra da_os el_ctricos debido a fluctuaciones de energia.
[] Protecci6n de P_rdida de Alimentos $ 250 cada a_o para deterioro de cualquier
alimento que resulta de falla mec6nica de cualquiera de nuestros refrigeradores o
congeladores cubiertos.
[]Reembolso de la renta si la reparaci6n de su producto cubierto toma m6s tiempo
que Io prometido.
[]25% de descuento en el precio normal de cualquier servicio de reparaci6n no cubierto
y piezas instaladas relacionadas.
Una vez adquirido el acuerdo, una simple Ilamada telef6nica es todo Io que se necesita
para programar el servicio. Usted puede Ilamar a cualquier hora del dia o de la noche,
o programar una cita de servicio en Iinea.
El acuerdo maestro de protecci6n es una compra sin riesgo. Si usted cancela por cualquier
motivo durante eJ perlodo de garanfia deJ producto, Je daremos un reembolso completo.
O un reembolso proporcianal en cualquier momenta despu_s de que eJ periodo de
garanfia del producto caduca, iCompre su acuerdo maestro de protecci6n hay!
AIgunas limitaciones y exdusiones podrian aplicarse. Para precios e informaci6n adicional
en Jos EE.UU. Jlame al 1-800-827-6655.
oLa cobertura en Canada varia en algunos articulos. Para m6s informaci6n Ilame a Sears
Canada al 1-800-361-6665.
Servicio de instalaci6n de Sears
Para Ja instalaci6n profesional de eJectrodom_sticos, abridores de puertas de garaje,
calentadores de agua y otros arficulos domesticos principales de Sears, en los EE.UU.
o Canad6, Ilame al 1-800-4-MY-HOME
17
Page 34

Your Home
For troubleshooting, product manuals and expert advice:
www.managemylife.com
For repair - in your home - of all major brand appliances,
lawn and garden equipment, or heating and cooling systems,
no matter who made it, no matter who sold it !
For the replacement parts, accessories and
owner's manuals that you need to do-it-yourself.
For Sears professional installation of home appliances
and items like garage door openers and water heaters.
1-800-4-MY-HOME ® Call anytime, day or night
(1-800-469-4663) (U.S.A. and Canada)
................................................................................................................................www:sears:com ....................................................................................................www:searslca ......................................................................................................................
Our Home
For repair of carry-in items like vacuums, lawn equipment,
and electronics, call anytime forthe location of the nearest
Sears Parts & Repair Service Center
1-800-488-1222 (U.S.A.) 1-800-469-4663 (Canada)
www.sears.com www.sears.ca
TOpurchase aprotection agreement on a product serviced by Sears: ::::
1-800-827-6655 (U.S.A.) 1-800-361-6665 (Canada)
Pars pedirservido de reparaci6n Au Canada pour servce en frangas
a domicilio,y pars ordenar piezas: 1-800-LE-FOYERMc il
1-888-SU-HOGAR® (1-800-533-6937)
.... www.sears.com
® Registered Trademark / ' Trademark of KCD IP, LLC in the United States, or Sears Brands, LLC in other countries
® Marca Registrada / ' Marca de F_brica de KCD IP, LLC en Estados Unidos, o Sears Brands, LLC in otros paises
MC _,lD
' Marque de commerce / ' Marque d@osee de Sears Brands, LLC
(1-888-784-6427) www.sears.oa
TM
TM
 Loading...