

Page 1

Tumble Dryer
OWNER’S MANUAL
MD-C8800
Read all instructions and explanations before use.
Follow the instructions carefully.
Keep the operation instructions handy for later use.
if the appliance is sold or passed on then ensure
that the new owner always receives these operation
instructions.This manual is available on website:
www.midea.com.cn
CAUTION: HOT SURFACE !
CAUTION: RISK OF FIRE !
Page 2

CONTENTS
SAFETY INSTRUCTIONS
SAFETY INSTRUCTIONS
Safety Instructions ..................................................
INSTALLATION
Product Description ................................................
Installation ...........................................................
OPERATIONS
Quick Start .............................................................
Before Each Drying ..................................................
Control Panel .........................................................
Other Functions......................................................
Drying Programmes Table ........................................
MAINTENANCE
Cleaning And Care .................................................
Trouble Shooting ....................................................
Technical Specifications .........................................
10
12
14
17
19
20
22
Safety Instructions
2
!
Warning!
To prevent any damages to your and others' life or
property, you have to follow the safety notes.
7
7
• This product belongs to CategoryⅠelectrical appliances, and
only for drying textiles which have been washed with water in
the household. Please pay attention to the safety of power
use during the operation!
9
• The power source with reliable earthing must be used. Its
earth wire must be buried under the ground and shall not be
connected with the public utilities such as city water pipe or
gas pipe etc. The earth wire and null wire shall be
distinguished and shall not be connected together.
• The power wire shall be met IEC and must be able to
withstand the current above 16A. To ensure your and your
family's safety, please make improvement immediately if any
power use at your home does not meet the above-mentioned
requirements.
• Do not put more load than recommended. Obey the maximum
load volume. See the related chapter in the user manual.
• That the tumble dryer is not to be used if industrial chemicals
have been used for cleaning.
• Do not dry unwashed items in the tumble dryer.
• Items that have been soiled with substances such as cooking
oil, acetone, alcohol, petrol, kerosene, spot removers,
turpentine, waxes and wax removers should be washed in hot
water with an extra amount of detergent before being dried in
the tumble dryer.
1 2
Page 3

SAFETY INSTRUCTIONSSAFETY INSTRUCTIONS
• Items such as foam rubber (latex foam), shower caps,
waterproof textiles, rubber backed articles and clothes or
pillows fitted with foam rubber pads should not be dried
in the tumble dryer.
• Fabric softeners, or similar products, should be used as
specified by the fabric softener instructions.
• The final part of a tumble dryer cycle occurs without heat
(cool down cycle) to ensure that the items are left at a
temperature that ensures that the items
will not be damaged.
• The lint trap has to be cleaned frequently.
• The lint must not to be allowed to accumulate around
the tumble dryer.
• Adequate ventilation has to be provided to avoid the
back flow of gases into the room from appliance burning
other fuels, including open fires.
• The exhaust air must not be discharged into a flue which
is used for exhausting fumes from appliance burning gas
or other fuels.
• The appliance must not be install behind a lockable door,
a sliding door or a door with a hinge on the opposite side
to that of the tumble dryer. In such a way that a full
opening of the tumble dryer door is restricted.
• Oil-affected items can ignite spontaneously, especially
when exposed to heat sources such as in a tumble dryer.
The items become warm, causing an oxidation reaction in
the oil. Oxidation creates heat. If the heat cannot escape,
the items can become hot enough to catch fire. Piling,
stacking or storing oil-affected items can prevent heat
3 4
from escaping and so create a fire hazard.
• If it is unavoidable that fabrics that contain vegetable
or cooking oil or have been contaminated by hair care
products be placed in a tumble dryer they should first be
washed in
hot water with extra detergent-this will reduce, but not
eliminate, the hazard.
• The appliance should not be overturned during normal use
or maintenance.
• Remove all objects from pockets such as lighters and
matches.
• This appliance can be used by children aged from 8 years
and above and persons with reduced physical, sensory or
mental capabilities or lack of experience and knowledge
if they have been given supervision or instruction
concerning use of the appliance in a safe way and
understand the hazards involved. Children shall not play
with the appliance. Cleaning and user maintenance shall
not be made by children without supervision.(This warning
is only for EUROPEAN market)
• If the power cable is damaged, it must be replaced by the
manufacturer, its service agent or similarly qualified
persons in order to avoid a hazard.
• This appliance is for indoor use only.
• The openings must not be obstructed by a carpet.
• Children of less than 3 years should be kept away unless
continuously supervised.
• If the appliance appear high temperature abnormally ,
please draw the mail plug immediately.
Page 4

SAFETY INSTRUCTIONSSAFETY INSTRUCTIONS
SAFETY INSTRUCTIONSSAFETY INSTRUCTIONS
• The appliance is not intended for use by persons
(including children) with reduced physical, sensory or
mental capabilities, or lack of experience and knowledge,
unless they have been given supervision or instruction
concerning use of the appliance by a person responsible
for their safety. Children should be supervised to ensure
that they do not play with the appliance.(This warning
is not for EUROPEAN market)
!
Warning!
Never stop a tumble dryer before the end of the drying
cycle otherwise too much heat will diffuse and may
cause harm.
Correct Disposal of this product:
This marking indicates that this product should not
be disposed with other household wastes throughout
the EU. To prevent possible harm to the environment
or human health from uncontrolled waste disposal,
recycle it responsibly to promote the sustainable
reuse of material resources. To return your used
device, please use the return and collection systems
or contact the retailer where the product was
purchased. They can take this product for
environmental safe recycling.
Electric shock hazard
• Do not draw the power cord forcefully to pull out the mains
plug.
• Please do not plug/draw the mains plug with wet hands.
• Do not damage the power cord and the power plug.
Injury danger
• Do not disassemble and install the dryer under no instruction
or supervision.
• Do not stack this dryer on washing machine without stacking
kits.(if want stacking on washing machine, please purchase
the independent parts and it must be installed by the
manufacturer, its service agent or similarly qualified persons
in order to avoid a hazard.)
• Do not lean on the opened door of the dryer.
• Do not put any pyrotoxin on the dryer, such as the candle,
electric cooker.
Damage danger
• Do not dry over the rated capacity.
• Do not operate the dryer without the filter door and filter base.
• Do not dry the clothes before being spun.
• Do not expose the dryer directly under the sun, and indoor
use only.
• Do not install the dryer in humid and drenching environment.
• While cleaning and maintenance, please do remember to
pull out the power plug and do not directly wash the dryer
with water.
Explosion danger
Please do not dry the clothes with some flammable substances
such as coal oil, alcohol or there will be explosion.
3 4
5 6
Page 5

INSTALLATION
INSTALLATION
Product Description
Top board
Control Panel
Container
Power Cord
Drum
Lint filter
Air inlet
Handle
Maintenance cover
Accessories
The following parts are optional for specific models.
If your dryer has following parts, please wear gloves and them
following the instruction below .
Hose holder(optional)
Condensing drain
hose(optional)
install
Installation
Door
Transport
Move cautiously. Do not grasp any salient parts of machine. The machine
door can not be used as the handle for delivery.
Installation Position
1.It is recommended that, for your convenience, the machine is positioned close
to
your washing machine.
2.The tumble dryer must be installed in a clean place, where dirt does not build up.
Air must be able to circulate freely all round the appliance. Do not obstruct the
front air inlet or the air intake grilles at the back of the machine.
3.To keep vibration and noise to a minimum when the dryer is in use, it should be
placed on a firm and level surface.
4.The feet must never be removed. Do not restrict the floor clearance through
deep pile carpets, strips of wood or similar. This might cause heat built-up which
would interfere with the operation of the appliance.
Level Adjusting
Once in its permanent operating position,
check that the dryer is absolutely level with the aid
of a spirit level. If it is not, adjust the feet with a tool.
Use pliers to remove
the drain hose from
the hose connector.
Insert the
external
drainage
hose.
Power Supply Connection
1.Make sure that the voltage of the power supply is the same as the electric specification
0cm
20
Max .120 cm
Put the hose holder on the washing
basin or any other sink.
7 8
of the dryer.
2.Do not connect the dryer with the power connection board, the universal plug or socket.
Page 6

OPERATIONS
OPERATIONS
Quick Start
Note!
Before using, please make sure it's installed properly.
plug in
1
load
2
Drying
on
select program
select function
or default
After Drying
Buzzer beep or " :00"on display.0
1 2 3 4 5
close door
start
Before Each Drying
Attention!
Before the first cycle, the dust and grease may remain in this dryer during the
period of manufacture and transportation, to avoid contaminating your clothes,
please follow these steps:
3
• Put some clean rags into the drum.
• Plug the power.
• Select the “Quick” Programme, press “Start/Pause” button.
• After finishing this programme, please follow the “Cleaning And Care” to clean
the lint filter and air condenser on page 19.
1.Before drying, thoroughly spin the laundry in washing machine. High spin speed can
reduce
the drying time and save energy consumption.
2.For uniform drying result, sort the laundry according to fabric type and drying programme.
3.Before drying, please close zips, hooks and eyelets, button up, tie fabric belts, etc.
4.Do not over dry the clothes, because over dried clothes can easily get creases.
5.Do not dry the articles containing rubber or similar elastic materials.
6.The door can be opened only after the programme of the drying machine finishes to
from being scalded by hot steam or over heated drying machine.
prevent human skin
7.Clean the lint filter and empty container after each use to avoid extension of drying time
and energy consumption.
8.Do not dry these clothes after dry-clean process.
The reference weight of dry clothes (each)
open the door and
take out laundry
pull out the
container
pour out
condensate water
clean the filter power off
Note!
• If use the socket with a switch, please press the switch to turn off the power
directly.
9
Mixed-fabric clothes
(about 800g)
Single bedsheet
(about 600g cotton)
Short sleeve shirt
(about 180g cotton)
Jacket
(about 800g cotton)
Work clothes
(about 1120g)
Short pants
(about 70g cotton)
Jeans
(about 800g)
Sleepwear
(about 200g)
Socks
(about 50g
mixed-weave)
Towel quilt
(about 900g cotton)
Long sleeve shirt
(about 300g cotton)
Note!
•
Never overload.
• Not for textile with dropping water. The dryer could be damaged, even fire.
• Not suitable for silk or woolen textiles.
10
Page 7

OPERATIONS OPERATIONS
Please pay attention to use the drying machine if the materials of your clothes can not be
dried by it or contain the symbols as follows:
Dry
Line dry / hang to dry
Dry clean
Normal
Drip dry
Do not dry clean
Not tumble dry normal
Dry flat
Dry clean normal cycle
with any solvent
Do not dry
In the shade
Dry clean normal cycle
petroleum solvent only
Control Panel
5
4
3
2
1
5
4
11 12
3
2
1
Page 8

OPERATIONS OPERATIONS
1
On/Off
1
Product is switched on or off.
2
Start/Pause
1
the button to start or pause the
Press
drying cycle.
3
Specialty function
These buttons are used for setting
additional functions.
Fliter
Please clean the filter when the“ ” is lighting, after the dryer stops.
Tank
Please empty the container when the“ ” is lighting, after the dryer stops.
Delay start
Time
Child lock
Remaining Time indicator/Error message
Cycle phase status
Clean filters (warning)
Empty water container (warning)
Dryness level (four grades)
Speed dry indicator
Signal indicator
Anti-crease mode
My cycle
4
Display
This display shows the setting, estimated
remaining time and status messages of
your dryer.
5
Programmes
Different Dryer cycle can be selected
according to the user's needs to make the
clothes have more effective drying results.
Programme selector
1.Press the【On/Off 】 button ,when the LED display screen brightens up, rotate
the programme knob to select the desired programme.
2.Select the【Delay】,【Time】,【Intensity】,【Speed Dry】,【Signal】or
【Anti-Crease】 functions for additional option.
3.Press the【Start/Pause】button.
Programme start
The drum will keep rotating after the programme starts, the state light in the
display area will flash in sequence, the remaining time displayed will change
automatically.
Programme end
1.The drum will stop running after the programme ends,
the
the display will show " ", last cycle phase status light will flash. The
dryer will start Anti-crease if user doesn’t remove the load in
1 minute (refer to page 15). Please press key to cut off power and
pull the plug out.
2.Deal with the problem accroding to “Malfunction display and solutions , if
there is a unexpected stop during the drying procedure and the dryer show
information(refer to page 20 ).
【 】function
【On/Off】
the buzzer will beep,
”
Other Functions
• Instructions of the 【Delay】 function
This function is used for delaying clothes drying time within 24 hours.
means the programme
time starts to decrease on the
Steps in details
1. Load your laundry and make sure the machine door is closed.
2. Press the 【On/Off】button,then to turn the programme selector knob and select a
desired programme.
3. You can select the 【Anti-Crease】 or 【Signal】functions according to your need.
4. To press the 【Delay】 key.
5. Continue to press the 【Delay】to select the delay time.
6. After the 【Start/Pause】 button is pushed, the dryer is at the run condition. The
drying procedure will be automatically performed when the delay time is over.
7. If you push the【Start/Pause】button again, the delay function will be paused.
8. If you want to cancel the “Delay” function, please press the 【On/Off】button.
will start after x hours. When the delay programme starts, the
display and the delay icon blinks.
The delay time
13 14
Page 9

OPERATIONS OPERATIONS
• Instructions of the 【Time】function
When the warm or cool or refresh programme is selected, the 【Time】button can be
used to adjust the drying time in 10 min. steps.
• Instructions of the 【Intensity】function
Used to adjust the dryness level of the laundry. The level has four grades .
The drying time increases 3 minutes in every grade.
1. The intensity function can be activated only before the programme start.
2. Press the 【Intensity】button repeatedly to select the drying time.
3. Except the 【Cotton Iron】【Qucik】【Synthetic Iron】【Baby Care】【Warm】
【Cool】【Refresh】,all the other programmes can be the【Intensity】function.
• Instructions of the 【Speed dry】
Use to curtail shorten the drying time, the 【Cotton Extra】【Cotton Standard】
【Mix】【Jean】programme can be set the function.
Use to curtail shorten the drying time, the 【Cotton Extra】【Cotton Standard】
【Bed linen】【Jean】programme can be set the function.
• Instructions of the【Signal】function
Set up the buzzer on or off. In the general condition, the buzzer is on. Please press it if
needed. When the buzzer on:
1. The dryer will give the leading sound if press the extra function buttons.
2. If the dryer is running, rotate the function choosing knob, the dryer will remind the
operator it is an invalid choose.
3. When the drying programme is end, the buzzer will also remind the user
• Instructions of the【Anti-Crease】function
At the end of the drying cycle,the anti-crease operation time is 30 minutes (default ) or 120
minutes (selected).
The 【Anti-Crease】 light shall illuminate when the anti-crease function is selected. This
function prevents the laundry from creases. The laundry can be removed during the
anti-crease phase. Except【Cool】,【Refresh】and 【Baby Care】, all the other programmes
have this function.
• Instructions of the【My Cycle】function
Used to define and save your favorite proragmmes that are used frequently.
1. Use the programme selector to select the required programme and other drying functions.
2. Press and hold the 【Intensity】,
【Speed dry】 button for 3 seconds until the beep and the
required programme has been saved.
3. Turn the programme selector to the 【My Cycle】position, you can start your favorite
proragmmes. If you want to change the 【My Cycle】settings, repeat the steps 1 and 2.
• Instructions of the 【Child Lock】 feature
1.This machine incorporates a special child safety lock, which can prevent children from
carelessly pressing keys or making the faulty operation.
2.When the dryer is at the operation state except standby state, press the【Anti-Crease】
and 【Signal】buttons at the same time for over 3 seconds to start child lock function.
When child lock function is set, the display will show child lock icon and no key can
effect to the dryer except【On/Off】button.
Under the start state of the child lock, the【Anti-Crease】and 【Signal】buttons shall
be pressed at the same time for over 3 seconds to release the child lock function.
15 16
Page 10
OPERATIONS
OPERATIONS
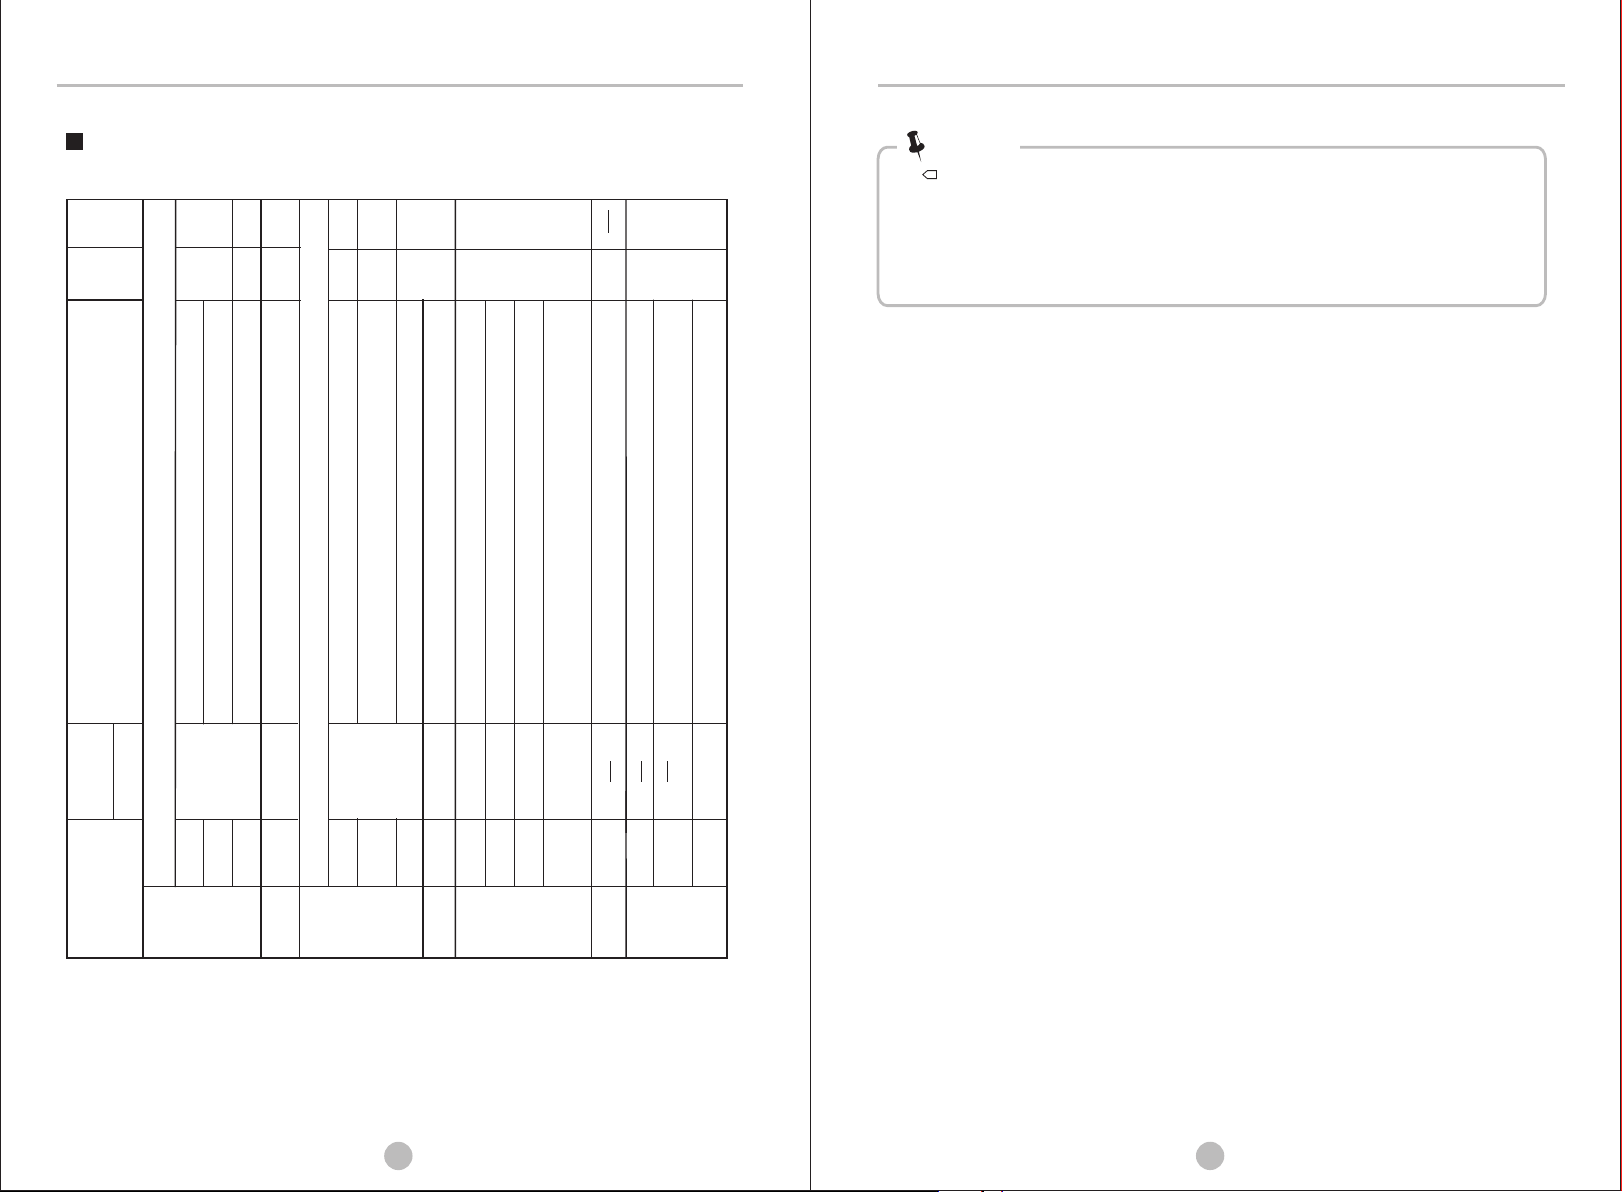
Drying Programmes Table
N
Time
Y N
Delay
Application/Properties
To dry cott on piec es of clo thing. Dry ing lev el: extr a dry.
N
Y
Y
To dry cott on piec es of clo thing. Dry ing lev el: appl icable to iron.
To dry cott on piec es of clo thing. Dry ing lev el: cupb oard dr y.
For wa shing w hich is t o be drie d quick ly,e g,mad e of acry lic fib res or
for individual small items. Als o for sub seque nt dryi ng.
Y N
To dry thin s ynthe tic fab rics wh ich are not ironed, such as ea sy care s hirts,
To dry thick or multi-layered synthetic fabrics. Drying level: extra dry.
To dry thin s ynthe tic fab rics which a re also t o be iron ed, such a s knitw ear, shirts.
table linen, ba by clot hes, socks.
Note!
• This sym bol mea ns the en ergy ef ficie ncy tes t progr amme “st andard cotton programme”, whi ch is
acc ordance with the applicable EN 61121 standar d and mos t suita ble to dr y norma l cotto n load at r ated
loa d capac ity.
• Thick or multi-l ayere d fabri cs,e.g. bedl inen, jeans, jackets etc , are not ea sy to dry.
You'd bett er choo se Cott on Extr a progr amme.
Y N
To dry the cl othes o f the bab y at lower tem perat ure.
Y N
To dry jean s or leis ure clo thes that ar e spun at h igh spe eds in th e was hing ma chine.
If yo u can not determine what the clothing's materi al is, please choose Mix.
To dry spor tswea r, thin fabr ics, polyes ter,whi ch are no t ironed.
Y
Define and save your favorite programme.
For easy c are clo thes su ch shir ts and bl ouses w ith ant i-cre ase mec hanis m
for minimum ironing effort . Place cl othes l oosel y in the dr yer. Once drie d,
hang it on a clothes hange
To warm clothes from minimum 10 min. to maximum 120 min.(in 10 min. steps).
To cool clothes without blowing hot air from minimum 10 min. to maximum
Y Y
time from minimum 20 min. to maximum 150 min.(in 10 min. steps).
To refresh the clothes that have been kept at closed environments for a long
30 min.(in 10 min. steps).
• As the u neven m ateri al, thick an d multi -laye red clo thes ar e not eas y to dry, it is bett er to cho ose the
app ropri ate time drying programme to dry them if some parts of the clothes still da mp afte r progr amme
fin ished.
8.0kg
(max)
Weight
Programme
8.0kg
3.0kg
Standard
Extra
For cottons and coloureds made of cotton or linen.
Iron
Cotton
Quick
For non-iron washing made of synthetic and blended fabrics,cotton.
Quick
3.5kg
Standard
Extra
Synthetics
17 18
1.0kg
Iron
Baby Care
Baby Care
5.0kg
Jean
3.5kg
Mix
3.0kg
Sports
Special
1.0kg
Shirts
Warm
My Cycle
My Cycle
Cool
Time
1.0kg
Refresh
Page 11

MAINTENANCE
MAINTENANCE
Cleaning And Care
Clean the lint filter
Leave the dryer to cool down.
1.Open the machine door.
2.Take out the lint filter, pull
upward to take it out.
3.Clean the lint filter; wipe off
the scrap threads accumulated
on the lint filter, with your hand or
rinse with water and dry thoroughly.
4.Reinstall the lint filter.
Note!
• The lint filter accumulated on the filter will block the air circulation, which will
cause the extension of drying time and energy use; therefore, the scrap thread
filter shall be cleaned after each use.
• Do disconnect the power cord before cleaning!
• Do not operate the dryer without the lint filter!
• Clean the lint filter after each use to prevent lint accumulation inside the dryer.
Wash air condenser
Leave the dryer to cool down.
Residual water may escape, place an absorbent
cloth under the maintenance cover.
1. Unlock the maintenance cover.
2. Completely open maintenace cover.
3. Screw both locking levers towards each other.
4. Pool out the air condenser.
5. Clean the air condenser completely, drain thoroughly.
6. Clean the seals.
7. Re-insert the air condenser, handle at the button!
8. Unscrew both locking levers.
9. Cloth the maintenance cover until it locks into position.
Please clean the air condenser approx, once every 3
months if frequently used.
Do not damage the air condenser!
!
Warning!
• Clean with water only; do not use hard/sharp-edged objects!
Do not operate the dryer without the air condenser!
• During drying, water may collect between the window and the
seal, but this does not affect the function of your dryer!
19 20
Empty the water container
1.Hold and pull out the water container with two hands.
2.Tilt the water container, pour out the condensate water.
3.Insert the water container.
!
Warning!
• Empty the water container after each use, the programme will be paused and
the “ ” icon will light if the water container is full during the drying process.
After the container is emptyed, the dryer can be restarted by pressing
【Start/Pause】 button.
• Do not drink the condensate water.
• Do not use the dryer without the water container.
Trouble Shooting
Alarm Problem Alarm Reason Release
“ ”E30
“ ”E32
“ ”E33
Heating problem
Humidity sensor error
Temprature sensor error
P lease contact your local service
center
if the problem persists.
Page 12
MAINTENANCE
MAINTENANCE
!
Warning!
• Only authorised technicans can carry out repairs.
• Before you call service,
fault yourself or if you have followed the user instructions.
• A technician will charge you for advice, even during the warranty period.
Problem
•Display does not on
• “ ”is lighting
•“ ”is inglight
•Dryer does not start
•Degree of dryness was
reached or drying time too
long
please check if you have dealt with the
Solution
• Check if the power supply works.
• Check if the mains plug is inserted.
• Check the selected programme .
• Press the 【On/Off】button.
• Empty water container.
• If the light is still on, please call the service.
• Clean heat exchanger.
• Clear lint filter.
Check the
• the door has closed.
• Check the programme has set.
• Check the start button has selected.
• Clean lint filter and .
• Empty container.
not
• Check drain hose.
• Dryer installation place is too restricted.
• Clean the moisture sensors.
• Keep the Air inlet clean.
• Use higher drying intensity level programme or
time programme.
heat exchanger
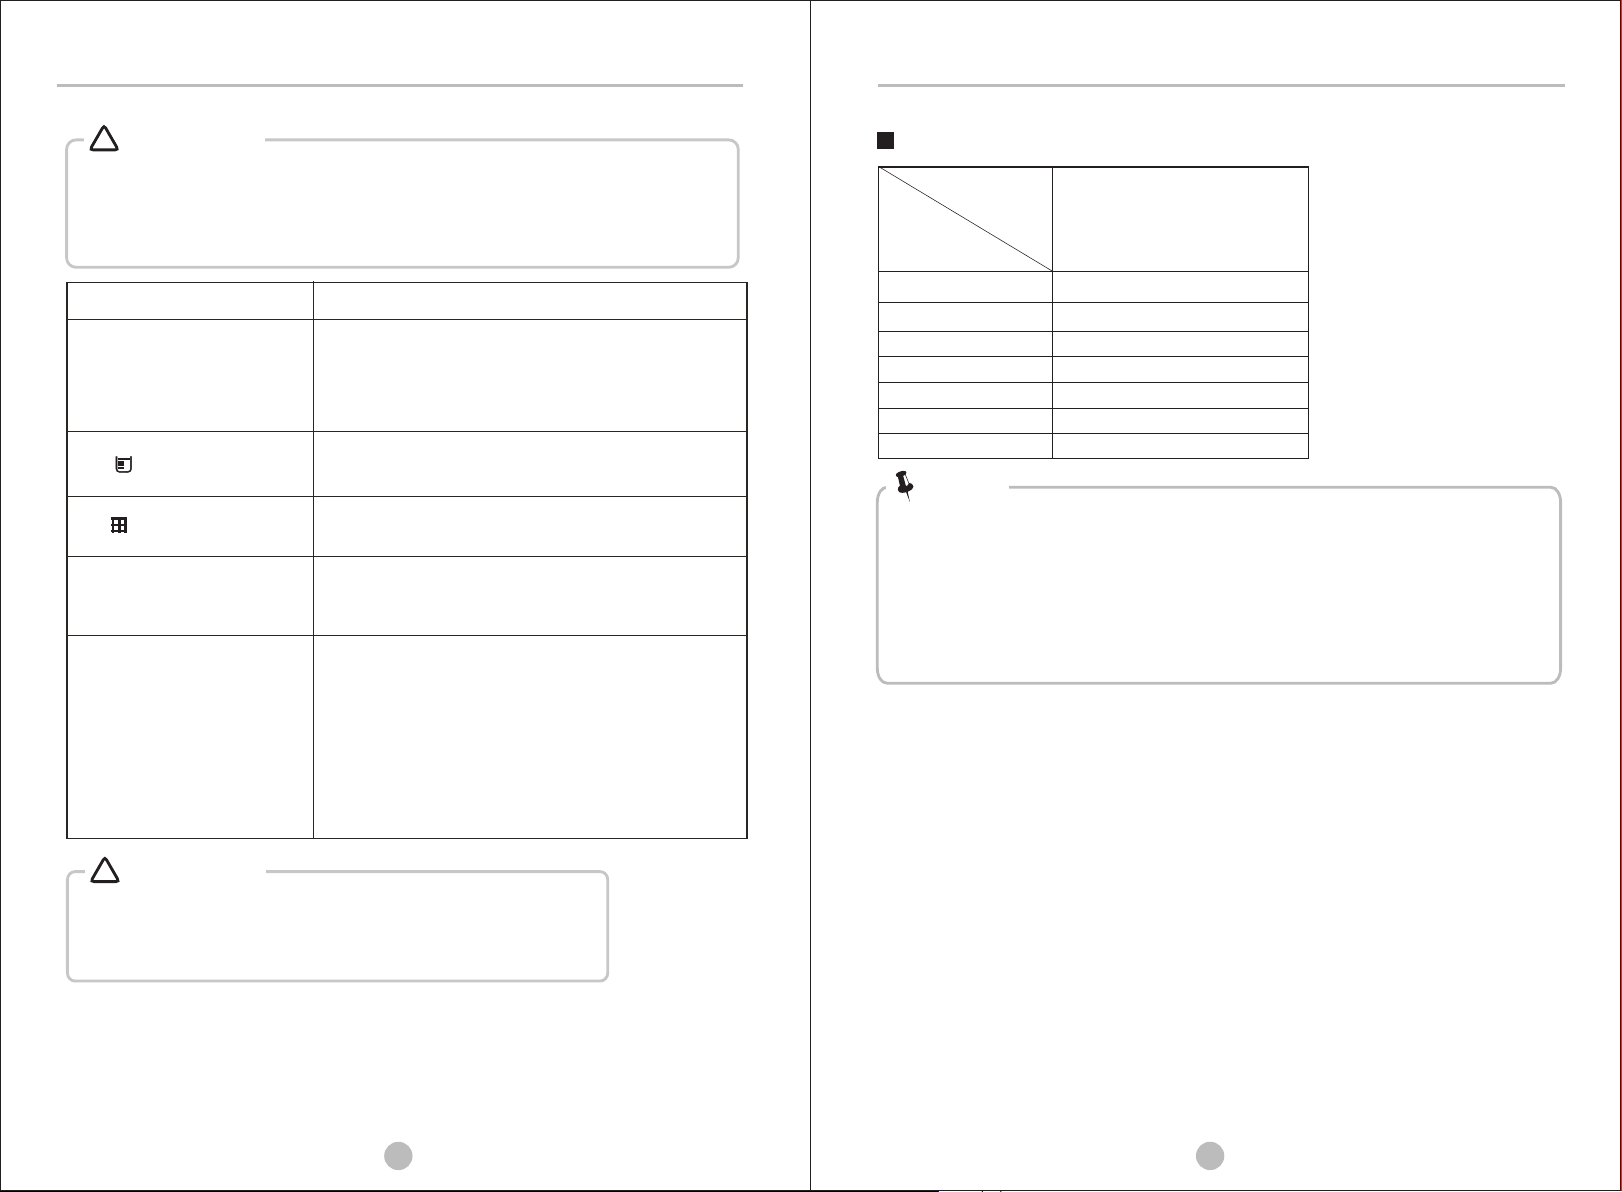
Technical Specifications
Model
Parameter
Dimension(L*W*H)
Ambient temperature
Rated input power
Rated voltage
Rated frequency
Weight of product
Rated capacity
MD-C8800
615*595*845(mm)
+ 5° c ~ +35°c
2700W
220-240V~
50Hz
41kg
8.0kg
Note!
• The rated capacity is the maximum capacity, make sure that the dry clothes which are
loaded to the appliance do not exceed the rated capacity each time.
• Do not install the tumble dryer in a room when there is a risk of frost occurring. At
temperatures around freezing point the tumble dryer may not be able to operate
properly.
• There is a risk of damage if the condensate water is allowed to freeze in the pump,
hoses and / or condensate water container.
!
Warning!
If you cannot deal with the fault by yourself and need help:
• Press the 【On/Off】button.
• Pull out the mains plug and call the service.
21 22
 Loading...