

Page 1

Vacuum Cleaner
MCS2025GB
PLEASE READ THE
MANUAL CAREFULLY
BEFORE USING AND
KEEP IT PROPERLY
FOR FUTURE USE
INSTRUCTION MANUAL
Warning notices: Before
using this product, please
read this manual carefullly
and keep it for future
reference.
The design and
specifications are subject to
change without prior notice
for product improvement.
Consult with your dealer or
manufacturer for details.
EN, IT, DE, ES, FR, HR
Page 2

2
ENGLISH............................................................
3-14
ITALIANO........................................................
DEUTSCH.......................................................
ESPAÑOL.......................................................
FRANÇAIS.....................................................
Hrvatskijezik.................................................
15-27
28-42
43-56
57-69
70-82
Page 3

Important Safety Instructions
3
• Read this manual thoroughly
before first use, even if you
are familiar with this type of
prod¬uct.
• The safety precautions
enclosed reduce the risk of fire,
electric shock and injury when
correctly adhered to.
• Keep the manual in a safe
place for future reference,
along with the completed
warranty card, purchase
receipt and carton.
• Always follow basic safety
precautions and accident
prevention measures when
using an electrical appliance,
including the following:
• Before turning on, ensure the
electrical voltage and frequency of the charging adaptor
corresponds to those indicated
on the rating label.
• Do not leave the vacuum
cleaner when plugged in.
• Use only as described
in this manual, use only
manufacturers recommended
attachments.
• Do not operate any appliance
with a damaged charging
adaptor or after the appliance
malfunctions, or has been
damaged in any manner.
• Keep the charging adaptor
and cords away from heated
surfaces.
• Do not unplug by pulling on
cord. To unplug, grasp the
charging adaptor, not the
cord.
• To reduce the risk of electrocution never operate the product
with wet hands, submerge in
water or spill liquids into the
product.
• Do not use with any opening
blocked; keep free of dust, lint,
hair, and anything that may
reduce airflow.
• Unplug from outlet when not
in use and before cleaning or
servicing.
• Do not use outdoors or on wet
surfaces.
• Young children should be
supervised to ensure they do
not play with the appliance.
• Do not insert any objects into
the appliance.
• Turn off all controls before
unplugging.
• Do not use to vacuum flammable or combustible liquids, such
as gasoline, matches, or use
in areas where they may be
present.
• Do not vacuum anything that
is burning or smoking, such as
cigarettes, matches, or hot
ashes.
Page 4

• Do not use without the filter in
4
place.
• This appliance is intended for
normal household use only.
• If the charging adaptor is
damaged, it must be replaced
by the same type.
• This appliance is not intended
for use by persons (including
children) with reduced physical,
sensory or mental capabilities,
or lack of experience and
knowledge, unless they have
been given supervision or
instruction concerning use of
the appliance by a person
responsible for their safety.
• Children should be supervised
to ensure that they do not play
with the appliance.
• When charging the appliance,
the power switch must be off.
• This Appliance should not be
used by children or people who
are physically challenged.
• This appliance is not a toy,
and if not used in the correct
manner, can lead to unnecessary damage or failure to
perform.
Caution
• Do not use your appliance out
doors or on any wet surface or
for wet pick up. Never use the
product to suck up water.
• Do not pick up hard or sharp
objects, matches, hot ashes,
cigarette ends or other similar
items.
• Do not spray with or pick up
flammable liquids, cleaning
fluids, aerosols or their vapours.
• Do not run over the power
charging cord when using your
appliance or remove the plug
by pulling on the power cord.
• Do not continue to use your
appliance or charger if it
appears faulty.
• Do not replace the batteries
with non-rechargeable
batteries.
• The battery must be removed
from the appliance before it is
scrapped
• The appliance must be
disconnected from the supply
mains when removing the
battery
• The battery is to be disposed of
safely
• Do not recharge nonrechargeable batteries, the
battery is not replaceable
Motor Power: 350W
Adaptor Model:MC2805B-V
Input: 100-240V~50-60Hz 0.5A
Output:
25.0V 0.5A 12.5W
29.0V 0.5A 14.5W
Battery Type:
25.2V, 2000mAh, Li-ion
Charging Time: 3-5 hours
Dust Bin Volume: 0.45L
Running Time:
Max Power Mode: ≥12mins
Mid Power Mode: ≥30mins
Min Power Mode: ≥60mins
Page 5

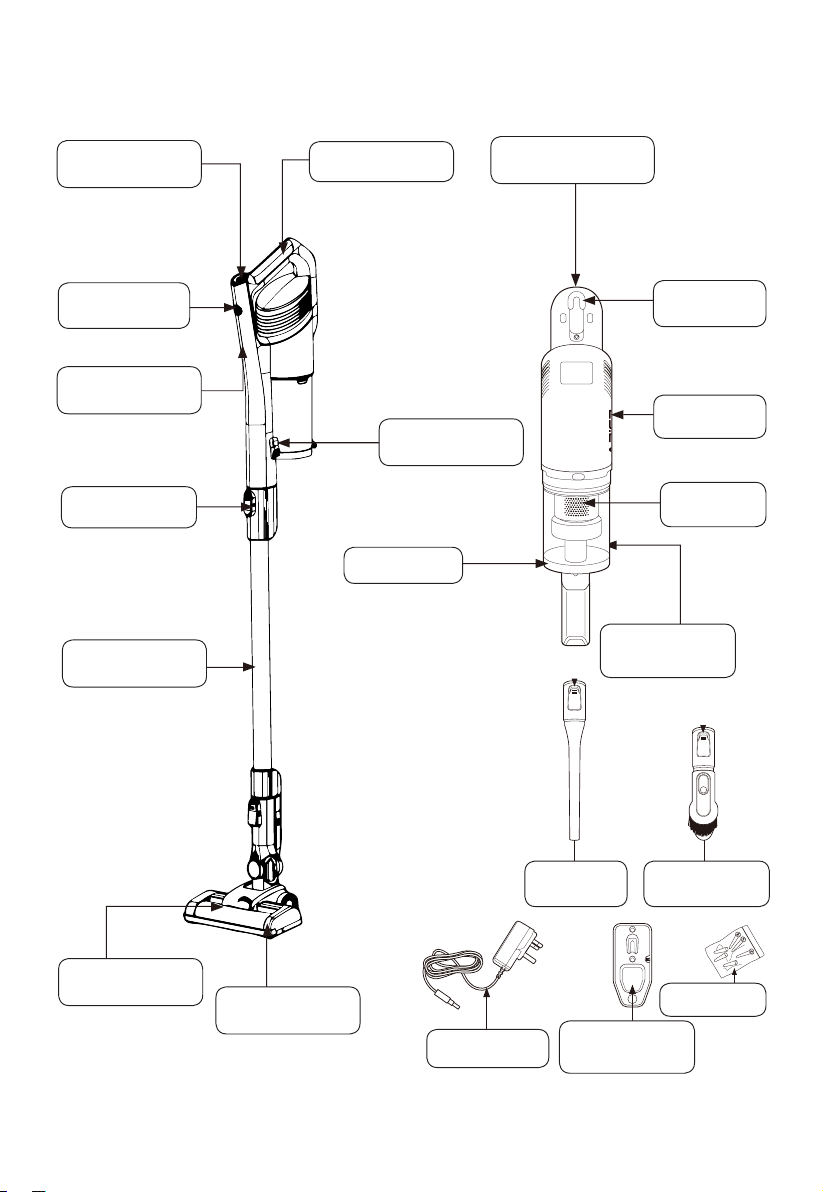
Names of Main Parts
5
Power on/off
button
Mode button
Charge
indicator lights
Release clip
Extension pole
Carry handle
Dust release
Dust cup
Charger
connection point
Mount hook
Main body
latch
Filter
assembly
Dust cup
release button
Brush
multi-tool
Wall mount
bracket fixings
Lights
Floor head
Charger
Crevice
tool
Wall mount
bracket
Page 6

Operation instructions
6
How to use your vacuum cleaner
Ensure the vacuum cleaner is fully charged and assembled before using.
Always take care when vacuuming stairs.
1.
There are two power settings on the stick vac: max mode (this has a
higher suction power but a shorter running time, approx 15 mins) and
eco mode (lower suction power with a
longer running time, approx 45 mins).
The stick vac will always start in max
mode. The run time may vary depending
on the surface being cleaned.
2.
For the 'max' mode simply press the
power button (1), while for 'eco' mode
press the power button (1) followed by
the mode button (2). The max operation
light will illuminate when in 'max' mode
and go out when switched to 'eco'
mode.
When required, press the power button
again to turn off the stick vac.
3.
Move the floor head back and forth over the surface. Use even
strokes. Don't press hard; allow the stick vac to suck away the debris.
There are lights on the floor head which will illuminate automatically
when the stick vac is in operation to help with visibility in dark corners/
areas.
2
4.
The stick vac has charge indicator lights, these are the two small lights
on the handle.
Whilst charging - the lower light will flash and the top light is off
Half charged - the lower light is on and the top light will flash
Fully charged - both lights are on, will turn off after 10mins
When in use and the battery is almost gone, the bottom light will be
off and the top light will flash. After approximately 10 seconds the
stick vac will automatically switch off.
5.
It is advisable to empty the dust cup after each use. For best
performance, check the filters are clean (see the 'Removing and
cleaning the dust cup and filters' section of this manual).
Page 7

Operation instructions
7
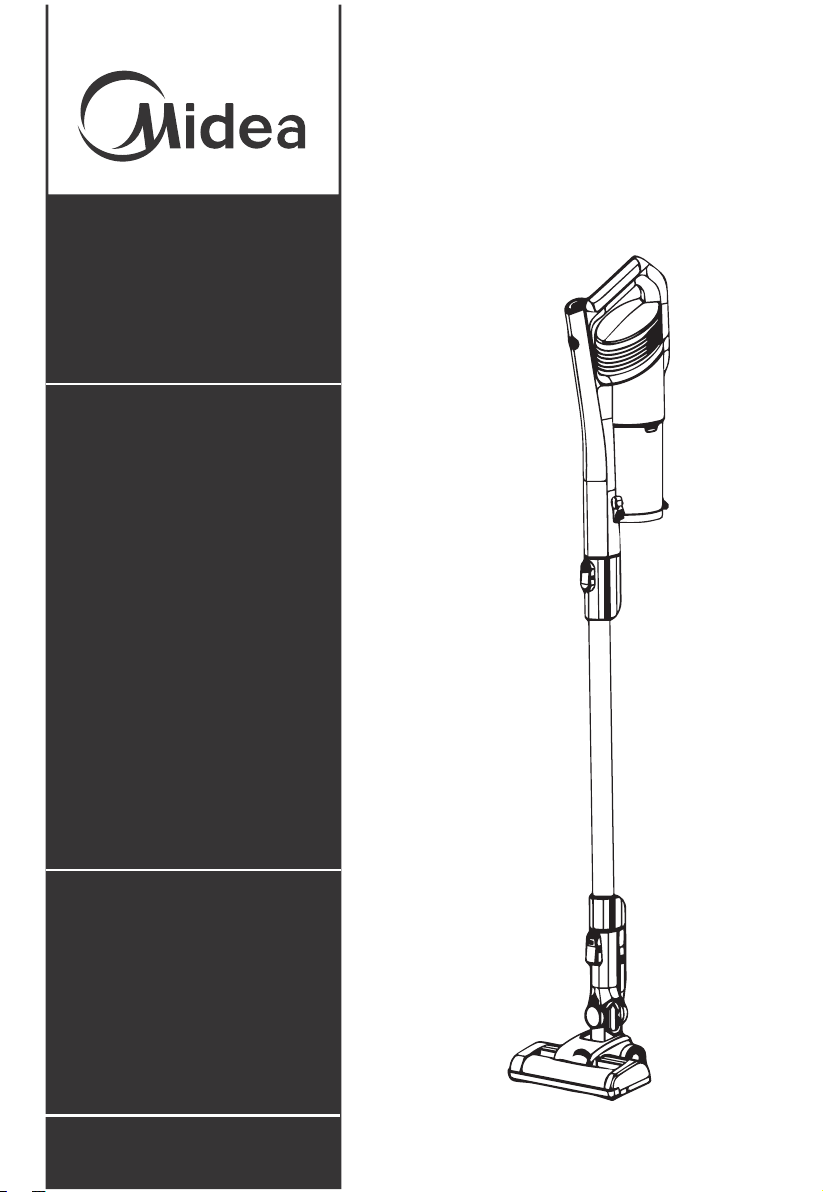
Charging vacuum cleaner
Before use we recommend that
the stick vac is charged fully for
between 3 and 4 hours. When
first purchased there will be some
charge so it may not take the full
amount of time to fully charge.
1.
Plug the end of the charger
into the charger connection
point located on the top of
the stick vac main body. It is
recommended that the stick
vac is charged without any
attachments connected and
the appliance is laid on a flat
surface.
2.
Plug the charger into the
mains.
3.
The lower charge indicator
light will flash on and off
to show the appliance is
charging. Leave to charge.
4.
Once fully charged, the
charge indicator light will stop
flashing and both lights will be
lit.
5.
Turn off from the mains power
and remove the charger.
Note: Do not leave the stick
Max operation
light
vac unattended or leave
overnight when charging. The
appliance will not work whilst
Top light
charging.
lower light
Page 8

Maintenance guide
8
Emptying the dust cup
Ensure the stick vac is switched off and
any attachments are removed before
emptying the dust cup.
1.
Hold the cup assembly over a
household bin and push the dust
release latch on the side of the dust
cup. The debris will fall out into the
bin. Please note: Do not allow the
dust cup to overfill. Don't exceed the
MAX level marker. Empty regularly.
Every time you empty the dust cup,
check the filter assembly and tap
gently over the household bin to
remove any excess dust.
2.
Once empty close the lid until it clicks
shut.
Removing and cleaning the dust cup
and filters
Before starting any cleaning, ensure the
stick vac is not charging and is switched
off. It is easier to remove the dust cup
without any attachments on the stick
vac.
1.
Empty the dust cup as shown in the
'Emptying the dust cup' section of this
manual.
2.
Press the dust cup release button
located on the side of the main body
near the bottom of the dust cup (1).
Then pull the dust cup away from the
main body, keeping the cup fairly
upright (2).
1
2
Page 9

Maintenance guide
9
3.
The dust cup houses the circular sponge
filter and filter assembly. Firstly remove
the circular sponge filter by pinching the
ribbon material at the top of the filter and
pulling upwards, then set aside.
4.
Pinch either side of the filter assembly
and pull upwards away from the dust
cup. Tap the filter assembly gently over
the household bin to remove any large
amounts of dust.
Note: Do not allow the dust cup to overfill.
Don't exceed the MAX level marker.
Empty regularly.
5.
Remove any more excess dust from the
filter assembly using a soft brush or a clean
paint brush. The filter can be broken down
into three parts. Hold the top section and
twist the lower section in the direction of
the arrow and the unlock padlock icon.
6.
Rinse the dust cup, filter assembly parts
and circular sponge filter under warm
water until the water runs clear and leave
to dry for 24 hours.
Page 10

Maintenance guide
10
7.
Once all the parts are thoroughly dry,
reassemble the filter assembly parts
following the arrow and the icon for
the locked padlock and place it back
into the dust cup. Don't forget to put
the circular sponge filter back in the
top of the filter assembly.
8.
Replace the dust cup to the main
body by hooking the channel on the
top of the dust cup with the lug on
the main body (1). Push the dust cup
back towards the main body until you
hear it click into place (2).
Note: It is important to regularly
maintain and clean the filters. A
clogged filter reduces suction power
and can shorten the life of your stick
vac.
1
Below is a recommended guide for how often you should clean the
filters:
Filter type Recommended cleaning times
• Shake out debris when you empty the dust cup.
Filter
assembly
Circular
sponge filter
Use the soft dusting brush to gently remove any
dust build-up.
• Rinse under warm water once a month or more
often if required.
• ccasionally remove any dust/debris as necessary.
The filter can also be rinsed under warm water
once a month.
2
Page 11

Maintenance guide
11
Removing and cleaning the floor head and roller brush
Before starting any cleaning, ensure the
stick vac is not charging and is switched
off and remove the floor nozzle from the
rest of the stick vac.
If the roller brush becomes tangled
during use, the self-protect system will
shut off the stick vac. If that happens,
please follow below steps.
1.
Turn the floor brush head (I) upside
down. To access the roller brush, slide
the tab, marked with arrows, to the
right.
2.
Pull the roller brush at a slight angle
up and out of the floor brush head.
Any build up of hair etc. can now
be removed from the roller brush.
Scissors can be used to cut any hair
away from the roller if necessary,
taking care not to cut any of the
brush bristles.
1
I
2
3
3.
Once the roller brush is cleaned,
replace the roller brush by aligning
the left, open side of the roller with
the star cog shape on the floor
brush head. You may need to twist
the roller head a little to lock this in
place.
4.
Push the other end of the roller down
as far as it will go. Slide the tab back
to the left to lock in place.
4
Page 12

Maintenance guide
12
Clearing a blockage
Ensure the stick vac is not plugged into the mains supply and is switched
off before dismantling the vac.
The stick vac would only become blocked if the dust cup has exceeded
the 'Max' level, the filters are clogged up or a large object has been
sucked up.
1.
Check the dust cup and empty if necessary.
2.
Check the 2 filters in the unit, remove any debris/dust and wash if
necessary.
3.
If the floor head, crevice or brush multi-tool were in use, detach them
from the main body or extension pole and check for blockages.
Remove any blockages.
4.
Detach the extension pole and look down it to see if there are any
blockages. If there are, use the handle of a broom to clear the
obstruction. Take care not to damage the pole in the process.
5.
Check the roller brush for any hair or thread which may have
become wrapped around the roller. Cut away with a pair of scissors.
To do this safely, remove as shown in the 'Removing and cleaning the
floor head roller brush' section of this manual.
Storing the cordless stick vac
Your stick vac can be stored safely and securely by hanging from
the wall mount supplied with your product or by removing all the
attachments and stowing together in a cupboard. Either way will help
avoid the product falling over and causing damage.
Always turn off and unplug from the mains supply before storing.
1.
Remove any attachments if the stick vac was last used with them on.
2.
Store the stick vac and accessories away safely in a dry place.
Page 13

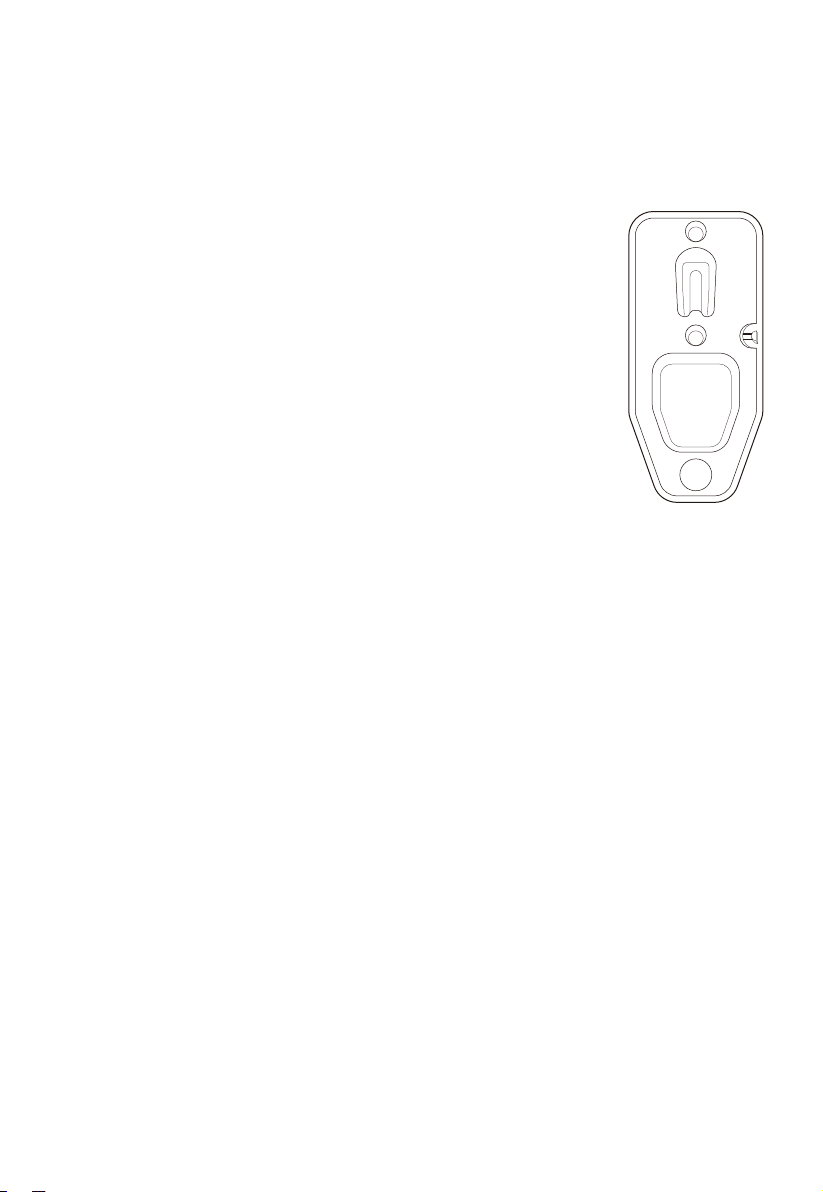
Storing the cordless stick vac with the wall mount
13
1.
Find a suitable spot in your household where you'd
like to secure your stick vac.
2.
Mark the desired screw hole positions on the wall
using a pencil. We recommend that the stick vac
hangs slightly lifted off the floor.
3.
Use the wall mount bracket fixings supplied only if
suitable for your wall type.
4.
Screw the wall mount bracket fixings and mount to
the wall (see illustration for which way the mount
should hang on the wall).
5.
The stick vac can then be mounted on the wall
mount. The mount hook can be found on the back
on the main body near the handle.
Page 14

Troubleshooting
14
Problem Solution
1.
Empty the dust cup
2.
The stick vac is not
cleaning well.
The stick vac has
stopped or won’t
work.
The lights on the
floor head turn off
and/or the motor
overheat light
illuminates red.
Remove excess dust from the filters
3.
Wash the filters
4.
Check for blockages
1.
Charge the vac (check the mains socket
works and the switch is turned on)
2.
It might be blocked
- check items 1 to 4 above
3.
Product self-protection activated. Switch off
the vac and leave the motor to cool for an
hour then try using again.
1.
The floor head is blocked, refer to the
‘Removing and cleaning the floor head and
roller brush’ section of this manual.
2.
The roller brush motor has become
overheated due to heavy loading. This
might be due to extended use on a long pile
carpet or loose rug. Leave the vac to cool
for an hour then use the eco mode rather
than the max mode.
0LGHD,WDOLD6UODVRFLRXQLFR
9LDOH/XLJL%RGLR
0LODQR0,
Page 15

Aspirapolvere
MCS2025GB
LEGGERE CON
ATTENZIONE IL
PRESENTE MANUALE
PRIMA DELL’USO
E CONSERVARLO
ADEGUATAMENTE
PER UN’EVENTUALE
CONSULTAZIONE
FUTURA.
MANUALE DI ISTRUZIONI
Avvertenze: Prima di usare il
prodotto, leggere con attenzione
il presente manuale e conservarlo
adeguatamente per un’eventuale
consultazione futura.
Sia il design sia le specifiche
tecniche sono soggetti a variazioni
senza preavviso finalizzate al
miglioramento del prodotto.
Consultare il rivenditore o
il produttore per maggiori
informazioni.
Page 16

Importanti istruzioni di sicurezza
16
• Leggere attentamente questo
manuale prima del primo utilizzo,
anche se si ha familiarità con
questo tipo di prodotto.
• Le precauzioni di sicurezza
ivi presenti riducono il rischio
di incendio, scosse elettriche
e lesioni se correttamente
rispettate.
• Conservare il manuale in un
luogo sicuro per riferimenti futuri,
insieme alla scheda di garanzia
compilata, alla ricevuta
d'acquisto e alla confezione.
• Quando si utilizza un
apparecchio elettrico, seguire
sempre le precauzioni di
sicurezza di base e le misure di
prevenzione degli incidenti, e
più specificatamente:
• Prima dell'accensione, assicurarsi
che la tensione e la frequenza
elettrica dell'adattatore di
ricarica corrispondano a quelle
indicate sulla targhetta di
identificazione.
• Non lasciare l'aspirapolvere con
la spina collegata alla presa.
• Scollegare la spina dalla presa
di corrente quando non è in uso
e prima degli interventi di pulizia
o manutenzione.
• Non utilizzare all'aperto o su
superfici bagnate.
• Sorvegliare i bambini per
assicurarsi che non giochino con
l'apparecchio.
• Non inserire alcun oggetto
nell'apparecchio.
• Utilizzare solo come descritto
nel presente manuale. Fare uso
esclusivamente degli accessori
consigliati dal produttore.
• Non mettere in funzione alcun
apparecchio con un adattatore
di carica danneggiato o a
seguito di un malfunzionamento
oppure se è stato danneggiato
in qualunque modo.
• Tenere l'adattatore di carica
e i cavi lontano da superfici
riscaldate.
• Non staccare la spina tirando il
cavo. Per scollegare, fare presa
sull'adattatore di carica e non
sul cavo.
• Per ridurre il rischio di folgorazione
non usare mai il prodotto con le
mani bagnate, non immergere
mai il prodotto in acqua e non
versare liquidi su di esso.
• Non utilizzare con l'apertura
bloccata; mantenerla libera
da polvere, lanugine, capelli e
da tutto ciò in grado di ridurre il
flusso d'aria.
• Spegnere tutti i comandi prima
di scollegare la spina.
• Non utilizzare per aspirare liquidi
infiammabili o combustibili
come benzina e fiammiferi. Non
utilizzare l’apparecchio in aree
dove questi materiali potrebbero
essere presenti.
• Non passare l'aspirapolvere su
tutto ciò che brucia o fuma
come sigarette, fiammiferi o
cenere calda.
Page 17

• Non usare se il filtro non è in
posizione.
• Questo apparecchio è destinato
esclusivamente al normale uso
domestico.
• Se l'adattatore di carica è
danneggiato, occorre sostituirlo
con lo stesso tipo di accessorio.
• Questo apparecchio non
può essere usato da persone
(compresi i bambini) con ridotte
capacità fisiche, sensoriali o
mentali o privi di esperienza e
conoscenza, a meno che non
siano sotto stretta supervisione o
vengano date istruzioni sull'uso
dell'apparecchio da una
persona responsabile della loro
sicurezz
a.
• I bambini devono essere
sorvegliati per assicurarsi che
non giochino con l'apparecchio.
• Quando si ricarica
l'apparecchio, l'interruttore
di alimentazione deve essere
spento.
• Questo apparecchio non
dovrebbe essere utilizzato da
bambini o da persone con
disabilità fisiche.
• Questo appa
recchio non è
un giocattolo e, se non viene
utilizzato nel modo corretto,
può causare danni superflui o il
mancato funzionamento.
Potenza del motore: 350 W
Attenzione
• Non utilizzare l'apparecchio
all'aperto o su una superficie
bagnata o per aspi
Non usare mai il prodotto per
aspirare acqua.
• Non aspirare oggetti duri o
taglienti, fiammiferi, cenere
calda, mozziconi di sigaretta o
altri oggetti simili.
• Non spruzzare o aspirare liquidi
infiammabili, detergenti liquidi,
aerosol o vapori.
• Non passare sul cavo di
alimentazione quando si utilizza
l'apparecchio e non rimuovere
la spina tirando il cavo di
alimentazione.
• Non continuare ad utilizzare
l'apparecchio o il caricabatterie
se appare difettoso.
• Non sostituire le batter
batterie non ricaricabili.
• La batteria dovrà essere rimossa
dall'elettrodomestico prima
suo smaltimento
• L'elettrodomestico deve essere
scollegato dall'alimentazione
elettrica durante la rimozione
della batteria
• La batteria deve essere smaltita
nella massima sicurezza
• Non ricaricare le batterie non
ricaricabili. La batteria non è
sostituibile
Ingresso dell’adattatore: 100-240 V ~ 50-60 Hz 0,5 A
Uscita:
25.0V 0.5A 12.5W
29.0V 0.5A 14.5W
Tipo di batteria: 25,2 V, 2000 mAH, ioni di litio
Tempo di ricarica della batteria: 3-5 ore
Volume della vaschetta raccogli polvere: 0,45 l
Tempo di esecuzione: Modalità di potenza massima.: ≥ 12 minuti
Modalità a media potenza: ≥30 minuti
Modalità di potenza minima: ≥ 60 minuti
17
rare liquidi.
ie con
del
Page 18

Nomi delle parti principali
18
Pulsante di
accensione/
spegnimento
Pulsante Modalità
Indicatori luminosi di
carica
Gancio di rilascio
Asta ad espansione
Impugnatura
Blocco di rilascio
Pulsante di rilascio
polvere
Presa di connessione del
caricabatterie
Pulsante di rilascio
della vaschetta
raccogli polvere
Gancio di
montaggio
Struttura
principale
Gruppo filtri
Luci
Testina pavimento
Caricabatterie
Aspiratore per
fessure
Staffa di montaggio a
parete
Spazzola
multiuso
Tasselli per le staffe di
montaggio a parete
Page 19

Istruzioni d’uso
19
Come usare l’aspirapolvere
Assicurarsi che l'aspirapolvere sia completamente carico e montato
prima dell'uso. Fare molta attenzione durante la pulizia delle scale.
1.
Ci sono due livelli di potenza dell'aspirapolvere: modalità massima
(che ha una maggiore potenza di aspirazione, ma un tempo di
funzionamento ridotto, circa 15 minuti) e
modalità ecologica (che ha una minore
potenza di aspirazione, ma un tempo di
funzionamento più lungo, circa
45 minuti).
L'aspirapolvere entra sempre in
funzione a potenza massima. La durata
dell'operazione può variare in base alla
superficie da pulire.
2.
Per attivare la modalità ‘max’, basta
premere l'interruttore (1), mentre per
la modalità ‘eco’, occorre premere
l'interruttore (1) seguito dal pulsante
di modalità (2). L'indicatore di
funzionamento ‘max’ si accende in
quella modalità, mentre si spegne in
modalità ‘eco’.
Quando serve, premere di nuovo
l'interruttore per spegnere l'aspirapolvere.
3.
Spostare avanti e indietro la testina da pavimento sulla superficie
da pulire. I movimenti devono essere regolari. Non premere con
forza, ma permettere all'aspirapolvere di rimuovere i detriti. Quando
l'aspirapolvere è in funzione, ci sono delle luci che si accendono
automaticamente sulla testina da pavimento per facilitare la visibilità
di angoli e spazi bui.
4.
L'aspirapolvere è anche dotato di due indicatori di carica, due
piccole spie luminose che si trovano sull'impugnatura.
Durante la carica - la luce inferiore lampeggia e quella superiore è
spenta
A metà della carica - la luce inferiore è accesa e quella superiore
lampeggia
Carica completa - entrambe le luci sono accese, si spengono dopo
10 minuti
Se la batteria è quasi scarica durante l'uso, l'indicatore luminoso
inferiore è spento e quello superiore lampeggia. Dopo circa
10 secondi l'aspirapolvere si spegne automaticamente.
5.
Si consiglia di svuotare il raccoglitore di polvere dopo ogni uso. Per
garantire i migliori risultati, controllare che i filtri siano puliti (consultare
la sezione 'Rimozione e pulizia di filtri e raccoglitore di polvere' di
questo manuale).
2
Page 20

Istruzioni d’uso
20
Ricaricare l’aspirapolvere
Prima dell'uso si consiglia di
caricare completamente
l’aspirapolvere per un periodo
compreso tra le 3 e le 4 ore.
Al primo uso dopo l'acquisto, il
prodotto potrebbe presentare
una carica residua, per cui la
ricarica completa potrebbe
durare di meno.
1.
Inserire l'estremità del
caricabatterie nella presa
di connessione, situata in
cima alla struttura centrale
dell'aspirapolvere. Si consiglia
di procedere alla ricarica
dell'aspirapolvere dopo
averne rimosso tutti gli
accessori e averlo sistemato su
una superficie piana.
2.
Collegare il caricabatterie
all'alimentazione elettrica.
3.
La spia di ricarica inferiore
lampeggia e si spegne per
indicare che l'apparecchio
è sotto carica. Lasciare
ricaricare.
4.
Quando la ricarica è
completata, l'indicatore
di ricarica smetterà di
lampeggiare ed entrambe le
spie luminose saranno accese.
5.
Spegnere l'alimentazione
luminoso superiore
elettrica e rimuovere il
caricabatterie.
luminoso inferiore
Nota: Non lasciare l'apparecchio incustodito durante la ricarica
né farlo caricare durante la notte. L'elettrodomestico non funziona
durante la carica.
Indicatore
luminoso di
utilizzo max
Indicatore
indicatore
Page 21

Guida alla manutenzione
21
Svuotamento del raccoglitore di polvere
Prima di svuotare il raccoglitore di
polvere, verificare che l'aspirapolvere sia
spento e privo di accessori.
1.
Tenendo il raccoglitore su un
cestino di rifiuti domestici, premere
il blocco di rilascio della polvere
sul lato del raccoglitore. I residui di
polvere cadranno nel cestino. Note
importanti: Evitare il riempimento
eccessivo del raccoglitore di polvere.
Non superare mai l'indicatore del
livello MAX. Svuotarlo regolarmente.
Dopo aver svuotato il raccoglitore
di polvere, controllare il gruppo
filtri e scuoterlo delicatamente su
un cestino di rifiuti domestici per
rimuovere eventuali accumuli di
polvere.
2.
Dopo lo svuotamento, chiudere il
coperchio facendolo scattare nella
posizione di chiusura.
Rimozione e pulizia di filtri e raccoglitore
di polvere
Prima di procedere alle operazioni di
pulizia, verificare che l'aspirapolvere sia
spento e scollegato dalla rete elettrica.
Il modo migliore per rimuovere il
raccoglitore di polvere è senza accessori
applicati all'elettrodomestico.
1.
Svuotare il raccoglitore di polvere
come indicato nella sezione
'Svuotamento del raccoglitore di
polvere' del presente manuale.
2.
Premere il pulsante di rilascio della
vaschetta raccogli polvere situato sul lato del corpo principale vicino
alla parte inferiore del contenitore stesso (1). Quindi rimuovere il
raccoglitore di polvere dalla struttura principale dell'unità, tenendolo
rivolto verso l'alto (2).
1
2
Page 22

Guida alla manutenzione
22
3.
Il raccoglitore di polvere contiene il filtro
a spugna circolare e il gruppo dei filtri.
Dapprima rimuovere il filtro a spugna
circolare, tenendo con le dita e tirando
verso l'alto il nastro situato in cima al filtro,
quindi metterlo via.
4.
Tenendo con le dita entrambi i lati del
gruppo filtri, estrarlo dal raccoglitore di
polvere. Avvicinando il gruppo filtri a un
contenitore di rifiuti domestici, scuoterlo
delicatamente su di esso per rimuovere
eventuali accumuli di polvere.
Nota: Evitare il riempimento eccessivo
del raccoglitore di polvere. Non superare
mai l'indicatore del livello MAX. Svuotarlo
regolarmente.
5.
Rimuovere eventuali accumuli di polvere
residui dal gruppo filtri tramite una
spazzola morbida o un pennello pulito. Il
filtro può essere diviso in tre parti. Tenendo
la sezione superiore, ruotare la sezione
inferiore nella direzione della freccia e
dell'icona del lucchetto aperto.
6.
Lavare il raccoglitore di polvere, le
parti del gruppo filtri e il filtro a spugna
circolare in acqua tiepida finché l'acqua
non è pulita, lasciandoli poi asciugare per
24 ore.
Page 23

Guida alla manutenzione
23
7.
Dopo aver accuratamente asciugato
tutti i componenti, rimontare il gruppo
filtri seguendo le frecce e l'icona
del lucchetto chiuso, e sistemarli di
nuovo sul raccoglitore di polvere.
Non dimenticare di applicare il filtro
a spugna circolare in cima al gruppo
filtri.
8.
Rimettere a posto il raccoglitore
di polvere sulla struttura centrale
agganciando il canale in cima
al raccoglitore al morsetto sulla
struttura centrale (1). Far scorrere
il raccoglitore di polvere verso la
struttura principale finché non scatta
nella corretta posizione (2).
Nota: La manutenzione e la pulizia
periodica dei filtri è molto importante.
Un filtro ostruito riduce la capacità
di aspirazione dell'apparecchio e ne
può ridurre la durata.
1
2
Seguono alcuni consigli sulla frequenza di pulizia dei filtri:
Tipo di filtro Tempi di pulizia suggeriti
• Rimuovere tutti i detriti durante lo svuotamento del
raccoglitore di polvere. Usare la spazzola morbida
Gruppo filtri
Filtro a
spugna
circolare
per spolverare per la rimozione delicata degli
accumuli di polvere.
• Sciacquare in acqua tiepida almeno una volta al
mese se necessario.
• Rimuovere periodicamente polvere o detriti in
caso di necessità. Il filtro può essere lavato in
acqua tiepida una volta al mese.
Page 24

Guida alla manutenzione
24
Rimozione e pulizia della testina da pavimento e della spazzola rotante
Prima di iniziare la pulizia, accertarsi che
l’aspirapolvere non sia sotto carica e che
sia spento. Rimuovere la bocchetta per
pavimenti dall’aspirapolvere.
Se la spazzola a rullo si aggroviglia durante
l'uso, il sistema di auto-protezione spegne
l’aspirapolvere. Se accade ciò, osservare
le seguenti istruzioni.
1.
Capovolgere la testa di aspirazione(I).
Per accedere alla spazzola a rullo, far
scorrere la linguetta, contrassegnata
dalle frecce, verso destra.
2.
Effettuando un leggero movimento
angolare, tirare la spazzola a rullo
verso l'alto. Verrà così staccata dalla
testata di aspirazione. Ora è possibile
rimuovere eventuali accumuli di
polvere o peluria dalla spazzola
rotante. Gli eventuali accumuli di
peluria della spazzola possono essere
tagliati con delle forbici, evitando di
tagliare le setole della spazzola.
1
I
2
3
3.
Una volta pulita la spazzola a rullo,
riposizionarla allineando il lato sinistro
aperto del rullo alla ruota dentata a
forma di stella sulla testa di aspirazione.
Per bloccare la testina della spazzola,
potrebbe essere necessario ruotarla
leggermente per fissarla nella giusta
posizione.
4.
Spingere verso il basso l'altra estremità
della spazzola rotante finché va. Far
scorrere la linguetta verso sinistra per
bloccarla in posizione.
4
Page 25

Guida alla manutenzione
25
Pulizia dei blocchi
Per smontare l’aspirapolvere, occorre che l'apparecchio sia prima
scollegato dalla rete elettrica e spento.
L'aspirapolvere si blocca quando il raccoglitore di polvere supera il
'Max', i filtri sono ostruiti o in caso di aspirazione di oggetti di dimensioni
eccessive.
1.
Svuotare il raccoglitore di polvere se necessario.
2.
Controllare i 2 filtri dell'unità e pulirli rimuovendone detriti e polvere, se
necessario.
3.
Se la testina da pavimento, l'aspiratore per fessure o la spazzola
multiuso erano in uso, staccarli dall'asta ad espansione o dalla
struttura centrale dell'apparecchio e rimuovere eventuali blocchi.
Rimuovere eventuali blocchi.
4.
Rimuovere l'asta ad espansione e controllare la presenza di eventuali
blocchi. Se ce ne sono, servirsi dell'impugnatura di una scopa per
rimuovere le ostruzioni. Fare attenzione a non danneggiare l'asta
durante l'operazione.
5.
Rimuovere eventuale fili di polvere o peluria che potrebbero essersi
accumulati intorno alla spazzola rotante. Tagliarli servendosi di un
paio di forbici. A questo scopo, procedere come indicato nella
sezione "Rimozione e pulizia della testina da pavimento e della
spazzola rotante" del presente manuale.
Conservazione dell'aspirapolvere senza fili
L'aspirapolvere può essere conservato in tutta sicurezza appendendolo
al sostegno a parete in dotazione con il prodotto oppure rimuovendo
tutti gli accessori e conservandoli in un armadietto. In entrambi i casi, il
prodotto sarà protetto dal rischio di danni e cadute.
Spegnere e staccare sempre la spina dalla rete elettrica prima di
immagazzinarla.
1.
Rimuovere gli eventuali accessori applicati all'aspirapolvere
nell'ultimo utilizzo.
2.
Conservare aspirapolvere e accessori in un luogo asciutto.
Page 26
Conservazione dell'aspirapolvere senza fili
26
poggiandolo all'apposito sostegno a parete
1.
Trovare in casa un posto adeguato in cui poter
conservare in modo sicuro l'aspirapolvere.
2.
Segnare con una matita le posizioni dei fori per le viti
sulla parete. Suggeriamo di lasciare l’aspirapolvere
leggermente sollevato dal pavimento.
3.
Usare i perni di montaggio della piastra di sostegno a
parete in dotazione solo se adatti al tipo di parete in
questione.
4.
Avvitare i perni di montaggio della staffa di sostegno
e applicarla alla parete (consultare la figura per i
dettagli sulla sistemazione del sostegno alla parete).
5.
L'aspirapolvere potrà poi essere applicato al
sostegno a parete. Il gancio di appoggio si trova
sul retro della struttura centrale dell'apparecchio in
prossimità dell'impugnatura.
Page 27

Risoluzione dei problemi
27
Problema Soluzione
1.
Svuotare il raccoglitore di polvere
2.
L'aspirapolvere non
funziona bene.
L'aspirapolvere
ha smesso di
funzionare.
Le spie luminose
sulla testina da
pavimento sono
spente e/o la spia
di surriscaldamento
del motore è
accesa in rosso.
Rimuovere gli accumuli di polvere dai filtri
3.
Lavare i filtri
4.
Rimuovere eventuali blocchi
1.
Caricare l'aspirapolvere (verificare che la
presa di corrente sia funzionante e che
l'interruttore sia acceso)
2.
Potrebbe essere bloccato
- controllare i precedenti punti 1-4
3.
Auto-protezione del prodotto attivata.
Spegnere l'aspirapolvere e lasciar
raffreddare il motore per un'ora prima di
usare di nuovo l'apparecchio.
1.
Se la testina da pavimento è bloccata,
consultare la sezione "Rimozione e pulizia
della testina da pavimento e della spazzola
rotante" del presente manuale.
2.
Il motore della spazzola rotante è
surriscaldato a causa di un sovraccarico.
Questo potrebbe accadere in caso di
uso prolungato su fibre di moquette o
tappeti. Lasciar raffreddare l'aspirapolvere
e riprendere l'uso in modalità eco anziché
max.
0LGHD,WDOLD6UODVRFLRXQLFR
9LDOH/XLJL%RGLR
0LODQR0,
Page 28

Staubsauger
MCS2025GB
BITTE LESEN SIE
DAS HANDBUCH
VOR GEBRAUCH
AUFMERKSAM DURCH
UND BEWAHREN SIE
ES FÜR SPÄTEREN
GEBRAUCH
SORGFÄLTIG AUF
BEDIENUNGSANLEITUNG
Warnhinweise: Bevor Sie dieses
Produkt verwenden, lesen
Sie bitte dieses Handbuch
aufmerksam durch und
bewahren Sie es zum späteren
Nachschlagen auf.
Das Design und die
Spezifikationen können ohne
vorherige Ankündigung zur
Produktverbesserung geändert
werden. Wenden Sie sich für
Einzelheiten an Ihren Fachhändler
oder an den Hersteller.
Page 29

Wichtige Sicherheitshinweise
29
• Lesen Sie dieses Handbuch vor
Erstgebrauch aufmerksam durch,
auch wenn Sie mit dieser Art von
Produkten vertraut sind.
• Die enthaltenen
Sicherheitshinweise verringern bei
korrekter Beachtung die Gefahr
von Feuer, Stromschlag und
Verletzungen.
• Bewahren Sie das Handbuch
zum späteren Nachschlagen
zusammen mit der ausgefüllten
Garantiekarte, dem Kaufbeleg
und der Verpackung auf.
• Befolgen Sie stets die
grundlegenden Sicherheits- und
Unfallverhütungsmaßnahmen,
wenn Sie ein elektrisches Gerät
verwenden, einschließlich der
folgenden:
• Vergewissern Sie sich vor dem
Einschalten, dass Spannung
und Frequenz des Ladegeräts
mit den auf dem Typenschild
angegebenen Werten
übereinstimmen.
• Lassen Sie den Staubsauger
nicht unbeaufsichtigt, wenn er
angeschlossen ist.
• Ziehen Sie den Netzstecker, wenn
Sie ihn nicht benutzen sowie vor
der Reinigung oder Wartung.
• Verwenden Sie den Staubsauger
nicht im Freien oder auf nassen
Flächen.
• Kleine Kinder müssen
beaufsichtigt werden, damit sie
nicht mit dem Gerät spielen.
• Führen Sie keine Fremdkörper in
das Gerät ein.
• Verwenden Sie das Gerät
nur wie in diesem Handbuch
beschrieben, verwenden Sie
nur vom Hersteller empfohlene
Zubehörteile.
• Betreiben Sie kein Gerät mit
einem beschädigten Ladegerät
oder wenn es nicht funktioniert
oder in irgendeiner Weise
beschädigt wurde.
• Halten Sie das Ladegerät und die
Kabel von heißen Flächen fern.
• Ziehen Sie den Netzstecker nicht
am Kabel ab. Fassen Sie zum
Trennen des Netzsteckers das
Ladegerät und nicht am Kabel
an.
• Um das Risiko eines Stromschlags
zu verringern, bedienen Sie das
Gerät nie mit nassen Händen,
tauchen Sie es nicht in Wasser
und verschütten Sie keine
Flüssigkeiten auf dem Gerät.
• Verwenden Sie das Gerät nicht
mit blockierten Öffnungen;
halten Sie es frei von Staub,
Fusseln, Haaren und allem, was
den Luftstrom beeinträchtigen
könnte.
• Schalten Sie alle Bedienelemente
aus, bevor Sie den Netzstecker
ziehen.
• Verwenden Sie den Staubsauger
nicht zum Aufsaugen von
brennenden oder brennbaren
Flüssigkeiten wie Benzin,
Streichhölzern oder in Bereichen,
in denen sie möglicherweise
vorhanden sind.
Page 30

• Saugen Sie keine brennenden
30
oder rauchenden Gegenstände
wie Zigaretten, Streichhölzer oder
heiße Asche auf.
• Verwenden Sie das Gerät nicht
ohne eingesetzten Filter.
• Dieses Gerät ist nur für den
normalen Gebrauch im Haushalt
bestimmt.
• Wenn das Ladegerät beschädigt
ist, muss es durch den gleichen
Typ ersetzt werden.
• Dieses Gerät ist nicht für die
Verwendung durch Personen
(einschließlich Kinder) mit
eingeschränkten physischen,
sensorischen oder geistigen
Fähigkeiten oder mangelnder
Erfahrung und Kenntnissen
bestimmt, es sei denn, sie
wurden v
on einer für ihre
Sicherheit verantwortlichen
Person beaufsichtigt oder in
die Verwendung des Geräts
eingewiesen.
• Kinder müssen beaufsichtigt
werden, damit sie nicht mit dem
Gerät spielen.
• Während des Auflad
ens muss
das Gerät ausgeschaltet sein.
• Dieses Gerät darf nicht von
Kindern oder Personen mit
körperlichen Behinderungen
verwendet werden.
• Dieses Gerät ist kein Spielzeug
und kann bei unsachgemäßem
Gebrauch zu unnötigen Schäden
oder Leistungseinbußen führen.
Vorsicht
• Benutzen Sie das Gerät nicht
im Freien, auf
nassen Flächen
oder zum Aufsaugen von Nässe.
Verwenden Sie das Gerät
niemals zum Aufsaugen von
Wasser.
• Saugen Sie keine harten
oder scharfen Gegenstände,
Streichhölzer, heiße Asche,
Zigarettenstummel oder ähnliche
Gegenstände auf.
• Besprühen Sie das Gerät nicht
mit brennbaren Flüssigkeiten,
Reinigungsflüssigkeiten, Aerosolen
oder deren Dämpfen und saugen
Sie diese nicht auf.
• Treten Sie nicht auf das
Ladekabel, wenn Sie Ihr Gerät
benutzen und ziehen Sie den
Netzstecker nicht am Netzkabel.
• Benutzen Sie I
hr Gerät oder
Ladegerät nicht weiter, wenn es
defekt zu sein s
cheint.
• Ersetzen Sie die Akkus nicht durch
gewöhnliche Batterien.
• Der Akku muss vor der Entsorgung
aus dem Gerät ausgebaut
werden.
• Das Gerät muss von der
Stromversorgung getrennt sein,
wenn Sie den Akku ausbauen.
• Entsorgen Sie den Akku
umweltgerecht.
• Laden Sie keine gewöhnlichen
Batterien auf, der Akku ist nicht
austauschbar.
Motorleistung: 350 W
Netzteileingang:
100 - 240 V~, 50-60 Hz, 0,5 A
Ausgang:
25.0V 0.5A 12.5W
29.0V 0.5A 14.5W
Akku: 25,2 V, 2000 mAh, Lithium-Ionen
Ladezeit: 3 - 5 Stunden
Volumen Staubbehälter: 0,45 L
Betriebszeit:
Hochleistungsmodus: ≥12 Minuten
Mitte Leistungsmodus: ≥30 Minuten
Niedriger Leistungsmodus: ≥60 Minuten
Page 31
Komponenten
31
Ein/Aus-Taste
Modustaste
Lade-LEDs
Entriegelungstaste
Saugrohr
Tragegriff
Entriegelungstaste für
den Staubbehälter
Staubbehälter
Ladebuchse
Haken zum
Aufhängen
Gerätegehäuse
Filtereinheit
Entriegelungstaste für
den Staubbehälter
LEDs
Bodendüse
Ladegerät
MultifunktionsbürsteFugendüse
Befestigungsmaterial
Wandhalterung
Page 32

Bedienungshinweise für den Betrieb
32
Staubsauger verwenden
Achten Sie darauf, dass der Staubsauger vor Gebrauch vollständig
aufgeladen und montiert ist. Seien Sie beim Saugen von Treppen immer
besonders vorsichtig.
1.
Der Staubsauger besitzt zwei Leistungseinstellungen: Den
Höchstleistungmodus (mehr Saugkraft, jedoch kürzere Laufzeit
(ca. 15 Minuten)) und den
Energiesparmodus (geringere Saugkraft,
jedoch längere Laufzeit (ca. 45
Minuten)).
Der Staubsauger startet immer im
Höchstleistungmodus. Die Laufzeit
kann je nach zu saugender Fläche
unterschiedlich sein.
2.
Drücken Sie für den Höchstleistungmodus
die Ein/Aus-Taste (1) und für den
Energiesparmodus die Ein/Aus-Taste
(1) gefolgt von der Modustaste (2).
Im Höchstleistungmodus leuchtet die
Höchstleistungmodus-LED, die erlischt,
wenn Sie in den Energiesparmodus
wechseln.
2
Drücken Sie nach Beenden der Staubsaugerbenutzung die Ein/AusTaste erneut, um ihn wieder auszuschalten.
3.
Bewegen Sie die Bodendüse auf der zu saugenden Fläche vor und
zurück. Verwenden Sie gleichmäßige Bewegungen. Drücken Sie nicht
zu stark auf, damit der Staubsauger die Verschmutzung aufsaugen
kann. An der Bodendüse befinden sich kleine LEDs, die während des
Betriebs des Staubsaugers automatisch leuchten, damit Sie auch in
dunklen Ecken gut sehen können.
Page 33

4.
33
Der Staubsauger besitzt am Griff zwei kleine LEDs für die
Ladezustandsanzeige.
Während des Ladens - die untere LED blinkt und die obere LED ist aus.
Halb aufgeladen - die untere LED leuchtet und die obere LED blinkt.
Vollständig aufgeladen - beide LEDs leuchten und erlöschen nach
10 Minuten.
Wenn der Akku während der Benutzung fast leer ist, erlischt die untere
LED und die obere LED blinkt. Ca. 10 Sekunden später schaltet sich
der Staubsauger automatisch aus.
5.
Wir empfehlen, den Staubbehälter nach jeder Benutzung zu
entleeren. Überprüfen Sie für maximale Leistung die Filter auf
Sauberkeit (siehe Abschnitt „Staubbehälter und Filter entfernen und
reinigen“ in dieser Bedienungsanleitung).
Page 34

Bedienungshinweise für den Betrieb
34
Staubsauger aufladen
Vor Gebrauch empfehlen wir,
den Staubsauger für 3 - 4 Stunden
vollständig aufzuladen. Das
erstmalige Laden kann etwas
kürzer sein, weil der Staubsauger
etwas geladen ausgeliefert wird.
1.
Schließen Sie das Ladegerät
an der Ladebuchse am
oberen Ende des Staubsaugers
an. Wir empfehlen, den
Staubsauger ohne montiertes
Zubehör und auf einer ebenen
Fläche zu laden.
2.
Schließen Sie das Ladegerät
an einer geeigneten
Steckdose an.
3.
Die untere LED blinkt zur
Anzeige, dass das Gerät
aufgeladen wird. Lassen Sie
das Gerät laden.
4.
Sobald der Akku vollständig
geladen ist, leuchten beide
LEDs.
5.
Ziehen Sie den Netzstecker und
anschließend das Ladekabel
vom Staubsauger ab.
Bitte beachten Sie: Lassen Sie
den Staubsauger während des
Ladens nicht unbeaufsichtigt
und laden Sie auch nicht
über Nacht. Während des
Ladenzyklus können Sie das
Gerät nicht benutzen.
Höchstleistungs-
LED
Obere LED
Untere LED
Page 35

Pflegehinweise
35
Staubbehälter entleeren
Vergewissern Sie sich, dass der
Staubsauger ausgeschaltet ist und das
Zubehör entfernt wurde, bevor Sie den
Staubbehälter entleeren.
1.
Halten Sie den Staubbehälter über
einen Abfalleimer und drücken
Sie dann die Entriegelungstaste,
die sich an der Seite des
Staubbehälters befindet. Daraufhin
fällt der angesammelte Staub in
den Abfalleimer. Bitte beachten Sie:
Achten Sie immer darauf, dass sich
nicht zu viel Staub im Staubbehälter
ansammelt. Der angesammelte
Staub darf die Markierung „MAX“
nicht überschreiten. Entleeren Sie
den Staubbehälter regelmäßig.
Überprüfen Sie jedes Mal die
Filtereinheit, wenn Sie den
Staubbehälter entleeren und
klopfen Sie sie vorsichtig über einen
Abfalleimer aus, um übermäßige
Staubansammlungen zu entfernen.
2.
Schließen Sie nach dem Entleeren
den Deckel wieder und achten Sie
darauf, dass er hörbar einrastet.
Staubbehälter und Filter entfernen und
reinigen
Vergewissern Sie sich, dass der
Staubsauger nicht geladen wird und
ausgeschaltet ist, bevor Sie mit der
Reinigung beginnen. Das Entfernen des
Staubbehälters ist einfacher, wenn kein
Zubehör am Staubsauger montiert ist.
1
2
Page 36

1.
36
Entleeren Sie den Staubbehälter, wie es unter „Staubbehälter
entleeren“ in dieser Bedienungsanleitung beschrieben wird.
2.
Drücken Sie die Entriegelungstaste des Staubbehälters, die sich an
der Seite des Gehäuses in der Nähe des Bodens des Staubbehälters
befindet (1). Entfernen Sie anschließend den Staubbehälter und
achten Sie dabei darauf, dass er aufrecht bleibt (2).
Pflegehinweise
3.
Staubbehälter, runder Schwammfilter
und Filtereinheit: Entfernen Sie zuerst den
runden Schwammfilter, indem Sie ihn an
dem Band auf der Oberseite des Filters
zuerst nach oben und dann zur Seite
ziehen.
4.
Drücken Sie jetzt beide Seiten der
Filtereinheit zusammen und ziehen
Sie sie dann nach oben hin aus dem
Staubbehälter heraus. Klopfen Sie die
Filtereinheit über dem Mülleimer vorsichtig
aus, um den Staub grob zu entfernen.
Bitte beachten Sie: Achten Sie immer
darauf, dass sich nicht zu viel Staub
im Staubbehälter ansammelt. Der
angesammelte Staub darf die Markierung
„MAX“ nicht überschreiten. Entleeren Sie
den Staubbehälter regelmäßig.
Page 37

5.
37
Entfernen Sie den verbleibenden Staub
in der Filtereinheit mit Hilfe einer weichen
Bürste oder eines sauberen Pinsels. Sie
können die Filtereinheit in drei Teile
zerlegen. Halten Sie die Filtereinheit am
oberen Abschnitt fest und drehen Sie
den unteren Abschnitt in Pfeilrichtung in
Richtung des offenen Schlosssymbols.
6.
Spülen Sie den Staubbehälter, die
Teile der Filtereinheit und den runden
Schwammfilter unter warmem Wasser
solange ab, bis das Wasser klar bleibt.
Lassen Sie anschließend alle Teile für
24 Stunden trocknen.
Pflegehinweise
7.
Wenn alle Teile vollständig
getrocknet sind, setzen Sie die Teile
der Filtereinheit den Pfeilen und
dem geschlossenen Schlosssymbol
folgend zusammen. Setzen Sie sie
anschließend wieder zurück in den
Staubbehälter. Vergessen Sie nicht,
den runden Schwammfilter wieder
auf die Oberseite der Filtereinheit zu
setzen.
8.
Bringen Sie den Staubbehälter
wieder am Staubsauger an, indem
Sie ihn zuerst oben mit der Nase zum
Staubsauger (1) zeigend ansetzen.
Drücken Sie nun den Staubbehälter
in Richtung Staubsauger an, bis er
hörbar einrastet (2).
Bitte beachten Sie: Es ist wichtig,
die Filter regelmäßig zu warten und
zu reinigen. Ein zugesetzter Filter
verringert die Saugleistung und kann
die Lebensdauer Ihres Staubsaugers
verkürzen.
1
2
Page 38

Nachstehend finden Sie eine Empfehlung, wie oft Sie die Filter reinigen
38
sollten:
Filtertyp Empfohlene Reinigungsintervalle
• Schütteln Sie alle Verunreinigungen heraus, wenn
Sie den Staubbehälter entleeren. Entfernen Sie
Filtereinheit
festsitzende Verschmutzungen mit Hilfe einer
weichen Bürste.
• Spülen Sie sie einmal pro Monat oder bei Bedarf
öfters unter warmem Wasser ab.
Runder
Schwammfilter
• Entfernen Sie ab und an Staub und
Verunreinigungen. Sie können den Filter auch
einmal pro Monat mit warmem Wasser abspülen.
Page 39

Pflegehinweise
39
Bodendüse und Walzenbürste entfernen und reinigen
Bevor Sie mit der Reinigung beginnen,
vergewissern Sie sich, dass der
Staubsauger nicht geladen wird und
ausgeschaltet ist und entfernen Sie die
Bodendüse vom Staubsauger.
Wenn sich die Walzenbürste während
des Gebrauchs verheddert, schaltet das
Selbstschutzsystem den Staubsauger
ab. Befolgen Sie in diesem Fall bitte die
nachstehenden Schritte.
1.
Drehen Sie die Bodenbürste (I) um.
Um Zugang zur Walzenbürste zu
erhalten, schieben Sie die mit Pfeilen
markierte Nase nach rechts.
2.
Ziehen Sie die Walzenbürste in
einem leichten Winkel nach oben
und aus der Bodenbürste heraus.
Jetzt können Sie Haare usw. von der
Walzenbürste entfernen. Sie können
Haare und andere Fremdkörper
auch mit einer Schere von der
Walzenbürste entfernen. Achten
Sie jedoch darauf, dass Sie keine
Bürstenhaare abschneiden.
1
I
2
3
3.
Wenn die Walzenbürste gereinigt
ist, setzen Sie sie wieder ein, indem
Sie die linke, offene Seite der Walze
mit der sternförmigen Verzahnung
der Bodenbürste ausrichten.
Möglicherweise müssen Sie die
Bodendüse ein wenig drehen, damit
die Bürste in ihrer Position einrastet.
4.
Drücken Sie jetzt die andere Seite
der Walzenbürste so weit wie
möglich herunter. Schieben Sie die
Nase wieder nach links, um sie zu
verriegeln.
4
Page 40

Pflegehinweise
40
Blockierungen entfernen
Vergewissern Sie sich, dass der Staubsauger nicht am Stromnetz
angeschlossen und ausgeschaltet ist, bevor Sie ihn demontieren.
Der Staubsauger verstopft nur, wenn der Staubbehälter über die
Markierung MAX hinaus gefüllt ist, die Filter zugesetzt sind oder ein großes
Objekt aufgesaugt wurde.
1.
Überprüfen Sie den Staubbehälter und entleeren Sie ihn gegebenenfalls.
2.
Überprüfen Sie die beiden Filter im Gerät und entfernen Sie wenn
notwendig Staub/Verunreinigungen.
3.
Wenn Sie die Bodendüse, die Fugendüse oder die Multifunktionsbürste
benutzt haben, entfernen Sie sie vom Staubsauger oder dem
Saugrohr und überprüfen Sie sie anschließend auf Blockierungen.
Beseitigen Sie alle Blockierungen.
4.
Entfernen Sie das Saugrohr und schauen Sie hindurch, um evtl.
Blockierungen zu erkennen. Wenn es Blockierungen gibt, entfernen Sie
sie mit Hilfe eines Besenstiels. Beschädigen Sie dabei das Saugrohr nicht.
5.
Überprüfen Sie die Walzenbürste auf vorhandene Haare, Fäden usw.,
die sich um die Walzenbürste gewickelt haben. Schneiden Sie sie
mit einer Schere durch. Schlagen Sie hierfür unter „Bodendüse und
Walzenbürste entfernen und reinigen“ in dieser Bedienungsanleitung
nach, um dies sicher durchzuführen.
Staubsauger aufbewahren
Mit der mitgelieferten Wandhalterung können Sie Ihren Staubsauger
sicher an der Wand befestigen. Sie können aber auch sein Zubehör
entfernen und ihn zusammen mit seinem Zubehör in einem Schrank
verstauen. Beide Möglichkeiten schützen den Staubsauger davor,
umzufallen und dadurch beschädigt zu werden.
Schalten Sie das Gerät bei Nichtgebrauch stets aus und ziehen Sie den
Netzstecker.
1.
Entfernen Sie alle Zubehörteile, wenn der Staubsauger mit
Zubehörteilen benutzt wurde.
2.
Bewahren Sie den Staubsauger und sein Zubehör an einem trockenen
Ort auf.
Page 41

Staubsauger an der Wandhalterung aufhängen
41
1.
Suchen Sie eine geeignete Stelle in Ihrer Wohnung,
an der Sie den Staubsauger an der Wand aufhängen
möchten.
2.
Markieren Sie die Stelle für die Schrauben mit einem
Bleistift. Wir empfehlen, den Staubsauger etwas über
dem Boden hängen zu lassen.
3.
Benutzen Sie die mitgelieferte Wandhalterung nur
dann, wenn Sie für Ihren Wandtyp geeignet ist.
4.
Bohren Sie die Löcher in die Wand und bringen
Sie anschließend die Wandhalterung an (siehe
Abbildung für die richtige Ausrichtung an der Wand).
5.
Anschließend können Sie den Staubsauger an der
Wandhalterung aufhängen. Der Haken befindet sich
auf der Rückseite des Staubsaugers in der Nähe des
Griffs.
Page 42

Fehlerbehebung
42
Problem Lösungsvorschlag
1.
Entleeren Sie den Staubbehälter.
2.
Der Staubsauger
saugt nicht gut.
Der Staubsauger
hat sich
ausgeschaltet
oder lässt sich nicht
einschalten.
Die LEDs an
der Bodendüse
sind erloschen
und/oder die
MotorüberhitzungsLED leuchtet rot.
Entfernen Sie groben Staub von den Filtern.
3.
Waschen Sie die Filter aus.
4.
Überprüfen Sie auf Blockierungen.
1.
Laden Sie den Staubsauger auf (überprüfen
Sie, ob die Steckdose Strom führt).
2.
Er ist möglicherweise verstopft,
überprüfen Sie die vorstehenden Punkte
1 bis 4.
3.
Der Selbstschutz des Produkts ist aktiviert.
Schalten Sie Ihren Staubsauger aus und
lassen Sie den Motor für 1 Stunde abkühlen.
Versuchen Sie es anschließend erneut.
1.
Die Bodendüse ist blockiert – schlagen
Sie unter „Bodendüse und Walzenbürste
entfernen und reinigen“ in dieser
Bedienungsanleitung nach.
2.
Der Walzenbürstenmotor ist aufgrund großer
Belastung überhitzt. Das kann bei längerem
Benutzen auf einem Langflorteppich
oder Läufer auftreten. Lassen Sie
den Staubsauger für ca. eine Stunde
abkühlen und benutzen Sie anschließend
lieber den Energiesparmodus als den
Höchstleistungsmodus.
0LGHD,WDOLD6UODVRFLRXQLFR
9LDOH/XLJL%RGLR
0LODQR0,
Page 43
Aspirador
MCS2025GB
LEA DETENIDAMENTE
EL MANUAL ANTES DE
USARLA Y GUÁRDELO
DEBIDAMENTE COMO
REFERENCIA FUTURA
MANUAL DE
INSTRUCCIONES
Aviso de advertencia: Antes
de usar este producto, lea
este manual detenidamente
y guárdelo como referencia
futura.
El diseño y las
especificaciones están
sujetos a cambio sin previo
aviso para la mejora del
producto. Consulte con su
distribuidor o fabricante
para obtener más detalles.
Page 44

Instrucciones importantes de seguridad
44
• Lea detenidamente este
manual antes de usarlo por
primera vez, incluso si está
familiarizado con este tipo de
productos.
• Las precauciones de seguridad
adjuntas reducen el riesgo de
incendios, descarga eléctrica
y lesiones cuando se cumplen
correctamente.
• Guarde el manual en un lugar
seguro como referencia futura,
conjuntamente con la tarjeta
de garantía cumplimentada,
recibo de compra y cartón.
• Siempre siga las precauciones
e seguridad básicas y las
medidas de prevención de
accidentes cuando se use un
aparato eléctrico, incluyendo
las siguientes:
• Antes de encenderlo,
asegúrese de que la tensión
y la frecuencia eléctrica
del adaptador de carga se
corresponden con aquellas
indicadas en la etiqueta de
calificación.
• No deje el aspirador sin atender
cuando esté enchufado.
• Desenchúfelo de la toma
cuando no vaya a usarse
y antes de la limpieza o
mantenimiento.
• No lo use en el exterior o en
superficies húmedas.
• Se debe supervisar a los niños
pequeños para asegurarse de
que no juegan con el aparato.
• No inserte ningún objeto en el
aparato.
• Úselo solo tal y como se
describe en este manual; use
únicamente los accesorios
recomendados por el
fabricante.
• No opera ningún aparato
con un adaptador de
carga dañado o tras un
funcionamiento incorrecto
del aparato o si este presenta
cualquier tipo de daños.
• Mantenga el adaptador de
carga y los cables alejados de
superficies calientes.
• No lo desenchufe tirando del
cable. Para desenchufarlo,
agarre el adaptador de carga,
no el cable.
• Para reducir el riesgo de
electrocución, nunca opera
el producto con las manos
húmedas, lo sumerja en agua
o vierta líquidos en el producto.
• No lo use con cualquier
abertura bloqueada;
manténgalo libre de polvo,
pelusas, pelo y cualquier cosa
que pueda reducir el flujo de
aire.
• Apague todos los controles
antes de desenchufarlo.
• No lo use para aspirar líquidos
inflamables o combustibles,
como gasolina, cerillas o lo use
en áreas donde puedan estar
presentes.
Page 45

• No aspire nada que queme
45
o presente humos, como
cigarrillos, cerillas o cenizas
ardiendo.
• No lo use sin el filtro en su lugar.
• Este aparato está diseñado
únicamente para un uso
doméstico normal.
• Si el adaptador de carga
presenta daños, debe sustituirse
por uno del mismo tipo.
• Este aparato no está diseñado
para usarse por parte de
personas (incluidos niños) con
capacidades físicas, sensoriales
o mentales reducidas o con
falta de conocimientos o
experiencia salvo que se les
haya dado una supervisión
o instrucciones adecuara
respecto al uso del aparato
por parte de una persona
responsable de su seguridad.
• Se debe supervisar a los niños
para asegurarse de que no
juegan con el aparato.
• Cuando cargue el aparato,
el interruptor de alimentación
debe estar apagado.
• Los niños o personas con
discapacidad física no deben
usar este aparato.
• Este aparato no es un juguete,
y si no se usa de una manera
correcta, puede provocar
daños innecesarios o fallos de
funcionamiento.
Precaución
• No use el aparato en el exterior
o sobre cualquier superficie
húmeda o para recoger
artículos húmedos. Nunca use
el producto para aspirar agua.
• No recoja objetos duros y
afilados, cerillas, cenizas
ardiendo, colillas de cigarrillos
u otros elementos similares.
• No pulverice o recoja líquidos
inflamables, líquidos de
limpieza, aerosoles o sus
vapores.
• No pise el cable de
alimentación cuando use
el aparato o lo retire del
enchufe tirando del cable de
alimentación.
• No continúe usando el aparato
o el cargador si parece
defectuoso.
• No sustituya las baterías por
baterías no recargables.
• Se debe retirar la batería del
aparato antes de que deseche
• El aparato debe
desconectarse de la
alimentación antes de retirar la
batería.
• La batería debe eliminarse de
forma segura
• No recargue las pilas no
recargables; la batería no es
sustituible
Potencia del motor: 350W
Entrada del adaptador:
100-240V ~ 50-60 Hz 0,5A
Salida:
25.0V 0.5A 12.5W
29.0V 0.5A 14.5W
Tipo de batería:
Iones de litio de 25,2V, 2000 mAh
Tiempo de carga de la batería:
3-5 horas
Volumen del contenedor de polvo:
0,45L
Tiempo de funcionamiento:
Mode Puissance maximum : ≥ 12 minutes
Mode Puissance milieu : ≥ 30 minutes
Mode Puissance minimum : ≥ 60 minutes
Page 46

Nombres de las piezas principales
46
Botón de encendido /
apagado
Botón modo
Luces del indicador de
carga
Clip de liberación
Palo de extensión
Asa de transporte
Pestaña de liberación
Copa del polvo
del polvo
Punto de conexión del
cargador
Botón de liberación
de la copa del polvo
Gancho de
montaje
Carcasa principal
Filtro
Luces
Cabezal del suelo
Cargador
Herramienta
para esquinas
Abrazadera de
montaje en pared
Cepillo
multiherramientas
Accesorios de la
abrazadera para el
montaje en pared
Page 47

Instrucciones de funcionamiento
47
Uso del aspirador
Asegúrese de que el aspirador esté completamente cargado y
montado antes de usarlo. Tenga siempre cuidado cuando aspire
escaleras.
1.
Hay dos configuraciones adecuadas en el aspirador: modo máximo
(este tiene un mayor poder de succión pero un menor tiempo de
funcionamiento, aproximadamente
15 minutos) y el modo eco (menor poder
de succión con un mayor tiempo de
funcionamiento, aproximadamente
45 minutos).
El aspirador siempre empezará en modo
máximo. El tiempo de funcionamiento
puede variar dependiendo de la
superficie que se esté limpiando.
2.
Para ir al modo "máximo" simplemente
pulse el botón de encendido (1),
mientras que para el modo "eco" pulse
el botón de encendido (1) seguido
por el botón modo (2). La luz de
funcionamiento máximo se iluminará
cuando esté en modo "máximo" y se apagará cuando cambie a
modo "eco".
2
Cuando sea necesario, vuelva a pulsar el botón de encendido para
apagar el aspirador.
3.
Mueva hacia adelante y hacia atrás el cabezal del suelo sobre la
superficie. Use pasos uniformes. No pulse muy fuerte; deje que el
aspirador succione los residuos. Hay luces en el cabezal del suelo
que se iluminarán automáticamente cuando el aspirador esté en
funcionamiento para ayudar a la visibilidad de áreas / esquinas
oscuras.
Page 48

4.
48
El aspirador dispone de luces indicativas de carga; existen dos
pequeñas luces en el asa.
Mientras se carga - la luz inferior parpadeará y la luz superior está
apagada
Cargado a la mitad - la luz inferior está encendida y la luz superior
parpadeará
Completamente cargado - ambas luces están encendidas y se
apagarán después de 10 minutos
Cuando esté en uso y la batería esté casi gastada, la luz inferior
estará apagada y la luz superior parpadeará. Tras aproximadamente
10 segundos, el aspirador se apagará automáticamente.
5.
Es recomendable vaciar la copa de polvo tras cada uso. Para
obtener el mejor rendimiento, compruebe que los filtros están limpios
(véase la sección "Retirada y limpieza de la copa de polvo y filtros"
en este manual).
Page 49

Instrucciones de funcionamiento
49
Carga del aspirador
Antes de usarlo, recomendamos
que se cargue completamente
el aspirador entre 3 y 4 horas.
Cuando se adquiere, estará algo
cargado así que puede que no
tarde todo el tiempo en cargarse
completamente.
1.
Conecte el extremo del
cargador en el punto de
conexión del cargador situado
en la parte superior de la
carcasa del aspirador. Se
recomienda que se cargue
el aspirador sin accesorios
conectados y que se coloque
el aparato sobre una superficie
plana.
2.
Enchufe el cargador en la
corriente eléctrica.
3.
La luz del indicador de carga
inferior parpadeará y se
apagará para mostrar que el
aparato se está cargando.
Déjelo cargando.
4.
Una vez que esté
completamente cargado, la
luz del indicador de carga
dejará de parpadear y
ambas luces permanecerán
encendidas.
5.
Desconéctelo de la corriente
eléctrica y retire el cargador.
Nota: No deje el aspirador sin
atender o lo deje cargando
por la noche. El aparato no
funcionará mientras se está cargando.
Luz de
funcionamiento
en modo
máximo
Luz superior
Luz inferior
Page 50

Guía de mantenimiento
50
Vaciado de la copa de polvo
Asegúrese de que el aspirador está
apagado y que se han eliminado los
accesorios antes de vaciar la copa de
polvo.
1.
Sujete la copa sobre el cubo de
residuos domésticos y empuje la
pestaña de liberación de polvo
situada en un lateral de la copa de
polvo. Los residuos caerán al cubo.
Tenga en cuenta: No deje que la
copa se llene demasiado. No supere
la marca de nivel MAX. Vacíelo
regularmente. Cada vez que vacíe la
copa de polvo, compruebe el filtro y
golpéelo suavemente sobre el cubo
de residuos domésticos para retirar
cualquier exceso de polvo.
2.
Una vez vacío, cierre la tapa hasta
que se cierre con un clic.
Retirada y limpieza de la copa de polvo
y filtros
Antes de iniciar cualquier limpieza,
asegúrese de que el aspirador no está
cargando y está apagado. Es más
sencillo retirar la copa de polvo sin
ningún accesorio en el aspirador.
1.
Vacíe la copa de polvo tal y como se
muestra en la sección "Vaciado de la
copa de polvo" de este manual.
2.
Presione el botón de liberación de la
copa de polvo situado en el lateral
de la carcasa principal cerca de la parte inferior de la copa de
polvo (1). Posteriormente extraiga la copa de polvo de la carcasa
manteniendo la copa recta (2).
1
2
Page 51

Guía de mantenimiento
51
3.
La copa de polvo alberga el filtro de
esponja circular y el filtro. Retire primero
el filtro de esponja circular pinzando
el material del lazo situado en la parte
superior del filtro y tirando hacia arriba y
después separándolo.
4.
Pince cada lado del filtro y tire hacia
arriba alejándolo de la copa de polvo.
Golpee suavemente el filtro sobre la
basura doméstica para eliminar cualquier
cantidad grande de polvo.
Nota: No deje que la copa se llene
demasiado. No supere la marca de nivel
MAX. Vacíelo regularmente.
5.
Retire cualquier exceso de polvo del filtro
usando un cepillo suave o un pincel de
pintura limpio. El filtro puede dividirse en
tres partes. Sujete la sección superior y
doble la sección inferior en la dirección
de la flecha y el icono del candado
abierto.
6.
Aclare la copa de polvo, los
componentes del filtro y el filtro de
esponja circular bajo agua caliente hasta
que el agua salga limpia y déjelo secar
durante 24 horas.
Page 52

Guía de mantenimiento
52
7.
Una vez que todas las piezas están
completamente secas, vuelva a
montar los componentes del filtro
tras la flecha y el icono del candado
cerrado y vuélvalo a colocar en
la copa del polvo. No se olvide de
volver a colocar el filtro de esponja
circular en la parte superior del filtro.
8.
Vuelva a colocar la copa del polvo
en la carcasa sujetando el canal en
la parte superior de la copa del polvo
con la agarradera de la carcasa (1).
Vuelva a empujar la copa del polvo
hacia la carcasa hasta que se ajuste
en su lugar con un clic (2).
Nota: Es importante mantener
regularmente y limpiar los filtros. Un
filtro atascado reduce el poder de
succión y puede acortar la vida del
aspirador.
1
2
Debajo se encuentra una guía recomendada sobre la frecuencia con la
que debe limpiar los filtros:
Tipo de filtro Tiempos de limpieza recomendados
• Agite los residuos cuando vacíe la copa del polvo.
Use el cepillo de polvo suave para retirar con
Filtro
Filtro de
esponja
circular
suavidad cualquier acumulación de polvo.
• Aclárelo bajo agua caliente una vez al mes o más
si es necesario.
• De forma ocasional elimine cualquier polvo /
residuo según sea necesario. También se puede
aclarar el filtro bajo agua caliente una vez al mes.
Page 53

Guía de mantenimiento
53
Retirada y limpieza del cabezal de suelo y cepillo rodillo
Antes de iniciar cualquier limpieza,
asegúrese de que el aspirador no se
está cargando y está apagado y retire la
boquilla del suelo del resto del aspirador.
Si el cepillo rodillo queda enredado
durante su uso, el Sistema de protección
automática apagará el aspirador. Si
eso se produce, siga los pasos que
aparecen debajo.
1.
Dé la vuelta al cabezal del cepillo
de suelo (I). Para acceder al cepillo
rodillo, deslice la pestaña, marcada
con flechas, a la derecha.
2.
Tire del cepillo rodillo en un ligero
ángulo y extraiga el cabezal del
cepillo de suelo. Ahora se puede
eliminar cualquier acumulación de
pelo del cepillo rodillo. Se pueden
usar tijeras para cortar cualquier pelo
del rodillo si es necesario, teniendo
cuidado en no cortar las cerdas del
cepillo.
1
I
2
3
3.
Una vez que se ha limpiado el cepillo
rodillo, vuelva a colocar el cepillo
rodillo alineándolo a la izquierda;
abra el lateral del rodillo con forma
de atasco en Estrella en el cabezal
del cepillo de suelo. Puede que sea
necesario doblar en cabezal del
rodillo un poco para ajustarlo en su
lugar.
4.
Empuje el otro extremo del rodillo
hacia abajo hasta donde pueda.
Vuelva a deslizar la pestaña a la
izquierda para bloquearla.
4
Page 54

Guía de mantenimiento
54
Eliminación de un bloqueo
Asegúrese de que el aspirador no está conectado a la corriente
eléctrica y está apagado antes de desmontar el aspirador.
El aspirador solo quedará atascado si la copa de polvo ha superado el
nivel "Máx" o los filtros están atascados o se ha aspirado un objeto muy
grande.
1.
Compruebe la copa de polvo y vacíelo si es necesario.
2.
Compruebe los 2 filtros de la unidad y retire cualquier residuo / polvo
si es necesario.
3.
Si el cabezal del suelo, la herramienta para esquinas o el cepillo
multiherramienta se están usando, sepárelos de la carcasa principal
o palo de extensión y compruebe a ver si hay bloqueos. Elimine
cualquier bloqueo.
4.
Separe el palo de extensión y mire hacia abajo para ver si hay
bloqueos. Si los hubiera, use el palo de una escoba para eliminar la
obstrucción. Tenga cuidado en no dañar el palo en el proceso.
5.
Compruebe el cepillo rodillo en busca de cualquier pelo o hilo que
haya podido quedar atrapado alrededor del rodillo. Córtelo con
unas tijeras. Para hacerlo de forma segura, elimínelo tal y como se
muestra en la sección "Retirada y limpieza del cepillo del cabezal del
rodillo del suelo" de este manual.
Guardar el aspirador sin cables
El aspirador puede guardarse de forma segura colgándolo del montaje
en pared que se suministra con el producto o retirando todos los
accesorios y guardándolos todos en un armario. De cualquier manera,
ayudará a evitar que el producto se caiga y cause daños.
Apáguelo y desconéctelo siempre de la corriente eléctrica antes de
guardarlo.
1.
Retire cualquier accesorio si el aspirador los ha usado la última vez.
2.
Guarde el aspirador y los accesorios de forma segura en un lugar
seguro.
Page 55

Guarde el aspirador sin cables con el montaje en
55
pared
1.
Encuentre un lugar adecuado en su hogar donde
desee asegurar el aspirador.
2.
Marque las posiciones que desee del agujero
para los tornillos en la pared usando un lapicero.
Recomendamos que aspirador cuelgue ligeramente
sobre el suelo.
3.
Use los accesorios de la abrazadera del montaje en
pared que se suministran solo si son aptos para su
tipo de pared.
4.
Atornille los accesorios de la abrazadera de montaje
en pared y móntelo en la pared (véase la ilustración
para ver de qué manera el montaje debe colgar en
la pared).
5.
El aspirador puede montarse en el montaje en pared.
El gancho de montaje puede encontrarse en la parte posterior de la
carcasa cerca del asa.
Page 56

Problemas y soluciones
56
Problema Solución
1.
Vacíe la copa de polvo
2.
El aspirador no limpia
bien.
El aspirador se
ha parado o no
funciona.
Las luces del
cabezal del suelo se
apagan y/o la luz de
sobrecalentamiento
del motor se ilumina
de color rojo.
Retire el exceso de polvo de los filtros
3.
Lave los filtros
4.
Comprobación de bloqueos
1.
Cargue el aspirador (compruebe que
la toma de corriente funciona y que el
interruptor está encendido)
2.
Puede que esté bloqueado
- compruebe los elementos 1 al 4 que
aparecen arriba
3.
Protección automática del producto
activada. Apague el aspirador y deje
que el motor se enfríe durante una hora y
después intente volver a usarlo.
1.
El cabezal del suelo está bloqueado;
remítase a la sección "Retirada y limpieza
del cabezal de suelo y cepillo rodillo" en
este manual.
2.
El motor del cepillo rodillo se ha
sobrecalentado debido a una carga
pesada. Esto puede deberse a un uso
prolongado de una alfombra grande o a
una alfombrilla suelta. Deje que el aspirador
se enfríe durante una hora y después use el
modo eco en lugar del modo máximo.
0LGHD,WDOLD6UODVRFLRXQLFR
9LDOH/XLJL%RGLR
0LODQR0,
Page 57

Aspirateur
MCS2025GB
VEUILLEZ LIRE
ATTENTIVEMENT
LE MANUEL AVANT
USAGE ET LE
CONSERVER POUR
Y FAIRE REFERENCE
DANS LE FUTUR
GUIDE D'UTILISATION
Avertissements : Avant
d'utiliser ce produit, veuillez
lire attentivement ce manuel
et le garder pour s'y référer
dans le futur.
La conception et les
spécifications sont indiquées
sous réserve de modifications
pour l’amélioration du
produit. Consultez votre
revendeur ou le fabricant
pour les détails.
Page 58

Instructions Importantes De Securite
58
• Lire attentivement ce manuel
avant la première utilisation,
même si vous êtes familier avec
ce type de produit.
• Ces instructions de sécurité
réduisent le risque d'incendie,
d'électrocution et de blessure
quand elles sont respectées.
• Garder le manuel dans un
endroit sûr pour s'y reporter
dans le futur, avec la carte
de garantie complète, le reçu
d'achat et le carton.
• Toujours respecter les
précautions de sécurité
basiques et les mesures de
prévention des accidents
lors de l'utilisation d'appareil
électrique, y-compris les points
suivants :
• Avant de mettre sous tension,
s'assurer que la tension et
la fréquence électrique de
l'adaptateur de chargement
correspond à celles indiquées
sur la plaque d'identification.
• Ne pas partir en laissant
l'aspirateur branché.
• Le débrancher de la prise de
courant quand il n'est pas
utilisé et avant le nettoyage ou
la révision.
• Ne pas utiliser dehors ou sur des
surfaces mouillées.
• Les jeunes enfants doivent être
surveillés pour s'assurer qu'ils ne
jouent pas avec l'appareil.
• Ne pas insérer de corps
étranger dans l'appareil.
• N'utiliser que tel que décrit
dans ce manuel, n'utiliser que
les accessoires recommandés
par le fabricant.
• Ne faire fonctionner aucun
appareil avec un chargeur
endommagé ou après un
dysfonctionnement, ou s'il a été
endommagé.
• Tenir le chargeur et les fils à
l'écart des surfaces chaudes.
• Ne pas débrancher en tirant
sur le fil. Pour débrancher, tenir
le chargeur, pas le fil.
• Pour réduire le risque
d'électrocution, ne jamais faire
fonctionner le produit avec
les mains mouillées, ne pas le
plonger dans l'eau ni renverser
du liquide dedans.
• Ne pas utiliser avec une
ouverture bouchée ; retirer
la poussière, les peluches, les
cheveux et tout ce qui peut
réduire la circulation d'air.
• Eteindre toutes les commandes
avant de débrancher.
• Ne pas utiliser pour aspirer
des produits inflammables ou
combustibles comme l'essence,
les allumettes, ou l'utiliser dans
des zones où ils peuvent être
présents.
• Ne pas aspirer une matière
qui brûle ou fume, comme les
Page 59

cigarettes, les allumettes ou les
59
cendres chaudes.
• Ne pas utiliser sans les filtres en
place.
• Cet appareil n'est prévu que
pour un usage domestique.
• Si le chargeur est endommagé,
il doit être remplacé par le
même type.
• L'appareil n'est pas prévu
pour être utilisé par des
personnes (y-compris les
enfants) ayant des capacités
physiques, sensorielles ou
mentales réduites, ou un
manque d'expérience et de
connaissance, sauf si elles sont
supervisées ou reçoivent des
instructions concernant l'usage
de l'appareil, par une personne
responsable de leur sécurité.
• Les enfants doivent être
surveillés pour s'assurer qu'ils ne
jouent pas avec l'appareil.
• En chargeant l'appareil,
l'interrupteur doit être coupé.
• L'appareil ne doit pas être
utilisé par les enfants ou les
personnes physiquement
diminuées.
• Cet appareil n'est pas un
jouet, et s'il n'est pas utilisé
correctement, cela peut
entrainer des dégâts non
nécessaires ou des pannes.
Attention
• Ne pas utiliser votre appareil
à l'extérieur ou sur une surface
mouillée ou pour aspirer des
articles mouillés. Ne jamais
utiliser le produit pour aspirer de
l'eau.
• Ne pas aspirer des objets durs
ou pointus, des allumettes, des
cendres chaudes, des mégots
de cigarette ou autres articles
similaires.
• Ne pas disperser ou aspirer
des liquides inflammables, des
liquides de nettoyage, des
aérosols ou leurs vapeurs.
• Ne pas passer sur le fil de
chargement en utilisant votre
appareil, ou le débrancher en
tirant sur le fil.
• Ne pas continuer à utiliser votre
appareil ou le chargeur s'il
semble défectueux.
• Ne pas remplacer les batteries
avec des piles
non-rechargeables.
• La batterie doit être retirée de
l'appareil avant de le jeter
• L'appareil doit être débranché
de la prise de courant pour
retirer la batterie
• La batterie doit être mise au
rebut de façon sécurisée
• Ne pas recharger des piles
non-rechargeables, la batterie
n'est pas remplaçable
Puissance du moteur : 350 W
Entrée d'adaptateur :
100-240 V ~ 50-60 Hz 0,5 A
Sortie :
25.0V 0.5A 12.5W
29.0V 0.5A 14.5W
Type de batterie :
25,2 V, 2000 mAh, Li-ion
Durée de chargement de la batterie :
3 à 5 heures
Volume du bac à poussière : 0,45 l
Durée de fonctionnement :
Modo de potencia máxima: ≥12 minutos
Modo de potencia mediados: ≥30 minutos
Modo de potencia mínima: ≥60 minutos
Page 60

Nom des pièces principales
60
Touche Marche-
Arrêt
Bouton de mode.
Témoins de
chargement
Clip de
dégagement
Tuyau télescopique
Poignée de
transport
Verrou de
dégagement de
poussière
Bac à poussière
Point de connexion du
chargeur
dégagement du bac
à poussière
Crochet de
montage
Corps principal
Ensemble de
filtre
Bouton de
Voyants
Tête de sol
Chargeur
Embout plat
Support de
montage mural
Brosse
multi-usage
Fixations de
support mural.
Page 61

Instructions opérationnelles
61
Comment utiliser votre aspirateur
S'assurer que l'aspirateur est complètement chargé et assemblé avant
l'utilisation. Faire très attention en aspirant des escaliers.
1.
Il y a deux réglages de puissance sur l'aspirateur-balai : mode Max.
(plus grande puissance d'aspiration mais durée de fonctionnement
plus courte, environ 15 min.) et mode
Eco (moins de puissance d'aspiration
avec une durée de fonctionnement plus
longue, environ 45 min.).
L'aspirateur-balai démarre toujours en
mode Max. La durée de fonctionnement
peut varier selon la surface à nettoyer.
2.
Pour le mode Max., appuyer simplement
sur le bouton Marche (1), tandis que
pour le mode Eco, appuyer sur le bouton
Marche (1) puis sur le bouton de mode
(2). Le voyant de mode Max. s'allume
et s'éteint quand le mode Eco est
sélectionné.
Réappuyer sur le bouton Marche pour
couper l'aspirateur-balai.
3.
Déplacer la tête de sol d'avant en arrière sur la surface. Faire des
passages réguliers. Ne pas appuyer trop fort ; laisser l'aspirateurbalai aspirer les débris. Des voyants se trouvent sur la tête de sol qui
s'allument automatiquement quand l'aspirateur-balai est en marche
pour aider la visibilité dans des zones ou des coins sombres.
4.
L'aspirateur-balai a des voaynts de charge, ce sont deux petits
voyants sur le manche.
En cours de chargement - le voyant bas clignote et celui du haut est
éteint
Demi-charge - le voyant bas est allumé et celui du haut clignote
Complètement chargé - les deux voyants sont allumés, ils s'éteignent
après 10 minutes
Lors de l'utilisation et que la batterie est presque déchargée, le
voyant du bas s'éteint et celui du haut clignote. Après 10 secondes
environ, l'aspirateur-balai s'arrête automatiquement.
5.
Il est conseillé de vider le bac à poussière après chaque usage. Pour
de meilleurs résultats, vérifier si les filtres sont propres (voir la section
« Dépose et nettoyage le bac à poussière et les filtres » dans ce
manuel.
2
Page 62

Instructions opérationnelles
62
Chargement de l'aspirateur
Avant usage, nous
recommandons que l'aspirateur
soit complètement chargé entre
3 et 4 heures. A l'achat, il y a
peu de charge, il faudra donc le
temps complet pour le charger
entièrement.
1.
Brancher le chargeur dans la
connexion en haut du corps
principal de l'aspirateur-balai. Il
recommandé que l'aspirateurbalai soit chargé sans les
accessoires et qu'il soit couché
sur une surface plane.
2.
Brancher le chargeur dans la
prise de courant.
3.
Le voyant de charge du bas
clignote pour indiquer le
chargement de l'appareil.
Laisser charger.
4.
Une fois complètement
chargé, le voyant de charge
arrête de clignoter et les deux
voyants sont allumés.
5.
Couper la prise de courant et
enlever le chargeur.
Remarque : Ne pas laisser
l'aspirateur-balai sans
surveillance ni le charger la
nuit. L'appareil ne fonctionne
pas quand il est en cours de
chargement.
Voyant de
mode Max.
Voyant du
haut
Voyant du
bas
Page 63
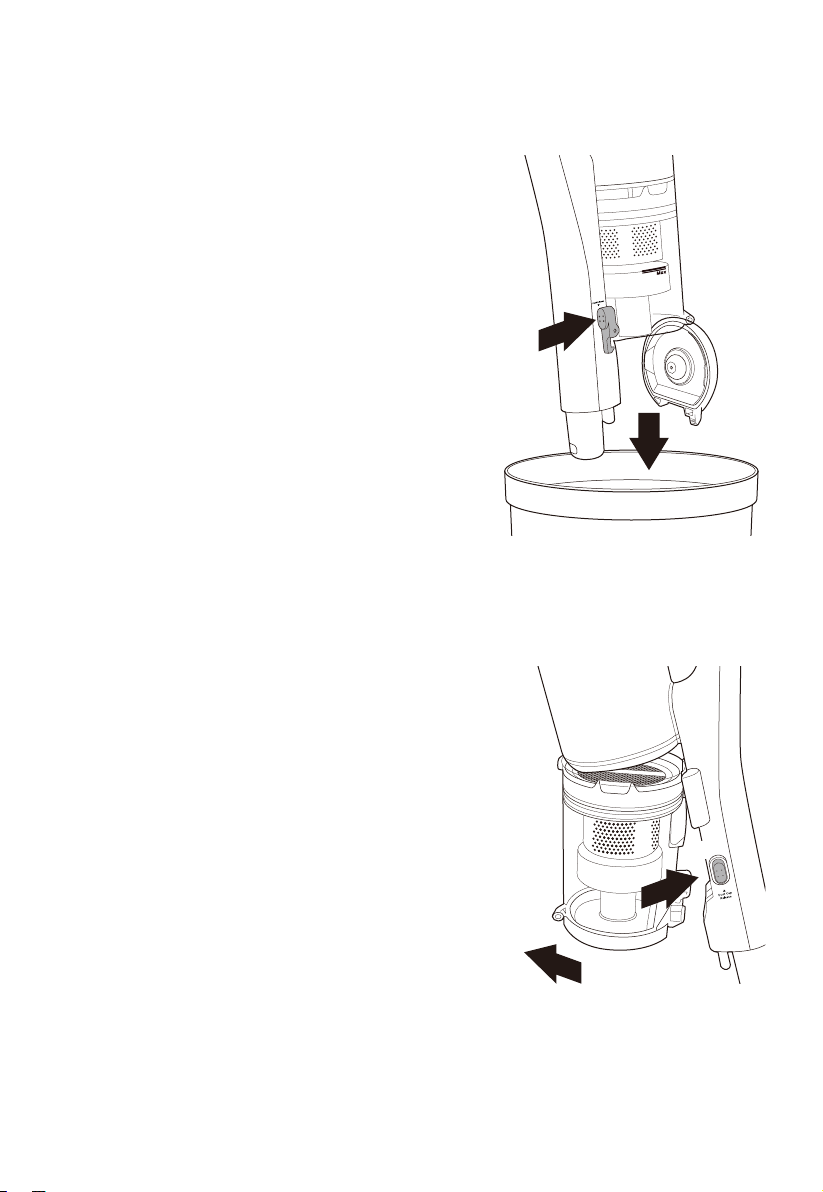
Guide d'entretien
63
Vider le bac à poussière
S'assurer que l'aspirateur-balai est arrêté
et que les accessoires sont retirés avant
de vides le bac à poussière.
1.
Tenir le bac au-dessus de la poubelle
et pousser le loquet de dégagement
de poussière sur le côté du bac à
poussière. Les débris tombent dans la
poubelle. Remarque : Ne pas laisser
le bac à poussière trop se remplir.
Ne pas dépasser la marque MAX.
Vider régulièrement. A chaque fois
que vous videz le bac à poussière,
vérifiez l'ensemble de filtre et taper
doucement au-dessus de la poubelle
pour retirer l'excès de poussière.
2.
Une fois vide, fermer le couvercle
jusqu'au clic.
Dépose et nettoyage le bac à poussière
et les filtres.
Avant de commencer le nettoyage,
s'assurer que l'aspirateur-balai n'est pas
en cours de chargement et qu'il est à
l'arrêt. Il est plus facile de retirer le bac
à poussière s'il n'y a pas d'accessoire sur
l'aspirateur-balai.
1.
Vider le bac à poussière comme
indiqué dans la section "Vider le bac
à poussière" de ce manuel.
2.
Appuyer sur le bac à poussière,
relâcher le bouton situé sur le côté du
corps principal près du bas du bac à
poussière (1). Puis retirer le bac à
poussière du corps principal en tenant
le bac bien (2).
1
2
Page 64

Guide d'entretien
64
3.
Le bac à poussière contient le filtre
circulaire en éponge et l'ensemble de
filtre. Retirer d'abord le filtre circulaire en
éponge en pinçant le ruban en haut du
filtre et en tirant vers le haut, puis le mettre
de côté.
4.
Pincer un des côtés de l'ensemble de
filtre et tirer vers le haut pour le sortir
du bac à poussière. Taper doucement
sur l'ensemble de filtre au-dessus de la
poubelle pour retirer les gros volumes de
poussière.
Remarque : Ne pas laisser le bac à
poussière trop se remplir. Ne pas dépasser
la marque MAX. Vider régulièrement.
5.
Retirer ce qui reste de poussière de
l'ensemble de filtre avec une brosse
douce ou un pinceau à peinture propre.
Le filtre peut être divisé en trois partie.
Tenir la section supérieure et tourner la
section inférieure dans le sens de la flèche
et de l'icône de déverrouillage.
6.
Rincer le bac à poussière, les pièces de
l'ensemble de filtre et le filtre circulaire en
éponge sous l'eau tiède jusqu'à ce que
l'eau soit propre et laisser sécher pendant
24 heures.
Page 65
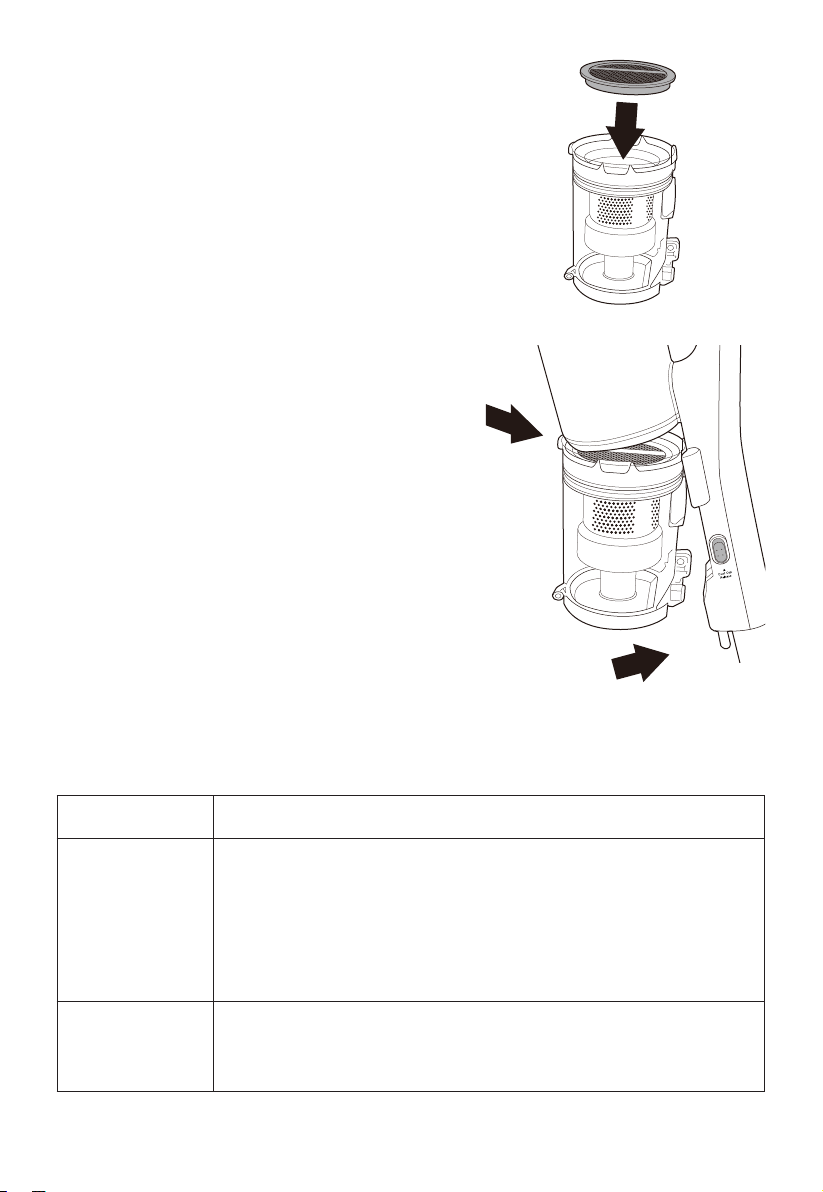
Guide d'entretien
65
7.
Une fois que toutes les pièces sont
bien sèches, réassembler les pièces
de filtre en suivant les flèches et l'icône
de cadenas verrouillé et le remettre
dans le bac à poussière. Ne pas
oublier de mettre le filtre circulaire en
éponge en haut du filtre.
8.
Replacer le bac à poussière dans
le corps principal en accrochant le
profilé en haut du bac à poussière
dans la prise du corps (1). Pousser
le bac à poussière contre le corps
principal jusqu'au (2).
Remarque : Il est important d'entretenir
et nettoyer les filtres. Un filtre bouché
réduit la puissance d'aspiration et
peut diminuer la durée de vie de
l'aspirateur-balai.
1
Le guide ci-dessous est la recommandation de la fréquence de
nettoyage des filtres :
Type de filtre Intervalles recommandés de nettoyage
• Secouer les débris pour vider le bac à poussière.
Utiliser une brosse de dépoussiérage douce pour
Ensemble de
filtre
Filtre
circulaire en
éponge
enlever les amas de poussière.
• Rincer sous l'eau tiède une fois par mois ou plus
souvent si nécessaire.se under warm water once a
month or more often if required.
• Retirer de temps en temps la poussière et les
débris. Le filtre peut également être rincé à l'eau
tiède une fois par mois.
2
Page 66

Guide d'entretien
66
Dépose et nettoyage de la tête de sol et de la brosse rotative
Avant de commencer le nettoyage,
s'assurer que l'aspirateur-balai n'est
pas en cours de chargement et qu'il est
coupé, et retirer la tête de sol du reste
de l'aspirateur-balai.
Si la brosse rotative se coince pendant
l'utilisation, le système d'autoprotection
coupe l'aspirateur. Si cela se produit,
procéder de la façon suivante.
1.
Retourner la tête de sol (I). Pour
accéder à la brosse rotative, glisser
la plaque marquée de flèches, vers
la droite.
2.
Tirer sur la brosse rotative avec un
angle hors de la tête de sol. Les
amas de cheveux, etc., peuvent
être maintenant retirés de la brosse
rotative. Des ciseaux peuvent être
utilisés pour couper les cheveux du
rouleau si cela est nécessaire, en
prenant soin de ne pas couper les
poils de brosse.
1
I
2
3
3.
Une fois que la brosse est nettoyée,
la remettre en alignant le côté
gauche ouvert du rouleau avec
l'étoile de la tête de sol. Vous devrez
peut-être pivoter un peu la tête de
rouleau pour la verrouiller en place.
4.
Pousser l'autre extrémité du rouleau
aussi loin que possible. Remettre la
plaque en place vers la gauche
pour la verrouiller.
4
Page 67

Guide d'entretien
67
Nettoyer un blocage
S'assurer que l'aspirateur-balai n'est pas branché dans la prise et qu'il est
coupé avant de le démonter.
L'aspirateur-balai ne se bloque que si le bac est rempli et dépasse le
niveau Max., que les filtres sont bouchés ou qu'un gros objet a été aspiré.
1.
Vérifier le bac à poussière et le vider si nécessaire.
2.
Vérifier les deux filtres dans l'unité, retirer les débris et la poussière, et
les laver si nécessaire.
3.
Si la tête de sol, l'embout plat ou la brosse multi-usage est en cours
d'utilisation, les retirer du corps principal ou du tuyau et vérifier les
blocages. Retirer les blocages.
4.
Détacher le tuyau et regarder dedans pour voir s'il y a un blocage.
S'il y en a un, utiliser le manche d'un balai pour retirer l'obstruction.
Prendre soin de ne pas endommager le tuyau au cours du processus.
5.
Vérifier si des cheveux ou des fils ne se sont pas enroulés sur la brosse
rotative. Couper avec des ciseaux. Pour le faire en sécurité, les retirer
comme indiqué dans la section "Retirer et nettoyer la brosse rotative
de la tête de sol " dans ce manuel.
Rangement de l'aspirateur-balai sans fil
Votre aspirateur-balai peut être rangé de façon sécurisée en le pendant
au support mural fourni avec le produit ou en retirant l'accessoire et
en les rangeant ensemble dans une armoire. Chaque façon évitera la
chute du produit et les dommages.
Toujours l'arrêter et le débrancher de la prise de courant avant de le
ranger.
1.
Retirer les accessoires si l'aspirateur-balai les a utilisés la dernière fois.
2.
Ranger l'aspirateur-balai et les accessoires de façon sécurisée dans
une endroit sec.
Page 68

Ranger l'aspirateur-balai sur le support mural.
68
1.
Trouver un endroit approprié dans l'habitat où vous
voulez ranger votre aspirateur-balai.
2.
Marquer le trou de vis sur le mur avec un crayon.
Nous recommandons de lever légèrement
l'aspirateur-balai du sol.
3.
Utiliser les fixations de support mural fournies si elles
conviennent à votre mur.
4.
Visser les fixations de support mural au mur (voir
l'illustration indiquant la façon de suspendre le
support au mur).
5.
L'aspirateur-balai peut être monté au mur. Le crochet
se trouve au dos du corps principal près du manche.
Page 69

Dépannage
69
Problème Solution
1.
Vider le bac à poussière
2.
L'aspirateur-balai
ne nettoie pas bien.
L'aspirateur-balai
s'est arrêté ou ne
fonctionne pas.
Les voyants sur
la tête de sol
s'éteignent et/ou le
voyant du moteur
s'allume en rouge.
Retirer l'excès de poussière des filtres.
3.
Laver les filtres
4.
Vérifier s'il y a des blocages
1.
Charger l'aspirateur (vérifier si les prises de
courant fonctionnent et si l'interrupteur est
en marche)
2.
Il pourrait être bloqué
- vérifier les articles 1 à 4 ci-dessus
3.
Autoprotection du produit activée. Arrêter
l'aspirateur et laisser le moteur refroidir
pendant une heure avant de le réutiliser.
1.
La tête de sol est verrouillée, voir la section
« Dépose et nettoyage de la tête de sol et
de la brosse rotative » dans ce manuel.
2.
Le moteur de brosse rotative chauffe en
raison de surcharge. Cela peut être dû à
une utilisation prolongée sur un tapis à poil
long ou sur une moquette détendue. Laisser
l'aspirateur refroidir pendant une heure puis
utiliser le mode Eco plutôt que le mode Max.
0LGHD,WDOLD6UODVRFLRXQLFR
9LDOH/XLJL%RGLR
0LODQR0,
Page 70

Usisivač
MCS2025GB
MOLIMO VAS,
PROČITAJTE PRIRUČNIK
PRIJE UPOTREBE I
SAČUVAJTE GA ZA
BUDUĆU UPOTREBU
KORISNIČKI PRIRUČNIK
Upozorenja: Prije upotrebe
ovog proizvoda, pažljivo
pročitajte ovaj priručnik
i sačuvajte ga za buduću
upotrebu.
Dizajn i specifikacije
podložne su promjenama bez
prethodne najave, u svrhu
poboljšanja proizvoda. Za
detalje se obratite prodavaču
ili proizvođaču.
Page 71

Važne upute za sigurnost
71
• Prije prve uporabe pažljivo
pročitajte ovaj priručnik, čak i
ako ste upoznati s ovom vrstom
proizvoda.
• Priložene sigurnosne mjere
opreza smanjuju rizik od požara,
električnog udara i ozljeda ako
ih se pravilno pridržavate.
• Čuvajte ovaj priručnik na
sigurnom mjestu za buduće
reference, zajedno sa
popunjenom garancijskom
karticom, računom i kutijom.
• Kad koristite električni uređaj,
uvijek slijedite osnovne
sigurnosne mjere i mjere
sprječavanja nesreća,
uključujući sljedeće:
• Prije uključivanja osigurajte da
električni napon i frekvencija
adaptera za punjenje
odgovaraju onima navedenim
na naljepnici.
• Ne ostavljajte usisavač kad je
uključen u struju.
• Odspojite utikač iz utičnice
kada se ne koristi i prije čišćenja
ili servisiranja.
• Koristite samo kako je opisano
u ovom priručniku, koristite
samo dodatke koje preporuči
proizvoiđač.
• Nemojte koristiti uređaje s
oštećenim adapterom za
punjenje ili nakon nepravilnog
rada uređaja ili nakon bilo
kojeg oštećenja.
• Držite adapter i kablove za
punjenje dalje od grijanih
površina.
• Ne isključujte utikač izvlačenjem
kabela. Kako biste iskopčali
utikač primite adapter za
punjenje, a ne kabel.
• Kako biste smanjili rizik od
električnog udara, proizvod
nikada ne primajte mokrim
rukama, ne potapajte ga u
vodu i ne prosipajte tekućinu u
proizvod.
• Ne upotrebljavajte s blokiranim
otvorima; čuvajte od prašine,
dlaka, kose i svega što bi moglo
smanjiti protok zraka.
• Isključite sve kontrole prije
isključivanja.
• Ne koristiti na otvorenom ili na
vlažnim površinama.
• Djecu treba nadzirati kako se
ne bi igrala s uređajem.
• U uređaj ne stavljajte nikakve
predmete.
• Ne upotrebljavajte za
usisavanje zapaljivih tekućina
ili predmeta, kao što su benzin,
šibice, ili koristite na mjestima
gdje isti mogu biti prisutni.
• Ne usisavajte ništa što gori ili se
dimi, poput cigareta, šibica ili
vrućeg pepela.
Page 72

• Ne koristite bez filtra.
72
• Ovaj je uređaj namijenjen samo
uobičajenoj kućanskoj uporabi.
• Ako je adapter za punjenje
oštećen, mora se zamijeniti
istim tipom.
• Uređaj nije namijenjen
osobama (uključujući djecu) sa
smanjenim fizičkim, senzornim
ili mentalnim sposobnostima ili
nedostatkom iskustva i znanja,
osim ako im nije dodijeljen
nadzor ili upute o korištenju
uređaja od strane osobe
odgovorne za njihovu sigurnost.
• Djecu treba nadzirati kako bi
se osiguralo da se ne igraju s
uređajem.
• Pri punjenju uređaja uređaj
mora biti isključen.
• Ovaj uređaj ne smiju koristiti
djeca ili ljudi koji su fizički
ugroženi.
• Ovaj uređaj nije igračka i ako
se ne koristi na pravilan način,
može dovesti do nepotrebnih
oštećenja ili kvarova u radu.
Oprez
• Ne koristite vani niti na bilo
kojoj mokroj površini ili za mokro
usisavanje. Nikada ne koristite
proizvod za usisavanje vode.
• Ne skupljajte tvrde ili oštre
predmete, šibice, vrući pepeo,
opuške cigareta ili druge slične
predmete.
• Ne prskajte i ne usisavajte
zapaljive tekućine, tekućine
za čišćenje, aerosole ili njihove
pare.
• Nemojte prelaziti preko kabela
za napajanje tijekom upotrebe
uređaja ili vaditi utikač
povlačenjem kabela.
• Ne nastavljajte koristiti svoj
uređaj ili punjač ako se čini
neispravnim.
• Ne mijenjajte baterije
baterijama koje se ne mogu
puniti.
• Baterija mora biti izvađena iz
uređaja prije odlaganja
• Kad uklanjate bateriju, uređaj
mora biti iskopčan iz mrežnog
napajanja
• Bateriju je potrebno sigurno
odložiti
• Nemojte ponovno puniti
baterije koje se ne mogu puniti,
baterija nije zamjenjiva
Snaga motora: 350 W
Ulazna snaga adaptera:
100-240 V ~ 50-60 Hz 0,5 A
Izlaz:
25.0V 0.5A 12.5W
29.0V 0.5A 14.5W
Vrsta baterije:
25,2 V, 2000 mAh, Li-ion
Vrijeme punjenja baterije: 3-5 sati
Zapremina spremnika za prašinu:
0,45 L
Vrije rada:
Maks. snaga: ≥12 min
Közepén. snaga: ≥30 min
Min. snaga: ≥60 min
Page 73
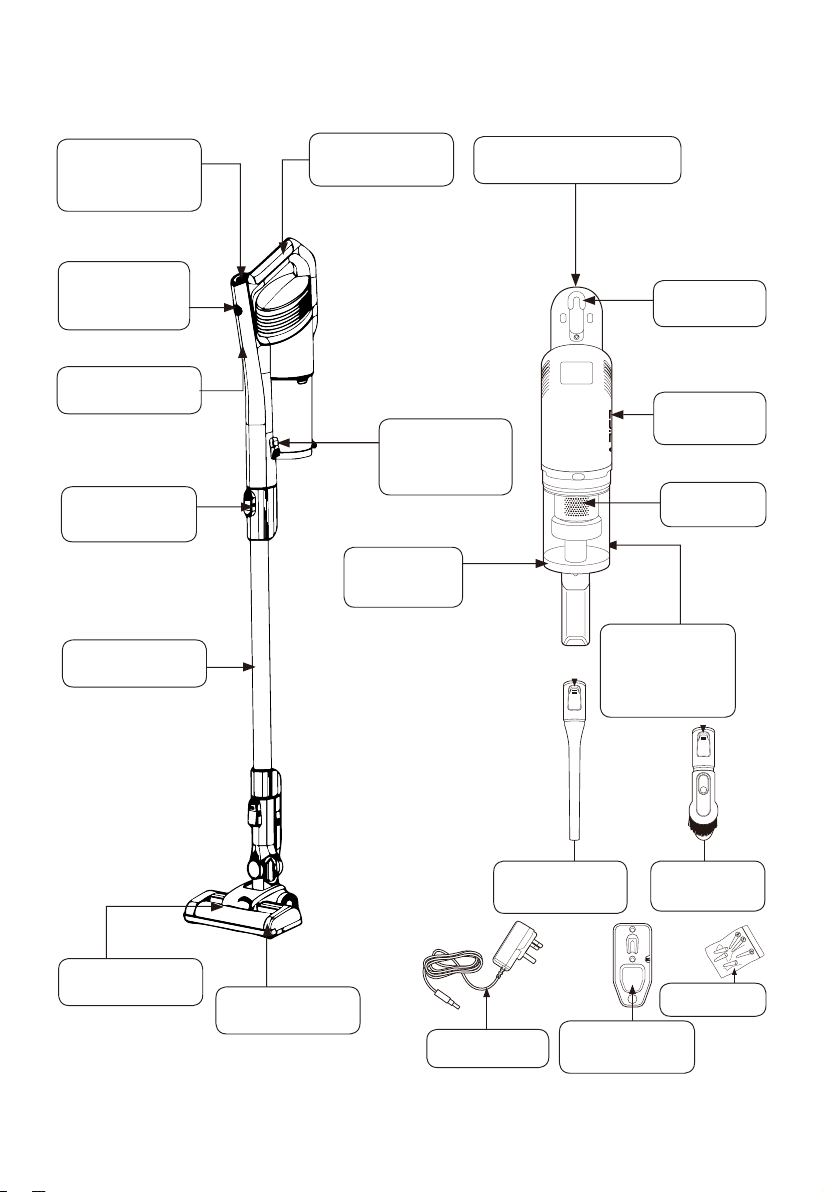
Nazivi glavnih dijelova
73
Gumb za
uključivanje/
isključivanje
Gumb za
odabir načina
rada
Indikatorska
svjetla punjenja
Spojka za
otpuštanje
Produžna cijev
Ručka za
nošenje
Spojka za
otpuštanje
prašine
Spremnik za
prašinu
Točka za priključivanje
punjača
Kuka za
nosač
Glavno
tijelo
Sklop filtra
Gumb za
otpuštanje
spremnika za
prašinu
Svjetla
Podna glava
Punjač
Nastavak za
namještaj
Nosač za zidnu
montažu
Višenamjenska
četka
Instalacija nosača
za montažu
Page 74
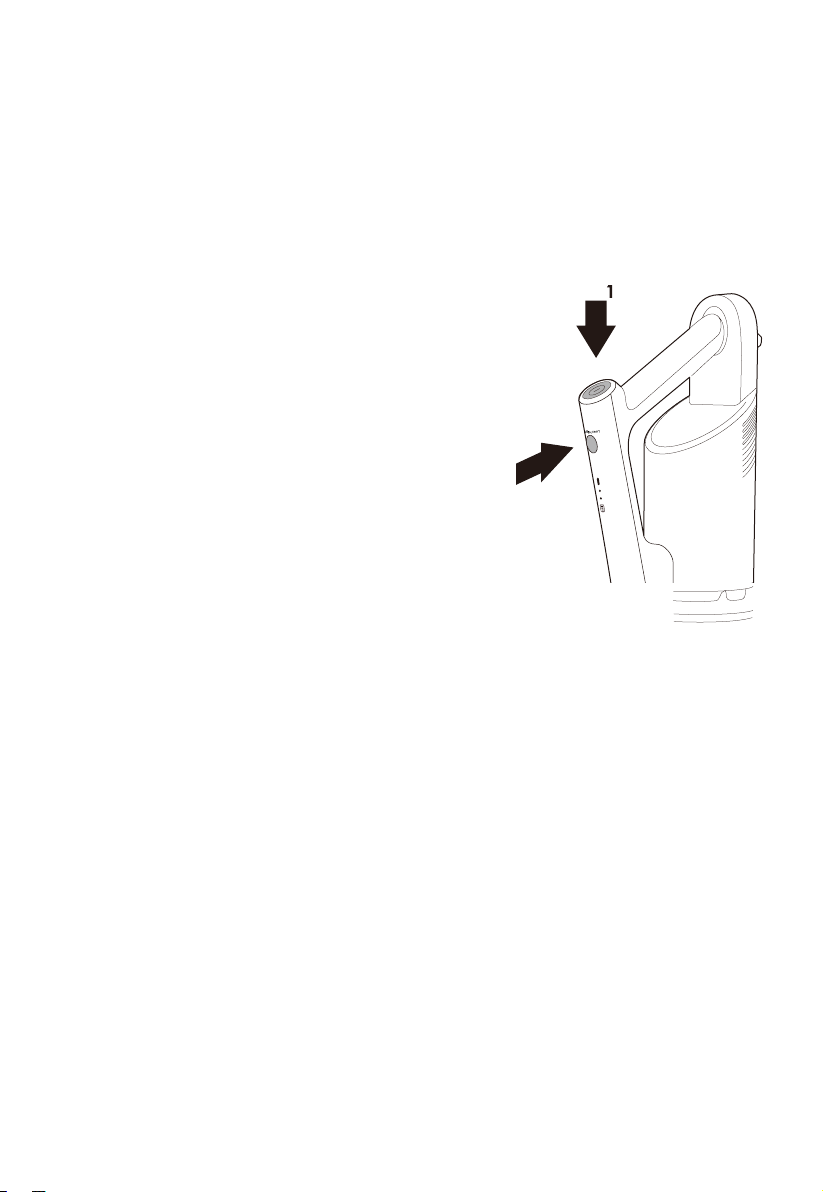
Upute za uporabu
74
Kako koristiti vaš usisivač
Provjerite je li usisavač potpuno napunjen i sastavljen prije upotrebe.
Uvijek pazite kod usisavanja stepenica.
1.
Na štapnom usisivaču postoje dvije postavke snage: max način rada
(ima veću snagu usisavanja, ali kraće vrijeme rada, oko 15 min) i
eko način rada (niža snaga usisavanja s
dužim radnim vremenom, oko 45 min).
Štapni usisivač će se uvijek pokrenuti
u max modu. Trajanje rada može se
razlikovati ovisno o površini koja se čisti.
2.
Za način rada "max" jednostavno
pritisnite tipku za uključivanje (1), dok za
režim "eko" pritisnite gumb za napajanje
(1), a zatim gumb za odabir načina rada
(2). Svjetlo maks. načina rada će se
upaliti kad je u režimu "max" i ugasiti se
kad je prebačeno na "eko" način rada.
Po potrebi ponovno pritisnite gumb za
napajanje da biste isključili štapni usisivač.
3.
Pomičite podnu glavu natrag-naprijed po površini. Koristite
ujednačene poteze. Ne pritiskajte snažno; dopustite da štapni
usisivač pokupi ostatke. Na podnoj glavi nalaze se svjetla koja će se
automatski upaliti kad štapni usisivač, kako bi pomogla u vidljivosti u
tamnim kutovima/područjima.
2
4.
Štapni usisivač ima indikatorske lampice napunjenosti, to su dvije
male lampice na ručici.
Tijekom punjenja - donje svjetlo treperi, a gornje svjetlo je ugašeno
Djelomična napunjenost - donje svjetloje uključeno, a gornje svjetlo
treperi
Potpuno napunjenost - oba svjetla su uključena, ugasit će se nakon
10 min
Kad se koristi i baterija gotovo da nestane, donje svjetlo će se ugasiti,
a gornje svjetlo će bljeskati. Nakon otprilike 10 sekundi, štapni usisivač
se automatski isključuje.
5.
Preporučljivo je isprazniti spremnik za prašinu nakon svake uporabe.
Za najbolje performanse provjerite jesu li filtri čisti (pogledajte
"Uklanjanje i čišćenje spremnika za prašinu i filtera" u ovom priručniku).
Page 75
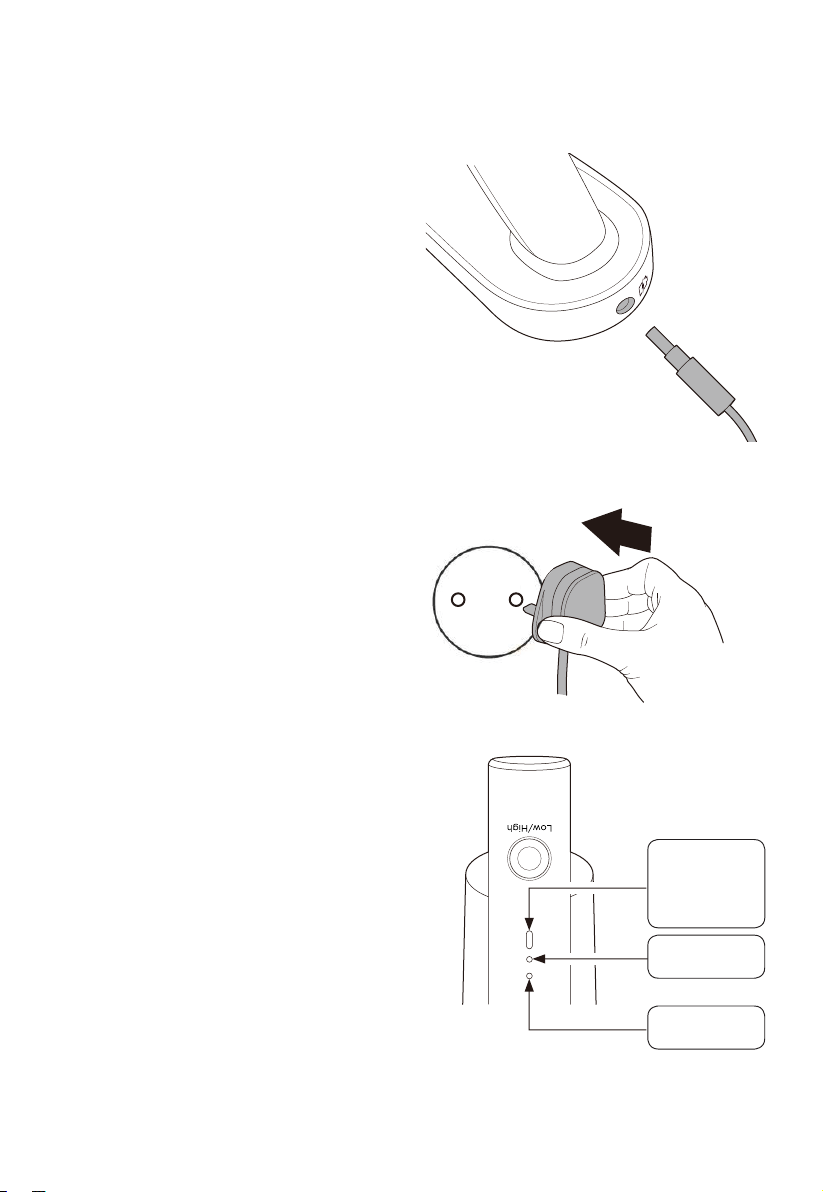
Upute za uporabu
75
Punjenje usisivača
Prije upotrebe, preporučujemo
da se štapni usisivač napuni u
potpunosti između 3 i 4 sata.
Kada ga kupite, bit će donekle
napunjen, pa možda neće trebati
puno vremena za potpuno
punjenje.
1.
Kraj punjača uključite u
mjesto priključka punjača na
vrhu glavnog tijela štapnog
usisivača. Preporučuje se
punjenje štapnog usisivača bez
ikakvih nastavaka i uređajem
položeneim na ravnu površinu.
2.
Uključite punjač u napajanje.
3.
Pokazivač slabe napunjenosti
će se upaliti i ugasiti kako bi
pokazao da se uređaj puni.
Ostavite da se puni.
4.
Kad se potpuno napuni,
indikatorska lampica
napunjenosti prestat će
treperiti i oba svjetla će
zasvijetliti.
5.
Isključite iz napajanja i izvadite
punjač.
Napomena: Nemojte ostavljati
štapni usisivač bez nadzora
ili ne ostavljajte preko noći
tijekom punjenja. Uređaj neće
raditi tijekom punjenja.
Svjetlo maks.
načina rada
Gornje
svjetlo
donje svjetlo
Page 76

Vodič za održavanje
76
Pražnjenje spremnika za prašinu
Prije pražnjenja spremnika za prašinu
osigurajte da je štapni usisivač isključen i
da su svi dodaci uklonjeni.
1.
Držite sklop spremnika za prašinu nad
kantom i gurnite zasun za ispuštanje
prašine na strani spremnika za
prašinu. Krhotine će pasti u kantu
za smeće. Imajte na umu: Nemojte
dopustiti da se spremnik za prašinu
previše napuni. Ne prelazite oznaku
razine MAX. Praznite redovito. Svaki
put kada praznite spremnik za
prašinu, provjerite sklop filtra i lagano
protresite nad kantom kako biste
uklonili suvišnu prašinu.
2.
Nakon pražnjenja zatvorite poklopac
dok ne začujete klik.
Uklanjanje i čišćenje spremnika za
prašinu i filtera
Prije početka bilo kakvog čišćenja
provjerite da se usisivač ne puni i da
je isključen. Lakše je skinuti spremnik za
prašinu bez dodataka na usisivaču.
1.
Ispraznite spremnik za prašinu kao
što je prikazano u odjeljku 'Pražnjenje
spremnika za prašinu' u ovom
priručniku.
2.
Pritisnite gumb za otpuštanje
spremnika za prašinu smješten na
bočnom dijelu kućišta, blizu dna
spremnika za prašinu (1). Potom
spremnik za prašinu izvucite s glavnog tijela, držeći spremnik prilično
uspravno (2).
1
2
Page 77
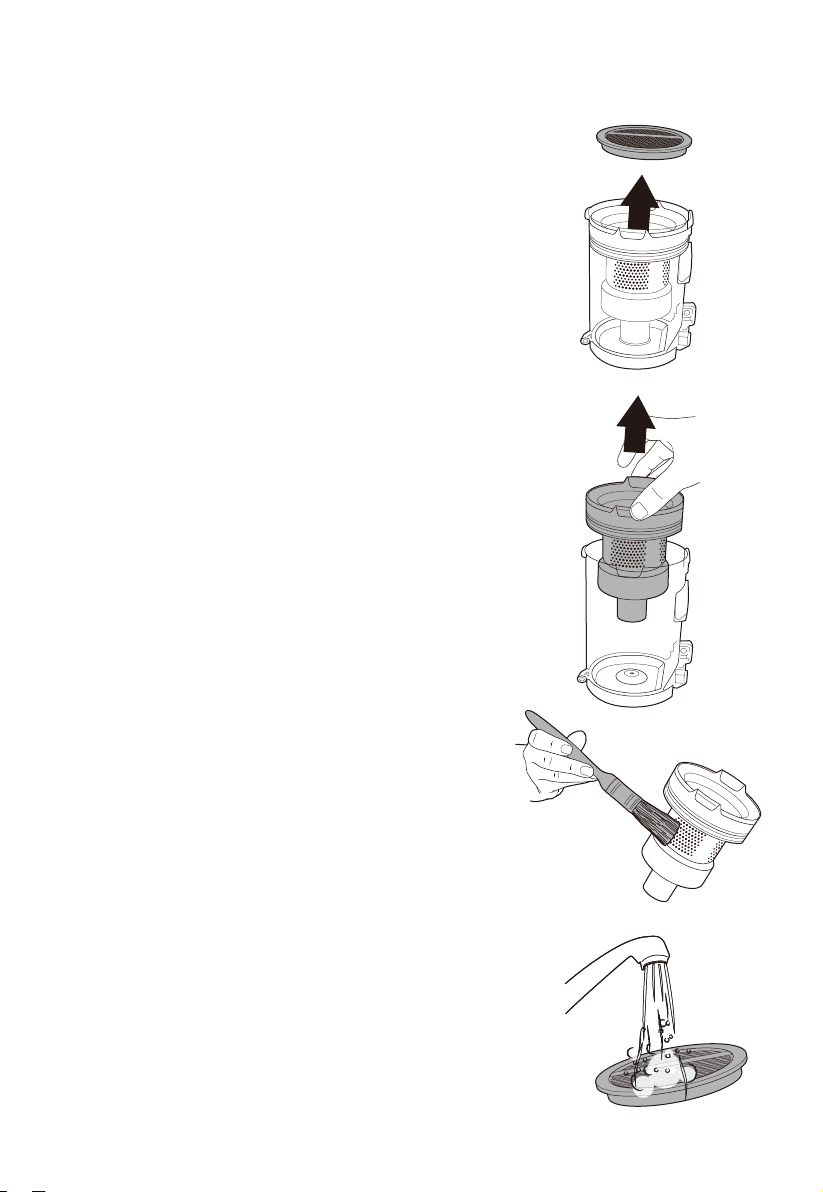
Vodič za održavanje
77
3.
Spremnik za prašinu sadrži kružni spužvasti
filtar i filtar. Prvo uklonite kružni spužvasti
filtar tako što ćete primiti trake na vrhu
filtera i povući prema gore, a zatim ga
odložiti.
4.
Zakrenite obje strane sklopa filtra i
povucite prema gore od spremnika za
prašinu. Lagano protresite sklop filtra nad
kantom kako biste uklonili velike količine
prašine.
Napomena: Nemojte dopustiti da se
spremnik za prašinu previše napuni. Ne
prelazite oznaku razine MAX. Praznite
redovito.
5.
Uklonite višak prašine sa sklopa filtra
mekom četkom ili čistom soboslikarskom
četkom. Filtar se može rastaviti na tri
dijela. Držite gornji dio i uvijte donji dio
u smjeru strelice i ikone za otključavanje
katanca.
6.
Spremnik za prašinu, dijelove sklopa i
kružni spužvasti filtar isperite pod toplom
vodom dok voda ne bude čista i ostavite
da se osuši 24 sata.
Page 78

Vodič za održavanje
78
7.
Nakon što se svi dijelovi temeljno
osuše, sastavite dijelove sklopa filtra
slijedeći strelicu i ikonu zaključane
bravice i vratite natrag u spremnik za
prašinu. Ne zaboravite staviti kružni
spužvasti filtar na vrh sklopa filtra.
8.
Zamijenite spremnik za prašinu na
glavnom tijelu tako da zakačite
kanal na vrhu spremnika za prašinu
te pričvrstite nastavak na glavno
tijelo (1). Gurnite spremnik za prašinu
natrag prema glavnom tijelu dok ne
čujete da klikne na svom mjestu (2).
Napomena: Važno je redovito
održavati i čistiti filtre. Začepljeni filter
smanjuje snagu usisavanja i može
skratiti vijek trajanja vašeg usisivača.
1
Ispod je preporučeni vodič za učestalost
čišćenja filtera:
Tip filtra Preporučena vremena čišćenja
• Istresite ostatke kad ispraznite spremnik s prašinom.
Koristite meku četkicu za prašinu kako biste nježno
Sklop filtra
Kružni
spužvasti filtar
uklonili nakupine prašine.
• Isperite pod toplom vodom jednom mjesečno ili
češće, ako je potrebno.
• Povremeno uklonite prašinu/nečistoće po potrebi.
Filter se također može isprati pod toplom vodom
jednom mjesečno.
2
Page 79

Vodič za održavanje
79
Uklanjanje i čišćenje podne glave i četke s valjkom
Prije početka bilo kakvog čišćenja,
osigurajte da se štapni usisivač ne puni i
da je isključen i uklonite podnu mlaznicu
s ostatka usisivača.
Ako se tijekom upotrebe četka s valjkom
zaplete, samozaštitni sustav će isključiti
usisivač. Ako se to dogodi, slijedite
korake u nastavku.
1.
Okrenite glavu podne četke (I)
naopako. Kako biste pristupili četki s
valjkom, pomaknite jezičak označen
strelicama desno.
2.
Izvucitečetku s valjkom k pod malim
kutom prema gore i van glave
podne četke. Svaka nakupina dlake
itd. sada se može ukloniti iz četke s
valjkom. Škare se mogu koristiti za
rezanje bilo koje dlake s valjka ako je
potrebno, pri čemu morate paziti da
ne izrežete niti jednu četkicu.
1
I
2
3
3.
Kad se očisti valjkasta četka,
zamijenite četku s valjkom
poravnavajući lijevu, otvorenu stranu
valjka sa stošcem u obliku zvijezde
na glavi podne četke. Možda ćete
morati malo zakrenuti glavu valjka
kako biste je zaključali na svom
mjestu.
4.
Drugi kraj valjka gurnite dolje dok ide.
Pomaknite jezičak nalijevo kako biste
zaključali u mjestu.
4
Page 80

Vodič za održavanje
80
Uklanjanje blokade
Provjerite je li usisivač priključen u mrežni kabel i je li isključen prije
demontaže usisivača.
Štapni usisivač blokira se samo ako je spremnik za prašinu premašio razinu
'Max', filteri su začepljeni ili je usisan veliki predmet.
1.
Provjerite spremnik za prašinu i po potrebi ga ispraznite.
2.
Provjerite 2 filtra u uređaju, uklonite nečistoće/prašinu i po potrebi
operite.
3.
Ako ste koristili podnu glavu, nastavak za namještaj ili višenamjensku
četku, odvojite ih od glavnog tijela ili produžne cijevi i provjerite da li
postoje blokade. Uklonite sve blokade.
4.
Odvojite produžnu cijev i pogledajte prema dolje kako biste vidjeli
ima li blokada. Ako postoje, koristite ručicu metle za uklanjanje
blokada. Pripazite da ne oštetite cijev u postupku.
5.
Provjerite postoji li dlaka ili konac koji bi se mogli umotati u valjak
četke. Odrežite škarama. Da biste to učinili sigurno, uklonite kako je
prikazano u odjeljku "Uklanjanje i čišćenje četke s valjkom za podnu
glavu" ovog priručnika.
Skladištenje bežičnog štapnog usisivača
Vaš štapni usisivač se može sigurno spremiti vješanjem na zidni nosač koji
se isporučuje uz vaš proizvod ili uklanjanjem svih privitaka i spremanjem u
ormar. Bilo koji način pomoći će vam da izbjegnete prevrtanje proizvoda
i nanošenje štete.
Prije spremanja uvijek isključite uređaj i isključite mrežni kabel.
1.
Uklonite sve nastavke ako je štapni usisivač posljednji put korišten s
njima.
2.
Čuvajte štapni usisivač i nastavke na sigurnom i suhom mjestu.
Page 81

Skladištenje štapnog usisivača sa zidnim nosačem
81
1.
Pronađite odgovarajuće mjesto u svom kućanstvu
gdje želite spremiti vaš usisivač.
2.
Olovkom označite željene položaje rupa za vijke
na zidu. Preporučamo da štapni usisivač visi malo
podignut od poda.
3.
Upotrijebite isporučena pričvršćenja na zidu nosača
samo ako su prikladna za vašu vrstu zida.
4.
Privijte pričvrsne držače zidnog nosača i pričvrstite ih
na zid (pogledajte sliku na koji način nosač treba visiti
na zidu).
5.
Štapni se usisivač zatim može postaviti na zidni nosač.
Kuka za postavljanje može se naći na stražnjoj strani
glavnog tijela u blizini ručke.
Page 82

Rješavanje Problema
82
Problem Rješenje
1.
Ispraznite spremnik za prašinu
2.
Štapni usisivač ne
čisti dobro.
Štapni usisivač je
zaustavljen ili neće
raditi.
Svjetla na podnoj
glavi se isključuju i/ili
svjetlo pregrijavanja
motora svijetli
crveno.
Uklonite višak prašine s filtera
3.
Operite filtre
4.
Provjerite ima li blokada
1.
Napunite usisivač (provjerite da li mrežna
utičnica radi i da li je prekidač uključen)
2.
Može biti blokiran
- provjerite stavke gore od 1 do 4
3.
Aktivirana je automatska zaštita proizvoda.
Isključite usisivač i ostavite motor da se ohladi
sat vremena, a zatim pokušajte ponovo.
1.
Podna glava je blokirana, pogledajte
odjeljak "Uklanjanje i čišćenje podne glave i
četke s valjkom" u ovom priručniku.
2.
Motor četke s valjkom se pregrijao zbog
velikog opterećenja. To bi moglo biti
posljedica duže upotrebe na dugom tepihu
ili otiraču. Ostavite usisivač da se hladi sat
vremena, a zatim upotrijebite eko, a ne
maks. način rada.
0LGHD,WDOLD6UODVRFLRXQLFR
9LDOH/XLJL%RGLR
0LODQR0,
 Loading...