

Page 1
1 1
1:1
K
项目
库
文件名
A
1
2
4
6
3
5
1
2
4
6
3
5
B
C
D
E
F
G
H
A
B
C
D
E
F
G
H
技术要求(版本号: A, 2017-01)
1
2
3.
.印刷颜色:单黑
.装钉方式:打钉
说
4.警语部分大写字母字高>3mm.
明书的幅面大小为 145*210mm。
16161000A06970
:
广东美的生活电器制造有限公司
会 签
材料:100g双胶纸
卢灿飞
2018.05.09
容培旺
制 图
设 计
校 对
审 核
标准化
审 定
日 期
标记
处数 更 改 文件号 签 字 日 期
电饭煲
说明书 MIDEA-21851
(MB-FS5017)-0501
说明书
重点
校对项
1.版面尺寸
2.材质标注
3.物料编码
4.颜色标注
5.客户型号
6.产品名称
7.重量标注
8.电压功率
古广君
古广君
--- - -
--- - -
--- - -
145mm
210mm
Page 2

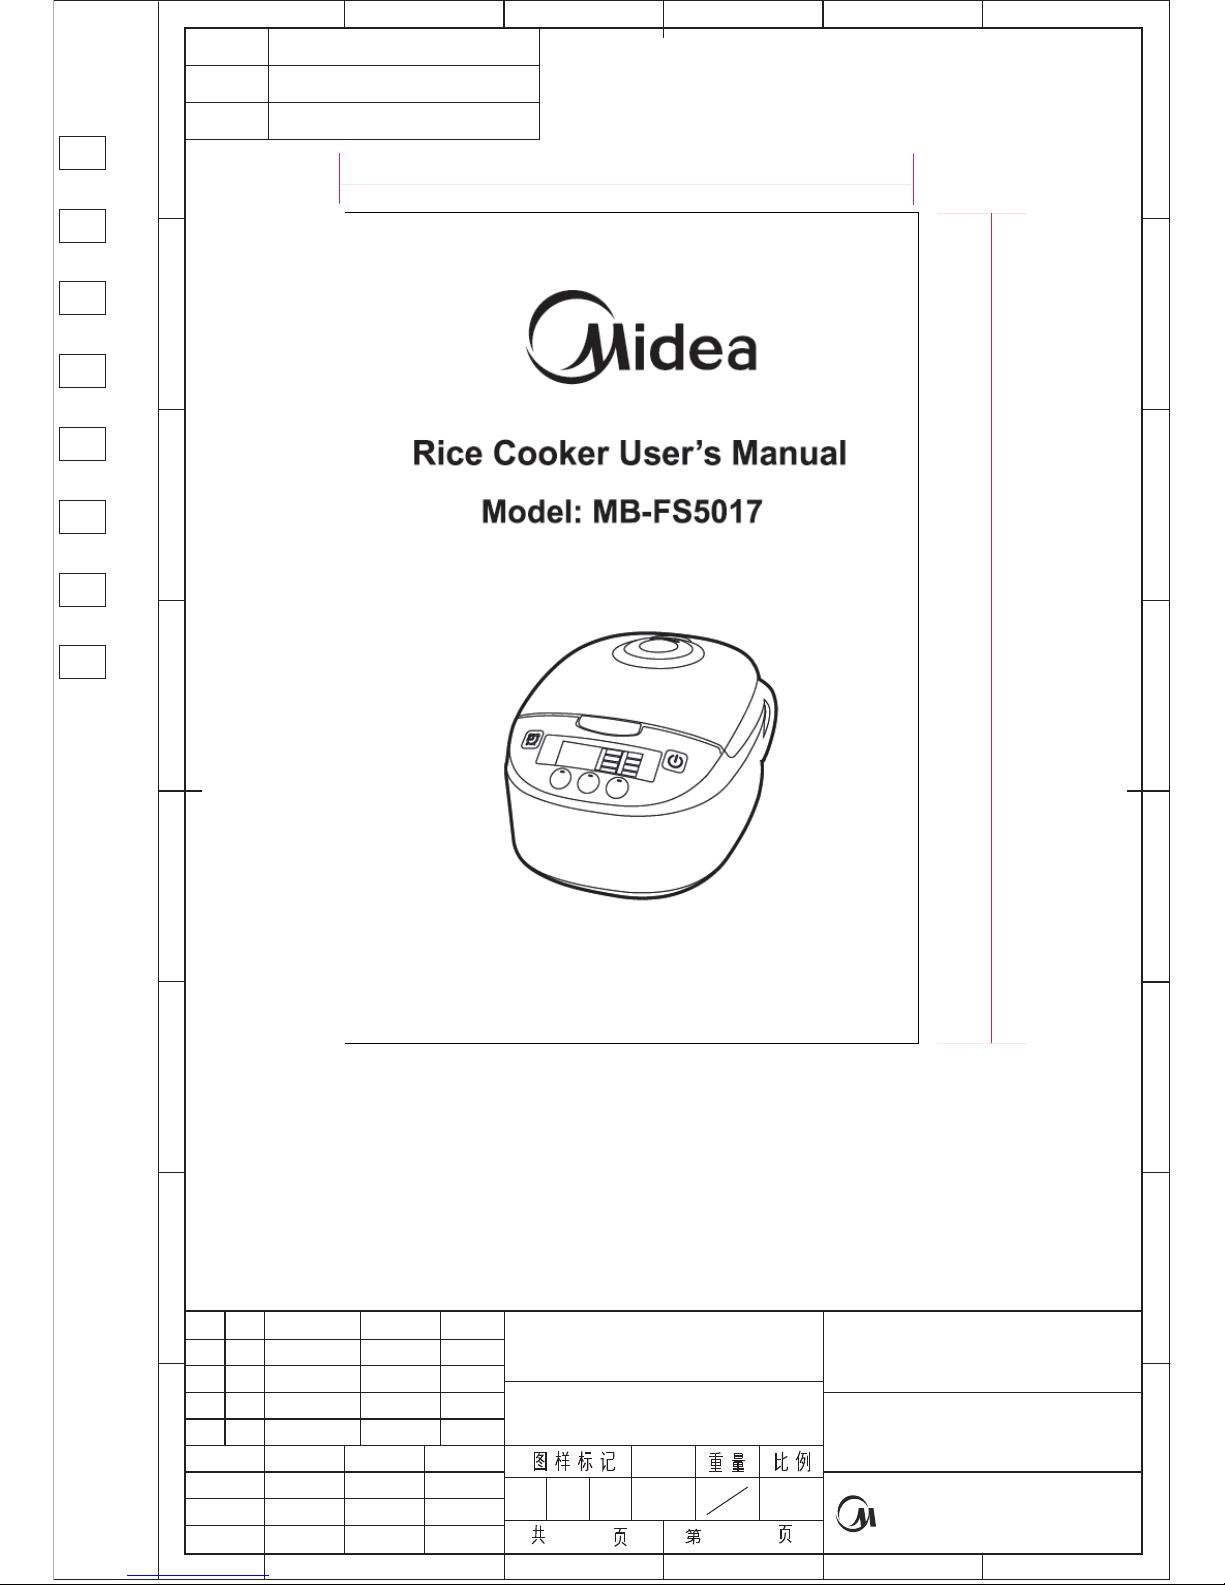
Rice Cooker User’s Manual
Model: MB-FS5017
Page 3

Page 4
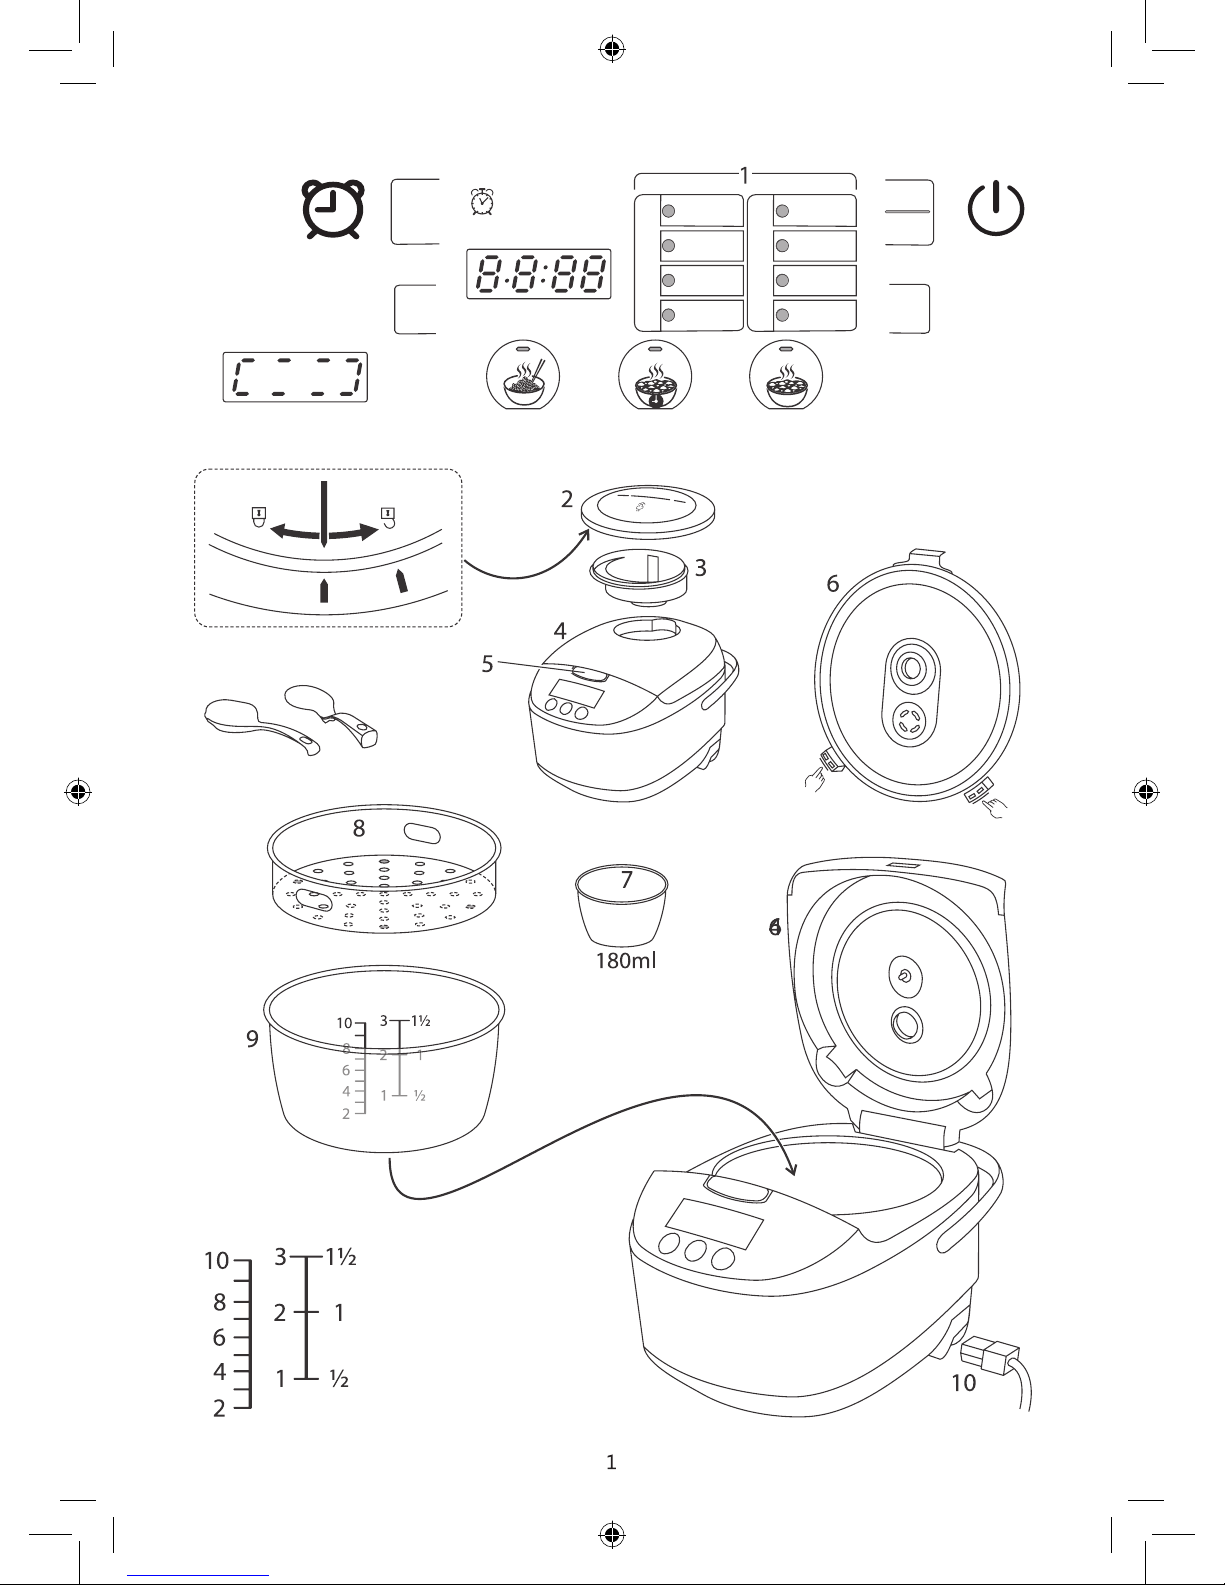
TIMER
HOUR
MIN
Meat
Soup
Yoghurt
Bread
Fish
Steam
Porridge
Cake
KEEP WARM
STOP
MENU
START
Rice Slow cook Stew
congee
rice
porridge
max
congee
rice
porridge
max
Page 5
instructions
diagrams
menu
menu
meat
soup
yoghurt
bread
sh
steam
cake
porridge/risotto
timer
rice
slow cook
stew
keep warm
stop
start
lter
lter lid
lid
lid lock
inner lid
measuring cup
basket
bowl
connector
Read the instructions, keep them safe, pass them on if you pass the appliance on. Remove all
packaging before use.
IMPORTANT SAFEGUARDS
Follow basic safety precautions, including:
1 This appliance can be used by children aged 8 years and above
and persons with reduced physical, sensory or mental capabilities
or lack of experience and knowledge if they have been
supervised/instructed and understand the hazards involved.
Children shall not play with the appliance. Cleaning and user
maintenance shall not be done by children unless they are older
than 8 and supervised. Keep the appliance and cable out of reach
of children under 8 years.
2 If the connector or cables are damaged, they must be replaced by
a special assembly available from the manufacturer or its service
agent.
3 This appliance is not intended for use by persons (including
children) with reduced physical, sensory or mental capabilities, or
lack of experience and knowledge, unless they have been given
supervision or instruction concerning use of the appliance by a
person responsible for their safety.
4 Children should be supervised to ensure that they do not play
with the appliance.
5 This appliance is for household use only. Do not use outdoors.
6 If the supply cord is damaged, it must be replaced by a special
cord or assembly available from the manufacturer or its service
agent.
STOP
Page 6

Don’t immerse the appliance in liquid.
Misuse of the appliance may cause injury.
The surfaces of the appliance will get hot. Residual heat will
keep the surfaces hot after use.
Warning: Keep the connectors dry.
Warning: Avoid spillage on the connector.
7 This appliance is intended to be used in household and similar
applications such as:
- sta kitchen areas in shops, oces and other working
environments;
- farm houses;
- by clients in hotels, motels and other residential type
environments;
- bed and breakfast type environments.
instructions
1 Don’t put frozen meat or poultry in the appliance - defrost fully before use.
2 Cook meat, poultry, and derivatives (mince, burgers, etc.) till the juices run clear.
Cook sh till the esh is opaque throughout.
3 Don’t try to cook anything in the body of the cooker - cook only in the removable
bowl.
4 Don’t ll above max.
5 Don’t cover the appliance or put anything on top of it.
6 Remove the plug from the power socket, then remove the connector from the
power inlet on the appliance.
7 Unplug the appliance when not in use.
8 Don’t use accessories or attachments other than those we supply.
9 Don’t use the appliance for any purpose other than those described in these
instructions.
10 Don’t use the appliance if it’s damaged or malfunctions.
11 Please turn o and unplug the appliance before cleaning, maintenance or
relocation and whenever.
HOUSEHOLD UES ONLY
Page 7

1 Use the measuring cup to put the rice into the bowl.
2 Don’t use more than 10 cups of rice.
3 Use the scale on the left, inside the bowl, which is marked from 2 to 10.
4 Fill the bowl with water up to the number corresponding to the number of cups of rice used.
5 Close the lid.
6 Press the button. The button will glow.
7 The outer segments of the display will blink while the food heats up.
8 The display will then show the remaining cooking time (13 minutes), and count down.
9 At the end of the cooking time, the appliance will go into “keep warm” mode.
10 The light will glow.
11 Open the lid.
12 Lift out the bowl and set it down on a heat-resistant mat or dinner plate.
13 Press the button.
14 Use the spatula to turn and mix the rice, to let all the steam escape.
15 Sometimes the layer of rice in contact with the bowl will form a crust.
16 If you don’t want it you can remove it with the spatula, after you’ve served the rice.
1 Brown meat and vegetables (see “BROWN/SAUTE/SOFTEN/BOIL”).
2 Boil the cooking liquid (see “BROWN/SAUTE/SOFTEN/BOIL”).
3 Put the solid ingredients into the bowl, then add the cooking liquid.
4 Close the lid.
6 Close the lid.
7 Attach the connector to the appliance before plugging the cable into the power socket.
8 The display will ash. The light will blink.
• Press the lid lock to open the lid.
• Add the ingredients.
• Give the bowl quarter of a turn each way, to ensure the bottom of the bowl makes good contact
with the element.
• Close the lid.
• Use the menu button to select a program.
• The three big buttons at the bottom, rice cooking, slow cooking, and stewing, over-rule
the menu and the button.
• Set the timer , if appropriate.
• Press the button to start the program.
• To stop the appliance, press stop once if the display is not counting down, or twice if the
display is counting down.
• After using the appliance, let it rest for 15 minutes before using it again.
HOW IT WORKS
PREPARATION
1 Sit the appliance on a stable, level, heat-resistant surface.
2 Don’t use the appliance near or below curtains, shelves, cupboards, or anything else likely to be
damaged by the escaping steam.
3 Have oven gloves (or a cloth) to hand, and a heat-resistant mat or dinner plate to put the bowl
on after cooking.
4 Put the bowl inside the cooker.
5 Give the bowl quarter of a turn each way, to ensure the bottom of the bowl makes good contact
with the element.
POWER UP
RICE
SLOW COOKING
Page 8

1 Rub the food all over with cooking oil.
2 Rub any seasonings over the surface of the food.
3 Put a tablespoon of cooking oil in the bowl.
4 Put the food in the bowl.
5 Close the lid.
6 Time depends on the size of the food.
7 Don’t cook more than about 500g of food at a time.
8 We suggest cooking times of 10 minutes + 10 minutes per 100g of weight for beef.
9 Don’t cook pork or poultry for less than 5, 10, 15, 20, 25, 30 minutes.
10 Use the button to select in the menu.
11 Choose the cooking time. The default time is 20 minutes.
12 You can only use the h and min buttons while the display time is blinking.
13 Use the min button to move the display through the options (10, 15, 20, 25, 5, 10, 15, 20, 25, 30,
35, 40, 45, 50, and 55).
14 If you want to cook for 1 hour, press the h button.
15 To undo the 1 hour setting, press the h button again, while the display time is blinking.
If you do nothing for 2 minutes, the appliance will revert to standby mode.
16 When you have set the time, press .
17 The display will count down.
18 At the end of the cooking time, the appliance will go into “keep warm” mode.
19 The light will glow.
20 Press the button. Open the lid. Remove the food.
1 Brown meat and vegetables (see “BROWN/SAUTE/SOFTEN/BOIL”).
2 Boil the cooking liquid (see “BROWN/SAUTE/SOFTEN/BOIL”).
3 Put the solid ingredients into the bowl, then add the cooking liquid.
4 Close the lid.
5 Press the button. The button will glow.
6 The display will show 1 hour, and count down.
7 At the end of the cooking time, the appliance will go into “keep warm” mode.
8 The light will glow.
9 Press the button. Open the lid. Remove the food.
5 Press the button. The button will glow.
6 The display will show 8 hours, and count down.
7 At the end of the cooking time, the appliance will go into “keep warm” mode.
8 The light will glow.
9 Press the button. Open the lid. Remove the food.
STEWING
USING THE MENU
menu
meat
soup
yoghurt
bread
sh
steam
porridge/risotto
cake
range
10 min -1 h
1 - 5 h
6-10 h
1 - 3 h
10 min-1 h
30 min - 2 h
1 -4 h
30 min - 2 h
default
20 min
1 h
8 h
3 h
20 min
30 min
1 h
40 min
MEAT
Page 9

1 Brown meat and vegetables (see “BROWN/SAUTE/SOFTEN/BOIL”).
2 Put the solid ingredients into the bowl, then add the cooking liquid.
3 Close the lid.
4 Use the button to select in the menu.
5 Choose the cooking time. The default time is 1 hour.
6 You can only use the h and min buttons while the display time is blinking.
7 Use the min button to move the display through the options (10, 15, 20, 25, 5, 10, 15, 20, 25, 30,
35, 40, 45, 50, and 55).
8 Use the h button to move the display through the options (1, 2, 3, 4, and 5).
9 To undo the 5 hour setting, press the h button again, while the display time is blinking.
If you do nothing for 2 minutes, the appliance will revert to standby mode.
10 You have the option of using the timer with this program (see TIMER).
11 Press the button.
12 The display will count down.
13 At the end of the cooking time, the appliance will go into “keep warm” mode.
14 The light will glow.
15 Press the button. Open the lid. Remove the food.
• You may use the delay timer with the soup , yoghurt , bread , steam , and porridge
programs.
• Do this immediately after setting the cooking time, and before pressing start :
1) Press the button. The light will glow.
2) Decide when you want the food to be ready.
3) For example, if it is 2.00 now, and you want it to be ready at 9.00, you must set the time to 7
hours.
4) Use the h and min buttons to set the correct hour and minute.
5) Press the button.
THE TIMER
SOUP
YOGHURT
yoghurt culture
1 You may use 5, 10, 15, 20, 25, 30ml (2 tablespoons) of:
1) Unavoured live yoghurt - it must be fresh (look for a long expiry date).
• Dierent brands will give dierent results.
2) Yoghurt you made previously.
• The bacteria weakens over time, so you can only do this 10 times before using another new
culture.
3) Freeze-dried yoghurt culture from a pharmacy or health food shop.
• If the instructions on the culture package dier from this guide, follow the instructions on the
package.
milk
2 You will need 1 litre of milk.
3 Whole milk gives thicker yoghurt than low fat milk.
4 To make it even thicker, you may add up to 8 tablespoons of powdered milk to the liquid milk.
5 You may also use reconstituted powdered milk, or tinned evaporated milk.
making yoghurt
6 You need to kill the bacteria in the milk, to prevent them competing with the bacteria in the
yoghurt culture.
7 While you are heating the milk, let the yoghurt culture get to room temperature.
8 Open the lid.
Page 10

1 Defrost frozen dough thoroughly before use.
2 Don’t cook more than about 500g of food at a time.
3 Wipe the bowl with cooking oil.
4 Put the dough into the bowl.
5 Close the lid.
6 Use the button to select in the menu.
7 Choose the cooking time. The default time is 3 hours.
8 You can only use the h and min buttons while the display time is blinking.
9 Use the min button to move the display through the options (10, 15, 20, 25, 5, 10, 15, 20, 25, 30,
35, 40, 45, 50, and 55).
10 Use the h button to move the display through the options (1, 2, 3, 4, 5, and 6).
11 To undo the 6 hour setting, press the h button again, while the display time is blinking.
If you do nothing for 2 minutes, the appliance will revert to standby mode.
12 You have the option of using the timer with this program (see TIMER).
13 Press the button.
14 The display will count down.
15 At the end of the cooking time, the appliance will go into “keep warm” mode.
16 The light will glow.
17 Press the button. Open the lid. Remove the food.
1 Rub the food all over with cooking oil.
2 Rub any seasonings over the surface of the food.
3 Put a tablespoon of cooking oil in the bowl.
4 Put the food in the bowl.
5 Close the lid.
6 Time depends on the size of the food.
7 Don’t cook more than about 500g of food at a time.
8 We suggest cooking times of 10 minutes per 100g of weight.
9 Use the STEAMING (BROWN/SAUTE/SOFTEN/BOIL) program to heat the milk to just below
boiling.
10 Let the milk heat till it begins to bubble at the edges.
11 Let the milk cool to between 37°C and 45°C.
12 Stir the yoghurt culture into the milk.
13 They must be thoroughly mixed, or the yoghurt will be lumpy.
14 Close the lid.
15 Use the button to select in the menu.
16 Choose the cooking time. The default time is 8 hours.
17 You can only use the h and min buttons while the display time is blinking.
18 Use the min button to move the display through the options (10, 15, 20, 25, 5, 10, 15, 20, 25, 30,
35, 40, 45, 50, and 55).
19 Use the h button to move the display through the options (6, 7, 8, 9, and 10).
20 To undo the 10 hour setting, press the h button again, while the display time is blinking.
If you do nothing for 2 minutes, the appliance will revert to standby mode.
21 You have the option of using the timer with this program (see TIMER).
22 Press the button.
23 The display will count down.
24 At the end of the cooking time, the appliance will go into standby mode.
25 It will not keep the yogurt warm.
26 Press the button. Open the lid. Remove the food.
BREAD
FISH
Page 11

STEAMING
1 You may use the STEAMING program at its default setting, with the lid open, as a high
temperature pan for 5, 10, 15, 20, 25, 30 minutes, prior to cooking with another program.
2 Use it with a little oil to brown meat and vegetables, to sautée, to soften onions, celery, leeks,
etc.
3 Use it with water or stock to pre-heat cooking liquids.
9 You can only use the h and min buttons while the display time is blinking.
10 Use the min button to move the display through the options (5, 10, 15, 20, 25, 30, 35, 40, 45,
50, and 55).
11 Use the h button to move the display through the options (1, and 2).
12 To undo the 2 hour setting, press the h button again, while the display time is blinking.
If you do nothing for 2 minutes, the appliance will revert to standby mode.
13 You have the option of using the timer with this program (see TIMER).
14 Press the button.
15 The display will count down.
16 At the end of the cooking time, the appliance will go into “keep warm” mode.
17 The light will glow.
18 It’s best to remove the food as soon as it has cooked, to prevent it going soggy.
19 Press the button. Open the lid. Remove the food.
1 Fill the bowl with cold water up to the 6 mark.
2 Put the basket on top of the bowl and put the food into the basket.
3 For uniform cooking, cut all pieces of food to roughly the same size.
4 For peas, or anything that’ll break up or drop into the water, make a parcel with aluminium
foil.
5 Take care when removing the parcel - wear oven gloves and use plastic tongs/spoons.
6 Close the lid.
7 Use the button to select in the menu.
8 Choose the cooking time. The default time is 30 minutes.
• These should cook within the default time:
9 Use the button to select in the menu.
10 Choose the cooking time. The default time is 20 minutes.
11 You can only use the h and min buttons while the display time is blinking.
12 Use the min button to move the display through the options (10, 15, 20, 25, 5, 10, 15, 20, 25, 30,
35, 40, 45, 50, and 55).
13 If you want to cook for 1 hour, press the h button.
14 To undo the 1 hour setting, press the h button again, while the display time is blinking.
If you do nothing for 2 minutes, the appliance will revert to standby mode.
15 When you have set the time, press .
16 The display will count down.
17 At the end of the cooking time, the appliance will go into “keep warm” mode.
18 The light will glow.
19 It’s best to remove the food as soon as it has cooked, to prevent it drying out.
20 Press the button. Open the lid. Remove the food.
food (fresh)
green beans
brussels sprouts
carrots (sliced)
potatoes (quartered)
quantity
200g
200g
200g
400g
food (fresh)
broccoli
cabbage
corn cobs
quantity
200g
quarter
2
BROWN/SAUTE/SOFTEN/BOIL
Page 12

1 Defrost frozen dough thoroughly before use.
2 Don’t ll the bowl more than about half full.
3 Wipe the bowl with cooking oil.
4 Put the dough into the bowl.
5 Close the lid.
6 Use the button to select in the menu.
7 Choose the cooking time. The default time is 40 minutes.
8 The default time is 40 minutes.
9 You can only use the h and min buttons while the display time is blinking.
10 Use the min button to move the display through the options (5, 10, 15, 20, 25, 30, 35, 40, 45, 50,
and 55).
11 Use the h button to move the display through the options (1, and 2).
12 To undo the 2 hour setting, press the h button again, while the display time is blinking.
If you do nothing for 2 minutes, the appliance will revert to standby mode.
13 When you have set the time, press .
14 The display will count down.
15 At the end of the cooking time, the appliance will go into “keep warm” mode.
16 The light will glow.
17 It’s best to remove the food as soon as it has cooked, to prevent it going soggy.
18 Press the button. Open the lid. Remove the food.
• Use the scale on the centre, inside the bowl, which is marked from 1 to 3.
• Don’t ll above max.
2 Fill the bowl with water up to the number corresponding to the number of cups of grain.
3 Close the lid.
4 Use the button to select in the menu.
5 Choose the cooking time. The default time is 1 hour.
6 You can only use the h and min buttons while the display time is blinking.
7 Use the min button to move the display through the options (5, 10, 15, 20, 25, 30, 35, 40, 45, 50,
and 55).
8 Use the h button to move the display through the options (1, 2, 3, and 4).
9 To undo the 4 hour setting, press the h button again, while the display time is blinking.
If you do nothing for 2 minutes, the appliance will revert to standby mode.
10 You have the option of using the timer with this program (see TIMER).
11 Press the button.
12 The display will count down.
13 At the end of the cooking time, the appliance will go into “keep warm” mode.
14 The light will glow.
15 Press the button. Open the lid. Remove the food.
4 When you switch to the main program, the appliance is warmed up, and some or all of your
ingredients will already be in the bowl.
5 You don’t then have to wash the pan you would have used during preparation.
PORRIDGE/RISOTTO
1 Use the measuring cup to put the grain (rice, oats, barley, etc.) into the bowl.
porridge
• Use the scale on the right, inside the bowl, which is marked from 1/2 to 1 1/2
• Don’t ll above max.
risotto
• Follow the recipe shown later in this booklet.
porridge
CAKE
Page 13

KEEP WARM
Open the lid. Add the oil. Select on the menu, and press . Add the onion and garlic. Cook till
the onions soften. Drain the beans and add them. Reserve the couscous. Add the remaining
ingredients. Press twice to stop the program. Close the lid. Select . Add the couscous 30
minutes before cooking ends. If cooking has already nished, select on the menu and cook for
about 20 minutes more.
1 Unplug the appliance and let it cool.
Remove the plug from the power socket, then remove the connector from the power inlet on
the appliance.
2 With the lid closed, grip the top of the lter and lever it out of the lid.
3 Turn it over, to expose the markings on the front edge.
4 Hold the lter lid fast, and turn the rest of the lter towards the open padlock .
5 Press on the tabs at the bottom of the inner lid ( ) and pull it o the appliance.
6 Hand wash the removable parts.
7 Wipe all surfaces with a clean damp cloth.
8 Don’t put any part of the appliance in a dishwasher.
9 Reassemble the lter, and replace it in the lid.
10 Replace the inner lid in the lid.
• If you want to use the keep warm feature after a program that doesn’t support it, then, when
the only thing showing on the display is the blinking light, press .
• Press to exit this feature.
CARE AND MAINTENANCE
ENVIRONMENTAL PROTECTION
To avoid environmental and health problems due to hazardous substances in electrical and
electronic goods, appliances marked with this symbol mustn’t be disposed of with unsorted
municipal waste, but recovered, reused, or recycled.
recipes
tablespoon (15ml)
teaspoon (5ml)
grams
millilitres
measuring cup
stick/rib (celery)
handful
egg, medium (53-63 g)
pinch
bunch
sprig
clove(s)
tin/can
jar
sachet (7g)
egg, large (63-73 g)
vegetable and couscous chilli
red onion, chopped
large onion, chopped
garlic, peeled and chopped
red pepper, deseeded and chopped
yellow pepper, deseeded and chopped
orange pepper, deseeded and chopped
ground coriander
tomato purée
vegetable stock
hot tomato sauce
couscous
olive oil
butter beans
cannellini beans
green jalapenos
kidney beans
chopped tomatoes
ground cumin
sugar
chilli powder
dried oregano
slow cook
to serve:
grated cheese
small bunch coriander, chopped
sour cream
Page 14

Open the lid. Add the stock. Select on the menu, and press . Bring to the boil, stirring. Simmer
for 10 minutes. Add the remaining ingredients. Press twice to stop the program.
Reserve the coriander. Open the lid. Add the remaining ingredients. Close the lid. Select on the
menu, and press . Cook till the sh becomes aky (40-60 minutes). Press twice to stop the
program. Add the coriander. Adjust the seasoning and serve. This would be great with couscous.
Open the lid. Add the oil. Select on the menu, and press . Chop the beef, tomatoes and
pepper into bite sized chunks. Brown the meat, then remove it. Add the onions, garlic and all the
herbs. Cook till the onions soften. Add the meat. Reserve the beans. Add the remaining
ingredients. Press twice to stop the program. Close the lid. Select . Add the beans 30 minutes
before cooking ends. If the meat is still a little tough at the end of the program, add a cup of
water, and run the meat program for an additional 30 minutes
Open the lid. Add the milk. Select on the menu, and press . Let the milk heat till it begins to
bubble at the edges. Press twice to stop the program. Let the milk cool to between 37°C and
45°C. Stir the yoghurt into the milk. They must be thoroughly mixed, or the yoghurt will be
lumpy. Close the lid. Select on the menu, and press . Wait till the program ends. Put the
yoghurt in the fridge to cool completely. Heat the berries gently in a pan. Add the honey. When
the berries begin to collapse, remove from the heat, allow to cool, then mix with the yoghurt. If
you want to store your yoghurt you must sterilize the jars you are going to use. Heat them in an
oven at 100°C for 10 minutes. The yoghurt will keep for up to 2 of weeks in the fridge.
Serve in a bowl with a handful of cheese, a drizzle of sour cream, and a sprinkle of fresh
coriander. For a classic vegitarian chilli, omit the couscous.
home-made yoghurt
avour option
yoghurt
milk yoghurt
honey
frozen mixed summer berries
stew
ery NY beef chilli
braising beef
garlic, peeled and chopped
ground cumin
cayenne pepper
smoked paprika/chipotle powder
green pepper
salt
basil leaves, roughly chopped
garlic, peeled and chopped
red pepper, deseeded and chopped
chopped tomatoes
ground ginger
cinnamon stick
white wine
sh stock
sh (cod/haddock/salmon)
small bunch coriander, chopped
olive oil
onions, chopped
chilli powder
tomato sauce
tomatoes
bayleaf
black pepper
kidney beans
sh
Moroccan sh tagine
onion, chopped
celery, chopped
ground cumin
turmeric
harissa paste
tomato purée
lemon
green olives
salt and pepper
split pea and ham hock soup
slow cook
chicken stock
split peas
celery, chopped
thyme, nely chopped
ham hock
onion, nely chopped
carrot, chopped
garlic (crushed)
bayleaf
black pepper
Page 15

salmon with a spicy rub
Remove the meat from the bone. Cut the meat and bacon into bite-sized chunks. Open the lid.
Select on the menu, and press Add the stock. Bring to the boil, stirring. Simmer for 10
minutes. Transfer the stock to a jug. Add the oil. Add the onion and sauté till soft. Add the meat,
garlic, herbs and other vegetables, and cook for 5 minutes. Add the stock. Add the tomato
purée. Press twice to stop the program. Close the lid. Select .
Melt the butter in a pan over a low heat. Line the bowl with buttered foil. Whisk the melted
butter, sugar, cocoa powder, our, eggs, vanilla and salt in a dish. Fold in the chocolate drops.
Put the batter into the foil inside the bowl. Close the lid. Select on the menu. Set the
cooking time to 1 hour 30 minutes. Press the button. The cake should be rm round the
edges and slightly gooey in the centre. Serve the cake warm, topped with ice cream.
Mix the paprika, chilli powder, cumin, sugar, salt and pepper. Sprinkle over the salmon llets.
Open the lid. Add the oil. Select on the menu, and press . Wait a couple of minutes to let
the oil heat. Add the llets, skin down. Close the lid. This is a great combination of steaming and
pieces osh but you get a crispy skin. Serve with a wedge of lemon. A great light meal.
Close the lid. Select . Wait till the program ends. Remove the ham hock. Discard the skin and
bones. Dice the meat. Discard the bayleaf. Mash the split peas with the back of a wooden spoon.
Add the meat. Adjust the seasoning, and serve. Heaven in a bowl!
sh
salmon llets (with skin)
paprika
ground cumin
soft brown sugar
olive oil
chilli powder
salt and pepper
lemon
chocolate brownie cake
unsalted butter
sugar
cocoa powder
milk chocolate drops
cake
vanilla essence
salt
plain our
to serve:
vanilla ice cream (optional)
irish stew with goats cheese dumplings
for the stew:
lamb shoulder (cooked)
streaky bacon
lamb stock
large onion, chopped
celery, chopped
tomato purée
stew
olive oil
garlic (crushed)
salt and pepper
carrots, chopped
rosemary, chopped
cornour
for the dumplings:
self raising our
suet
water
goat’s cheese (soft)
dried marjoram
baking powder
salt
dried parsley
dried thyme
black pepper
for the stew:
for the dumplings:
Mix all the ingredients by hand. Divide the mixture into 6 balls. Rest for 20 minutes.
to nish:
Make a smooth paste with the cornower and a little water in a cup. 30 minutes before cooking
ends, open the lid. Stir the paste into the stew. Add the dumplings. Close the lid. Wait till the
program ends, then serve. A fabulous bowl of comfort food!
Page 16

Open the lid. Add the milk. Select on the menu, and press . Let the milk heat till it begins to
bubble at the edges. Transfer the milk to a jug. Press twice to stop the program. Let the milk
cool to between 37°C and 45°C. Melt the butter in a pan over a low heat. Mix the our and salt In
a bowl. Add the yeast, butter, and syrup. Add the milk and knead into a ball. If the mix is very
sticky, add a little extra our.. Cover and leave in a warm place for 10 minutes. Knead again.
Cover and leave in a warm place for 10 minutes. Open the lid. Select on the menu, and press .
Open the lid. Select on the menu, and press . Add the stock. Bring to the boil, stirring.
Simmer for 10 minutes. Transfer the stock to a jug. Add the oil. Add the onion and sauté till soft.
Add the wine and cook for a few minutes. Add the pearl barley, and stir till it begins to take on
the colour of the wine. Drain the beans and add them. Add the tomatoes. Add the stock. Press
twice to stop the program. Close the lid. Select . 30 minutes before cooking ends, open the lid.
Check the amount of liquid in the bowl. Add 150ml of hot water if necessary. Close the lid. Wait
till the program ends. Serve with fresh crusty bread and a splash of hot chilli oil.
If you do not have any cooked lamb, you may use raw lamb, with the slow cook program
instead of the stew program, then carry on from the dumplings moment.
Slice the lemon. Cut the stem ush with the bottom of each artichoke. Cut the top quarter o
each artichoke. Discard any damaged leaves. Rub the cut surfaces with a slice of lemon. Put the
lemon slices in the basket. Add the sprigs of herbs. Add the garlic. Put the artichoke on top. Fill
with water to the 2 level on the scale on the left, inside the bowl. Put the basket on top of the
bowl. Close the lid. Select on the menu, and press . The artichokes are cooked when the
outer leaves can be removed easily. Serve warm or cold with a vinaigrette. Amazing!
steam
steamed artichoke
garlic, peeled and chopped
sprigs of herbs (tarragon, mint, parsley, thyme)
globe artichokes
lemon
pearl barley and borlotti bean one-pot meal
stew
olive oil
pearl barley
chopped tomatoes
vegetable stock
dry red wine
borlotti beans
onion, nely chopped
tomato purée
parsley (chopped)
salt and pepper
to serve:
hot chilli oil (optional)
syrup sponge pudding
butter
caster sugar
self raising our
golden syrup
steam
vanilla essence
milk
Beat the eggs in a bowl. Cream the butter and sugar in a bowl. Gradually add the eggs, then the
vanilla, then the our. Stir in the milk. Grease a 1200ml oven-proof bowl. Put the syrup in the
bottom of the oven-proof bowl and put the mixture on top. Cover with baking parchment then
with foil, and tie the top with string. Open the lid. Put the oven-proof bowl inside the bowl in
the appliance. Add enough boiling water into the bowl in the appliance to reach 3cm below the
top of the oven-proof bowl. Close the lid. Select on the menu. Set the cooking time to 1 hour
30 minutes. Press the button. Wait till the program ends. Invert on to a dish and serve warm.
This is a great pudding any time of the year!!
white loaf
bread
golden syrup
milk
strong white bread our
butter
dried yeast
salt
Page 17

Open the lid. Select on the menu, and press . Add the stock. Bring to the boil, stirring.
Simmer for 10 minutes. Transfer the stock to a jug. Press twice to stop the program. Select
on the menu, and press . Leave it to warm up. Peel the beetroot, and cut into 1cm cubes. Put
the beetroot, garlic, and onion in the bowl. Cook till the onions soften. Stir in the rice. Close the
lid and cook for 3-4 minutes. Open the lid. Stir in the wine. Close the lid and cook for 3-4 minutes.
Open the lid. Add the thyme. Add the stock. Close the lid. Wait till the program ends. Check the
rice - it should have a slight bite, but should not be hard. If not quite done, add a little water and
cook for a few minutes more. Stir in the butter - this gives the risotto its shine. Serve with a dollop
of the yoghurt and sprinkle with parsley. This is a really good as a starter or as a light lunch.
Open the lid. Add the oatmeal, salt, and sugar. Fill with water to the 1 ½ level on the scale on the
right, inside the bowl. Close the lid. Select on the menu, and press . Wait till the program
ends. Serve with milk or cream. Sprinkle with dark brown sugar. If you wish, you may add chopped
dried apricots or halved prunes (without stones) 15 minutes before the end of the cooking time.
Left over porridge may be kept in the fridge for up to 2 days, then reheated.
Open the lid. Grease the bowl with butter. Select on the menu. Close the lid. Set the cooking
time to 2 hours 15 minutes. Press the button. Leave it to warm up. Put the soda bread mix
into a bowl. Add the water. Mix by hand into a ball. Open the lid. Put the dough into the bowl.
Divide the dough into quarters with a plastic spatula. Close the lid. 30 minutes before cooking
ends, open the lid. Turn the bread over. This will help to give the top of the loaf a little colour
and a crunch. Wait till the program ends. Cool on a wire rack. Serve with salted butter on its own
or with a meal.
Close the lid. 30 minutes before cooking ends, open the lid. Turn the bread over. This will help to
give the top of the loaf a little colour and a crunch. Wait till the program ends. Serve with
lashings of butter.
soda bread
bread
porridge/risotto
soda bread mix
water
butter
porridge
oatmeal
salt
water
sugar
to serve:
dark brown sugar milk/single cream
nutty porridge
porridge/risotto
rolled oats
milk
ground cinnamon
water
desiccated coconut
to serve:
golden syrup nibbed almonds
Open the lid. Add the oats, cinnamon, coconut and milk. Fill with water to the ½ level on the
scale on the right, inside the bowl. Close the lid. Select on the menu, and press . Wait till
the program ends. Drizzle golden syrup and sprinkle nibbed almonds on top.
multi-cooker beetroot risotto
porridge/risotto
beetroot
arborio/risotto rice
white wine
vegetable stock/chicken stock
olive oil
onion, nely chopped
garlic, peeled and chopped
thyme, nely chopped
to nish:
yoghurt
butter
parsley (chopped)
Page 18

Open the lid. Select on the menu, and press . Sauté the chorizo for 2 minutes. Add the
onion and garlic. Cook till the onions soften. Peel, core and chop the apple. Add the remaining
ingredients. Press twice to stop the program. Close the lid. Select on the menu, and press
. Wait till the program ends. This is a great soup and if you leave it overnight in the fridge, the
avour will develop further.
Open the lid. Add the stock. Select on the menu, and press . Bring to the boil, stirring.
Simmer for 10 minutes. Transfer the stock to a jug. Press twice to stop the program. Peel and
dice the potatoes. Select on the menu, and press Add the oil. Add the onion and sweet
pepper. Cook till the onions soften. Add the stock. Add the remaining ingredients. Close the lid.
Wait till the program ends. Adjust the seasoning. Serve with crusty bread.
savoury rice
rice
rice
stock cube (vegetable)
red pepper, deseeded and chopped
turmeric
water
carrots, chopped
celery, chopped
peas (optional)
Open the lid. Put the rice in the bowl. Fill with water to the 2 level on the scale on the left, inside
the bowl. Crush the stock cube and stir it into the water. Add the remaining ingredients. Close
the lid. Select . Wait till the program ends, then serve. If the rice is not quite done, leave it for a
few minutes, with the lid closed, to steam.
tomato big soup
soup
onion, chopped
chopped tomatoes
red pepper, deseeded and chopped
chicken stock
dried mixed herbs
olive oil
chopped tomatoes
potatoes
tomato purée
black pepper
chorizo, cabbage and apple soup
soup
chorizo sausage, nely chopped
apple
celery, chopped
spring cabbage, nely chopped
garlic, peeled and chopped
salt
vegetable stock
onion, nely chopped
carrots, chopped
chopped tomatoes
tomato purée
cayenne pepper
black pepper
chicken with tomatoes and mushrooms
meat
chicken breasts, skinned and boned
brown mushrooms, chopped
garlic, peeled and chopped
Worcestershire sauce
salt and pepper
olive oil
chopped tomatoes
tomato sauce
dried oregano
Open the lid. Select on the menu, and press . Add the oil. Season the chicken breasts with
salt and pepper and put them in the bowl. Turn the meat to seal both sides. Add the garlic and
mushrooms. Cook for 3-4 minutes, turning the chicken once. Add the tomatoes, Worcestershire
sauce, tomato sauce and oregano. Carry on cooking, turning the chicken once more. Check the
chicken is cooked through. Serve with pasta, potatoes or rice. A quick tasty store cupboard meal.
Open the lid. Select on the menu. Add the oil. Set the cooking time to 1 hour 45 minutes.
stout-braised ribs with maple and soy
belly pork ribs
Guinness/stout
beef stock / pork stock
maple syrup / honey
meat
onion, chopped
olive oil
garlic, peeled and chopped
dark soy sauce
Page 19

brisket one-pot meal
Leave the skins on the potatoes. Cut the potatoes, carrots and celery into chunks. Season the
brisket with salt and pepper. Open the lid. Select on the menu, and press , Add the stock.
Bring to the boil, stirring. Simmer for 10 minutes. Transfer the stock to a jug. Sauté the chorizo for
2 minutes. Add the meat. Brown all over. Add the onions, garlic, potatoes, celery and carrots. If
you have any other root vegetables that need using up, add them too. Cook till the onions soften.
Add the stock. Add the remaining ingredients. Press twice to stop the program. Select . Wait
till the program ends, then serve. Cooking for 8 hours will do no harm, but it will probably be
ready to eat after 5 hours.
Press the button. Add the ribs and brown for 5 minutes - turning occasionally. Remove the
ribs. Add the onion and garlic. Cook till the onions soften. Return the ribs to the bowl. Stir in the
Guinness, stock, maple syrup and soy sauce Close the lid. Wait till the program ends. Adjust the
seasoning, and serve. A great starter or as part of a pick and mix lunch.
slow cook
brisket
tomato purée
garlic, peeled and chopped
bayleaf
chorizo sausage, sliced
carrots
red onions, chopped
celery
beef stock
rosemary, chopped
dried mixed herbs
chopped tomatoes
potatoes (small)
salt and pepper
Worcestershire sauce
Page 20

电饭煲使用说明书
型号:MB-FS5017
Page 21

定时
时
分
肉
汤
酸奶
面包
鱼
蒸煮
粥
蛋糕
保温
停止
菜单
开始
米饭 慢炖 炖煮
稀饭米饭粥
最高
稀饭
米饭
粥
最高
Page 22

使用说明
图示
菜单
菜单
肉
汤
酸奶
面包
鱼
蒸煮
蛋糕
粥/意式烩饭
定时
米饭
慢炖
炖煮
保温
停止
开始
过滤器
过滤器盖
盖子
盖锁
内盖
量杯
蒸笼
内锅
接头
请阅读使用说明,保证安全,传递本产品时请一并传递本使用说明。使用前请拆掉所有包装。
重要保证
遵守基本的安全措施,包括:
1 本产品仅供 8 岁及以上儿童使用,身体、感官或智力受损或缺乏
经验和知识的人员请在监督/指示下使用,并了解相关危险。禁止
儿童玩弄本产品。8 岁以下无监管儿童严禁对本产品进行清洗或保
养。请将本产品及其电源线放在 8 岁以下儿童无法触及的地方。
2 如果接头或电线损坏,必须由制造商或其服务代理提供的特殊
装配进行替换。
3 身体、感官或智力受损,或缺乏经验的人员(包括儿童)请不
要使用本电器,除非他们在安全责任人的监管下,以及得到安
全使用本电器的指导后,他们才可以使用本电器。
4 应照看好儿童,确保不让他们玩弄设备。
5 本产品只限家庭使用。禁止在户外使用。
6 如果电源线损坏,必须用制造商或其服务代理提供的特殊电线
或配件进行更换。
停止
Page 23

7 本产品只限于家庭或以下类似场合使用:
- 商店的员工茶水间、办公室或其他工作场所;
- 农场;
- 酒店、汽车旅馆以及其他住宿场所;
- 住宿和早餐型环境。
使用说明
1 禁止将冷冻的猪肉或家禽肉放在饭煲内,使用前请完全
解冻。
2 汁液清澈时方可烹饪猪肉、家禽肉及衍生品(肉末、汉堡
包等)。鱼肉完全不透明时方可烹饪鱼肉。
3 禁止直接在电饭煲内烹饪任何食物,仅应在可拆装的内锅
中进行烹饪。
4 禁止超出最高值。
5 禁止遮盖本产品或将任何物品置于本产品之上。
6 将插头从电源插座上拔下来,然后将接头从饭煲的电源插
口拔下来。
7 不用时拔掉饭煲的插头。
8 禁止使用非我司提供的配件或附件。
9 禁止将本产品用于本使用说明书所描述用途以外的任何
用途。
10 如果本产品损坏或有故障,禁止使用。
11 清洗、维护或重新安装之前,请关闭饭煲并拔掉插头。
本产品仅限于家庭使用
禁止将本产品浸入到液体中。
本产品使用不当可能会造成伤害。
产品表面温度将升高。使用后,由于尚有余热,表面温度仍
较高。
警告:保持接头干燥。
警告:避免接头部位泄漏。
Page 24

• 按下盖锁打开盖子。
• 加入材料。
• 将内锅转动四分之一圈,确保内锅底与部件接触良好。
• 合上盖子。
• 使用菜单按钮 选择一个程序。
• 底部的三个按钮- 煮饭、 慢炖和 炖煮对菜单和 按钮无效。
• 在适当情况下设置定时 。
• 按下 按钮开始程序。
• 停止饭煲时,如果显示器未显示倒计时,则按下“停止” 一次,或者,如果显示器显
示倒计时,则按下两次。
• 使用本电器之后,再次使用之前应等待 15 分钟。
1 使用量杯将大米放入内锅中。
2 大米不得超过 10 杯。
3 使用内锅内部左侧的刻度,刻度标注为 2-10。
4 根据加入大米的量向内锅中加入相应的水。
5 合上盖子。
6 按下按钮 。按钮将发光。
7 食物加热时显示器的外部闪烁。
8 然后显示器显示剩余的烹饪时间(13 分钟),并开始倒计时。
9 烹饪结束时,本产品将进入“保温”模式。
10 灯 将发亮。
11 打开盖子。
12 将内锅取出,放在一个耐热垫或餐盘上。
13 按下按钮 。
14 使用铲子翻动并混合米饭,使所有蒸汽逸出。
15 有时与内锅接触的一层米饭容易变得坚硬。
16 如果不需要这种硬外层,可在盛出米饭之后将其去除。
1 嫩煎肉和蔬菜(见“嫩煎/煸炒/软化/煮”)。
2 煮烹饪液体(见“嫩煎/煸炒/软化/煮”)。
3 将固体材料放入内锅中,然后加入烹饪液体。
4 合上盖子。
6 合上盖子。
7 将电源线插入电源插座之前,插上饭煲的接头。
8 显示器将闪烁。灯 也将闪烁。
本产品的运行方式
准备
1 将本产品放在一个稳定、水平、耐热的表面。
2 禁止在窗帘、架子、碗橱或逸出蒸汽可能会损坏的任何物品附近或下方使用饭煲。
3 烹饪后,应戴隔热手套(或手拿抹布),或将内锅放在耐热垫或餐盘上。
4 将内锅放在电饭煲内。
5 将内锅转动四分之一圈,确保内锅底与部件接触良好。
通电
米饭
慢炖
Page 25

1 在食物上涂满食用油。
2 在食物表面涂抹调味料。
3 在内锅中放入一大勺食用油。
4 将食物放入内锅中。
5 合上盖子。
6 根据食物的大小确定烹饪时间。
7 请勿一次烹饪 500 克以上的食物。
8 建议每 100 克牛肉的烹饪时间为 10 分钟 + 10 分钟。
9 猪肉或家禽肉的烹饪时间不得少于 5、10、15、20、25、30 分钟。
10 使用菜单上的按钮 进行选择 。
11 选择烹饪时间。默认时间为 20 分钟。
12 显示时间闪烁时,仅可使用“时”和“分”按钮。
13 使用“分”按钮通过选项选择显示器上的时间(10、15、20、25、5、10、15、20、25、
30、35、40、45、50 和 55)。
14 如果预计烹饪时间为 1 小时,请按“时”按钮。
15 取消 1 小时设置时,在显示时间闪烁时再次按下“时”按钮。
如果 2 分钟内没有任何操作,本产品将恢复待机模式。
16 设置时间之后,按下 。
17 显示器将开始倒计时。
18 烹饪结束时,本产品将进入“保温”模式。
19 灯 将发亮。
20 按下按钮 。打开盖子。取出食物。
1 嫩煎肉和蔬菜(见“嫩煎/煸炒/软化/煮”)。
2 煮烹饪液体(见“嫩煎/煸炒/软化/煮”)。
3 将固体材料放入内锅中,然后加入烹饪液体。
4 合上盖子。
5 按下按钮 。按钮将发光。
6 显示器将显示 1 小时,然后开始倒计时。
7 烹饪结束时,本产品将进入“保温”模式。
8 灯 将发亮。
9 按下按钮 。打开盖子。取出食物。
5 按下按钮 。按钮将发光。
6 显示器将显示 8 小时,然后开始倒计时。
7 烹饪结束时,本产品将进入“保温”模式。
8 灯 将发亮。
9 按下按钮 。打开盖子。取出食物。
炖煮
使用菜单
菜单
肉
汤
酸奶
面包
鱼
蒸煮
粥/意式烩饭
蛋糕
范围
10 分钟 - 1 小时
1 – 5 小时
6-10 小时
1 – 3 小时
10 分钟 -1 小时
30 分钟 - 2 小时
1-4 小时
30 分钟 - 2 小时
默认
20 分钟
1 小时
8 小时
3 小时
20 分钟
30 分钟
1 小时
40 分钟
肉
Page 26

• 可使用汤 、酸奶 、面包 、蒸煮 和粥 等程序的延时定时。
• 设置烹饪时间后、按下“开始” 之前立即进行此操作:
1) 按下 按钮。灯 将发亮。
2) 确定你希望完成食物烹饪的时间。
3) 例如,如果现在是 2:00,你希望 9:00 完成烹饪,必须将时间设置为7小时。
4) 使用“时”和“分”按钮设置正确的小时和分钟。
5) 按下按钮 。
1 嫩煎肉和蔬菜(见“嫩煎/煸炒/软化/煮”)。
2 将固体材料放入内锅中,然后加入烹饪液体。
3 合上盖子。
4 使用 按钮选择菜单上的 。
5 选择烹饪时间。默认时间为1小时。
6 显示时间闪烁时,仅可使用“时”和“分”按钮。
7 使用“分”按钮通过选项选择显示器上的时间(10、15、20、25、5、10、15、20、25、
30、35、40、45、50 和 55)。
8 使用“时”按钮通过选项选择显示器上的时间(1、2、3、4 和 5)。
9 取消 5 小时设置时,在显示时间闪烁时再次按下“时”按钮。
如果 2 分钟内没有任何操作,本产品将恢复待机模式。
10 可以选择使用该程序的定时(见“定时”)。
11 按下按钮 。
12 显示器将开始倒计时。
13 烹饪结束时,本产品将进入“保温”模式。
14 灯 将发亮。
15 按下按钮 。打开盖子。取出食物。
定时
汤
酸奶
酸奶发酵剂
1 可使用 5、10、15、20、25、30 毫升(2 大勺):
1) 原味活性酸奶,必须为新鲜酸奶(使用保质期较长的酸奶)。
• 不同品牌的酸奶制作结果也会不同。
2) 之前做过的酸奶。
• 时间越长,细菌的活性越低,因此仅可使用十次,然后使用新发酵剂。
3) 药店或保健品商店购买的冻干酸奶。
• 如果发酵剂包装上的使用说明与本指南不同,请以包装上的说明为准。
牛奶
2 准备 1 升牛奶。
3 全脂牛奶做出的酸奶比低脂牛奶浓稠。
4 如果希望做出更浓稠的酸奶,可在液态奶中加入 8 大勺奶粉。
5 还可以使用复原奶粉或罐头炼乳。
做酸奶
6 应杀死牛奶中的细菌,防止其与酸奶发酵剂中的细菌竞争。
7 加热牛奶时,确保酸奶发酵剂达到室温。
8 打开盖子。
Page 27

9 使用蒸(嫩煎/煸炒/软化/煮)程序将牛奶加热至即将沸腾的状态。
10 一直加热,直到牛奶边缘开始冒泡。
11 将牛奶冷却至 37°C - 45°C。
12 将酸奶发酵剂搅拌至牛奶中。
13 必须充分混合,否则酸奶可能会结块。
14 合上盖子。
15 使用 按钮选择菜单上的 。
16 选择烹饪时间。默认时间为 8 小时。
17 显示时间闪烁时,仅可使用“时”和“分”按钮。
18 使用“分”按钮通过选项选择显示器上的时间(10、15、20、25、5、10、15、20、25、
30、35、40、45、50 和 55)。
19 使用“时”按钮通过选项选择显示器上的时间(6、7、8、9 和 10)。
20 取消 10 小时设置时,在显示时间闪烁时再次按下“时”按钮。
如果 2 分钟内没有任何操作,本产品将恢复待机模式。
21 可以选择使用该程序的定时(见“定时”)。
22 按下按钮 。
23 显示器将开始倒计时。
24 烹饪时间结束时,本产品将进入待机模式。
25 此时酸奶不再保温。
26 按下按钮 。打开盖子。取出食物。
1 使用前将冷冻面团完全解冻。
2 请勿一次烹饪 500 克以上的食物。
3 在内锅内涂上食用油。
4 将面团放入内锅中。
5 合上盖子。
6 使用 按钮选择菜单上的 。
7 选择烹饪时间。默认时间为 3 小时。
8 显示时间闪烁时,仅可使用“时”和“分”按钮。
9 使用“分”按钮通过选项选择显示器上的时间(10、15、20、25、5、10、15、20、25、30、
35、40、45、50 和 55)。
10 使用“时”按钮通过选项选择显示器上的时间(1、2、3、4、5 和 6)。
11 取消 6 小时设置时,在显示时间闪烁时再次按下“时”按钮。
如果 2 分钟内没有任何操作,本产品将恢复待机模式。
12 可以选择使用该程序的定时(见“定时”)。
13 按下按钮 。
14 显示器将开始倒计时。
15 烹饪结束时,本产品将进入“保温”模式。
16 灯 将发亮。
17 按下按钮 。打开盖子。取出食物。
1 在食物上涂满食用油。
2 在食物表面涂抹调味料。
3 在内锅中放入一大勺食用油。
4 将食物放入内锅中。
5 合上盖子。
6 根据食物的大小确定烹饪时间。
7 请勿一次烹饪 500 克以上的食物。
8 建议每 100 克重量的烹饪时间为 10 分钟。
面包
鱼
Page 28

蒸煮
1 使用另一项程序进行烹饪之前,可以在默认设置下使用“蒸煮” 程序,在盖子打开的情
况下,在高温下对平锅蒸 5、10、15、20、25、30 分钟。
2 使用一点油嫩煎肉和蔬菜,煸炒,软化洋葱、芹菜、韭菜等的时候可使用本程序。
3 有水或高汤时可使用本程序预热烹饪液体。
9 显示时间闪烁时,仅可使用“时”和“分”按钮。
10 使用“分”按钮通过选项选择显示器上的时间(5、10、15、20、25、30、35、40、45、
50 和 55)。
11 使用“时”按钮通过选项选择显示器上的时间(1 和 2)。
12 取消 2 小时设置时,在显示时间闪烁时再次按下“时”按钮。
如果 2 分钟内没有任何操作,本产品将恢复待机模式。
13 可以选择使用该程序的定时(见“定时”)。
14 按下按钮 。
15 显示器将开始倒计时。
16 烹饪结束时,本产品将进入“保温”模式。
17 灯 将发亮。
18 烹饪完成后最好尽快取出食物,以免浸水。
19 按下按钮 。打开盖子。取出食物。
1 向内锅中加入冷水,至刻度 6处。
2 将蒸笼放在内锅上方,将食物放在蒸笼中。
3 为确保烹饪均匀,将食物切成大小大致相同的块。
4 对于豌豆或任何可能会破裂或落入水中的食物,应使用铝箔包装。
5 取包装时应小心,应戴隔热手套并使用塑料夹/勺子。
6 合上盖子。
7 使用 按钮选择菜单上的 。
8 选择烹饪时间。默认时间为30分钟。
• 下述食物应在默认时间内烹饪:
9 使用 按钮选择菜单上的 。
10 选择烹饪时间。默认时间为 20 分钟。
11 显示时间闪烁时,仅可使用“时”和“分”按钮。
12 使用“分”按钮通过选项选择显示器上的时间(10、15、20、25、5、10、15、20、25、
30、35、40、45、50 和 55)。
13 如果预计烹饪时间为 1 小时,请按“时”按钮。
14 取消 1 小时设置时,在显示时间闪烁时再次按下“时”按钮。
如果 2 分钟内没有任何操作,本产品将恢复待机模式。
15 设置时间之后,按下 。
16 显示器将开始倒计时。
17 烹饪结束时,本产品将进入“保温”模式。
18 灯 将发亮。
19 最好在烹饪结束后立即取出食物,以免变干。
20 按下按钮 。打开盖子。取出食物。
食物(新鲜)
青豆
球芽甘蓝
胡萝卜(片)
土豆(切成四块)
数量
200g
200g
200g
400g
食物(新鲜)
花椰菜
卷心菜
玉米芯
数量
200g
四分之一磅
2
嫩煎/煸炒/软化/煮
Page 29

1 使用前将冷冻面团完全解冻。
2 加入内锅中的液体不得超过半满。
3 在内锅内涂上食用油。
4 将面团放入内锅中。
5 合上盖子。
6 使用 按钮选择菜单上的 。
7 选择烹饪时间。默认时间为 40 分钟。
8 默认时间为 40 分钟。
9 显示时间闪烁时,仅可使用“时”和“分”按钮。
10 使用“分”按钮通过选项选择显示器上的时间(5、10、15、20、25、30、35、40、45、
50和55)。
11 使用“时”按钮通过选项选择显示器上的时间(1 和 2)。
12 取消 2 小时设置时,在显示时间闪烁时再次按下“时”按钮。
如果 2 分钟内没有任何操作,本产品将恢复待机模式。
13 设置时间之后,按下 。
14 显示器将开始倒计时。
15 烹饪结束时,本产品将进入“保温”模式。
16 灯 将发亮。
17 烹饪完成后最好尽快取出食物,以免浸水。
18 按下按钮 。打开盖子。取出食物。
• 使用内锅内部中心位置的刻度(刻度为1至3)。
• 禁止超出最高值。
2 根据加入谷物的量向内锅中加入相应的水。
3 合上盖子。
4 使用 按钮选择菜单上的 。
5 选择烹饪时间。默认时间为 1 小时。
6 显示时间闪烁时,仅可使用“时”和“分”按钮。
7 使用“分”按钮通过选项选择显示器上的时间(5、10、15、20、25、30、35、40、45、
50 和 55)。
8 使用“时”按钮通过选项选择显示器上的时间(1、2、3 和 4)。
9 取消 4 小时设置时,在显示时间闪烁时再次按下“时”按钮。
如果 2 分钟内没有任何操作,本产品将恢复待机模式。
10 可以选择使用该程序的定时(见“定时”)。
11 按下按钮 。
12 显示器将开始倒计时。
13 烹饪结束时,本产品将进入“保温”模式。
14 灯 将发亮。
15 按下按钮 。打开盖子。取出食物。
4 切换至主程序时,饭煲温度升高,部分或所有材料已放入内锅。
5 无需清洗准备过程中使用的平锅。
粥/意式烩饭
1 使用量杯将谷物(大米、燕麦、大麦等)放入内锅中。
粥
• 使用内锅内部右侧的刻度(刻度为 1/2 至 1 1/2)
• 禁止超出最高值。
意式烩饭
• 查阅本手册随后附上的食谱。
粥
蛋糕
Page 30

保温
打开盖子。加入油。选择菜单上的 ,按下 。加入洋葱和大蒜。待洋葱变软时开始烹饪。
挤干豆子中的水分,然后加入。蒸粗麦粉备用。加入剩余的材料。按两次 停止程序。合上
盖子。选择 。烹饪结束之前 30 分钟加入蒸粗麦粉。如果烹饪已经结束,选择菜单上的 ,
再烹饪20分钟左右。
1 拔掉饭煲的插头,使其冷却。
将插头从电源插座上拔下来,然后将接头从饭煲的电源插口拔下来。
2 合上盖子时,抓住过滤器的顶部,从盖子中取出来。
3 把过滤器翻过来,露出正面边缘上的标记。
4 紧紧抓住过滤器盖,将过滤器的剩余部分转向打开的挂锁 。
5 按下内盖 底部上的耳片,从饭煲上取下来。
6 用手清洗可拆卸部件。
7 使用干净的湿抹布擦洗所有表面。
8 禁止将饭煲的任何部件放入洗碗机。
9 重新安装过滤器,更换盖子中的过滤器。
10 更换盖子中的内盖。
• 如果想要在不支持保温的程序之后使用保温功能,当显示器上仅显示闪烁的灯光 时,
按下 。
• 按下 退出本功能。
维护与保养
环境保护
为避免电子电气产品中的有害物质引起环境和健康问题,带有此标志的电器不得作为未
分类城市废物处理,但可回收、重新使用或循环利用。
食谱
一大匙(15 毫升)
一茶匙(5 毫升)
克
毫升
量杯
枝条/条(芹菜)
一把
中等大小的鸡蛋(53-63 克)
一撮
一束
小枝
瓣
罐头
罐
小袋(7 克)
大鸡蛋(63-73 克)
香辣蔬菜和蒸粗麦粉
红洋葱,切碎
大洋葱,切碎
大蒜,剥皮、切碎
红辣椒,去籽、切碎
黄椒,去籽、切碎
橙色辣椒,去籽、切碎
香菜粉
番茄泥
蔬菜高汤
热番茄汁
蒸粗麦粉
橄榄油
棉豆
白豆
墨西哥青椒
芸豆
切碎的番茄
小茴香粉
糖
辣椒粉
干牛至
慢炖
与以下食物一并食用:
乳酪粉
小束香菜,切碎
酸奶油
Page 31

打开盖子。加入高汤。选择菜单上的 ,按下 。煮沸,搅拌。炖 10 分钟。加入剩余的材料。
按两次 停止程序。
香菜备用。打开盖子。加入剩余的材料。合上盖子。选择菜单上的 ,按下 。烹饪直至鱼
变成易剥落的片状(40-60 分钟)。按两次 停止程序。加入香菜。加入适当作料即可食用。
加入蒸粗麦粉味道更好。
打开盖子。加入油。选择菜单上的 ,按下 。将牛肉、番茄和胡椒切成一口大小的块。嫩煎
肉,然后取出。加入洋葱、蒜和所有香料。待洋葱变软时开始烹饪。加入肉。豆子备用。加
入剩余的材料。按两次 停止程序。合上盖子。选择 。烹饪结束之前 30 分钟加入豆子。
如果程序结束时肉质仍有些硬,加入一杯水,然后运行肉食程序 30 分钟
打开盖子。加入牛奶。选择菜单上的 ,按下 。一直加热,直到牛奶边缘开始冒泡。按两次
停止程序。将牛奶冷却至 37°C-45°C。将酸奶与牛奶搅拌到一起。必须充分混合,否则酸奶
可能会结块。合上盖子。选择菜单上的 ,按下 。等待程序结束。将酸奶放入冰箱,使其
完全冷却。在平锅中轻轻加热浆果。加入蜂蜜。浆果开始塌陷时,从平锅中取出来,开始冷
却,然后与酸奶混合。如果希望存放酸奶,必须对所使用的罐消毒。在炉中以 100°C 的温度加
热 10 分钟。酸奶最长可在冰箱中存放 2 周。
加入一把奶酪、一些酸奶油和少量新鲜香菜盛入碗中。如果为传统的素食辣椒,不加蒸粗
麦粉。
自制酸奶
口味选择
酸奶
牛奶 酸奶
蜂蜜
冰冻混合夏日浆果
炖煮
纽约火红香辣牛肉
炖牛肉
大蒜,剥皮、切碎
小茴香粉
辣椒粉
烟熏辣椒粉/干红辣椒粉
青椒
盐
罗勒叶,大致切碎
大蒜,剥皮、切碎
红辣椒,去籽、切碎
切碎的番茄
姜粉
肉桂棒
白酒
鱼高汤
鱼(鳕鱼/黑线鳕/三文鱼)
小束香菜,切碎
橄榄油
洋葱,切碎
辣椒粉
番茄酱
番茄
月桂树叶
黑胡椒
芸豆
鱼
摩洛哥炖鱼
洋葱,切碎
芹菜,切碎
小茴香粉
姜黄
哈里萨辣椒酱
番茄泥
柠檬
青橄榄
盐和胡椒
碎豌豆和蹄膀汤
慢炖
鸡汤
碎豌豆
芹菜,切碎
百里香,细细地切碎
蹄膀
洋葱,细细地切碎
胡萝卜,切碎
蒜(压碎)
月桂树叶
黑胡椒
1200ml
50 g
100ml
Page 32

香辣三文鱼
将辣椒粉、辣椒粉、小茴香、糖、盐和胡椒混合到一起。撒在三文鱼上。打开盖子。加入
油。选择菜单上的 ,按下 。等几分钟油变热。加入三文鱼片,皮面朝下。合上盖子。虽
然有蒸汽和鱼片,但鱼皮酥脆。与柠檬角一并食用。一顿完美的便餐。
合上盖子。选择 。等待程序结束。取出蹄膀。剔除皮和骨头。肉切块。取出月桂树叶。用木
匙背面将豌豆捣碎。加入肉。加入作料即可食用。享受天堂般的美味吧!
将肉与骨头分离。将肉和培根切成一口大小的块。打开盖子。选择菜单上的 ,按下 ,加
入高汤。煮沸,搅拌。炖 10 分钟。将高汤放入罐中。加入油。加入洋葱,用少量油煎至变软。
加入肉、大蒜、香料和其他蔬菜,烹饪 5 分钟。加入高汤。加入番茄泥。按两次 停止程序。
合上盖子。选择 。
在平锅中低温融化黄油。在内锅中铺上涂黄油的箔。在盘子中搅拌黄油溶液、糖、可可粉、
面粉、鸡蛋、香草和盐。拌入巧克力豆。将糊状物放入内锅中的箔上。合上盖子。选择菜单
上的 。将烹饪时间设置为 1 小时 30 分钟。按下按钮 。蛋糕边缘应坚硬,中间略粘。取出
尚温热的蛋糕,在顶部放上冰淇淋。
鱼
三文鱼片(带皮)
辣椒粉
小茴香粉
软红糖
橄榄油
辣椒粉
盐和胡椒
柠檬
巧克力布朗尼蛋糕
无盐黄油
糖
可可粉
牛奶巧克力豆
蛋糕
香草精
盐
纯面粉
与以下食物一并食用:
香草冰淇淋(可选)
爱尔兰炖菜和山羊奶酪水饺
炖菜:
羊肩(煮熟)
五花熏咸肉
羊高汤
大洋葱,切碎
芹菜,切碎
番茄泥
炖煮
橄榄油
蒜(压碎)
盐和胡椒
胡萝卜,切碎
迷迭香,切碎
玉米粉
水饺:
自发粉
板油
水
山羊奶酪(软)
干马郁兰
发酵粉
盐
干欧芹
干百里香
黑胡椒
炖菜:
水饺:
用手混合所有材料。将混合物分成 6 个团。等待 20 分钟。
结束时:
将矢车菊做成光滑的糊状,在杯子中加入一点水。烹饪结束之前 30 分钟,打开盖子。将糊状
物与炖菜搅拌在一起。加入水饺。合上盖子。等待程序结束即可食用。一碗美味的爽心美食!
Page 33

在碗中将鸡蛋打散。向内锅中加入黄油和糖。逐步加入鸡蛋,随后加入香草,然后加入面粉。
在牛奶中搅拌。在 1200 毫升的耐热碗中涂上油。将糖浆放在耐热碗底部,然后加入混合物。
覆盖上烘焙羊皮纸,覆盖上箔,在顶部系上细绳。打开盖子。将耐热碗放入饭煲的内锅中。
向饭煲中的内锅加入足够的沸水,至耐热碗顶部下方 3 厘米处。合上盖子。选择菜单上的 。
将烹饪时间设置为 1 小时 30 分钟。按下按钮 。等待程序结束。翻转到盘子上即可趁热食
用。享受一年中最美味的布丁吧!!
将柠檬切片。将茎与每个洋蓟底部切齐。切下每个洋蓟顶部四分之一的部分。扔掉损坏的叶
子。在切面上覆盖上一片柠檬。将柠檬片放在蒸笼中。加入小枝香料。加入大蒜。将洋蓟放
在顶部。向内锅中倒入水,直至内锅内左侧刻度 2 的位置。将蒸笼放在内锅上方。合上盖子。
选择菜单上的 ,按下 。当能够轻易拿掉外叶时,即完成洋蓟的烹饪。可淋上油醋汁热食
或冷食。妙不可言!
打开盖子。加入牛奶。选择菜单上的 ,按下 。一直加热,直到牛奶边缘开始冒泡。将牛奶
倒入罐中。按两次 停止程序。将牛奶冷却至 37°C-45°C。在平底锅中低温溶化黄油。在碗中
将面粉和盐混合。加入酵母、黄油和糖浆。加入牛奶,揉成一个团。如果混合物较粘,额外
加入一点面粉。遮盖住,在一个温热的地方放置 10 分钟。再揉。遮盖住,在一个温热的地方
放置 10 分钟。打开盖子。选择菜单上的 ,按下 。
打开盖子。选择菜单上的 ,按下 。加入高汤。煮沸,搅拌。炖 10 分钟。将高汤放入罐
中。加入油。加入洋葱,用少量油煎至变软。加入葡萄酒,烹饪几分钟。加入珍珠麦,搅拌,
直至珍珠麦染上葡萄酒的颜色。挤干豆子中的水分,然后加入。加入番茄。加入高汤。按
两次 停止程序。合上盖子。选择 。烹饪结束之前 30 分钟,打开盖子。检查内锅中的液
体量。必要时,加入 150 毫升热水。合上盖子。等待程序结束。可与新鲜的硬皮面包和辣椒
油一并食用。
如果没有煮熟的羊肉,可以使用生羊肉,使用慢炖程序而非炖煮程序,然后从水饺环节
继续。
蒸煮
蒸洋蓟
大蒜,剥皮、切碎
小枝香料(龙嵩叶、薄荷、欧芹、百里香)
洋蓟
柠檬
珍珠麦和波罗蒂豆一锅烩
炖煮
橄榄油
珍珠麦
切碎的番茄
蔬菜高汤
干红葡萄酒
波罗蒂豆
洋葱,细细地切碎
番茄泥
欧芹(切碎)
盐和胡椒
与以下食物一并食用:
辣椒油(可选)
糖浆海绵布丁
黄油
细白砂糖
自发粉
金黄糖浆
蒸煮
香草精
牛奶
白面包
面包
金黄糖浆
牛奶
高筋面包粉
黄油
干酵母
盐
Page 34

打开盖子。加入燕麦片、肉桂、椰子和牛奶。向内锅中加入水,至内锅内右侧刻度 ½ 的位
置。合上盖子。选择菜单上的 ,按下 。等待程序结束。在顶部涂上涂上糖浆、撒上切碎
的杏仁。
打开盖子。选择菜单上的 ,按下 。加入高汤。煮沸,搅拌。炖 10 分钟。将高汤放入罐中。
按两次 停止程序。选择菜单上的 ,按下 。然后加热。甜菜根去皮,切成 1 厘米的方
块。将甜菜根、大蒜和洋葱放入内锅中。待洋葱变软时开始烹饪。加入大米搅拌。合上盖子,
烹饪 3-4 分钟。打开盖子。加入葡萄酒搅拌。合上盖子,烹饪 3-4 分钟。打开盖子。加入百里
香。加入高汤。合上盖子。等待程序结束。检查大米,应能够咬得动,但不太硬。如果未完
成,加入一点水,再多烹饪几分钟。加入黄油搅拌,如此可使得意式烩饭有光泽。可加上一
团酸奶、撒上欧芹食用。可作为简便午餐美味的第一道菜。
打开盖子。加入燕麦片、盐和糖。向内锅中加入水,至内锅内右侧刻度 1 ½ 的位置。合上盖
子。选择菜单上的 ,按下 。等待程序结束。可涂上牛奶或奶油食用。撒上红糖。如果愿
意,可在烹饪时间结束之前 15 分钟加入切碎的杏干或切半的梅子(无核)。剩下的粥可在冰
箱中最多存放 2 天,然后重新加热。
打开盖子。在内锅中涂上黄油。选择菜单上的 。合上盖子。将烹饪时间设置为 2 小时 15 分
钟。按下按钮 。然后加热。将苏打面包混合物倒入一个碗中。加水。用手混成一个团。打
开盖子。将面团放入内锅中。使用塑料铲将面团分成四份。合上盖子。烹饪结束之前 30 分钟,
打开盖子。把面包翻过来。如此一来,面包顶部会有一点颜色,且发脆。等待程序结束。放
在金属网架上冷却。可加上含盐黄油食用或随餐食用。
合上盖子。烹饪结束之前30分钟,打开盖子。把面包翻过来。如此一来,面包顶部会有一点
颜色,且发脆。等待程序结束。可与大量黄油一并食用。
苏打面包
面包
粥/意式烩饭
苏打面包混合物
水
黄油
粥
燕麦粥
盐
水
糖
与以下食物一并食用:
红糖 牛奶/淡奶油
坚果粥
粥/意式烩饭
燕麦片
牛奶
肉桂粉
水
椰蓉
与以下食物一并食用:
金黄糖浆 切碎的杏仁
多用锅甜菜根意式烩饭
粥/意式烩饭
甜菜根
阿尔博里奥/意式烩饭米
白酒
蔬菜高汤/鸡汤
橄榄油
洋葱,细细地切碎
大蒜,剥皮、切碎
百里香,细细地切碎
结束时:
酸奶
黄油
欧芹(切碎)
Page 35

打开盖子。选择菜单上的 。加入油。将烹饪时间设置为 1 小时 45 分钟。
打开盖子。选择菜单上的 ,按下 。加入油。使用盐和胡椒为鸡胸肉调味,然后放入内锅
中。翻动肉将两侧密封。加入大蒜和蘑菇。烹饪 3-4 分钟,翻动一次鸡肉。加入番茄、辣酱油、
番茄酱和牛至。继续烹饪,再翻动鸡肉。检查鸡肉是否熟透。与意大利面、土豆或米饭一并
食用。一道快速而美味的私厨美食。
打开盖子。加入高汤。选择菜单上的 ,按下 。煮沸,搅拌。炖 10 分钟。将高汤放入罐中。
按两次 停止程序。土豆削皮并切成块。选择菜单上的 ,按下 加入油。加入洋葱和甜
椒。待洋葱变软时开始烹饪。加入高汤。加入剩余的材料。合上盖子。等待程序结束。加入
作料。与硬皮面包一并食用。
打开盖子。将大米放入内锅中。向内锅中倒入水,直至内锅内左侧刻度 2 的位置。弄碎汤块,
加水搅拌。加入剩余的材料。合上盖子。选择 。等待程序结束即可食用。如果米饭未煮熟,
合上盖子再蒸几分钟。
打开盖子。选择菜单上的 ,按下 。用少量油将西班牙香肠煎 2 分钟。加入洋葱和大蒜。待
洋葱变软时开始烹饪。将苹果去皮、挖核、切碎。加入剩余的材料。按两次 停止程序。合
上
盖子。选择菜单上的 ,按下 。等待程序结束。烹饪出来的汤味道鲜美,如果在冰箱里放上
一夜,味道会更浓郁。
开胃米饭
米饭
米饭
汤块(蔬菜)
红辣椒,去籽、切碎
姜黄
水
胡萝卜,切碎
芹菜,切碎
豌豆(可选)
西红柿浓汤
汤
洋葱,切碎
切碎的番茄
红辣椒,去籽、切碎
鸡汤
干混合香料
橄榄油
切碎的番茄
土豆
番茄泥
黑胡椒
西班牙香肠、卷心菜和苹果汤
汤
西班牙香肠,细细地切碎
苹果
芹菜,切碎
春季卷心菜,细细地切碎
大蒜,剥皮、切碎
盐
蔬菜高汤
洋葱,细细地切碎
胡萝卜,切碎
切碎的番茄
番茄泥
辣椒粉
黑胡椒
番茄蘑菇鸡肉
肉
鸡胸肉,去皮、去骨
棕色蘑菇,切碎
大蒜,剥皮、切碎
辣酱油
盐和胡椒
橄榄油
切碎的番茄
番茄酱
干牛至
枫糖酱油浓香红烧排骨
猪腹肉排
吉尼斯黑啤酒/烈性啤酒
牛肉汤/猪肉汤
枫糖浆/蜂蜜
肉
洋葱,切碎
橄榄油
大蒜,剥皮、切碎
深色酱油
Page 36

牛腩一锅烩
按下按钮 。加入排骨,嫩煎 5 分钟并不时翻动。取出排骨。加入洋葱和大蒜。待洋葱变软
时开始烹饪。将排骨放入内锅中。加入吉尼斯黑啤酒、高汤、枫糖浆和酱油搅拌,合上盖
子。等待程序结束。加入作料即可食用。开始享受美味的第一道菜或自选自配午饭吧。
土豆不去皮。将土豆、胡萝卜和芹菜切成大块。使用盐和胡椒为牛腩调味。打开盖子。选择
菜单上的 ,按下 ,加入高汤。煮沸,搅拌。炖 10 分钟。将高汤放入罐中。用少量油将西
班牙香肠煎 2 分钟。加入肉。全部嫩煎。加入洋葱、大蒜、土豆、芹菜和胡萝卜。如果还有
其他根类蔬菜,请一并加入。待洋葱变软时开始烹饪。加入高汤。加入剩余的材料。按两
次 停止程序。选择 。等待程序结束即可食用。烹饪 8 个小时没有坏处,但 5 个小时之后
即可使用。
慢炖
牛腩
番茄泥
大蒜,剥皮、切碎
月桂树叶
西班牙香肠,切片
胡萝卜
红洋葱,切碎
芹菜
牛肉汤
迷迭香,切碎
干混合香料
切碎的番茄
土豆(小)
盐和胡椒
辣酱油
Page 37

 Loading...