

Page 1
INVERTER SPLIT-TYPE ROOM AIR CONDITIONER
Kids Star Series
All Model Numbers
CS78421-548-754
IMPORTANT NOTE:
Read this manual carefully before installing
or operating your new air conditioning
unit. Make sure to save this manual for
future reference.
Owner s Manual
Page 2
a. Electrical Heating Function ............................................................. 13
b. Temperature Display Function ......................................................... 13
c. Light Sensitive Function ................................................................. 13
d. ECO Function ............................................................................... 13
e. Intelligent Eye Function ................................................................... 14
Manual Operation (Without Remote) ................................. 15
Care and Maintenance .............................................................. 16
Troubleshooting.......................18
How to Use Advanced Functions ..........................................13
4
5
6
7
European Disposal Guidelines ............................................... 22
8
Safety Precautions.......................................04
a. AUTO Function .................................. 10
b. COOL Function .................................. 10
c. HEAT Function ..................................... 10
d. Setting temperature ................... ........... 11
e. Setting Fan Speed .............................. 11
f. Setting Angle of Air Flow ...................... 11
g. LOCK function ................................... 12
Your Remote Control ................08
Unit Specifcations and Features ........06
Table of Contents
Owner s Manual
How to Use Basic Functions .......10
0
1
2
3
SAFETY
FIRST
Page 3
a. Electrical Heating Function ............................................................. 13
b. Temperature Display Function ......................................................... 13
c. Light Sensitive Function ................................................................. 13
d. ECO Function ............................................................................... 13
e. Intelligent Eye Function ................................................................... 14
Manual Operation (Without Remote) ................................. 15
Care and Maintenance .............................................................. 16
Troubleshooting.......................18
How to Use Advanced Functions .......................................... 13
4
5
6
7
European Disposal Guidelines ............................................... 22
8
Page 4
Page 5
ELECTRICAL WARNINGS
Only use the specifed power cord. If the power cord is damaged, it must be replaced by the
manufacturer or certified service agent.
Keep power plug clean. Remove any dust or grime that accumulates on or around the plug. Dirty
plugs can cause fire or electric shock.
Do not pull power cord to unplug unit. Hold the plug firmly and pull it from the outlet. Pulling
directly on the cord can damage it, which can lead to fire or electric shock.
Do not use an extension cord, manually extend the power cord, or connect other appliances to
the same outlet as the air conditioner. Poor electrical connections, poor insulation, and insuffcient
voltage can cause fire.
CLEANING AND MAINTENANCE WARNINGS
Turn off the device and pull the plug before cleaning. Failure to do so can cause electrical shock.
Do not clean the air conditioner with excessive amounts of water.
Do not clean the air conditioner with combustible cleaning agents. Combustible cleaning agents
can cause fire or deformation.
CAUTION
If the air conditioner is used together with burners or other heating devices, thoroughly ventilate
the room to avoid oxygen defciency.
Turn off the air conditioner and unplug the unit if you are not going to use it for a long time.
Turn off and unplug the unit during storms.
Make sure that water condensation can drain unhindered from the unit.
Do not operate the air conditioner with wet hands. This may cause electric shock.
Do not use device for any other purpose than its intended use.
Do not climb onto or place objects on top of the outdoor unit.
Do not allow the air conditioner to operate for long periods of time with doors or windows open,
or if the humidity is very high.
Safety
Precautions
Page 4
Safety Precautions
Read Safety Precautions Before Installation
Incorrect installation due to ignoring instructions can cause serious damage or injury. The
seriousness of potential damage or injuries is classifed as either a WARNING or CAUTION.
WARNING
This symbol indicates that ignoring instructions may cause death or serious
injury.
This symbol indicates that ignoring instructions may cause moderate injury
to your person, or damage to your appliance or other property.
CAUTION
WARNING
This appliance can be used by children aged from 8 years and above and persons with reduced
physical, sensory or mental capabilities or lack of experience and knowledge if they have been given
supervision or instruction concerning use of the appliance in a safe way and understand the hazards
involved. Children shall not play with the appliance. Cleaning and user maintenance shall not be
made by children without supervision.
INSTALLATION WARNINGS
Ask an authorized dealer to install this air conditioner. Inappropriate installation may cause water
leakage, electric shock, or fire.
All repairs, maintenance and relocation of this unit must be performed by an authorized service
technician. Inappropriate repairs can lead to serious injury or product failure.
WARNINGS FOR PRODUCT USE
If an abnormal situation arises (like a burning smell), immediately turn off the unit and pull the
power plug. Call your dealer for instructions to avoid electric shock, fire or injury.
Do not insert fingers, rods or other objects into the air inlet or outlet. This may cause injury, since
the fan may be rotating at high speeds.
Do not use fammable sprays such as hair spray, lacquer or paint near the unit. This may cause
Fire or combustion.
Do not operate the air conditioner in places near or around combustible gases. Emitted gas may
collect around the unit and cause explosion.
Do not operate the air conditioner in a wet room (e.g., bathroom or laundry room). This can
cause electrical shock and cause the product to deteriorate.
Do not expose your body directly to cool air for a prolonged period of time.
Safety
Precautions
Page 5
Page 5
ELECTRICAL WARNINGS
Only use the specifed power cord. If the power cord is damaged, it must be replaced by the
manufacturer or certified service agent.
Keep power plug clean. Remove any dust or grime that accumulates on or around the plug. Dirty
plugs can cause fire or electric shock.
Do not pull power cord to unplug unit. Hold the plug firmly and pull it from the outlet. Pulling
directly on the cord can damage it, which can lead to fire or electric shock.
Do not use an extension cord, manually extend the power cord, or connect other appliances to
the same outlet as the air conditioner. Poor electrical connections, poor insulation, and insuffcient
voltage can cause fire.
CLEANING AND MAINTENANCE WARNINGS
Turn off the device and pull the plug before cleaning. Failure to do so can cause electrical shock.
Do not clean the air conditioner with excessive amounts of water.
Do not clean the air conditioner with combustible cleaning agents. Combustible cleaning agents
can cause fire or deformation.
CAUTION
If the air conditioner is used together with burners or other heating devices, thoroughly ventilate
the room to avoid oxygen defciency.
Turn off the air conditioner and unplug the unit if you are not going to use it for a long time.
Turn off and unplug the unit during storms.
Make sure that water condensation can drain unhindered from the unit.
Do not operate the air conditioner with wet hands. This may cause electric shock.
Do not use device for any other purpose than its intended use.
Do not climb onto or place objects on top of the outdoor unit.
Do not allow the air conditioner to operate for long periods of time with doors or windows open,
or if the humidity is very high.
Safety
Precautions
Page 6
Page 7
NOTE ON ILLUSTRATIONS
Illustrations in this manual are for explanatory purposes. The actual shape of your indoor unit may be
slightly different. The actual shape shall prevail.
Production Specifications
Product Number
Indoor Unit Dimensions
Outdoor Unit Dimensions
Heat Pump / Electrical Heat
Remote Control
Unit
Specifcations
and Features
Main Functions
Your new air conditioner can:
Cool you down
Warm you up (for heat pump units)
Work as a fan
COOL mode HEAT mode DRY mode
Room Temperature
o o
17 C - 32 C
o o
(62 F - 90 F)
o o
0 C - 30 C
o o
(32 F - 86 F)
o o
10 C - 32 C
o o
(50 F - 90 F)
Outdoor
Temperature
o o
0 C - 50 C
o o
(32 F - 122 F)
o o
-15 C - 30 C
o o
(5 F - 86 F)
o o
0 C - 50 C
o o
(32 F - 122 F)
o o
-15 C - 50 C
o o
(5 F - 122 F)
(For models with
low temp. cooling
systems.)
To further optimize the performance of your unit, do the following:
Keep doors and windows closed
Do not block air inlets or outlets
Regularly inspect and clean air filters
FOR UNITS WITH
AUXILARY ELECTRIC
HEATER
W hen outside temperatue
o o
is below 0 C(32 F),
we strongly recommend
keeping the unit plugged
in at all times to ensure
smooth ongoing
performance.
Achieving Optimal Performance
Optimal performance for the COOL, HEAT, and DRY modes can be achieved in the following
temperature ranges. When your air conditioner is used outside of these ranges, certain safety
protection features will activate and cause the unit to perform less than optimally.
Page 6
Unit Specifications and Features
1
Unit Parts
Unit
Specifcations
and Features
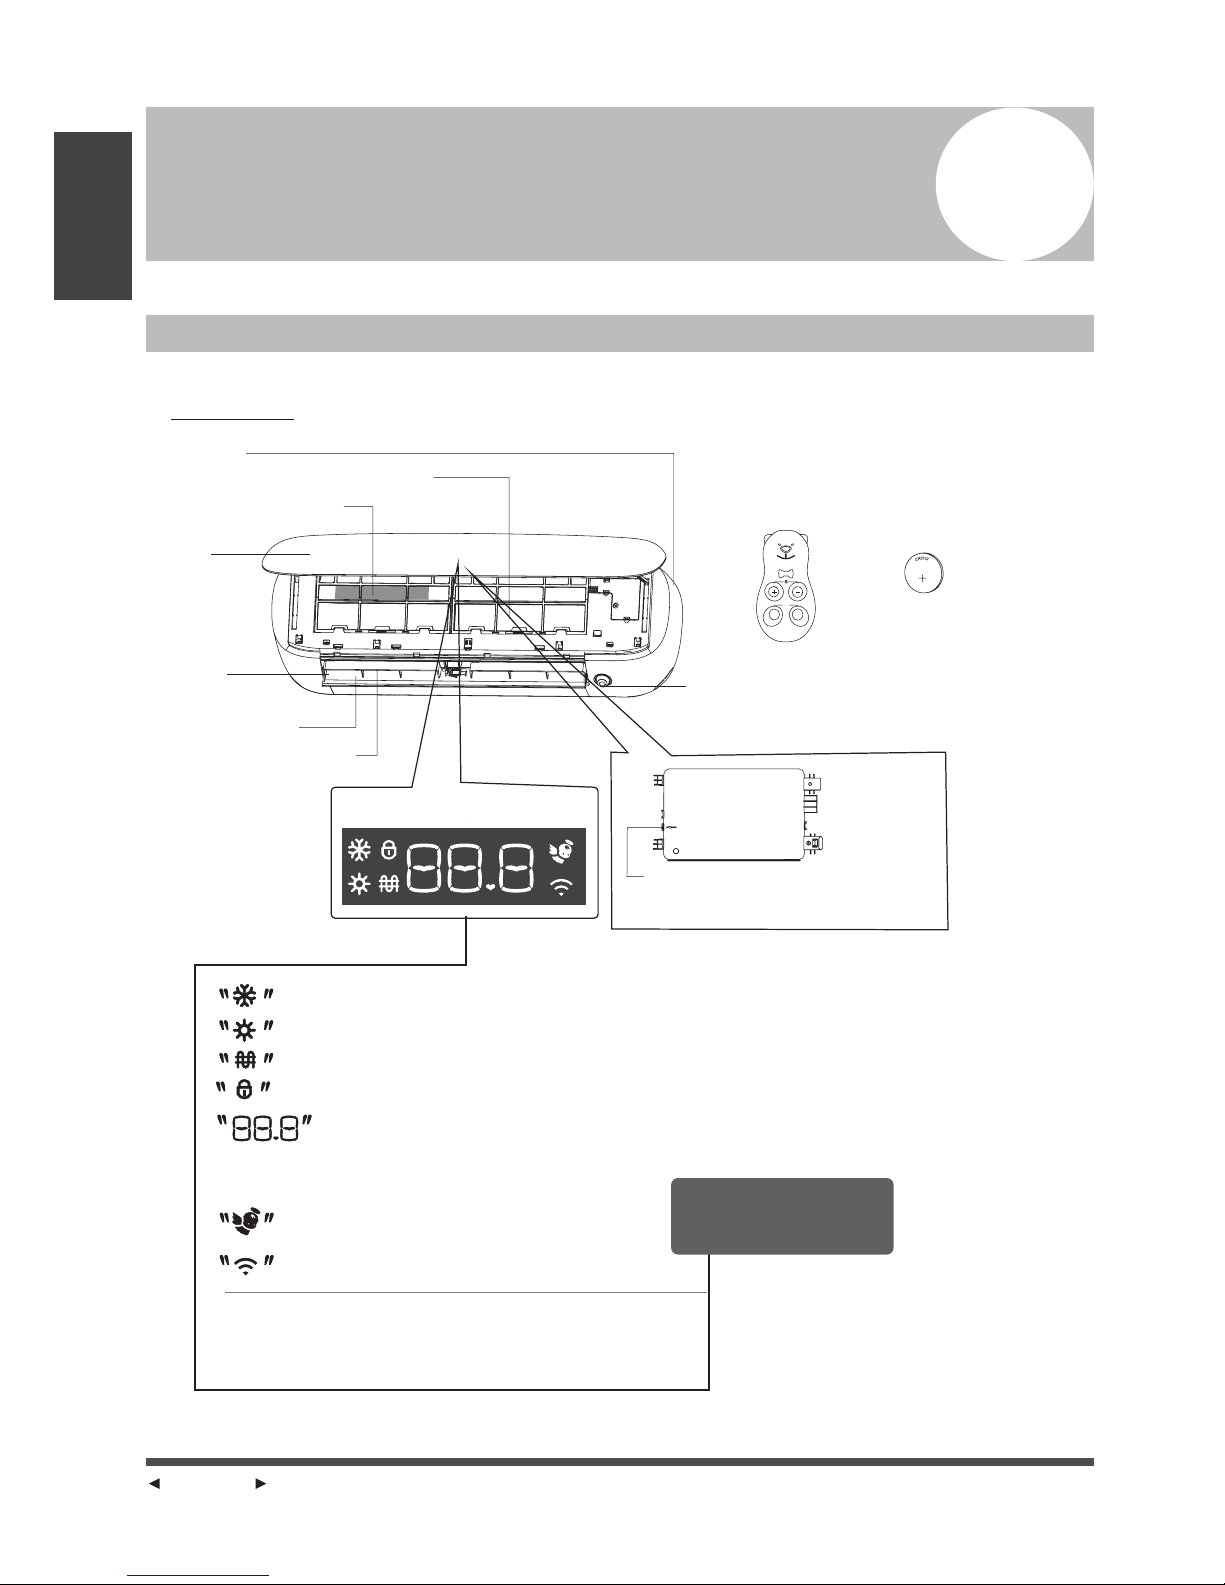
Frame
Air filter
Panel
Intelligent Ey e
Manu al cont rol but ton
Air ou tlet
Louv er(ho rizon tal)
Louv er(ve rtica l)
Func tiona l Filte r
Indoor unit
Disp lay win dow
Cooling operation
Heating operation
Electrical Heating operation
Lock function is turned on
when intelligent eye function is turned on
Displays selected temperature
& self-diagnostic codes
when WIFI function is turned on
Display Code
Meanings
In Fan mode, the unit will display the room temperature.
In other modes, the unit will display your temperature setting.
Open t he pane l, you ca n find it bes ide
the di splay w indow
Lith um batt ery
(Type : CR203 2)
Remo te cont rol
Fig. 1
AUTO /COOL
ON/OF F
SWING
EYE
ELECTRICAL
HEAT
Page 7
Page 7
NOTE ON ILLUSTRATIONS
Illustrations in this manual are for explanatory purposes. The actual shape of your indoor unit may be
slightly different. The actual shape shall prevail.
Production Specifications
Product Number
Indoor Unit Dimensions
Outdoor Unit Dimensions
Heat Pump / Electrical Heat
Remote Control
Unit
Specifcations
and Features
Main Functions
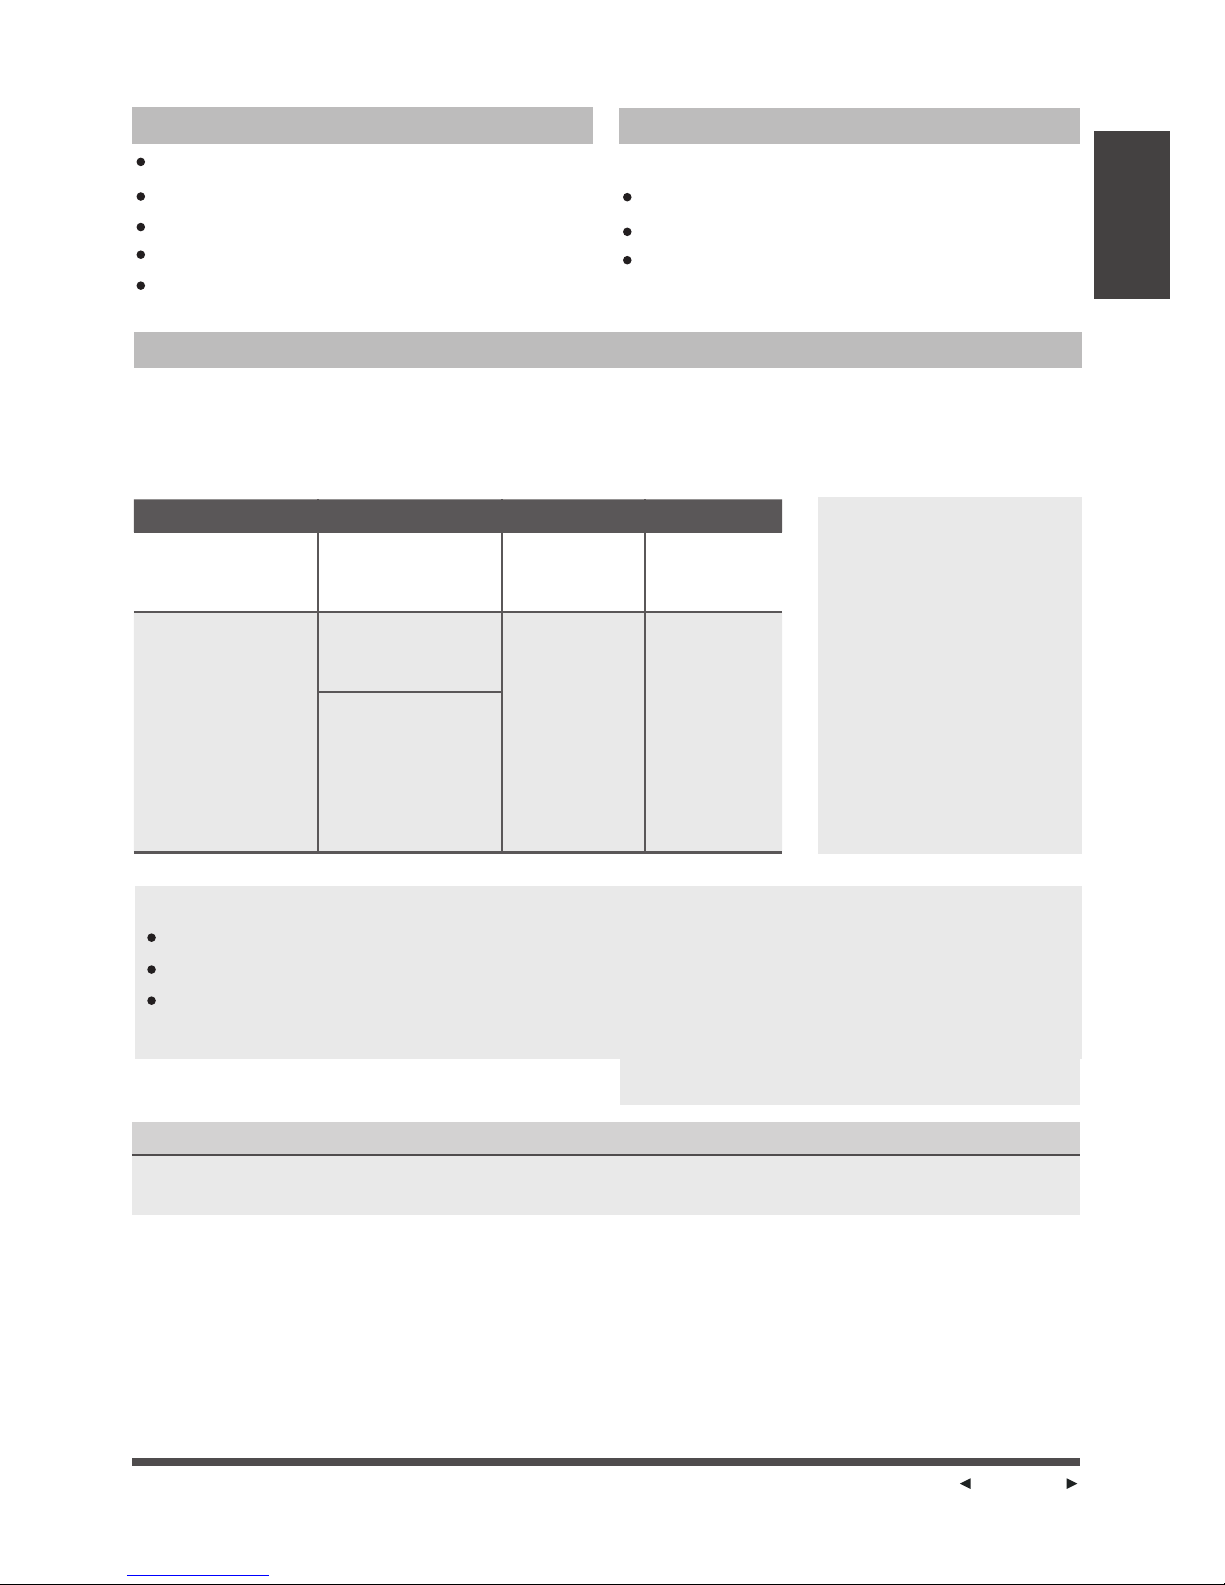
Your new air conditioner can:
Cool you down
Warm you up (for heat pump units)
Work as a fan
COOL mode HEAT mode DRY mode
Room Temperature
o o
17 C - 32 C
o o
(62 F - 90 F)
o o
0 C - 30 C
o o
(32 F - 86 F)
o o
10 C - 32 C
o o
(50 F - 90 F)
Outdoor
Temperature
o o
0 C - 50 C
o o
(32 F - 122 F)
o o
-15 C - 30 C
o o
(5 F - 86 F)
o o
0 C - 50 C
o o
(32 F - 122 F)
o o
-15 C - 50 C
o o
(5 F - 122 F)
(For models with
low temp. cooling
systems.)
To further optimize the performance of your unit, do the following:
Keep doors and windows closed
Do not block air inlets or outlets
Regularly inspect and clean air filters
FOR UNITS WITH
AUXILARY ELECTRIC
HEATER
W hen outside temperatue
o o
is below 0 C(32 F),
we strongly recommend
keeping the unit plugged
in at all times to ensure
smooth ongoing
performance.
Achieving Optimal Performance
Optimal performance for the COOL, HEAT, and DRY modes can be achieved in the following
temperature ranges. When your air conditioner is used outside of these ranges, certain safety
protection features will activate and cause the unit to perform less than optimally.
Page 8
Page 9
NOT SURE WHAT A FUNCTION DOES?
Refer to the How to Use Basic Functions and
How to Use Advanced Functions sections
of this manual for a detailed description of
how to use your air conditioner.
SPECIAL NOTE
Button designs on your unit may differ
slightly from the example shown.
If the indoor unit does not have a
particular function, pressing that function s
button on the remote control will have no
effect.
TIPS FOR USING REMOTE CONTROL
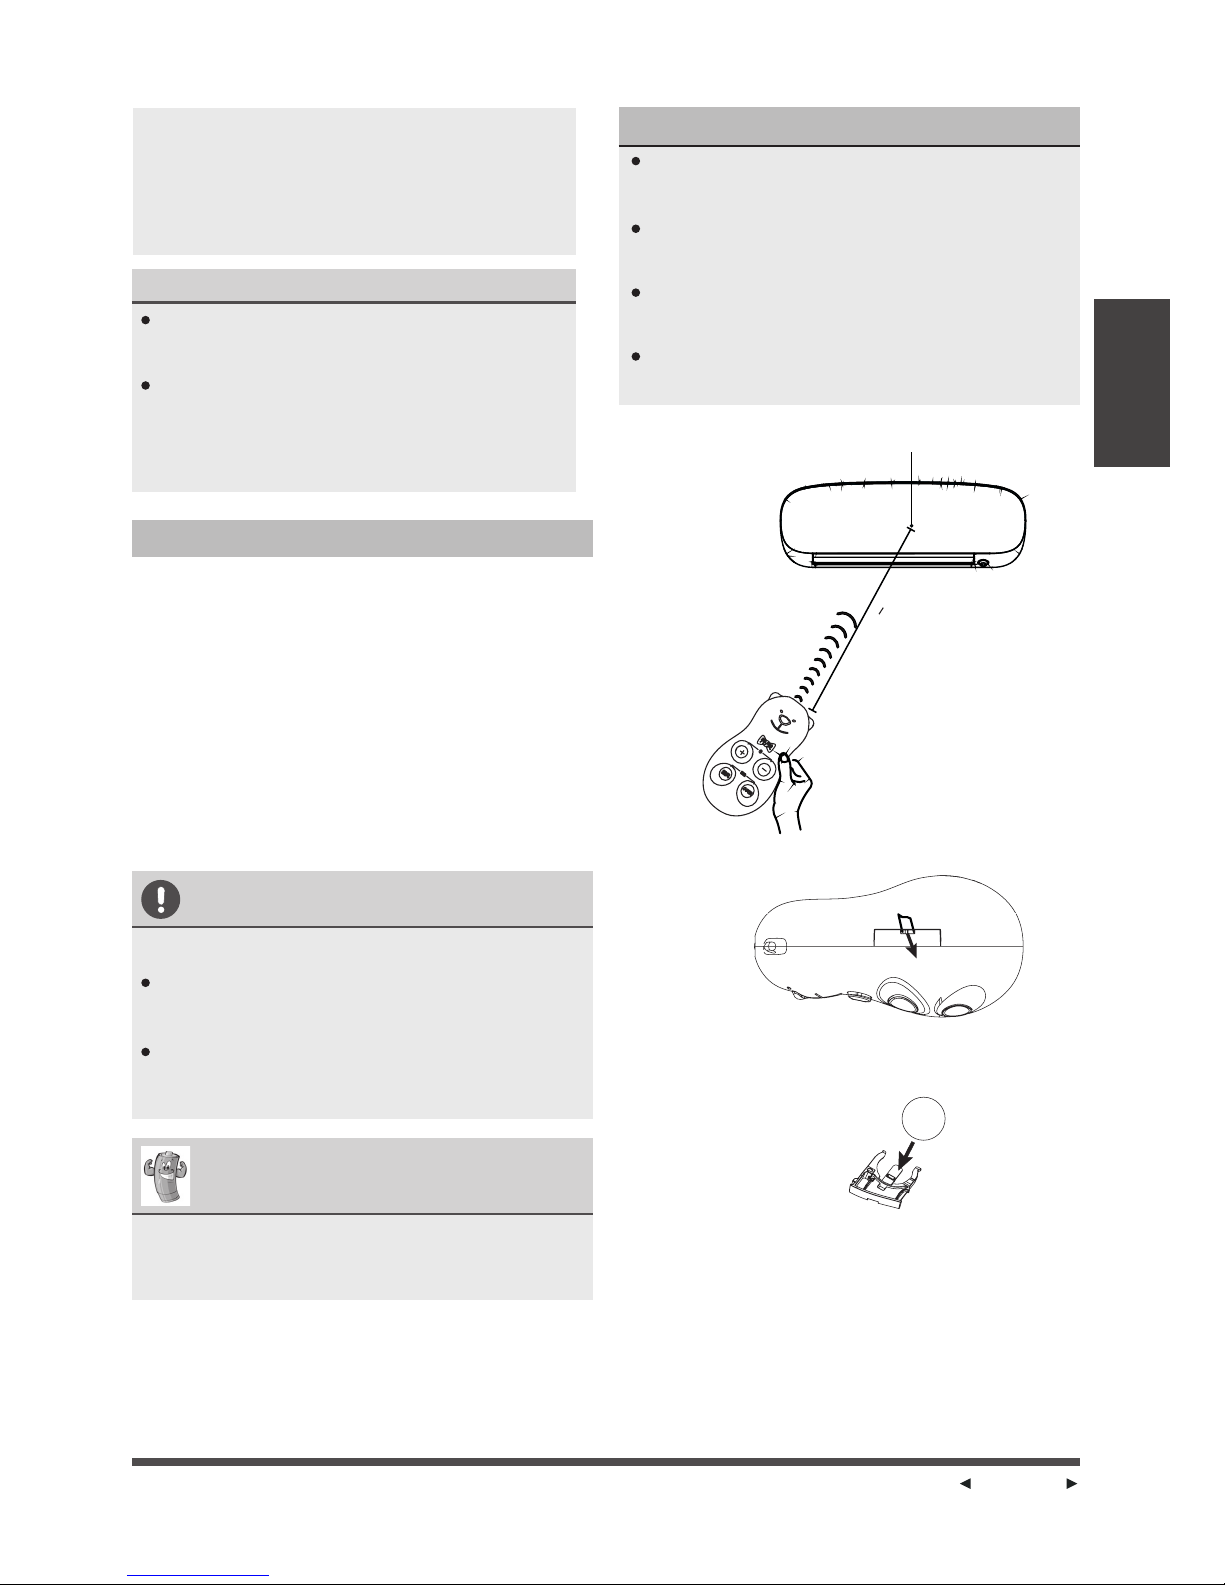
The remote control must be used within 8
meters of the unit.
The unit will beep when remote signal is
received.
Curtains, other materials and direct sunlight
can interfere with the infrared signal receiver.
Remove batteries if the remote will not be
used more than 2 months.
Your Remote
Control
Inserting and Replacing Batteries
Your air conditioning unit comes with one button
Battery. Put the battery in the remote control
before use.
1. Use a sharp tool like a flat screwdriver to
pry open the battery compartment as shown
in Fig.4.
2. Install the battery, paying attention to match
up the (+) and (-) ends of the batteries with
the symbols inside the battery compartment.
3. Slide the battery compartment back into place.
BATTERY NOTES
For optimum product performance:
Do not mix old and new batteries, or
batteries of different types.
Do not leave batteries in the remote control
if you don t plan on using the device for
more than 2 months.
BATTERY DISPOSAL
Do not dispose of batteries as unsorted
municipal waste. Refer to local laws for proper
disposal of batteries.
,
,
Signal receiver
Distan ce <8 m
Fig. 3
Fig. 4
Fig. 5
Page 8
Your Remote Control
2
Before you begin using your new air conditioner, make sure to familiarize yourself with its remote
control. The following is a brief introduction to the remote control itself. For instructions on how to
operate your air conditioner, refer to the How to Use Basic Functions section of this manual.
Your Remote
Control
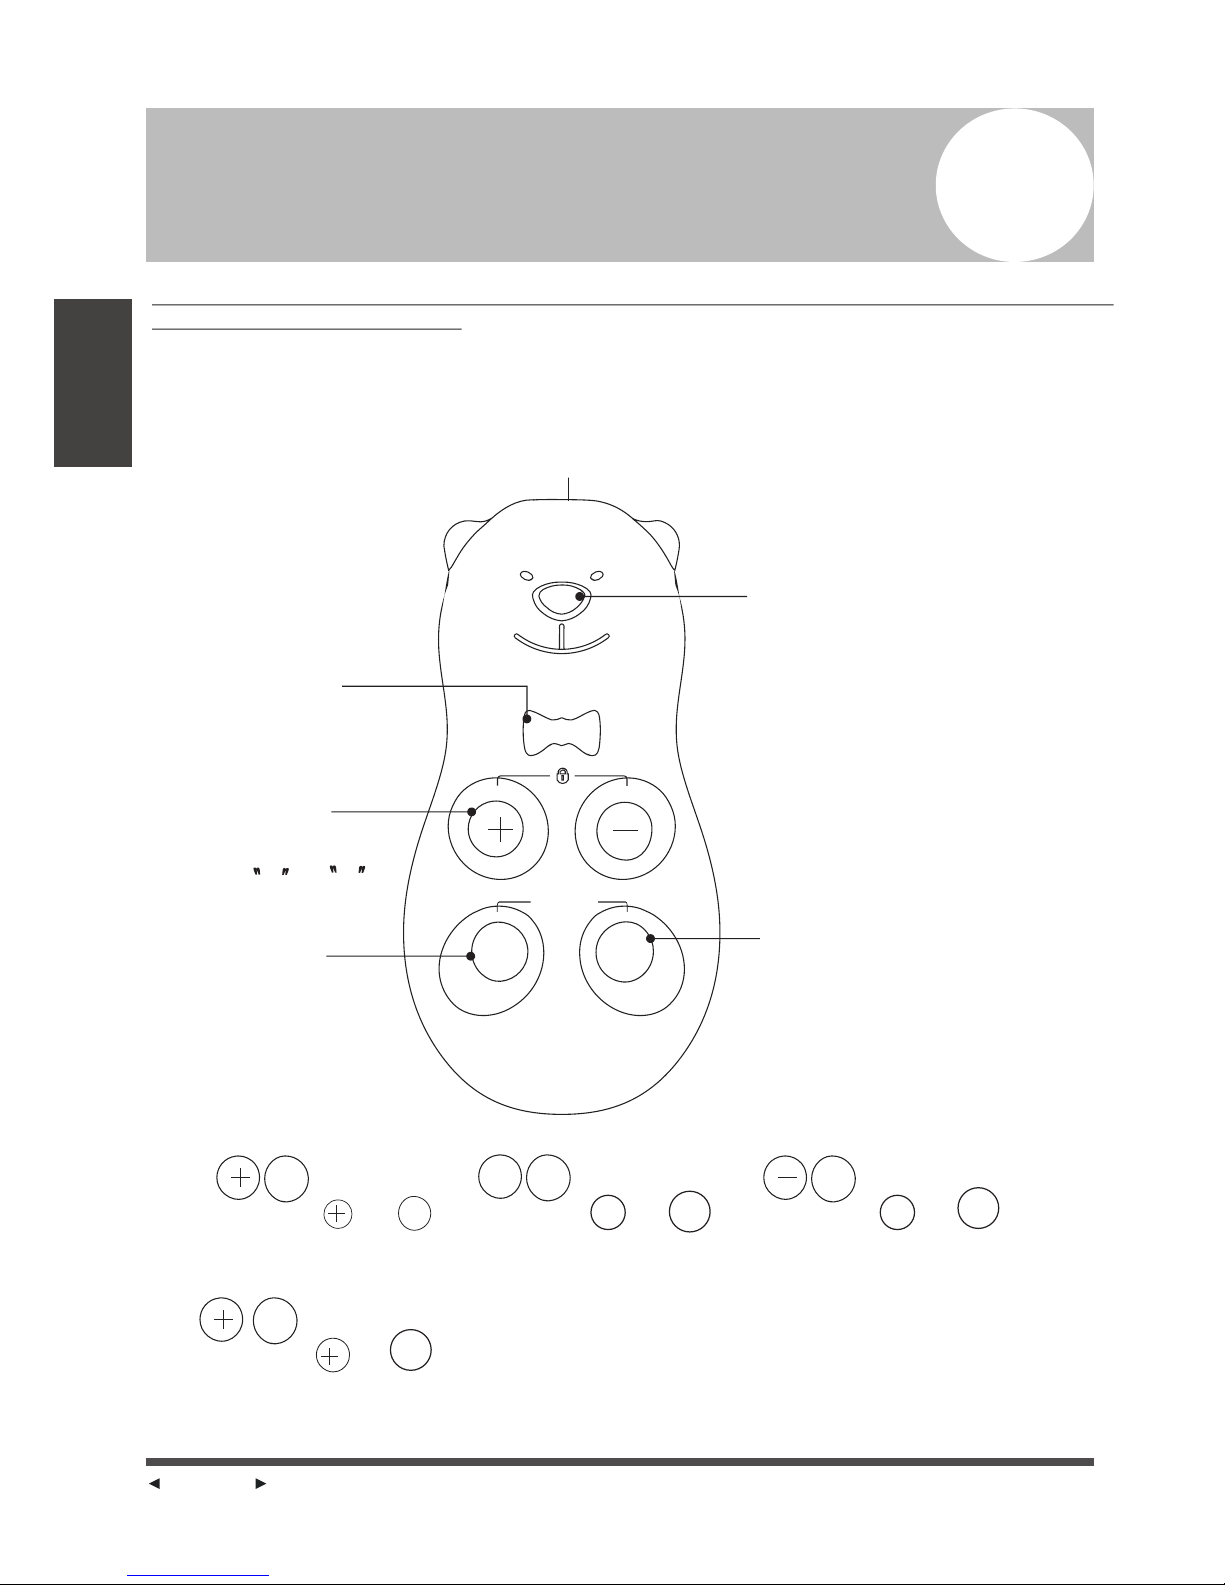
Sign al tran smitter
Trans missi on Indica tor
ON/O FF butt on
Adj ust but ton
Swin g butto n
Inte llige nt Eye butt on
Ligh ts up for e ach pre ss
of the b utton . If it does t
work , pleas e check t he
batt eries .
Tur ns the un it on or
off, and a ctiva tes
AUTO mod e.
Adju sts the t emper ature
or fan s peed. P ress
butt on and
simu ltane ously t o lock
or unl ock the k eyboa rd.
Pres s this bu tton to
acti vate ho rizon tal louver
to aut o swing . Hold do wn
this b utton f or at lea st 1
seco nd to act ivate f an
spee d setti ng.
Star ts and st ops Int elligen t
Eye fu nctio n.
Hold d own for a t least 1
seco n
d to tur n indoo r
unit s L ED disp lay on
and off.
,
+
-
,
SWING
SWING
EYE
EYE
EYE
EYE
EYE
EYE
SWI NG
Pres s butto n and
simu ltane ously t o activate
HEAT mode.
Pres s butto n and
simu ltane ously t o activate
COOL mode.
Pres s butto n and
simu ltane ously t o activate
AP mode.
Pres s butto n and
simu ltane ously t o turn
elec trica l heati ng functi on
on and o ff
Swing
-
Fig. 2
WARNING:The Remote control is not a toy. Not suitable for children under 36 months.
Small part. Choking hazard.
ON/OFF
SWING
EYE
ELE CTRIC AL
HEAT ING
Page 9
Page 9
NOT SURE WHAT A FUNCTION DOES?
Refer to the How to Use Basic Functions and
How to Use Advanced Functions sections
of this manual for a detailed description of
how to use your air conditioner.
SPECIAL NOTE
Button designs on your unit may differ
slightly from the example shown.
If the indoor unit does not have a
particular function, pressing that function s
button on the remote control will have no
effect.
TIPS FOR USING REMOTE CONTROL
The remote control must be used within 8
meters of the unit.
The unit will beep when remote signal is
received.
Curtains, other materials and direct sunlight
can interfere with the infrared signal receiver.
Remove batteries if the remote will not be
used more than 2 months.
Your Remote
Control
Inserting and Replacing Batteries
Your air conditioning unit comes with one button
Battery. Put the battery in the remote control
before use.
1. Use a sharp tool like a flat screwdriver to
pry open the battery compartment as shown
in Fig.4.
2. Install the battery, paying attention to match
up the (+) and (-) ends of the batteries with
the symbols inside the battery compartment.
3. Slide the battery compartment back into place.
BATTERY NOTES
For optimum product performance:
Do not mix old and new batteries, or
batteries of different types.
Do not leave batteries in the remote control
if you don t plan on using the device for
more than 2 months.
BATTERY DISPOSAL
Do not dispose of batteries as unsorted
municipal waste. Refer to local laws for proper
disposal of batteries.
,
,
Signal receiver
Distan ce <8 m
Fig. 3
Fig. 4
Fig. 5
Page 10
Page 11
How to Use
Basic Functions
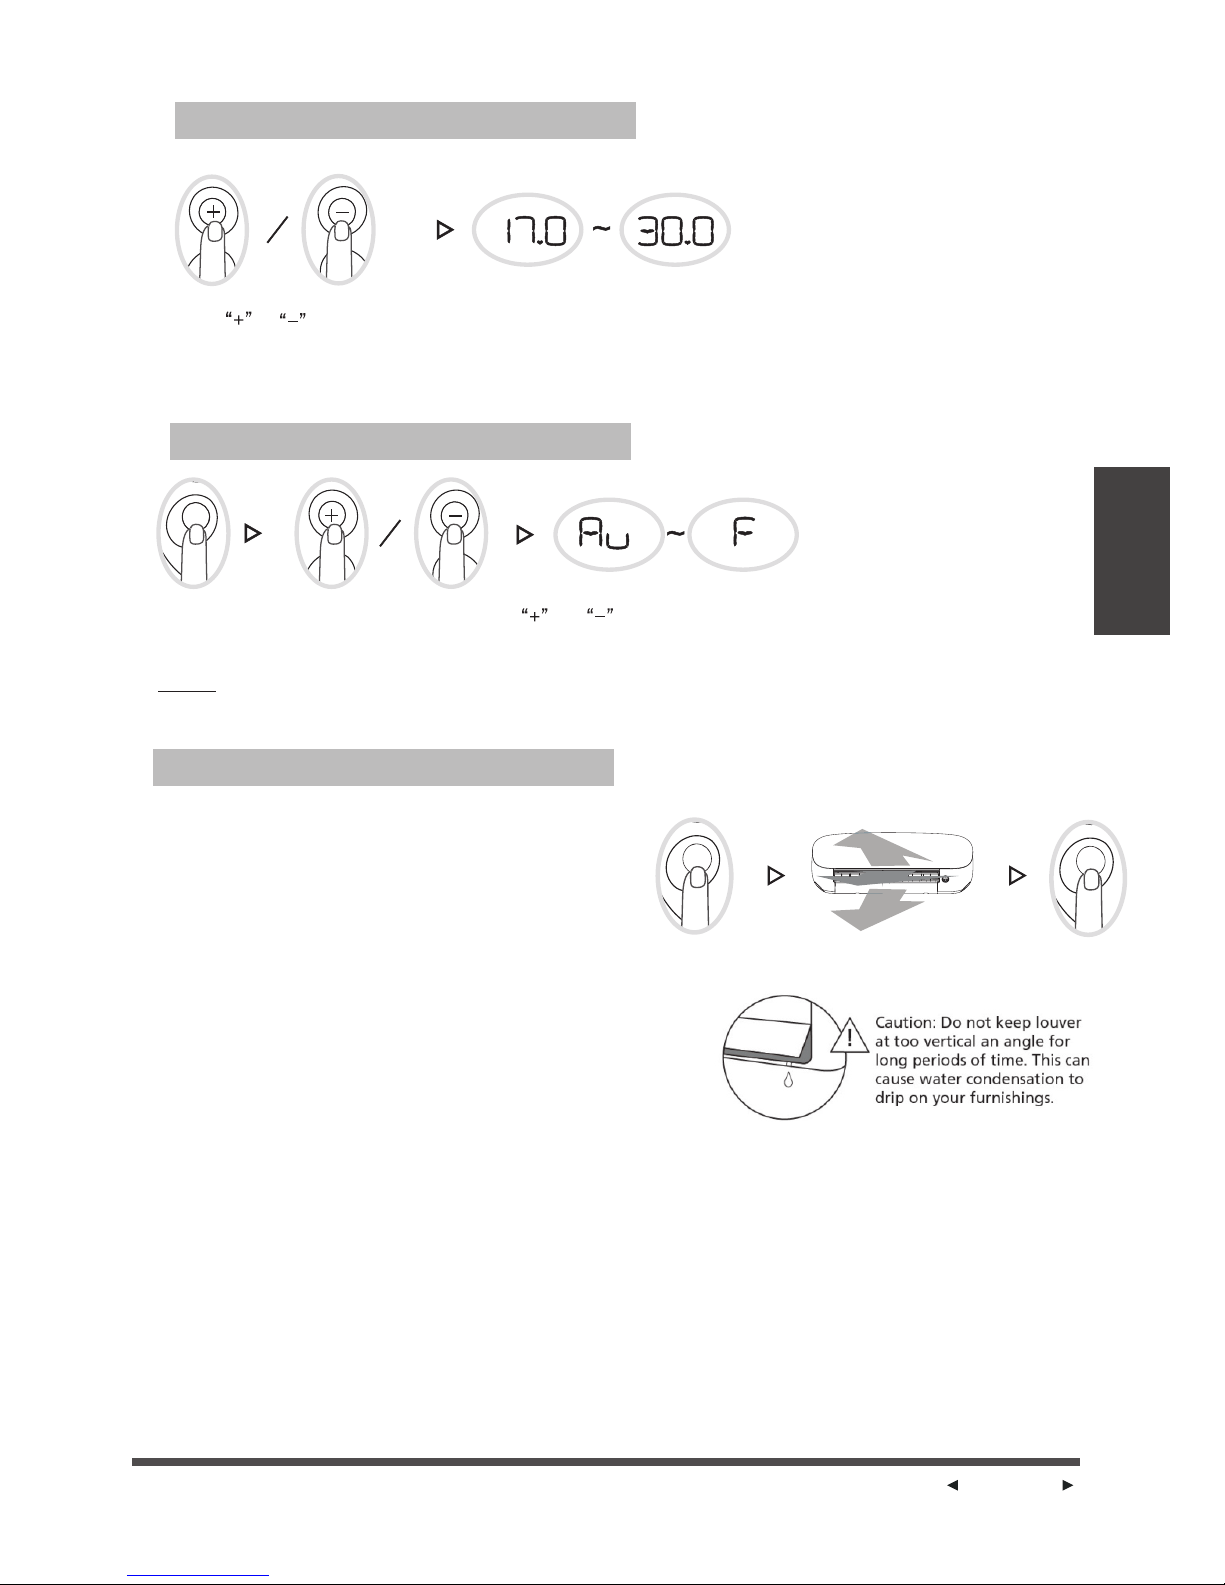
SETTING TEMPERATURE
SETTING FAN SPEED
Pres s or butt on to
set th e tempe ratur e.
The op erati ng temp erature r ange fo r units
o
is 17- 30 C. You ca n incre ase or de creas e
o
the se t tempe ratue i n 0.5 C.
Hold d own SWI NG butt on for
one se cond to s tart fa n speed
sett ing mod e.
Pres s or butt on to
sele ct the fa n speed : Au, 20,
40,6 0,80 or F.
NOTE : FAN SPEE D can t be se t in AUTO mode.
,
Setting Angle of Air Flow
Setting vertical angle of air flow
While the unit is on, use the SWING button
to set the direction (vertical angle) of airflow.
Press the
SWING
button to make the
louver swing up and down continuously.
Press the button until the direction you
prefer is reached.
Setting horizontal angle of air flow
The horizontal angle of the airflow must be set
manually. Grip the deflector rod (See Fig. 7 )
and manually adjust it to your preferred direction.
Fig. 6
SWIN G
SWIN G
SWI NG
Page 10
The following are instructions for using your air
Conditioner s basic functions. Refer to How to
Use Advanced Functions section for those not
covered here.
How to Use Basic Functions
3
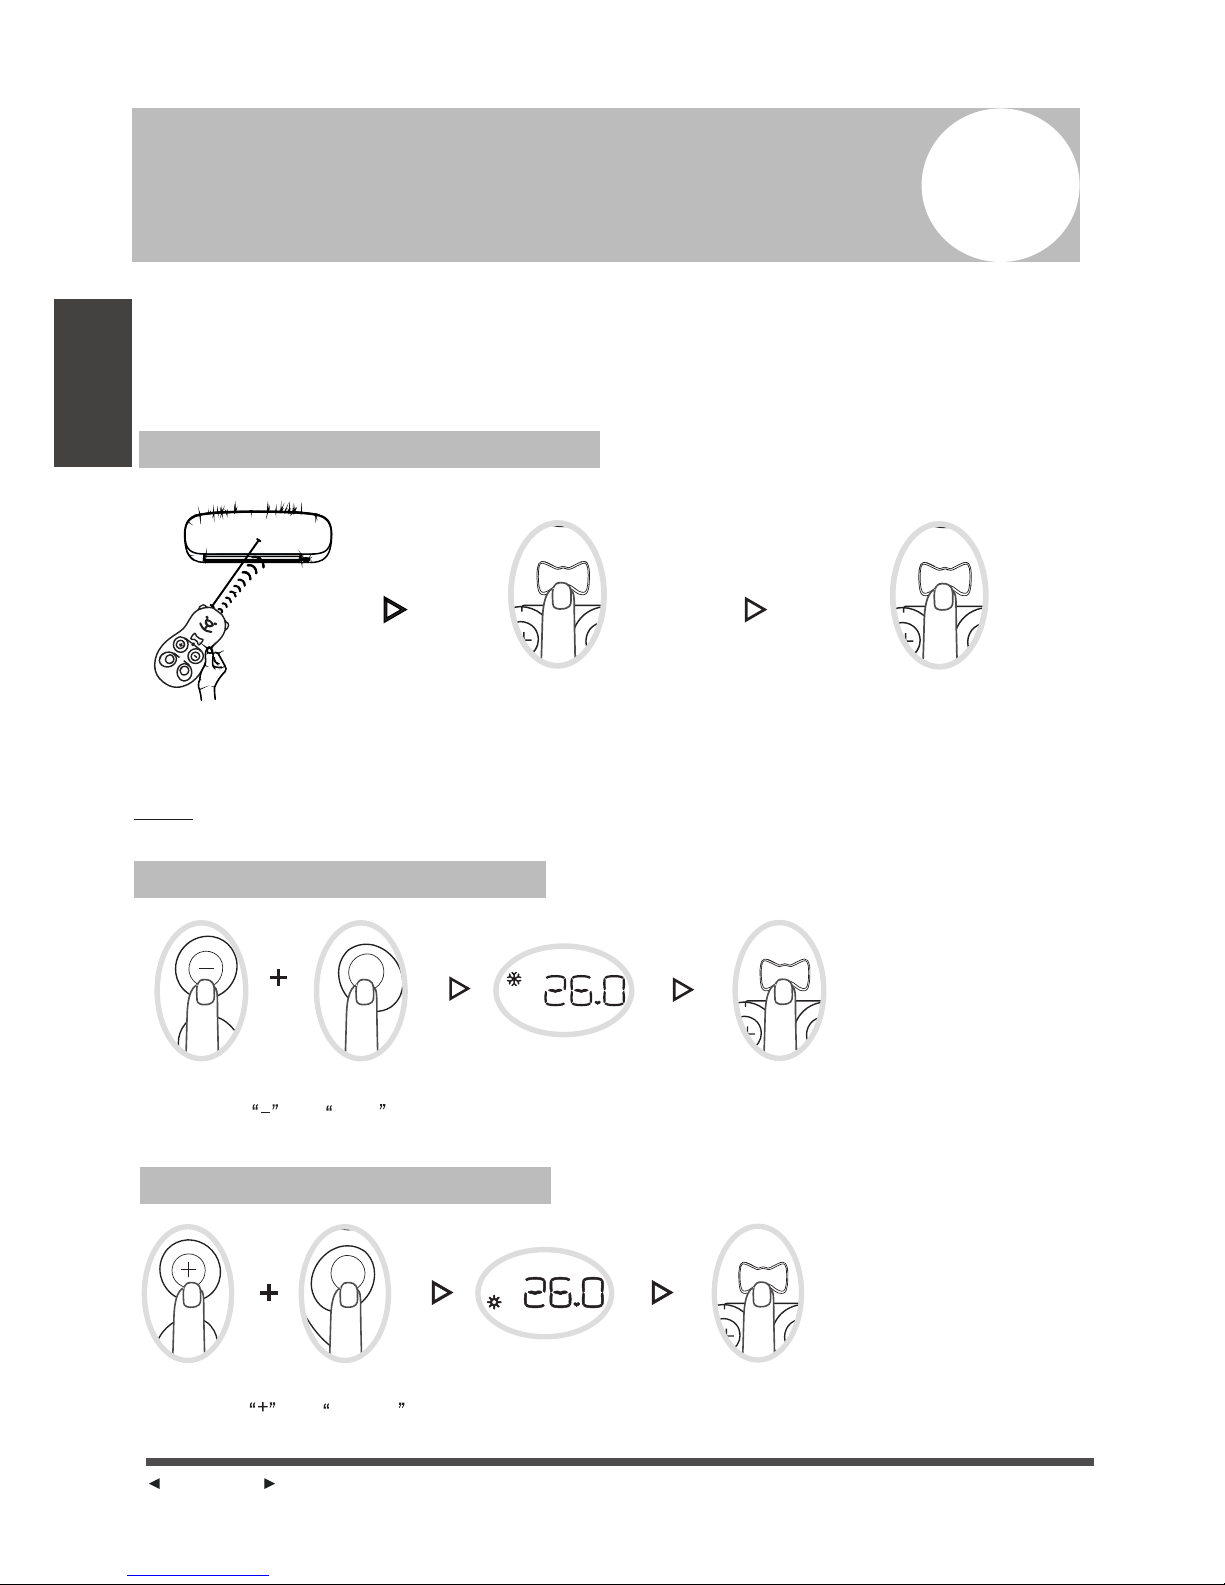
AUTO Function
COOL Function
HEAT Function
,
With in a rang e of 8m
Pres s this bu tton
to tur n on the un it
and en ter AUTO mod e
Pres s this bu tton ag ain to
turn o ff t he unit .
Pres s this bu tton
to tur n off the uni t.
Pres s this bu tton
to tur n off the uni t.
When t he unit i s off, or not und er cool m ode,
pres s butto n and EYE simultan eousl y
for on e secon d will st art cool operati on.
When t he unit i s off, or not und er heat m ode,
pres s butto n and SWING simult aneou sly
for on e secon d will st art heat op erati on.
NOTE :In AUTO mod e, the unit will aut omati cally s elect the
COOL or HEAT functi on base d on the set te mpera ture.
How to Use
Basic Functions
ON/ OFF
ON/ OFF
ON/ OFF
ON/ OFF
SWI NG
EYE
Page 11
Page 11
How to Use
Basic Functions
SETTING TEMPERATURE
SETTING FAN SPEED
Pres s or butt on to
set th e tempe ratur e.
The op erati ng temp erature r ange fo r units
o
is 17- 30 C. You ca n incre ase or de creas e
o
the se t tempe ratue i n 0.5 C.
Hold d own SWI NG butt on for
one se cond to s tart fa n speed
sett ing mod e.
Pres s or butt on to
sele ct the fa n speed : Au, 20,
40,6 0,80 or F.
NOTE : FAN SPEE D can t be se t in AUTO mode.
,
Setting Angle of Air Flow
Setting vertical angle of air flow
While the unit is on, use the SWING button
to set the direction (vertical angle) of airflow.
Press the
SWING
button to make the
louver swing up and down continuously.
Press the button until the direction you
prefer is reached.
Setting horizontal angle of air flow
The horizontal angle of the airflow must be set
manually. Grip the deflector rod (See Fig. 7 )
and manually adjust it to your preferred direction.
Fig. 6
SWIN G
SWIN G
SWI NG
Page 12
Page 13
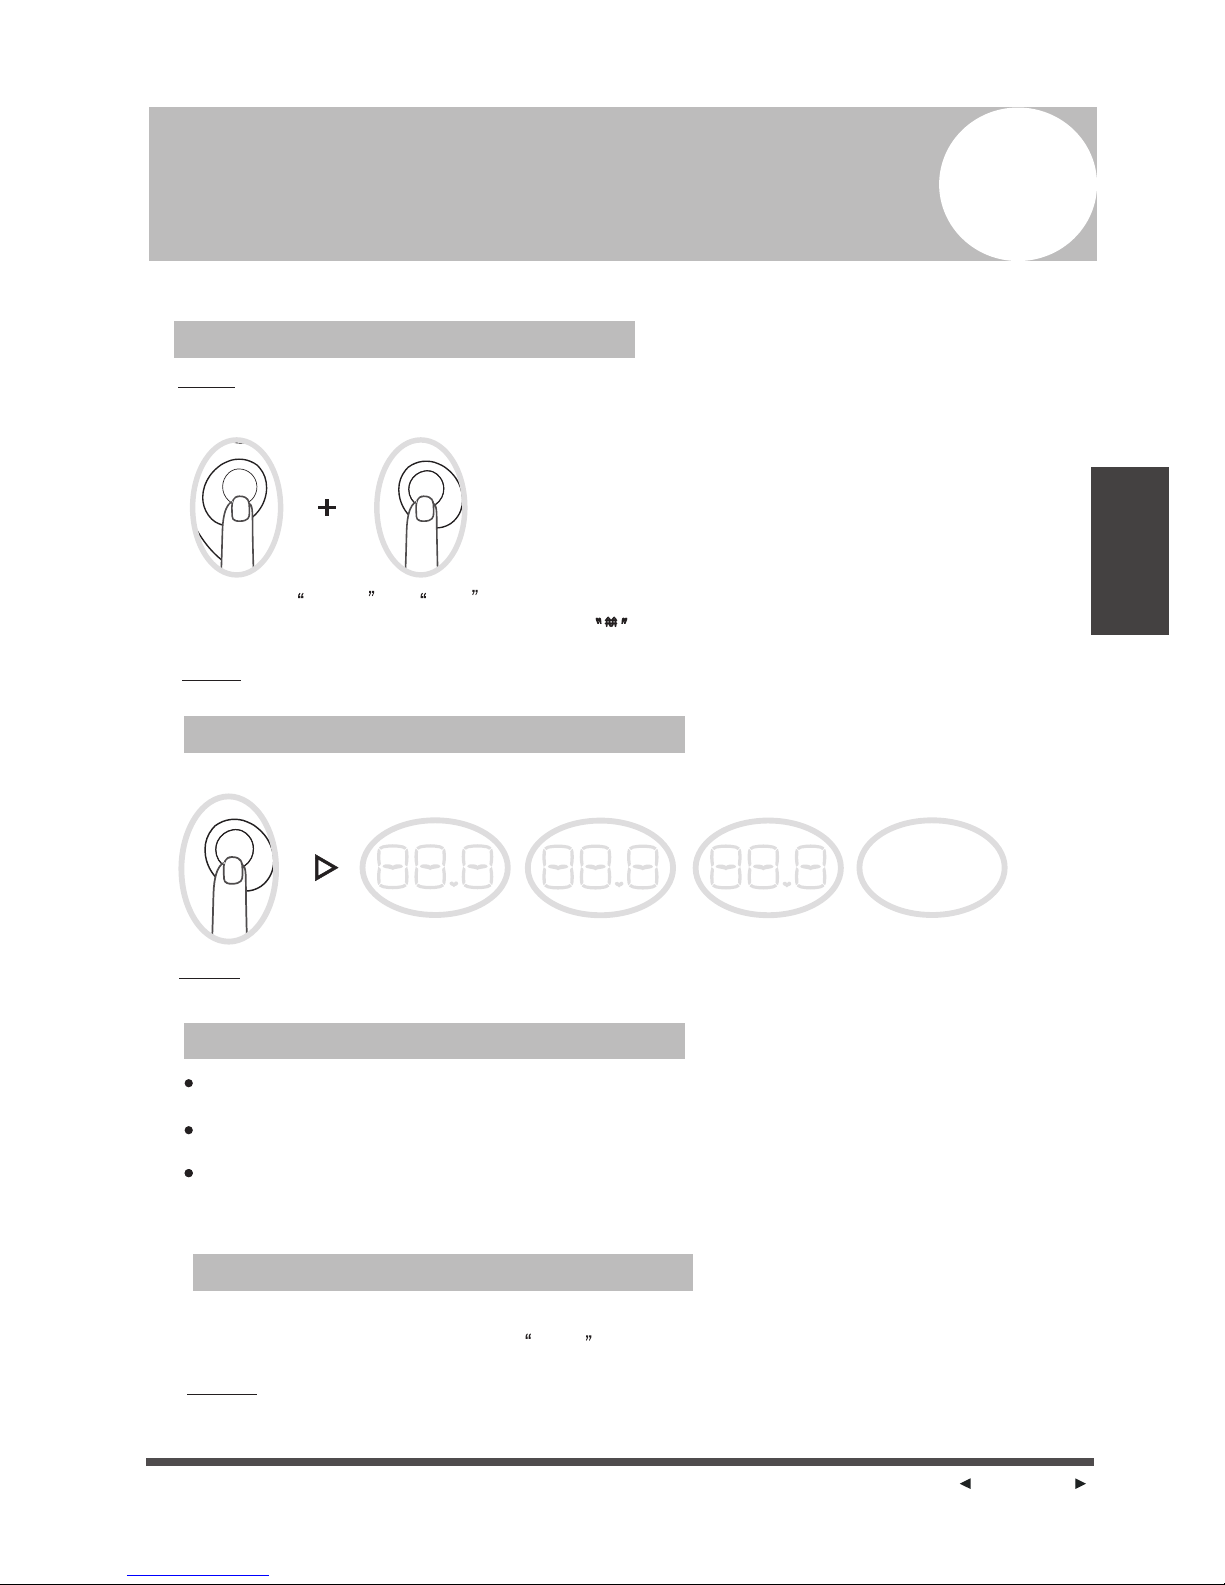
ELECTRICAL HEATING FUNCTION
TEMPERATURE DISPLAY FUNCTION
LIGHT SENSITIVE FUNCTION
ECO FUNCTION
Pres s butto n SWING and EYE for on e secon d to turn
the El ectri cal hea ting func tion on o r off. A sy mbol will displa y on the in door
unit d ispla y after t he electr ical he ating f uncti on is activ ated.
simu ltane ously
NOTE : Th e elect rical h eating fu nctio n is acti vated automati cally
when t he air co ndtio ner is under heati ng oper ation .
To start o r stop th e elect rical hea ting fu nctio n by remo te contro l:
NOTE :In Ele ctric al heatin g mode, t he unit w ill aut omatica lly tur n on or off the e lectrical
heat ing dev ice bas ed on the operatio n mode, r oom tem perature and set t emper ature .
Each press of EYE button for one second will scroll through temperature displays as follows:
NOTE: The temperature can also be checked when the unit is pluged,
and is not turned on. The temperature display will disappear in 15 seconds.
Set
tempe rature
Room
tempe rature
Outdoor
tempe rature
No disp lay
The brightness of display screen of air conditioner will change
according to the lights of room.
If the lights of room fades, the brightness of the display screen gets weaker.
When the light becomes bright, the brightness of the display screen returns.
If the room light turns off, after a few seconds, the display screen becomes dark.
And the voice of air conditioner buzzer reduces , fan speed shifts to low.when
the room light turns on again, the display screen gets brighter.
The ECO function can only be activated via WIFI control under cooling operation.
The indoor display screen displays ECO . It will hold on for 8 hours, then the
unit will revert back to the previous cooling operation.
NOTE: The ECO operation may result in insufficient cooling capacity, if th e out sid e
temperature is too high, please do not select this energy saving mode to avoid feeling
uncomfortable.
How to Use Advanced Functions
4
The following are instructions for using your air conditioner s advanced functions.
,
How to Use
Advanced
Functions
EYE
EYE
SWING
NOTE ON LOUVER ANGLES
When using COOL or DRY mode, do not set
louver at too vertical an angle for long periods
of time. This can cause water to condense on
the louver blade, which will drop on your floor
or furnishings. (See Fig. 6 )
When using COOL or HEAT mode, setting the
louver at too vertical an angle can reduce the
performance of the unit due to restricted air
Do not move louver by hand. This will cause
Do not put anything into the air outlet or hang
anything on it.
the
louver to become out of sync. If this occurs, turn
off the unit and unplug it for a few seconds,
then restart the unit. This will reset the louver.
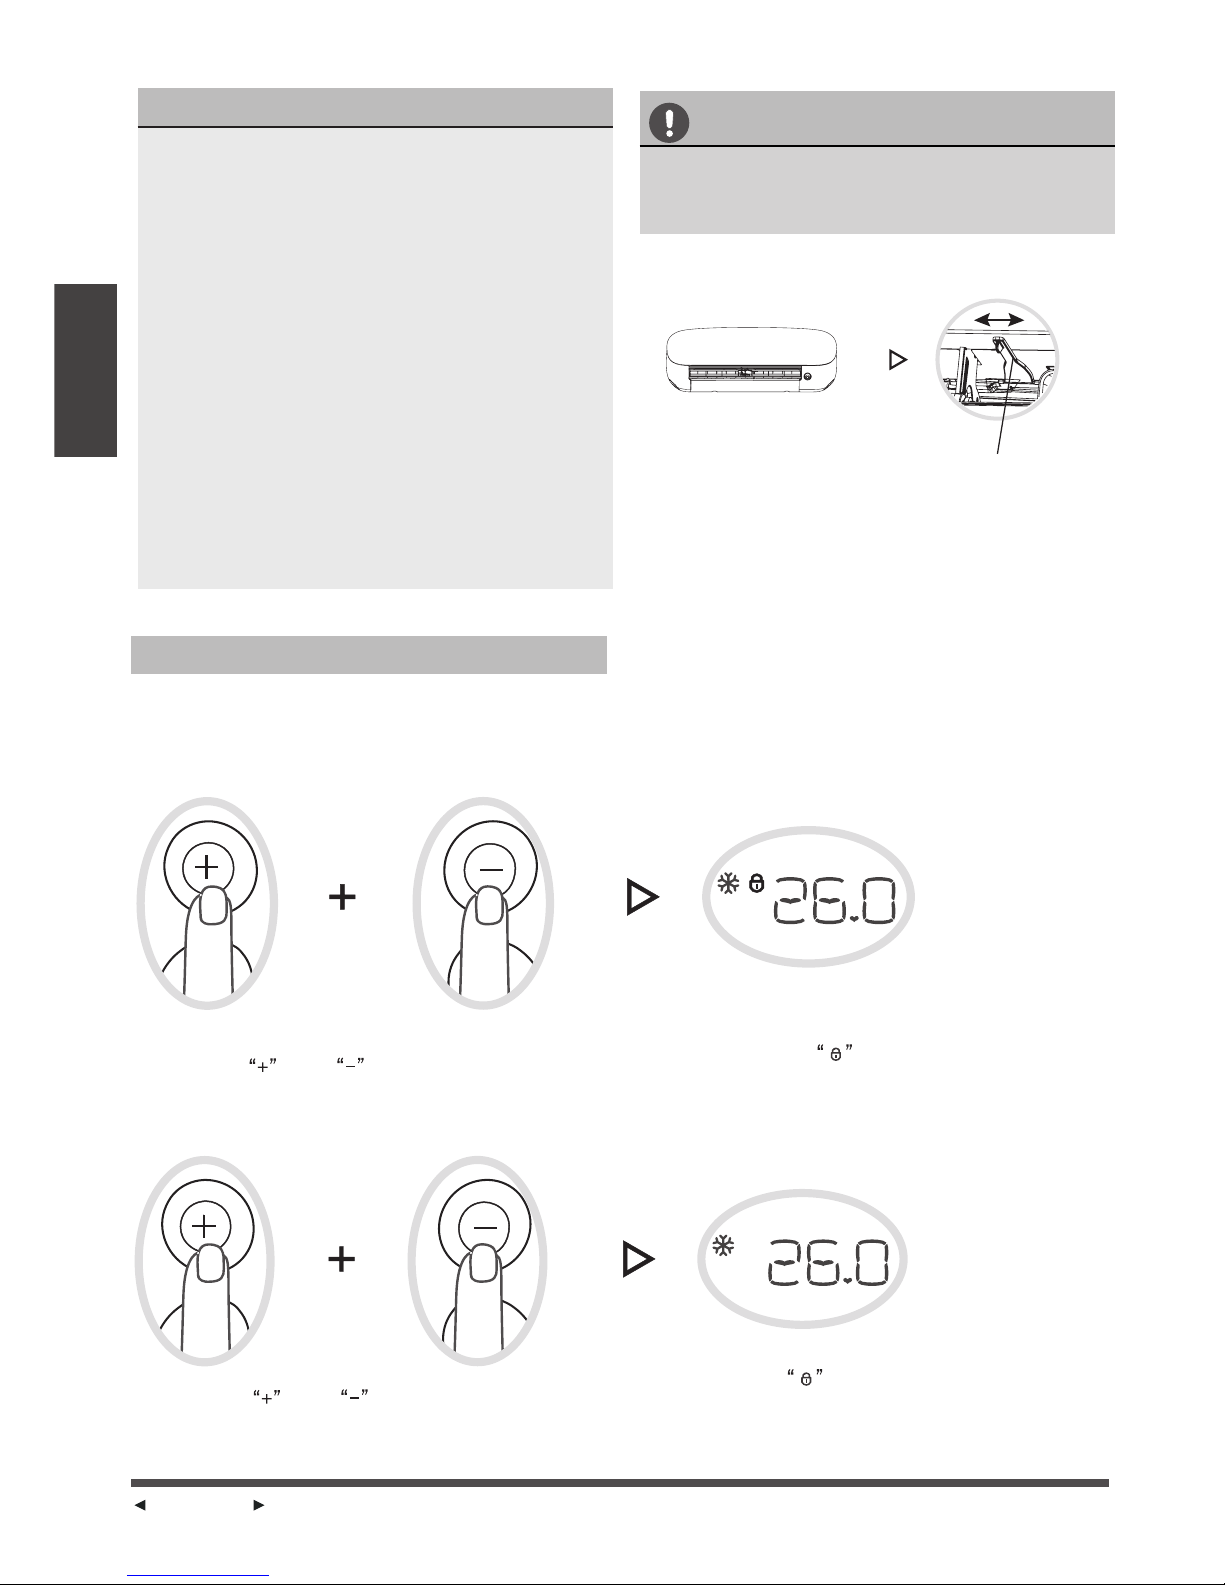
CAUTION
Do not put your fingers in or near the blower
and suction side of the unit. The high-speed
fan inside the unit may cause injury.
Fig. 7
Deflector rod
How to Use
Basic Functions
LOCK FUNCTION
Use the LOCK function when you want to prevent settings from being changed accidentally.
Under lock mode, all current settings are locked, and the remote controller will not
accept any operation except that of the LOCK.
Press button and
simultaneous ly for on e secon d
to activate LOCK f uncti on.
Press button and
simultaneous ly for on e secon d
to cancel LOCK fun ction .
A lock symbol will appear on
the indoor unit display when the lock
function is activated.
A lock symbol will disappear from
the indoor unit display when the lock
function is cancelled.
Page 12
Page 13
Page 13
ELECTRICAL HEATING FUNCTION
TEMPERATURE DISPLAY FUNCTION
LIGHT SENSITIVE FUNCTION
ECO FUNCTION
Pres s butto n SWING and EYE for on e secon d to turn
the El ectri cal hea ting func tion on o r off. A sy mbol will displa y on the in door
unit d ispla y after t he electr ical he ating f uncti on is activ ated.
simu ltane ously
NOTE : Th e elect rical h eating fu nctio n is acti vated automati cally
when t he air co ndtio ner is under heati ng oper ation .
To start o r stop th e elect rical hea ting fu nctio n by remo te contro l:
NOTE :In Ele ctric al heatin g mode, t he unit w ill aut omatica lly tur n on or off the e lectrical
heat ing dev ice bas ed on the operatio n mode, r oom tem perature and set t emper ature .
Each press of EYE button for one second will scroll through temperature displays as follows:
NOTE: The temperature can also be checked when the unit is pluged,
and is not turned on. The temperature display will disappear in 15 seconds.
Set
tempe rature
Room
tempe rature
Outdoor
tempe rature
No disp lay
The brightness of display screen of air conditioner will change
according to the lights of room.
If the lights of room fades, the brightness of the display screen gets weaker.
When the light becomes bright, the brightness of the display screen returns.
If the room light turns off, after a few seconds, the display screen becomes dark.
And the voice of air conditioner buzzer reduces , fan speed shifts to low.when
the room light turns on again, the display screen gets brighter.
The ECO function can only be activated via WIFI control under cooling operation.
The indoor display screen displays ECO . It will hold on for 8 hours, then the
unit will revert back to the previous cooling operation.
NOTE: The ECO operation may result in insufficient cooling capacity, if th e out sid e
temperature is too high, please do not select this energy saving mode to avoid feeling
uncomfortable.
How to Use Advanced Functions
4
The following are instructions for using your air conditioner s advanced functions.
,
How to Use
Advanced
Functions
EYE
EYE
SWING
Page 14
Page 15
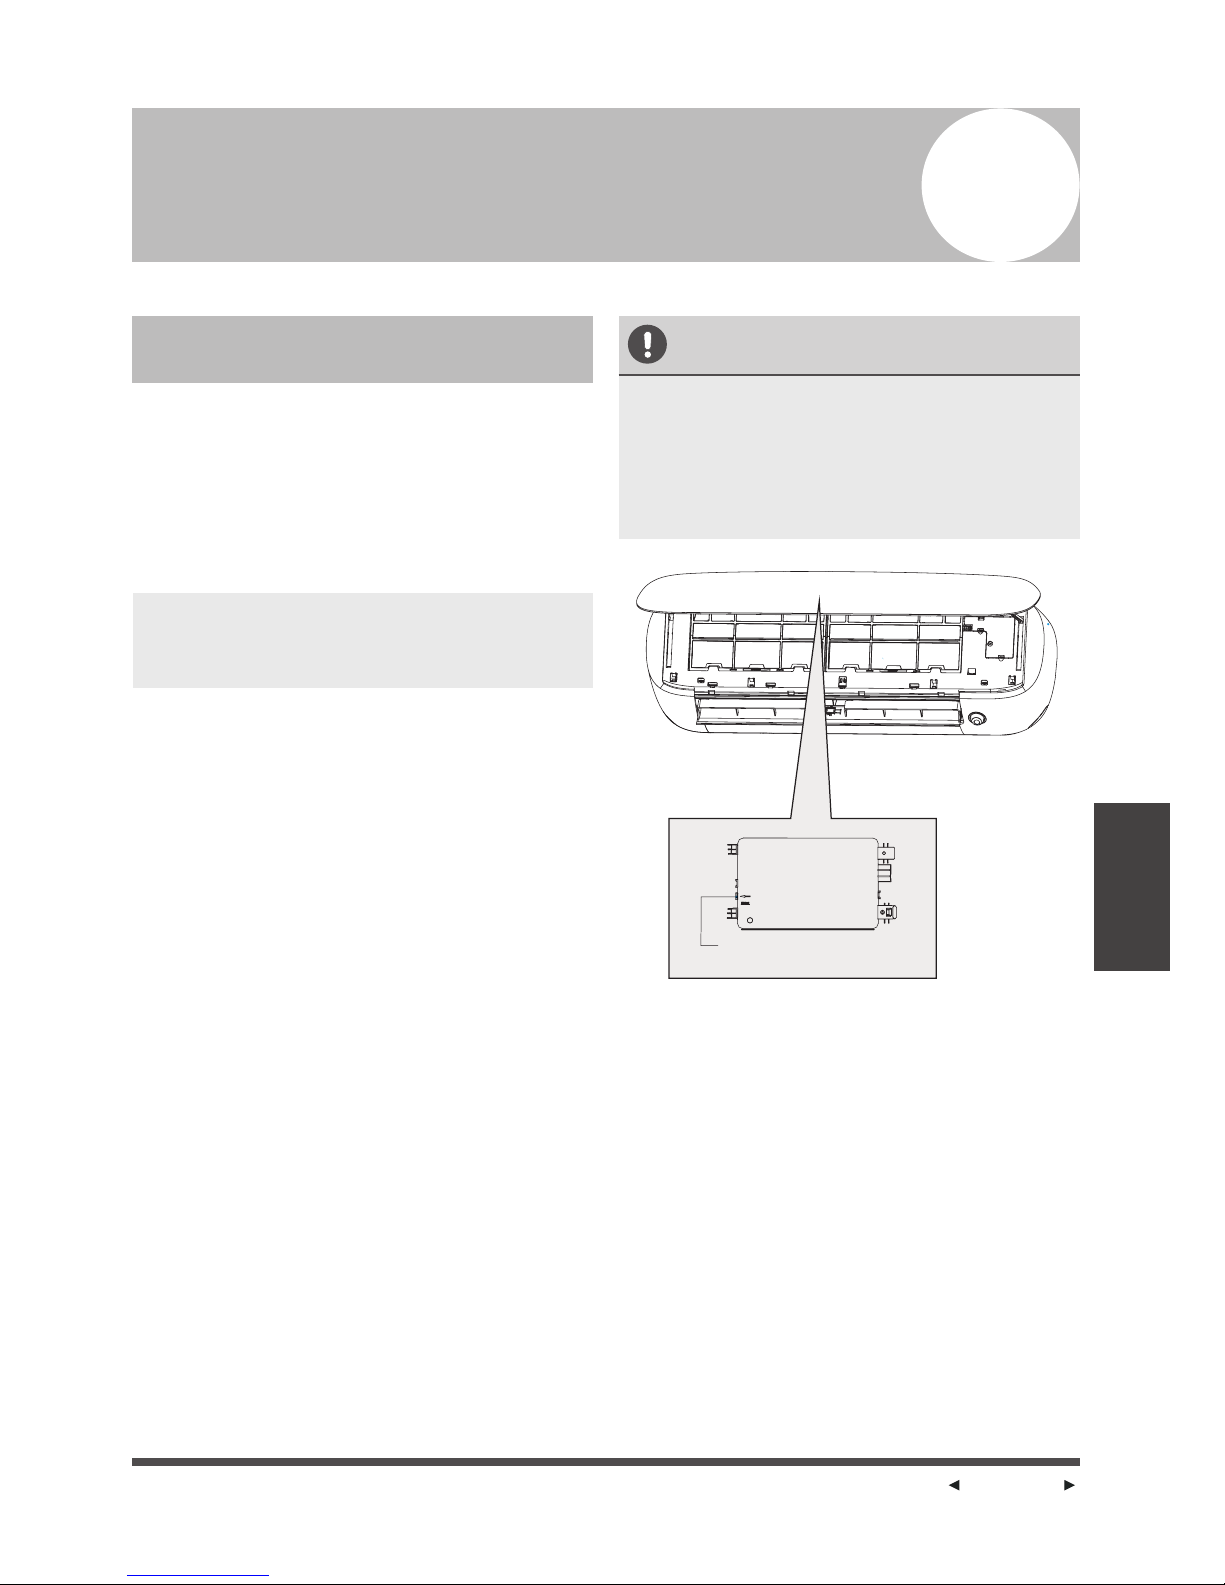
How to operate your unit without
the remote control
In the event that your remote control fails to
work, your unit can be operated manually with
The MANUAL CONTROL button located on
the indoor unit. Note that manual operation is
not a long-term solution, and that operating
the unit with your remote control is strongly
recommended.
BEFORE MANUAL OPERATION
Unit must be turned off before manual
operation.
To operate your unit manually:
1. Open the front panel of the indoor unit.
2. Locate the MANUAL CONTROL button
beside of the display screen.
3. Press MANUAL CONTROL button
4. Close the front panel.
repeatedly to change modes as follows:
o
a) Once=AUTO mode(heat or cool, 24 C
b) Twice=COOL mode(switches off after 30
c) Three times=OFF
and auto fan speed)
minutes--testing purpose)
Manual Operation (Without Remote)
5
CAUTION
The manual button is intended for testing
purposes and emergency operation only. Please
do not use this function unless the remote is
lost and it is absolutely necessary. To restore
regular operation, use the remote control to
activate the unit.
Manual Operation
(Without Remote)
Manu al cont rol but ton
Page 14
How to Use
Advanced
Functions
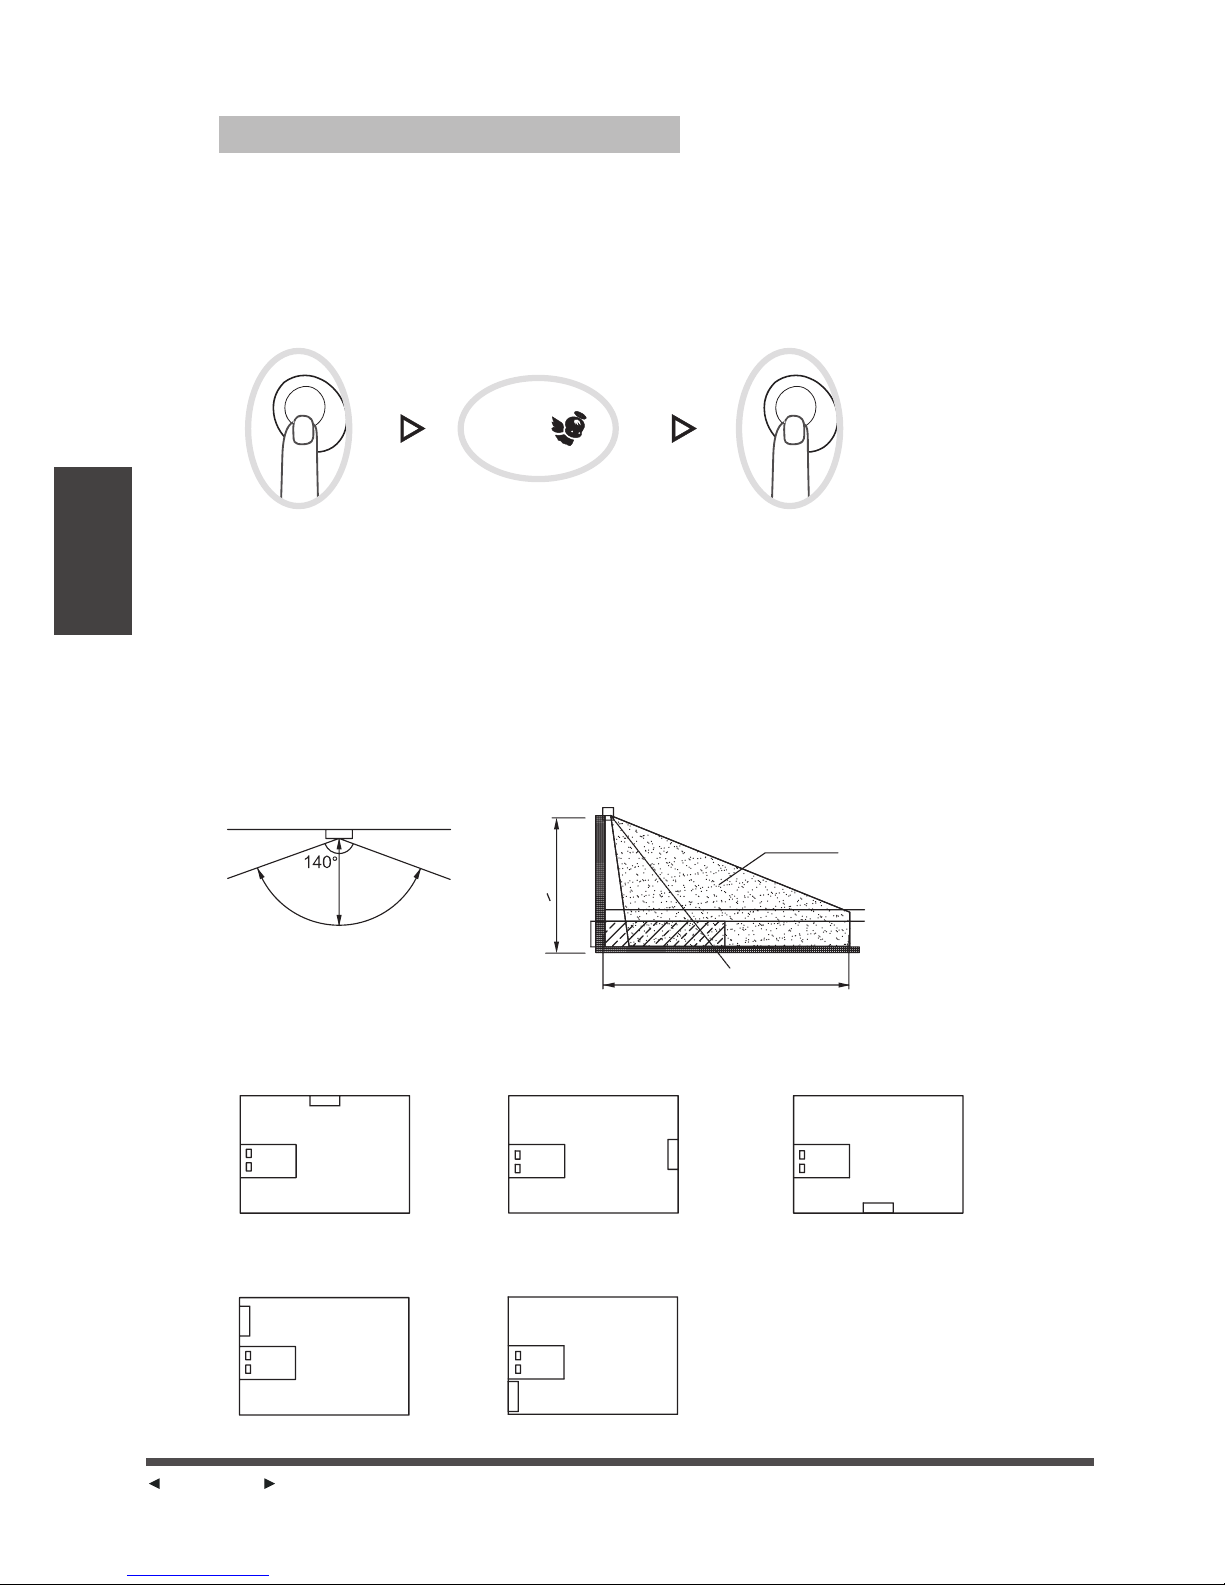
The following situations may affect the detection result of the Intelligent Eye:
-- size of the room, thickness of the mosquito net, position of bed, double layer bed;
-- the children is less than one meter high;
-- obstacles between Intelligent Eye and bed;
-- a heating appliance in the conditioned space.
Press the EYE button to activate the intelligent eye function, press it again to stop.
The system is controlled intelligently under EYE mode. First it goes into sleeping
operation by default, the set temperature and fan speed are automatically controlled.
After 20~30 minutes later, the system begins to sense the sleeping state of the children
and goes into sleeping detection mode. If it detects the children kicking the blankets and
most part of the body exposing, the system will automatically adjust the set temperature,
fan speed and the airflow direction of the horizontal louver to protect the children.
INTELLIGENT EYE FUNCTION
EYE
EYE
Effective Detection range of intelligent eye:
-- cover a level angle of 140 degrees, a fan-shaped area with a radius of 4 meters;
-- the detection radius is determined by the air conditioner installation position. It is
recommended to install the air condtioner at 220mm~250mm from the floor.
-- The lower the air contioner installs, the smaller distance the Intelligent Eye detects.
Please place the bed near the air contioner If the bed is higher.
Air conti oner
Air conti oner
4 meters
Wal l
Bed
4m
>2.2 m
Scanned a rea
Suggested installation positions:(AC=air conditioner)
Not recommended installation positions:(AC=air conditioner)
AC
AC
AC
AC
AC
Bed
Bed
Bed
Bed
Bed
Page 15
Page 15
How to operate your unit without
the remote control
In the event that your remote control fails to
work, your unit can be operated manually with
The MANUAL CONTROL button located on
the indoor unit. Note that manual operation is
not a long-term solution, and that operating
the unit with your remote control is strongly
recommended.
BEFORE MANUAL OPERATION
Unit must be turned off before manual
operation.
To operate your unit manually:
1. Open the front panel of the indoor unit.
2. Locate the MANUAL CONTROL button
beside of the display screen.
3. Press MANUAL CONTROL button
4. Close the front panel.
repeatedly to change modes as follows:
o
a) Once=AUTO mode(heat or cool, 24 C
b) Twice=COOL mode(switches off after 30
c) Three times=OFF
and auto fan speed)
minutes--testing purpose)
Manual Operation (Without Remote)
5
CAUTION
The manual button is intended for testing
purposes and emergency operation only. Please
do not use this function unless the remote is
lost and it is absolutely necessary. To restore
regular operation, use the remote control to
activate the unit.
Manual Operation
(Without Remote)
Manu al cont rol but ton
Page 16
Page 17
CAUTION
Before changing the filter or cleaning,
turn off the unit and disconnect its power
supply.
When removing flter, do not touch metal
parts in the unit. The sharp metal edges
can cut you.
Do not use water to clean the inside of the
indoor unit. This can destroy insulation and
cause electrical shock.
Do not expose flter to direct sunlight when
drying. This can shrink the filter.
CAUTION
Any maintenance and cleaning of outdoor
unit should be performed by an authorized
dealer or licensed service provider.
Any unit repairs should be performed
by authorized dealer or licensed service
provider.
Maintenance -
Long Periods of Non-Use
If you plan not to use your air conditioner for an
extended period of time, do the following:
Clean all filters
Turn on FAN function
to dry unit
Turn off the unit and
disconnect the power
Remove batteries
from remote control
Maintenance -
Pre-Season Inspection
After long periods of non-use, or before periods
of frequent use, do the following:
Check for damaged wires Clean all filters
Check for leaks Replace batteries
Make sure nothing is blocking all air inlets and outlets
Care and
Maintenance
Page 16
Cleaning Your Indoor Unit
BEFORE CLEANING OR
MAINTENANCE
ALWAYS TURN OFF YOUR AIR CONDITIONING
SYSTEM AND DISCONNECT ITS POWER SUPPLY
BEFORE CLEANING OR MAINTENANCE.
CAUTION
Only use a soft, dry cloth to wipe the unit clean.
If the unit is especially dirty, you can use a cloth
soaked in warm water to wipe it clean.
Do not use chemicals or chemically treated
cloths to clean the unit
Do not use benzene, paint thinner,
polishing powder or other solvents to clean
the unit. They can cause the plastic surface
to crack or deform.
Do not
o o
use water hotter than 40 C (104 F)
to clean the front panel. This can cause the
panel to deform or become discolored.
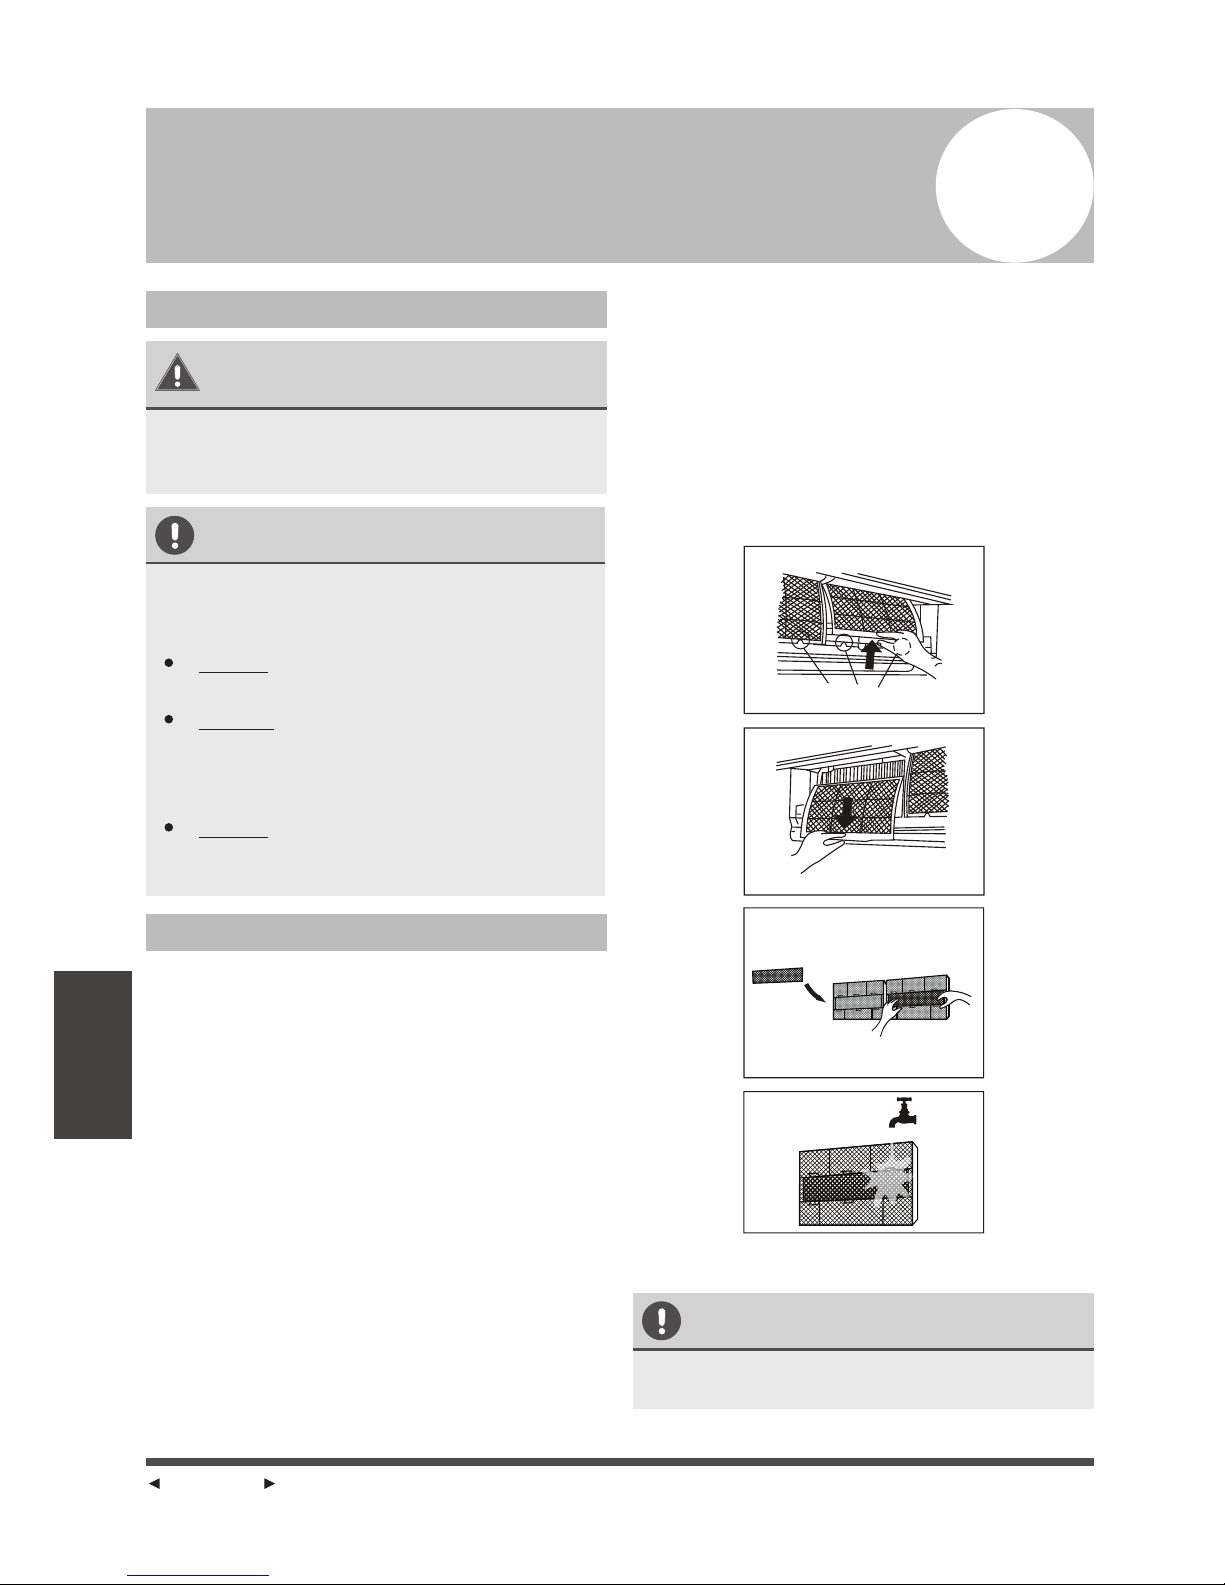
Cleaning Your Air Filter
A clogged air conditioner can reduce the cooling
effciency of your unit, and can also be bad for
your health. Make sure to clean the filter once
every two weeks.
1. Lift the front panel of the indoor unit.
2. Grip the tab on the end of the filter, push it
up slightly, then pull it a little towards yourself.
3. Now pull down to extract the filter.
4. If your filter has a small air freshening filter,
unclip it from the larger filter. Clean this air
freshening filter with a hand-held vacuum.
5. Clean the large air filter with warm, soapy
water. Be sure to use a mild detergent.
Care and Maintenance
6
6. Rinse the filter with fresh water, then shake
off excess water.
7. Dry it in a cool, dry place, and refrain from
exposing it to direct sunlight.
8. When dry, re-clip the air freshening filter to
the larger filter, then slide it back into the
indoor unit.
9. Close the front panel of the indoor unit.
CAUTION
Do not touch air freshening (Plasma) filter for
at least 10 minutes after turning off the unit.
Care and
Maintenance
Fig. 6.1
Filter Tabs
R emove air freshening filter from
Back of larger filter (some units)
Page 17
Page 17
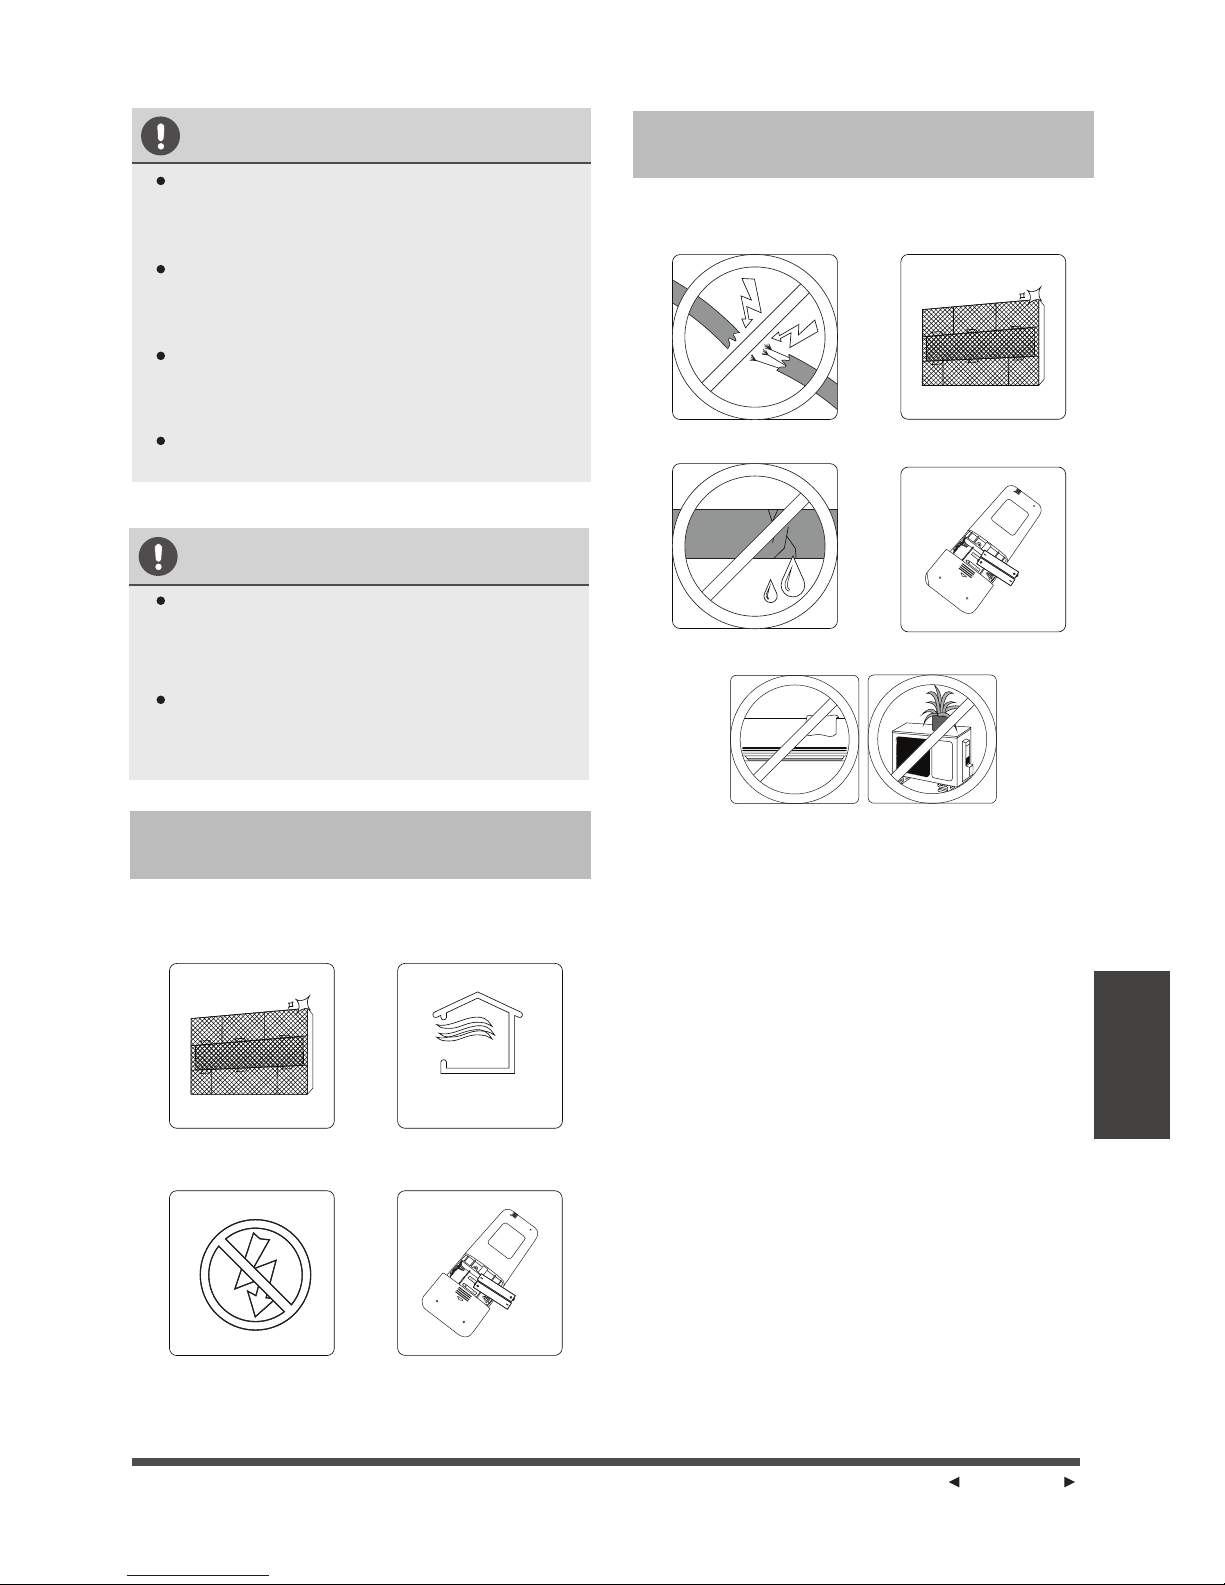
CAUTION
Before changing the filter or cleaning,
turn off the unit and disconnect its power
supply.
When removing flter, do not touch metal
parts in the unit. The sharp metal edges
can cut you.
Do not use water to clean the inside of the
indoor unit. This can destroy insulation and
cause electrical shock.
Do not expose flter to direct sunlight when
drying. This can shrink the filter.
CAUTION
Any maintenance and cleaning of outdoor
unit should be performed by an authorized
dealer or licensed service provider.
Any unit repairs should be performed
by authorized dealer or licensed service
provider.
Maintenance -
Long Periods of Non-Use
If you plan not to use your air conditioner for an
extended period of time, do the following:
Clean all filters
Turn on FAN function
to dry unit
Turn off the unit and
disconnect the power
Remove batteries
from remote control
Maintenance -
Pre-Season Inspection
After long periods of non-use, or before periods
of frequent use, do the following:
Check for damaged wires Clean all filters
Check for leaks Replace batteries
Make sure nothing is blocking all air inlets and outlets
Care and
Maintenance
Page 18
Page 19
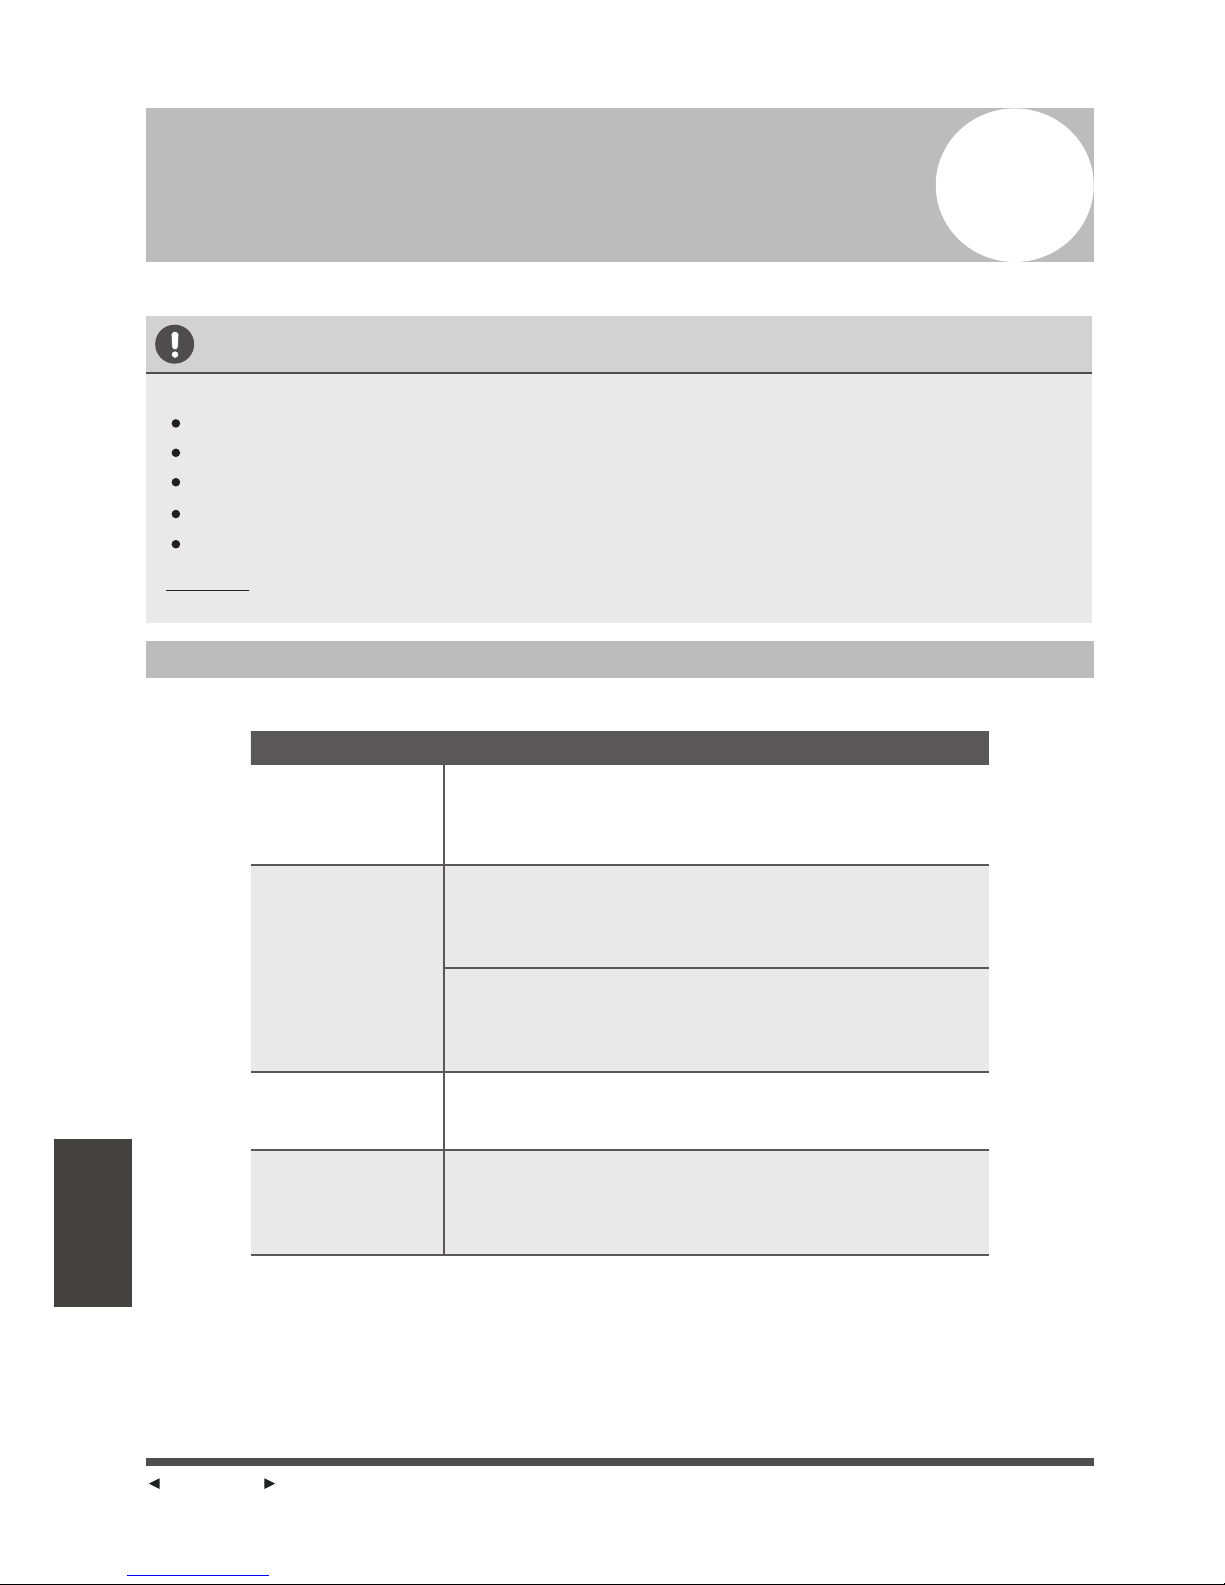
Issue Possible Causes
The indoor unit
makes noises
A rushing air sound may occur when the louver resets its
position.
A squeaking sound may occur after running the unit in HEAT
mode due to expansion and contraction of the unit s plastic
parts.
Both the indoor
unit and outdoor
unit make noises
Low hissing sound during operation: This is normal and is
caused by refrigerant gas fowing through both indoor and
outdoor units.
Low hissing sound when the system starts, has just stopped
running, or is defrosting: This noise is normal and is caused by
the refrigerant gas stopping or changing direction.
Squeaking sound: Normal expansion and contraction of
plastic and metal parts caused by temperature changes during
operation can cause squeaking noises.
The outdoor unit
makes noises
The unit will make different sounds based on its current
operating mode.
Dust is emitted
from either the
indoor or outdoor
unit
The unit may accumulate dust during extended periods of
non-use, which will be emitted when the unit is turned on.
This can be mitigated by covering the unit during long periods
of inactivity.
The unit emits a
bad odor
The unit may absorb odors from the environment (such as
furniture, cooking, cigarettes, etc.) which will be emitted
during operations.
The unit s filters have become moldy and should be cleaned.
The fan of the
outdoor unit does
not operate
During operation, the fan speed is controlled to optimize
product operation.
Operation
is erratic,
unpredictable,
or unit is
unresponsive
Interference from cell phone towers and remote boosters may
cause the unit to malfunction.
In this case, try the following:
Disconnect the power, then reconnect.
Press ON/OFF button on remote control to restart operation.
NOTE: If problem persists, contact a local dealer or your nearest customer service center.
Provide them with a detailed description of the unit malfunction as well as your model number.
Troubleshooting
,
,
Page 18
SAFETY PRECAUTIONS
If ANY of the following conditions occurs, turn off your unit immediately!
The power cord is damaged or abnormally warm
You smell a burning odor
The unit emits loud or abnormal sounds
A power fuse blows or the circuit breaker frequently trips
Water or other objects fall into or out of the unit
DO NOT
ATTEMPT TO FIX THESE YOURSELF! CONTACT AUTHORIZED SERVICE PROVIDER
IMMEDIATELY!
Common Issues
The following problems are not a malfunction and in most situations will not require repairs.
Issue Possible Causes
Unit does not turn
on when pressing
ON/OFF button
The Unit has a 3-minute protection feature that prevents the
unit from overloading. The unit cannot be restarted within
three minutes of being turned off.
The unit changes
from COOL/HEAT
mode to FAN
mode
The unit may change its setting to prevent frost from forming
on the unit. Once the temperature increases, the unit will start
operating in the previously selected mode again.
The set temperature has been reached, at which point the
unit turns off the compressor. The unit will continue operating
when the temperature fuctuates again.
The indoor unit
emits white mist
In humid regions, a large temperature difference between the
room s air and the conditioned air can cause white mist.
Both the indoor
and outdoor units
emit white mist
When the unit restarts in HEAT mode after defrosting, white
mist may be emitted due to moisture generated from the
defrosting process.
Troubleshooting
7
Troubleshooting
,
Page 19
Page 19
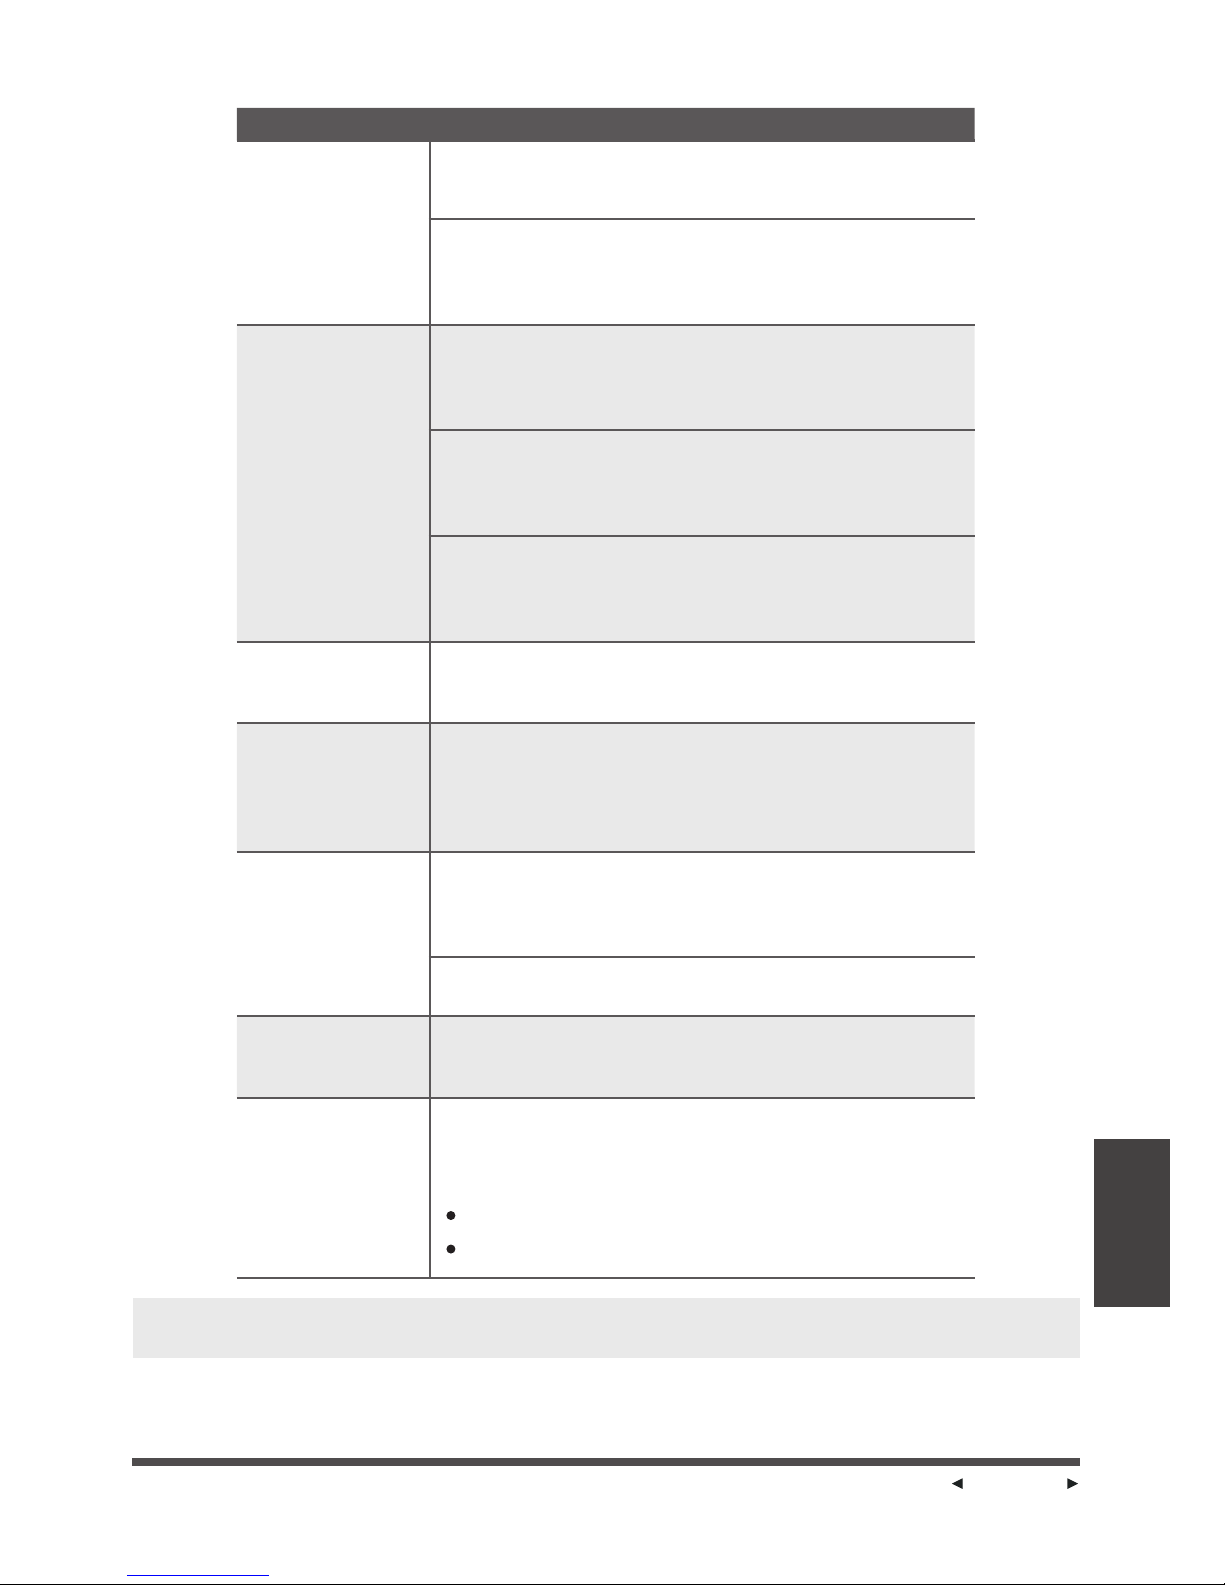
Issue Possible Causes
The indoor unit
makes noises
A rushing air sound may occur when the louver resets its
position.
A squeaking sound may occur after running the unit in HEAT
mode due to expansion and contraction of the unit s plastic
parts.
Both the indoor
unit and outdoor
unit make noises
Low hissing sound during operation: This is normal and is
caused by refrigerant gas fowing through both indoor and
outdoor units.
Low hissing sound when the system starts, has just stopped
running, or is defrosting: This noise is normal and is caused by
the refrigerant gas stopping or changing direction.
Squeaking sound: Normal expansion and contraction of
plastic and metal parts caused by temperature changes during
operation can cause squeaking noises.
The outdoor unit
makes noises
The unit will make different sounds based on its current
operating mode.
Dust is emitted
from either the
indoor or outdoor
unit
The unit may accumulate dust during extended periods of
non-use, which will be emitted when the unit is turned on.
This can be mitigated by covering the unit during long periods
of inactivity.
The unit emits a
bad odor
The unit may absorb odors from the environment (such as
furniture, cooking, cigarettes, etc.) which will be emitted
during operations.
The unit s filters have become moldy and should be cleaned.
The fan of the
outdoor unit does
not operate
During operation, the fan speed is controlled to optimize
product operation.
Operation
is erratic,
unpredictable,
or unit is
unresponsive
Interference from cell phone towers and remote boosters may
cause the unit to malfunction.
In this case, try the following:
Disconnect the power, then reconnect.
Press ON/OFF button on remote control to restart operation.
NOTE: If problem persists, contact a local dealer or your nearest customer service center.
Provide them with a detailed description of the unit malfunction as well as your model number.
Troubleshooting
,
,
Page 20
Page 21
Problem Possible Causes Solution
The unit is not
working
Power failure
Wait for the power to be
restored
The power is turned off Turn on the power
The fuse is burned out Replace the fuse
Remote control batteries are
dead
Replace batteries
The Unit s 3-minute protection
has been activated
Wait three minutes after
restarting the unit
Timer is activated Turn timer off
The unit starts and
stops frequently
There s too much or too little
refrigerant in the system
Check for leaks and
recharge the system with
refrigerant.
Incompressible gas or
moisture has entered the
system.
Evacuate and recharge the
system with refrigerant
The compressor is broken Replace the compressor
The voltage is too high or too
low
Install a manostat to
regulate the voltage
Poor heating
performance
The outdoor temperature is
o o
lower than 7 C (44.5 F)
Use auxiliary heating
device
Cold air is entering through
doors and windows
Make sure that all doors
and windows are closed
during use
Low refrigerant due to leak or
long-term use
Check for leaks, re-seal
if necessary and top off
refrigerant
Indicator lamps
continue fashing
The unit may stop operation or continue to run safely. If
the indicator lamps continue to fash or error codes appear,
wait for about 10 minutes. The problem may resolve itself.
If not, disconnect the power, then connect it again. Turn
the unit on.
If the problem persists, disconnect the power and contact
your nearest customer service center.
Error code appears in
the window display
of indoor unit:
E0, E1, E2---
P1, P2, P3---
F1, F2, F3---
NOTE: If your problem persists after performing the checks and diagnostics above, turn off your
unit immediately and contact an authorized service center.
Troubleshooting
,
,
Page 20
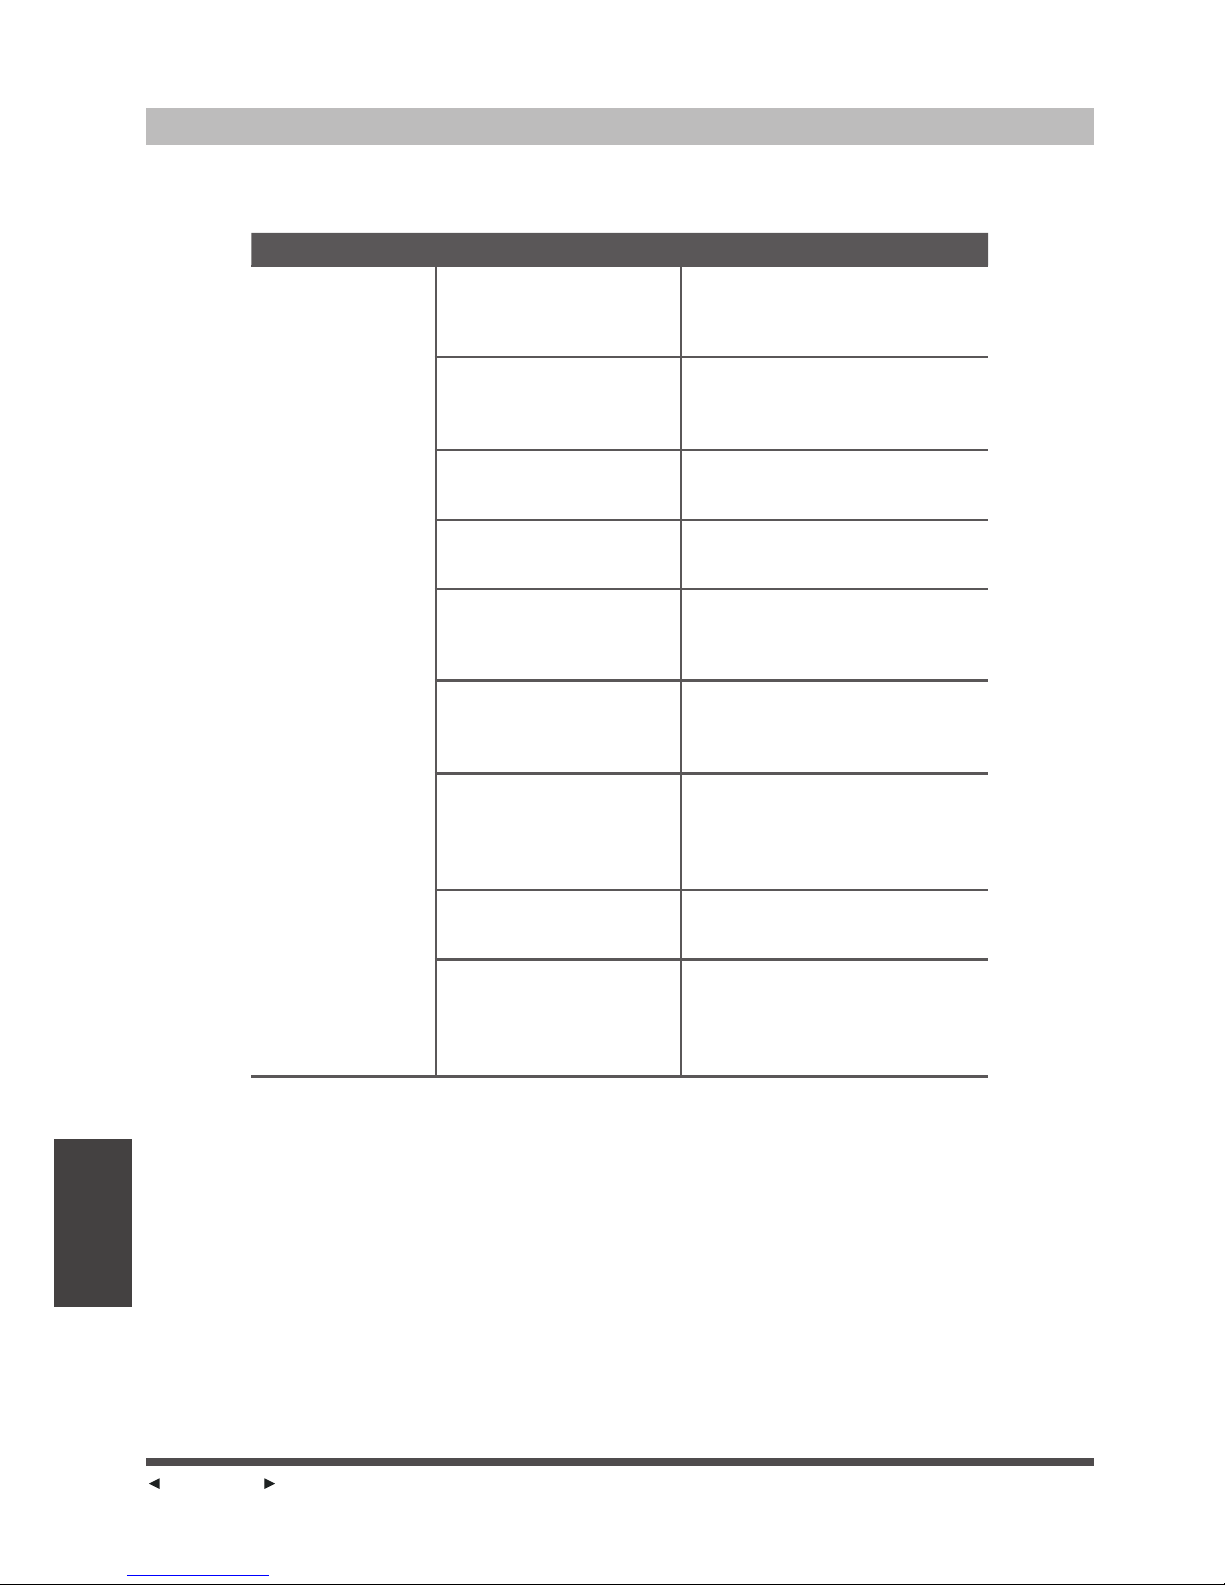
Troubleshooting
When troubles occur, please check the following points before contacting a repair company.
Problem Possible Causes Solution
Poor Cooling
Performance
Temperature setting may
be higher than ambient
room temperature
Lower the temperature setting
The heat exchanger on the
indoor or outdoor unit is
dirty
Clean the affected heat exchanger
The air filter is dirty
Remove the filter and clean it
according to instructions
The air inlet or outlet of
either unit is blocked
Turn the unit off, remove the
obstruction and turn it back on
Doors and windows are
open
Make sure that all doors and
windows are closed while
operating the unit
Excessive heat is generated
by sunlight
Close windows and curtains
during periods of high heat or
bright sunshine
Too many sources of heat
in the room (people,
computers, electronics,
etc.)
Reduce amount of heat sources
Low refrigerant due to leak
or long-term use
Check for leaks, re-seal if
necessary and top off refrigerant
SILENCE function is
activated
SILENCE function can lower
product performance by reducing
operating frequency. Turn off
SILENCE function.
Troubleshooting
Page 21
Page 21
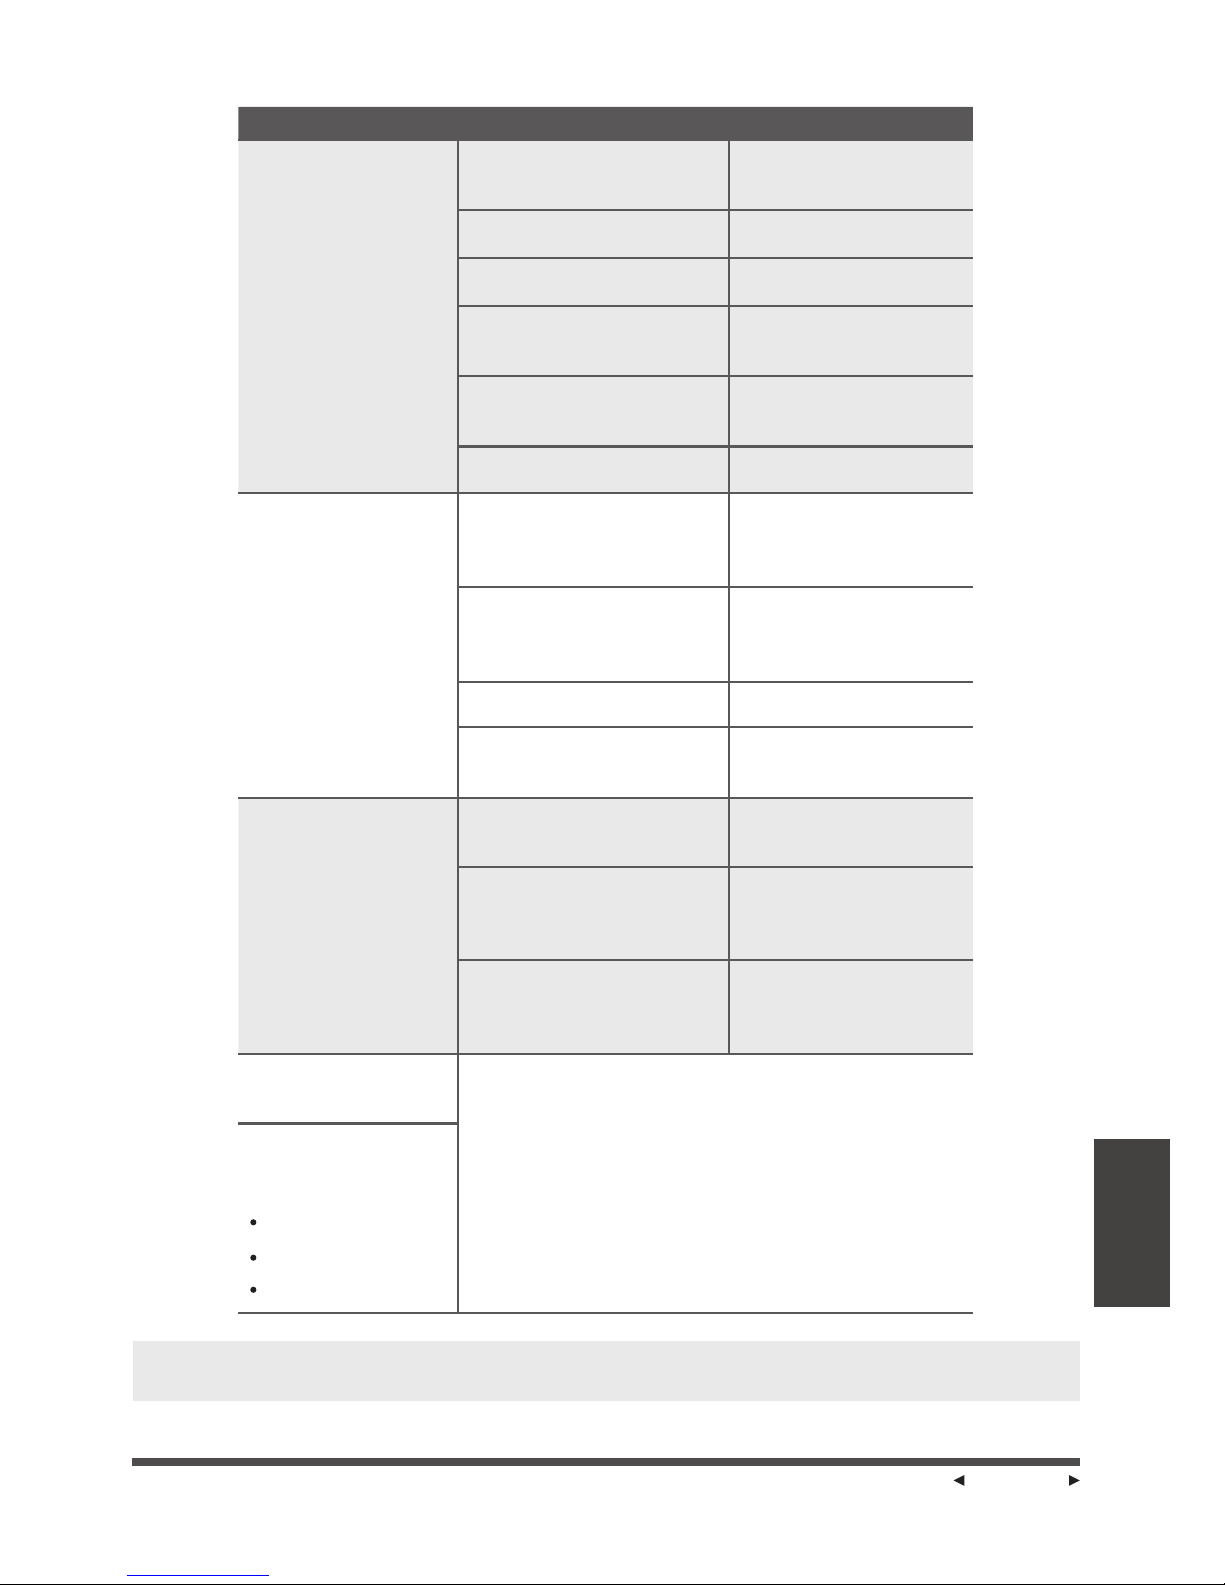
Problem Possible Causes Solution
The unit is not
working
Power failure
Wait for the power to be
restored
The power is turned off Turn on the power
The fuse is burned out Replace the fuse
Remote control batteries are
dead
Replace batteries
The Unit s 3-minute protection
has been activated
Wait three minutes after
restarting the unit
Timer is activated Turn timer off
The unit starts and
stops frequently
There s too much or too little
refrigerant in the system
Check for leaks and
recharge the system with
refrigerant.
Incompressible gas or
moisture has entered the
system.
Evacuate and recharge the
system with refrigerant
The compressor is broken Replace the compressor
The voltage is too high or too
low
Install a manostat to
regulate the voltage
Poor heating
performance
The outdoor temperature is
o o
lower than 7 C (44.5 F)
Use auxiliary heating
device
Cold air is entering through
doors and windows
Make sure that all doors
and windows are closed
during use
Low refrigerant due to leak or
long-term use
Check for leaks, re-seal
if necessary and top off
refrigerant
Indicator lamps
continue fashing
The unit may stop operation or continue to run safely. If
the indicator lamps continue to fash or error codes appear,
wait for about 10 minutes. The problem may resolve itself.
If not, disconnect the power, then connect it again. Turn
the unit on.
If the problem persists, disconnect the power and contact
your nearest customer service center.
Error code appears in
the window display
of indoor unit:
E0, E1, E2---
P1, P2, P3---
F1, F2, F3---
NOTE: If your problem persists after performing the checks and diagnostics above, turn off your
unit immediately and contact an authorized service center.
Troubleshooting
,
,
Page 22
Page 22
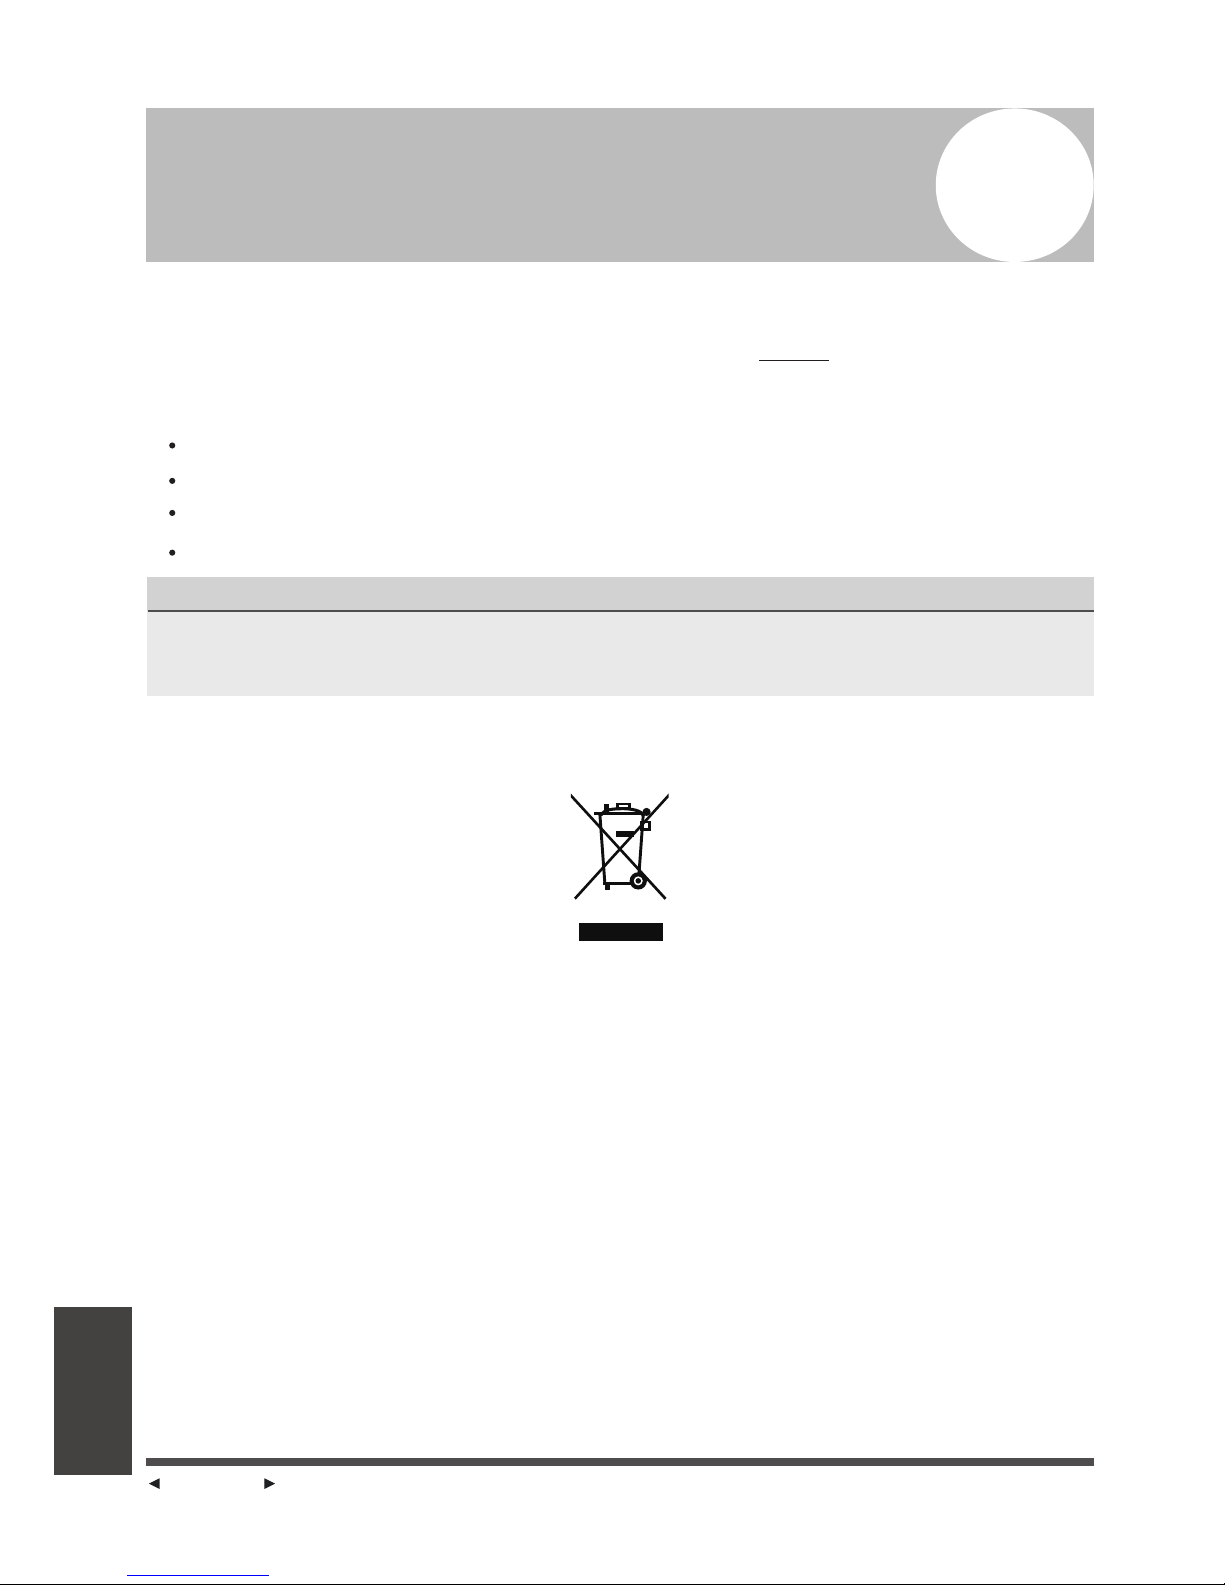
European Disposal Guidelines
8
This appliance contains refrigerant and other potentially hazardous materials. When disposing of
this appliance, the law requires special collection and treatment. Do not dispose of this product as
household waste or unsorted municipal waste.
When disposing of this appliance, you have the following options:
Dispose of the appliance at designated municipal electronic waste collection facility.
When buying a new appliance, the retailer will take back the old appliance free of charge.
The manufacturer will take back the old appliance free of charge.
Sell the appliance to certifed scrap metal dealers.
Special notice
Disposing of this appliance in the forest or other natural surroundings endangers your health and is
bad for the environment. Hazardous substances may leak into the ground water and enter the food
chain.
Disposal
Information
Page 23

CS366U-BPEA
16122000002694
The design and specifications are subject to change without prior notice for
product improvement. Consult with the sales agency or manufacturer for details.
 Loading...