

Page 1
OVEN
INSTRUCTION MANUAL
HMA52002
Gas Cooker
Page 2
Installation place conditions
1>The use of the gas ranges produce heat and humidity where they are installed
2> Be sure that there is a good air flow, keeping natural air ventilation through
a window or door by installing a range hood to extract the air. If ventilation is
not good, this might cause lack of oxygen, which is dangerous for your health
and the gas performance.
3> If the gas range will be working for a long period of time, an extra ventilation
will be necessary to increase the air flow.
4> Air draft should not decrease the performance of the gas range or cut the gas
flame.
5>To install your gas range to a LPG(Liquefied Petroleum Gas) pipe,
check if your hose has a gas tap exclusive for the gas range and if this is in good condition.
6> Be sure that your house has an exclusive plug for your gas range and this is in good conditions.
7> Do not install the range on top of carpets.
8> Do not install the range near the refrigerator, as the excessive heat hinders its performance.
The appliance that you have bought may be slightly different from the one illustrated in this manual. Please refer to
the information related to the model you have. The appliance you have may carry a different plug than the one
illustrated in this manual. The plug that comes with the product follows the electrical specification of the country
where it is sold.
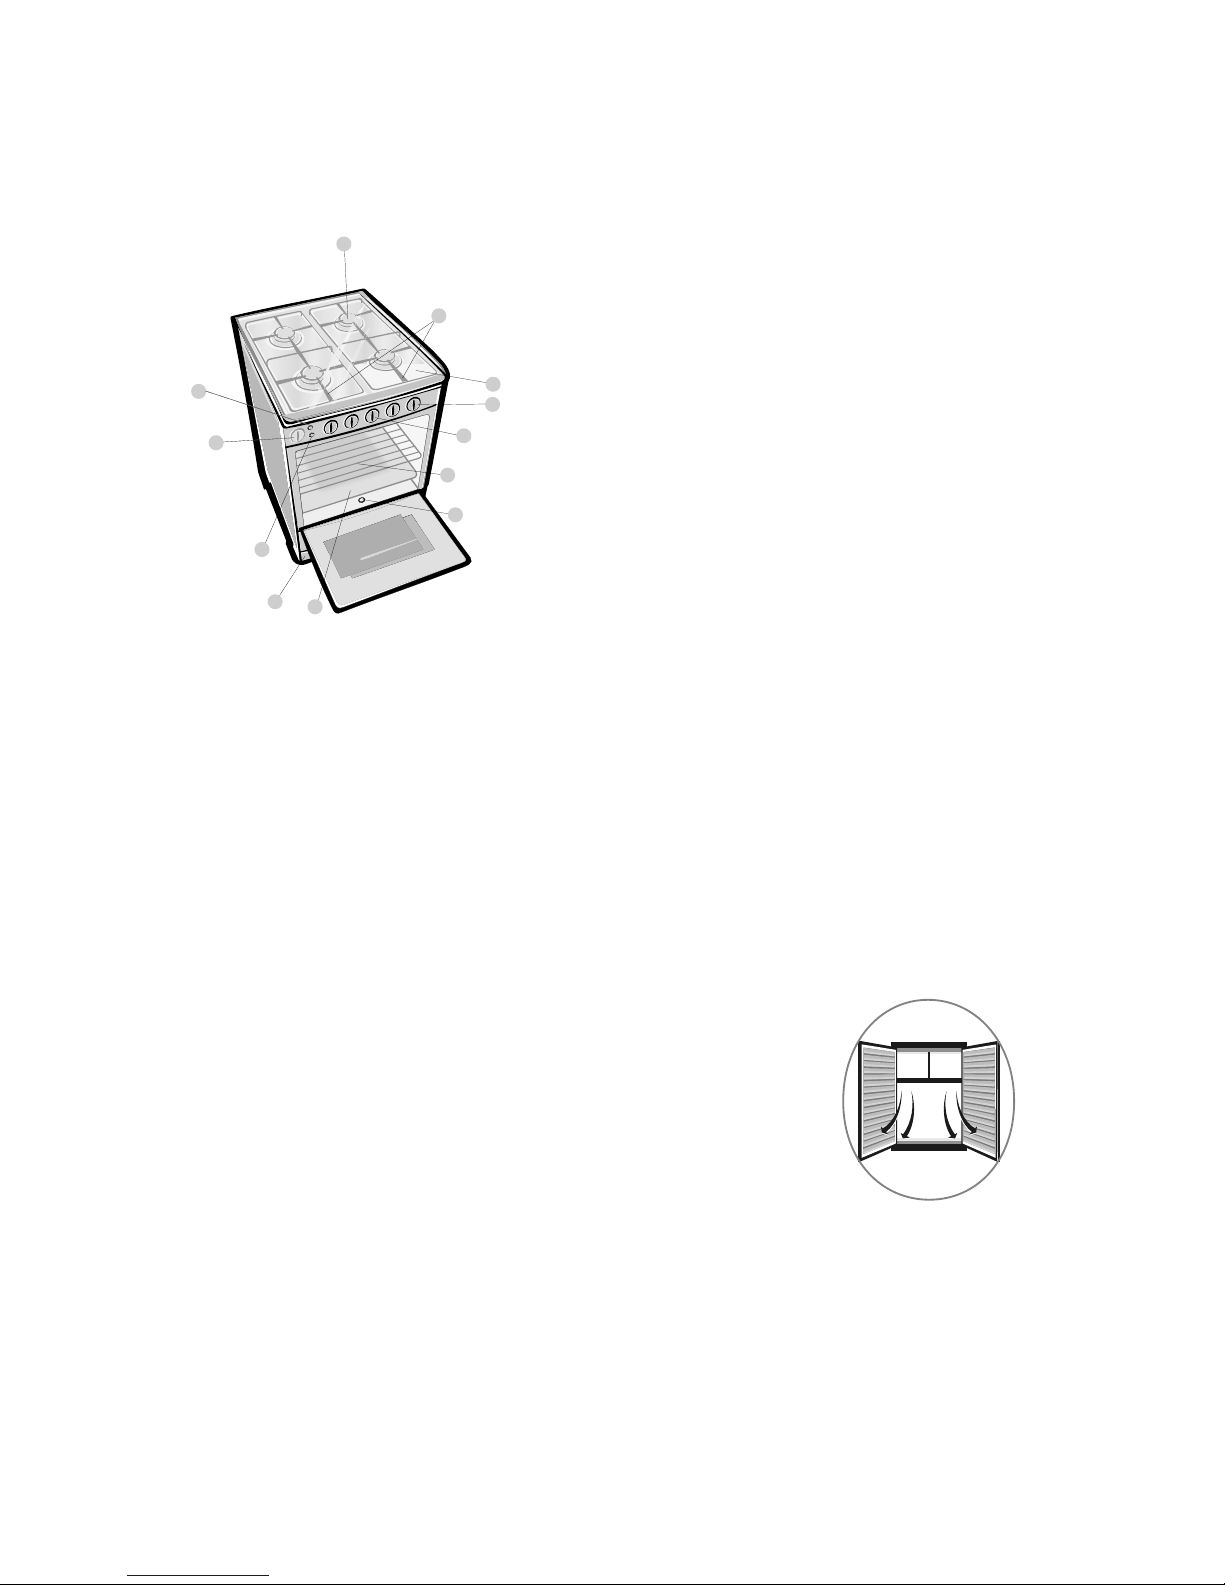
1> Sealed burners
2> Pan Grated
3> Glass Lid
4> Burners knobs
5> Temperature knob
6> Baking rack
7> Oven igniter
8> Dripping Pan
9> Base
10> Electric igniter-burners and oven (only some models)
11> Oven light (only some models)
Important
Product description
Parts name
Important
11
10
09
08
07
06
05
04
03
02
01
2
12
12> Timer(only some models)
Page 3

80 to 85cm
2cm
1> Leave at least 80 to 85cm between the top of the gas range and any
cabinet or range hood install above prepared to be installed built in.
2>Leave at least 2cm in the back and each side of the gas range to allow
the heat to get out.
3>Make sure to not blok the oven gas exit, including the funnel or the gas vents,
when you install the oven.
Gas installation
1>This range was designed for use with LP gas
2> Always use a pressure regulator exclusive for your gas range. The lack of
pressure regulator might cause excess of pressure and leak of gas. Always
check for the validity of the pressure regulator. Hose and regulartor should
be replaced every 5 years. Technical specificaltion of the pressure regulator.
·Pressure: 200mm C.A.
·Max. consumption: 2kg/h
3> Always use a PVC hose to work from-20
O
C to 100OC. Be sure that hose:
·does not have joints.
·does not go on the back of the gas range neither close to the hot air exits.
·Its less then 125cm long.
4> If possible, install the gas cylinder outside the kitchen, in a place protected
and with air flow.
5> Use a ½ metallice hose to connect to the gas range.
6> Only use a plastic hose when this one does not go on the back of the gas range.
Hose installation
1> Place the metal clamp on the hose end.
2> Connect the hose to the oven inlet and tighten the clamp.
3> Place the other clamp on the oppsite hose end and connect it to the pressure regulator,
Tighten the clamp.
4>Bolt the pressure regulator to the gas cylinder carefully.
5> After the installation, check if there is any gas leak, using soap or liquid detergent foam.
Gas range installation
3
Page 4

Safety
For children
1>. Avoid accidents. After unpacking the range,keep packing materials away from children.
2>. Do not allow children to handle the appliance,even when it is disconnected.
3>. Prevent children from touching the range surface and from staying in its proximity when in use,
still hot,or after turn off.
For the user and installer
1>. Disconnect the range before cleaning or doing maintenance.
2>. Never unplug the range by pulling on the power cord.Use the plug.
Do not manipulate your gas range plug. Do not bite, twist or tie the power cord.
3>. It is dangerous to modify your gas range specifications and characteristics.
Do not install your gas range on top of the power cord.
4>. Connect the range to its own outlet. Do not use an extension cord or adaptor plug.
To avoid any accident,before replacing the light lamp, turn off the cook top burners
and unplug the appliance. Use a range lamp of 40W to replace it.
Care with food and cookware
1>To handle or remove food, please use the cooking gloves.
2> Never leave clothes or flammable materials near the burners
when the range is in use.When using frying oil or butter additional
care must be taken since these products are flammable.
3> Do not use the oven to store utensils,especially those containing
residues or large quantities of oil or fat.
4> Containers with curved bases or salient edges must not be used
since they can be easily destabilized when moved.
5> The handle of the utensil should be positioned so that it is turned inward.
Instructions for cleaning your range
1> Before cleaning or servicing your gas range,unplug it and cut gas tap.
2> Cleaning should be done when the appliance is cold.
3> For hygienic and security reasons,you should keep your gas range always clean
4> After each use always clean the glass cove of the gas range
5> Choose the burner size according to the pot you are going to use.
4
Page 5

How to use:
Timer setting:
1> To set the time, turn the knob clockwise to the desired time.The time can be set up to 60 minutes.
2> When cooking is finished, it will beep.
Before lighting the oven,please remove the following elements: A.Dripping pan; B.Baking rack.
C.Identify the oven knob in the middle of the knobs. D.Ignition can be manual or electric.
Manual ignition:Turn the knob to the maximum position, then at the same time keep a match
close the oven burner.
Electric ignition (only some models) : Press the ignition button and turn the oven knob
counterclockwisely at the same time until the oven light.
1> Be sure that the oven is burning, then close door smoothly. Preheat the oven at maximum
temperature for 10 to 20 minutes.
2> Select the temperature.To turn off the oven,turn the knob to the off position.
will give you more precise temperature as indentified mo the oven konb.
Oven racks:
Leveling the baking rack or tray will depend on the type of the food you want to cook.
We recommend:
1> Use the central slider to bake bread,cakes,etc.
2> Follow the instructions of the proper recipe.
3> To bake bread, cookies,pizzas or similar food, use the baking plate on the grate.
Burner ignition
1> Choose the knob of the burner that you want to light.
2> Ignition can be manual or electric.
Manual ignition:
Turn the knob of the burner you want to light up to maximum position,
then at the same time keep a match close the burner.
Electric ignition (only for some modes):
Press the ignition button and at the same time turn the knob counterclockwise until the burners light.
3> Select the temperature.
4> Turn the knob to off position to turn off the burner.
Important:
Never bake food directly on the upper burner or the tray covering the burner.
5
3> your gas range can have a thermo control or a thermostat.Oven with a thermostat
Page 6

Tips and adverside
1> Do not use any kind of protection on the board(aluminium foil) as it could cause clogging of the gas nozzle or bad
coupling of the burners parts.
2> When using the oven avoid touching its glass surface and internal accessories, wait for them to cool for a reasonable
time before handling them.
3> When cooking on the oven, avoild contact with glass. Avoid children in the kitchen when you are cooking.
4> Never allow kid to sit on the oven door,neither put heavy items on it.
5> To avoid electrical shocks,unplug the gas range when you replace the oven light.
For a lower and more efficient gas consumption it is advisable to use pans with a diameter adequate to the burners
size(fig.1and 2), preventing the flame to burn in the open(fig.3).It is advisable to reduce the flame as soon as the liquid
starts to boil, and keep the flame to the minimum necessary to sustain boiling.Make sure there is adequate ventilation
in the room where the range is installed. For an easier ignition,light the burner before placing the pan over the grill.
Usage of the Rotisserie Rack: (only for some models)
1> Remove the grill rack and replace with the oven tray.
2> Put the food on the rosisserie and fix it using the forks, then install the rod on
corresponding support inside the oven.
3> Turn on the knob"Grill" as indicated in the previous point.
4> Gently close the door to start roasting.
Accessories: Rotisserie skewer
The average speed of the motor heat the food evenly. AT the same time,it can guarantee the nutrition of the food.
Oven light(only for some models)
1> Press the button that indicates the oven light to turn the light on.
2> To turn the light off, press the button again.
It is normal that all the burners have continuous sparkling when pressing the electric ignition.
Important recommendations
6
Page 7

Cleaning and maintenance
Before any cleaning or servicing unplug the gas range and cut gas tap.
1> To clean the finishing use a soft cloth with a hot soap cloth with a hot soap water solution with
bicarbonate(2 spoonfuls in 1L of water).
2> To clean the glass front and control panel of the touch pad system, it is recommended to use a dry
paper towel.
3> Do not use detergents aerosols, corrosive or strongly abrasive products.
4> Do not use scrubbers as they may deteriorate the appearance and polish.
Important
When cleaning the board or the burners,you must be careful not to let food remainders into the oven,
pay attention into the gas exit.
Instruction of grill part in free-standing gas oven(only some models)
1> The oven is controlled via dual gas out-flow valve, and the valve separately controls the
button and top burner (but can not make the two burner work together at the same time).
2> When using grill function, the operate process should be: Turn on chief gas switch, if allowed,
check the gas flow system whether the pressure fulfill the kind and pressure that provided on
rating label.
3> Press the ignition button with left hand, and at the same time, press the valve operation knob
and turn right (clockwise) 60 degree with right hand, and then sound of high pressure ignition
discharge shall be heard. Grill shall be ignited and the flame shall go through all the fire holes
quickly, the flame shall be stable, no phenomenon of flameout. Tempering of flame fiercely pulsating.
After 4-5 seconds you can stop the operating of both hands.
4> Confirm the grill working normally, after putiing the foods materical that need to be grilled, close the
oven door lightly. Do not close the door rapidly and strongly, or the flame will go out because of the
leaping of the pressure in cavity.
5> After closing door, observe the flame is buring stable through the window, set the timer to grill accroding
to user's need.
OFF
7
Page 8

PROBLEM
POSSIBLE CAUSE
SOLUTION
Gas Smell
Connection hose or tubing punctured
Change the installation
Burners incorrect position
Place them in the
correct position.
An oven burner in use accidentally went off.
Call the costumer service
Pressure regulator badly installed
Install it correctly
Strong Smells
Oil and grease used to manufacture your stove
It is normal the first time
you use it.
Noise
Metal expansion due to heat
Normal.
Electric components
do not function
Disconnected stove socket without power
Connect the electric
cord.Check the
socket connecting
a lamp.
.
PROBLEM
SOLUTION
Gas Smell
Strong Smells
Noise
When turning on the
lamp,the roasting
rod
It is normal.
.
GENERAL EQUIVALENCES TABLE
COMMON MEASURES LIQUID MEASURES
1 Pinch
Less than
¼ teaspoonful
8 Spoonfuls ½
Cup
3 Teaspoonfuls 1 Spoonful 1 Cup 8 Liqude Ounces
2 Spoonfuls 30 grams= 10 Ounce 1 Cup
¼
Liter
4 Spoonfuls ¼ Cup 2Cups
½
Liter
8 Spoonfuls ¼ Cup 4 Cups
1Liter
16 Spoonfuls 1 Cup
EQUIVALENCES FARENHEIT AND CELCIUS GRADES
122º F = 50
ºC
250º f = 121º C
400
ºF =
204º C
130 54 275 135 425 218
150
66 300 149 450 232
175 79 325 163 475 246
200 93 350 177 500 260
225 107 375 191
Troubleshooting
8
 Loading...