

Page 1

1. :PANTONE BLACK C
2. A5
3.
HAMDWQP42601SA PC
(2601A)(MIDEA)
DD
REV
00
1:1
11
11
11
6720601728
80G
22
Page 2

HAMDWQP42601SA PC
洗碗機
說明書
Page 3

快速指南
具體操作方法見說明書的相應內容。
電源連接
電源為110V AC 60Hz
插座規格為10A 110V AC
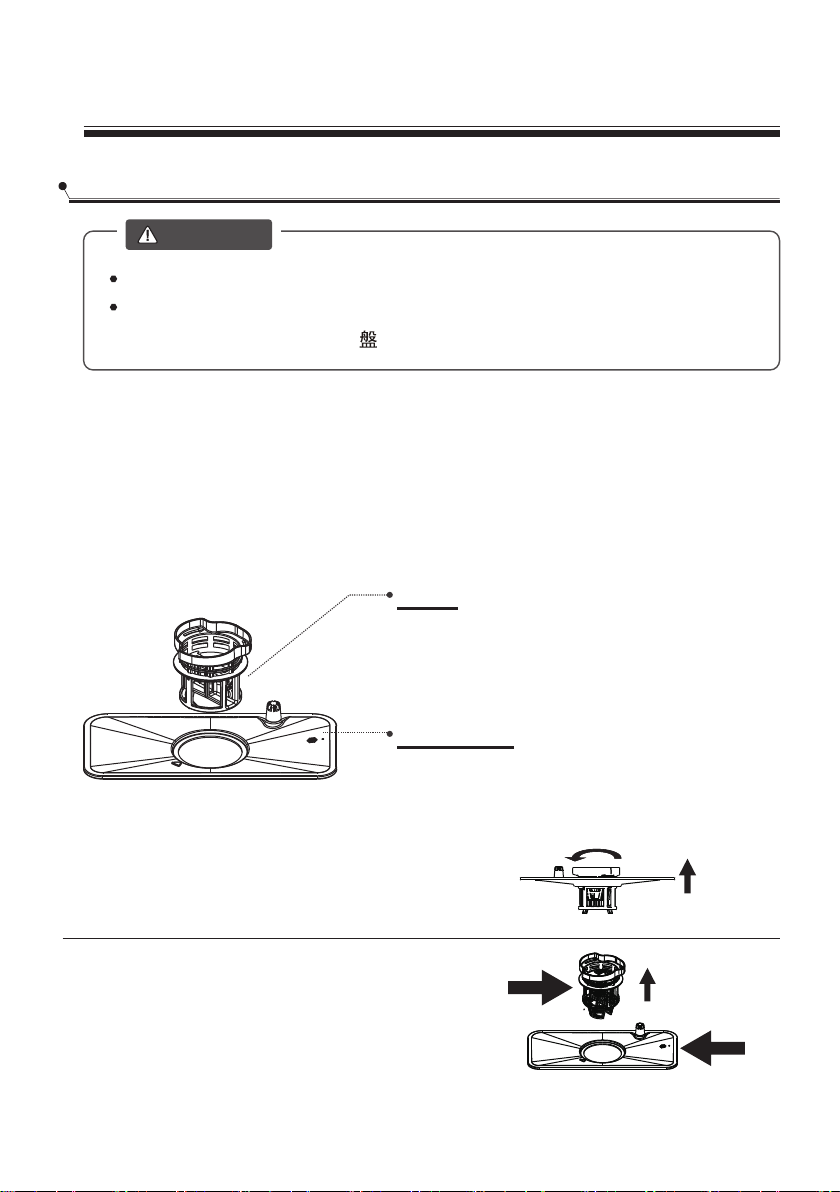
排水管連接:將排水管末端放入水槽或水桶。
將機器背部的管道與排水管固定。介面用夾具夾緊,
然後用螺絲刀緊固。
或
將吸杯與排水管固定。
清理大塊殘渣
放入碗 前,請先清理大塊殘渣。
打開機門,將碗 放入,然後加入洗滌劑
按碗 大小順序從兩側向中間放置。各種刀叉餐具建議傾斜放置,以提高清潔效
果。
刀叉餐具放置不當時,噴臂可能會被堵塞,導致清潔效果不理想。
.
拉開
左 右
Page 4

不要將刀叉餐具放在右側,否則可能
影響清潔效果。儘量將髒汙的一面朝
向噴射臂。
添加洗滌劑的位置(蔬果清潔時不加洗滌劑)。
往洗碗機的水箱加水
往水箱加水有兩種方式:
1
將進水管與水龍頭連接;
打開蓋子,手動往洗碗機水箱里加水。
2
水箱水滿後有兩種提示。
1.啟動前:
水箱水滿後,機器會響起“滴滴滴滴滴”的聲音。
2.啟動後:
水不滿時, 亮起;
水滿時, 燈不亮,機器會響起“滴滴滴滴滴”的聲音。
關閉機門,選擇程式,啟動洗碗機。
1
或
2
Page 5

目錄
使用洗碗機前,請仔細閱讀本說明書,它可以幫助你正確使用和維護洗碗機。
5
重要安全須知
10
瞭解本機
10
洗碗機各部件
11
控制台
12
使用洗碗機
14
洗碗機置物籃裝物操作
18
20
洗碗機 設計
20
清洗 表
21
開機
21
更改程式
22
忘記添加碗
23
清洗 結束時
24
維護與清潔
過濾系統
24
25
洗碗機
28
安裝說明
28
安裝準備
29
關於電源連接
30
通水
30
排水管連接
31
故障排除指南
31
呼叫服務之前
34
錯誤代碼
35
技術資訊
Page 6

重要安全須知
5
警告
使用洗碗機時,請遵守以下注意事項:
本機器用於家用和類似用途,如:
-商店、辦公室和其他工作環境內的員工廚房;
-酒店、汽車旅店和其他住宿環境內由客人自用;
本機器可供8歲以上兒童或缺少經驗、知識的人士使用,
但在使用時應給以有關安全使用本機器的監督或指導,
並使其瞭解潛在危險
。
監督,不得進行清潔和
兒童不得玩弄本機器。兒童未經
維護。(IEC60335-1)
Page 7

本機器僅供室內、家庭使用。
6
為防止觸電,請勿將裝置、線纜或插頭浸入水中或其他
液體中。
清潔和維護前,請拔下插頭。
清潔時請使用軟布,以溫和的肥皂水濕潤後再行清潔,
然後使用 布再擦拭一次。
接地說明
本機器必須接地。如發生故障,接地至少可以提供一定
的電阻,從而降低觸電風險。本機器配備的線材包含設
備接地導線和接地 。
插頭必須插入相應的插座,插座的安裝和接地應符合當
地規範和法規。
如插頭無法插入插座,請勿自行改裝機器自帶的插頭。
應由專業電工安裝配套插座。
設備接地導線連接不當會導致觸電風險。如無法確定是
否正確接地,請諮詢 。
Page 8

一般使用
7
操作機門或碗 架時,請務必遵守操作說明
操作洗碗機時,務必確認所有封蓋均已關閉。
洗碗機運行時,開啟機門務必小心,有濺出危險。
機門打開時,請勿將重物放置在機門上,也不要坐在機
門上。本機器
放入 洗滌時:
。
。
1)注意尖銳物品不要放在可能劃傷機門密封件的地方;
2)警告: 和其他帶有尖刺的廚房用具必須放在置物
籃中,尖頭朝下,或者 放置。
Page 9

請勿清洗塑膠物品,但如明確標示為可以用洗碗機或類
8
似機器洗滌的,不在此列。未標示的塑膠物品,請參考
建議。
務必使用針對自動洗碗機設計的洗滌劑。
不要在洗碗機內使用肥皂、洗衣粉或手洗液。
機門不得敞開,以免絆倒。
如電源線損壞,應由廠商、服務代表或 專業人員更
兒童加以監督,確保其不會玩弄本機器。
換,避免發生危險。
安裝時,不得過度或以危險方式彎曲或擠壓電源線。
請勿 控制器。
本機器應使用新的軟管套件與主水管相連,不要重複使
用老舊的軟管套件。
允許進水壓力最高為1MPa。
允許進水壓力最低為
22
0.04MPa。
Page 10

處置
9
處置本機器及其包裝時,應交予回收中心
。處置時請切斷電源線,將機門關好,使
其保持在不可用的狀態。
硬紙板包裝以回收紙製作,應放入廢紙堆
中回收。
確保產品的正確處置,有助於防止因產品廢物處置不當
而對人類和環境健康造成有害的潛在負面後果。
更多關於產品回收的資訊,請聯繫當地辦事處及家庭廢
物處置服務。
處置:請勿將本品當成未分類廢物處置。必須對廢
行隔離收集,以供特殊處理。
物進
Page 11

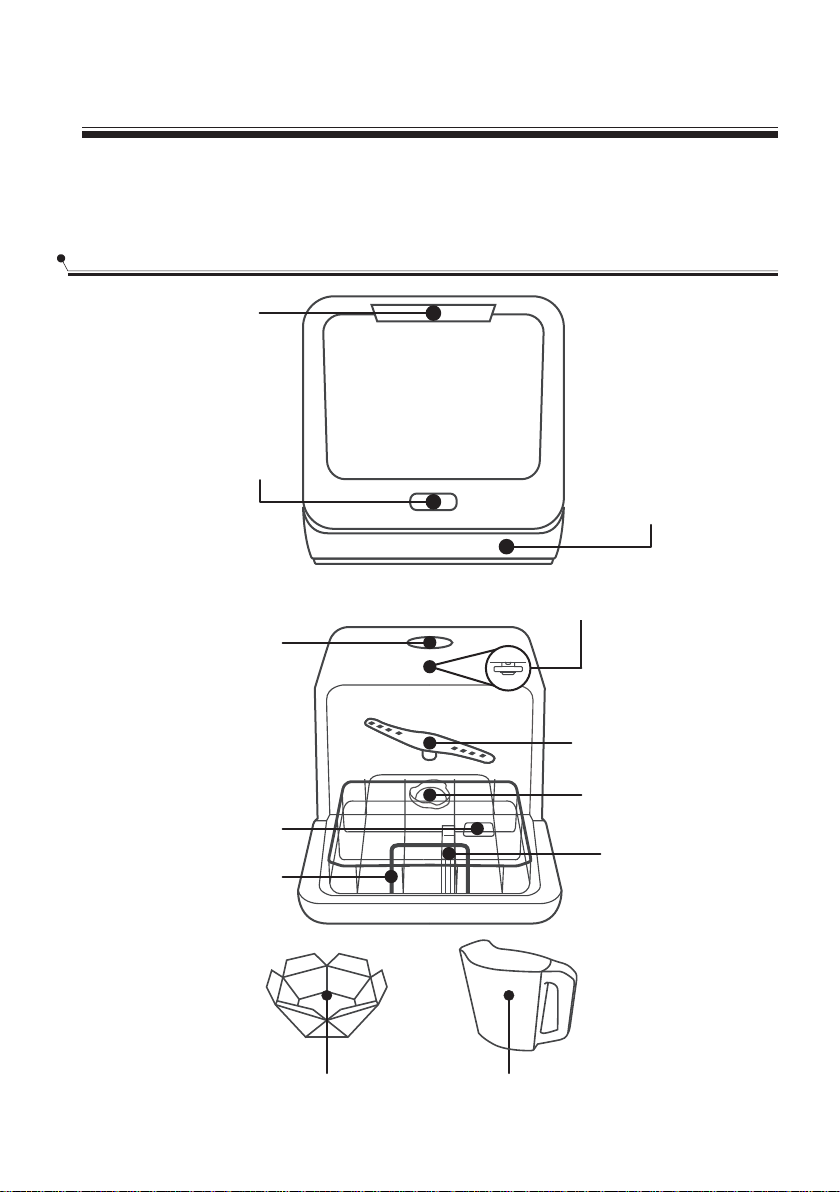
瞭解本機
10
重要:
首次使用洗碗機之前,為達到最佳使用效果,請閱讀本說明書。
洗碗機各部件
把手
控制台
上噴臂
水箱蓋
洗滌劑添加口
筷叉
籃
下噴臂
餐具籃
水果籃
Page 12

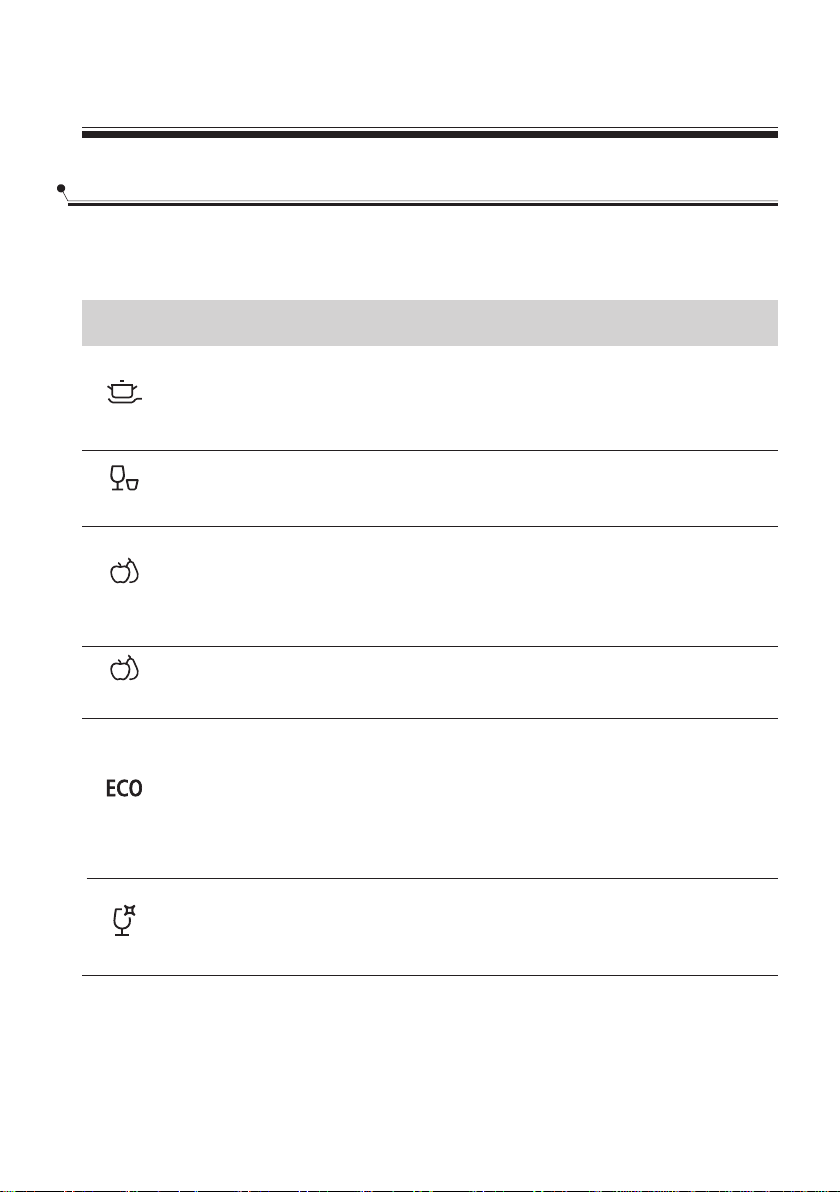
控制台
11
F
F
1
1
2
3
4
5
6
7
2 3 4 5 6 7 8
9
通電和斷電。
功能按鈕:按下按鈕,選擇洗滌
F1(強力洗 )-F2(快
功能
速洗 )
保管:針對洗滌結束 ,餐具還繼續保存
在洗碗機內,可除味,除濕,防霉。
加強乾燥:為獲得更好乾燥效果,選擇此
功能
預 約鍵
環 保洗
顯示預約啟動時間00-24小時。
:適合清洗一定大小的水果表面,比如蘋果、葡萄、棗子。
12min
:適合表面脆軟的水果,比如草莓。
6min
此為默認功能
針對輕微髒汙的
,適合普通髒汙程度的餐具
,如玻璃品、水晶和精細瓷器。
餐具
。
8
啟動/暫停
9
顯示 屏
按下按鈕,啟動或暫停洗碗機, 指示燈會閃爍。
時鐘
顯示時間、功能等。
Page 13

洗碗機置物籃裝物操作
12
建議
請考慮購買確定能使用洗碗機清洗的餐具。
請使用標為“適用
對於某些特殊物品,請儘量選擇溫度低的程式。
為防止損壞,洗滌模式結束後,請勿立刻將玻璃和刀叉等從洗碗機中拿出。
於洗碗機
”的洗滌劑。如果需要,請向洗滌劑廠 尋求更多資訊。
Page 14

適合用於洗碗機的物品
13
不適合的物品: 限制使用:
帶有木製、瓷器把手的刀叉餐
不耐熱的塑膠物品
其他帶有不耐熱 部件的刀叉餐具
合的刀叉餐具或碗碟
鉛錫或銅制物品
會生銹的鋼制物品
木製物品
合成纖維製成的物品
塑膠 頻繁清洗後,瓷器可能會褪色。
具
某些玻璃經大量清洗後會失去光澤
銀、鋁製品清洗後可能會掉色。
。
洗碗機置物籃裝 前後注意事項
載
(為使洗碗機得到最佳效果,請遵守以下裝載說明。置物籃及 叉籃的特點與外觀可能筷
隨機型而發生變化。)
大塊食物殘。將物品按
倒掉
杯具、玻璃品、盤等物品朝下擺放。
彎曲物品或帶有凹坑的物品應傾斜放入,方便 。
所有器皿應疊放牢靠,不要傾斜。
所有器皿在擺放時,應保證噴臂在清洗時自由旋轉。
如下步驟放入洗碗機:
沖洗
注意
微小物品容易掉出置物籃,不得放入洗碗機洗滌。
空心物件,如杯子、玻璃品、盤子等,應將開口朝下放置,防止容器內積水。
碗盤和刀叉物件必須相互疊套,或者相互覆蓋。
豎直朝上的較長的開刃刀具可能造成潛在危險!
Page 15

較長和/或尖銳的刀叉物品(如切肉刀)必須 放置在置物籃內。
14
洗碗機請勿超載。這一點對洗滌效果很重要,也是出於節能的合理必要。
篮
置物
水平
将餐具 好,避免 水流移动。
为了是喷射水柱能夠清洁表面,需将
髒污面放在靠内的位置。
咖啡杯
醬油碟
汤碗
小碗
筷子及汤匙
玻璃餐具
dinner plate
餐盤
将筷子篮底部的小孔对准碗篮定位
孔,然后用力向下压将其固定在碗
篮上。
警告
任何器具不得从底部伸出。
保证尖锐餐具的尖端朝下!
Page 16

筷子及汤匙
15
高度25
*
mm
以下。 摆放刀具时小心预防刮擦。
刀具及其他尖锐器具须放入篮中,尖端朝下或平放。
篮
置物
的使用
篮
置物
调节活动排以达到最佳洗涤
效果。
有一个可调节的活动排。
水果篮适於放置一定大小的水果
Page 17

添加洗滌劑
16
警告
務必使用洗碗機專用洗滌劑。
請勿使用其他清洗助劑和洗滌劑。否則可能損壞機器。
洗碗機洗滌劑有腐蝕性!
洗碗機洗滌劑不要放在兒童能夠拿到的地方。
濃縮洗滌劑
根據化學成本,去污劑可分為兩個基本類型:
帶有腐蝕性成分的常規 性洗滌劑。
帶有天然酶的低鹼性濃縮洗滌劑。
正常清洗程式配合濃縮洗滌劑使用,可減少污染,對碗 也有好處。
洗滌錠
不同品牌的洗滌锭的溶解速度不同。出於這個原因,在較短的清洗功能中,某些洗滌
锭無法溶解並發揮出最大清潔效力。因此,在使用洗滌锭時,請選擇較長的清洗功
能
,確保完全清除洗滌劑殘留。
洗滌劑
每個清洗模式開始前,必須對照清洗
洗碗機,本品消耗的洗滌劑更少。一般來說,正常清洗量只需要一勺洗滌劑。嚴重髒汙
的物品則需要更多洗滌劑。務必在啟動洗碗機之前添加洗滌劑,否則可能造成 和溶
解不足。
功能
表中給出的說明,重新添加洗滌劑。相較常規
残留
Page 18

洗滌劑添加口(蔬果模式不得添加洗滌劑)
17
Page 19

洗碗機 設計
18
清洗 表
下表顯示食物殘渣量對應的最佳
功能
功能
功能
沖刷:清潔主要污漬 快速清潔。
清洗:高溫清潔剩餘殘留汙漬,深層清潔。
,以及洗滌劑的需要量。
功能
12min
6min
(*En5 0242)
選擇資訊
功能
。
。
適合清洗一定大小的水果表面,
比如蘋果、葡萄、棗子。
不適合表皮脆軟的水果。
適合表皮脆軟的果蔬,如草莓。
默認功能
此為 ,適合普通髒汙
程度的餐具
針對輕微髒汙的物品,如玻璃
品、水晶和精細瓷器。
。
說明
功能
沖刷 (62°C)
清洗
清洗 (70°C)
乾燥
沖刷 (45°C)
清洗
清洗 (55°C)
清洗 (36°C)
清洗 / 6 0.01 5
沖刷 (55°C)
清洗
清洗 (68°C)
乾燥
沖刷 (50°C)
清洗
清洗 (65°C)
乾燥
洗滌劑
6 克
6 克
少許蘇打粉
6 克
6 克
時間
(分鐘)
160 0.5
29 0.35
12
155 0.45
85 0.4
能耗
(千瓦時) (升)
0.15
耗水
5
5
5
5
5
Page 20

注意
19
EN 50242: 本程式為測試模式。EN 50242相容性測試資訊如下:
關機模式耗電量為0.45W,通電模式為0.49W。
開機
啟動清洗模式……
抽出置物籃(見“洗碗機裝物”一節)。
倒入洗滌劑(見“添加洗滌劑”一節)。
將插頭插入插座。電源為110V AC 60 HZ,插座規格為10 A 110V AC。
按下電源按鈕,使機器通電。
將進水管連接到水龍頭,確保供水壓力充足,或者手動往水箱加水。
根據
“清洗模式表”選擇適當 。
功能
選擇 後,感應燈即亮起。此時按下“啟動/暫停”按鈕,洗碗機啟動。
注意
功能
清洗時按下“啟動/重定”按鈕將會暫停,然後 燈停止閃爍,洗碗機每分鐘都
會發出聲響,直至按下“啟動/重定”按鈕啟動為止。
功能
更改程式
前提條件:如果洗碗機僅運行了較短時間,可以修改清洗程式。否則,在已經放入了洗
滌劑,並且機器已經排 了洗滌水的情況下,必須重啟清洗模式。
Page 21

機門關閉時,按下“啟動/暫停”按鈕,機器將會暫停。
20
功能
“ ”
按下 按鈕超過3秒,機器將進入待機模式,此時可將程式更改為所需模式
啟動清洗程式”一節)。
(見“
顯示 顯示洗碗機狀態:
屏
屏
a) 顯示 顯示“-:--” 待機;
屏
b) 顯示 顯示“H:MM”且不再閃爍 暫停;
屏
c) 顯示 顯示“H:MM”且閃爍 運行;
屏
d) 顯示 顯示“END” 結束。
機型有記憶功能,斷電後
仍會繼續運行,直至結束所選程式。
忘記放入碗
洗滌劑分液器打開之前,可隨時添加忘記放入的碗 。此時,請遵守如下說明:
1.
“啟動/暫停”按鈕
按下
2. 將機門打開一點,停止清洗。
3. 噴射臂停止運行後,可將機門完全打開。
4. 添加忘掉的碗 。
5. 關閉機門。
6. 按下“啟動/暫停”按鈕,洗碗機將開始運行。
Page 22

功能
21
清洗 結束時
功能
運行 結束時,洗碗機蜂鳴器將持續鳴響8秒,然後停止。使用“ON/OFF”按鈕關閉
機器,斷掉電源,然後打開洗碗機的機門。從洗碗機中拿出物品時,應先等待幾分鐘,
避免燙傷,因為此時碗 和器皿仍然很燙,而且容易破裂,這樣也可以使其更好地乾燥。
關閉洗碗機
1. 按下“ON/OFF”按鈕,關閉洗碗機。
2. 關閉水龍頭!
小心開啟機門
滾燙的碗 容易碰碎。碗 在從機器中拿出來之前,應先冷卻約15分鐘。
打開洗碗機的機門半 ,等待幾分鐘,然後將碗 拿出來。這樣一來,碗 就會更加冷
卻,乾燥效果得到提高。
洗碗機
洗碗機內部正常情況下是潮濕的。
開
警告
清洗時打開機門十分危險,因為可能被熱水燙傷。
Page 23
維護與清潔
22
過濾系統
警告
過濾系統
無 不得使用洗碗機!
過濾系統
請確認 已正確組裝。
否則洗滌效果
能有效地清除洗滌水中的食物殘渣,使其在過程中可以回收。
過濾網
為得到更好的效果,應定時清潔
因此,清洗 結束後,可用 內的大塊食物,以清理
清洗過濾系統時,應將提杯把手朝上。
會受到影響,碗 和器皿也會損壞。
B.
。
提杯
過濾系統
功能 清水洗滌過濾網和提杯
過濾網
殘渣。
步驟1:反向旋轉 ,然後將其拉起。
步驟2:從A中拉起B。
提杯
A.
平面過濾網
打開
B
A
Page 24

注意
23
從步驟1到步驟2,將卸載 ;如果從步驟2到步驟1,則為安裝
過濾系統
整個 應每週清潔一次。
過濾系統
過濾網
。
每次使用洗碗機後,應檢查 是否堵塞。
下提杯後,可將
過濾系統
過濾網
拆除。清理食物殘渣,然後在流水下清潔
警告
過濾網
清潔
效果。
洗碗機 護
控制台可用濕布清潔。清潔後,務必徹底乾燥。不要
用具處理洗碗機任何部件。
時,不要 。否則,
維
可能會扭曲,從而降低洗碗機的清洗
過濾網
用尖銳物體、鋼絲球或粗糙的清潔
清潔機門
清潔機門邊緣時,應使用柔軟濕 。
為避免水滲入門鎖和電氣件,請勿使用任何類型的高壓清潔器
具。
布
過濾網
。
Page 25

清潔噴臂
24
噴臂可輕鬆卸下,方便定期清潔噴嘴,防止堵塞。請在流水下清潔,並小心放入底座
檢查旋轉動作是否受阻。
握住噴臂中部,往上提拉,將其卸下。用流水沖洗噴臂,然後小心放入底座。重新
後,檢查噴臂能否自由旋轉。如果不能,請檢查是否正確安裝。
安裝
,
Page 26

如何保持洗碗機的良好狀態
25
每次清洗後
每次清洗後,關閉水源, 機門打開,使濕氣和味道逸出。
把
拔掉插頭
清潔或維護前,務必將插頭從插座上拔出。
不要使用溶劑和銳利堅硬物品
清潔洗碗機外部和橡膠部件時,不要使用溶劑或 清洗產品。只能使用
沾有溫熱肥皂
清理外表面斑點時,請使用沾有水和醋的布塊,或洗碗機專用的清潔產品。
水的布料。
長時間不用
建議讓洗碗機在某個清洗
通
風
這
。
樣可以延長機門密封件的壽命,防止氣味積留在機器內部。
功能
後
下空轉 ,然後拔掉插頭,關閉水源,
把機門打開,以便
移動機器
必須移動機器時,請儘量保持垂直狀態。如果確實必要,可將機器背部朝下放置。
Page 27

安裝說明
26
警告
觸電危險
安裝洗碗機之前請斷開電源。
否則會導致 。
觸電甚至死亡
安裝準備
洗碗機的安裝位置應靠近進水龍頭和排水口電源插座。
機器位置
將機器放在預定位置。背部靠牆,兩側沿相鄰櫥櫃或牆壁放置。洗碗機配備供水和排水
管,可分置左右,方便安裝。
Page 28

關於電源連接
27
警告
個人安全:
本機請勿使用延長線或適配插頭。
任何情況下,請勿從電源線上切斷或移除接地連接。
電氣要求
請檢查額定標籤,瞭解額定電壓,將洗碗機與相應電源連接。按要求使用推薦的10安培
保險絲、延時保險絲或斷路器,並為本機安排單獨的電路。
電氣連接
確定電壓和電源頻率與銘牌相符。插頭務必插入接地良好的插座中。如果機器插座與插
頭不相配,會導致過熱和燃燒,請務必更換插座。
使用前確定接地良好
接
水
將冷水管與螺紋連接器(3/4英寸)連接,確定緊固到位。
如為新水管或長時間不用的水管,請先放水,確定水質清潔、無
異物。否則進水管可能堵塞或損壞機器。
注意:如果提供的水管與水龍頭不相配,請聯繫當地
購買轉接頭。
Page 29

排水管連接
28
排
將
水管與機器背部的管道連接固定。
應用卡箍夾緊
,然後用螺絲刀緊固。
或
表面
將排水管與吸 連接
排水管連接:將排水管末端放入水槽 水桶。
或
盤
如何將水管中多餘的水排出
如果水槽離地超過1000 ,水管中多餘的水就無法從水槽中直接排出。必須將水
管中多餘的水排入外部低於水槽的容器中。
水管
排
接上排水管。排水管必須正確連接,避免漏水。請勿彎曲或擠壓排水管。
mm
延長管
如果需要延長排水管,務必使用相似的排水管。延長線不得超過4米,否則會降低
洗碗機的清洗效果。
Page 30

故障排除指南
29
呼叫服務之前
請查看下文中的圖表,這樣可以先行做初步的故障排除。
問題
洗碗機無法啟動
洗碗機無法排水
可能原因
保險絲斷裂,或
跳閘。
電源未開啟。
錯誤代碼:E1
水壓較低。
洗碗機門是否正確關閉。
排水管扭曲。
過濾系統
廚房水槽堵塞。
電源
堵塞。
如何解決
更換保險絲或重置 。移除與洗碗
機共用同一線路的其他電器。
確定洗碗機已通電且機門緊閉。
確定電源線正確插入牆壁插座。
檢查供水連接是否正確,是否有水。
確定機門正確關閉,然後上鎖。
檢查排水管。
檢查粗孔篩檢程式。
檢查廚房水槽,確定排水良好。
如果廚房水槽無法排水,需要聯繫
,而不是洗碗機維修 。
電源
機體
內有泡沫
20~30
1.5
.
Page 31

問題
30
可能原因
如何解決
內膽
內部有斑點
內表面白色結膜
刀叉有鏽斑
清洗有撞擊聲
清洗櫃有異響
清洗劑濺出
使用了帶有著色的
洗滌劑
硬水礦物
受影響物品不耐腐蝕。
噴臂碰撞了置物籃
中的物品。
器皿鬆動。
務必立刻清理濺出的清洗劑。
確定洗滌劑不含著色劑。
清理內部時,請使用沾有洗碗機洗滌劑
的濕潤海綿,並戴上橡膠手套。
請勿使用其他非洗碗機專用的清潔劑,
以免產生泡沫。
避免在洗碗機中清洗不耐腐蝕的物品。
清洗
中斷
中斷 ,重新擺放器皿。
,重新擺放阻礙噴臂的物品。
清洗
沖
水管有 擊聲
碗 不乾淨 碗 未正確 。
這可能是現場安裝或
水管連接
功能不適當
導致的。
。
對洗碗機功能沒有影響。
如有疑問,請聯繫專業管道工人。
見“洗碗機置物籃装载前後注意事
项”一節。
適合的功能
選擇更
。
Page 32

問題
31
碗 不乾淨
可能原因
洗滌劑分配不足。
如何解決
請使用更多的洗滌劑,或更換洗滌劑。
玻璃器皿
碗 和杯具有白色
斑點
碗 無法乾燥
表面有殘留
物品阻擋了噴臂。
孔
過濾系
正確安
塞。
清洗櫃底座上的
不乾淨,或未
統
裝。
這會導致噴臂 堵
水質太 ,洗滌劑過多。
硬
硬水會造成水垢沉積。
擺放
不當。 。
過早拿出碗 。
重新擺放物品,使噴臂自由旋轉。
請正確清潔和/或安裝
清潔噴射臂 。
如果使用了軟水,應減少洗滌劑用量,
然後選擇較短的清洗模式清潔玻璃器皿。
按建議往洗碗機內
請勿清洗後立刻拿出碗 。請將機門
開,使蒸汽逸出。待內部溫度降低
全溫度後,再拿出碗 。
孔
過濾系統
擺放
。
打
到安
選擇
功能錯誤
使用了塗層品質較低的
刀叉
時間較短時,清洗溫度較低,降低
了清潔效果。
請選擇清洗時間較長的 。
這些物品會使排水變得更困難。
這種類型的刀叉或碗 不適合洗碗機清
洗。
功能
Page 33

錯誤代碼
32
出現故障時,機器將顯示如下提示代碼:
代碼
含義
進水時間過長。
達
未 到所要求的溫度
漏水
觸摸按鍵失靈
通信故障
子
水箱浮 異常
可能原因
流量計 排水或泵故障,
加熱管或熱敏電阻異常,應由 修理。
洗碗機某些元件漏水。
水或其他物質導致E9 應由
應由 修理。
應由
修理。
警告
漏水
如果發生
如果水量過滿或底盤中有水,請在開啟洗碗機之前清理積水。
,請關閉主水源,然後呼叫 服務。
應由 修理。
修理。
Page 34

技術資訊
33
750
420
435
35
4
高度
寬度
深度
電壓連接載荷
水壓
電源
容量
435mm
420mm
435mm
見額定標籤
0.04 - 1.0MPa
見額定標籤
22 餐具設定
Page 35

單元
34
名稱:洗碗機 型號(型式):
限用物質及其化學符號
鉛
(Pb)
汞
(Hg)
鎘
(Cd)
六價鉻
+6
(Cr
多溴聯苯
)
(PBB)
多溴二苯醚
(PBDE)
外門
把手
導線
外殼
內門
呼吸器
內膽
開關
底座
噴臂組件
頂板組件
水杯
碗籃
水管
螺釘
洗滌泵
加熱管
電路板 超出 0.1 wt %
電源線
○ ○ ○ ○ ○ ○
○ ○ ○ ○ ○ ○
○ ○ ○ ○ ○ ○
○ ○ ○ ○ ○ ○
○ ○ ○ ○ ○ ○
○ ○ ○ ○ ○ ○
○ ○ ○ ○ ○ ○
○ ○ ○ ○ ○ ○
○ ○ ○ ○ ○ ○
○ ○ ○ ○ ○ ○
○ ○ ○ ○ ○ ○
○ ○ ○ ○ ○ ○
○ ○ ○ ○ ○ ○
○ ○ ○ ○ ○ ○
○ ○ ○ ○ ○ ○
○ ○ ○ ○ ○ ○
○ ○ ○ ○ ○ ○
超出 0.01 wt %
超出 0.1 wt %
○
○ ○ ○ ○ ○
○ ○ ○
備考1.〝超出0.1 wt %〞及〝超出0.01 wt %〞係指限用物質之百分比含量超出百分比含量基準值。
備考2.〝○〞係指該項限用物質之百分比含量未超出百分比含量基準值。
備考3.〝-〞係指該項限用物質為排除項目。
Page 36

Page 37

HAMDWQP42601SA PC
DISHWASHER
Page 38

QUICK USER GUIDE
Please read the corresponding content on the instruction manual for detailed
operating method.
Connected to power supplies
The po wer s upply is 110 V AC 60 Hz
the sp eci ficat ion o f the socket i s 10 A 110 V AC
The connection of the drain pipe: Put end of the drain into a sink or bucket.
Fix the drain pipe with the back pipe of the machine.The interface
is fitted with clamps and tightened with a screwdriver.
or
Fix the drain pipe with
suction cups
Remove the larger residue
Please remove the large residue before placing.
Open the door, placing the dishes and adding detergent
Placing order by size and from the two sides to the middle.All cutlery
are suggested to be tilted to improve cleaning preformance.
The arm will be blocked with the improper placement of the cutlery
and cleaning effect may not be ideal.
Pull open
Left Right
Page 39

Should not place the cutle ry
in the right direction or ma y
aff ec t th e cl ea ni ng p reformance.
Try to l ea ve t he d ir ty f ac e
towards the spray arm.
The palce to add the detergent
(The program of friut should not
add the detergent)
Add water into the dishwasher’s tank
There are two ways to add water into the tank:
Connect inlet hose to the tap;
1
2
Open the cap and add water into the dishwasher’s
tank manually
There are two ways of prompting the tank that full of water.
1. Before starting:
When the tank is full of water, the machine will
drip-drip-drip-drip-drip beeps.
2. After starting :
Water is not enough, lights on;
Water is enough, lights is not on and the machine will
drip-drip-drip-drip-drip beeps.
Close the door, select the program and start the dishwasher
1
or
2
Page 40

CONTENTS
Please carefully read this manual before using the dishwasher, it will help you
use and maintain the dishwasher properly .
5
IMPORTANT SAFETY INSTRUCTIONS
10
GETTING TO KNOW YOUR APPLIANCE
10
Dishwasher features
11
Control panel
12
USING YOUR DISHWASHER
12
Loading the salt into the softener
13
Adjusting Salt Consumption
14
Loading the dishwasher baskets
18
Filling the dispenser
20
PROGRAMMING THE DISHWASHER
20
Wash cycle table
21
Turning on the appliance
21
Change the programme
22
Forget to add a dish?
23
At the end of the wash cycle
24
MAINTENANCE AND CLEANING
24
Filter system
25
Caring for the dishwasher
28
INSTALLATION INSTRUCTION
28
Installation preparationnce
29
About Power Connection
30
Water Connection
30
Connection of drain hoses
31
TROUBLESHOOTING TIPS
31
Before calling for service
34
Error codes
35
Technical information
Page 41

IMPORTANT SAFETY INSTRUCTIONS
5
WANING
When using your dishwasher , follow the
precautions listed below:
This appliance is intended to be used in household
and similar applications such as:
-staff kitchen areas in shops, offices and other
working environments;
-farm houses;
-by clients in hotels, motels and other residential type
environments;
-bed and breakfast type environments.
This appliance can be used by children aged from 8
years and above and persons with reduced physical,
sensory or mental capabilities or lack of experience
and knowledge if they have been given supervision
or instruction concerning use of the appliance in a
safe way and understand the hazards involved.
Children shall not play with the appliance. Cleaning
and user maintenance shall not be made by children
without supervision.(For EN60335-1)
This appliance is not intended for use by
persons(including children )with reduced physical,
sensory or mental capabilities, or lack of
Page 42

experienceand knowledge,unless they have been
6
given supervision or instruction concerning use of the
appliance by a person responsible for their safety.
(For IEC60335-1)
This appliance is for indoor use only, for household
use only.
To protect against the risk of electrical shock, do not
immerse the unit, cord or plug in water or other
liquid.
Please unplug before cleaning and maintaining the
appliance .
Use a soft cloth moisten with mild soap, and then use
a dry cloth to wipe it again.
Earthing instructions
This appliance must be earthed. In the event of a
malfunction or breakdown, earthing will reduce the
risk of an electric shock by providing a path of least
resistance of electric current. This appliance is
equipped with a cord having an equipmentearthing conductor and a earthing plug.
The plug must be plugged into an appropriate
outlet that is installed and earth ed in accordance
with all local codes and ordinances.
Page 43

Do not modify the plug provided with the
7
appliance; If it does not fit the outlet. Have a proper
outlet installed by a qualified electrician.
Improper connection of the equipment-earthing
conductor can result in the risk of an electric shock.
Check with a qualified electrician or service
representative if you are in doubt whether the
appliance is properly earthed.
General use
Do not abuse, sit on, or stand on the door or dish rack
of the dishwasher.
Do not operate your dishwasher unless all enclosure
panels are properly in place.
Open the door very carefully if the dishwasher is
operating, there is a risk of water squirting out.
Do not place any heavy objects on or stand on the
door when it is open. The appliance could tip forward.
When loading items to be washed:
1) Locate sharp items so that they are not likely to
damage the door seal;
Warning:
2) Knives and other utensils with sharp
points must be loaded in the basket with their
points down or placed in a horizontal position.
Check that the detergent powder is empty after
completion of the wash cycle.
Page 44

Do not wash plastic items unless they are marked
8
dishwasher safe or the equivalent. For plastic items
without mark, check the manufacturer's
recommendations.
Use only detergent additives designed for an
automatic dishwasher.
Never use soap, laundry detergent, or hand washing
detergent in your dishwasher.
Children should be supervised to ensure that they do
not play with the appliance.
The door should not be left open, since this could
increase the risk of tripping.
If the supply cord is damaged, it must be replaced by
the manufacturer or its service agent or a similarly
qualified person in order to avoid a hazard.
During installation, the power supply must not be
excessively or dangerously bent or flattened.
Do not tamper with controls.
The appliance is to be connected to the water mains
using new hose sets and that old hose-sets should
not be reused.
The maximum number of pieces to be
washed is 22.
The maximum permissible inlet water pressure is
1MPa.
The minimum permissible inlet water pressure is
0.04MPa.
Page 45

Disposal
9
For disposing of package and the
appliance please go to a recycling
centre. Therefore cut off the power
supply cable and make the door closing
device unusable.
Cardboard packaging is manufactured from
recycled paper and should be disposed in the waste
paper collection for recycling.
By ensuring this product is disposed of correctly, you
will help prevent potential negative consequences
for the environment and human health, which
could otherwise be caused by inappropriate waste
handling of this product.
For more detailed information about recycling of
this product, please contact your local city office
and your household waste disposal service.
DISPOSAL: Do not dispose this product as unsorted
municipal waste. Collection of such waste
separately for special treatment is necessary.
Page 46
GETTING TO KNOW YOUR APPLIANCE
10
IMPORTANT:
Before using this dishwasher for the first time and to get the best performance,
read these instructions.
Dishwasher features
Handle
Control panel
Cap of water tank
Base board
Upper spray arm
The place to
Add detergent
Basket
Lower spray arm
Filter
Tableware basket
Fruit basket Water bottle
Page 47

Control panel
11
F
F
1
1
Power
Program
2
Function
3
Delay
4
Fruit wash
5
ECO
6
2 3 4 5 6 7 8
9
To turn on and off.
Program Button: Press the button to select wash cycles
P1(Intensive ) -P2 (Rapid ) .
Storage
Get rid of the smell, damp and mildew proofing.
Extra dry
To select the extra dry function.
To show the delay time 00~24h.
Hot water : Suitable for washing fruit surfaces of a certain size,
such as apple, grape, jujube.
Cold water : Suitable for fruits with a weak surface, such
as strawberries.
This is standard prog ramme, it i s suitabl e to clean normally
soiled tableware an d it is the mos t effici ent progr amme in
terms of its combined e nergy and w ater cons umption for
that type of tablewar e.
Glass
7
8
Start/Pause
Display
9
For lightly soiled loads, such as glasses, crystal and fine
china.
Press this button to start or pause the dishwasher, the process
pilot lamp will be blinking when starting.
Display the time, function and so on.
Page 48

Loading the dishwasher baskets
12
Recommendation
Consider buying utensils which are identified as dishwasher-proof.
Use a mild detergent that is described as 'kind to dishes'. If necessary, seek further
information from detergent manufacturers.
For particular items, select a program with as low temperature as possible.
To prevent damage, do not take glass and cutlery out of the dishwasher immediately
after the program has ended.
Page 49

Suitability of use in the dishwasher
13
Not suitable for use:
Cutlery with wooden, horn, china or
mother-of-pearl handles
Plastic items that are not heat resistant
Older cutlery with glued parts that are
not temperature resistant
Bonded cutlery items or dishes
Pewter or copper items
Crystal glass
Steel items subject to rusting
Wooden items
Items made from synthetic fibres
Limited suitability:
Some glasses can become dull
after a large number of washes.
Silver and aluminium have a
tendency to discolour during
washing.
Glazed patterns may fade if
washed frequently.
Attention before or after loading the dishwasher baskets
(For the best performance of the dishwasher, follow these loading guidelines.
Features and appearance of baskets and cutlery baskets may vary from your model.)
Scrape off any large food paritcles. Soften remnants of burnt food in pans. It is not
necessary to rinse the dishes under running water. Place objects in the dishwasher in
following way:
Items such as cups, glasses, pots/pans, etc. are face downwards.
Curved items, or those with recesses, should be loaded at aslant so that water can
run off.
All utensils are stacked securely and can not tip over.
All utensils are placed in the way that the spray arms can rotated freely during
washing.
NOTE
Very small items should not be washed in the dishwasher as they could
easily fall out of the basket.
Load hollow items such as cups, glasses, pans etc. with the opening facing
downwards so that water cannot collect in the container or a deep base.
Dishes and items of cutlery must not lie inside one another, or cover each other.
To avoid damage to glasses, they must not be touched.
Long bladed knives stored in an upright position are a potential hazard!
Page 50

Long and/or sharp items of cutlery such as carving knives must be positioned
14
horizontally in the basket.
Please do not overload your dishwasher. This is important for good results and for
reasonable energy consumption.
Loading basket
Position the dishes and cookware so that they will not get moved by the spray of
water.
In order to clean the surface of the
spray water column, it is necessary
to place the stain on the inside.
Mug
seasoning dish
Soup bowl
glass
Place the small holes at the bottom
of the chopsticks basket with the
bowl basket, then press it hardly to
fix it on the bowl basket.
small bowl
chopsticks and spoons
dinner plate
dinner plate
WARNING
Do not let any item extend
through the bottom.
Always load sharp utensils
with the sharp point down!
Page 51

Chopsticks and spoons
15
Height should below 25cm. Handle the tableware downward. Please be
careful to scratch when place sharp cutlery.
* Knives and other sharp appliances must be packed in baskets and
pointed down or horizontally placed.
Howtousethebasket
The bowl basket has an
adjustable movable row.
Adjust the adjustable row
to achieve the best
washing effect.
The fruit basket is suitable for
loading a certain size surface of
fruit , such as apple, grape, jujube.
Not suitable for fruits with fragile
surface, such as strawberries.
Page 52

Filling the dispenser
16
The rinse aid is released during the final rinse to prevent water from forming
droplets on your dishes and utensils, which can leave spots and streaks.
WANING
Only use detergent
specifically for dishwashers.
Never use any other rinse aid and detergents.
This will damage the appliance.
Dishwasher detergent is corrosive!
Keep dishwasher detergent out of
the reach of children.
Concentrated Detergent
Based on their chemical composition, detergents can be split in two basic types:
Conventional, alkaline detergents with caustic components.
Low alkaline concentrated detergents with natural enzymes.
The use of Normal washing program in combination with concentrated detergent
reduces pollution and is good for your dishes.
Detergent Tablets
Detergent tablets of different brands dissolve at different speeds. For this reason
some detergent tablets cannot dissolve and develop their full cleaning power during
short Programs. Therefore please use long programs when using detergent tablets,
to ensure the complete removal of detergent residuals.
Detergent
The detergent must be refilled before the start of each wash cycle following the
instructions provided in the Wash Cycle Table. Your dishwasher uses less detergent
then conventional dishwasher. Generally, only one tablespoon of detergent is
needed for a normal wash load. More heavily soiled items need more detergent.
Always add the detergent just before starting the dishwasher, otherwise it could
get damp and will not dissolve properly.
Page 53

Adding detergent
17
(The program of friut should not add the detergent)
The palce to add the detergent
Page 54
PROGRAMMING THE DISHWASHER
18
Wash cycle table
The table below shows which programmes are best for the levels of food residue
on them and how much detergent is needed. It also show various information
about the programmes.
Program
Cycle Selection
Information
Description
Of Cycle
Detergent
Time
(min)
Energy
(Kwh)
Water
(L)
Intensive
Rapid
12min
6min
(*En5 0242)
Glass
For lightly soiled loads that
do not need excellent drying
efficiency.
A shorter wash for lightly
soiled loads and quick wash.
Suitable for washing fruit
surfaces of a certain size,
such as apple, grape, jujube.
Not suitable for fruits with
a weak surface
suitable for fruits with a weak
surface, such as strawberries
This is standard programme,
it is suitable to clean normally
soiled tableware and it is the
most efficient programme in
terms of its combined energy
and water consumption for
that type of tableware.
For lightly soiled loads, such as
glasses, crystal and fine china
Wash(62 ℃)
Rinse
Rinse(70 ℃)
Drying
Wash (45 )
Rinse
Rinse (55℃)
Wash (36℃)
Rinse
Rinse
Wash (55 ℃)
Rinse
Rinse (68 ℃)
Drying
Wash(50 ℃)
Rinse
Rinse(65 ℃)
Drying
℃
6 g.
6 g.
A little
soda powder
/
6 g.
6 g.
160 0.5
29 0.35
0.15
12
6 0.01
155 0.45
85 0.4
5
5
5
5
5
5
Page 55

NOTE
19
EN 50242:
test in accordance with EN 50242, are as follows:
This program is the test cycle. The information for comparability
The power consumption of off-mode is 0.45W,
left-on mode is 0.49W
Turning on the appliance
Starting a wash cycle...
Draw out the basket(see the section entitled "Loading the Dishwasher").
Pour in the detergent (see the section“Fill the detergent”).
Insert the plug into the socket. The power supply is 110 V
specification of the socket is 10 A 110 V
Press the power button to turn on the appliance,
Connect the inlet hose to the tap, make sure that the water supply is turned on
to full pressure, or add water the the tank manually.
select a suitable program according to the “Wash cycle table”;
If a program is selected, the response light will light. Then press the Start/ Pause
button, the dishwasher begins to start.
AC.
NOTE
When you press the Star t/Reset b utton to pa use during washing,the
program light will st op blinki ng and the di shwasher will mooing
every minute unless y ou press th e Start/R eset button to start.
AC 60 HZ, the
Change the programme
Premise: You can modify the washing program, If the dishwasher just worked for
a short time. Otherwise, the detergent may have already been released, and the
appliance may have already drained the wash water in this case, the cycle
must be restarted.
Page 56

tart/Pause
20
Press S Button to pause the machine when the door is closed ,
Press Function Button more than three seconds the machine will be in stand by
state , then you can change the program to the desired cycle setting
(see the section entitled " Starting a wash program" ).
The Display window shows the state of the dishwasher:
a) Display window shows "-:--" ----------------------------------> stand by;
b) Display window shows "H:MM" and not blinking -------------> pause;
c) Display window shows "H:MM" and blinking ------------------------> run;
d) Display window shows "END" ------------------------> end.
NOTE
If you open the door duri ng washin g, the mach ine will pause. When
you and press the Start /Pause Bu tton, the m achine will keep on
working after 10 seco nds.
If your model has broken remember function, the machine will go on to finish the
selected program after the power cut.
Forget to add a dish
A forgotten dish can be added any time before the detergent dispenser opens. If
this is the case, follow the instructions below:
1. Press the Start/Pause button
Open the door a little to stop the washing.
2.
After the spray arms stop working, you can open the door completely.
3.
Add forgotten dishes.
4.
Close the door.
5.
6 Press the tart/Pause button, the dishwasher will run .
. S
Page 57

At the end of the Wash Cycle
21
When the working cycle has finished, the buzzer of dishwasher will sound 8 seconds,
then stop. Turn off the appliance using the ON/OFF button, shut off the water supply
and open the door of the dishwasher. Wait a few minutes before unloading the
dishwasher to avoid scald, the dishes and utensils are still hot and more susceptible
to breakage. They will also dry better.
Switch Off the Dishwasher
1.Switch off the dishwasher by pressing the ON/OFF button.
2.Turn off the water tap!
Open the door carefully
Hot dishes are sensitive to knocks. The dishes should be allowed to cool down
around 15 minutes before removing from the appliance.
Open the dishwasher's door, leave it ajar and wait a few minutes before removing
the dishes. In this way they will be cooler and the drying will be improved.
Unloading the dishwasher
It is normal that the dishwasher is wet inside.
WANING
It is dangerous to open the door when washing, because the hot water
may scald you.
Page 58

MAINTENANCE AND CLEANING
22
Filter system
WANING
Never use the dishwasher without filters!
Make sure the filter is properly assembled.
The performance may be affected and dishes and utensils could become
damaged.
The filter efficiently
recycled during the cycle.
For best performance and results, the filter assembly must be cleaned regularly.
For this reason, it is a good idea tore move the larger food particles trapping in
the filter after each wash cycle by rinsing the filter and cup under running water.
To remove the filter assembly, pull the cup handle in the upward direction.
A.Main filter
Step 1: Contrarotate the filter assembly,
then lift it all up.
removes food particles from the wash water, allowing it to be
B.Fine filter
This filter holds soil and food residues in
the sump area and prevents it from being
deposited on the dishes during wash cycle.
Food and soil particles trapped in this filter
are pulverized by a special jet on the lower
spray arm and washed down to drain.
Open
B
Step 2: Lift B up from A.
A
Page 59

NOTE
23
If do it from step1 to step 2, the filter system will be removed; while if do it
from Step 2 to Step 1, the filter system will be installed.
The entire filter assembly should be cleaned once a week.
Inspect the filters for blocking after every time the dishwasher has been used.
By unscrewing the coarse filter, you can remove the filter system. Remove any food
remnants and clean the filters under running water.
WANING
When cleaning the filters, don't knock on them. Otherwise, the filters could
be contorted and the performance of dishwasher could be decreased.
Caring for the Dishwasher
The control panel can be cleaned by using a lightly dampened cloth. After
cleaning, make sure to dry it thoroughly. For the exterior use a good appliance
polish wax.Never use sharp objects, scouring pads or harsh cleaners on any part of
the dishwasher.
Cleaning The Door
To clean the edge around the door, you should use only a soft warm, damp cloth.
To avoid penetration of water into the door lock and electrical components, do
not use a spray cleaner of any kind.
WANING
Never use a spray cleaner to clean t he door pan el as it may da mage
the door lock and electrical com ponents .
Abrasive agents or some paper to wel shoul d not be used b ecause of
the risk of scratching or leavin g spots on th e stainle ss steel surface.
Page 60

Protect against freezing
24
please take frost protection measures on the dishwasher in winter. E fter
washing cycles, please operate as follows.
1. Cut off electrical power to the dishwasher.
2. Turn off the water supply and disconnect the water inlet pipe from the
water valve.
3. Drain water from the inlet pipe and water valve (Use a pan to catch the water).
4. Reconnect the water inlet pipe to the water valve.
5. Remove the filter at the bottom of the tub and use a sponge to soak up water
in the sump.
ach time a
NOTE
If your dishwasher cannot work because of the ice, please contact
authorised service person.
Cleaning the spray arms
The spray arms can be easily removed for periodic cleaning of the nozzles to prevent
possible clogging. Wash them under running water and carefully replace them in
their seats, checking that their rotary movement is in no way impeded.
Grasp the middle of the spray arm, pull it upwards to remove it. Wash the arms
under a jet of running water and replace it carefully to its seat. After reassembly,
check that the spray arms rotate freely. Otherwise, check that they have been
installed correctly.
Page 61

How to keep your dishwasher in shape
25
After every wash
After every wash, turn off the water supply to the appliance and leave the door
slightly open so that moisture and odours are not trapped inside.
Remove the plug
Before cleaning or performing maintenance, always remove the plug from the socket.
No solvents or abrasive cleaning
To clean the exterior and rubber parts of the dishwasher,do not use solvents or
abrasive cleaning products.Only use a cloth with warm soapy water.
To remove spots or stains from the surface of the interior, use a cloth dampened with
water an a little vinegar, or a cleaning product made specifically for dishwashers.
When not in use for a longtime
It is recommend that you run a wash cycle with the dishwasher empty and then
remove the plug from the socket, turn off the water supply and leave the door of
the appliance slightly open. This will help the door seals to last longer and
prevent odours from forming within the appliance.
Moving the appliance
If the appliance must be moved, try to keep it in the vertical position. If absolutely
necessary, it can be positioned on its back.
Page 62

INSTALLATION
26
WANING
Electrical Shock Hazard
Disconnect electrical power before
installing dishwasher.
Failure to do so could result in death or
electrical shock.
Attention
The installation of the pipes and electrical equipments should be done by
professionals.
Installation preparation
The installation position of dishwasher should be near the existing water inlet tap
and drain outlet and power socket.
One side of the cabinet sink should be chosen to facilitate the connection of drain
hoses of the dishwasher.
Positioning the Appliance
Position the appliance in the desired location. The back should rest against the wall
behind it, and the sides, along the adjacent cabinets or wall. The dishwasher is
equipped with water supply and drain hoses that can be positioned to the right or
the left to facilitate proper installation.
Page 63

About Power Connection
27
WANING
For personal safety:
Do not use an extension cord or an adapter plug
with this appliance.
Do not, under any circumstances, cut or remove
the earthing connection from the power cord.
Electrical Requirements
Please look at the rating label to know the rating voltage and connect the
dishwasher to the appropriate power supply. Use the required fuse 10 amp, time
delay fuse or circuit breaker recommended and provide separate circuit serving
only this appliance.
Electrical Connection
Ensure the voltage and frequency of the power being corresponds to those on
the rating plate. Only insert the plug into an electrical socket which is earthed
properly. If the electrical socket to which the appliance must be connected is not
appropriate for the plug , replace the socket, rather than using a adaptors or the
like as they could cause overheating and burns.
Ensure that proper earthing exists before use
Water Connection
Connect the cold water supply hose to a threaded 3/4(inch)
connector and make sure that it is fastened tightly in place.
If the water pipes are new or have not been used for an
extended period of time, let the water run to make sure that
the water is clear and free of impurities. If this precaution is
not taken, there is a risk that the water inlet can get blocked and damage
the appliance.
Please Note: If the supplied hose cloes not fit your tap, please contact your local
plumbing supply center where adapters are available for purchase.
Page 64

Connection of drain hoses
28
Fix the drain pipe with the back
pipe of the machine.The interface
is fitted with clamps and tightened
with a screwdriver.
or
Fix the drain pipe with suction cups
The connection of the drain pipe: Put end of the drain into a sink or bucket.
How to Drain Excess Water From Hoses
If the sink is more than1000 mm higher than the floor, the excess water in hoses
cannot be drained directly into the sink. It will be necessary to drain excess water
from hoses into a bowl or suitable container that is held outside and lower than
the sink.
Water Outlet
Connect the water drain hose. The drain hose must be correctly fitted to avoid
water leaks. Ensure that the water drain hose is not kinked or squashed.
Extension Hose
If you need a drain hose extension, make sure to use a similar drain hose. It must
be no longer than 4 metres, otherwise the cleaning effect of the dishwasher could
be reduced.
Page 65

TROUBLESHOOTING TIPS
29
Before calling for service
Reviewing the charts on the following pages may save you from calling for service.
Problem Possible Causes What To Do
Dishwasher doesn't
start
Water not pumped
form dishwasher
Suds in the tub
Fuse blown, or the
circuit break tripped.
Power supply is not
turned on.
Error code:E1;
Water pressure is low
Door of dishwasher
not properly closed.
Twisted or trapped
drain hose.
Filter clogged.
Kitchen sink clogged.
Detergent is not used
correctly Detergent
overdue or mouldy
Replace fuse or reset circuit breaker.
Remove any other appliances sharing
the same circuit with the dishwasher.
Make sure the dishwasher is turned
on and the door is closed securely.
Make sure the power cord is
properly plugged into the wall socket.
Check that the water supply is
connected properly andthe water
is turned on.
Make sure to close the door
properly and latch it.
Check the drain hose.
Check coarse the filter.
Check the kitchen sink to make sure
it is draining well.If the problem is
the kitchen sink that is not draining ,
you may need a plumber rather than
a serviceman for dishwashers.
To avoid suds, us e dis hwa she r's
detergent If it happens, please
open the dishwasher door for
20~30 minutes and let the suds
evaporate. If there still have
sunds, please add 1.5 liters of
water in the inner tub, close the
dishwasher door and run a strong
operation of the water discharge
until the suds is been cleared.
Use the detergent within the
period of validity.
Page 66

Problem Possible Causes What To Do
30
Spilled rinse-aid. Always wipe up rinse-aid spills
immediately.
Stained tub interior Detergent with
colourant may
have been used.
White film on
inside surface
There are rust
stains on cutlery
Knocking noise in
the dishwasher
Hard water minerals. To clean the interior, use a damp
The affected items
are not corrosion
resistant.
A programme
was not run after
dishwasher salt was
added. Traces of
salt have gotten
into the wash cycle.
The lid of the softer
is loose.
A spray arm is
knocking against
an item in a basket
Make sure that the detergent has no
colourant.
sponge with dishwasher detergent
and wear rubber gloves. Never use
any other cleaner than dishwasher
detergent otherwise, it may cause
foaming or suds.
Avoid washing items that are not
corrosion resistant in the dishwasher.
Always run a wash programme
without any crockery after adding
salt. Do not select the Turbo function
(if present).
Check the softener lid is secure.
Interrupt the programme and
rearrange the items which are
obstructing the spray arm.
Rattling noise in
the dishwasher
Knocking noise in
the water pipes
The dishes
are not clean
Items of crockery
are loose in the
dishwasher.
This may be caused
by on-site installation
or the cross-section
of the piping.
The dishes were not
loaded correctly.
The programme was
not powerful enough.
Interrupt the programme and
rearrange the items of crockery.
This has no influence on the
dishwasher function. If in doubt,
contact a qualified plumber.
See notes in “Loading & unloading
your dishwasher”.
Select a more intensive programme.
Page 67

Problem Possible Causes What To Do
31
The dishes
are not clean.
Cloudiness on
glassware.
White spots
appear on dishes
and glasses.
Black or grey
marks on dishes
Not enough detergent
was dispensed.
Items are blocking
the movement of
the spray arms.
The filter combination
is not clean or is not
correctly fitted in the
base of washcabinet.
This may cause the spray
arm jets to get blocked.
Combination of soft
water and too much
detergent.
Hard water area
can cause limescale
deposits.
Aluminium utensils
have rubbed against
dishes
Use more detergent, or change
your detergent.
Rearrange the items so that the spray
can rotate freely.
Clean and/or fit the filter correctly.
Clean the spray arm jets.
Use less detergent if you have soft
water and select a shorter cycle to
wash the glassware and to get
them clean.
Add more detergent.
Use a mild abrasive cleaner to
eliminate those marks.
Detergent left in
dispenser
The dishesare
not drying
Dishes block
detergent dispenser
Improper loading Load the dishwasher as suggested in
Dishes are removed
too soon
Re-loading the dishes properly.
the directions.
Do not empty your dishwasher
immediately after washing. Open
the door slightly so that the steam
can come out. Take out the dishes
until the inside temperature is safe
to touch. Unload the lower basket
first to prevent the dropping water
from the upper basket.
Page 68

Problem
32
The dishesare
not drying
Possible Causes What To Do
Wrong program has
been selected.
With a short programme, the
washing temperature is lower,
decreasing cleaning performance.
Choose a programme with a long
washing time.
Use of cutlery with a
low-quality coating.
Water drainage is more difficult with
these items. Cutlery or dishes of this
type are not suitable for washing in
the dishwasher.
Error codes
When some malfunctions come on, the appliance will display error codes to
warn you:
Codes
Meanings
Longer inlet time.
Not reaching required
temperature
Overflow. Some element of dishwasher leaks .
Touch button adhesion
Communication anomaly
Water tank float anomaly
Possible Causes
A flow meter, drain valve, or pump failure,
it should be repaired by a qualified worker.
Heating tube or thermistor anomaly,it
should be repaired by a qualified worker.
Water or other material in the key area
causes E9 or it should be repaired by a
qualified worker.
It should be repaired by a qualified worker.
It should be repaired by a qualified worker.
WANING
If overflow occurs, turn off the main water supply before calling a service.
If there is water in the base pan because of an overfill or small leak,
the water should be removed before restarting the dishwasher.
Page 69

Technical information
33
420420
440435
44 435
750750
Height
Width
Depth
Voltage connected Load
Water pressure
Power supply
Pieces
435mm
420mm
435mm
see rating label
0.04 - 1.0MPa
see rating label
22 pieces
Page 70

34
Unit
Exceeding 0.1 wt %
Exceeding 0.1 wt %
Equipment name
:
Lead
(Pb)
Mercury
:
Restricted substances and its chemical symbols
(Hg)
Type designation (Type)
Cadmium
(Cd)
Hexavalent
chromium
+6
(Cr
Polybrominated
)
biphenyls
(PBB)
Polybrominated
diphenyl ethers
(PBDE)
○ ○ ○ ○ ○ ○
○ ○ ○ ○ ○ ○
○ ○ ○ ○ ○ ○
○ ○ ○ ○ ○ ○
○ ○ ○ ○ ○ ○
○ ○ ○ ○ ○ ○
○ ○ ○ ○ ○ ○
○ ○ ○ ○ ○ ○
○ ○ ○ ○ ○ ○
○ ○ ○ ○ ○ ○
○ ○ ○ ○ ○ ○
○ ○ ○ ○ ○ ○
○ ○ ○ ○ ○ ○
○ ○ ○ ○ ○ ○
○ ○ ○ ○ ○ ○
○ ○ ○ ○ ○ ○
○ ○ ○ ○ ○ ○
Exceeding 0.01 wt %
○ ○ ○ ○
○ ○ ○ ○ ○
Note 1:“Exceeding 0.1 wt %” and “exceeding 0.01 wt %” indicate that the percentage content of the restricted substance exceeds the
reference percentage value of presence condition.
Note 2:“○” indicates that the percentage content of the restricted substance does not exceed the percentage of reference value of presence.
Note 3:The “−” indicates that the restricted substance corresponds to the exemption.
Page 71

TAIWAN MEIZHI ELECTRICAL CONSUMER CO., LTD.
3F, NO. 152, Jiankang RD., Songshan Dist., Taipei City 10586, Taiwan
Tel: +886-2-27600066
Fax: +886-2-27660123
 Loading...