

Page 1

USER MANUAL OF SMART KIT
IMPORTANT NOTE:
Read the manual carefully before installing or
connecting your Smart kit(Wireless module). Make
sure to save this manual for future reference.
Page 2
CONTENTS
1
SPECIFICATION...............................................
INSTALL THE SMART KIT
(wireless module) ...........................................
DOWNLOAD AND INSTALL APP.....................
PREPARATION ................................................
CREATE ACCOUNT..........................................
NETWORK CONFIGURATION.........................
HOW TO USE APP............................................
SPECIAL FUNCTIONS......................................
APP DECLARATION.........................................
1
2
3
4
5
6
7
8
9
2
3
4
4
5
6
17
20
26
Page 3
2
1
SPECIFICATION
NOTE:
Company will not be liable for any issues
and problems caused by Internet, Wi-Fi
Router and Smart Devices. Please contact
the original provider to get further help.
Model: US-SK103
Standard: IEEE 802. 11b/g/n
Antenna Type: Wxternal omnidirectional Antenna
Frequency Band: 2400-2483.5MHz
Operation Temperature:0 C~45 C/32 F~113 F
Operation Humidity: 10%~85%
Power Input: DC 5V/300mA
Maximum TX Power: 19.8dBm
Page 4
3
KOODXXXXX XXXXXXX
2
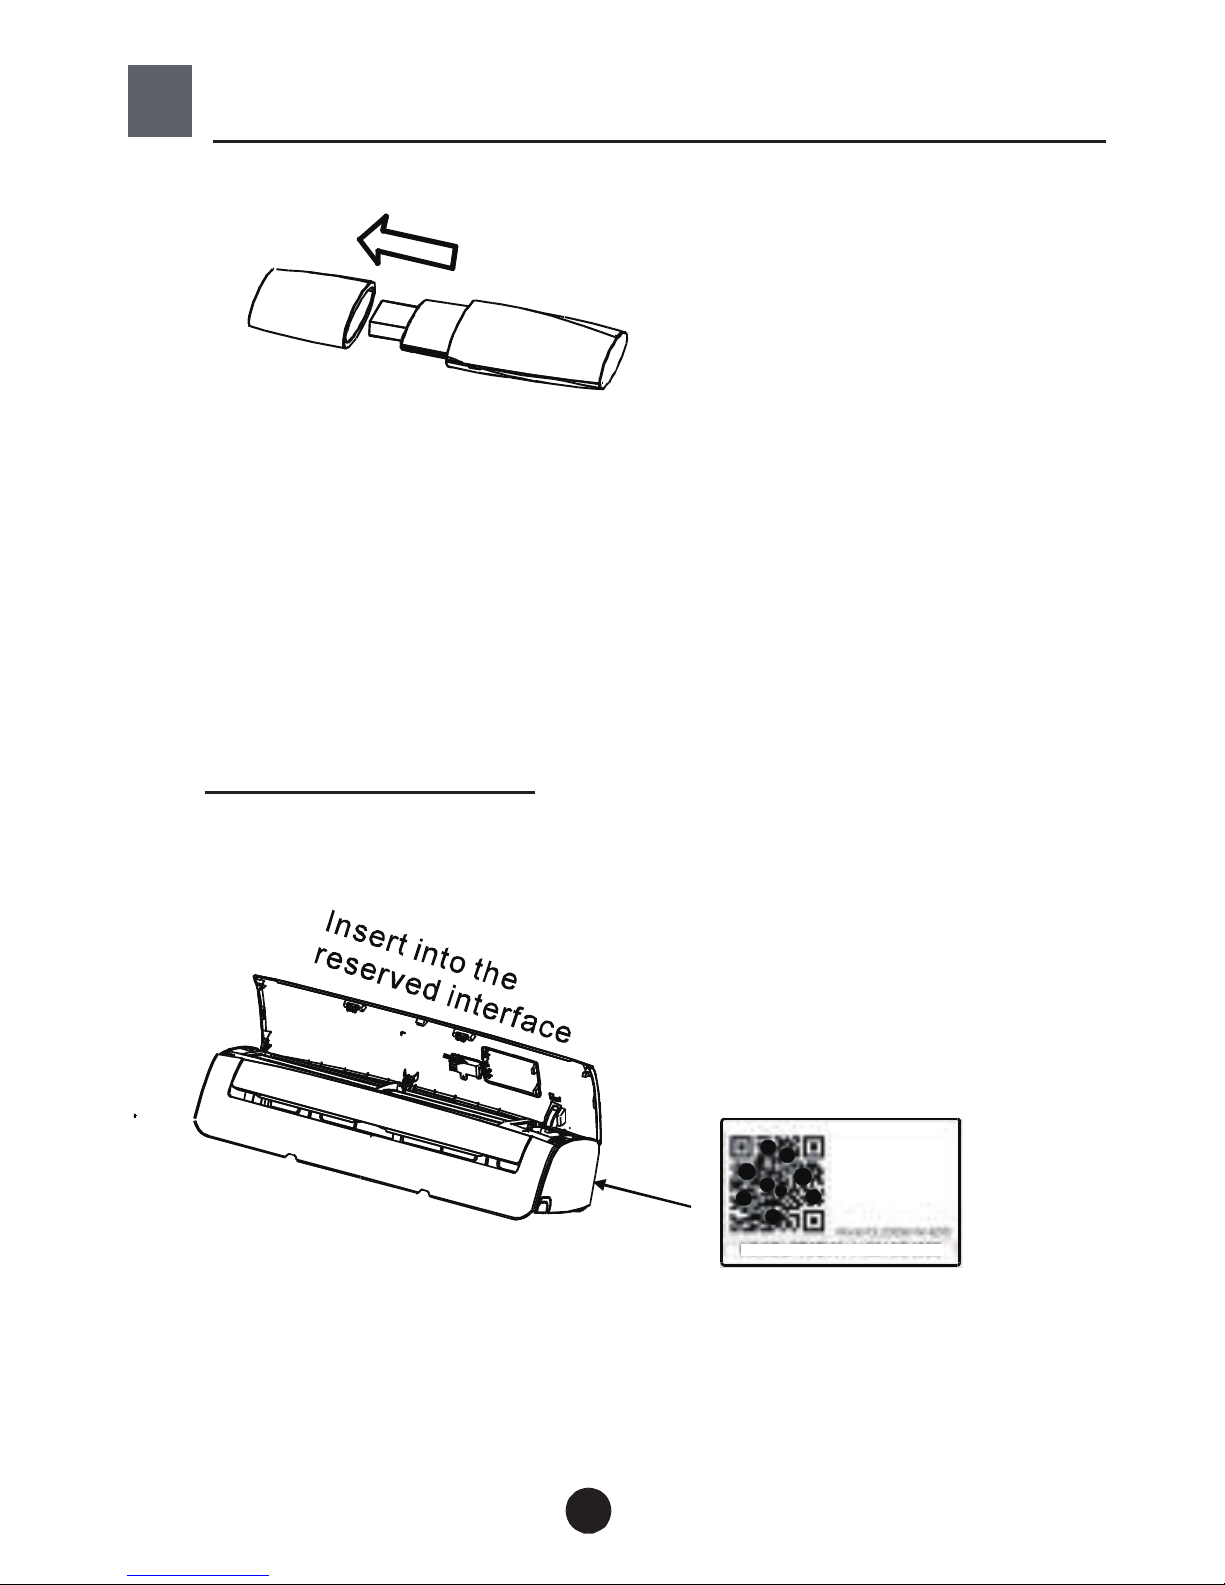
INSTALL THE SMART KIT(wireless module)
1) Remove the protective cap of the smart kit.
2) Open the front panel and insert the smart kit
into the reserved interface.
3) Attach the QR code packed with SMART KIT
to the side panel of the machine or other
convenient location, ensure it is covenience to
be scanned by the mobile phone.
Kindly reminder: It is better to reserve the other
two QR Code in a safe place or take a picture
and save it in your own phone.
WARNING: This interface is only compatible with
SMART KIT(Wireless module) provided by the
manufacturer.
Page 5
4
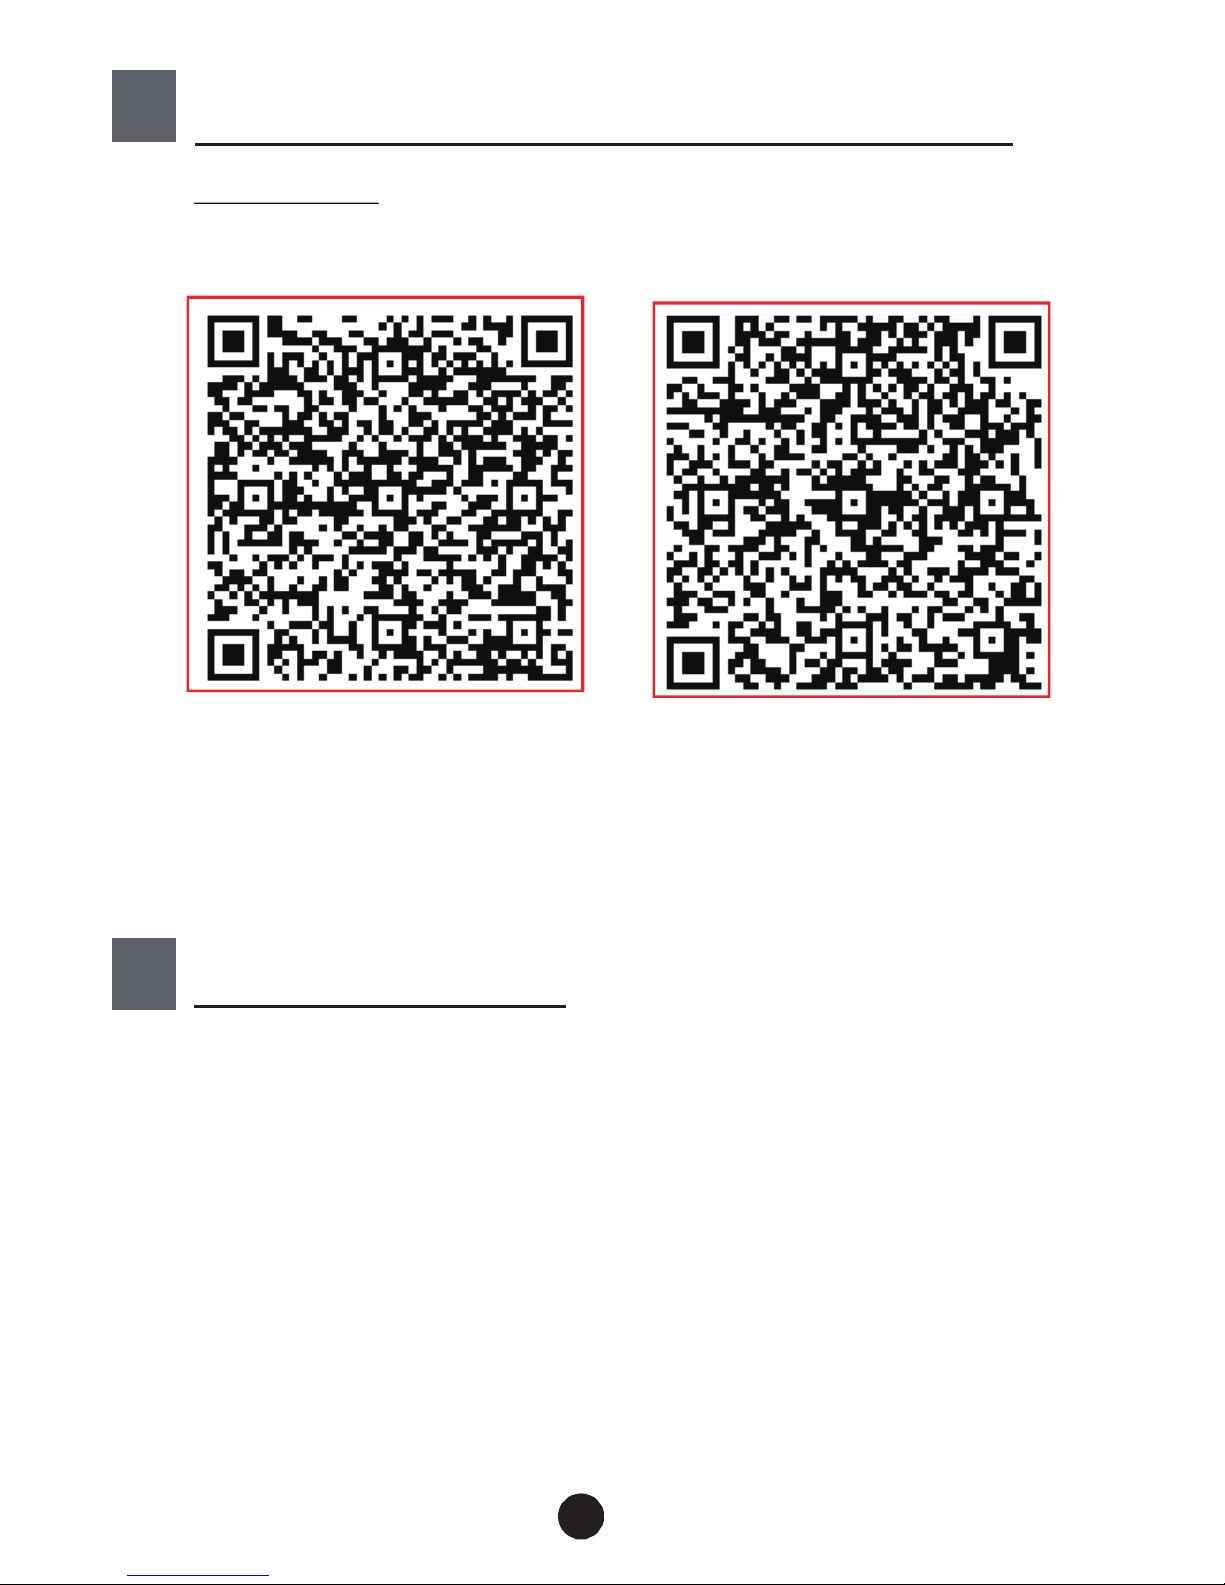
Scan QR c ode to do wnload the “ Midea Air ” APP
or ge t it fro m G oogle play and app store by manuall y
searc hing.
CAUTION: The following QR Code is only available
for downloading APP. It is totally differ ent with
the QR code packed with SMART KIT.
1) Please en sure your mobile dev ice is conn ected
to Wif i router. Also, the Wifi router has already
conne cte d to Internet before doin g us er
registration and network config ura tion.
2) Mak sure your mobile device h as already been
connected to the wifi network which you want to
use. Also, you need to forget other irrelevant wifi
network in case it influences y our configuration
process.
3
DOWNLOAD AND INSTALL APP
4
PREPARATION
Android
iOS
Page 6
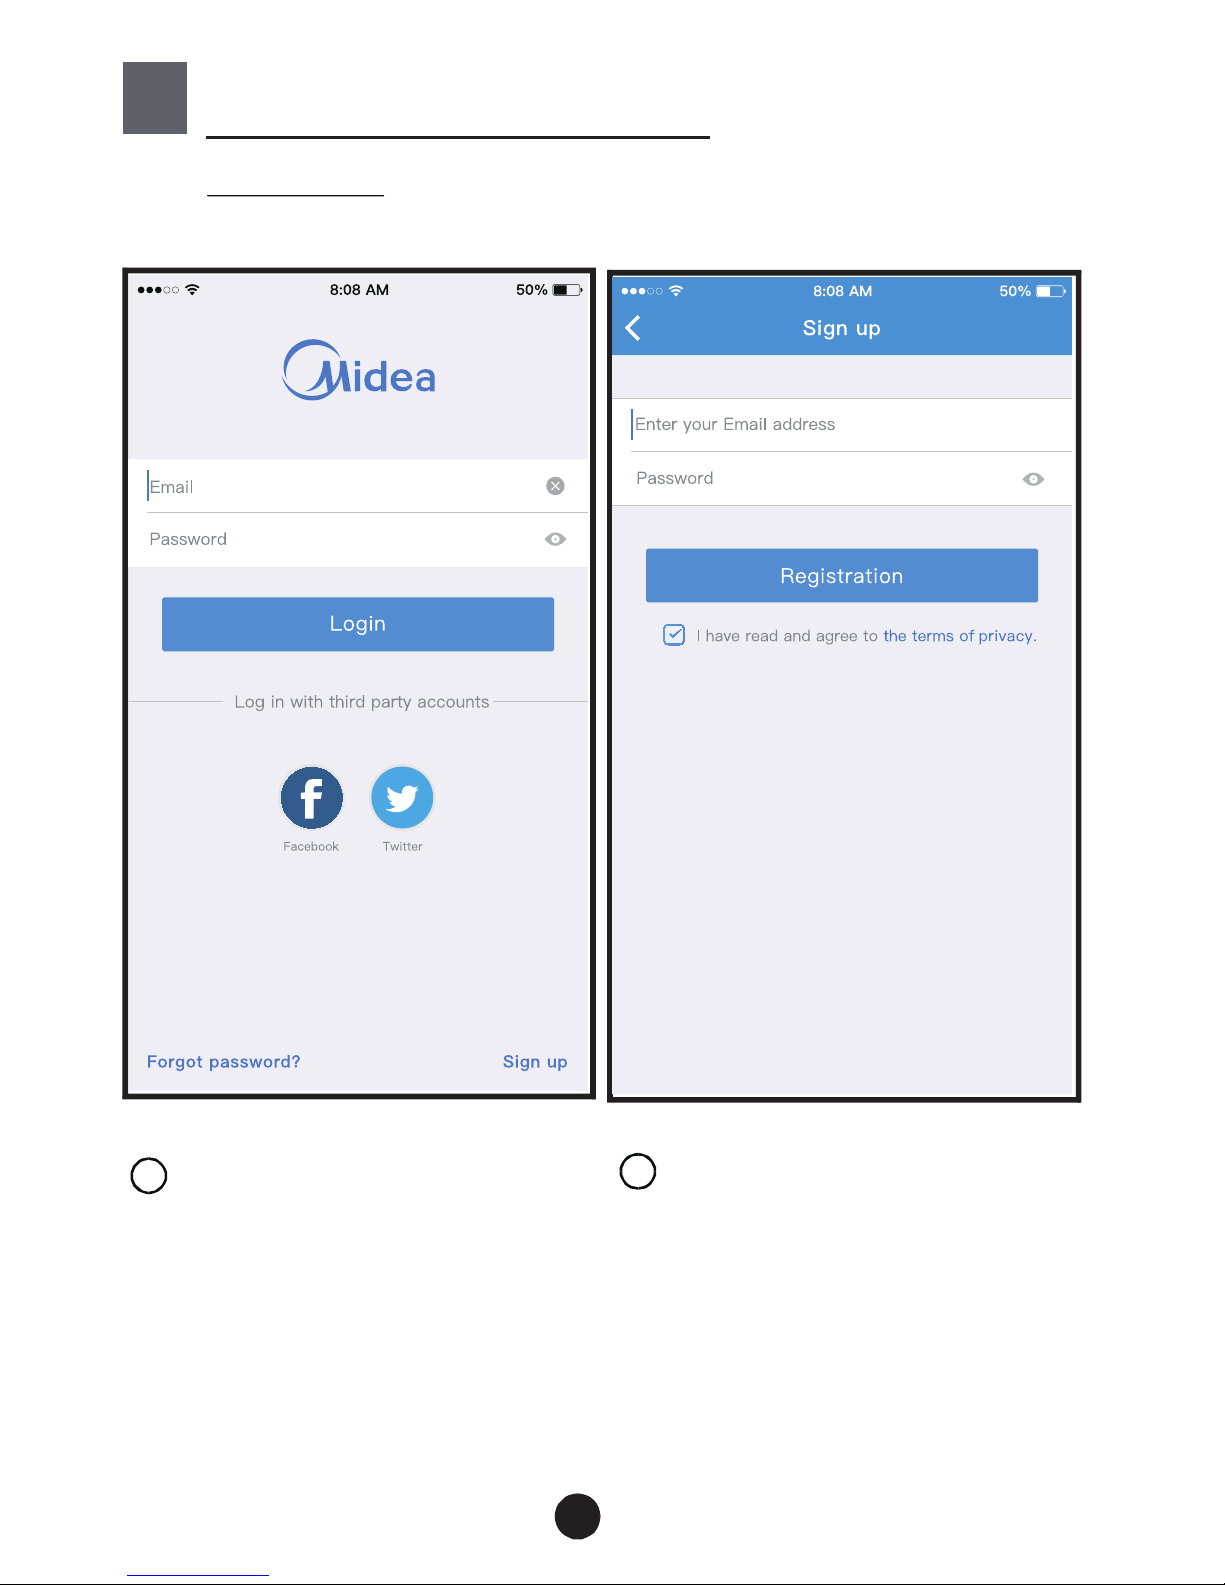
5
1
2
Click "Login "
Enter your email address
an d password, and then
cl ick " "Registration
VI 5
Creat Acc
Fo
rgot password ?
5
CREATE ACCOUNT
Reminder: When you register to use app, you
need read and agree the Data Privacy Notice.
Page 7
6
6
NETWORK CONFIGURATION
Cautions
Kindly reminder:
Using Android device to do network configuration
It is necessary to forget any other around network and
make sure the Android or i OS device just connect to
the Wi-Fi network you want to configure.
Make sure the Android or i OS device Wi-Fi function
works well and can be connected back to your original
Wi-Fi network automatically.
connect to the Wi-Fi network which you want to use.
Also, you need to forget other irrelevant Wi-Fi network
in case it influences your configuration process.
press the “ LED DISPLAY” or “DO NOT DISTURB”
button seven times in 10 seconds.
User must finish all the steps in 8 minutes after powering on
AC, otherwise you need to power on it again.
1
2
2
3
4
Make sure your mobile device has already been
D
isconnect the power supply of AC.
Connect the power supply of AC, and continuously
When the AC displays AP , it means that the AC Wi-Fi
has already entered into AP Mode.
'
'
'
'
Some type of AC do not need the step to be in AP
mode
Page 8
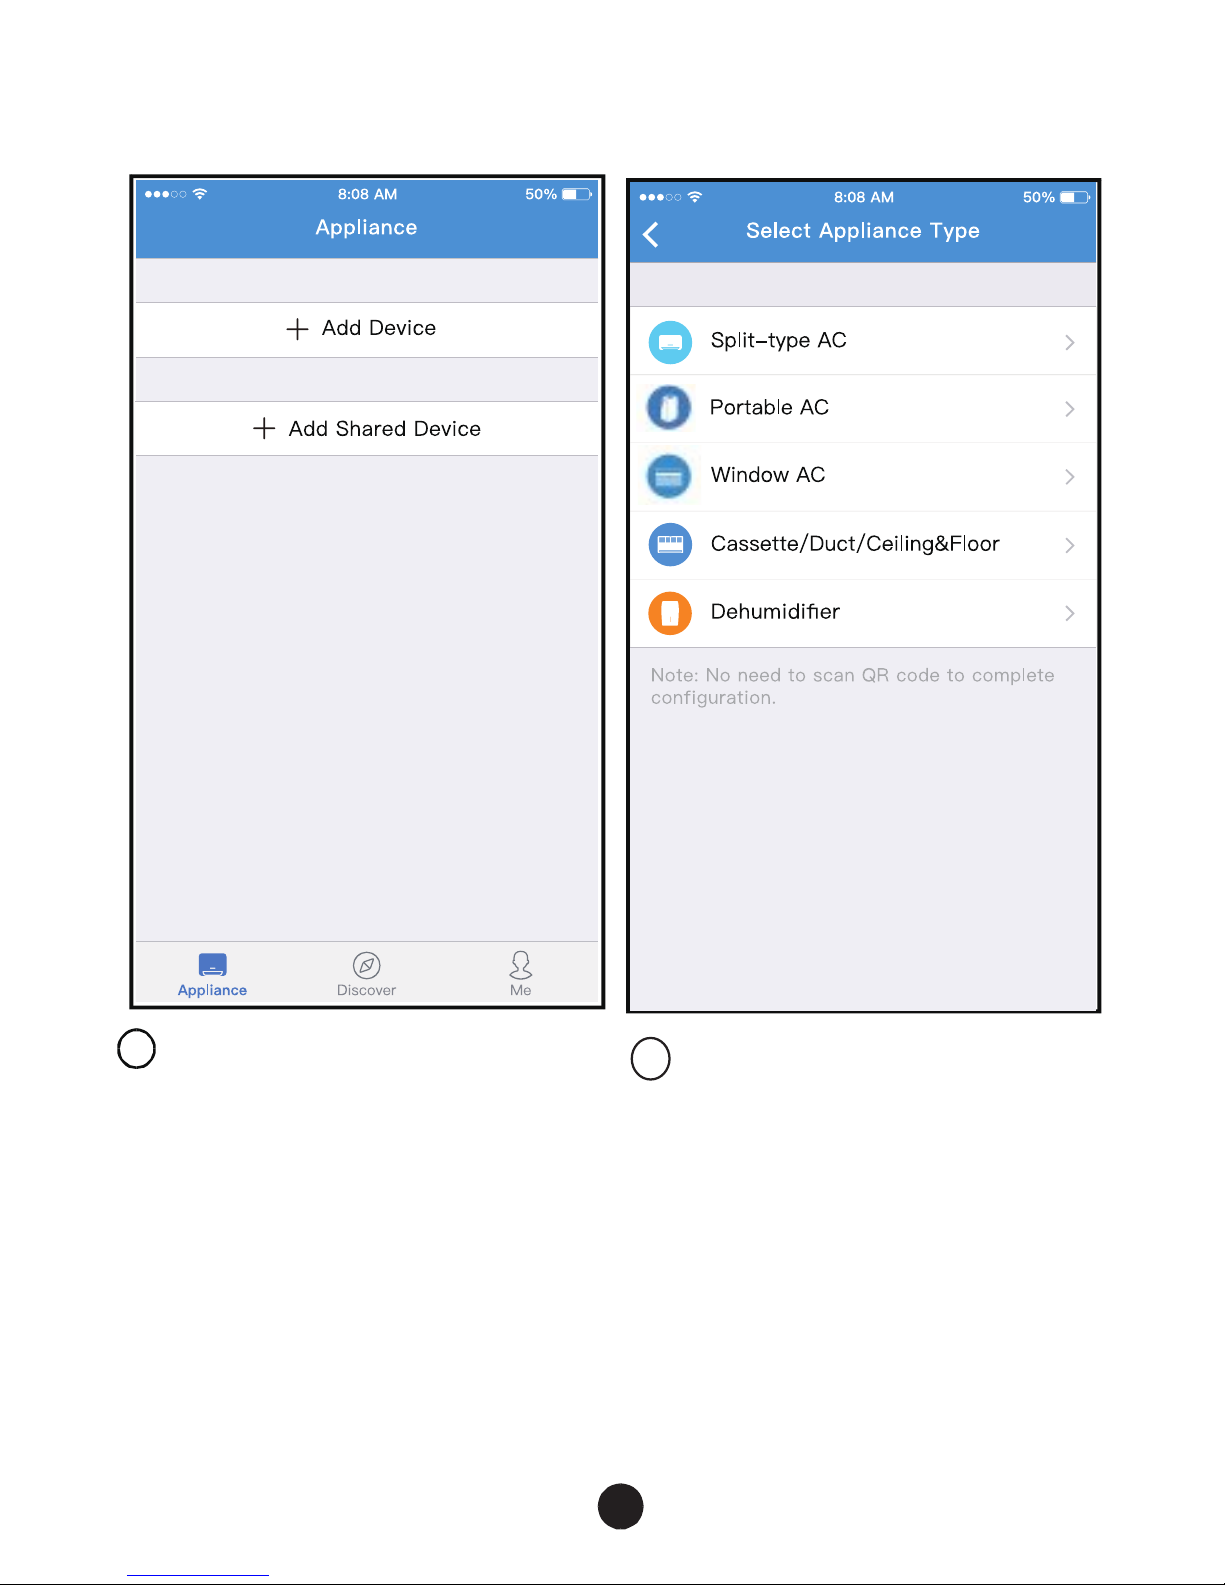
7
5
Press “ + Add Device ”
6
Select appliance type
Page 9
8
7
Follow the above steps to enter “AP” mode.
Page 10
9
8
Choose the network
configuration method.
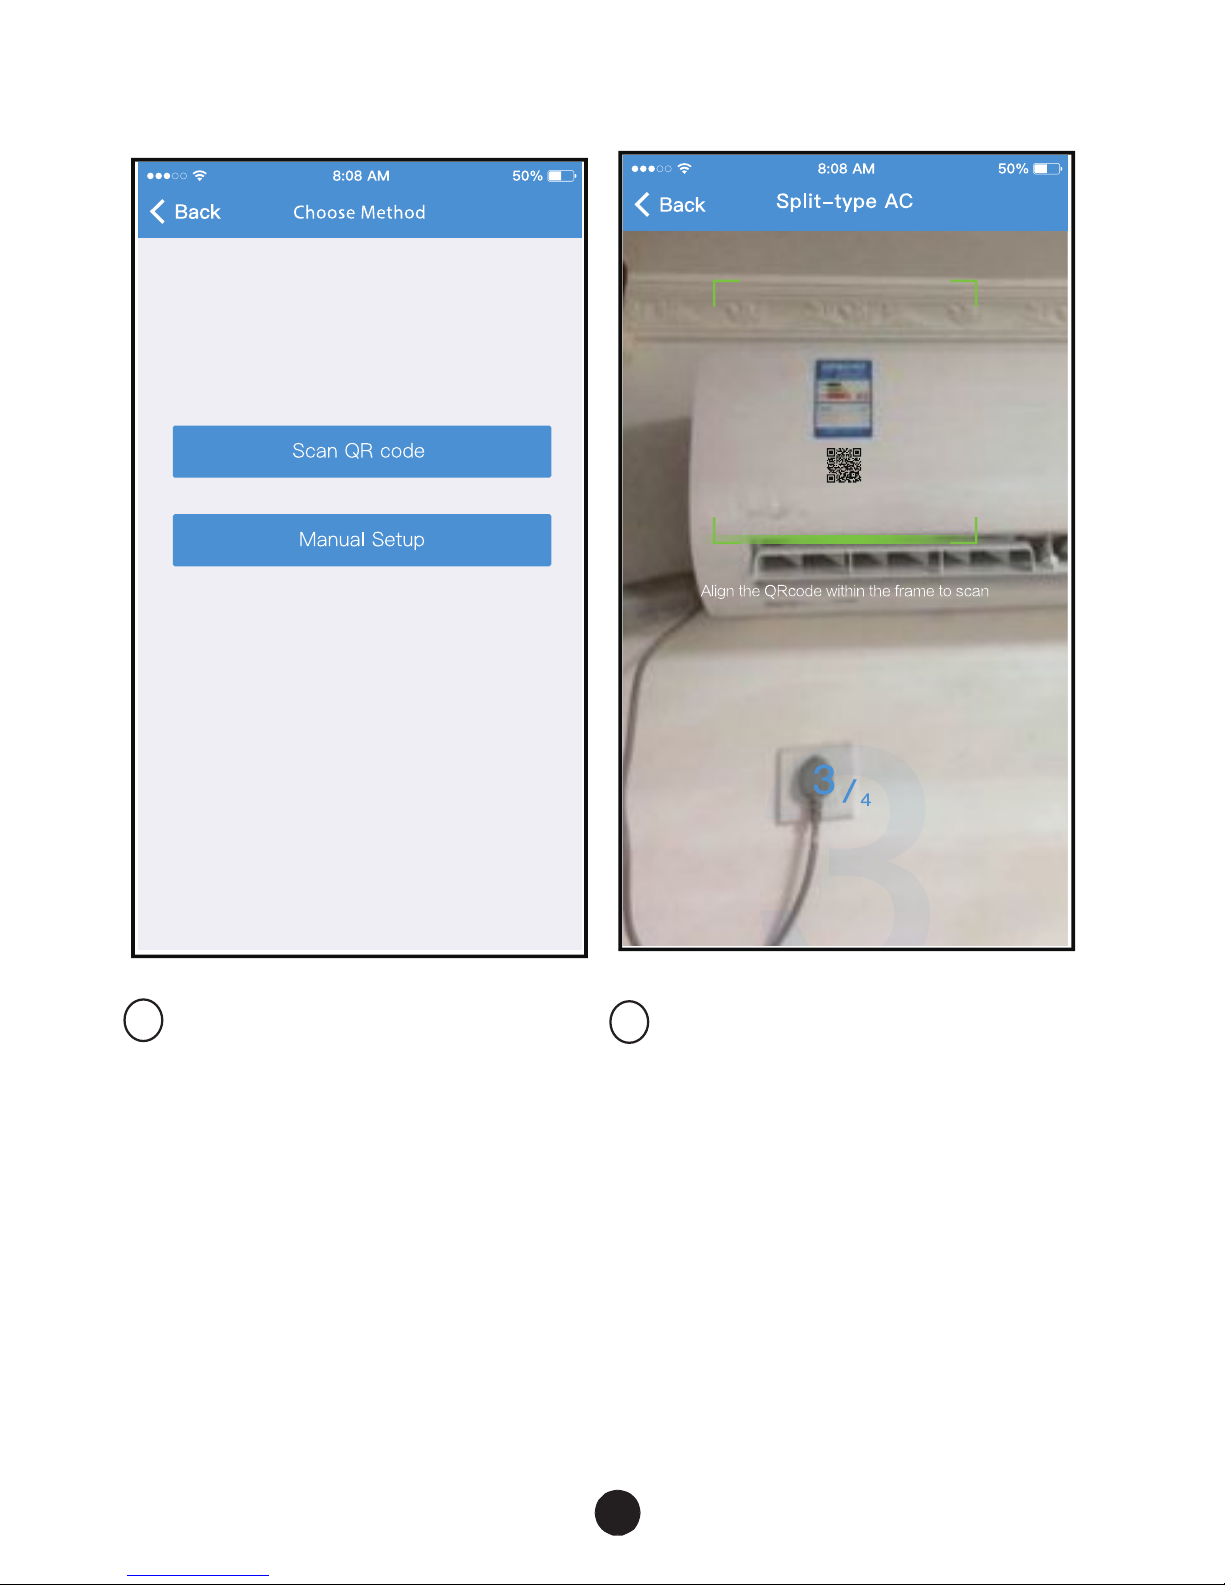
9
Choose the “Scan the
QR code” method.
Page 11

10
9
Or choose the “Manual
Setup” method.
Please enter password
10
Page 12

11
12
Network configuration is
successful
11
Configuration Success,
you can see the device
on the list.
Page 13

12
Using iOS device to do network configuration
5
Press “ + Add Device ”
6
Select appliance type
1
2
3
4
Make sure your mobile device has already been
connected to the Wi-Fi network which you want to
use. Also, you need to forget other irrelevant Wi-Fi
network in case it influences your configuration process.
Disconnect the power supply of AC(some units).
Connect the power supply of AC, and continuously
press the “LED DISPLAY” button or “DO NOT
DISTURB” button seven times in 10 seconds.
When the AC displays “AP” , it means that the AC
Wi-Fi has already entered into “AP” Mode.
Page 14

13
o
7
Follow the above steps to enter “AP” mode.
Page 15

14
o
8
Connect to the Wi-Fi
network.
Please enter password
9
Page 16

15
11
Network configuration is
successful
10
Configuration Success,
you can see the device
on the list.
Page 17

16
NOTE:
When finishing network configuration, APP will
display success cue words on the screen.
Due to different internet environment, it is possible
that the device status still display “offline” . If this
situation occurs, it is necessary to pull and refresh
the device list on the APP and make sure the device
status become “online” . Alternatively, user can
turn off the AC power and turn on it again, the device
status will become “online” after few minutes.
Page 18

17
7 HOW TO USE APP
1
Click "Login "
SIM
!
082
cc
2
Choose the air conditioner.
Please ensure both your mobile device and air
conditioner are connected to the Internet before
using app to control the air conditioner via internet,
please follow the next steps:
Page 19

18
3
Thus, user can control air conditioners on/off status,
operation mode, temperature, fan speed and so on.
Page 20

19
NOTE:
Not all the function of the APP is available on air
conditioner. For example: ECO, Turbo, Swing function,
please check the user manual to find more information.
Page 21

20
Includin g: Timer on, Timer off, Sleep curve, Check,
Energy M onitor, Bill Contro l Check.
No all the unit can use these special function on
the APP. Thus, if the air conditioner do not support
the abov e func tion, the function will be hided from
the function list.
NOTE:
8 SPECIAL FUNCTIONS
Page 22

21
Weekly, user can make an appointment to turn on or
off AC on speci fic time. User also can ch oose
circulation to keep the AC under schedule control
every week.
Timer o n/ Timer off
Page 23

22
Sleep
User can cust omize their own comfortable sleep
by setting targ et tem perature.
Page 24

23
Check
User can simp ly check the AC run ning status with
this func tion. When finishing this procedure, it can
display the normal items, abnormal items, and
detail information.
Page 25

24
Energy Monitor
User can simply monitor the el ectrici ty consumption
of AC unit by checking the chart and history record.
Page 26

25
Bill Control
User can set parameters to limit the electricity
consumption over a period of time.
Page 27

26
Share Device
The air conditioner can be controlled by multi-users
at the same time by Share Device function.
1
Click ""Share device
2
Let the others to scan the
displayed QR code.
Page 28

27
3
Add the shared device.
Page 29

28
Applicable system: IOS, Android.
APP can not support the latest software version of
Android and IOS system.
Due to special situation may be occurred, we explicitly
claims below: Not all of the Android and IOS system
are compatible with APP. We will not be responsible
for any issue as a result of the incompatibility.
W
Cautions
ireless safety strategy
Smart kit only support WPA-PSK/WPA2-PSK
encryption and none encryption .
WPA-PSK/WPA2-PSK encryption is recommended.
Please Check T he Service Website For More Information.
Due to different network situati on, co ntrol process
may return time-out sometimes. If this situation
occurs , the display between board an d App may not
be the same , please do not feel confused.
Smart Phone camera needs to be 5 million pixels or
above to ma ke sur e scan QR code we ll.
Due to differe
nt network situation, sometimes,
request time-out could happen, thus, it is necessa ry
to do network configuration again.
The APP system is subject to update without prior notice for
product function improvement. The actual network configuration
process may be slightly different from the manual, the actual
process shall prevail.
9
APP DECLARATION
Page 30

29
Declaration of conformity
This d evice co mplies with Pa rt 1 5 o f the F CC R ules and
In dustry Can ada's lice nce-exemp t RSSs.
Operat ion is sub ject to the f ollow in g two con d ition s:
(1) T his d evice may not cause int er feren ce; a nd
(2) T his d evice must accep t a ny in terfe re nce , including
inte rf er ence tha t may ca use und esire d op erat ion of
the de vice .
Only operate the device in accordance with the instructions
supplied.
Changes or modifications to this unit not expressly
approved by the party responsible for compliance could
void the user's authority to operate the equipment.
This device complies with FCC radiation exposure limits
set forth for an uncontrolled environment. In order to avoid
the possibility of exceeding the FCC radio frequency
exposure limits, human proximity to the antenna shall not
be less than 20cm (8 inches) during normal operation.
NOTE: This equipment has been tested and found to
comply with the limits for a Class B digital device,
pursuant to part 15 of the FCC Rules. These limits are
designed to provide reasonable protection against
harmful interference in a residential installation. This
equipment generates, uses and can radiate radio
frequency energy and, if not installed and used in
accordance with the instructions, may cause harmful
interference to radio communications. However, there
is no guarantee that interference will not occur in a
IC : 1 257 5A-MD NA 19
FC C ID: 2 ADQOMD NA19
Page 31

30
Hereby, we declare that this AC is in compliance with the
essential requirements and other relevant provisions of
RE Directive 2014/53/EU. A copy of the full DoC is attached.
particular installation. If this equipment does cause
harmful interference to radio or television reception,
which can be determined by turning the equipment off
and on, the user is encouraged to try to correct the
interference by one or more of the following measures:
--Reorient or relocate the receiving antenna.
--Increase the separation between the equipment
and receiver.
--Connect the equipment into an outlet on a circuit
different from that to which the receiver is connected.
--Consult the dealer or an experienced radio/TV
technician for help.
Page 32

CS373U-APP(US-SK103)-B
Manufacturer:
GD Midea Air-Conditioning Equipment Co,.Ltd.
Lingang Road Beijiao Shunde Foshan
Guangdong People’s Republic of China 528311
Page 33

技术要求:
铜版纸100克,
74mm*105mm
彩色印刷
 Loading...