

Page 1
PROFESSIONAL BLENDER
USER MANUAL
BL1192B
CONTENT
IMPORTANT SAFETY INSTRUCTIONS.
PART NAME
TECHNICAL DATA OF THE PRODUCT
INSTRUCTIONS FOR USE
RECIPES
ABNORMALITY ANALYSIS AND HANDLING
CLEANING AND MAINTENANCE
CIRCUIT PRINCIPLE DIAGRAM
IMPORTANT NOTE: Please read the manual carefully before operating your
product. Retain it for future reference.
1
3
3
4
6
7
8
9
Page 2

IMPORTANT SAFETY INSTRUCTIONS
To avoid the risk of serious injury when using your blender, basic
safety precautions should be followed, including the following.
READ ALL INSTRUCTIONS, SAFEGUARDS, AND WARNINGS
BEFORE OPERATING BLENDER
1.
There is a potential injury from misuse. Please handle it with care.
Always disconnect the appliance from the supply if it is left unattended
2.
and before assembling, disassembling or cleaning.
This appliance shall not be used by children. Keep the appliance and its
3.
cord out of children reach.
Appliances can be used by persons with reduced physical, sensory or
4.
mental capabilities or lack of experience and knowledge if they have
been given supervision or instruction concerning use of the appliance in
a safe way and if they understand the hazards involved.
5.
Children shall not play with the appliance.
Be careful when handing the sharp cutting blades, emptying the bowl
6.
and during cleaning.
Be careful if hot liquid is poured into blender as it can be ejected out of
7.
the appliance due to a sudden steaming.
8.
Switch off the appliance and disconnect from supply before changing
accessories or approaching parts that move in use.
9.
This appliance is intended to be used in household and similar
applications such as:
– Staff kitchen areas in shops, offices and other working environments;
– Farm houses;
– By clients in hotels, motels and other residential type environments;
– Bed and breakfast type environments .
If the supply cord is damaged. it must be replaced by the manufacturer.
10.
1
Page 3

IMPORTANT SAFETY INSTRUCTIONS
its service agent or similarly qualified persons in order to avoid a hazard.
This appliance conforms to EC Regulation 1935/2004 on materials and
articles intended to come into contact with food.
SAVE THESE INSTRUCTION.
THIS UNIT IS INTENDED FOR HOUSEHOLD USE ONLY.
Caution:
Ensure that the blender is switched off before removing
Caution:
The failure to follow any of the important safeguards and the important
instructions for safe use is a misuse of your professional blender that can
void your warranty and create the risk of serious injury.
Safety system
This appliance is equipped with motor themal protector. If the
appliance overheats, it switches off automatically. Unplug the
appliance and let it cool down until room temperature then put the
mains plug back into the power outlet and switch on the appliance
again. Please contact your dealer or an authorized service center if it
is activated too often.
2
Page 4
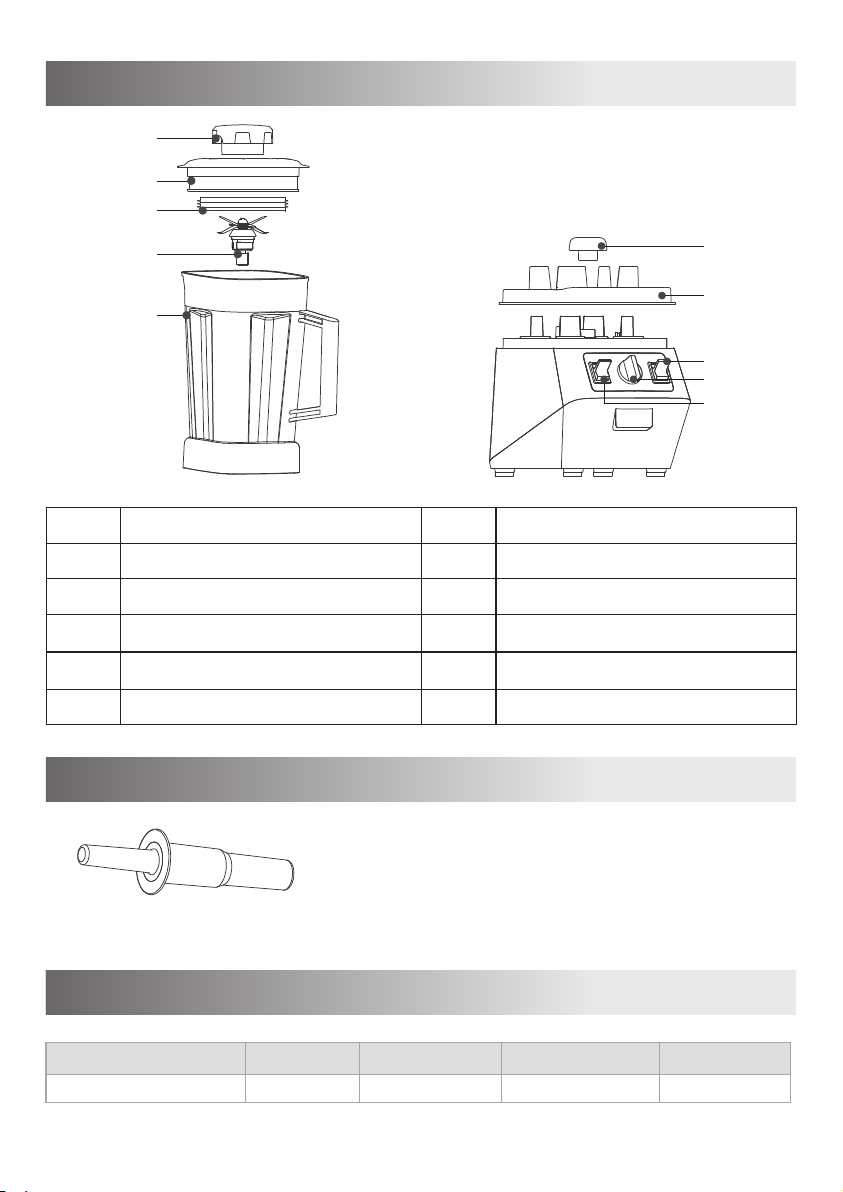
PART NAME
1
2
3
4
5
6
7
8
9
10
No.
Description
Measuring cup
1
Jar lid
2
Jar seal
3
4
Blade asm
5
Jar(2.0L)
No.
Description
Drive clutch
6
Top housing pad
7
8
ON / OFF
9
Rotary knob
10
Pulse switch
Accessories (optional)
Tamper
TECHNICAL DATA OF THE PRODUCT
Product name Model No. Rated voltage Rated frequency Rated power
PROFESSIONAL BLENDER
BL1192B 220-240V~ 50-60Hz 2200W
3
Page 5

INSTRUCTIONS FOR USE
Professional blender
1 2 3
4 5 6
Tamper (optional)
Warning:
Rotating Blades Can Cause Severe Injury.
DO NOT put hands, spatulas, etc. in the container while the machine is running or while
the container is still on the base.
Lids and tampers are not interchangeable between different container styles, types,
and sizes. Use the tamper that was supplied with your machine.
Important
The splash disk (near the top of the tamper) and lid prevent the tamper from
hitting the blades when the lid is secured properly in the position.
The container should not be more than two-thirds full when the tamper is used
during blending.
To avoid overheating during blending, Do not use the tamper for more than 30
consecutive seconds.
If the food does not circulate, the machine may have trapped an air bubble.
Carefully remove the measuring cup while making sure the lid stays firmly in
place. Release the air bubble by inserting the tamper through the lid plug
opening.
Holding the tamper straight down may not help the ingredients circulate. If
necessary, point the tamper toward the sides or corners of the container. Do not
try to force the tamper deeper into the container.
4
Page 6

INSTRUCTIONS FOR USE
Control panel
Sto p
Lo we rIce cru sh
Smoot hie
Dessert
1.
On/Off Switch: The On/Off (or Power) Switch is on the right-hand side of the
Midd le
Hig h
ON
OFF
machine base, it controls the power to the machine. Before moving the On/Off
Switch to the “On” position, make sure the Rotary knob Switch is in the “Stop”
position. Move the On/Off Switch to the “Off” position whenever the machine will
be left unattended.
2.
Rotary knob: The Variable Speed Dial selects blade rotation speeds from low to
high. Always begin the blending process with the Rotary knob set to low. Make
sure that the On/Off Switch is in the “On” position. and rotate the Rotary knob to
the desired speed setting. To stop the machine, rotate the Rotary knob to “Stop”.
Or move the On/Off switch back to “OFF” position.
3.
Pulse Switch: Pressing down on the Pulse Switch to “PULSE” will cause the
machine to blend at the speed setting when Rotary knob at any speed setting.
Caution:
Measuring cup:
Insert through the lid and secure by turning clockwise. Remove the measuring cup to
add ingredients.
Caution:
• Rotating Blades Can Cause Severe Injury.
• DO NOT reach into container while machine is running.
Blade Container:
Designed for processing liquids, including juice, frozen mixtures, sauces,
soups, purées, batters, and for wet chopping.
5
Page 7

RECIPES
Item
Function
Food
1
2
3
4
5
6
7
Lower
Middle
High
Ice crush
Smoothie
Dessert
Pulse
Raw nuts
Raw soup
Carrot juice
Ice cube
Strawberry
smoothie
Coconut
mango
gelato
Biscuits/
cookies
Operating instructions:
Preparation & Usage
To make nut meal.
Use in cakes, biscuits
and muffins.
Use for soup
Use for beverage
Use for cooling
Use for milk shake
Use for dessert
Break biscuits/cookies
in half. Blend to form
crumbs.
Use for cheesecake crusts.
Quantity
150g-300g, 1-2cups
400g potatoes,400g carrots,
400g onions, 800g water
Carrot 800g, water 1200g
8-12 pieces
125g frozen strawberry,
hulled and cut in half +
250g chilled milk
600g chilled mango pieces
not exceed 15 mm; 1 lime,
peeled, deseeded halved;
1/2 cup (125ml) chilled coconut
milk, 1/2 cup (150g) sweetened
condensed milk
250g 3-8 pulses
Time
5-15 seconds
90 seconds
2 mins
5-10 pulses
1 mins
1 mins
Caution:
Never Start on Speeds at high with Hot Liquids to Avoid Possible Burns. Use Caution;
escaping steam or splashes may scald.
Place the lid in jar completely. This will prevent expansion from affecting the position of
the lid when the machine is turned on.
Start from low speed, slowly increase to high.
Due to the machine speed, processing times are much quicker than standard
1.
appliances. Unless you are accustomed to the machine, count your time carefully
to avoid over-processing.
2.
After turning the machine off, wait until the blades stop completely before removing the lid or container from the motor base.
6
Page 8

ABNORMALITY ANALYSIS AND HANDLING
Abnormality Handling
1. In case of abnormalities such as abnormal noises, smell, smoke, etc., you
should immediately cut off power and stop use.
2. If the product cannot work, please check if the power supply is connected, if
the switch is put to the ON position and if fittings are installed in place.
3. If the product still cannot work after checks mentioned above, please consult
the designated repair centre for maintenance.
Fault Analysis and Elimination
Symptom
Product does
not work
Mixing sword
master
The abnormal
odor products,
hot, the
phenomenon
such as
smoking
Analysis of
Countermeasure
Possible Causes
Did not press the inching
switch
This appliance is equipped
with motor themal protector.
If the appliance overheats,
it switches off automatically.
Excessive amount of food
processing
Ingredients stick to blade Cut off the power supply, clean up the blade
Excessive amount of
food processing
Product continuous
working time is too long
Processing the
ingredients of
temperature is too high
Keep the point switch in the pressed state
Unplug the appliance and let it cool down until
room temperature then put the mains plug
back into the power outlet and switch on the a
ppliance again.
Reduce the quantity of ingredients
on the ingredients
Reduce the quantity of ingredients
Shorten the product continuous working time
The temperature of the ingredients do not
exceed 60 ˚C
7
Page 9

CLEANING AND MAINTENANCE
Container
To prepare your new machine for initial use, the follow steps is under Normal
Cleaning.
Normal Cleaning:
1.
Fill up container with half full warm water and add a couple of drops liquid dish
washing detergent to the container.
Push the lid completely.
2.
Turn machine at "ON" position, start from low, and inerease the speed to high
3.
slowly.
4.
Run the machine on High speed for 30 to 60 seconds.
5.
Turn off the machine, rinse and drain the container.
To Sanitize:
1.
Follow Normal Cleaning instructions above.
2.
Fill up container with half full water and adding 1 1/2 teaspoons of bleach agent.
3.
Push the lid completely in jar.
Turn machine at "ON" position, start from low, and inerease the speed to high
4.
slowly.
5.
Run the machine on High speed for 30 to 60 seconds.
Turn off the machine, and allow mixture to stand in the container for an additional
6.
1 1/2 minutes.
7.
Pour bleach mixture out. Allow container to air dry.
Do not rinse after sanitizing.
8.
Lid, Measuring Cup
Separate the lid and measuring cup. Wash the parts in warm soapy water. Rinse
clean under tap water, and dry. Reassemble before use.
Motor Base
1. Unplug the power cord.
Warning:
• Electrical Shock Hazard.
• Disconnect power before cleaning machine.
• Failure to follow instructions can cause death or electrical shock.
8
Page 10

CLEANING AND MAINTENANCE
Wash the outside surface with a damp soft cloth or sponge, which has been
2.
rinsed in a mild solution of liquid detergent and warm water. Do not place themotor base in water.
The centering pad can be removed for more thorough cleaning.
3.
4.
Thoroughly clean the switches so they work freely. They may become sticky from
use. Use a moistened cotton swab to clean machine. Immediately dry any
excess water.
5.
Polish with a soft cloth.
CIRCUIT PRINCIPLE DIAGRAM
AC
Motor
Interlock
Switch
L
N
L
Power
supply
N
E
Power PCB
Environmental protection
The appliance must not be disposed of with regular household waste.
At the end of its service life, the appliance must be properly delivered
to a collection point for the recycling of electrical and electronic
equipment. By Collection By Collection and recycling of old appliances,
you are making an important contribution to the conservation of our
natural resources and provide for environmentally sound and healthy
disposal.
ON/OFF
Switch
Control PCB
Pulse
Switch
Connect wire
9
Page 11

1
2
4
6
5
重点
校对项
1.结构尺寸
2.材质标注
3.物料编码
A
项目
库
文件名
3
A
4.颜色标注
5.客户型号
6.电压功率
7.认证信息
8.条码数字
9.产品名称
B
B
尺寸:148X210mm
C
页码:10页
C
材质 : 80G 书纸
印刷颜色:单色印刷(黑色)
D
D
印刷版面:双面印刷
装钉:骑马钉
E
警告语:首字母字体高度3.03(12pt)
F
E
F
G
处数 更改 文 件 号 签 字 日 期
标记
H
制 图
设 计
校 对
会 签
罗海燕
-- - - -
-- - - -
-- - - -
认 证
标准 化
审 定
日 期
符官文
古广 君
苏德松
2018-5-11
Midea-BL1192B(BL1192B)-0501 南非
BL1192
说明书
K
1 1
G
材质:80G 书纸
H
1:1
主力智业(深圳)电器实业有限公司
 Loading...