

Page 1
Tumble Dryer Machine
Service Manual
MDA60-V012/A0303-GB18
Page 2

6.FAULT ALARM DISPLAY...........
8.DRYER EXPLODED FIGURE
5.1 Ordinary Information
5.2 The disassembly methods of Struts
5.3 Notice
4.6 Switch on the power source, press the “start/pause” button,
4.7 The dryer is running, open the door but the dryer still running
4.8 When the dryer is running, the air volume of outlet was little
4.9 The dryer keep running a long time while drying fewer clothes
4.10 The drum of the dryer cannot rotate efficiently
4.11 When you find the cabinet have current in the using process
4.12 The key doesn't work under the normal condition
1 ….........................................…………………............
2 OPERATIONAL ………………....................…...........…..........................................................
1.1 Safety Precaution …………………….…………………………………….............................
1.2 Warning ………………….…………………………………………………..........................
……………….……………………….......................
………………………............................................
SAFETY PRECAUTION
.......................
3
5
3
3
6
6
7
7
10
10
10
10
10
10
11
11
12
11
11
11
11
11
12
12
18
- 02 -
TABLE OF CONTENTS
……………………………………........
6
…………………………………………………………………………....................
8
9
19
21
3.SCHEDULE OF FAILURE AND MAINTAIN TREE
3.1 The Control panel not displayed after selecting the program
3.2 The drum not worked after selecting the program
3.3
Maintenance non-heating malfunction
3.4 Drum worked ,but the effect of drying is not good
3.5 Noise
3.6 Peculiar smell appears when the dryer is working
……………………………....................
...........……………….………………………......................
…………………………………….....................
……………………………….
4.PHENOMENON OF THE FAULT
……………….………………………..............................
4.1 The lamp of the control panel is showed ,when you press the power switch
4.2 Press the power switch andthe "start/pause" button, the lamp
is normal but the drum don't turn
4.3 When a long heating and drying, the clothing doesn't to be heated
4.4 Switch on the power source, press the power switch without pressing the”start” button, the dryer start running
4.5 Switch on the power source, the dryer start running
5.DISASSEMBLY INFORMATION FOR THE PRODUCT
……………………………………......................
…………......
………………………………...........
……..
the dryer doesn't work but alarm
.....……............
……………………………….....................
……………………………….....................
……………………………….....................
………………………………......................................
………………………………........................
………………………………......................................
……………………………….
……………………………….................................................................
………………………………....................................................
……………………………….....................................................................................
………………………………............................................
………………………………............................................
7.DRYER CIRCUIT DIAGRAMS
20
………………………………............................................
Page 3

1.SAFETY PRECAUTION
To prevent injury to the user or other people and property damage, the following
.instructions must be followed
Incorrect operation due to ignoring instruction will cause harm or damage.
Before service unit, be sure to read this service manual at first.
Do not use a defective or underrated circuit breaker Use this appliance on a dedicated circuit.
There is risk of fire or electric shock.
For electrical work, contact the dealer, seller, a qualified electrician, or an Authorized
.service center
Do not disassemble or repair the product, there is risk of fire or electric shock.
Always ground the product.
There is risk of fire or electric shock.
Install the panel and the cover of control box securely.
There is risk of fire of electric shock.
Always install a dedicated circuit and breaker.
Improper wiring or installation may cause fore or electric shock.
Use the correctly rated breaker of fuse.
There is risk of fire or electric shock.
Do not modify or extend the power cable.
There is risk of fire or electric shock.
Do not install, remove, or reinstall the unit by yourself (customer).
There is risk of fire, electric shock, explosion, or injury.
Be caution when unpacking and installing the product.
Sharp edges could cause injury, be especially careful of the case edges and the fins
on the condenser and evaporator.
For installation, always contact the dealer or an Authorized service center.
There is risk of fire, electric shock, explosion, or injury.
Do not install the product on a defective installation stand.
It may cause injury, accident, or damage to the product.
Be sure the installation area does not deteriorate with age.
If the base collapses, the dryer could fall with it, causing property damage, product
failure, and personal injury.
Take care to ensure that power cable could not be pulled out or damaged during operation.
There is risk of fire or electric shock.
Do not place anything on the power cable.
There is risk of fire or electric shock.
1.1 Safety Precaution
1.2 Warning
- 03 -
Page 4

1.SAFETY PRECAUTION
Do not plug or unplug the power supply plug during operation.
Do not touch (operation) the product with wet hands.
Do not place a heater or other appliance near the power cable.
There is risk of fire and electric shock.
Do not allow water to run into electric parts.
It may cause fire, failure of the product, or electric shock.
Do not store or use flammable gas or combustible near the product.
There is risk of fire or failure of product.
Do not use the product in a tightly closed space for a long time.
Oxygen deficiency could occur.
If strange sounds, or small or smoke comes from product. Turn the breaker off or disconnect
supply cable.the power
There is risk of electric shock or fire.
Stop operation and close the window in storm or hurricane. If possible, remove the product
from the window before the hurricane arrives.
There is risk of property damage, failure of product, or electric shock.
Be caution that water could not enter the product.
There is risk of fire, electric shock, or product damage.
Turn the main power off when cleaning or maintaining the product.
There is risk of electric shock.
When the product is not be used for a long time, disconnect the power supply plug or
turn off the breaker.
There is risk of product damage or failure, or unintended operation.
There is risk of fire or electric shock.
There is risk of fire or electric shock.
- 04 -
Page 5
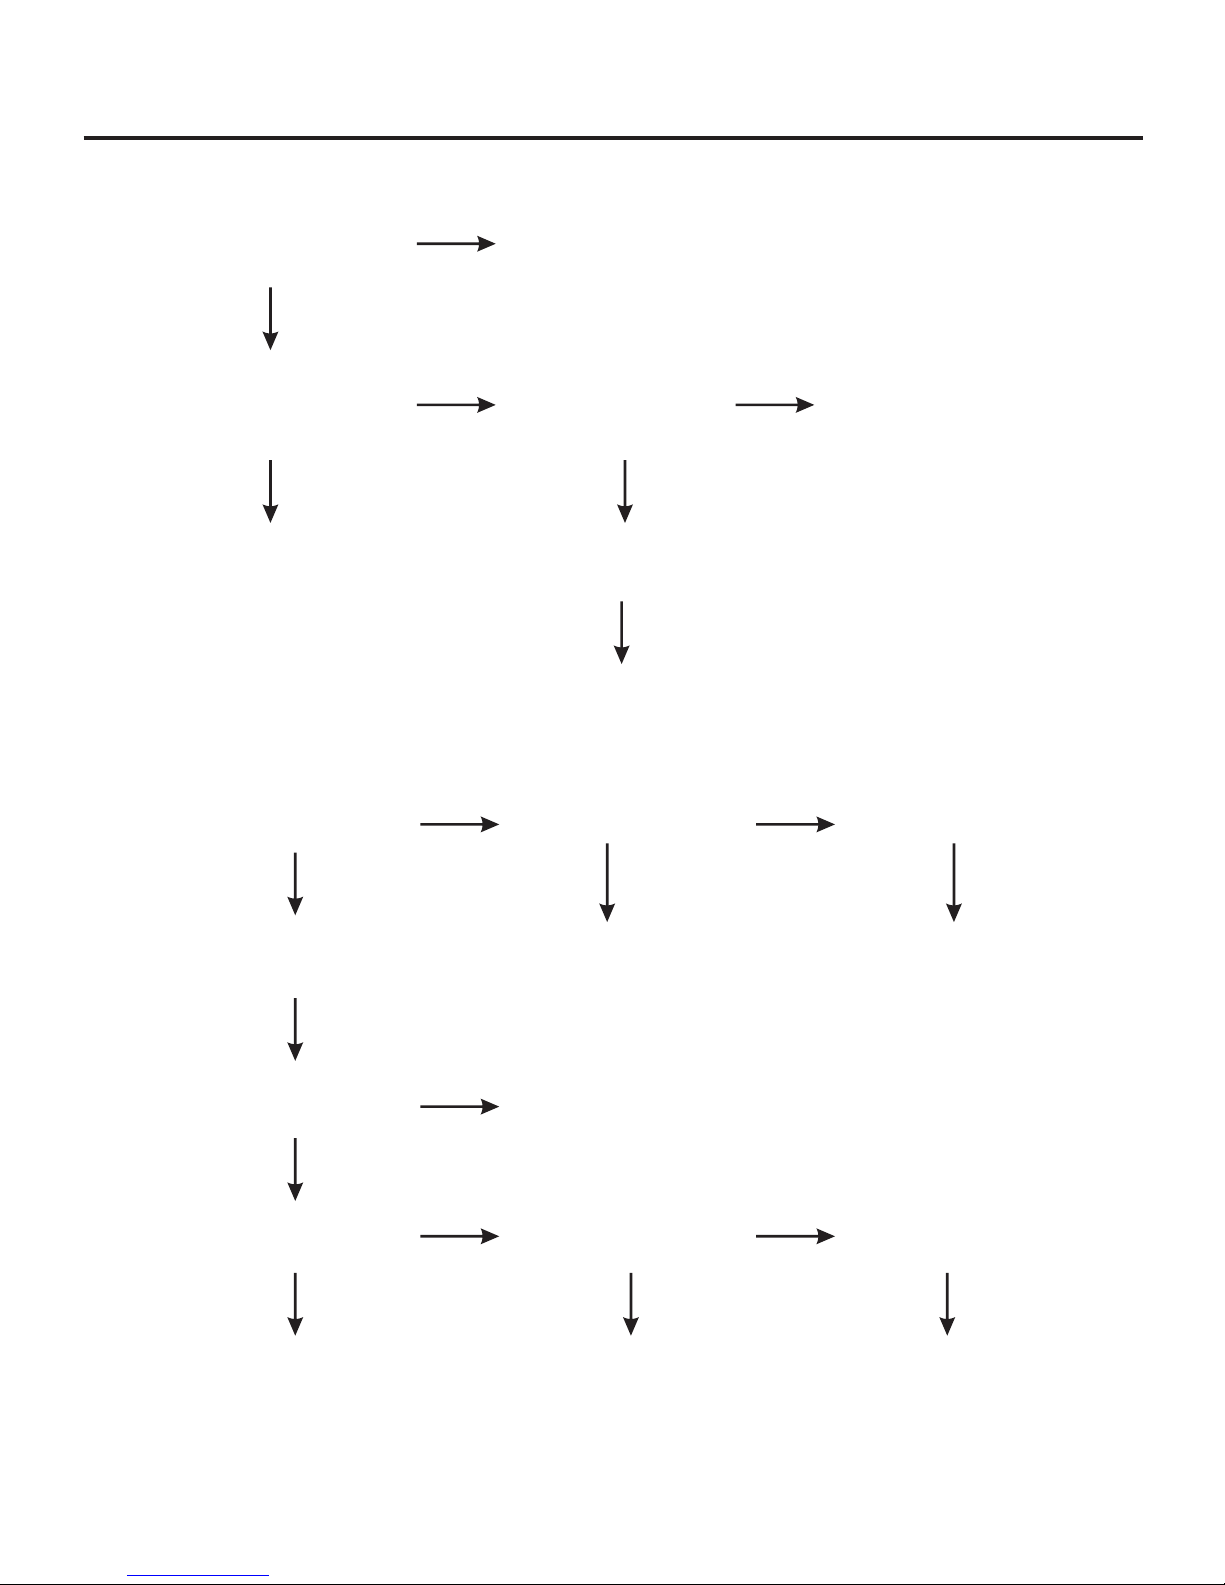
Whether the PCB has
alarm or not
whether the strap
break off
change the strap
Whether the connection
is well or not
Whether the connection
is short or not
change the motor
whether the spring is
well
change the spring
Change the connection
wire
whether the axes is
break off or not
change the axes
Whether the door is
closed well or not
lose the door or change
the door lock
whether the motor
wrecked
3.SCHEDULE OF FAILURE AND MAINTAIN TREE
3.1 The Control panel not displayed after selecting the program
Whether the power
socket has voltage or
check the fuse
Turn on the Timer,
whether the voltage
between electric shock
is normal
Change the PCB kit
check whether the
wiring harness
assemble well or not
whether The filter is
well or not
reliable the connection
3.2 The drum not worked after selecting the program
NO
YES
NO NO
NO
NO
NO
NO
NO
NO NO
- 06 -
Page 6

2.OPERATIONAL
check that whether has power source or not;
check that whether the power socket inserted firmly or not;
Check that whether the power switch is on or not;
Check that whether press the ”start/pause” button or not.
Symptom
Totally not worked
Suddenly stop
in operation
the key stoke
useless
The dryer run well,
but the heater
not worked
Whether the power source stopped if the power source stopped , the
program input could be canceled, it does not continue to work;
Please input the program again and run it again;
Whether the door is open or not.
After starting the program, it is just available in the period of
drying for both key stoke, if you want to change the setting, please
turn off the power, and set it again;
Check that whether the “child-lock” if so ,press
the ”heat” and “select ”at the same time.
Check that Whether retains the “air-dry”program or in the.
Check daily notice proceeding
- 05 -
Page 7

3.3
Maintenance non-heating malfunction
3.4 Drum worked ,but the effect of drying is not good
Whether the connect of
heater、thermostat and PCB
panel is well or not
Whether the thermostat is
well or not
Change the thermostat
Reliable connection
Whether the heater is well
or not
Whether to set up nonheating
To choose the new program
connect power cord,
Choose the cotton
program, Whether the
heater is heating or
Whether the underprop
was block
Whether the connect
of heater is well or
not
Whether the thermostat
is well or not
Change the thermostat
Whether the filter lint
have been cleaned in
time
clean the filter lint
clean the underprop
Whether the Impeller
is well or not
Whether the volume
of clothes is more
than 6kg or not
make sure the volume
of clothes is no more
3.SCHEDULE OF FAILURE AND MAINTAIN TREE
NO
YES
NO
YES
NO
YES
NO
YES
NO
NO NO
NO
- 07 -
Page 8

Check the source of voice
Whether the Pulley Spring is
invalidation
change Pulley Spring
Whether the Screw which
connect to Tub_wrap and lifter is
loose,cause the Screw and
twist the Screw
Whether the Underprop_wheel adjust the axial position of
Underprop_wheel
Whether the Tub_shaft is
break off
Whether the Motor_support change Motor_suppor or
install Motor_suppor again
Whether the Motor friction or
oscillation is too big
change Motor
Whether the Impeller was
broke or broke off
change Impelleror install
Impeller again
Whether the Bearing block
the Tub_shaft
Whether the Drain_hose and
the Overflow_tube chafe the
Side_board
install Drain_hose and the
Overflow_tube in pipe catch
3.5 Noise
3.SCHEDULE OF FAILURE AND MAINTAIN TREE
YES
YES
YES
YES
NO
NO
NO
NO
NO
NO
NO
NO
- 08 -
Page 9

3.6 Peculiar smell appears when the dryer is working
Whether something burning
in heater
Clean heater
Whether the motor blocked
Solve the motor blocked , if
the motor damaged ,it
Whether the belt sliding or
wear leading to rubber odor
Replace the belt
Whether other electrical
components broken down
Replace corresponding
electrical components
3.SCHEDULE OF FAILURE AND MAINTAIN TREE
NO
NO
NO
YES
YES
YES
YES
- 09 -
Page 10

4.PHENOMENON OF THE FAULT
4.1 The lamp of the control panel is showed ,when you press the power switch.
Analysis and maintenance:
1.Check the power supply, whether power or socket contact undesirable.
2.Check the power wiring rack whether installed in place or not PCB board, see if the problem has been solved.
3.Check the line plug in the computer board, if it is normal, change into a new PCB board,
1.First check whether the door is closed, if it can't run when the door is already closed and switch
2.If the motor works normally, maintenance methods are:
a.First check the cabinet or the top cover is seriously distortion;
b.If there is no seriously distortion, check the belt is damaged or installation does not get the right position.
Replace the belt if it has damaged. Install the belt to the right position if it is not.;
c.If the belt is ok, check the pulley kit whether it is working correctly. If pulley kit can't move or resistance,
replace pulley kit and pulley kit pin shaft. If support kit for tighten wheel deformation leading to pulley kit can't work,
;Replace the support kit for tighten wheel. If the spring of the pulley kit to fall or too loose s, replace the spring
d. If the case were not there, check whether the belt has slip .If the belt slip, replace the belt.
a. Check the line of the PCB board correctly, whether the wiring are fracture;
b.Check whether the capacitance and motor are matching, whether the wiring are put in good position;
c.Use the new capacitance to test If the motor running normally, the capacitance proved to be broken.
d.f there is no problem with motor and capacitor, replace PCB board.
4.3 When a long heating and drying, the clothing doesn't to be heated.
1.Check whether reset thermostat is ok, find the reason that caused this action,
2.Else, check whether the pin of heater fixed well;
3.Check whether the units on PCB board connected tightly;
4.Check whether the impedance of heater was normal;
5.Check whether the impedance of temperature sensor was normal;
6.When there is no problem above, change the PCB board.
4.4 Switch on the power source, press the power switch without pressing
This might caused by the fault of PCB board, make the “start/pause” button not work. Then take off
the control panel, and replace the PCB board.
4.5 Switch on the power source, the dryer start running.
This might caused by the fault of PCB board, take off the control panel, and replace the PCB board.
4.2 Press the power switch and the "start/pause" button, the lamp
3.If the motor can't work,maintenance method is:
Analysis and maintenance:
is normal but the drum don't turn.
see if the problem has been solved .
normally, enter into steps 2.
otherwise the motor proved to be broken, Replace motor.
Analysis and maintenance:
Analysis and maintenance:
Analysis and maintenance:
reset after solved this problem;
the “start” button, the dryer start running.
- 10 -
Page 11

4.6 Switch on the power source, press the “start/pause” button,
This might caused by the fault of door lock, make the PCB board detected that the door is open
4.7 The dryer is running, open the door but the dryer still running.
4.8 When the dryer is running, the air volume of outlet was little.
1.Check whether the inlet was obstructed; keep the freely flowing of air inlet;
2.Check whether the filter was obstructed, get it out and cleaned.
4.9 The dryer keep running a long time while drying fewer clothes.
It is suggest to you take the 1 hour program. If it still cannot solve the problem, please check
4.10 The drum of the dryer cannot rotate efficiently.
The dryer cannot work efficiently when you put the clothes of rated capacity. It may be caused by the questions:
;And then the weak belt make the drum of the dryer cannot rotate efficiently. In this case, please replace the belt
2.The extenuation of the spring of the pulley spring leads to the weak force of pulley .This can also
3.Because of the faulty connection of the capacitor, the motor cannot work normally;
4.11 When you find the cabinet have current in the using process.
You should check it drain current or faradic current. It is very dangerous if it caused by drain current. It is usually
caused by some electrical parts are short-circuited or damaged by moisture or the wire's insulative parts touch
the metal parts under the fracture, etc. It is the faradic current if you find the electroprobe light when you put it on the
dryer's cabinet. In this case, please check the dryer grounded. or not. You should check it and exclude it
4.12 The key doesn't work under the normal condition.
The dryer's key doesn't work under the normal condition, it may be caused by the questions:
1.The button is droped or dislocated;
2.The key of the control panel is partly damaged;
3.The key of the PCB board is broken.
This might caused by the fault of door lock, make the PCB board detected that the door
1.Due to the belt had been fretted away flabbily and the wedge type is damaged,.the belt works skidded .
4.Maybe the capacitor is aged. In this case, please replace the capacitor.
4.PHENOMENON OF THE FAULT
the dryer doesn't work but alarm.
Analysis and maintenance:
Analysis and maintenance:
and alarmed, replace the door switch.
Analysis and maintenance:
Analysis and maintenance:
Analysis and maintenance:
Analysis and maintenance:
Analysis and maintenance:
is closed, replace the door switch.
the thermostat and replace it after you are sure the thermostat is error.
make the belt skidding and the drum of the dryer cannot rotate efficiently.
In this case, please replace the pulley spring;
- 11 -
Page 12

5.DISASSEMBLY INFORMATION FOR THE PRODUCT
5.1 Ordinary Information.
1.Please unplug the power cord when you disassemble or maintain the product;
2.Please use the regulation connector lug between the wires as much as possible. Then crimp them firmly
3.When you plug the wires, please insert the plug to the bottom so it is not easily to be unplugged;
5.Please preserve the screws when you take them down. You will use them when you install the dryer;
5.2 The disassembly methods of Struts:
the sharp/hard-edged party and high-heat part (motor);
4.Make sure that the wires cannot touch the mobile part such like the drum, and also cannot touch
6.ometimes you must operate the dryer when it is electriferous . In this case, you must be careful and
by the proper tools and bundle them by the insulating tape;
pay attention to the electric shock.
- 12 -
Steps of disassembling machine Pictures
1. Remove the top cover components of the case
(1) Remove the screw cap;
(2) Remove the screws fixed roof component;
(3) Take out the roof component.
2.Remove the back board component of the case
(1) remove the screws fixed back board ;
(2) remove the screws fixed thermostat support component;
(3) pulled out wire harness assembly and Line firm and
terminal connected with back board;
(4) take down the back board component.
2-1. Removed the back vent flange
Page 13

5.DISASSEMBLY INFORMATION FOR THE PRODUCT
- 13 -
2-2. Remove the power line
2-3. Remove the filter
3. remove the door component (including the door hinge)
(1) remove the screws fixed door hinge;
(2) take down the door component and hinge.
3-1. remove the door hinge,front door and back door frame
4. Remove the inner tub assy
(1) Remove the reinforced plate;
(2) take out the belt from the motor shaft ;
(3) removed the screws which is fixed drum kit and the
automatic thermostat;
(4) pull out the terminal connected wire with heating
pipe;
(5) take out the drum kit and the belt.
Page 14

5.DISASSEMBLY INFORMATION FOR THE PRODUCT
- 14 -
4-1. Remove the body of drum, lifting bar, heating pipe
cover and drum shaft, etc
4-2. Remove the heating pipe, heating pipe cover and its
support
5. Remove the control panel component
(1) removed the screws fixed control panel component;
(2) Pull out the terminals connected wire with PCB board.
5-1. Remove the control pannel, PCB board and buttons, etc
6. Remove the wiring harness (including the thermostat)
(1) remove all the line firm fixed wires;
(2) pull out the terminals connected the wires with the
motor and the door switch ;
(3) take out the wires.
Page 15

5.DISASSEMBLY INFORMATION FOR THE PRODUCT
- 15 -
6-1. Remove the automatic thermostat
6-2. Remove the support components of the manual
thermostat
6-3. Remove the manual thermostat
7. Remove the front plate assembly
(1) remove the screws fixed front plate assembly;
(2) take out the front plate assembly
7-1. remove the door switch plate
Page 16

5.DISASSEMBLY INFORMATION FOR THE PRODUCT
- 16 -
7-2. Remove the support components of the drum
7-3. Remove the door gasket and front plate
8. Remove the side plates and base assembly
(1) remove the screws fixed side plates;
(2) take out the side plates and base assembly.
8-1. Remove the front air duct
8-2. Remove the impeller
Page 17

5.DISASSEMBLY INFORMATION FOR THE PRODUCT
- 17 -
8-3. Remove the fixd block of the motor
8-4. Remove the fixd stator of the motor
8-5. Remove the tight spring
8-6.Take out the motor components
8-7. Remove the capacitance
Page 18

5.3 Notice.
1.When you Remove the cabinet motherboard, pay attention to wear Gloves in case hurting your hands;
2.Do not rub the Cabinet in order not to influence its nicety;
3.Pay attention to take all the screws and stuff trimly;
4.When you install all the screws, make sure all the screws firmly and not ineffectively.
5.DISASSEMBLY INFORMATION FOR THE PRODUCT
- 18 -
8-8. Remove the motor bracket, Bottom plate and the air
duct
P1(white) Temperature sensor
P2(brown) Door switch
P3(purple) Motor
P4(blue) Power cord
P5(metal) Heating pipe
P6(metal) Heating pipe
 Loading...