

Page 1

MIDEA
Double Drawer
Dishwasher
Stainless Steel
INSTALLATION
INSTRUCTIONS
USER GUIDE
Warning notices: Before using this product,
please read this manual carefully and keep
it for future reference. The design and
specifications are subject to change without
prior notice for product improvement.
Consult with your dealer or manufacturer
for details.
340950
Page 2

QUICK USER GUIDE
Starting A Wash
1
Discard scraps
Scrape large food particles off and
remove any foreign objects.
3
Check spray arm
Ensure there are no items blocking
the spray arm from rotating.
1
2
2
Load dishes carefully
For better washing result, place the
dishes properly avoiding any contact
or overlapping between them.
4
Add detergent and check rinse aid
If the “ ” indicator is lit, or the
rinse aid is below the minimum
capacity line, please refill.
Set up the dishwasher function
Power the dishwasher on, then select
drawer, wash program and function.
65
Start wash or set Delay time
Close the drawer and press “ ”.
Page 3

After The Wash
The drying fan may continue to run for a set time after that the washing cycle is over
or until the drawer is open.
For best drying result, we recommend to unloading the dishes when they have
cooled down.
NOTE:
Reviewing the section on TROUBLESHOOTING TIPS will help you solve some
common problems by yourself.
If you cannot solve the problems by yourself, please ask for help from a
professional technician.
The manufacturer, following a policy of constant development and updating of
the product, may make modifications without giving prior notice.
If lost or out-of-date, you can receive a new user manual from the manufacturer
or responsible vendor.
Page 4

CONTENTS
5
SAFETY INFORMATION
9
PRODUCT DESCRIPTION
9
Product Overview
10
Control Panel
13
USING YOUR DISHWASHER
13
Basket Use Tips
16
Preparing And Loading Dishes
19
Adding Detergent
19
Adding Rinse Aid
21
OPERATING THE APPLIANCE
21
Wash Cycle Table
22
Select A Drawer
Starting A Cycle Wash
22
23
Changing The Program Once Started
23
Adding Items While A Wash Is In Progress
24
MAINTENANCE AND CLEANING
24
External Care
24
Internal Care
Caring For The Dishwasher
27
28
INSTALLATION INSTRUCTION
28
Product Dimensions
29
Before Installation
30
Installing Your Dishwasher
34
Electrical Requirements
34
Cold Water Connection
Connection Of The Drain Hose
35
37
TROUBLESHOOTING TIPS
39
Error Codes
40
Product Specification
Page 5

SAFETY INSTRUCTIONS
WARNING
READ ALL INSTRUCTIONS BEFORE USE
It is your responsibility to use caution when installing
maintaining, and operating your dishwasher.
Midea will not be liable for any damage resulting from
improper use.
This is the safety alert symbol. This symbol alerts you to
potential hazards that can result in property damage or
serious bodily harm, even death.
The safety alert symbol will be followed by either the
word “WARNING” or “CAUTION” then an important
safety message. These words mean:
WARNING
CAUTION
Indicates the possibility of serious
bodily harm or death.
Indicates the possibility of injury or
damage to property.
,
Basic Safety Precautions
This appliance is intended to be used in household
and similar applications such as:
- staff kitchen areas in shops, offices and other
working environments;
- farm houses;
5
Page 6

- by clients in hotels, motels and other residential type
environments;
- bed and breakfast type environments.
This appliance can be used by children aged from 8
years and above and persons with reduced physical,
sensory or mental capabilities or lack of experience and
knowledge providing they have been given supervision
or instruction concerning use of the appliance in a safe
way and understand the hazards involved.
Children should not play with the appliance. Cleaning
and user maintenance should not be done by children
without supervision.(For EN60335-1)
This appliance is not intended for use by persons
(including children ) with reduced physical, sensory or
mental capabilities, or lack of experience and
knowledge, unless they have been given supervision or
instruction regarding the use of the appliance by a
person responsible for their safety. (For IEC60335-1 )
Packaging material could be dangerous for children!
This appliance is for indoor household use only.
To protect against the risk of electrical shock, do not
immerse the unit, cord or plug in water or other liquid.
Unplug before cleaning and performing maintenance
on the appliance.
Do not put downward force on either opened drawer
prior to the dishwasher being fully installed. It will be
unstable and may tip forward.
6
Page 7

Do not use the dishwasher before it is fully installed
as per the Installation Instructions. It will be
unstable and be likely to tip forward.
Do not operate the dishwasher without all the
enclosures fixed in place.
The sharp edges of knives and utensils with sharp
points should not face upwards.
Some dishwasher detergents are strongly alkaline.
They can be extremely dangerous if swallowed.
Avoid contact with the skin and eyes and keep
children away from the dishwasher when the door
is open.
Check that the detergent receptacle is empty after
completion of the wash cycle.
The door should not be left open position since this
could present a tripping hazard.
When emptying the dishwasher, check that all the
detergent has been dissolved.
The inlet water hose supplied must be used. Do not
reuse a used or old hose.
The power cable must be safely routed. If it is ever
damaged, it must be replaced with a similar item by
a registered electrician.
An earthed 3 pin socket must be used. Consult a
registered electrician if there is doubt regarding the
earth connection.
7
Page 8

Product Disposal
Midea supports the recycling of all suitable
materials to reduce waste and the negative
effects on the environment.
The packaging can be recycled.
If the product is to be disposed of, do this
responsibly at your local Council Waste Depot.
DISPOSAL: Do not dispose this product as
unsorted municipal waste. Collection of such
waste separatelyfor special treatment is
necessary.
8
Page 9
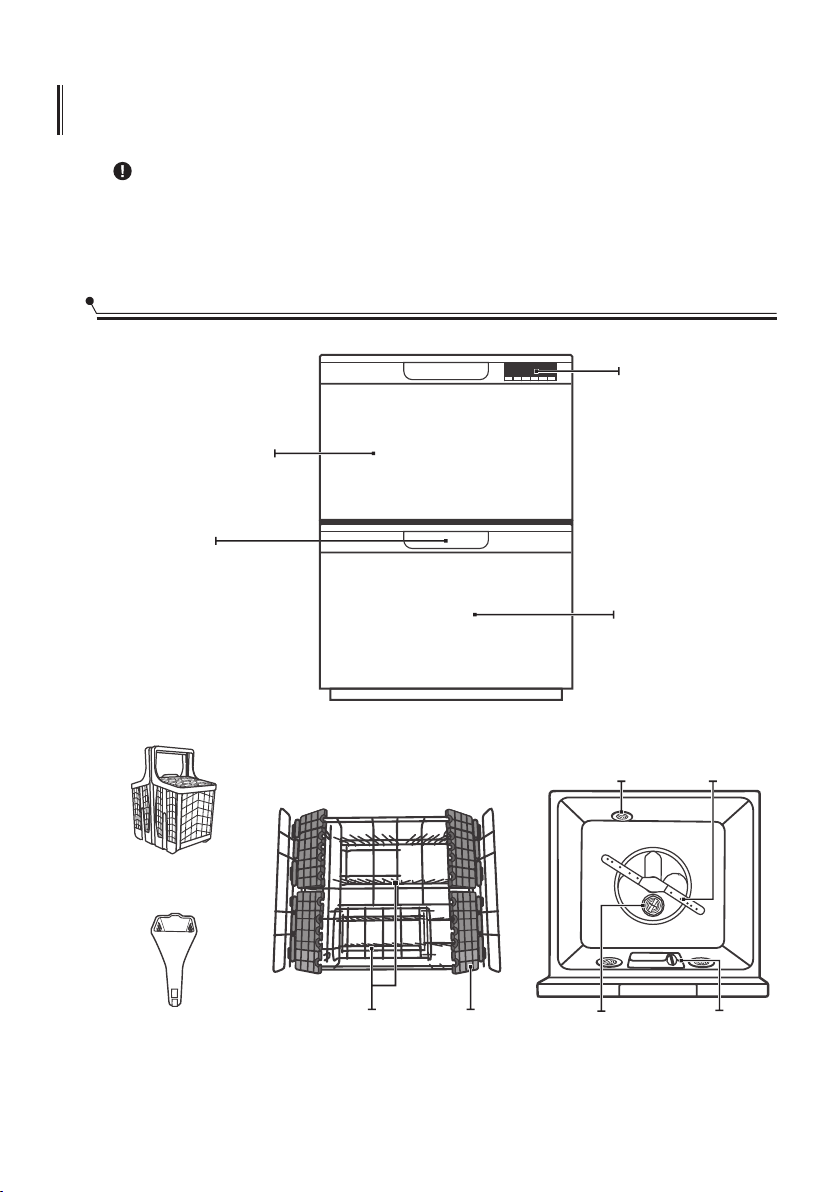
PRODUCT DESCRIPTION
IMPORTANT:
To get the best performance from your dishwasher, read all operating instructions
before using it for the first time.
Product Overview
Control panel
Upper drawer
Handle
Lower drawer
Cutlery basket
Detergent
chute
Adjustable racks
Basket
9
Cup rack
Spray armDrying fan
DispenserFilter assembly
Tub
Page 10

Control Panel
8 9 10 11
1 2 3 4 6 5 7
Operation (Button)
1
Power
Drawer
2
selector
Program
3
selector
Option
4
selector
Delay time
5
6
Child lock
Press this button to turn on your dishwasher, the screen will
light up.
Press the button to select either upper drawer or lower drawer
loaded, the corresponding indicator will light up.
Press this button to select the appropriate washing program, the
selected program indicator will light up.
Press the button to select a option, corresponding indicator
will be lit.
Press and hold the Option button for 3 seconds in standby
mode to run the Dry & Fresh option immediately.
Press the button to increase the delay start time. Delay a
cycle for up to 24 hours in one-hour increments. After setting
the delay time, press the Start/Pause button to start.
This option allows you to lock the buttons on the control panel,
so children cannot accidently start the dishwasher by pressing
the buttons on the panel. Only the Power button and Drawer
selector button remains active.
To lock or unlock the buttons on the control panel, press and
hold the Option button+ Delay button for 3 seconds
simultaneously.
10
Page 11

7
Start/Pause
Display
To start the selected washing program or pause it when the
dishwasher is operating.
When the dishwasher is running, if you need to open the
drawer, please press the “Start/Pause” button first and wait a
few seconds, then open the door slowly.
Auto
Auto sensing wash, lightly, or heavily soiled crockery, with or
with out dried-on food.
Intensive
For heaviest soiled crockery, such as pots, pans, casserole
dishes and dishes that have been sitting with dried food on
them for some time.
Washing
8
program
Screen
9
ECO
For normally soiled loads, such as pots, plates, glasses and lightly
soiled pans, standard everyday cycle.
Heavy
For heavily soiled loads, such as pots, plates, glasses and lightly
soiled pans.
Wash&Dry
For lightly soiled plates and pans that need a quick wash.
Super Fast
A shorter wash for lightly soiled loads that do not need drying.
Delicate
For fragile items such as fine china and glassware.
Show the operating drawer, time reminding, delay time,
error code etc, Child lock indication.
11
Page 12
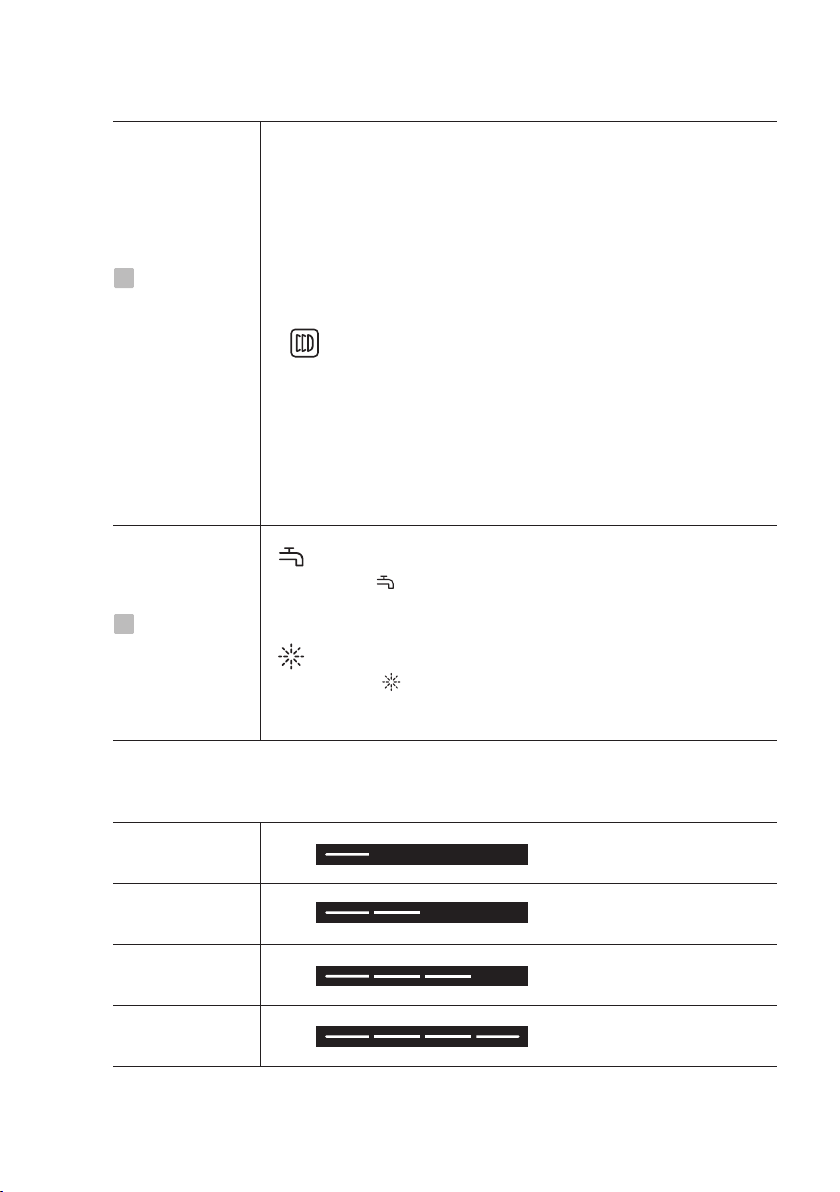
Display
Option
10
Warning
11
Delay Time
If the delay time is set, the corresponding indicator will be lit.
Extra Dry
For better drying result. (It can only be used with Intensive, ECO,
Heavy, Wash&Dry, Delicate.)
Dry&Fresh
Dry&Fresh
For removing bad odor and moisture even when dishes a
re left longer time in the baskets.
A) when selected this option will start to run at the end
of the washing cycle, its indicator will blink.
B) Press and hold the Option button for 3s, when
dishwasher is on, for let the option run immediately.
Water Supply Failure
If the “ ” indicator is lit, it means that no water is
reaching the dishwasher.
Rinse Aid
If the “ ” indicator is lit, it means the dishwasher is low
on dishwasher rinse aid and requires refilling.
Washing progress
Main-wash
Rinse
Drying
End
12
Page 13

USING YOUR DISHWASHER
2
1
Before using your dishwasher :
1. Removing the larger residue off the wash items
2. Loading the basket
3. Loading the detergent
4. Filling the rinse aid dispenser
Basket Use Tips
There are many ways to adjust the loading pattern of the basket.
Removing the rear rack
The rear rack can be removed to create a flat surface for such things as pots and pans.
Rear rack
Front rack
13
Page 14

Folding down the pins
The spacing between the pins can be increased by folding them down. This will help
the loading of large bowls and deep pot and pans.
The pins on the front rack can also be folded down to create a flat space.
Do not load the basket with the front rack removed. It is removable only to allow
access to the filters for servicing. The risk is too great because item could fall in the
open space and damage the rotating spray arm.
If returning the rear rack, be sure to firmly set it into it’s correct place.
Using the cup racks
Cups and glasses and large utensils fit on the cup racks.
The fronts of the racks are designed to secure wine glasses.
14
Page 15

Adjustable the cup racks
You can adjust these cup racks to different heights independently:
Fold the cup racks if you need more space
1. .
2. Remove the cup holder and install it on a iron wire of different height to adjust the
height of the cup holder.
1 2
Two positions cutlery basket
The cutlery basket is made in two halves.
The cutlery basket is composed by two foldable half.
Is possible to used it open or fold as in the drawing.
Pull Pull
You can use the cutlery basket with the cover open.
15
Press Press
Page 16

Preparing And Loading Dishes
Consider buying utensils which are identified as dishwasher-proof.
For particular items, select a program with the lowest possible temperature.
To prevent damage, do not take glass and cutlery out of the dishwasher
immediately after the program has ended.
For washing the following cutlery/dishes
Are not suitable
Cutlery with wooden, horn china or mother-of-pearl handles
Plastic items that are not heat resistant
Older cutlery with glued parts that are not temperature resistant
Bonded cutlery items or dishes
Pewter or copper items
Crystal glass
Steel items subject to rusting
Wooden platters
Items made from synthetic fibres
Are of limited suitability
Some types of glasses can become dull after a large number of washes
Silver and aluminum parts have a tendency to discolor during washing
Glazed patterns may fade if machine washed frequently
Recommendations for loading the dishwasher
Scrape off any large amounts of leftover food. Soften remnants of burnt food in
pans. It is not necessary to rinse the dishes under running water.
For best performance of the dishwasher, follow these loading guidelines.
Place objects in the dishwasher in following way:
Items such as cups, glasses, pots/pans, etc. are faced downwards.
Curved items, or ones with recesses, should be loaded on a slant so that water can
run off.
All utensils are stacked securely and can not tip over.
Be sure that no wash items protrude through the basket base where they will likely
foul the spray arm.
Load hollow items such as cups, glasses, pans etc. With the opening facing
downwards so that water cannot collect in the container or a deep base.
Dishes and items of cutlery must not lie inside one another, or cover each other.
16
Page 17

To avoid damage, glasses should not touch one another.
Please do not overload your dishwasher. This is important for good results and for
reasonable consumption of energy.
NOTE:
Very small items should not be washed in the dishwasher as they could easily fall
through the basket.
CAUTION
Items will be hot! To prevent damage, do not take glass and
cutlery out of the dishwasher for around 15 minutes after the
program has ended.
Loading the dishwasher
The loading pattern in the illustration is recommended for the design of basket.
It is the pattern used for the Standards Wash Test (AS/NZS 2007.1).
NOTE:
Cups and glasses face downwards.
Plates face the back of each other, as do side plates, soup plates and saucers.
Dinner platesSoup plates
Cups
Glasses
Glasses
Saucers
Cutlery basket
Detergent chute
Dessert dishes
17
Page 18

Loading the cutlery basket
You can place each knife, spoon, or fork separately into the spoon stands in the
basket’s covers to prevent chipping and discoloration.
The spoon stands as seen from above with the suggested placement of cutlery items.
Match the numbers in the diagram to the numbers in the list of cutlery items above.
WARNING
Always load sharp utensils with the
sharp point down!
Do not let any item extend through
the bottom.
3 3 3 3 3 3 3
1 1
1
2
22
Settings for Standards Wash Test AS/NZS 2007.1
Capacity: 7 Place settings per drawer
Wash Program: ECO
Detergent quantity: 24g
Rinse Aid setting: D3
1
1
2
2
1
1
2
2
5555555
4444444
18
1 32 444 5
Number
1
2
3
4
5
Item
Soup spoons
Forks
Knives
Teaspoons
Dessert spoons
Page 19

To shorten the drying time, the drawer
can be opened approx. 50 mm at the
end of the wash cycle.
This however is not compulsory.
The wash load will dry completely given
the drying time suggested in the table
on page 21.
50 mm
Adding Detergent
The chemicals in Dishwasher Detergent are necessary to remove, dissolve and help
dispose of all the soils from the wash load.
Only specific Electric Dishwasher Detergent is capable of doing this.
WARNING
Dishwasher detergent is dangerous. Avoid skin and eye contact
Keep the dishwasher detergent out of reach of children.
Keep it sealed in a dry place.
Add the recommended quantity of detergent to the detergent chute
on the basket.
Adding Rinse Aid
Rinse Aid is added during the final rinse to assist the wash load drying and to prevent
spots and streaks on glassware.
For guaranteed excellent drying results, always use a branded Rinse Aid. No other
products are suitable.
Filling the Rinse Aid Dispenser
Refill the dispenser when either the level is at the low level mark by the indicator
window, or when the display indicate the rinse aid symbol ( ) .
19
Page 20

Undo the plug by turning it
anticlockwise.
Fill the dispenser slowly to avoid
21
spillage. Each dispenser will take
300ml from empty.
NOTE:
It is important to clean up any spills
rinse aid, as it will cause excessive
foaming in the wash cycle.
3
Close the plug by rotating it clockwise.
Adjusting the rinse aid dispenser
To achieve the best drying result, with the least amount of rinse aid being used, the
dispenser can be adjusted by the user.
There are 5 levels of adjustment, the factory setting is D3. This setting will provide
excellent drying results.
If the dishes are not drying properly or with cloudy stains, the setting of D4 or D5 will
be required.
If there are sticky whitish stains on your dishes or a bluish film on glassware or knife
blades, the dispenser can be set back to either D2 or D1 to reduce any unnecessary
waste of rinse aid, whilst maintaining excellent drying results.
Follow the steps below:
1. Switch
on the dishwasher by press the Power button.
2. Within 60 seconds after step 1, press the Start/Pause button more than 5 seconds,
the rinse aid indication blinks.
3. Press the Start/Pause button to select the proper set according to your using habits,
the sets will change in the following sequence: D1->D2->D3->D4->D5->D1.
4. Without any operations in 5 second, or exit the set mode through the power
button, the new setting is active.
20
Page 21

OPERATING THE APPLIANCE
Wash Cycle TableWash Cycle Table
The table below shows which programs are best for the levels of food residue
on them and how much detergent is needed. It also show various information about
the programs.
Program Water
Auto
Intensive
ECO
(*AS/NZS 2007.1)
Heavy
Wash&Dry
Water temp
(℃)
Auto wash (45-50℃)
Rinse
Rinse (50℃)
Auto Rinse (60-70℃)
Drying
Wash (65℃)
Rinse
Rinse (45℃)
Rinse (65℃)
Drying
Wash(45℃)
Rinse
Rinse
Rinse(45℃)
Drying
Wash(60℃)
Rinse
Rinse
Rinse(60℃)
Drying
Wash (55℃)
Rinse (55℃)
Rinse (55℃)
Rinse (55℃)
Drying
Detergent
required
grams or
tablets
.23 75g
1 piece
.23 75g
1 piece
23.7 5g
1 piece
23.7 5g
1 piece
23.7 5g
1 piece
Running
Time
(min)
150
140
170
120
58
Drying
Time
(min)
40
35
33
35
17
Energy
usage
(Kwh)
0.5-1
0.85
0.36
0.6
0.55
usage
6-9
11.5
6.7
(L)
8
11
Super Fast
Wash (50℃)
Rinse (55℃)
23.7 5g
1 piece
21
29
0
0.33
4
Page 22

Program Water
Delicate
Water temp
(℃)
Wash (50℃)
Rinse
Rinse
Rinse (55℃)
Drying
Detergent
required
grams or
tablets
.23 75g
1 piece
Running
Time
(min)
85 25 0.45
Drying
Time
(min)
Energy
usage
(Kwh)
usage
(L)
8.5
NOTE:
AS/NZS 2007.1:
test in accordance with AS/NZS 2007.1.
This program is the test cycle. The information for comparability
Select A Drawer
1. Close the drawer, press the Power button to switch on the machine.
2. Press the Drawer button to choose a drawer. After selecting a drawer, the response
light will turn on, and the corresponding drawer program, reservation, and other
information are displayed.
NOTE:
After selecting the drawer, all other buttons (except the power button) operate
only for the current drawer.
Starting A Cycle Wash
1. After selecting the drawer, press the Program button to select the required program.
2. Press the Start/Pause button, the dishwasher will start its cycle.
NOTE:
When the current drawer is running, you can press the drawer selection key to
switch to another drawer, and set and start the operation. Switch to the running
drawer after switching to the non-operating drawer after 5 seconds.
If two drawers are running at the same time, both drawer indicators light up.
This icon” ”indicates the currently displayed drawer.
After that the washing cycle of one drawer is ended , meanwhile another cycle in
the other basket is still running, the display will continue to show the information
above the finished cycle for 5 minutes. After that the information shown will be
the one of the currently running cycle.
22
Page 23

Changing The Program Once Started
A wash program can only be changed if it has not been running long. You need to
ensure that the wash water is still present and it has not drained out and began
rinsing. Detergent will have to be re added if there is no wash water present.
Here are the instructions to change the program:
1. Press the Start/Pause button to pause the washing.
2. Press the Program button for more than 3 seconds, the program will be cancelled.
3. Press the Program button to select the desired program.
4. Press the Start/Pause button, the dishwasher will start.
Adding Items While A Wash Is In Progress
You can add items after the wash program has begun.
However if it is no longer in the wash cycle, anything added may not be well washed,
and other items soiled as well. Check that it is not rinsing.
Follow these instructions:
1. Press the Start/Pause button to pause the washing.
2. Wait 5 seconds then open the drawer.
3. Add the extra items.
4. Close the drawer.
5. Press the Start/Pause button, the dishwasher will start.
CAUTION
It is dangerous to open the drawer
mid-cycle, as hot steam may
scald you.
NOTE:
When the dishwasher is operating, do not force open the drawer, press the
Start/Pause button, and wait a few seconds before opening the drawer.
If the electric power to the dishwasher is interrupted during a wash program, it will
continue to the end of the program when the power is restored.
23
Page 24

MAINTENANCE AND CLEANING
Keeping your dishwasher clean improves its performance, reduces unnecessary
repairs, and lengthens its life.
WARNING
Disconnect the dishwasher from the power supply (unplug or switch off at
the circuit breaker) and allow all its parts to cool before any cleaning or
maintenance.
External Care
It’s best to clean spills on the outside of your dishwasher as they occur. Use a soft,
damp cloth on the control panel to gently wipe away spills and dust. Do not use
benzene, wax, thinner, chlorine bleach, or alcohol. These materials may discolor the
inner walls and cause stains. Do not clean the dishwasher by sprinkling water over it
and avoid letting water come into contact with any of the electrical parts.
NOTE:
If your dishwasher has a stainless steel door panel, you can clean it with a stainless
steel cleaner for home appliances or a similar product using a clean, soft cloth.
Internal Care
Filtering system
The filtering system in the base of the wash cabinet traps coarse debris from the
washing cycle. The collected coarse debris may cause the filters to clog. Check the
condition of the filters regularly and clean them if necessary under running water.
Follow the steps below to clean the filters.
CAUTION
Do not over tighten the filters. Put the filters back in sequence securely,
otherwise coarse debris could get into the system and cause a blockage.
NEVER use the dishwasher without filters in place. Improper replacement of
the filter may reduce the performance level of the appliance and damage
dishes and utensils.
24
Page 25

1 2
Lift up the handles and remove the
plate support
3 4
Pull forward the Fine filter. Tilt the Fine filter and remove it
5 6
Rinse with running water.
For a more thorough clean, use a
soft cleaning brush.
Rotate the Cylinder filter counterclockwise. Lift the Cylinder filter
upwards and out of under the basket.
from under the basket.
Reinstall the filters in reverse order
making sure the Fine filter locks
into place.
7
Rotate the Cylinder filter clockwise
to the close arrow.
25
Page 26

Spray arms
If you are in a hard water area, it is necessary to clean the spray arms regularly for
hard water chemicals will clog the spray arm jets and bearings.
To clean the spray arms, follow the instructions below:
1
One hand raised the basket slightly,
and the other hand reached under
the basket. Hold the spray arm and
lift it up.
3
Wash the arms in soapy and warm
water and use a soft brush to clean
the jets.
After cleaning, replace it in the
opposite direction.
2
Slightly tilt the arm and remove it
from under the basket.
26
Page 27

Caring For The Dishwasher
Frost precaution
If you live in a region that is where the inside temperature can drop below zero, care
needs to be taken to avoid possible damage if the water in the dishwasher freezes.
1. Turn off the mains power to the dishwasher.
2. Turn off the water supply and disconnect the Water Inlet Hose. Drain the water
inside the hose then reconnect.
3. Remove the course filters in the tubs and soak up all water possible with a sponge.
Then re-assemble.
Cleaning
Only use gentle cleaning products on the exterior of the dishwasher, no solvents or
abraisive compounds.
Products specifically for cleaning the stainless steel interior are effective in restoring the
original bright interior.
Long term storage
Disconnect the power supply and the water supply.
Remove the coarse filters and soak up all water possible with a sponge.
This reduces the chance of any odors developing inside the tubs.
27
Page 28

INSTALLATION INSTRUCTION
Product Dimensions
H2H2
D1D1
WW
H1H1
H3
H4
D2D2
Height (H1)
Height (H2)
Height (H3)
Height (H4)
Width (W)
Depth (D1)
Depth (D2)
820 mm
398 mm
8 mm (Ventilation gap between drawer front panels)
85-135 mm (Height of kick plate)
595 mm
570 mm
1080 mm (Drawer open)
28
Page 29

Before Installation
Parts supplied
Mounting brackets (4)
(for drain hose coupling)
Wire clamps (2)
(for drain hose coupling)
Drain hose coupling (1)
Ensure that the inner end of
the tab is protruding by one
material thickness
Hose clamp (1)
(for sink waste connection)
Moisture protection tape (1)
Drain hose support (1) Kick plate brackets (2)
(For installing kick plate)
Screws (8) Lock nuts (4)
29
Page 30

Installing Your Dishwasher
Prepare the cavity
The cavity will need to conform to the dimensions in the diagram.
The water supply and power point for the appliance cannot be in the dishwasher cavity.
Ideally they should be in an adjacent cavity, easily accessed for isolating the product.
An opening to allow the hoses and power cord to exit is required on either side of the
cavity with the minimum dimensions shown.
90 °
min. 820 mmmin. 820 mm
mm
mm
min. 580
min. 580
Electrical, drain
Electrical, drain
and water supply
and water supply
line entrances
line entrances
Space between cabinet
Space between cabinet
bottom and floor
bottom and floor
min. 600 mm
90 °
8080
100100
Prepare the dishwasher
Drawer dishwashers are unstable until they are secured to their surrounding cabinetry.
Study the two options for securing offered and choose one that suits your cabinetry.
Fit the mounting brackets supplied to the top or sides of the product, ensuring the
locking tab effectively retains the bracket in place. Adjust the tabs if needed.
With the aid of pliers pre form the bracket to match the surface it will be fitted to.
Shorten the tab if needed.
45°45°
30
Page 31

Installation method (A)
Attach top mounting brackets
Installation method (B)
Attach side mounting brackets
31
Page 32

Fit the dishwasher
Position the dishwasher in the cavity so the the drawer fronts are inline with the
adjacent cabinetry.
Draw the hoses and power cord through the their opening as you slide the product in.
This can be checked by using a spirit level on an open drawer.
Moisture protection tape
must be applied.
Spirit level
If need be, adjust the feet in each corner to
ensure the product sits evenly on the floor,
and is level both left to right and front to back.
Lock nut
Foot
This can be checked by using a spirit level on an
open drawer.
If you do adjust the feet, you will need to remove
them and fit the lock nuts provided. This will
ensure that the feet are secure and will not move
when you install the dishwasher into the cavity.
Secure the product in place
With suitable fasteners, fix the mounting brackets to the cabinetry.
32
Page 33

Install the kick plate
1. Prepare a kick plate as shown.
(The mounting hole position is measured by the machine at the factory state. If the height of the feet is
adjusted, the position of the mounting hole should be changed according to the actual situation.)
595
48.5
51
15
2. Set the insertion length of the kick plate and bend the bracket teeth with pliers.
3. Secure the brackets to the kick plate with screws and install the kick plate to the
bottom of the dishwasher.
498
Unit: mm
Method A: Method B:
Side view
6 mm
clearance
min.10 mm
clearance
kick plate
bracket
min.10 mm
clearance
33
If you need to install the kick plate
inside, please cut the kick plate to
the appropriate height according
to the actual situation, and ensure
that the clearance between the
bottom surface of the kick plate
and the ground is at least 10 mm.
Page 34

Electrical Requirements
WARNING
Electrical Shock Hazard
Disconnect electrical power before
installing dishwasher.
Failure to do so could result in death or
electrical shock.
Attention
The installation of the pipes and electrical equipments should be done by professionals.
The dishwasher requires a 220 -240 Volt 50 Hz AC supply through a 10 amp rated
power outlet.
Ensure that the supply is properly earthed.
Cold Water Connection
Cold water connection
The Inlet Hose supplied requires a inch BSP Male fitting, suitable for a flat sealing
washer.
A faucet is important for isolating the supply to the dishwasher.
Ensure that the sealing washer supplied inside the hose connection is firmly in place.
Check that the initial water is clean, particularly if the supply has not been used for
some time.
3/4
Back of dishwasher
3/4 BSP thread
Rubber sealing washer
Drainage pipe
34
Inlet pipe Power cable
Page 35

Connection Of The Drain Hose
There are two recommended options for connecting the drain hose.
Option A: Connecting to the sink waste
This is the typical modern method.
Check if your sink waste pipe has provision for this method.
Beware if it has the drain hose spigot that has never been used, it will likely be blanked
off inside the spigot.
This will need careful drilling /cutting out to make it operational. Ensure that the
opening you make has no ragged edges that will likely lead to debris snagging over
time and causing a blockage.
First cut off the head of the drain hose.When inserting the hoses into the Y piece,
wet the hose ends for ease of insertion. Insert fully. Use the hose support clip provided,
install as per the illustration. Insure that the hoses have a straight run from the clip to
the connection to the waste pipe.
Cut off the head of the drain hose
Drain hose
support cup
Cold water supply
with faucet
Drain hoses must not
loop downwards
35
Page 36

Option B: Connecting to a standpipe
The standpipe must be a minimum diameter of 38mm (1 1/2 inch) and requires a trap
for odor control.
Use the hose support clip to secure the hoses, ensure they do not enter the standpipe
more than 120mm.
120mm maximum entry
Standpipe ∅38mm minimum
NOTE:
If there is surplus length of the drain hose it can be shortened. The Inlet Hose
cannot be shortened.
Whilst the very first wash cycle is operating, observe all pipe and hose connections
for leaks. Checking for any trace of water on the floor in the cavity where the
connections are after the first full cycle is a good practice.
36
Page 37

TROUBLESHOOTING TIPS
Before Calling For Service
Before calling for service, check the following list for problems probable causes and
what you can do.
Problem Possible Causes What To Do
Dishwasher won’t start No power.
No water supply. Check that the hose is connected to
There is water
remaining in the tub
The wash items are
not clean
Kinked or blocked
drain hose.
Clogged filters in
the tub.
Incorrect wash program
chosen.
Obstacle obstructing
the spray arm from
turning.
Loading pattern
too tight
Filters not correctly
in place.
Check that the power cord is
plugged in to a live powerpoint
and it is turned on.
a water supply and it is turned on.
Check the drain hose routing.
Check the filters. If they are clogged,
remove them carefully to avoid
dropping anything into the sump
that could cause a blockage.
Select a more intensive program
Check the washload for items
protruding through the bottom
of the basket, or if an item has fallen
through the basket.
Check for adequate spacing
between items.
If either filter is found to be out
of place, also check spray arm
for blockages.
Blocked spray arm. Check that the holes in the spray arm
are all clear. Back flush with water
to clear.
Insufficient detergent
loaded.
Increase detergent quantity
37
Page 38

Problem Possible Causes What To Do
Wash items are not
fully dry
Glassware developing
cloudy stains and
calcium rings
Wash items showing
signs of rust
Tub becoming dull
in color
Traces of detergent in
the tub
Foam in the wash tub Non electric dishwasher
Unloading dishwasher
too soon.
Insufficient Rinse Aid. Check for Low Rinse Aid Level
Rinse Aid setting too low. Increase Rinse Aid setting as per
Insufficient Rinse Aid
being dispensed.
Items are unsuitable for
dishwasher use.
Tub requires rejuvenation. Dose the tub with specific Stainless
Incomplete/interrupted
wash cycle.
detergent used.
Spilt Rinse Aid present. Repeat the Rinse Program until clear.
The drying cycle must be complete
before the dishwasher is unloaded.
Check the Display for end time.
warning and re fill if necessary.
instructions on page 20.
Adjust the Rinse Aid Dispenser as
per the instructions on page 20.
Discontinue washing such items in
the dishwasher.
Steel Tub /Bowl Cleaner.
Rerun wash program to ensure
wash load is not contaminated
with detergent.
Use correct detergent.
38
Page 39

Error Codes
If there is a malfunction, the dishwasher will display error codes to identify the symptom.
Codes
E3 Heating element malfunction.
Ec Electronics or Motor failure.
Ed Wiring failure between the two devices.
EH The cover motor device damage or foreign
Meanings
Extended Water Inlet Time.E1 Water supply failure, closed faucet, or
Water temperature not
reaching target.
Leak Detected.E4 For some reason water has leaked from the
Washing Control System
failure.
Failure of connection
between Display Unit
and the Control System.
The cover does not open
or close properly.
Possible Causes
insufficient supply water pressure.
wash system. Possibilities are over height
item in the washload stopping lid from
sealing; internal plumbing or seal failure.
matter stuck.
39
Page 40

Product Specification
Manufacturer
Type/Description
Standard place settings
Energy efficiency class
Water consumption class
Standard cleaning cycle
Energy consumption of the standard cleaning cycle
Water consumption of the standard cleaning cycle
Program duration of the standard cleaning cycle
Noise level
Mounting
Could be built-in
Power consumption
Rated voltage/frequency
Water supply pressure
MIDEA
340950
14 (7place/drawer)
3.5
4.5
ECO
0.36 kWh
6.7 liter
170 mins
49 dB(A) re 1 pW
Built-in
YES
1930-2280 W
AC 220-240 V/50 Hz
0.04-1.0 MPa=0.4-10 bar
40
Page 41

 Loading...