

Page 1
Page 2

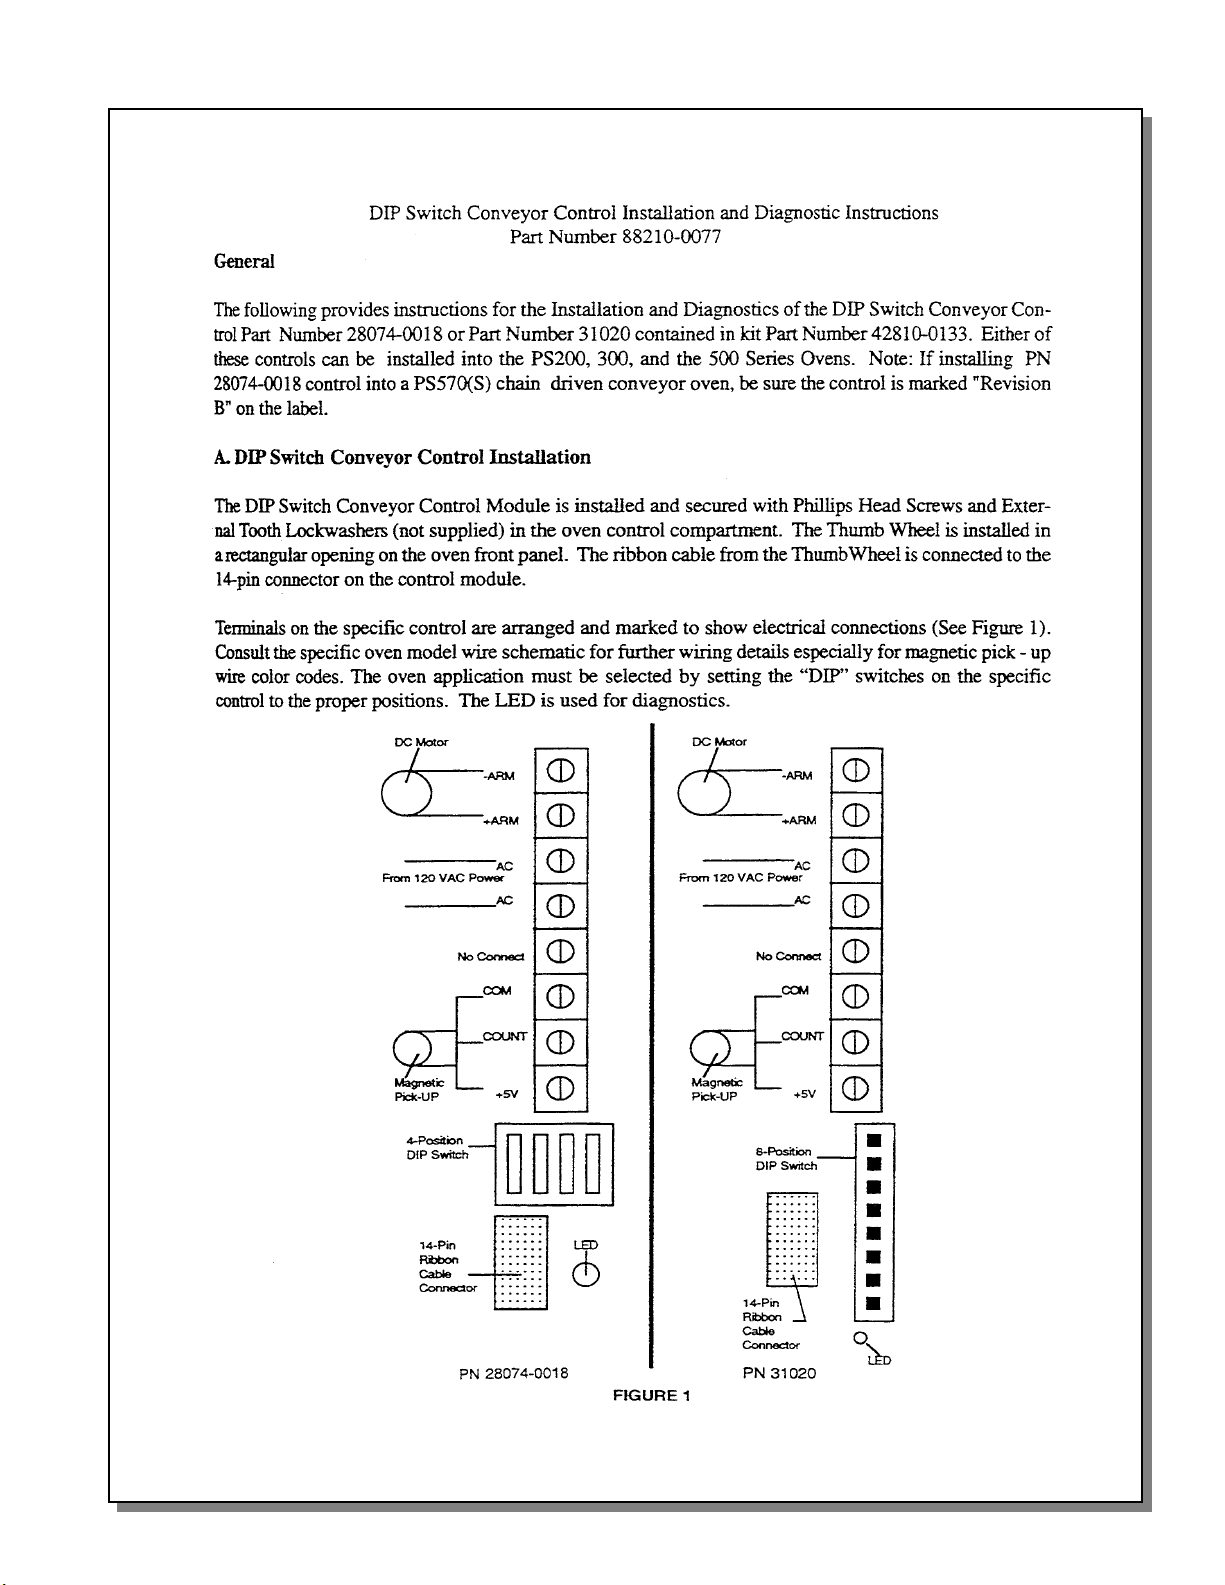
technical service
manual
This Technical Service Manual includes information
for the following oven models:
PS200/220/224 Series
PS310/360 Series
PS555/570 Series
P/N 47829 Rev. C V1 4/02
Middleby is proud to support the
Commercial Food Equipment Service Association (CFESA).
We recognize and applaud CFESAs ongoing efforts
to improve the quality of technical service in the industry.
© 2002 Middleby Marshall, Inc.
is a registered trademark of Middleby Marshall, Inc. All rights reserved.
Middleby Cooking Systems Group 1400 Toastmaster Drive Elgin, IL 60120 (847) 741-3300 FAX (847) 741-4406 24-Hour Service Hotline (800) 238-8444
1
Page 3

W ARNING
Improper installation, adjustment, alteration, service or maintenance can cause
property damage, injury or death. Read the installation, operating and maintenance
instructions thoroughly before installing or servicing this equipment.
W ARNING
DISCONNECT THE OVEN FROM ITS ELECTRICAL
POWER SUPPLY
During the warranty period, ALL parts replacement and servicing should be performed by your
Middleby Marshall Authorized Service Agent. Service that is performed by parties other than
your Middleby Marshall Authorized Service Agent may void your warranty.
Using any parts other than genuine Middleby Marshall factory manufactured parts relieves the
manufacturer of all warranty and liability.
Middleby Marshall reserves the right to change specifications at any time.
BEFORE SERVICING.
NOTICE
NOTICE
NOTICE
TABLE OF CONTENTS
Section 1 - Sequence of Operation .................................................... 4
I. Gas Oven Sequence of Operation ............................................. 4
II. Electric Oven Sequence of Operation ....................................... 6
Section 2 - Air Flow and Heat Transfer ............................................. 7
I. Types of Heat Transfer ............................................................... 7
II. Blowers and Blower Speed ....................................................... 7
A. PS200-series ovens ............................................................ 7
B. PS360-series ovens ............................................................ 8
C. PS555/570-series ovens .................................................... 8
III. Air Fingers ................................................................................... 8
A. Description and Function .................................................... 8
B. Configuration and Alignment ............................................... 9
C. Performing a Test Bake ....................................................... 9
D. PS300/350 Air Finger Shutter Adjustment ......................... 10
IV. Oven Capacity ............................................................................12
A. Conveyor Speed and Bake Time ....................................... 12
B. Belt Time ..............................................................................12
C. Time of Delivery (TOD)....................................................... 12
Section 3 - Troubleshooting and Servicing Components
I. Conveyor Speed Controller and Drive Motor.............................13
A. Part Number Reference - Speed Controllers .................... 13
B. Part Number Reference - Pickup Assemblies ...................14
C. Preparing to Service the Speed Controller ........................ 14
D. Controller/Motor Failure ......................................................15
E. Basic Troubleshooting Flowcharts ................................... 16
If the Conveyor Runs at Full Speed ......................... 16
If the Conveyor Will Not Run at All .......................... 17
F. Initial Troubleshooting ......................................................... 18
G. Conveyor Control Pickup Test............................................ 19
H. Conveyor Motor Test ..........................................................19
I. Replacing the Magnetic Pickup .......................................... 19
J. Unshielded Pickup Wires on Early PS360-series Ovens . 19
K. Appendices .........................................................................20
Conveyor sensor wiring changes for PS360-series
and PS570S, 10/95 .................................................... 20
Service Bulletin MM-133B - Installation Instructions
for Conveyor Speed Controller Kit with Thumbwheel,
P/N 42810-0133, 4/95 ................................................ 21
Instructions for Service Kit 42810-0133- Conveyor
Speed Controller Kit with Thumbwheel, 4/95 ..........23
Service Bulletin MM-177 - Introduction and Compat-
ibility of Conveyor Speed Controller with Digital
Display, P/N 37337, 8/00........................................... 27
Instructions for Service Kit 44756 - Conveyor Speed
Controller Kit for PS200R68-series Ovens, 2/02 ...28
Service Bulletin MM-189 - New Conveyor Gear
Motors, Brushes, and Pickup Clamps, 8/01............29
DIP switch settings for Conveyor Speed Controller
with Digital Display (P/N 37337), 4/02 .....................30
II. Temperature Controller ............................................................... 30
A. Part Number Reference - Temperature Controllers ..........31
B. Description ..........................................................................32
C. High Limit/Cooldown Functions..........................................32
D. Troubleshooting .................................................................. 32
E. Appendices.........................................................................32
Temperature Controller Terminal
Cross-Reference, 4/02 .............................................. 32
Instructions for Service Kit 47321 - Digital
Temperature Controller Kit, 2/02 .............................. 33
Service Bulletin MM-136 - Electrical Noise Filter
Capacitor Assembly on Temperature Controllers,
2
9/93 ............................................................................. 43
Page 4

TABLE OF CONTENTS (continued)
III. Hig h L i mit Control Module ...........................................................45
A. Part Number Reference - High Limit Control Modules ...... 45
B. Location ..............................................................................45
C. Troubleshooting ..................................................................45
D. Appendices ......................................................................... 46
Instructions for Service Kit 39733 -
High Limit Conversion Kit for PS300, 310,
350 & 360 Ovens, 5/99 ..............................................46
IV. Thermocouples ........................................................................... 54
A. Part Number Reference - Thermocouples ........................ 54
B. Thermocouple Functions ....................................................54
C. Troubleshooting ..................................................................54
D. Appendices ......................................................................... 56
Instructions for Service Kits 33984 and 33985 -
Oven Thermocouple Kit, 11/01 ................................. 56
V. B lo wer s ....................................................................................68
A. PS200-series ovens...........................................................68
B. PS360-series ovens...........................................................74
C. PS555/570-series ovens ................................................... 76
VI. Blower Motor Centrifugal Safety Switch (PS360-series) .......80
A. Part Number Reference - Blower Centrifugal Switch ......80
B. Troubleshooting .................................................................. 80
VII. Burner Blower Motor Centrifugal Safety Switch (PS200-
series gas, PS310, PS314, PS360, PS360WB, PS570S) .........80
VIII. Ai r Pr essure Safety Switch (PS200-series, PS555/570-
series, PS360EWB, PS360WB70) .............................................81
A. Part Number Reference - Air Switches ............................81
B. Troubleshooting .................................................................. 82
C. Appendices ......................................................................... 83
Instructions for Service Kits 35624 and 35625 -
Air Pressure Switch Replacement Kits, 1/97 ..........83
Instructions to Replace an Alternate Air Switch
P/N 36194 with Service Kit P/N 35624, 3/97 ...........85
IX. PS570/570S Flame Gate............................................................. 87
A. Part Number Reference - Flame Gate ...............................87
B. Flame Gate Orientation .......................................................87
X. Gas Train and Burner System ...................................................88
A. Part Number Reference - Gas Train Components............88
B. Part Number Reference - Gas Orifices and Gas
Conversion Kits ..................................................................91
C. Component Identification ....................................................92
D. Pilot/Ignitor Assembly .......................................................... 93
E. Burner Blower Motor .......................................................... 95
F. Air Shutter...........................................................................95
G. Burner Transformer ...........................................................96
H. Burner Motor Relay ............................................................ 96
I. High Flame Solenoid Valve ................................................. 96
J. Bypass (Low Flame) Orifice .............................................96
K. Modulating Gas Valve ......................................................... 97
L. Amplifier Board ................................................................... 97
M. Combination Gas Control Valve .........................................98
N. Ignition Module .................................................................... 99
O. Gas Conversion Kits ....................................................... 100
P. Burner and Gas Train Troubleshooting .......................... 100
Q. Checking the Gas Pressures .......................................... 102
R. Troubleshooting Flowcharts ........................................... 103
Intermittent Pilot System Troubleshooting Table 103
No Spark, System Does Not Work........................ 104
Spark is Present, Pilot Will Not Light ................... 105
Pilot Lights, Main Valve Will Not Come On ......... 106
S. Appendices ...................................................................... 107
Instructions for Service Kit 42810-0117 -
Pilot/Ignitor Kit, 7/91 ............................................... 107
Instructions for Service Kit 30185 - Pilot Tee, 3/94 . 108
Instructions for Service Kit 42810-0121 -
Combination Gas Valve, 1/92 ................................ 112
Instructions for Service Kit 42810-0114 -
Ignition Module, 11/90 ............................................. 116
Position of Combination Gas Valve Components
during Burner Operation, 4/02 ................................ 118
Instructions for All Gas Conversion Kits
for Ovens with Wayne Burner, Natural Gas to
Propane, 8/00 ........................................................... 119
Instructions for All Gas Conversion Kits
for Ovens with Wayne Burner, Propane to
Natural Gas, 8/00 ................................................... 125
Instructions for Service Kit 36856 - Gas
Conversion Kit for PS360EWB/WB70 with
Midco Burner, Natural Gas to Propane, 1/98 ....... 131
Instructions for Service Kit 36863 - Gas
Conversion Kit for PS360EWB/WB70 with
Midco Burner, Propane to Natural Gas, 1/98 ....... 135
Equivalent Orifice Sizes at High Altitudes, 4/02 . 139
XI. Electric Oven Heating System ................................................ 140
A. PS200-series ovens ........................................................ 140
B. PS310/360-series ovens ................................................ 142
C. PS555 ovens .................................................................... 144
D. Electric Oven Mercury Contactor Replacement ............ 146
Section 4 - Electrical Wiring Diagrams ............................................ 149
I. Component Wiring.................................................................... 149
A. Temperature Controllers .................................................. 149
B. Ignition Modules ............................................................... 150
II. PS200-series Ovens ............................................................... 151
III. PS310/360-series Ovens ........................................................ 160
IV. PS555/570-series Ovens ........................................................ 166
Section 5 - Reference ..................................................................... 172
25-point preventative maintenance checklist ....................... 172
Fractional inches to decimal and millimeter equivalents ... 173
Decimal equivalents of drill sizes ......................................... 173
General conversion factors ................................................... 174
Pressure conversions ............................................................ 174
Pressure conversion chart ..................................................... 175
Ohms Law equation wheel .................................................... 175
Common electrical wiring diagram symbols ........................ 176
3
Page 5

SECTION 1 - SEQUENCE OF OPERATION
SEQUENCE OF OPERATION
SECTION 1
I. GAS OVEN SEQUENCE OF OPERATION
A. Electrical Supply
Gas heated ovens operate on 208/240V, single phase.
Standard incoming power configurations are:
1. 4-wire system (PS200 series, PS310/360 series,
PS570, PS570S) - 2 single phase 208/240V supply (hot) lines, 1 neutral and 1 ground.
2. 3-wire system (PS360WB70, PS360EWB, PS555,
PS570G, PS536) - 2 single phase 208/240V supply (hot) lines and 1 ground.
For all wiring configurations, the voltage when measured
from either hot line to neutral should never exceed 130V.
B. Door Switch
Closing the control cabinet door (or machinery compartment door, as appropriate for the oven model) will
close the door switch and allow the oven to operate.
Note that the electrical systems will still be live
if the switch is open, although the oven cannot
operate.
The door switch has a bypass position to enable service operation with the door opened. When the door is
open, grasp the switch actuator and pull it out as far as
possible. This will close the door switch and permit
troubleshooting. Closing the control cabinet door will
reset the switch.
1. Closing the door switch permits a circuit to go
through a fuse (or circuit breaker, as appropriate
for the oven model) to one side of the conveyor
switch, blower motor switch, cooldown relay and
heat switch.
2. Closing the door switch permits a circuit to go
through the motor fuse (two 9A or 15A fuses per
motor).
C. Conveyor Switch
Closing the conveyor switch permits a circuit to go to
the Conveyor Speed Control Module, which:
1. Sends power to the gear motor (conveyor drive motor). The 120VAC signal to the Conveyor Speed
Control Module is rectified to a 90VDC signal which
is then sent to the gear motor.
2. Allows regulation of conveyor speed. Adjusting the
thumbwheel (or digital pushbutton display unit, as
appropriate) to the desired conveyor belt speed instructs the Conveyor Speed Control Module to regulate the output to the gear motor. This increases
or decreases the conveyor speed as necessary to
match the speed setting shown on the thumbwheel
or display unit.
D. Blower Switch
Closing the blower switch energizes:
1. The cooling (axial) fan(s).
2. The blower motor contactor (s).
Closing this contactor starts the blower motor(s). When
both blower motors are up to speed, centrifugal switches
located inside the blower motors (or air switches detecting blower operation, as appropriate for the oven
model) will close, setting up the heat circuit.
3. The Temperature Controller.
E. Heat Switch
Closing the heat switch completes a circuit:
1. Through the heat switch.
2. Through the blower motor centrifugal switches (or
air switches, as appropriate for the oven model).
3. Through the high limit switch.
4. One circuit then goes to the:
a. Burner (L1).
b. Transformer (110V to 24V).
c. Motor relay coil. On a cold start the heater on
this relay takes about 30 seconds to warm up
before the relay will energize. This gives an
additional prepurge. The relay is not used on
ovens with 208/240V burner blower motors.
d. Burner blower motor. As the motor reaches full
operating speed, the centrifugal switch (or air
flow switch, as appropriate for the oven model)
closes and applies voltage to the burner control. This energizes the ignitor control spark
transformer and the pilot valve. The spark then
lights the pilot. The flame sensor proves the
presence of the pilot flame, and the ignitor control then shuts off the spark. At the same time,
the main burner valve is opened. The main
burner is then ignited.
If the pilot does not light within approximately
90 seconds, the oven will shut down.
The pilot and main gas valve will stay on (open)
as long as the heat switch is ON and the flame
is proven. If the flame goes out for any reason,
the pilot will try to light for 90 seconds, and
then go into automatic lockout. To relight the
pilot after it has gone into automatic lockout,
the burner
and then turned ON again.
must be turned OFF for 5 minutes
4
Page 6

SECTION 1 - SEQUENCE OF OPERATION
e. For ovens with an On-Off gas regulation sys-
tem (with solenoid valve): Temperature Controller
terminals 4 & 5 (power for the primary relay
contacts for the high flame solenoid valve).
For PS360EWB ovens with a modulating gas
system and Temperature Controller P/N 32571:
Temperature Controller terminals 4 & 5 (input
signal to amplifier board).
For all other ovens with a modulating gas system: Temperature Controller terminals 15 & 16
(input signal to amplifier board).
In all ovens, the temperature-sensing thermocouple(s)
send a millivolt signal to the temperature controller. As
long as the temperature inside the oven is below the
set point of the Temperature Controller, the Controller
will do the following:
1. For ovens with an On-Off gas regulation system: If
the temperature sensed by the thermocouple(s) is
below the set point on the Temperature Controller,
the Controller energizes the high flame solenoid.
When the solenoid is energized, the solenoid valve
permits 100% gas flow. Power to the solenoid is
cut when the temperature reaches the set point,
which closes the valve. This permits on-off gas
flow to the burner.
When power is cut to the high flame solenoid, the
burner will remain ON in the low flame mode. When
the temperature drops a few degrees, the Temperature Controller will again energize the high flame
solenoid, which opens the valve and restores gas
flow to 100%.
An indicator on the Temperature Controller will
show whether the high flame solenoid is energized
(or whether the burner is activated, which is effectively the same). This indicator varies by Temperature Controller model. Refer to the instructions for
the appropriate Temperature Controller for an illustration and description of this indicator.
2. For ovens with a modulating gas system: In response to the signal from the thermocouple(s), the
Temperature Controller sends a 4-20mA signal to
the amplifier board. The amplifier board converts
this to a 0-20VDC signal which is sent to the modulating gas valve. The valve opens or closes in proportion to the signal from the amplifier board, allowing the gas flow to be regulated as required from
0-100%.
An indicator on the Temperature Controller will
show whether the burner is activated. This indicator varies by Temperature Controller model. Refer
to the instructions for the appropriate Temperature
Controller for an illustration and description of this
indicator.
F. High Limit
NOTE: Most PS200-Series and PS360-series gas ovens use the high limit feature of the Temperature Controller. All other oven models use a separate High Limit
Control Module. Refer to the wiring diagram for the
appropriate oven model to check whether a separate
High Limit Control Module is used.
The high limit relay will shut the oven burner OFF:
1. If the high limit thermocouple senses an oven temperature above 650°F.
2. If the signal from the high limit thermocouple is
lost.
An indicator on the Temperature Controller will show a
high limit condition. This indicator varies by Temperature Controller model. Refer to the instructions for the
appropriate Temperature Controller for an illustration and
description of this indicator.
G. Cooldown
NOTE: PS200VL-series ovens do not include a
cooldown feature.
When the heat and blower Switches are turned OFF
the cooldown relay will allow the blowers to remain ON
until the oven temperature falls to 200°F (93°C).
During cooldown, the Temperature Controller will continue to show the oven temperature.
5
Page 7

SECTION 1 - SEQUENCE OF OPERATION
ll. ELECTRIC OVEN SEQUENCE OF OPERATION
A. Electrical Supply
Most electrically heated ovens operate on a 208/230/
380/440V, 3 phase, 4 wire system. The fourth wire is
for a 120 V neutral ground. This 120 V neutral ground
eliminates the need for a control transformer. Where a
neutral is not available, a 240/110V transformer is supplied.
B. Door Switch
Closing the control cabinet door (or machinery compartment door, as appropriate for the oven model) will
close the door switch and allow the oven to operate.
Note that the electrical systems will still be live
if the switch is open, although the oven cannot
operate.
The door switch has a bypass position to enable service operation with the door opened. When the door is
open, grasp the switch actuator and pull it out as far as
possible. This will close the door switch and permit
troubleshooting. Closing the control cabinet door will
reset the switch.
Closing the door switch permits a circuit to go through
a fuse (or circuit breaker, as appropriate for the oven
model) to one side of the conveyor switch, blower motor switch and to the heat switch.
C. Conveyor Switch
Closing the conveyor switch permits a circuit to go to
the Conveyor Speed Control Module, which:
1. Sends power to the gear motor (conveyor drive motor). The 120VAC signal to the Conveyor Speed
Control Module is rectified to a 90VDC signal which
is then sent to the gear motor.
2. Allows regulation of conveyor speed. Adjusting the
thumbwheel (or digital pushbutton display unit, as
appropriate) to the desired conveyor belt speed instructs the Conveyor Speed Control Module to regulate the output to the gear motor. This increases
or decreases the conveyor speed as necessary to
match the speed setting shown on the thumbwheel
or display unit.
D. Blower Switch
Closing the blower switch energizes:
1. The cooling (axial) fan(s).
2. The blower motor contactor (s).
Closing this contactor starts the blower motor(s). When
both blower motors are up to speed, centrifugal
switch(es) located inside the rear end of the motor(s)
(or air flow switch[es], as appropriate for the oven model)
will close, setting up the heat circuit.
3. The Temperature Controller.
E. Heat Switch
Closing the heat switch completes a circuit:
1. Through the heat switch.
2. Through the blower motor centrifugal switch.
3. Through the high limit switch.
4. For ovens with on On-Off heater activation mode:
To the primary relay contacts of the Temperature
Controller (terminals 4 and 5 for digital controllers,
terminals 5 and 6 for analog controllers).
When the temperature-sensing thermocouple(s)
indicate that the oven temperature is below the set
point on the Temperature Controller, the Temperature Controller will energize the contactor(s) which
in turn energize the heaters.
When the oven temperature reaches the set point
of the Temperature Controller, the Temperature Controller will cut power to the heaters. When the temperature drops a few degrees, the Temperature Controller will again energize the heaters.
An indicator on the Temperature Controller will
show whether the Controller is calling for heat. This
indicator varies by Temperature Controller model.
Refer to the instructions for the appropriate Temperature Controller for an illustration and description of this indicator.
5. For ovens with a Variable Pulse heater activation
system: To terminals 15 and 16 on the temperature controller. In response to the signal from the
thermocouple(s), Terminals 15 and 16 send a 420mA signal to a controller module that contains
an amplifier board and two solid state relays. The
relays activate the heating elements at 100% power
on a fixed cycle time, for a length of time proportional to the signal from the temperature controller.
A HEAT ON indicator on the Temperature Controller will light to show whether the Controller is
calling for heat.
F. High Limit
NOTE: Electric oven models use a separate High Limit
Control Module.
The High Limit relay will shut the oven burner OFF:
1. If the high limit thermocouple senses an oven temperature above 650°F.
2. If the signal from the high limit thermocouple is
lost.
An indicator on the Temperature Controller will show a
high limit condition. This indicator varies by Temperature Controller model. Refer to the instructions for the
appropriate Temperature Controller for an illustration and
description of this indicator.
G. Cooldown
When the heat and blower switches are turned OFF
the cooldown relay will allow the blowers to remain ON
until the oven temperature falls to 200°F (93°C).
During cooldown, the Temperature Controller will continue to show the oven temperature.
6
Page 8
SECTION 2 - AIR FLOW AND HEAT TRANSFER
SECTION 2
AIR FLOW AND HEAT TRANSFER
I. TYPES OF HEAT TRANSFER
Heat constantly moves from a warm object to a cold object. Heat moves in three different ways: thorough conduction, through radiation, and through convection.
Middleby Marshall conveyor ovens use all three of these
paths to cook the product.
Conduction - Heat is transferred through surface con-
tact (such as pizza dough in contact with a pan).
Radiation - Heat is transferred from light-colored ob-
jects to dark-colored objects. The darker the color of
an object, the greater the amount of heat that it absorbs. The lighter the color of an object, the greater
the amount of heat that it reflects. Middleby ovens use
light-colored interiors (aluminized or stainless steel,
depending on the oven model) to reflect as much heat
as possible to the product.
Convection - Heated air will transfer heat to objects
with which it comes into contact. Unless the air flow is
controlled, hot air will rise and be replaced by cooler
air. Middleby Marshall ovens use blowers (one or two
large fans, depending on the oven model) to force air
through adjustable air fingers onto the product.
The intensity of the heat at the point at which it is sensed is
called temperature. The difference in temperature between
the food product and the heat source - that is, the pan,
oven interior, or heated air, as described above - determines
the speed at which the heat flows. The greater the difference in temperature, the faster the heat flows to the product.
In Middleby Marshall conveyor ovens, the heat transfer from
conduction is greatly dependent on the customers product
and cooking surface (pans, etc.). Likewise, the heat transfer from radiation is effectively constant, because the color
of the oven interior cannot be changed. For these reasons,
the best way to optimize heat transfer is by regulating the
convection air. This can be done in two ways:
Adjusting the
quantity and velocity of air delivered onto the product.
Adjusting the air finger configuration to change the pat-
tern in which the vertical columns of air are delivered to
the product.
II. BLOWERS AND BLOWER SPEED
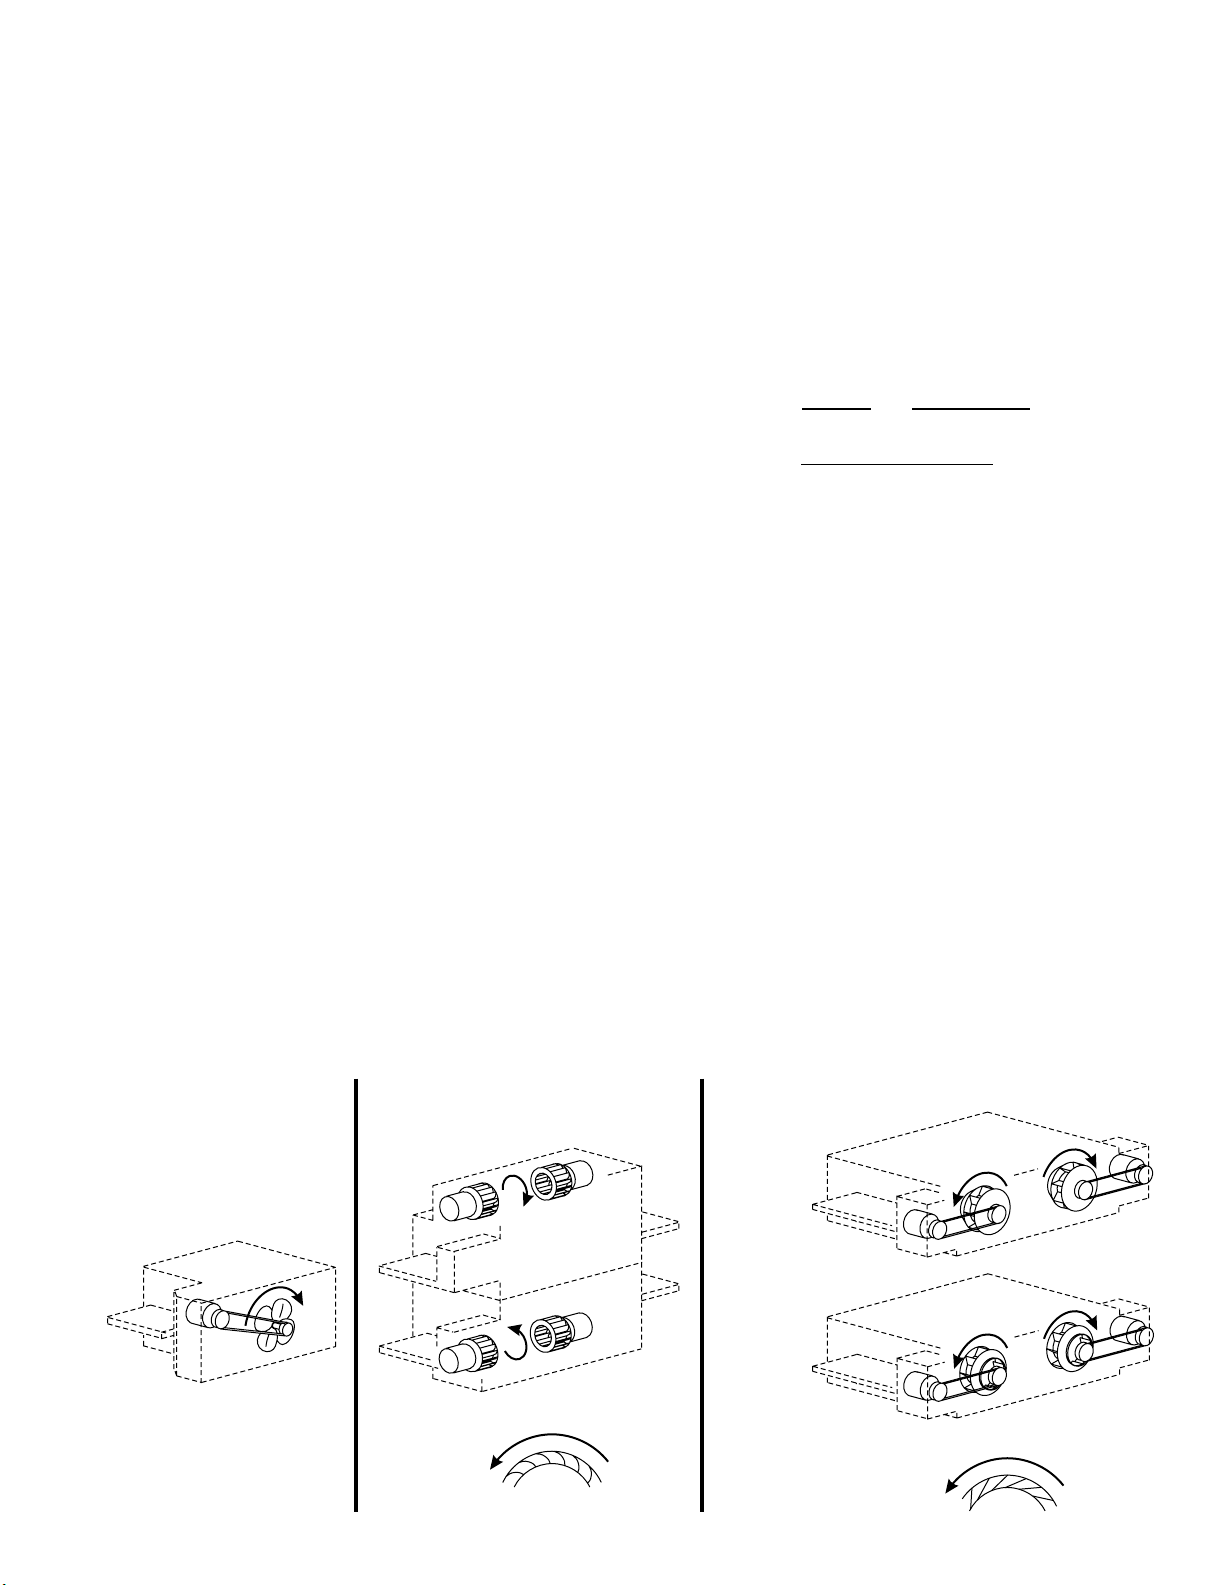
A. PS200-series ovens
PS200-series ovens have a single blower motor mounted
inside the machinery compartment, with a pulley on
the end of the motor shaft. A belt connects this pulley
to another on the shaft of the blower fan. The air velocity can be changed by using a larger or smaller pulley
on the motor shaft, and changing the length of the belt
to match the new pulley. See Figure 1.
However, note that there are only two approved belt/
pulley combinations for PS200-series ovens; one for
60Hz ovens, and one for 50Hz ovens. Field modifications to these approved combinations are not permitted unless under the specific directions of the Middleby
Technical Service Department. Any changes to convection air delivery MUST be made using the air fingers.
blowers and blower speed to change the
PS200-series
PS360-series PS555/570-series
Blower
Wheel
Orientation
Figure 1
Blowers, belts and pulleys
Early
(PS570)
Current
(PS570S,
PS570G, all
PS555)
Blower Wheel
Orientation
7
Page 9

SECTION 2 - AIR FLOW AND HEAT TRANSFER
B. PS360-series ovens
PS360-series ovens feature two blower motors. A blower
wheel is fastened onto the end of the motor shaft. In
order to adjust the amount and speed of heated air that
is directed by the blower wheels, it is necessary to
change the size of the wheels and/or change the speed
of the motor. See Figure 1.
Each PS360-series oven model has a specific combination of blower motor and blower wheel. Field modifications to these approved combinations are not permitted unless under the specific directions of the
Middleby Technical Service Department. Any changes
to convection air delivery MUST be made using the air
fingers.
C. PS555/570-series ovens
PS555/570-series ovens have one blower motor
mounted inside each of the end compartments of the
oven, with a pulley on the end of the motor shaft. The
oven has two blower wheels; a belt connects each motor
pulley to a pulley on the end of one of the blower wheel
shafts. The air velocity can be changed by using a
larger or smaller pulley on the motor shaft, and changing the length of the belt to match the new pulley. See
Figure 1.
Some customers have a specific belt/pulley combination approved by Middleby Marshall, while others use a
standard configuration. Field modifications to these
approved combinations are not permitted unless under
the specific directions of the Middleby Technical Service Department.
III. AIR FINGERS
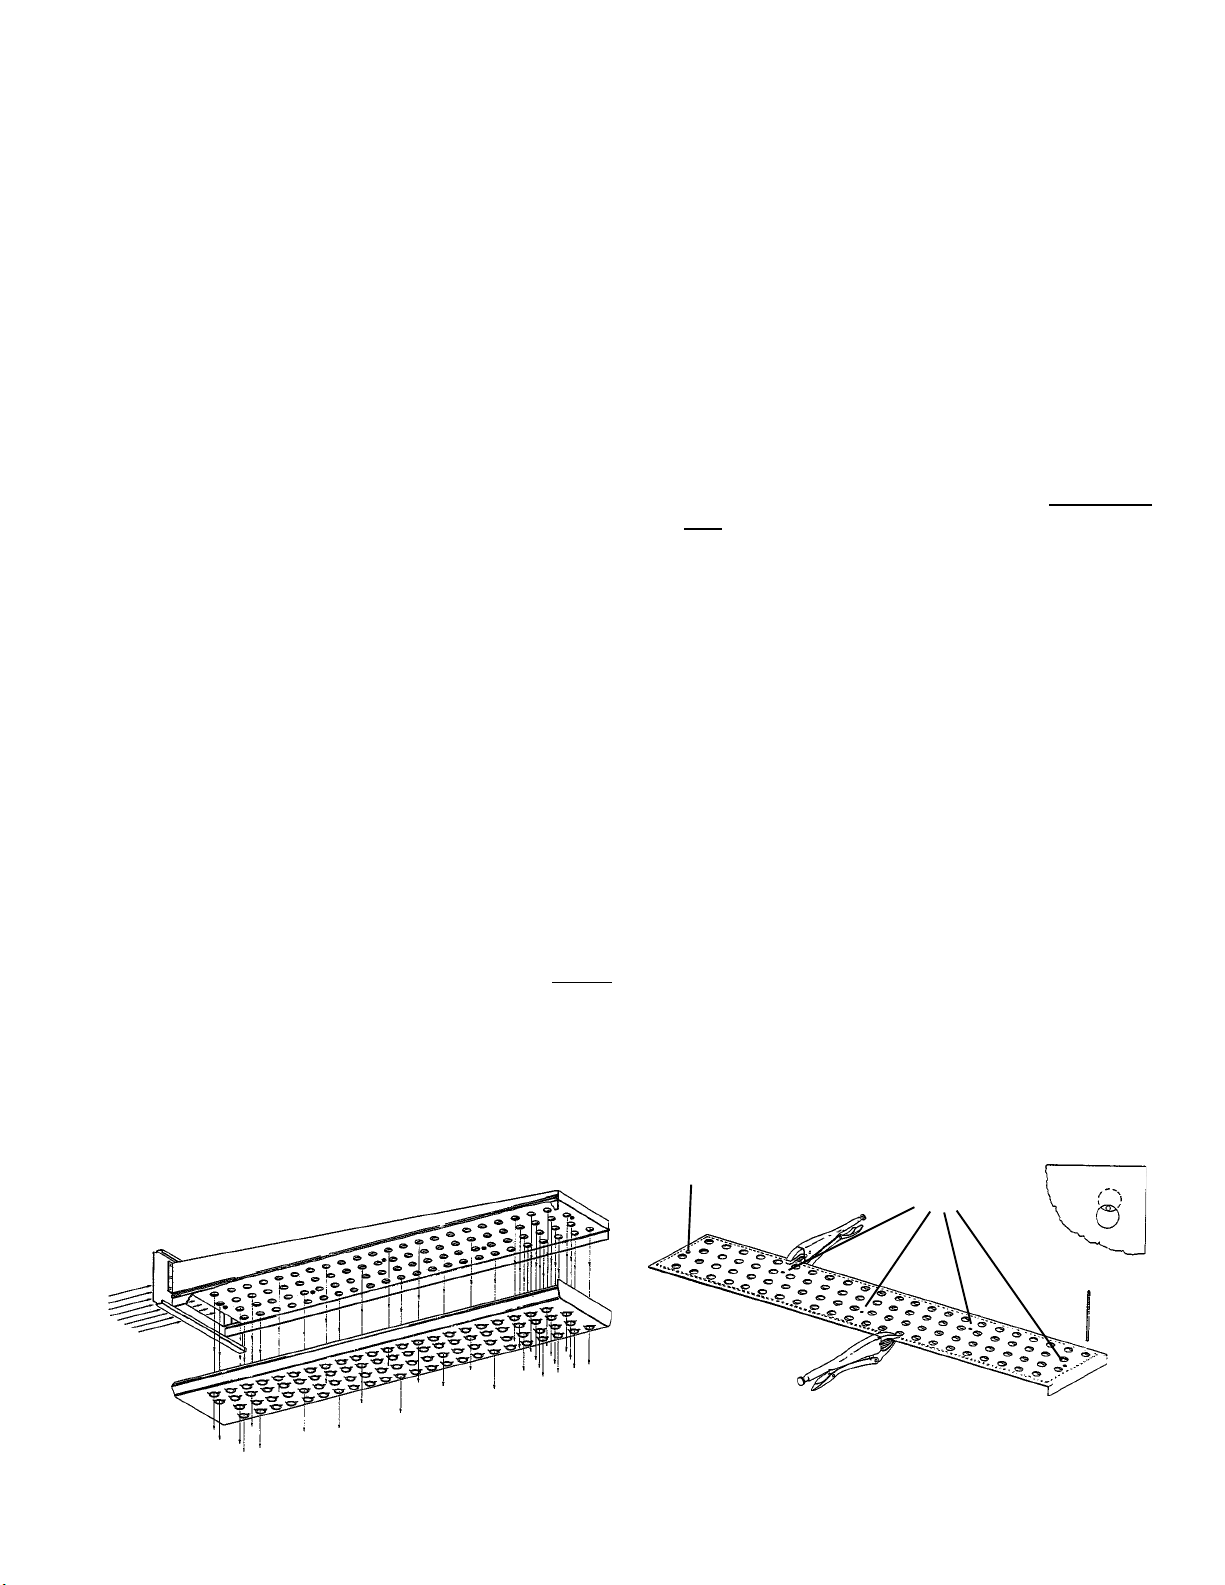
A. Description and Function
Air fingers direct the heated air from the blowers into
vertical jets that are directed at the top and bottom of
the conveyor belt. Each air finger configuration has
been tested to optimally cook a specific customers
product. As a rule, air finger configurations should NOT
be changed from customer specifications without direct instructions from the Middleby Technical Services
Department.
Middleby uses two main types of air fingers:
PS300/350 and early PS310/360 ovens used a shut-
ter-type air finger assembly. The finger is assembled from a manifold, inner plate and outer
plate. The inner plate is assembled from two separate plates, each with a series of holes, that are
riveted together. The plates can be repositioned
relative to each other to restrict the air flow through
the holes as necessary. These fingers are no longer
in general use, but may still be found in older ovens in the field. See Figure 3.
All current ovens use an air finger which is com-
posed of a manifold, inner plate, and outer plate.
No adjustments are necessary or possible to these
fingers, but a wide variety of styles is available to
meet different customers baking needs. See Figure 4.
Figure 3
PS300/350 air finger with shutter plate
Outer plate
Lower air fingers have wire
rack as shown to prevent
conveyor belt from rubbing
on outer plate.
Hot air flow
from blower
wheel(s)
Vertical
columns of
high-velocity
hot air
Figure 2
Air finger operation
Rivets
Inner plate
Shutter
Manifold
Figure 4
Current standard air finger (all oven models)
Outer plate
Width and hole
configuration varies.
Inner plate
Width and hole
configuration varies.
May have inner dam.
Manifold
Width varies to match inner
and outer plates. Baffle may
be solid, perforated, partially
perforated, or absent.
Several special shapes are
available to meet specific
8
customer needs.
Page 10
SECTION 2 - AIR FLOW AND HEAT TRANSFER
B. Configuration and Alignment
To ensure proper baking of the product, the air flow
MUST be properly aligned as it exits the air fingers.
Because air finger configurations are tested at the factory for a specific customers product, severe bake problems related to the air fingers are rare. If you encounter a problem, check the following:
1. Check that the air fingers are properly assembled,
cleaned and free of obstructions. For the standard
air fingers shown in Figure 4, a variety of styles are
available for each of the three components. It is
often possible to assemble these components incorrectly, as they are designed to be modular. This
will affect the quality of the bake.
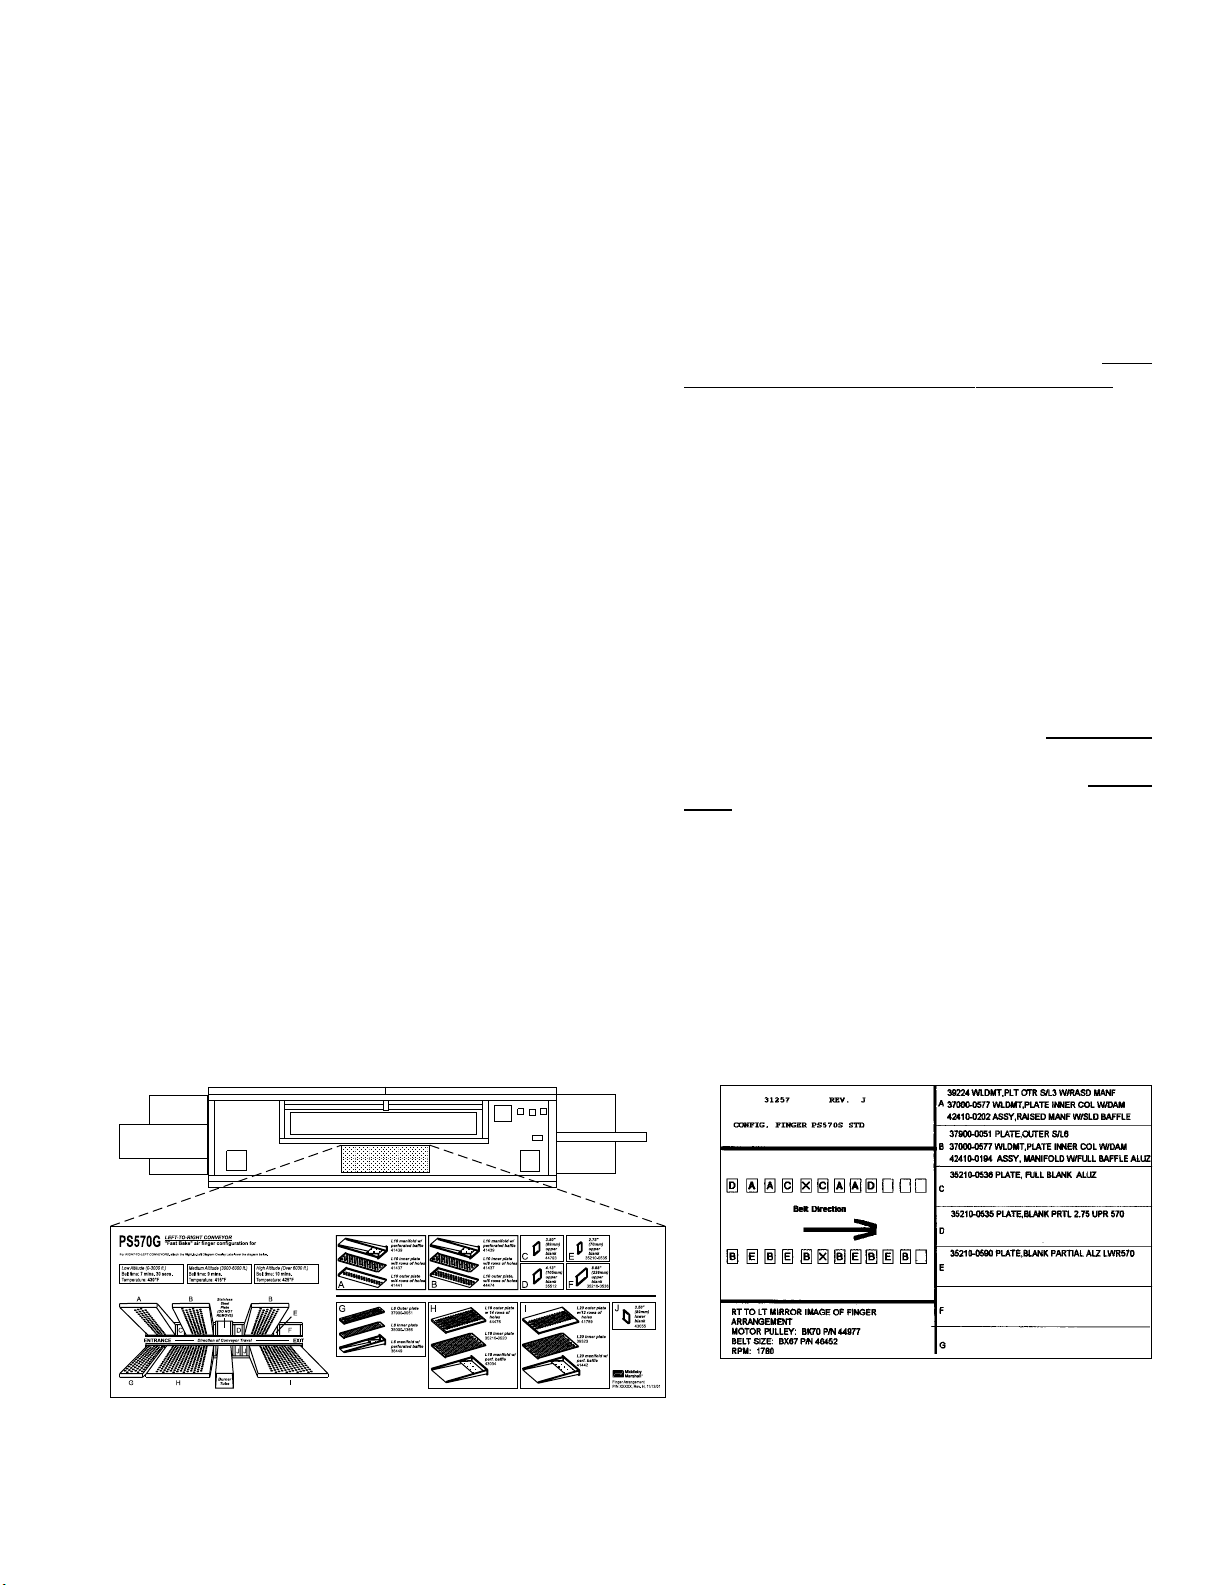
If you need information on the correct air finger configuration of the oven, check the following:
3D air finger label or card. Many current ov-
ens will have a three-dimensional drawing on
the front panel of the oven that shows the correct air finger configuration, as shown in Figure 5. Other ovens may have this information
on a laminated card attached to the oven.
Internal air finger chart. All Middleby ovens
have a chart similar to the one shown in Figure
6 attached inside the machinery compartment
door. Note that if the air finger configuration
has been updated since the oven was installed,
this chart may no longer be correct.
If there is no label present on the oven, and the
chart inside the machinery compartment is incorrect, contact Middleby Technical Service for
assistance.
Figure 5
3D air finger label (if present)
2. Check that the bake time and temperature settings
of the oven match the customers specifications.
Most customers have an acceptable range for bake
time and temperature to allow for local variations in
altitude, humidity, etc.
3. If these checks fail to correct the problem, you
should perform a test bake to pinpoint the type of
baking problem that is present.
C. Performing a Test Bake
Before you attempt to correct any problem, please CONFIRM THAT THERE IS ACTUALLY A PROBLEM. It is
extremely difficult to tell if an oven is baking unevenly
by simply looking at a pizza with ingredients, especially if the pizza is a large combination-type. Often,
the ingredients and toppings themselves can cause an
uneven bake.
The best way to check for an uneven bake is to make a
test bake with a consistent, predictable product and
then read it. We recommend using the customers
dough (for a pizza product) OR a commercially-available pancake mix (for customers with a variety of products). The pancake mix is generally more sensitive to
variations in temperature and thus provides more accurate results than the dough test.
When interpreting the results of the test, consistently
uneven baking on the top of the product may indicate a
problem with the upper air fingers. Likewise, consistently uneven baking on the bottom of the product may
indicate a problem with the lower air fingers.
The most common bake problem is a front-to-back
bake issue. This problem occurs when the front of the
conveyor belt (towards the window) receives more heat
than the rear, or vice-versa. This results in uneven baking for the product based on where it is placed on the
conveyor.
Figure 6
Internal air finger chart
NOTE: Labels of this type are not
used on all ovens. Label placement
and design will vary based on
customer preference.
NOTE: All ovens use a chart of this
type inside the machinery compartment.
Changes to the air finger configuration
after oven installation MAY NOT BE
INDICATED.
9
Page 11
SECTION 2 - AIR FLOW AND HEAT TRANSFER
To perform the test bake:
1. Select identical pans for the test. Choose the pans
based on the width of the conveyor; you should space
the pans in line completely across the conveyor without having them touch each other. For instance, for a
32 /813mm-wide conveyor, you could use three 10/
254mm pans or two 15/381mm pans.
You will need enough pans to have three complete rows.
This eliminates the possibility of a single row distorting
the results. If necessary, the test can be run with only
1 row of pans, but the results are not as reliable.
2. For a pancake batter test, mix the pancake batter as
instructed by the manufacturer. Pour the batter
EVENLY into the test pans to a depth of 1/4 (6mm).
You may use any type of pancake mix that is available,
AS LONG AS YOU USE THE SAME TYPE THROUGHOUT THE TEST.
For a dough test, have the customer make up a thin
crust dough in each pan. The dough should be of a
consistent thickness in each pan and should be no
thicker than 1/4 (6mm). Thicker doughs will provide
too great a cushion and will distort the test results.
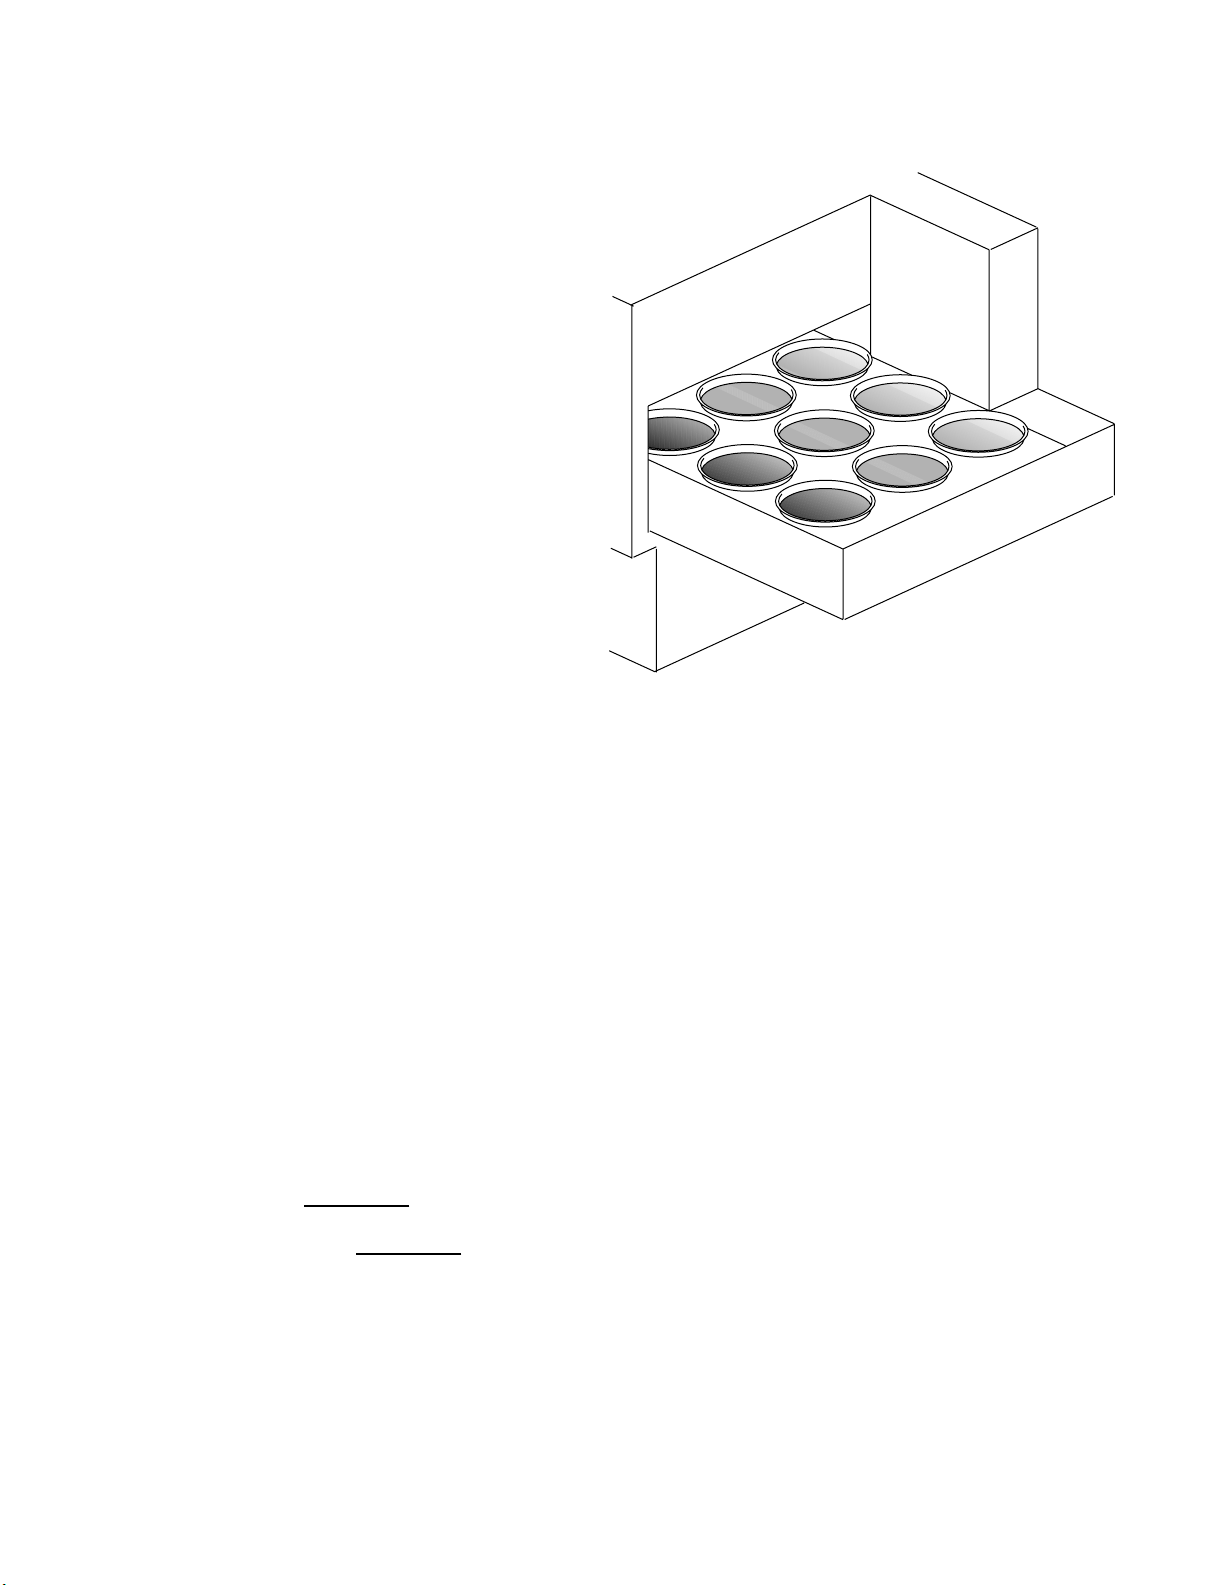
3. Place the pans side-by-side on the conveyor. The front
and rear edges of the pans should be aligned so that it
is easier to see if there is a front-to-back bake problem. DO NOT stagger the rows of pans diagonally.
Also, check that the pans do not touch each other;
this can transfer heat to the test product and distort
the results.
4. Run the products through the conveyor at the
customers normal bake time and temperature settings.
5. Read the results of the test. Each pan of product
should have the same coloration.
If you used pancake batter, the sugar in the mix will
brown very rapidly if over-baked. This highlights an outof-balance oven.
If the product lightens or darkens slightly from front-toback in only one row, there is probably not a significant
front-to-back bake problem. If the product is noticeably lighter or darker at the front or back in ALL of the
rows of pans, there is a front-to-back bake problem.
See Figure 7.
Also, remember that
consistently uneven baking on
the top of the product may indicate a problem with the
upper air fingers. Likewise, consistently uneven baking on the bottom of the product may indicate a problem with the lower air fingers.
If the oven has the current standard air finger type,
you should contact Middleby Technical Services
for assistance.
If the oven has the PS300/350-style air fingers with
a shutter plate, it is possible to adjust the positions of the air shutters to correct a front-to-back
bake problem. Proceed to Step D, PS300/350 Air
Figure 7
Front-to-back uneven bake
NOTE: In this example,
the front of the product
is darker than the rear.
The opposite condition
is also possible.
Finger Shutter Adjustment.
D. PS300/350 Air Finger Shutter Adjustment
Before attempting to properly balance a Middleby
Marshall oven equipped with shutter fingers, you should
understand the principles of operation of this type of
finger.
The oven moves approximately 2000 ft.³ of air per minute.
When this large amount of air is moved through the
plenum and fingers it rushes through the plenum and to
the end of the air finger. This creates a back pressure
of air inside the finger and tends to deliver more air onto
the product at the front of the air finger.
The inner plate has a separate shutter plate riveted to it
at a slight angle. Since there is more pressure at the
end of the fingers (front of the oven) than at the plenum
(rear of the oven), the shutter plate is angled to restrict
the air flow near the front of the oven. This creates a
proper balance permitting an even amount of air to exit
out of the holes across the width of the conveyor. See
Figure 8.
Before adjusting the shutters, it is necessary to determine if the finger is providing a balanced air delivery
across the width of the conveyor. This is the purpose
10
Page 12
SECTION 2 - AIR FLOW AND HEAT TRANSFER
of making a test to read the bake.
1. Remove all upper air fingers from the oven.
NOTE: As the air fingers are removed, use a felt pen to
mark all parts of the fingers. This includes the manifold, inner plate and outer plate. If a blank or choke
plate is used, mark that plate also. Fingers are marked
in the order shown below, as viewed from the front of
the oven. If there are upper and lower oven cavities,
you should mark the fingers for the upper oven with a
U and those for the lower oven with a L.
VERY IMPORTANT: When the ovens were shipped
from the factory, all of the shutters were pre-adjusted for their location within the oven. AII parts
of the fingers must be marked as explained above
and reassembled into their original position.
2. Check the size of the openings at the front of the shut-
ter plates by inserting a drill into the opening. The
factory setting is a #46 drill (0.081/2.06mm).
3. Drill out the four 1/8 pop rivets that are located toward
the front of the fingers. See Figure 8.
NOTE: DO NOT drill out the rivet at the back of the air
finger. This is the pivot for the shutter.
4. If the product is lighter at the front of the oven, increase
the opening by 1/16/1.59mm. If the product is darker
at the front of the oven, decrease the opening by 1/16/
1.59mm.
The best way to check the size of the openings is to
use numbered drills as a gauge. An orifice drill set is
ideal for making this adjustment. For example, to increase the opening by 1/16, you would use a #30 drill
(0.1285/3.26mm), which is approximately 1/16 larger
than the original setting measured with the #46 drill
(0.081/2.06mm).
Be sure that the measurement is taken at the largest
point of the opening. See Figure 8.
5. While holding the new adjustment, clamp the two shutter plates together (two pairs of vice grip pliers are ideal)
and drill holes for new pop rivets.
NOTE: Most of the old rivet holes can be reused if the
old hole is simply elongated. However, if the hole is not
properly elongated, the new rivets may pull the plates
out of adjustment when they are installed.
IMPORTANT: Aluminum 1/8 pop rivets are ideal
for use here. They are much easier to drill out
than stainless steel rivets.
6. Repeat these steps to adjust all upper air fingers. Then,
reinstall the fingers into the oven.
7. Perform another test bake.
lMPORTANT: This test bake must be an exact duplicate of the first test bake. If you change any of the
conditions you will change the results.
If the test indicates an even bake, your adjustment
is complete.
If the test indicates that the bake is still uneven,
you will need to repeat the adjustment procedure
until an even bake is obtained. By keeping the
tests identical, you should be able to determine
how much more the shutter plates should be opened
or closed to achieve a balanced bake without removing the fingers for a third time.
VERY IMPORTANT: After attaining a proper adjustment of the fingers, each air finger should be marked
with a metal stamp showing its position inside the oven.
This will eliminate future problems of operators mixing
the adjusted fingers when cleaning the oven.
Figure 8
PS300/350-style air finger with adjustable shutter plate
Pivot
DO NOT
drill out
Vise grip
pliers
Higher pressure at the
front of the fingers is
regulated by the
shutter openings
Drill out
rivets
11
Insert drill bit
to check size
of opening
Page 13
SECTION 2 - AIR FLOW AND HEAT TRANSFER
IV. OVEN CAPACITY
Oven capacity is generally not a service issue. However,
when reporting a service problem, customers may use terms
relating to capacity, such as bake time, belt time, time of
delivery, etc. This information is provided as a reference for
understanding these terms.
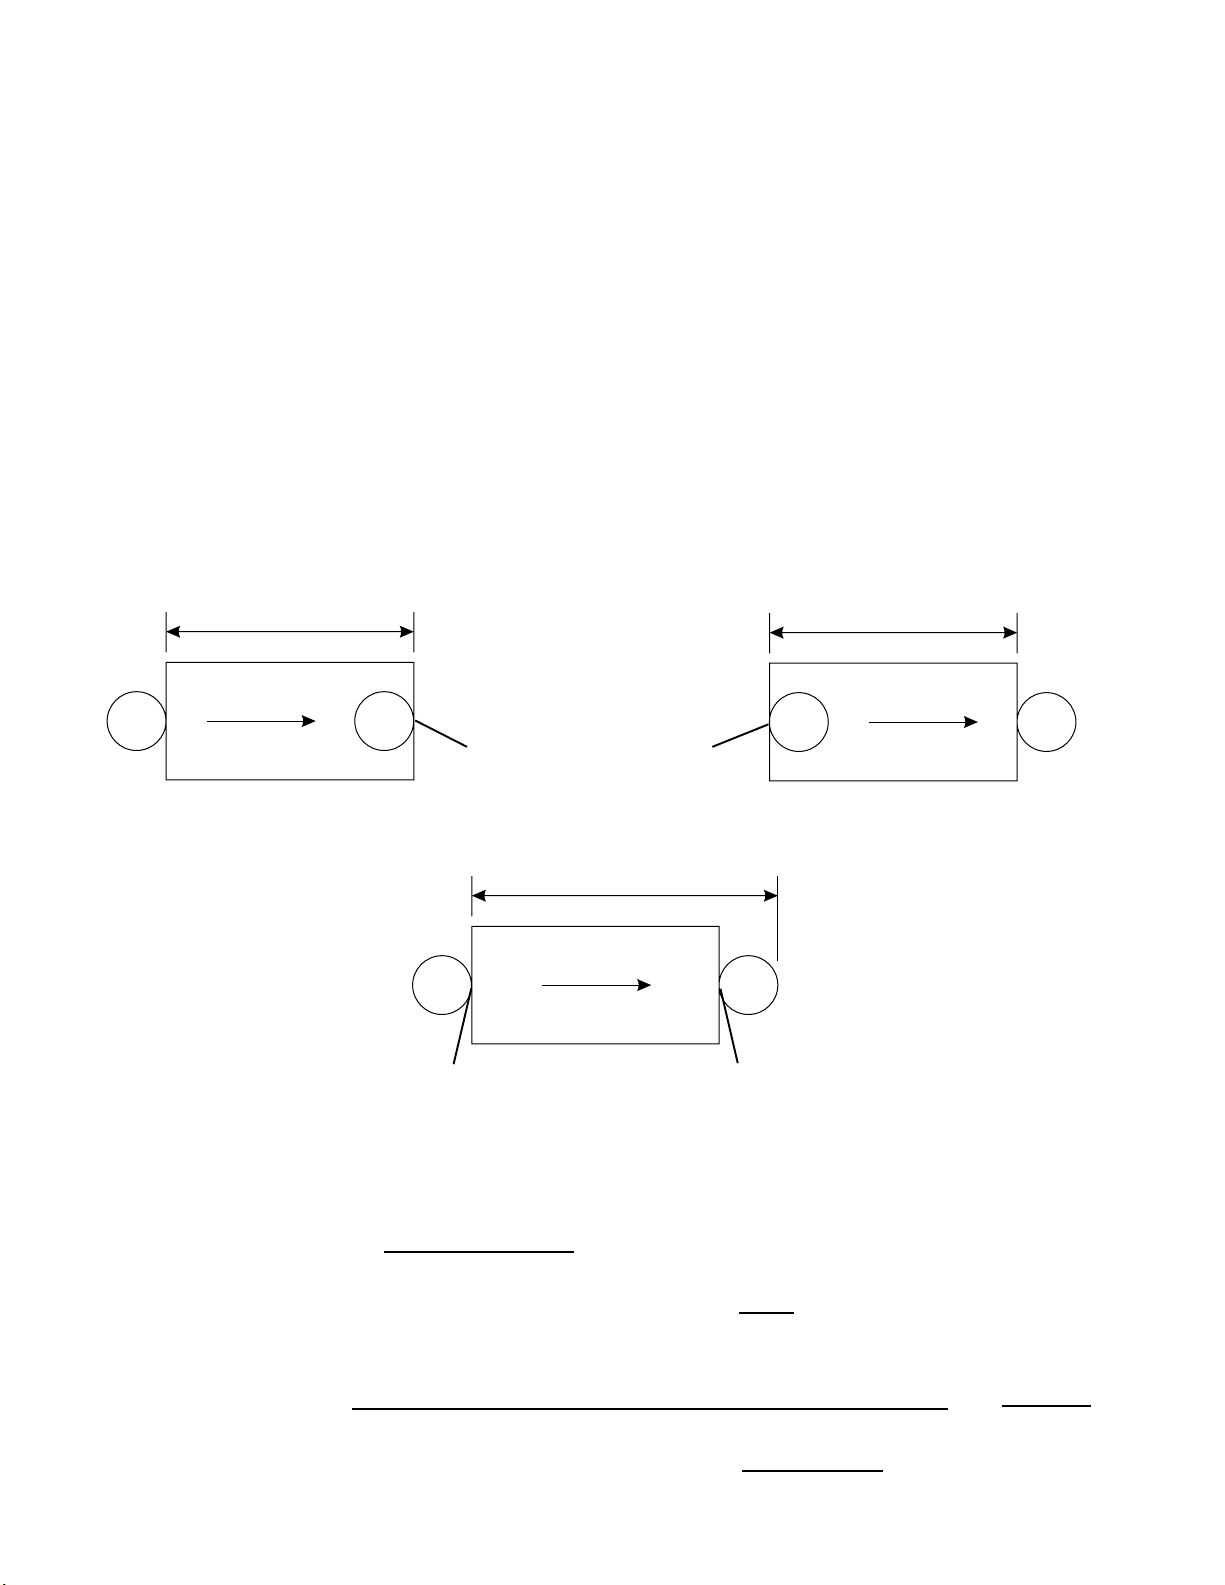
A. Conveyor Speed and Bake Time
Middleby Marshall conveyor ovens display the Conveyor
Speed on the Thumbwheel (or on the display of the
Digital Speed Controller, as appropriate for the oven
model). Conveyor Speed is also called Bake Time.
Conveyor Speed (Bake Time) is a leading edge to lead-
ing edge measurement. That is, it is the elapsed time
from the leading edge of the product entering the bake
chamber to the leading edge of the product leaving the
bake chamber. See Figure 9.
Figure 9 - Conveyor Speed (Bake Time)
Conveyor Speed
(Bake TIme)
B. Belt Time
Belt Time is a measurement used by several customers. It is a trailing edge to trailing edge measurement.
That is, it is the elapsed time from the trailing edge of
the product entering the bake chamber to the trailing
edge of the product leaving the bake chamber. See
Figure 10.
Note that belt time is equal in length to conveyor speed
(bake time), although the time is measured during a
different period of the baking process.
C. Time of Delivery (TOD)
Time of delivery (TOD) is a leading edge to trailing edge
measurement. That is, it is the elapsed time from when
the leading edge of the product enters the bake chamber to when the trailing edge of the product leaves the
bake chamber. See Figure 11.
Figure 10 - Belt Time
Belt Time
Direction of
Conveyor Travel
Leading edge
of product
Trailing edge
of product
Figure 11 - Time of Delivery
Time of Delivery
Direction of
Conveyor Travel
Leading edge
of product
D. Formulas for Determining Time of Delivery (TOD) and Oven Capacity per Hour
1. Time of Delivery (TOD)
Time of Delivery (TOD) = x (Bake Chamber Length + Product Diameter)
Conveyor Speed
Bake Chamber Length
Example: PS570S Oven, 7:00 Bake Time, 16 Product Diameter = x (70 + 16) = 8.6 mins. (8:36)
Trailing edge of
product
7 mins.
70
Direction of
Conveyor Travel
2. Oven Capacity/Hour
Oven Capacity/Hour = x
Example: PS570S Oven, 7:00 Bake Time, 16 Product Diameter = x 6.98 = 75 pizzas/hr.
(Bake Chamber Length + Product Diameter) x Bake Chamber Depth
Product Diameter²
(70 + 16) x 32
256 in.²
60 min./hr.
12
TOD
Page 14
SECTION 3 - SERVICING COMPONENTS
SECTION 3
SERVICING COMPONENTS
I. CONVEYOR SPEED CONTROLLER AND DRIVE
MOTOR
The Conveyor Speed Controller is used to set and monitor
the speed of the conveyor. The Controller consists of three
components:
Control Module
Early units used a module which featured a microcomputer that was unique to each oven model. Using this
control module required verifying that the correct microcomputer was installed.
Later units use DIP switches to set up the controller for
a particular oven model. This later model was initially
available with a thumbwheel unit (either 4 or 8 DIP
switches). Current models feature a digital display with
keypad (8 DIP switches).
Thumbwheel Unit (or Digital Display with Keypad)
This module displays the conveyor speed and allows it
to be adjusted by the operator. It is connected to the
control module by a ribbon cable.
Pickup Assembly
The pickup assembly consists of a magnetic wheel on
the end of the gear motor (conveyor drive motor) shaft,
and a Hall Device sensor that provides feedback to the
control module.
As the magnetic wheel turns, the revolutions of the
magnet are monitored by the Hall Device sensor. The
signals are sent to the control module, which compares
the motor speed with the speed shown on the
thumbwheel or digital display. The control module increases or decreases the voltage to the gear motor
(conveyor drive motor) depending on the signal.
A. Part Number Reference - Speed Controllers
1. Original-style speed controller with interchangeable microcomputer and thumbwheel. This unit is no longer
available and part numbers are provided for reference
only. Servicing this unit is beyond the scope of this
manual. If this controller is in need of service, we recommend simply installing a current unit (see below).
P/N Description
28174-0004 PS360 controller, yellow (12A) microcomputer
28074-0006 PS360 microcomputer, yellow (12A)
27170-0232 PS360 microcomputer w/emulator, yellow (12A)
28074-0007 PS314 controller, orange (13A) microcomputer
28074-0008 PS314 microcomputer, orange (13A)
27170-0233 PS314 microcomputer w/emulator, orange (13A)
28074-0013 PS200 microcomputer, pink (15A)
2. Current-style speed controller with either 4 or 8 DIP switch
settings and thumbwheel. This unit is no longer available
from the factory, but may still be stocked by service agencies.
P/N Description
42810-0133 Controller assembly with thumbwheel
42810-0118 Thumbwheel only
3. Current-style speed controller with 8 DIP switch settings and digital display/keypad. Note that the two types
of controllers ARE NOT compatible - the controller and
display unit MUST be of the same type.
P/N Description
37337 Controller assembly with digital display/keypad,
NCC (8/00-current)
37503 Digital display/keypad unit only, NCC
45133 Controller assembly with digital display/keypad,
Danaher (2/02-current)
Figure 12
Original-style speed controller
Produced with thumbwheel only.
Interchangeable microcomputer selects oven model.
THIS CONTROLLER IS OBSOLETE AND NO
LONGER AVAILABLE.
Control module
Microcomputer
Thumbwheel
Produced with Thumbwheel or digital display.
DIP switches may
be on control
module or digital
display, depending
on the controller
model.
13
Figure 13
Current-style speed controller
4 or 8 DIP switches select oven model.
Cover plate
shows DIP
switch settings
Thumbwheel
or digital
display
Control
module
Page 15
SECTION 3 - SERVICING COMPONENTS
B. Part Number Reference - Pickup Assemblies
1. PS350-style pickup assembly or old-style pickup assembly (see Figures 14-15). These parts use the same
part number. They are no longer available from the
factory, but may still be stocked by some service agencies.
P/N Description
28074-0005 Pickup assembly, PS350-style or old-style
2. Current-style pickup assembly (see Figures 16-17)
P/N Description
27170-0263 Pickup assembly, current
C. Preparing to Service the Speed Controller
NOTE: To properly service this equipment, you must use a
digital meter. An analog meter will not work.
1. Before troubleshooting the conveyor speed controller,
check the following:
a. Conveyor belt is tight.
b. Drive chain is tight and aligned.
c. Set screws on drive sprockets are tight.
d. Axial fan(s) are running and clean of dust and de-
bris.
e. Motor and pickup wires are secure at the Conveyor
Terminal Block (location of the block varies by oven
model).
f. Wire connections on conveyor speed control mod-
ule (including the ribbon cable to the thumbwheel/
display unit) are secure.
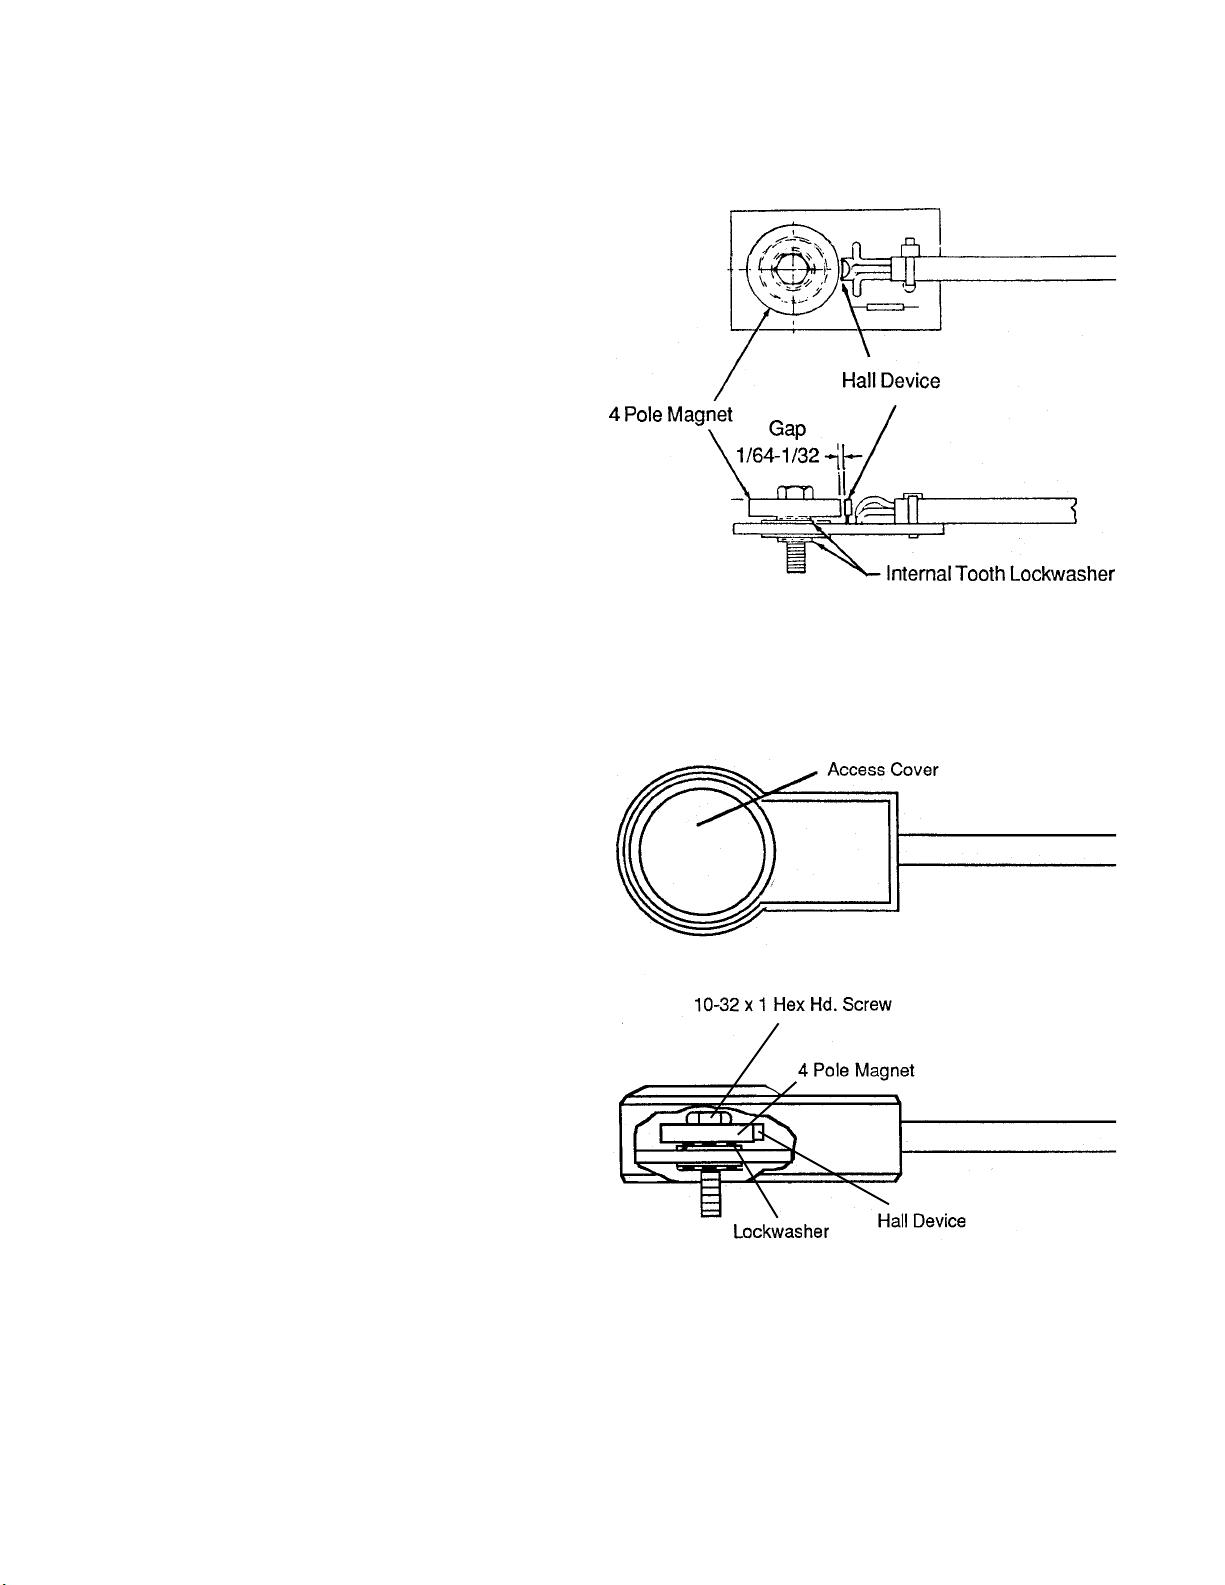
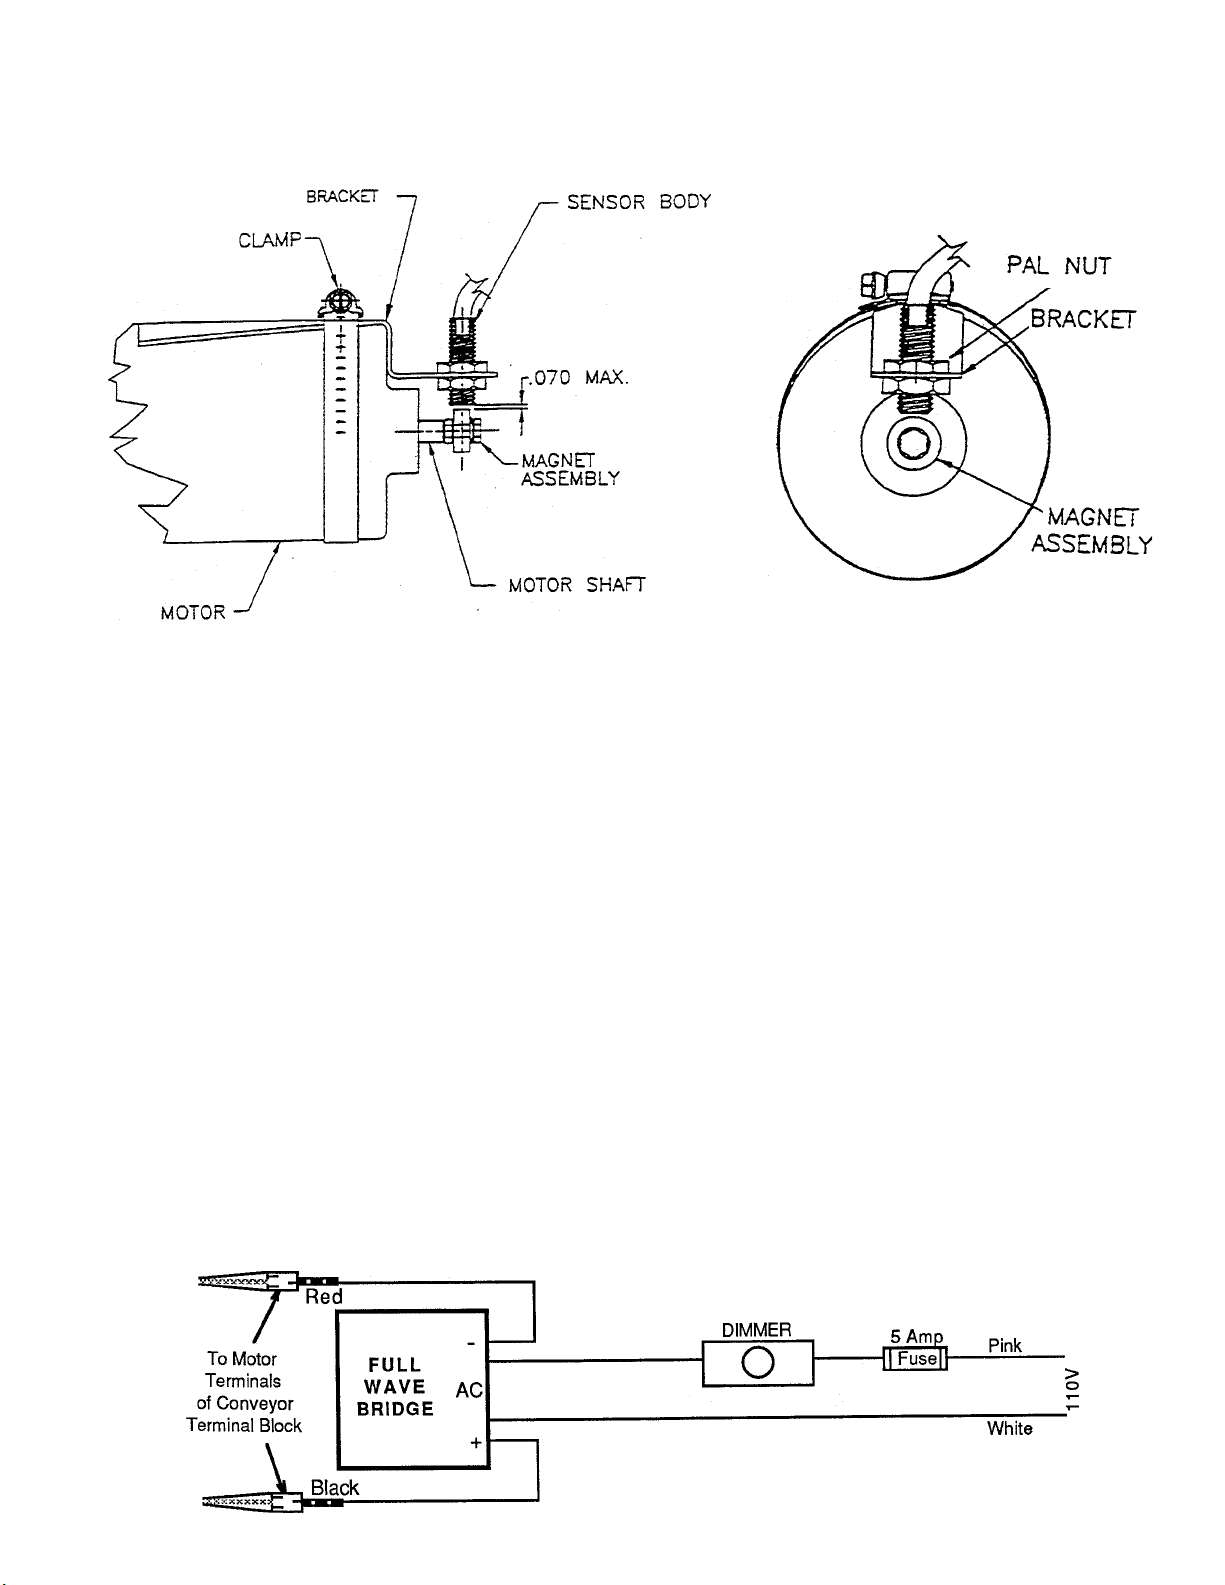
2. Check the pickup for the following (see Figures 14-17):
a. Pickup is secure.
b. Magnet is not cracked or chipped.
c. Magnet is not rubbing on plastic housing.
d. Mounting bolt is not worn or bent.
e. Pickup bearing in good condition.
f. On PS350-style pickup (Fig. 14), gap between
magnet and Hall Device is spaced approximately
1/64-1/32 (0.4-0.8mm, or a business card thickness).
Figure 14
PS350-style pickup assembly
(used on early PS360)
Figure 15
Old-style pickup assembly
14
Page 16
SECTION 3 - SERVICING COMPONENTS
Figure 16
Current pickup assembly - side view
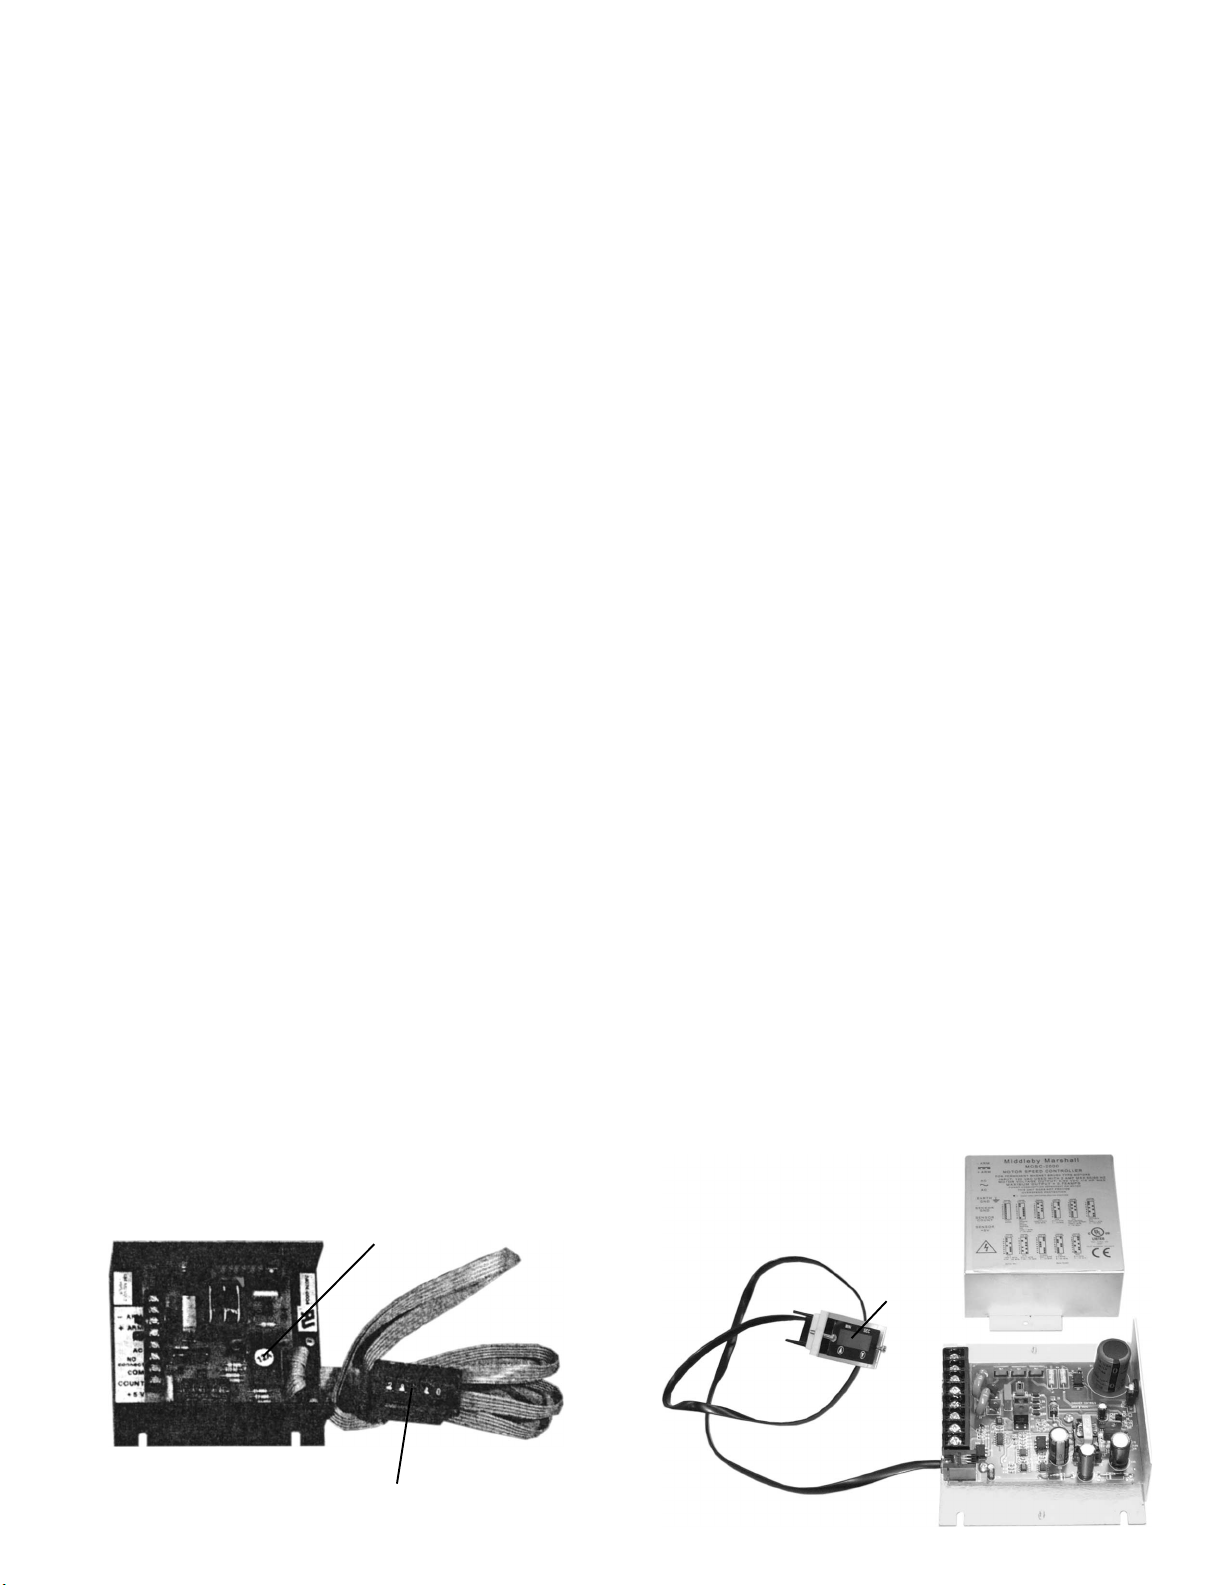
D. Controller/Motor Failure
When the conveyor speed controller fails, it is very possible that a shorted conveyor motor caused the problem.
Unless the motor is changed, the installation of another
conveyor speed controller will simply burn up the new controller.
You are STRONGLY ADVISED to bypass the speed controller and install the tester unit shown in Figure 18 before
replacing any speed controller that has burned out. This
will identify the source of the problem - the speed controller
or the motor. It is much less expensive to burn out the
tester than another speed controller.
The components for this tester can be purchased at any
electrical supply store. The tester is not as accurate or
sensitive as the speed controller, and so should NOT be
left in place on the oven after servicing!
Figure 17
Current pickup assembly -
end view
Components needed for the field tester:
Full-wave AC-DC bridge, 400V, 4A
Light dimmer switch, 5A
In-line 5A AC fuse enclosed in plastic case
2 alligator clips
CAUTION: DO NOT turn the conveyor switch ON while
the field tester is connected!
1. Disconnect the motor lead wires and attach to the field
tester as shown in Figure 18. Depending on the oven
model, you can simply use the black and red gear motor
leads, or the remote leads at the terminal block connection.
To reverse the conveyor motor direction, simply interchange the black and red leads.
2. To start the test, the dimmer switch should be turned
until the motor begins to operate. The switch can then
be turned down to the desired motor speed.
Figure 18
Field Tester for Conveyor Drive Motor
15
or circuit breaker
Page 17
SECTION 3 - SERVICING COMPONENTS
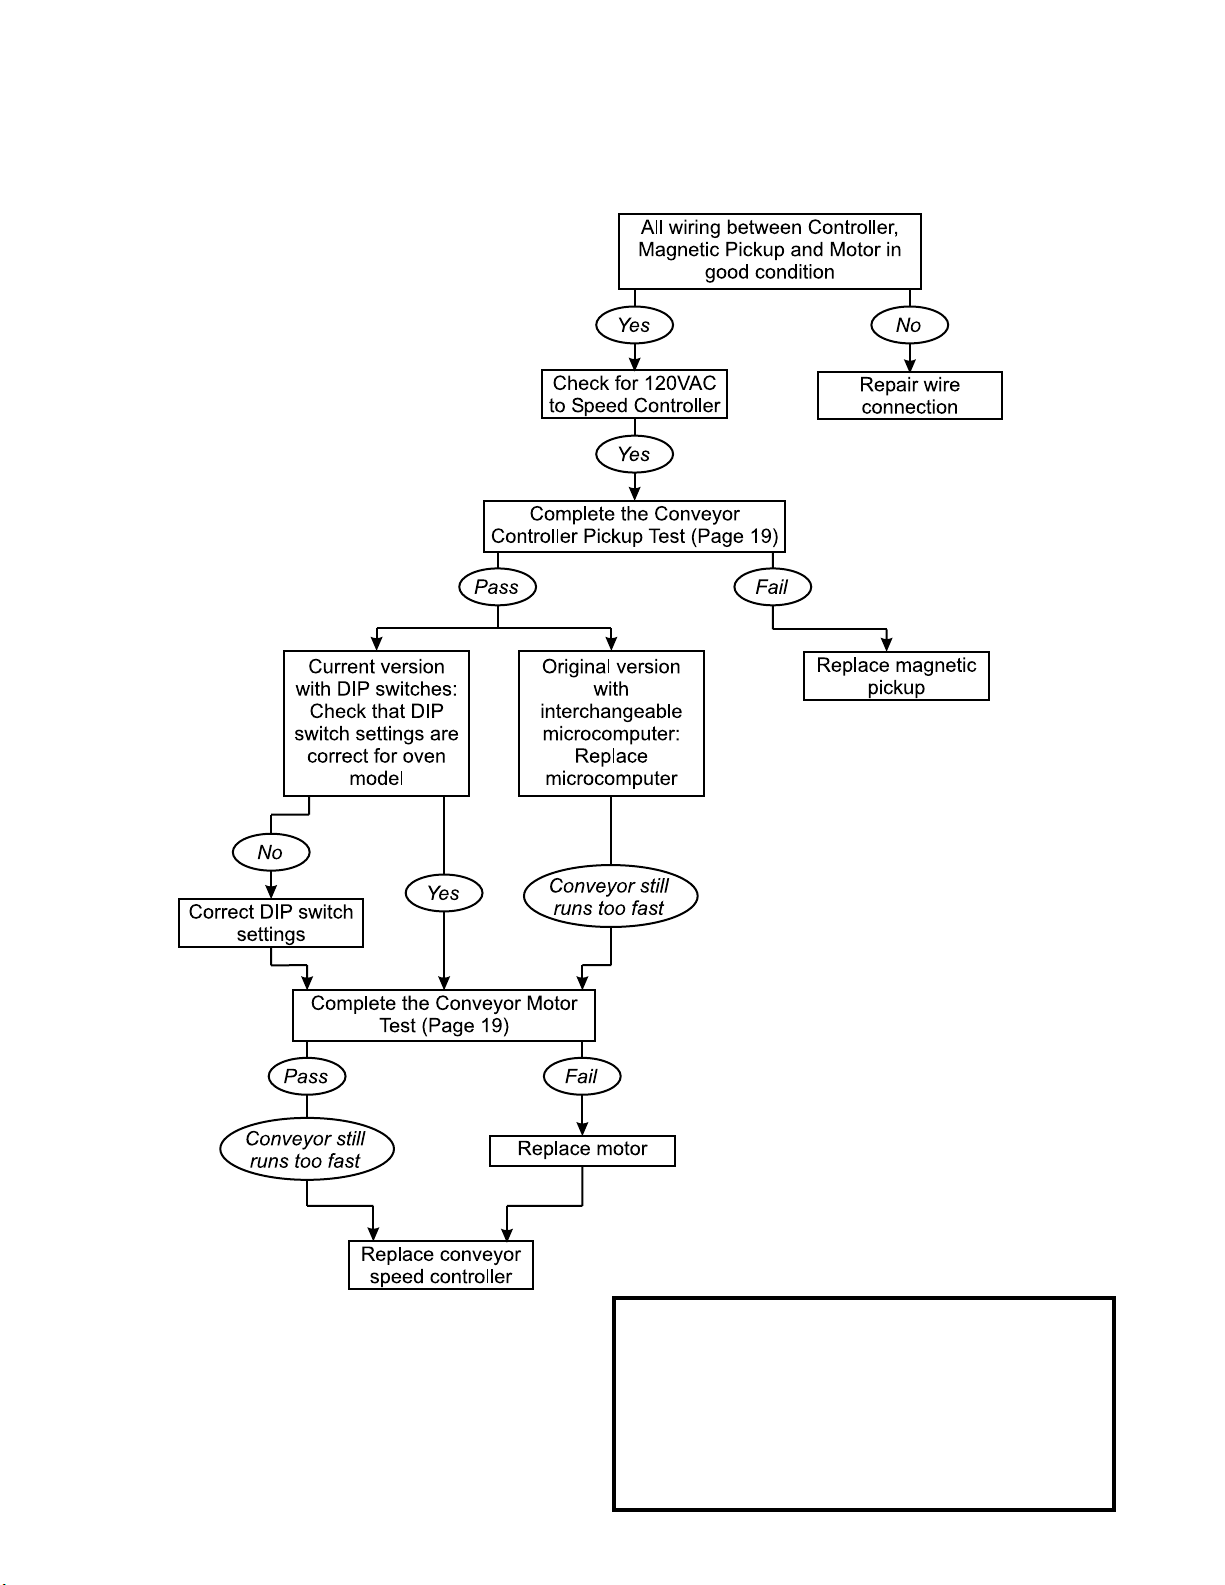
E. Basic Troubleshooting Flowcharts
1. IF THE GEAR MOTOR RUNS AT FULL SPEED:
16
NOTE:
Middleby no longer stocks parts for the original
speed controller with interchangeable microcomputer. If it is necessary to replace this version of
the controller or the microcomputer, and the
service agent does not have the parts in stock, it
will be necessary to replace the entire speed
controller with a current model.
Page 18
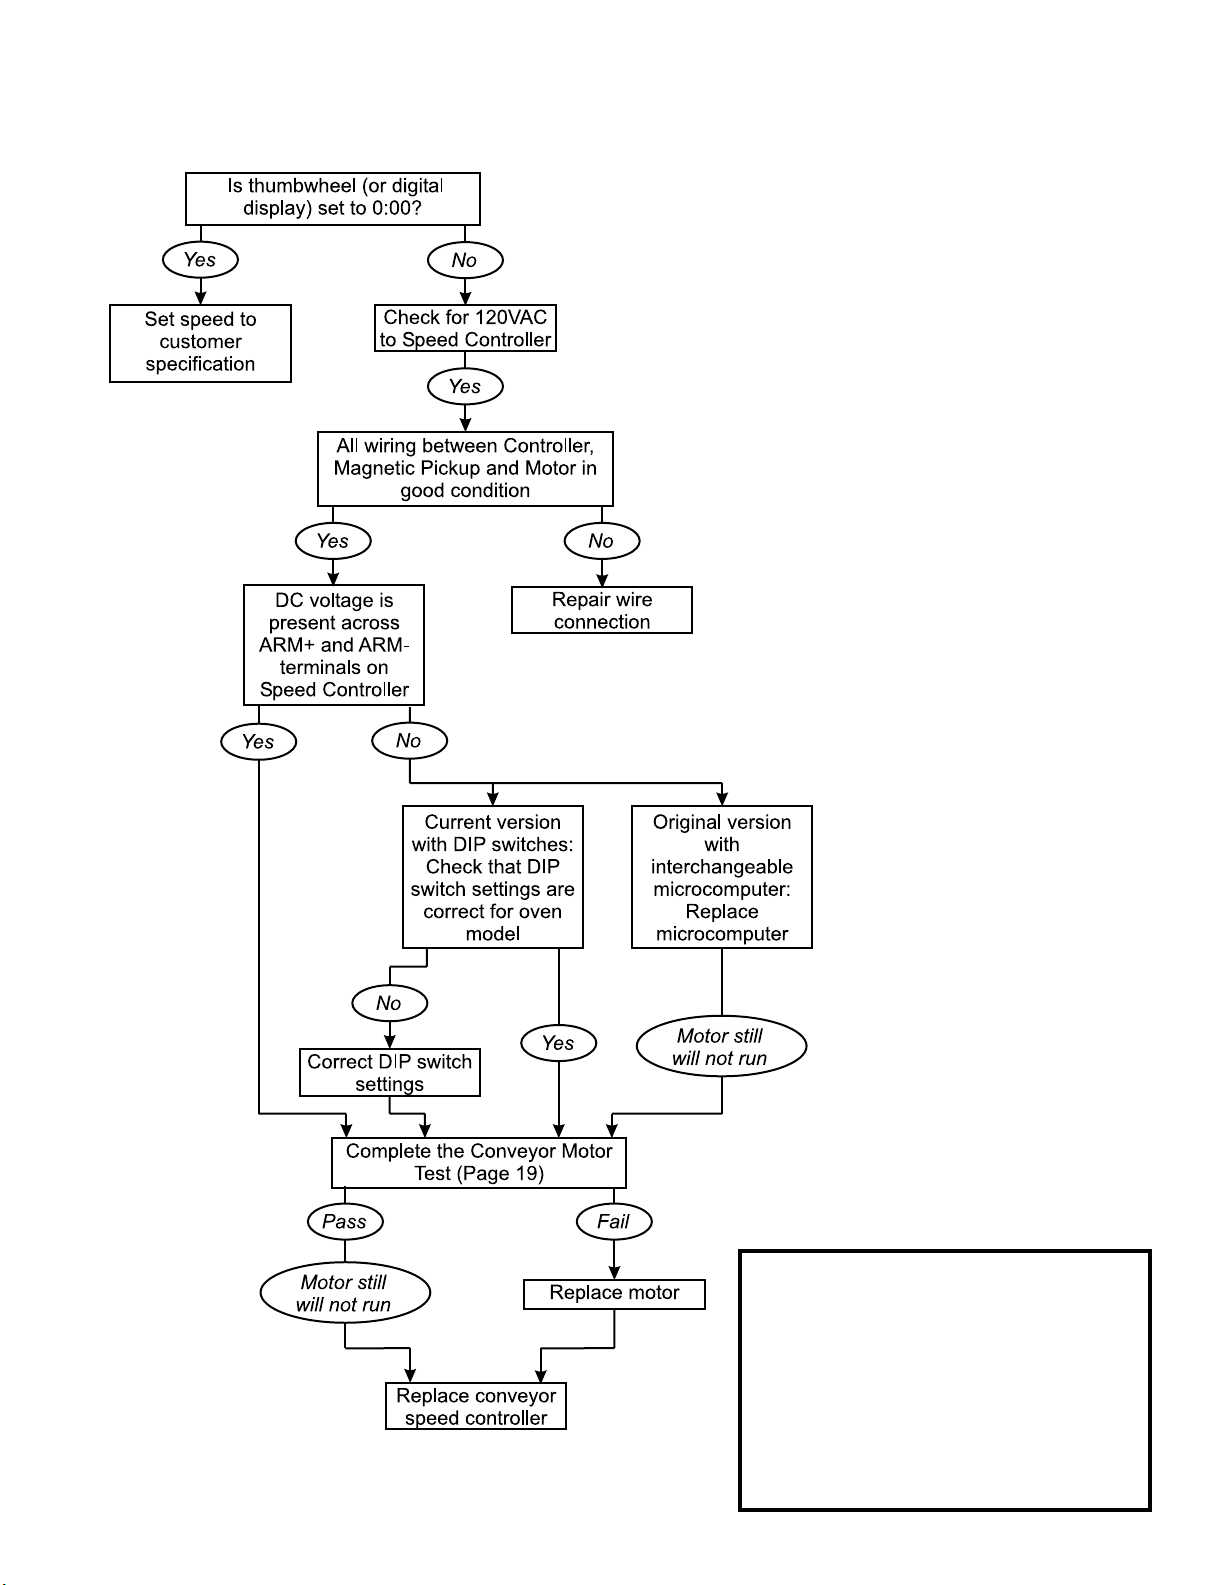
2. IF THE GEAR MOTOR WILL NOT RUN AT ALL:
SECTION 3 - SERVICING COMPONENTS
17
NOTE:
Middleby no longer stocks parts for the
original speed controller with inter-
changeable microcomputer. If it is
necessary to replace this version of
the controller or the microcomputer,
and the service agent does not have
the parts in stock, it will be necessary
to replace the entire speed controller
with a current model.
Page 19
SECTION 3 - SERVICING COMPONENTS
F. Initial Troubleshooting
NOTE: When changing the conveyor speed on a controller
with a thumbwheel, it is advisable to turn the conveyor switch
OFF before adjusting the thumbwheel. Note that this cannot be done on a digital keypad, as switching the conveyor
switch OFF will also turn off the display.
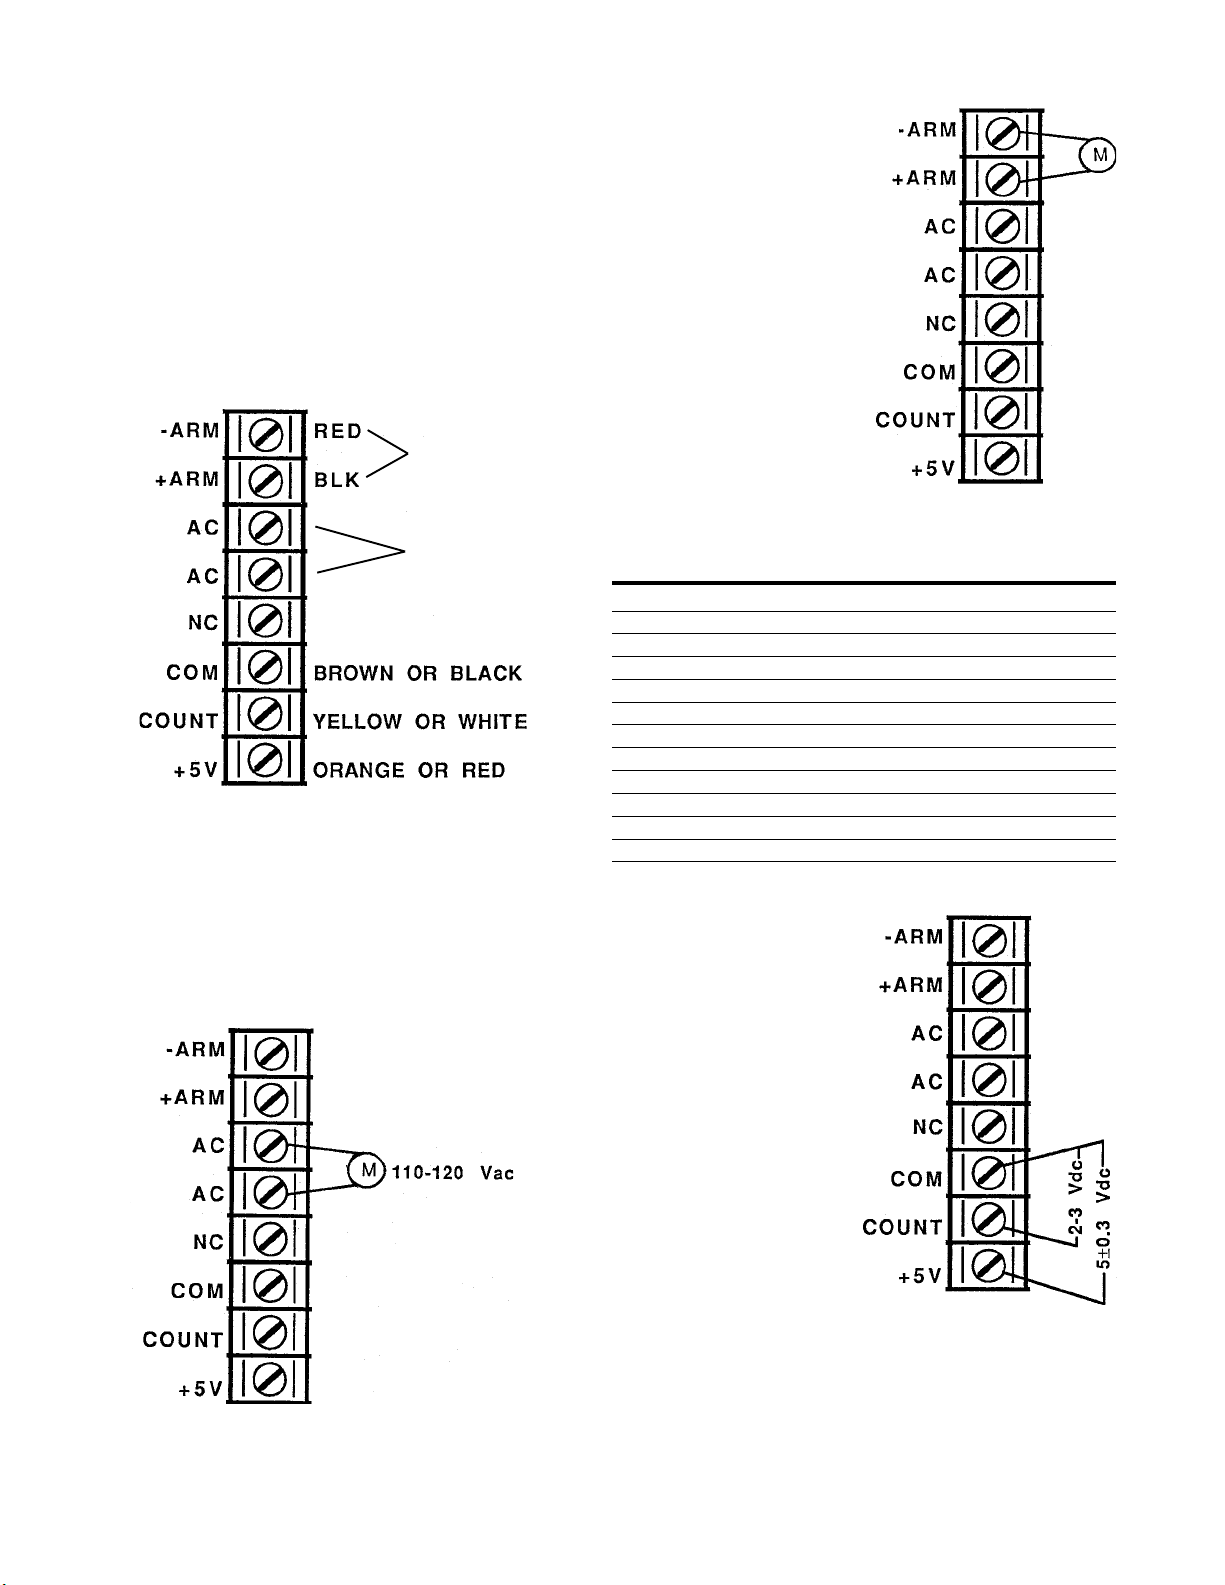
1. Check all connections at the terminals on the conveyor
speed control module to ensure that they are correct
and tight. Connections are shown in the drawing.
Correct the connections if necessary.
Connections are
reversed if
conveyor direc-
tion is reversed.
120VAC supply.
Wire colors vary
by oven model.
2. Ensure that there is power to the controller. Use a
digital multimeter to read the voltage between the terminals marked AC. The voltage should read between
110-120VAC.
If the power is not present or of an incorrect voltage,
check the power source.
3. With the AC power on,
check the DC voltage to
the conveyor motor.
Match the measured voltage with those shown on
the chart below. If the
voltage reading is more
than ±5VDC of that shown
on the chart, complete
the Motor Test on the next
page.
Thumbwheel/ DC Motor Voltage
Display PS200, PS310, 360,
Setting 570, 360WB70 360WB, 360EWB
3 mins. 84VDC 67VDC
4 mins. 63VDC 50VDC
5 mins. 51VDC 40VDC
6 mins. 43VDC 34VDC
7 mins. 37VDC 28VDC
8 mins. 32VDC 25VDC
9 mins. 29VDC 22VDC
10 mins. 27VDC 20VDC
11 mins. 24VDC 18VDC
12 mins. 22VDC 17VDC
13 mins. 19VDC 14VDC
15 mins. 18VDC 13VDC
4. Check the magnetic
pickup on the motor.
If the pickup is in good
condition, check that
the conveyor is running
and then check the voltage between the COM
and ±5VDC terminals
on the controller. On
controllers with thumbwheels, the voltage
should read 5VDC,
±0.3VDC. Digital controllers should read
5VDC , ±1.0VDC.
Next, check the voltage
between the COM
and COUNT terminals. The reading should stay between 2 and 3VDC.
If EITHER of these two readings are incorrect, perform
the Conveyor Control Pickup Test on the next page.
18
Page 20
SECTION 3 - SERVICING COMPONENTS
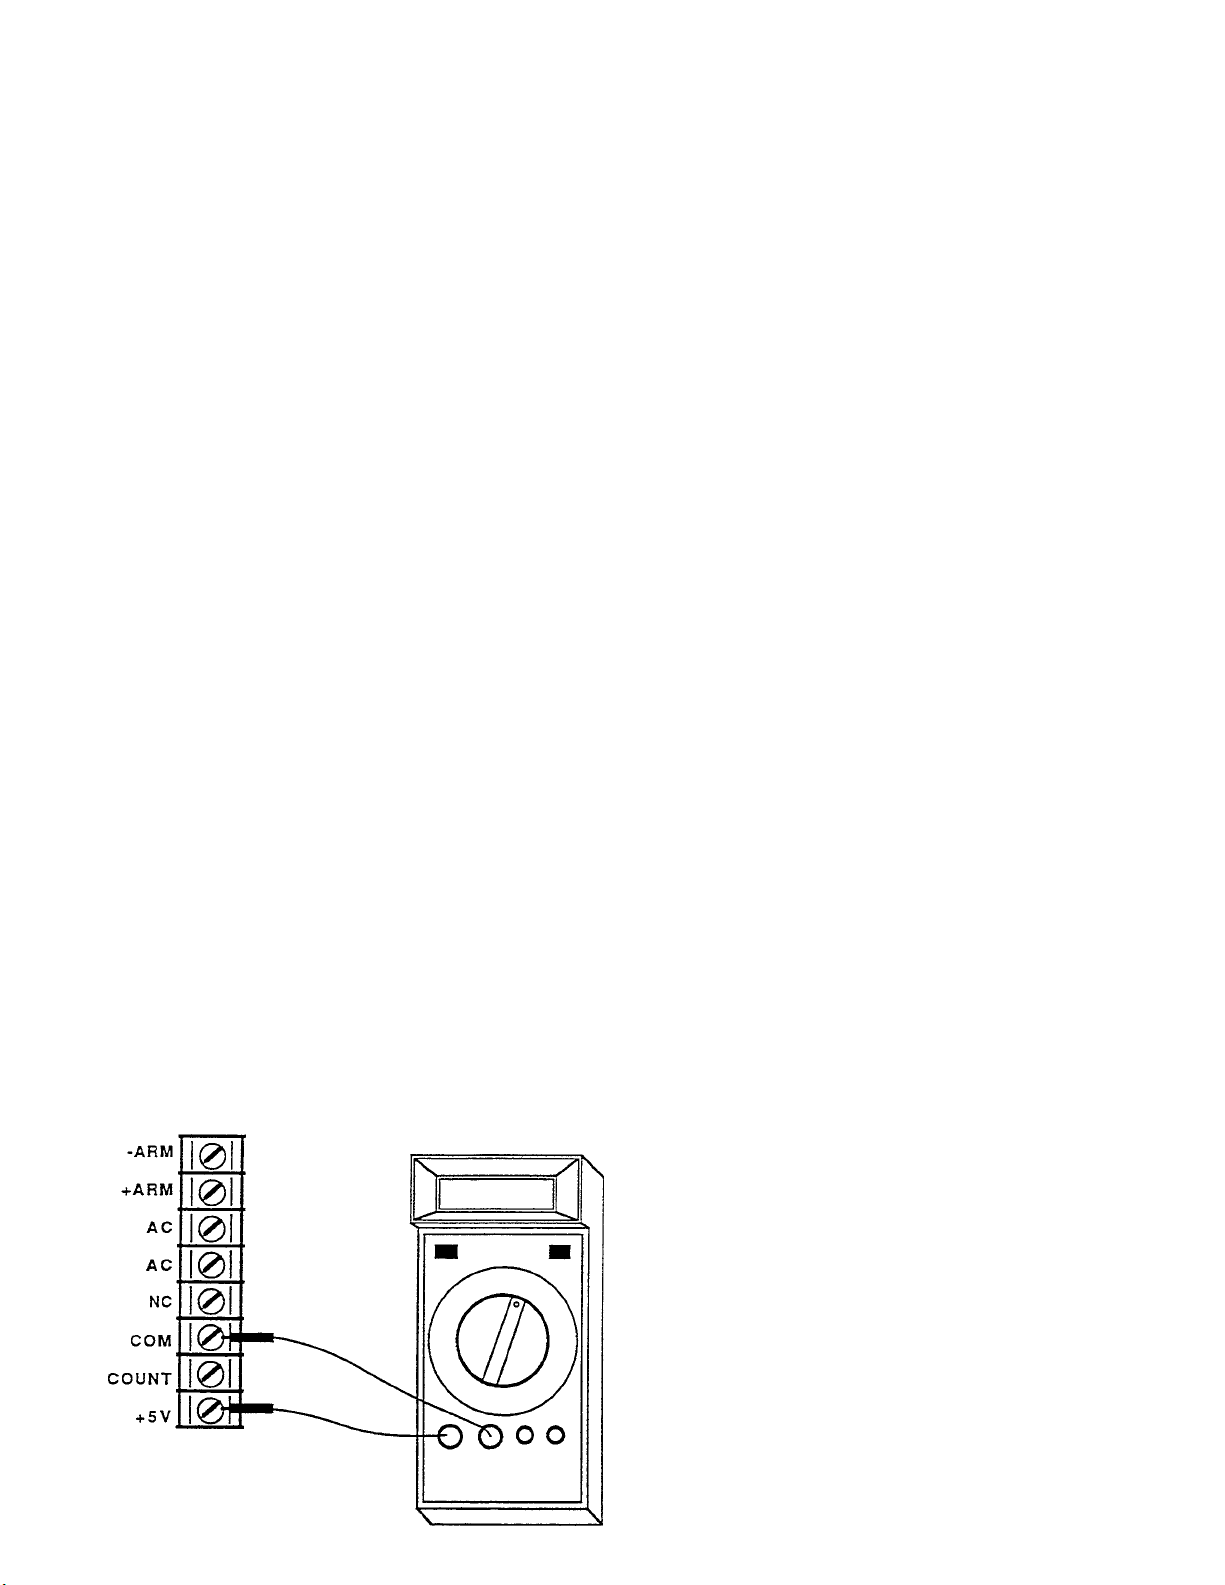
G. Conveyor Control Pickup Test
1. Visually check the pickup for the following:
The magnet is clean and the bearing is in good
condition.
There are no chips or cracks on the magnet.
If using a PS350-style pickup (see Figure 14), there
is a 1/64 to 1/32 (0-4-0.8mm, or a business card
thickness) gap between magnet and hall device.
2 Set the multimeter to the VDC scale, then connect the
meter probes as shown in Figure 19. The black (-common) probe should connect to the COM terminal on
the speed control board, while the red (+VW) probe
connects to the +5V terminal. +5VDC should be
present at all times when the conveyor is operating.
If +5VDC is present, proceed to Step 3.
If +5VDC is not present, disconnect the three pickup
wires (connected to the COM, SIGNAL, and +5V
terminals) and again check for +5VDC.
- If +5VDC is present with the pickup disconnected, replace the pickup assembly.
- If +5VDC is still not present, replace the conveyor speed controller.
3. Connect the multimeters red (+) lead to the SIGNAL
terminal; then, disconnect the motor wires from the ARM and +ARM terminals. Using a 5/16 open-end
wrench, very slowly rotate the motor pickup shaft while
observing the multimeter. Two (2) changes from +5VDC
to 0VDC should occur for each motor revolution.
lf the signal is always at 0VDC, go to Step 4.
lf the signal is always at 5VDC, OR if the signal
changes more than 2 times per revolution, replace
the pickup assembly.
4. Disconnect the pickup signal wire from the speed controller and check for +5VDC at the SIGNAL terminal of
the controller.
If +5VDC is present, replace the pickup assembly.
If 0VDC is present, replace speed control.
Figure 19
Connections for pickup test
H. Conveyor Motor Test
1. Disconnect the gear motor wires from the Speed Controller terminals (-ARM and +ARM).
2. Remove the brush retainer caps from the gear motor.
DO NOT remove the brushes.
3. Set the multimeter to the lowest Ohm scale. Then,
place one meter probe on each brush retaining plate.
BE SURE THAT NEITHER PROBE TOUCHES THE
MOTOR CASING.
4. Using a 5/16 open-end wrench, very slowly rotate the
motor pickup shaft while observing the multimeter. During a 1/2 rotation:
The Ohm reading should stay betweeen 3-5W.
There should NEVER be a complete short.
There should never be a high Ohm reading.
If the motor fails any of these tests, replace the motor.
I. Replacing the Magnetic Pickup
If you need to replace the magnetic pickup on a gear motor
shaft:
1. Apply Loctite Removable #242 (or equivalent) sparingly
to the threads.
2. Turn the mounting screw until it is finger tight, then turn
it an additional 1/4 turn with a wrench.
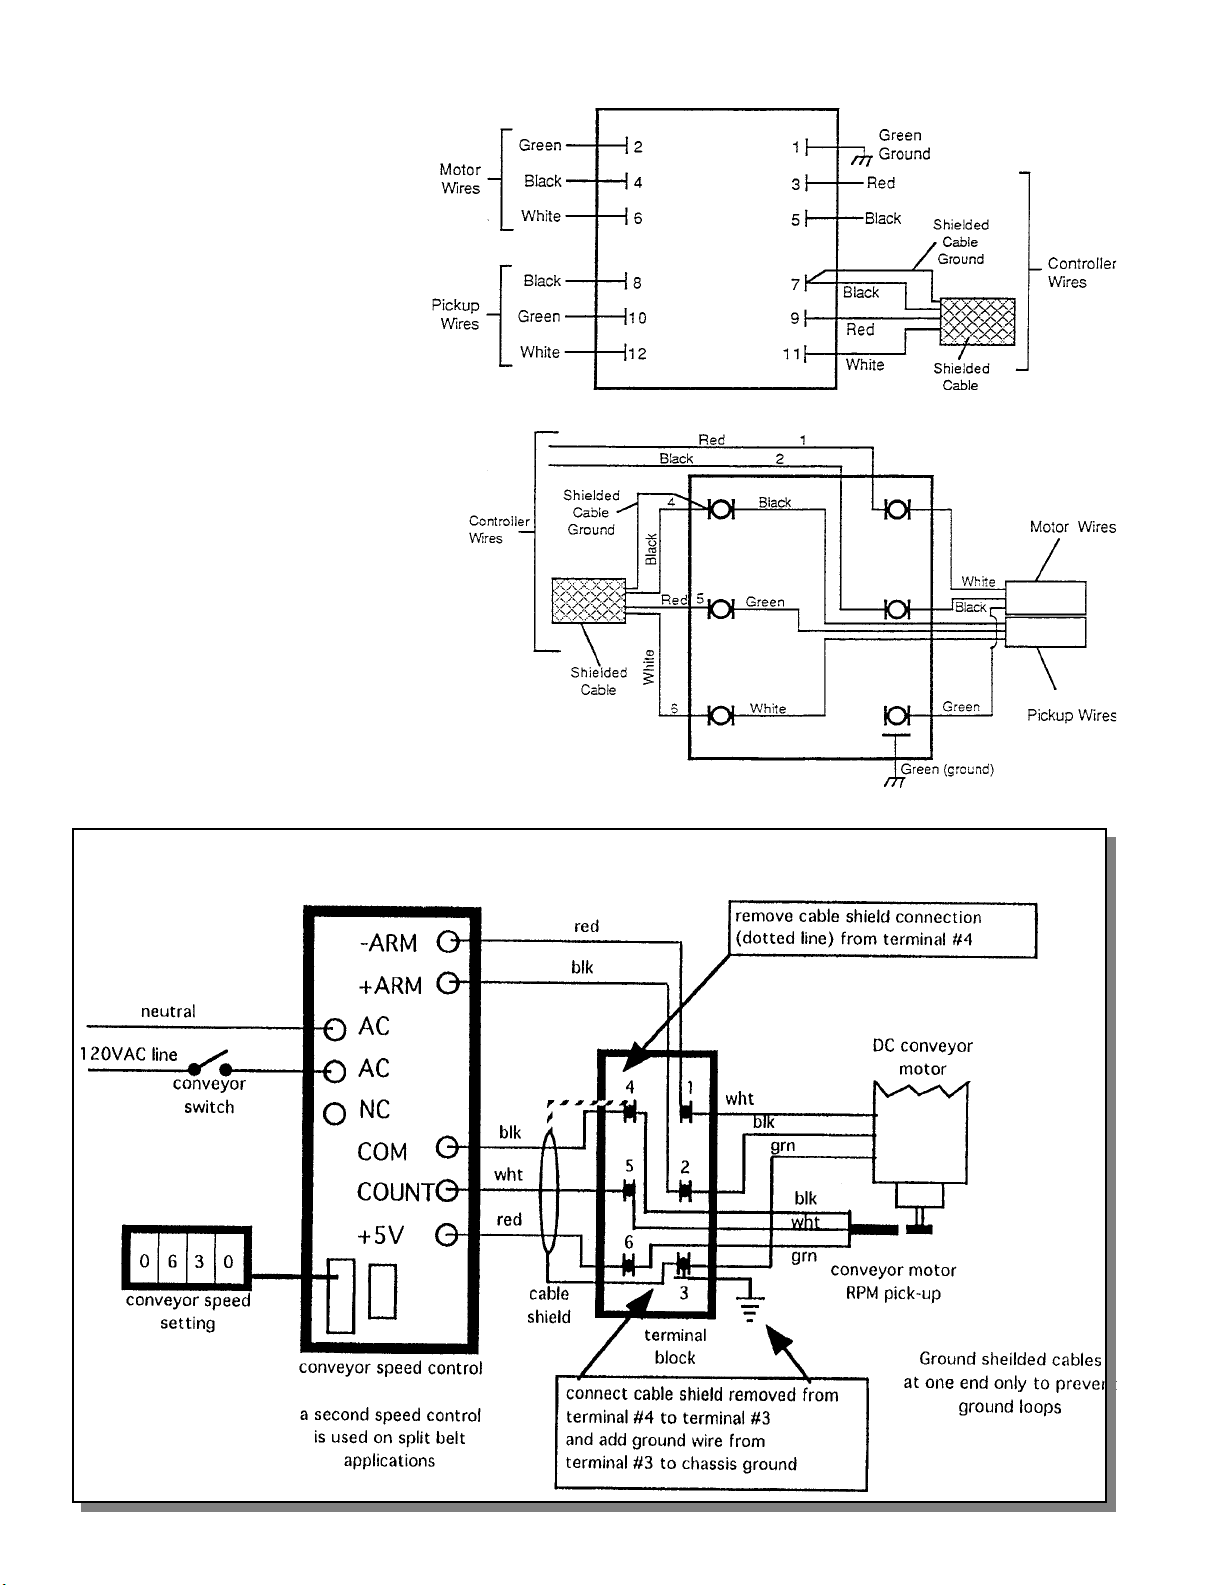
J. Unshielded Pickup Wires on Early PS360-series ovens
The conveyor speed controller can be affected by electrical
noise transmitted by other electrical components or wiring.
Early PS360-series ovens used an unshielded connection
between the pickup assembly and the control module. On
these ovens, the unshielded wiring can pick up the noise
and transmit it to the control module. The problem is most
easily seen when the conveyor fails during burner spark
ignition.
There are two remedies for this problem:
1. Turn the conveyor switch to the OFF position, and then
back to the ON position, after the burner has ignited.
The controller should reset and allow normal operation.
This should be used as a stop-gap measure ONLY to
allow the oven to continue operation.
2. Replace the pickup wiring between the control module
and the terminal block with a new shielded cable (P/N
42400-0334). When installing the shielded cable, follow the color code change shown here:
Old Wiring Shielded Cable
Br own Black
Orange Red
Yellow White
Wiring diagrams are also provided in Figures 20 and 21
on the next page.
There is a fourth lead on one end of the shielded cable.
This is a ground lead which is attached to the black
wire of the cable. The ground lead should be connected
to the terminal block inside the motor compartment.
Current PS360-series ovens have the shielded cable
installed at the factory and do not require this retrofit.
19
Page 21
SECTION 3 - SERVICING COMPONENTS
Figure 20
Wiring for PS360 Shielded
Pickup Cable - early terminal
block design
Figure 21
Wiring for PS360 Shielded
Pickup Cable - late terminal
block design
K. Appendices
Appendix - Conveyor sensor wiring changes for PS360-series and PS570S, 10/95
20
Page 22
SECTION 3 - SERVICING COMPONENTS
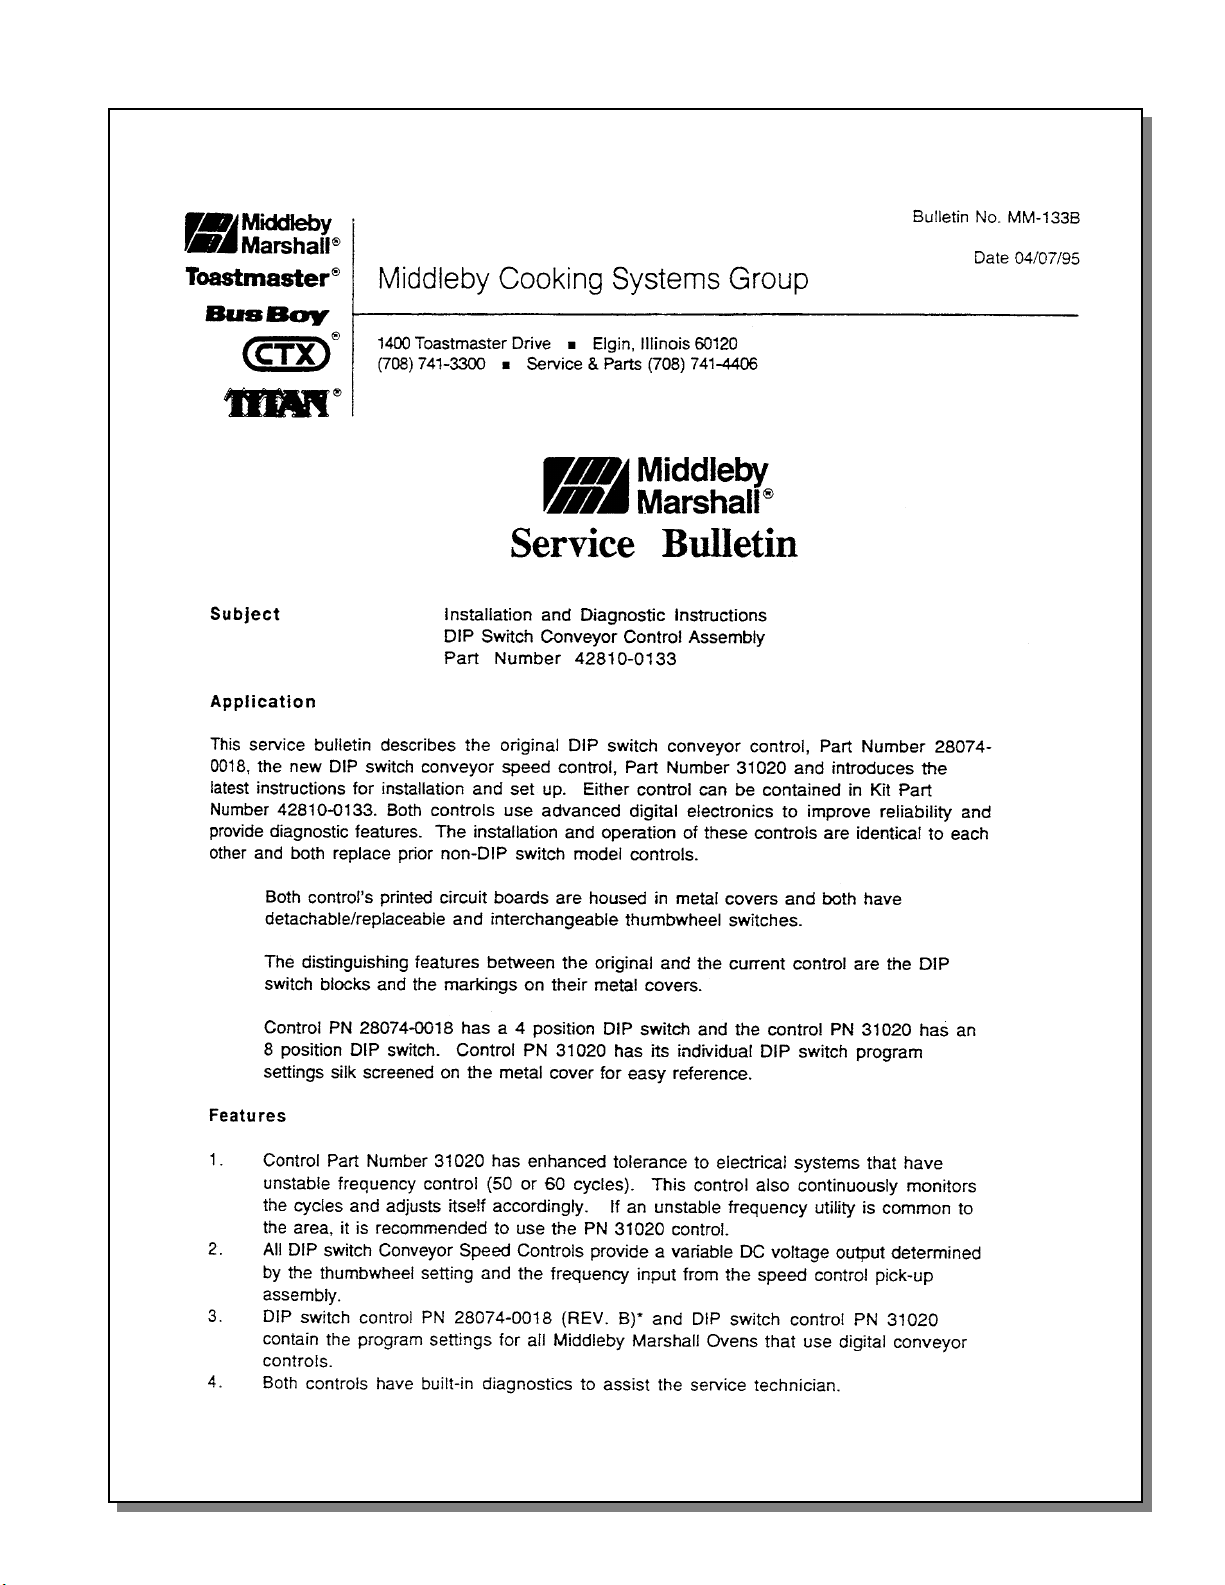
Appendix - Service Bulletin MM-133B - Installation Instructions for Conveyor
Speed Controller Kit with Thumbwheel, P/N 42810-0133, 4/95
21
Page 23
SECTION 3 - SERVICING COMPONENTS
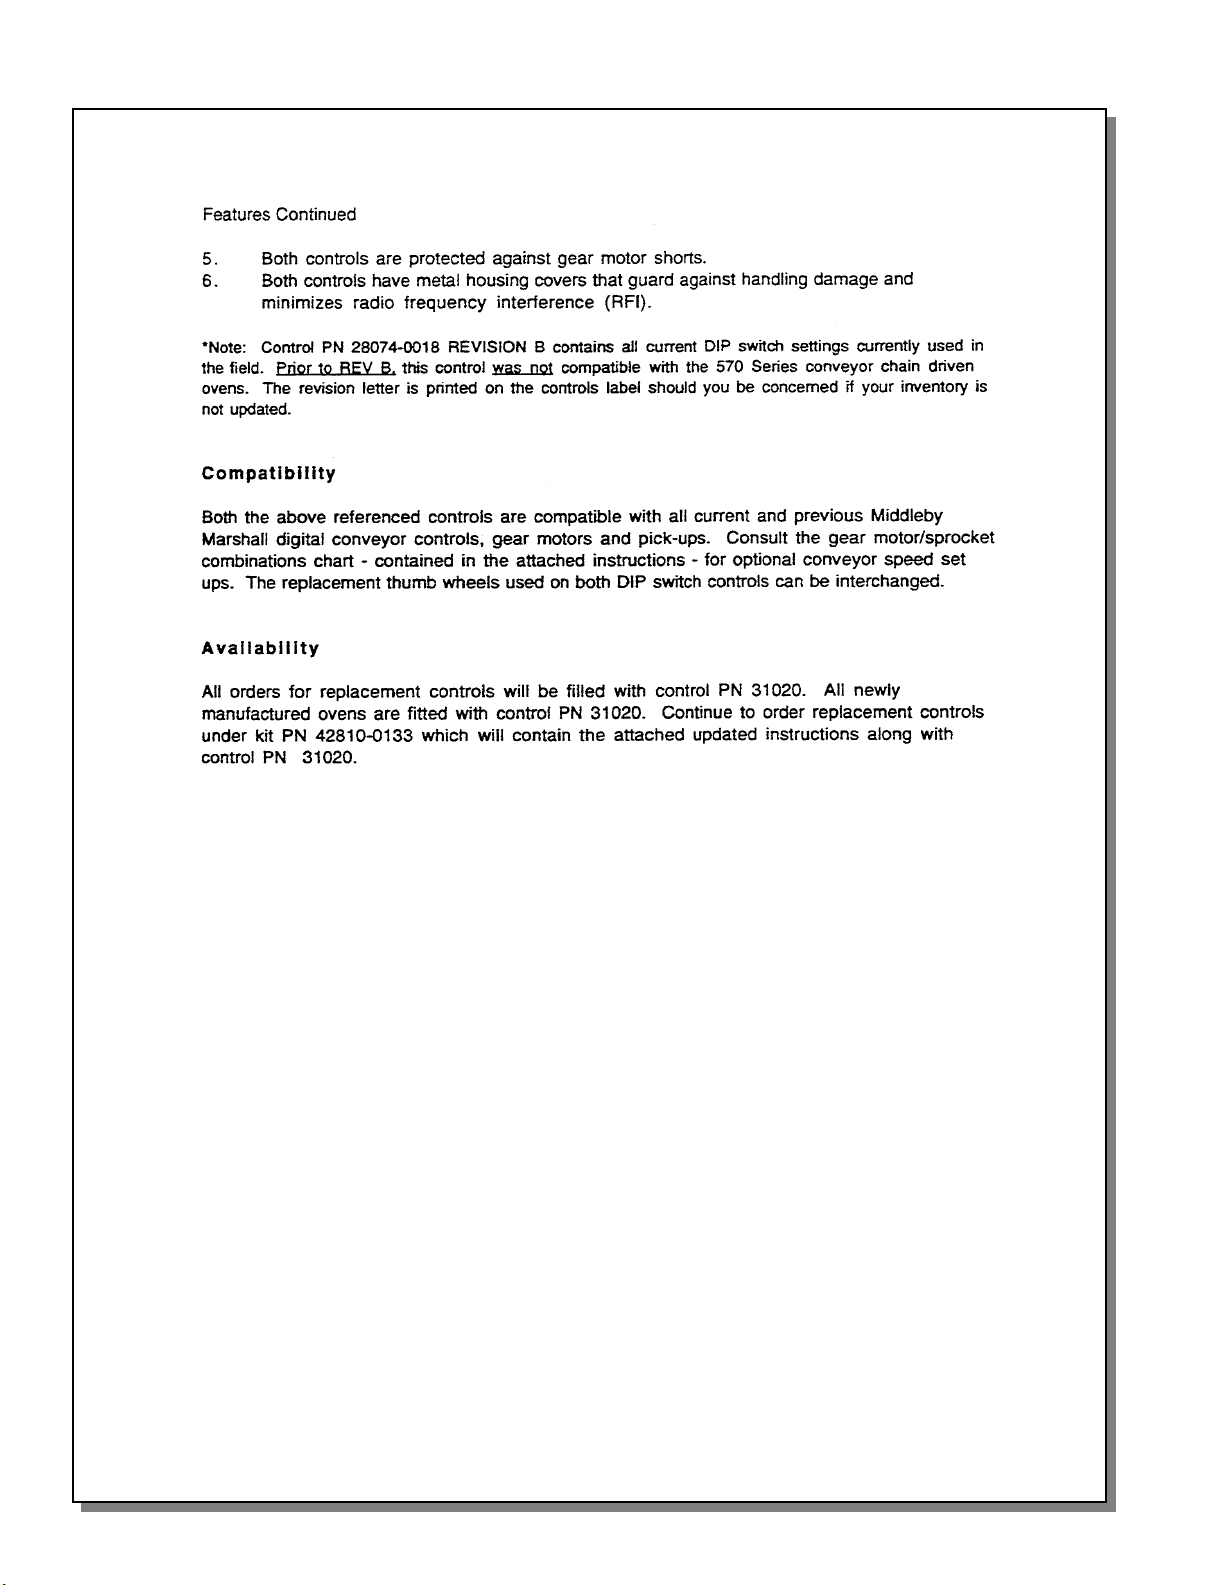
Appendix - Service Bulletin MM-133B - Installation Instructions for Conveyor
Speed Controller Kit with Thumbwheel, P/N 42810-0133, 4/95
22
Page 24
SECTION 3 - SERVICING COMPONENTS
Appendix - Instructions for Service Kit 42810-0133-
Conveyor Speed Controller Kit with Thumbwheel, 4/95
23
Page 25
SECTION 3 - SERVICING COMPONENTS
Appendix - Instructions for Service Kit 42810-0133-
Conveyor Speed Controller Kit with Thumbwheel, 4/95
24
Page 26
SECTION 3 - SERVICING COMPONENTS
Appendix - Instructions for Service Kit 42810-0133-
Conveyor Speed Controller Kit with Thumbwheel, 4/95
25
Page 27
SECTION 3 - SERVICING COMPONENTS
Appendix - Instructions for Service Kit 42810-0133-
Conveyor Speed Controller Kit with Thumbwheel, 4/95
26
Page 28
SECTION 3 - SERVICING COMPONENTS
Appendix - Service Bulletin MM-177 - Introduction and Compatibility of
Conveyor Speed Controller with Digital Display, P/N 37337, 8/00
Bulletin No. MM-177
Date: 8/18/00
Middleby Cooking Systems Group
1400 Toastmaster Drive Elgin, IL 60120-9272 U. S. A. Telephone: (847)741-3300 Service and Parts Fax: (847)741-4406
Service Bulletin
SUBJECT
Availability of Conveyor Speed Controller Kits
GENERAL
Middleby Marshall is changing is standard Conveyor Speed Controller from the familiar thumbwheel
control to a unit that features a digital display with pushbutton speed selectors. The part numbers of
these components are summarized here:
Speed Controller with Thumbwheel
Kit (includes control module and thumbwheel): 42810-0133
Thumbwheel unit only: 42810-0118
Speed Controller with Digital Display
Kit (includes control module and digital display): 37337
Digital selector/display unit only: 37503
Because of this change, supplies of the previous speed controller are VERY LIMITED, and the separate thumbwheel is no longer available.
your remaining thumbwheel controls for use with the oven models that cannot use the new controller.
Immediately stock the new Speed Controller units and save
APPLICATION
Service agents should immediately begin to stock P/Ns 37337 and 37503 to fulfill their normal
need for conveyor speed controllers. The new units can be used without modification on ALL
OVENS EXCEPT THE PS200R68-SERIES.
Your existing stock of P/Ns 42810-0133 and 42810-0118 should be used, whenever possible,
ONLY for PS200R68-series ovens.
The new speed controller and digital display are already in use on Middleby Marshall PS555 ovens;
so, your Agency may already have some of these components in stock. Please check your existing stock of these components before placing addtional orders.
COMPATIBILITY
The Speed Controller with Digital Display is compatible with all Middleby Marshall ovens EXCEPT the
PS200R68, PS220R68, and PS224R68.
AVAILABILITY
P/Ns 37337 and 37503 are available for immediate shipment.
P/N 42810-0133 is available in very limited quantities. Note that some future orders may not be
fulfilled.
P/N 42810-0118 is no longer available.
27
Page 29
SECTION 3 - SERVICING COMPONENTS
Appendix - Instructions for Service Kit 44756 - Conveyor Speed Controller Kit
for PS200R68-series Ovens, 2/02
Middleby Cooking Systems Group 1400 Toastmaster Drive Elgin, IL 60120 USA (847) 741-3300 FAX (847) 741-4406
Instructions for Service Kit 44756
Conveyor Speed Controller Kit for PS200R68-series ovens
KIT COMPONENTS:
Qty. P/N Description
1 37337 Conveyor speed controller with digital display
1 44749 Cable assembly, PS200R68-series ovens
1 44757 Instructions, PS200R68-series oven conveyor speed controller kit
This Service Kit will update one Middleby Marshall PS200R68, PS220R68, or PS224R68 oven to operate using the current
digital conveyor speed controller with keypad display (P/N 37337), instead of the previous controller with thumbwheel
adjustment (P/N 42810-0133). If the oven is already equipped with controller P/N 37337, this Kit is not necessary; P/N 37337
may be used as a direct replacement for the existing controller.
WARNING
BEFORE PERFORMING ANY SERVICE WORK, THE ELECTRICAL POWER SUPPLY
SUPPLY
MUST BE TURNED OFF.
AND THE GAS
1. Disconnect the oven from its electrical power supply at
the circuit breaker/fused disconnect. For ga s o ve ns ,
shut off the gas supply to the oven.
2. Identify the 24-pin control cable (female at both ends) that
connects the rear of the remote box (on top of the oven) to
the rear of the machinery compartment (on the side of the
oven).
3. Remove and discard the cable.
4. Open the machinery compartment door and locate the
conveyor speed control module.
5. One at a time, disconnect the leads from the terminals on
the existing speed control module and connect them to
the corresponding terminals on the new control module.
6. Remove the ribbon cable plug from its socket on the old
speed control module, and attach it to the corresponding
socket on the new control module.
7. Remove and discard the old control module from the inside of the machinery compartment door.
8. Adjust the DIP switch settings on the new speed control
module to the correct settings for the PS200-series oven
with a 3-30 minute bake time range. These settings are
shown on the case of the controller and are also provided
in Figure 1.
9. Install the new module in place. Close and fasten the
machinery compartment door.
10. Temporarily remove the remote box from the top of the
oven. Open the remote box.
11. Disconnect the thumbwheel units ribbon cable plug from
its socket on the remote board. Then, remove and discard the thumbwheel unit.
12. Install the new digital display unit in place. Connect its
ribbon cable plug into its socket on the remote board.
13. Close the remote box and reinstall it atop the oven.
14. Install the new kit-supplied control cable between the back
of the remote box and the back of the machinery compartment.
15. Restore the electrical and gas utility supplies to the oven.
16. Test the operation of the new conveyor speed controller to
make certain that it is operating properly. The oven is now
ready for operation.
Figure 1
DIP Switch Settings
Middleby Cooking Systems Group
1400 Toastmaster Drive
Elgin, IL 60120
(847) 741-3300 FAX (847) 741-4406
Middleby Corporation Service
Hotline 1-800-238-8444
P/N 44757 Rev. C V1 2/02
28
Page 30
SECTION 3 - SERVICING COMPONENTS
Appendix - Service Bulletin MM-189 - New Conveyor Gear Motors,
Brushes, and Pickup Clamps, 8/01
Bulletin No. MM-189
Date: 8/24/01
Middleby Cooking Systems Group
1400 Toastmaster Drive Elgin, IL 60120-9272 U. S. A. Telephone: (847)741-3300 Service and Parts Fax: (847)741-4406
Service Bulletin
SUBJECT
New conveyor gear motors, brushes, and pickup clamps for Middleby Marshall ovens
GENERAL
The conveyor gear motors used on all Middleby Marshall ovens (except model PS536) have been redesigned by the
vendor. Changes to the motors include:
A smaller-diameter motor casing.
New motor brushes.
- Old-style motors continue to use brush P/Ns 22450-0052 or 22450-0230 as shown in the table below.
All of the new motors use brush P/N 46658.
-
A shorter clamp to attach the pickup assembly. This accommodates the smaller diameter of the motor.
- The pickup assembly with the original clamp is still available as P/N 27170-0263. This kit is only available in
limited quantities.
existing clamp to attach a new pickup assembly to an old-style motor.
- The pickup assembly with the new, shorter clamp is available as P/N 46451.
- All of the new motors will be shipped in a kit that also includes the new clamp. This allows you to attach an
existing pickup assembly to a new motor.
- In 7/01 and 8/01, some of the new motors were shipped under the part numbers of the old motors. These parts
shipped without the new clamp. In most of these cases, you can tighten the existing clamp to fit the new motor.
Some older clamps, however, cannot be tightened enough to fit.
in all ovens, you should add the new clamp, P/N 46602, to your required parts stocking list, and carry a few
spare clamps on each service vehicle.
Please be aware of these changes as you order your stocking parts. Some versions of the old motor, as well as the oldstyle pickup assembly, are still available in limited quantities. The brush for the old motor (P/N 22450-0052) will remain
available in order to maintain motors already in the field.
Ratio Used on Motor Brush Pickup Motor* Brush Pickup Clamp
1400:1 PS310 27384-0008 22450-0052 27170-0263 46603 46658 46451 46602
PS314
PS360/360S
PS360SS High Speed
PS360T Tandem
PS360WB
PS360WB70
PS360EWB
PS555
PS570/570S Single Belt
1350:1 PS200/220FS/224 27384-0011 22450-0230 27170-0263 46604 46658 46451 46602
PS200VL/220VL/224VL
PS200R68/220R68/224R68
PS200T Tandem
PS570/570S Split Belt (Standard)
600:1 PS314SBI 27384-0003 22450-0052 27170-0263 46605 46658 46451 46602
300:1 PS200/220FS/224 (High Speed) 27384-0014 22450-0230 27170-0263 46606 46658 46451 46602
PS570/570S Split Belt (High Speed)
* New Motor part numbers shown in this table are kits that include both the motor and the new pickup clamp.
After our stock of the old-style pickup assembly kit is exhausted, you will need to save the
To be sure that you can install the new motor
Old Old Old Ne w Ne w Ne w Ne w
29
Page 31

SECTION 3 - SERVICING COMPONENTS
Appendix - DIP switch settings for Conveyor Speed Controller
with Digital Display (P/N 37337), 4/02
II. TEMPERATURE CONTROLLER
The Temperature Controller is used to set and control the
oven temperature. Depending on the oven, model, the controller has several functions:
On gas ovens with On-Off gas valve operation, the tem-
perature controller opens and closes the high flame
solenoid. This allows 100% or 0% gas flow to the burner
in response for the need for heat to maintain the set
point temperature. The temperature controller has no
effect on the low flame bypass or oven ignition.
For this operating mode, the temperature controller is set
to the On-Off Mode as described in the Kit instructions.
On gas ovens with modulated gas valve (PID) opera-
tion, the temperature controller sends a signal to the
amplifier board which in turn controls the operation of
the modulating valve. This allows a modulated gas flow
of any necessary value from 0-100% in response for
the need for heat to maintain the set point. The temperature controller has no effect on oven ignition.
For this operating mode, the temperature controller is set
to the PID Mode as described in the Kit instructions.
On electric ovens with On-Off heater activation (includ-
ing most PS200-series and PS360-series electric ovens), the temperature controller permits or cuts power
to the heating elements as necessary to maintain the
set point temperature.
For this operating mode, the temperature controller is set
to the On-Off Mode as described in the Kit instructions.
On electric ovens with variable pulse heater activation
(including PS555 electric ovens), the temperature controller sends its signal to a controller module that contains an amplifier board and two solid state relays. The
relays activate the heating elements at 100% power on
a fixed cycle time, for a length of time proportional to
the signal from the temperature controller.
For this operating mode, the temperature controller is set
to the PID Mode as described in the Kit instructions.
Note that temperature controller P/N 46837
(inc. with Service Kit 47321) includes a dedicated variable pulse mode intended for the
PS536 electric oven. This special mode is NOT
used on the PS555.
The temperature controller regulates the cooldown func-
tion. NOTE: PS200VL-series ovens do not include a
cooldown function.
On most PS200-series and PS300-series gas ovens
(except the PS200VL), the temperature controller monitors the high limit. All other oven models use a High
Limit Control Module that is independent of the temperature controller.
30
Page 32

A. Part Number Reference - Temperature Controllers
Middleby Marshall ovens have used several different models of temperature controllers. The current Digital Temperature Controller (P/N 46837, included in Service Kit 47321)
is the only model currently available. All other controllers
SECTION 3 - SERVICING COMPONENTS
shown are no longer available and part numbers are provided for reference only. Servicing these units is beyond
the scope of this manual. If one of these controllers is in
need of service, we recommend simply installing a current
unit (P/N 46837, included in Kit P/N 47321).
P/N 28071-0012 (A)
Analog Temperature Controller
cooldown functions, 120V, on-off mode only.
P/N 28071-0018 (A)
Analog Temperature Controller with high-limit and
cooldown functions, 120V, on-off mode only.
P/N 34983 (B)
Analog Temperature Controller without high-limit and
cooldown functions, 120V, on-off mode only. Used on
PS200VL-series ovens only. PS200VL-series ovens
equipped with this Temperature Controller do not have
a cooldown feature and use a separate high limit control module.
P/N 28071-0027 (C)
Digital Temperature Controller with blue plastic faceplate, 120V, on-off mode only.
P/N 28071-0028 (D)
Digital Temperature Controller with gray rubber faceplate and buttons with text, 120V, on-off mode only.
P/N 28071-0028 (E)
Digital Temperature Controller with gray rubber face
plate and buttons with symbols, 120V, on-off mode only.
without high-limit and
P/N 30871 (E)
Digital Temperature Controller with gray rubber face
plate and buttons with symbols, 208-240V, on-off mode
only. Used on early PS360WB70 and some CE oven
models.
P/N 32571 (E)
Digital Temperature Controller with gray rubber face
plate and buttons with symbols, 208-240V, PID mode
only. Used on early PS360EWB.
P/N 36021 (F)
Digital Temperature Controller with gray face plate (steel
trim on edges), 120-240V, selectable on-off or PID
modes.
P/N 36056 (G) - Service Kit P/N 36939
Digital Temperature Controller with black plastic face
plate, 120-240V, selectable on-off or PID modes.
P/N 46837 (G) - Service Kit P/N 47321
Digital Temperature Controller with black plastic face
plate, 120-240V, selectable on-off, PID and variable
pulse modes.
Note that the dedicated variable pulse mode is used on
the PS536 electric oven ONLY. Using this mode requires moving a jumper on one of the PC boards inside
the controller. The PS555 variable pulse electric oven
does NOT use this mode and should have the controller set to the PID mode as described in the Kit instructions.
C
Figure 22 - Temperature controllers
A
B
DEFG
31
Page 33

SECTION 3 - SERVICING COMPONENTS
B. Description
The temperature controller consists of two main components: a sleeve or case (metal or plastic) with terminal connections on the back, and a plug-in chassis that includes
the faceplate and circuitry. The sleeve is mounted to the
panel or door of the oven, and the chassis is inserted into
the front of the sleeve.
VERY IMPORTANT: When replacing a controller, you
should ALWAYS replace the sleeve as well. Some controller models have sleeves of a similar size, but with DIFFERENT CONNECTIONS. Using an incorrect sleeve can damage the controller and cause the oven to function incorrectly. Exception: The sleeve used on Controllers 36056
and 46837 is identical except for the information label.
C. High Limit/Cooldown Functions
Except where noted in Section A (Part Number Reference),
the temperaturecontroller incorporates circuitry for the high
limit and cooldown functions.
1. The High Limit function (terminals 11 and 12) will shut
off the burner/heating elements if the oven temperature
sensed by the thermocouple(s) exceeds 650°F/343°C.
This function is used on most PS200-series and PS360series gas ovens. All other oven models use a separate high limit control module.
If the high limit temperature is reached, an indicator on
the controller will illuminate. The current controller
(P/N 46837) has a lamp marked OVERTEMP to show
this condition. Older controllers will have different indicators; you should refer to the operating instructions
for the controller in question for assistance.
2. The Cooldown function allows the blowers to continue
in operation after the operator switches off all operating
switches on the control panel. The blowers will remain
in operation until the cooldown switch opens (usually
180°F/82°C).
D. Troubleshooting
1. Troubleshooting the Temperature Controller and
Thermocouple(s) using the Altek Thermocouple Source
(Middleby P/N 27170-0192)
Turn the heat switch OFF.
Disconnect the thermocouple leads from Terminals
7 and 8 on the temperature controller. Tape the
ends to prevent shorting.
Connect the white lead of the Thermocouple Source
to Terminal 8 (+). Connect the red lead of the Thermocouple Source to Terminal 7 (-).
Set the Thermocouple Source as close as pos-
sible to the customers set point. Then, turn the
BLOWER switch to the ON position.
The temperature controller should read close to the
customers set point. Failure indicates a problem with
the temperature controller. If the temperature controller is functioning properly, check the thermocouples.
Refer to Section IV, Thermocouples.
2. Troubleshooting the High Limit Switch
On ovens that use the high limit function of the tem-
perature controller (most PS200-series and PS360-series ovens), an intermittent high limit switch will cause
intermittent operation of the burner. If you suspect that
this is a problem, a good check is to place a 1A fuse in
parallel around the switch contacts (terminals 11 and
12).
If the switch is functioning properly, the fuse will never
carry a load. The only time the switch would open
would be under a no-load condition.
If the switch is trying to open intermittently, however,
the full current load of the blowers will be carried by the
fuse. Regardless of the oven model, this load is far
greater than 1A, and the fuse will blow.
E. Appendices
Appendix - Temperature controller terminal cross-reference, 4/02
Terminal for Terminal for
28071-0012 and Terminal for 36056 and Description
28071-0018 34983 46837
1 TC+ 8 + TC
2TC-7 - TC
5 COM 5 Input to Temperature Control Relay
6 NO 4 Output to High Flame Solenoid or Heater Contactors
L2 L2 L2 Neutral
L1 L1 L1 Power
GG Ground
13 -- 9 Input to Cooldown Relay
14 -- 10 Output from Cooldown Relay
15 -- 11 Input to High Limit Relay
16 -- 12 Output from High Limit Relay
-- -- 15 PID or Variable Pulse Output
-- -- 16 PID or Variable Pulse Output
32
Page 34

SECTION 3 - SERVICING COMPONENTS
Appendix - Instructions for Service Kit 47321 - Digital Temperature Controller Kit, 2/02
Middleby Cooking Systems Group 1400 Toastmaster Drive Elgin, IL 60120 USA (847) 741-3300 FAX (847) 741-4406
Instructions for Service Kit 47321
Digital Temperature Controller
Installation, Programming and Troubleshooting Instructions
KIT COMPONENTS
Qty. P/N Description
1 46837 Digital Temperature Controller (On/Off Gas & Electric, PID Gas, and
Variable Pulse Electric operating modes), with mounting brackets
1 47322 Instructions
TABLE OF CONTENTS
Controller Types ............................................................................................... 2
Before You Begin ............................................................................................. 3
Installation ........................................................................................................ 3
Electrical Connections ..................................................................................... 4
Jumper Setting ................................................................................................. 6
Programming ................................................................................................... 6
Diagnostic Error Messages ............................................................................. 8
Operating Instructions (to be left with customer after installation) ...................... 9
Middleby Cooking Systems Group 1400 Toastmaster Drive Elgin, IL 60120
(847) 741-3300 FAX (847) 741-4406
Middleby Corporation Service Hotline 1-800-238-8444
Page 1 of 10
P/N 47322 Rev. A V2 2/02© 2002 Middleby Marshall.
33
Page 35

SECTION 3 - SERVICING COMPONENTS
Appendix - Instructions for Service Kit 47321 - Digital Temperature Controller Kit, 2/02
Controller Types
This Kit includes one Digital Temperature Controller (P/N 46837) that can operate at 120-240V, and
can be programmed to operate in on-off, PID, or variable pulse modes. The Controller is shown in
Figure 1G, below. By following these instructions, the Controller can be installed into any Middleby
Marshall oven equipped with the following Controllers.
P/N 28071-0012 (Fig. 1A)
Analog Temperature Controller
cooldown functions, operating at 120V, on-off mode only.
P/N 28071-0018 (Fig. 1A)
Analog Temperature Controller
cooldown functions, operating at 120V, on-off mode only.
P/N 34983 (Fig. 1B)
Analog Temperature Controller
cooldown functions, operating at 120V, on-off mode only.
Used on PS200VL models. As of 12/01, P/N 34983 is
still available and should be used on these ovens if
possible.
P/N 28071-0027 (Fig. 1C)
Digital Temperature Controller with blue plastic faceplate, operating at 120V, on-off mode only.
P/N 28071-0028 (Fig. 1D)
Digital Temperature Controller with gray rubber faceplate and buttons with text, operating at 120V, on-off
mode only.
without high-limit and
with high-limit and
without high-limit and
P/N 28071-0028 (Fig. 1E)
Digital Temperature Controller with gray rubber face
plate and buttons with symbols, operating at 120V, onoff mode only.
P/N 30871 (Fig. 1E)
Digital Temperature Controller with gray rubber face
plate and buttons with symbols, operating at 208-240V,
on-off mode only. Used on early PS360WB70 and some
CE oven models.
P/N 32571 (Fig. 1E)
Digital Temperature Controller with gray rubber face
plate and buttons with symbols, operating at 208-240V,
PID mode only. Used on early PS360EWB.
P/N 36021 (Fig. 1F)
Digital Temperature Controller with gray face plate (steel
trim on edges), operating at 120-240V, selectable onoff or PID modes.
P/N 36056 (Fig. 1G)
Digital Temperature Controller with black plastic face
plate, operating at 120-240V, selectable on-off or PID
modes.
Figure 1
A
C
D
EFG
B
This Kit CANNOT be installed in a PS536 oven equipped with the P/N 44783 (variable pulse electric) or
P/N 44823 (PID gas) controller shown below.
H
Page 2 of 10
34
Page 36

SECTION 3 - SERVICING COMPONENTS
Appendix - Instructions for Service Kit 47321 - Digital Temperature Controller Kit, 2/02
WARNING
BEFORE PERFORMING ANY SERVICE WORK, THE ELECTRICAL POWER SUPPLY
AND THE GAS SUPPLY MUST BE TURNED OFF.
Before you Begin
1. This Temperature Controller requires a current-version thermocouple for proper operation. Check
that the thermocouple(s) installed in the oven match the current three-lead, flanged versions BEFORE you begin to install the Temperature Controller. See Figure 2.
If the oven is not equipped with current thermocouples, you should replace them BEFORE you install
the new Temperature Controller.
P/N 33984: Thermocouple kit for PS300-series, PS555 and PS570
P/N 33985: Thermocouple kit for PS200-series and PS536
Figure 2
flange
Cable
(3 leads)
Current thermocouple
Cable
(2 leads)
Obsolete 2-lead
thermocouple
clip
Installation
1. Check the ovens existing temperature controller, as shown on the previous page.
IF THE EXISTING CONTROLLER IS P/N 36056 OR P/N 46837 (shown in Figure 1G), the new
controller can be installed directly into the existing sleeve as follows:
- Loosen the Phillips screw at the bottom center of the faceplate.
- Pull the old controller out of the sleeve.
- Skip ahead to the Jumper Setting section of these instructions on Page 6 to set up the new
controller. After the jumper is configured, the new controller can be installed directly into the
existing sleeve.
IF THE EXISTING CONTROLLER IS OF ANY OTHER TYPE, the sleeve will have to be replaced
with the one included in this Kit. Continue on to Step 2 in this section.
2. Access the back of the existing temperature controller. Tag each wire that connects to the controller
with its terminal number. These numbers will be used later to wire the new controller.
3. Disconnect all wires from the terminals on the temperature controller.
that are removed.
4. Remove the controller and sleeve from the oven as follows:
For analog controllers P/Ns 28071-0012 and 28071-0018 (Fig. 1A), remove the two bracket
screws on the back of the control. Then, remove the bracket. Pull the controller and sleeve out
through the front of the oven panel.
For all other controllers, remove the two screws and brackets that hold the controller in place.
Then, pull the controller and sleeve out through the front of the panel.
Page 3 of 10
Be sure to retain any jumpers
35
Page 37

SECTION 3 - SERVICING COMPONENTS
Appendix - Instructions for Service Kit 47321 - Digital Temperature Controller Kit, 2/02
5. Check that the new controller is mounted into its sleeve. Then, slide the assembly into the opening in
the panel from the outside. Check that the controller is upright, with the display on top and the
keypad on the bottom.
6. Locate the rectangular holes on the top and bottom of the new controllers sleeve. Attach the two kitsupplied mounting brackets against the inside panel of the oven, and into the holes in the sleeve, as
shown in Figure 3. Check that the heads of the screws point to the rear of the controller.
7. Tighten the two screws evenly until the lip of the sleeve is seated tightly against the panel.
8. If there is a protective clear plastic strip on top of the display, remove it at this time.
Figure 3
Temperature controller is
pre-installed into sleeve
and is upright
Control
panel
Bracket clips and
screw heads point to
REAR of controller
Electrical Connections
1. Wire the new controller as follows:
If you are replacing an Analog Temperature Controller, P/Ns 28071-0012 or 28071-0018 (see
Fig. 1A), refer to Figure 4A for a listing of the new terminal numbers.
If you are replacing an Analog Temperature Controller P/N 34983 (Fig. 1B - PS200VL models
only), refer to Figure 4B for a listing of the new terminal numbers.
If you are replacing any Digital Temperature Controller, simply reconnect ALL of the original
wires and jumpers to the same terminals, as all terminals are numbered the same.
EXCEPTION: Controller P/N 32571(Fig. 1E - used on early PS360EWB ovens only) uses Terminals 4 & 5 for the mA output to the amplifier board. The current controller uses Terminals 15 & 16 for
these connections, as shown in Figure 5A.
Page 4 of 10
36
Page 38

SECTION 3 - SERVICING COMPONENTS
Appendix - Instructions for Service Kit 47321 - Digital Temperature Controller Kit, 2/02
Figure 4a
Analog temperature controller (P/Ns
28071-0012 and 28071-0018) terminals
New temperature
controller terminals
Not used on
Not used
pulse output (electric ovens with
variable pulse system). Neither of
these systems were available with
ovens equipped with these
controllers.
Terminal for
28071-0012 and Terminal for Terminal for Description
28071-0018 34983 46837
1TC+8 + TC
2TC-7 - TC
5 COM 5 Input to Temperature Control Relay
6 NO 4 Output to High Flame Solenoid or Heater Contactors
L2 L2 L2 Neutral
L1 L1 L1 Power
GG Ground
13 - - 9 Input to Cooldown Relay
14 - - 10 Output from Cooldown Relay
15 - - 11 Input to High Limit Relay
16 - - 12 Output from High Limit Relay
-- -- 15 PID or Variable Pulse Output
-- -- 16 PID or Variable Pulse Output
some gas and
electric ovens
Not used
Not used. These
terminals provide PID
output (gas ovens
with modulating
valve) or variable
Not used
Analog temperature controller
(P/N 34983) terminals
New temperature
controller terminals
Figure 4b
Not used. PS200VL
ovens have a separate high limit module
and do not include a
cooldown feature.
Not used
Not used. PS200VL
ovens do not include a
modulating gas system.
Figure 5a
Modulated Gas Output System
4-20mA
input
NOTE: Controller P/N 32571 used Terminals 4 & 5
for the 4-20mA input to the amplifier board.
These connections must be moved to Terminals
15 & 16 on the new controller as shown.
Amplifier board
24VAC
input
Figure 5b
Variable Pulse Output System
Modulating
valve
Relay
20VDC pulsed output
0-24VDC
output
NOTE: Safety switches
may be placed between
the temperature controller
and the relay on some
oven models.
Page 5 of 10
37
Page 39

SECTION 3 - SERVICING COMPONENTS
Appendix - Instructions for Service Kit 47321 - Digital Temperature Controller Kit, 2/02
Jumper Setting
Loosen the Phillips screw at the bottom center of the faceplate. Then, pull the controller out of its sleeve.
Next, access the jumper shown in Figure 6. This jumper affects the signal that is output from Terminals
15 and 16.
CAUTION
If the jumper is incorrectly set, the oven will be unable to properly maintain temperature. In addition, DAMAGE MAY OCCUR TO THE CONTROLLER AND OTHER OVEN COMPONENTS.
Always make sure that the jumper is correctly set BEFORE restoring power to the oven!
For gas ovens equipped with the modulating gas system, the jumper must be set to the
W1 position.
This instructs the controller to send a variable-current 4-20 mA signal from Terminals 15 and 16 to
the amplifier board. The board converts this to a 0-24VDC signal which is sent to the modulating
valve. The valve regulates the gas flow according to the need for heat to maintain the set point.
For gas ovens, you should always check inside the machinery compartment to see whether a modulating valve is present in the unit before setting this jumper.
For electric ovens equipped with the variable pulse system, the jumper must be set to the
W2 position.
This instructs the controller to send a constant-current, pulsed 20VDC signal to the relay. Once per
second, the signal pulses on proportional to the need for heat to maintain the set point.
As of 1/02, only the PS536 Electric oven uses the variable pulse system. Other oven models equipped
with this system will be announced by Middleby as they become available.
For all other ovens - gas or electric - that use the on-off system, the jumper may be set to
either position.
After the jumper has been properly set, replace the controller into its sleeve and tighten the screw.
The jumper MUST be set to the correct position for proper operation of the controller.
Figure 6
Jumper is set to the W1
position for gas ovens with
modulating gas system
Jumper is set to the W2
position for electric ovens
with variable pulse system
Programming
1. Restore electrical power to the oven.
2. Refer to Figure 7. Set the following options,
according to the customers preferences:
Set Point locked or unlocked
Degrees Fahrenheit or Celsius
Set Point or Actual Temperature display
3. Set the controller to PID or On-Off operating
mode. Choose the PID mode for BOTH gas
ovens with the modulating system AND for electric ovens with the variable pulse system.
4. Adjust the Set Point according to the
customers specifications.
5. If the PID operating mode was chosen, perform an Auto-Tune calibration as per the instructions in Figure 7.
6. Check that the customer is familiar with the
operation of the controller. The last page of
these instructions includes an operating guide
for the controller. Remove this page and leave
it with the customer for future reference.
Page 6 of 10
38
Page 40

SECTION 3 - SERVICING COMPONENTS
Appendix - Instructions for Service Kit 47321 - Digital Temperature Controller Kit, 2/02
Figure 7
Temperature Controller Service Instructions
Page 7 of 10
39
Page 41

SECTION 3 - SERVICING COMPONENTS
Appendix - Instructions for Service Kit 47321 - Digital Temperature Controller Kit, 2/02
Diagnostic Error Messages
The controller runs background tests during normal operation. If any problems occur during the tests, an
error message flashes in the display. A listing of these diagnostic error messages is shown below.
1. Turn the Blower Switch (HEAT Switch for PS536 ovens with the twoswitch configuration) OFF for 2 minutes.
2. Turn the Blower Switch (or HEAT Switch, as per Step 1) ON.
Flashes on the display (alternating with the temperature)
indicating that the internal diagnostic test has failed.
The oven temperature has
not reached 200°F/93°C
within 15 minutes of startup.
On gas ovens, this is usually
a result of the burner not lighting.
3. If necessary, repeat Steps 1 and 2 up to two additional times.
4. If the problem does not clear after 3 attempts, replace the controller.
1. Turn the Blower Switch (HEAT Switch for PS536 ovens with the twoswitch configuration) OFF for 2 minutes.
2. Turn the Blower Switch (or HEAT Switch, as per Step 1) ON.
3. If the problem does not clear, contact the Middleby Technical Service Department for assistance.
Caused by an open in the
thermocouple circuit.
Polarity of the thermocouple
leads is reversed.
1. Check that the thermocouple leads are properly connected to Terminals 7 & 8 of the temperature controller.
2. Check the continuity of the thermocouple at room temperature. You
should measure 9-20 Ohms of resistance.
3. If the reading was outside the correct range, the thermocouple has
an open. Remove and replace the thermocouple.
If the reading was inside the correct range, contact the Middleby
Technical Service Department for assistance.
1. Check the polarity of the thermocouple leads. The red wire (-) should
be attached to Terminal 7 on the temperature controller. The white
wire (+) should be attached to Terminal 8.
2. If the polarity connections are incorrect, connect the thermocouple
properly.
If the polarity connections are correct, replace the thermocouple.
Page 8 of 10
40
Page 42

SECTION 3 - SERVICING COMPONENTS
Appendix - Instructions for Service Kit 47321 - Digital Temperature Controller Kit, 2/02
Digital Temperature Controller
P/N 46837
Operating Instructions
"SP LOCK" Light
Lights when the set
point is locked out
from changes. This
setting can only be
changed by service
personnel.
OVERTEMP Light
Lights when the oven
temperature is greater
than 650°F (343°C).
Temperature Key
Press this key once to
view the Actual Temperature in the Display.
Display
Shows the Set Point or
the Actual Temperature in degrees Fahrenheit (F) or Celsius
(C).
"HEAT ON" Light
Lights when the
burner or heating elements, as appropriate
for the oven model,
are in operation.
"SET PT" (setpoint)
Light
Lights when the set
point is shown in the
display.
"ACTUAL TEMP"
Light
Lights when the
Actual Temperature is shown in
the display.
Service Key
For use by service personnel
only.
Unlock Key
Press this key together
with the Set Point Key
to allow the Set Point
to be changed. Changes
can only be made for
60 seconds.
Up Arrow and Down Arrow
Keys
Press these keys to adjust
the Set Point up or down. If
the Set Point will not
change, refer to
Key and Unlock Key.
Set Point
41
Set Point Key
Press this key together
with the Unlock Key to
allow the Set Point to
be changed.
Changes can only be
made for 60 seconds.
Page 43

SECTION 3 - SERVICING COMPONENTS
Appendix - Instructions for Service Kit 47321 - Digital Temperature Controller Kit, 2/02
Middleby Cooking Systems Group 1400 Toastmaster Drive Elgin, IL 60120
(847) 741-3300 FAX (847) 741-4406
Middleby Corporation Service Hotline 1-800-238-8444
42
Page 44

SECTION 3 - SERVICING COMPONENTS
Appendix - Service Bulletin MM-136 - Electrical Noise
Filter Capacitor Assembly on Temperature Controllers, 9/93
43
Page 45

SECTION 3 - SERVICING COMPONENTS
Appendix - Service Bulletin MM-136 - Electrical Noise
Filter Capacitor Assembly on Temperature Controllers, 9/93
44
Page 46

SECTION 3 - SERVICING COMPONENTS
III. HIGH LIMIT CONTROL MODULE
On most PS200-series and PS300-series gas ovens, the
temperature controller monitors the high limit. All other
oven models use a High Limit Control Module that is independent of the temperature controller.
Middleby ovens have used several different types of high
limit control modules. See Figure 23.
The United Electric Type 54 control was used for high
limit functions only. Ovens equipped with this control
did not have a cooldown feature. The control was used
on early PS310 and PS360 electric ovens.
The United Electric Type 55 control included both high
limit and cooldown functions, and was used on PS310
and PS360 electric ovens.
The Watlow high limit control module is the only ver-
sion still in use by Middleby. The module includes
high limit functions only. The cooldown function is controlled by the ovens temperature controller, except on
PS200VL-series ovens, which do not include a
cooldown feature.
The Watlow high limit control module is used on PS200series, PS360-series, and PS555/570-series ovens.
Service information in this Manual is limited to the current
Watlow high limit control module. The United Electric units
are no longer available. Service Kit P/N 39733 can be used
to upgrade either of the two previous controllers to the
Watlow version.
A. Part Number Reference - High Limit Control Mod-
ules
P/N Description
28071-0002 United Electric Type 54 high limit control module
No longer available - upgrade to current model
34982 using Service Kit 39733
28071-0014 United Electric Type 55 high limit/cooldown con-
trol module
No longer available - upgrade to current model
34982 using Service Kit 39733
34982 Watlow high limit control module, 115V
For use on ovens with 120V control circuits
33983 Watlow high limit control module, 240V
For use on ovens with 208-240V control circuits
30693 Illuminated reset button (green) for Watlow con-
trol (all voltages)
39733 High Limit Conversion Kit for PS300, PS310,
PS350, and PS360 ovens
Replaces P/Ns 28071-0002 or 28071-0014 with
P/N 34982
B. Location
On ovens that include the separate high limit control module, it is located:
PS200-series - Inside the machinery compartment.
PS360-series - Inside the control compartment.
Early PS555 ovens - Inside the left blower motor com-
partment.
Current PS555 and all PS570 ovens - Inside the
machinery compartment.
C. Operation and Troubleshooting
Refer to the wiring diagrams at the back of this manual for
high limit wiring connections.
The Watlow high limit control module generally uses a dedicated high limit thermocouple. Some older ovens use a
dual-function, four-lead thermocouple that sends a signal
to both the temperature controller and the high limit control
module. Refer to Thermocouples on Page 54 for details.
If the temperature sensed by the high limit thermocouple
exceeds 650°F/343°C, the high limit control module will
shut down the oven and illuminate the green reset button.
The module will need to be reset (by pressing the reset
button) before the oven can be operated. The reset button
is located inside the machinery compartment to ensure that
it is reset by an authorized service agent. The agent should
determine and correct the cause of the high limit condition
before returning the oven to service.
An open high limit thermocouple will trigger the high limit
control module to shut down the burner. The high limit
control will need to be reset after the open is corrected (as
per the procedure described above) before the oven can
return to operation.
Figure 23 - High limit control modules
(Shown in PS360-series oven)
United Electric Type 54
high limit control module
United Electric Type 55
high limit/cooldown
control module
Watlow high limit
control module
Reset button
45
Page 47

SECTION 3 - SERVICING COMPONENTS
D. Appendices
Middleby Cooking Systems Group 1400 Toastmaster Drive Elgin, IL 60120 USA (847) 741-3300 FAX (847) 741-4406
Instructions for Service Kit 39733
High Limit Conversion Kit for PS300, 310, 350, & 360 Ovens
KIT COMPONENTS -
Qty. P/N Description
TOOLS REQUIRED
Drill with 3/16 drill bit
Middleby Marshall Thermocouple Signal Source
Wire cutters/strippers
Appendix - Instructions for Service Kit 39733 -
High Limit Conversion Kit for PS300, 310, 350 & 360 Ovens, 5/99
Check that the kit includes ALL of these parts BEFORE you begin!
Qty. P/N Description
1 39732 Instructions
1 34982 Watlow high limit control module
1 30693 Reset switch w/ lighted pushbutton
1 35634 Mounting bracket, reset switch
1 35691 Wire set, reset switch (includes 4
wires and 3 1/4/25mm connectors)
1 33812-1 Thermocouple, type J, 6/152.4mm
1 39690 Mounting sleeve, thermocouple
Generator (P/N 27170-0192)
2 ft./610mm 27152-0050 Wire, #18 AWG, brown
2 ft./610mm 27152-0053 Wire, #18 AWG, white
2 ft./610mm 27152-0054 Wire, #18 AWG, purple
8 1455A8750
1 3002693 Wire tie, nylon
2 2000076 Screw, 6-32 X 1-5/8
2 1421B8803 Screw, 6-32 X 1/4
4 2001327 Nut, 6-32
Wire connector, 1/4/6.4mm
Figure 1
United Electric Type 54
High Limit Control
A. OVERVIEW
This Service Kit is used to replace two different types of
United Electric high limit/cooldown controllers with a
Watlow high limit controller for PS300, 310, 350, and
360 Ovens. See Figure 1.
The early (Type 54) United Electric control was ONLY
equipped with a high limit circuit. Ovens equipped
with this control did NOT have a cooldown circuit.
This control was used on the following models:
- PS300/350 Gas (early)
- PS300/310/350/360 Electric (early - all voltages)
For these ovens, the kit directly replaces the Type
54 high limit control with the Watlow high limit control.
The later (Type 55) United Electric control was
equipped with BOTH high limit and cooldown circuits,
and was used on the following models:
- PS300/310/350/360 Electric (late), 208/240V and
480V UL versions ONLY
For these ovens, the kit replaces the Type 55 control with the Watlow high limit control, and uses the
ovens temperature controller to provide the
cooldown circuit.
United Electric Type 55
High Limit/Cooldown
Control
Lighted Reset
Switch
Watlow High
Limit Control
Page 1 of 8
46
P/N 39732
Rev. B V1 5/99
Page 48

SECTION 3 - SERVICING COMPONENTS
Appendix - Instructions for Service Kit 39733 -
High Limit Conversion Kit for PS300, 310, 350 & 360 Ovens, 5/99
B. INSTALLATION
WARNING
BEFORE PERFORMING ANY SERVICE WORK, THE GAS SUPPLY (IF SO EQUIPPED)
THE ELECTRICAL SUPPLY TO THE OVEN
1. Open the machinery compartment and control compartment access panels.
2. Locate the high limit thermo bulb/capillary assembly. Its location is shown in Figure 2. Loosen the set
screw that holds the assembly in place. Remove the thermo bulb/capillary assembly from the mounting tube.
3. Disconnect the wires (2 for the Type 54 control, 4 for the Type 55 control) from the terminals of the
United Electric control. Bundle the loose wires together, and allow them to hang loose for later
reconnection.
4. Remove the mounting screws that hold the United Electric high limit control in place. Then, remove
and discard the high limit control and its mounting screws.
5. Position the new high limit control in place on the left wall of the control compartment, as shown in
Figure 3. When positioning the control:
Ensure that the control is positioned AT LEAST 1 (25mm) back into the compartment to allow the
compartment door to close.
Ensure that additional space is left underneath the control for the reset switch.
NOTE: Instead of holding the high limit control in place, you may use the dimensions provided in
Figure 4 to determine the location of the control and its mounting holes.
MUST BE TURNED OFF.
AND
6. Mark the locations of the two mounting holes for the high limit control. Then, drill the holes using a
3/16 drill bit.
7. Secure the high limit control in place using the kit-supplied 6-32 x 1-5/8 screws and 6-32 nuts.
8. Position the bracket for the reset switch on the left wall of the control compartment, as shown in Figure
3. Note that the face of the bracket with the large, circular switch-mounting hole should face YOU.
Also, the bracket should be positioned AT LEAST 3 (75mm) back into the compartment to allow the
door to close.
9. While holding the bracket in place, mark the locations of the two mounting holes. Then, remove the
bracket and drill the holes using a 3/16 drill bit.
10. Secure the bracket to the panel using the kit-supplied 6-32 x 1/4 screws and 6-32 nuts. DO NOT
INSTALL THE RESET SWITCH INTO THE BRACKET AT THIS TIME.
11. Insert the kit-supplied thermocouple into its mounting sleeve. Position the sleeve so that the mounting
hole is at the base of the thermocouple, not the tip. See Figure 5.
12. Insert the thermocouple and mounting sleeve into the original mounting tube. The set screw opening
in the sleeve should align with the set screw hole on the side of the mounting tube.
Push the thermocouple into the opening until its base seats firmly on the mount. See Figure 6.
13. Insert the thermocouples set screw into the hole on the side of the mounting tube. Tighten the set
screw to hold the thermocouple and sleeve in place.
14. Thread the thermocouples shielded cable into the electrical compartment. Coil the free end of the
cable and fasten it with the kit-supplied nylon wire tie. Be sure to leave enough free cable to reach the
new high limit control.
Page 2 of 8
47
Page 49

SECTION 3 - SERVICING COMPONENTS
Appendix - Instructions for Service Kit 39733 -
High Limit Conversion Kit for PS300, 310, 350 & 360 Ovens, 5/99
High limit thermocouple location -
lower oven
Figure 3 Figure 4
Figure 2
High limit thermocouple location -
upper oven
NOT TO SCALE
Base
Figure 5
Thermocouple
Hole in sleeve is
base of
next to
thermocouple
Figure 6
Sleeve
Page 3 of 8
48
Page 50

SECTION 3 - SERVICING COMPONENTS
Appendix - Instructions for Service Kit 39733 -
High Limit Conversion Kit for PS300, 310, 350 & 360 Ovens, 5/99
C. WIRING
For the various wiring connections listed below, cut the kit-supplied #18 AWG wires to length. Refer to
Figures 7 and 8 (on pages 6 and 7) for diagrams of the wiring connections.
Lighted Reset Switch Wiring and Installation
14. Using the kit-supplied 1/4 wire connectors, connect the following kit-supplied wires:
- Red wires ................. connect one wire to each RESET terminal on the high limit control
- Black wire ................. connect to terminal NC on the high limit control
- White wire ................. connect to terminal L2 on the ovens temperature controller
15. Slip the free ends of these four wires through the circular hole in the reset switch mounting bracket, so
that they hang down in front of the control compartment.
16. Use the kit-supplied 1/4 wire connectors to connect these four wires to the terminals on the lighted
reset switch.
- Terminals 1 and 3 ..... Red wires (these connections are interchangeable)
- Terminal 2 ................ Black wire
- Terminal 4 ................ White wire (kit-supplied)
17. Push the lighted reset switch through the mounting hole in the center of the bracket until it snaps into
place. Be sure to avoid pinching the wires against the sides of the mounting hole.
Cooldown circuit wiring
NOTE: Perform steps 18 and 19 ONLY if you are replacing a UE Type 55 controller. If you are
replacing a UE Type 54 controller (which has no cooldown circuit), skip ahead to Step 20.
18. Attach the ovens
troller, as shown in Figures 7 and 8.
For Ovens with a Digital Temperature Controller:
a. Terminal 9 ................ Black wire (from blower switch)
b. Terminal 10 .............. Brown wire (from blower switch)
For Ovens with an Analog Temperature Controller:
a. Terminal 13 .............. Black wire (from blower switch)
b. Terminal 14 .............. Brown wire (from blower switch)
19. Attach a brown kit-supplied wire between the following terminals on the Temperature Controller:
Digital Controller ............. Terminals 10 and L1
Analog Controller............ Terminals 13 and L1
High Limit Control wiring
20. Using the kit-supplied 1/4 wire connectors, wire the high limit control terminals as follows:
a. Terminal NO ........... Purple wire (originally to UE control)
c. Terminal TC + ........ White wire (to thermocouple) - DO NOT CUT THIS WIRE TO LENGTH.
d. Terminal TC - ......... Red wire (to thermocouple) - DO NOT CUT THIS WIRE TO LENGTH.
f. Terminal L2 ............ White wire (kit-supplied; to neutral on the ovens terminal block)
h. Terminal COM........ Orange wire (originally to UE control)
existing cooldown wiring to the following terminals on the ovens Temperature Con-
21. Using a 1/4 wire connector, attach a brown kit-supplied wire to the L1 terminal on the high limit
control. Attach the free end of the wire to the L1 terminal on the temperature controller.
Page 4 of 8
49
Page 51

SECTION 3 - SERVICING COMPONENTS
Appendix - Instructions for Service Kit 39733 -
High Limit Conversion Kit for PS300, 310, 350 & 360 Ovens, 5/99
D. TESTING THE INSTALLATION
22. Remove the thermocouple wires from the TC + and TC - terminals on the high limit control.
23. Attach a Middleby Marshall Thermocouple Source (P/N 27170-0263) to the TC + and TC - terminals on the high limit control, in place of the thermocouple wires. Note that it may be necessary to
attach a pair of terminal connectors to the leads of the Thermocouple Source to allow them to connect
to the high limit controls terminals.
24. Restore the gas supply (if so equipped) and the electrical supply to the oven. Because the control
compartment door is still open, pull the door safety switch out into the service position.
25. Test the operation of the high limit control as follows:
a. Set the Thermocouple Source to a normal operating temperature, between 200°-600°F (93°-315°C).
b. Turn the oven on, and allow it to heat to 600°F (315°C).
c. After the oven has reached the setpoint temperature, set the Thermocouple Source to 700°F (371°C).
The high limit control is set to open at any temperature in excess of 650°F (343°C). This will shut
down the ovens heat circuit and illuminate the Reset Switch lamp.
26. Set the Thermocouple Source to a temperature setting below 600°F (316°C), and depress the Reset
Switch. This should turn off the Reset Switch lamp and restore heat circuit operation.
27. Turn the oven off.
28. If you replaced a UE type 55 controller (with a cooldown circuit), you must set the Thermocouple
Source to a temperature setting below 200°F (93°C). Then, wait for the blowers to turn off.
29. Press the door safety switch in to reset it to normal.
30. Remove the Thermocouple Source from the oven.
31. Reattach the thermocouple wires to the high limit controls terminals as follows:
White wire ................ TC +
Red wire ................... TC -
32. Close the machinery compartment and control compartment access panels, and fasten them in place.
The oven is now ready for normal operation.
Page 5 of 8
50
Page 52

SECTION 3 - SERVICING COMPONENTS
Appendix - Instructions for Service Kit 39733 -
High Limit Conversion Kit for PS300, 310, 350 & 360 Ovens, 5/99
KEY
Figure 7 - United Electric Model 55 replacement: ovens with a cooldown feature
Page 6 of 8
51
Page 53

SECTION 3 - SERVICING COMPONENTS
Appendix - Instructions for Service Kit 39733 -
High Limit Conversion Kit for PS300, 310, 350 & 360 Ovens, 5/99
KEY
Figure 8 - United Electric Model 54 replacement: ovens without a cooldown feature
Page 7 of 8
52
Page 54

SECTION 3 - SERVICING COMPONENTS
Appendix - Instructions for Service Kit 39733 -
High Limit Conversion Kit for PS300, 310, 350 & 360 Ovens, 5/99
A MIDDLEBY COMPANY
Middleby Cooking Systems Group 1400 Toastmaster Drive Elgin, IL 60120 USA (847) 741-3300 FAX (847) 741-4406
Middleby Corporation Service Hotline 1-800-238-8444
www.middleby.com
Page 8 of 8
53
Page 55

SECTION 3 - SERVICING COMPONENTS
IV. THERMOCOUPLES
All temperature controller and high limit functions are based
on input from thermocouples. When two wires composed
of dissimilar metals are joined together and one of the ends
is heated, a continuous current flow is generated. Middleby
ovens use a Type J (iron constant) thermocouple. The iron
wire increases the number of dissimilar metal junctions in
the circuit.
Middleby has used several types of thermocouples. All
can be replaced with the current version. Refer to Figure
24 for illustrations.
A two-lead thermocouple with a small retaining clip.
Used for EITHER temperature-sensing OR high-limit
functions. This type is no longer available.
A four-lead thermocouple with a small retaining clip.
This is a dual-function unit that sends its signal to the
temperature controller and to a separate high limit control module. This type is no longer available.
A three-lead thermocouple with a separate ground lead,
a shielded cable and a large mounting flange. This is
the only type of thermocouple available from Middleby
at this time. If it is used to replace a four-lead dualfunction thermocouple, two complete and separate thermocouples will have to be installed.
Figure 24 - Thermocouples
Cable
flange
Current 3-lead
thermocouple
Obsolete 2-lead
or 4-lead
thermocouple
A. Part Number Reference - Thermocouples
Part numbers are provided ONLY for the current, 3-lead thermocouple kits. These thermocouples include instructions
for replacing all previous thermocouple designs, in all oven
models.
P/N Description
33984 Kit, thermocouple, PS360-series or PS555/570
series
33985 Kit, thermocouple, PS200-series or PS536
(3 leads)
Cable
(2 or 4 leads)
clip
B. Thermocouple Functions
1. Temperature-sensing thermocouple(s)
All thermocouples monitor oven temperature. However,
Middleby uses the term temperature-sensing thermocouple in reference to thermocouples that send their
signal to the temperature controller instead of to a separate high limit control module.
On ovens that do NOT include a separate high-limit
control module (this includes most PS200-series and
PS360-series gas ovens), this thermocouple signal is
used to monitor the oven temperature for regulating the
gas flow/heater activation, AND to activate the high limit
warning in case of an overtemp condition.
Middleby ovens use from one to three temperature-sensing thermocouples, depending on the oven model.
Temperature-sensing thermocouples are used on all
oven models and are connected to Terminals 7 and 8
on the temperature controller. Based on the signal from
this thermocouple, the temperature controller:
Calls for heat from the burner/heating elements to
maintain the set point (output from Terminals 4 & 5
for on-off electric and gas ovens; output from Terminals 15 & 16 for variable pulse electric and modulating gas ovens).
Controls the cooldown feature if the HEAT switch
is turned off while the oven is above the cooldown
temperature (output from Terminals 9 & 10).
On ovens without a separate high limit control mod-
ule (most PS200-series and PS360-series gas and
electric ovens), the oven temperature sensed by
this thermocouple is also used to activate the high
limit warning (output from Terminals 11 & 12).
2. High limit thermocouple
Middleby uses the term high limit thermocouple in
reference to the thermocouple that sends its signal
solely to the separate high limit control module.
If the oven does not have a separate high limit control
module, there is no high limit thermocouple. On these
ovens, the temperature-sensing thermocouple(s) control high limit activation.
C. Troubleshooting
1. Open thermocouple
An open in a thermocouple will cause the temperature
controller to read the maximum temperature (usually
909°F/487°C). This causes the following:
On ovens without a separate high limit control mod-
ule, an open thermocouple triggers the high limit
alarm. This shuts down the burner. After the open
has been corrected, the high limit will need to be
reset to allow the oven to resume operation.
On ovens with a separate high limit control mod-
ule, an open temperature-sensing thermocouple
causes the temperature controller to stop calling
for heat. This shuts down the burner.
On ovens with a separate high limit control mod-
ule, an open high limit thermocouple will trigger the
high limit control module to shut down the burner.
Note that the high limit control will need to be reset
after the open is corrected before the oven can return to operation.
54
Page 56

SECTION 3 - SERVICING COMPONENTS
2. Checking the thermocouple with a DC millivolt meter
It is possible to check that a thermocouple is reading
accurately by using a multimeter set to read DC millivolts. At 32°F/0°C the thermocouple should read
0 mVDC. This can be checked by inserting the ther-
mocouple into an ice bath for several minutes. At 72°F/
22°C the reading should be 1.134mVDC.
You can use the chart below by checking the temperature at the thermocouples junction terminals. This is
called the Junction Temperature.
Figure 24 - Thermocouple millivolt readings at various operating and junction temperatures
55
Page 57

SECTION 3 - SERVICING COMPONENTS
D. Appendices
Middleby Cooking Systems Group 1400 Toastmaster Drive Elgin, IL 60120 USA (847) 741-3300 FAX (847) 741-4406
Instructions for Service Kits P/Ns 33984 and 33985
Oven Thermocouple Kit
This Service Kit provides the parts and instructions necessary to replace one temperature-sensing or high limit thermocouple in any of the following Middleby Marshall oven models:
PS200 Series uses Kit P/N 33985
PS360 Series uses Kit P/N 33984
These instructions include replacement procedures for ovens built with the current flanged thermocouple, AND for ovens
built with the obsolete thermocouple without a flange (P/N 28071-0001).
KIT CONTENTS - KIT P/N 33984
P/N Qty. Description
33812-1 1 Thermocouple, type J, 6 L
B301A8861 2 Screw, hex wshr hd #6 x 3/8
21292-0001 3 Screw, hex wshr hd #10-16 x 3/4
27276-0001 1 Cable clamp, nylon
41687 1 Attachment plate, PS360 rear thermocouple
34701 1 Instructions
IMPORTANT - READ THIS
The thermocouple in your Kit has three leads:
The red and white leads connect directly to the thermocouple terminals on the ovens temperature controller (or high
limit control module, as appropriate), or to a local terminal block that in turn is connected to one of these units.
The uninsulated lead is a ground wire for the thermocouples protective sheath. The ground connection helps to drain
any radio-frequency disturbances from the thermocouple before the signal enters the temperature controller or high
limit control module. For a temperature-sensing thermocouple, the ground lead MUST be connected to the ground
terminal on the temperature controller. For a high limit thermocouple, the ground lead should be connected to a
chassis ground or to the mounting screw for the high limit control module.
Some early thermocouples may have either two or four leads:
The two-lead thermocouple is simply an earlier version of the current model, without the ground lead. When replacing
a two-lead thermocouple, it will be necessary to connect the new ground lead.
The four-lead thermocouple is actually a dual-function unit which sends its signal to both the temperature controller
and the high limit control module. Current ovens use separate thermocouples for these functions. When replacing a
four-lead thermocouple, it will be necessary to use a SECOND KIT to install the high limit thermocouple. In addition,
any oven equipped with these early thermocouples should have all of its thermocouples updated at the same time. For
a PS570 or PS570S oven, this will require THREE THERMOCOUPLE KITS - two for the existing thermocouples, and
one for the new, separate high limit.
Appendix - Instructions for Service Kits 33984 and 33985 -
Oven Thermocouple Kit, 11/01
PS536 uses Kit P/N 33985
PS555 uses Kit P/N 33984
KIT CONTENTS - KIT P/N 33985
P/N Qty. Description
33812-2 1 Thermocouple, type J, 13-3/8 L
B301A8861 1 Screw, hex wshr hd #6 x 3/8
34701 1 Instructions
BEFORE YOU BEGIN!
PS570 uses Kit P/N 33984
Oven Model Page
PS200 Series - before 2/96, serial numbers before ASH-0001 ........... 2
PS200 Series - 2/96 or later, serial numbers after ASH-0001 ............. 2
PS360 Series rear wall thermocouples - before 2/96, serial
numbers before ASH-0001 .................................................................3
PS360 Series rear wall thermocouples - 2/96 or later, serial
numbers after ASH-0001 .................................................................... 3
PS360 Series front-mounted thermocouples inside the
machinery compartment...................................................................... 4
PS536 ................................................................................................5
WARNING
BEFORE PERFORMING ANY SERVICE WORK, THE ELECTRICAL POWER SUPPLY
1
56
Oven Model Page
PS555 Gas - rear wall thermocouples with screw terminal
connections (no terminal blocks) .........................................................8
PS555 Electric and PS555E............................................................... 9
PS570 (X01-X05 name plate ID numbers) and PS570S
(early) with side-mounted thermocouples inside
the blower motor compartments ........................................................ 10
PS570S (late) - rear wall thermocouples with left-side AND
right-side terminal block connections ................................................. 12
PS555G and PS570G - rear wall thermocouples with
left-side terminal block connections.................................................... 14
AND THE GAS SUPPLY MUST BE TURNED OFF.
P/N 34701 Rev. C V1 11/01
or outside
Page 58

Appendix - Instructions for Service Kits 33984 and 33985 -
Oven Thermocouple Kit, 11/01
PS200 Series - before 2/96, serial numbers
before ASH-0001
Thermocouples on these ovens are located inside the machinery compartment. They are secured in place by a set
screw in the mounting tube, inside the plenum chamber.
This Kit eliminates the set screw. The new thermocouple
is held in place by the head of the screw that is already
used to attach the mounting tube.
NOTE FOR HIGH LIMIT THERMOCOUPLES:
CE ovens and PS200VL models have two thermocouples,
one mounted above the other. In these ovens, the upper
thermocouple senses the oven temperature and is connected to the temperature controller. The lower thermocouple is connected to the high limit control module. Either thermocouple can be replaced using this Kit.
1. Remove the lower end plug from the control end of the
oven. Then, remove 1 or 2 lower air fingers as necessary to access the thermocouple mounting tube.
2. Refer to Figure 1. REMOVE AND DISCARD the set
screw and pull the thermocouple out of the mounting
tube. Disconnect the thermocouple wiring from the temperature controller or high limit module, as appropriate.
3. Remove AND RETAIN the #10-16 screw that fastens
the flange of the thermocouple mounting tube to the
plenum wall. Leave the mounting tube in place.
4. Install the new thermocouple so that its flange fits firmly
against the mounting tube flange.
5. Replace the #10-16 screw that you removed in Step 3.
Check that the head of the screw holds the thermocouple flange securely in place, as shown in Figure 1.
6. Route the thermocouple leads away from the ignition
cable. Connect the leads as shown in Figure 2.
PS200 Series - 2/96 or later, serial numbers
after ASH-0001
Thermocouples on these ovens are located in the same
position as the earlier PS200 models described above.
However, these ovens feature a flanged thermocouple identical to the new thermocouple provided in this Kit.
The thermocouple SHOULD be held in place by the screw
that attaches the thermocouple mounting tube, as per the
replacement procedure above. For these ovens, simply
disconnect the thermocouple wiring from the temperature
controller and follow Steps 3-6 of the procedure shown above
to remove and replace the thermocouple.
On some of these ovens, the thermocouple flange rests
ON TOP of the retaining screw for the mounting tube, as
shown in the INCORRECT inset of Figure 1. These thermocouples are held in place by the set screw on the mounting tube, inside the plenum chamber. For these ovens, you
should remove and replace the thermocouple by following
Steps 1-6 of the preceding section.
Thermocouple Installation - PS200 Series
Thermocouple
Set screw
(not used with new
thermocouple)
CORRECT
Thermocouple flange sits firmly on
mounting tube flange; tube
mounting screw holds thermo-
couple in place.
Thermocouple Wiring - PS200 Series
White
Red
Shielded
ground lead
Analog
Temperature
Controller
Red White
Shielded
ground lead
2
SECTION 3 - SERVICING COMPONENTS
Figure 1
Thermocouple
Tube
flange
shown.
Digital
Controller
Shielded
ground lead
Control
Module
Mounting
tube
screw
flange
Mounting
tube
Figure 2
Oven
wall
INCORRECT
Thermocouple flange sits on top of
screw head, leaving a gap as
Temperature
RedWhite
High Limit
57
Page 59

SECTION 3 - SERVICING COMPONENTS
Appendix - Instructions for Service Kits 33984 and 33985 -
Oven Thermocouple Kit, 11/01
PS360 Series rear wall thermocouples before 2/96, serial numbers before ASH-0001
Thermocouples on these ovens are located on the rear wall
of the baking chamber. They are secured in place by a
clamp on the outside of the oven.
This Kit eliminates the clamp. The flange of the new thermocouple is held to the back wall of the oven by a retaining
plate, as shown in Figure 3.
1. Loosen the retaining clamp and pull the thermocouple
straight out. Disconnect the thermocouple leads. Carefully thread the wiring out of the oven and discard the
thermocouple.
2. Remove and discard the cable clamp.
3. Slide the new thermocouple into the mounting tube until
the flange is seated firmly on the back wall of the oven.
4. Install the kit-supplied retaining plate (P/N 41687) as
shown in Figure 3.
5. Fasten the attachment plate to the back wall of the
oven using the two kit-supplied #10-16 x 3/4 self-tapping screws. Ensure that the thermocouple flange is
securely trapped between the plate and the rear wall of
the oven.
6. Route the wiring through the grommet hole and into the
machinery compartment. Check that the leads are clear
of all components, PARTICULARLY THE BLOWER
MOTOR, by using the existing wiring bundles.
7. Connect the leads as shown in Figure 4.
8. Attach the kit-supplied nylon clamp and #10-16 x 3/4
screw to the rear of the oven. The clamp should be
positioned to support the thermocouple leads away from
the flue pipes and vent openings.
Thermocouple
Plenum
wall
tube
Figure 3
Clamp (remove
and discard if
present)
thermocouple
Figure 4
Thermocouple
flange
New
Retaining
plate
Thermocouple Installation - PS360 Series
Mounting
(welded to
plenum)
Oven
wall
Thermocouple Wiring - PS360 Series
Digital Temperature Controller
White
Red
#10-16 x 3/4
mounting
screws (2)
PS360 Series rear-wall thermocouples - 2/96
or later, serial numbers after ASH-0001
Thermocouples on these ovens are mounted directly to the
back wall of the oven using a single retaining screw. It
should be possible to simply replace the existing thermocouple using the original mounting hardware.
To replace the thermocouple:
1. Remove AND RETAIN the screw that holds the thermocouple in place on the rear wall.
2. Disconnect the thermocouple leads. Carefully thread
the wiring out of the oven and discard the thermocouple.
3. Slide the new thermocouple into the mounting tube until
the flange is seated firmly on the back wall of the oven.
4. Fasten the thermocouple to the back wall of the oven
using the original mounting screw. Then, perform Steps
6-8 of the preceding section to wire the thermocouple.
58
Shielded
ground lead
Analog Temperature Controller
Shielded
RedWhite
ground lead
3
Page 60

Appendix - Instructions for Service Kits 33984 and 33985 -
Oven Thermocouple Kit, 11/01
PS360 Series front-mounted thermocouple
inside the machinery compartment
These thermocouples are mounted in a tube that extends
diagonally up and into the plenum chamber. They are secured in place by a set screw located on the mounting
tube, and by a bead of high-temperature silicone around
the end of the shaft.
The new thermocouple will be held in place in the same
manner, except that the silicone should be applied so that
it wraps around the edges of the thermocouples mounting
flange.
Thermocouple
SECTION 3 - SERVICING COMPONENTS
Thermocouple Installation - PS360 Series
Machinery Compartment
Figure 5
Set
screw
High-temperature
silicone wraps around
thermocouple flange
and onto mounting
tube
NOTE FOR HIGH LIMIT THERMOCOUPLES:
PS310/360 electric ovens have two thermocouples inside
the machinery compartment. One thermocouple is connected to the temperature controller, while the other is
connected to the high limit control module.
The thermocouple supplied in this Kit is incompatible with
the early United Electric Type 54 and Type 55 high limit
control modules used on these ovens. If the oven is
equipped with one of these control modules, it will be
necessary to upgrade the control unit to the current
Watlow model (shown in Figure 6) before the thermocouple can be replaced. Service Kit 39733 includes all
parts and instructions needed for the conversion. Refer
to Service Bulletin MM-168 (5/7/99) for details.
1. Remove the silicone seal around the end of the thermocouple. Loosen the set screw.
2. Pull the thermocouple out of its mounting tube. Carefully thread the wiring out of the oven and discard the
thermocouple.
3. Check that the silicone has been removed completely
from the end of the mounting tube. Any remaining silicone can interfere with the correct placement of the
new thermocouple.
4. Insert the new thermocouple until its flange is seated
on the end of the mounting tube. See Figure 5.
5. Tighten the set screw until the thermocouple is secure
inside the tube. AVOID OVERTIGHTENING THE SET
SCREW TO PREVENT DAMAGE TO THE THERMOCOUPLE.
6. Use high-temperature silicone to seal the flange to the
mounting tube, as shown in Figure 5. Check that all
holes and spaces are filled by the silicone. This not
only helps to hold the thermocouple in place, but prevents heat from entering the machinery compartment.
7. Route the wiring for the new thermocouple through the
hole in the side of the electrical control box by using
the existing wiring bundle. Check that the leads are
clear of the ignition cable and all components.
8. Connect the leads as shown in Figure 6.
White
Red
Shielded
ground lead
Shielded
ground lead
Plenum
wall
Mounting
tube
Thermocouple Wiring - PS360 Series
Figure 6
RedWhite
Analog
Temperature
Controller
Red White
Digital
Temperature
Controller
Shielded
ground lead
High Limit
Control
Module
4
59
Page 61

SECTION 3 - SERVICING COMPONENTS
Appendix - Instructions for Service Kits 33984 and 33985 -
Oven Thermocouple Kit, 11/01
PS536
Thermocouples on these ovens are located inside the machinery compartment. They are secured in place by a sheet
metal screw that traps the thermocouple flange against the
wall of the compartment. See Figure 7.
NOTE FOR HIGH LIMIT THERMOCOUPLES:
PS536 ovens have two thermocouples, one mounted
above the other. The upper thermocouple senses the
oven temperature and is connected to the temperature
controller. The lower thermocouple is connected to the
high limit control module. Either thermocouple can be
replaced using this Kit.
Thermocouple
Thermocouple Installation - PS536
Figure 7
Plenum
wall
Sheet
metal
screw
Thermocouple
flange
Machinery
compartment
wall
1. Loosen the sheet metal screw that holds the thermocouple flange to the wall of the machinery compartment.
2. Pull the thermocouple out of the machinery compartment. Disconnect the thermocouple leads.
3. Install the new thermocouple so that its flange fits firmly
against the wall of the machinery compartment. Tighten
the sheet metal screw so that its head holds the thermocouple flange securely in place.
NOTE: PS536 ovens do not use a thermocouple mounting tube, so it is CRITICAL that the thermocouple flange
is securely fastened to the wall of the machinery compartment.
4. Route the thermocouple leads away from the ignition
cable. Connect the leads as shown in Figure 8.
Temperature-
sensing
thermocouple
High limit
thermocouple
Figure 8
Thermocouple Wiring - PS536
Digital Temperature Controller
White
Red
Screw head holds thermocouple
flange in place
60
Shielded
ground lead
High Limit Control Module
Red White
Shielded
ground lead
5
Page 62

SECTION 3 - SERVICING COMPONENTS
Appendix - Instructions for Service Kits 33984 and 33985 -
Oven Thermocouple Kit, 11/01
PS555 Gas - thermocouples with screw terminal connections (no terminal blocks)
Thermocouples on these ovens are located on the rear wall.
They are secured in place by two screws that are inserted
through the holes in the thermocouple flange. These ovens
are equipped with a three-lead, flanged thermocouple identical to the one in this Kit.
NOTE FOR HIGH LIMIT THERMOCOUPLES:
These ovens have a high limit thermocouple installed in
the last mounting hole at the exit end of the oven.
The thermocouple supplied in this Kit can be used to
replace ANY of the temperature-sensing or high limit thermocouples on the oven.
1. Remove the rear shrouds and blower motor covers. This
allows access to the thermocouples (on the rear wall)
and screw terminals (inside the blower motor compartments).
2. Remove the screws that hold the thermocouple to the
wall. Slide the thermocouple out of its mounting hole.
3. Disconnect the thermocouple leads. Refer to Figure 9.
High limit thermocouples are wired directly to the
high limit control module. The thermocouples
ground wire is connected to the mounting screw
for the high limit control module.
The red and white leads from ALL temperature-sens-
ing thermocouples are joined at capped screw terminals, located inside the left blower motor compartment. Leads from these screw terminals connect to the temperature controller at the front of the
oven.
The ground leads for temperature-sensing thermocouples are connected to the chassis ground lug
inside the left blower motor compartment.
4. Remove and discard the thermocouple.
5. Install the new thermocouple into the original mounting
hole. Fasten it in place with the supplied #6 x 3/8
screws.
6. Wire the thermocouple as shown in Figure 9.
6. Use the kit-supplied nylon clamp and #10-16 x 3/4
screw to secure the thermocouple leads so that they
will clear the shrouds, blower belts, and pulleys.
7. Close the machinery compartment door. Replace all
shrouds onto the oven.
Cap
Screw terminals:
1 for red leads
1 for white leads
2 total
Temperature-sensing
thermocouple leads
(red or white)
1 lead to temperature
controller
Thermocouple Wiring - PS555
Temperature-sensing
thermocouple ground
leads attach to
ground lug
+
Shielded
ground lead
High limit
thermocouple leads
attach directly to high
limit control module
Figure 9
Red White
6
61
Page 63

SECTION 3 - SERVICING COMPONENTS
Appendix - Instructions for Service Kits 33984 and 33985 -
Oven Thermocouple Kit, 11/01
PS555 Electric and PS555E
Temperature-sensing thermocouples on these ovens are located on the rear wall. High limit thermocouples are located inside the machinery compartment. All thermocouples are secured in place by two screws that are inserted through the holes in the thermocouple flange. These
ovens are equipped with a three-lead, flanged thermocouple
identical to the one in this Kit.
NOTE FOR HIGH LIMIT THERMOCOUPLES:
PS555E electric ovens are equipped with a high limit thermocouple at the front of the oven, inside the machinery
compartment. All other PS555E, PS555G and PS570G
ovens have a high limit thermocouple installed into the
rear wall in the last mounting hole at the exit end of the
oven.
The thermocouple supplied in this Kit can be used to
replace ANY of the temperature-sensing or high limit thermocouples on the oven.
1. If you will be replacing the high limit thermocouple, open
the machinery compartment door.
To replace any other thermocouple, first remove the
rear shrouds. Then, remove the cover over the left blower
motor. This allows access to the thermocouples on
the rear wall, and to the terminal block inside the blower
motor compartment.
Note that all of the rear wall thermocouples are connected to the terminal block inside the left blower motor compartment. It is not necessary to access the
right blower motor compartment.
2. Remove the screws that hold the thermocouple to the
wall. Slide the thermocouple out of its mounting hole.
3. Disconnect the thermocouple leads. Rear wall thermocouples are connected to the terminal block inside
the left blower motor compartment. High limit thermocouples are connected directly to the high limit control
module.
4. Remove and discard the thermocouple.
5. Install the new thermocouple into its mounting hole.
Fasten it in place with the supplied #6 x 3/8 screws.
6. Wire the thermocouple as shown in Figure 10.
7. If you replaced a rear wall thermocouple, use the kitsupplied nylon clamp and #10-16 x 3/4 screw to secure the thermocouple leads so that they will clear the
shrouds, blower belts, and pulleys.
8. Replace all shrouds onto the oven. Close the machinery compartment door.
Temperature-sensing
thermocouple leads
Ground
leads
WhiteRed
To temperature
controller
To ground
terminal on temp
controller
Thermocouple Wiring - PS555 Electric and PS555E
Figure 10
Temperature-sensing
thermocouple leads
Shielded
ground lead
Left
Terminal
Block
High Limit
Control
Module
Red White
62
7
Page 64

SECTION 3 - SERVICING COMPONENTS
Appendix - Instructions for Service Kits 33984 and 33985 -
Oven Thermocouple Kit, 11/01
PS570 (X01-X05 name plate ID numbers) and
PS570S (early) with side-mounted thermocouples inside
or outside the blower motor
compartments
These ovens are equipped with two thermocouples, one on
each end wall of the oven. The thermocouples may be
mounted either inside or outside of the blower motor compartments.
The thermocouple on the right side of the oven has two
leads and sends its signal to the temperature controller.
The thermocouple on the left side of the oven is a dual-
function unit. It has FOUR LEADS and sends individual signals to the temperature controller and the high
limit control module.
Installing this Kit will replace BOTH thermocouples with
current three-lead versions located on the back wall of the
oven. The Kit also requires the installation of a THIRD thermocouple to act as a high limit sensor. Because of this,
you will need three separate thermocouple kits for these
ovens.
If the oven has already been updated with the rear-wall thermocouple configuration, you can simply replace the affected
thermocouple. Follow the instructions for PS570S (late)
rear wall thermocouples on Page 10.
1. If the thermocouples are located outside the blower
motor compartments, remove and retain the thermocouple covers.
2. Remove the end plugs from the oven. Then, remove 1
or 2 air fingers from each end of the oven as necessary
to access the thermocouple mounting tubes.
3. Remove the rear shrouds. Open the blower motor compartment doors.
4. Remove the cooling fans from both blower motors. Then,
remove the blower belts.
5. For each thermocouple:
Disconnect the thermocouple leads from the ter-
minal block inside the blower motor compartment.
Remove and discard the screws that hold the ther-
mocouple mounting tube to the plenum wall. Remove and discard the thermocouple and tube.
Plug the internal and external openings left by the
tubes using a high-temperature silicone sealant.
6. If the thermocouples were located outside the blower
motor compartments, replace the thermocouple covers.
7. Refer to Figure 11. Measure and scribe marks in the
rear wall of the oven for drilling the thermocouple mounting holes. Make sure that your measurements begin
at the edges of the rear panels, and NOT at the outer
edges of the oven!
Note that there are two different thermocouple placement
locations: one for Pizza Hut (and Pizza Hut International,
or Tricon) ovens, and one for all other ovens.
8. Drill the new thermocouple mounting holes using an
11/32 (8.73mm) D x 8 (203mm) L bit. Make sure that
you drill through all three walls of the oven.
9. Drill the two screw mounting holes for each thermocouple using a 7/64 (2.78mm) bit. Tap the holes using
a #6-32 tap.
10. If necessary, remove air fingers from the oven to access the areas around the new thermocouple mounting holes.
11. Vacuum out ALL drill shavings. If the oven is equipped
with a screen over the openings for the lower air fingers, use a flexible hose extension on the vacuum to
reach the shavings through the upper air finger openings.
12. Reinstall the air fingers and end plugs onto the oven.
13. Install the three new thermocouples into the back wall
of the oven. Check that the thermocouple flanges are
flush with the back wall.
14. Secure each thermocouple in place with the two kitsupplied #6 x 3/8 screws.
15. Wire the thermocouples as shown in Figure 12. The
thermocouples should be wired to the terminal block
inside the blower motor compartment closest to the
thermocouple.
IMPORTANT
As you wire the thermocouples, be sure to connect a
single chassis ground wire to the mounting screw for the
terminal block. See Figure 12.
A good ground connection for the thermocouples
uninsulated lead is REQUIRED for proper operation!
16. If you will be replacing additional thermocouples, repeat Steps 7-15 as necessary.
17. Using the kit-supplied nylon clamps and #10-16 x 3/4
screws, secure the thermocouple leads to the back
wall of the oven so that they will clear the shrouds,
blower belts, and pulleys.
18. Replace the blower belts and cooling fans.
19. Close the blower motor compartment doors. Replace
all shrouds onto the oven.
8
63
Page 65

SECTION 3 - SERVICING COMPONENTS
Appendix - Instructions for Service Kits 33984 and 33985 -
Oven Thermocouple Kit, 11/01
Location of New Thermocouple Mounting Holes - PS570, PS570S
Figure 11
High limit thermocouple
position for ovens with
LEFT-TO-RIGHT conveyors
Thermocouple positions
for non-Pizza Hut/Tricon ovens
High limit thermocouple
position for ovens with
RIGHT-TO-LEFT conveyors
Thermocouple positions
for Pizza Hut/Tricon ovens
Thermocouple Wiring - PS570 and PS570S (early) after thermocouple update - Left to Right Conveyor
Left
Terminal
Ground
lead
White
(temp)
Red
(temp)
Figure 12a
(temp)
Red
White
(temp)
Ground
leads (all)
Red
(hi lim)
White
(hi lim)
Block
Right
Terminal
Block
To temperature
controller
ground wire
To temperature
controller
To high limit
control module
New chassis
Figure 12b
Thermocouple Wiring - PS570 and PS570S (early) after thermocouple update - Right to Left Conveyor
Left
Terminal
Block
White
(hi lim)
To high limit
control module
Red
(hi lim)
Ground
leads (all)
To temperature
controller
White
(temp)
Red
(temp)
New chassis
ground wire
Red
(temp)
To temperature
controller
White
(temp)
Ground
lead
Right
Terminal
Block
9
64
Page 66

SECTION 3 - SERVICING COMPONENTS
Appendix - Instructions for Service Kits 33984 and 33985 -
Oven Thermocouple Kit, 11/01
PS570S (late) - rear wall thermocouples with
left-side AND right-side terminal block connections
Thermocouples on these ovens are located on the rear wall
and are secured in place by two screws that are inserted
through the holes in the thermocouple flange.
Most of these ovens have either three or four thermocouples,
all installed in the back wall of the oven. The thermocouple
at the extreme exit end of the oven is the high limit thermocouple, while all other thermocouples send their signals to
the digital temperature controller. The thermocouple supplied in this Kit can be used to replace ANY of the thermocouples on these ovens.
Some PS570S ovens are equipped with only two thermocouples. In these ovens:
The thermocouple on the right side of the oven has two
leads and sends its signal to the temperature controller.
The thermocouple on the left side of the oven is a dual-
function unit. It has FOUR LEADS and sends individual signals to the temperature controller and the high
limit control module.
Installing this Kit will replace BOTH thermocouples with
current three-lead versions located on the back wall of
the oven. The Kit also requires the installation of a
THIRD thermocouple to act as a high limit sensor. Because of this, you will need three separate thermo-
couple kits for these ovens.
1. Remove the rear shrouds and open the blower motor
compartment doors. This allows access to the thermocouples (on the rear wall) and terminal blocks (inside the blower motor compartments).
2. Remove the screws that hold the thermocouple to the
wall. Slide the thermocouple out of its mounting hole.
3. Disconnect the thermocouple leads. Remove and discard the thermocouple.
4. Perform Step 4 ONLY if you are installing a high
limit thermocouple and no mounting hole is
present. This would be the case if the oven formerly used a four-lead thermocouple to send a
signal to the high limit control module.
Temperature-sensing thermocouples for these ovens should be installed in the two existing thermocouple mounting holes.
Refer to Figure 13. Measure and scribe marks in
the rear wall of the oven for drilling the high limit
thermocouple mounting hole. Make sure that your
measurements begin at the edges of the rear panels, and NOT and the outer edges of the oven!
Drill the new high limit thermocouple mounting hole
using an 11/32 (8.73mm) D x 8 (203mm) L bit.
Be sure to drill through all three walls of the oven.
Drill the two screw mounting holes for the high limit
thermocouple using a 7/64 (2.78mm) bit. Tap the
holes using a #6-32 tap.
If necessary, remove the end plugs and air fingers
from the oven to access the areas around the new
high limit thermocouple mounting hole.
Vacuum out ALL drill shavings. If the oven is
equipped with a screen over the openings for the
lower air fingers, use a flexible hose extension on
the vacuum to reach the shavings through the upper air finger openings.
Reinstall the air fingers and end plugs onto the oven.
Location of High Limit Thermocouple Mounting Hole - PS570S
High limit thermocouple
position for ovens with
LEFT-TO-RIGHT conveyors
Figure 13
High limit thermocouple
position for ovens with
RIGHT-TO-LEFT conveyors
10
65
Page 67

SECTION 3 - SERVICING COMPONENTS
Appendix - Instructions for Service Kits 33984 and 33985 -
Oven Thermocouple Kit, 11/01
Thermocouple Wiring - PS570S (Late) - Left to Right Conveyor
Left
Terminal
NOTE: This configuration
shows leads for three
temperature-sensing
thermocouples - two on the
left side, and one on the
right. Ovens with only two
temperature-sensing
thermocouples will have a
single set of leads on the
left terminal block, instead
of the two sets that are
shown.
Block
terminal on temp
To ground
controller
Ground
leads
Figure 14a
White
Red
(temp)
(temp)
To temperature
controller
Red
(temp)
To temperature
controller
White
Ground
(temp)
leads (all)
To ground
terminal on temp
controller
White
Red
(hi lim)
(hi lim)
To mounting screw
for high limit
control module
Right
Terminal
Block
To high limit
control module
Thermocouple Wiring - PS570S (Late) - Right to Left Conveyor
Figure 14b
Left
Terminal
White
(hi lim)
Red
(hi lim)
Ground
leads (all)
Block
NOTE: This configuration
shows leads for three
temperature-sensing
thermocouples - two on the
right side, and one on the
left. Ovens with only two
temperature-sensing
thermocouples will have a
single set of leads on the
right terminal block,
instead of the two sets
that are shown.
To high limit
control module
To mounting screw
for high limit
control module
To ground
terminal on temp
controller
5. Install the new thermocouple into its mounting hole.
Fasten it in place with the supplied #6 x 3/8 screws.
6. Wire the thermocouple as shown in Figure 14. The
thermocouples should be wired to the terminal block
inside the blower motor compartment closest to the
thermocouple.
IMPORTANT
As you wire the thermocouples, check that ground leads
run from the terminal blocks inside the blower motor compartments to BOTH the temperature controller AND the
high limit control module, as shown in Figure 14.
If the ground leads to the front compartment of the oven
are NOT present - for example, on an oven that previously used the older-style 2-lead or 4-lead thermocouples
- it is acceptable to use a single chassis ground wire to
the mounting screw for the terminal block. See Figure
15.
A good ground connection for the thermocouples
uninsulated lead is REQUIRED for proper operation!
Red
White
White
(temp)
Red
(temp)
To temperature
controller
(temp)
To temperature
controller
(temp)
Ground
leads
To ground
terminal on temp
controller
7. If you will be replacing additional thermocouples, repeat Steps 2-6 as necessary.
8. Use the kit-supplied nylon clamp and #10-16 x 3/4
screw to secure the thermocouple leads so that they
will clear the shrouds, blower belts, and pulleys.
9. Close the machinery compartment and blower motor
compartment doors. Replace all shrouds onto the oven.
Red
Figure 15
Ground
leads (all)
White
(temp)
Red
(temp)
Use ONLY if ground leads to front compartment are not present.
Alternate ground lead wiring
White
(hi lim)
(hi lim)
Right
Terminal
Block
66
New chassis
11
ground wire
To high limit
control module
To temperature
controller
Page 68

SECTION 3 - SERVICING COMPONENTS
Appendix - Instructions for Service Kits 33984 and 33985 -
Oven Thermocouple Kit, 11/01
PS555G and PS570G rear wall thermocouples
with left-side terminal block connections
Thermocouples on these ovens are located on the rear wall.
They are secured in place by two screws that are inserted
through the holes in the thermocouple flange. The ovens
are equipped with a three-lead, flanged thermocouple identical to the one in this Kit.
NOTE FOR HIGH LIMIT THERMOCOUPLES:
These ovens have a high limit thermocouple installed in
the last mounting hole at the exit end of the oven.
The thermocouple supplied in this Kit can be used to
replace ANY of the temperature-sensing or high limit thermocouples on the oven.
1. Remove the rear shrouds. Then, remove the cover over
the left blower motor. This allows access to the thermocouples on the rear wall, and to the terminal block
inside the blower motor compartment.
Note that the thermocouples on these ovens are all
connected to the terminal block inside the left blower
motor compartment. It is not necessary to access the
right blower motor compartment.
Figure 16
Thermocouple Wiring - PS555G and PS570G
2. Remove the screws that hold the thermocouple to the
wall. Slide the thermocouple out of its mounting hole.
3. Disconnect the thermocouple leads from the terminal
block. Remove and discard the thermocouple.
4. Install the new thermocouple into its mounting hole.
Fasten it in place with the supplied #6 x 3/8 screws.
5. Wire the thermocouple as shown in Figure 16. Note
that the terminals are labeled - TC for temperaturesensing thermocouple leads, G for ground leads, and
HL for high limit thermocouple leads.
6. Use the kit-supplied nylon clamp and #10-16 x 3/4
screw to secure the thermocouple leads so that they
will clear the shrouds, blower belts, and pulleys.
7. Replace all shrouds onto the oven.
White
White
(temp)
Ground
leads (all)
Red
(temp)
To temperature
controller
Middleby Cooking Systems Group 1400 Toastmaster Drive Elgin, IL 60120 (847) 741-3300 FAX (847) 741-4406
Middleby Corporation Service Hotline 1-800-238-8444
To ground
terminal on temp
controller
Red
(hi lim)
To mounting screw
for high limit
control module
(hi lim)
To high limit
control module
12
67
Page 69

SECTION 3 - SERVICING COMPONENTS
V. BLOWERS
A. PS200-series ovens
All PS200 ovens are equipped with one 1/3hp blower motor. The motor indirectly drives a pulley on the shaft of the
blower fan with a fan belt.
Two main designs exist for the PS200 indirect fan drive
assembly:
Early design, used through 6/90. This design used
1/2 (12.7mm) bore flange mount bearings and a 1/2
(12.7mm) diameter blower fan shaft. See Figure 25.
Current design, used 7/90 and later. This design uses
5/8 (15.9mm) pillow block bearings and a 5/8 (15.9mm)
diameter blower fan shaft. See Figure 26.
Blower motors on both versions are rated for 208-240V,
single-phase, and are protected by:
A built-in thermal overload protection device.
Two 9A fuses on the inside of the machinery compart-
ment door. Fuse location is shown in Figure 27.
In addition, the blower fan is protected by an air pressure
saftety switch that prevents the burner/heating elements
from activating if the fan is not rotating. See Air Pressure
Safety Switch on Page 81.
Figure 25
Early-style PS200 indirect drive assembly
Direction of rotation
(viewed from
rear of oven)
Figure 26
Current PS200 indirect drive assembly
1. Part number reference
Early version components
NOTE: If an early-version PS200-series oven has a
failed fan shaft, upgrade the oven to the current drive
assembly using Kit P/N 49810-0121.
Part Number Description
22230-0072 Pulley, 1/2 / 12.7mm bore
22071-0019 Bearing, 1/2 / 12.7mm bore, flange
mount
37900-0094 Fan shaft alignment tool (early)
27381-0066 Motor, 1/3 hp, 200-240V, 50/60Hz ,1 Ph
22181-0034 Fan belt
Current version components
Part Number Description
35900-0232 Shaft, blower fan
22230-0073 Pulley, 5/8 / 15.9mm bore
22072-0025 Bearing, 5/8 / 15.9mm bore, pillow
block mount
27399-0003 Blower fan, 16 / 0.4m diameter
37900-0106 Fan shaft alignment tool (current)
49810-0121 Indirect drive upgrade kit (upgrades
early-style version to current version)
49810-0018 Fan shaft service kit (includes 2 bear-
ings, 1 shaft, and alignment tool )
27381-0066 Motor, 1/3 hp, 200-240V, 50/60Hz ,1 Ph
22181-0034 Fan belt
Direction of rotation
(viewed from
rear of oven)
Figure 27
Blower motor fuses
Blower
motor
fuses
Control
fuse
68
Page 70

SECTION 3 - SERVICING COMPONENTS
2. Blower balancing and direction of rotation
Proper blower rotation is extremely important. From
the rear of the oven, the blower shaft pulley should turn
in a clockwise direction. See Figures 25 and 26.
All blower fans are balanced at the factory. Any fan
found to be out of balance should be replaced. Vibration from an out-of-balance fan can cause poor baking
and premature bearing failure. Note that vibrations can
also be caused by other sources, including defective
motor or blower shaft bearings, loose bearings or motor mounting bolts, or an incorrectly tensioned fan belt.
3. Lubricating the blower fan shaft bearings
IMPORTANT: Middleby uses two different types
of grease in blower shaft bearings:
DuPont Krytox® grease is used in some
PS536 ovens. Refer to Service Bulletin MM192 (included in the Appendices section of
this chapter) for details on identifying
Krytox® bearings.
All other ovens use the standard Middleby
high-temperature grease, P/N 17110-0015.
Mixing grease types within the bearing will
cause the bearing to seize. For all PS200 ovens, be sure to use ONLY the standard
Middleby grease.
Figure 28
Bearing lubrication
Grease fittings
(1 per bearing,
2 total)
Figure 29
Blower belt tension
1 (25mm)
vertical
deflection
NOTE: Middleby recommends lubricating the blower
fan shaft bearings every three months.
Use a grease gun to lubricate the main blower fan shaft
bearings. See Figure 28. When lubricating the bearings:
Use a high-quality NLGI #2, lithium soap grease with
petroleum oil, such as Middleby P/N 17110-0015.
Add the grease slowly until a small bead of grease
is present at the seals. AVOID OVERGREASING.
Excessive greasing may cause harm to the bearing.
Manually turn the blower shaft by pulling on the belt to
purge the grease. Wipe off any excess grease. The
oven cannot be operated until the rear shroud is replaced.
4. Blower belt tension
NOTE: Middleby recommends checking the blower
belt condition and tension every three months.
Check the blower belt for at least 1" (25mm) deflection
at the center, and for cracking or excessive wear.
Overtightening the belt will cause premature bearing
failure and possible vibrations. See Figure 29.
If necessary, adjust the tension of the belt by loosening
the two motor mounting bolts as shown in Figure 30.
Reposition the motor as neccessary until the correct
deflection is reached, then tighten the bolts.
Figure 30
Repositioning the blower motor
Loosen bolts to
reposition motor
and adjust belt
tension
69
Page 71

SECTION 3 - SERVICING COMPONENTS
5. Early-style PS200 bearing replacement and alignment
NOTE: This procedure is for early-style indirect fan
shaft assemblies only, as shown in Figure 25. Bearing
replacement procedures for the current-style indirect
fan shaft assembly (Figure 26) are provided on Page
72.
IMPORTANT: Before attempting any repair on the
early-style PS200 Indirect Fan Drive Assembly:
If you need to perform any maintenance more
involved than replacing and aligning the shaft bearings, you should upgrade the fan shaft assembly
to the current version.
Check the front and rear brackets (Item 6 in Fig-
ure 32). If the brackets ARE NOT welded together, you should upgrade the fan shaft assembly to the current version.
In either of these cases, you can upgrade the fan
shaft assembly using Service Kit P/N 49810-0121.
See Part Number Reference on Page 68 for details.
The following procedures are necessary to align the
fan shaft whenever service to the fan shaft or replacement of the bearings is required. REFER TO FIGURE
32 FOR ILLUSTRATIONS OF THE COMPONENTS DESCRIBED HERE.
1. Remove the entire back wall (Item 1) of oven to
service the fan assembly.
2. Remove the blower fan (Item 13) and pulley (Item
8).
NOTE: If parts are to be replaced, you should replace
them now.
3. When installing the Drive Bracket Assembly (Item
5) insert one 3/8 flat washer (Item 4) at the 4 outer
holes and one 3/8 special flat washer (Item 14) at
the 4 inner holes between bracket and back wall at
mounting locations. Use eight 3/8-16 x 1 screws
(Item 2) and assemble a 3/8 lockwasher (Item 3)
and a 3/8 flat washer (Item 4) onto each screw.
Insert a screw at all 8 locations, hand tighten only
at this time.
4. Install front and rear fan shaft flange bearings (Item
10), if they were removed, to Indirect Drive Bracket
(Item 6) using three 1/4-20 x 3/4 screws (Item 11)
and three 1/4 lockwashers (Item12) on each bearing.
IMPORTANT: The bearings (10) must be mounted
so the grease fitting faces up when the bracket
assembly (Item 5) is mounted on the rear wall.
NOTE: Do not tighten flange bearing block screws
until Step 10 has been completed.
9. Install the fan shaft as shown in Figure 32. Align
bearing set screws with flats on shaft but do not
tighten set screws at this time.
10. Insert fan shaft alignment tool (Item 15) into back
wall as shown in Figure 31.
NOTE: The bracket assembly is designed for slight up
and down and right to left movement to attain free shaft
rotation when the shaft alignment tool is in place. Once
free shaft rotation is achieved, tighten all eight bracket
screws (Item 2).
11. Tighten rear flange bearing block screws (Item 11)
then front flange bearing block screws.
12. Remove shaft alignment tool, then recheck fan shaft
for free rotation.
13. Install pulley (Item 8) on fan shaft and position fan
shaft per the dimensions shown in Figure 32. Align
the two flats per bearing which are machined on
fan shaft for the bearing set screws. Use High
Temperature Loctite, RC 620 on bearing set screws
and then tighten set screws. Recheck fan shaft for
free rotation.
14. Apply anti-seize compound on fan shaft before installing fan blade (Item 13). Position fan blade per
dimension shown in Figure 32.
15. Apply High Temperature Loctite Type RC 620 to
fan blade set screws.
NOTE: Tighten the two set screws on fan blade per
the following sequence when viewing fan blade from
front: first, the screw at the 12:00 position, then the
screw at the 3:00 position.
16. Recheck fan shaft rotation before installing back
wall to oven cavity.
NOTE: Apply anti-seize compound (MM P/N 17110-
0017) to all 12 bolts before installing back wall assem-
bly to oven.
17. Install back wall on oven.
18. Install fan belt.
NOTE: Excessive fan belt tension will create overloading of rear bracket fan shaft bearing. Refer to Blower
Belt Tension on Page 69.
Figure 31
Fan shaft alignment tool
70
Page 72

SECTION 3 - SERVICING COMPONENTS
Figure 32
Bearing replacement and alignment - early-style PS200 fan shaft assembly
Item Qty. Part Number Description
11Not available Back Wall Assembly
2 8 21216-0001 Screw, Hex Cap SS 3/8-16x1
3 16 21422-0001 Lock Washer, Split 3/8
4 20 21416-0001 Flat Washer, SS 3/8
51Not available Indirect Fan Drive Bracket Assembly
61Not available Bracket, Indirect Drive
71Not available Shaft, Fan Drive
8 1 22230-0072 Pulley, 1/2 Bore
Item Qty. Part Number Description
9 1 21651-0008 Square Key 1/8
10 2 22071-0010 Flange Bearing, 5/8 Bore
11 6 21211-0004 Screw, Hex Cap 1/4-20 x 3/4
12 6 21421-0016 Lock Washer, Split 1/4
13 1 Not available Blower Fan, 16 Dia.
14 4 21419-0004 Flat Washer 3/8 SS Special
15 1 37900-0094 Fan Shaft Alignment Tool
IMPORTANT: If parts listed as Not Available require replacement, use Service Kit 49810-0121 to upgrade the fan shaft
assembly to the current version.
71
Page 73

SECTION 3 - SERVICING COMPONENTS
6. Current-style PS200 bearing replacement and alignment
NOTE: This procedure is for current-style indirect fan
shaft assemblies only, as shown in Figure 26. Bearing
replacement procedures for the early-style indirect fan
shaft assembly (Figure 25) are provided on Page 70.
The following procedures are necessary to align the
fan shaft whenver service to the fan shaft or replacement of the bearings is required. REFER TO FIGURE
34 FOR ILLUSTRATIONS OF THE COMPONENTS DESCRIBED HERE.
1. Remove the entire back wall (Item 1) of oven to
service the fan assembly.
2. Remove the blower fan (Item 11) and pulley (Item
7).
3. Remove the indirect drive bracket assembly (Item
5) by removing eight (8) screws (Item 2). lf you are
upgrading from the early-style assembly, save the
hardware (Items 2, 3, 4, and 12) to be reused with
the new style bracket (Item 5).
NOTE: If parts are to be replaced, you should replace
them now.
4 Install front and rear fan shaft pillow block bearings
(Item 9), if they were removed, to indirect drive
bracket (Item 5) using two (2) 3/8-16 X 1 screws
(Item 2) and two 3/8 lockwashers (Item 10) on each
bearing.
NOTE: Do not tighten the pillow block bearings
until Step 7 has been completed.
5. Install the fan shaft (Item 6) as illustrated in Figure
34. Align bearing set screws with flats on shaft but
do not tighten set screws at this time.
NOTE: Before proceeding to Step 6, it is advisable to
position the rear wall assembly in an upright, vertical
position using a block of wood under the fan ring.
6. When installing the drive bracket (Item 5) insert
one 3/8 flat washer (Item 4) at the four outer holes
and one 3/8 special flat washer (Item 12) at the 4
inner holes between the bracket and back wall at
the mounting locations. Use eight 3/8-16 X 1
screws (Item 2) and assemble a 3/8 lockwasher
(Item 3) and a 3/8 flat washer (Item 4) into each
screw. Insert a screw at all 8 locations. Hand
tighten only at this time.
7. Insert fan shaft alignment tool (Item 13) as shown
into back wall.
NOTE: The bracket assembly is designed for slight up
and down and right to left movement to attain free shaft
rotation when the shaft alignment tool is in place. Once
free shaft rotation is achieved, tighten all eight bracket
screws (Item 2).
8. Tighten rear pillow block bearing screws (Item 9)
then front pillow block bearing screws.
9. Remove shaft alignment tool, then recheck fan shaft
for free rotation.
10. Install pulley (Item 7) on fan shaft and position fan
shaft per dimension shown in Figure 34. Align the
flats machined on fan shaft with the bearing set
screw holes. Apply High Temperature Loctite, type
RC 620 on bearing set screws and then tighten set
screws. Recheck fan shaft for free rotation.
11. Apply anti-seize compound on fan shaft before installing fan blade (Item 11). Position fan blade flush
with 5/8 shoulder on shaft as called out in Figure
34.
NOTE: Fan blade hub has a 1/2 bore. The fan shaft
is turned down from 5/8 to 1/2 to receive fan blade.
12. Apply High Temperature Loctite Type RC 620 to
fan blade set screws.
NOTE: Tighten the two set screws on fan blade per
the following sequence when viewing fan blade from
front: first, the screw at the 12:00 position, then the
screw at the 3:00 position.
13. Recheck fan shaft rotation before installing back
wall to oven cavity. Be sure fan assembly has adequate clearance inside orifice ring and is not rubbing.
NOTE: Apply anti-seize compound (MM P/N 17110-
0017) to all 12 bolts before installing back wall assem-
bly to oven.
14. Install back wall on oven.
15. Check motor pulley and fan pulley alignment. See
Figure 33.
16. Install fan belt.
NOTE: Excessive fan belt tension will create overloading of rear bracket fan shaft bearing. Refer to Blower
Belt Tension on Page 69.
Figure 33 - Four-point alignment test for correct pulley alignment
Cord tied to shaft
Cord must touch sheaves at four points indicated by arrows
72
Page 74

SECTION 3 - SERVICING COMPONENTS
Figure 34
Bearing replacement and alignment - current-style PS200 fan shaft assembly
Item Qty. Part Number Description
1 1 37900-0068 Back Wall Assembly
2 16 21216-0001 Screw, Hex Cap SS 3/8-16x1
3 16 21422-0001 Lock Washer, Split 3/8
4 12 21416-0001 Flat Washer, SS 3/8
5 1 37900-0101 Bracket, Indirect Drive
6 1 35900-0232 Shaft, Fan Drive
7 1 22230-0073 Pulley, 5/8 Bore
8 1 21651-0008 Square Key 3/16
9 2 22072-0025 Pillow Block Bearing, 5/8 Bore
10 4 21422-0001 Lock Washer, Split 1/4
Item Qty. Part Number Description
11 1 27399-0003 Blower Fan, 16 Dia.
12 4 21419-0004 Flat Washer 3/8 SS Special
13 1 37900-0106 Fan Shaft Alignment Tool
Also available:
-- -- 49810-0018 Fan Shaft Service Kit
Includes Qty. 2 of Item 9 and Qty. 1 ea.
of Items 6 and 13.
-- -- 49810-0021 Fan Shaft Upgrade Kit
Includes parts and instructions to update early-style fan shaft assembly to
the current version shown here.
73
Page 75

SECTION 3 - SERVICING COMPONENTS
B. PS360-series ovens
All PS360-series ovens are equipped with two blower motors.
All gas ovens have motors rated at 230V, single-phase.
All electric ovens built before 8/02 have three-phase
motors.
All electric ovens built 8/02 or later that operate on a
supply voltage of 208-240V have single-phase motors.
All electric ovens built 8/02 or later that operate on supply
voltages above 240V have three-phase motors.
Blower motors are protected by:
A built-in thermal overload protection device.
For ovens with single-phase blower motors: Two 9A
fuses. Fuse location is shown in Figure 35.
For ovens with three-phase blower motors: Three 5A
fuses. Fuse location is shown in Figure 36.
In addition, each motor contains a centrifugal safety switch
that prevents the burner/heating elements from activating if
either motor is not operating. See Blower Motor Centrifugal
Safety Switch on Page 80.
The blower wheel is directly connected to the motor shaft.
A heat slinger, also mounted on the motor shaft, helps to
keep heat away from the motor bearings. If the motor is
stopped when the temperature in the compartment is over
180°F/82°C, the bearings can be damaged.
1. Part number reference
Blower motors
Part Number Description
27381-0023 1 Ph, 1/3 hp (PS310, -314, -360, -360S)
27381-0024 3 Ph, 1/3 hp (PS310, -314, -360)
27381-0054 1 Ph, 1/4 hp (PS360Q)
27381-0075 1 Ph, 1/2 hp (PS360WB)
31432 1 Ph, 1 hp (PS360EWB, -WB70)
Blower wheels
Part Number Part Number
(clockwise) (counter-clockwise) Description
22523-0002 22523-0003 9-3/16 / 233mm dia. (PS310, -314,
-360, -360Q, -360S, -360WB)
35603 35604 9-1/8 / 232mm dia. (PS360EWB)
36014 36015 8-1/4 / 210mm dia. (PS360EWBQ)
31599 31600 9-7/8 dia. / 251mm (PS360WB70)
Other components
Part Number Description
27396-0005 Heat slinger
42400-0101 Blower wheel puller tool
Figure 35
Blower motor fuses - single-phase motors
Left motor
fuses - 9A
Right motor
fuses - 9A
Control
fuse - 5A
Figure 36
Blower motor fuses - three-phase motors
Left motor
fuses - 5A
Transformer fuses
(480V electric
ovens only)
Right motor
fuses - 5A
Control
fuse - 5A
2. Blower balancing
All blower wheels are balanced at the factory. Any
blower wheel found to be out of balance should be replaced. Vibration from an out-of-balance wheel can
cause poor baking and premature motor bearing failure. Note that vibrations can also be caused by other
sources, including defective motor bearings and loose
motor mounting bolts.
74
Page 76

SECTION 3 - SERVICING COMPONENTS
3. Direction of blower rotation
Proper blower rotation is extremely important. Blower
rotation is determined by viewing the motor and wheel
from the REAR of the motor (or from the open end of
the oven). See Figures 37-39.
Figure 37 - Clockwise blower wheel
Heat slinger
blades face motor
Note slant of blades
Direction
of rotation
(rear view)
Figure 38 - Counterclockwise blower wheel
Direction
of rotation
Heat slinger
blades face motor
4. Removing the blower wheels
To change a motor or blower wheel, the wheel must
first be removed from inside the oven as follows:
Remove the end plugs and conveyor assembly.
From inside the oven cavity, reach into the blower
recess and remove the inlet rings. See Figure 40.
Loosen the set screw on the blower wheel hub and
remove the blower wheel. A special wheel puller
tool (P/N 42400-0101) is available for this purpose.
See Figure 41.
IMPORTANT: Before installing the new wheel,
apply an anti-seize lubricant (Middleby P/N 17110-
0017) to the motor shaft and the inside of the blower
wheel hub.
Figure 40
Inlet ring
Note slant of blades
(rear view)
Figure 39 - Blower wheel placement
Shown from rear of oven
Clockwise
Upper right
Counter-
clockwise
Lower right
Figure 41
Blower wheel puller tool
Counter-
clockwise
Upper left
Clockwise
Lower left
75
Page 77

SECTION 3 - SERVICING COMPONENTS
A. PS555/570-series ovens
All PS555/570-series ovens are equipped with two 1hp blower
motors. Each motor indirectly drives a pulley on the shaft
of a blower wheel with a fan belt.
Two main designs exist for the PS555/570 blower fan system:
PS570/570S design. In this version, the pillow block
bearings for the blower wheel shaft were mounted upright, on brackets that were parallel to the fan belts.
See Figure 42.
PS555/570G design. In this version, the pillow block
bearings are mounted with the grease fittings pointing
in towards the center of the oven. See Figure 43.
Figure 42 - PS570/570S blower configuration
Blower
motor
Pulley
Belt
The two designs share many common parts, including blower
wheels, motors, and bearings. From a service standpoint,
the major difference is the size of the pulleys and the length
of the belts.
Blower motors on all PS555/570-series ovens are rated for
208-240V, single-phase, and are protected by:
A built-in thermal overload protection device.
Two 15A fuses or 15A circuit breakers. Refer to Figure
44 for the location of the fuses/breakers.
In addition, each blower fan is protected by an air pressure
saftety switch that prevents the burner/heating elements
from activating if the fan is not rotating. See Air Pressure
Safety Switch on Page 81.
Direction
of rotation
Blower
motor
Pulley
Bearing PulleyBlower
shaft
Blower wheel
(inside oven)
Figure 43 - PS555/570G blower configuration
Belt
Bearing PulleyBlower
shaft
Blower wheel
(inside oven)
Figure 44 - Fuse/circuit breaker locations
PS570/570S:
15A fuses located on
left side of machinery
compartment
PS555 (early):
15A breakers located
inside left blower
motor compartment
76
PS555 (current),
PS570G: 15A
breakers located on
right side of machinery
compartment
Page 78

SECTION 3 - SERVICING COMPONENTS
1. Part number reference
Part Number Description
27381-0069 Motor, 1 hp, 208-240V, 50/60 Hz, 1 Ph
22521-0005 Blower wheel, clockwise (right end of
PS570; left end of PS555, PS570S,
PS570G)
22521-0006 Blower wheel, counterclockwise (left end
of PS570; right end of PS555, PS570S,
PS570G)
Oven Blower Pulley Motor Pulley Belt Blower
Application model Hz Part No. Desc. Part No. Desc. Part No. Desc. RPM
Standard PS570 60 22230-0084 BK52 30476 BK47 22181-0037 -- --
PS570S 60 22230-0087 BK47H 30476 BK47 46744 BX55 1780 RPM
PS570S 50 22230-0087 BK47H 22230-0086 BK55 46745 BX56 1733 RPM
PS570G 60 39587 BK70 44977 BK70 46452 BX67 1780 RPM
PS555/ 60 39587 BK70 39586 BK80 44946 BX61 2080 RPM
555G/555E
Pizza Hut PS570S 60 22230-0087 BK47H 22230-0086 BK55 46745 BX56 1733 RPM
USA
PS570S 60 22230-0087 BK47H 39910 BK62 44963 BX58 2300 RPM
High Altitude
PS570G 60 39587 BK70 39586 BK80 46453 BX68 2057 RPM
PS570G 60 39587 BK70 46455 BK90 46454 BX70 2300 RPM
High Altitude
Pizza Hut PS570S 60 22230-0087 BK47H 22230-0086 BK55 46745 BX56 1733 RPM
Intl. (Tricon)
PS570G 60 39587 BK70 39586 BK80 46453 BX68 2057 RPM
PS555G 50 39587 BK70 42984 BK95H 47044 BX62 2020 RPM
PS555E 50 39587 BK70 39586 BK80 44946 BX61 1680 RPM
Dominos Q PS570S 60 22230-0087 BK47H 45796 BK45 46744 BX55 1692 RPM
PS570G 60 39587 BK70 47267 BK65 46452 BX67 1692 RPM
PS555G 60 39587 BK70 39910 BK62 44963 BX58 1580 RPM
Papa Johns PS555G 60 39587 BK70 39910 BK62 44963 BX58 1580 RPM
Part Number Description
22072-0026 Bearing, pillow block, 1 / 25.4mm bore
(PS570)
22072-0017 Bearing, pillow block, 1-7/16 / 36.5mm
bore (PS570S)
35210-0251 Blower shaft, 1 dia. (PS570)
35210-0506 Blower shaft, 1-7/16 dia. (PS570S)
41899 Blower shaft, 1-7/16 dia. (PS555 or
PS570G)
22031-0001 bushing
NOTE: If a particular customer/oven model combination is not listed (for example, Pizza Hut PS555G), use the
Standard information.
77
Page 79

SECTION 3 - SERVICING COMPONENTS
2. Blower balancing and direction of rotation
Proper blower rotation is extremely important. Proper
blower rotation is shown in Figure 45.
Early PS570 blower wheels were positioned so that
the open end of the wheel faced into the baking chamber. This was changed on the PS570S (and all later
models) to improve airflow. Note that this also means
that on early PS570 ovens the counterclockwise wheel
is moved to the left side of the oven, and the clockwise
wheel moved to the right side, so that the wheel blades
point in the same direction. This is reflected in the
Part Number Reference information on Page 77.
All blower wheels are balanced at the factory. Any
blower wheel found to be out of balance should be replaced. Vibration from an out-of-balance wheel can
cause poor baking and premature bearing failure. Note
that vibrations can also be caused by other sources,
including defective motor or blower shaft bearings, loose
bearings or motor mounting bolts, or an incorrectly
tensioned fan belt.
3. Lubricating the blower shaft bearings
Figure 45
PS500-series blower wheel orientation
Clockwise:
Right end
Counter-
clockwise:
Right end
Open end of wheel faces IN
PS570S, PS570G, PS555:
Open end of wheel faces OUT
PS570:
Counter-
clockwise:
Left end
Clockwise:
Left end
IMPORTANT: Middleby uses two different types
of grease in blower shaft bearings:
DuPont Krytox® grease is used in some
PS536 ovens. Refer to Service Bulletin MM192 (included in the Appendices section of
this chapter) for details on identifying
Krytox® bearings.
All other ovens use the standard Middleby
high-temperature grease, P/N 17110-0015.
Mixing grease types within the bearing will
cause the bearing to seize. For all PS555/570series ovens, be sure to use ONLY the standard Middleby grease.
NOTE: Middleby recommends lubricating the blower
fan shaft bearings every three months.
Use a grease gun to lubricate the main blower fan shaft
bearings. See Figure 46. When lubricating the bearings:
Use a high-quality NLGI #2, lithium soap grease with
petroleum oil, such as Middleby P/N 17110-0015.
Add the grease slowly until a small bead of grease
is present at the seals. AVOID OVERGREASING.
Excessive greasing may cause harm to the bearing.
Manually turn the blower shaft by pulling on the belt to
purge the grease. Wipe off any excess grease. The
oven cannot be operated until the rear shroud is replaced.
Note slant of blades
Figure 46
Bearing lubrication
Grease fittings
(1 per bearing,
4 total)
PS570,
PS570S
Grease fittings
(1 per bearing,
4 total)
78
PS570G,
PS555
Page 80

SECTION 3 - SERVICING COMPONENTS
4. Blower belt tension
NOTE: Middleby recommends checking the blower
belt condition and tension every three months.
Check the blower belt for at least 1" / 25mm deflection
at the center, and for cracking or excessive wear.
Overtightening the belt will cause premature bearing
failure and possible vibrations. See Figure 47.
If necessary, adjust the tension of the belt by loosening
the two motor mounting bolts as shown in Figure 47.
Reposition the motor as neccessary until the correct
deflection is reached, then tighten the bolts.
5. Bearing replacement and alignment
Whenever service to the blower shaft or replacement of
the bearings is required, the shaft will need to be aligned.
NOTE: Apply anti-seize compound (MM P/N 17110-
0017) to all bolts before installing back wall assembly
to oven.
First, reassemble the back wall components, but DO
NOT TIGHTEN THE HEX BOLTS that hold the bearings
to their mounting brackets. Leaving the bearings loose
allows the pulleys to be aligned.
Next, check the alignment of the pulleys using a cord
as shown in Figure 48. Reposition the bearings as
required to align the blower shaft, then tighten the hex
bolts to hold the shaft in place.
Replace the belts and rear shrouds after the pulleys
are properly aligned.
Figure 47
Blower belt tension and
repositioning the blower motor
PS570,
PS570S
1 (25mm)
vertical
deflection
PS570G,
PS555
Loosen bolts to
reposition motor
and adjust belt
tension
Figure 48 - Four-point alignment test for correct pulley alignment
Cord tied to shaft
Cord must touch sheaves at four points indicated by arrows
79
Page 81

SECTION 3 - SERVICING COMPONENTS
VI. BLOWER MOTOR CENTRIFUGAL SAFETY SWITCH
(PS360-SERIES)
Middleby ovens have a safety feature that prevents the
burner/heating elements from activating if the blower(s) are
not in operation. On PS360-series ovens, this feature is
controlled by a centrifugal switch mounted inside each
blower motor. If either motor is not operating, the burner/
heating elements cannot activate.
The centrifugal switch is a normally-closed (NC) limit switch
mounted inside the rear of each blower motor. See Figure
49. When the motor is not running, the centrifugal switch
weight holds the switch open. As the motor reaches full
speed, the weight moves away from the switch permitting
the contacts to close. When the switch contacts of BOTH
blower motors are closed, the heat circuit is completed,
allowingthe burner/heating elements to activate.
If a blower motor is not operating, the switch will not close
and the circuit remains open, preventing burner/heating element activation.
A. Part Number Reference - Blower Centrifugal Switch
On all PS360-series blower motors, the centrifugal
switch can be replaced with switch P/N 27270-0144.
B. Troubleshooting
1. To access the switch, remove the rear motor wiring
cover plates. See Figure 49.
2. When the switch is operating properly, both sides of
the brown wires coming from the switch should be hot
when the motor is at full RPM.
3. No adjustment can be made to the switch. If it is not
operating properly, it must be replaced.
VII. BURNER BLOWER MOTOR CENTRIFUGAL SAFETY
SWITCH (PS200-SERIES GAS, PS310, PS314,
PS360, PS360WB, PS570S)
Middleby gas ovens with a 120V burner blower motor have
a centrifugal safety switch that prevents burner activation if
the burner blower motor is not in operation. This includes:
Most PS360-series ovens (except PS360WB70 and
PS360EWB);
PS200-series gas ovens (except units produced with
the modulating gas system);
All Model PS570S ovens.
Ovens with a 208/240V burner blower motor use a separate
air pressure safety switch to prove motor operation. See
Air Pressure Safety Switch on Page 81.
The centrifugal switch is a normally-closed (NC) limit switch
mounted inside each blower motor. When the motor is not
running, the centrifugal switch weight holds the switch open.
As the motor reaches full speed, the weight moves away
from the switch permitting the contacts to close. This completes the heat circuit, allowingthe burner to light.
If the burner blower motor is not operating, the switch will
not close and the circuit remains open, preventing burner
activation.
No adjustment can be made to the switch. If it is not operating properly, the burner blower motor must be replaced.
Figure 49 - PS360-series blower motor centrifugal safety switch
Switch
80
Page 82

SECTION 3 - SERVICING COMPONENTS
VIII. AIR PRESSURE SAFETY SWITCH (PS200-SERIES,
PS555/570-SERIES, PS360EWB, PS360WB70)
Middleby ovens have a safety feature that prevents the
burner/heating elements from activating if the blower(s) are
not in operation. On PS200-series ovens and PS555/570series ovens, this feature is controlled by a separate air
pressure switch that reads air flow from the blower. One
switch is used for each blower (1 for the PS200-series, 2
for the PS555/570 series).
These ovens cannot use a centrifugal switch on the motor
because they use an indirect, belted drive system. If a belt
fails, it is possible for the motor to operate normally while
the blower itself is stopped.
In addition, gas ovens with a line-voltage burner blower motor use an identical air switch to check that the burner blower
motor is operating before burner activation. These ovens
include the PS360EWB, PS360WB70, PS555, PS555G,
and PS570G, as well as PS200-series ovens equipped with
the modulating gas system. This additional air switch is
not necessary on ovens with a 120V burner blower motor
Figure 50 - Air pressure safety switch models
because of the presence of a centrifugal air switch inside
the motor housing (see Section VII, Burner Blower Motor
Centrifugal Safety Switch, on the previous page).
The switch is an assembly that includes a normally-open
microswitch and a diaphragm. When the blower is at speed,
pressure is applied to the diaphragm which in turn closes
the microswitch. This completes the heat circuit, allowing
the burner/heating elements to activate.
If a blower is not operating, the microswitch receives no
signal from the diaphragm and cannot close, preventing
burner/heating element activation.
A. Part Number Reference - Air Switches
Middleby has used four different types of air switches for
these applications. See Figure 50.
When replacing one of these switches, note that the current Yamatake-Honeywell air switch (#4 below) cannot be
used as an upgrade for an older switch. If you are replacing
Switches #1, #2 or #3 as shown in Figure 50, you should
use the Service Kits described for Switch #2.
1.
Original-style round air switch
Replace with #2
Positive
pressure
Adjustment
screw
3.
Dungs square-case replacement air switch with screw adjustment
Replace with #2
Adjustment
screw
2.
Dungs square-case air switch with dial adjustment
Replace with same
Adjustment dial
(in. W.C. or
mbar)
Positive
pressure
Negative
pressure
4.
Yamatake-Honeywell air switch, non-adjustable
Replace with same
Positive
pressure
Negative
pressure
81
Adjustment
screw
(fixed at proper
setting - cannot
be adjusted)
Positive
pressure
Negative
pressure
Page 83

SECTION 3 - SERVICING COMPONENTS
1. Original-style round air switch with screw adjustment
(P/N 28023-0005)
This was the standard switch used through 9/96 and is
no longer available. If it must be replaced, use Kit P/N
35624 (for use in the USA) or 35625 (for export use).
See #2 below for a description of these kits.
2. Dungs square-case air switch with dial adjustment
This was the standard switch used from 9/96 through
1/02. It cannot be upgraded to the current YamatakeHoneywell octagonal switch, and so should still be used
as a service replacement. EXCEPTION: PS570G and
all PS555 ovens have used the Yamatake-Honeywell
switch throughout their production run (see #4 below).
Two different models were used; one for domestic ovens, and another for export ovens. The switches are
identical except for the markings on the dial. The domestic unit measures pressure in water column inches
(in. W.C.), while the export unit measures pressure in
millibars (mbar).
Domestic switch: Kit P/N 35624
Export switch: Kit P/N 35625.
3. Dungs square-case alternate air switch with threaded
screw-type adjustment (P/N 36194)
This switch was used on a limited number of domestic
production ovens in early 1997 to cover an availability
problem with the standard switch (see #2 above). Markings were in water column inches (in. W.C.). An export
version of this switch was never used.
This switch was never available as a service part. If it
must be replaced, use Kit P/N 35624 (see #2 above).
4. Yamatake-Honeywell air switch, non-adjustable
This switch is the current standard for all new-production Middleby ovens. You may NOT use this switch as
an upgrade on an oven equipped with an older switch.
Two different models are used; one for dometic and
standard export ovens, and another for CE-approved
ovens.
Figure 51
PS360WB70/EWB with Midco burner
Domestic switch: P/N 39530
CE-version switch: P/N 37498
If this switch must be replaced, use an identical switch.
Note that this is the ONLY time that you may use P/Ns
39530 and 37498 as service replacement parts.
B. Troubleshooting
1. Postive pressure vs. negative pressure
All air switches except the original round version can
sense either positive air pressure or negative air pressure. The connection that is actually made to the switch
depends on the application.
If the switch is used to detect blower operation, the
tip of the pitot tube is located outside of the blower
wheel. This means that the pressure applied to
the end of the tube is positive. Because of this,
the tube should be connected to the positive side
of the switch.
If the switch is used to detect burner blower opera-
tion,
check the type of burner used on the oven.
- The Midco burner, used ONLY on some
PS360EWB and PS360WB70 ovens, has its
pitot tube mounted inside the blower wheel.
For correct operation, you should attach the
tube to the NEGATIVE side of the switch.
Refer to Figure 51 for an illustration of the Midco
burner.
- For ovens with the standard Wayne burner, the
pitot tube is mounted outside the blower wheel.
For correct operation, you should attach the
tube to the POSITIVE side of the switch.
Note that some PS360EWB and PS360WB70
ovens use the Wayne burner. You should always check the type of burner installed into
the oven before connecting the air tube. Refer
to Figure 52 for an illustration of a typical
PS360WB70/EWB gas train with the Wayne
burner.
Figure 52
PS360WB70/EWB with Wayne burner
Connects to
negative pressure
side of air switch
Connects
to positive
pressure
side of air
switch
82
Page 84

SECTION 3 - SERVICING COMPONENTS
C. Appendices
Appendix - Instructions for Service Kits 35624 and 35625 -
Air Pressure Switch Replacement Kits, 1/97
83
Page 85

SECTION 3 - SERVICING COMPONENTS
Appendix - Instructions for Service Kits 35624 and 35625 -
Air Pressure Switch Replacement Kits, 1/97
84
Page 86

SECTION 3 - SERVICING COMPONENTS
Appendix - Instructions to Replace an Alternate Air Switch
P/N 36194 with Service Kit P/N 35624, 3/97
85
Page 87

SECTION 3 - SERVICING COMPONENTS
Appendix - Instructions to Replace an Alternate Air Switch
P/N 36194 with Service Kit P/N 35624, 3/97
86
Page 88

SECTION 3 - SERVICING COMPONENTS
IX. PS570/570S FLAME GATE
All PS570/570S ovens produced for Pizza Hut USA through
8/00 were equipped with an adjustable flame gate at the
end of the burner tube. The purpose of the flame gate was
to direct heat towards the entrance end of the oven to better suit the customers cooking needs.
PS570S ovens produced 9/00 or later, as well as all PS570G
ovens, are not equipped with the flame gate. The introduction of the modulating gas system to these ovens, as well
as improvements to the customers air finger configuration
and baking specs, make the flame gate unneccessary on
these ovens.
A. Part Number Reference - Flame Gate
Part No. Description
35210-0555 Flame gate
35210-0511 Adjustment rod
35210-0510 Clamp
Figure 53
PS570/570S flame gate adjustment
LEFT-TO-RIGHT conveyor travel
(factory setting)
B. Flame Gate Orientation
To check the position of the flame gate, view it through
the ovens window. See Figure 53. The gate must
point towards the EXIT end of the oven. Note that this
directs the flame from the burner tube towards the ENTRANCE end of the oven, as described above.
All ovens were originally shipped from Middleby Marshall
with the gate pointing to the right. This is because all
ovens were shipped with left-to-right conveyors. If the
conveyor direction of one of these ovens is reversed in
the field, the flame gate should be repostioned as follows:
Loosen (do not remove) the two 7/16 hex bolts on
the clamps that hold the adjustment rod in place.
Insert a #2 Phillips-head screwdriver into the hole
in the rod as shown in Figure 53. Swing the handle
of the screwdriver to rotate the rod and move the
flame gate. You should position the gate as far as
possible towards the EXIT end of the conveyor as
shown.
Remove the screwdriver. Tighten the two screws
to hold the clamps in place.
RIGHT-TO-LEFT conveyor travel
(factory setting)
Gate points to
RIGHT (exit)
end of oven
7/16 hex
bolts (2)
Rotate screwdriver
handle to reposition
flame gate
Direction of
conveyor travel
Metal clamps
hold rod in
place
Direction of
conveyor travel
Gate points to
LEFT (exit)
end of oven
87
Page 89

SECTION 3 - SERVICING COMPONENTS
X. GAS TRAIN AND BURNER SYSTEM
A. Part Number Reference -
Gas Train Components
OVENS WITH
MODULATING GAS
SYSTEM ONLY:
M420 modulating
valve, 1/2
41647
Combination gas
control valve, 1/2
45688
1/2 union
23051-0003
Manual shutoff
valve, 1/2
23115-0009
Figure 54
PS200-series gas train
Air shutter
42810-0087
Bypass line
(1/4 aluminum
tubing)
15125-0002
(per foot)
Pilot line
(1/4 aluminum
tubing)
15125-0002
(per foot)
Pilot
pressure
tap
30185
Burner blower and motor assy
OVENS WITH ON/OFF
GAS SYSTEM ONLY:
120V motor assy with centrifugal
safety switch 27170-0011
OVENS WITH MODULATING
GAS SYSTEM ONLY:
208/240V motor assy 27170-0287
OVENS WITH ON/OFF
GAS SYSTEM ONLY:
Junction box
Includes:
240Vp:120Vs
transformer 27170-0017
Relay 27170-0016
OVENS WITH
ON/OFF GAS
SYSTEM ONLY:
Solenoid valve, 1/2
28091-0017
Manual shutoff
valve, 1/2
23115-0009
Figure 55
PS310, PS314, PS360 or PS360WB gas train
Burner blower and motor assy, 120V
with centrifugal safety switch
Solenoid valve, 1/2
Combination gas
control valve, 1/2
45688
1/2 union
23051-0003
27170-0011
Air shutter
42810-0087
28091-0017
Bypass line
(1/4 aluminum tubing)
15125-0002
(per foot)
pressure
30185
88
Pilot
tap
Junction box
Includes:
240Vp:120Vs
transformer
27170-0017
Relay
27170-0016
Pilot line
(1/4 aluminum
tubing)
15125-0002
(per foot)
Page 90

SECTION 3 - SERVICING COMPONENTS
Figure 56
PS360EWB or PS360WB70 gas train with Midco burner
PS360WB70
ONLY:
Bypass line
(1/4 aluminum
tubing)
15125-0002
(per foot)
Manual shutoff
valve, 3/4
23115-0010
3/4 union
23051-0004
PS360WB70 ONLY:
Solenoid valve, 3/4
31500
PS360EWB ONLY:
M420 modulating
valve, 3/4
32570
Combination gas
control valve, 3/4
32569
Air tube
(silicone rubber)
22450-0297
(per foot)
TO NEGATIVE (-)
SIDE OF AIR
SWITCH
Pilot line
(1/4 aluminum tubing)
15125-0002
(per foot)
Air shutter
36830
Main orifice
See chart on
Page 69
Burner blower
motor,
208/240V
32195
Pilot
pressure
tap
Pilot orifice
See chart on
Page 69
PS360WB70 ONLY:
Bypass line
(1/4 aluminum tubing)
15125-0002
(per foot)
Manual shutoff
valve, 3/4
23115-0010
Figure 57
PS360EWB or PS360WB70 gas train with Wayne burner
PS360WB70 ONLY:
Solenoid valve, 3/4
31500
Air tube
PS360EWB ONLY:
M520 modulating
valve, 3/4
32570
Combination gas
control valve, 3/4
32569
3/4 union
23051-0004
(silicone rubber)
22450-0297
(per foot)
TO POSITIVE (+)
SIDE OF AIR
SWITCH
Air shutter
42810-0087
Burner blower
and motor assy,
208/240V
27170-0287
89
Pilot line
(1/4 aluminum
tubing)
15125-0002
(per foot)
Pilot
pressure
tap
30185
Page 91

SECTION 3 - SERVICING COMPONENTS
1/2 union
23051-0003
Combination gas
control valve, 1/2
Manual shutoff
valve, 1/2
23115-0009
45688
(1/4 aluminum tubing)
Figure 58
PS570S gas train
OVENS RETROFITTED
WITH MODULATING
GAS SYSTEM ONLY:
M420 modulating
valve, 1/2
Solenoid valve, 1/2
Bypass line
15125-0002
(per foot)
41647
28091-0017
Burner blower and
motor assy, 120V
with centrifugal
safety switch
27170-0011
Flexible air hose
22450-0255
Pilot line
(1/4 aluminum tubing)
15125-0002
(per foot)
Pilot
pressure
tap
30185
Air shutter
42810-0087
NOT SHOWN
(components are
installed on back wall
of machinery
compartment):
240Vp:120Vs blower
motor transformer
27170-0017
Relay
27170-0016
Combination gas
control valve, 1/2
45688
1/2 union
23051-0003
Manual shutoff
valve, 1/2
23115-0009
Figure 59
PS570G or PS555 gas train
M420 modulating
valve, 1/2
41647
Pilot pressure tap
30185
(1/4 aluminum tubing)
15125-0002
90
Pilot line
(per foot)
Air shutter
42810-0087
Flexible air hose
22450-0255
Burner blower
and motor assy,
208/240V
27170-0287
Air tube
(silicone rubber)
22450-0297
(per foot)
TO POSITIVE (+)
SIDE OF AIR
SWITCH
Page 92

Pilot/ignitor
assembly
42810-0117
Pilot shield
27170-0204
SECTION 3 - SERVICING COMPONENTS
Figure 60 - Wayne burner - exploded view
Venturi
Wtih angled flame target:
27170-0223
With round flame target:
38127
Air shutter
42810-0087
Burner blower and motor assy
120V: 27170-0011
208/240V: 27170-0287
Pilot orifice
See chart below
Main orifice
See chart below
Pitot tube assembly
(for use with 208/
240V motors)
42400-0640
B. Part Number Reference - Gas Orifices and Gas Conversion Kits
PS200 PS220/224 PS310/314/360 PS360WB Midco burner Wayne burner PS555 PS570S/PS570G Description
42810-0125 42810-0126 42810-0120 42810-0127 36863 44664 43061 42810-0127 GAS CONVERSION KIT,
22176-0010 22176-0016 22176-0004 22176-0014 31821 22176-0014 43059 22176-0014 MAIN ORIFICE, NATURAL
0.204/5.18mm 0.182/4.62mm 0.219/5.56mm 0.250/6.35mm 0.234/5.94mm 0.250/6.35mm 0.228/5.79mm 0.250/6.35mm GAS
22174-0011 22174-0011 22174-0011 22174-0011 31818 22174-0011 22174-0011 22174-0011 PILOT ORIFICE, NATU-
0.028/0.71mm 0.028/0.71mm 0.028/0.71mm 0.028/0.71mm 0.032/0.81mm 0.028/0.71mm 0.028/0.71mm 0.028/0.71mm RAL GAS
22174-0006* 22174-0006* 22174-0006 22174-0006 22174-0006* 22174-0006* NONE* 22174-0006* BYPASS ORIFICE, NATU-
0.060/1.52mm/ 0.060/1.52mm/ 0.060/1.52mm/ 0.060/1.52mm/ 0.060/1.52mm/ 0.060/1.52mm/ 0.060/1.52mm/ RAL GAS
#53 drill #53 drill #53 drill #53 drill #53 drill #53 drill #53 drill
28092-0019 28092-0019 28092-0019 28092-0019 28092-0019 28092-0019 28092-0019 28092-0019 GAS VALVE SPRING KIT,
42810-0122 42810-0123 42810-0119 42810-0124 36856 44665 43062 42810-0124 GAS CONVERSION KIT,
22176-0007 22176-0017 22176-0003 22176-0015 31822 31980 43060 22176-0015 MAIN ORIFICE, PROPANE
0.1285/3.26mm 0.113/2.87mm 0.134/3.40mm 0.152/3.86mm 0.185/4.70mm 0.165/4.19mm 0.141/3.58mm 0.152/3.86mm
22174-0010 22174-0010 22174-0010 22174-0010 31819 22174-0010 22174-0010 22174-0010 PILOT ORIFICE, PROPANE
0.018/0.45mm 0.018/0.45mm 0.018/0.45mm 0.018/0.45mm 0.025/0.64mm 0.018/0.45mm 0.018/0.45mm 0.018/0.45mm
22174-0009* 22174-0009* 22174-0009 22174-0009 22174-0009* 22174-0009* NONE* 22174-0009* BYPASS ORIFICE, PRO-
0.038/0.97mm/ 0.038/0.97mm/ 0.038/0.97mm/ 0.038/0.97mm/ 0.038/0.97mm/ 0.038/0.97mm/ 0.038/0.97mm/ PANE
#62 drill #62 drill #62 drill #62 drill #62 drill #62 drill #62 drill
28092-0018 28092-0018 28092-0018 28092-0018 28092-0019 28092-0018 28092-0018 28092-0018 GAS VALVE SPRING KIT,
PS360WB70/EWB PS360WB70/EWB
PROPANE TO NATURAL
NATURAL GAS
NATURAL TO PROPANE
(same as PROPANE
natural gas)
*NOTE
Bypass orifices are used ONLY on ovens equipped with an on-off gas regulation system (with a solenoid valve). These ovens include:
PS200-series
(through 3/02)
Ovens equipped with a PID modulated gas system (with a modulating valve) do not use a bypass orifice. These ovens include:
PS200-series
(4/02 or later)
PS310
PS314
PS360EWB
PS555
PS360
PS360WB
PS570S
(9/00 or later)
PS360WB70
PS570S (through 8/00)
PS570G
NOTE: Installations at higher altitudes have a lower ambient air pressure that disrupts the air-fuel mixture. To correct this
problem, smaller gas orifices are required. A general rule is a 4% reduction for each 1000 ft. (305m) above sea level. Refer
to the chart in the Appendices section (page 135) for a listing of orifice sizes showing this reduction.
91
Page 93

SECTION 3 - SERVICING COMPONENTS
C. Component Identification
1. Burner type
Middleby ovens are equipped with one of two main burner
designs. Details of these burners are provided below.
1. Midco burner - see Figure 61. This burner was
used on PS360WB70 and PS360EWB ovens only.
Late-production PS360EWB and PS360WB70 ovens used the Wayne burner shown in Figure 62. In
addition, many PS360EWB ovens were retrofitted
during 1998 to use the Wayne burner.
Servicing the Midco burner is beyond the scope of
this manual. However, note that most gas train
components EXCEPT FOR THE BURNER ITSELF
are identical to the components used with the
Wayne burner. If necessary, contact Middleby Technical Service for assistance.
2. Wayne burner - see Figure 62. Wayne burners are
used on all Middleby oven models except earlyproduction PS360WB70 and PS360EWB models.
The Wayne burner configuration varies slightly between oven models and so may be slightly different from that shown in Figure 62. Refer to the
drawings in Part Number Reference - Burner Com-
ponents (pages 88-90) for illustrations of the burner
configuration used on each oven model. Common
variants include:
Flexible air tube between the burner blower and
plenum. Used on all PS555/570 series ovens.
120V burner blower motor. Used on PS200-
series (through 3/02), PS310, PS314, PS360,
PS360WB and PS570S ovens.
208/240V line voltage blower motor. Used on
PS200-series (4/02 or later), PS360WB70,
PS360EWB, PS555, and PS570G ovens.
1. Solenoid valve vs. Modulating valve
Middleby ovens use one of the following systems for
gas flow regulation:
On-Off gas flow regulation. These ovens are
equipped with a high flame solenoid valve. The
solenoid valve can only be positioned fully open
(100% gas flow) or fully closed (0% gas flow) as
necessary to maintain the set point. A bypass line
supplies gas to maintain the flame when the valve
is closed. On/off gas systems have a temperature
swing of several degrees on either side of the set
point.
On-Off gas flow regulation is used on the following
Middleby oven models:
- PS200-series
(through 3/02)
- PS310
- PS314
- PS360WB
- PS360WB70
- PS570S
(through 8/00)
- PS360
Additional information on the solenoid valve is pro-
vided in Solenoid Valve on Page 96.
Modulated gas regulation. These ovens are
equipped with a modulating gas valve. The modulating valve can open or close at any setting from 0100% gas flow in response to the need for heat to
maintain the set point. Because of this flexibility,
the temperature swing is eliminated.
The modulated gas system is used on the following
Middleby oven models:
- PS200-series
(4/02 or later)
- PS360EWB
- PS570S
(9/00 or later)
- PS570G
- PS555
Additional information on the modulating valve is
provided in Modulating Valve on Page 97.
Air
shutter
Main gas
line
Figure 61 - Midco burner
Burner blower
Pilot line
Burner
blower
motor
Plenum
Figure 62 - Wayne burner
PS360EWB shown. For different oven models, refer
to the drawings on pages 88-90.
Plenum
Main gas
line
Pilot line
Burner
blower
Burner
blower
motor
92
Air shutter
Page 94

SECTION 3 - SERVICING COMPONENTS
D. Pilot/Ignitor Assembly
The pilot assembly is attached to the end of the pilot line.
It consists of an ignitor electrode/flame sensor, a pilot shield
and the pilot burner. See Figure 63.
The pilot assembly includes a safety circuit. An electrical
current is sent to the flame sensor probe to prove the presence of the pilot flame. When the spark ignites the pilot, a
circuit is completed THROUGH THE FLAME from the flame
sensor probe to the pilot burner, which is grounded. This
safety circuit must be completed before the pilot will light.
1. Pilot Shield
The pilot shield is a plate located on the bottom of the
pilot. It prevents drafts, etc. from blowing the pilot flame
away from the sensing probe. See Figure 64.
2. Flame target
The flame target aids in distributing the flame from the
end of the venturi. See Figure 65.
PS310/360-series ovens built prior to 6/87 are not
equipped with a flame target. The burner on these
ovens resembles the one shownin Figure 64.
The angled flame target is used on:
- PS200-series ovens built through 3/02.
- PS310, PS314, PS360 and PS360WB ovens
built 6/87 or later.
- PS570S ovens.
All of these ovens use a 120V burner blower motor.
Most units equipped with the 120V burner blower
motor also use the angled flame target.
The round flame target is used on:
- PS200-series ovens built 4/02 or later.
- PS360EWB and PS360WB70 ovens equipped
with the Wayne burner system.
- PS555 and PS570G ovens.
All of these ovens use a 208/240V burner blower
motor. All ovens equipped with the line voltage
burner blower motor use the round flame target.
Figure 63 - Pilot/ignitor assembly
Pilot
burner
Hood
Ignitor/sensor
probe
Figure 64
End of burner without flame target
showing pilot shield
Pilot
shield
Pilot line
connects here
Spark cable
connects here
Figure 65
Flame targets
Angled
target
93
Round
target
Page 95

SECTION 3 - SERVICING COMPONENTS
3. Pilot and Proof of Pilot Flame
Rectification
Figure 66
Flame structure
With standing pilots, heat is
a necessary ingredient for
proper thermocouple operation. But this is not the case
with IIDS (Intermittent Ignition
Device Systems) when flame
conduction or rectification is
used. To better understand the
principles of flame conduction
and rectification, we must first
understand the structure of a
gas flame. See Figure 66.
With the proper air-gas ratio to give a blue pilot flame,
three zones exist.
Zone 1: An inner, fuel-rich cone that will not burn because excess fuel is present.
Zone 2: Around the inner, fuel-rich cone is a blue envelope. In this area is a mixture of vapor from the fuel-rich
inner cone and the secondary, or surrounding, air. This
is where combustion occurs.
Zone 3: Outside the blue envelope is a third zone that
contains an excessive quantity of air and will not burn.
Of concern is the second, or combustion area. This is
where the burning occurs and is the area that is of
prime importance for good flame sensor location.
Flame Rectification
With flame rectification, two probes with different surface areas are exposed to a flame - in this case, the
pilot flame. The probe with the larger surface area attracts more free electrons and, as a result, becomes
the negative probe. Therefore, current is conducted
through the flame from the positive probe to the negative probe. See Figure 67.
Note also that the AC voltage sine wave has not
changed, but the negative portion of the current sine
wave has been chopped off. This positive portion now
represents a DC current. This is the phenomenon of
flame rectification.
To apply this principle to an IID (Intermittent Ignition
Device - in this case, the pilot/ignitor assembly), a pilot
and flame sensor have been substituted for the two
probes (See Figure 68). After the pilot is ignited, a DC
current flow of 2.0mA (microamps) or more is conducted
through the flame, from the flame sensor (the positive
probe) to the pilot tip (the negative probe). The pilot tip,
acting as the negative probe, completes the circuit to
ground. The IID sensing circuit uses this DC current
flow to energize a relay and open the main burner gas
valve.
Figure 67 - Flame rectification
Figure 68 - Pilot and probe
THE FOLLOWING CONDITIONS WILL HAVE A DIRECT
BEARING ON EVERY IID APPLICATION:
Voltage
The supply voltage to the ignition controls should be
within the following ranges:
120VAC controls 102 to 132VAC
24VAC controls 21 to 26.5VAC
24VAC systems should use transformers that will provide adequate power under maximum load conditions.
Gas Pressure
Inlet gas pressures
Natural gas, Wayne burner - 6-12 W.C. (14.9-29.9 mbar)
Propane, Wayne burner - 11½-12 W.C. (28.7-29.9 mbar)
Midco burner (all gases) - 6-14 W.C. (14.9-34.9 mbar)
Regulated gas pressures
Natural gas, Wayne burner - 3.5 W.C. (8.7 mbar)
Propane, Wayne burner - 10 W.C. (24.9 mbar)
Midco burner (all gases) - 3-5 W.C. (7.5-12.5 mbar)
Pilot gas pressures
Natural gas, Wayne burner - 3½-4 W.C. (8.71-9.95 mbar)
Propane, Wayne burner - 8-10 W.C. (19.9-24.9 mbar)
Midco burner (all gases) - 5-6 W.C. (12.5-14.9 mbar)
94
Page 96

SECTION 3 - SERVICING COMPONENTS
Temperature
Ignition controls should not be exposed to temperatures exceeding 140°F (60°C) or less than -40°F (-40°C).
Pilot Application
The pilot and flame sensor application is the most critical aspect of the llD application.
The pilot flame must make contact with the pilot tip
and surround the flame sensor probe. A multimeter or
ampmeter set to read microamps (mA) is necessary to
verify that the proper amount of current is being maintained through the pilot flame. The minimum value
required is 2.0 mA. Rectification-based ignition systems respond in less than 0.8 of a second to a loss of
flame. If the minimum signal is not being maintained
at all times, OR if the pilot flame is briefly directed
away from the flame sensor or pilot tip, the main gas
valve may cycle rapidly (chattering) or the burner may
be prevented from activating.
Other conditions that can cause the failure of the main
burner to activate, OR chattering of the burner, are:
1. Pilot flame is too small.
2. Gas pressure is too low for proper pilot flame impingement on the flame sensor.
In these cases, the pilot may ignite, but the main burner
gas valve will not be energized. It is also possible for
drafts or unusual air currents to deflect the pilot flame
away from the flame sensor. Deflection of the pilot
flame may also be caused by main burner ignition concussion or roll-out of the main burner flame.
An additional point to be considered is the condition of
the pilot flame. If the pilot flame is hard and blowing,
the grounding area of the pilot is reduced to a point
where the necessary current is not being maintained,
and a shutdown of the system will result.
The positioning of the flame sensor is also critical in
the pilot application. Positioning of the flame sensor
should be such that it will be in contact with the second, or combustion area of the pilot flame. Passing
the flame sensor through the inner cone of the pilot
flame is not a recommended procedure. For this reason, a short flame sensor may provide a superior signal over a longer one. The final determination of the
sensor location (length) is best determined by the use
of a multimeter set to read microamps (mA).
E. Burner Blower Motor
The burner blower motor is located on the side or top of the
burner housing. Some blowers use a flexible tube to connect the blower to the burner, depending on the available
space inside the machinery compartment. The burner
blower motor drives a blower wheel located in a housing
attached to the end of the motor that is the primary air
supply for combustion. The motor requires no lubrication.
Depending on the oven model, the burner motor operates
on either 120V or 208/240V (line voltage). 120V motors
have an internal centrifugal switch that controls the 24V
power supply to the gas valve (see Burner Blower Motor
Centrifugal Safety Switch on Page 80). 208/240V motors
use a separate air pressure safety switch to sense blower
operation (see Air Pressure Safety Switch on Page 81).
This safety feature prevents burner operation in case of motor
failure.
F. Air Shutter
The air shutter is a round metal plate located on the open
end of the burner blower wheel. Adjusting the position of
the shutter will increase or decrease the amount of air that
is permitted into the plenum for combustion. Rotate the
plate in a counterclockwise direction to increase the air
supply, or in a clockwise direction to reduce the air supply.
You can insert a drill bit into the shutter gap to check the
size of the opening. Refer to Figure 69 for the recommended
opening sizes.
Early Midco burners use an adjustment screw on the front
wall of the plenum to adjust the airflow. If it is not possible
to adjust the air supply properly using the screw, a retrofit
kit is available (P/N 36829) to install the external air shutter
shown in Figure 69.
95
Figure 69
Air shutter adjustment
Wayne burner
Standard openings:
1/4/6.4mm for natural gas ovens
3/8/9.5mm for propane ovens
Clockwise -
less air
Standard opening 5/16/7.9mm (all gases)
Clockwise -
less air
Loosen hex
nut to adjust
shutter
Midco burner
Counterclockwise -
Loosen
screw to
adjust
shutter
Counter-
clockwise -
more air
more air
Page 97

SECTION 3 - SERVICING COMPONENTS
G. Burner Transformer
120V burner blower motors feature a transformer located in
the electrical junction box on the burner. In PS570S ovens,
AND all ovens with 208/240V burner blower motors, the
transformer is located inside the machinery compartment.
The transformer supplies 24V to the burner motor relay (if
present) and also to the 24V gas valve through the motors
centrifugal switch (or air pressure safety switch).
H. Burner Motor Relay
120V burner blower motors feature a 24V time delay relay
located in the electrical junction box on the burner. In
PS570S ovens, the relay is located on the back wall of the
machinery compartment.
Approximately 25 seconds after power is applied to the coil
of the relay, the contacts will close and complete a circuit
to the burner blower, allowing the motor to operate. This
15-30 second delay is a prepurge for a cold start. When
the coil of the relay is warm, the delay is bypassed.
Ovens with 208/240V burner blower motors are not equipped
with the burner motor relay, and do not have a prepurge for
a cold start.
I. High Flame Solenoid Valve (if so equipped)
Ovens that use an on-off gas regulation system are equipped
with a high flame solenoid valve. The valve is located between the combination gas control valve and the burner.
The valve operates on 110-120V.
The valve opens when the ovens temperature falls 2 degrees Fahrenheit below the set point, and closes when the
temperature rises to 2 degrees above the set point. Because of residual heat within the oven, however, the temperature swing after preheating is about 5 degrees Fahrenheit above and below the set point.
The solenoid valve can only be positioned fully open (100%
gas flow) or fully closed (0% gas flow). While the valve is
closed, gas is still supplied to the burner through the by-
pass line that goes around the solenoid valve. This allows
the burner to operate in low flame mode while awaiting reactivation.
When the oven has been fully preheated and has maintained the set point for about an hour with a moderate product load, the low flame to high flame ratio should be approximately 1 to 1. That is, the oven will be calling for heat
approximately half the time. To check this ratio, refer to
the HEAT indicator on the temperature controller, which will
only be active when the burner is on high flame.
EXCEPTION: Older PS310/314/360 ovens have a temperature-sensing thermocouple mounted at the front of the oven,
inside the machinery compartment. On these ovens, the
low flame to high flame ratio should be approximately 2 or 3
to 1 (oven calls for heat 1/3 or 1/4 of the time).
IMPORTANT: For proper functioning of the solenoid valve, the temperature controller MUST be
set to the on-off operating mode. Refer to Tem-
perature Controller on Page 31.
J. Bypass (Low Flame) Orifice (ovens with a high
flame solenoid valve only)
All ovens that use an on-off gas regulation system are
equipped with an orifice in the low flame bypass line. See
Figure 70.
When the oven is not calling for heat, the solenoid valve is
closed, but gas is still supplied to the burner through the
bypass line. This allows the burner to operate in low flame
mode while awaiting re-activation.
The low flame orifice regulates the gas flow through the
bypass line. If the orifice size is too large, the low flame
will be too high. In some cases, this will prevent the oven
from being able to maintain the set point.
Refer to the chart on Page 91 to determine the proper size
for the bypass orifice.
Figure 70
Low Flame (Bypass) Orifice
Bypass line configuration varies depending on the oven model. Refer to the drawings on pages 88-90.
Low flame
(bypass)
orifice
Bypass
line
Solenoid
valve
96
Page 98

SECTION 3 - SERVICING COMPONENTS
K. Modulating Gas Valve (if so equipped)
Ovens that use a PID (modulated) gas regulation system
are equipped with a modulating gas valve instead of a solenoid valve. The valve is located between the combination
gas control valve and the burner.
In response to the millivolt signal from the thermocouple,
the Digital Temperature Controller sends a 4-20mA signal
to an amplifer board. The board, in turn, passes on a 020VDC signal to the modulating valve itself. The valve opens
or closes proportionally to the signal from the amplifier board,
allowing any setting from 0-100% gas flow.
When the oven is switched on, gas demand is at its peak
and the valve is fully open, permitting 100% gas flow. As
the ovens temperature approaches the set point, the valve
slowly begins to close, restricting gas flow to the 35-60%
range. After the oven is fully preheated, the gas flow usually stabilizes at about 30%. The actual oven temperature
can remain constant, with NO temperature swing, because
the valve is adjusted constantly according to the demand.
Modulating valves are used on all PS360EWB, PS555, and
PS570G gas ovens. They are also used on PS200 ovens
produced 4/02 or later and PS570S ovens produced 9/00 or
later.
The Model PS360EWB oven uses a Maxitrol M520 modulating valve with a 3/4 gas line, P/N 32570. All other
Middleby oven models equipped with a modulating valve
use the Maxitrol M420 valve with a 1/2 gas line, P/N 41647.
The modulating valve features a bypass adjustment screw,
shown in Figure 71. For all ovens except the PS536, the
screw should ALWAYS remain fully closed; no adjustment
is necessary. The screw is pre-set to the fully-closed position from the factory. If the screw is adjusted to any setting
other than fully-closed, the oven may not be able to maintain the set point temperature.
IMPORTANT: For proper functioning of the modulating valve, the temperature controller MUST be
set to the PID operating mode. Refer to Tempera-
ture Controller on Page 31.
L. Amplifier Board (ovens with a modulating gas
valve only)
Ovens equipped with a modulating gas valve have an amplifier board mounted inside the machinery compartment.
In response to the millivolt signal from the thermocouple,
the Digital Temperature Controller sends a 4-20mA signal
to the amplifer board. The board, in turn, passes on a 020VDC signal to the modulating valve. The valve opens or
closes proportionally to the signal from the amplifier board,
allowing any setting from 0-100% gas flow.
All Middleby oven models equipped with a modulating valve
use amplifier board P/N 31651.
Modulating Valve
blue
blue/white
bypass adjustment
screw (under cap)
MUST BE FULLY
CLOSED
Figure 71 - Modulating Gas System
To transformer
24VAC input
orangeorange/white
To thermocouple
Amplifier Board
To amplifier board terminal 6
To amplifier board terminal 5
white +
red -
purple
purple/white
Digital Temperature
Controller
MUST BE SET TO PID
OPERATING MODE
purple/white
purple
PS360EWB
with Controller 32571
only
97
Page 99

SECTION 3 - SERVICING COMPONENTS
M. Combination Gas Control Valve
1. Part Number Reference - Combination Gas Valve
PS360WB70 and PS360EWB ovens are equipped with
a 3/4 (19.05mm) gas line. This requires the use of
Combination Gas Valve P/N 32569. The valve has a
tan plastic cover with a blue On/Off knob.
All other oven models are equipped with a 1/2 (12.7mm)
gas line.
- Through 10/01 - these ovens used Valve P/N 28092-
0017. The valve operated on a 60 Hz supply, had a
tan plastic cover and a blue On/Off knob.
- 11/01 and later - these ovens use Valve P/N 45688.
The valve operates on a 50 or 60 Hz supply, has a
grey plastic cover and a black On/Off knob. It is
otherwise identical to the previous version, and may
be used to replace it in all cases.
2. Valve Operation
When the ON-OFF knob on the valve is in the ON position,
gas is allowed to enter the valve. Once 24VAC is supplied
to the valve, gas is supplied to the pilot line.
When the pilot flame has been proved (see Pilot and Proof
of Flame Rectification on Page 94), 24VAC is supplied to
the combination valve by the ignition module, opening the
main valve. Gas pressure from the inlet side of the valve is
passed through the Pressure Regulator. The regulated pressure is supplied to a cavity below the main valve diaphragm.
This pressure overcomes the spring force and moves the
main valve to its open position. During operation, the main
valve is opened and closed by the pressure regulator to
keep a constant pressure at the outlet of the valve.
When power to the valve is cut, the cavity below the main
valve diaphragm is depressurized and the valve spring closes
the main valve rapidly to shut off the main burner.
When the 24VAC supply to the valve is cut, the valve stops
gas flow to both the pilot and the main burner.
The combination valve includes taps to measure both the
inlet pressure and the regulated pressure. To ensure accuracy, the regulated pressure should be measured when the
oven is on low flame.
3. Servicing the Combination Valve
Pilot pressure
One of the more common service issues with the combination valve occurs on ovens with the on/off gas regulating system (with a solenoid valve), when the oven is
on low flame. During low flame, the servo can bounce
inside the valve as it searches for the proper level. The
bouncing line pressure can also cause surges in the
pilot pressure. A properly adjusted pilot will tend to
smooth out the surges.
The best way to check for a properly adjusted pilot is
to check the pilot line pressure. This requires a pilot
pressure tap in the pilot line. Ovens built 3/94 or later
should have the tap installed in the line. The tap is
also available as Service Kit P/N 30185 which includes
installation instructions.
Recommended pilot gas pressures are:
- Wayne burner, natural gas - 3½-4 W.C. (8.71-9.95
mbar)
- Wayne burner, propane - 8-10 W.C. (19.9-24.9
mbar)
- Midco burner (all gases) - 5-6 W.C. (12.5-14.9
mbar)
Burrs in pilot adjustment portal
Some combination valves have been shown to have
shipped with small burrs in the pilot adjustment portal.
Although this will not interfere with proper operation of
the valve in any way, it does make it difficult to adjust
the pilot pressure until the burr is removed.
Check for a burr by attaching a manometer to the pilot
pressure tap. If the manometer does not detect any
change in pilot pressure when the screw is tightened
all the way down, there is probably a burr in the portal.
To remove a burr, perform the following procedure:
- Turn the adjustment screw all the way down.
- Apply more pressure to break through the burr.
- Back the screw out until the top of the screw is
level with the top of the access hole.
- Turn the adjustment screw back down to adjust
the pressure.
- Repeat these steps until the burr is cleared.
Figure 72 - Combination Gas Control Valve
Pressure
regulator
adjustment
(under cap
screw)
Inlet
pressure
tap
On/Off knob (should
remain in ON position)
adjustment (under
98
Regulated
pressure
tap
Pilot line
connection
Pilot pressure
cap screw)
Page 100

SECTION 3 - SERVICING COMPONENTS
N. Ignition Module
1. Part Number Reference - Ignition Module
PS360WB70 and PS360EWB ovens equipped with the
Midco burner use Ignition Module P/N 31501.
For all other oven models:
- Through 10/90 - these ovens used Ignition Module
P/N 27161-0004. Some versions of this module
included a separate, replaceable fuse. This module shared a common ground with the 24V transformer and the relay coil. See Figure 73.
- 11/90 or later - these ovens use Ignition Module
P/N 27161-0005, included in Service Kit 42810-
0114. The module is internally grounded and the
common ground with the transformer and relay coil
has been eliminated. See Figure 74.
If you are replacing the obsolete module (P/N 27161-
0004) with the current version (P/N 27161-0005), BE
SURE TO DISCONNECT THE MODULE FROM THE
COMMON GROUND WITH THE TRANSFORMER AND
RELAY. Double-grounding of the module creates a feedback voltage circuit that allows the module to operate
without a signal from the burner/blower assembly. This
procedure is explained in greater detail in the instructions for Kit 42810-0114, included in the Appendices
section.
2. Module Operation
The ignition module delivers 24V to the pilot ignitor when
the blower motor centrifugal switch (or air pressure safety
switch) is closed.
When the module detects a current flow of at least 2.0 mA
through the pilot flame, it supplies 24V to the combination
gas control valve, allowing the valve to operate.
Figure 73
Wiring diagram of ignition and gas valve system (obsolete ignition module 27161-0004)
Figure 74
Wiring diagram of ignition and gas valve system (current ignition module 27161-0005)
99
 Loading...