

Page 1
Middleby
A MIDDLEBY COMPANY
Marshall
Red Lobster
operating
& installation
manual
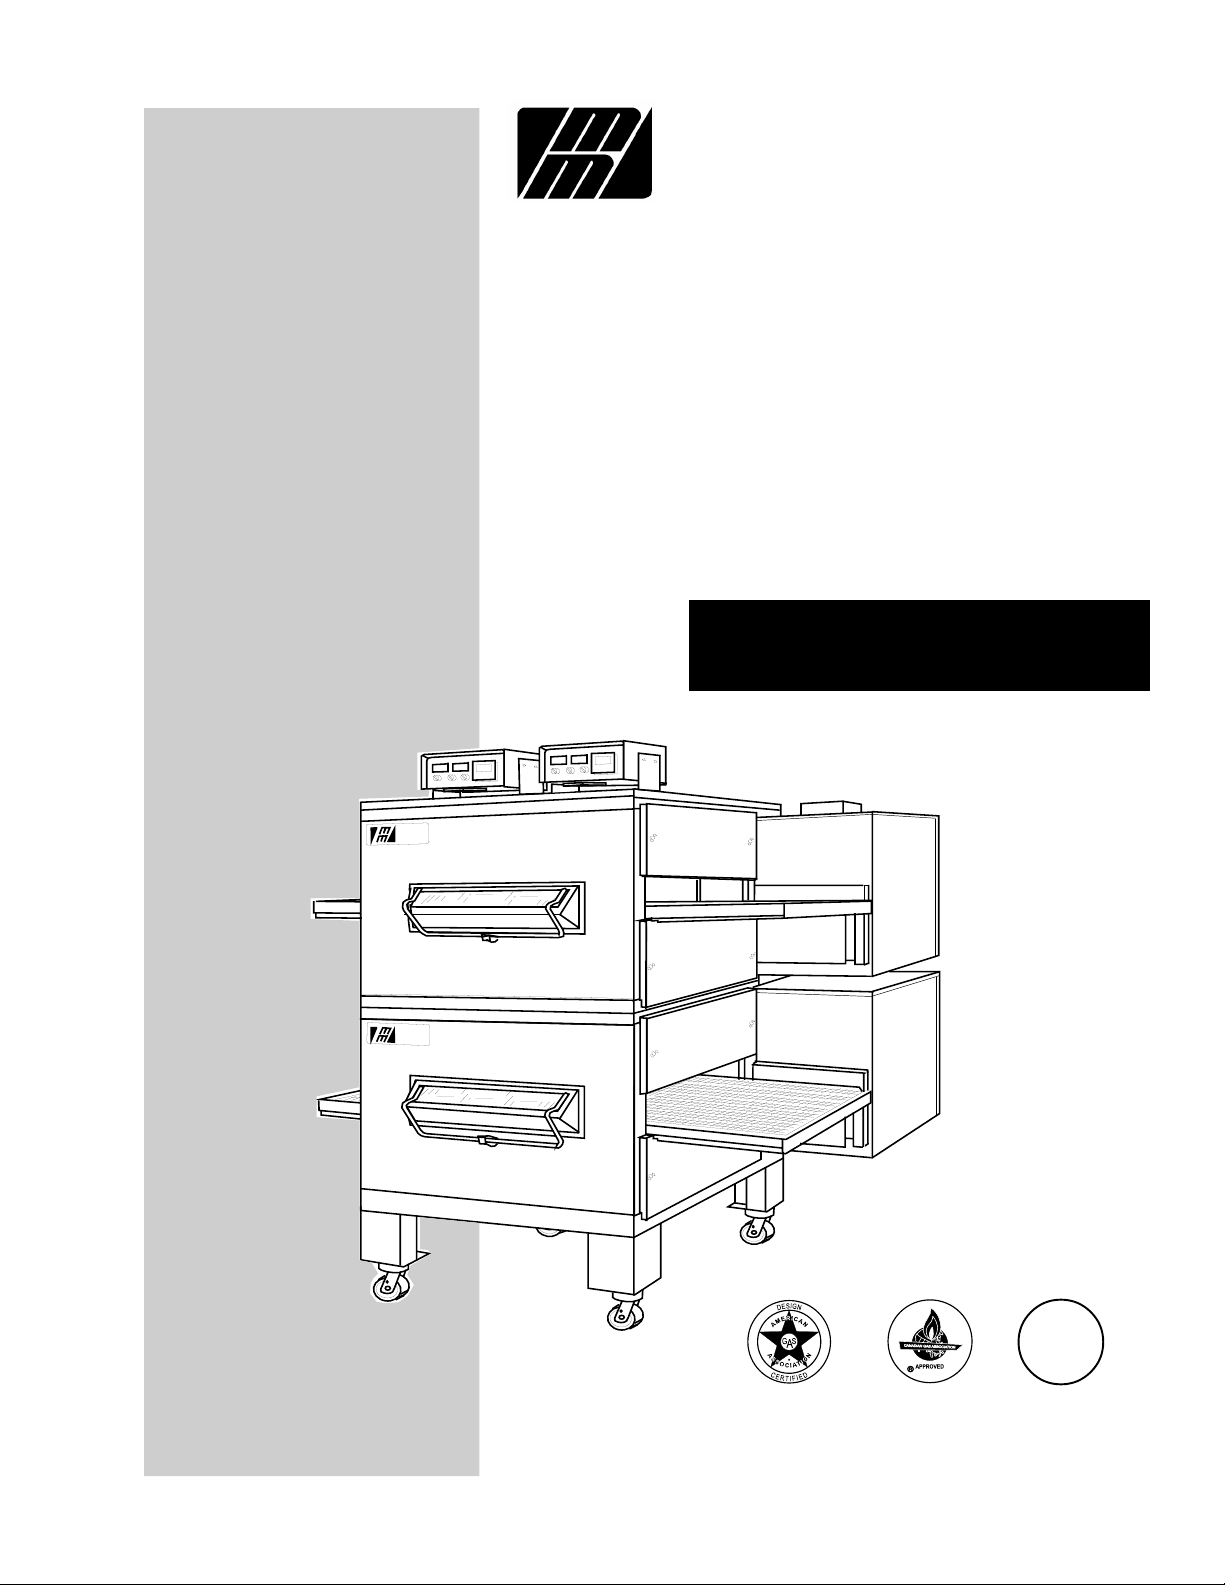
MIDDLEBY SERIES
PS200-R68 OVENS
Middleby
Marshall
Middleby
Marshall
NSF
®
©1995 Middleby Marshall Inc.
Part No. 31349
Price $15.00
P4/95
Page 2

Model No._________________Serial No.______________________________Installation Date_______________
MIDDLEBY MARSHALL INC.
NO QUIBBLE LIMITED WARRANTY
(U.S.A. ONLY)
MIDDLEBY MARSHALL, HEREINAFTER REFERRED TO AS THE SELLER, WARRANTS EQUIPMENT MANUFACTURED BY IT TO BE FREE FROM DEFECTS IN
MATERIAL AND WORKMANSHIP FOR WHICH IT IS RESPONSIBLE. THE SELLER’S
OBLIGATION UNDER THIS WARRANTY SHALL BE LIMITED TO REPLACING OR
REPAIRING AT SELLER’S OPTION, WITHOUT CHARGE, ANY PART FOUND TO BE
DEFECTIVE AND ANY LABOR AND MATERIAL EXPENSE INCURRED BY SELLER IN
REPAIRING OR REPLACING SUCH PART, SUCH WARRANTY SHALL BE LIMITED
TO THE ORIGINAL PURCHASER ONLY AND SHALL BE EFFECTIVE FOR A PERIOD
OF TWO YEARS FROM DATE OF ORIGINAL INSTALLATION, OR 30 MONTHS FROM
DATE OF SHIPMENT, WHICHEVER IS EARLIER; PROVIDED THAT TERMS OF
PAYMENT HAVE BEEN FULLY MET.
This warranty is valid only if the equipment is installed, started and demonstrated under
the supervision of a factory certified installer.
Normal maintenance functions, including lubrication, cleaning or customer abuse are not
covered by this no quibble warranty.
Seller shall be responsible only for repairs or replacements of defective parts performed
by Seller’s authorized service personnel. Authorized service agencies are located in
principal cities throughout the contiguous United States, Alaska and Hawaii. This
warranty is valid in the 50 United States and is void elsewhere unless the product is
purchased through Middleby International with warranty included.
The foregoing warranty is exclusive and in lieu of all other warranties, expressed
or implied. There are no implied warranties of merchantability or of fitness for a
particular purpose.
The foregoing warranty shall be Seller's sole and exclusive obligation and Buyer's sole
and exclusive remedy for any action including breach of contract or negligence. In no
event shall Seller be liable for a sum in excess of the purchase price of the item. Seller
shall not be liable for any prospective or lost profits of Buyer.
Middleby Marshall Inc. • 1400 Toastmaster Drive • Elgin, IL 60120 • (708) 741-3300 • FAX (708) 741-4406
National Service Cooperative 1-800-298-1862
Middleby Corporation Service Hotline 1-800-238-8444
Page 3
This Manual Must Be Kept
For Future Reference
WARNING
POST IN A PROMINENT LOCATION, THE EMERGENCY TELEPHONE NUMBER OF YOUR LOCAL GAS
SUPPLIER AND INSTRUCTIONS TO BE FOLLOWED IN THE EVENT YOU SMELL GAS.
Instructions to be followed in the event the user smells gas shall be obtained by consulting the local gas supplier.
If the smell of gas is detected, immediately call the emergency phone number of your local Gas Company. They
will have personnel and provisions available to correct the problem.
FOR YOUR SAFETY
DO NOT STORE OR USE GASOLINE
OR OTHER FLAMMABLE VAPORS AND LIQUIDS IN
THE VICINITY OF THIS OR ANY OTHER APPLIANCE
WARNING
Improper installation, adjustment, alteration, service or
maintenance can cause property damage, injury or
death. Read the installation, operating and maintenance
instructions thoroughly before installing
or servicing this equipment.
NOTICE
CONTACT YOUR LOCAL SERVICE COMPANY
TO PERFORM MAINTENANCE AND REPAIRS.
A SERVICE AGENT DIRECTORY IS SUPPLIED IN YOUR
INSTALLATION KIT.
NOTICE
Using any parts other than genuine
Middleby Marshall factory
manufactured parts relieves the manufacturer
of all warranty and liability.
NOTICE
Middleby Marshall (Manufacturer) reserves the right to
change specifications at any time.
WARNING
The equipment warranty is not valid unless the oven is installed, started and demonstrated under the supervision
of a factory certified installer.
Page 4

SECTION 1 - DESCRIPTION
I. MODEL IDENTIFICATION ................................................................................................. 1
OVEN SPECIFICATION CHART .......................................................................................... 2
ELECTRICAL SPECIFICATION CHART............................................................................... 3
II. PRINCIPLE OF AIR FLOW ............................................................................................... 4
A. Heat Transfer And How It Works ............................................................................... 4
B. Air Fingers ................................................................................................................. 5
III. COMPONENT FUNCTION............................................................................................... 7
A. Conveyor ................................................................................................................... 7
B. Fan .................................................................................................................... 7
C. Gas Burner(Gas Oven Only) ..................................................................................... 7
D. Electric Heaters (Electric Ovens Only) ...................................................................... 7
E. Front Window............................................................................................................. 7
F. Cooling Fan................................................................................................................ 7
G. Air Fingers ................................................................................................................. 8
SECTION 2 - INSTALLATION
I. UNLOADING ....................................................................................................................9
INSTALLATION KITS..................................................................................................... 10-12
DIMENSION DRAWING OF OVEN..................................................................................... 13
II. CONTROL BOX AND CABLE INSTALLATION............................................................... 14
III. FLUE VENT INSTALLATION ......................................................................................... 15
IV. RESTRAINT CABLE INSTALLATION............................................................................ 15
GAS OVEN ROUGH-IN....................................................................................................... 16
ELECTRIC OVEN ROUGH-IN ............................................................................................ 17
V. VENTILATION GUIDELINES.......................................................................................... 18
VI. ELECTRIC SUPPLY FOR GAS HEATED OVENS ........................................................ 19
VII. ELECTRICAL CONNECTION INFORMATION FOR ALL OVENS ............................... 19
VIII. ELECTRIC SUPPLY FOR ELECTRICALLY HEATED OVENS ................................... 20
IX. GAS SUPPLY FOR GAS HEATED OVENS .................................................................. 21
X. CONVEYOR BACKSTOP AND END STOP INSTALLATION......................................... 23
TABLE OF CONTENTS
Page
SECTION 3 - OPERATION
I. CONTROLS AND COMPONENTS .................................................................................. 25
II. COMPONENT INFORMATION AND LOCATION ........................................................... 26
A. Door Safety Switch .................................................................................................. 26
B. Blower Fan............................................................................................................... 26
C. Heat (Gas ovens only) ............................................................................................. 26
D. Temperature Controller............................................................................................ 26
E. Heat (Electrically heated ovens only)....................................................................... 26
F. Conveyor.................................................................................................................. 27
III. OPERATION ..................................................................................................................28
A. Start Up Procedures — Gas Heated Ovens ............................................................ 28
B. Temperature Controller Operation Instructions........................................................ 30
C. Start Up Procedures — Electric Ovens ................................................................... 32
D. Shut Down (Gas or Electric Ovens)......................................................................... 33
E. Conveyor Speed (Bake Time) And Time Of Delivery............................................... 33
Page 5

SECTION 4 - MAINTENANCE
I. MAINTENANCE - DAILY.................................................................................................. 35
A. Exterior .................................................................................................................. 35
B. Cooling Fan ............................................................................................................. 35
C. Crumb Pans............................................................................................................. 36
II. MAINTENANCE - WEEKLY ............................................................................................ 36
A. Removing Conveyor From Oven For Cleaning ........................................................ 36
B. Oven Interior Disassembly....................................................................................... 38
C. Window Disassembly For Cleaning ......................................................................... 39
D. Loading The Soak Bin ............................................................................................. 39
E. Cleaning Parts That Were Soaked Overnight .......................................................... 41
F. Cleaning Interior of Oven ......................................................................................... 43
G. Oven Reassembly ................................................................................................... 44
III. MAINTENANCE - EVERY 3 MONTHS........................................................................... 50
A. Cleaning Fan Motor ................................................................................................. 50
B. Electrical Terminals ................................................................................................. 50
C. Checking and/or Replacing Main Blower Fan Belt................................................... 51
D. Main Blower Fan Shaft Bearing Lubrication............................................................. 52
IV. MAINTENANCE - EVERY 6 MONTHS .......................................................................... 53
SECTION 5 - TROUBLESHOOTING
OWNERS TROUBLESHOOTING CHARTS........................................................................ 55
TABLE OF CONTENTS
Continued
SECTION 6 - PARTS LIST
Oven Panels, Window and Legs Exploded Drawing ........................................................... 60
Air Finger Exploded Drawing............................................................................................... 62
Control Panel Exploded Drawing......................................................................................... 64
Blower and Shroud Exploded Drawing................................................................................ 66
Conveyor Exploded Drawing ............................................................................................... 68
Gas Burner and Piping Assembly Exploded Drawing.......................................................... 70
Machinery Compartment Exploded Drawing ....................................................................... 72
Electric Oven Electrical Panel Drawing ............................................................................... 74
Junction Box and Export Transformer Exploded Drawing ................................................... 76
SECTION 7 - ELECTRICAL SCHEMATICS
Gas Oven Schematic, 208-240V,50/60Hz,1Ph,4W ............................................................. 80
Oven Control Box Cables .................................................................................................... 81
Page 6

NOTES
Page 7
SECTION 1
DESCRIPTION
SECTION 1
DESCRIPTION
I. MODEL IDENTIFICATION
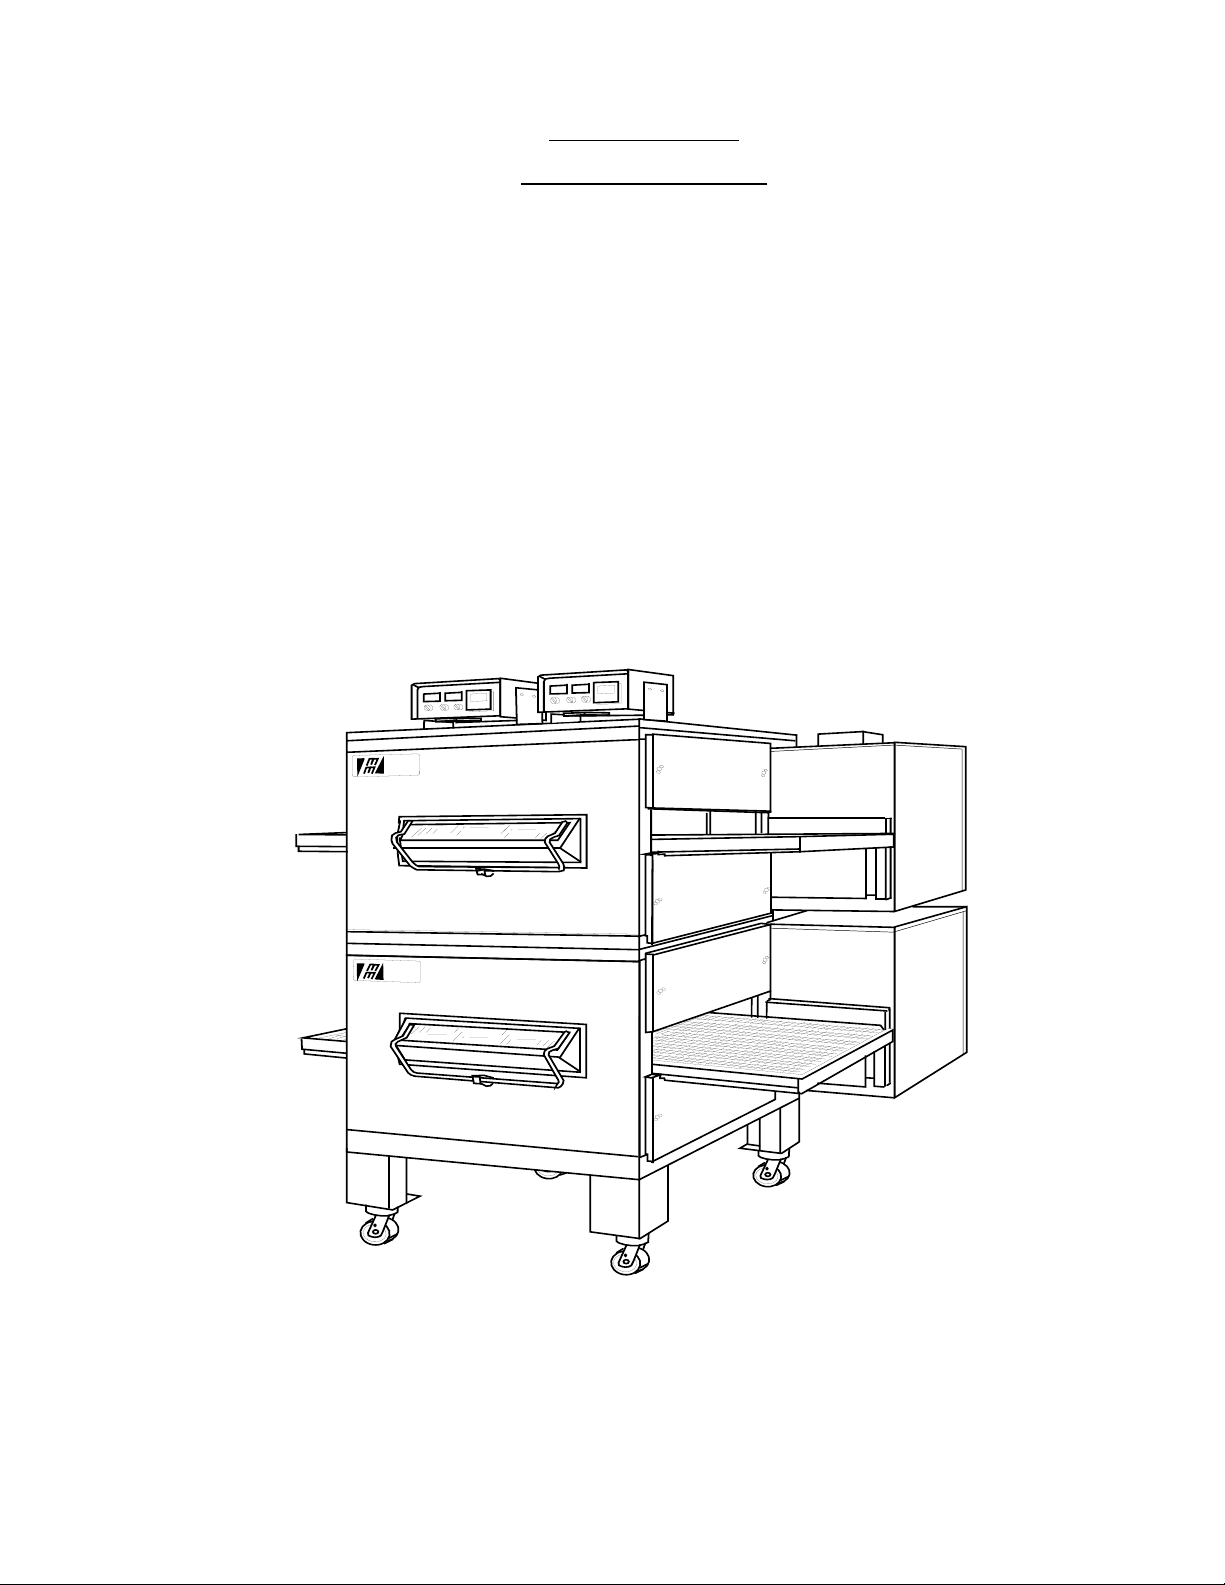
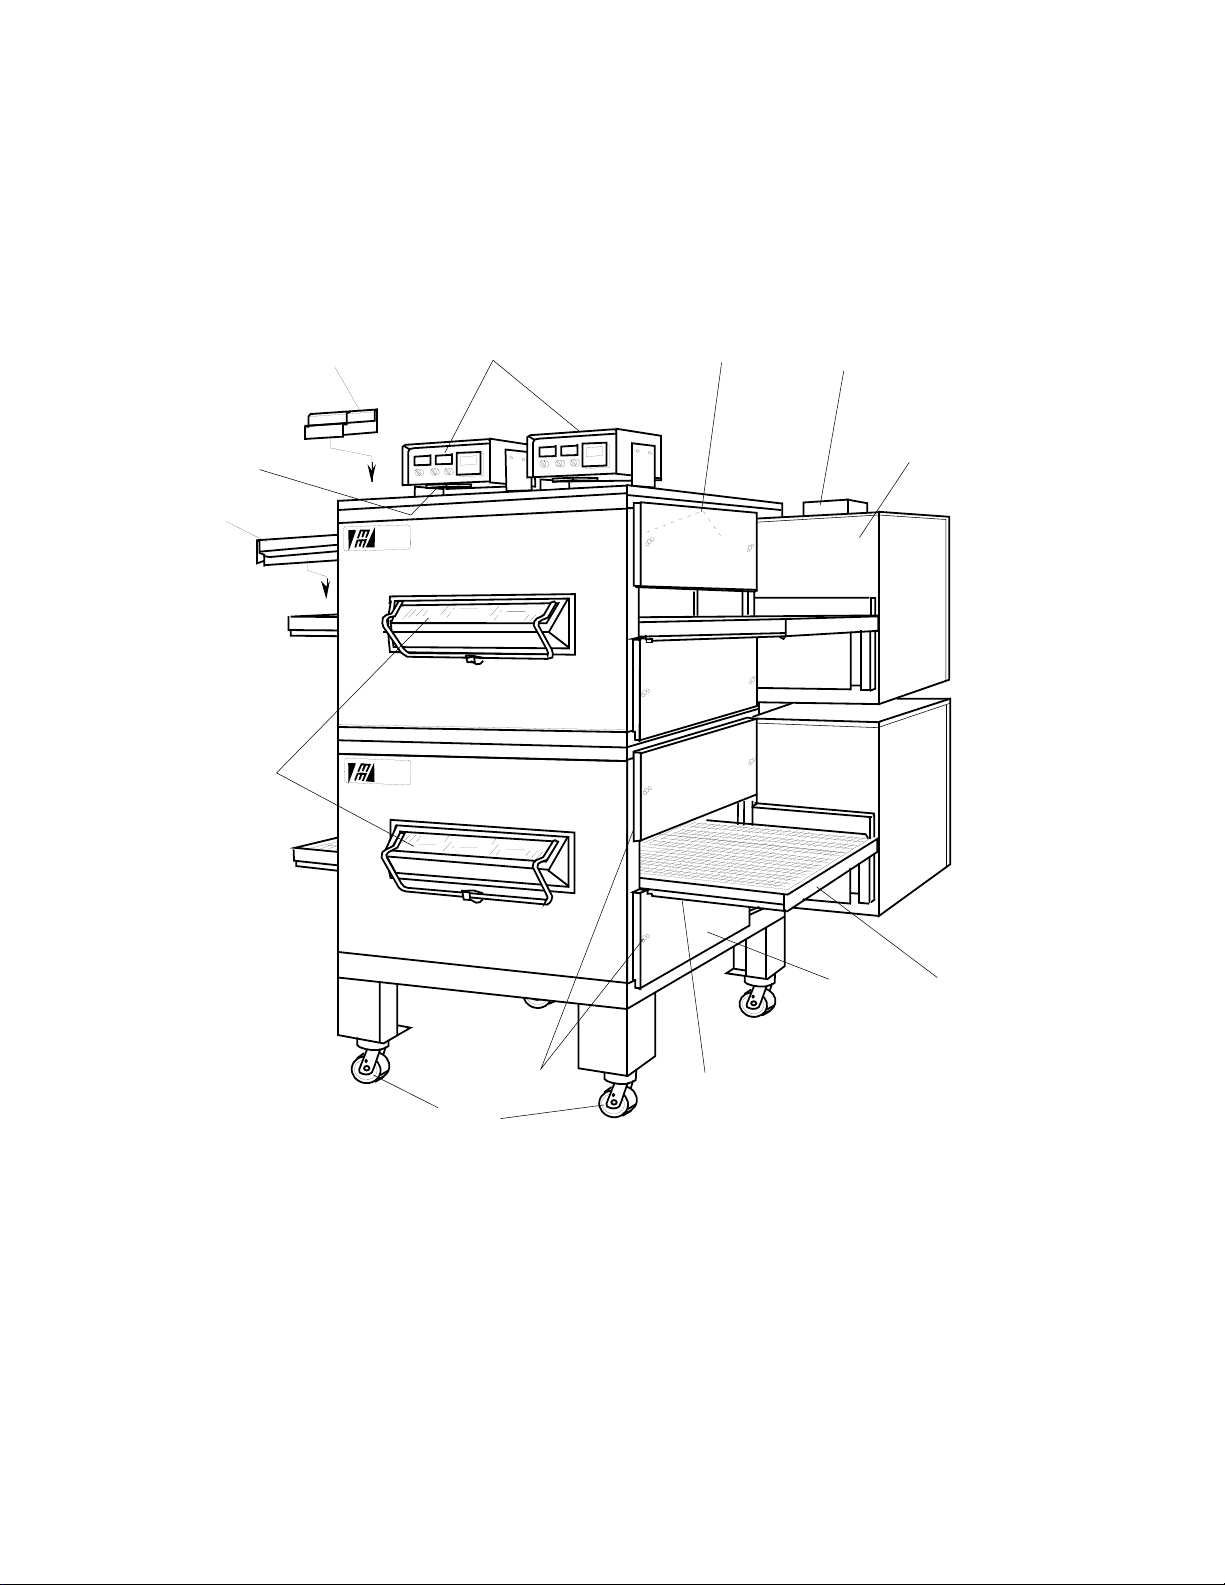
The Middleby™ Series PS200-R68 Ovens may be used
singly or stacked for use as double ovens.
The Series PS200-R68 single oven is mounted on a base
pad with 6" extension legs and casters. A double oven is
stacked and the lower oven is on a base pad with casters.
Middleby
Marshall
The ovens in a double oven operate completely independent of one another. Both ovens use identical controls
and components. One can be serviced while the other is
operating.
The Series PS200-R68 Ovens can be ordered with the
conveyor drive at either the right end or left end of the
oven. Each oven is equipped with a remote control box.
Middleby
Marshall
Figure 1-1. Middleby™ Series PS200-R68 Ovens
1
Page 8

PS200-R68 GAS PS200-R68 ELECTRIC PS224-R68 GAS PS224-R68 ELECTRIC PS220-R68 GAS PS220-R68 ELECTRIC
Conveyor Belt Width 32"(813mm) 32"(813mm) 24"(610mm) 24"(610mm) 20"(508mm) 20"(508mm)
Heating Zone Length 40-1/2"(1028mm) 40-1/2"(1028mm) 40-1/2"(1028mm) 40-1/2"(1028mm) 40-1/2"(1028mm) 40-1/2"(1028mm)
Baking Area Square Feet 9 sq.ft.(0.84sq.m.) 9 sq.ft.(0.84sq.m.) 6.4 sq.ft.(0.59sq.m.) 6.4 sq.ft.(0.59sq.m.) 5.5 sq.ft.(0.51sq.m.) 5.5 sq.ft.(0.51sq.m.)
Overall Dimension 68"(1727mm) L x 68"(1727mm) L x 68"(1727mm) L x 68"(1727mm) L x 68"(1727mm) L x 68"(1727mm) L x
Red Lobster Double Oven 57-3/4"(1467mm) W x 57-3/4"(1467mm) W x 49-3/4"(1264mm) W x 49-3/4"(1264mm) W x 45-3/4"(1162mm) W x 45-3/4"(1162mm) W x
Weight of Single Oven 925 lbs.(419kg) 925 lbs.(419kg) 825 lbs.(374kg) 825 lbs.(374kg) 750 lbs.(340kg) 750 lbs.(340kg)
Shipping Weight of Single Oven 1,100 lbs.(498.3kg) 1,100 lbs.(498.3kg) 1,000 lbs.(453kg) 1,000 lbs.(453kg) 925 lbs.(419kg) 925 lbs.(419kg)
Shipping Cube of Single Oven Approx.132 ft3(3.74 m3) Approx.132 ft3(3.74 m3) Approx.132 ft3(3.74 m3) Approx.132 ft3(3.74 m3) Approx.132 ft3(3.74 m3) Approx.132 ft3(3.74 m3)
Operating Range of Single Oven 120,000 BTU/HR 28kW/HR 100,000 BTU/HR 28kW/HR 100,000 BTU/HR 28kW/HR
Maximum Operating Temperature 550°F(287°C) 550°F(287°C) 550°F(287°C) 550°F(287°C) 550°F(287°C) 550°F(287°C)
Exhaust Vent Size 2" x 3"(50 x 75mm) -- 2" x 3"(50 x 75mm) -- 2" x 3"(50 x 75mm) -Exhaust Flow 80 C.F.M.(2.1m3m) -- 80 C.F.M.(2.1m3m) -- 80 C.F.M.(2.1m3m) -Warm Up Time 10 min. 15 min. 10 min. 15 min. 10 min. 15 min.
Gas Inlet Line Size 3/4"(19mm)ID for each cavity
Minimum Gas Meter Rating 450 cu.ft./hr.(12.74m3h) for 1 to 2 cavities
2
Minimum Gas Pipe Size: Natural 2" (51mm)ID for 1 or 2 ovens or
Propane 1.5" (38mm)ID for 1 to 2 ovens or
Gas Pressure: Natural 6"(152mm) to 14"(356mm) Water Column
Propane 11.5"(292mm) to 14"(356mm) Water Column
Gas Valves 0.75" (19mm)ID full flow gas shut-off valve.
Recirculating Air Blower One blower at 1700 RPM
Jet Air Velocity 3000 F.P.M.(1524cm/sec.)(Average)
Bake Time 2 min. 40 sec. Bake Time minimum
76-3/4"(1949mm) H 76-3/4"(1949mm) H 76-3/4"(1949mm) H 76-3/4"(1949mm) H 76-3/4"(1949mm) H 76-3/4"(1949mm) H
(30,240 kcal) (25,200 kcal) (25,200 kcal)
(35.1 kW/HR) (29.3 kW/HR) (29.3 kW/HR)
Add 180 cu.ft./hr.(5.1m3h)for each additional cavity
2.5" (64mm)ID for 3 or 4 ovens
2"(51mm)ID for 3 or 4 ovens -
(must be dedicated line)
A separate connection and valve must be provided for each cavity.
29 min. 50 sec. Bake Time maximum
SECTION 1
DESCRIPTION
PS200-R68 SERIES OVEN SPECIFICATIONS
Page 9

SERIES PS200-R68
ELECTRICAL SPECIFICATIONS
GAS HEATED OVENS
Main Blower Control Phase Frequency Amperage Poles Wires
& Elements Circuit Draw
Voltage Voltage
208-240V 120V 1 Ph 50/60 Hz 4.1 Amp 3 Pole 4 Wire
(2 hot,1 neut,1 grd)
208V 120V 1 Ph 50/60 Hz 4.1 Amp 2 Pole 3 Wire
Export Transformer (2 hot,1 grd)
200V 120V 1 Ph 50/60 Hz 4.1 Amp 2 Pole 3 Wire
Export Transformer (2 hot,1 grd)
220-240V 120V 1 Ph 50/60 Hz 4.1 Amp 2 Pole 3 Wire
Export Transformer (2 hot,1 grd)
ELECTRIC HEATED OVENS
Main Blower Control Phase Frequency Amperage Poles Wires
& Elements Circuit Draw
Voltage Voltage
208-240V 120V 3 Ph 50/60 Hz 75 Amp 4 Pole 5 Wire
(3 hot, 1 neut, 1 grd)
HEATER AMPERAGE
Voltage kW Amp Average Amps
208 27 70 37 37 37
220 23.5 67 30 30 30
230 25.7 63 31 31 31
240 27 61 33 33 33
220-240V 120V 3 Ph 50/60 Hz 75 Amp 3 Pole 4 Wire
Transformer (3 hot, 1 grd)
HEATER AMPERAGE
Voltage kW Amp Average Amps
220 23.5 67 30 30 30
240 27 61 33 33 33
380V 120V 3 Ph 50/60 Hz 50 Amp 4 Pole 5 Wire
Export Transformer (3 hot, 1 neut, 1 grd)
HEATER AMPERAGE
Voltage kW Amp Average Amps
380 27 38 22 22 22
400-416V 120V 3 Ph 50/60 Hz 50 Amp 4 Pole 5 Wire
Export Transformer (3 hot, 1 neut, 1 grd)
HEATER AMPERAGE
Voltage kW Amp Average Amps
415 27 35 28 28 28
SECTION 1
DESCRIPTION
NOTE
Wiring Diagram is contained at the back of this Manual
and is also located inside of the
machinery compartment.
.
3
Page 10
SECTION 1
DESCRIPTION
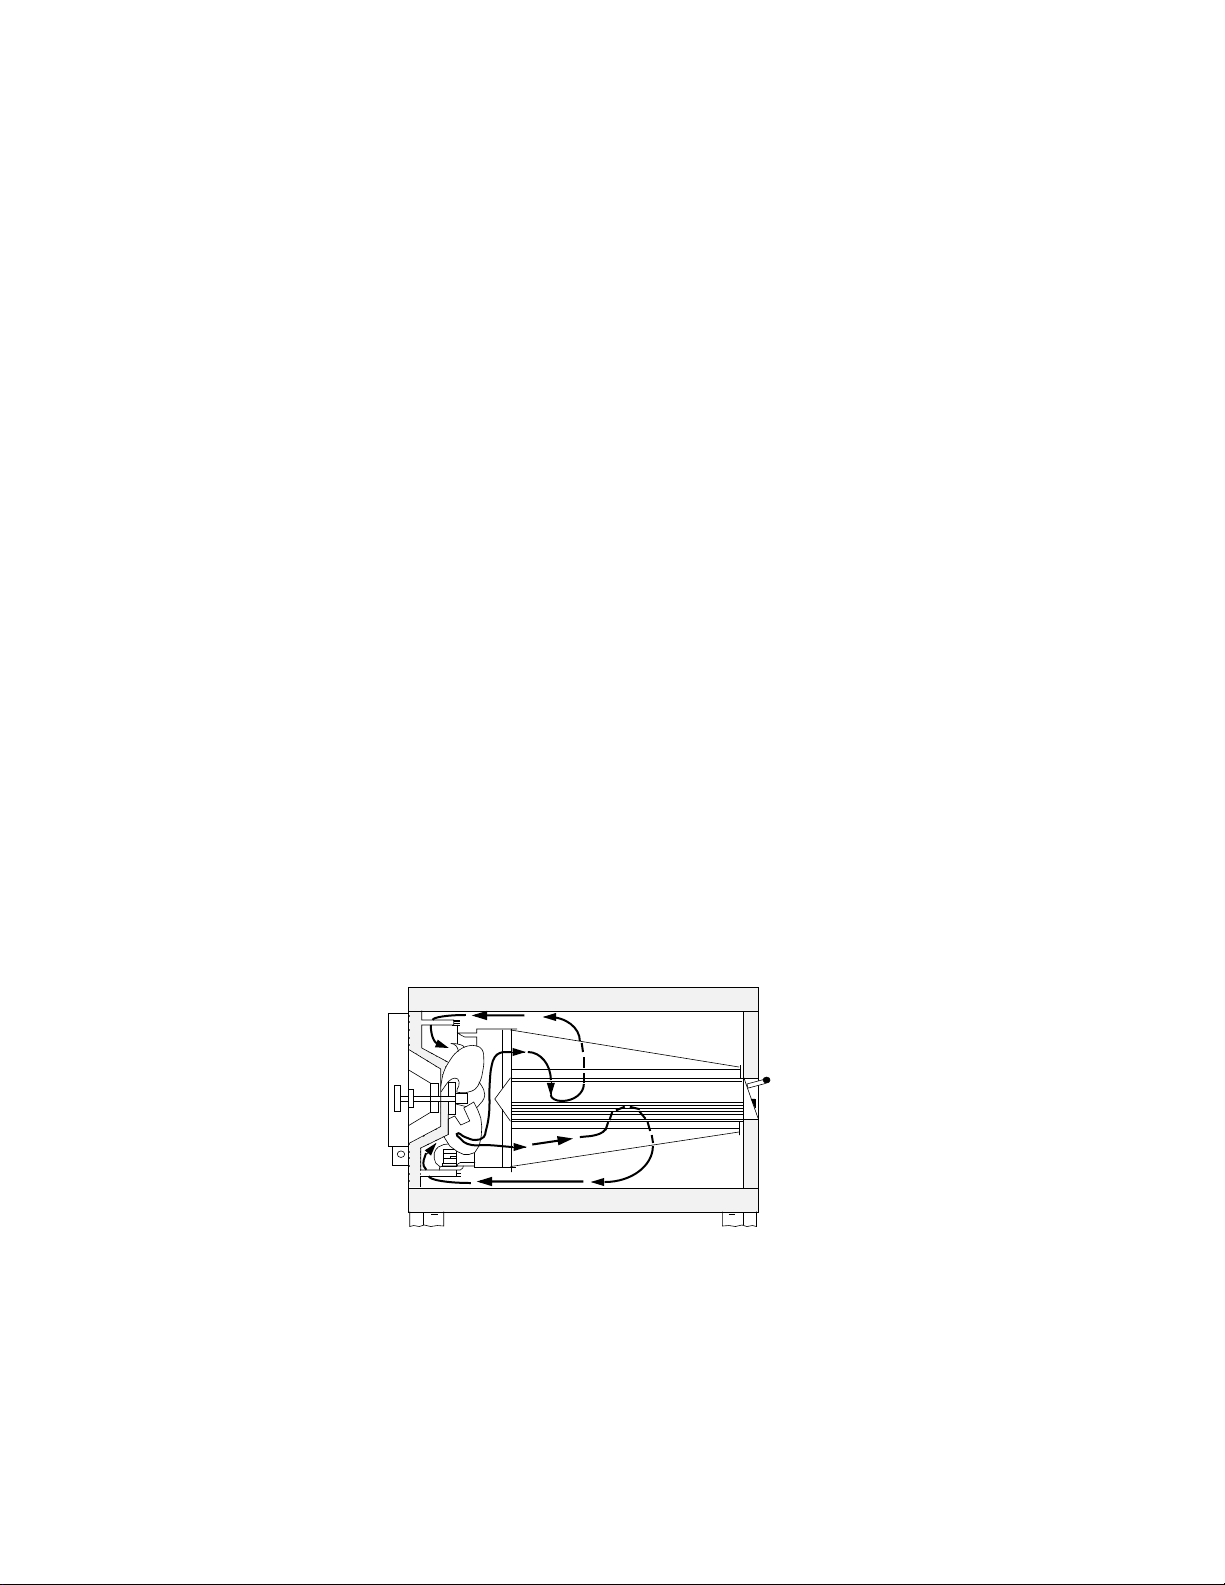
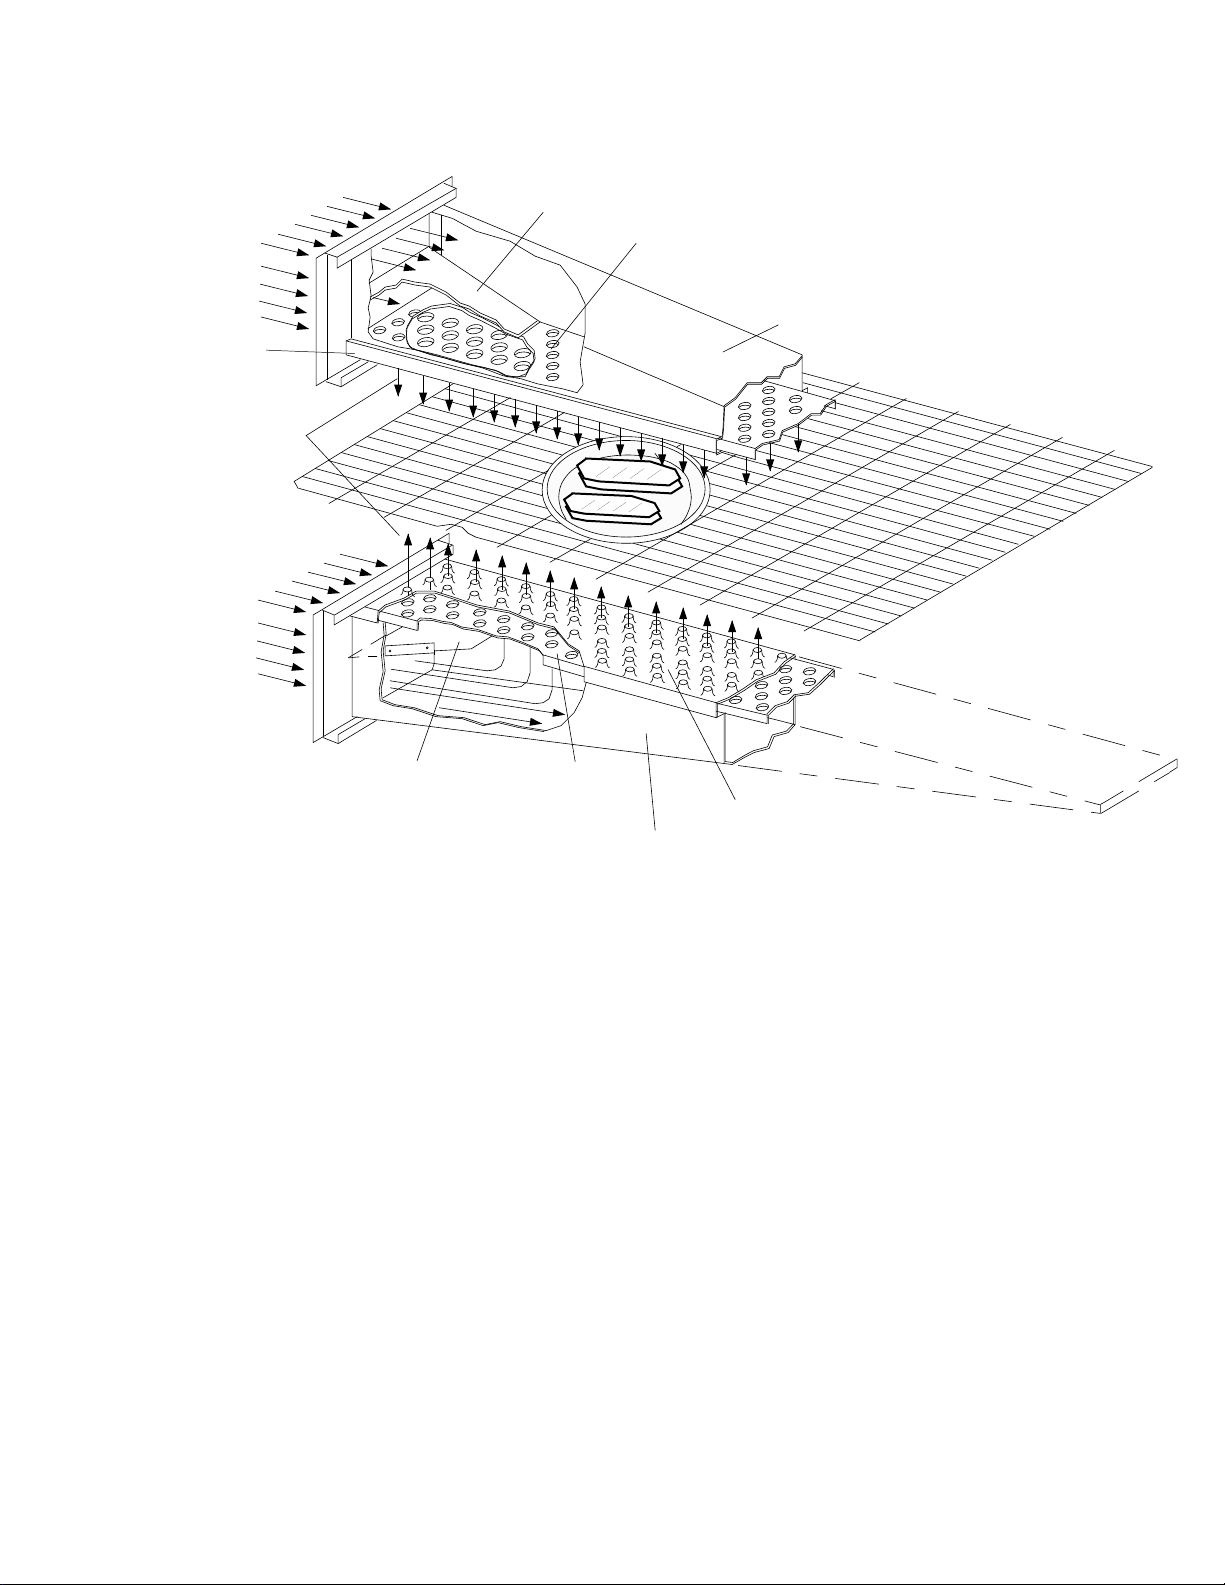
II. PRINCIPLE OF AIR FLOW
Air is heated and then pulled through the fan which
pushes the air into the oven plenum and delivers heated
air into the air fingers. The fingers contain an inner plate
and outer plate which columnate the air and evenly
distribute heated air across the conveyor belt on which
the product rides. Air is then pulled back into the blower
and the process continues.
A. Heat Transfer and How It Works
1. Heat constantly moves from a warm object to a cold
object. Heat moves using three different paths which are
conduction, radiation and convection.
Conduction:
tact. The pizza dough in contact with the pan is a good
example of conduction.
Radiation:
heat. Dark objects absorb heat whereas light or shiny
objects reflect more heat. This is the reason that the
This path utilizes surface to surface con-
This path has to do with objects radiating
inside of the Middleby Series PS200-R68 Oven is light in
color to reflect more heat back to the product.
Convection:
of air. It explains why hot air will rise and cooler air
replaces hot air. An industrial application of this principle
is to incorporate a fan to force the hot air movement which
in turn will increase the heat transfer to the product.
The Middleby Series PS200-R68 Oven has a large fan to
move the hot air through the air fingers and onto the
product so the most efficient bake is achieved.
2. Temperature is the intensity of heat at the point which
it is sensed. As discussed above, heat flows by conduction, radiation and convection. The speed at which the
heat flows is determined by the temperature difference
between the oven and the food product. The larger the
difference the faster the heat flows to the item that is
being baked.
This path has to do with moving amounts
Side View
Figure 1-2
Series PS200-R68 Air Flow
4
Page 11
II. PRINCIPLE OF AIR FLOW Continued
SECTION 1
DESCRIPTION
Air Flow From
Plenum Chamber
Outer Plate
High Velocity
Columns of Air to
Product
Air Flow From
Plenum Chamber
Manifold Baffle
Inner Plate
Manifold
Manifold Baffle
Inner Plate
Figure 1-3. Air Fingers Showing Air Passing Through Inner Plate And Outer Plate
Which Forms High Velocity Columns Of Air To The Product.
B. Air Fingers
The Middleby Series PS200-R68 Oven is a conveyorized
hot air oven employing vertical air streams (Figure1-3) to
give uniform and intensive heating. The columnated
vertical streams of hot air provide an exceptional heat
transfer rate and generally bake faster and at lower
temperatures than convection hot air or infrared heating
ovens.
Outer Plate
Manifold
This is accomplished with use of hot air fingers inside the
oven. The oven can accommodate up to 4 bottom air
fingers and 4 top air fingers. Standard PS200-R68 Series
ovens have 4 bottom fingers and 2 top fingers.
5
Page 12
SECTION 1
DESCRIPTION
Cooling
Fan
Conveyor
End Stop
Conveyor
Rear Stop
Middleby
Marshall
Control
Boxes
Removable
Jet Fingers
(Inside
Oven)
Machinery
Compartment
Conveyor
Motor
Front
Window
Middleby
Marshall
Removable End Plugs
Locking
Casters
(Rear Casters
are not locking
casters)
Figure 1-4. Component Location
Removable
Crumb Pans
Removable
Drip Pans
(Inside Oven)
Removable
Conveyor
6
Page 13
SECTION 1
DESCRIPTION
III. COMPONENT FUNCTION
A. Conveyor
The conveyor is driven by a variable speed electric motor
operating through a gear reducer (See Figure 1-5). The
motor speed is controlled by a digital control. The stainless steel wire belt can travel in either direction and at
variable speeds from 3 minutes to 23 minutes.
Conveyor
Drive Motor
Fan
Motor
Should a flame outage occur the control will close the
main gas control valve within 0.8 seconds and attempt to
reignite the pilot.
D. Electric Heaters (Electric Oven Only)
There are six heater elements mounted on the inside of
the rear panel. Each element is connected to a separate
electrical contact which is energized by the temperature
controller.
E. Front Window
The front window is used for viewing items being baked
and provides access to the oven for items which do not
require full bake time, such as sandwiches, cookies,
small items or cheese melting processes.
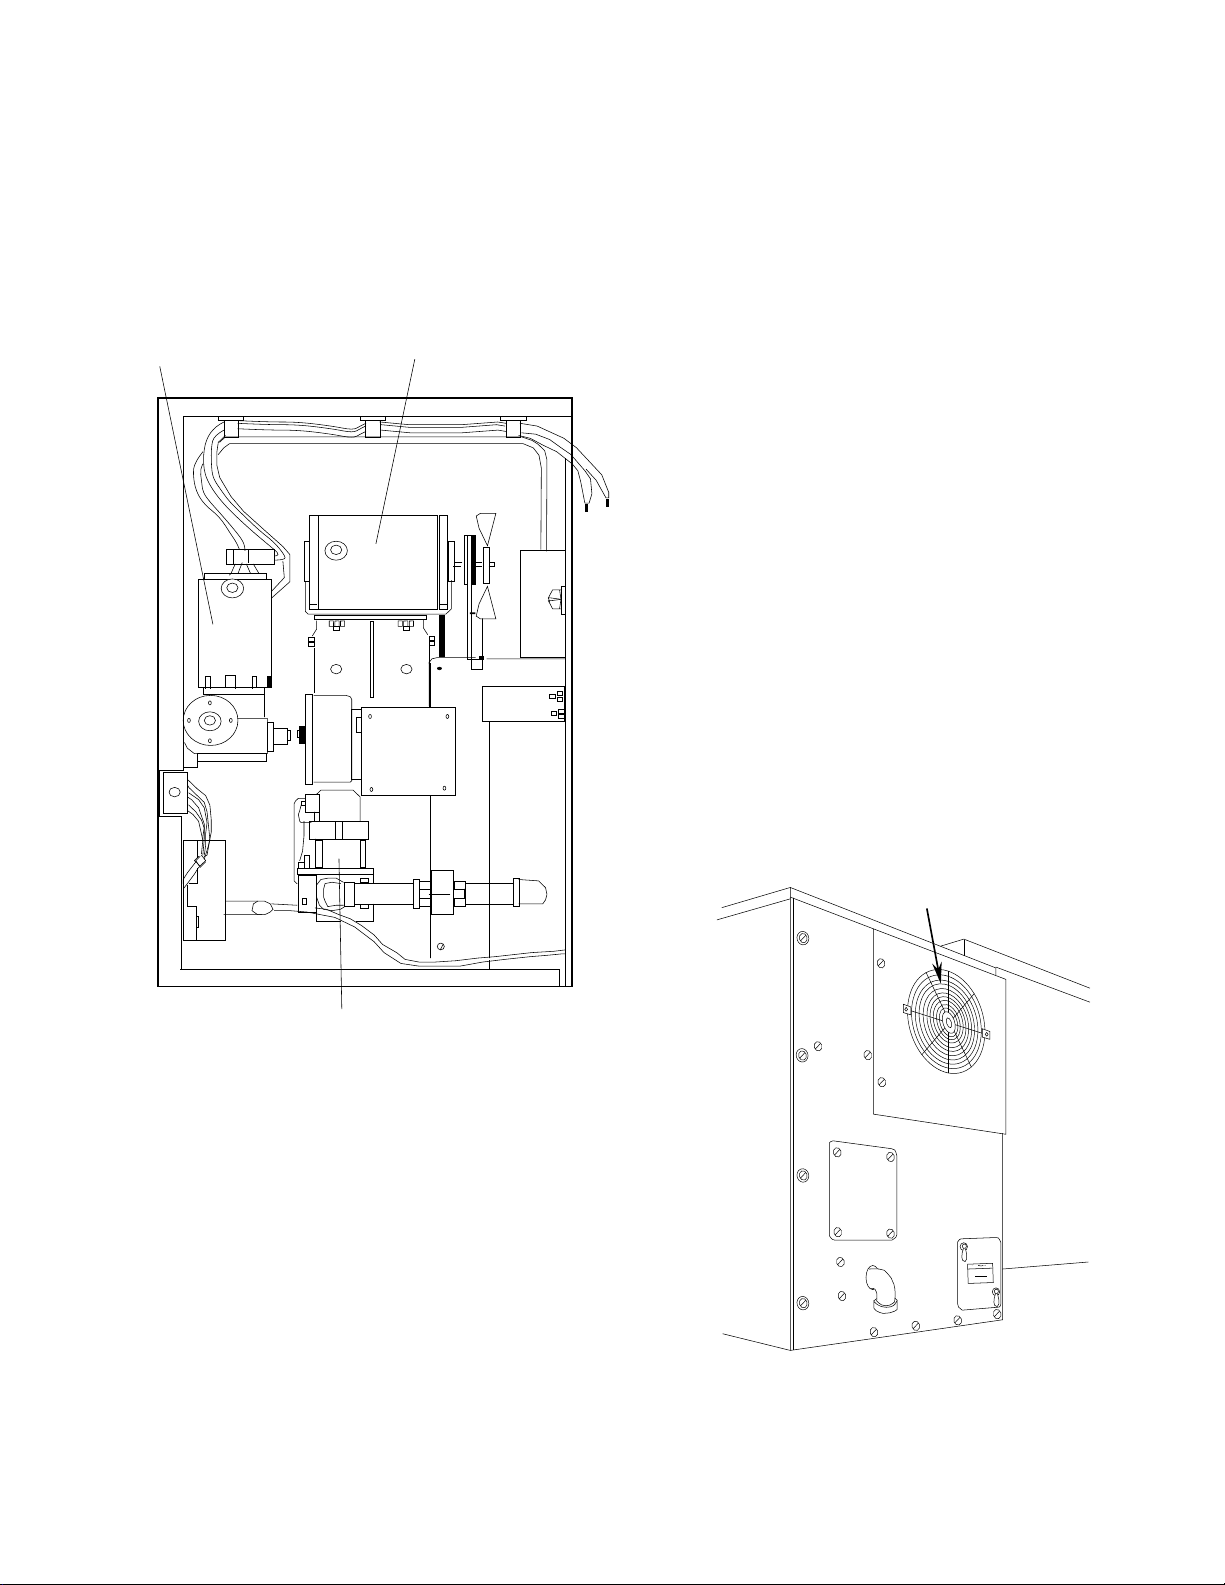
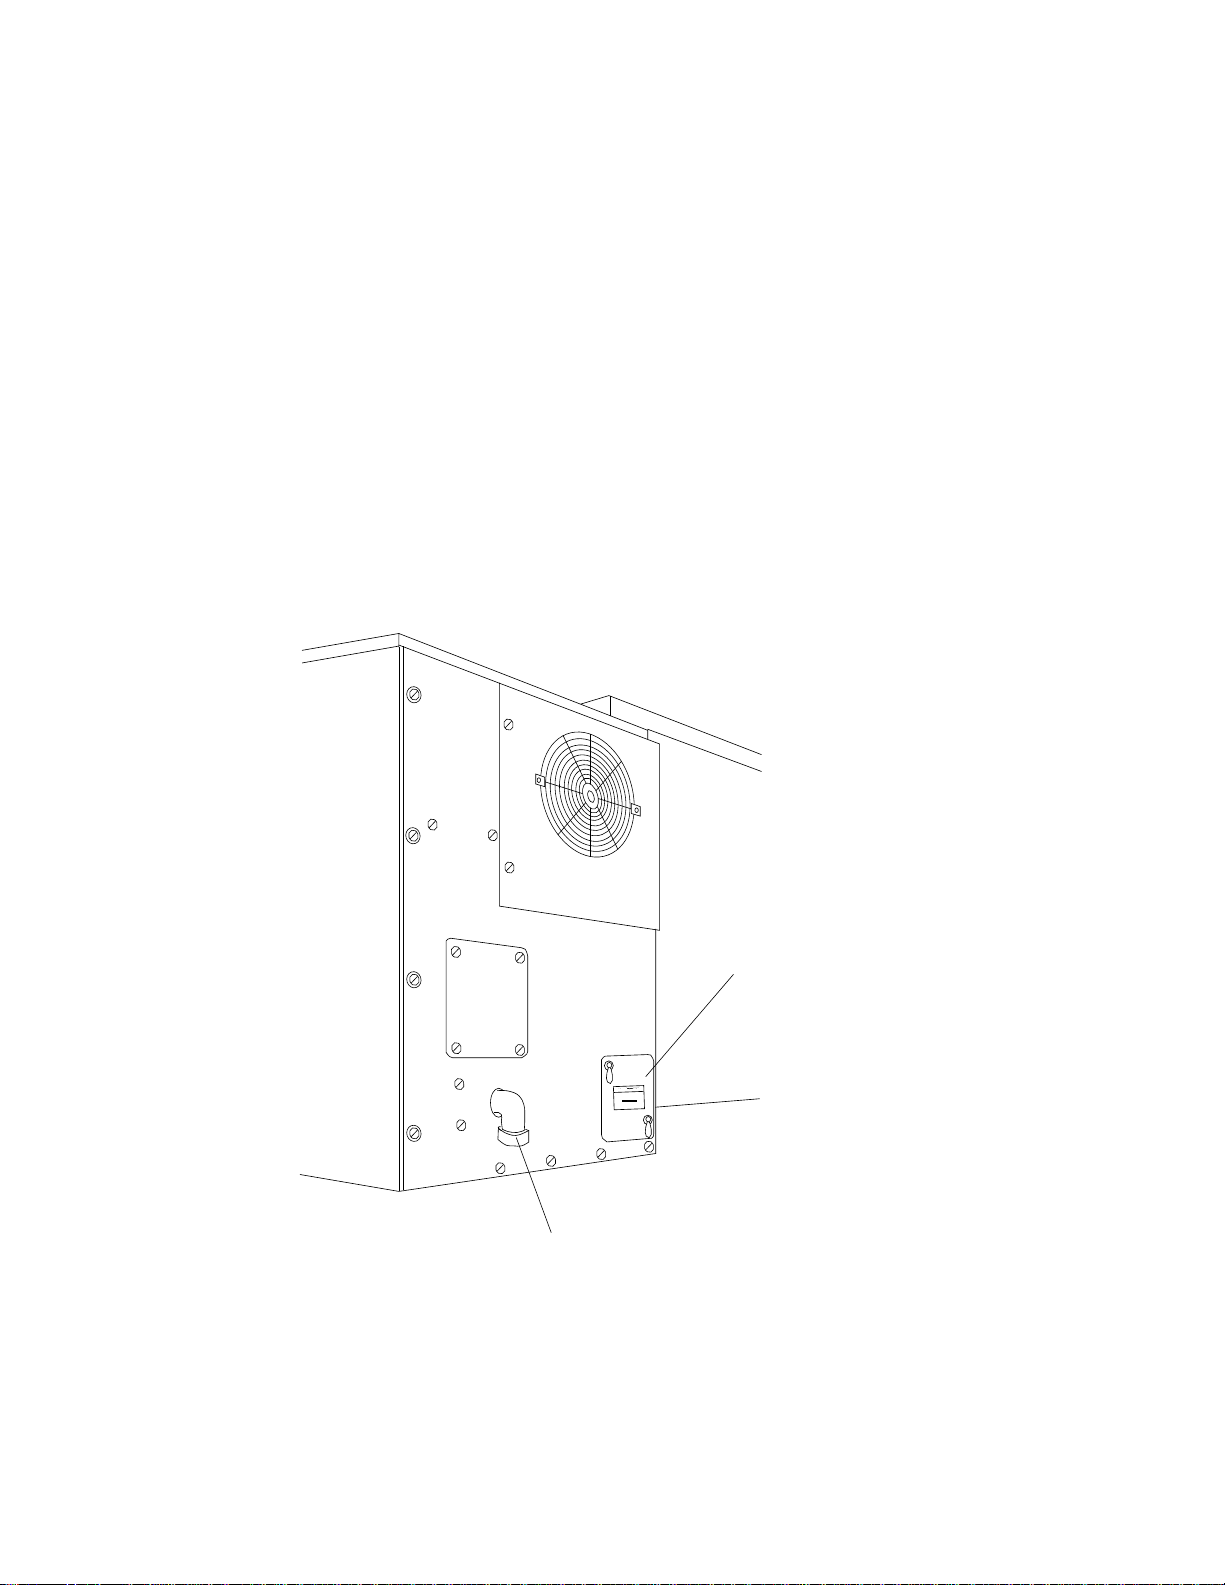
F. Cooling Fan
A cooling fan is located in the back of the oven. This
cooling fan blows cool air in through the machinery
compartment across the fan motor and conveyor motor
and control cabinet. The air is then exhausted through
the side of the cabinet and also out the back of the oven
compartment. Refer to Figure 1-6.
Main Gas
Control Valve
Figure 1-5. Conveyor Drive Motor
B. Fan
The fan is located at the rear of the oven. This fan forces
heated air through the fingers. The fan switch has two
positions and must be "on" for oven warm up and bake
and for the conveyor to run.
Another cooling fan is located in the bottom of each
control box. Air is drawn in through the louvers in the rear
of the control box and out through the fan. Refer to Figure
1-4.
C. Gas Burner (Gas Oven Only)
With the heat and blower switches ON the gas burner
heats the air as the air enters the main blowers to
maintain the set temperature. The burner flame is ignited
and monitored by a solid state burner control device.
Figure 1-6. Cooling Fan
7
Page 14
SECTION 1
DESCRIPTION
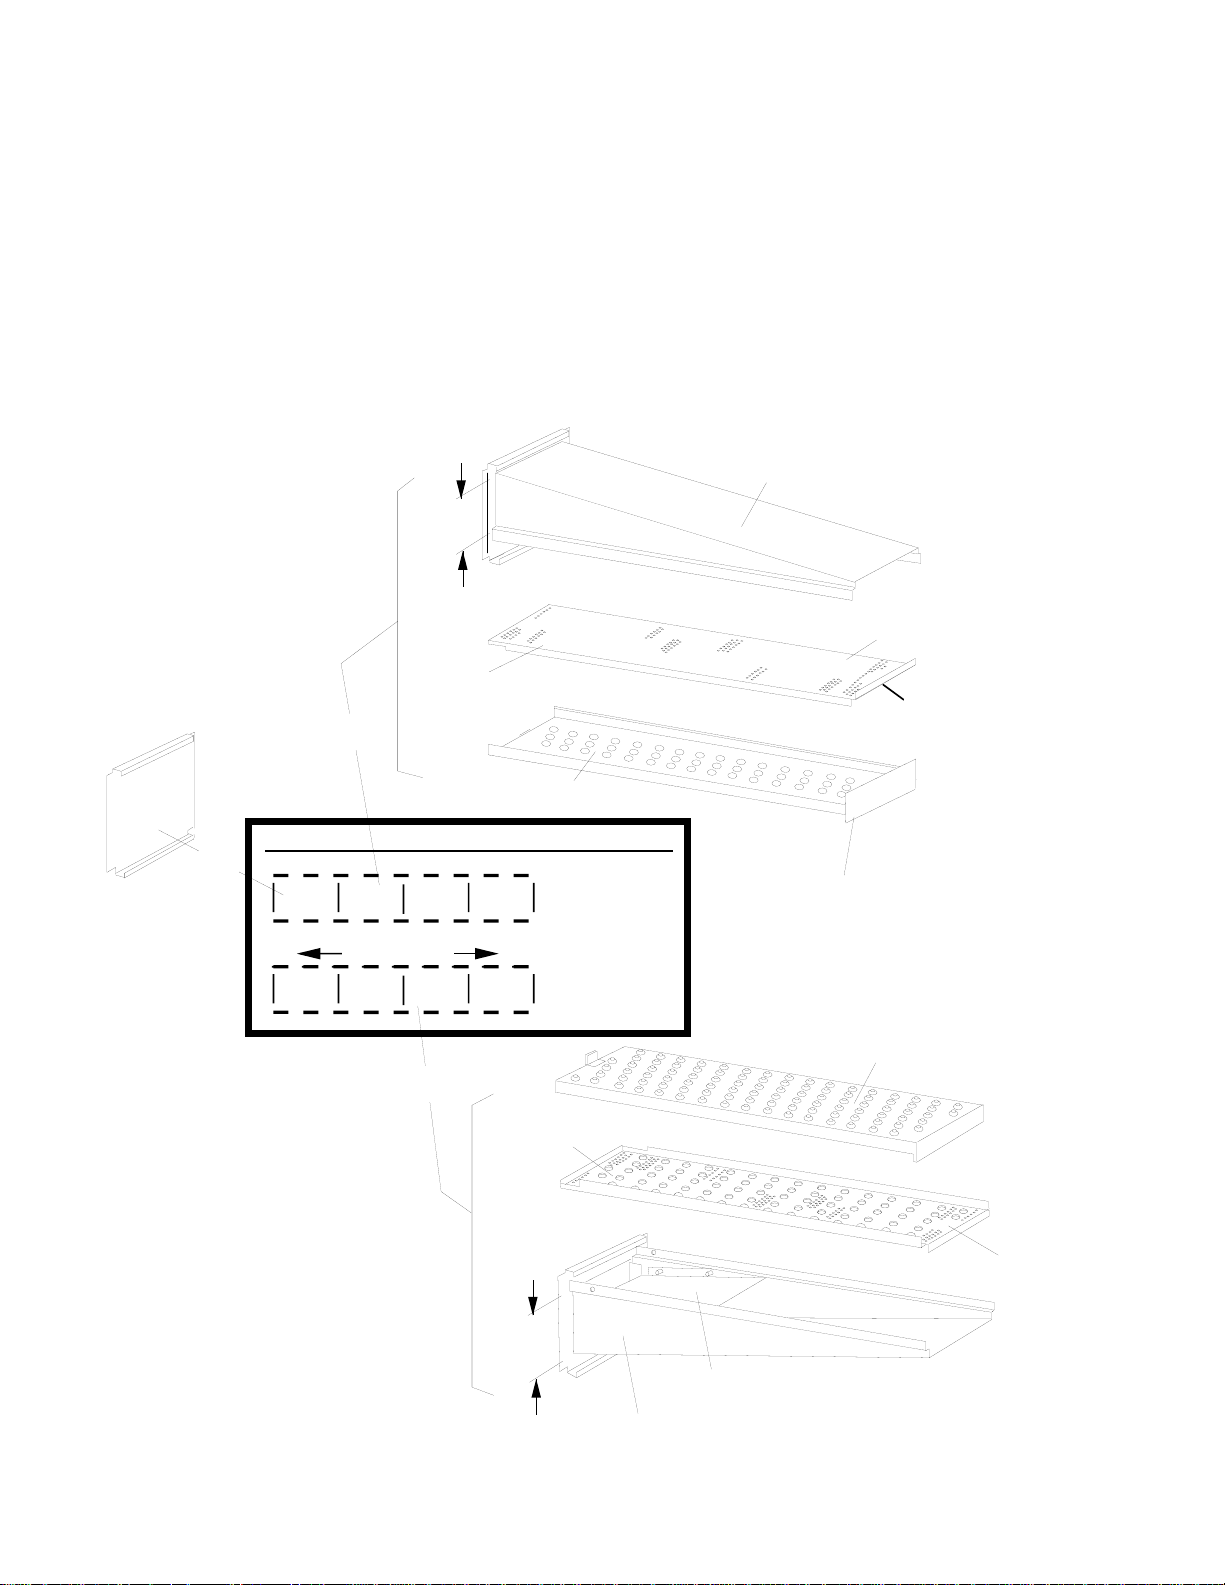
G. Air Fingers
The Air Finger Assemblies are made up of three parts as
follows (See Figure 1-7):
1. Outer Plate - The Outer Plate is the removable cover
with tapered holes, which directs the air stream onto the
product to be baked.
2. Inner Plate -The Inner Plate is vital to forming the
manifold with its holes lined up with outer plate holes.
The inner plate is also manufactured with no rows of
holes. This type of finger is a non-columnating air finger.
3. Manifold - The Manifold is the assembly which slides
on tracks into the oven plenum.
4. Blank Plates- The Blank Plates are installed on the
plenum where air fingers are not required.
columnated air jets. It must be assembled onto the
NOTE: On a PS200-R68 Series Red Lobster oven the 2 upper fingers (M3) have 3 rows of holes in the outer plate
and a non-columnating inner plate. The 4 bottom fingers (M6) have 6 rows of holes completely across the inner and
outer plates.
Manifold
4-1/32" Rear
Opening
No Large Holes,
Perforated Only
UPPER
Inner
Plate
M3RN
Finger
Outer Plate with
3 Rows of Holes
Stamped "UPPER"
UPPER
Full
Blank
RED LOBSTER FINGER CONFIGURATION IN OVEN
FB M3RNFBM3RN
Product Direction (Either Direction)
M6
M6
M6
M6
Finger
M6
5-5/32" Rear
Opening
Upper Fingers
Lower Fingers
Large Holes &
Perforated
Raised Front
(Stamped "UPPER")
Outer Plate
with 6 Rows
of Holes
Inner
Plate
Baffle
Manifold
Figure 1-7. Fingers
8
Page 15

SECTION 2
INSTALLATION
SECTION 2
INSTALLATION
NOTE: For U.S. installations the installation must conform with local codes or in absence of local codes, with
ANSI Z223.1-latest edition and electrical code ANSI/NFPA No. 70-latest edition.
NOTE: For Canadian Installations - The installation should be done in accordance with the CAN 1-B149.1 or .2
installation code and/or local code and the Canadian electrical code, Part 1, CGA C22.1 for the electrical features.
I. UNLOADING
Your Middleby Marshall Series PS200-R68 Oven(s)
is shipped partially assembled and it will arrive in a
carton.
Carton size for all Series 200-R68 Ovens is:
84"(2134mm) Long x
58" (1473mm) Wide x
44" (1118mm) High.
A Pre-installation Procedures Manual (MM P/N
88910-0009) is attached to the exterior wall of the
carton. This manual contains detailed instructions on
unpacking and moving the oven(s) into your facility.
When your common carrier or truck line notifies you
of delivery, you must have a forklift at the facility to
unload the carton(s).
Instructions for stacking the ovens are contained in
a separate manual issued to Middleby Marshall
Certified Installers.
If you have a door wider than the carton simply move
the carton into your facility and set up an appointment
with your Certified Middleby Marshall Installer.
If your door is narrower than the carton, then the oven
will have to be uncrated. Follow directions shown in
the Pre-Installation Procedures Manual.
Each crate must be examined before signing the Bill
of Lading. Report any visible damage caused by the
trucker in transit, and check for the proper number of
crates. If apparent damage is found, arrangements
should be made to file a claim against the carrier.
Interstate Commerce Regulations require that the
claim must be initiated by the consignee within 10
days from the date it is received.
NOTE
There Must Be Adequate Clearance Between
Oven And Combustible Construction.
Clearance Must Also Be Provided For
Servicing And For Operation.
CAUTION: It is required that the oven be placed under a ventila-
tion hood for adequate air supply and ventilation.
CAUTION: A minimum clearance of 0" from non-drive end of
oven to wall, 18" from drive end of oven to wall and 6" from
rear wall to air openings at rear of unit must be maintained.
For servicing and cleaning a minimum of 18" clearance from
all walls and combustible materials is recommended.
CAUTION: Do not obstruct the flow of combustion and ventila-
tion air to and from your oven. Do not obstruct the ventilation
holes in the control panel, as these provide the combustion
air for the burner.
9
Page 16

SECTION 2
INSTALLATION
PS200-R68 OVEN INSTALLATION
REQUIRED KITS AND EQUIPMENT
KITS AND EQUIPMENT
PS200-R68 PS200-R68 PS200-R68 PS200-R68
TYPE
OF
INSTALLATION
PS200-R68 Single Gas Oven 1 1
PS200-R68 Single Electric Oven 1 1
PS200-R68 Double Gas Oven 2 1
PS200-R68 Double Electric Oven 2 1
PS220-R68 Single Gas Oven 1 1
PS220-R68 Single Electric Oven 1 1
PS220-R68 Double Gas Oven 2 1
PS220-R68 Double Electric Oven 2 1
Gas Oven Electric Oven Single Oven Double Oven
Installation Installation Option Kit P/N Option Kit P/N
Kit P/N Kit P/N 49025-0007 31361
31350 31514
PS220-R68 OVEN INSTALLATION
REQUIRED KITS AND EQUIPMENT
KITS AND EQUIPMENT
PS220-R68 PS220-R68 PS220-R68 PS220-R68
Gas Oven Electric Oven Single Oven Double Oven
Installation Installation Option Kit P/N Option Kit P/N
Kit P/N Kit P/N 30752 31363
31352 31517
PS224-R68 OVEN INSTALLATION
REQUIRED KITS AND EQUIPMENT
KITS AND EQUIPMENT
PS224-R68 PS224-R68 PS224-R68 PS224-R68
Gas Oven Electric Oven Single Oven Double Oven
Installation Installation Option Kit P/N Option Kit P/N
Kit P/N Kit P/N 49025-0016 31362
31351 31516
PS224-R68 Single Gas Oven 1 1
PS224-R68 Single Electric Oven 1 1
PS224-R68 Double Gas Oven 2 1
PS224-R68 Double Electric Oven 2 1
10
Page 17
SECTION 2
INSTALLATION
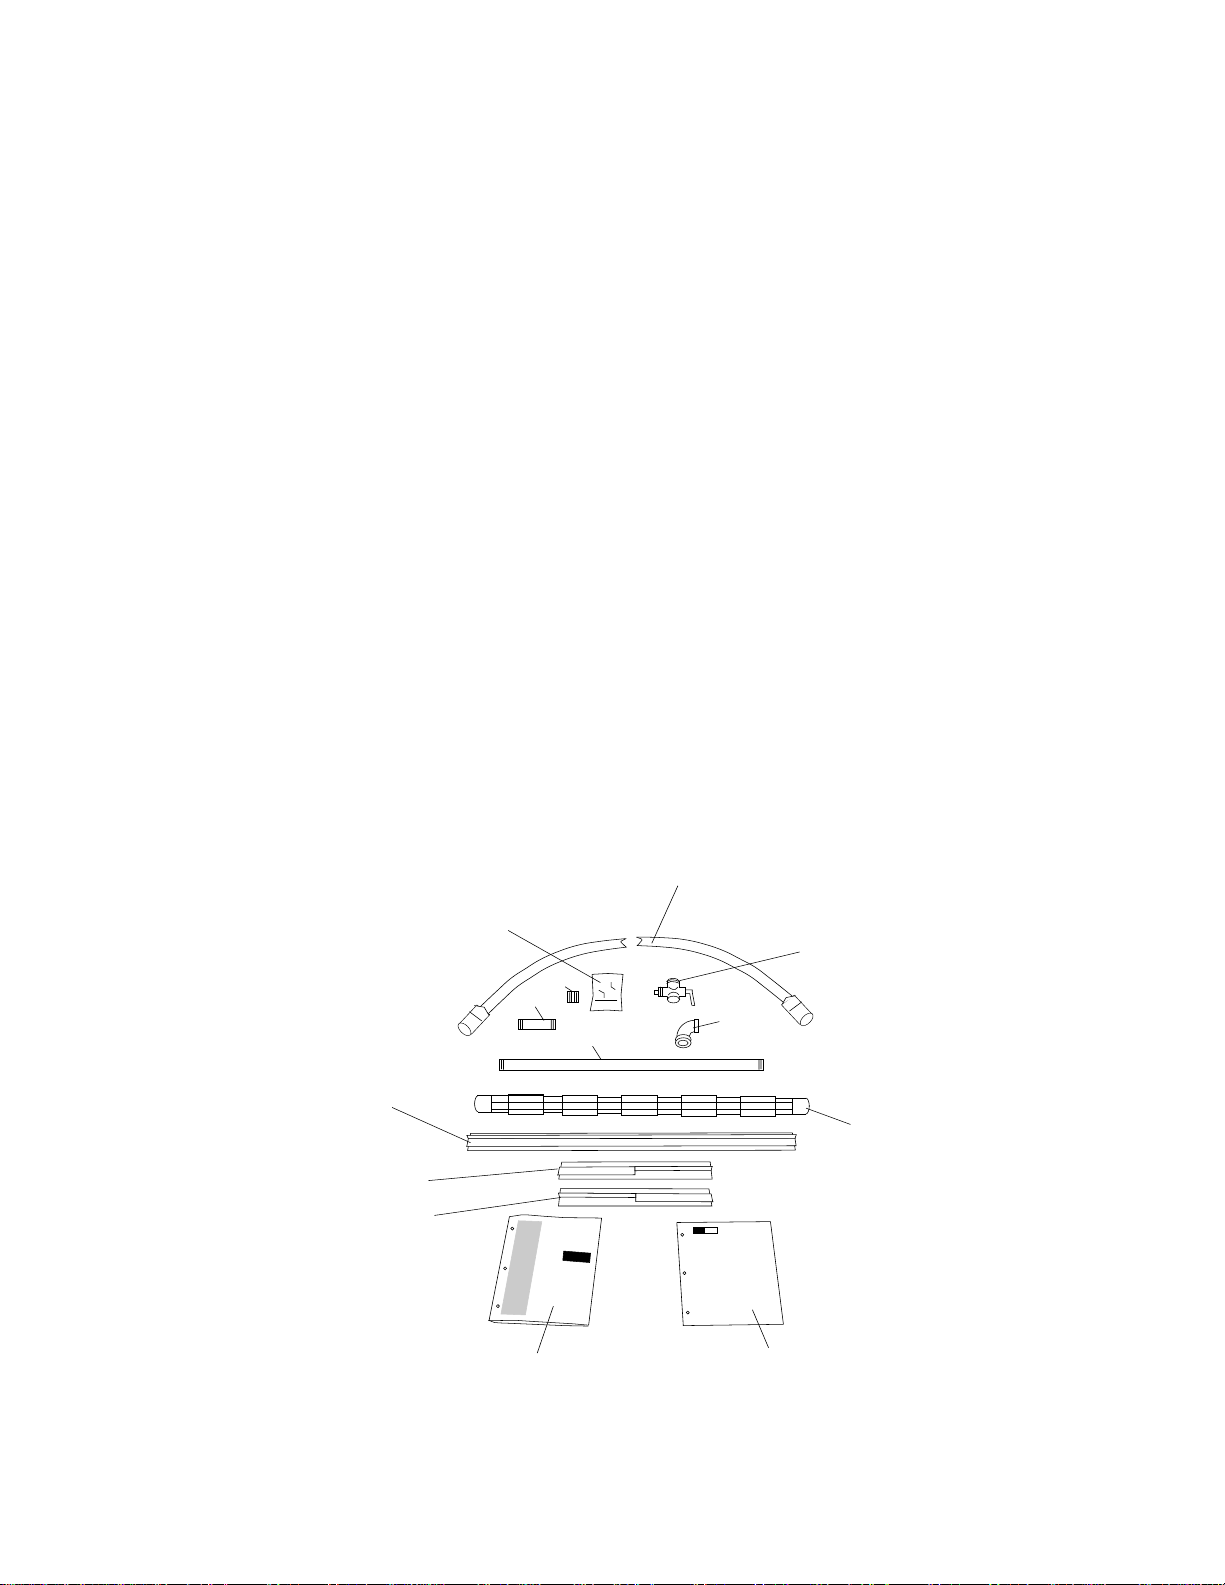
PARTS LIST FOR SERIES PS200-R68 GAS OVEN
INSTALLATION KIT
PS200-R68, P/N 31350
PS220-R68, P/N 31352
PS224-R68, P/N 31351
ITEM QTY PS200-R68 PS220-R68 PS224-R68 DESCRIPTION
NO. PART NO. PART NO. PART NO.
1 1 22361-0005 22361-0005 22361-0005 FLEXIBLE GAS HOSE, 72"
2 1 23115-0010 23115-0010 23115-0010 3/4" GAS SHUTOFF VALVE
3 1 31006 30849 30851 CONVEYOR END STOP
4 1 30830 30830 30830 CONVEYOR LEFT REAR STOP
5 1 30796 30796 30796 CONVEYOR RIGHT REAR STOP
6 1 88910-0008 88910-0008 88910-0008 SERIES PS200-R68 OWNER/OPERATOR MANUAL
7 1 1002040 1002040 1002040 SERVICE STATION DIRECTORY
8 1 33900-0032 33900-0081 33900-0035 CONVEYOR WIRE BELT
9 1 42400-0089 49400-0090 49400-0197 MASTER LINK KIT
10 1 23125-0002 23125-0002 23125-0002 ELBOW 90° BLK REDUCER 1/2" X 3/4"
11 1 23153-0005 23153-0005 23153-0005 NIPPLE BLK 3/4 CLOSE
12 1 31315 31315 31315 PIPE, 31", UPPER OVEN
13 1 31238 31238 31238 NIPPLE BLK 1/2" X 4"
PARTS LIST FOR SERIES PS200-R68 ELECTRIC OVEN
ITEM QTY PS200-R68 PS220-R68 PS224-R68 DESCRIPTION
NO. PART NO. PART NO. PART NO.
3 1 31006 30849 30851 CONVEYOR END STOP
4 1 30830 30830 30830 CONVEYOR LEFT REAR STOP
5 1 30796 30796 30796 CONVEYOR RIGHT REAR STOP
6 1 88910-0008 88910-0008 88910-0008 SERIES PS200-R68 OWNER/OPERATOR MANUAL
7 1 1002040 1002040 1002040 SERVICE STATION DIRECTORY
8 1 33900-0032 33900-0081 33900-0035 CONVEYOR WIRE BELT
9 1 42400-0089 49400-0090 49400-0197 MASTER LINK KIT
(Two required for double oven)
INSTALLATION KIT
PS200-R68, P/N 31514
PS220-R68, P/N 31517
PS224-R68, P/N 31516
(Two required for double oven)
1
9
2
11
13
10
12
3
8
4
5
Owners
Operating
Manual
6
7
Figure 2-1.
Series PS200-R68 Gas & Electric Oven
Installation Kits
11
Page 18
SECTION 2
INSTALLATION
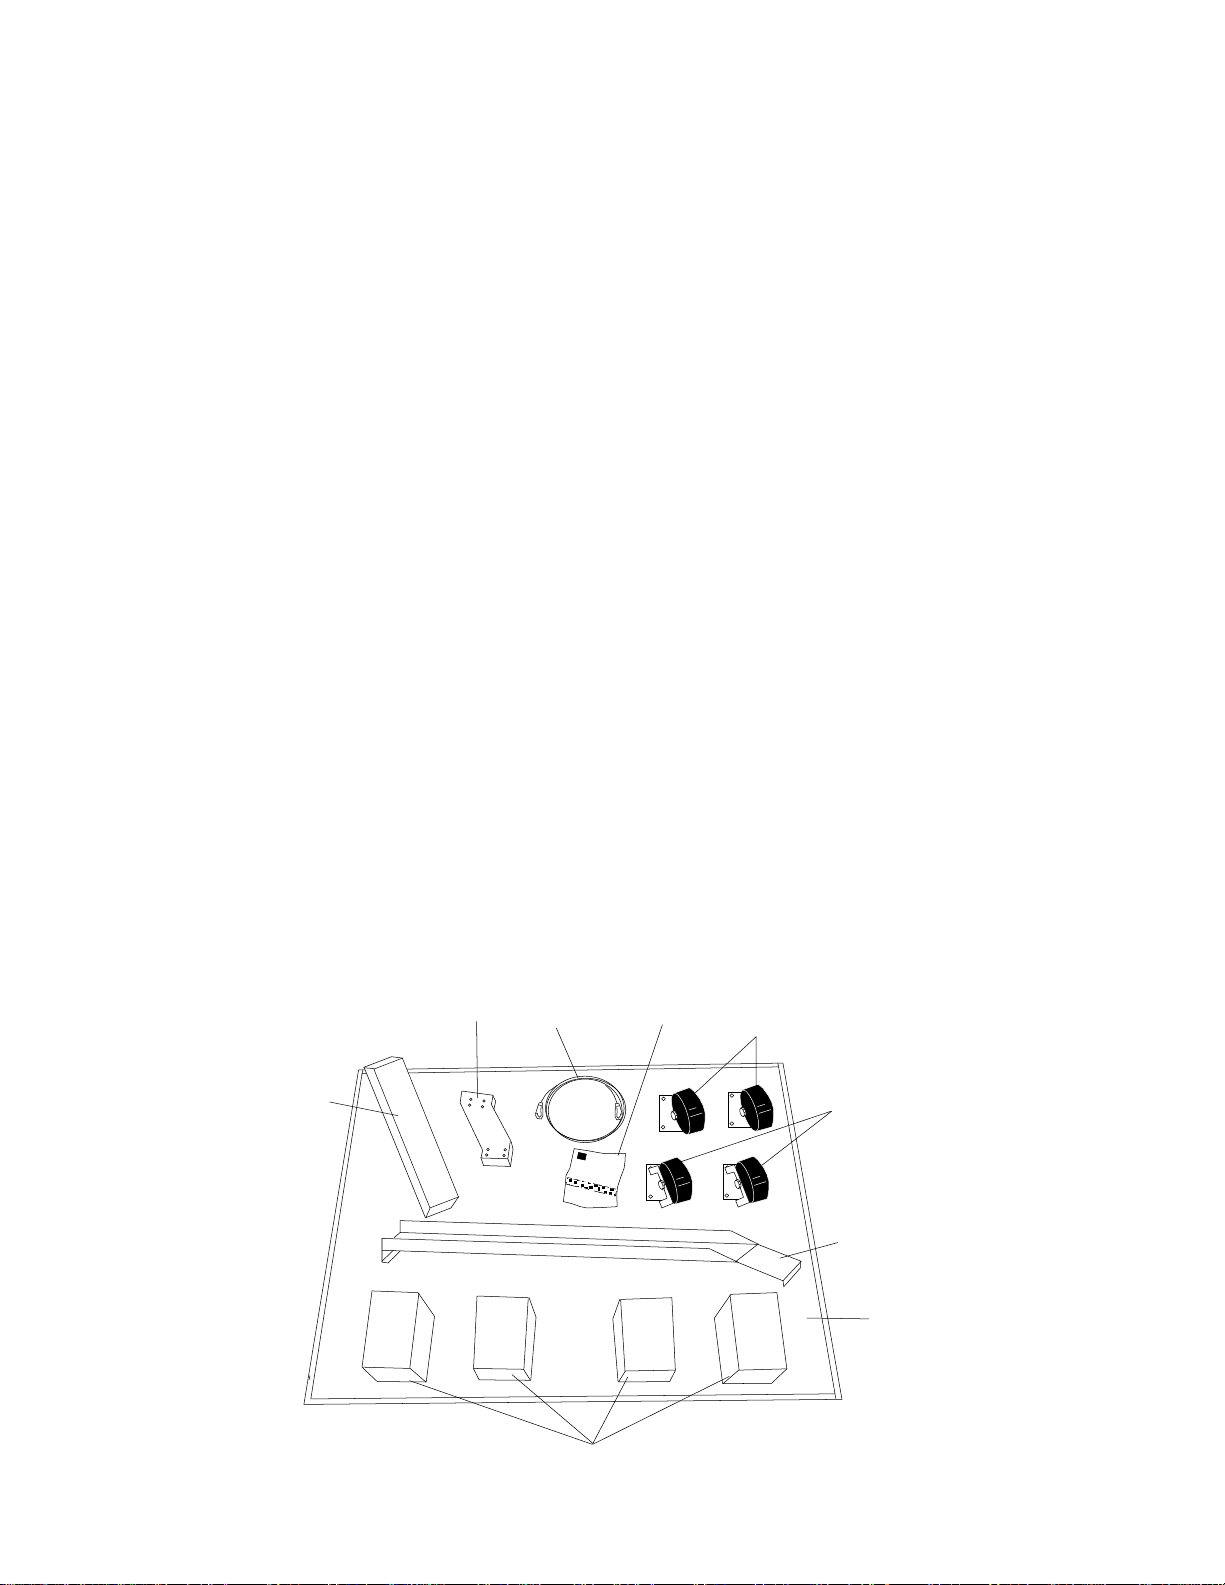
ITEM QTY PS200-R68 PS220-R68 PS224-R68 DESCRIPTION
NO. PART NO. PART NO. PART NO.
1 1 35900-0055 37900-0184 35900-0411 BASE PAD
2 4 37900-0102 37900-0102 37900-0102 LEGS
3 2 22290-0009 22290-0009 22290-0009 SWIVEL CASTER W/LOCKING BRAKE
4 2 22290-0010 22290-0010 22290-0010 SWIVEL CASTER
5 32 A11039 A11039 A11039 3/8" LOCKWASHER
6 32 21416-0001 21416-0001 21416-0001 3/8" FLAT WASHER
7 32 220373 220373 220373 3/8 - 16 SCREW HEX HD SS
8 4 21256-0008 21256-0008 21256-0008 SCREWS FOR TOP 10-32 X 3/8" RH
9 32 21296-0005 21296-0005 21296-0005 10-32 X 3/4" SCREW HEX WASHER HD SS
10 1 22450-0228 22450-0228 22450-0228 RESTRAINT CABLE ASSEMBLY
13 1 31319 31319 31319 LABEL, UPPER
14 1 31320 31320 31320 LABEL, LOWER
15 1 32116 32116 32116 WIREWAY ASSEMBLY
16 2 21516-0001 21516-0001 21516-0001 POP RIVETS
17 1 32227 32227 32227 INSTRUCTION, CONTROL BOX INSTALLATION
Not shown 1 32023 31261 30878 OVEN TOP
ITEM QTY PS200-R68 PS220-R68 PS224-R68 DESCRIPTION
NO. PART NO. PART NO. PART NO.
1 1 35900-0055 37900-0184 35900-0411 BASE PAD
2 4 37900-0102 37900-0102 37900-0102 LEGS
3 2 22290-0009 22290-0009 22290-0009 SWIVEL CASTER W/LOCKING BRAKE
4 2 22290-0010 22290-0010 22290-0010 SWIVEL CASTER
5 32 A11039 A11039 A11039 3/8" LOCKWASHER
6 32 21416-0001 21416-0001 21416-0001 3/8" FLAT WASHER
7 32 220373 220373 220373 3/8 - 16 SCREW HEX HD SS
8 4 21256-0008 21256-0008 21256-0008 SCREWS FOR TOP 10-32 X 3/8" RH
9 32 21296-0005 21296-0005 21296-0005 10-32 X 3/4" SCREW HEX WASHER HD SS
10 1 22450-0228 22450-0228 22450-0228 RESTRAINT CABLE ASSEMBLY
11 1 30042 30042 30042 VENT EXTENSION
12 1 30039 30039 30039 OFFSET CROSSOVER VENT
13 1 31319 31319 31319 LABEL, UPPER
14 1 31320 31320 31320 LABEL, LOWER
15 1 32116 32116 32116 WIREWAY ASSEMBLY
16 2 21516-0001 21516-0001 21516-0001 POP RIVETS
17 1 32227 32227 32227 INSTRUCTION, CONTROL BOX INSTALLATION
Not Shown 1 32023 31261 30878 OVEN TOP
PARTS LIST FOR SERIES PS200-R68 SINGLE OVEN OPTION KIT
PS200-R68, P/N 31360
PS220-R68, P/N 30752
PS224-R68, P/N 49025-0016
PARTS LIST FOR SERIES PS200-R68 DOUBLE OVEN OPTION KIT
PS200-R68, P/N 31361
PS220-R68, P/N 31363
PS224-R68, P/N 31362
5,6,7,8,9,13,
12
10
14,16,17
4
11
Middleby
Marshall
3
15
2
Figure 2-2. Series PS200-R68 Single and Double Oven Option Kits
12
1
Page 19
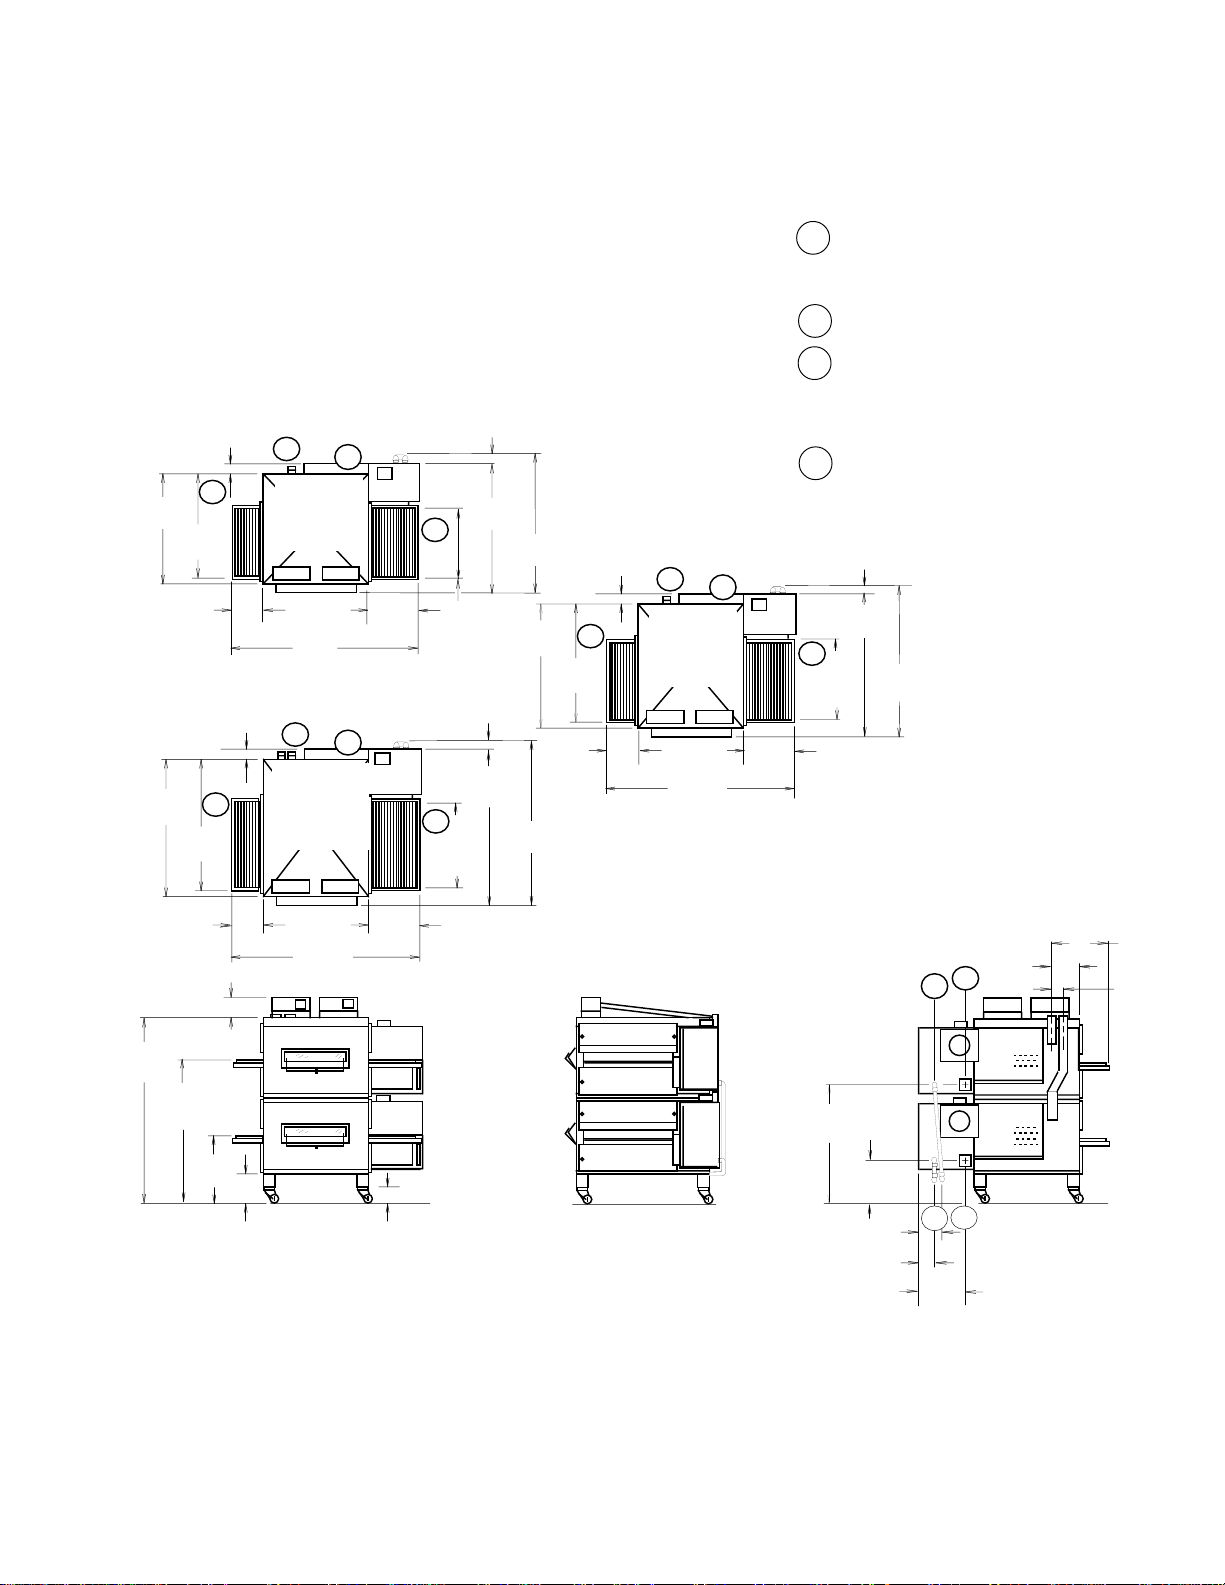
38-1/2"
978mm
50-1/2"
1283mm
NOTE: The Model PS200-R68 Series ovens are
manufactured with the conveyor drive at either the right or
left end of the oven.
3
20"
813mm
Cooking
Zone
3
32"
813mm
Cooking
Zone
1”
25mm
44-3/4”
1137mm
1”
25mm
56-3/4”
1441mm
3
36-1/2"
927mm
10"
254mm
48-1/2"
1232mm
3"
76mm
76mm
3
4
PS220-R68
Top View
3"
PS200-R68
Top View
Model
40-1/2"
1028mm
68"
1727mm
4
Model
3
3
17-1/2"
445mm
45-3/4”
1162mm
42-1/2"
1080mm
57-3/4”
1467mm
40-1/2"
1029mm
10"
254mm
3
3"
76mm
4
3
Model
PS224-R68
Top View
40-1/2"
1028mm
68"
1727mm
17-1/2"
445mm
INSTALLATION
GAS OVEN: Gas Inlet
1
ELECTRIC OVEN: Conduit for
GAS OVEN: Electrical Junction Box
2
RECOMMENDED MINIMUM
3
CLEARANCES:
Rear of Oven to Wall - 3" (76mm)
Non-Drive End of Oven to Wall - 0"
Drive End of Oven to Wall - 18" (457mm)
OVEN VENT - GAS OVEN ONLY
4
2" x 3" (50mm x 75mm)
25mm
48-3/4”
1238mm
3
24"
813mm
Cooking
Zone
Electrical Connection
1”
49-3/4”
1264mm
SECTION 2
69-1/2"
1765mm
11372mm
10"
254mm
54"
27-1/2"
699mm
7-1/4"
184mm
12-1/2"
318mm
40-1/2"
1028mm
68"
1727mm
Front
View
17-1/2"
445mm
End
6-1/2"
165mm
View
Figure 2-3. Series PS200-R68 Oven Dimensions
47"
1194mm
20"
508mm
178mm
127mm
19-3/4"
9-3/4"
248mm
2
1
2
View
14-1/2"
368mm
Rear
1
7”
5"
502mm
3-1/8"
79mm
13
Page 20
SECTION 2
INSTALLATION
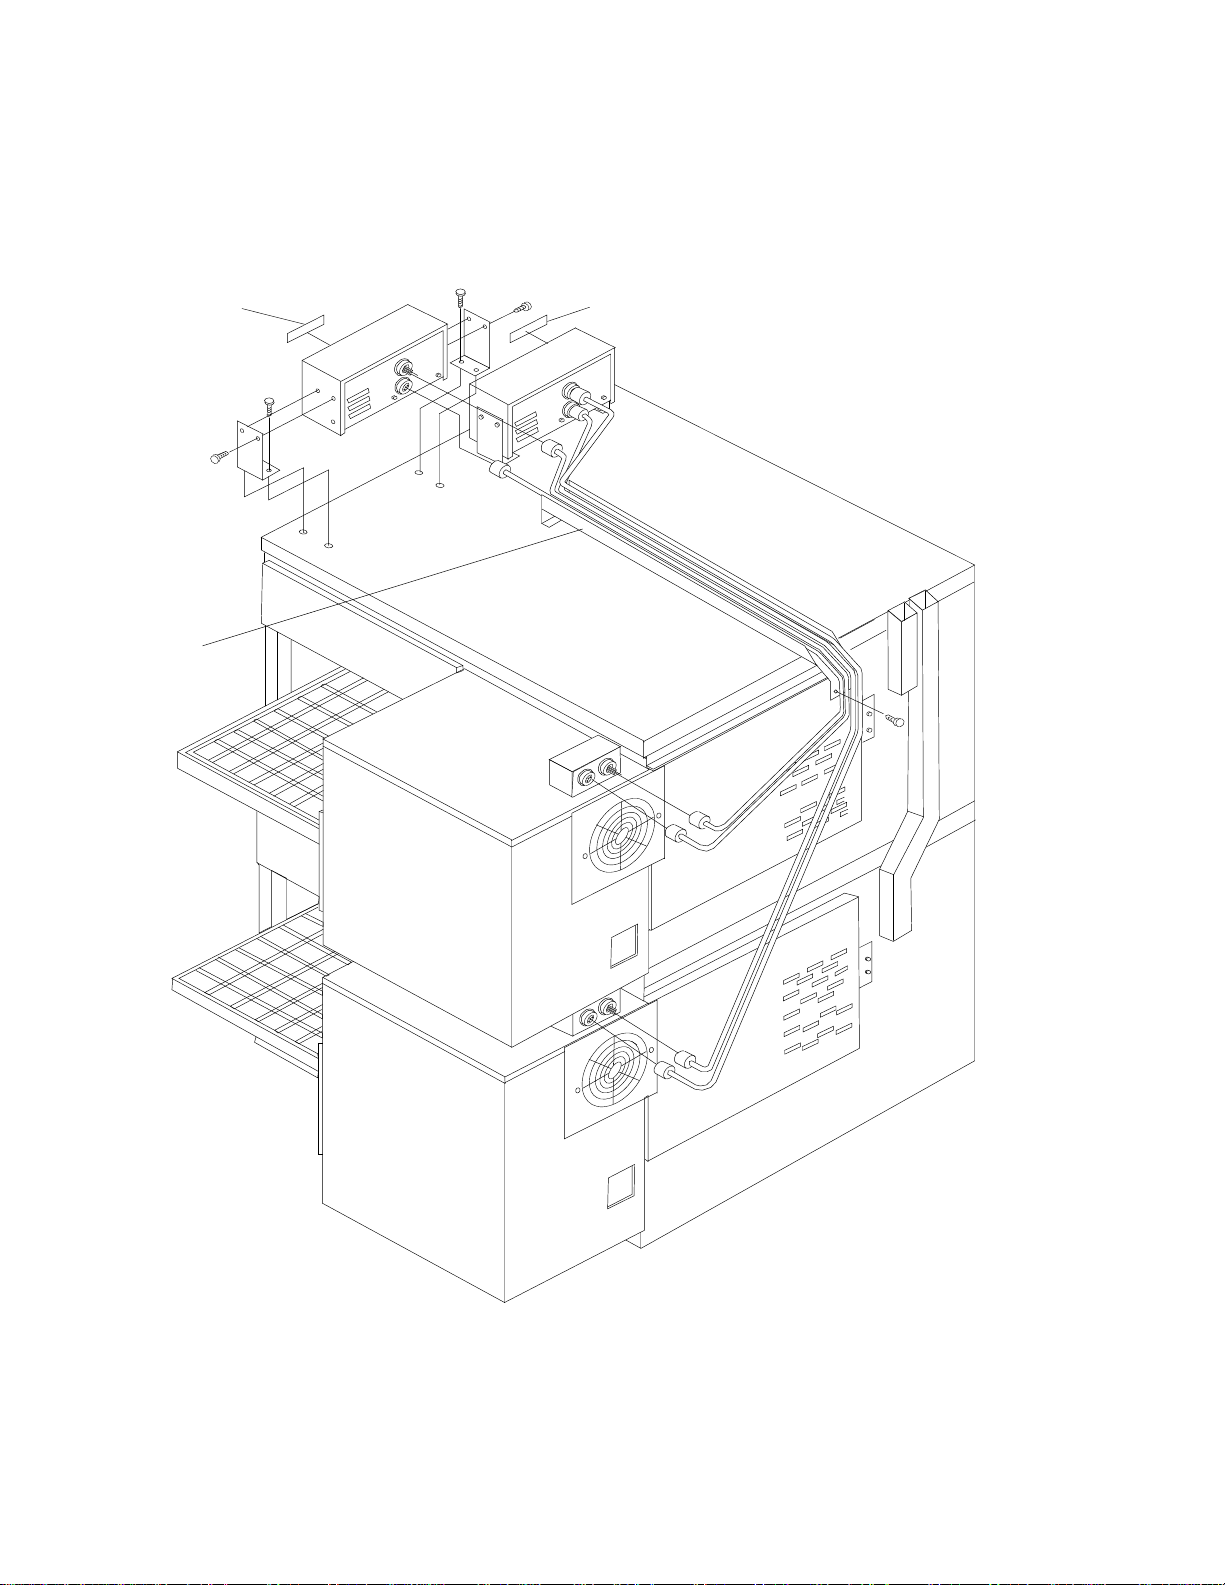
II. CONTROL BOX AND CABLE INSTALLATION
CAUTION: When attaching cables turn the circuit breakers off.
A. Install the control boxes, wireway and cables as shown in Figure 2-5.
B. Install the "UPPER" and "LOWER" labels as shown.
"UPPER" label
Wireway
"LOWER" label
Figure 2-4. Control Box, Wireway and Cable
Installation
14
Page 21
SECTION 2
INSTALLATION
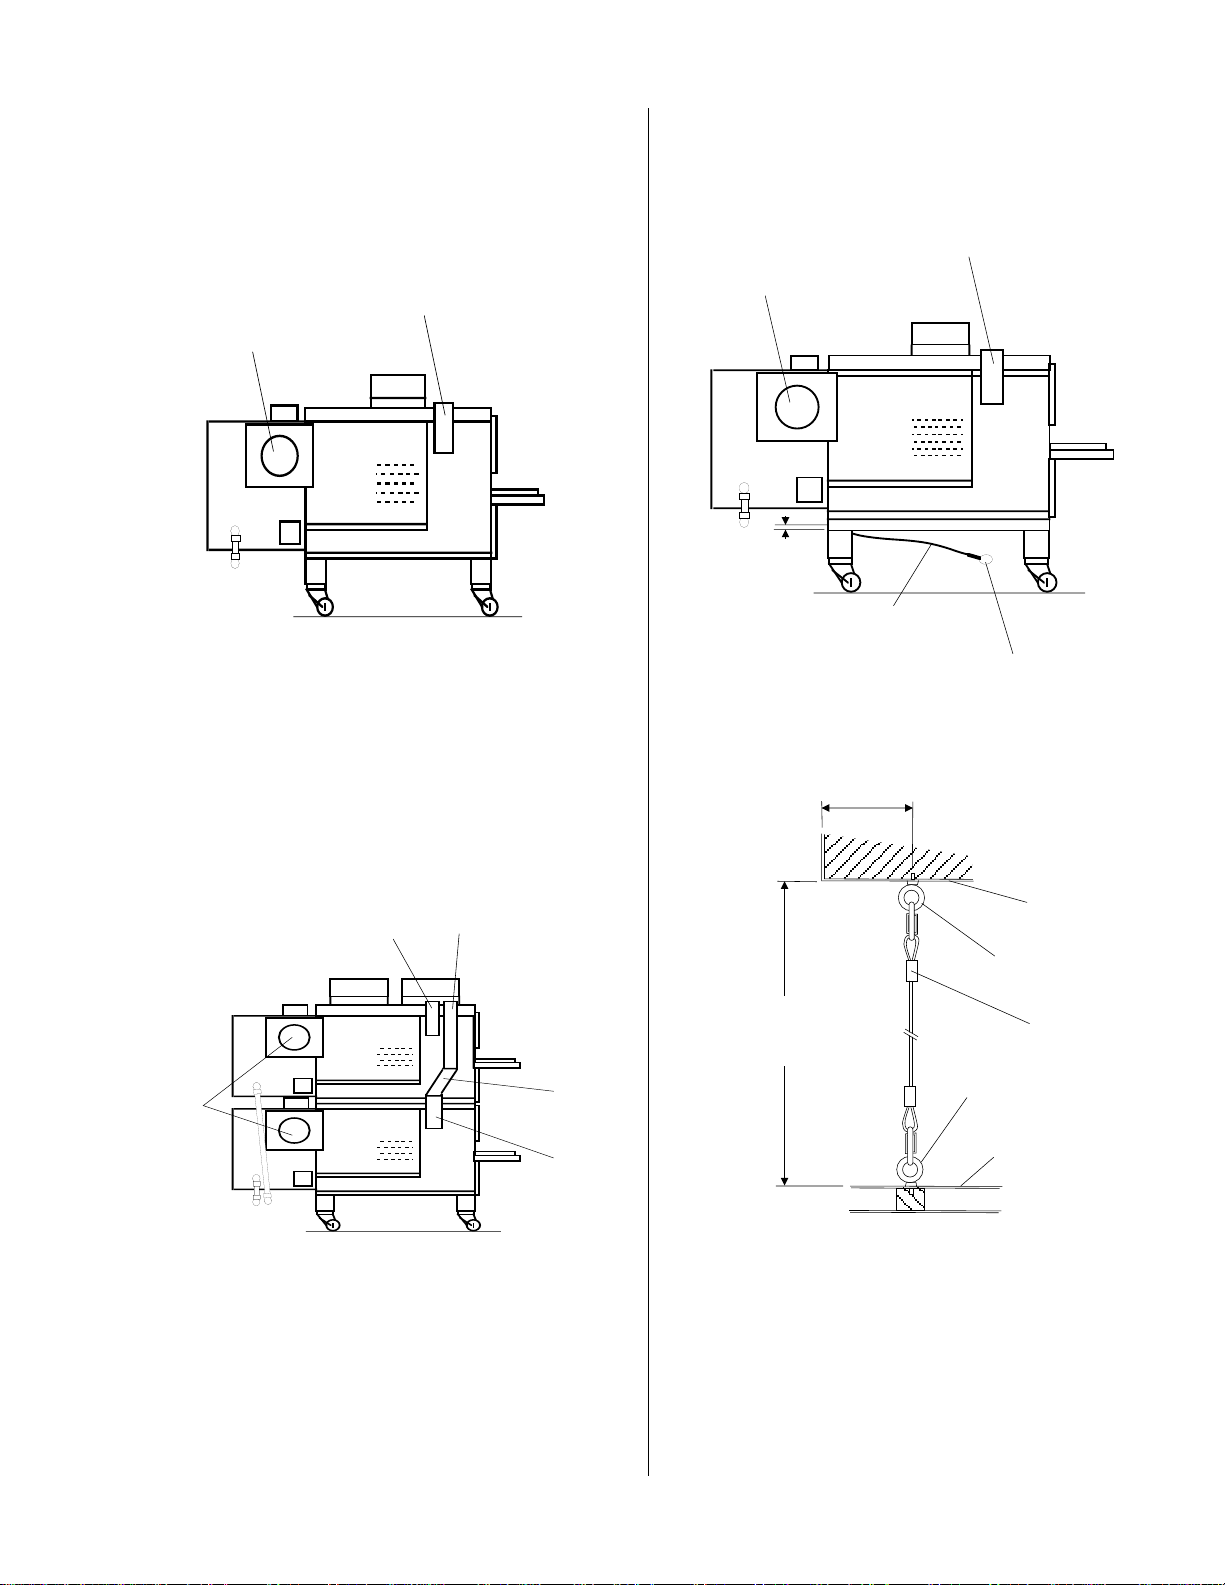
III. FLUE VENT INSTALLATION
A. Install the flue vent: (Gas oven only)
NOTE: On a single oven the flue is factory mounted.
Flue
Fan
Rear
View
Figure 2-5. Single Oven Flue Installation
IV. RESTRAINT CABLE INSTALLATION
Install the restraint cable assembly on the oven as
shown in Figure 2-7.
Flue
Fan
3/4"
(19mm)
Restraint
Cable
Assembly
Rear
View
To Eyebolt
On Wall
B. On a double oven install the flue extension and
flue offset by sliding it down over the lower flue. Then
attach both flues with the screws provided.
Flue
ExtensionUpper Oven
Flue
Flue
Fan
Rear View
Offset
Lower
Oven Flue
Figure 2-6. Double Oven Flue Installation
49-3/4"
(1264mm)
3-5/16"
(84mm)
Rear Surface
of Oven
3/4" (19mm) Eyebolt
in Base Pad
Restraint Cable
Assembly
3/4" (19mm) Eyebolt
Wall of Structure
Figure 2-7. Restraint Cable Assembly Installation
15
Page 22
SECTION 2
INSTALLATION
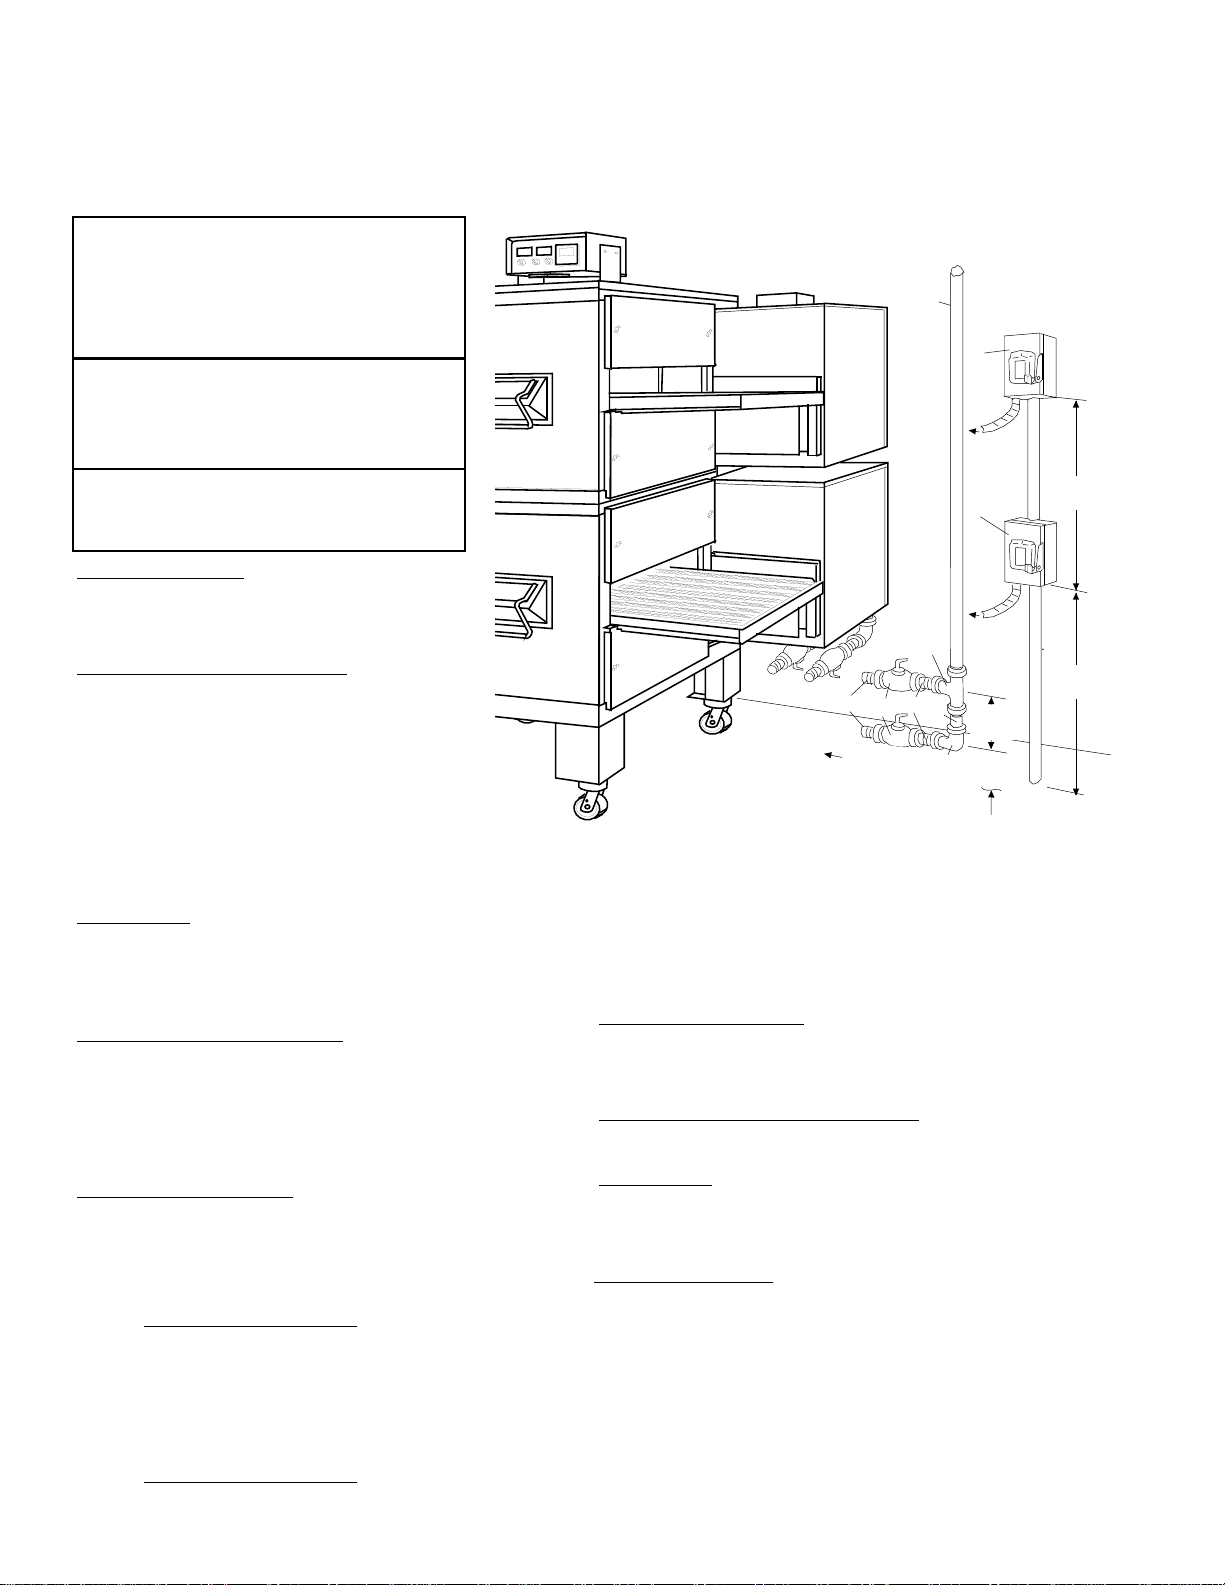
GAS OVEN ROUGH-IN
UTILITY ROUGH-IN DIMENSIONS AND POSITIONING
FOR PS200-R68 SERIES OVENS
CAUTION
IT IS REQUIRED THAT THE OVEN BE
PLACED UNDER A VENTILATION
HOOD FOR ADEQUATE AIR SUPPLY
AND VENTILATION.
GAS SUPPLY &
ELECTRICAL SUPPLY
PROVIDED BY CUSTOMER
DO NOT USE CONDUIT
FOR GROUND
5
ON
6
OFF
To
Oven
24"
6
610mm
ON
CIRCUIT BREAKER
15 Amp circuit breaker with lockout/tagout
electrical shutoff for each cavity. Wire each
cavity separately.
ELECTRICAL SPECIFICATIONS
DOMESTIC: 208-240V main blower motors, 1
Ph, 4.1 Amp draw, 50/60 Hz, 120V control
circuit, 3 pole, 4 wire system per cavity (2 hot,
1 neut, 1 grd). Do not use conduit for ground.
or
EXPORT: 200-208V or 220-240V main blower
motors, 1 Ph, 4.1 Amp draw, 50/60 Hz, 120V
transformer control circuit, 2 pole, 3 wire
system per cavity (2 hot, 1 grd). Do not use
conduit for ground.
GAS RATING
Model PS200-R68 is 120,000 BTU/Hour (30,240 kcal),
35.1 kW/HR
Models PS224-R68 & 220-R68 are 100,000 BTU/Hour
(25,200 kcal), 29.3 kW/HR
MINIMUM GAS METER RATING
450 Cu.Ft./Hour (12.74m3h) for 1 or 2 oven cavities.
Add 180 Cu.Ft./Hour (5.1m3h) for each additional cavity.
Minimum rating may not take other gas appliances into
consideration. Gas consumption varies at each site. Total BTU/
HR (kcal/hr) must be calculated on high flame off of each
appliance to determine if meter needs to be larger.
MINIMUM GAS PIPE SIZE
Natural: 2" (51mm) ID for 1 or 2 oven cavities with runs
up to 200 ft.(61m).
or
2-1/2" (64mm) ID for 3 or 4 oven cavities with runs up to
200 ft.(61m)
Must be a dedicated line.
Runs over 200 ft. consult factory
Propane: 1-1/2" (38mm) ID for 1 or 2 oven cavities with
runs up to 200 ft.(61m).
or
2" (51mm) ID for 3 or 4 oven cavities with runs up to 200
ft.(61m).
Must be a dedicated line.
Runs over 200 ft. consult factory
To
Oven
1
2
To Oven (Flexible Hose)
2
3
7
6”
152mm
3”
76mm
4
Figure 2-8
Typical Installation
GAS SHUTOFF VALVES
3/4" (19mm) ID full flow gas shut-off valve.
A separate connection and valve must be provided for
each oven.
REQUIRED SUPPLY GAS PRESSURE
Natural: 6 " to 14 " (152 to 356mm) water column
Propane: 11.5" to 14" (290 to 356mm) water column
SUGGESTED
If space permits service should be located at the drive
end of the ovens to allow access to switches and
valves.
User Supplied Items:
ITEM QTY DESCRIPTION
1 1 2"(51mm) X 2"(51mm) X 3/4"(19mm) TEE
2 3 3/4"(19mm) X 3"(76mm) NIPPLE
3 2 3/4" (19mm) FULL FLOW GAS SHUT-OFF VALVE
4 1 2"(51mm) X 2"(51mm) 90° ELBOW
5 1 2"(51mm) ID GAS SUPPLY PIPE LINE
-NATURAL GAS
6 2 15 AMP TOGGLE SWITCH - 2 POLE for GAS
16
OFF
24"
610mm
Page 23
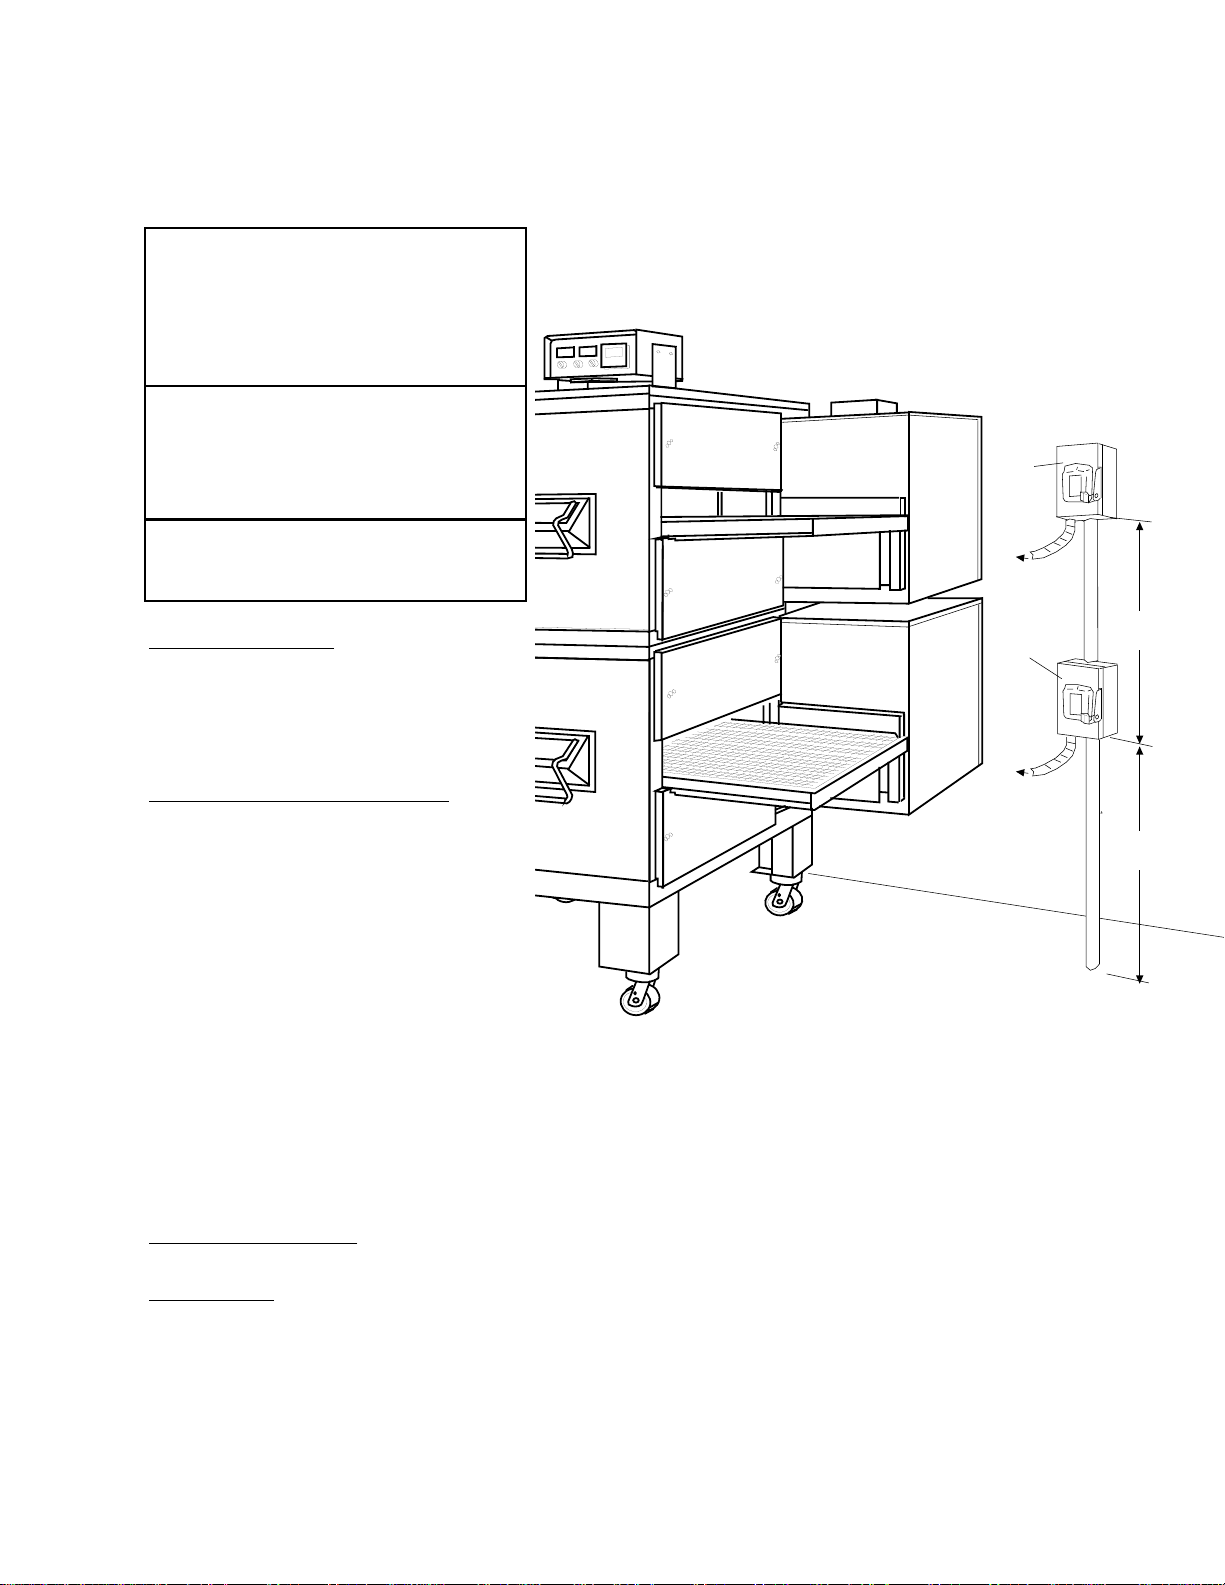
ELECTRIC OVEN ROUGH-IN
UTILITY ROUGH-IN DIMENSIONS AND POSITIONING
FOR PS200-R68 SERIES OVENS
CAUTION
IT IS REQUIRED THAT THE OVEN BE
PLACED UNDER A VENTILATION
HOOD FOR ADEQUATE AIR SUPPLY
AND VENTILATION.
SECTION 2
INSTALLATION
ELECTRICAL SUPPLY
PROVIDED BY CUSTOMER
DO NOT USE CONDUIT
FOR GROUND
CIRCUIT BREAKER
Separate circuit breaker with lockout/
tagout electrical shutoff for each
cavity. Wire each cavity separately.
100 Amp circuit breaker for 200-240V,
or 50 Amp circuit breaker for 380-480V.
ELECTRICAL SPECIFICATIONS
DOMESTIC: 208-240V main blower
motors and elements, 3 Ph, 75 Amp
draw, 50/60 Hz, 120V control circuit, 4
pole, 5 wire system per cavity (3 hot, 1
neut, 1 grd).
or
DOMESTIC: 220-240V main blower
motors and elements, 3 Ph, 75 Amp
draw, 50/60 Hz, 120V control circuit, 3
pole, 4 wire system per cavity (3 hot, 1
grd).
or
EXPORT: 380V or 400-416V main
blower motors and elements, 3 Ph, 50
Amp, 50/60 Hz, 120V transformer
control circuit, 4 pole, 5 wire system per
cavity (3 hot, 1 neut, 1 grd).
ELECTRICAL RATING
26 kW/HR
SUGGESTED
If space permits service should be
located at the drive end of the ovens to
allow access to switches and valves.
Figure 2-9
Typical Installation
6
To
Oven
6
To
Oven
ON
OFF
24"
610mm
ON
OFF
24"
610mm
17
Page 24
SECTION 2
INSTALLATION
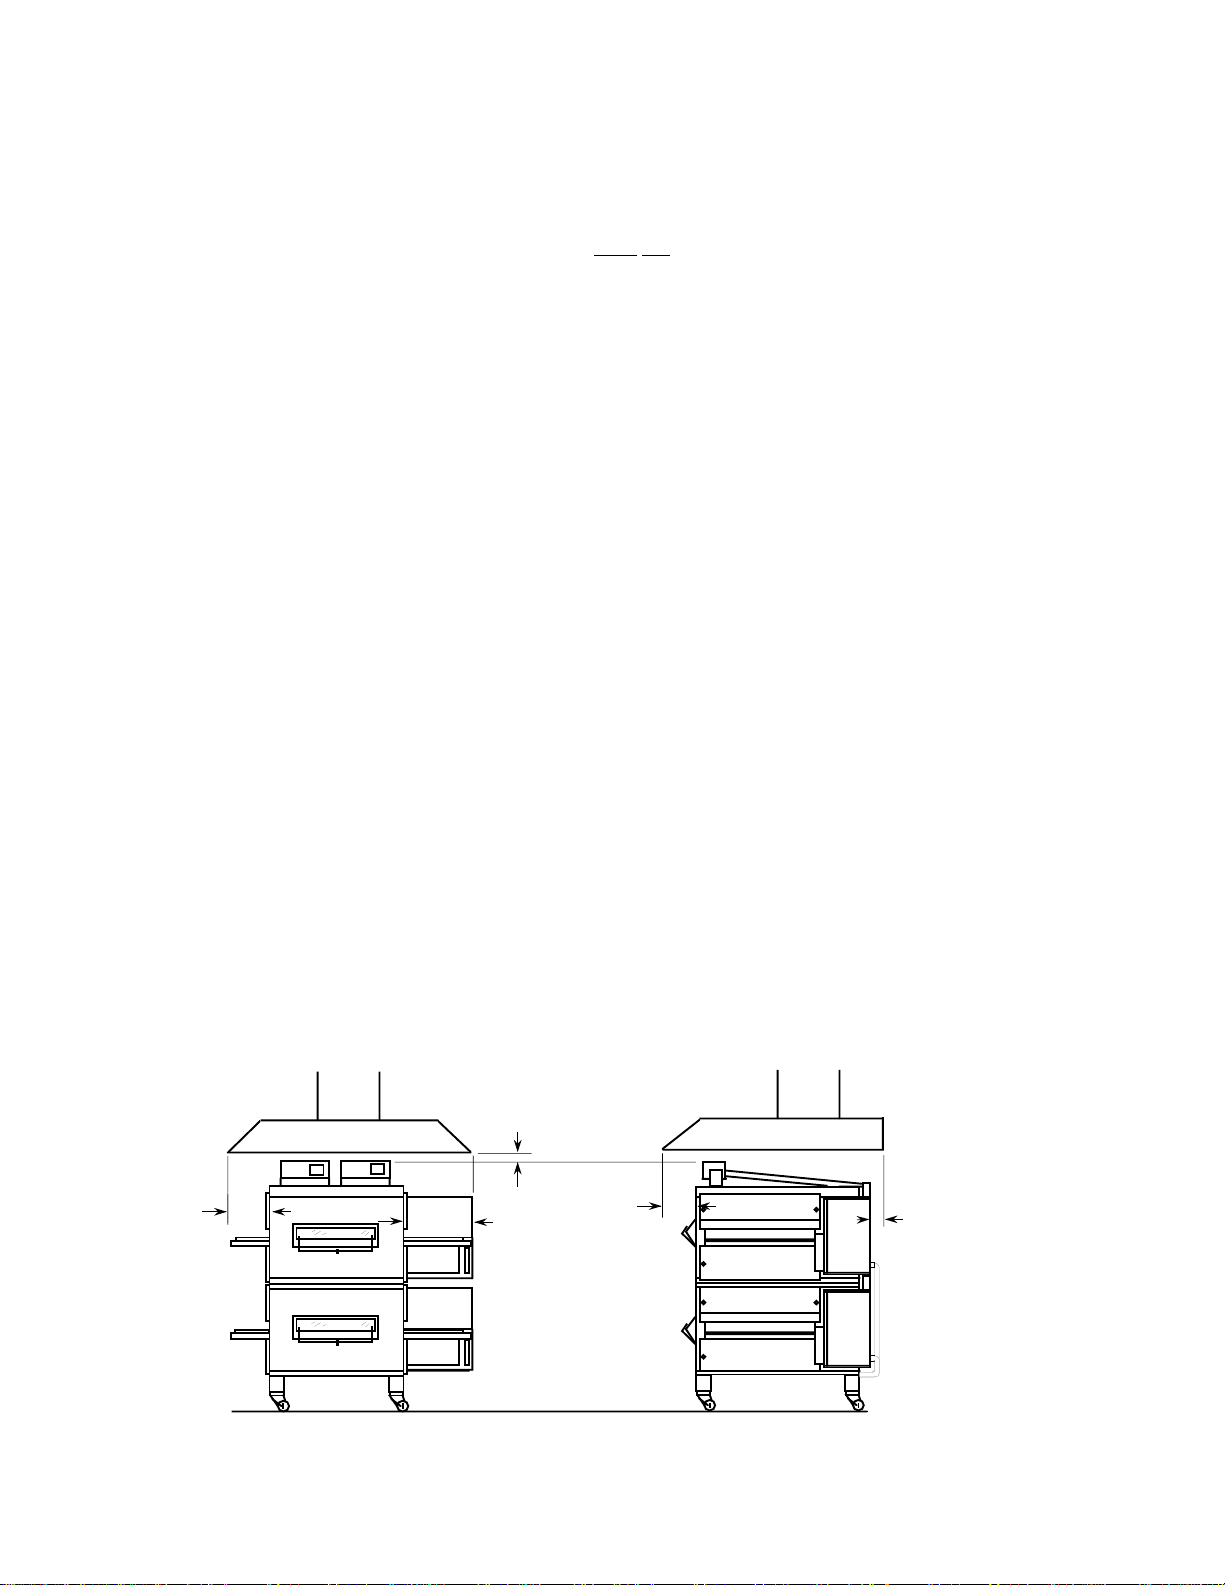
V. VENTILATION GUIDELINES
A mechanically driven ventilation system is required for
the PS200-R68 Series Middleby Marshall conveyorized
gas ovens. The minimum hood canopy dimensions are
outlined below.
Local codes and conditions vary greatly from one area to
another and must be complied with. These are the
“Authority having jurisdiction” as stated by the National
Fire Protection Association, Inc. in NFPA 96-latest edition. Following are the suggested requirements for good
ventilation. Please remember these are general recommendations or guidelines, you may have a special condition or problem that will require the services of a
ventilation engineer or specialist. Proper ventilation is the
oven owner’s responsibility. Improper ventilation can
inhibit oven performance. It is recommended that the
ventilation and duct work be checked every three months.
Grease filters in the intake of the hood may be required
by local codes.
VENTILATION HOOD
The rate of air flow exhausted through the ventilation
system is generally between 1400 and 2500 CFM, but
may vary depending on the oven configuration and hood
design. To avoid a negative pressure condition in the
kitchen area, return air must be brought back to replenish
the air that was exhausted. A negative pressure in the
kitchen can cause heat related problems to the oven
components as if there were no ventilation at all. The best
method of supplying return air is through the heating,
ventilation and air conditioning system (HVAC). Through
the HVAC system, the air can be temperature controlled
for summer and winter. Return air can be brought in
directly from outside the building, but detrimental affects
can result from either extreme seasonal hot and cold
temperature from the outdoors.
NOTE: Return air from fan driven system within the hood
must not blow at opening of bake chamber or poor oven
baking performance will result.
VENTILATION CAPTURE TEST
It is recommended that a 30 second smoke candle test be
performed on your ventilation hood system. Follow the
steps below to complete the ventilation smoke test.
All tests are to be done on single ovens or lower units of
a double oven. We recommend you wear protective
gloves when performing this test. At no time should food
be present when the smoke test is being conducted. Also
check that no fire suppression system will be activated by
the smoke.
1. Turn ventilation system on.
2. Turn oven(s) on and allow to heat up to customers
normal operating temperature, or a minimum of 480°F
(248°C).
3. Turn conveyor off. Place a 30 second smoke candle
in a pie or cake pan which is no higher than 3" (76mm).
4. Open the front oven window. Next, light the smoke
candle in the pan and then slide the pan into the center
of the bake chamber on the conveyor belt and close the
window.
5. The ventilation hood should capture 90% to 100% of
the smoke produced by the candle.
10”
254mm
2”
51mm
minimum to
allow stacking
of ovens
17-1/2”
445mm
Figure 2-10
Vent Hood
8”
203mm
18
3”
76mm
Page 25
SECTION 2
INSTALLATION
VI. ELECTRIC SUPPLY FOR GAS HEATED OVENS
Electric supply for all gas heated ovens is 208-240 volts
AC single phase. Each oven requires a separate 15 amp
service. Connection is made as shown in Figures 2-8 &
2-12. A separate ground wire must also be supplied.
CAUTION: Before connecting incoming power to oven,
a voltage reading of each leg to neutral must be made.
These readings should not normally exceed 120 volts
each.
If one of the incoming legs reads over 130 volts, this
indicates the supply voltage has a high leg.
Export ovens are supplied with a stepdown transformer
for the 110V control circuit.
Call your local electrician or electrical power supply
company and have them remove the high leg from the
electrical supply line for the oven.
Connecting a high leg to the black lead of the oven will
severely damage many of the electrical components in
the oven.
CONNECTING A HIGH LEG TO THE BLACK WIRE
VOIDS ALL OVEN WARRANTIES.
Connect one 208-240V supply leg to the black wire and
the other 208-240V supply leg to the red wire. The supply
neutral should connect to the white oven wire and supply
ground should connect to the oven ground screw located
in the main junction box.
VII. ELECTRICAL CONNECTION
INFORMATION FOR ALL OVENS.
Check the oven data plate before making any electrical
connections. Connections must agree with data on oven
data plate (Refer below to Figure 2-11).
NOTE: In Canada with C22.1,Part 1 and/or local code.
A fused disconnect switch or circuit breaker (not furnished) MUST be installed in the electrical supply line
FOR EACH OVEN. A lockout/tagout electrical shutoff
must be installed for each oven, refer to Figure 2-9. The
service connection must meet all national and local
electrical code requirements. All connections are made
at one common connection at the back of each control
box.
NOTE:
When the oven is installed it must be electrically
grounded in accordance with local codes, or in the
absence of local codes. ANSI/NFPA - Latest edition.
WARNING
CAUTION
IT IS REQUIRED THAT THE OVEN BE
OVEN MUST BE KEPT CLEAR
OF COMBUSTIBLES
AT ALL TIMES.
CAUTION:
The power burner will not operate and gas will not flow through the burner
without electric power. No attempt should be made to operate the oven during
power failure.This oven is to be operated only on the type of gas as shown on
the specification data plate.
SUITABLE FOR INSTALLATION ON COMBUSTIBLE FLOORS ADJACENT
TO COMBUSTIBLE AND NONCOMBUSTIBLE WALLS WITH THE FOLLOW-
Middleby
A MIDDLEBY COMPANY
MODEL NO.
ID NO.
INPUT BTU PER HOUR MAXIMUM
MAN. PRESS.
DATA PLATE FOR OVENS WITH THE MACHINERY/DRIVE COMPARTMENT LOCATED AT THE RIGHT END OF OVEN
Marshall
SERIAL NO.
TYPE OF GAS
VAC AMPS AMPS HZ
IN.W.C.
WIRE WITH GROUND
Middleby
A MIDDLEBY COMPANY
MODEL NO.
ID NO.
INPUT BTU PER HOUR MAXIMUM
MAN. PRESS.
DATA PLATE FOR OVENS WITH THE MACHINERY/DRIVE COMPARTMENT LOCATED AT THE LEFT END OF OVEN
Marshall
SERIAL NO.
TYPE OF GAS
VAC AMPS AMPS HZ
IN.W.C.
WIRE WITH GROUND
ING MINIMUM CLEARANCES: ZERO INCHES TO LEFT SIDE WALL,
EIGHTEEN INCHES TO RIGHT SIDE WALL, SIX INCHES TO BACK WALL.
FOR INSTALLATION UNDER VENTILATING HOOD ONLY
MANUFACTURED UNDER U.S. PATENT NUMBERS 3,844,213 AND 4,154,861
ELGIN, ILLINOIS, 60120, U.S.A. COMMERCIAL OVEN ANS Z 83.12
SUITABLE FOR INSTALLATION ON COMBUSTIBLE FLOORS ADJACENT
TO COMBUSTIBLE AND NONCOMBUSTIBLE WALLS WITH THE FOLLOWING MINIMUM CLEARANCES: ZERO INCHES TO RIGHT SIDE WALL,
EIGHTEEN INCHES TO LEFT SIDE WALL, SIX INCHES TO BACK WALL.
FOR INSTALLATION UNDER VENTILATING HOOD ONLY
MANUFACTURED UNDER U.S. PATENT NUMBERS 3,844,213 AND 4,154,861
ELGIN, ILLINOIS, 60120, U.S.A. COMMERCIAL OVEN ANS Z 83.12
PLACED UNDER A VENTILATION HOOD
FOR ADEQUATE AIR SUPPLY
AND VENTILATION
"INTENDED FOR OTHER THAN HOUSEHOLD USE"
I
G
S
E
N
D
I
ACCEPTED FOR USE
CITY OF NEW YORK
DEPARTMENT OF BUILDINGS
MEA 309-83-E
"INTENDED FOR OTHER THAN HOUSEHOLD USE"
ACCEPTED FOR USE
CITY OF NEW YORK
DEPARTMENT OF BUILDINGS
MEA 309-83-E
C
R
E
A
M
N
A
G
S
A
A
S
S
O
C
I
C
E
R
T
I
A
A
S
S
C
E
CANADIAN GAS ASSOCIATION
N
O
I
T
A
D
E
I
F
S
E
D
R
E
M
G
A
O
C
I
R
T
I
APPROVED
R
I
G
N
I
C
A
N
S
N
O
I
T
A
D
E
I
F
19
CANADIAN GAS ASSOCIATION
APPROVED
R
Figure 2-11.
Oven Specifi-
cation Data
Plate Refer-
ence
Page 26
SECTION 2
INSTALLATION
VIII. ELECTRIC SUPPLY FOR ELECTRICALLY
HEATED OVENS
Electrically heated ovens are available in 208 or 240
volts, 5 wire, 3 phase only. They are pre-wired at the
factory and only one common connection is necessary.
A standard oven is a 5 wire system (3 hot, 1 neut, 1 grd),
it will not have a stepdown transformer. The neutral wire
is combined with one 208-240 VAC, 3 phase leg to
provide a 110V control circuit.
If the oven was special ordered for a 4 wire system, it will
use a stepdown transformer for the 110V control circuit.
A 1-1/4" cutout is supplied on the rear of oven control box
for the electrical connection. A 1-1/4" strain relief fitting
must be used if flexible cable is used to run electrical
supply.
Be sure wire size is adequate to handle amperage draw
listed on data tag. Use Copper Wire Only.
Minimum Supply Conductor
ampacity -- 95 Amps Per Unit.
Maximum Supply Circuit protective
device -- 100 Amps Per Unit
Normal electrical requirements are as follows:
PS200 Series Single - 208-240V, 3 phase, 5 wire, 27kw,
100 amp service.
PS200 Series Double Oven - 208-240, 3 phase, 5 wire,
54 kw, 2 separate 100 amp services, one for each oven.
FOR OTHER SERVICES CONSULT FACTORY.
Electrical
Junction
Cover Plate
3/4" pipe for gas oven gas connection
or
1-1/4" hole for electrically heated oven
connection
Figure 2-12
Junction Connection Box
20
Page 27

CAUTION
DO NOT CONNECT BLACK
LEAD TO HIGH LEG
BLACK AND WHITE MUST
BE 120 VAC
High Leg Warning tag located on cover of electrical
connection box of gas heated ovens.
IX. GAS SUPPLY FOR GAS HEATED OVENS
Check identification plate located on machinery compartment (see Figure 2-11) to determine type of gas (Propane or Natural) to be used with the oven.
NOTE: If identification plate (Figure 2-11) is missing,
natural or propane ovens can usually be determined by
checking the manifold pressure rating on the gas combination valve. The rating for natural gas is 3-1/2" w.c. The
rating for Propane gas is 10.5" w.c.
Install the manual shutoff valve(s) enclosed with the oven
on the 3/4" gas connection pipe extending through the
control compartment at rear of oven control box.
If the rear of the oven is installed close to the wall, install
the 3/4" elbow on the 3/4" gas connection pipe coming
out the rear of the oven and then install the manual
shutoff valve(s). This will prevent kinking the connection
hose.
The minimum and maximum incoming line flow pressures (when oven(s) and all other gas appliances are on
high flame cycle) should be the following:
Natural Gas: 6.0"w.c. Minimum, 14"w.c. Maximum
Propane Gas: 11.5"w.c. Minimum, 14"w.c. Maximum
This incoming pressure reading can be taken by installing a gas pressure gauge in the inlet pressure tap of the
main gas valve. See Figure 2-13. Outgoing pressure can
be measured at the outlet pressure tap of the main gas
valve.
Remember, the longer the pipe runs, the more pressure
drops. One 90° elbow equals a 4 foot length of pipe.
NOTE
The installation must conform with local codes or in
the absence of local codes, with the National Fuel
Gas Code, ANSI Z223, 1-latest edition
In Australia the installation must conform with AGA
Code AG601 and with any requirements of the
appropriate statutory authority.
CANADIAN:
CAN/CGA-B 149.1 Natural Gas
Installation Code
CAN/CGA-B 149.2 Propane
Installation Code
SECTION 2
INSTALLATION
On ovens equipped with casters, the installation shall be
made with a gas connector that complies with the standard for gas connectors for Moveable Gas Appliances,
ANSI Z21.69-1987/CANI 6.10-88(or latest edition), and
Addenda, Z21.69a-1989(or latest edition), and a quick
disconnect device that complies with the standard for
Quick-Disconnect Devices for Use With Gas Fuel, ANSI
Z21.41-1989/CANI 6.9M79(or latest edition), and cable
restraint assembly (refer to Figure 2-7) must be provided
to limit the movement of the oven without depending on
the connector and the quick-disconnect device or its
associated piping to limit oven movement.
When an oven is required to be removed from its installation for service, shut off the gas valve upstream of the
gas connector. Disconnect gas connector, disconnect
the restraining device, move oven for servicing.
When service is complete, place oven in original location,
connect restraining cable device, connect gas connector, turn gas valve on. Follow standard start up procedure.
Refer below to determine what size gas pipe to run to the
oven (NOTE: each oven requires maximum BTU usage
of 120,000 BTU per hour for a PS200-R68 or 100,000
BTU per hour for a PS220-R68 and PS224-R68.) The
maximum total for a Double Oven would be 240,000 BTU
per hour for a PS200-R68 or 200,000 BTU per hour for a
PS220-R68 and PS224-R68.
RECOMMENDED SUPPLY PIPE SIZE:
Natural-
2" (51mm) ID for 1 or 2 oven cavities with runs up to 200
ft.(61m).
or
2-1/2" (64mm) ID for 3 or 4 oven cavities with runs up to 200
ft.(61m)
Must be a dedicated line. Runs over 200 ft. consult
factory.
Propane-
1-1/2" (38mm) ID for 1 or 2 oven cavities with runs up to 200
ft.(61m).
or
2" (51mm) ID for 3 or 4 oven cavities with runs up to 200
ft.(61m).
Must be a dedicated line. Runs over 200 ft. consult
factory.
NOTE: The recommended pipe sizes are larger than
usually required to eliminate any operation problems. It is
much less expensive to make the initial installment large
enough to do the job rather than redoing the job later.
GAS METER SIZE:
Minimum Gas Meter Size:
450 cu.ft./hour (3.2 liters/sec.) for single or double
oven.
Add 180 cu.ft./hour (1.3 liters/sec.) for each
additional cavity.
21
Page 28

SECTION 2
INSTALLATION
CAUTION
DURING PRESSURE TESTING NOTE
THE FOLLOWING:
1. The oven and its individual manual shutoff valve
(located at the left rear of the oven) must be disconnected from the gas supply piping system during any
pressure testing of that system at test pressure in
excess of 1/2 psig (3.45 kPA). Turn OFF main gas
shutoff valve or main gas supply line.
2. The oven must be isolated from the gas supply
piping system by closing its individual manual
shutoff valve located at the rear of the oven during
any pressure testing of the gas supply piping system
at test pressure equal to or less than 1/2 psig (3.45
kPA).
3. If incoming w.c. pressure is over 14" w.c. a
separate regulator must be installed before the
3/4"manual gas shutoff valve located at the rear
outside of the oven.
WARNING
TROL VALVE REGULATOR DURING INITIAL TURN
VERY IMPORTANT TO OPEN MANUAL SHUTOFF
After the initial gas turn on, the manual shutoff valve
must remain open except during pressure testing as
outlined in the above steps or when necessary during service maintenance.
:
TO PREVENT DAMAGE TO CON-
ON OF GAS, IT IS
VALVE VERY SLOWLY.
22
Page 29

It is possible to convert ovens from natural gas to propane
and back. Call your local authorized factory service agent
to perform the conversion.
NOTE: In Canada to conform with CAN/CGA-B149.2
Propane Installation Code the oven must be ordered
Propane, it may not be converted in the field.
SECTION 2
INSTALLATION
Outlet
Pressure
Tap
Burner Blower
Air Adjustment
Plate
Figure 2-13. Gas Train
X. CONVEYOR BACKSTOP AND END STOP INSTALLATION
Locate the conveyor backstop and end stop in the
installation kit. Install the backstop and end stop at the
exit end of the oven. Refer to Figure 2-14.
Pilot Line
Low
Flame
Bypass
Line
Conveyor
End Stop
High
Flame
Solenoid
Valve
Conveyor
Rear Stop
On/Off KnobAlways Leave
In On Position
Combination
Gas Control
Valve
Manual
Shutoff Valve
Gas Cock
located below
machinery
compartment
Incoming
Pressure Tap
(Where
incoming gas
pressure is
measured)
Figure 2-14.
Installing Backstop and End Stop
23
Middleby
Marshall
Page 30

SECTION 2
INSTALLATION
NOTES:
24
Page 31

I. CONTROLS AND COMPONENTS
Upper Oven
Control Box
SECTION 3
OPERATION
SECTION 3
OPERATION
Temperature
Controller
Conveyor
Speed Control
Lower Oven
Control Box
Blower
Switch
Conveyor
Switch
Heat
Switch
Figure 3-1.
PS200-R68 Series
Control Functions
25
Page 32

SECTION 3
OPERATION
II. COMPONENT INFORMATION AND LOCATION
Blower
Fan Motor
Door Safety
Switch
Figure 3-2
A. Door Safety Switch
The Door Safety Switch is located at upper left hand side
of control cabinet. Opening the control cabinet door will
permit the switch to open, disconnecting power to all
electrical controls.
CAUTION: DO NOT TOUCH WIRES GOING TO THIS
SWITCH AS CURRENT IS ALWAYS PRESENT.
B. Blower Fan
The blower switch located on the control box has
two positions. The switch must be on (I) for the burner and
conveyor to come on and permit the oven to warm up.
The fan circulates the air throughout the oven and must
stay on during baking and during the cool down cycle
above 200° F. (93°C.) to prevent blower bearing damage. To protect the blower motor and bearings a thermostatic override is built into the oven. If the temperature
inside the oven is over 180° F. (82° C.) the main blower
and conveyor will continue to run even when the blower
switch is turned to the off position.
An air pressure switch monitors the air flow from the main
blower, this acts as a safety interlock for the burner. The
heat will not come on if the air switch does not sense air
flow off the main blower fan.
C. Heat (Gas ovens only)
Turning the heat switch to on (I) will initially set up the
Conveyor
Speed
Control
oven purge circuit after approximately 30 seconds the
pilot will light. After the pilot is lit the main control valve will
open permitting gas to go to the burner and heat the oven.
This switch is in series with the burner blower motor
centrifugal switch, high temperature safety switch and
blower fan air pressure switch. All three safety switches
must be closed for gas to flow and the burner to light.
D. Temperature Controller
The temperature controller located on the control box
is a solid state on/off type which is used to maintain the
desired set temperature. The temperature controller
continuously monitors the oven temperature and turns
high flame solenoid valve on in gas heated ovens. The
heat is on for the time required to maintain a constant
temperature.
The temperature controller contains a Hi-Limit switch
which will shut down the oven when the oven reaches
650°F. (343° C.) and a low-limit switch which allows the
oven to cool down to 180°F. (82° C.) before shutting off
the blowers.
E. Heat (Electrically heated ovens only)
Turning the heat switch located on the control box
to on (I) will energize the electric heating system. This
switch is in series with the blower fan motor centrifugal
switch and high temperature override switch. Both
switches must be closed before the elements may be
energized.
26
Page 33

1 1 1
:
SECTION 3
OPERATION
F. Conveyor
The conveyor switch is on
0
the control box. Also on the control box is the digital control for the
conveyor speed. The digital control can be adjusted from 2 minutes 40 seconds to 29 minutes 50
Figure 3-3. Conveyor Speed Digital Control
Figure 3-4. Product at entrance end of bake chamber- BEGIN TIMING.
seconds bake time (conveyor
speed). Refer to Figure 3-3.
Conveyor speed is measured by
the amount of time it takes for an
item to go through the bake chamber of the oven.
MEASURING CONVEYOR SPEED.
Refer to Figure 3-4 & 3-5.
To check conveyor speed place
an item at the product entrance
end of oven bake chamber as
shown. Time how long it takes for
the leading edge of the item to go
from the entrance end of the bake
chamber to the exit end and this
will be your conveyor speed.
NOTE: In Figures 3-4 & 3-5 the
oven shown has the conveyor running right to left.
Figure 3-5. Product at exit end of bake chamber-END OF TIMING
27
CAUTION
Possibility of injury from
rotating parts and electri-
cal shock exist in this
oven.
Never disassemble or
clean the oven with the
blower switch or any other
part of the oven turned
"on". Turn OFF and
lockout or tagout all
electrical power to the
oven before attempting to
clean or service this oven.
Page 34

SECTION 3
OPERATION
II. OPERATION
A. Start Up Procedures -- Gas Heated Ovens
Initial Start Up
1. Check that manual gas shutoff valve is on. Valve is
located below machinery compartment. See Figure 2-12.
Daily Start Up
1. Turn blower switch to the on (I) position. This
starts the main blower fan and the cooling fan. The blower
circulates air through the air fingers and must stay on
during the cooking or baking process.
2. Check to see if the cooling fans (see Figures 1-4 and
1-6) are operating when the blower switch is turned on (I).
The cooling fans cool the electrical components and
burner blower motor. The cooling fan, located at the rear
of the machinery cabinet blows air into and through the
cabinet. Air is exhausted out the back of the oven. A
cooling fan is also located in the bottom of the control box
to draw air through the rear louvers and out the bottom.
Clean the cooling fan grills and louvers daily.
IMPORTANT NOTE: The cooling fan will operate when
the blower switch is turned on (I). It must operate to keep
the machinery cabinet below 140°F. (60° C.).
WARNING: IF FAN BLADE IS NOT ROTATING, BROKEN OR IF FAN ASSEMBLY IS MISSING FROM MAIN
BLOWER MOTOR SHAFT, DO NOT OPERATE OVEN.
REPLACE COOLING FAN BLADE BEFORE OPERATING OVEN. Serious damage could be done to the burner
blower motor and/or the solid state electrical components if oven is operated while cooling fan is not running
or vent grill is plugged.
3. Turn the conveyor switch to the on (I) position.
This now starts the conveyor belt moving through the
oven. Set conveyor speed digital control for desired bake
4. The temperature controller should be set at your
desired baking temperature. See section on bake times
to determine desired temperature.
NOTE: For complete temperature controller operation
instructions refer to Step B.
5. Turn the heat switch to the on (I) position. This will
complete a circuit which supplies power to the burner.
When an oven that has not been in operation for approximately 1/2 hour is turned on it goes through a 15 second
purge cycle. The burner blower motor will not operate
during the time the main fan is purging the oven. After 15
seconds the burner blower motor starts, which can be
detected by feeling a slight vibration when touched. This
should permit the burner to light.
When in operation, the burner is either on low or high
flame. A flame sensing electrode must be satisfied to
keep the pilot and gas valve open. If for some reason the
pilot flame is extinguished, the pilot will try to relight for 90
seconds. If the pilot does not relight in 90 seconds the
oven will go into automatic safety lockout.
To relight the oven the heat switch must be turned off
for 5 minutes and then repeat the oven start-up proce-
dure.
6. Close front window.
7. Oven will reach a baking temperature of 500° F (260°
C) in approximately 10 minutes. Allow the oven to cycle
for 30 minutes after it has reached desired bake temperature and the oven is now ready for baking.
Power Failure
In case of power failure, turn off all switches, open oven
window and remove product. After power has been
reestablished follow normal start-up procedure.
time .
CAUTION
The burner will not operate and gas will not
flow through the burner without electric
power. No attempt should be made to
operate the oven during power failure.
28
Page 35

Middleby Marshall
SECTION 3
OPERATION
MIN
Conveyor Speed
SEC
Control
ALM
HEAT
1
351
F
S E T P T
FUNCTION DISPLAY RESET SET UP
Temperature
Controller
Lower
Left Blank
˚C
SEC
MIN
MIN
SEC
0
0
0
0
I
O
I
O
I
RESET
O
SETUP
DISPLAY
FUNCTION
Lower Right
Blank
Blower Switch
Conveyor Switch
Heat Switch
Figure 3-6. Control Panel
29
Page 36

SECTION 3
OPERATION
B. Temperature Controller Operation Instructions
1. UNLOCKING SET POINT. The temperature controller set point must be 450°F (232.2°C) for the upper oven and
350°F (176.7°C) for the lower oven. To raise or lower the set point on a Red Lobster oven the set point must first
be unlocked by pressing the Lower Left Blank and the Lower Right Blank keys simultaneously. The set point will
remain unlocked for 60 seconds or until the DISPLAY key is pressed.
a. Raising the temperature set point. Refer to Figure 3-7.
AA. Slow Method: 1 Degree increments.
Press the UP Arrow Button (▲). The temperature set point will
increase one degree. If this button is kept depressed, the temperature set point will continue to increase in one degree increments.
BB.Fast Method: 10 Degree increments.
Press and hold the UP Arrow Button (▲). The temperature set point
will begin to increase one degree at a time. With your other hand,
press the DOWN Arrow Button (▼) and release. The temperature
set point will begin increasing in 10 degree increments.
CC.Fast Method: 100 Degree increments.
Press and Hold the UP Arrow Button (▲). The temperature set point
will begin to increase by one degree at a time. With your other hand,
press the DOWN Arrow Button (▼) once and release. The temperature set point will begin increasing in 10 degree increments. Press
the DOWN Arrow Button (▼) again and release. The temperature
set point will begin increasing in 100 degree increments. See Figure
3-7.
b. Lowering the temperature set point.
AA.Follow the previous steps AA through CC for raising the temperature set point but use the opposite UP/DOWN
Arrow Buttons.
ALM
HEAT
FUNCTION DISPLAY RESET SET UP
Lower Left
Blank
Middleby Marshall
1
351
S E T P T
Figure 3-7
F
Lower Right
Blank
2. Displaying the actual oven temperature. Refer to Figure 3-8.
a. To check the oven temperature press the DISPLAY Button once
and the actual oven temperature and the word “TEMP” will be displayed.
See Figure 3-8.
b. Press the DISPLAY Button again and the display will return to the
temperature set point. If the DISP key is not pressed, then the display
will automatically return to the temperature set point after 60 seconds.
30
Middleby Marshall
ALM
HEAT
1
F
351
TEMP
FUNCTION DISPLAY RESET SET UP
Figure 3-8
Page 37

SECTION 3
OPERATION
3. Display Messages
a. ALM - The ALM window will display either a “1” or “2” or will be
blank.
AA.Refer to Figure 3-9. The “1” signals that the oven tempera-
ture is above 650°F (343°C) and therefore the high limit feature
has been activated. The burner will then shut off and the oven
will not function until the temperature cools down below 650°F
(343°C).
BB.Refer to Figure 3-10. The “2” signals that the oven temperature is below 180°F (82°C). The “2” will appear only when the
oven is initially heating up and has not yet reached 180°F
(82°C) or the heat switch is turned off and the oven has cooled
down below 180°F (82°C).
CC.The ALM window is blank during normal operation when
the oven temperature is 180°F to 650°F (82°C to 343°C).
Middleby Marshall
ALM
1
HEAT
F
651
S E T P T
FUNCTION DISPLAY RESET SET UP
Figure 3-9
Middleby Marshall
ALM
2
HEAT
F
199
S E T P T
b. HEAT - The HEAT window will display either a “1” or will be
blank. Refer to Figure 3-11.
AA.The “1” signals that the temperature controller is calling for
heat and the burner is turned full on.
BB.When the HEAT window is blank the temperature set point
has been reached and the burner is turned down to low flame.
CC.The “1” will continue to blink on and off every few seconds
during normal operation. This indicates that the temperature
controller is maintaining the correct temperature.
FUNCTION DISPLAY RESET SET UP
Figure 3-10
Middleby Marshall
ALM
HEAT
1
F
500
S E T P T
FUNCTION DISPLAY RESET SET UP
Figure 3-11
31
Page 38

SECTION 3
OPERATION
c. FAILSF (Failsafe)
AA.Refer to Figure 3-12. If the oven does not reach 200°F (93°C)
in 15 minutes the temperature controller will shut off the high flame
valve and begin flashing “FAILSF” and “SET PT” alternately. You
will also note that the “2” in the ALM window stays on but the “1” in
the HEAT window turns off. This condition signals a problem in
oven heating or heat sensing.
BB.To reset the temperature controller, turn off the oven blower
switch. Wait 10 seconds and turn the oven blower switch back on.
The “2” in the ALM window, the “1” in the HEAT window, the current
temperature set point, and the words “SET PT” will be displayed
again. The temperature controller will now cycle through its normal
procedures.
d. F/C - The F/C window will display either an “F” or a “C”.
AA.The “F” indicates that the temperature displayed is in degrees
Fahrenheit.
BB.The “C” indicates that the temperature displayed is in degrees Celsius.
C. Start Up Procedures -- Electric Ovens
1. Turn blower switch to the"ON" position. This starts the main blower fan and cooling fan. The blower circulates
air through the air fingers and must stay on during the cooking or baking process. The cooling fan cools the electrical
components and blower fan motor of the oven.
2. Check to see if the cooling fans (see Figures 1-4 and 1-6) are operating when the blower switch is turned "ON". The
cooling fans cool the electrical components and burner blower motor. The cooling fan, located at the rear of the
machinery cabinet blows air into and through the cabinet. Air is exhausted out the back of the oven. A cooling fan is
also located in the bottom of the control box to draw air through the rear louvers and out the bottom.
Clean the cooling fan grills and louvers daily.
IMPORTANT NOTE: The cooling fan will operate when the blower switch is turned "ON". It must operate to keep the
machinery cabinet below 140°F. (60° C.).
WARNING: IF FAN BLADE IS NOT ROTATING, BROKEN OR IF FAN ASSEMBLY IS MISSING FROM MAIN
BLOWER MOTOR SHAFT, DO NOT OPERATE OVEN. REPLACE COOLING FAN BLADE BEFORE OPERATING
OVEN. Serious damage could be done to the burner blower motor and/or the solid state electrical components if oven
is operated while cooling fan is not running or vent grill is plugged.
3. Turn conveyor switch to the "ON" position. This now starts the conveyor belt moving through the oven. Set
ALM
HEAT
FUNCTION DISPLAY RESET SET UP
Middleby Marshall
2
199
FAIL SF
Figure 3-12
F
conveyor speed digital control for desired bake time .
4. Set desired temperature on temperature controller. Refer to previous Section B for complete temperature
controller operation instructions. See section on bake times to determine desired temperature.
5. Turn the heat switch to the "ON" position. This will complete a circuit which supplies power to the heater.
6. Close front window.
7. When oven reaches desired temperature, wait at least 30 minutes before baking.
Power Failure
In case of power failure, turn off all switches, open oven window and remove product. After power has been
reestablished follow normal start-up procedure.
32
Page 39

SECTION 3
OPERATION
D. Shut Down (Gas or Electric Ovens)
1. Turn "OFF" heat switch and blower switch.
CAUTION: Blower fan and conveyor will remain on.
2. Open front window.
3. Do not turn off conveyor switch. The conveyor and blower fan will automatically shut off when temperature
goes below 180°F (82°C) The conveyor switch is used only for emergency shut down of conveyor.
NOTE: For oven servicing and complete shut down, turn OFF main gas shutoff valve located at rear of oven and main
electric power supply.
E. Conveyor Speed: Bake Time and Time of Delivery
BAKE TIME (CONVEYOR SPEED) - As stated in the previous paragraphs, bake time (conveyor speed) is defined
as the amount of time elapsed between the time the Leading edge of a product enters the oven and the leading edge
exits the oven. See Figure 3-13.
Bake Time (Conveyor Speed) is controlled by adjusting the digital speed controller. The setting on the digital speed
control dial indicates the actual bake time (conveyor speed).
Bake Time will be the same for any size product
TIME OF DELIVERY- Time Of Delivery is the amount of elapsed time between the period when the Leading edge of
a product enters the oven and the Trailing edge of the product is fully discharged and is ready to be delivered to the
customer. See Figure 3-14. Time of delivery changes as the product size changes.
Bake Time
Leading Edge of Product
Figure 3-13. Bake time
Time of Delivery
Leading Edge of Product
Trailing Edge
of Product
Figure 3-14. Time of Delivery
33
Page 40

SECTION 3
OPERATION
NOTES:
34
Page 41

SECTION 4
MAINTENANCE
SECTION 4
MAINTENANCE
I. MAINTENANCE - DAILY
Cooling Fan Grill
Figure 4-1. Oven Cooling Fan
CAUTION
Possibility of injury from rotating parts and electrical shock
exist in this oven.
Turn off and lockout or tagout electrical supply to oven(s)
before attempting to disassemble, clean or service oven(s).
Never disassemble or clean the oven interior with the fan switch
or any other part of the oven turned "on".
NOTICE
If the oven is to be removed from it's installed location for servicing, the
following procedure is to be implemented.
1. Shut off main manual gas valve.
2. Disconnect gas connector from oven.
3. Unlock caster brakes and disconnect restraint cable.
4. Move oven to desired location for servicing.
5. When servicing is complete, move oven to original location.
6. Reconnect restraint cable and lock casters w/brakes.
7. Connect gas connector to oven.
8. Turn on manual gas valve.
9. Follow normal lighting instructions.
A. Exterior
The exterior of the conveyor oven
must be cleaned daily. While the
oven is still hot dampen a towel or
grill pad with plain water or detergent
and water and wipe down entire exterior of oven including the back and
fan covers. Grease can build up on
the top of the oven openings and the
area above the windows. If this
buildup does not steam off with a
damp towel dip the towel in filter
powder and rub lightly. Clean exterior any time at the end of each night,
even before the oven has been
turned off.
B. Cooling Fan
1. THE COOLING FAN GRILL AT
THE REAR OF EACH OVEN CONTROL COMPARTMENT MUST BE
CLEANED DAILY. ALSO CLEAN
THE FAN LOCATED IN THE BOTTOM OF THE CONTROL BOX AND
THE LOUVERS IN THE REAR OF
THE CONTROL BOX.
2. Check air intake of the cooling fan
daily. The best time to check is right
after starting the oven.
IMPORTANT NOTE:
The cooling fan will operate when
the blower switch is turned "on". It
must operate to keep the electrical
control cabinet below 140°F. (60°C.).
WARNING
IF FAN BLADE IS NOT ROTATING,
BROKEN OR FAN ASSEMBLY IS
MISSING FROM MAIN BLOWER
MOTOR SHAFT, DO NOT OPERATE OVEN. REPLACE COOLING
FAN BLADE BEFORE OPERATING
OVEN. Serious damage could be
done to the burner blower motor
and/or the solid state electrical components if oven is operated while
cooling fan is not running.
35
Page 42

SECTION 4
MAINTENANCE
C. Crumb Pans
Remove the crumb pan(s) at both
ends of the oven. Crumb pans are
removed by sliding out as shown in
Figure 4-2. Wash the crumb pans in
the pot sink.
Figure 4-2.
CAUTION
Possibility of injury from rotating parts and electrical shock exist in this oven.
Turn off and lockout or tagout electrical supply to oven(s) before
attempting to disassemble, clean
or service oven(s).
Never disassemble or clean the oven with the fan switch or any other part of the oven turned "on".
II.MAINTENANCE WEEKLY - Oven Disassembly and Cleaning
Use the following instructions to clean the oven interior once a week. To clean the interior 2 people are required to
disassemble the oven. Disassemble
the oven the night before and soak the
Conveyor
Rear Stop
removed parts overnight. Then clean
the oven in the early morning before
production and line setup. Approxi-
Conveyor
End Stop
Middleby
Marshall
mately 2 hours is required.
When cleaning your Series PS200-R68
oven note the following:
PRECAUTIONS-
1. Do not use excessive water or saturation of oven insulation will occur.
2. Do not get water in the fan area
located in the bake chamber.
A. Removing conveyor from oven
for cleaning
Middleby
Marshall
Removable
Crumb
Pans
1. Remove crumb pans, conveyor end
stops and conveyor rear stops shown
in Figure 4-2.
2. Remove upper end plugs from each
Notch In Lower
End Plug
Removable
Crumb
Pans
end of oven. The two wing screws in
each end plug are loosened and then
the end plugs are removed and set
aside. The wing screws should be held
in the end plugs by locking washers. If
your wing screws drop out of the end
plugs order new screws from your local
Figure 4-3.
service agency.
36
Page 43

Figure 4-4.
SECTION 4
MAINTENANCE
3. Remove conveyor drive chain
cover as shown.
4. Remove tension from drive chain by lifting and pushing
the conveyor slightly into the oven. Remove drive chain
from conveyor drive sprocket as shown.
Figure 4-5.
5. While one person pulls the conveyor out from the drive end of the
oven the second person should lift the far end (opposite end) of
conveyor until crumb tray slide is clear. Then both people can begin
sliding conveyor out from the drive end of the oven, as shown,
folding as they go. Move slowly and use caution as the conveyor
chain and the drive sprocket can be easily damaged.
Figure 4-6.
6. Remove the lower end plug from each end of the oven. Refer to
Figure 4-3.
37
Page 44

SECTION 4
MAINTENANCE
B. Oven interior disassembly.
1. Slide blank plates straight out. There is a blank plate
located at each end of the row of top fingers.
2. Remove air fingers. There are four bottom air fingers with
6 rows of holes and 2 top air fingers with 3 rows of holes.
You can remove top and bottom fingers and blank plates from
each or either end.
Figure 4-7.
Figure 4-8.
3.Remove the air fingers by pulling the fingers
at the back side and pulling straight out.
The finger assemblies should not be disassembled at this time.
3 Drip
Pans
4. Remove the 3 drip pans from the bottom of
the oven. Refer to Figure 4-9
Figure 4-9.
38
Page 45

Figure 4-10.
SECTION 4
MAINTENANCE
C. Window disassembly for cleaning.
1. Remove the window by opening it and unscrewing the
window knobs from each end. Place the window knobs
on top of the oven in a cup so they can be easily found the
next day.
2. Push the window all the way inside the oven,
making sure it is clear of the frame. Now, turn the
window sideways while inside the oven and then
remove it. This will avoid window breakage.
Folded
Conveyor
Figure 4-11.
D. Loading the soak bin.
1. Move the soak bin to the dish rack. Close the
soak bin drain and add 2 gallons of degreaser
and then begin filling with hot water.
2. First load the parts from one oven into one end
of the soak bin as follows.
a. Fold the conveyor and load it into the end of
the soak bin as shown in Figure 4-12.
Soak Bin
Drain
Figure 4-12.
39
Page 46

SECTION 4
MAINTENANCE
End Plugs
b. Place the end plugs in the soak
bin as shown in Figure 4-13.
Then place the fingers in the soak
bin by placing the slanted sides of
the fingers together to conserve
space as shown in Figure 4-13.
Fingers
Figure 4-13.
3. Repeat Steps a and b for the
second oven. Refer to Figure 4-14.
Figure 4-14.
40
Page 47

Drip
Pans
SECTION 4
MAINTENANCE
Windows (Blank plates
placed under windows)
4. Place the drip pans from both
ovens on top of the fingers, then the
blank plates and last place the windows on the drip pans so they will
not be damaged. Refer to Figure 4-
15.
5. Allow to soak overnight.
Figure 4-15.
E. Cleaning parts that were soaked overnight.
Cleaning takes 2 people. One to clean the oven and one to clean the parts.
You will need:
• Boots
• Rubber Gloves
• Steel brush
• Kote Spray
• Squirt bottle filled with water
• Towels
• Grill pads
• Black pad
• Putty knife
NOTE: Before cleaning parts from soak bin cover any dishes or other equipment or pans in the dish area with plastic
sheets. Prepare an area for spraying parts with Kote.
1. Clean windows first.
2. Scrub crumb pans, end plugs, drip pans and blank plates. Then run them through the dish machine, dry thoroughly
and then spray with Kote.
3. Clean conveyor by unfolding carefully on dish sink counter. Rinse away any loose material from conveyor chain and
if needed scrub with small steel brush. Dry the conveyor thoroughly and spray with Kote.
41
Page 48

SECTION 4
MAINTENANCE
4. Cleaning fingers.
WARNING: Clean one finger at a time. Only one finger at a time should be disassembled because
the parts of the fingers are not interchangeable.
a. Finger assemblies are made up of an outer plate, inner plate and finger manifold as shown in Figure 4-16.
b. When cleaning finger assemblies check one assembly at a time to see if the inner plate needs scrubbing.
Disassemble only one finger at a time and after cleaning the inner plate and the manifold, reassemble the
finger before disassembling the next finger.
Manifold
4-1/32" Rear
Opening
No Large Holes,
Perforated Only
UPPER
Inner
Plate
M3RN
Finger
Stamped "UPPER"
Full
Blank
Outer Plate with
3 Rows of Holes
RED LOBSTER FINGER CONFIGURATION IN OVEN
FB M3RNFBM3RN
Upper Fingers
Product Direction (Either Direction)
M6
M6
M6
M6
Finger
M6
Large Holes &
Perforated
Lower Fingers
UPPER
Raised Front
(Stamped "UPPER")
Outer Plate
with 6 Rows
of Holes
Inner
Plate
Figure 4-16.
5-5/32" Rear
Opening
Baffle
Manifold
42
Page 49

Figure 4-17.
SECTION 4
MAINTENANCE
c. Place fingers in an upright position to remove the outer plate.
Gently step on the lip of the finger and pull the outer plate off.
d. To remove the inner plate, pull plate out and then up.
Figure 4-18.
e. Scrub the parts using the black pad if necessary and then run the
parts through the dish machine and dry thoroughly. Spray the finger
parts with Kote.
f. Reassemble the inner plate, keep your fingers clear so you won't
pinch them. The inner plate of a finger will only go on in one way
because of its design. Refer to Figure 4-18.
g. Replace the outer plate by placing your hands flat on the top of the
plate and pushing down. Keep your fingers clear so you won't pinch
them. Refer to Figure 4-17.
F. Cleaning interior of oven.
1. Use the squirt bottle to spray the
inside of oven with water. Do not
spray into fan areas.
2. Wipe off all interior surfaces with
damp grill pad. Use your black pad
and putty knife to loosen any baked
on material. Refer to Figure 4-19.
Figure 4-19.
Black Pad wrapped
around putty knife
43
Page 50

SECTION 4
MAINTENANCE
3. Clean the oven exterior as needed and dry the
oven inside and out.
4. Spray all interior surfaces, except the fan
area, with Kote. Cover all areas well. Refer to
Figure 4-20. Be sure the oven is dry before
spraying. Kote does not work well on wet surfaces. A thorough spraying with Kote is your best
tool for easy cleaning because it prevents grease
splatters from baking on. Areas that are not
sprayed with Kote will need hard scrubbing rather
than light cleaning at the next weekly cleaning.
Figure 4-20.
Figure 4-21.
G. Oven reassembly.
1. Replace the 3 drip pans into bottom of oven. Refer to Figure 4-21.
44
Page 51

2. Reassemble bottom fingers into oven first by pushing in on their back side.
Refer to Figure 4-16 for correct finger position in oven.
a. IMPORTANT: When inserting fingers the tab on
IMPORTANT: Only M6 fingers fit in the
bottom row. All M3 finger cover plates have
extended lips at front. This extended lip will
not allow these fingers to be installed in the
bottom row.
Extended
Lip
the outer plate must be in the groove as shown in the
illustration. There is a blocking tab on the outside of
the groove which will prevent inserting the finger in
the groove if the outer plate is moved away from the
flange of the finger manifold. Refer to Figure 4-22.
SECTION 4
MAINTENANCE
Figure 4-22.
Tab on
Outer Plate
Blocking
Tab
Tab on
Outer Plate
Flange of Finger
Manifold
Tab to Rest
End Plug On
45
Page 52

SECTION 4
MAINTENANCE
Top
Finger
Tab on Outer Plate
of Finger Located
in Groove
IncorrectToo Much
Space
Blocking
Tab
b. Install fingers and blank plates
correctly with edges interlocked.
There must be be no opening between edges of filler plates. Refer to
Figure 4-23.
Blank
Plate
Tab To Rest
End Plug On
Top
Finger
Tab on Outer Plate
of Finger Located
in Groove
Top
Finger
IncorrectToo Much
Space
Blank
Plate
Tab To Rest
End Plug On
Blocking
Tab
Figure 4-23.
Correct-Edges
Overlap
Completely
Blank
Plate
Tab on Outer Plate
of Finger Located
in Groove
Tab To Rest
End Plug On
Blocking
Tab
46
Page 53

SECTION 4
MAINTENANCE
3. Reassemble lower end plugs to both ends
of oven. Refer to Figure 4-24. Notice that the
lower end plugs have a notch in them. Position
the lower end plugs against the oven and then
up into place. Use the wing nuts to secure the
end plugs to the oven.
Upper End
Plug
Lower End Plug
Gear
Chain Cover
Removable
Crumb Pans
Notch in Lower
End Plug
Figure 4-24.
4. Reassemble top fingers and blank plates
into oven. Refer to Figure 4-16, 4-22 & 4-23.
5. Spray Kote on any areas that may have
been wiped off.
Figure 4-25.
6. Using 2 people install the conveyor.
a. Lift the conveyor and start it into the drive
end of the oven. The drive end of the oven is
the end with the machinery compartment attached. Slide the conveyor along the side
guides until the crumb tray slide falls into place
at the opposite end.
47
Page 54

SECTION 4
MAINTENANCE
b. Attach drive chain by lifting conveyor and
attaching drive chain to conveyor drive
sprocket.
Figure 4-26.
Figure 4-27.
c. The angle plate located on the underside of the
conveyor must be against the lower end plug. This is true
on both ends of oven.
d. Reassemble conveyor drive chain cover.
Figure 4-28.
48
Page 55

SECTION 4
MAINTENANCE
e. Checking conveyor belt tension.
NOTE: Oven conveyor belt must be cool when adjusting belt.
Do not adjust belt if HOT.
AA. With the conveyor assembly in the oven, stand at one end
of conveyor and check tension by lifting the conveyor belt at
the center of the oven chamber opening. The belt should not
lift higher than 3 to 4 inches (76mm to 102mm).
BB. Adjust conveyor chain tension screws (located on left end
of oven) for the 3" to 4" deflection shown in the photo.
Figure 4-29.
Conveyor
Rear Stop
Conveyor
End Stop
Middleby
Marshall
Middleby
Marshall
CC. If conveyor belt is still not under proper tension recheck
your adjustment of the conveyor tension screws. If correct
adjustment is not possible call your service agency.
Removable
Crumb
Pans
Figure 4-30.
Lower End
Plug
Notch In Lower
End Plug
Removable
Crumb
Pans
49
f. Reinstall conveyor end stop
and rear stop.
7. Reassemble upper end plugs to
both ends of oven. Refer to Figure
4-30. Notice that the upper end plug
is not notched. Secure the end plugs
to oven using the wing nuts.
Page 56

SECTION 4
MAINTENANCE
III. MAINTENANCE - EVERY 3 MONTHS
NOTE: It is recommended that the 3 Month Maintenance schedule be performed by an Authorized Middleby Marshall
Service Agent.
CAUTION:
All electrical power should be shut OFF
and locked out or tagged out before attempting
maintenance in steps "A" thru "D".
A. Cleaning fan motor
NOTE: It is recommended that step "A" thru "D" be performed by an authorized Middleby Marshall Service Agent.
To gain access to the fan motor, open the machinery compartment door by removing three screws. Clean the fan motor,
burner motor, conveyor motor and the surrounding area using either compressed air or CO
the motor compartment and vents inside the motor. Failure to do this could cause premature failure of the electric
motor.
B. Electrical terminals
Open machinery compartment door by removing three screws from the door. Tighten all electrical terminal screws
on all components. Also tighten electrical terminal screws in the remote controls.
. Thoroughly blow out
2
Conveyor
D.C.
Motor
Burner
Blower
Motor
Machinery
Compartment
Fan MotorBlow out in
this area
Machinery
Compartment
Door
Figure 4-31.
50
Page 57

Remove 2
Screws
SECTION 4
MAINTENANCE
C. Checking and/or replacing main blower fan belt
1. Check the main blower fan belt for proper tension and
wear. To gain access you must remove the two (2)
screws on the bottom lip of rear shroud along with the
two (2) screws on the cooling fan guard plate.
Figure 4-32.
Figure 4-33.
2. The fan belt should have no less than 1" deflection at
the center and have no cracks or excessive wear. A
spare belt is located inside the machinery compartment.
Over tightening the belt will cause premature bearing
failure and possible vibration problems.
51
Page 58

SECTION 4
MAINTENANCE
3. If belt is loose or to replace belt loosen the tension
locking bolts on the motor mounting bracket. Next pull
back on the motor, do not over tighten or fan bearings
may be damaged. Retighten locking bolts.
Figure 4-34.
D. Main Blower Fan Shaft Bearing Lubrication
Figure 4-35.
Grease the 2 main blower fan shaft bearings using a
special high temperature grease (MM P/N 171100015 Lithium base higher temperature grease). ONLY
ONE PUMP of grease gun in each bearing is required.
Over greasing will damage bearing seals which will
accelerate grease loss and shorten bearing life. Wipe
off any excess grease on and around the bearing.
Replace rear shroud, oven will not operate without the
rear shroud in place.
52
Page 59

SECTION 4
MAINTENANCE
IV. MAINTENANCE - EVERY 6 MONTHS
NOTE: It is recommended that the 6 Month Maintenance schedule be performed by an Authorized Middleby Marshall
Service Agent.
CAUTION:
All electrical power should be shut OFF
and locked out or tagged out before attempting
maintenance in steps "A" thru "C".
A. Check brushes on D.C. conveyor motor, when worn to less than 3/32" (2.2mm) replace.
B. Burner nozzle and electrode assembly should be cleaned and inspected. Also check your oven venting system.
C. Check conveyor shaft bushings and spacers. Replace them if they are worn.
MAINTENANCE PARTS
The following parts were shipped inside the control compartment of your oven to be used
for preventive maintenance or as spares. It is recommended that whenever you use one
of these parts you should order a replacement from your local authorized Middleby
Marshall Parts Distributor.
QUANTITY MIDDLEBY MARSHALL DESCRIPTION
PART NUMBER
2 28154-0003 TRM 9 Amp Fuse (See Figure 6-3)
1 22181-0034 Fan Belt (Refer to previous
page for fan belt replacement.
53
Page 60

SECTION 4
MAINTENANCE
NOTES:
54
Page 61

SECTION 5
TROUBLESHOOTING
PROBLEM
PRODUCTS OVERCOOKED OR
UNDERCOOKED
SECTION 5
TROUBLESHOOTING
Check for correct
setting of conveyor
speed control.
Set conveyor speed
control at correct setting.
Verify food
preparation
If products still cook incor-
rectly call your local
Middleby Marshall Service
Check set temperature on temperature
controller.
Refer to Operation
Section for proce-
dure to set tempera-
ture correctly.
process.
Agency.
55
Page 62

SECTION 5
TROUBLESHOOTING
PROBLEM
OVEN WILL NOT HEAT
Check to see if both blower
switch and heat switch are in the
"I" (on) position
If still no heat call your local Middleby
Marshall Service Company.
PROBLEM
OVEN BLOWER AND CONVEYOR OPERATE
BUT THE OVEN IS NOT HEATING
If the oven does not reach 200°F
(93°C) within 15 minutes the
temperature controller will flash
"FAILSF". To reset the tempera-
ture controller turn the blower
switch off for 30 seconds.
Try restarting the oven again. If the oven will
not heat call your local Middleby Marshall
Service Agency.
56
Page 63

PROBLEM
CONVEYOR WILL NOT HOLD PROPER
SPEED OR WILL NOT RUN AT ALL
Check if conveyor is jammed
on something in oven.
Check for proper tension of conveyor belt.
Refer to Maintenance Section for checking
procedure.
Check that drive sprocket
is tight.
SECTION 5
TROUBLESHOOTING
If conveyor still will not run contact your local
Middleby Marshall Service Agency.
PROBLEM
OVEN WILL NOT TURN ON WHEN THE SWITCHES
ARE TURNED ON
Check if circuit breakers are
turned on.
Check if cables at remote control and at top of
machinery compartment are attached.
CAUTION:
If cables need to be attached
turn the circuit breakers off
before attaching the cables.
If oven still will not respond contact your local
Middleby Marshall Service Agency.
57
Page 64

SECTION 5
TROUBLESHOOTING
PROBLEM
BLOWER MOTORS RUNNING BUT LITTLE
OR NO AIR AT FINGERS
Fingers assembled incor-
rectly after cleaning
58
Page 65

SECTION 6
PARTS LIST
SECTION 6
PARTS LIST
FIGURE NO. DESCRIPTION PAGE NO.
6-1
6-2
6-3
6-4
6-5
6-6
6-7
6-8
6-9
Oven Panels, Window and Legs Exploded Drawing
Air Finger Exploded Drawing
Control Panel Exploded Drawing
Blower and Shroud Exploded Drawing
Conveyor Exploded Drawing
Gas Burner and Piping Assembly Exploded Drawing
Machinery Compartment Exploded Drawing
Electric Oven Electrical Panel Drawing
Junction Box and Export Transformer Exploded Drawing
NOTE: Throughout Section 6 parts lists the following abbreviations are used:
A/R = Quantity as required
N/A = Does not apply
60
62
64
66
68
70
72
74
76
59
Page 66

60
39
SECTION 6
PARTS LIST
17
16
37
4
5
3
1
2
8
6
4
5
7
33
35
36
11
11
13
12
38
34
10
1
2
3
25
21
23
20
22
25
24
18
19
26
31
30
32
32
31
30
29
28
27
29
5
14
10
4
7
6
9
8
FIGURE 6-1
OVEN PANELS, WINDOW AND LEGS
Page 67

OVEN PANELS, WINDOW AND LEGS
61
ITEM PART PART PART
PS200-R68 PS220-R68 PS224-R68
NO. QTY. NO. NO. NO. DESCRIPTION
1 2 49400-0160 31314 49400-0245 END PLUG ASSEMBLY - UPPER
2 1 35900-0285 35900-0371 35900-0436 INNER PANEL - END PLUG
3 1 30261 30420 35900-0245 WELDMENT - OUTER PANEL UPPER END PLUG
4 2 21416-0005 21416-0005 21416-0005 FLAT WASHER SS 1/4"
5 2 2000346 2000346 2000346 SCREW SS 1/4-20 x 1/2"
6 2 49400-0161 49400-0244 49400-0252 END PLUG ASSEMBLY - LOWER
7 1 35900-0286 35900-0472 35900-0463 INNER PANEL - END PLUG
8 1 30264 30514 30531 WELDMENT - OUTER PANEL - LOWER END PLUG
4 2 21416-0005 21416-0005 21416-0005 FLAT WASHER SS 1/4"
5 2 2000346 2000346 2000346 SCREW SS 1/4-20 x 1/2"
9 8 21296-0002 21296-0002 21296-0002 WING SCREW x 1/4-20 x 1/2"
10 8 21182-0006 21182-0006 21182-0006 NUT, PUSH TYPE, BOLT RETAINER, SS
11 8 30278 30278 30278 MOUNTING BRACKET - END PLUG
12 A/R 21296-0005 21296-0005 21296-0005 SCREW, WASHERHEAD 10-16 x 3/4", SS
13 4 35900-0043 35900-0043 35900-0043 SHELF BRACKET - UPPER END PLUG
14 1 35900-0314 35900-0314 35900-0314 CHAIN GUARD-RIGHT END DRIVE
14 1 30756 30756 30756 CHAIN GUARD-LEFT END DRIVE
16 1 31357 31261 30878 OVEN TOP
17 4 21256-0008 21256-0008 21256-0008 SCREW 10-32 x 3/8" SS
18 1 31382 31382 31382 WINDOW MOUNTING FRAME, L.H.
18 1 30280 30280 30280 WINDOW MOUNTING FRAME, R.H.
19 1 30285 30285 30285 GLASS DOOR ASSEMBLY
20 1 30286 30286 30286 GLASS TOP FRAME
21 1 17130-0006 17130-0006 17130-0006 SEALANT, SILICON RUBBER, 11OZ.
22 1 22140-0017 22140-0017 22140-0017 TEMPERED GLASS
23 1 33300-0273 33300-0273 33300-0273 TUBE, GLASS FRAME, HINGE
24 1 30287 30287 30287 GLASS DOOR FRAME WELDMENT
25 2 34121-0003 34121-0003 34121-0003 SCREW, THUMB PIVOT
26 1 37900-0025 37900-0184 37900-0196 BASE PAD
27 4 37900-0102 37900-0102 37900-0102 LEG, 6"
28 2 22290-0009 22290-0009 22290-0009 SWIVEL CASTER W/BRAKE
29 2 22290-0010 22290-0010 22290-0010 SWIVEL CASTER
30 A/R 220373 220373 220373 HEX BOLT, 3/8"-16 X 1"
31 A/R 21426-0001 21426-0001 21426-0001 SPLIT WASHER, 3/8"
32 A/R 21416-0001 21416-0001 21416-0001 FLAT WASHER, 3/8"
33 1 22500-0021 22500-0021 22500-0021 PLATE, MM
34 1 OPERATING INSTRUCTIONS, GAS
35 1 22500-0041 22500-0041 22500-0041 LABEL, CAUTION HOT SURFACE
36 3 35900-0387 35900-0437 35900-0467 DRIP PANS
37 1 30258 30258 30258 CONTROL ENCLOSURE, TOP ASSEMBLY
38 1 30256 30256 30256 CONTROL ENCLOSURE DOOR
39 per ft. 22420-0005 22420-0005 22420-0005 WINDOW GASKET, SILICON, PER FOOT
PARTS LIST
SECTION 6
Page 68

SECTION 6
PARTS LIST
8
9
5
7
62
2
6
3
1
4
FIGURE 6-2
AIR FINGERS
Page 69

SECTION 6
PARTS LIST
AIR FINGERS
PS200-R68 PS220-R68 PS224-R68
1 49400-0146 49400-0242 49400-0249 FINGER ASSEMBLY SS M6
2 37900-0051 37900-0172 37900-0217 COVER PLATE M6
3 37900-0123 37900-0209 37900-0219 INNER PLATE SS - SUPER FINGER
NO. NO. NO. NO. DESCRIPTION
ITEM PART PART PART
4 49400-0270 48400-0274 49400-0272 FINGER MANIFOLD ASSEMBLY SS
5 49400-0145 49400-0243 49400-0250 UPPER FINGER ASSEMBLY M3RN, NON-COLUMNATING SS
6 37900-0230 37900-0210 37900-0220 COVER PLATE M3
7 35900-0291 35900-0471 35900-0477 INNER PLATE, NON-COLUMNATING SS w/NO ROWS OF HOLES
8 49400-0269 49400-0273 49400-0271 FINGER MANIFOLD ASSEMBLY, SS, 4.2" clearance in oven
9 35900-0287 35900-0287 35900-0287 FULL BLANK SS
63
Page 70

SECTION 6
PARTS LIST
6
64
10
11,13
12,13
MIN
0
I
SEC
0
0
O
0
I
11,13
4
5
1
7
19
14
20
2,3
16
18
SEC
MIN
RESET
SETUP
DISPLAY
I
FUNCTION
O
O
17
15
8
9
FIGURE 6-3
CONTROL PANEL
Page 71

SECTION 6
PARTS LIST
CONTROL PANEL
1 1 31120 CONTROL PANEL ENCLOSURE
2 1 31118 FACE PANEL, REMOTE
3 1 31119 LABEL, FACE PANEL, REMOTE
4 1 32340 RECEPTACLE CONTROL BOX ASSEMBLY AC
5 1 32341 RECEPTACLE/BOARD ASSEMBLY DC
NO. QTY. NO. DESCRIPTION
ITEM PART
6 1 32142 CABLE AND RECEPTACLE ASSEMBLY 16 PIN AC
7 1 32141 CABLE AND RECEPTACLE ASSEMBLY 12 PIN DC
8 1 31370 FAN, TUBE AXIAL
9 1 3000330 FILTER/GUARD, FAN PLASTIC
10 1 32339 THUMBWHEEL ASSEMBLY, SPEED CONTROL
11 2 28021-0062 SWITCH KNOB - BLUE
12 1 28021-0063 SWITCH KNOB - RED
13 3 27060-0012 CONTACT BLOCK W/BASE
14 2 LEG, CONTROL PANEL ENCLOSURE
15 1 22500-0131 LABEL - TEMPERATURE DOT 170°F (77°C)
16 3 28041-0008 CONTACTOR, DP 25A, 120V COIL 4P
17 1 42810-0133 CONVEYOR SPEED CONTROL
18 1 27021-0011 FUSEBLOCK, 30A, 600V, 5P Class M
19 1 28154-0003 FUSE TM DELAY 0.9A, 250V
20 1 42810-0138 TEMPERATURE CONTROLLER
65
Page 72

25
10
SECTION 6
PARTS LIST
19
12
15
14
5
6
21
22
12
16
13
17
18
12
66
22
23
26
24
20
12
20
12
7
6
5
4
6
8
11
2
12
5
3
6
5
4
2
1
17
FIGURE 6-4
BLOWER AND SHROUD
Page 73

SECTION 6
PARTS LIST
BLOWER AND SHROUD
1 1 22181-0034 BELT, V-NOTCHED
2 1 22230-0073 PULLEY, 60 HZ OVENS, 5/8"B AK32
NO. QTY. NO. DESCRIPTION
ITEM PART
THREADS BEFORE REINSTALLING
3 1 37900-0147 WELDMENT, REAR BRG BRACKET SS RED LOB
4 16 220373 BOLT 3/8"-16 x 1-1/2" SS HX
5 A/R 21422-0001 SPLIT WASHER 3/8" SS
6 A/R 21416-0001 FLAT WASHER 3/8" SS
7 4 21419-0004 FLAT WASHER 3/8" SS SPECIAL
8 2 22072-0025 BEARING, PILLOW BLOCK 5/8"
4A A/R 17110-0017 NEVER SEIZE LUBRICANT - USED ON ITEMS 4 & 10 - APPLIED TO
10 A/R 21326-0002 BOLT 3/8"-16 x 5-1/2" SS HX
11 1 49400-0155 FLUE VENT
12 A/R 21292-0005 HX HD SCREW 10-16 x 3/4" SS
13 1 30039 WELDMENT, VENT OFFSET SS
14 1 30042 WELDMENT, DOUBLE VENT SS
15 1 37900-0162 COVER - REAR CNTRL PNL, for OVEN W/RIGHT END CONTROL PANEL SS
15 1 37900-0149 COVER - REAR CNTRL PNL, for OVEN W/LEFT END CONTROL PANEL SS
16 1 27470-0035 GUARD - COOLING FAN
17 4 21256-0009 SCREW TRUS CAP - 10-32 x 5/8", SS
18 1 37900-0161 REAR SHROUD, OVEN W/RIGHT END CONTROL PANEL
18 1 37900-0148 REAR SHROUD, OVEN W/LEFT END CONTROL PANEL
19 1 31434 SHROUD, VENT SS, LH & RH
20 2 30410 SHROUD HANGER BRACKET
21 1 22450-0217 RING ORIFICE FAN 16" DIA
22 A/R 35900-0108 STAND-OFF TUBE SS
23 1 35900-0232 SHAFT FAN DRIVE
24 1 21651-0010 KEY, SQ 3/16" X 3/16" 1-1/2" STL
25 1 27399-0003 FAN 16" DIAMETER
26 1 37900-0158 BACK WALL - GAS OVEN ONLY, OVEN W/RIGHT END CONTROL PANEL SS
26 1 37900-0144 BACK WALL - GAS OVEN ONLY, OVEN W/LEFT END CONTROL PANEL SS
67
Page 74

68
16
17
13
14
15
11
12
18
37
13
12
14
15
38
10
SECTION 6
PARTS LIST
36
31
35
34
33
15
12
23
26
24
25
21
19
9
22
17
16
23 12
15
7
8
27
20
31
30
28,29
39
7
40
41
1,2
4
6
5
3
FIGURE 6-5
CONVEYOR
Right Hand Drive Oven Shown. All components
are reversed for Left Hand Drive Oven
Page 75

SECTION 6
PARTS LIST
INCLUDED IN ITEM 4
INCLUDED IN ITEM 4
INCLUDED IN ITEM 4
NOTE: MASTER LINK KIT INCLUDES ITEMS 4, 5 , AND 6.
1 30290RH 31286RH 31299RH CONVEYOR ASSEMBLY W/BELT
1 30433LH 31271LH 31304LH CONVEYOR ASSEMBLY W/BELT
1 1 31268 31041 CONVEYOR BELT WIRE SS, 130"
2 1 33900-0032 33900-0081 33900-0035 CONVEYOR BELT SECTION WIRE SS, 1 FT
3 1 42400-0089 49400-0197 49400-0090 MASTER LINK KIT
4 1 -- -- -- MASTER LINK - RIGHT
5 -- -- -- MASTER LINK - MIDDLE
NO. QTY. PART NO. PART NO. PART NO. DESCRIPTION
ITEM PS200-R68 PS220FS-R68 PS224-R68 CONVEYOR
6 1 -- -- -- MASTER LINK - LEFT
7 2 35900-0398 35900-0398 35900-0398 PIVOT PLATE - CONVEYOR FRAME
8 4 21176-0002 21176-0002 21176-0002 LOCKNUT, HEX SS 3/8-20
9 1 30291 31272 31301 CONVEYOR FRAME ASSEMBLY - IDLER
10 1 30292 31236 31233 CONVEYOR FRAME WELDMENT - IDLER
11 1 49400-0013 49400-0175 49400-0240 CONVEYOR ASSEMBLY - IDLER SHAFT
12 2 22034-0003 22034-0003 22034-0003 BUSH, FLANGE 3/4 OD, x 5/8 ID
13 2 35000-1008 35000-1008 35000-1008 BOLT, ADJ - CONVEYOR IDLER
14 2 37000-0413 37000-0413 37000-0413 IDLER SHAFT ADJUSTMENT BRACKET
15 2 35900-0020 35900-0020 35900-0020 CONVEYOR SHAFT SUPPORT BRACKET
16 A/R 22229-0003 22229-0003 22229-0003 CONVEYOR SPROCKET 10T W/SCREW
17 A/R 21276-0040 21276-0040 21276-0040 SOCKET SET SCREW 1/4-28 x 3/8", SS
18 1 35000-1011 35900-0331 35900-0422 IDLER SHAFT
19 1 30298 31273 31300 CONVEYOR FRAME ASSEMBLY - DRIVE
20 1 30299 31235 31231 CONVEYOR FRAME WELDMENT
21 1 49400-0011 49400-0178 49400-0241 CONVEYOR ASSEMBLY - DRIVE SHAFT
22 1 22011-0013 22011-0013 22011-0013 SHAFT COLLAR W/SCREW
12 2 22034-0003 22034-0003 22034-0003 BUSH, FLANGE 3/4 OD x 5/8 ID
23 2 35000-1080 35000-1080 35000-1080 NYLON SPACER
15 2 35900-0020 35900-0020 35900-0020 CONVEYOR SHAFT SUPPORT BRACKET
16 A/R 22229-0003 22229-0003 22229-0003 CONVEYOR SPROCKET 10T W/SCREW
17 A/R 21276-0040 21276-0040 21276-0040 SOCKET SET SCREW 1/4-28 x 3/8", SS
24 1 35000-1013 35000-1013 35000-1013 DRIVE SHAFT ADAPTER
25 1 22151-0002 22151-0002 22151-0002 ROLLER CHAIN SPROCKET W/SCREW
26 1 21276-0038 21276-0038 21276-0038 SOCKET SET SCREW 10-32 x 5/16" SS
27 1 35000-1012 35900-0335 35000-1072 DRIVE SHAFT
28 1 49400-0050 49400-0050 49400-0050 DRIVE CHAIN ASSEMBLY - 18" LONG
29 1 22273-0002 22273-0002 22273-0002 MASTER LINK
30 1 22151-0003 22151-0003 22151-0003 SPROCKET, DRIVE MOTOR 15T W/SCREW
31 1 27384-0011 27384-0011 27384-0011 GEAR MOTOR 1/15 HP 1350:1
32 2 22450-0230 22450-0230 22450-0230 BRUSHES - GEAR MOTOR
69
33 4 21126-0007 21126-0007 21126-0007 HEX NUT 10-32
34 4 21426-0005 21426-0005 21426-0005 SPLIT WASHER #10, SS
35 4 A19682 A19682 A19682 FLAT WASHER #10, SS
36 1 27170-0263 27170-0263 27170-0263 CONVEYOR CONTROL PICKUP KIT
37 1 31006 30849 30851 CONVEYOR END STOP
38 1 30830 30830 30830 CONVEYOR LEFT HAND REAR STOP
38 1 30796 30796 30796 CONVEYOR RIGHT HAND REAR STOP
39 2 31468 30739 30742 CRUMB PAN IDLER END
40 2 31469 30740 30741 CRUMB PAN DRIVE END
41 1 27413-0002 27413-0002 27413-0002 PLUG, HOLE 3/4" SS
Page 76

24
28
23
SECTION 6
PARTS LIST
70
27
25
19
21
12
26
20
22
11
14
18
Regulator Spring
Adjustment Screw
Cap Screw
Silver - Nat.
Black - Propane
Silver - Nat.
Red - Propane
10
11
9
12
Gas Conversion Kit
29
1
7
3
31
3
4
5
3
4,30
6
13
2
15
16
17
3
2
7
8
FIGURE 6-6
GAS BURNER AND PIPING ASSEMBLY
10
15
Page 77

71
GAS BURNER AND PIPING ASSEMBLY
ITEM PART
NO. QTY. NO. DESCRIPTION
1 1 42810-0121 1/2" GAS CONTROL VALVE
2 2 23153-0004 1/2" CLOSE NIPPLE - BLK
3 2 23122-0004 1/2" ELBOW - 90°
4 2 23151-0030 1/2" x 2" NIPPLE - BLK
5 1 23051-0003 1/2" PIPE UNION
6 1 23125-0002 1/2" x 3/4" REDUCER ELBOW - 90°
7 1 23151-0001 3/4" x 2-1/2" NIPPLE - BLK
8 1 23115-0010 3/4" MANUAL GAS SHUTOFF VALVE
9 1 42810-0123 NATURAL TO PROPANE CONVERSION KIT, PS220-R68 & PS224-R68
9 1 42810-0126 PROPANE TO NATURAL CONVERSION KIT, PS220-R68 & PS224-R68
9 1 42810-0122 NATURAL TO PROPANE CONVERSION KIT, PS200-R68
9 1 42810-0125 PROPANE TO NATURAL CONVERSION KIT, PS200-R68
10 1 22174-0006 ORIFICE #53 DRILL LOW FLAME - NATURAL
10 1 22174-0009 ORIFICE #62 DRILL LOW FLAME - PROPANE
11 1 22176-0016 ORIFICE, MAIN BURNER - NATURAL (0.182"), PS220-R68 & PS224-R68
11 1 22176-0017 ORIFICE, MAIN BURNER - PROPANE (0.113"), PS220-R68 & PS224-R68
11 1 22176-0006 ORIFICE, MAIN BURNER - NATURAL (0.196"), PS200-R68
11 1 22176-0007 ORIFICE, MAIN BURNER - PROPANE (0.129"), PS200-R68
12 1 22174-0011 ORIFICE, PILOT - NATURAL ().024")
12 1 22174-0010 ORIFICE, PILOT - PROPANE (.014")
13 2 23126-0016 ELBOW - MALE 1/4" TUBE x 1/8" NPT
14 1 23015-0004 1/2" COUPLING NPT
15 1 35900-0098 1/4" TUBING - ALUM 8"
16 1 35900-0099 1/4" TUBING - ALUM 6-1/2"
17 1 23151-0030 1/2" x 2" NIPPLE - BLK
18 1 27361-0015 GAS BURNER ASSEMBLY
19 1 27363-0002 PILOT ASSEMBLY W/IGNITOR
20 1 27170-0204 PILOT SHIELD
21 1 27170-0264 PILOT IGNITOR BRACKET
22 1 27170-0016 MOTOR RELAY
23 1 27170-0017 TRANSFORMER 120/240V
24 1 27170-0011 BLOWER MOTOR ASSEMBLY
25 1 BLOWER WHEEL, INCLUDED IN ITEM #24
26 1 27170-0223 VENTURI W/TARGET
27 1 42810-0087 AIR SHUTTER KIT
28 1 27030-0005 FUSE HOLDER WITH FUSE (1 AGC)
29 1 28091-0017 1/2" SOLENOID VALVE
30 1 23151-0032 1/2" x 3" NIPPLE - BLK, R.H. DRIVE ONLY
31 1 31315 1/2" x 31" PIPE, UPPER OVEN ONLY
31 1 31238 1/2" x 4" PIPE, LOWER OVEN ONLY
PARTS LIST
SECTION 6
Page 78

SECTION 6
PARTS LIST
72
21
23,24
8
7
6
5
22
1
14
15
16
15
11
15
17
18
18
19
14
16
14
20
8
9
10
2
12
3
13
FIGURE 6-7
MACHINERY COMPARTMENT
Page 79

SECTION 6
PARTS LIST
MACHINERY COMPARTMENT
1 1 28021-0047 GAS & ELECTRIC SAFETY INTERLOCK SWITCH
2 1 42810-0114 GAS IGNITION CONTROL MODULE
3 1 27159-0019 GAS IGNITION/SENSOR WIRE
5 1 28021-0061 GAS & ELECTRIC SAFETY, MOMENTARY, 10A NO 2 POLE
6 1 28023-0005 GAS & ELECTRIC AIR SWITCH
7 1 35900-0105 GAS & ELECTRIC TUBING 1/4" x 45-1/8"
8 1 27381-0066 GAS & ELECTRIC MOTOR 1/3 HP 200-240V 1PH
9 1 27221-0015 GAS & ELECTRIC SNAP - IN BUSHING - NYLON, BLACK
10 1 37900-0005 GAS & ELECTRIC MOUNTING BRACKET - MOTOR
11 1 35900-0076 GAS 7 ELECTRIC SUPPORT BRACKET - MOTOR
12 1 35900-0075 GAS & ELECTRIC ROD - MOTOR BRACKET
13 2 21611-0007 GAS & ELECTRIC COTTER PIN 1/8" X 1/2"
14 3 220373 GAS & ELECTRIC BOLT 3/8"-16 x 1 SS HX
NO. QTY. NO. MODEL DESCRIPTION
ITEM PART
15 3 21426-0001 GAS & ELECTRIC 3/8" SPLIT WASHER
16 2 21416-0001 GAS & ELECTRIC 3/8" FLAT WASHER SS
17 4 A3896 GAS & ELECTRIC HEX HD SCREW 5/16-18 x 1" SS
18 8 21416-0002 GAS & ELECTRIC FLAT WASHER 5/16"
19 4 21126-0004 GAS & ELECTRIC HEX NUT SS 5/16-18
20 1 22230-0073 GAS & ELECTRIC PULLEY, 5/8 BORE AK32
20 1 22230-0074 GAS & ELECTRIC PULLEY, 50Hz - EXPORT ONLY AK.41
21 1 27399-0007 GAS & ELECTRIC COOLING FAN - 5/8" BORE
22 1 48019-0027 GAS & ELECTRIC THERMOCOUPLE TYPE J - GAS OVEN
23 1 32342 GAS & ELECTRIC MACH. COMPARTMENT RECEPTACLE ASSY AC
24 1 32343 GAS & ELECTRIC MACH. COMPARTMENT RECEPTACLE ASSY DC
73
Page 80

SECTION 6
PARTS LIST
8
74
12
10
9
2
6
7
11
5
j
4
3
1
FIGURE 6-8
ELECTRIC OVEN ELECTRIC PANEL
Page 81

75
ELECTRIC OVEN ELECTRIC PANEL
ITEM PART
NO. QTY. NO. DESCRIPTION
1 1 37900-0097 ELECTRIC PANEL W/O COMPONENTS
2 1 37900-0096 BRACKET - ELECTRIC PANEL
3 2 27480-0001 POWER DISTRIBUTION BLOCK - 2 POLE
4 1 15028707 GROUND LUG
5 2 27021-0016 FUSE BLOCK - 3 POLE, 60 AMP, 600V, CLASS T
6 6 28150-0130 FUSE - 50 AMP, 600V, CLASS T
7 A/R 27276-0003 CABLE CLAMP
8 A/R 28041-0015 MERCURY CONTACTOR 3 POLE
8 A/R 27170-0247 CONTACTOR TUBE KIT W/CLIP FOR P/N 28041-0015
8 1 42810-0090 CONTACTOR COIL KIT (INCLUDES COIL & 3 RETAINER CLIPS)
9 A/R 27152-0025 WIRE STRAND 10 GA 105° C. BL.
10 A/R 27152-0053 WIRE STRAND 18 GA 105° C. BL.
11 3 21256-0008 10-32-3/8 TRUSS HD. SS
12 1 28071-0025 HI/LO LIMIT BOARD
PARTS LIST
SECTION 6
Page 82

76
5,6
SECTION 6
PARTS LIST
7
Transformer
17
N
2
3
FIGURE 6-9
JUNCTION BOX AND EXPORT TRANSFORMER
N17 1 2
NN1717112
1
Terminal
Block
2
2
2
4
Ground
Page 83

77
JUNCTION BOX AND EXPORT TRANSFORMER
ITEM PART
NO. QTY. NO. DESCRIPTION
1 1 28082-0010 TRANSFORMER .75 KVA 240-480V EXPORT ONLY
1 1 28082-0011 TRANSFORMER 1.0 KVA 190-380V EXPORT ONLY
2 2 27083-0008 BOX CONNECTOR 1/2" x 50°
3 1 35900-0147 CONDUIT 1/2" x 6"
4 1 27292-0009 JUNCTION BOX 4" x 4"
5 2 A3333 BOLT 1/4"-20 x 3/4" SS
6 2 21426-0002 SPLIT WASHER 1/4" SS
7 1 27011-0010 TERMINAL BLOCK - 30 AMP 600V, 4 POLE
7 1 27011-0011 TERMINAL BLOCK - 30 AMP 600V, 8 POLE
Not Shown 42810-0086 TRANSFORMER KIT FOR 110V SUPPLY
Not Shown 28082-0016 2.0 KVA - USED WITH TRANSFORMER KIT # 42810-0086 110 - 220V.
PARTS LIST
SECTION 6
Page 84

SECTION 6
PARTS LIST
NOTES
78
Page 85

ELECTRICAL SCHEMATICS
SECTION 7
ELECTRICAL SCHEMATICS
SECTION 7
79
Page 86

For use in split belt applications only
SECTION 7
ELECTRICAL SCHEMATICS
80
red line-2
blk line-1
1 2 3 4 5 6
#16
blk
#16
LINE-1
blk
9A 9A
blk
Motor
orn
Temperature
Controller
(TC)
J2-23
neutral
wht
grn
grd
G
Gnd
#16
blk
#16
#16
blk
red
LINE-2
1
3 5
13
2
4
14
6
blk
Hi-Limit
(TC)
N.O. 650˚F (343˚C)
11 12
purple
8 7 6 5
J2-22
red
wht
+
T/C
Terminal
Block
Rear Interlock
Switch
Door Interlock
Switch
wht
C1
brn
Heat
Switch
4
L2
L1
4
blu
J1-5
Fan
neutral # 16
orn
3
J1-2
purple
J1-4
J1-16
J1-14
grn
Gnd
J1-13
J1-15
High Flame
Solenoid Valve
wht
blk
#16
Air
Pressure
Switch
N.O.
wht
wht
9A
blk
J1-1
D.C. Motor
wht
D.C. Motor
wht
Conveyor Switch
Blower Switch
blk
9 10
-M AC SP+M AC
blk
yel
-M AC SP
+M AC
blk
J1-3
43
yel
43
brn
J1-6
brn wht
wht
D.C. Control
D.C. Control
C
om
C
ount
C
om
C
ount
Contactor Coil
A1 A2
C1
+5V
+5V
Cooldown(TC)
N.O. 180˚F(82˚C)
brn
yel
yel
Relay Coil
XFMR
24V
R
115V
yel
blk
wht
red
red
blk
yel
Centrifugal
Switch
Burner Blower
Motor
wht
SERIES PS200-R68 GAS OVEN SCHEMATIC
208-240V Main Blower Motors, 50/60Hz, 120V Control Circuit, 1 Ph,
4.1 Amp Draw, 3 Pole, 4 Wire (2 hot, 1 neut, 1 grd)
wht
blu
wht
red
MV
MV/PV
PV
Gnd
24V Gnd
24V
Ignition
Module
Spark
Pick-up
grn
Pick-up
grn
Burner
Sensor
wht
wht
Pilot
Ignitor
blk
pins 1-12
J2-24
blk
grn
PV
PV
MV
Valve
MV
Terminals
grn
Burner
To Gas Control
Pilot Outlet
J2
J2-24
Thumbwheel
with 12
conductor
ribbon cable
Pilot
Gnd
Page 87

J2
24 pin cable,
Both connectors
female
at Machinery Compartment,
14 pin cable
Male end
J1
16 pin cable
at Remote Control,
Female end
81
4 3 2 1
9 7 6 5
8
12 11 10
24 23
22
Pin #’s 1-12
Thumbwheel Ribbon Cable
starting with Pin #1 - blue
Pin #22 Red, Thermocouple
Pin #23 Wht, Thermocouple
Pin #24 Ground
1 2 3
4
5 6
1413
Pin Wire Color
#1 Control Fuse Blk
#2 Air Switch Orn
#3 Conveyor AC Yel
#4 Transformer Purple
#5 High Flame Solenoid Blu
#6 Contactor Brn
#13 Neutral W ht
#14 Ground Grn
2 1
6
5 4
3
1615
Pin Terminal
#1 T emperatu re Control #9
#2 Heat Switch #3
#3 Conveyor Switch #4
#4 T emperatu re Control #5
#5 T emperatu re Control #4
#6 T emperatu re Control #10
#15 Temperature Control L2
#16 Ground
ELECTRICAL SCHEMATICS
SECTION 7
Page 88

SECTION 7
ELECTRICAL SCHEMATICS
Middleby
A MIDDLEBY COMPANY
Middleby Marshall Inc. • 1400 Toastmaster Drive • Elgin, IL 60120 • (708) 741-3300 • FAX (708)741-4406
Marshall
National Service Cooperative 1-800-298-1862
Middleby Corporation Service Hotline 1-800-238-8444
82
 Loading...