

Page 1
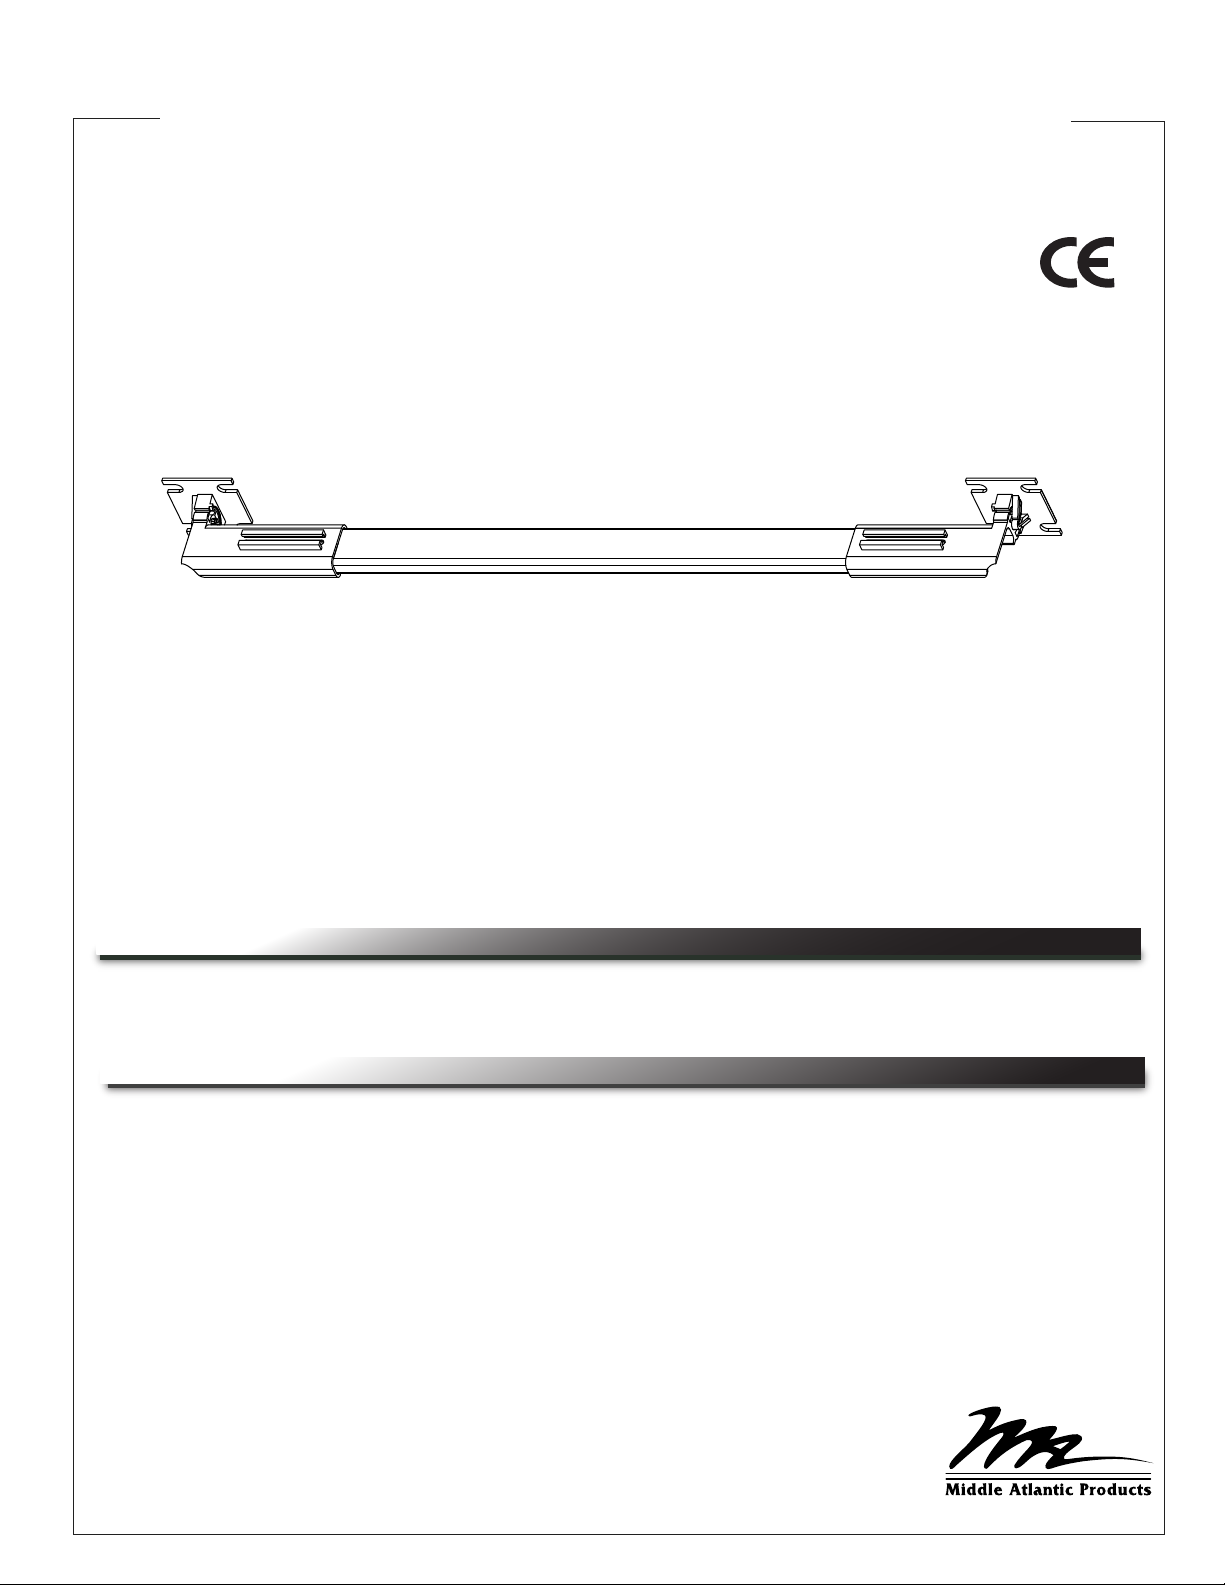
Instruction Sheet
LT Series, Rackmount LED Work Light
LT-CABUTL-SINGLE | LT-CABUTL-DUAL
LT-CABUTL-SINGLE
Only
THANK YOU
Thank you for purchasing a LT Series, Rackmount LED Work Light. Please read these instructions
thoroughly before installing this product.
PRODUCT FEATURES
• Brilliant white lighting that may be pivoted to provide even and directed illumination to devices.
• Use a Single Work Light (LT-CABUTL-SINGLE) for one light source or a Dual Work Light
(LT-CABUTL-DUAL) for two light sources.
• Horizontal (rackspace) or vertical (rackrail and rackrail bracket) mounting options.
• Power Supply Kit accommodates United States, EU, BS, and SAA power requirements.
I-00782 Rev A
Page 2
IMPORTANT SAFETY INSTRUCTIONS / INSTRUCTIONS IMPORTAANTES SUR LA SÉCURITÉ
DANGER HAZARDOUS VOLTAGE/DANGER HAUTE TENSION
The lightning flash with the arrowhead symbol, within an equilateral
triangle is intended to alert the user to the presence of uninsulated
dangerous voltage within the product’s enclosure that may be of
sufficient magnitude to constitute a risk of electric shock to persons.
L'éclair avec le symbole de flèche dans un triangle équilatéral est
destiné à alerter l'utilisateur de la présence d'une tension dangereuse
non isolée dans l'enceinte du produit qui peut être d'une ampleur
suffisante pour constituer un risque de choc électrique pour les
personnes.
CAUTION/ATTENTION The exclamation point within an equilateral
triangle is intended to alert the user to the presence of important
operating and maintenance (servicing) instructions in the literature
accompanying the appliance.
Le point d'exclamation dans un triangle équilatéral est destiné à
alerter l'utilisateur de la présence d'importants instructions d’opération
et de maintenance (entretien) dans la documentation accompagnant
l'appareil.
REGULATORY COMPLIANCE
WARNING! Failure to read, understand and follow the
!
following information can result in serious personal injury,
damage to the equipment or voiding of the warranty. It is
the responsibility of the Installer/User to ensure
that this product is loaded according to specifications.
AVERTISSEMENT! Refus de lire, comprendre et suivre
!
la renseignements suivants peut traduire par de graves
blessures, des dommages à l'équipement ou invalider la
garantie. Il est la responsabilité de l'installateur / utilisateur
de s'assurer que ce produit est chargé conformément aux
spécifications.
CAUTION! The socket-outlet shall be installed near the
!
equipment and shall be easily accessible.
ATTENTION! La prise de courant doit être installée près
!
de l'équipement et doit être facilement accessible.
CAUTION! Use indoor in dry locations only.
!
ATTENTION! Pour être utilisé en intérieur dans un endroit
!
sec seulement.
Federal Communications Commission (FCC) Compliance Statement
CAUTION: Any changes or modifications not expressly approved by the party responsible for compliance could void the user's authority to operate the
equipment.
NOTE: This equipment has been tested and found to comply with the limits for a Class B digital device, pursuant to part 15 of the FCC Rules. These
limits are designed to provide reasonable protection against harmful interference in a residential installation. This equipment generates, uses and can
radiate radio frequency energy and, if not installed and used in accordance with the instructions, may cause harmful interference to radio communications. However, there is no guarantee that interference will not occur in a particular installation. If this equipment does cause harmful interference to radio
or television reception, which can be determined by turning the equipment off and on, the user is encouraged to try to correct the interference by one or
more of the following measures:
• Reorient or relocate the receiving antenna.
• Increase the separation between the equipment and receiver.
• Connect the equipment into an outlet on a circuit different from that to which the receiver is connected.
• Consult the dealer or an experienced radio/TV technician for help.
This device complies with part 15 of the FCC Rules. Operation is subject to the following two conditions: This device may not cause harmful interference,
and (2) this device must accept any interference received, including interference that may cause undesired operation.
ATTENTION: Les changements ou modifications non expressément approuvés par la partie responsable de la conformité pourraient annuler l'autorité de
l'utilisateur à utiliser l'équipement.
REMARQUE: Cet équipement a été testé et jugé conforme aux limites d' un dispositif numérique de classe B, conformément à la partie 15 des règles de
la FCC . Ces limites sont conçues pour fournir une protection raisonnable contre les interférences nuisibles dans une installation résidentielle . Cet
équipement génère , utilise et peut émettre de l'énergie radiofréquence et, si non installé et utilisé conformément aux instructions , peut provoquer des
interférences dans les communications radio . Cependant , il n'y a aucune garantie que des interférences ne se produiront pas dans une installation
particulière . Si cet équipement provoque des interférences nuisibles à la réception radio ou de télévision , ce qui peut être déterminé en allumant et
éteignant l'équipement , l'utilisateur est encouragé à essayer de corriger l'interférence par une ou plusieurs des mesures suivantes:
• Réorienter ou déplacer l' antenne de réception .
• Augmenter La distance entre l'équipement et le récepteur .
• Brancher l'équipement dans une prise sur un circuit différent de celui sur lequel est branché le récepteur.
• Consulter le revendeur ou un technicien radio / TV expérimenté.
Cet appareil est conforme à la partie 15 des règles de la FCC. Le fonctionnement est soumis aux deux conditions suivantes : (1) Cet appareil ne peut
pas causer d'interférences nuisibles et (2) cet appareil doit accepter toute interférence reçue , y compris les interférences qui peuvent causer un mauvais
fonctionnement.
Industry Canada (IC)
ICES-003 Class B Notice - Avis NMB-003, Classe B This Class B digital apparatus complies with Canadian ICES-003. Cet appareil numérique de la
classe B est conforme à la norme NMB-003 du Canada.
Page 2
Page 3

IMPORTANT SAFETY INSTRUCTIONS
Safety Instructions - Rack Mount
A. Elevated Operating Ambient - If installed in a closed or multi-unit rack assembly, the operating ambient temperature of the rack environment may be
greater than room ambient. Therefore, consideration should be given to installing the equipment in an environment compatible with the maximum ambient
temperature (Tma) specified by the manufacturer.
B. Reduced Air Flow- Installation of the equipment in a rack should be such that the amount of air flow required for safe operation of the equipment is not
compromised.
C. Mechanical Loading - Mounting of the equipment in the rack should be such that a hazardous condition is not achieved due to uneven mechanical
loading.
D. Circuit Overloading - Consideration should be given to the connection of the equipment to the supply circuit and the effect that overloading of the
circuit might have on overcurrent protection and supply wiring. Appropriate consideration of equipment nameplate ratings should be used when addressing this concern.
E. Reliable Earthing - Reliable earthing of rack-mounting equipment should be maintained. Particular attention should be given to supply connections
other than direct connections to the branch circuit (e.g. use of power strips).
• Disconnect Device (Pluggable Equipment) - The socket-outlet shall be installed near the equipment and shall be easily accessible.
When using electrical products, basic precautions should always be followed, including the following:
• Read and follow all instructions before using.
• There are no user-serviceable components within this device. Removal of the cover from this device may present a shock
hazard, and void the warranty.
• DANGER – To reduce the risk of electrical shock:
Always unplug this device from the electrical outlet before cleaning.
• WARNING – To reduce the risk of burns, fire, electric shock, or injury to persons:
1. Unplug from outlet before putting on or taking off parts.
2. Close supervision is necessary when this device is used by, or near children, invalids, or disabled persons.
3. Use this device only for its intended use as described in these instructions. Do not use attachments not
recommended by the manufacturer.
4. Never operate the device if it has a damaged cord or plug, if it is not working properly, if it has been dropped or
damaged, or dropped into water. Return the device to a service center for examination and repair.
5. Protect the power cord from being walked on or pinched particularly at plugs, convenience receptacles, and the point
where they exit from the apparatus.
6. Keep the cord away from heated surfaces.
7. Never drop or insert any object into any opening.
8. Do not use outdoors.
9. Do not operate where aerosol (spray) products are being used or where oxygen is being administered.
10. To disconnect, turn all controls to the off position, then remove plug from outlet.
11. WARNING: Risk of Electric Shock – Connect the device to a properly grounded outlet only.
Do not defeat the safety purpose of the polarized or grounding-type plug. A polarized plug has two blades with one
wider than the other. A grounding type plug has two blades and a third grounding prong. The wide blade or the third
prong is provided for your safety. If the provided plug does not fit into your outlet, consult an electrician for replacement
of the obsolete outlet.
12. WARNING: The apparatus shall not be exposed to dripping or splashing and that no objects filled with liquids, such as
vases, shall be placed on the apparatus"
13. The mains plug is used as your disconnect device. This device shall remain readily operable.
14. Clean only with dry cloth.
15. Unplug this apparatus during lightning storms or when unused for long periods of time.
16. Only use attachments/accessories specified by the manufacturer.
17. Do not overload the wall outlet where this device is being connected. Do not overload this device. Ensure the total load
to this device does not exceed that which is listed in the specifications section of this manual.
18. Ensure this device is connected to a properly grounded AC power source. Ensure the device is plugged into a source
providing the required 120V. Do not use a plug adapter that defeats the ground pin of the AC plug.
SAVE ALL INSTRUCTIONS
Page 3
Page 4

INSTRUCTIONS IMPORTAANTES SUR LA SÉCURITÉ
Consignes de sécurité - montage en rack
A. Température de fonctionnement élevée - Si installé dans un rack fermé ou à unités multiples , la température ambiante de fonctionnement de l'environnement du rack peut
être supérieure à ambiante de la pièce . Par conséquent , il faudrait envisager d'installer l'équipement dans un environnement compatible avec la température ambiante
maximale ( Tma ) spécifiée par le constructeur .
B. Réduction Air accréditives Installation de l'équipement dans un rack doit être telle que la quantité de flux d'air nécessaire au bon fonctionnement de l'équipement ne soit pas
compromise.
C. Chargement mécanique - Le montage de l'équipement dans le rack doit être telle qu'une condition dangereuse ne lié à un chargement mécanique irrégulier.
D. Surcharge des circuits - Il faudrait envisager à la connexion de l'équipement au circuit d'alimentation et l' effet que la surcharge du circuit pourrait avoir sur la protection
contre les surintensités et le câblage d'alimentation . Examen approprié des équipements évaluations de la plaque signalétique doit être utilisée pour traiter de cette préoccupation.
E. Mise à la terre fiable - Fiable mise à la terre de l'équipement de montage en rack doit être maintenue . Une attention particulière devrait être accordée aux connexions
d'alimentation autres que les connexions directes vers le circuit de dérivation (par exemple de l'utilisation de bandes de puissance ) .
• Appareil Disconnect ( Équipement Pluggable ) - La prise de courant doit être installée à proximité du matériel et doit être facilement accessible .
Lors de l'utilisation des produits électriques, des précautions de base doivent toujours être respectées, y compris les suivantes:
• Lire et suivre toutes les instructions avant l'utilisation du matériel.
• Il n'ya pas de composants réparables par l'utilisateur au sein de cet appareil. Retrait de la couverture de cet appareil peut
présenter un dangerd'électrocution et annuler la garantie.
• DANGER - Pour réduire le risque de choc électrique :
Toujours débrancher le meuble de la prise électrique avant de le nettoyer.
• AVERTISSEMENT - Pour réduire les risques de brûlures, d'incendie, de choc électrique ou de blessures:
1. Débrancher de la prise électrique avant d'installer ou de retirer des pièces.
2. Surveiller étroitement ce meuble s'il est utilisé par ou à proximité d'un enfant, d'une personne invalide ou handicapée.
3. N'utiliser ce meuble que pour l'usage auquel il est destiné, tel que décrit dans la présente fiche d'instructions. Ne pas
utiliser d'accessoires non recommandés par le fabricant.
4. Ne jamais utiliser ce meuble si le cordon ou la prise est endommagé, s'il ne fonctionne pas correctement, s'il est
tombé ou est endommagé, ou s'il est tombé dans l'eau. Renvoyer le meuble à un centre de service après-vente pour
qu'il soit examiné et réparé.
5. Le cordon d'alimentation doit être placé de manière à éviter qu'il soit piétiné ou pincé, notamment au niveau des
prises, des réceptacles et à la sortie de l'appareil.
6. Garder le cordon d'alimentation loin des surfaces chauffées.
7. Ne jamais faire tomber ou introduire un objet dans une ouverture.
8. Ne pas utiliser en extérieur.
9. Ne pas utiliser dans des lieux où des produits aérosols sont utilisés ou à proximité d'une source d'oxygène.
10. Pour débrancher, placer tous les boutons en position off, puis retirer la fiche de la prise électrique.
11. AVERTISSEMENT : Risque de choc électrique - Brancher le meuble uniquement à une prise correctement mise
à la terre. Ne pas détériorer le dispositif de sécurité de la fiche polarisée ou de la fiche de terre. Une fiche polarisée
possède deux broches, dont l'une plus large que l'autre. Une fiche de type terre possède deux broches et une
troisième de mise à la terre. La broche large ou la troisième fiche sont fournies pour des raisons de sécurité. Si la
fiche fournie n'entre pas dans votre prise de courant, veuillez faire appel à un électricien pour remplacer la prise
obsolète.
12. AVERTISSEMENT : L' appareil ne doit pas être exposé à des éclaboussures et aucun objet rempli de liquide,
comme des vases , ne doit être placé sur l'appareil "
13. La fiche secteur est utilisée comme sectionneur de courant. Ce dispositif doit rester en état de marche.
14. Nettoyer uniquement avec un chiffon sec.
15. Débrancher cet appareil pendant les orages ou s'il n'est pas utilisé pendant de longues périodes.
16. Utiliser uniquement les pièces/accessoires indiqués par le fabricant.
17. Ne surchargez pas le réceptacle de mur ou le circuit qui fournit l'énergie à ce appareil. Ne pas surcharger cette appareil.
S'assurer que la charge totale à cet appareil ne dépasse pas celle qui est répertoriée dans la section desspécifictions de
ce manuel.
18. Assurez-vous cet appareil est connecté à une source d'alimentation C/A avecmise à la terre. Assurez-vous cet appareil
est branché sur une sourced’alimentation fournissant les nécessaires 120V. Ne pas utiliser un adaptateurqui contrecarre
la broche de terre de la prise du cordon d’alimentation.
CONSERVER CES INSTRUCTIONS.
Page 4
Page 5
SUPPLIED COMPONENTS AND HARDWARE
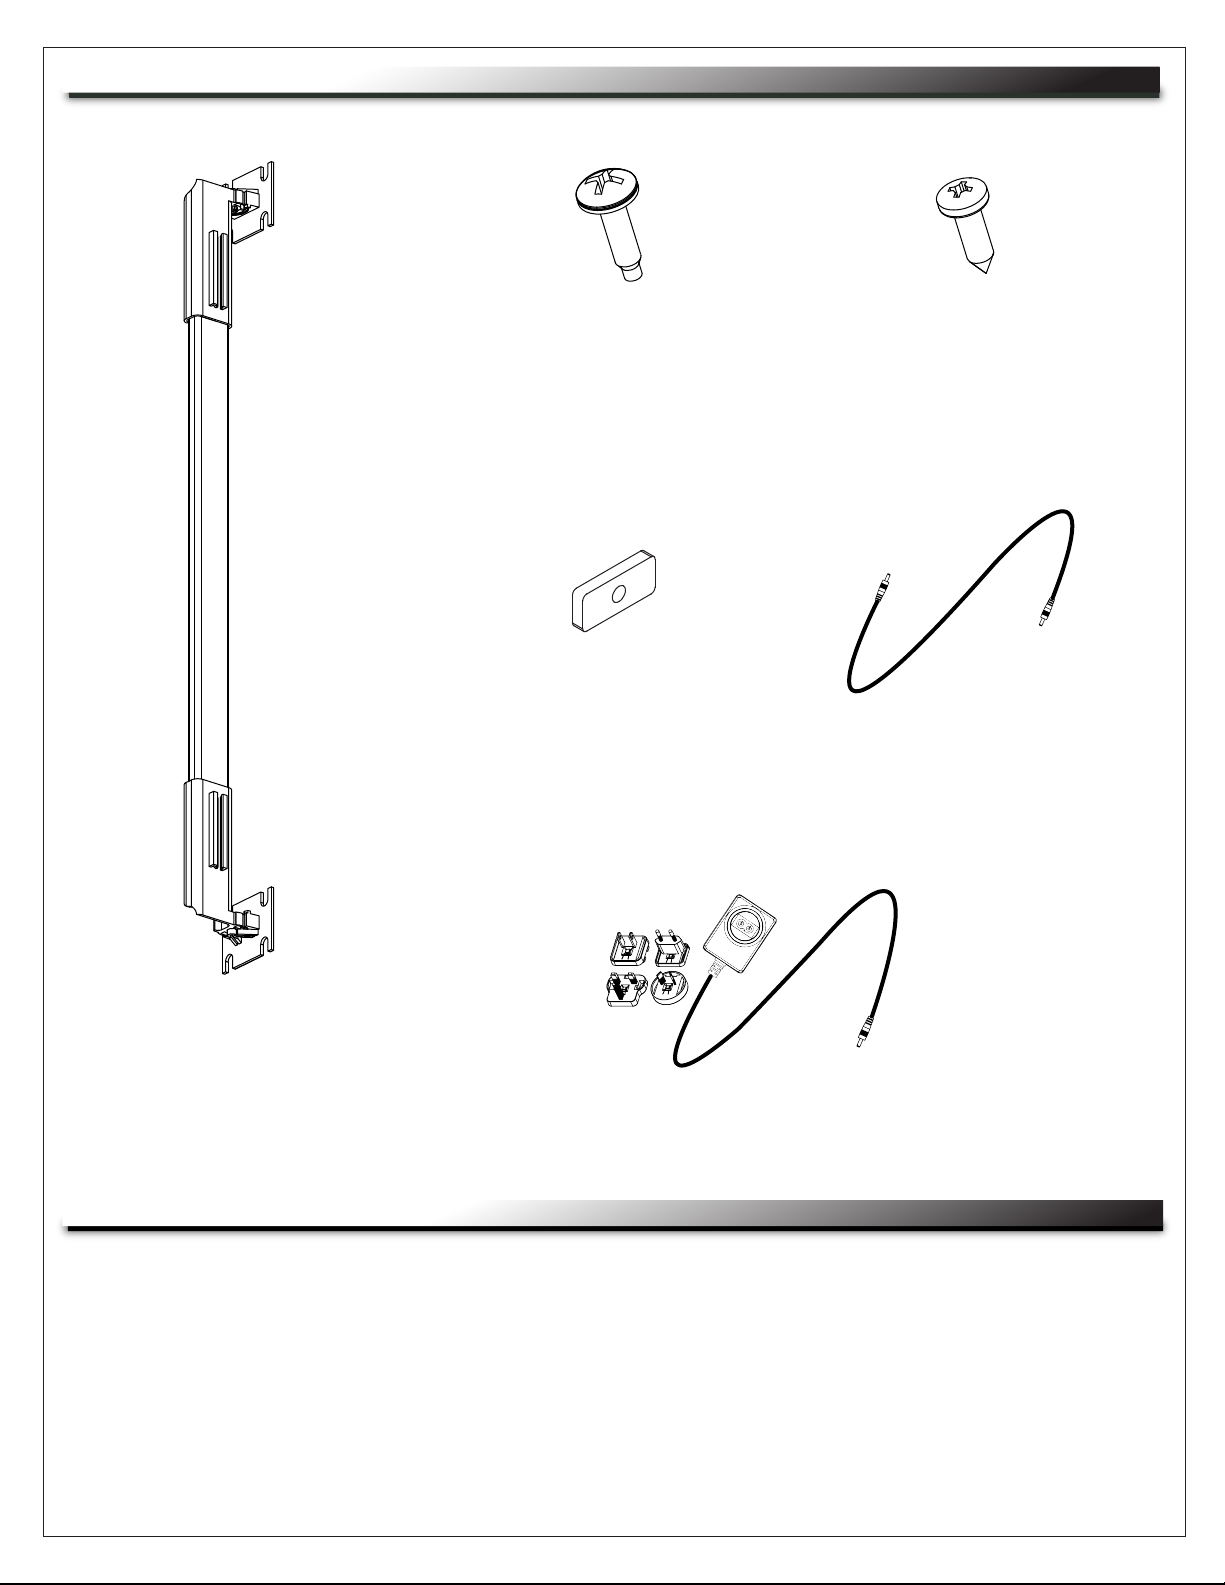
10-32 x 3/4 Phil.Head Screw
With Washer (x4 for Single,
x8 for Dual Work Light)
10-32 Oval Nut
(x4 for Single,
x8 for Dual Work Light)
#10 x 5/8 Phil. Head
Wood Screw (x4 for Single,
x8 for Dual Work Light)
Connector Cable
(9’, Dual Work Light Only)
Work Light With Attached
Telescoping Brackets
(x1 for Single,
x2 for Dual Work Light)
REQUIRED TOOLS
• #2 Phillips Head Driver
• #4-40 Hex Driver (Included)
12V 2A Power Supply
(x1 Single and Dual Work Light)
Page 5
Page 6
ADJUSTING THE LIGHT WIDTH
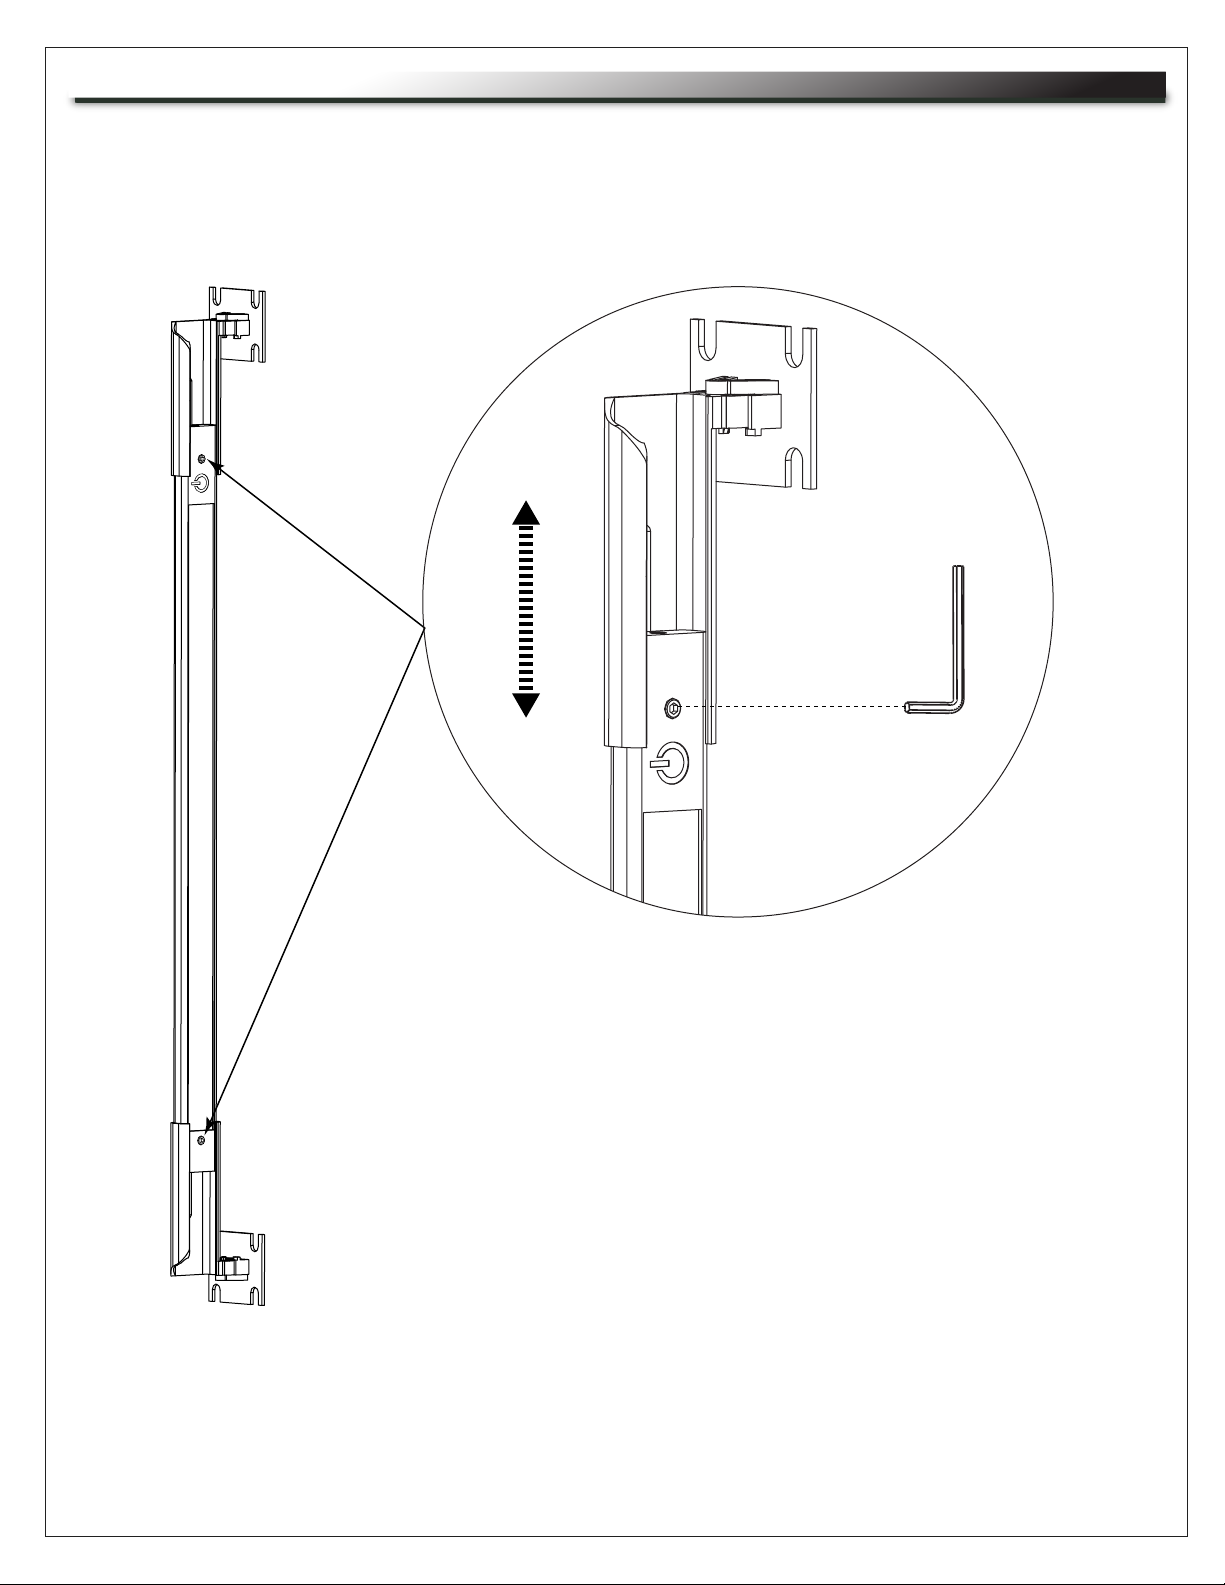
1. Loosen the hex screws on the ends of the light to adjust the telescoping brackets to the desired width.
NOTE: The light is preconfigured for a 19” EIA rackmount.
2. Tighten hex screws to secure the desired width. Do not overtighten. (FIGURE A)
Page 6
FIGURE A
Page 7
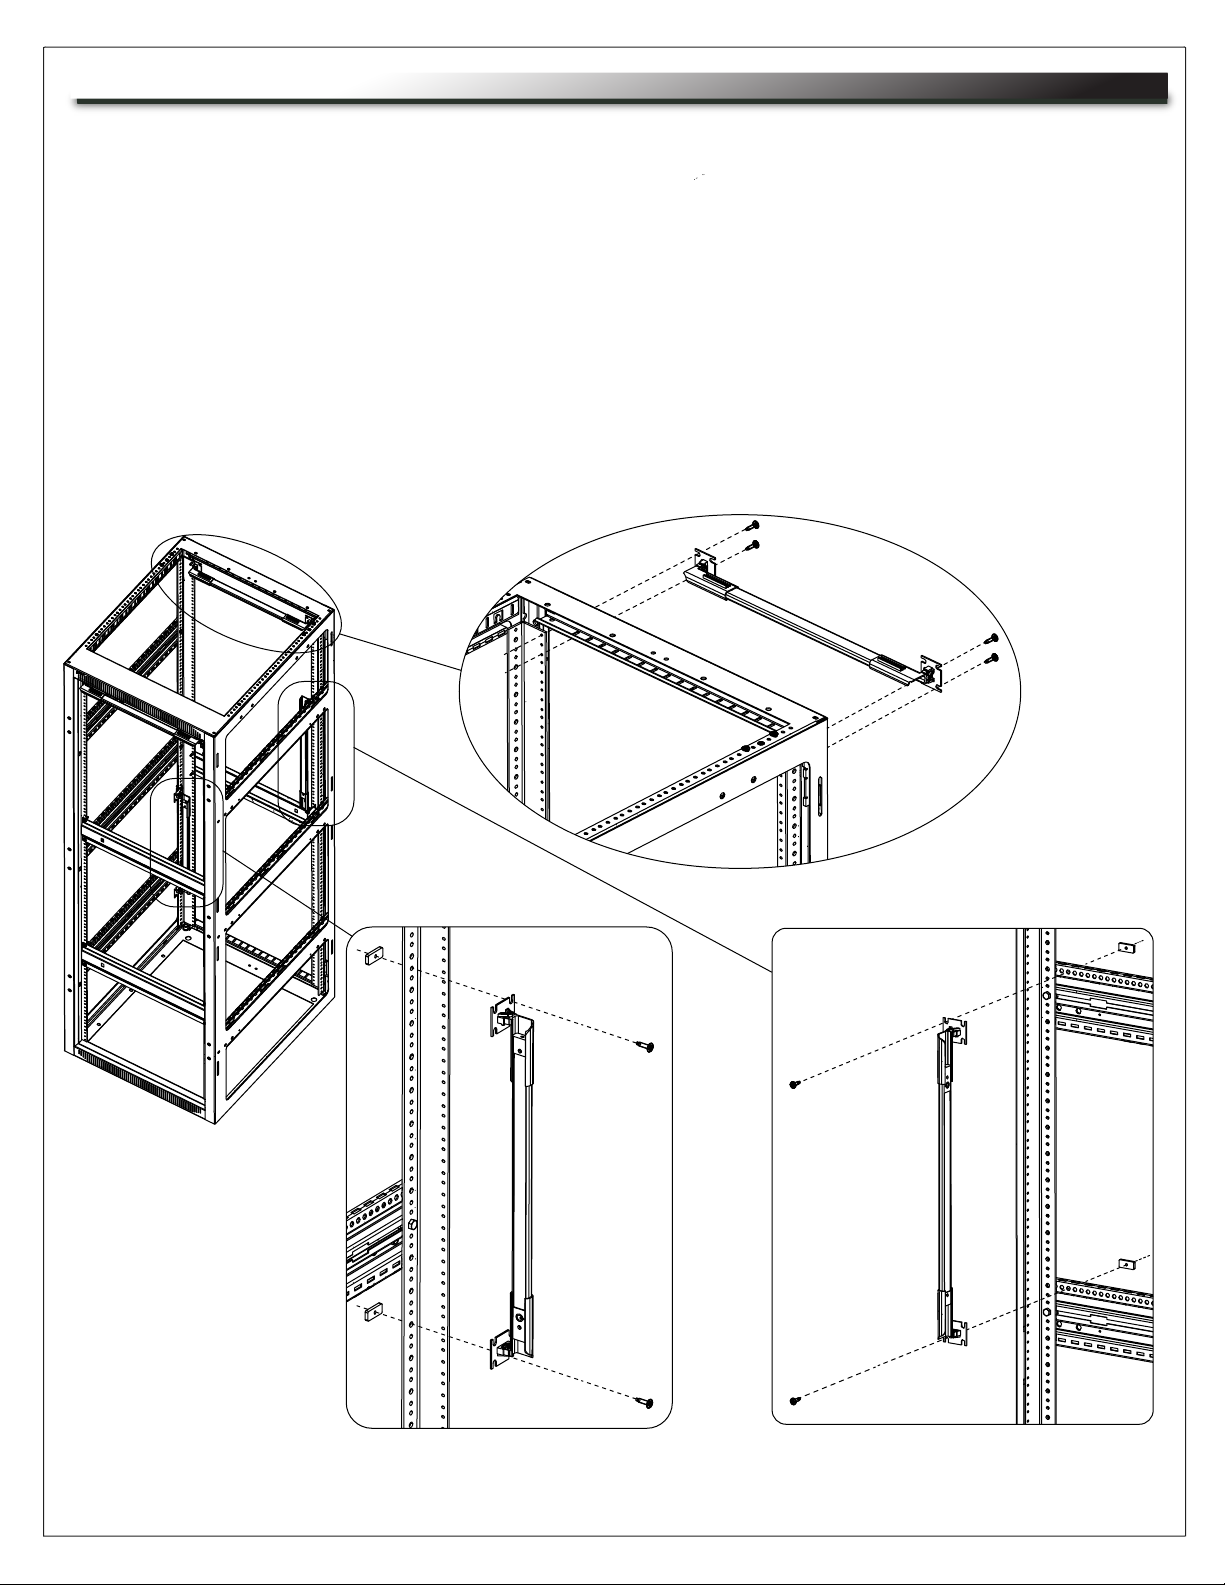
INSTALLATION
Install your light into any of the following positions as applicable to your enclosure:
NOTE: You can mix and match light positions with the Dual Work Light based on the length of the 9’ connector cable running
between the lights.
Installing Horizontally on Rackrails
1. Pass (4) Phil. head screws with washers through the flanges of the light brackets and into the threaded sides of the
rackrails as shown. (FIGURE B)
Installing Vertically on Side Brackets
1. Pass (2) Phil. head screws with washers through the top flanges of the light brackets, through the side brackets, and into
(2) oval nuts as shown. (FIGURE C)
Installing Vertically on Rackrail
1. Pass (2) Phil. head screws with washers through the top flanges of the light brackets, through the unthreaded side of the
rackrail, and into (2) oval nuts as shown. (FIGURE D)
FIGURE D
FIGURE B
FIGURE C
Page 7
Page 8
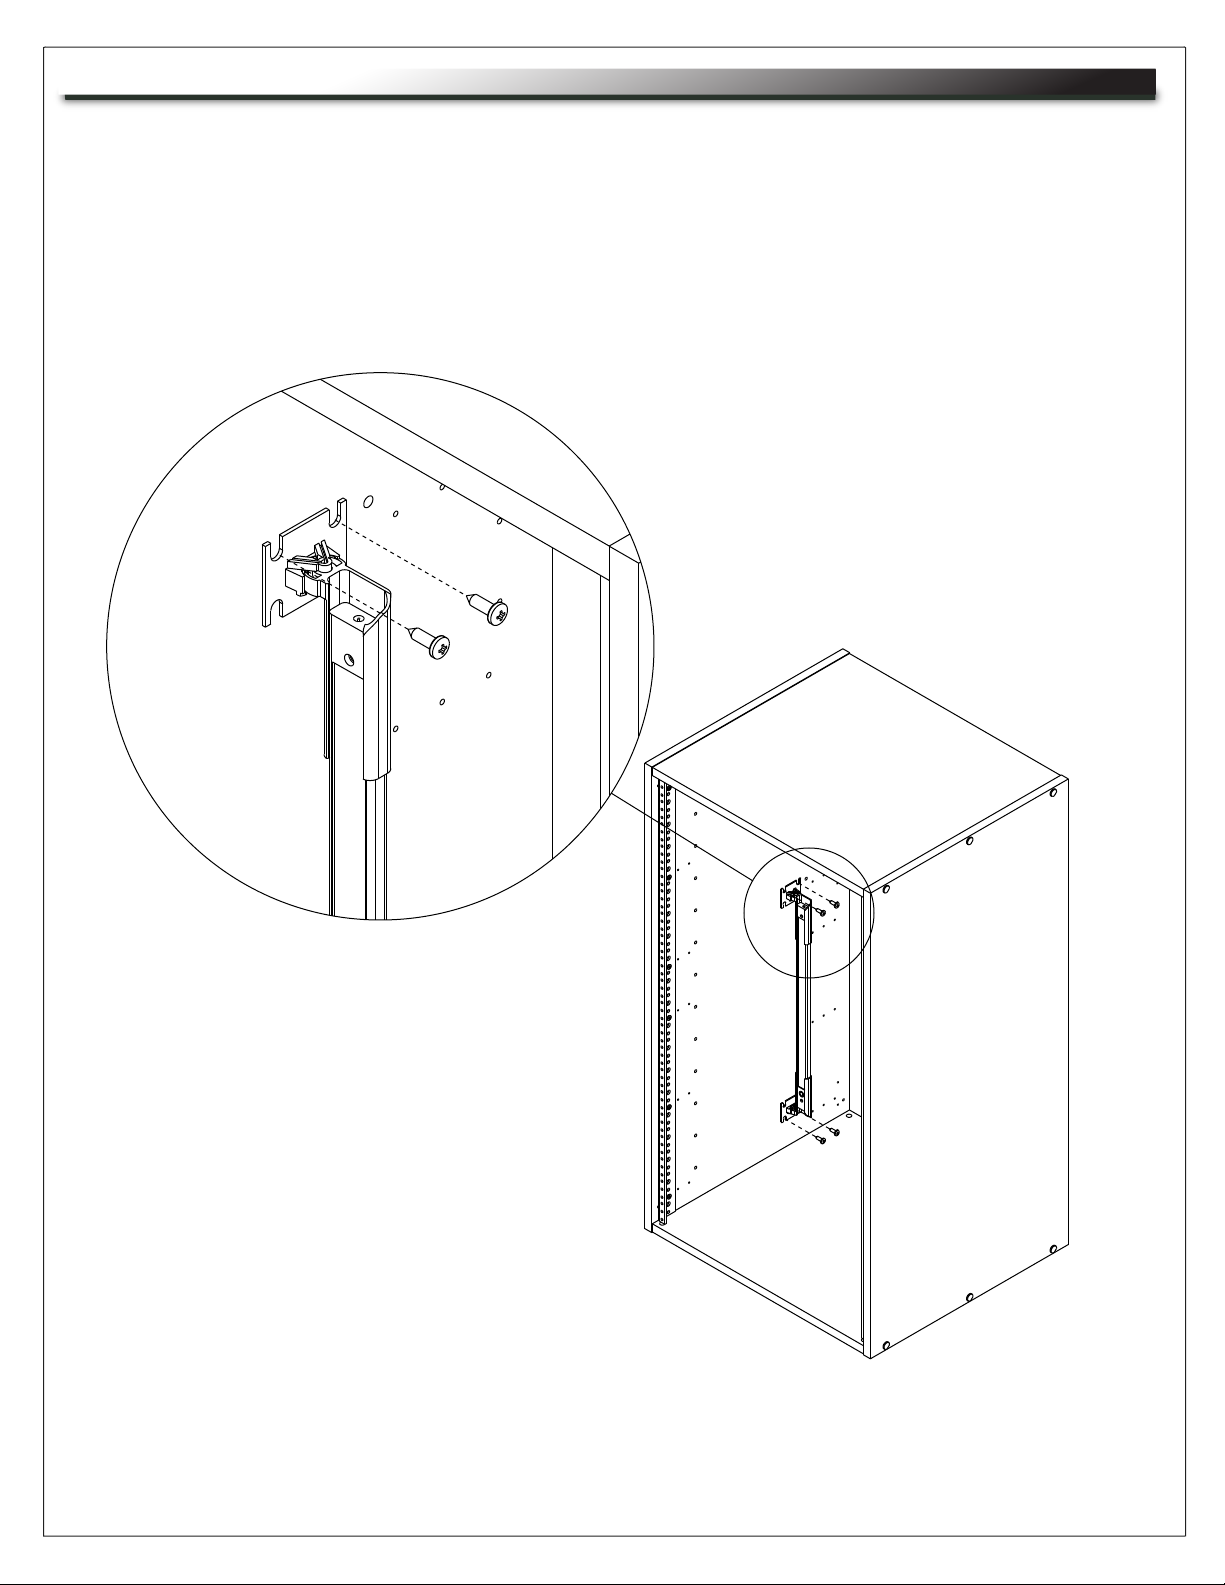
INSTALLATION (CONTINUED)
Installing Inside Wooden Enclosures (RK/BRK)
1. Pass (4) Phil. head wood screws through the flanges of the light brackets and into the inside of the wooden enclosure as
shown. (FIGURE E)
NOTE:
• Carefully measure and drill pilot holes for precise installation. Be careful not to drill piliot holes through wooden enclosure
panels.
• Lights may only be installed vertically inside wooden enclosures that are 10 RU or taller.
• See instructions on previous page if installing horizontally on rackrails.
• A rear rackrail is required for installing horizontally to the rear of wooden enclosures.
FIGURE E
BRK RACK SHOWN
Page 8
Page 9
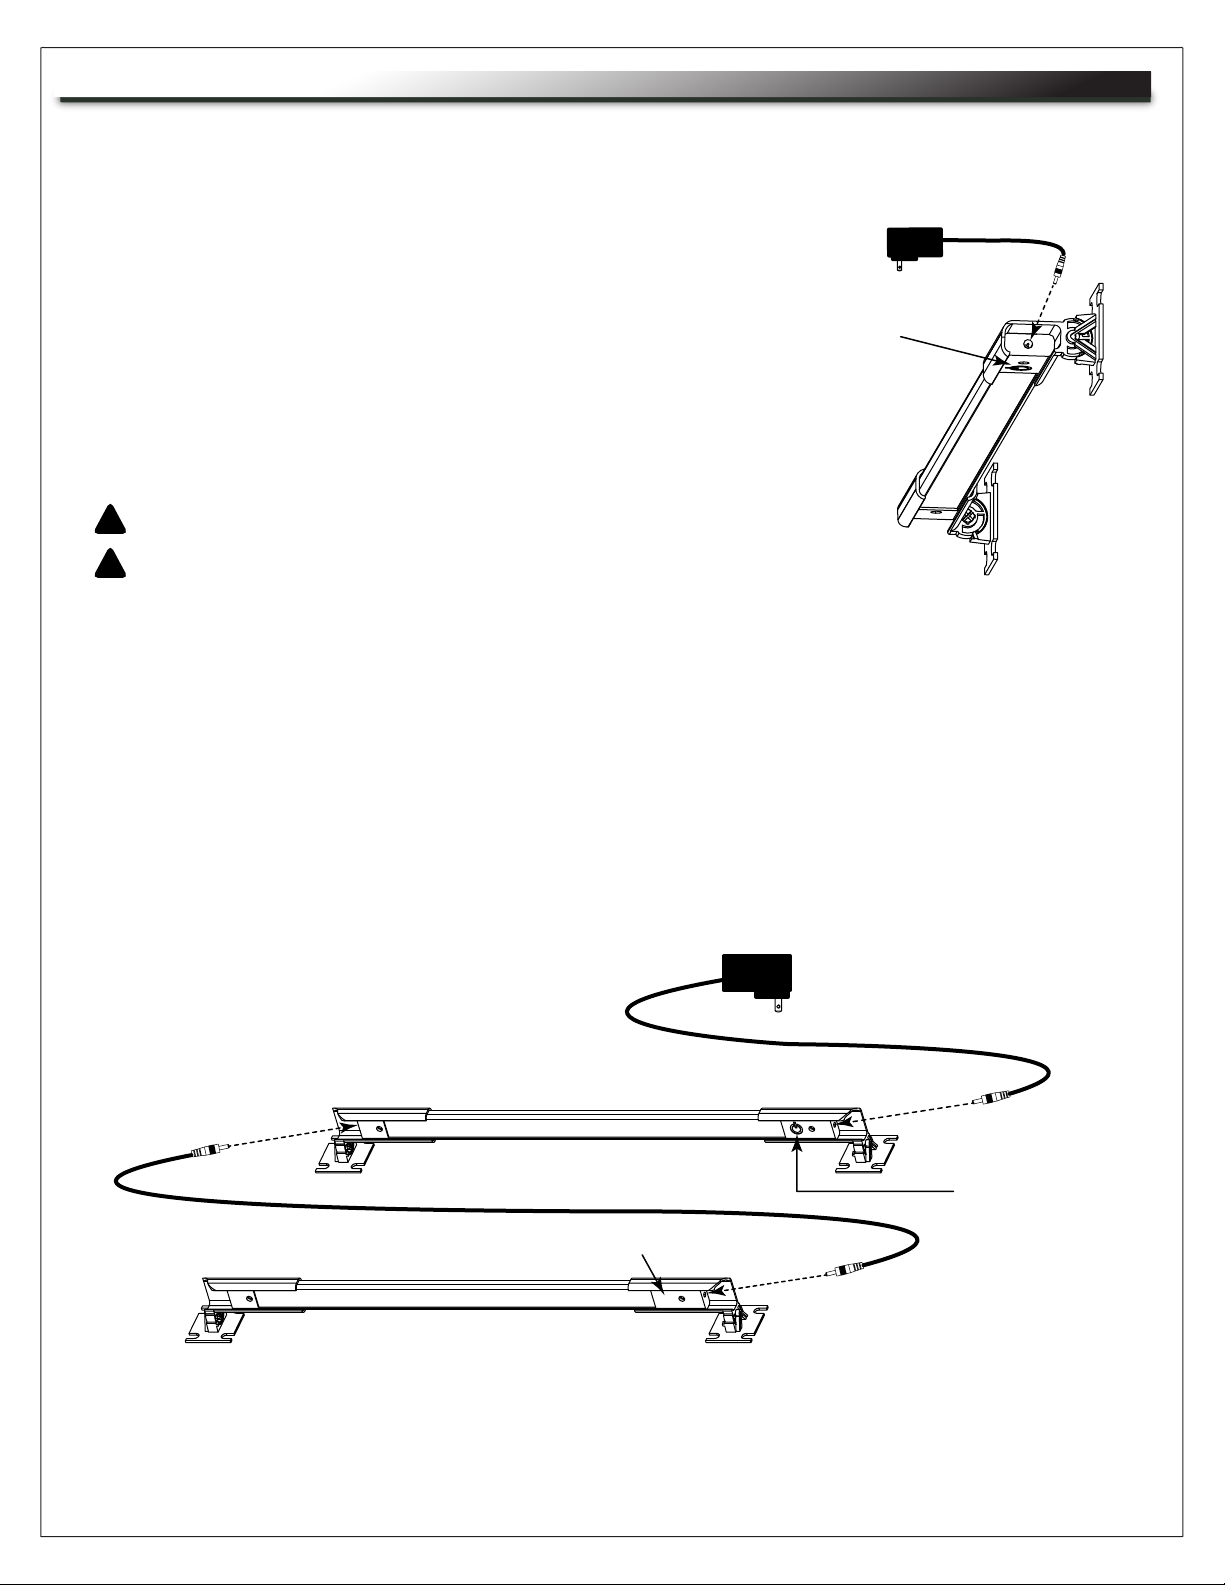
WIRING SINGLE AND DUAL WORK LIGHTS
NOTE: The procedures for wiring the Single and Dual Work Lights show the United States power supply connector. The
procedure is the same for EU, BS, and SAA power requirements until plugging into AC power. For more information, see
“Power Supply Kit” at the end of these instructions.
Wiring a Single Work Light (LT-CABUTL-SINGLE)
1. Plug the small end of the power supply into the input on the
power button side of the light. (FIGURE F)
NOTE: Plug the small end of the power supply into the side of
the light without the power button to bypass the switch and
always keep the light on, if desired.
2. Plug the large end of the power supply into AC power.
Wiring a Dual Work Light (LT-CABUTL-DUAL)
CAUTION: Do not connect more than two lights to a single power supply.
!
!
ATTENTION: Ne pas connecter plus de deux feux à une seule alimentation.
1. Plug the small end of the power supply into the input on the
power button side of the light. (FIGURE G)
2. Attach one side of the light connector cable into the opposite end
of the first light, and the other end of the light connector cable into
the second light. (FIGURE G)
NOTE: Plug the small end of the power supply into the side of
the light without the power button to bypass the switch and
always keep the light on, if desired.
2. Plug the large end of the power supply into AC power.
does not function unless wired
Power Button
NOTE: The power button
from the power supply to the
same side as the switch.
FIGURE F
NOTE: The second light has no power button.
FIGURE G
Page 9
Power Button
NOTE: The power
button does not
function unless
wired from the
power supply to
the same side as
the switch.
Page 10
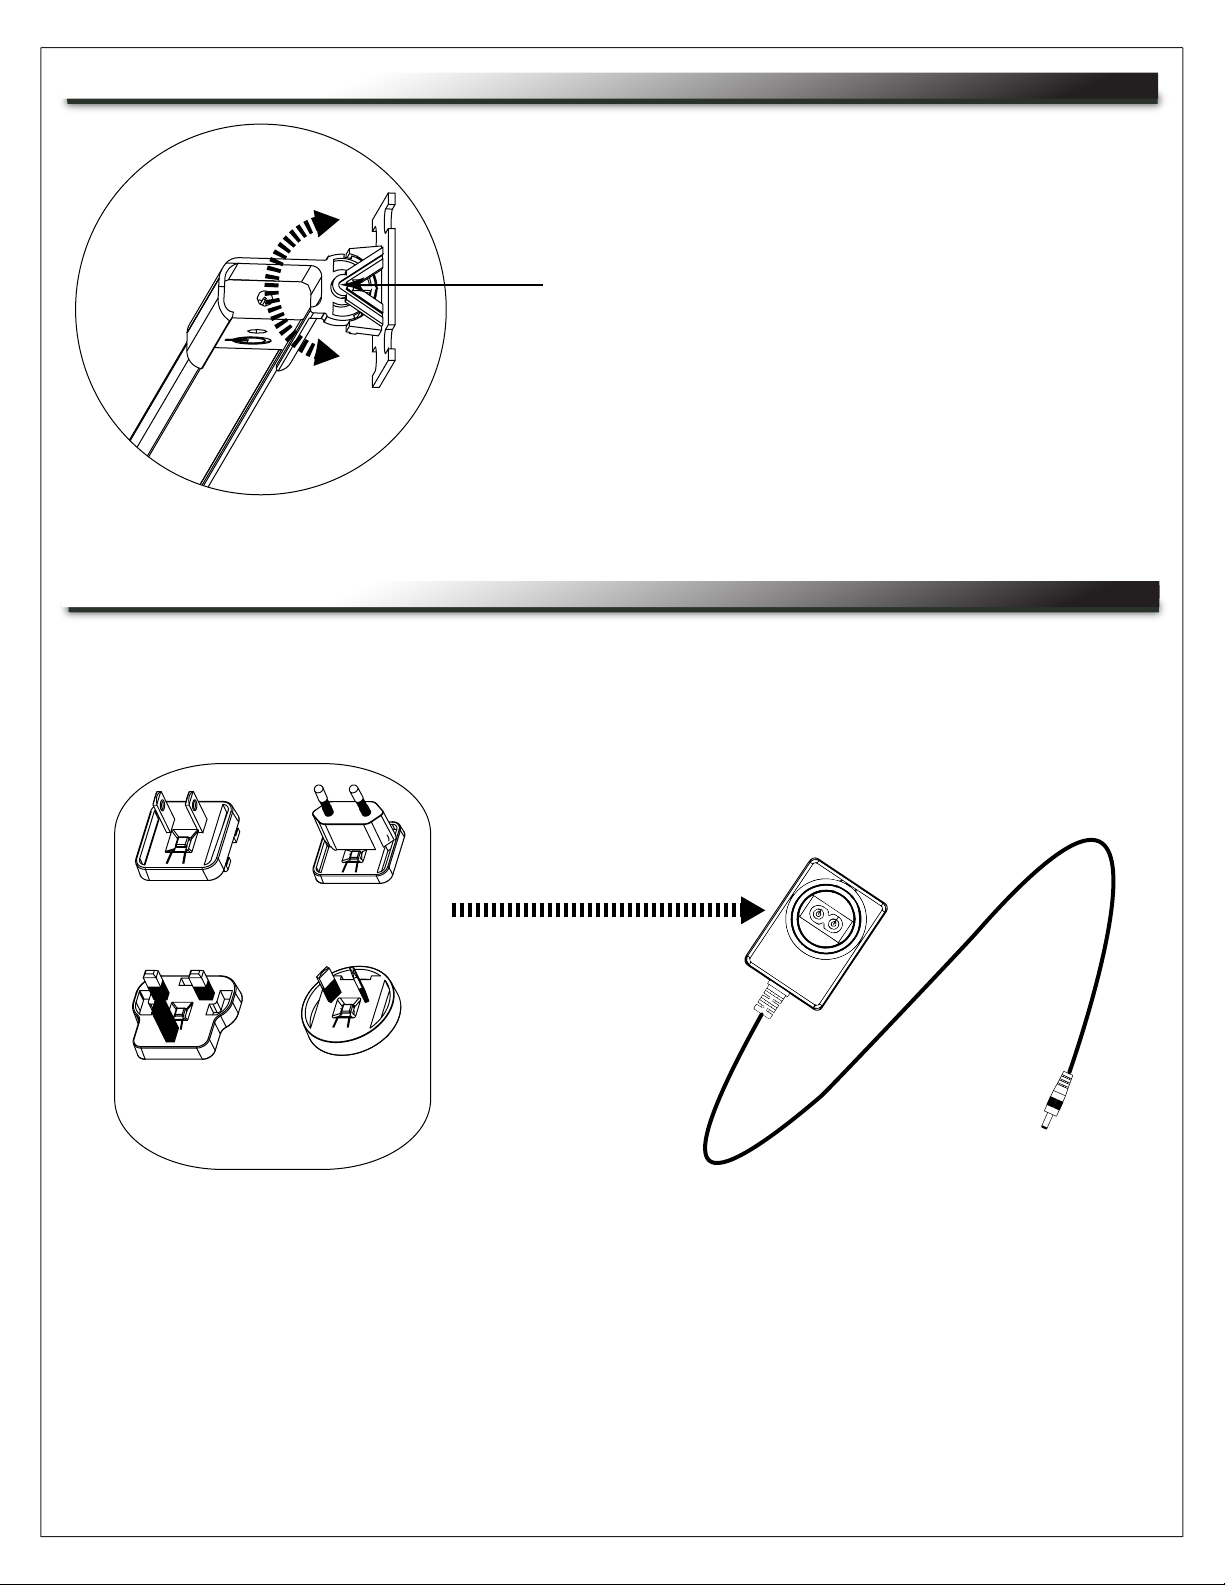
PIVOTING THE WORK LIGHT
1. Firmly grasp both ends of the light to position as desired on the
axis shown. (FIGURE H)
NOTE: Pivot the light to direct light toward specific devices in your
enclosure.
FIGURE H
POWER SUPPLY KIT
Attachments for US, EU, BS, and SAA are provided with the Power Supply Kit. (FIGURE N)
1. Fasten the connector for your locale to the large end of the supply. (FIGURE P)
2. Wire your lighting kit as explained on the previous page, and then connect to AC power.
United
States
(US)
British
Standard
(BS)
European
Union
(EU)
Standards
Association of
Australia
(SAA)
FIGURE N FIGURE P
Page 10
Page 11

WARRANTY
For warranty information, refer to www.middleatlantic.com/terms.
Corporate Headquarters
Corporate Voice: 973-839-1011 - Fax: 973-839-1976 / International Voice: +1 973-839-8821 - Fax: +1
973-839-4982
www.middleatlantic.com - [email protected]
Middle Atlantic Canada
Voice: 613-836-2501 - Fax: 613-836-2690 / www.middleatlantic.ca [email protected]
Factory Distribution
USA: NJ - CA - IL Canada: ON - BC
At Middle Atlantic Products we are always listening. Your comments are welcome.
Middle Atlantic Products is an ISO 9001 and ISO 14001 Registered Company.
Page 11
Page 12

 Loading...