

Page 1
Standard Digital Adapter
Quick Start Guide
Installation and Activation Steps: TV
Step 1: Step 2: Step 3:
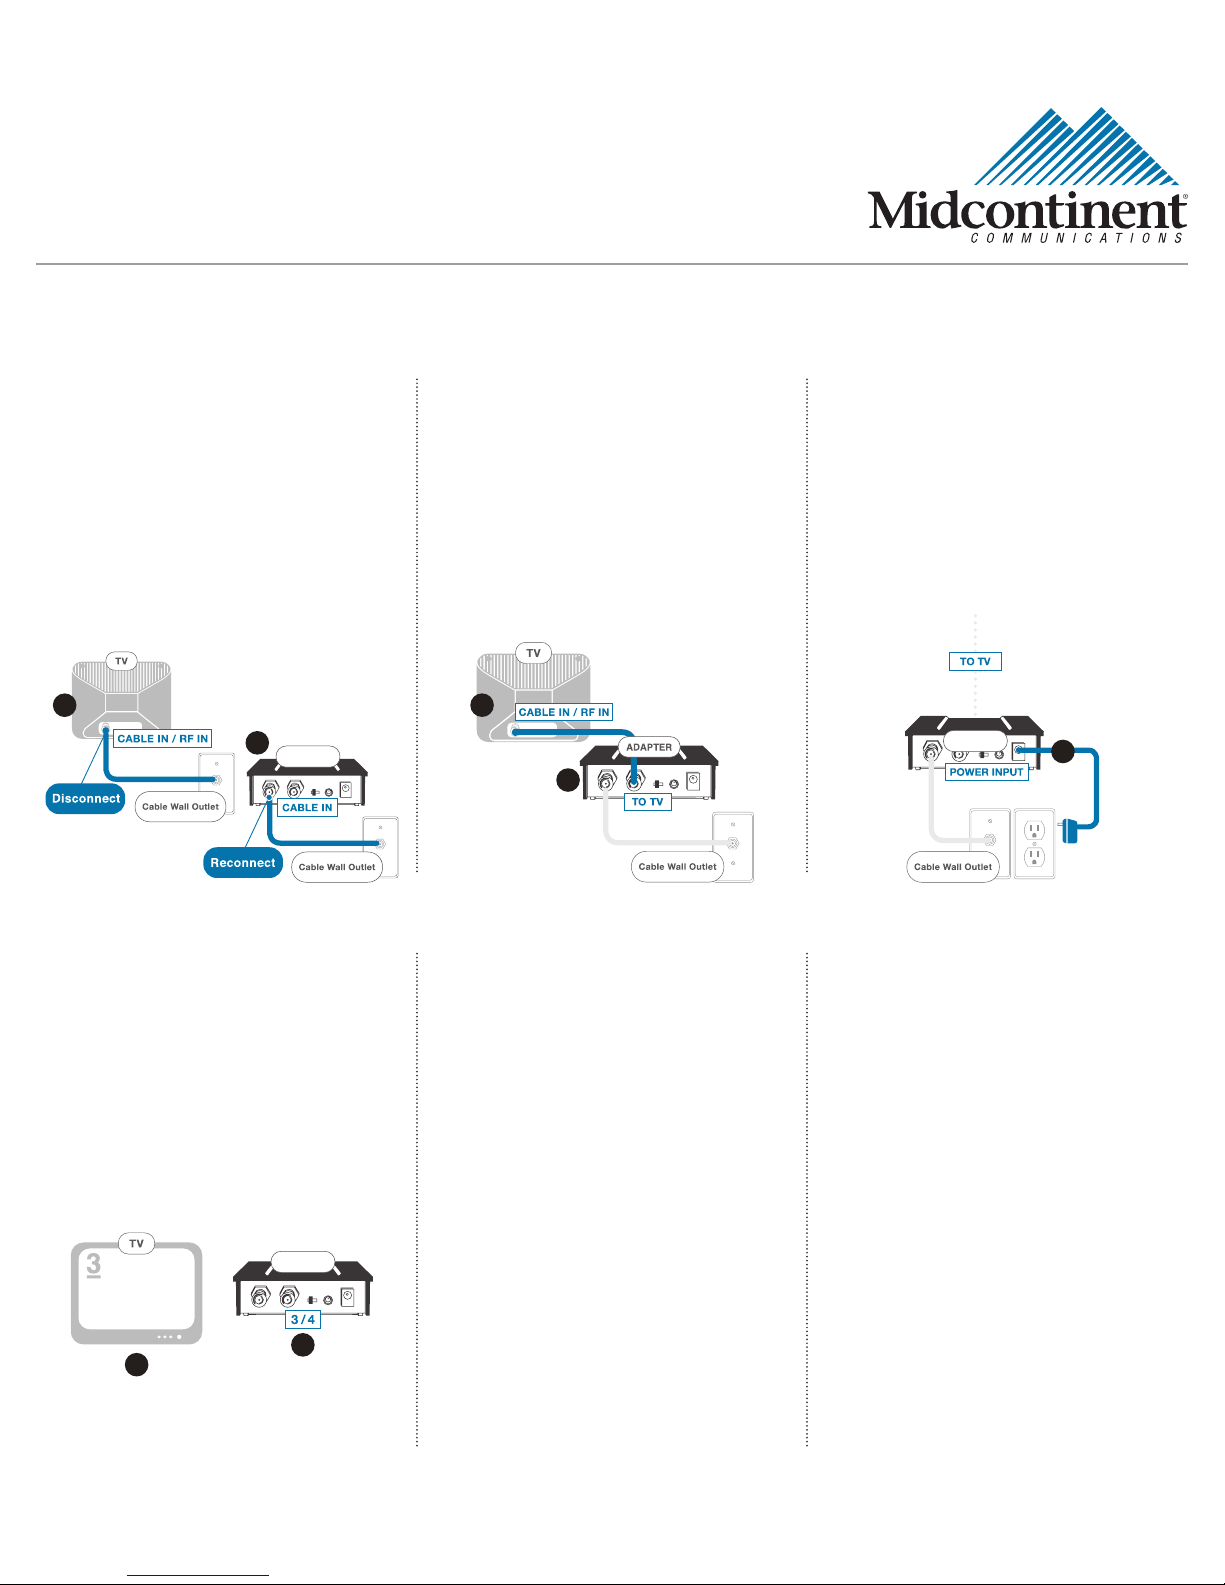
Connect the Digital Adapter
to the Cable Outlet
1: Locate the cable that currently
runs from the cable wall outlet to
the back of your TV. Leave one end
of the cable connected to the wall,
but disconnect the other end from
the back of your TV.
2: Reconnect this end of the cable to
the “Cable In” input on the back of
the Adapter.
Connect the Digital Adapter
to the TV
1: Find the 3-foot coax cable included in
this kit. Connect one end of the cable
to the “To TV” input on the back of
the Adapter.
2: Connect the other end to the
“Cable In/RF In” input on the
back of your TV.
Power Up
1: Plug the round end of the power cord
into the “Power” input on the back of
the Adapter.
2: Plug the other end into a live power
outlet or surge protector.
1
2
ADAPTER
2
1
Step 4: Step 5: Step 6:
Set the Channel
1: Turn on your TV and tune it to
channel 3. Make sure your volume
is on.
2: Set the switch on the back of the
Adapter to channel 3.
Note: If you do not have a picture
after completing the activation, you
may need to switch both your TV
and Adapter to channel 4.
ADAPTER
2
1
Activate
1: You must connect all Digital Adapters
before activating. If you are going
to mount the Adapter to the back of
the TV, do not do so until after the
Adapter is activated.
2: Your Digital Adapter needs up to
15 minutes to sync before activating.
Check the green light on the front
panel. If it’s blinking twice, you’re
ready for activation.
3: Ensure your remote control has
been programmed for your TV.
Note: See the “Using Your Remote
Control” panel on page 3 for
programming steps.
4: To activate your device,
call 1.800.888.1300 and
follow the prompts or visit
123Free.midcocomm.com.
Conrm Your Service
1: After completing Step 5,
wait a few minutes.
2: Make sure your TV is on.
3: Conrm that the Adapter is
connected to the power outlet
and that the light on the front is
solid (not blinking).
4: Using the remote control to operate
your Digital Adapter, scroll through
your channels and make sure they
are all working.
Note: If the light is blinking, or your
channels are not showing up, turn
to the Troubleshooting section of
this guide.
ADAPTER
1
NOTE: Illustrations used in this installation guide are for reference only and may differ from the actual product. Digital Adapter Quick Start Guide - 1
Page 2
Standard Digital Adapter
Quick Start Guide
Installation and Activation Steps: TV+VCR
Step 1: Step 2: Step 3:
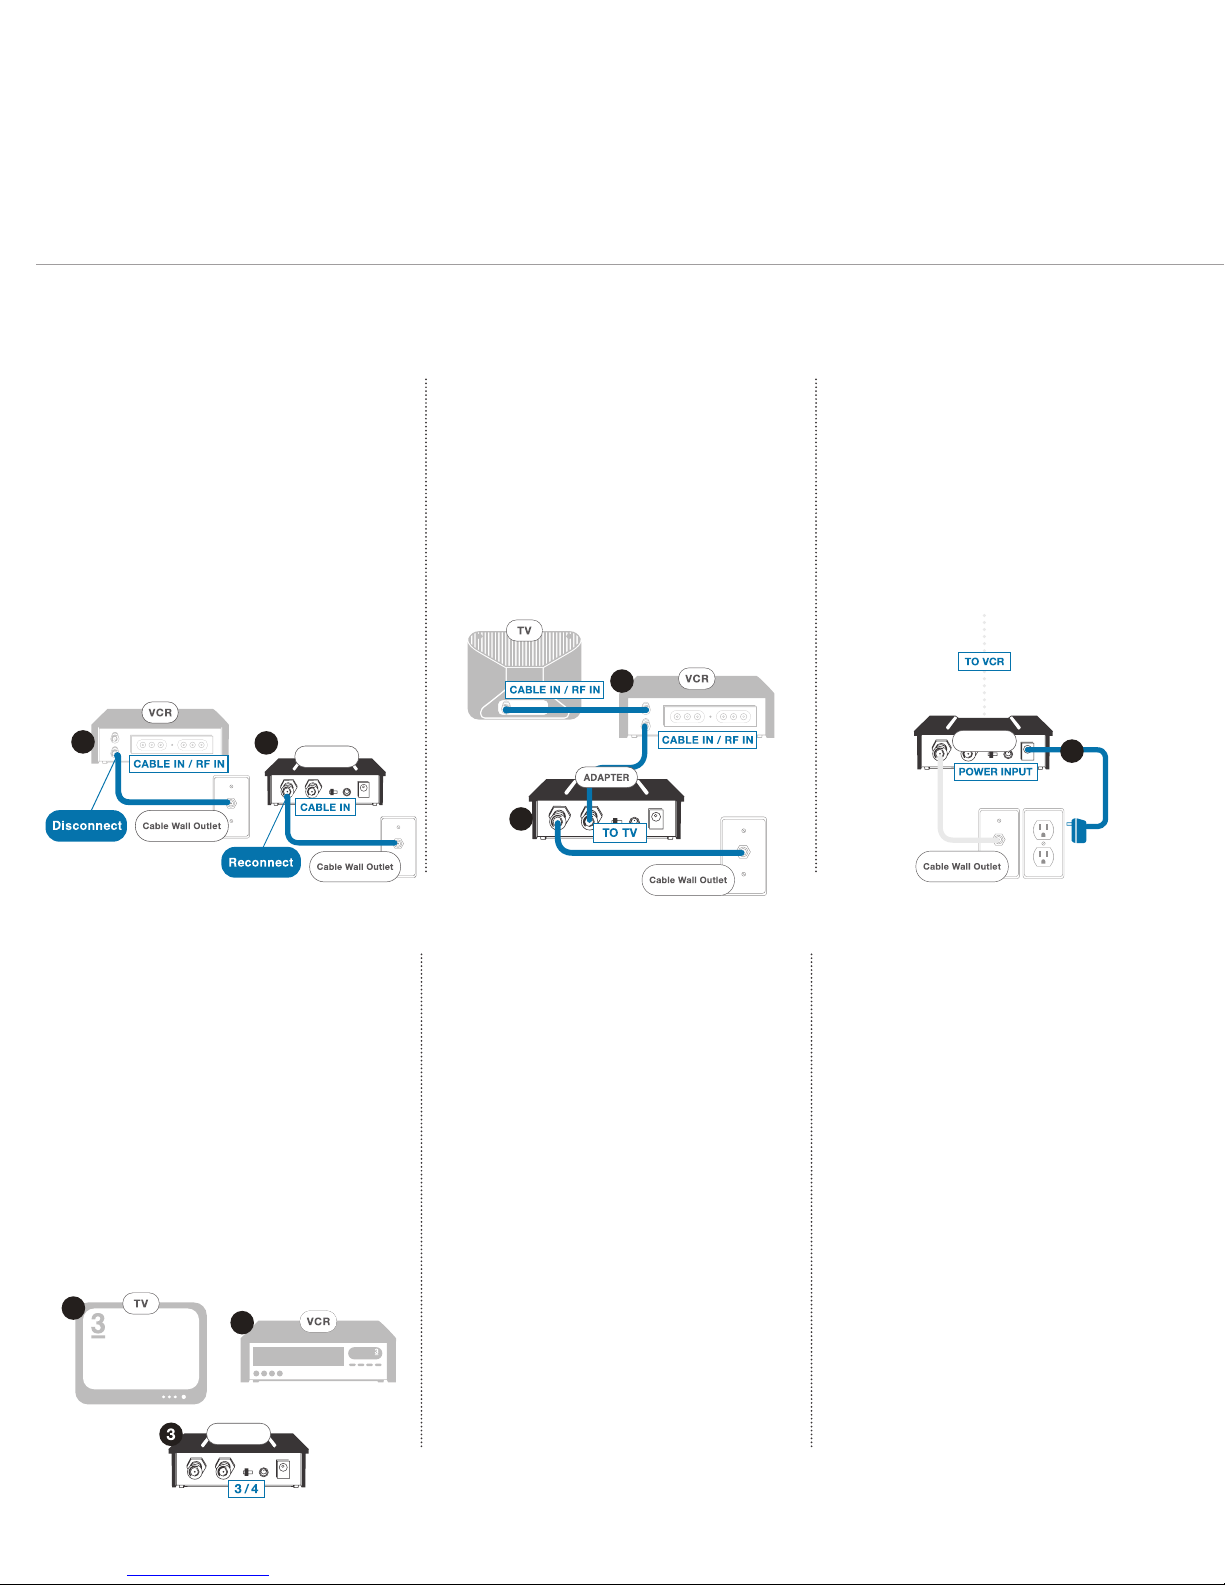
Connect the Digital Adapter
to the Cable Outlet
1: Locate the cable that currently
runs from the cable wall outlet
to the back of your VCR (or other
recording device). Leave one end
of the cable connected to the wall,
but disconnect the other end from
the back of your VCR.
2: Reconnect this end of the cable to
the “Cable In” input on the back of
the Adapter.
Connect the Digital Adapter
to the VCR
1: Find the 3-foot coax cable included in
this kit. Connect one end of the cable
to the “To TV” input on the back of
the Adapter.
2: Connect the other end to the
“Cable In/RF In” input on the
back of your VCR.
2
Power Up
1: Plug the round end of the power cord
into the “Power” input on the back of
the Adapter.
2: Plug the other end into a live power
outlet or surge protector.
1
2
ADAPTER
1
Step 4: Step 5: Step 6:
Set the Channel
1: Turn on your TV and tune it to
channel 3. Make sure your volume
is on.
2: Turn on your VCR and tune it to
channel 3.
3: Set the switch on the back of the
Adapter to channel 3.
Note: If you do not have a picture
after completing the activation,
you may need to switch your TV,
VCR and Adapter to channel 4.
1
2
ADAPTER
Activate
1: You must connect all Digital Adapters
before activating. If you are going
to mount the Adapter to the back of
the TV, do not do so until after the
Adapter is activated.
2: Your Digital Adapter needs up to
15 minutes to sync before activating.
Check the green light on the front
panel. If it’s blinking twice, you’re
ready for activation.
3: Ensure your remote control has been
programmed for your TV.
Note: See the “Using Your Remote
Control” panel on the next page for
programming steps.
4: To activate your device,
call 1.800.888.1300 and
follow the prompts or visit
123Free.midcocomm.com.
Conrm Your Service
1: After completing Step 5,
wait a few minutes.
2: Make sure your TV is on.
3: Conrm that the Adapter is
connected to the power outlet
and that the light on the front is
solid (not blinking).
4: Using the remote control to operate
your Adapter, scroll through your
channels and make sure they are
all working.
Note: If the light is blinking, or your
channels are not showing up, turn
to the Troubleshooting section of
this guide.
ADAPTER
1
2 - Digital Adapter Quick Start Guide
Page 3

Troubleshooting Tips
The Digital Adapter will
not power on.
The power light is
blinking.
The Digital Adapter
power light is on (not
blinking), the TV is on,
however programming
is not viewable.
A power icon is located on the front panel. If it is illuminated green (either ashing or
steady), the Adapter is on. If the power icon is not illuminated:
• Check to see if you have plugged the Digital Adapter into a power outlet that has an
on/off wall switch. It is recommended to use an outlet that does not have a wall switch
if at all possible.
• Verify that the AC power cord on the back of the Digital Adapter is securely connected
and completely plugged into the electrical wall outlet.
• Plug your Digital Adapter into another electrical wall outlet to ensure that the wall outlet
you are using is working.
If the power light is blinking, your Digital Adapter is not authorized. You can authorize your
Digital Adapter by following step 5 in your instructions or call us at 1.800.888.1300.
• Long continuous blink: The Digital Adapter is in a “hunt” mode. This means that it
is not ready to be authorized.
If you tried to authorize your Digital Adapter during the “hunt” mode, the Digital Adapter
will not be authorized. Wait until the Digital Adapter shows two short blinks and then try
authorizing again.
• Three short blinks: The Digital Adapter is updating itself. Wait until the Digital Adapter
shows two short blinks and then try authorizing again.
• Two short blinks: This means that your Digital Adapter is ready to be authorized.
• Once your Digital Adapter is authorized, a solid power light will indicate normal
operation mode.
• Try a different channel; you may be on an unauthorized channel.
• Check to be sure that your TV is on the correct input setting.
• The TV and the Digital Adapter need to be set to the same channel (either channel
3 or 4). Check the channel on the TV and then set the Digital Adapter to the same
channel (3 or 4). You can nd the channel toggle switch on the back of the Digital Adapter.
• Check the cable between the TV and the Digital Adapter. If it is loose, tighten the
connections.
• Check the cable between the Digital Adapter and the cable wall outlet. If it is loose, tighten the connections.
• Unplug power from the rear of the Digital Adapter for 15 seconds. Plug it back in and
wait until the power light is solid.
The remote control
does not work.
My television has
no sound.
My remote will not
control my TV.
NOTE: Illustrations used in this installation guide are for reference only and may differ from the actual product. Digital Adapter Quick Start Guide - 3
• Check to be sure the batteries have been installed and they are installed properly.
• Be sure that nothing is between your remote and the Digital Adapter.
• Be sure that you are pointing your remote at the Digital Adapter or the Remote Control
Signal Receiver (used when the Digital Adapter is mounted to the back of the TV).
• Use your remote to check if the Mute button has been activated. If so, you need to
deactivate the Mute button. Make sure the volume is turned up on your television.
• Unplug power from the rear of the Digital Adapter for 15 seconds. Plug it back in and
wait until the power light is solid.
• The remote control must be programmed to your TV; instructions are included with your
remote. If you have programmed your remote control, try to program it again.
• Check the batteries to be sure they are installed correctly.
• Be sure you are pointing the remote at the TV.
Page 4
Standard Digital Adapter
Quick Start Guide
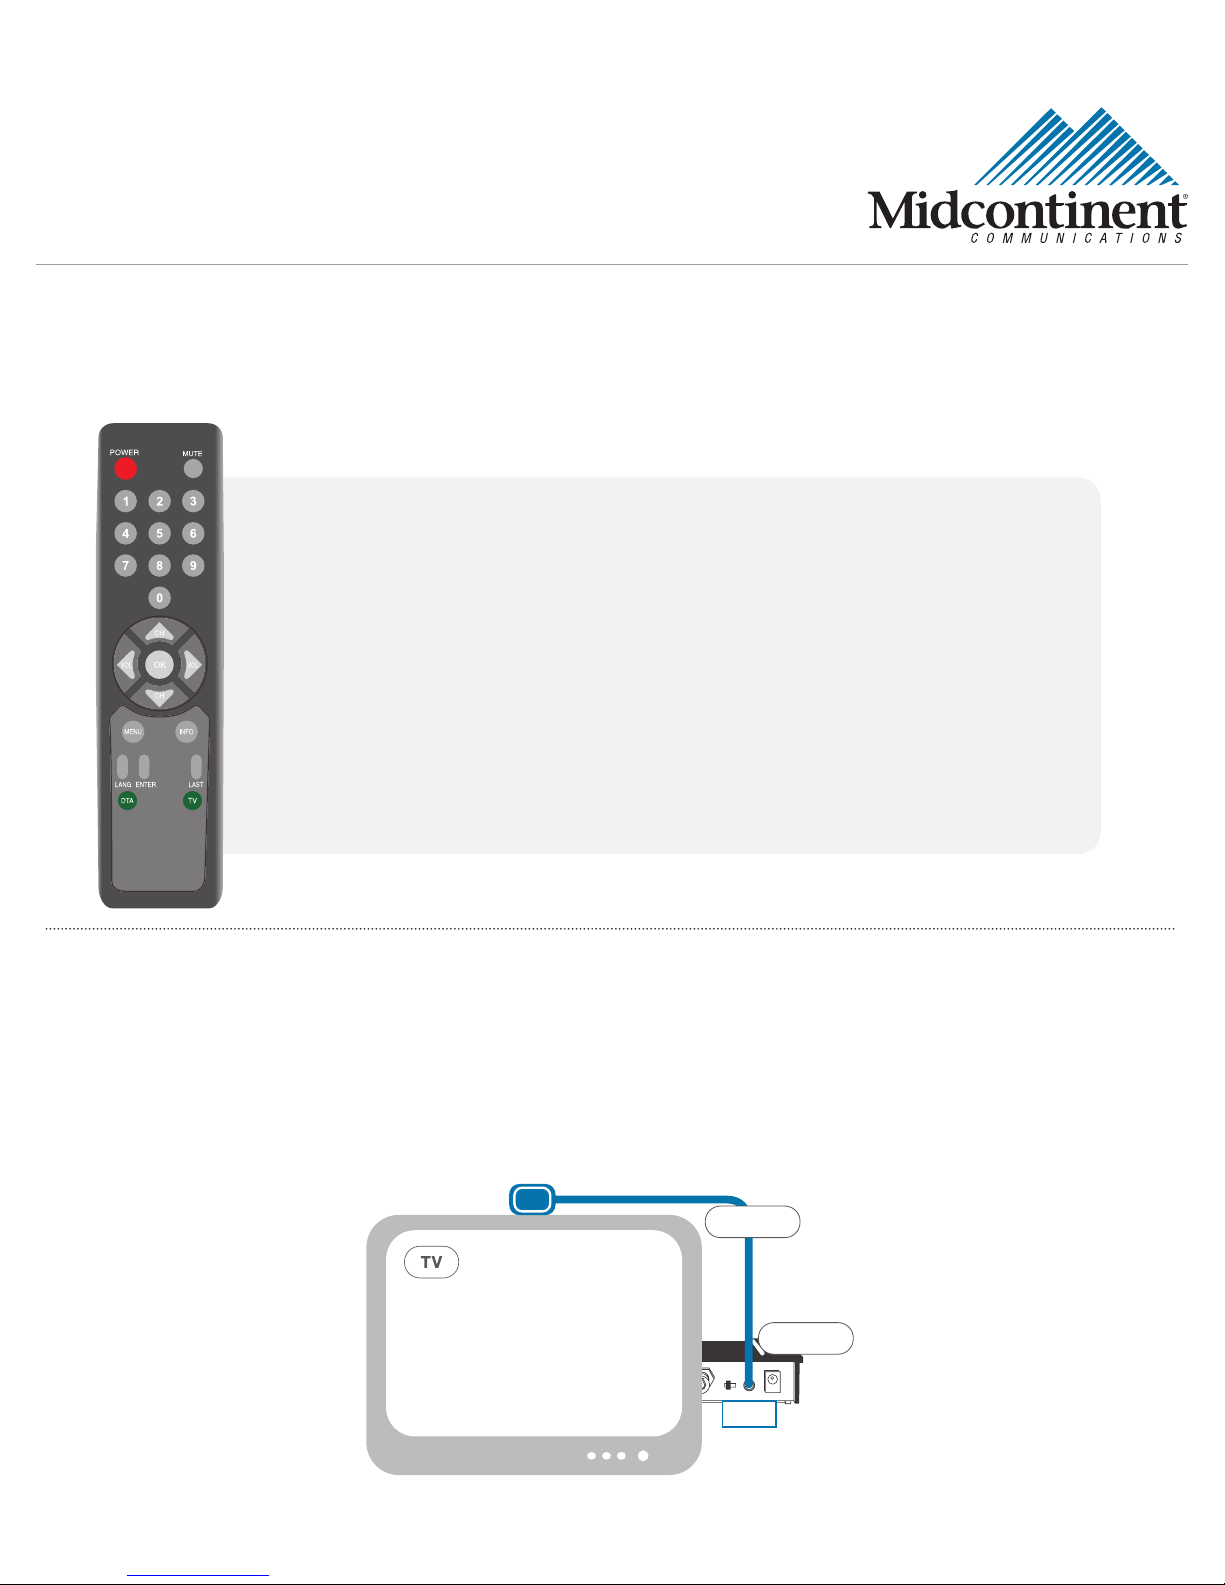
Using Your Remote Control
The Digital Adapter you received will have the remote control illustrated below. Follow the appropriate instructions to program
the remote for use with the Digital Adapter and your TV. For additional information or troubleshooting, please refer to the user
guide included with the remote control.
1. Turn TV on.
2. Press the TV button and OK button simultaneously for 3 seconds. The POWER LED light
will turn on for 20 seconds indicating the unit is ready to be programmed.
3. Locate the 3-digit code(s) for your TV found in the remote user guide.
4. Enter the 3-digit code(s) one at a time using the keypad on the remote. As soon as you
have entered the correct 3-digit code, your TV will turn off. Press the POWER button to
turn your TV back on.
a. If the TV turns back on, press TV button to lock in the code. The POWER LED light
will blink twice to conrm that the code was successfully stored.
OR
b. If the TV does not turn back on or if any of the functions on your remote do not work,
repeat step 4 using the next 3-digit code number listed until you nd the best code for
your TV.
Using the Remote Control Signal Receiver
In order for your remote to work properly, the Digital Adapter needs to be visible or use the Remote Control Signal Receiver.
If you want to mount the Digital Adapter to the back of the TV so it is out of sight, or if the signal from the remote will not reach
the Adapter in its current location, use the Remote Control Signal Receiver.
Plug the smaller end of the Remote Control Signal Receiver into the “IR In” port on the back of the Digital Adapter. Position the
other end of the Remote Control Signal Receiver where it can be seen from the front of the TV.
RECEIVER
Make sure all
plugs are pushed
in completely.
ADAPTER
IR IN
NOTE: Illustrations used in this installation guide are for reference only and may differ from the actual product. Digital Adapter Quick Start Guide - 4
MC53 SD Cisco UG 1012 Web
 Loading...