

Page 1

1
Cordless
Hosted VoIP
Quick Start Guide
Get the most out of our Hosted VoIP service
with these handy instructions for the Yealink
W56P/W56H IP DECT cordless device.
Page 2

© 2018 Midcontinent Communications. All rights reserved. 2
Contents
Equipment ...................................................................................................................... 4
Base Station ..................................................................................................................................... 4
Handset and Charger Cradle ................................................................................................... 7
Features ............................................................................................................................ 12
Physical Features ........................................................................................................................... 12
Main Menu ............................................................................................................................... 12
Ringtones ........................................................................................................................................ 14
Calls ............................................................................................................................................... 15
Contacts.................................................................................................................................. 23
Voicemail ............................................................................................................................................. 25
Online Resources ........................................................................................................ 27
Helpful Tools and Tips ................................................................................................................. 27
My Account and Bill Pay ................................................................................................................ 27
Policies ............................................................................................................................................. 27
24/7 Support ............................................................................................................................. 27
Page 3

© 2018 Midcontinent Communications. All rights reserved. 3
Make the Right Connection
Thanks for choosing Midco for your business Hosted VoIP service!
Your experience with this service matters to us. We hope you find this
quick start guide is a helpful tool to get you going with this service.
We have even more tips and tools at Midco.com/Business/Support,
where you can learn more about different features, read common
questions and answers, and get tips about your services. This is where
you can also find help using our online management tool, known as the
CommPortal.
Please note that some features must be enabled on your account so
that you can use them. Contact our business support team for
questions and assistance at 1.800.888.1300.
Page 4

© 2018 Midcontinent Communications. All rights reserved. 4
Equipment
This phone is a full-featured mobile
device, which provides reliable
and convenient wireless voice
communications. In addition, it provides
many widely accepted benefits of the
DECT standard, including high security,
scalability and low power consumption.
This equipment comes with a base
station, charger cradle and cordless
handset.
Base Station
Set up the base station and the charger cradle at a central location on a flat,
non-slip surface. The device’s unobstructed coverage is:
• Indoors: 65-165 feet
• Outdoors: 985 feet
To connect the power (over Ethernet):
Connect the Ethernet cable between the internet port on the base station and an
available port on the in-line power switch/hub. After successful startup, all LEDs
on the base station illuminate green in sequence.
Page 5

© 2018 Midcontinent Communications. All rights reserved. 5
Base Station Description
After the base station starts
up successfully and the
handset is registered to the
base station, all LEDs on the
base station illuminate green
in sequence.
Item Description
1
Paging key
• Locates a misplaced handset.
• Toggles the registration mode.
• Resets base station to factory settings.
2
Registration LED
Indicates the mode of the base station:
• Fast flashes green when base
station is in paging mode.
• Slow flashes green when base
station is in registration mode.
• Illuminates solid green when at least one
handset is registered to a base station.
3
Network Status LED
Indicates the network status:
• Slow flashes green when
network is unavailable.
• Illuminates solid green when
network is available.
4
Power Indicator LED
Indicates base station’s power status:
• Slow flashes green during base
station fir mware upgrade.
• Illuminates solid green when
base station is powered on.
Page 6

© 2018 Midcontinent Communications. All rights reserved. 6
To restart the base station via the handset:
1. Press OK to enter the main menu.
2. Select Settings, System Settings and then Base Restart.
3. Enter the system PIN (default: 0000).
4. Press Done.
The registration LED and network status LED will turn off simultaneously. After a
period of time, the LED indicators will illuminate solid green again, indicating the
base station has restarted successfully.
To reset the base station via the handset:
1. Press OK to enter the main menu.
2. Select Settings, System Settings and then Base Reset.
3. Enter the system PIN (default: 0000).
4. Select Done.
All individual settings for the base station will reset to factory defaults. This may
take a few minutes. Do not power off until the base station starts up successfully.
Page 7

© 2018 Midcontinent Communications. All rights reserved. 7
To set up the charger cradle and charge the handset:
1. Connect the USB plug on the charger cradle to the
DC5V port on the power adapter.
2. Connect the power adapter into an electrical power
outlet.
3. Place the handset in the charger cradle.
The handset batteries take about three hours to fully charge. After charging,
the handset is ready for use. The batteries’ charging status displays in the top
right corner of the handset’s LCD screen – and will indicate a low battery status.
To restart the handset:
1. Press OK to enter the main menu.
2. Select Settings, System Settings and then Handset Reset.
3. The handset will ask, “Reset handset to default?” Press Yes to reset the
handset or
No to cancel.
Page 8
© 2018 Midcontinent Communications. All rights reserved. 8
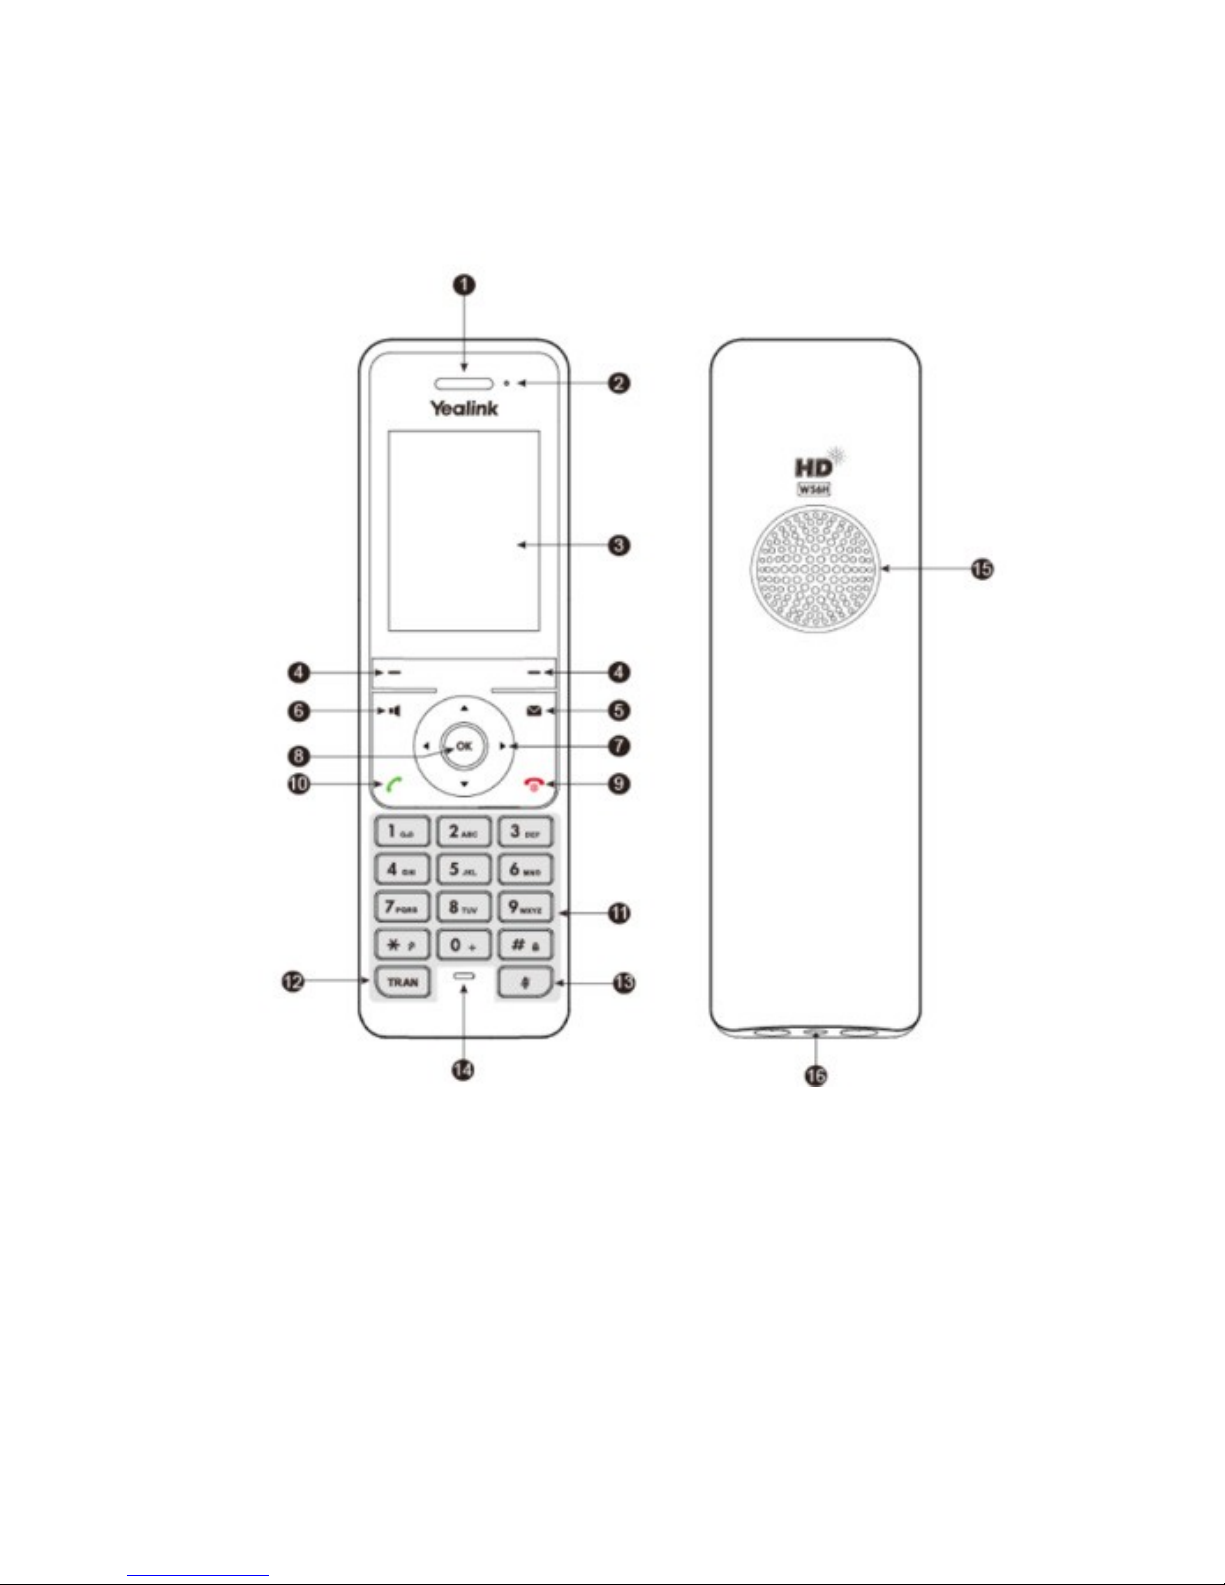
Handset Overview
The main hardware components of the W56P/W56H handset are the LCD screen
and the keypad.
Page 9

© 2018 Midcontinent Communications. All rights reserved. 9
Item Description
1 Earpiece Outputs audio during the earpiece call
2
Power Indicator LED
Indicates handset power and some feature statuses.
• Receives an incoming call (fast flashing red)
• Receives a voicemail or a missed
call (slow flashing red)
• Battery charging (solid red)
3
LCD Screen
Shows call information, handset status,
icons and prompt messages.
4
Soft Keys
Perform various actions on the LCD screen
through specified selection keys.
5 Message Button Accesses voicemail or missed calls.
6 Speaker Button Switches between earpiece and speaker modes.
7
Up and Down
Navigation Buttons
• Move the cursor.
• Act as shortcuts.
• Scroll through displaying information.
8
Left and Right
Navigation Buttons
• Move the cursor.
• Act as shortcuts.
• Adjust the ringer volume.
• Switch among the on-screen selection options.
9
Power/End Call Button
• Returns user from the menu screen to the
idle screen with a short press of the button.
• Turns the handset on or off when user
holds down button for one second.
• Cancels actions or ends a call.
• Rejects an incoming call.
10
Call Button
• Answers an incoming call.
• Enters the redial calls list.
• Places a call in earpiece or earphone mode.
11
Alphanumerical
Keypad
Allows entry of digits, letters and special characters.
12 TRAN Button Transfers a call to another party.
13 Mute Button Toggles mute feature on or off.
14 Microphone Picks up audio during earpiece and hand-free calls.
15 Speaker Provides hands-free (speaker) audio output.
16 3.5 mm Earphone Jack Allows connection to a standard 3.5 mm earphone.
Page 10

© 2018 Midcontinent Communications. All rights reserved. 10
The following icons may appear on the handset’s LCD screen.
Icon Description
Earpiece mode on
Earpiece mode off
Speaker mode on
Keypad locked
Voicemail present
Silence mode on
Call forward
Contact
Received calls
Missed calls
Placed calls
Call on hold
Call muted
Conference call
Do not disturb
Intercom call
Shared line on idle
Shared line actively dialing, in conversation,
or placed on private hold
Share line receiving an incoming
call, or placed on public hold
Unassigned outgoing line
Anonymous call enabled
Anonymous rejection enabled
Page 11

© 2018 Midcontinent Communications. All rights reserved. 11
To turn the handset on, use one of these options:
• Press and hold the Power/Call button until the screen lights up.
• Place the handset in the charger cradle. The handset will turn on automatically.
To turn the handset off:
When the handset is idle, press and hold the Power/End Call button.
Page 12

© 2018 Midcontinent Communications. All rights reserved. 12
Features
Physical Features
In ideal, unobstructed conditions, the cordless device includes these distance
and time capabilities. Keep in mind that other wireless devices, concrete or brick
walls, and competing wireless signals from neighbors can interfere with the
device’s range.
• Indoors range: 65-165 feet
• Outdoors range: 985 feet
• Standby time: 400 hours
• Talk time: 30 hours
Main Menu
The top-level menu consists of seven items:
• Status
• Intercom
• Voicemail
• Call Features
• Directory
• Settings
• History
To access the main menu on the handset:
1. When the handset is idle, press OK. The seven menus appear as icons on
screen.
2. Use the up, down, left and right navigation buttons to scroll through, and
select
menu items.
3. Press OK to enter the submenu you prefer.
Page 13

© 2018 Midcontinent Communications. All rights reserved. 13
Number Description
1 Displays the selected menu item name.
2
Displays the main menu icon
Status: Displays the base, handset and line status.
Intercom: Makes an internal call to another Yaelink cordless device.
Voicemail: Accesses voicemail.
Call Features: Accesses call features for call forward, do not disturb
(DND), call waiting, anonymous call rejection and anonymous call.
Directory: Accesses the contact directory and favorites.
Settings: Configures the handset settings.
History: Accesses the call history list.
3 Displays the two soft key labels.
Page 14

© 2018 Midcontinent Communications. All rights reserved. 14
Ringtones
You can set different ringtones to distinguish the incoming lines from each other
on your handset, or to distinguish an incoming intercom call.
To configure ringtones:
1. Press OK to enter the main menu.
2. Select Settings, Audio, Ring Tones and then Melodies.
3. Use the up or down navigation buttons to highlight the Intercom Call option
or the desired
line.
4. Use the right or left navigation buttons to select and listen to
different ringtones.
5. Select Save to accept the change or Back to cancel.
To adjust the ringer volume using the menu:
1. Press OK to enter the main menu.
2. Select Settings, Audio, Ring Tones and then Volume.
3. Use the left or right navigation buttons to decrease or increase the
ringer volume.
4. Select Save to accept the change or Back to cancel.
To adjust ringer volume when the handset is idle or ringing:
• Use the left navigation button to decrease the ringer volume or the right
navigation button to increase the ringer volume.
• Press Save to accept the change or Back to cancel.
Page 15

© 2018 Midcontinent Communications. All rights reserved. 15
Call Features
To place a call:
1. Use the keypad to enter the desired number.
2. Press the Call button or OK.
To place a call if there are multiple lines assigned to your handset as outgoing lines:
1. Press Line to select the desired line. (If you don’t select a line, the handset will
use the default outgoing line.)
2. Select OK or Dial.
3. Use the keypad to enter the desired phone number.
4. Press the Call button or OK.
To place a call from the local directory:
1. Press OK to enter the main menu.
2. Select Directory.
3. Use the up or down navigation buttons to highlight the contact you
want to call.
4. Press the Call button to place the call.
• If the contact has one number in your directory, the device will dial
the number.
• If the contact has multiple numbers stored in your directory, the
screen will display each number. Press the up or down navigation
buttons to locate the desired
number and highlight it. Press the Call
button.
OR
1. When the handset is idle, press the down navigation button.
2. Use the up or down navigation buttons, and highlight the desired number.
3. Press the Call button to place the call.
• If the contact has one number in your directory, the phone will dial the
number.
• If the contact has multiple numbers stored in your directory, the screen
will display each number. Press the
up or down navigation buttons to
locate the desired number and highlight it. Press the Call button to
place the call.
Page 16

© 2018 Midcontinent Communications. All rights reserved. 16
To place a call from the call history:
1. When the handset is idle, press History.
2. Use the up or down navigation buttons to highlight the desired list, and then
press
OK.
3. Use the up or down navigation buttons to select a previously dialed number.
4. Press the Call button to place the call.
To place an internal call to one handset via another handset:
This feature applies when calls are made to another Yaelink cordless handset
registered to the same base station.
1. Press OK to enter the main menu, and select the Intercom button. Or, press
the
up navigation button.
2. The screen will display other registered handset names. Press the up or down
navigation buttons to highlight the handset you want to call. Or, select All HS
to dial all handsets.
3. Press the Call button, the speaker button or OK to place the call.
To place a new call during an active call via the handset:
1. Press New Call to place the active call on hold.
2. Use the keypad to enter the desired number in the Call To field.
3. Press the Call button, the speaker button or OK to place the call.
You can place up to two calls at the same time on your handset.
To redial the last dialed number:
Press the Call button twice when the handset is idle. It will dial the last dialed
number.
To redial a previously dialed number:
1. When the handset is idle, press the Call button.
2. Use the up or down navigation buttons to select a previously dialed number.
• If the number needs to be edited, select Options and then Edit Before
Call to edit the number.
3. Press the Call button again.
Page 17

© 2018 Midcontinent Communications. All rights reserved. 17
To answer a call:
You can answer a call in three ways:
• Using the handset: Press the Call button or Accept.
• Using the speaker: Press the speaker button.
• Using the headset: With a headset connected, press Accept.
To ignore an incoming call:
Press Silence or the End Call (red phone) button.
To answer a call while on another call:
Press the Call button, the speaker button, OK or Accept. This places the original
call on hold and answers the incoming call.
To end a call:
Either press the End Call (red phone) button, or place the handset in the
charger cradle.
To check the local call history:
1. When the handset is idle, press History.
2. Use the up or down navigation buttons to highlight the desired call history
list, and then press OK.
3. Use the up or down navigation buttons to highlight a previous local call, and
then select O
K.
The screen will display the detailed information about the caller.
To mute a call:
During an active call, press the Mute button to mute your voice. Press the Mute
button again to unmute the call.
Call Hold
To place a call on hold:
During a call, press Options and then Hold.
• If you have a call on hold and then place the handset on the charger
cradle, the call will continue to hold and will not disconnect.
To resume a held call:
When one call is on hold:
Page 18

© 2018 Midcontinent Communications. All rights reserved. 18
• Press Resume, the speaker button or the Call button.
Page 19

© 2018 Midcontinent Communications. All rights reserved. 19
When two calls are on hold:
• Use the up or down navigation buttons to select the appropriate call, and
press
Resume
• Select Swap to switch between the two calls.
Call Park
The call park feature allows you to put a call on hold on one phone and continue the
conversation from another desktop calling device.
To park a call:
1. After answering the call, press the Transfer softkey.
2. Dial 101. The call is now held in Call Park 1.
• If you are parking more than one call at a time, dial 102 for Call Park
2, dial 103 for Call Park 3, and so forth.
You can end the call only after the call is transferred.
To retrieve a parked call:
1. Press the Call button to hear the dial tone.
2. Dial *46, and then dial 101 to pick up Call Park 1.
• Dial 102 to retrieve Call Park 2, dial 103 for Call Park 3, and so
forth.
3. Press the Dial button to answer the parked call.
Speed Dial
You can assign up to eight speed dial numbers – making it easier to call important
or frequently called contacts.
To assign a speed dial number:
1. Access the speed dial setup in one of these ways:
• Press OK to enter the main menu. Select Settings, Telephony and then
Speed Dial.
• On the keypad, press and hold down a number not already assigned to a
number f
or speed dial.
The screen will display all the available speed dial keys.
Page 20

© 2018 Midcontinent Communications. All rights reserved. 20
2. Use the up or down navigation buttons to highlight the desired speed dial key,
and then press
Assign.
3. Select the desired contact from the directory. Press OK to assign the number
to the selected speed dial key.
• If more than one number is stored for the contact, use the up or down
navigation buttons to select one number. Press OK.
To delete a speed dial number:
1. Press OK to enter the main menu.
2. Select Settings, Telephony and Speed Dial. The screen will display all the
available speed dial keys.
3. Use the up or down navigation buttons to highlight the desired speed dial key.
4. Press Options and then Clear Key to delete the assigned speed dial
number.
To place a call using a speed dial key:
When the handset is idle, use the keypad to press and hold the number assigned to
the number you want to call.
Auto Answer
With auto answer, you can answer incoming calls by picking up the handset from
the charger cradle. The auto answer feature works only if the handset is placed in
the charger cradle.
To configure auto answer:
1. Press OK to enter the main menu.
2. Select Settings, Telephony and Auto Answer.
3. Press Change.
• To enable or turn on this feature, make sure the Auto Answer checkbox
contains a
checkmark.
• To disable or turn off this feature, make sure the Auto Answer checkbox is
blank (no checkmark).
Page 21

© 2018 Midcontinent Communications. All rights reserved. 21
Call Forwarding
With call forwarding, you can forward incoming calls to another phone. There
are three forwarding types:
• Always Forward: Incoming calls are immediately forwarded.
• Busy Forward: Incoming calls are forwarded if the line is busy.
• No Answer Forward: Incoming calls are forwarded if not answered after a
period of time.
To turn call forwarding on or off:
1. Press OK to enter the main menu.
2. Select Call Features and then Call Forward.
3. Use the up or down navigation buttons to select the desired phone line.
Press
OK.
4. Use the up or down navigation buttons to highlight the desired
forwarding type (Always Forward, Busy Forward or No Answer Forward).
Press
OK.
5. Set the Status using the right or left navigation buttons to choose
Enabled or Disabled.
• If you’re setting up a No Answer Forward status, you must choose
the After Ring Time, the amount of time to wait before forwarding a
call. Press the right or left navigation buttons, and choose the desired
ring time.
6. Enter the Target number you want to receive forwarded calls.
7. Select Save.
Page 22

© 2018 Midcontinent Communications. All rights reserved. 22
Call Transfer
You can transfer a call to another party in three different ways:
• Blind (Cold) Transfer: Transfer a call directly to another party without
consulting or introducing the caller.
• Semi-Attended Transfer: Transfer a call when receiving the ring-back.
• Attended (Warm) Transfer: Transfer a call with prior consulting or an
introduction.
To perform a blind (cold) transfer:
1. During a call, press Options, and then select Transfer. Or you can press the
TRAN button.
2. Enter the number or handset you want to receive the transferred call.
3. Press Transfer or TRAN.
To perform a semi-attended or attended (warm) transfer:
1. During a call, press Options, and then select Transfer. Or you can press the
TRAN button.
2. Choose where to route the call in one of these ways.
• Enter the number or handset you want to receive the transferred call.
Press the
Call button.
• Press Directory, and select the desired contact. If a contact has both an
office number and a mobile number, select the desired number. Then
press the
Call button.
3. Select Transfer to connect the parties.
To transfer a call to another party when there are two calls on the handset:
1. Dial the number for the first party.
2. Put the first call on hold, and dial the number of the second party.
3. Select the call you want to transfer.
4. Press Options and then Call Transfer.
5. The screen will display the target number that will receive the
transferred call. Press
Transfer to connect the parties.
Page 23

© 2018 Midcontinent Communications. All rights reserved. 23
Conference Calls
The handset supports up to three parties (including yourself) in a conference
call. You create a conference between an active call and a held call on the
handset (on the same line or different lines).
To set up a local conference call via the handset:
1. Dial the first party’s number.
2. Press Options and then Conference.
3. Choose your conference call participants in one of these ways.
• Dial the number of the second party, and then press the Call button,
the
speaker button, OK or Conf.
• Press Directory, and select the desired contact and number.
• If the contact has multiple numbers stored, select the number
you wish to call. Press the
Call button, the speaker button, OK
or Conf.
If you wish, when the second party answers the call, you can consult
with the individual before adding the call to the conference.
4. When you have an active call and a held call, press Conf. to set up a
conference call.
To join two calls in a conference:
1. Dial the first party’s number, then the second party’s number.
2. Select the desired call.
3. Press Options and then Conference. Three participants will be joined in
the call.
To end a conference call:
During a conference call, simply select End or the End Call button.
Page 24

© 2018 Midcontinent Communications. All rights reserved. 24
Contacts
Local Directory
You can store frequently used contacts in the handset’s local directory. These can
be added manually or from the call history.
To add a contact to the Directory manually:
1. Press OK to enter the main menu.
2. Select Contacts.
3. Press Options and then New Contact.
4. Enter the contact’s Name, Number and Mobile information.
5. Press Save.
To add a contact to the Directory from the call history:
1. When the handset is idle, press History.
2. Select a history option: All Calls, Missed Calls, Placed Calls, or
Received Calls. Press OK.
3. Press the up or down navigation buttons to locate and highlight the
past caller in the list.
4. Press Options, Add to Local and then New Entry.
5. Use the up or down navigation buttons to choose the number type as
Number or Mobile. Press OK.
6. Enter the contact’s Name information.
7. Press Save.
To edit a contact:
1. Press OK to enter the main menu.
2. Select Directory.
3. Press the up or down navigation buttons, and highlight the desired contact.
4. Select Options and then Edit.
5. Edit the contact’s Name, Number and Mobile information as necessary.
6. Select Save.
Page 25

© 2018 Midcontinent Communications. All rights reserved. 25
To delete a contact:
1. Press OK to enter the main menu.
2. Select Directory.
3. Press the up or down navigation buttons to highlight the desired contact.
4. Select Options and then Delete.
To search for and dial a contact:
1. Press OK to enter the main menu.
2. Select Contacts.
3. Using the keypad, enter a few characters of the contact name or number.
Contacts matching your search will appear on the LCD screen when you press
Search.
4. Select a contact to dial.
• If both the office number and mobile number are stored, select the
number you wish to call. Press the Call button, the speaker button, OK or
Conf.
Voicemail
Voicemail allows you to access your phone messages while you're at work or away
from your business. Customize your greeting to let people know they’ve reached the
right person. Some voicemail setup and usage instructions are included here. You can
find additional information on personal greetings, voicemail messages and more at
Midco.com/Business/Support under Hosted VoIP.
To access and set up your voicemail for the first time:
When you have a new voicemail, your phone will alert you. When you pick up your
handset, you'll hear a stutter tone. Also, if your business phone includes it, you'll see a
message waiting indicator light.
1. Access your voicemail system using one of these methods.
• If you’re using your business phone, dial *98.
• If you’re accessing your voicemail from a different location, dial the access
number: 1.800.793.5050.
2. Enter your 10-digit phone number and then #. Then, enter your voicemail PIN
and #.
Page 26

© 2018 Midcontinent Communications. All rights reserved. 26
• Midco provides your voicemail PIN during service setup.
3. The first time you access your voicemail, the system will prompt you to initialize
the setup.
• If you have already completed this, you will hear a message with details
about your current voicemails.
4. After the tone, record your name, and press #. Your recording will play back.
• To change your recorded name, press 1.
• To save your recorded name, press #.
5. Choose one of these greeting types, and follow the voice instructions.
• For a personal greeting, press 1. After the tone, record your greeting, and
press #.
• For a system-generated greeting that includes your name, press 2.
• For a system-generated greeting that includes your phone number, press 3.
• For a system-generated greeting without your name or phone number,
press 4.
To access your voicemail after initial setup:
When you have a new voicemail, your phone will alert you. When you pick up your
handset, you'll hear a stutter tone. Also, if your business phone includes it, you'll see a
message waiting indicator light.
1. Access your voicemail system using one of these methods.
• If you’re using your business phone, dial *98.
• If you’re accessing your voicemail from a different location, dial the
access number: 1.800.793.5050.
2. Enter your 10-digit phone number and then #. Then, enter your voicemail PIN,
and press #.
• Midco provides your voicemail PIN during service setup.
To manage your voicemails when you have messages:
When you have a new voicemail, your phone will alert you. When you pick up your
handset, you'll hear a stutter tone. Also, if your business phone includes it, you'll see a
message waiting indicator light.
1. Access your voicemail system. You will hear a message with details about
your current voicemails.
2. Choose one of these options, and follow the voice instructions:
Page 27

© 2018 Midcontinent Communications. All rights reserved. 27
• Press 1 to play messages.
• Press 2 to send a voicemail message.
• Press 3 to manage greeting options.
• Press 4 for manage mailbox settings.
• Press 7 to leave the mailbox and log in as another subscriber.
• Press 0 for help.
• Press * to exit.
Page 28

© 2018 Midcontinent Communications. All rights reserved. 28
Online Resources
Helpful Tools and Tips
Your experience with Midco matters to us. We want to help you get the most out of your
services. We offer many helpful tools and resources for you at
Midco.com/Business.
Check it out today!
Midco.com/Business/Support
Visit our online library of helpful tools and information for you, including the most
commonly requested resources. Get help with your equipment, online CommPortal, the
Softphone app (if your business uses it), troubleshooting and more.
My Account and Bill Pay
Midco.com/Business/MyAccount
• View and pay your current and past bills online. Set up auto pay or make a one-time
payment. Don’t forget to go green by enrolling in e-statements.
• Sign up to receive email and texts about service maintenance and your account.
Policies
Midco provides Hosted VoIP service to our customers subject to policies established
for the protection of our users, our company and our communities. Visit
Midco.com/Legal, which include these and others:
• Acceptable Use Policy
• Phone Service Terms and Conditions
• Cable, Internet and Phone Subscriber Privacy Notice
• Online Privacy Policy
24/7 Support
Have a question? Let us know! Reach out to us around-the-clock at 1.800.888.1300.
We also offer customer service by email, live online chat
and social media, and at our
local Customer Experience Centers during regular business hours. Just visit
Midco.com/Business/Contact.
Page 29

© 2018 Midcontinent Communications. All rights reserved. 29
BUSINESS
© 2018 Midcontinent Communications. All rights reserved. Updated August 2018.
 Loading...