

Page 1
MIDAS TOUCH INC
1
MAC-1000PEF/PMF Hardware Manual
MAC-1000
Standalone Fingerprint Access Controller
Hardware Manual
Version 1.3.2
Page 2

MIDAS TOUCH INC
2
MAC-1000PEF/PMF Hardware Manual
Table of Contents
Chapter 1 Product Overview ................................................................................................ 5
1.1
Package Contents: ................................................................................................... 5
1.2
Features ................................................................................................................... 6
1.3
Specification ............................................................................................................. 7
Chapter 2 Physical Dimension ............................................................................................. 8
2.1
Dimension ................................................................................................................ 8
2.2
Appearance Introduction .......................................................................................... 8
Chapter 3 System Configuration & Wire Connections ....................................................... 12
3.1
System Configuration ............................................................................................. 12
3.2
Wire Connections ................................................................................................... 13
3.2.1
Installations .................................................................................................... 13
3.2.2
with ACU-30 Wire Diagram ............................................................................ 14
3.2.3
Electronic Lock Setup..................................................................................... 15
3.2.3.1
NO Mode Connection ......................................................................... 15
3.2.3.2
NC Mode Connection ......................................................................... 16
3.2.3.3
Magnetic Door Lock Connection ........................................................ 16
3.2.4
Exit Button/Door Sensor Connection .............................................................. 17
3.2.5
Siren/Alarm Connection ................................................................................. 17
3.2.6
Communication Interface Connection ............................................................ 18
3.2.6.1
RS-485 Connection ............................................................................ 18
3.2.6.2
TCP/IP Connection ............................................................................. 18
3.2.7
Slave Reader Connection .............................................................................. 19
3.2.8
Power Supply Connection .............................................................................. 20
3.2.9
DVR Connection ............................................................................................ 20
Chapter 4 Setting ............................................................................................................... 21
4.1
RS-485/ TCP/IP Selection (to PC) .......................................................................... 21
4.2
Function Settings .................................................................................................... 22
4.2.1
Card Manage ................................................................................................. 23
4.2.1.1
Add Fingerprint ................................................................................... 23
4.2.1.2
Delete Fingerprint ............................................................................... 26
4.2.1.3
Change Fingerprint............................................................................. 28
4.2.1.4
Change Schedule ............................................................................... 29
4.2.1.5
Set Master Card/Code ........................................................................ 30
4.2.1.6
Set Disarm Card/Code ....................................................................... 33
Page 3

MIDAS TOUCH INC
3
MAC-1000PEF/PMF Hardware Manual
4.2.1.7
Set Duress Card/Code ....................................................................... 34
4.2.2
Access Info ..................................................................................................... 35
4.2.2.1
Set Time Zone .................................................................................... 35
4.2.2.2
Set Time Schedule ............................................................................. 36
4.2.2.3
Set Conditional Unlock Door Time ..................................................... 37
4.2.2.4
Unlock Door Time ............................................................................... 38
4.2.2.5
Set Alarm Relay Mode........................................................................ 39
4.2.2.6
Door Sensor Detection Time .............................................................. 40
4.2.3
Sys Setup ....................................................................................................... 41
4.2.3.1
Set Date ............................................................................................. 41
4.2.3.2
Set Time ............................................................................................. 42
4.2.3.3
Set Date Format ................................................................................. 43
4.2.3.4
Set Keypad Status .............................................................................. 44
4.2.3.5
Set Read Interface ............................................................................. 45
4.2.3.6
System Initiation ................................................................................. 46
4.2.4
Comm............................................................................................................. 47
4.2.4.1
Set Communication Way .................................................................... 47
4.2.4.2
Set IP Address ................................................................................... 48
4.2.4.3
Set Submask ...................................................................................... 49
4.2.4.4
Set Gateway ....................................................................................... 50
4.2.4.5
Set Port .............................................................................................. 51
4.2.4.6
Set Baud rate ..................................................................................... 52
4.2.4.7
Set Node ID ........................................................................................ 53
4.2.5
Language Selection ....................................................................................... 54
4.2.6
Information ..................................................................................................... 55
Chapter 5 Testing .............................................................................................................. 56
Chapter 6 Troubleshoot ..................................................................................................... 57
Chapter 7 Appendix ........................................................................................................... 59
Appendix 1:Set Controller IP by Tool ......................................................................... 59
Appendix 2:Wiring Material Requirements ................................................................. 64
Page 4

MIDAS TOUCH INC
4
MAC-1000PEF/PMF Hardware Manual
Revision History
Version
Description
V1.0
First Edition
V1.1
Modify case sensor.
V1.2
Modify 1.2Features. 1.3 Specification and Add the Installation (F) Tear off the
protective film.
V1.3
Modify the wire connections(DC+12V IN and SGND)
V1.3.1
Add Appendix 2:Wiring Material Requirements
V1.3.2
Modify MAC-1000 V2.00 Models
Page 5
MIDAS TOUCH INC
5
MAC-1000PEF/PMF Hardware Manual
Chapter 1 Product Overview
1.1
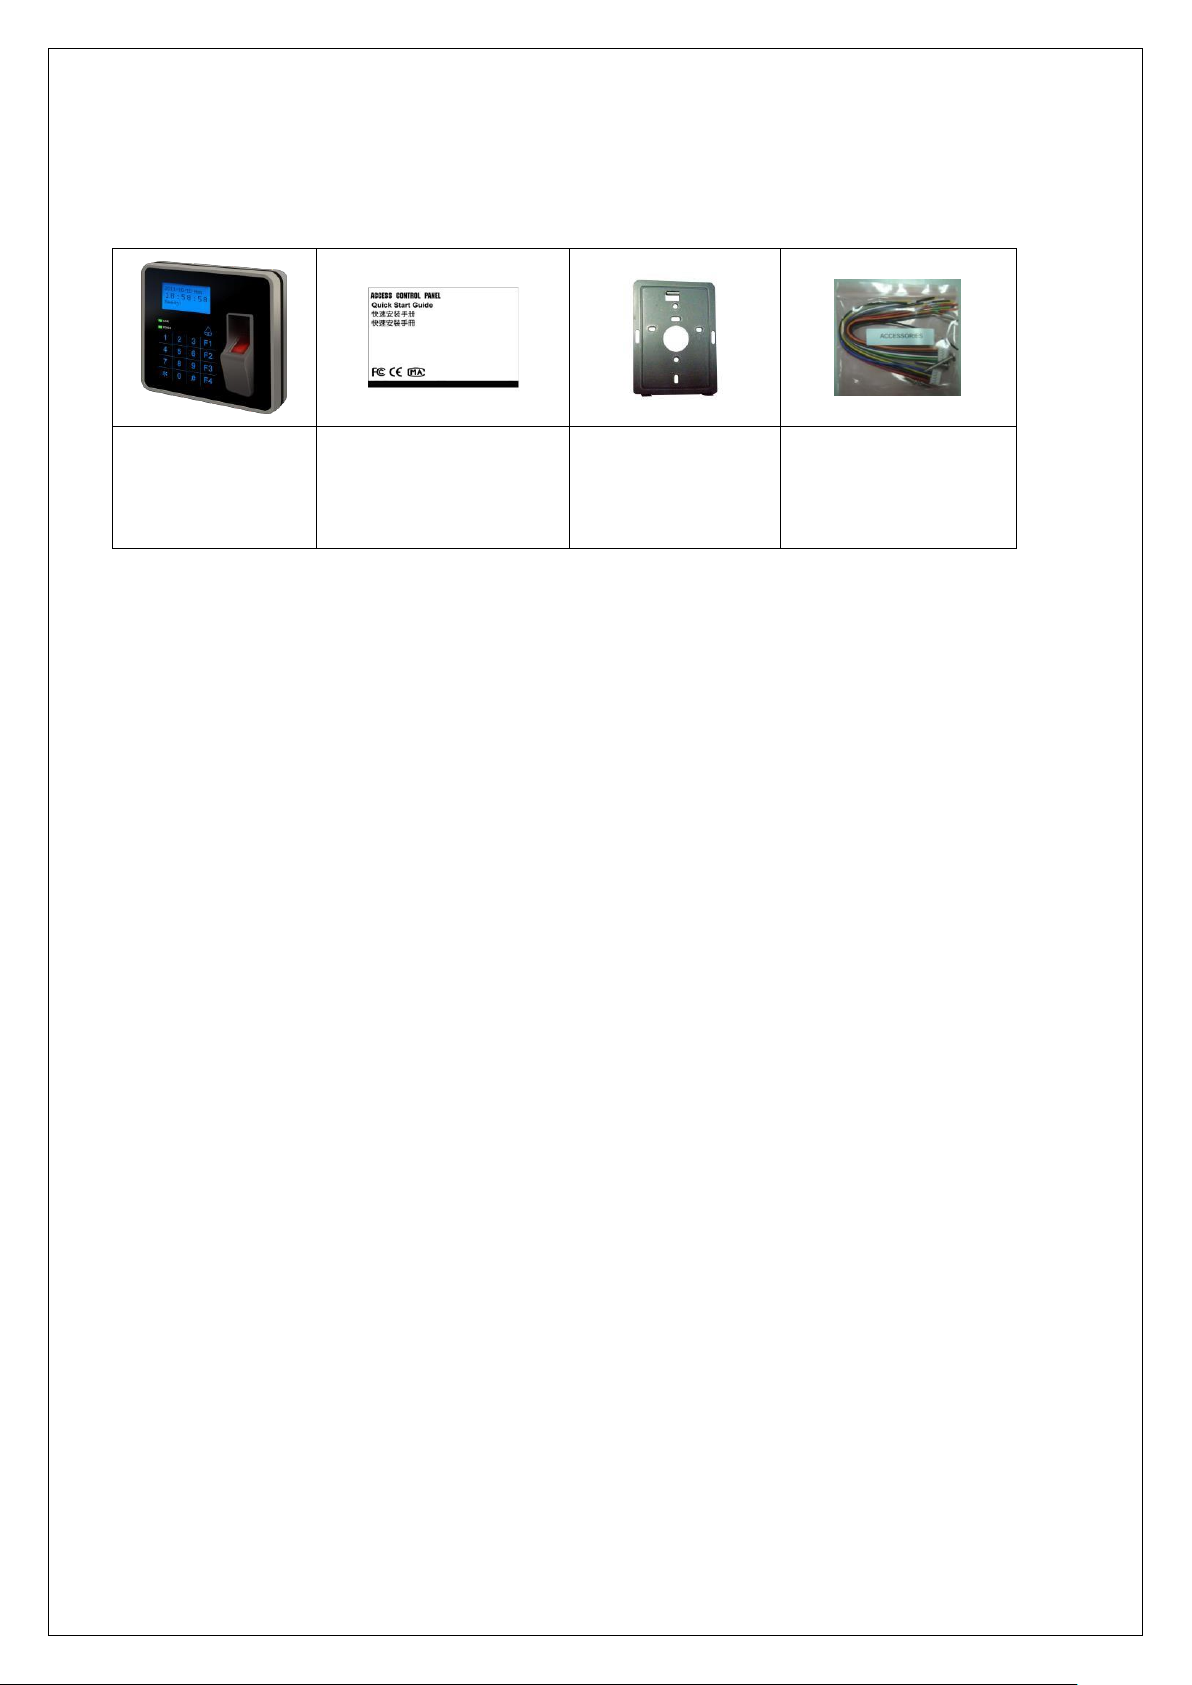
Package Contents:
Controller x 1
Quick Start Guide x 1
Plate x1
Hex Key Wrench x 1
Screw x 4
Cable x 2
Page 6

MIDAS TOUCH INC
6
MAC-1000PEF/PMF Hardware Manual
1.2
Features
Bell key function design. Suit for various location.
Casing tamper proof detection and door tamper alarm.
Slim, stylish design, sensitive touch keypad with blue backlight.
Dual card / fingerprint contrast function, improve system security.
High security, using encryption with random code to saving finger characteristic.
Large LCD display time, date, weekday and company name. And show cardholder
Chinese / English name or card number after verification.
The standard model can access 950 users with 2 fingerprint templates per each user
(total 1,900 fingerprint templates). The storage event record is up to 18,000 events.
The advanced model can access 4,750 users with 2 fingerprint templates per each
user (total 9,500 fingerprint templates).
Quick and accurate fingerprint verification, supports 1:1 authentication & 1:N
identification. And audible voice prompts guiding users during verification process.
Provide 32 working shifts and 32 siren schedules. Able display current shift or active
alarm. Provide 100 holiday schedules per year.
Provide 128 time zones and time schedules, 8 time conditional unlock door schedules
(per week).
Duress card/code setting. When door opened in the emergency, controller will send
signal to control center at the same time for tracing and rescue.
Programmable disarm code.
Unique ID or Block read format supported and programmable key value. (RAC-
970PMF)
RTC ensures to provide correct date and time. Watchdog function secures system
free from halting.
Built-in RS-485 & TCP/IP communication interface to PC.
On-board lithium battery ensures data storage can reach up to 1 year upon power
outage.
Conforms to ISO 14443A standard; supporting Mifare card. (MAC-1000PMF)
Page 7

MIDAS TOUCH INC
7
MAC-1000PEF/PMF Hardware Manual
1.3
Specification
Model No.
MAC-1000PEF
MAC-1000PMF
Read Format
EM (125KHz)
Mifare (13.56MHz )
Read Range
8-10 cm(max )
3-5 cm(max )
Slave Reader
T2 or Wiegand (1 Set )
Input Port
3 Sensors ( Door Sensor x 1、Exit Button x 1、Case
Sensor x 1 )
Output Port (Built-in)
Relay x 1(Door Lock or Bell)
Output Port (External)
O.C Output x 2 ( Door Lock/Alarm or Siren, external ACU30 )
Cardholders
18,000 (max)
Events
18,000
Fingerprint Capacity
950 users capacity (2 fingerprint template per person)
Identification Mode
1:1/1:N
Identification Time
1:1 <= 1 second;1:1,000 >= 1 second
FAR/FRR
<=0.001% / <=0.01%
Fingerprint Sensor
Optical CMOS Sensor
LED Indicator
Power / Comm.
LCD Display
128 x 64 Dot. Graphic Display with backlight
Keypad
17 Key ( F1-F4, 0-9, *, #, Bell) (Touch Sensitive
Keypads )
RTC (Real Time Clock)
YES
Beep Tone
Buzzer & Operating steps sound
ID or IP Setting
Command setting by keypad
Power Input
DC 12V/1A
Current Consumption
1A. (max.)
Comm. Interface
RS-485、TCP/IP
Operating Baud rate
RS-485:9,600/19,200 bps-N-8-1
TCP/IP:10/100Mbps
Operating Temp.
0℃~ 55℃ / 32℉~ 131℉
Relative Humidity
20% ~ 80% (Non-condensing)
Dimensions
140mm(L)x130mm(W)x41mm(H)
Weight (Device)
400g
* Product design and specifications are subject to change without prior notice.
Page 8

MIDAS TOUCH INC
8
MAC-1000PEF/PMF Hardware Manual
Chapter 2 Physical Dimension
2.1
Dimension
Scale: mm
2.2
Appearance Introduction
Page 9
MIDAS TOUCH INC
9
MAC-1000PEF/PMF Hardware Manual
Item
Name
Description
LCD/Reading
Area
First line displays date and week.
Second line displays time.
Third line displays Ready when in standby mode. Display
swiped card status when swiping card.
Fourth line is blank when standby mode. It will display name
or card number when swiping card.
POWER
Power LED, flashed green led usually, flashed red led upon
invalid operations.
LINK
Data transmission led. No flash usually. Flashing red and
green led indicates successful transmission. Flashing red led
only indicates no response of controller.
Bell
Bell Function key
Request Bell function should select mode 1 and activate by
HAMS.
Relay Active as below
(Relay 0 signifies Controller relay. Relay 1~2 signifies relay in
the external relay board.)
PS: Siren and alarm can not work at the same time. Only
select one once.
Numerical
Keypad
0~9 : Numeric key. * : Cancel # : Enter
Function
Keypad
F1:Duty On
F2:Duty Off
F3:Duty shift switch for Break In and Break Out
F4:Duty shift switch for Overtime Start and Overtime End
Fingerprint
Sensor
Fingerprint Scanning Area
Relay0
Relay1
Relay2
Mode 0(Default )
Door
Door
Siren/Alarm
Mode 1
Bell
Door
Siren/Alarm
Page 10
MIDAS TOUCH INC
10
MAC-1000PEF/PMF Hardware Manual
Item
Name
Description
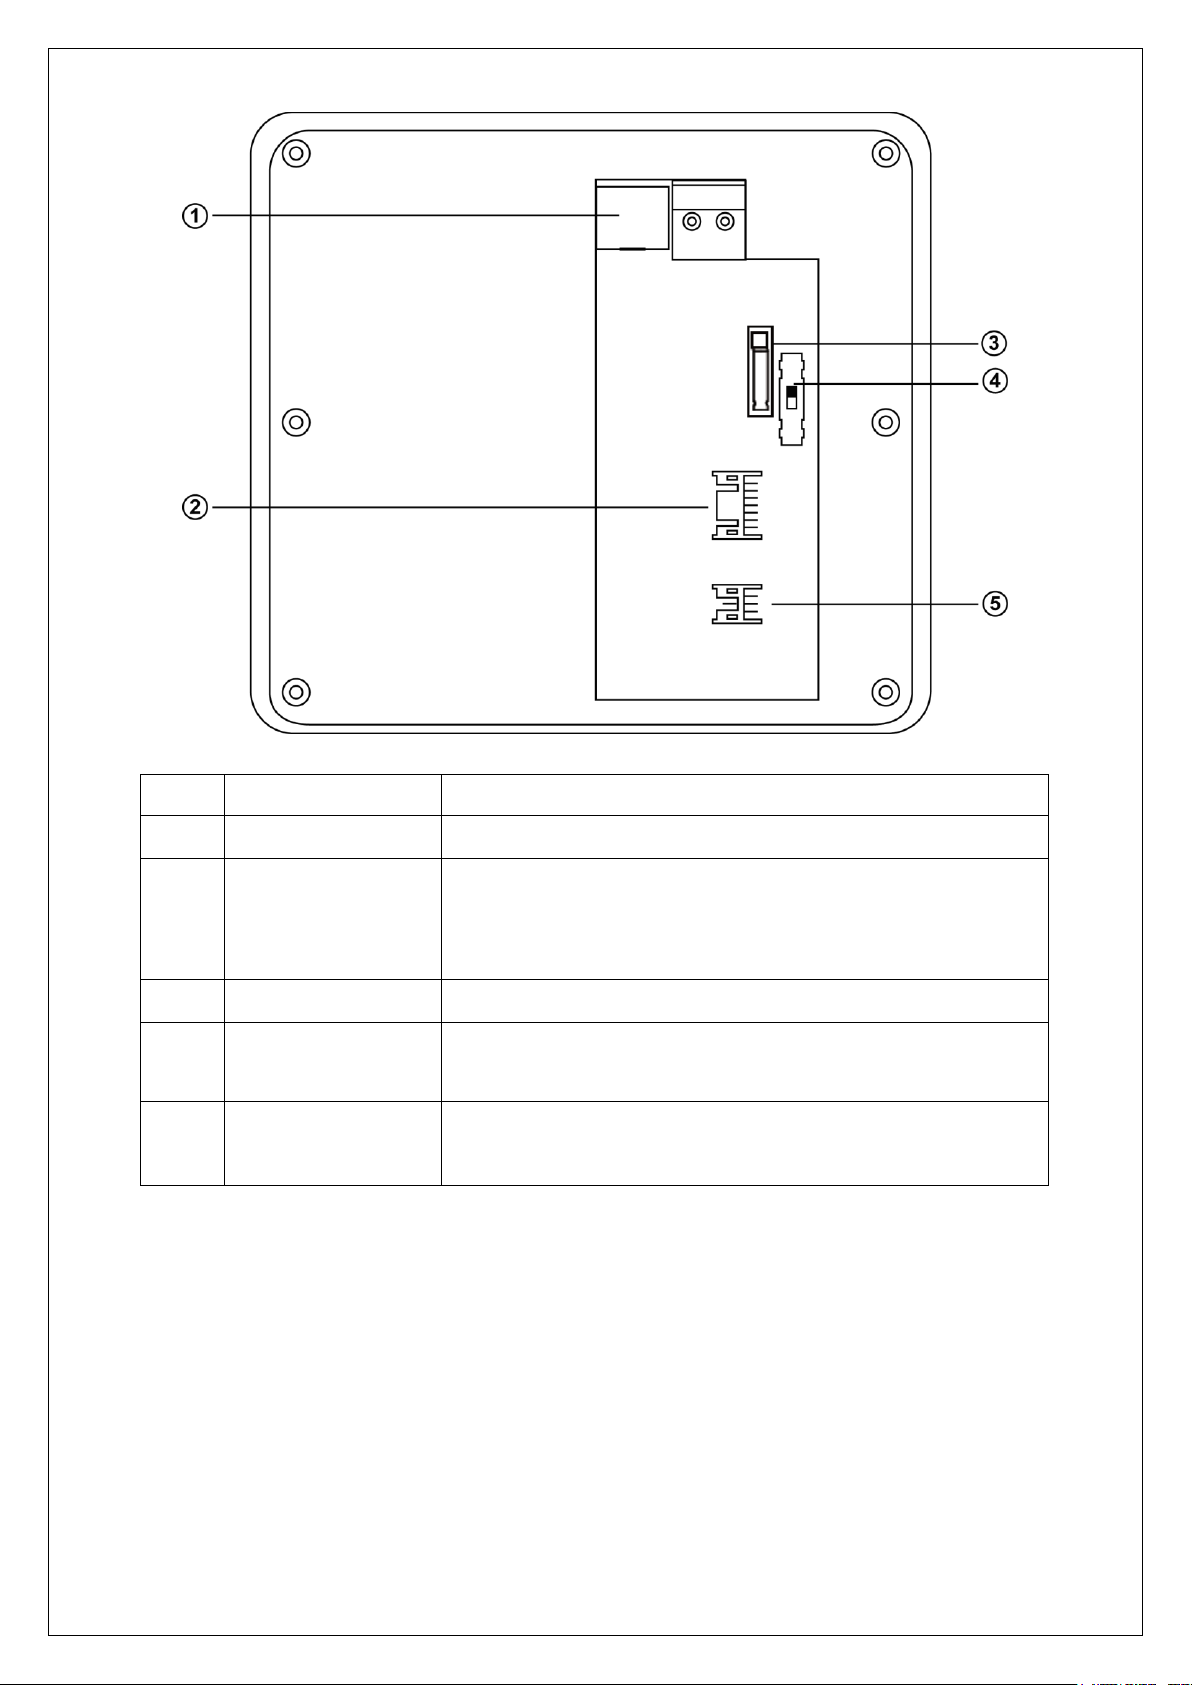
RJ-45
TCP/IP or RS-485 (Kindly refer to Chapter 3.2.6)
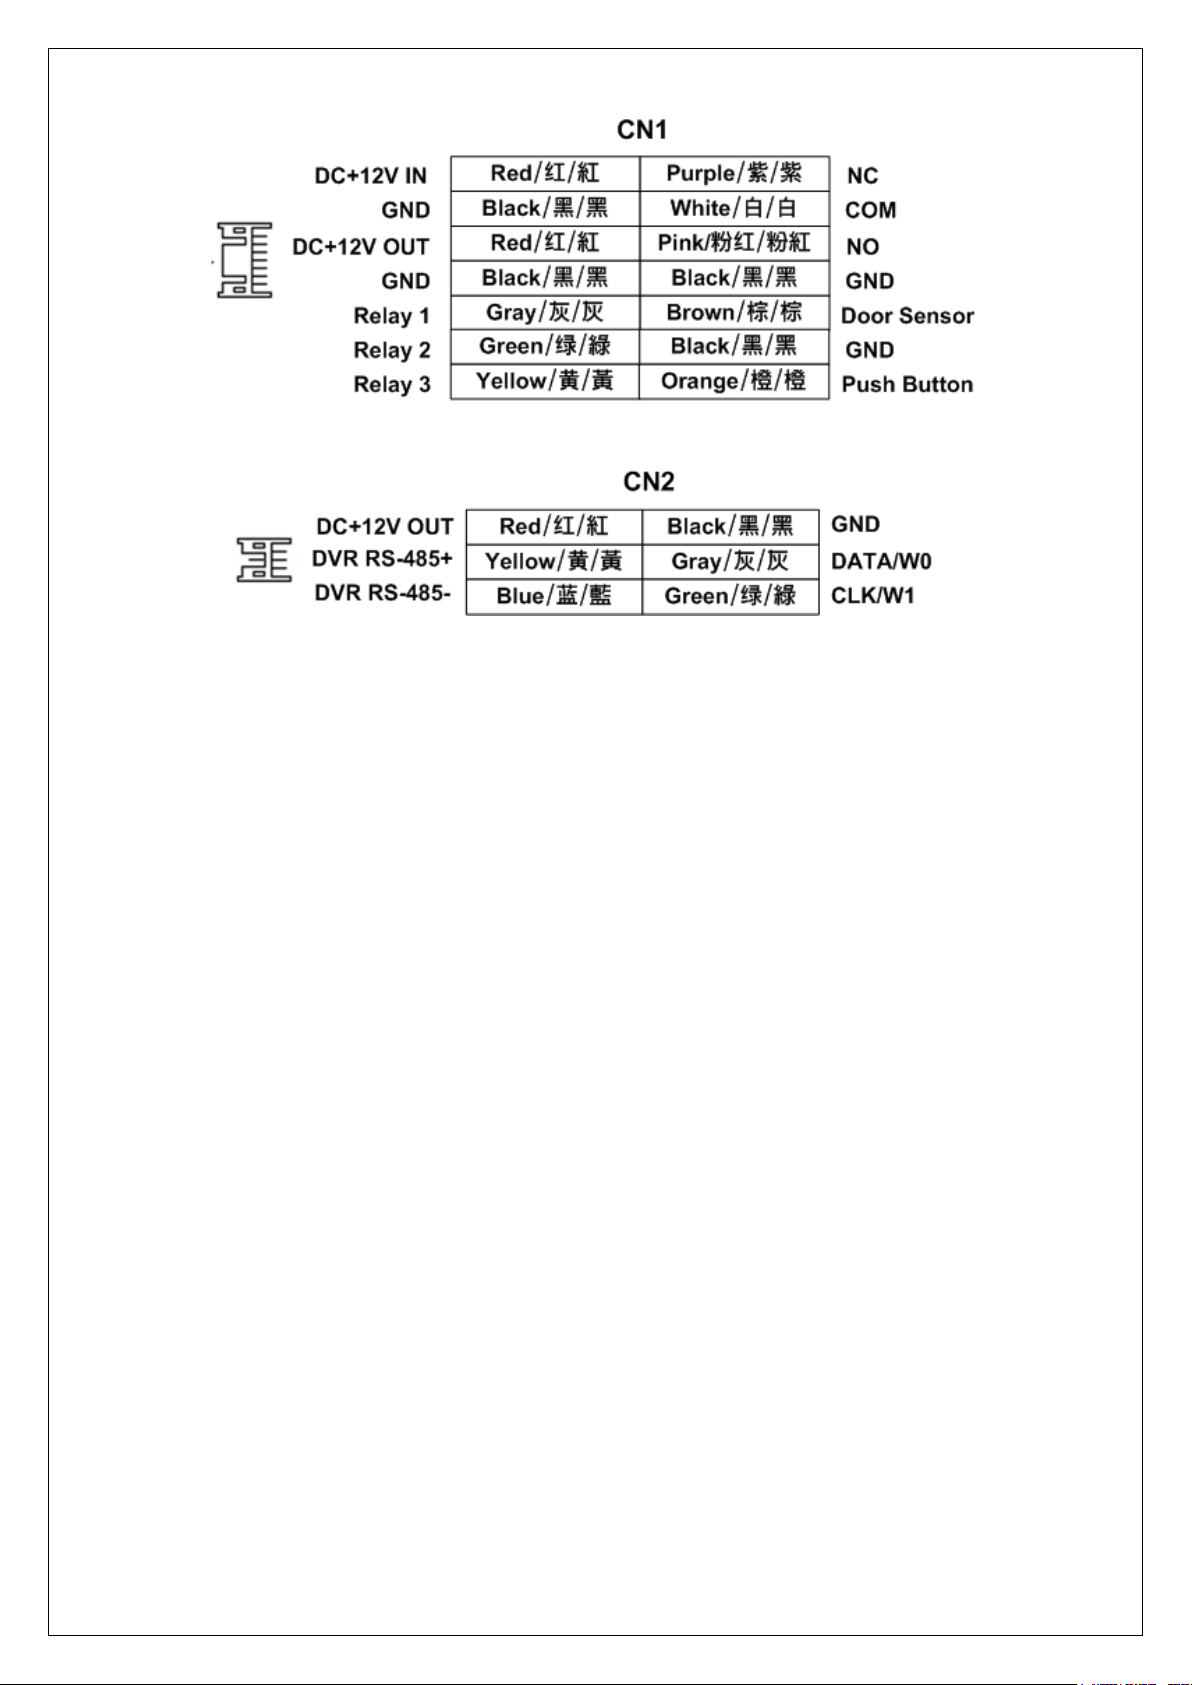
Contact(CN1)
Connector for Power, Exit Button, Lock, Sensor,
Relay …etc. Kindly refer to follow figure.
(Relay3 Reserved)
Case Sensor
Reader tamper proof detection
Comm. Switch
TCP/IP or RS-485.
(Switch up is TCP/IP,switch down is RS-485)
Contact of Slave
Reader(CN2)
Slave reader‘s connector for communication and DVR.
Kindly refer to follow figure.
Page 11
MIDAS TOUCH INC
11
MAC-1000PEF/PMF Hardware Manual
Page 12

MIDAS TOUCH INC
12
MAC-1000PEF/PMF Hardware Manual
Chapter 3 System Configuration & Wire Connections
3.1
System Configuration
Page 13
MIDAS TOUCH INC
13
MAC-1000PEF/PMF Hardware Manual
3.2
Wire Connections
3.2.1
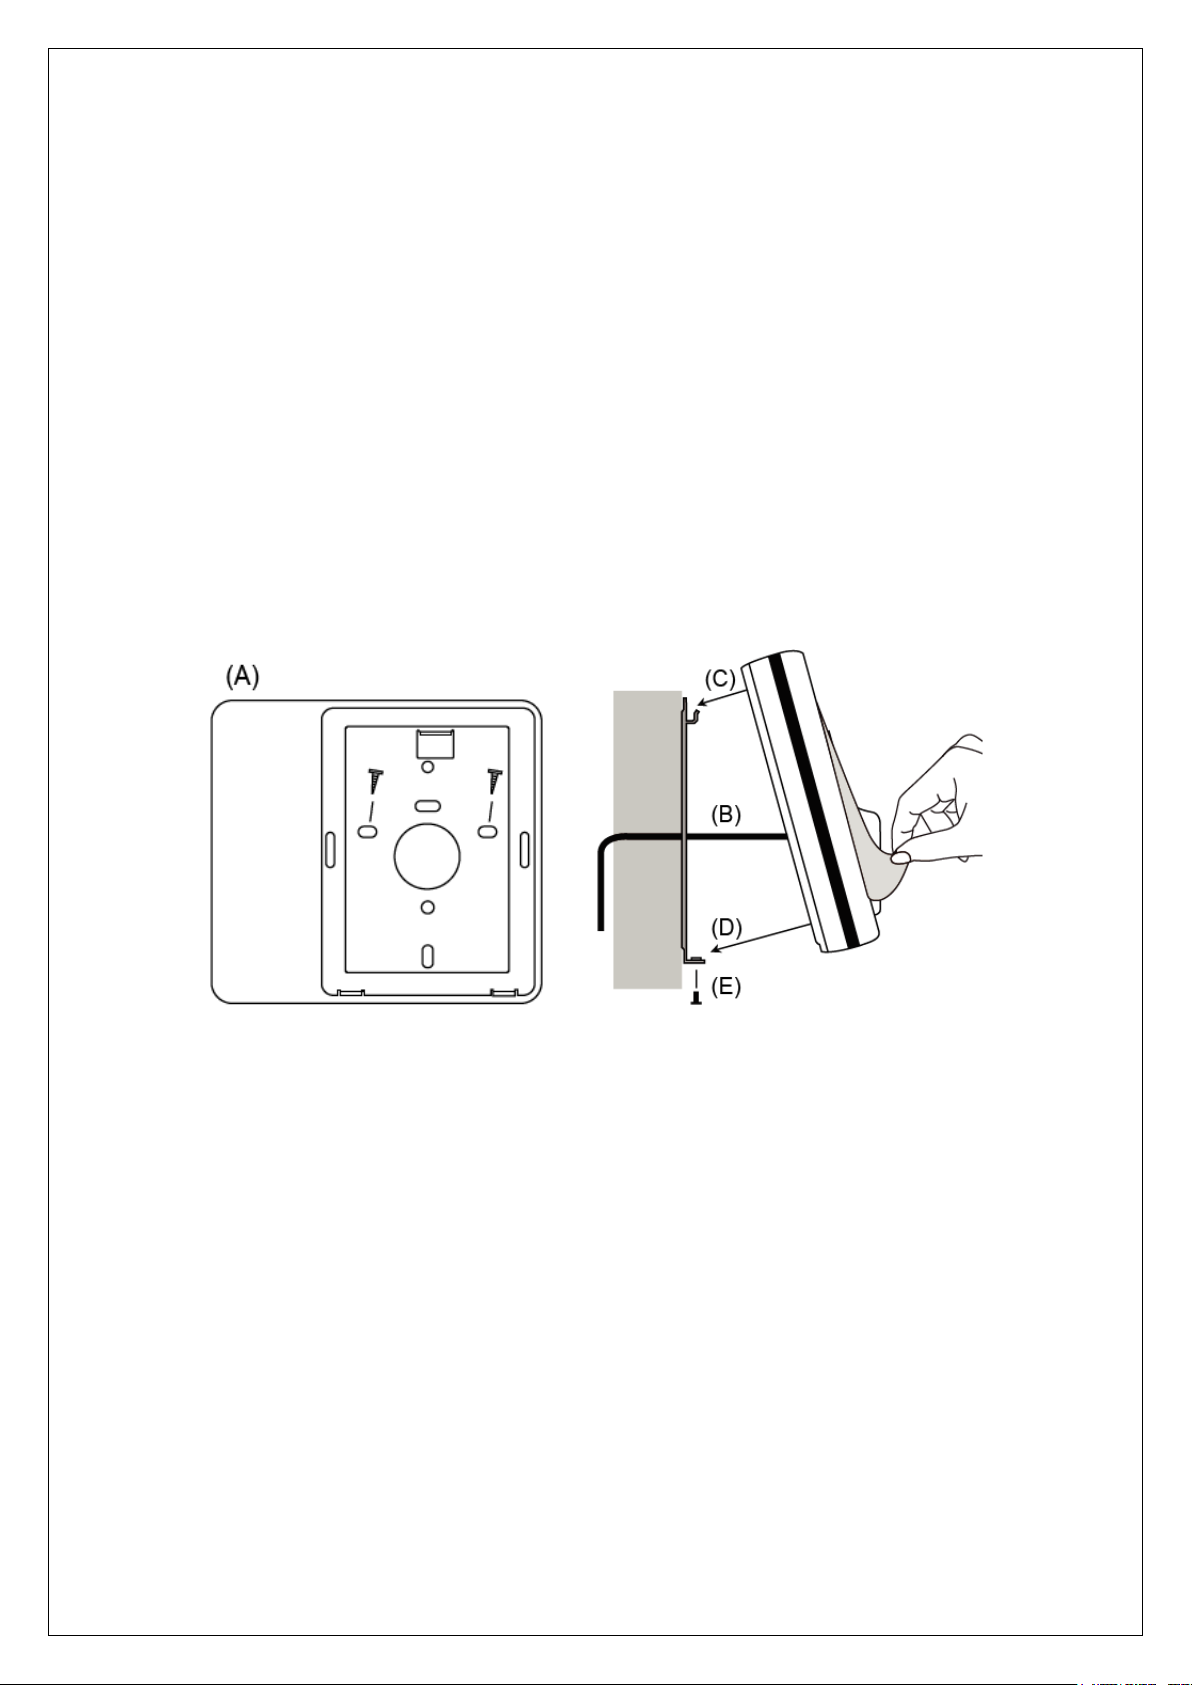
Installations
Do not over tighten the back plate screws during installation to prevent distortion.
Kindly refer to ” 4.2.4Comm” for set communication way and NODE ID.
(A)
Mount the fixed iron plate onto the wall with screws.
(B)
Connect the wires in accordance with the wiring instruction(CN1、CN2).
(C)(D) Install the controller upper cover to the back plate. Make sure the back plate and
the controller upper cover guides are aligned.
(E)
Use the screws onto the bottoms of the controller. Installation completed.
(F)
Tear off the protective film.
Page 14
MIDAS TOUCH INC
14
MAC-1000PEF/PMF Hardware Manual
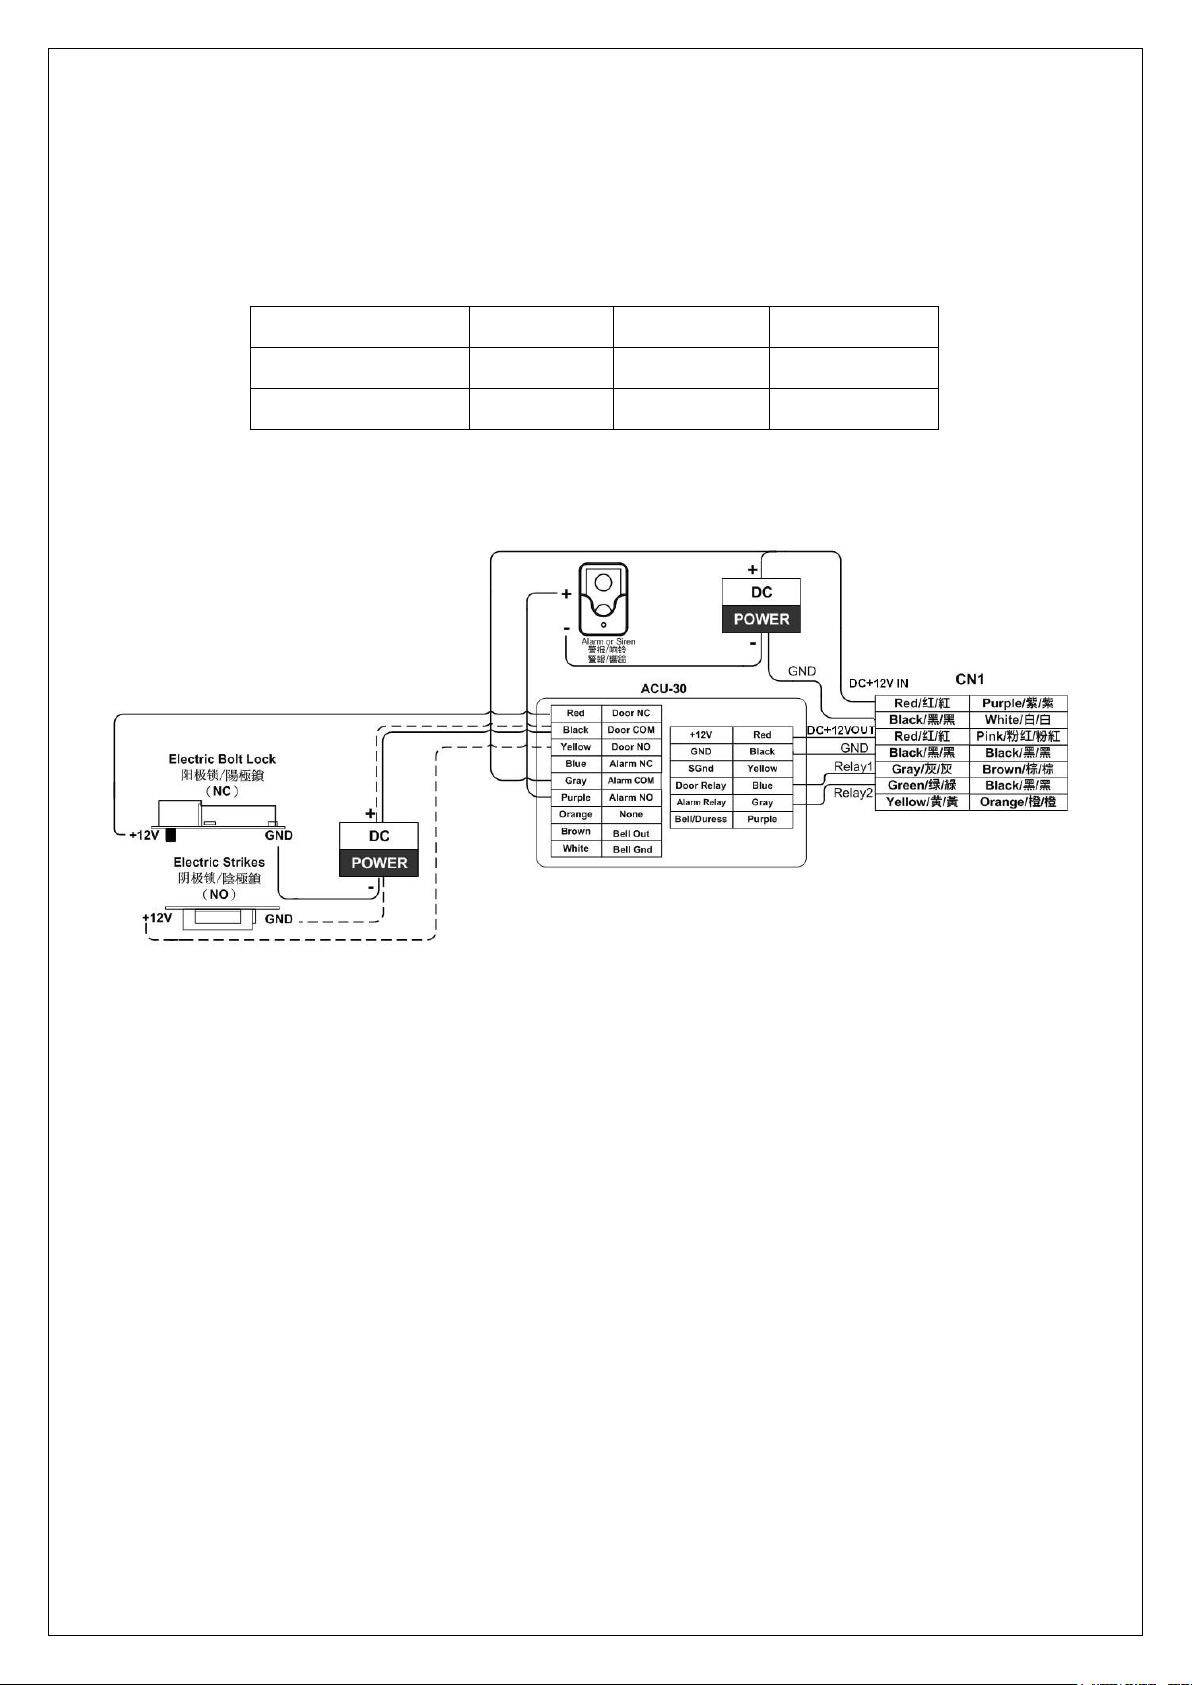
3.2.2
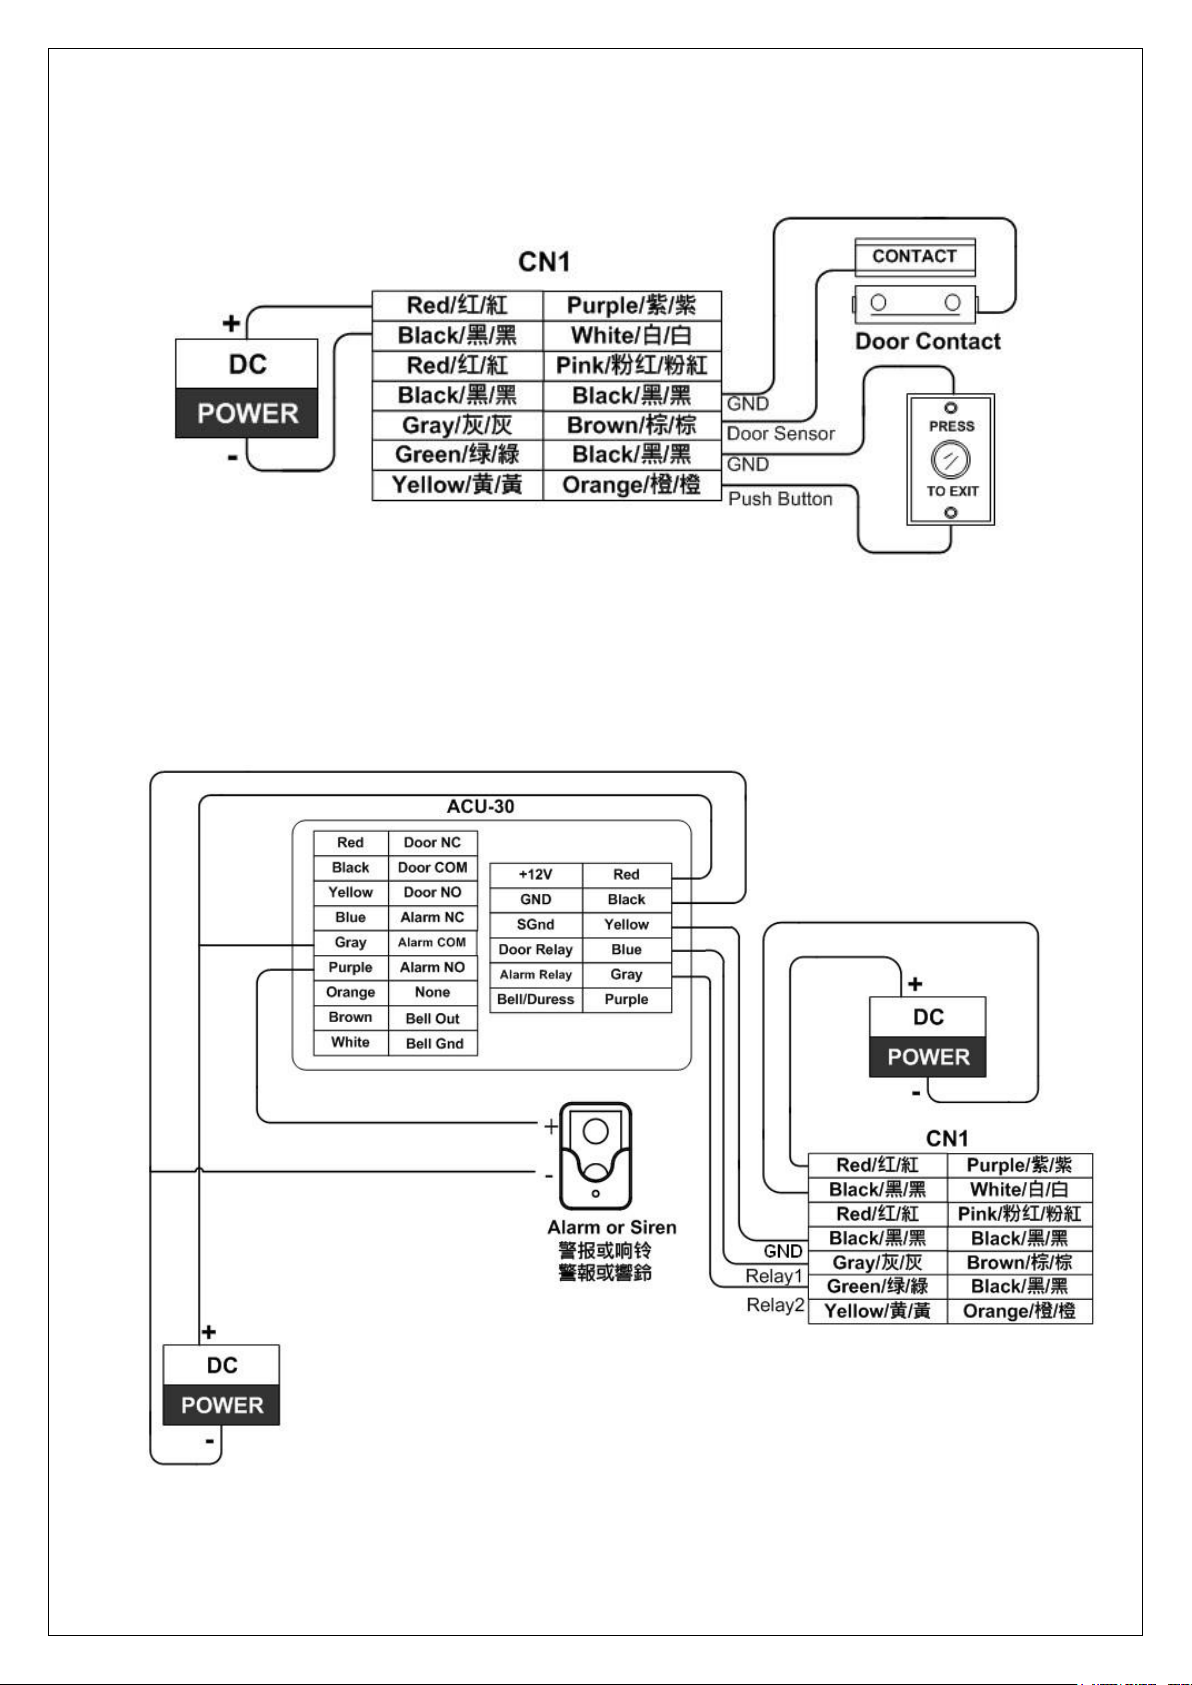
with ACU-30 Wire Diagram
Relay Active as below
(Relay 0 signifies Controller relay. Relay 1~2 signifies relay in the external relay board.)
Relay0
Relay1
Relay2
Mode 0(Default )
Door
Door
Siren/Alarm
Mode 1
Bell
Door
Siren/Alarm
ACU-30’s wiring is same in Mode 0 and Mode 1
Page 15
MIDAS TOUCH INC
15
MAC-1000PEF/PMF Hardware Manual
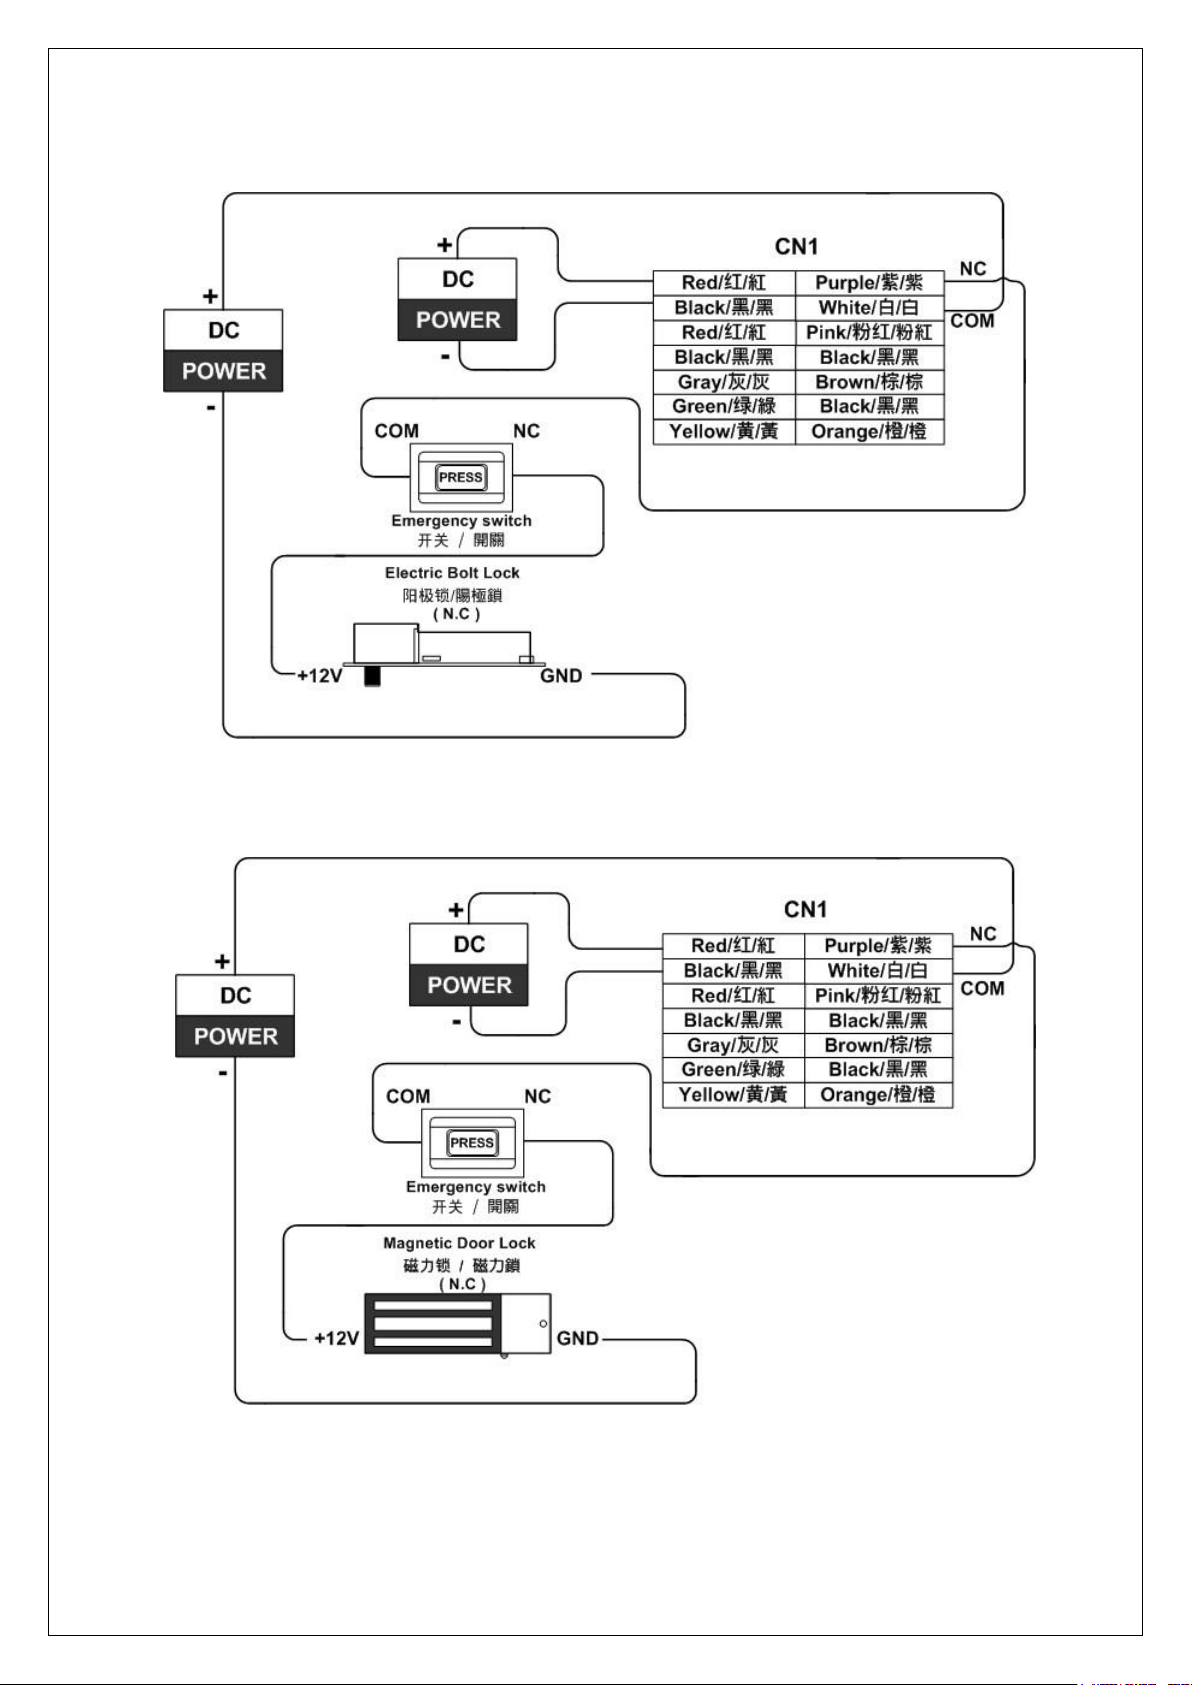
3.2.3
Electronic Lock Setup
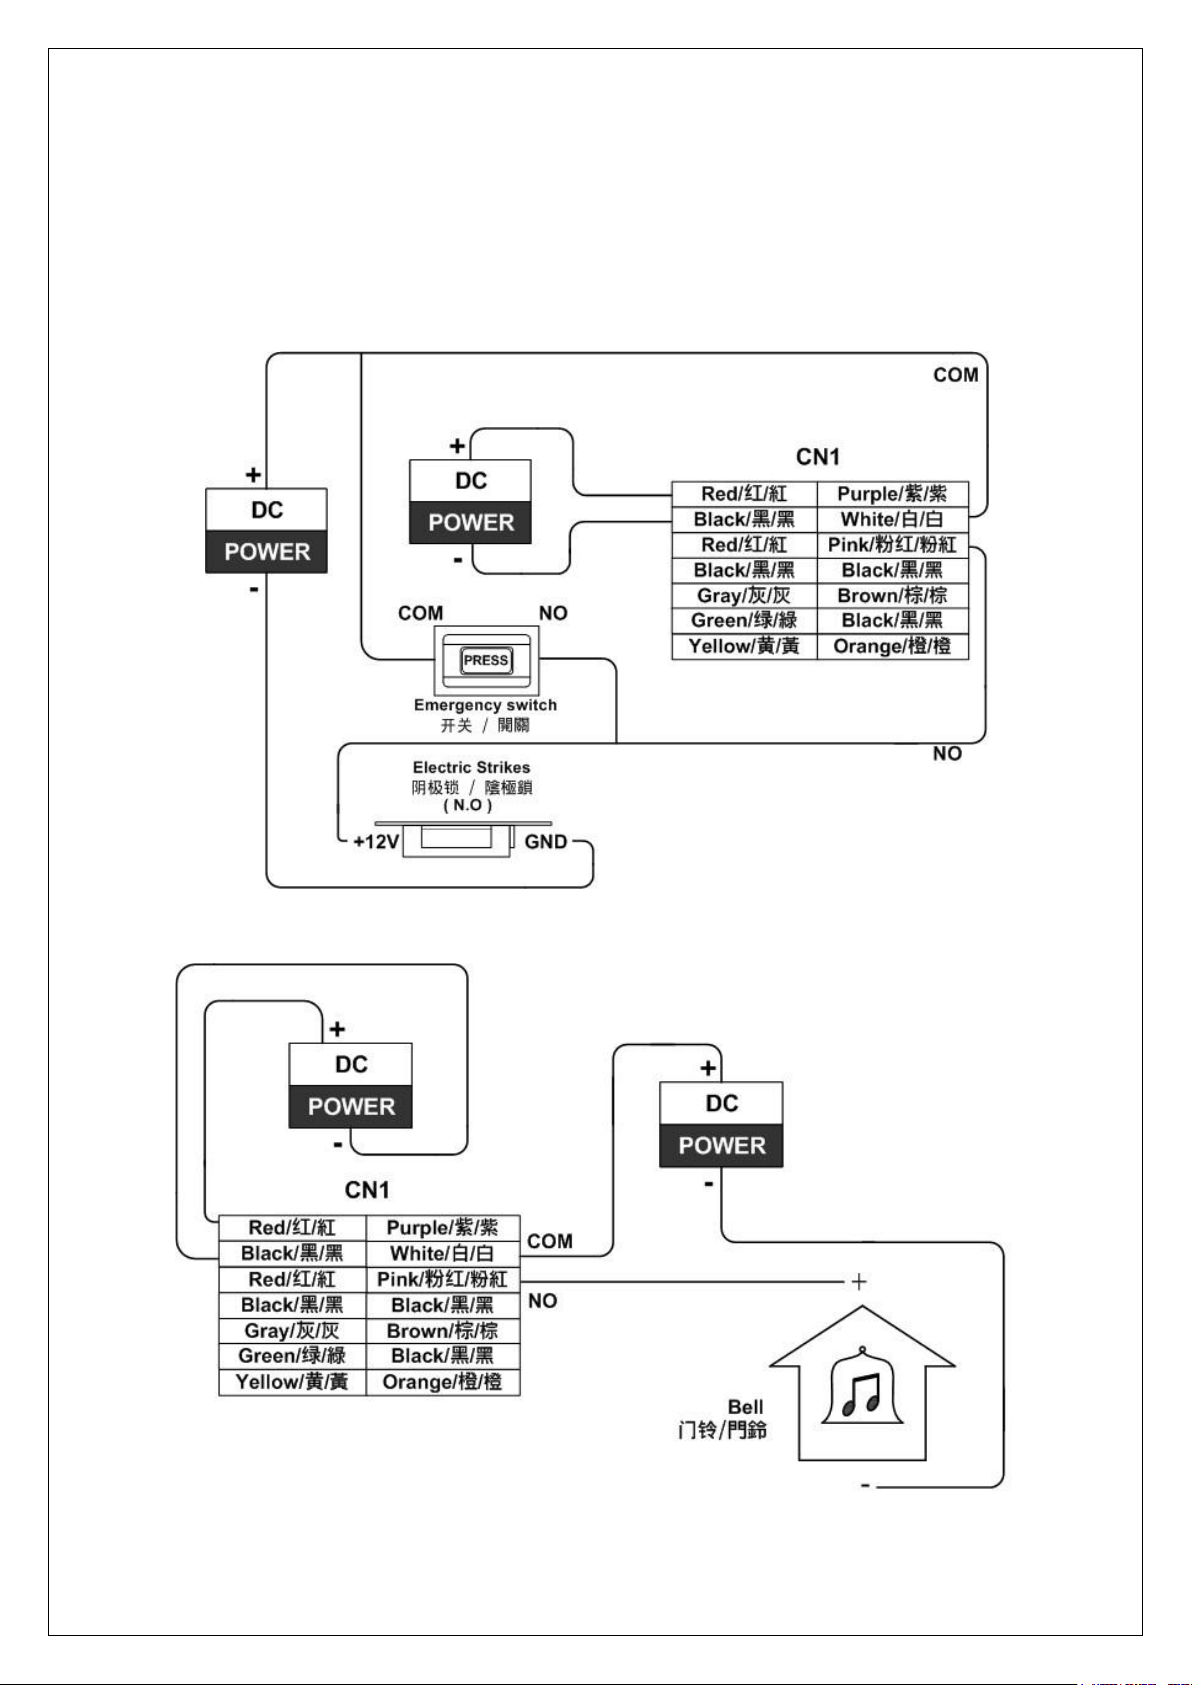
Wiring of using built-in relay
3.2.3.1
NO Mode Connection
This wire connection is mode 0.
This is doo bell connection of mode 1. ( Will activate bell button on the controller)
Page 16
MIDAS TOUCH INC
16
MAC-1000PEF/PMF Hardware Manual
3.2.3.2
NC Mode Connection
This wire connection is mode 0.
3.2.3.3
Magnetic Door Lock Connection
This wire connection is mode 0.
Page 17
MIDAS TOUCH INC
17
MAC-1000PEF/PMF Hardware Manual
3.2.4 Exit Button/Door Sensor Connection
3.2.5 Siren/Alarm Connection
Siren/Alarm wiring is same in Mode 0 and Mode 1
Page 18
MIDAS TOUCH INC
18
MAC-1000PEF/PMF Hardware Manual
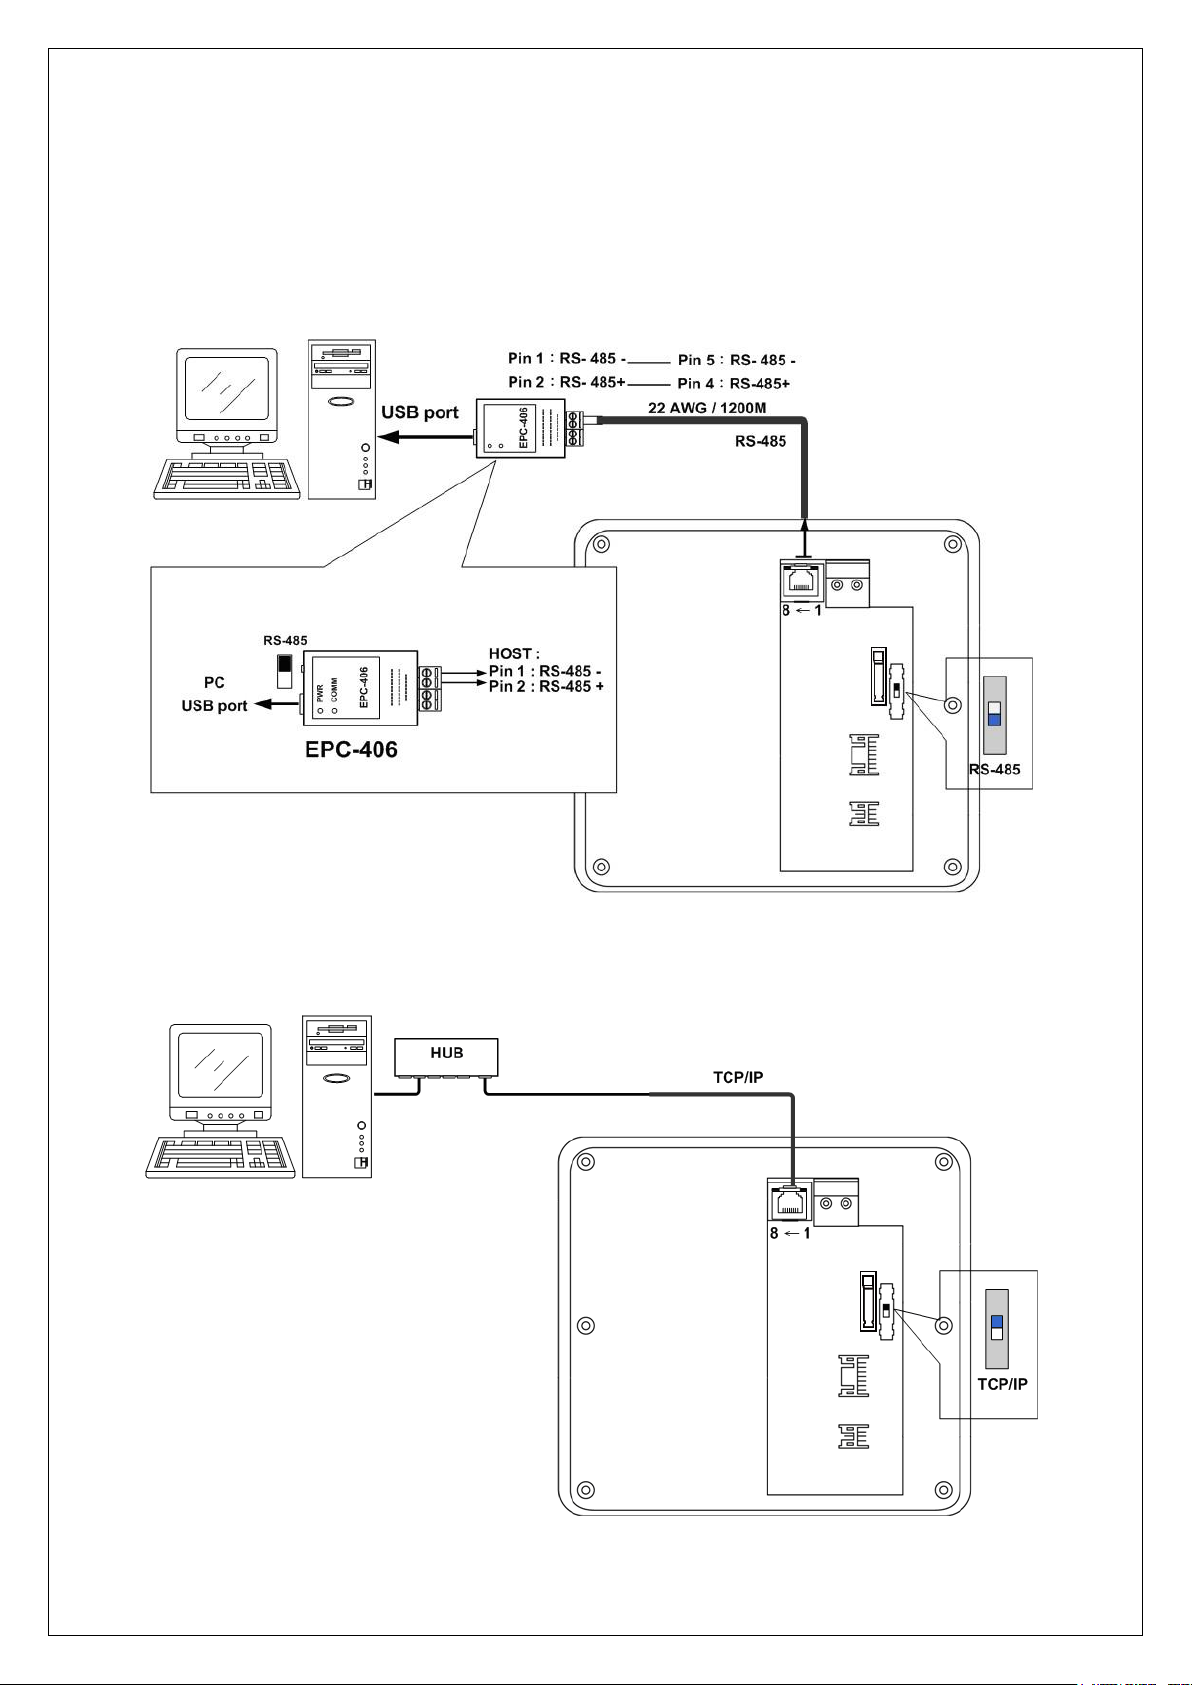
3.2.6 Communication Interface Connection
NOTE: To avoid device damage, please do not connect it with PoE Hub.
3.2.6.1
RS-485 Connection
3.2.6.2
TCP/IP Connection
Page 19
MIDAS TOUCH INC
19
MAC-1000PEF/PMF Hardware Manual
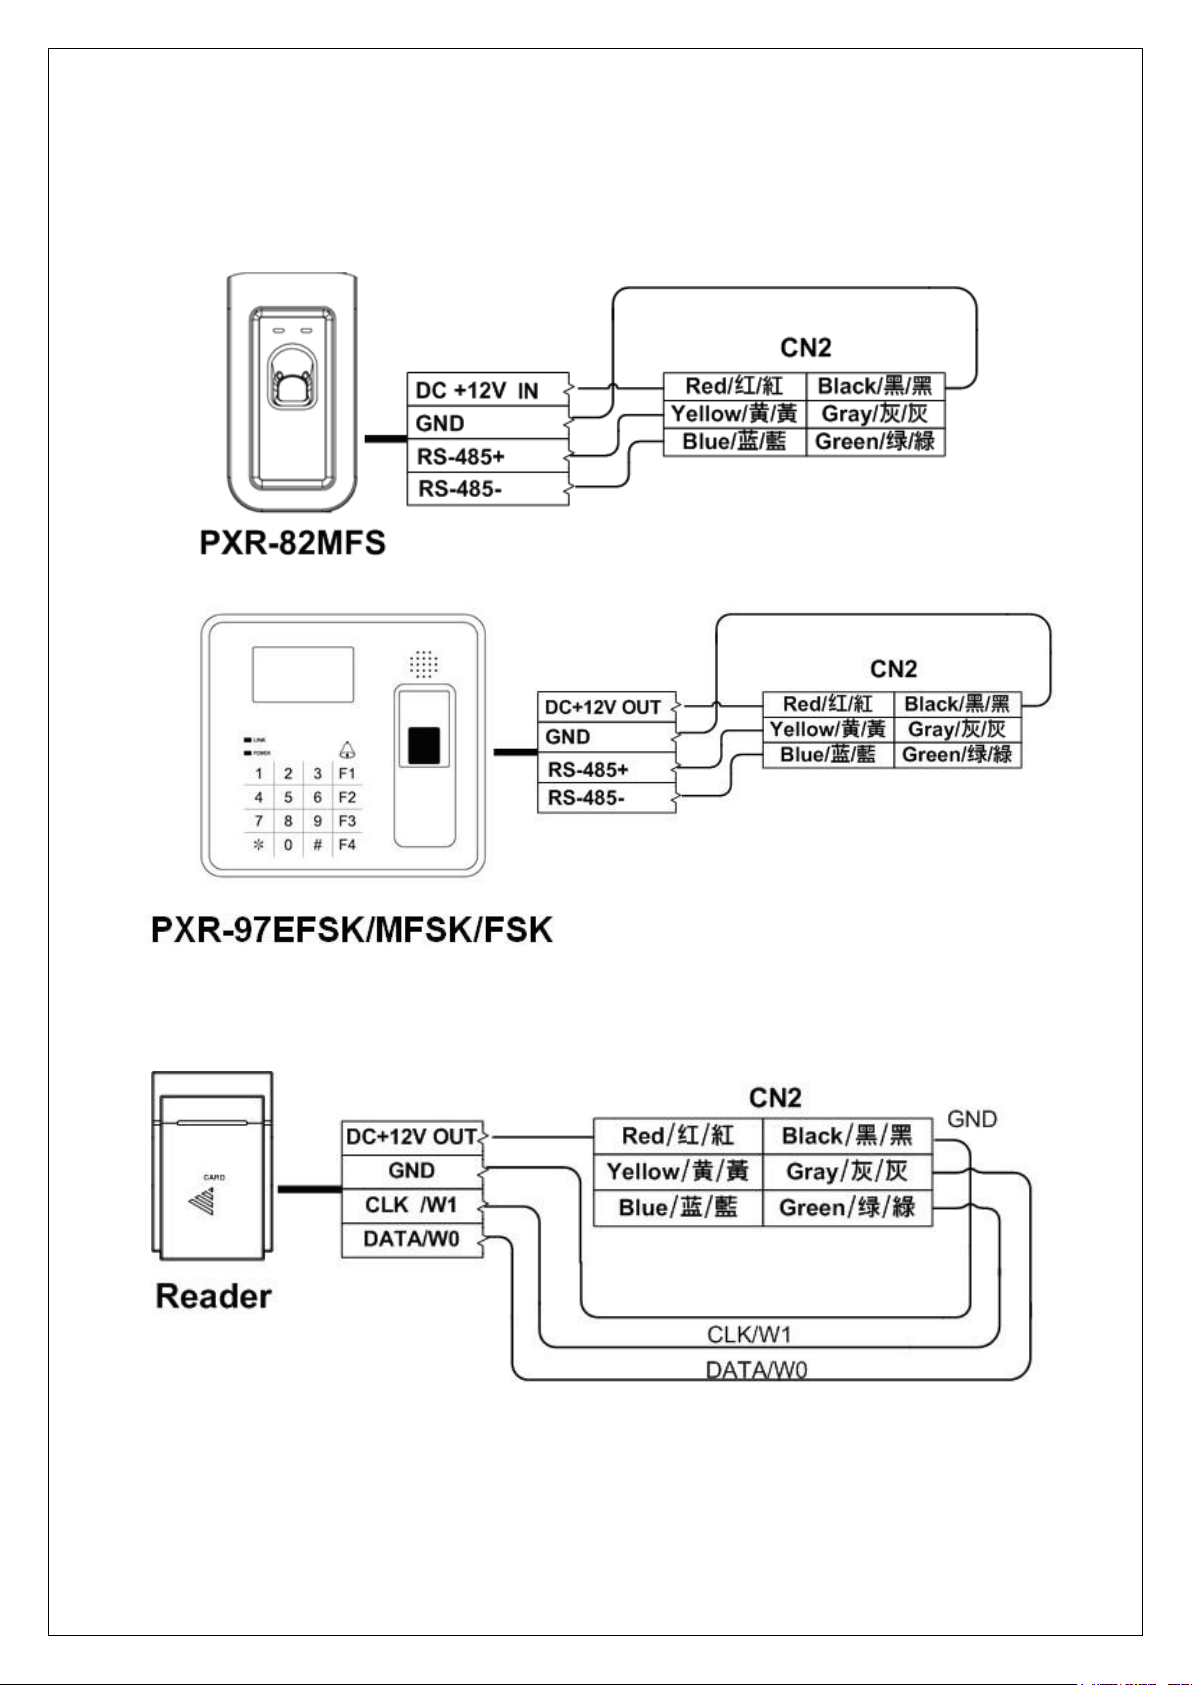
3.2.7 Slave Reader Connection
RS-485 Reader Connection(PXR-82MFS only support MAC-1000PMF)
T1/T2/W26/W34 Reader Connection
If the slave reader is wiegand format, the wire distance should be within 30M.
Slave reader and DVR are using same contacts. Please select device which you want to
using in the software. (Default is slave reader)
Page 20
MIDAS TOUCH INC
20
MAC-1000PEF/PMF Hardware Manual
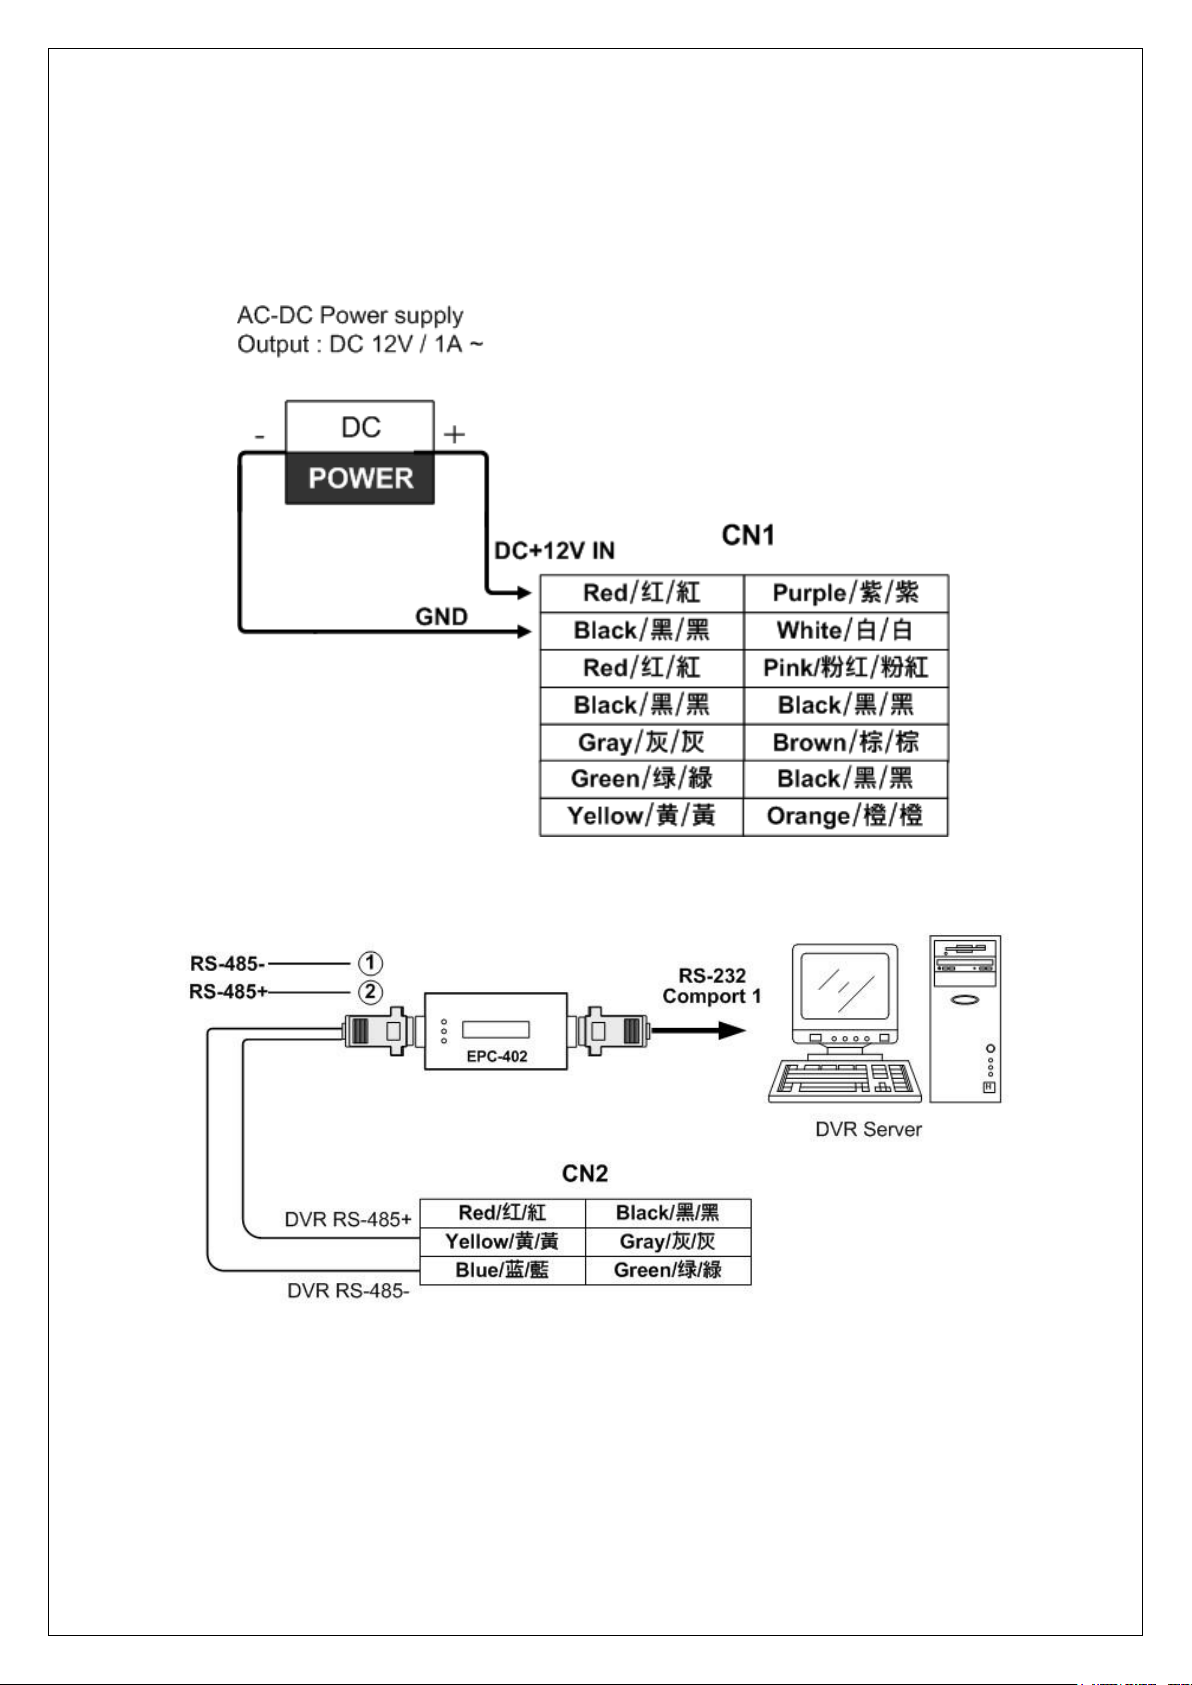
3.2.8 Power Supply Connection
Note:To avoid interference self- detection of sensitive keypad , please do not touch
keypad when input power.
3.2.9 DVR Connection
Page 21

MIDAS TOUCH INC
21
MAC-1000PEF/PMF Hardware Manual
Chapter 4 Setting
4.1
RS-485/ TCP/IP Selection (to PC)
Please select RS-485 or TCP/IP communication way.
Note:Follow SW2 DIP switch setting should identical with command 70 then the
communication will be success. Kindly refer to Chapter 4.2.4.1
Page 22

MIDAS TOUCH INC
22
MAC-1000PEF/PMF Hardware Manual
4.2
Function Settings
LCD Display
Menus
Operation
F1 and F2 are for up and down selection.
Function key # signifies OK
Input Master Code. Default master code is 30191000.
Then you will into menus operation.
Function key F1 and F2 are for function selections. When you select the functions,
the item which you selected will be marked. When you press function key #, it
will access next page or OK. Function key * signifies exit or cancel the input. ( or
input item code to direct to selection. Ex: input 3 to enter the Comm.)
System will return to ready status after 20 seconds if do not have any input
actions.
Page 23

MIDAS TOUCH INC
23
MAC-1000PEF/PMF Hardware Manual
4.2.1
Card Manage
4.2.1.1
Add Fingerprint
Allows to select restricted or unrestricted of time schedule for user.
The card number must be pure 10 digits of MAC-1000PEF/PMF
Operation Instruction:
Unrestricted
Page 24

MIDAS TOUCH INC
24
MAC-1000PEF/PMF Hardware Manual
Add FP_Card
Audio Prompt :
Position finger
Audio Prompt::
Position finger again.
(System will double
scan finger, if scan
failed, system will
return to upper menu)
If enroll first finger
success but second
finger failed, system
will also return to
upper menu and anew
the enroll process.
Card Manage
Enro
Unrestricted
Card No=
1 Examine Finger
Enroll Fail
1 Examine Finger
2 Examine Finger
Enroll Fail
2 Examine Finger
Completed
Master Card/Code
(Default 30191000)
Page 25

MIDAS TOUCH INC
25
MAC-1000PEF/PMF Hardware Manual
Restricted
Master Card/Code
(Default 30191000)
Add FP_Card
Restricted
Select Time Sch
Input time schedule
number.
There are 128 time
schedules (0-127).
Kindly refer to Chapter
4.2.2 Access Info for
more information of
Time Zone and Time
Schedule.
The card can only
select a time zone.
Card Manage
Card No =
If do not need password,
press function key # to
skip this step.
If do not need password,
press function key # to
skip this step.
Password=
Access by card swiped+
finger or finger only.
Completed
Access by card+
password
Access by card
swiped
If do not need enroll
fingerprint, press
function key # to
skip this step.
If do not need enroll
fingerprint, press
function key # to
skip this step.
1 Examine Finger
1 Examine Finger
Completed
Completed
2 Examine Finger
2 Examine Finger
Page 26

MIDAS TOUCH INC
26
MAC-1000PEF/PMF Hardware Manual
4.2.1.2
Delete Fingerprint
Deletes a single user or all users’ fingerprint templates and also removes its access
authorization.
Operation Instruction:
Delete A Single User
Master Card/Code
(Default 30191000)
Card Manage
Del FP_Card
Del A Card
Card No=
Del Success
Page 27

MIDAS TOUCH INC
27
MAC-1000PEF/PMF Hardware Manual
Delete All Users
Master Card/Code
(Default 30191000)
Card Manage
Del FP_Card
Del All Card
1:Yes
0:No
Del Success
Del All Card
Page 28

MIDAS TOUCH INC
28
MAC-1000PEF/PMF Hardware Manual
4.2.1.3
Change Fingerprint
Allow user to change fingerprint template.
Operation Instruction:
Master Card/Code
(Default 30191000)
Card Manage
C_Card FP
Card No =
1 Examine Finger
1 Examine Finger
2 Examine Finger
2 Examine Finger
Completed
Page 29

MIDAS TOUCH INC
29
MAC-1000PEF/PMF Hardware Manual
4.2.1.4
Change Schedule
Change a valid card’s time schedule.
Operation Instruction:
Continue
Master Card/Code
(Default 30191000)
Card Manage
Change Sch
Card No =
Screen will display original
time schedule.
Please input new time
Schedule (255 means open
24 hours ).
Continue to change other
cards’ time schedule. Or wait
for time out and return to ready
status.
Card No =
Input new Time
Schedule
Page 30

MIDAS TOUCH INC
30
MAC-1000PEF/PMF Hardware Manual
4.2.1.5
Set Master Card/Code
There are two different methods for master card/code. One is by card, the other is by
fingerprint. Default master code is 30191000, To change, kindly follow the instructions
below and input max. length is 13 digits for master code. Whenever a device initiation has
been performed, master code will be restored back to default “30191000”.
Operation Instruction:
Change master code/card
Note: If input master code by swipe card, please do not set “Retrieve Valid Code
Index” function hence setting index code will retrieve incomplete master digits.
Master Code/Card
(Default 30191000)
Card Manage
Master Card
Set Master
NEW =
Completed
Page 31

MIDAS TOUCH INC
31
MAC-1000PEF/PMF Hardware Manual
Assign a fingerprint as master card/code
Note:When user assigns a fingerprint as master card, the original master card will
become invalid card. To resume master card function, please delete the master fingerprint.
(Master fingerprint has priority in the system.)
Master Code/Card
(Default 30191000)
Card Manage
Master Card
Master_FP Add
1 Examine Finger
1 Examine Finger
2 Examine Finger
2 Examine Finger
Completed
Page 32

MIDAS TOUCH INC
32
MAC-1000PEF/PMF Hardware Manual
Delete master fingerprint
Note:After delete master fingerprint, if master card has been set before, user may swipe
card or press keypad into menu.
Master fingerprint
Card Manage
Master Card
Master_FP Del
Del Success
Page 33

MIDAS TOUCH INC
33
MAC-1000PEF/PMF Hardware Manual
4.2.1.6
Set Disarm Card/Code
Allow user to change disarm card/code. Default disarm code is “0000”. To changed, kindly
follow the instructions below and input maximum length is 13 digits for disarm card/code.
Whenever a device initiation has been performed, disarm code will be restored back to
default “ 0000”.
Operation Instruction:
Master Card/Code
(Default 30191000)
Card Manage
Completed
Screen will display original
disarm card/code.
Please just input new
disarm card/code.
Set Disarm
Card No =
Page 34

MIDAS TOUCH INC
34
MAC-1000PEF/PMF Hardware Manual
4.2.1.7
Set Duress Card/Code
Allow user to change duress card/code. Default duress code is “1190”. To changed, kindly
follow the instructions below and input maximum length is 13 digits for duress card/code.
Whenever a device initiation has been performed, duress code will be restored back to
default “1190”.
Operation Instruction:
Master Card/Code
(Default 30191000)
Card Manage
Completed
Screen will display original
duress card/code.
Please just input new
duress card/code.
Set Duress
Card No =
Page 35

MIDAS TOUCH INC
35
MAC-1000PEF/PMF Hardware Manual
4.2.2
Access Info
4.2.2.1
Set Time Zone
Allow user set time zone. Total have 128 sets (0~127 sets). Time range from
00:00~00:00to 00:00~00~23:59 (00:00~00:00 signifies whole day close. 00:00~23:59
signifies whole day open)
Operation Instruction:
Master Card/Code
(Default 30191000)
Access Info
Completed
Input Time Zone No.
Default Time Zone No 000
signifies 00:00~23:59
whole day open.
Default Time Zone No 001
signifies 00:00~00:00
whole day close.
Input time range.
For example: Input
0800-1800 which
means 8AM to 6PM.
Time Zone
Time Zone 0-127
NEW =
Page 36

MIDAS TOUCH INC
36
MAC-1000PEF/PMF Hardware Manual
4.2.2.2
Set Time Schedule
Allow user set time range to weekday. Total have 128 sets (0~127 sets). Please set time
zone first. Kindly refer to Chapter 4.2.2.1 Time Zone
Operation Instruction:
Master Card/Code
(Default 30191000)
Access Info
Completed
Input Time Schedule
No.
Default Time
Schedule No 000
signifies time zone no
000 (0000-2359) to
Mon to Sun.
Input Time Zone No.
Press F1 or F2 to
select the weekday
and enter the time
zone no.
Time Sch
Time Sch 0-127
NEW =
Page 37

MIDAS TOUCH INC
37
MAC-1000PEF/PMF Hardware Manual
4.2.2.3
Set Conditional Unlock Door Time
Allow user set conditional unlock door time. Provide 8 sets unlock door time (Select from
0~127 time schedule). The door will remain open until the allotted time. If parameter value
sets 255, then the function is deactivated. (Please set time zone and time schedule first.
Kindly refer to Chapter 4.2.2.1 and Chapter 4.2.2.2)
Operation Instruction:
Master Card/Code
(Default 30191000)
Access Info
Completed
Select unlock time
schedule from 0-127
sets time schedules.
The door will remain
open until the allotted
time.
255= Deactivate
function.
Input conditional
unlock door time no.
Provide 8 sets (No 0-
7) time schedule for
selection.
Conditional
Unlock 0-7
NEW =
Page 38

MIDAS TOUCH INC
38
MAC-1000PEF/PMF Hardware Manual
4.2.2.4
Unlock Door Time
Sets the duration of door opening time upon card swipe or exit button request. Default time
is 4 seconds. Time duration can be set from 0.1 ~ 409.5 seconds. (If parameter sets to 0
or greater than 409.5 seconds, the parameter is ineffective)
Operation Instruction:
Master Card/Code
(Default 30191000)
Access Info
Default time is 4
seconds. Screen will
show 004.0 seconds.
(It is advisable to keep
moderate time duration,
not too long or too
short.)
Door Relay
NEW =
Completed
Page 39

MIDAS TOUCH INC
39
MAC-1000PEF/PMF Hardware Manual
4.2.2.5
Set Alarm Relay Mode
There are three modes. Latch / Toggle/ Pulse (Default is Latch)。
Press F1 or F2 to select the action mode.
Latch Mode: It will not return to original position until alarms disarm card/code has been
entered.
Toggle Mode: It will change the relay condition after ever time being activated. For
example, relay on become to relay off.
Pulse Mode: it will return to original position within the time you set. Time range is 0.1 ~
409.5 seconds. (If parameter sets to 0 or greater than 409.5 seconds, the
parameter is ineffective).
Operation Instruction:
Master Card/Code
(Default 30191000)
Access Info
Alarm Relay
NEW =
Completed
Press F1 or F2 to select
the action mode
Page 40

MIDAS TOUCH INC
40
MAC-1000PEF/PMF Hardware Manual
4.2.2.6
Door Sensor Detection Time
Application only if door sensor is installed. Default value is 0 which means this function is
deactivated. Sensor detection time may be set from 1~255 seconds. (If parameter value is
greater than 255 seconds, the parameter is ineffective).
When door sensor detection time has been set, system will monitor door’s status. If the
allotted door open time has expired and door does not close, controller will make beep
sound continuity until the door has to be closed. However, if door was forced open,
controller will activate the alarm relay to alert the administrator or security personnel. To
deactivate the alarm relay, input the disarm code. (Default is 0000)
Operation Instruction:
Master Card/Code
(Default 30191000)
Access Info
Default is 0 second
which signifies
deactivates function.
Door Sensor
NEW =
Completed
Page 41

MIDAS TOUCH INC
41
MAC-1000PEF/PMF Hardware Manual
4.2.3
Sys Setup
4.2.3.1
Set Date
Sets date displayed on the LCD display. Date format is yy:mm:dd:w (yy stands for year
00~99, mm stands for month 01~12, dd stands for date 01~31 and w stands for week 1~7)
Operation Instruction:
Master Card/Code
(Default 30191000)
Sys Setup
Screen displays original
date.
For example:110518-3
signifies May 18, 2011,
Wednesday
Date
NEW =
After return to
ready status,
LCD screen will
display new
date.
Completed
Page 42

MIDAS TOUCH INC
42
MAC-1000PEF/PMF Hardware Manual
4.2.3.2
Set Time
Sets time displayed on the LCD display. Time format is hh:mm:ss (hh represents hours
00~23, mm for minutes 00~59 and ss for seconds 00~59.
Operation Instruction:
Master Card/Code
(Default 30191000)
Sys Setup
Screen displays
original time.
For Example:
090428 signifies
09:04:28 AM
After return to
ready status,
LCD screen will
display new
time.
Time
NEW =
Completed
Page 43

MIDAS TOUCH INC
43
MAC-1000PEF/PMF Hardware Manual
4.2.3.3
Set Date Format
Allow user set date format displayed on the LCD display.
Input 0, date format is YYYY/MM/DD
Input 1, date format is MM/DD/YYYY
Input 2, date format is DD/MM/YYYY
(YYYY is year, MM is month, DD is date)
Operation Instruction:
Master Card/Code
(Default 30191000)
Sys Setup
Date Format
Default value is
0. YYY/MM/DD.
Press F1 or F2
to select format.
0.
YYYY/MM/DD
1.
MM/DD/YYYY
2.
DD/MM/YYYY
After return to
ready status,
LCD screen will
display new
format.
Completed
Page 44

MIDAS TOUCH INC
44
MAC-1000PEF/PMF Hardware Manual
4.2.3.4
Set Keypad Status
Allows user to lock or unlock controller’s keypad. When parameter is set 0, keypads are
disabled. The parameter is set 1, keypads are enabled. (If parameter value is not 0 or 1,
the parameter is ineffective
Operation Instruction:
Note:
1.
Before disable keypad function, please set a new Master Card first hence
disabling the keypads will lock you out of the command prompt.
2.
If input master code by swiped card, please does not set “Retrieve Valid Code
Index” function hence setting index code will retrieve incomplete master digits.
Master Card/Code
(Default 30191000)
Sys Setup
When disable
keypads,
access is
required by
swiping valid
card.
And access to
command mode
is required by
swiping Master
Card only.
1=Enable
Keypad
0=Disable
Completed
Completed
Page 45

MIDAS TOUCH INC
45
MAC-1000PEF/PMF Hardware Manual
4.2.3.5
Set Read Interface
Allow the users to select read interface. 0 is T1/T2 reader interface. 1 is Wiegand 26(8)
(system will retrieve 8 digits). 2 is Wiegand 26(10)(system will read 8 digits back and add
00 automatic in front of number. Total will retrieve 10 digits.) 3 is Wiegand 34 (system will
retrieve 10 digits).
Operation Instruction:
Master Card/Code
(Default 30191000)
Sys Setup
Read Interface
0=T1/T2
1=Wiegand 26(8)
2=Wiegand 26(10)
3=Wiegand 34(10)
Completed
Completed
Completed
Completed
Page 46

MIDAS TOUCH INC
46
MAC-1000PEF/PMF Hardware Manual
4.2.3.6
System Initiation
System Initiation clears all records within the memory including the card numbers, system
settings, Master code (Default is 30191000) and restores all parameters to default settings.
After performing this function, card number and parameter should be reset.
Initiation should be performed only when the following occurs:
1.
On the initial installation, set the MAC-1000 parameter to its default settings
before deployment.
2.
If the following problem arises:
Abnormal operation
User wants to clear all card numbers, passwords and settings.
Operation Instruction:
Master Card/Code
(Default 30191000)
Sys Setup
Initial
0=No
1=Yes
Initial
Completed
Press function key * to exit the menu or
wait for time out and return to ready status.
Page 47

MIDAS TOUCH INC
47
MAC-1000PEF/PMF Hardware Manual
4.2.4
Comm
4.2.4.1
Set Communication Way
Select communication way of controller. The parameter 0 signifies TCP/IP, 1 signifies RS-
485. This setting should identical with Chapter 3.2.6 and Chapter 4.1
Operation Instruction:
Press function key * to exit the menu
or wait for time out and return to ready
status.
Master Card/Code
(Default 30191000)
Comm
Interface
0=TCP/IP
1=RS-485
Interface
Page 48

MIDAS TOUCH INC
48
MAC-1000PEF/PMF Hardware Manual
4.2.4.2
Set IP Address
Set controller’s IP address. Default IP address is 172.016.250.100 (The communication
way must select TCP/IP, otherwise the setting is ineffective)
Operation Instruction:
Master Card/Code
(Default 30191000)
Comm
Screen will display
original IP address,
Please input new IP
address.
IP
NEW =
Completed
Page 49

MIDAS TOUCH INC
49
MAC-1000PEF/PMF Hardware Manual
4.2.4.3
Set Submask
Set Controller’s submask. Default value is 255.255.0.0 (The communication way must
select TCP/IP, otherwise the setting is ineffective.)
Operation Instruction:
Master Card/Code
(Default 30191000)
Comm
Screen will display
original submask,
Please input new
submask.
Submask
NEW =
Completed
Page 50

MIDAS TOUCH INC
50
MAC-1000PEF/PMF Hardware Manual
4.2.4.4
Set Gateway
Set controller’s gateway. Default value is 000.000.000.000 (The communication way must
select TCP/IP, otherwise the setting is ineffective)
Operation Instruction:
Master Card/Code
(Default 30191000)
Comm
Gateway
NEW =
Completed
Page 51

MIDAS TOUCH INC
51
MAC-1000PEF/PMF Hardware Manual
4.2.4.5
Set Port
Set controller’s port. Default value is 4660. (The communication way must select TCP/IP,
otherwise the setting is ineffective)
Operation Instruction:
Master Card/Code
(Default 30191000)
Comm
Port
Screen will display
original port,
Please input new port.
NEW =
Completed
Page 52

MIDAS TOUCH INC
52
MAC-1000PEF/PMF Hardware Manual
4.2.4.6
Set Baud rate
Select controller’s baud rate. 0=9600, 1=19200, 2=38400,3=115200.
(The communication way must select RS-485, otherwise the setting is ineffective.)
Operation Instruction:
Master Card/Code
(Default 30191000)
Comm
Default value is 19200.
Program will mark
current selection.
Press F1 or F2
to select the value.
Baud Rate
0=9600,
1=19200
2=38400
3=115200
Completed
Page 53

MIDAS TOUCH INC
53
MAC-1000PEF/PMF Hardware Manual
4.2.4.7
Set Node ID
Set controller’s ID ( ID range from 001~255).
(The communication way must select RS-485, otherwise the setting is ineffective.)
Operation Instruction:
Master Card/Code
(Default 30191000)
Comm
Node ID
ID Range from
001~255
NEW =
Completed
Page 54

MIDAS TOUCH INC
54
MAC-1000PEF/PMF Hardware Manual
4.2.5
Language Selection
Allow user to select language(0= English, 1= Traditional Chinese, 2= Simplified
Chinese).
Operation Instruction:
Master Card/Code
(Default 30191000)
Language
Default is English.
Program will mark
current selection.
Press F1 or F2
to select the language.
0= English
1= 简体
2=繁體
Completed
Page 55

MIDAS TOUCH INC
55
MAC-1000PEF/PMF Hardware Manual
4.2.6
Information
Allow user to read controller’s information, as follow:
Version:XXX
Communication Way:TCP/IP or RS-485
Node ID:XXX
Baud Rate:XXXXXXBPS
IP:XXX.XXX.XXX.XXX
Submask:XXX.XXX.XXX.XXX
Gateway: XXX.XXX.XXX.XXX
Port:XXXX
Card:XXXXX Event:
XXXXX
Operation Instruction:
Master Card/Code
(Default 30191000)
Info
Press F1 or F2 to read
full information.
Version:XXX
Comm:TCP/IP
Completed
Page 56

MIDAS TOUCH INC
56
MAC-1000PEF/PMF Hardware Manual
Chapter 5 Testing
1.
Make sure the wire connecting is complete.
2.
Please input Master code 30191000 (Default) to enter command mode.
3.
Go to Card Manage Add FP_Card Restricted
4.
Input time schedule code. (000 = Open 24 hours)
5.
Input card number to be added. (Input card number through keypad then press # or
simply swipes the card).
6.
Input password then press # .( If password is unnecessary, please press # ).
7.
Add two different fingerprint templates.
8.
Upon successful addition, system will request to add another new card number. For
adding more cards, just repeat previous steps.
9.
To end of adding, press # , system will back to ready status.
10.
After resume to Ready Status, swipe card or input card number then put finger on the
sensor. Upon a valid entry, controller’s LCD will display “Complete” and audio prompt
“Thank you”. If LCD displays “Access Denied” or “Fingerprint r mismatch ”, the adding
fingerprints failed. Please re-add again.
Page 57

MIDAS TOUCH INC
57
MAC-1000PEF/PMF Hardware Manual
Chapter 6 Troubleshoot
Question
Reason
Solution
MAC-1000PEF/PMF,
PWR LED does not lit
Kindly check if the controller
receives DC12V power input
or inspect if the power
connecting is correct.
Kindly refer to Chapter 3.2.8
Power Supply Connection.
The controller does not
beep and
OK/ ERR LED does
not l i t upon a valid
card swiped.
1.
Kindly check if the
controller receives DC 12 V
power input.
2.
Controller is not under
ready status.
1. Kindly refer to Chapter
3.2.8 Power Supply
Connection.
2. Please contact with our
agent whom you bought the
products from.
LCD display Access
Granted but door
does not open.
The electronic lock
disconnection or bad
connection. And check
whether the lock is properly
installed.
Kindly refer to Chapter 3.2.3
Electronic Lock setup.
Controller doesn’ t
communication with
PC.
1.
Bad wire connection with
controller.
2.
Wrong IP setting.
3.
SW2 doesn’t switch to
correct comm. type.
1.
Kindly refer to 3.2.6
communication interface
connection.
2.
Kindly refer Chapter 7
Appendix to set controller IP
by tool.
3.
Kindly refer to Chapter
4.1 RS485/TCPIP selection
LCD display wrong t
ime and date.
Synchronize from software or
enter command mode to
modify date and time.
Kindly refer to Chapter
4.2.3.1 Set date and 4.2.3.2
Set time.
Unable to access
command mode
when input Master
code.
Master code is ineffective.
Check correct Master code
or Retrieve valid code index
setting from HAMS access
control management
system.
Page 58

MIDAS TOUCH INC
58
MAC-1000PEF/PMF Hardware Manual
Question
Reason
Solution
LCD display “ Access
Denied” when card
swiped.
Invalid card
Please download card
authorization through
HAMS. Kindly refer to
manual.
Set alarm t ime but
alarm does not
activate.
1.
Alarm wire disconnection.
2.
Bad Alarm
3.
The Alarm timetable
doesn’t download to
controller. Or Alarm relay
setting wrong.
1. Kindly refer to Chapter
3.2.5 Alarm connection.
2. Kindly refer to Chapter
4.2.2.5 Set Alarm Relay
Mode
3. Please refer to HAMS
access control system.
Page 59

MIDAS TOUCH INC
59
MAC-1000PEF/PMF Hardware Manual
Chapter 7 Appendix
Appendix 1:Set Controller IP by Tool
A、Overview
:
HTA-830 Tool.exe is a program that automatically locates TCP/IP based controller as well
as modify the device’s IP address. This program is application to TCP/IP device and does
not require installation. Double click on the programs to execute.
This program used broadcast search and connection method. And the terminal’s
firewall should be shut down in order to locate the devices.
B、Workspace Description:
Device List – Found devices are listed in this area. The following parameters are
also included in the listing:
●
MAC ID (Media Access Control Identification): It serves as unique identifier of the
device connected over the network. This fixed identification number is set from the
factory and is not allowed to be modified.
●
IP (Internet Protocol Address): Default is 172.16.250.100. IP address should be unique.
Page 60

MIDAS TOUCH INC
60
MAC-1000PEF/PMF Hardware Manual
Kindly differentiate the devices using their MAC ID on the initial search.
●
Submask (Subnet Mask): Default is 255.255.0.0
●
Gateway: Default is 0.0.0.0
●
Port: Communication port, default is 4660.
●
Baud Rate: Communication baud rate. Different device supports different baud rate.
Kindly check its manual individually.
Function reserved
Search Button: Click this button to search all the devices connected over the network.
New settings area: Modifies device’s IP address, Submask, Gateway, Port and Baud
Rate.
Broadcast Setup: This button will set new parameters to a device via broadcast
method.
Connect Setup: This button is connecting with a device and sets its new parameters.
C、Operation Procedure:
C-1 Shut down firewall
C-2
Double click HTA830Tools.exe to execute program.
C-3
Click on “Search” button to locate the devices over the network. Returned results
will be shown in the device list area. Kindly refer to follow figure:
●
If found devices have the same IP addresses, kindly differentiate each using their MAC
Page 61

MIDAS TOUCH INC
61
MAC-1000PEF/PMF Hardware Manual
ID。
C-4
Select a device as shown below:
C-5
Current settings of the selected device will be displayed in the ”New” settings area.
To modify it, overwrite the parameters:
Page 62

MIDAS TOUCH INC
62
MAC-1000PEF/PMF Hardware Manual
IP:New IP address
Submask:Sub Mask
Gateway:Modification is not required if the devices are connected on the same
network.
Port:Default is 4660 or user-defined port.
Baud Rate:Definition by different devices.
Kindly inquire the necessary information about the network environment from your IT
personnel. All parameter settings should be the same with the system in order to establish
connection with the devices.
C-6
Verify the new parameters before pressing the “Broadcast Setup” button.:
“Broadcast Setup” is applicable when devices are connected under the same
network. However, if the program and device belong to different network or if
connection cannot be established due to network barriers, kindly use
“Connect Setup” button to set the parameters.。
Page 63

MIDAS TOUCH INC
63
MAC-1000PEF/PMF Hardware Manual
C-7
Upon completion of the settings, the device will automatically restart and
temporarily disconnects from the network. Kindly wait for 10-20 sec. before searching
the device again. Check if the parameters are correct and successfully modified.
Page 64

MIDAS TOUCH INC
64
MAC-1000PEF/PMF Hardware Manual
Appendix 2:Wiring Material Requirements
Cable Type
Cable Specification
Max. Connection
Length
MAC-1000 Power Cable
18-22 AWG
30M
Alarm Relay Connection Cable
18-22 AWG
50M
Exit Button Connection Cable
18-22 AWG
50M
RS-232 Cable
4-core shielded twisted pair wire
20~22 AWG
25M
RS-485 Cable
4-core shielded twisted pair wire
20~22 AWG
800 M
Upgrade the cable specification according to transmission distance.
Upgrade the cable specification as per environmental interference factors.
It is recommended to use larger cable wires for future use.
It is highly recommended to use shielded twisted pair wire for readers and
communication cable to increase transmission distance and interference resistance
ability.
Page 65

刷卡+指紋
或直接按
指紋方式
通過
刷卡方式
通過
刷卡加密
方式通過
不登錄指
紋直接按
#
不輸入密
碼直接按#
不登錄指
紋直接按
#
完成
ONE YEAR LIMITED WARRANTY
We warrants this product against defect in material or workmanship for
1 year from the date of purchase. If such a defect is discovered within this warranty
limitation, contact your dealer for repair or replacement of your unit.
When returning the product, you must ship the product in its original packaging or
packaging that gives an equal degree of protection. This warranty becomes invalid if the
factory-supplied serial number has been removed or altered on the product.
This warranty does not cover cosmetic damage or damage due to acts of God, accident,
misuse, abuse, negligence or modification of any part of the product. This warranty does
not cover damage due to improper operation or maintenance, connection to improper
equipment, or attempted repair by anyone other than.
In no event shall manufacturer’s liability exceed the price paid for the product from direct,
indirect, special, incidental, or consequential, damages resulting from the use of the
product, its accompanying software, or it’s documentation. Hundure makes no warranty
or representation expressed, implied, or statutory, with respect to its products, contents of
use of this documentation and all accompanying software, and specially disclaims its
quality, performance, merchantability or fitness for any particular purpose. Hundure
reserves the right to revise or update its product, software or documentation without
obligation to notify any individual or entity.
TECHNICAL SUPPORT
For technical questions regarding your product, please email our service and support team
at support@midastouchinc.com
www.midastouchinc.com
 Loading...