

Page 1
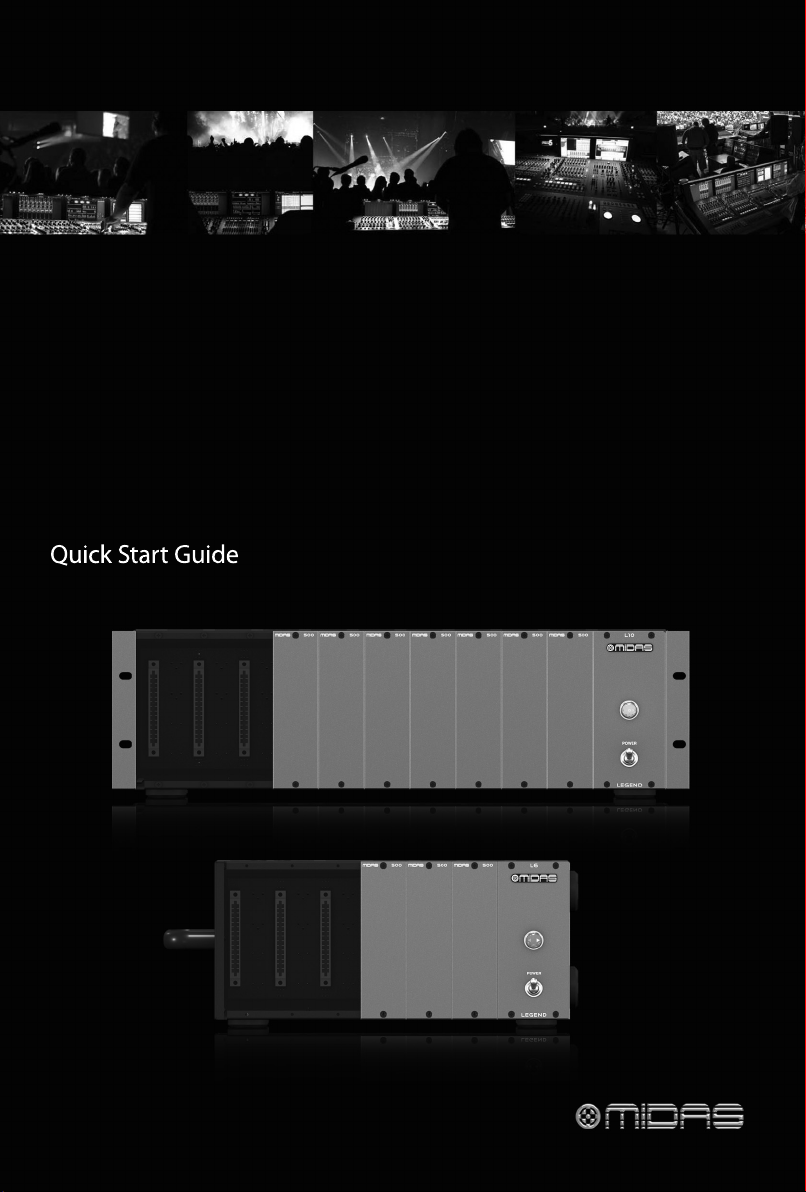
LEGEND L10
500 Series Rackmount Chassis for 10 Modules with
Advanced Audio Routing
LEGEND L6
500 Series Portable Chassis for 6 Modules with
Advanced Audio Routing and Rackmount Kit
Page 2
2 3Quick Start GuideLEGEND L10/L6
Important Safety
Instructions
Terminals marked with
this symbol carry
electrical current of
su cient magnitude to consti tute risk
of electr ic shock. Use only high-quality
professional sp eaker cables with ¼" TS
or twist-locki ng plugs pre-installed.
Allother installatio n or modi cation
should be per formed only by
quali edpersonnel.
This symbol, wherever it
appears, alert s you to the
presence of uninsulated
dangerous voltage in side the enclosure
- voltage that may be su cient to
constitute a risk o fshock.
This symbol, wherever it
appears, alerts you to
important operating and
maintenance instructions in the
accompanying literature. Please read
themanual.
Caution
To reduce the risk of
electric shock, do not
remove the top cover (or the rear
section). No user ser viceable parts inside.
Refer serv icing to quali edpersonnel.
Caution
To reduce the risk of
re or elec tric shock, do
not expose this ap pliance to rain and
moisture. Theapparat us shall not
be exposed to d ripping or splashing
liquids and no objec ts lled w ith
liquids, such as vases, shall be p laced
on the appara tus.
Caution
These service instructions
are for use by quali ed
service p ersonnel only. Toreduce
the risk of elec tric shock do not
perfor m any servicing other than that
contained in the operatio n instructions.
Repairshave to be p erformed by
quali ed servicepersonnel.
1. Read these instructions.
2. Keep these instructions.
3. He ed all warnings.
4. Follow all instru ctions.
5. Do not use this apparatus
near water.
6. Clean only wit h dry cloth.
7. Do not bl ock any ventilation
openings. Install in accordance with t he
manufacturer’s instructions.
8. Do not ins tall near any heat
sources such as radiators, heat registers,
stoves, or other a pparatus (including
ampli ers) that produce heat.
9. Do not defeat the safe ty purpose
of the polarized o r grounding-type
plug. A polarized p lug has two blades
with one wide r than the other.
A grounding-t ype plug has two blades
and a third groun ding prong. The wide
blade or the thi rd prong are provided
for your safe ty. Ifthe provided plug
does not t i nto your outlet, consult
an electric ian for replacement of the
obsolete outlet.
10. Protec t the power cord from being
walked on or pinc hed particularly
at plugs, convenience receptacle s,
and the point wher e they exit from
the apparatus.
11. Use only attach ments/accessories
speci e d by themanufactu rer.
12. Use only with
the cart, s tand,
tripod, brac ket, or
table speci ed by
the manufacturer,
orsold with
the apparat us. When a cart is used,
use cautio n when moving the cart /
apparatus combinat ion to avoid injury
from tip-over.
13. Unplug this apparatus during
lightning sto rms or when unused for
long periods of time.
14. Refer all servicing to quali ed
service p ersonnel. Servic ing is required
when the apparatus has b een damaged
in any way, such as power supply cord
or plug is damaged, liquid has been
spilled or objec ts have fallen into the
apparatus, the app aratus has been
exposed to r ain or moisture, does not
operate normally, or has bee ndropped.
15. The apparatus shall be connected
to a MAINS socket ou tlet with a
protective earthing connection.
16. Where t he MAINS plug or an
appliance coupler is used as th e
disconnect device, the disconnect
device shall remain readily operable.
17. Correct dispo sal of
this product: This
symbol indicates that
this product must not
be disposed of with
household was te, according to the
WEEE Directi ve (2012/19/EU) and your
national law. This product should b e
taken to a collect ion center licensed for
the recycli ng of waste electrical and
electronic equipment (EEE).
The mishandling of this t ype of waste
could have a possible n egative impact
on the environment and human health
due to potentially hazardous
substances that are generally
associated wi th EEE. At the same time,
your cooperation in the cor rect disposal
of this produc t will contribute to the
e cient use of natural res ources. For
more inform ation about where you can
take your waste e quipment for
recycling, pleas e contact your local city
o ce, or your household was te
collection ser vice.
18. Do not ins tall in a con ne d space,
such as a book case or si milar unit.
19. Do not p lace naked ame
sources, such as lighted candles,
on the appara tus.
20. Please keep t he environmental
aspect s of battery disposal in mind .
Batterie s must be disposed-of at a
batter y collection point.
21. Use this appar atus in tropical
and/or moderate climates.
LEGAL DISCLAIMER
MUSIC Group accepts no liabi lity for
any loss which may be su ered by
any person who r elies either wholly
or in part up on any description,
photograph, or statement cont ained
herein. Technical speci cations,
appearances and other informat ion
are subject to chan ge without notice.
All trademar ks are the propert y of
their respec tive owners. MIDA S,
KLARK TEKNIK, LAB GRUPPEN,
LAK E, TANNOY, TURB OSOUND,
TC ELECTRONIC, TC HELICON,
BEHR INGER, BU GERA and DDA are
trademarks or registered trademarks of
MUSIC Group IP Ltd. © MUSIC Group IP
Ltd. 2016 All rights reser ved.
LIMITED WARRANTY
For the applicable warr anty terms and
conditions and additional infor mation
regarding MUSIC Group’s Limited
Warranty, please see complete de tails
online at music-group.com/warranty.
Instrucciones de
seguridad
Las terminales marcadas
con este símbolo
transportan corriente
eléctric a de magnitud su c iente como
para constituir un riesgo de descarga
eléctric a. Utilicesolo cables de altavoz
profesionales y de alta ca lidad con
conector es TS de 6,3 mm o de bayoneta
pre jados. Cualquier otra instalación o
modi cación debe ser realizada
únicamente por un técnicoc uali cado.
Este símbolo, siempre que
aparece, leadvier te de la
presencia de voltaje
peligroso sin aislar dentro d e la caja;
estevoltaje pu ede ser su ciente para
constituir un ri esgo dedescarga.
Este símbolo, siempre que
aparece, leadvier te sobre
instrucciones operativas y
de mantenimiento que aparecen en la
documentac ión adjunta. Por favor,
leaelmanual.
Atención
Para reducir el r iesgo de
descarga eléctrica, no
quite la tapa (olaparte p osterior).
Nohay piezas en el i nterior del equipo
que puedan ser rep aradas por el
usuario. Sies neces ario, póngase en
contacto con pers onal cuali cado.
Atención
Para reducir el ri esgo
de incendio o descar ga
eléctric a, no exponga este aparato a la
lluvia, humedad o alguna otra f uente
que pueda salpicar o der ramar algún
líquido sobre el apar ato. Nocoloque
ningún tipo de rec ipiente para líquidos
sobre elapar ato.
Atención
Las instrucciones
de servicio deben
llevarlas a cabo exclusivam ente
personal cuali cado. Paraev itar el
riesgo de una descarga eléctrica,
no realice reparacio nes que no se
encuentren descritas en el manual de
operaciones. Lasreparaciones deben
ser realizadas exclusi vamente por
personalcuali cado.
1. Lea las instrucci ones.
2. Conserve e stas instrucciones .
3. Pre ste atención a todas
las advertencias.
4. Siga todas las inst rucciones.
5. No u se este aparato cerca
del agua.
6. Limpie es te aparato con un
paño seco.
7. No blo quee las aberturas
de ventilación. Instale el equip o
de acuerdo con las ins trucciones
del fabricante.
8. No instale es te equipo cerca de
fuentes de calor t ales como radiadores,
acumuladores de c alor, estufas u otr os
aparatos (incluyendo ampli cadores)
que puedan produc ir calor.
9. No elimine o deshabilite nunca
la conexión a tier ra del aparato o del
cable de alimentación de corriente.
Unenchufe polari zado tiene dos polos,
uno de los cuales tiene un contac to
más ancho que el otro. Una clav ija
con puesta a ti erra dispone de tres
contactos: dos p olos y la puesta a
tierra. El contac to ancho y el tercer
contacto, respec tivamente, son los que
garantizan una mayor seg uridad. Si el
enchufe suministrad o con el equipo
no concuerda con la toma de cor riente,
consulte con un electricista para
cambiar la toma de corrie nte obsoleta.
10. Coloque el cab le de suministro de
energía de mane ra que no pueda ser
pisado y que es té protegido de objetos
a lados. Asegúrese de que el cable de
suministro de energía es té protegido,
especialmente en la zo na de la clavija y
en el punto donde s ale del aparato.
11. Use únicamente los dispo sitivos
o accesorios esp eci c ados por
el fabricante.
12. Use
únicamente la
carretilla,
plataforma,
trípode, soporte o
mesa especi cados
por el fabricante o suminis trados junto
con el equipo. Altr ansportar el equipo,
tenga cuidado para evit ar daños y
caídas al trope zar con algún obstáculo.
13. Desenchufe el equipo durante
tormentas o si no va a u tilizarlo durante
un periodo largo.
14. Confíe las reparacione s
únicamente a servicios técnicos
cuali cados. La unidad requiere
mantenimiento siempre que haya
sufrido algún daño, si el cab le de
suministro de energía o e l enchufe
presentaran daños, s ehubiera
derramado un líquido o hubie ran caído
objetos dentro del e quipo, si el aparato
hubiera esta do expuesto a la humedad
o la lluvia, si ha dejado de funcio nar de
manera normal o si ha sufr ido algún
golpe o caída.
15. Al conectar la unidad a la toma de
corriente eléc trica asegúrese de qu e
la conexión disponga de una unión
atierra.
16. Si el enchu fe o conector
de red sirve com o único medio
de desconexión, éste debe ser
accesiblefácilmente.
Page 3
4 5Quick Start GuideLEGEND L10/L6
17. Cómo debe
deshacerse de este
aparato: Este símbolo
indica que este apar ato
no debe ser tratado
como basura orgánica, se gún lo
indicado en la Di rectiva WEEE (2012/19/
EU) y a las normativas aplic ables en su
país. En lugar de ello deberá llevarlo al
punto limpio más cercano par a el
reciclaje de sus ele mentos eléctricos/
electró nicos (EEE). Al hacer esto esta rá
ayudando a prevenir las p osibles
consecuencias negativas para el medio
ambiente y la salud que po drían ser
provocadas po r una gestión inadecuada
de este tipo de apar atos. Además,
el reciclaje de materiale s ayudará a
conservar los re cursos naturales. Para
más información ace rca del reciclaje de
este aparato, póngase en cont acto con
el Ayuntamiento de su ciud ad o con el
punto limpio local.
18. No instale esta unidad en un
espacio muy r educido, tal como
encastrada en u na librería o similar.
19. No coloque objeto s con
llama, como una vela encendida,
sobre este aparato.
20. Tenga presentes todas las
advertencias r elativas al reciclaje
y correct a eliminación de las pilas.
Las pilas deben s er siempre eliminadas
en un punto limpio y nunc a con el resto
de la basura orgánica.
21. Use este apar ato en rangos de
temperatura moderad os y/o tropicales.
NEGACIÓN LEGAL
MUSIC Group no admite n ingún tipo
de responsabilidad por cualquier
daño o pérdida que pudie ra sufrir
cualquier persona p or con ar total
o parcialmente en la descri pciones,
fotografías o a rmaciones
contenidas en este documento.
Las especi caciones técnicas,
imágenes y otras infor maciones
contenidas en este doc umento están
sujetas a modi caciones sin previo
aviso. Todas las marcas comerciales
que aparecen aq uí son propiedad
de sus respec tivos dueños. MIDAS,
KLARK TEKNIK, LAB GRUPPEN,
LAK E, TANNOY, TURB OSOUND, TC
ELECTRONIC, TC HELICON, BEHRINGER,
BUGE RA y DDA son marcas comerciales
o marcas regis tradas de MUSIC Group
IP Ltd. © MUSIC Group IP Ltd. 2016
Reservado s todos los derechos.
GARANTÍA LIMITADA
Si quiere conocer los det alles y
condiciones aplicable s de la garantía
así como información adicio nal sobre
la Garantía limitada d e MUSIC Group,
consulte online toda la informació n en
la web music-group.com/warranty.
Consignes de sécurité
Les points rep érés par ce
symbole p ortent une
tension électrique
su sante pour constit uer un risque
d’électrocution. Utilisez uniquement
des câbles d’enceintes pro fessionnels
de haute qualité avec c hes Jack mono
6,35 mm ou ches à verrouillages déjà
installées. Touteautre inst allation ou
modi cation doit être e ectuée
uniquement par un personnel quali é.
Ce symbole aver tit de la
présence d’une tension
dangereuse et non iso lée à
l’intérieur de l ’ap pareil - elle peut
provoquer des chocs électriques.
Attention
Ce symbol signale les
consignes d’utilisation
et d’entre ! Tienimpor tantes dans
la documentat ion fournie. Lisez les
consignes de séc urité du manuel
d’utilisation del’appareil.
Attention
Pour éviter tou t risque
de choc électrique,
ne pas ouvr ir le capot de l’appareil
ni démonter le panneau arr ière.
L’intérieur de l’appareil ne possède
aucun élément rép arable par
l’utilisateur. Laissertoute répara tion à
un professionn elquali é.
Attention
Pour réduir e les risques
de feu et de cho c
électr ique, n’e xposez pas cet appareil
à la pluie, à la moisissure, auxgout tes
ou aux éclaboussu res. Ne posez pas
de récipient contenant un liquide sur
l’appareil (unvase par e xemple).
Attention
Ces consignes de
sécurité et d’entretien
sont dest inées à un personnel
quali é. Pour éviter tout ri sque de
choc électrique, n’e ectuez aucune
réparation sur l ’ap pareil qui ne soit
décrite par le manuel d ’u tilisation.
Les éventuelles r éparations doivent
être e ectuées uniquem ent par un
technicienspécialisé.
1. Lisez ces consignes.
2. Conservez ce s consignes.
3. Resp ectez tous les avertisseme nts.
4. Respec tez toutes les
consignes d’utilisation.
5. N’utilisez jamais l’appareil à
proximité d’un liquide.
6. Net toyez l’appareil avec un
chi on sec.
7. Veillez à ne pa s empêcher la
bonne ventilation de l ’ap pareil via ses
ouïes de ventilation. Respe ctezles
consignes du fabricant concer nant
l’installation del ’a ppareil.
8. Ne placez pas l ’app areil à
proximité d’une source de chaleur te lle
qu’un chau age, une cuisinière ou tout
appareil dégageant de la chaleur (y
compris un ampli depuissance).
9. Ne supprimez jamais la sécurité
des prises bipolaires ou des prises
terre. Les prises bipolaires possèdent
deux contact s de largeur di érente.
Leplus large est le cont act de sécurité.
Les prises terr e possèdent deux
contacts plu s une mise à la terre
servant de s écurité. Si la prise du bloc
d’alimentation ou du cordon d’alimentation four ni ne correspond pas à
celles de votre installation électrique,
faites app el à un électricien po ur
e ectuer le chan gement de prise.
10. Installez le cordon d’alimentation
de telle façon que pers onne ne puisse
marcher dessus et qu’il s oit protégé
d’arêtes coupantes. Assurez-vous
que le cordon d’alimentation es t
suffisamment pro tégé, notamment
au niveau de sa prise éle ctrique et
de l’endroit où il est re lié à l’appareil;
cela est également va lable pour une
éventuelle rallonge électrique.
11. Utilisez exclusivement
des accessoires e t des appareils
supplémentaires recommandés par
lefabric ant.
12. Utilisez
exclusivement des
chariots, des
diables,
desprésen toirs,
despieds et des
surfaces de t ravail recommandés par le
fabricant ou liv rés avec le produit.
Déplacezprécaut ionneusement tout
chariot ou diab le chargé pour éviter
d’éventuelles blessur es en cas dechute.
13. Débranchez l’appareil de la
tension sec teur en cas d’orage ou si
l’appareil reste inutilisé pe ndant une
longue période de temps.
14. Les travaux d’entretien de
l’appareil doivent être e ectués
uniquement par du personnel qualifié.
Aucunentretie n n’es t nécessaire sauf si
l’appareil est en dommagé de quelque
façon que ce soit (dommagessu r le
cordon d’alimentation ou la pris e par
exemple), siun liquide ou un obj et
a pénétré à l’inté rieur du châssis, si
l’appareil a été expo sé à la pluie ou
à l’humidité, s’il ne fon ctionne pas
correc tement ou à la suite d’une chute.
15. L’appareil doit êt re connecté à une
prise sec teur dotée d’une protection
par mise à la terre.
16. La pr ise électrique ou la p rise
IEC de tout appareil dénué de b outon
marche/arrêt doit rester accessible
enpermane nce.
17. Mise au rebut
appropriée de ce
produit: Ce symbole
indique qu’en accord
avec la directive DEEE
(2012/19/EU) et les lois en vigueur dans
votre pays, ce pro duit ne doit pas être
jeté avec les déc hets ménagers.
Ce produit doit ê tre déposé dans un
point de collec te agréé pour le
recyclag e des déchets d’équipemen ts
électriques et électroniques (EEE).
Une mauvaise manipulation de ce t ype
de déchet s pourrait avoir un impac t
négatif sur l’environnement et la s anté
à cause des subst ances potentiellement
dangereuses généralement associées à
ces équipement s. En même temps,
votre coopération dans la mis e au rebut
de ce produit contribu era à l’utilisation
e cace des ressources naturelles.
Pour plus d’inf ormations sur l’endroit
où vous pouvez dé poser vos déchets
d’équipements pour le recyclage,
veuillez contacter votr e mairie ou votre
centre local de collec te des déchets.
18. N’inst allez pas l’appareil dans un
espace con né tel qu ’une bibliothèque
ou meuble similaire.
19. Ne placez jamais d’objets
en ammés, tels que des bougies
allumées, sur l’appareil.
20. Garde z à l’esprit l’imp act
environnemental lorsque vous mettez
des piles au reb us. Les piles usées
doivent être dép osées dans un point de
collecte adapté.
21. Utilisez l’appareil dans un climat
tropical et/ou modéré.
DÉNI LÉGAL
MUSIC Group ne peut êt re tenu
pour responsable pour toute perte
pouvant être subie p ar toute personne
se ant en partie ou en totalité à
toute description, photographie
ou a rmation contenue dans ce
document. Les c aractéristique s,
l’apparence et d’autres informations
peuvent fair e l’objet de modi cations
sans noti cation. Toutes les marques
appart iennent à leurs proprié taires
respectifs. MIDAS, KLARK TE KNIK,
LAB GRU PPEN, LAKE, TANNOY,
TURBOSOUND, TC ELEC TRONIC,
TC HELICON, BEHRINGER, BUGERA
et DDA sont des marq ues ou
marques déposées de MUSIC Group
IP Ltd. © MUSIC Group IP Ltd.
2016 Tous droits réservés.
GARANTIE LIMITÉE
Pour connaître les ter mes et conditions
de garantie applicables, ainsi que
les informations supplémentair es et
détaillées sur la Garant ie Limitée de
MUSIC Group, consultez le site Interne t
music-group.com/warranty.
Wichtige
Sicherheitshinweise
Vorsicht
Die mit dem Symbo l
markierten Anschlüsse
führen so viel Spannun g, dassdie
Gefahr eines Stro mschlags besteht.
Verwenden Sie nur hoc hwertige,
professionelle Lautsprecherkabel
mit vorinstalli erten 6,35 mm
MONO-Klinkensteckern oder
Lautsprecherstecker mit
Drehverriegelung. Alle anderen
Installationen oder Modi kationen
sollten nur von quali zi ertem
Fach perso nal au sgefü hrt we rden.
Achtung
Um eine Gefährdung
durch Stromschlag
auszuschließen, darf die
Geräteabdeckung bzw.
Geräterück wandnicht abgenommen
werden. ImInnern de s Geräts be nden
sich keine vom Benutze r reparierbaren
Teile. Reparaturarbeiten dürfen
nur von quali zie rtem Personal
ausgeführtwer den.
Page 4
6 7Quick Start GuideLEGEND L10/L6
Achtung
Um eine Gefährdung
durch Feuer bz w.
Stromschlag auszuschließen, darf
dieses Gerät weder Regen oder
Feuchtigkeit ausgesetzt werden
noch sollten Spritzwasser oder
tropfende Flüssigkei ten in das Gerät
gelangen können. Ste llen Sie keine
mit Flüssigkeit gefüllten G egenstände,
wie z. B. Vasen, aufdasGer ät.
Achtung
Die Service -Hinweise sind
nur durch quali ziertes
Personal zu be folgen. Umeine
Gefährd ung durch Stromschlag zu
vermeiden, f ühren Sie bitte keinerlei
Reparature n an dem Gerät durch,
dienicht in der B edienungsanleitung
beschrieben sind. Reparaturen
sind nur von quali ziertem
Fachpersonaldurchzuführen.
1. Lesen Sie diese Hinweise.
2. Bewahren Sie diese Hinweise auf.
3. Beac hten Sie alle Warnhinweise.
4. Befolge n Sie alle
Bedienungshinweise.
5. B etreiben Sie das Gerät nicht in
der Nähe vonWasser.
6. Reinigen Sie das Ger ät mit einem
trockenen Tuch.
7. Bloc kieren Sie nicht die
Belüftungsschlitze. Beachten
Sie beim Einbau des Ger ätes die
Herstellerhinweise.
8. Stellen Sie das Gerät nich t in der
Nähe von Wärmequellen auf. Solc he
Wärmequellen sin d z. B. Heizkörper,
Herde oder andere Wär me erzeugende
Geräte (auch Verstär ker).
9. Entfernen Sie in kein em Fall
die Sicherheitsvorrichtung von
Zweipol- oder ge erdeten Steckern. Ein
Zweipolstecker hat zwei unterschiedlich
breite Steckkontak te. Ein geerdeter
Stecker hat zwei Steck kontakte
und einen drit ten Erdungskontakt.
Derbreitere Ste ckkontakt oder der
zusätzliche Erdungskontakt dient
Ihrer Sicherheit. Falls das mitgelie ferte
Steckerf ormat nicht zu Ihrer Steckdos e
passt, wenden Sie sic h bitte an
einen Elektriker, damit die Steckdo se
entsprechend ausgetauscht wird.
10. Verlegen Sie das Ne tzkabel so,
dass es vor Tritten und sc harfen Kanten
geschütz t ist und nicht beschädigt
werden kann. Acht en Sie bitte
insbesondere im Bereich der Stecker,
Verlängerungskabel und an der Stelle,
an der das Netzk abel das Gerät verlässt,
aufausreichendenSc hutz.
11. Das Gerät muss jeder zeit mit
intaktem Schut zleiter an das Stromnetz
angeschlossen sein.
12. Sollte der Hauptnetzstecker
oder eine Gerätesteckdose die
Funktionseinheit zum Abschalten sein,
muss diese immer zugänglich sein.
13. Verwenden Sie nur Zusatzger äte/
Zubehörteile, dielaut H ersteller
geeignet sind.
14. Verwenden
Sie nur Wagen,
Standvo rrichtungen, Stative,
Halter oder Tische,
die vom Hersteller
benannt oder im Lieferumfang des
Geräts enthalten sind. Falls Sie einen
Wagen benutzen, seie n Sie vorsichtig
beim Bewegen d er
Wagen- Gerätkombination,
umVerletzung en durch Stolpern
zuvermeiden.
15. Ziehen Sie den Netzs tecker bei
Gewitter o der wenn Sie das Gerät
längere Zeit nicht benut zen.
16. Lass en Sie alle Wartungsar beiten
nur von quali ziertem Ser vicePersonal ausf ühren. EineWartung
ist notwendi g, wenn das Gerät in
irgendeiner Weise beschädi gt wurde
(z. B. Beschädig ung des Netzkabels
oder Stecker s), Gegenständ e oder
Flüssigkeit in das Geräteinnere gelangt
sind, das Gerät Regen o der Feuchtigkeit
ausgeset zt wurde, das Gerät nicht
ordnungsgemäß funktioniert oder auf
den Boden gef allen ist.
17. Korrek te
Entsorgung dieses
Produkts: Dieses Symbol
weist darauf hin, das
Produkt entsprechend
der WEEE Direk tive (2012/19/EU) und
der jeweiligen nationalen Geset ze nicht
zusammen mit Ihren Haushalts abfällen
zu entsorge n. DiesesProdukt sollte be i
einer autorisierten S ammelstelle für
Recycling elektrischer und
elektronischer Geräte (EEE) abgegeben
werden. Wegen bedenklicher
Substanzen, dieg enerell mit
elektrischen und elektronischen
Geräten in Verbind ung stehen, könnte
eine unsachgemäße Behandlung dieser
Abfallart eine negative Auswirkung auf
Umwelt und Gesundheit haben.
Gleichzeitig gewährleis tet Ihr Beitrag
zur richtigen Entsorgung dieses
Produkt s die e ektive Nutzung
natürlicher Resso urcen. Fürweitere
Informationen zur Ents orgung Ihrer
Geräte bei einer Re cycling-Stelle
nehmen Sie bit te Kontakt zum
zuständigen städtischen Büro,
Entsorgungsamt oder zu Ihrem
Haushaltsabfallents orgerauf.
18. Installier en Sie das Gerät nicht
in einer beengte n Umgebung, zum
Beispiel Bücherregal oder ähnliches.
19. Stellen Si e keine Gegenstände mit
o enen Flammen, etwa brennende
Kerzen, auf das Ger ät.
20. Beachten Sie b ei der Entsorgung
von Batteri en den UmweltschutzAspekt . Batterien müssen be i einer
Batterie-Sammelstelle entsorgt
werden.
21. Verwenden Sie da s Gerät in
tropischen und/oder gemäßigten
Klimazonen.
HAFTUNGSAUSSCHLUSS
MUSIC Group über nimmt keine
Haftung f ür Verluste, die Personen
entstanden si nd, die sich ganz
oder teilweise auf hier enthaltene
Beschreibungen, Fotos oder Aussagen
verlassen haben. Technische Daten,
Erscheinungsbild und andere
Informationen können ohne vorherige
Ankündigung geändert werden.
Alle Warenzeichen sind Eigentum
der jeweiligen Inhaber. MIDA S,
KLAR K TEKNIK, LAB GRUPPEN,
LAK E, TANNOY, TURB OSOUND,
TC ELECTRONIC, TC HELICON,
BEHR INGER, BU GERA und DDA sind
Warenzeichen oder eingetragene
Warenzeichen der MUSIC G roup
IP Ltd. © MUSIC Group IP Ltd.
2016 Alle Rechte vorbehalten.
BESCHRÄNKTE GARANTIE
Die geltenden Garantiebedingungen
und zusätzliche Informationen
bezüglich d er von MUSIC Group
gewährten beschränkten Garantie
nden Sie online unter music-group.
com/warranty.
Instruções de
Segurança Importantes
Aviso!
Ter mina is m arca dos
com o símbolo carre gam
corrente elétr ica de magnitude
su ciente para constituir um ris co de
choque elét rico. Use apenas cabos
de alto-falantes de alta qualidade
com plugues TS de ¼" ou plugue s
com trava de torção pr é-instalados.
Todas as outras instalações e
modi cações devem ser efe tuadas por
pessoasquali cadas.
Este símbolo, onde quer
que o encontre, alerta- o
para a leitura das
instruções de manuseamento que
acompanham o equipam ento. Por favor
leia o manual deinstruçõ es.
Atenção
De forma a dimi nuir
o risco de cho que
eléctrico, nãorem over a cobertura
(ouasecção de trás). Não existe m peças
substituíveis p or parte do utilizador no
seu interior. Para esse ef eito recorrer a
um técnicoquali c ado.
Atenção
Para reduzir o ri sco de
incêndios ou cho ques
eléctrico s o aparelho não deve ser
exposto à chu va nem à humidade.
Alémdisso, não deve ser sujeito a
salpicos, nem devem se r colocados em
cima do aparelho objectos contendo
líquidos, taiscomojarra s.
Atenção
Estas ins truções de
operação devem s er
utilizadas, eme xclusivo, por técnicos
de assistência quali cados. Para evitar
choques eléc tricos não proceda a
reparações ou intervençõe s, que
não as indicadas nas instruçõ es
de operação, s alvo se possuir as
quali -cações necessárias. Para evitar
choques eléc tricos não proceda a
reparações ou intervençõe s, que
não as indicadas nas instr uções de
operação. Só o de verá fazer se possuir
as quali caçõesnecessárias.
1. Leia estas instruções.
2. Guarde estas instruções.
3. Pre ste atenção a todos os avisos.
4. Siga todas as instr uções.
5. Não u tilize este dispositivo perto
de água.
6. Limpe ape nas com um pano seco.
7. Não obs trua as entradas de
ventilação. Instale de acordo com as
instruções do fabr icante.
8. Não instale per to de quaisquer
fontes de calor tais como radiadores,
bocas de ar quente, f ogões de sala
ou outros aparelhos (incluindo
ampli cadores) que produzam c alor.
9. Não anule o objectivo de
segurança das chas polarizadas ou
do tipo de ligação à ter ra. Uma cha
polarizada dispõ e de duas palhetas
sendo uma mais larga do que a o utra.
Uma cha do tipo ligação à terra dispõ e
de duas palhetas e um terceir o dente
de ligação à terra. A pa lheta larga ou
o terceiro dente são f ornecidos para
sua segurança. Se a cha fornecida
não encaixar na sua tomada, consulte
um electric ista para a substituição da
tomada obsoleta.
10. Proteja o cabo de aliment ação de
pisadelas ou aper tos, especialmente
nas chas, extensões, e n o local de
saída da unidad e. Certi que-se de
que o cabo eléc trico está protegido.
Veri que particularmente nas chas,
nos receptácu los e no ponto em que o
cabo sai doap arelho.
11. O aparelho tem de esta r sempre
conectad o à rede eléctrica com o
condutor de protecção intacto.
12. Se utilizar uma c ha de
rede princip al ou uma tomada de
aparelhos para desligar a unidade
de funcionamento, esta deve estar
sempre acessível.
13. Utilize apenas ligações/acessórios
especi cados pelofabricante.
14. Utilize apenas
com o carrinho,
estrutura, tripé,
suporte, ou mesa
especi cados pelo
fabricante ou
vendidos com o disp ositivo.
Quandoutilizar um c arrinho, tenha
cuidado ao mover o conjunto c arrinho/
dispositivo para ev itar danos provocados
pela terpidação.
15. Desligue este dispositivo durante
as trovoadas ou quando não for
utilizado durante longos períodos
detempo.
16. Qualque r tipo de reparação
deve ser sempr e efectuado por
pessoal quali cado. É necessária uma
reparação s empre que a unidade tiver
sido de alguma forma dani cada,
como por exemp lo: no caso do cabo de
alimentação ou c ha se encontrarem
dani cados; naeventualidade de
líquido ter sido derramado o u objectos
terem caído para de ntro do dispositivo;
no caso da unidad e ter estado exposta
à chuva ou à humidade; sees ta
não funcionar normalmente, ou se
tiver caído.
17. Correct a eliminação
deste produto: es te
símbolo indic a que o
produto não deve ser
eliminado juntamente
com os resíduos dom ésticos, segundo a
Directi va REEE (2012 /19/EU) e a legislação
nacional. Este pro duto deverá ser levado
para um centro de recolha licenciado p ara
a reciclagem de resíduos de
equipamentos eléctricos e electrónicos
(EEE). O tratamento incorre cto deste tipo
de resíduos pode ter um eventual
impacto negat ivo no ambiente e na
Page 5

8 9Quick Start GuideLEGEND L10/L6
saúde humana devido a subs tâncias
potencialmente perigosa s que estão
geralmente ass ociadas aos EEE. Ao
mesmo tempo, a sua colaboraç ão para a
eliminação correc ta deste produto irá
contribuir para a ut ilização e ciente dos
recursos natu rais. Paramais informação
acerca dos locais onde poderá deixar o
seu equipamento us ado para reciclagem,
é favor contactar o s serviços municipais
locais, a entidade de ges tão de resíduos
ou os serviço s de recolha de
resíduosdomést icos.
18. Não instale em lugare s
con nados, tais como estantes ou
unidades similares.
19. Não coloque f ontes de
chama, tais como velas aces as,
sobre o apare lho.
20. Favor, obedecer os aspectos
ambientais de descarte de bateria.
Baterias devem se r descartadas em um
ponto de coletas de bater ias.
21. Use este apar elho em climas
tropicais e/ou moderados.
RENUNCIANTE
LEGAL
O MUSIC Group não se respon sabiliza
por perda alguma que p ossa ser
sofrida po r qualquer pessoa que
dependa, seja de maneira co mpleta
ou parcial, de qualquer descrição,
fotogra a, ou declaração aqui
contidas. Dados técnicos, aparências
e outras infor mações estão sujeitas
a modi c ações sem aviso prévio.
Todas as marcas são propriedade
de seus respectivos donos. MIDAS,
KLAR K TEKNIK, LAB GRUPPEN,
LAK E, TANNOY, TURB OSOUND,
TC ELECTRONIC, TC HELICON,
BEHR INGER, B UGERA e DDA são
marcas ou marcas registradas do
MUSIC Group IP Ltd. © MUSIC Group IP
Ltd. 2016 Todos direitos re servados.
GARANTIA LIMITADA
Para obter os termos de garant ia
aplicáveis e condições e info rmações
adicionais a respeito da garantia
limitada do MUSIC Group, favo r
veri car detalhes na ínte gra através do
website music-group.com/warranty.
Page 6

10 11Qui ck Start GuideLEGEND L10/L6
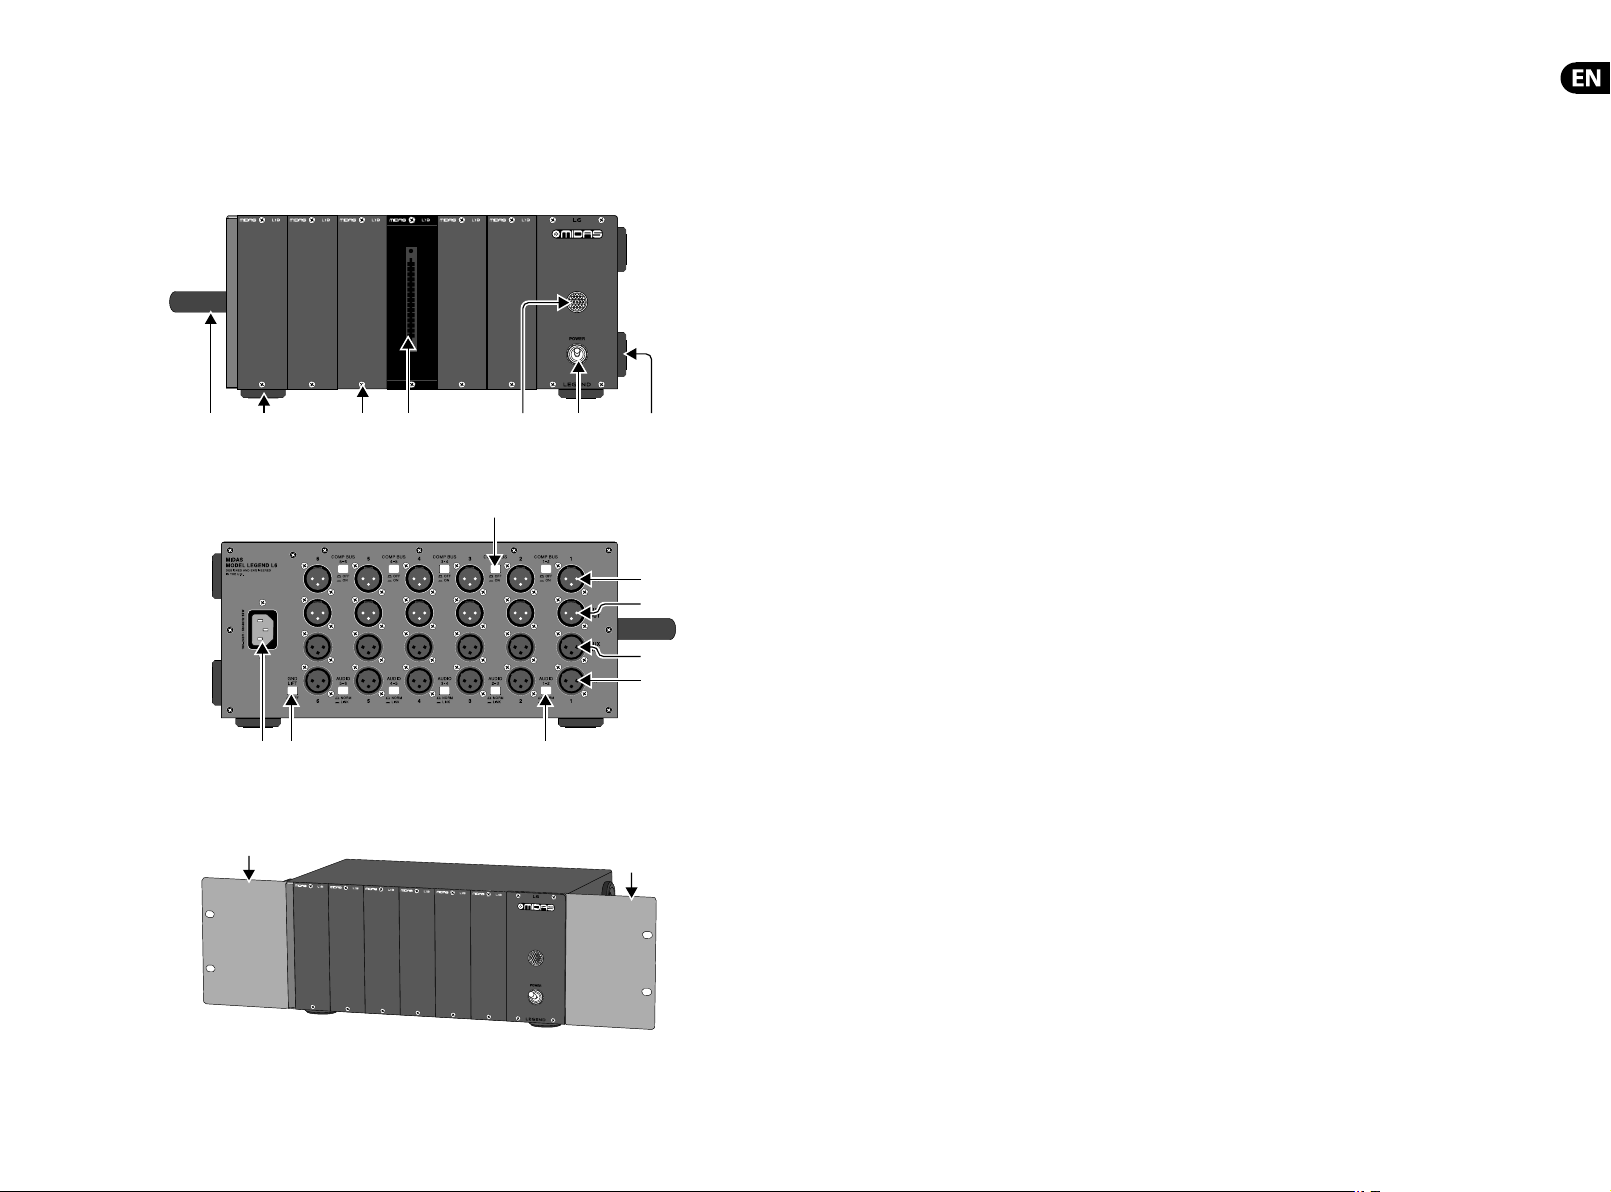
LEGEND L10 Controls
Step 2: Controls
(1) (2) (3) (4) (5) (6)
(14)
(8) (9)(7)
(13)
(12)
(11)
(10)
Rack Ears - These xed rack ears
(1)
allow the L10 to be rack-mo unted
in a 19" 3U space.
Feet (Horizontal) - These 4
(2)
feet allow t he L10 to be placed
horizont ally on a table or oth er at
surfa ce. If the L10 is rack mou nted
and there is n o free rack space
below, then the se feet need to
be removed by c arefully undoin g
the scre ws holding them to the
bottom o f the chassis.
Screw Ho les - These holes o n the
(3)
top and bot tom front rails ar e used
to secure t he 500-serie s modules
in place on th e L10. The y are also
used to se cure blank plates (L1B) to
cover empt y spaces in the L10.
Module Connectors - These
(4)
multi-p in connector s are used to
connec t to the rear connec tor of
any 500- series module plu gged
into the L10. The pin-o ut of these
connec tors follows the s tandard
conventions f or 500-series
modules f or audio input and
output, power, phantom power,
and ground . The exceptions
are for the Au x input and
output co nnections. Ch eck the
compatib ility of any modul es you
use by compa ring the connec tor
pin-ou ts shown on page 19 of this
quick st art guide.
Power Indic ator - This lamp
(5)
illuminat es when AC power is
applied an d the L10 power switc h
is turne d on. It indicates tha t
the L10 internal power s upply is
working a nd supplying power to
the 500-series modules.
Power Switch - S et this to the
(6)
Up positi on to turn on the L10.
Do this af ter all connect ions to
the 500- series modules h ave
been made. S et the switch in the
Down posi tion to turn o th e
power to the L10.
AC Input - Th e supplied power
(7)
cord connects to this AC input.
The L10 has an internal s witching
power supp ly that can accept AC
mains voltag es from 100 VAC to
240 VAC, 50/60 Hz. Make sure t he
front pa nel power switch is t urned
o before making connections.
GROUND LIFT - This switch is
(8)
used to rem ove the audio ground
in situati ons where audio hum
is present.
AUDIO Swi tch - This switc h
(9)
allows you to li nk the output of
one module t o the input of the
next mo dule in line, allowing
you to create a n audio chain of
modules . For an example, if the
rst module i s a microphone
preampli er a nd AUDIO 1-2 is
presse d, then the output fr om the
preampli er w ill be sent to the
input of mo dule 2, such as an EQ.
If AUDIO 2-3 is press ed, then the
EQ output w ill go to module 3 such
as a compre ssor, and so on. In this
example, IN 2 a nd IN 3 XLR inputs
are discon nected, and the au dio
for this ch ain of modules come s in
on IN 1, and out fro m OUT 3.
IN - This balanc ed XLR audio input
(10)
connec ts to the audio out puts of
your external equipment, such
as instruments, microphones,
and line- level outputs. T he audio
signals are t hen passed on to the
inputs o f the 500-serie s modules.
AUX IN - This b alanced XLR audio
(11)
input is us ed if your module has
this capability.
AUX OUT - This ba lanced XLR audio
(12)
output is u sed if your module h as
this capability.
OUT - This balance d XLR audio
(13)
output s ends the output of t he
module to th e balanced audio
input of you r external equi pment.
Use the AUDIO sw itches if you
want to send t he audio output
direc tly to the input of the n ext
module in li ne. In this case the
signals are s ent internally and n o
XLR patch cor ds are required.
COMP BUS - These s witches are
(14)
used for t hose compresso rs that
allow linki ng together for s tereo
or multi-channel compressor
applicat ions. Only cert ain
compres sors have this featur e,
and our cur rent MIDAS 522
compressor/limiter does not.
Page 7
12 13Quick Start GuideLEGEND L10/L6
LEGEND L6 Controls
Step 2: Controls
(1) (2) (3) (4) (5) (6) (7)
(15)
(14)
(13)
(12)
(11)
(9)(8)
(10)
(16)
(16)
Carrying Handle - This useful
(1)
handle allow s the L6 to be safely
transpor ted and moved to
various locations.
Feet (Horizontal) - These four
(2)
feet allow t he L6 to be placed
horizont ally on a table or oth er at
surfa ce. If the L6 is rack mounte d,
and there is n o free rack space
below, then the se feet need to
be removed by c arefully undoin g
the scre ws holding them to the
bottom o f the chassis.
Screw Ho les - These holes o n the
(3)
top and bot tom front rails ar e used
to secure t he 500-serie s modules
in place on th e L6. They are also
used to se cure blank plates (L1B)
to cover empt y spaces in the L6.
Module Connectors - These
(4)
multi-p in connector s are used to
connec t to the rear connec tor of
any 500- series module plu gged
into the L6. Th e pin-out of thes e
connec tors follows the s tandard
conventions f or 500-series
modules f or audio input and
output, power, phantom power,
and ground . The exceptions
are for the Au x input and
output co nnections. Ch eck the
compatib ility of any modul es you
use by compa ring the connec tor
pin-ou ts shown on page 19 of this
quick st art guide.
Power Indic ator - This lamp
(5)
illuminat es when AC power is
applied an d the L6 power switch i s
turned o n. It indicates that t he L6
internal p ower supply is worki ng
and supply ing power to the
500-series modules.
Power Switch - S et this to the
(6)
Up positi on to turn on the L6.
Do this af ter all connect ions to
the 500- series modules h ave
been made. S et the switch in the
Down posi tion to turn o th e
power to the L6 .
Feet (Vert ical) - These fee t are
(7)
used when t he L6 is placed in the
vertical posi tion.
AC Input - Th e supplied power
(8)
cord conne cts to this AC inpu t. The
L6 has an inter nal switching po wer
supply th at can accept AC mains
voltages f rom 100 VAC to 240 VAC,
50/60 Hz. Make sur e the front
panel powe r switch is turne d o
before making connections.
GROUND LIFT - This switch is
(9)
used to rem ove the audio ground
in situati ons where audio hum
is present.
AUDIO Swi tch - This switc h
(10)
allows you to li nk the output of
one module t o the input of the
next mo dule in line, to create an
audio chai n of modules. For an
example, i f the rst module is
a microph one preampli er and
AUDIO 1-2 is pressed, t hen the
output f rom the preampli er w ill
be sent to th e input of module
2, such as an EQ. If AUDI O 2-3 is
also press ed, then the EQ outpu t
will go to mod ule 3 such as a
compres sor, and so on. In this
example, IN 2 a nd IN 3 XLR inputs
are discon nected, and the au dio
for this ch ain of modules come s in
on IN 1, and out fro m OUT 3.
IN - This balanc ed XLR audio input
(11)
connec ts to the audio out puts of
your external equipment, such
as instruments, microphones,
and line- level outputs. T he audio
signals are t hen passed on to the
inputs o f the 500-serie s modules.
AUX IN - This b alanced XLR audio
(12)
input is us ed if your module has
this capability.
AUX OUT - This bal anced XLR
(13)
audio out put is used if your
module has t his capabilit y.
OUT - This balance d XLR audio
(14)
output s ends the output of t he
module to th e balanced audio
input of you r external equi pment.
Use the AUDIO sw itches if you
want to send t he audio output
direc tly to the input of the n ext
module in li ne. In this case the
signals are s ent internally and n o
XLR patch cor ds are required.
COMP BUS - These s witches are
(15)
used for t hose compresso rs that
allow linki ng together for s tereo
or multi-channel compressor
applicat ions. Only cert ain
compres sors have this featur e,
and our cur rent MIDAS 522
compressor/limiter does not.
Rack Ears - The suppli ed rack ears
(16)
can be scr ewed to the sides of th e
L6 to allow it to b e rack-mounted
in a 19" 3U space. The fe et on the
lower horiz ontal panel have to be
removed for t he L6 to be tted
into a rack , if there is no free r ack
space below. Th e handle and the 4
other fee t (vertical) can b e left in
place, as the ra ck ears cover them.
Page 8
14 15Quick Star t GuideLEGEND L10/L6
LEGEND L10/L6 Getting Started
Step 3: Network
Connection
With the po wer cord
unplugge d from the L6 or
L10, install the vari ous
500-series modules that
make up your sy stem. Use two scre ws to
secure t hem to the front top an d bottom
rails of the L 6 or L10. C arefully read the
instru ctions for your m odules so you know
the corre ct operation a nd follow the
recommended connections.
Blank space s in your L6 or
L10 can be lled using the
MIDAS L1B blank plates.
These plates will prevent
dirt, du st and other objec ts from enter ing
the unit.
When all conn ections are
made, and the a ppropriate
switche s set on the rear
panel, conn ect the supplie d
power cord to t he L6 or L10.
Some microphone
preampli er modules o er
+48V phan tom power if
your microphone needs it.
Be caref ul that any 48V phanto m power
switche s are correct ly set, because s ome
microph ones and audio devic es can be
damaged pe rmanently by phant om power.
Set the pow er switch to the
Up positi on and observe tha t
the fron t panel power lamp
is illumina ted, indicating
that the sy stem is ready for us e.
Although t he L6 and L10
have a rear pane l Ground Lift
switch, i t is recommended
that you onl y use it as a
temporar y last resor t. The cause of gro und
loop hums e tc should be caref ully
investigated and eliminated correctly,
rather th an use this temporar y measure.
The groun d lift switch do es not a ect the
safet y ground connec tion to the chassis ,
which is alw ays present.
Page 9

16 17Quick Star t GuideLEGEND L10/L6
Speci cations Module Connector Pin-Outs
LEGEND L10
Controls
Power Front pane l switch and lamp
Comp Bus
Audio link
Rear panel s witches,
1-2, 2-3, 3-4, 4-5, 5- 6, 6-7, 7-8, 8-9, 9-10
Rear panel s witches,
1-2, 2-3, 3-4, 4-5, 5- 6, 6-7, 7-8, 8-9, 9-10
Ground li ft Rear panel s witch
Input an d Output
Input 10 x balanced XLR
Aux input 10 x bala nced XLR
Output 10 x balanced XLR
Aux outpu t 10 x balanced XLR
Power Requirem ents
AC Input Volta ge 100-240 VAC, 50-6 0 Hz, IEC input
Output Vol tages 3.2 A @ ±16 V, 30 0 mA @ +48 V (phantom p ower)
Power consump tion Typically 55 W
Physical
Dimensio ns (HxWxD) 140 x 483 x 211 mm (5.5 x 19 x 8.3")
Dimensio ns (HxWxD) without fe et 132 x 483 x 211 mm (5.2 x 19 x 8.3")
Weight 4.9 kg (10.8 lbs)
LEGEND L6
Controls
Power Front pane l switch and lamp
Comp Bus Rear panel s witches, 1-2, 2-3, 3-4, 4-5, 5-6
Audio link Rear panel switc hes, 1-2, 2-3, 3-4, 4-5, 5-6
Ground li ft Rear panel s witch
Input an d Output
Input 6 x balanced X LR
Aux input 6 x ba lanced XLR
Output 6 x balanced X LR
Aux outpu t 6 x balanced XL R
Power Requirem ents
AC Input Volta ge 100-240 VAC, 50-6 0 Hz, IEC input
Output Vol tages 3.2 A @ ±16 V, 30 0 mA @ +48 V (phantom p ower)
Power consump tion Typically 35 W
Physical
Dimensio ns (HxWxD) with handle a nd feet 140 x 349 x 211 mm (5.5 x 13.7 x 8.3")
Dimensio ns (HxWxD) with rack ea rs, no feet 132 x 483 x 211 mm (5.2 x 19 x 8.3")
Weight 4.4 kg (9.7 lbs)
Pin Number Description
1Chassis GND
2 Output + (hot)
3 Aux output + (hot)
4 Output ‐ (cold)
5Audio GND
6 Compressor st ereo link
7 Aux output ‐ (cold)
8 Input ‐ (cold)
9 Aux input ‐ (cold)
10 Input + (hot)
11 Aux input + (ho t)
12 PSU +16 V
13 PSU GND (0 V)
14 PSU ‐16 V
15 PSU +48 V ph antom power
Note: All XLR conn ections a re wired pi n 1 = audio GND, pin 2 = + ( hot), pin 3 – (cold)
Page 10

18 19Quick Start G uideLEGEND L10/L6
Other important information
Important information
1. Register online.
Pleaseregister your new MUSIC Group
equipment right after you purchase
it by visiting midasconsoles.com.
Registeringyour purchase using our
simple online form helps us to process
your repair claims more quickly and
e ciently. Also, read the terms and
conditions of our warranty, ifapplicable.
2. Malfunction. Should your
MUSICGroup Authorized Reseller not be
located in your vicinity, you may contact
the MUSIC Group Authorized Ful ller for
your country listed under “Support” at
midasconsoles.com. Shouldyour country
not be listed, pleasecheck if your problem
can be dealt with by our “OnlineSupport”
which may also be found under “Support”
at midasconsoles.com. Alternatively,
please submit an online warranty claim
at midasconsoles.com BEFORE returning
theproduct.
3. Power Connections.
Beforeplugging the unit into a power
socket, please make sure you are using the
correct mains voltage for your particular
model. Faulty fuses must be replaced
with fuses of the same type and rating
withoutexception.
Aspectos importantes
1. Registro online.
Lerecomendamos que registre su
nuevo aparato MUSIC Group justo
después de su compra accediendo a
la página web midasconsoles.com.
Elregistro de su compra a través de
nuestro sencillo sistema online nos
ayudará a resolver cualquier incidencia
que se presente a la mayor brevedad
posible. Además,aproveche para leer
los términos y condiciones de nuestra
garantía, siesaplicable en sucaso.
2. Averías. En el caso de que no
exista un distribuidor MUSIC Group en
las inmediaciones, puede ponerse en
contacto con el distribuidor MUSIC Group
de su país, queencontrará dentro del
apartado “Support” de nuestra página
web midasconsoles.com. En caso de
que su país no aparezca en ese listado,
acceda a la sección “Online Support”
(quetambiénencontrará dentro
del apartado “Support” de nuestra
páginaweb) y compruebe si su problema
aparece descrito y solucionado allí.
Deforma alternativa, envíenos a través
de la página web una solicitud online de
soporte en periodo de garantía ANTES de
devolvernoselaparato.
3. Conexiones de corriente.
Antes de enchufar este aparato a una
salida de corriente, asegúrese de que
dicha salida sea del voltaje adecuado
para su modelo concreto. En caso de
que deba sustituir un fusible quemado,
deberáhacerlo por otro de idénticas
especi caciones, sinexcepción.
Informations
importantes
1. Enregistrez-vous
enligne. Prenezle temps
d’enregistrer votre produit MUSIC Group
aussi vite que possible sur le site Internet
midasconsoles.com. Lefait d’enregistrer
le produit en ligne nous permet de gérer
les réparations plus rapidement et plus
e cacement. Prenezégalement le
temps de lire les termes et conditions de
notregarantie.
2. Dysfonctionnement. Si vous
n’avez pas de revendeur MUSIC Group
près de chez vous, contactez le distributeur
MUSIC Group de votre pays: consultez la
liste des distributeurs de votre pays dans
la page “Support” de notre site Internet
midasconsoles.com. Si votre pays n’est
pas dans la liste, essayez de résoudre votre
problème avec notre “aideen ligne” que
vous trouverez également dans la section
“Support” du site midasconsoles.com.
Vouspouvez également nous faire
parvenir directement votre demande de
réparation sous garantie par Internet sur
le site midasconsoles.com AVANT de nous
renvoyer leproduit.
3. Raccordement au secteur.
Avant de relier cet équipement au secteur,
assurez-vous que la tension secteur
de votre région soit compatible avec
l’appareil. Veillez à remplacer les fusibles
uniquement par des modèles exactement
de même taille et de même valeur
électrique — sans aucuneexception.
Weitere wichtige
Informationen
1. Online registrieren.
Bitteregistrieren Sie Ihr
neues MUSICGroup-Gerät
direkt nach dem Kauf auf der
Website midasconsoles.com. WennSie
Ihren Kauf mit unserem einfachen online
Formular registrieren, könnenwir Ihre
Reparaturansprüche schneller und
e zienter bearbeiten. Lesen Sie bitte
auch unsere Garantiebedingungen,
fallszutre end.
2. Funktionsfehler. Sollte sich
kein MUSIC Group Händler in Ihrer Nähe
be nden, können Sie den MUSIC Group
Vertrieb Ihres Landes kontaktieren, der
auf midasconsoles.com unter „Support“
aufgeführt ist. Sollte Ihr Land nicht
aufgelistet sein, prüfen Sie bitte, ob Ihr
Problem von unserem „Online Support“
gelöst werden kann, den Sie ebenfalls
auf midasconsoles.com unter „Support“
nden. Alternativ reichen Sie bitte
Ihren Garantieanspruch online auf
midasconsoles.com ein, BEVOR Sie das
Produktzurücksenden.
3. Stromanschluss. Bevor Sie das
Gerät an eine Netzsteckdose anschließen,
prüfen Sie bitte, obSie die korrekte
Netzspannung für Ihr spezielles Modell
verwenden. Fehlerhafte Sicherungen
müssen ausnahmslos durch Sicherungen
des gleichen Typs und Nennwerts
ersetztwerden.
Outras Informações
Importantes
1. Registre-se online. Porfavor,
registreseu novo equipamento
MUSICGroup logo após a compra
visitando o site midasconsoles.com
Registrar sua compra usando nosso
simples formulário online nos ajuda
a processar seus pedidos de reparos
com maior rapidez e e ciência. Além
disso, leia nossos termos e condições de
garantia, caso sejanecessário.
2. Funcionamento
Defeituoso. Casoseufornecedor
MUSIC Group não esteja localizado
nas proximidades, vocêpode contatar
um distribuidor MUSICGroup para o
seu país listado abaixo de “Suporte”
emmidasconsoles.com. Se seu país
não estiver na lista, favor checar se seu
problema pode ser resolvido com o
nosso “SuporteOnline” que também
pode ser achado abaixo de “Suporte”em
midasconsoles.com. Alternativamente,
favorenviar uma solicitação de garantia
online em midasconsoles.com ANTES da
devolução doproduto.
3. Ligações. Antes de ligar a unidade
à tomada, assegure-se de que está a
utilizar a voltagem correcta para o modelo
em questão. Osfusíveis com defeito
terão de ser substituídos, sem qualquer
excepção, porfusíveis do mesmo tipo e
correntenominal.
Page 11

FEDERAL COMMUNICATIONS COMMISSION
COMPLIANCE INFORMATION
LEGEND L10/L6
21Quick Star t Guide20 LEGEND L10/L6
Responsi ble Party Name: Music Gr oup Research
Address: Klark In dustrial Par k,
Phone Numb er: +4 4 1562 741515
UK Limited
Walter Nas h Road,
Kidderminste r. Worce stershire.
DY11 7HJ. Englan d.
LEGEND L10/L6
complies with the FCC rules as mentioned in the following paragraph:
This equipment has been tested and found to comply with the limits for a
Class A digital device, pur suant to Part 15 of the FCC Rules. These limits are
designed to provide reasonable protection against harmful interference
when the equipment is operated in a commercial environment.
This equipment generates, uses, and can radiate radio frequency energy
and, if not installed and used in accordance with the instruc tion manual,
may cause harmful inter ference to radio communications. Operation of
this equipment in a residential area is likely to cause harmful interference
in which case the user will be required to correct the interference
at his own expense.
Important information:
Changes or modi cations to the equipment not expressly approved by
Music Group can void the user’s authority to use the equipment.
Warni ng:
Operation of this equipment in a residential environment
could cause radio inter ference.
Page 12

midasconsoles.com
 Loading...