

Page 1
Page 2

Table of Contents
FCC Information 1
Important Safeguards 1
Installation 2
Control Key Pads on the Front Panel 2
Layout of Cable & Connector on the Back Cover 3
How to enter OSD Menu 3
Factory Default Timing Setting 7
Specifications 8
Energy Declaration 9
Cleaning the LCD Screen 9
Trouble-Shooting 10
Page 3

FCC Information
This equipment has been tested and found to comply with the limits for a Class B digital device,
pursuant to Part 15 of FCC Rules. These limits are designed to provide reasonable protection against
harmful interference when the equipment is operated in a residential installation. This equipment
generates, uses, and can radiate radio frequency energy and if not installed and used in accordance
with the instruction manual may cause harmful interference to radio communications. However,
there is no guarantee that interference will not occur in a installation. If this equipment does cause
harmful interference to radio or particular television reception, which can be determined by turning
the equipment off and on, the user is encouraged to try to correct the interference by one or more of
the following measures:
Reorient the receiving antenna.
Increase the separation between the equipment and receiver.
Connect the equipment into an outlet on a circuit different from which the receiver is connected.
Consult the dealer or an experienced radio TV technician for help.
Notice:
(1). The changes or modifications not expressly approved by the party responsible for compliance
could void the user's authority to operate the equipment.
(2). Shielded interference cables must be used in order to comply with the emission limits.
Important Safeguards
Please read the following instructions carefully to prevent potential hazards.
1. Follow all warnings and instructions marked on the video monitor.
2. Do not use attachments which is not recommended by the video monitor manufacturer as they
may cause hazards.
3. Do not expose the monitor to rain, water, moisture or direct sunlight.
4. Do not place near or over a radiator or other heat-generating equipment.
5. Do not place this video monitor on an unstable cart, stand or table. The video monitor may fall
and cause serious injury to child or adult.
6. Do not block or cover ventilation opening with any material. The openings & slots on the cabinet
provide necessary air flow for heat dissipation. The unit should never be enclosed or built upon
unless adequate ventilation is provided.
7. Do not insert any objects into the video monitor cabinet's slots as they may touch dangerous
voltage points or short out parts that could result in a fire or electric shock.
8. This video monitor is equipped with a 3-wire grounding type plug. This plug will only fit into
a grounding-type power outlet. This is a safety feature. If you are unable to insert the plug into
the outlet, contact your electrician to replace your obsolete. Do not defeat the safety purpose of
the grounding type plug.
9. Do not overload wall outlets & extension cords as this can result in fire or electric shock.
10. Do not attempt to service this unit yourself as opening or removing covers may expose you to
dangerous voltage or other hazards.
11. When the video monitor unused for a long time, please unplug it from the wall outlet
12. Unplug this video monitor from the wall outlet and refer servicing under the following
conditions:
a. When the power cord or plug is damaged or frayed.
b. If liquid has been spilled into the video monitor
c. If the video monitor does not operate normally according to operating instructions.
d. If the video monitor has been dropped or the cabinet has been damaged
Note:
This user's manual for this LCD monitor containing graphics and information is for reference purpose
only , which is subject to change without notice
1
Page 4
Installation
1. Turn off the computer.
2. Connect the video cable from VGA connector and audio line from output of the computer to the
monitor.
3. Connect power cable to the power outlet.
4. Turn on the monitor and the computer. Wait about 30 seconds to adjust the picture with the
adjustment controls to obtain the most optimum picture.
Note: Please do not press the panel heavily because the surface of LCD panel is soft.
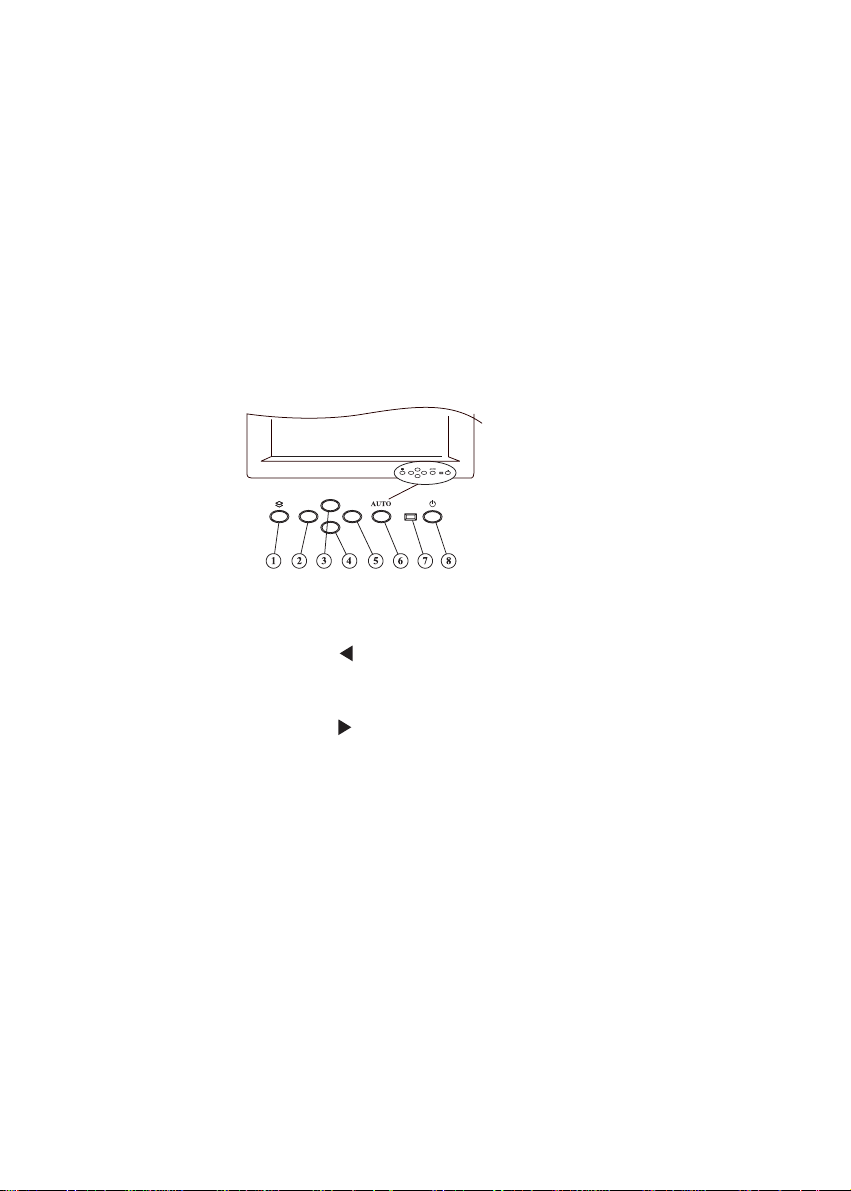
Control Key Pads on the Front Panel
1. Menu Button : Press the keypad to enter OSD menu or swap between icon and sub-
2. Left : Press button to activate the adjustment of volume when OSD is
3. Up : Select sub-items in OSD menu.
4. Down : Select sub-items in OSD menu.
5. Right : Press button to activate the adjustment of brightness when OSD is
6. Auto : Press the keypad to activate auto tuning when OSD is off. Press the
7. Power LED Indicator Green : Normal operation.
8 Power Switch : Press the keypad to power on or off.
items in OSD menu.
off. Select icon or adjust the setting value of sub-item in OSD menu.
off. Select icon or adjust the setting value of sub-item in OSD menu.
keypad to exit OSD menu or sub-items in OSD menu.
Orange : Enter soft-power off state.
Orange Blinking : No signal input or frequency out of range.
2
Page 5

Layout of Cable & Connector on the Back Cover
1. D-Sub Connector 2. Audio Line-in
3. Earphone Output (optional) 4.AC In
How to enter OSD Menu
(1) Press Menu button and the OSD as shown will appear on the screen.
(2) The OSD Menu contains 9 icons representing 9 functions for adjustment.
(3) The hand pointing up is used to select the icon.
(4) Press menu key to make the hand pointing up or down.
(5) Press up and down key to select sub-item. Press left and right key to change the setting.
(6) Press Auto to exit OSD Menu.
3
Page 6

Position
AUTO Auto adjust the position, horizontal clock and dot delay.
LEFT/RIGHT Horizontal position, adjust the horizontal display screen position .
DOWN/UP Vertical position, adjust the vertical display screen position .
Clock
HORZ. TOTAL Horizontal total clock, adjust the Horizontal Size to match LCD size.
DOT DELAY Adjust the dot delay to get best display focus.
RESET Reset the screen position, clock, H total and dot delay
Light / Contrast
LIGHT Adjust Brightness of back light
CONTRAST Adjust the screen Contrast.
BLACK LEVEL Adjust the screen black level.
RESET Reset the light, contrast and black level to the default settings
Color
RED Adjust the contrast of red on screen.
GREEN Adjust the contrast of green on screen.
BLUE Adjust the contrast of blue on screen.
WARM NORM COLD Select the different color temperature setting.
Warm means all the colors are with a little red.
Cold means all the colors are with a little blue.
RESET Reset color setting.
Screen Status Display signal input resolution and H,V frequency .
OSD Utility
OSD TIMER Select the duration of no operation to exit OSD Menu.
OSD HORIZONTAL Adjust OSD windows Horizontal position.
OSD VERTICAL Adjust OSD windows Vertical position.
Language : Select language for OSD menu.
Sound
VOLUME Adjust volume.
Reset All
EXECUTE Default monitor setting to factory setting.
4
Page 7

Message of Auto Tuning
Once you activate Auto Tuning, the following view
indicating that the unit is executing Auto Tuning will be
prompted.
Successfully executing Auto Tuning, select ACCEPT by
pressing key to confirm the adjustment Select UNDO
to cancel the adjustment.
If you do not make any selection within 5
seconds,then the unit will automatically confirm
the adjustment.
Notice
1. This function has to be executed when full screen picture is displayed. When the screen is painted
with black or character strings on the black background, this function may not perform correct
tuning. When the displayed picture is not suitable for tuning, the failure message as shown below
is displayed and tuning is aborted.
2. This function is a supplemental tool. If the performance of the screen is not good enough after
executing the function, please re-execute the function or enter the OSD menu to make adjustment
by manual to make the screen become clear.
5
Page 8

Message of Video Input
The message below will be displayed when horizontal and vertical synchronous signal from outside
is off or out of acceptable range of this system. This message is erased in about 5 seconds and the
system goes into the power saving mode.
(1) No H_sync or V_sync input
(2) H_sync or V_sync out of range
OUT OF RANGE
HSYNC : 43.2 KHz
VSYNC : 85.0 Hz
WORK RANGE
HS : 31.5 -60.0 KHz
VS : 56- 75 Hz
6
Page 9

Factory Default Timing Setting
Resolution H/V Frequency CLK count of H period
640 x 350 31.5 KHz / 70.1 Hz 800
640 x 400 31.5 KHz / 70.1 Hz 800
720 x 400 31.5 KHz / 70.1 Hz 900
640 x 480 31.5 KHz / 60.0 Hz 800
640 x 480 35.0 KHz / 66.7 Hz (Macintosh) 864
640 x 480 37.9 KHz / 72.8 Hz 832
640 x 480 37.5 KHz / 75.0 Hz 840
800 x 600 35.2 KHz / 56.3 Hz 1024
800 x 600 37.8 KHz / 60.3 Hz 1056
800 x 600 48.0 KHz / 72.2 Hz 1040
800 x 600 46.9 KHz / 75.0 Hz 1056
832 x 624 49.7 KHz / 74.6 Hz (Macintosh) 1152
1024 x 768 48.2 KHz / 60.0 Hz 1344
1024 x 768 56.5 KHz / 70.1 Hz 1328
1024 x 768 60.0 KHz / 75.0 Hz 1312
Note
Some brand of display cards may be not compatible with the LCD monitor due to the weak input
signal or inappropriate grounding wires. We suggest users to alter the resolution, frequency or
displaying card in order to ensure the best quality for display.
7
Page 10

Specifications
LCD type 15.1 XGA Color TFT
Input Signal Analog (0.7Vp-p/75 ohm positive)
Dot Pitch 0.30 mm
Scanning frequency (H) 31.5KHz-60KHz
(V) 56Hz-75Hz
Resolution 1024x768 800x600 832x624 640x480
720x400 640x400 640x350
Pixel Rate 80 MHz (maximum)
Display Color 16.19M colors with dithering
View Angle (CR>10) Horizontal: 120(typ.)
Vertical: 90(typ.)
Control Type OSD
Plug & Play VESA DDC1/2B
Audio Internal Speaker
Dimension (mm)
Panel (HxWxD) 320x396x60.5 mm
Base (WxD) 220x171.5 mm
Overall (HxWxD) 377x396x171.5 mm
Tilt Up 19Down 4
AC Input AC 100 V ~240 V
Power Management VESA DPMS
Power Dissipation 28W
Regulatory Compliance UL/C-UL, TUV/GS, FCC Class B, CE
VCCI, TCO 99 (optional), CNS 13438
Ambient Temperature 5 ~40(operating) , -20 ~60(storage)
Humidity (Relative) 20%~80% non-condensing (operating)
10%~90% non-condensing (storage)
8
Page 11

Energy Declaration
This monitor is equipped with a function for saving of energy which supports the VESA Display
Power Management Signaling ( DPMS ) standard. This means that the monitor must be connected
to which supports VESA DPMS to fulfill the requirement in the NUTEK specification. Time settings
are adjusted from the system unit by software. From indicated inactivity to Power Saving Position
A2 the total time must not be set to more than 70 minutes.
NUTEK VESA State LED Indicator Power Consumption
Normal operation ON Green 35 W ( Max )
Power Saving Position A1 SUSPEND Orange-Flash 5 W ( Max )
Power Saving Position A2 OFF Orange-Flash 5 W ( Max )
We recommend you to switch off the monitor when it is not in use for quite a long time
Cleaning the LCD Screen
1. Make Sure the LCD monitor is turned off and never spray or pour any liquid directly onto the
screen or case.
2. Wipe the screen with a clean, soft, lint-free cloth. This removes dust and other particles.
3. If still not clean, apply a small amount of non-ammonia, non-alcohol based glass cleaner onto
a clean, soft, lint-free cloth, and wipe the screen.
9
Page 12

Trouble-Shooting
If you are experiencing difficulties with your monitor, check the following table for possible
solutions.
Problem Items to check
? No picture 1. The VGA card should be completely seated in the slot.
2. Power switch of the monitor and the PC should be in the ON
position.
3. The signal cable should be completely connected to the
video card / computer.
4. Check if the pins of the connector are bent or shrunk.
? Image is scrolling or unstable 1. The signal cable should be completely connected to the
computer.
2. Check the pin assignments and signal timings of the monitor
and your video card.
? LED on the monitor is not lit 1. The adapter should be connected to DC Jack and AC outlet.
? Picture is fuzzy 1. Adjust the Dot Delay control or use Auto Tuning function.
? Picture bounces or wave pattern
is present in the picture
? Display image is not centered,
too small, or too large
1. Move electrical devices that may be causing electrical
interference away from the monitor.
2. Refer to the FCC information of this manual.
1. Adjust Size and Position Controls in the OSD or use Auto
tuning function.
10
 Loading...