

Page 1

Microtek
ArtixScan 4500t
INSTALLATION AND OPERATION MANUAL
Page 2
Copyright
2000 by Microtek International, Inc.
All rights reserved.
Trademarks
English
Microtek™, Artix™, ScanWizard Pro™, and ArtixScan™ are trademarks of Microtek International Inc. Windows® is a registered
trademark of Microsoft Corporation. Other product or company names are trademarks of registered trademarks of their respective
holders.
Important
Documents you scan may be protected under copyright law . The unauthorized use of such documents could be a violation of the rights
of the copyright holder. Microtek bears no responsibility for the unauthorized use of copyrighted materials.
Doc. No. I49-002910, A
June 2000
Microtek Lab, Inc.Microtek Lab, Inc.
Microtek Lab, Inc.
Microtek Lab, Inc.Microtek Lab, Inc.
3715 Doolittle Drive, Redondo Beach,
CA 90278-1226
Sales: 800-654-4160
Internet: http://www.micr otekusa.com
Tech Support: http://www.support.microtek.com
Microtek Europe BVMicrotek Europe BV
Microtek Europe BV
Microtek Europe BVMicrotek Europe BV
Max Euwelaan 68
NL - 3062 MA Rotterdam
The Netherlands
Tel: 31-10-242-5688
Fax: 31-10-242-5699
Internet: http://www.micr otek.nl
Microtek International Inc.Microtek International Inc.
Microtek International Inc.
Microtek International Inc.Microtek International Inc.
6, Industry East Road 3
Science Based Industrial Park
Hsinchu 30077, Taiwan, R.O.C.
Tel: 886-3-5772155
Fax: 886-3-5772598
Internet: http://www.micr otek.com
Federal Communications Commission Interference Statement
This equipment has been tested and found to comply with the limits for a Class B digital device, pursuant to Part 15 of the FCC rules. These limits are designed to provide reasonable
protection against harmful interference in a residential installation. This equipment generates, uses and can radiate radio frequency energy and, if not installed and used in accordance with the
instructions, may cause harmful interference to radio communications. However, there is no guarantee that interference will not occur in a particular installation. If this equipment does cause
harmful interference to radio or television reception, which can be determined by turning the equipment off and on, the user is encouraged to try to correct the interference by one or more
of the following measures:
• Reorient or relocate the receiving antenna.
• Increase the separation between the equipment and receiver.
• Connect the equipment into an outlet on a circuit different from that to which the receiver is connected.
• Consult the dealer or an experienced radio/TV technician for help.
FCC CautionFCC Caution
FCC Caution: To assure continued compliance, (example - use only shielded interface cables when connecting to computer or peripheral devices). Any changes or modifications not
FCC CautionFCC Caution
expressly approved by the party responsible for compliance could void the user’ s authority to operate this equipment.
This device complies with Part 15 of the FCC Rules. Operation is subject to the following two conditions: (1) This device may not cause harmful interference, and (2) this device must
accept any interference received, including interference that may cause undesired operation.
Responsible Party: Loi Han
Telephone No: 1-310-297-5000
3715 Doolittle Drive
Redondo Beach, CA 90278-1226
U.S.A.
Artix Japan CorporationArtix Japan Corporation
Artix Japan Corporation
Artix Japan CorporationArtix Japan Corporation
FORO M Bldg. 5F, 2-1-18 Iwamotocho
Chiyoda-ku, T okyo 101-0032 Japan
Tel: +81-3-5823-1555
Fax: +81-3-5823-1556
Internet: http://www.artixjapan.co.jp
Microtek Computer Asia Pte. Ltd.Microtek Computer Asia Pte. Ltd.
Microtek Computer Asia Pte. Ltd.
Microtek Computer Asia Pte. Ltd.Microtek Computer Asia Pte. Ltd.
No. 160, Paya Lebar Road, 05-04,
Orion Industry Building, 409022 Singapore
Tel: 65 747 7851
Fax: 65 747 7852
Internet: http://www .microtek.com.sg
Adara International, Inc.Adara International, Inc.
Adara International, Inc.
Adara International, Inc.Adara International, Inc.
8F, No. 220 Ta Tung Road, Section 3
Hsi Chih County , T aipei, Taiwan,
R.O.C
Tel: 02-2647-1488
Fax: 02-2647-1422
Internet: http://www.adara.com.tw
Shanghai Zhong Jing Computers Co., Ltd.Shanghai Zhong Jing Computers Co., Ltd.
Shanghai Zhong Jing Computers Co., Ltd.
Shanghai Zhong Jing Computers Co., Ltd.Shanghai Zhong Jing Computers Co., Ltd.
1F, Building 35, No. 680, Guiping Road,
Shanghai 200233, P.R.C.
Tel: 86-21-64856614, 64853358
Fax: 86-21-64859686, 64859692
Internet: http://www .microtek.com.cn
Trade Name Model Number
ArtixScan 4500t MTS-4500
FOR HOME OR OFFICE USE
Tested to Comply
With FCC Standards
Federal Communications Commission Interference Statement
This equipment (Model: MTS-4500) has been tested and found to comply with the limits for a Class B digital device, pursuant to Part 15 of the FCC Rules. These limits are designed to
provide reasonable protection against harmful interference in a residential installation. This equipment generates, uses and can radiate radio frequency energy and, if not installed and used in
accordance with the instructions, may cause harmful interference to radio communications. However, there is no guarantee that interference will not occur in a particular installation. If this
equipment does cause harmful interference to radio or television reception, which can be determined by turning the equipment off and on, the user is encouraged to try to correct the
interference by one or more of the following measures:
• Reorient or relocate the receiving antenna.
• Increase the separation between the equipment and receiver.
• Connect the equipment into an outlet on a circuit different from that to which the receiver is connected.
• Consult the dealer or an experienced radio/TV technician for help.
Note: 1) A shielded of SCSI interface cable with ferrite core installed on the scanner connector end must be used with this equipment. 2) AC adapter with ferrite core installed on the scanner
connector end must be used with this equipment.
Caution: Caution:
Caution: Changes or modifications not expressly approved by the manufacturer responsible for compliance could void the user's authority to operate the equipment.
Caution: Caution:
ii
Page 3

Contents
1. Introduction.......................................................................................................................... 1
Specifications ..................................................................................................... 1
General Requirements ........................................................................................ 2
Minimum Macintosh requirements ............................................................... 2
Minimum PC requirements........................................................................... 2
2. Before you begin.................................................................................................................. 3
Unpacking ......................................................................................................... 3
Front View ................................................................................................... 4
Back View .................................................................................................... 4
Checking the SCSI ID.......................................................................................... 5
Power up ........................................................................................................... 6
A. Connecting the scanner to the power source ............................................ 6
B. Performing the power-on self-test............................................................. 6
3. Installation ............................................................................................................................ 8
Step 1: Installing SCSI card.................................................................................. 8
For the Macintosh:
Install SCSI card if the Mac has no built-in SCSI interface.......................... 8
For the PC:
Install SCSI card under Windows 95, 98, 2000 and NT ............................. 8
Checking the interface card driver under Windows 95/98/2000............... 9
Installing the interface card driver under Windows NT ............................. 9
Step 2: Connecting your scanner ...................................................................... 10
Step 3: Using terminator ................................................................................... 11
Step 4: Installing the software ........................................................................... 11
For the Macintosh...................................................................................... 11
For the PC.................................................................................................. 11
English
4. Scanner Transparency Accessories ............................................................................. 12
How to use your scanner transparency accessories........................................... 13
Step 1: Placing the transparent film................................................................... 13
For non-standard-sized transparent film..................................................... 13
Using the Glass Holder ........................................................................... 13
For standard-sized transparent film ............................................................ 14
Using the Main Holder ........................................................................... 14
For 4" x 5" film ...................................................................................... 14
For 6 x 6 cm or 6 x 7 cm film.................................................................. 14
For 35mm mounted and unmounted slides ............................................ 15
Using the 4-in-1 Slide Holder.................................................................. 16
Step 2: Insert Film Holder into scanner ............................................................. 17
iii
Page 4

English
5. How to calibrate your scanner....................................................................................... 18
Introduction..................................................................................................... 18
Calibration target ............................................................................................. 18
Taking care of the target ................................................................................... 18
Installing the Scanner ICC Profiler .................................................................... 19
A. For the Macintosh.................................................................................. 19
B. For Windows 95 / 98 / 2000 / NT 4.0..................................................... 19
Placing the color target..................................................................................... 19
Starting Calibration .......................................................................................... 20
Scanning the target image ................................................................................. 21
Aligning the target registration marks ............................................................... 22
A. Aligning the upper-left registration mark................................................. 22
B. Aligning the upper-right r egistration mark............................................... 22
C. Aligning the bottom-right registration mark ............................................ 22
Creating a profile.............................................................................................. 23
Reference Section for Macintosh ...................................................................... 24
A. Menu commands.................................................................................... 24
B. The Main Window .................................................................................. 25
C. The Calibration Window: Preview and Scan ............................................ 26
D. The Calibration Window: Aligning targets and creating the profile .......... 26
Reference section for PC .................................................................................. 27
A. The Main Window.................................................................................. 27
B. The Calibration Window: Preview and Scan ............................................ 29
C. The Calibration Window: Aligning targets and creating the profile........... 29
6. Troubleshooting ................................................................................................................. 30
Introduction..................................................................................................... 30
Questions and Answers for Windows 95/98/2000 ............................................ 30
Questions and Answers for Windows NT 4.0 .................................................... 32
Questions and Answers for Macintosh G3/G4 .................................................. 34
iv
Page 5
1 Introduction
Congratulations on your purchase of the ArtixScan™ 4500t multi-format
film scanner! This 42-bit, high resolution scanner features a dynamic
range of 3.9 resulting in scans that include incredible detail in
shadow and highlight areas from film originals. This scanner has been
specifically engineered for photographers and other graphic arts
professionals who demand scanned images that are accurate in color,
sharpness, detail and clarity with their original film. This manual
will help you in the installation and operation of your scanner.
Specifications
English
Typ e Desktop, 1-pass film scanner
Image Sensor T ri-linear 10,000 element CCD
Interpolation Resolution 10,000 dpi
Optical Resolution 2,500 dpi
Sample Depth 14 bits per color
Dynamic Range 3.9
Scanning Media 35mm to 4" x 5" positive or negative, mounted and
unmounted transparencies
Interface SCSI-2
Lamp Source Cold Cathode Lamp
Accessories 4" x 5" (10 x 12.7 cm)
2.4" x 2.8" (6 x 7 cm)
2.4" x 2.4" (6 x 6 cm)
Dimensions 356 mm (W) x 180 mm (H) x 530 mm (L)
Net W eight 9.2 kg
Power Consumption 40W at 115VAC, 66 Hz
Certifications CSA, TUV, FCC class B, CF
ArtixScan 4500t Installation and Operation Manual 1
Page 6

General Requirements
English
Before unpacking your scanner, make sure that the site where the scanner will be
installed is big enough to allow for easier operation.
• Make sure that the operating environment for the scanner is free of dust and other
contaminants.
• Allow adequate ventilation space (no less than 2 inches) around the scanner.
• Place the scanner on a flat, stable surface that is not subject to vibration.
• Make sure that the scanning surface will not be exposed to direct sunlight or other
sources of bright light.
• Avoid placing the scanner close to sources of extreme temperature.
• Try to ensure the scanner is situated in its ideal operating temperature range -- between
60° and 104°F (10°C and 40°C).
• Keep the relative humidity in the scanner operating area between 10% and 85%.
• Avoid connecting the scanner to a power source that might experience power surges.
• A void positioning the scanner in the path of heavy traf fic where it may get bumped.
• Your scanner should be placed within 3 feet of the computer. Use the SCSI cable that
came with your scanner.
Once the scanner has been placed in a suitable location and is ready to be connected to
the host computer, it is time to proceed to installing the necessary hardware and software
components for the scanner.
Minimum Macintosh requirements
• Apple Power Mac with PCI bus (150 MHz)
• Apple Macintosh system software version 8.5 or higher
• CD-ROM drive
• 64MB of available RAM (128 MB recommended)
• Color monitor at least 17" with 24-bit color display ability
Minimum PC requirements
• Pentiums, or compatibles with a CD-ROM drive
• 64MB RAM for full version of Photoshop (128 MB recommended)
• Microsoft Windows 95/98/NT4/2000
• VGA color monitor; color display card; laser printer (recommended). Photoshop
requires a monitor and display card capable of displaying at least 256 colors.
• Basic knowledge of Windows, and how to install an interface card inside the PC.
2 ArtixScan 4500t Installation and Operation Manual
Page 7
2 Before you begin
Unpacking
Remove the scanner from the box, and save the box and packing materials in case you
need to ship the scanner again.
Upon opening the scanner box, you will see a Packing List that lists both hardware and
software components of your scanner package, as well as the part numbers for those
components.
If any component is missing, call Microtek Sales and provide information on the missing
component and part number. Please be r eady to pr ovide the scanner's serial number and
your proof of purchase as well. Keep the Packing List for your reference in case you need
to order a component in the future.
Note:Note:
Note: If you need to ship back the scanner for any repairs, the scanner must be packed
Note:Note:
in the original box in which it came. Otherwise, Microtek will not be responsible for any
damage that may be sustained during shipping to or from Microtek. You may be charged
for a new box.
English
ArtixScan 4500t
Holder Box
Document Box
Includes
Includes
U
N
L
LO
O
C
C
K
K
Main Holder
(Metal)
Installation
&
Operation
Guide
SCSI cable Power cord
THIS SIDE UP
35 mm
Film Mount
& Slide Spacer
Software
User’s Guide
6 x 6 cm
Film Mount
6 x 7 cm
Film Mount
Software QR
4 in 1 35mm
Slide Holder
& Film Mount
Driver
CD
ArtixScan 4500t Installation and Operation Manual 3
THIS SIDE UP
Glass Holder
(Plastic)
Page 8
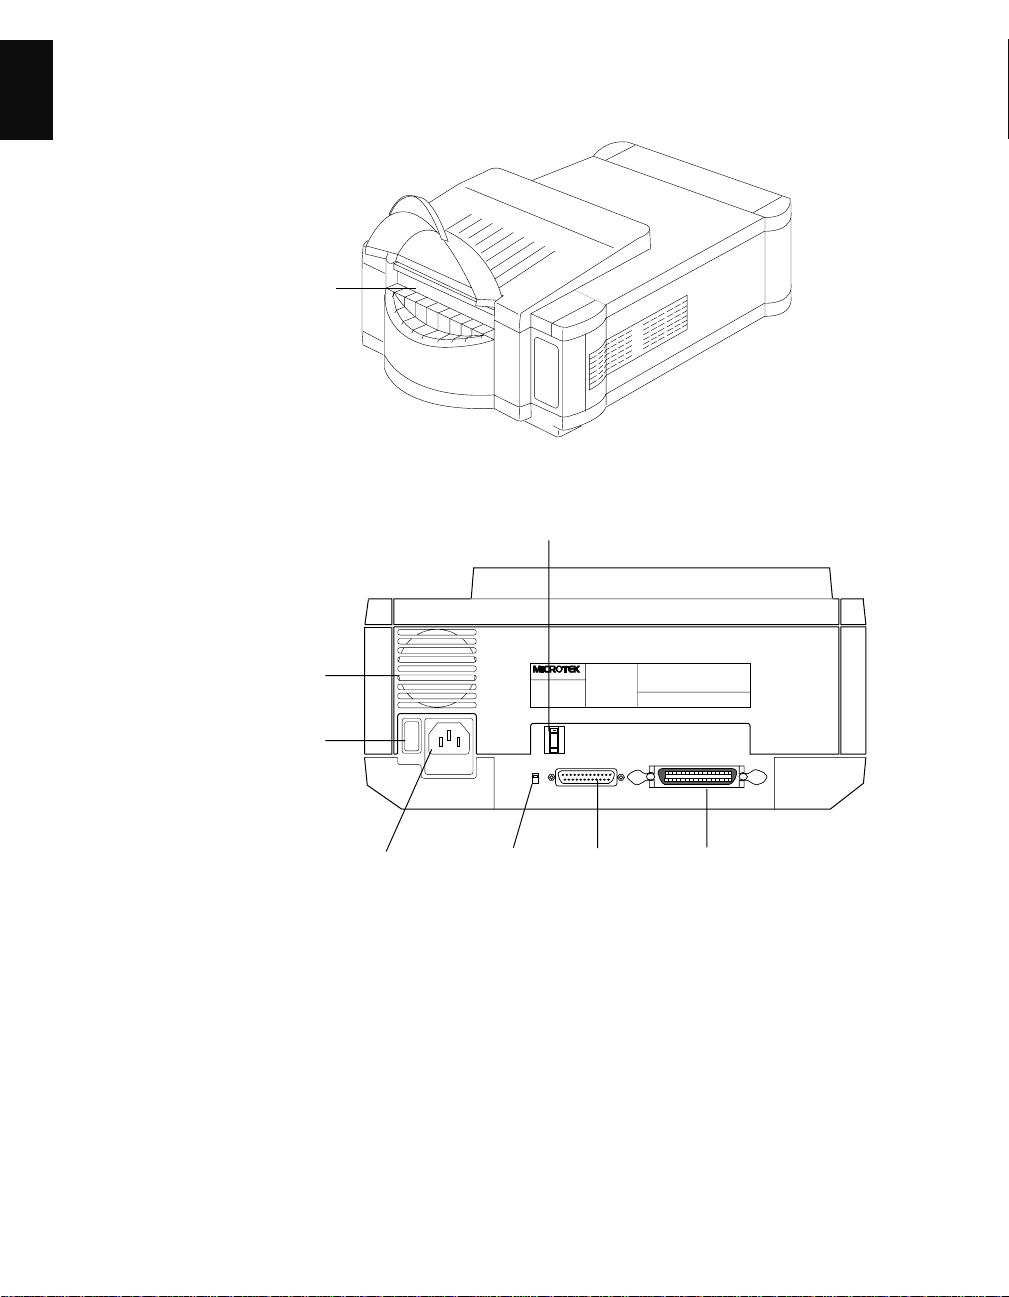
English
Front View
Film Holder Insert Slot
Back View
Power Switch
Fan
DC Power Inlet
SCSI ID Switch
SCSI T erminator
Switch
CAUTION
6
25-pin SCSI
Connector
50-pin SCSI
Connector
4 ArtixScan 4500t Installation and Operation Manual
Page 9

Checking the SCSI ID
A SCSI ID is a number assigned to each SCSI device in your daisy chain to differentiate
the devices from one another.
The SCSI ID for Microtek scanners is set at default to 6. Y ou won't need to change the
SCSI ID on your scanner unless another SCSI device on your system (such as a ZIP drive
or CD-ROM drive) is using the same number.
English
CAUTION
6
6
+
T o set the SCSI ID number:
Locate the SCSI ID selector, which is on the back panel. To change the SCSI ID, press the
push-button selector.
Notes on SCSI ID numbers
• Each SCSI device must have a unique SCSI ID number .
• Valid SCSI ID numbers are 0 to 6. Do not use SCSI ID #7, which is used to carry a self-
test for the scanner and make the carriage move back and forth. SCSI ID #8 and #9 are
also not used.
ArtixScan 4500t Installation and Operation Manual 5
Page 10
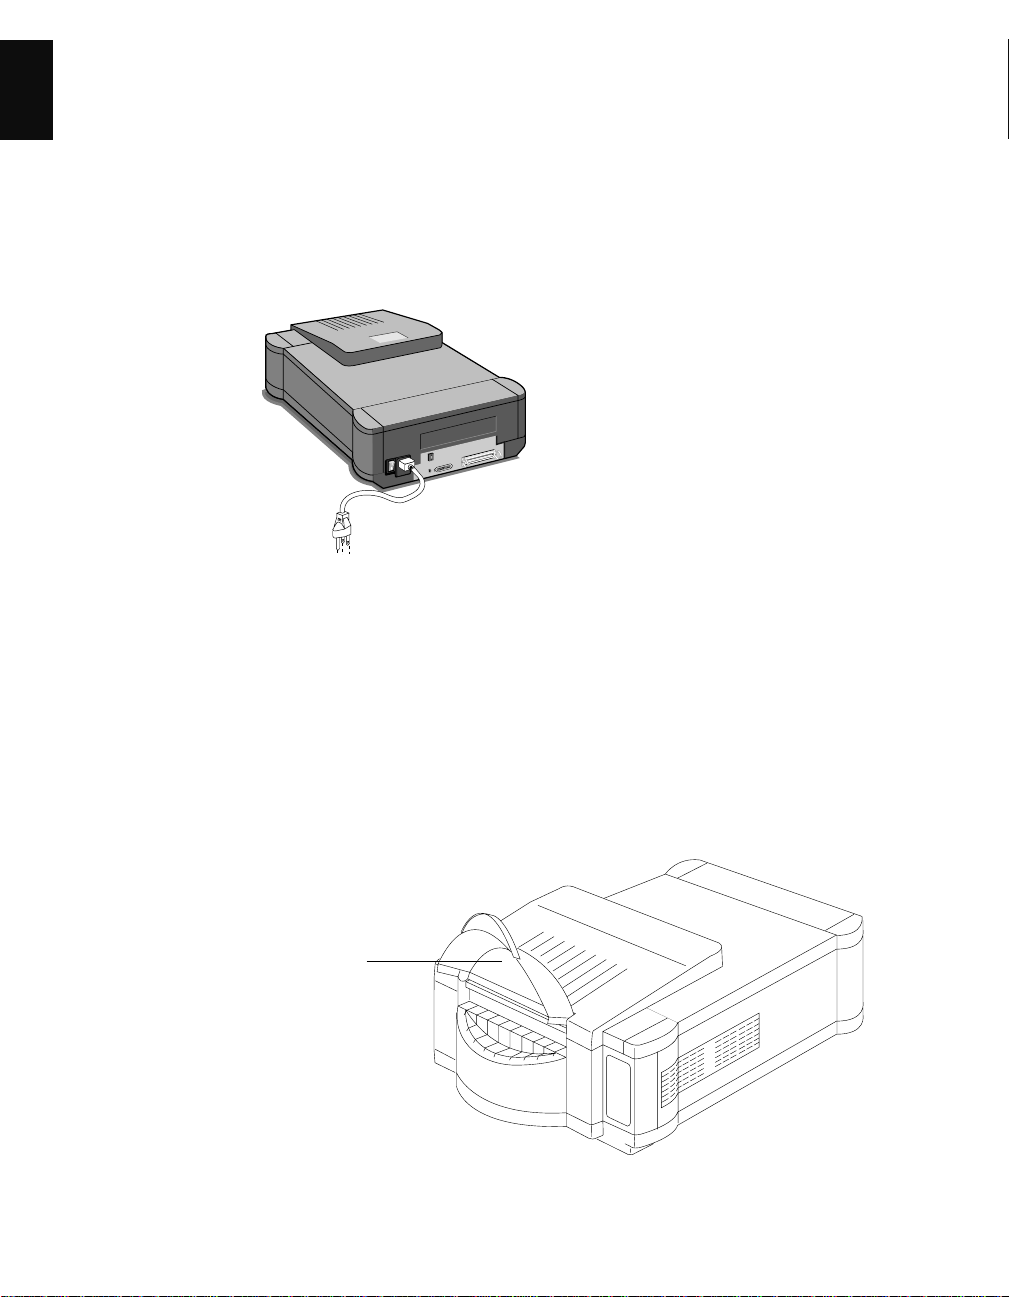
Powering up
English
A. Connecting the scanner to the power source
Connect the scanner to a voltage source directly by using the supplied power cord. Make
sure that the power outlet will not be overloaded when the scanner is turned on, and
ensure that other devices requiring significant power are not plugged into the same
outlet. Ideally, no other devices should share the scanner’s power source.
B. Performing the power-on self-test
The
power-on test is a quick self-checking mechanism that the scanner carries out after
you turn it on.
This is what happens after the scanner is turned on:
1. Close the Front Cover.
NoteNote
Note: This step is a must. Without closing the Front Cover, your scanner stays at the
NoteNote
Not Ready state.
Front Cover
6 ArtixScan 4500t Installation and Operation Manual
Page 11
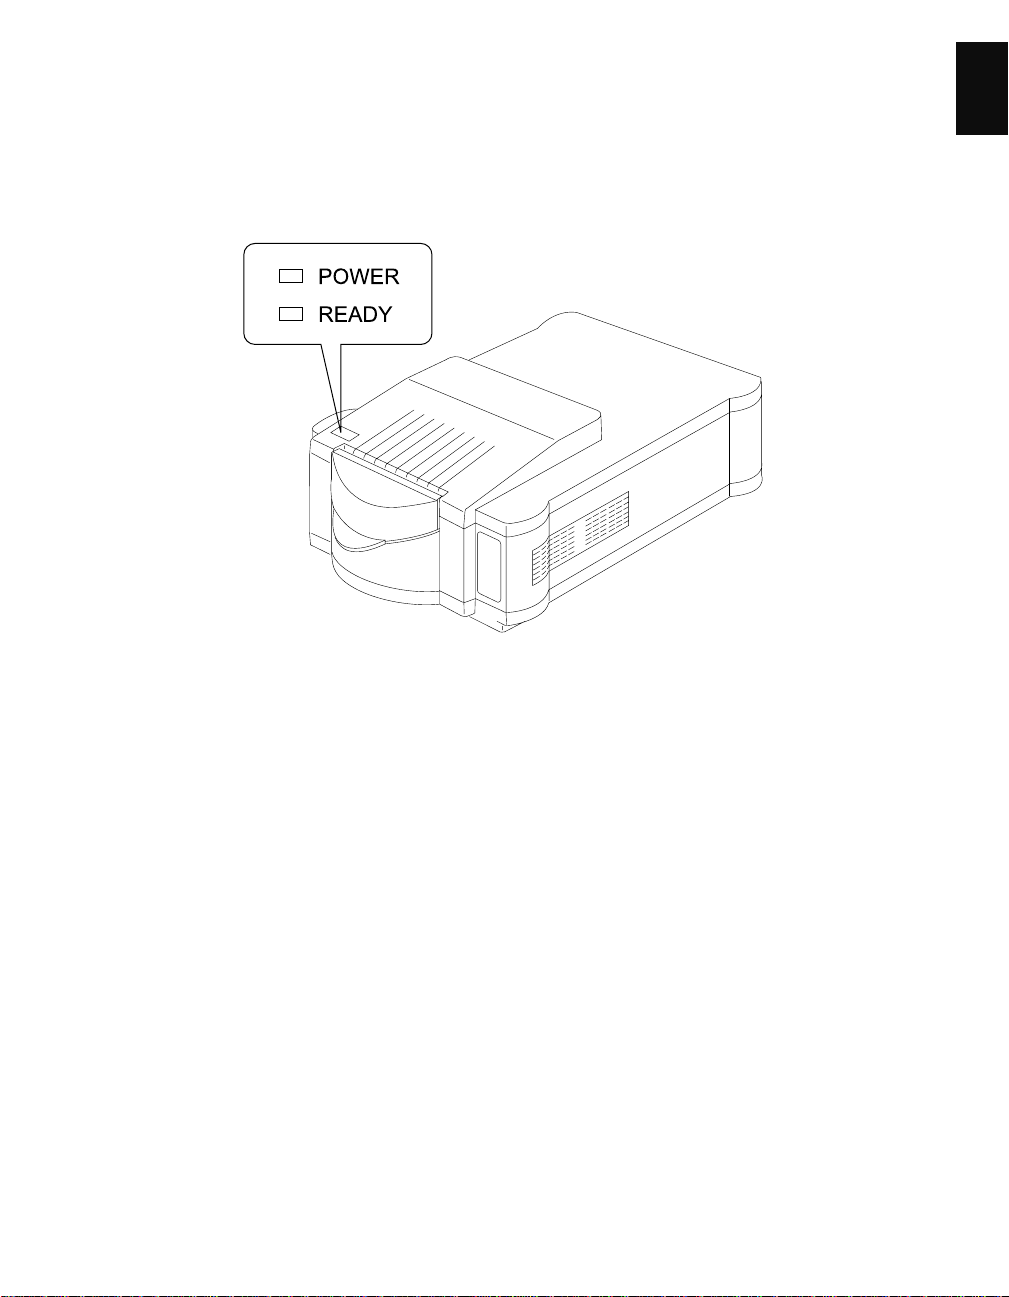
2. Switch the power on. The POWER indicator on the front panel of the scanner lights up.
3. The READY indicator beside the POWER indicator flashes briefly. After a 30-second
warm-up period, the scanner carries out a self-test, with the scanner carriage moving
back and forth about a half-inch. If no problems are detected, the READY indicator
stays lit.
English
4. The fluorescent lamp inside the scanner should be on too by this time. The lamp should
never go off while the scanner is on.
ArtixScan 4500t Installation and Operation Manual 7
Page 12
3 Installation
S
C
S
I C
a
rd
English
The ArtixScan 4500t installation procedure includes 4 steps:
Step 1: Installing SCSI card
Step 2: Connecting your scanner
Step 3: Using terminator
Step 4: Installing software
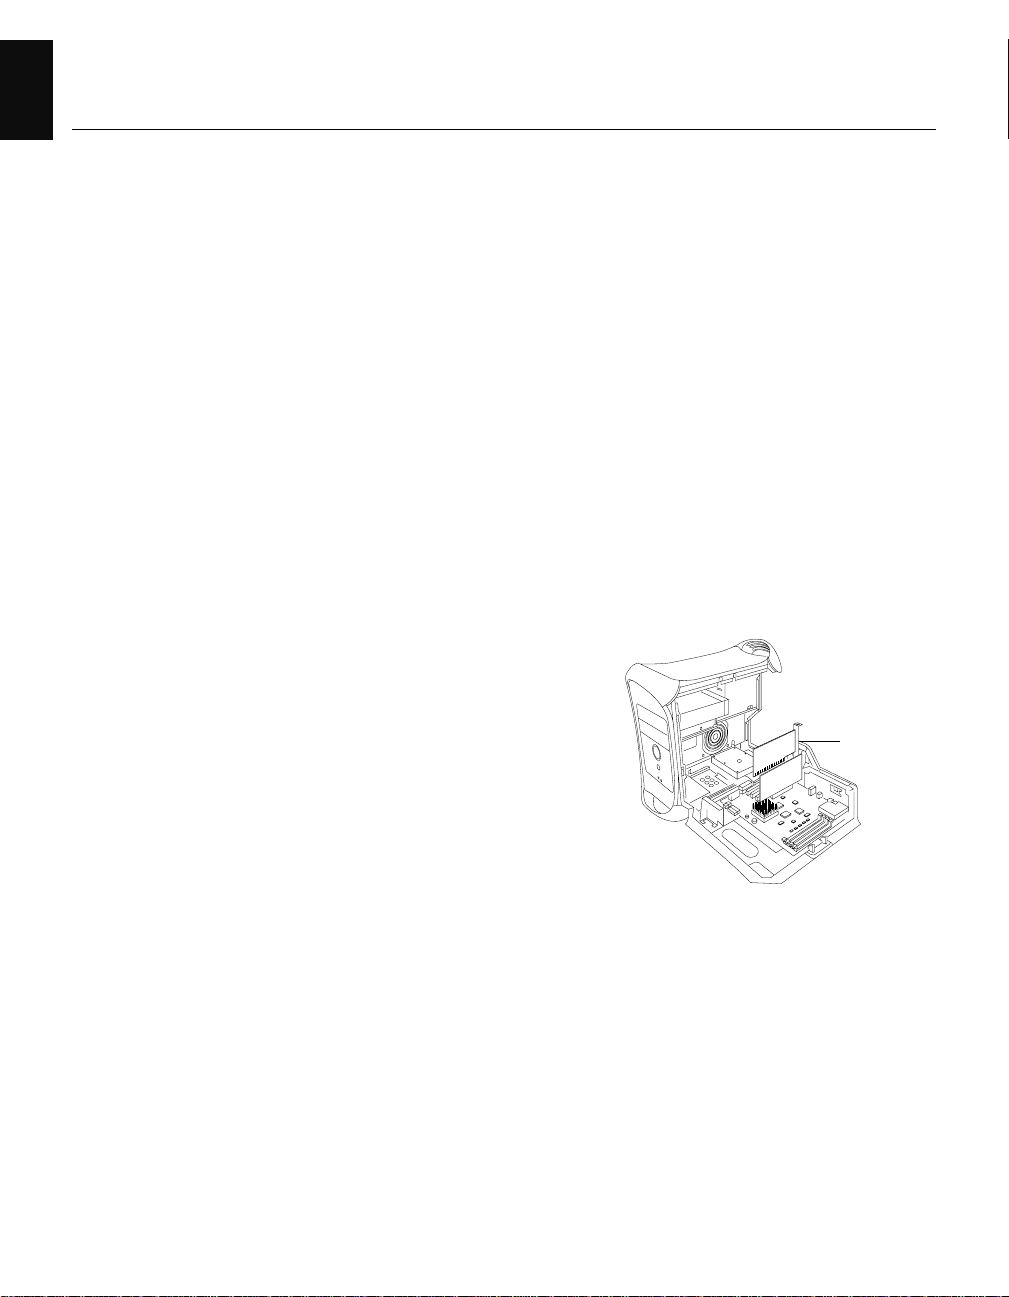
Step 1: Installing SCSI card
If your system is SCSI-ready, go to “Step 2: Connecting your scanner” directly to connect
your computer. If your system is not the SCSI-ready, you will need to install a SCSI card.
For the Macintosh:
Install SCSI card if the Mac has no built-in SCSI interface
1. Shut down your Macintosh computer and peripherals, unplug the power cord. Next,
open your computer .
2. Look for an available PCI card slot (typically
white or ivory) in your computer. Remove
the slot cover, and insert the PCI SCSI car d
into the slot. Push the card in to make sure it
is seated all the way in the slot. This is
important, as an improper card connection
will make you unable to use your scanner,
and you will then have to remove the
computer case and reinsert the card.
3. Close the computer , then plug the power
cord back in.
SCSI Card
For the PC:
Install SCSI card under Windows 95, 98, 2000 and NT
1. Turn off your PC and peripherals, then unplug the power cord. Next, remove the cover
from your computer.
2. Before handling the interface card, touch a metal frame (such as your computer casing)
to discharge any static electricity buildup in your body.
8 ArtixScan 4500t Installation and Operation Manual
Page 13

3. Look for an available PCI card slot in your computer, then
insert the PCI SCSI card (such as the Adaptec A VA-2903E) into
S
the slot. Push the card in to make sure it is seated all the way
C
S
I c
ard
in the slot, then put the screw back into the bracket.
Proper card connection is important, as an improper card
connection will make you unable to use your scanner , and you
will then have to remove the computer case and start the
process of card insertion all over again.
4. Replace the cover of the computer, then plug the power cord back in.
5. Turn your PC back on.
Check the interface card driver under Windows 95/98/2000
With the new SCSI card installed in your computer, when Windows starts, the card is
detected and the driver is automatically installed. Y ou may be asked to insert your
Windows CD-ROM. Do so, and follow the steps below to check your card status.
English
1. Double-click on the
Device ManagerDevice Manager
select
Device Manager from the top.
Device ManagerDevice Manager
2. Double-click on
System System
System icon in Control Panel and
System System
SCSI controllersSCSI controllers
SCSI controllers to display the screen
SCSI controllersSCSI controllers
below. If you are using Adaptec SCSI card, the string
“Adaptec 7850 PCI SCSI Controller” indicates that the
driver is installed.
The message “Adaptec AIC-7850 PCI SCSI Controller”
displays indicates that the driver is installed and the
interface card works properly.
Install the interface card driver under Windows NT
1. Start your computer , and log in as
trator in order to install the scanner softwar e components and use the scanner.
Start,Start,
2. In Windows, go to
click on the
3. Select the
SCSI AdaptersSCSI Adapters
SCSI Adapters icon.
SCSI AdaptersSCSI Adapters
DriversDrivers
Drivers tab in the SCSI Controllers dialog box, and click on the
DriversDrivers
SettingsSettings
Start,
Settings, then double-click on
Start,Start,
SettingsSettings
4. From the list of drivers that appear, select
(assuming that you are using Adaptec SCSI card), and
ContrContr
olleroller
Contr
oller on the right. Y ou may be asked to insert your W indows NT CD-ROM at this
ContrContr
olleroller
point; do so.
5. You will be asked to restart your computer. Click
Note: If you cannot successfully install the SCSI card, r efer to “Chapter 6: Troubleshooting”.
AdministratorAdministrator
Administrator. Note: You must be logged in as Adminis-
AdministratorAdministrator
Control PanelControl Panel
Control Panel, and double-
Control PanelControl Panel
AddAdd
Add button.
AddAdd
AdaptecAdaptec
Adaptec for manufacturers on the left
AdaptecAdaptec
Adaptec AIC-78xx PCI SCSIAdaptec AIC-78xx PCI SCSI
Adaptec AIC-78xx PCI SCSI
Adaptec AIC-78xx PCI SCSIAdaptec AIC-78xx PCI SCSI
YY
eses
Y
es to do so.
YY
eses
ArtixScan 4500t Installation and Operation Manual 9
Page 14

Step 2: Connecting your scanner
English
When the SCSI card is installed, follow the steps below:
1. Shut down your computer .
2. Connect the scanner to your computer, using the SCSI cable provided in the scanner
package.
Mac (G3/G4 Model)
PC
Mac (PowerMac Model)
3. Plug the power cord to the power connector at the back panel of the scanner, and plug
the other end of the power cord to your AC power source or wall outlet.
4. Turn on your scanner and wait for the lights on the front panel to stop blinking and
stay on steady.
5. Power up your computer.
10 ArtixScan 4500t Installation and Operation Manual
Page 15

Step 3: Using terminator
If you are connecting the scanner in a daisy chain to other SCSI devices (such as a CDROM drive), take note of the following:
1. If the scanner is the last device on the SCSI chain, set the internal terminator switch on
the back of the scanner to the “ON” position. There is no need to install an external
terminator on any of the other SCSI devices on the chain.
2. If the scanner is not the last device on the SCSI chain:
• Make sure the internal terminator switch located at the back of the scanner is set to
the “OFF” position.
• Make sure the last device on the SCSI chain is terminated.
ON
English
OFF
Step 4: Installing the software
For the Macintosh
Insert the ScanWizard Pro CD-ROM into your CD-ROM drive. When the CD-ROM icon
appears on your Macintosh desktop, open the software folders individually, then doubleclick the Installer icon on each folder to install the respective programs one at a time.
For the PC
Insert the ScanWizard Pr o CD-ROM into your CD-ROM drive; the Scanner Software
installer should come up automatically.
Note: If the Scanner Software is not automatically displayed, click
d:\cdsetup (where d: is your CD-ROM drive).
StarStar
tt
t, select
tt
RunRun
Run and type
RunRun
Star
StarStar
ArtixScan 4500t Installation and Operation Manual 11
Page 16

4 Scanner Transparency Accessories
English
See illustrations below and check to see that you have all of the items.
Item Purpose
T
H
IS
S
ID
E
U
P
Glass Holder (Plastic) T o scan non-standard-sized
film up to 3.8" x 4.8"
Main Holder (Metal) T o scan standard sized film
U
N
L
L
O
O
C
C
K
K
(Maximum 3.8" x 4.8")
• 6 x 6 cm Film Mount To hold 6 x 6 cm film
• 6 x 7 cm Film Mount To hold 6 x 7 cm film
• 35 mm Slide Mount T o hold 35 x 35 mm film
• 35 mm Slide Spacer T o raise the thickness
(metal) of mounted 35 mm slides so
that slides can fit on
35 mm Slide Mount
T
H
I
S
S
I
D
E
U
P
4-in-1 35 mm Slide Holder T o scan 35 mm slides
Vinyl Strip To secure film to the
Magnetic strip To secure film to the Main
12 ArtixScan 4500t Installation and Operation Manual
Glass Holder
Holder
Page 17

How to use your scanner transparency accessories
ABC
T
H
I
S
S
ID
E
U
P
There are three ways to scan transparent films:
• By using the Glass Holder , which is used to scan non-standard-sized transparent film.
• By using the Main Holder which is used together with the individual film mount to scan
a particular type of standard-sized transparent film, such as individual
4" x 5", 6 x 6 cm, 6 x 7 cm, or 35 mm film mount.
• By using the 4-in-1 35 mm Slide Holder , which is used together with 4-in-1 35 mm slide
mount.
Step 1: Placing the transparent film
For non-standard-sized transparent film
Using the Glass Holder
1 Place film on the Glass Holder
(on the surface that prints
“This Side Up”), with the film
upright and facing up.
2 Use the Vinyl strips to tape the
film to the glass to secure it in
place.
ImportantImportant
Important: Make sure the film
ImportantImportant
is taped securely to the glass.
Otherwise, the film may fall
out when you insert the Glass
Holder into the scanner, and
you will not be able to retrieve
the film.
This Side Up
English
ABC
T
H
I
S
S
ID
E
U
P
NoteNote
Note: For best results, the area around the film should be covered so that no light
NoteNote
can go through the glass around the sides of the film.
• The maximum scanning area is 3.8" x 4.8", so trim a piece of black paper to 3.8" x
4.8".
• Cut out a hole in the paper and make the cutout big enough so that the film
underneath shows through. The black paper should then cover the perimeter of
ArtixScan 4500t Installation and Operation Manual 13
Page 18

the film.
English
For standard-sized transparent film
Using the Main Holder
Before placing the standard-sized transparent film, place
the Main Holder on an even
surface, turn the locker to the
“Unlock” position, then open it.
For 4" x 5" film
1 Place the film upright and
facing up inside the Main
Holder, and r est the upper and
left edges against the two guide
pins for positioning.
Be careful that the guide pins
do not puncture the film when
you place the film inside the
film holder .
2 Close the Main Holder .
For 6 x 6 cm or 6 x 7 cm film
3 Turn the locker to the “Lock”
position.
1 Place the film to be scanned
inside the film mount (6 x 6 cm
or 6 x 7cm size), with the film
facing up.
2 Use the Magnetic strips to
secure the film to the film
mounts and position the strips
along the edge, making sure
that the area to be scanned is
not covered by the strips.
3 Place the mounted film in the
Main Holder, and r est the
upper and left edges against
the two guide pins for positioning. Be careful that the
guide pins do not puncture the
film when you place the film
inside the film holder .
4 Close the Main Holder .
5 Turn the locker to the “Lock”
position.
14 ArtixScan 4500t Installation and Operation Manual
Guide pin
Guide pins
UNLOCK
UNLOCK
U
N
LO
UNLOCK
C
K
L
O
C
K
LOCK
L
O
C
K
LOCK
Film is held
in place by
guide pins
U
N
L
L
O
O
C
C
K
K
LockUnlock
LOCK
UNLOCK
Magnetic strips
Mounted film
Page 19

For 35mm mounted and unmounted slides
AB
1 Do one of the following:
A. To scan thick mounted slides
Place the mounted slide in film mount.
Secure the film under the clips of the film
mount to lock the slide in place.
B. To scan thin mounted slides
Place the metal slide spacer beneath the
clips of film mount, then push the mounted
slide under the clips to lock the slide in
place.
2 Place film mount inside the Main Holder ,
and rest the upper and left edges of the film
adapter against the two guide pins for
positioning.
Be careful that the guide pins do not
puncture the film when you place the film
inside the film holder .
3 Close the Main Holder . Then turn the locker
to the “Lock” position.
A
Mounted slide
B
Film mount
English
Film mount
Mounted slide
Metal slide spacer
Guide pins
Film mount
U
N
L
L
O
O
C
C
K
K
ArtixScan 4500t Installation and Operation Manual 15
Page 20

English
T
H
I
S
S
I
D
E
U
P
Using the 4-in-1 Slide Holder
1 Place the 4-in-1 Slide Holder on an even
surface, then open the film holder .
2 Place the slides to be scanned inside the
slide mount, with the film facing up.
3 Close the slide holder .
T
H
IS
S
I
D
E
U
P
16 ArtixScan 4500t Installation and Operation Manual
Page 21

Step 2: Inserting Film Holder into scanner
1 Open the Front Cover.
2 Insert the Glass Holder (with
films loaded properly) into the
ArtixScan 4500t.
3 Close the front cover of the
ArtixScan 4500t. Y ou ar e now
ready to scan. Please refer to
ScanWizard Pro User’s Manual
for operation.
Warning: To scan images, you
must close the front cover.
Otherwise the scanner will stay at
the Not Ready state.
English
TH
IS
S
ID
E
U
P
ArtixScan 4500t Installation and Operation Manual 17
Page 22

5 How to calibrate your scanner
English
Introduction
The Scanner ICC Profiler is a scanner calibration and profiling utility program designed
exclusively for use with Microtek scanners, including the ArtixScan 4500t. The Scanner
ICC Profiler lets you calibrate the color attributes of your scanner and lets you create an
ICC color profile customized and tailored especially for your scanner.
Why do you need the Scanner ICC Profiler?
Every Microtek Artix scanner includes a factory-set ICC color profile for use with the
scanner controller program — in this case, ScanWizard Pro. This factory-set profile
delivers high color quality in general. But scanners, like any high quality imaging device,
interpret colors differently, resulting in subtle variations and differences in color imaging.
In addition, individual scanners of the same model may also perform differently due to
other factors, such as aging of the scanner lamp or ambient temperature fluctuations.
With the Scanner ICC Profiler, such color variations and differences can be minimized or
eliminated, as the program calibrates the scanner and compensates for subtle color
deviations. The customized color profile resulting from the use of the Scanner ICC
Profiler, in effect, delivers more accurate color and contributes to overall improved image
quality.
To keep the colors in your scanner consistent over time, it’s recommended that you use
the Scanner ICC Profiler regularly. Professional photographers or others who require
extremely precise color may wish to use the Profiler every time before they use their
scanner, but for most general usage, calibrating twice a month should be suf ficient.
Calibration target
Y our Scanner ICC Pr ofiler kit includes industry-standard Kodak Q-60E1 IT8 color tar get
for calibration. Calibrating the scanner ensures color accuracy when you scan
transparent media such as slides and filmstrips.
Taking care of the target
The calibration target is very delicate and must be handled carefully. Make sure you
follow these rules in caring for the target.
• Gently take the target out of its protective sleeve.
• Do not touch the target image with your fingers or with any other object.
• When not in use, keep the target out of light — even interior lighting.
18 ArtixScan 4500t Installation and Operation Manual
Page 23

• Always return the target to its protective sleeve immediately after use.
• Store the target away from light in a cool, dry place, since long exposure to heat and
light can change the colors on the target.
Installing the Scanner ICC Profiler
Note: The Scanner ICC Profiler program should have been installed at the time you performed
software installation pr ocedures (discussed earlier in the manual). If for some r eason you have not
installed the Scanner ICC Profiler, follow the steps below to install the program.
A. For the Macintosh
Before installing the Scanner ICC Profiler, you should have ScanWizard Pro and the
Kodak CMS programs installed on your computer .
T o install the Scanner ICC Pr ofiler program: Insert the Artix CD into your CD-ROM drive.
Open the ICC Profiler folder , then double-click the Installer icon to install the program.
B. For Windows 95/98/2000/NT 4.0
Before installing the Scanner ICC Profiler, you should have ScanWizard Pro and the
Kodak CMS programs installed on your computer .
T o install the Scanner ICC Pr ofiler program: Insert the Artix CD into your CD-ROM drive.
When the Software Installer screen appears, click on the “Install” option for the Scanner
ICC Profiler program, then follow the on-screen instructions until the program finishes
installing.
English
Placing the color target
With the correct alignment (as shown in the figure below), place the 4" x 5" target in the
metal Main Holder, then place it into the scanner. For further information on how to
place the target, refer to Chapter 4, page 14.
UNLOCK
LOCK
ArtixScan 4500t Installation and Operation Manual 19
Page 24

Starting Calibration
English
1. Turn on your scanner and let it warm up for about five minutes.
2. Place the target inside the scanner.
3. Launch the Scanner ICC Profiler calibration utility. The main menu below appears.
A. Choose the media type. Select Positive Film to calibrate.
B. Select the tar get type that matches your target type and date code. You can verify this
information by looking at the bottom of the target for the date code and the target
type information.
Note: If you are unable to select the target type with date code that matches with the
target you are using, find the Target Profile CD that came with your scanner . In
Macintosh, run Macsetup program; in Windows 95/98/2000/NT 4.0, run Winsetup.exe
on the CD, then restart your computer, the tar get type with the date code is now
available for selection.
20 ArtixScan 4500t Installation and Operation Manual
Date code and target
type information
Page 25

C . Click on the
preview is performed.
StarStar
Star
StarStar
Scanning the target image
Following the Preview, a message appears informing you of the next step to be done.
t Prt Pr
ofilingofiling
t Pr
ofiling button. The calibration window will appear, and an initial
t Prt Pr
ofilingofiling
English
To select the target image, move the pointer (now a crossbar) to the preview image, and
draw a frame enclosing the entire target image. When you release the mouse, a scan
frame appears, which is the dotted marquee enclosing the target image.
To resize the selection, move the cursor to any corner of the frame; the pointer is
changed to a double-headed arrow. Hold down the mouse, drag to form a new selection,
then release the mouse.
When the target image is selected, click the
ScanScan
Scan button to scan the target.
ScanScan
ArtixScan 4500t Installation and Operation Manual 21
Page 26

Aligning the target registration marks
English
A. Aligning the upper-left registration mark
Move the cursor into the target image area; the pointer will change to a flipped L mark
(“ ”). Align the cursor with the small upper-left registration mark.
B. Aligning the upper-right registration mark
After the upper left mark is aligned, the upper right part of the target image is displayed,
and an instruction dialog box prompts you to align the upper right registration mark.
Upper left
registration
mark
Upper right
registration
mark
Move the cursor into the target image area; the pointer will change to a normal L mark
(“ ”). Align the cursor with the small upper-right registration mark.
C. Aligning the bottom-right registration mark
After the upper right mark is aligned, the lower right part of the target image is displayed,
and an instruction dialog box prompts you to align the bottom right registration mark.
Move the cursor into the target image area; the pointer will change to a vertically flipped
L mark (“ ”). Align the cursor with the small bottom-right registration mark.
22 ArtixScan 4500t Installation and Operation Manual
Bottom-right registration
mark
Page 27

Creating a profile
Following the alignment of
registration marks, an
instruction dialog box appears,
prompting you to click the
Calibrate ProfileCalibrate Profile
Calibrate Profile button.
Calibrate ProfileCalibrate Profile
English
Click the
button. This only takes a few
moments. When the process is
finished, a
dialog box appears, prompting
you to input Profile Filename
and Profile Description.
Click
profile is saved automatically to
your hard disk.
Exit the Scanner ICC Profiler
now, and use the new scanner
profile with ScanWizard Pro to
scan excellent color images.
Calibrate ProfileCalibrate Profile
Calibrate Profile
Calibrate ProfileCalibrate Profile
Save Profile AsSave Profile As
Save Profile As
Save Profile AsSave Profile As
OKOK
OK, a custom scanner ICC
OKOK
Note: If the process fails, you
will need to rescan the target
image and repeat the calibration
procedure described in the
preceding pages. Make sure the
registration marks are aligned
properly, then click the
Calibrate ProfileCalibrate Profile
Calibrate Profile button again
Calibrate ProfileCalibrate Profile
to create your profile.
ArtixScan 4500t Installation and Operation Manual 23
Page 28

Reference Section for Macintosh
English
This section describes the features and commands of the Microtek Scanner ICC Profiler
program. All features are covered in the Menu commands, the Main window, and the
Calibration window .
A. Menu commands
1. Apple Menu — About ICC Profiler: Choose the About ICC Profiler command from
your Apple menu to display the splash screen for the Scanner ICC Profiler program.
The screen includes the product logo and the software version number
2. Scanner Menu: The Scanner Menu lets you see information on your current scanner
and your SCSI chain.
a) Find Plug-in: This command lets you choose the correct ScanWizard Pro Plug-in
driver for the ICC Profiler program (in case the
Plug-in driver cannot be found).
b) Get Current Scanner Info: This command pro-
vides information on the current scanner . A dialog
box appears showing the scanner model in use,
the SCSI ID number of the scanner, and the
firmware version of the scanner.
c) Scanner Probe: This command displays the SCSI
devices on the SCSI chain, as well as the SCSI ID
numbers of the individual devices.
T o use this command:
1. Choose the Get SCSI Chain Info command.
2. If your scanner does not show in the list, make sure
it is connected and turned on, then click on the Probe button in the dialog box.
• Choose the correct interface card in the card selection box.
• Check the numbered box corresponding to the SCSI ID of your scanner. Click OK to
close the dialog box
24 ArtixScan 4500t Installation and Operation Manual
Page 29

B. The Main Window
The Main window provides various features and a
system menu, allowing you to control the calibration
process.
Controls:
1. Scanner Model: This option lets you select the
scanner to be calibrated.
2. Media: This option lets you select the media type for calibration. If a particular media is
not supported, that media will not appear on the list.
3. Target type: This option lets you select the T ar get Description File (TDF) that matches
your Q-60E1 calibration target being used for calibration.
Note: The T arget Description File (TDF) contains colorimetric measur ements of the target.
Each target lot contains unique colorimetric data, and the Scanner ICC Profiler evaluates the
scanned RGB data of the target and then matches it to the colorimetric data inside the TDF to
create an ICC color pr ofile — a characterization of how your scanner “sees” color.
4. Tonal Mapping: This option lets you select the way in which the tonal reproduction
curve of the profile is controlled.
• Normal: Slightly brightens the highlights but also darkens the shadows.
Lighten: Brightens the highlights and also lightens the image overall.
• Darken: Darkens the shadows without changing the highlights.
• Reduce Contrast: Captures as much of the original as possible. Recommended for
CMYK color separation.
5. Darken Shadow: This option lets you compensate for artifacts introduced by the
scanner that indicate problems with the shadow portion of the image. Y ou should
enable this option if you wish to:
• Minimize detail in the shadow areas of the image;
• Make the shadow areas of an image darker; or
• Reduce the appearance of noise in the shadow areas.
6. Start Profiling: This button starts the calibration process by displaying the calibration
window and guides you through the process to create a customized scanner ICC
profile.
7. Close: This button lets you close and exit the Scanner ICC Profiler.
8. Help: This button displays the Help window.
English
ArtixScan 4500t Installation and Operation Manual 25
Page 30

C. The Calibration Window: Preview and Scan
English
1. Preview: The Preview button performs a preliminary scan of the target, displaying the entire target
image in the calibration window .
2. Scan: The Scan button scans the target image and
prepares the scanner for the important succeeding
steps of aligning the registration marks and
creation of the profile.
D. The Calibration Window: Aligning targets and creating the profile
1. Create Profile: This button starts the actual
calibration process in which a custom scanner
ICC profile is created for the scanner . This button
is grayed out until you have performed the
required alignment of the three registration
marks on the target.
2. Previous Mark: This button lets you go back one
step to align the previous registration mark.
3. Next Mark: This button lets you go forward one
step to align the next registration mark.
4. Go to Step 1: This button takes you back to the
preview image screen so that you can rescan the
target image and restart the calibration process.
5. Show Patches: This option lets you check the sampling area of all the color patches.
When aligned properly, the sampling area appears as a green square in the center of
most patches. If any areas fall outside a patch, realign the registration marks by clicking
the “Previous Mark” and “Next Mark” buttons, and then reselecting the registration
marks until the sampling areas are centered.
6. Close: This button lets you return to the main screen
26 ArtixScan 4500t Installation and Operation Manual
Page 31

Reference section for PC
This section describes the features and commands of the Microtek Scanner ICC Profiler
program. All features are covered in the Main window and Calibration window.
A. The Main Window
The Main window provides various features and a
system menu, allowing you to control the calibration
process.
Controls:
1. Scanner Model: This option lets you select the
scanner to be calibrated.
2. Media: This option lets you select the media type for calibration. If a particular media is
not supported, that media will not appear on the list.
3. Target type: This option lets you select the T ar get Description File (TDF) that matches
your Q-60E1 calibration target being used for calibration.
Note: The T arget Description File (TDF) contains colorimetric measur ements of the target.
Each target lot contains unique colorimetric data, and the Scanner ICC Profiler evaluates the
scanned RGB data of the target and then matches it to the colorimetric data inside the TDF to
create an ICC color pr ofile — a characterization of how your scanner “sees” color.
4. Tonal Mapping: This option lets you select the way in which the tonal reproduction
curve of the profile is controlled.
• Normal: Slightly brightens the highlights but also darkens the shadows.
• Lighten: Brightens the highlights and also lightens the image overall.
• Darken: Darkens the shadows without changing the highlights.
• Reduce Contrast: Captures as much of the original as possible. Recommended for
CMYK color separation.
5. Darken Shadow: This option lets you compensate for artifacts introduced by the
scanner that indicate problems with the shadow portion of the image. Y ou should
enable this option if you wish to:
• Minimize detail in the shadow areas of the image;
• Make the shadow areas of an image darker; or
• Reduce the appearance of noise in the shadow areas.
6. Start Profiling: This button starts the calibration process by displaying the calibration
window and guides you through the process to create a customized scanner ICC
profile.
7. Close: This button lets you close and exit the Scanner ICC Profiler.
8. Help: This button displays the Help window.
English
ArtixScan 4500t Installation and Operation Manual 27
Page 32

English
System Menu:
The System Menu displays current scanner information, lets you
view the SCSI chain status, and lets you view the About dialog
box of the Scanner ICC Profiler program.
1. Get Current Scanner Info: This command provides information on the current scanner . A dialog box appears showing the
scanner model in use, the SCSI ID number of the scanner , and
the firmware version of the scanner.
2. Scanner Probe: This command displays the SCSI devices on the
SCSI chain, as well as the SCSI ID numbers of the individual devices.
T o use this command:
1. Choose the Get SCSI Chain Info command.
2. If your scanner does not show in the list,
make sure it is connected and turned on, then
click on the Probe button in the dialog box.
• Choose the correct interface card in the
card selection box.
• Check the numbered box corresponding
to the SCSI ID of your scanner. Click OK to
close the dialog box.
3. About: This command displays the splash screen of the Scanner ICC Profiler program,
including the product logo and the software version number.
28 ArtixScan 4500t Installation and Operation Manual
Page 33

B. The Calibration Window: Preview and Scan
1. Preview: The Preview button performs a
preliminary scan of the target, displaying the
entire target image in the calibration window.
2. Scan: The Scan button scans the target image
and prepares the scanner for the important
succeeding steps of aligning the registration
marks and creation of the profile.
C. The Calibration Window: Aligning targets and creating the profile
1. Calibrate Profile: This button starts the actual
calibration process in which a custom scanner
ICC profile is created for the scanner. This
button is grayed out until you have performed
the required alignment of the three registration
marks on the target.
2. Previous Mark: This button lets you go back one
step to align the previous registration mark.
3. Next Mark: This button lets you go forward one
step to align the next registration mark.
4. Go to Step 1: This button takes you back to the
preview image screen so that you can rescan the target image and restart the calibration process.
5. Show Patches: This option lets you check the sampling area of all the color patches.
When aligned properly, the sampling area appears as a green square in the center of
most patches. If any areas fall outside a patch, realign the registration marks by
clicking the “Previous Mark” and “Next Mark” buttons, and then reselecting the
registration marks until the sampling areas are centered.
6. Close: This button lets you return to the main screen
English
ArtixScan 4500t Installation and Operation Manual 29
Page 34

6 Troubleshooting
English
Introduction
This Troubleshooting guide discusses the SCSI cards that work with Microtek scanner.
A vailable SCSI car ds are Adaptec 2902, 2903, 2906 and AdvanSys 902 car d.
Questions and Answers for Windows 95/98/2000
Q1: The SCSI card cannot be found by Windows 98.
A1:
Your interface card is not properly seated in the PCI card slot on your computer.
To fix this problem, power down your computer, r emove the SCSI interface card fr om
your computer. Then reinstall it, make sure the card is seated all the way in and secured
into the PCI card slot. The PCI card slot normally appears in white or ivory.
Q2: My interface card conflicts with another device.
A2:
Follow the steps below:
StartStart
1. Click
2. Double-click on the
top.
3. Double-click on “
mark appears next to the detected SCSI device.
4. Click on the option that has the yellow exclamation mark appeared at the left, and then
click
5. Select
Interrupt Request (IRQ) and Input/Output (I/O) address settings, including whether a
conflict happens.
6. If a conflict exists in Input/Output option, then click
Change SettingChange Setting
Change Setting. Use the Up/Down arrow keys to select
Change SettingChange Setting
a different range.
30 ArtixScan 4500t Installation and Operation Manual
SettingsSettings
Start,
Settings, and select
StartStart
SettingsSettings
System System
System icon in Control Panel and select
System System
SCSI controllersSCSI controllers
SCSI controllers” to display the dialog box. A yellow exclamation
SCSI controllersSCSI controllers
PropertiesProperties
Properties.
PropertiesProperties
ResourcesResources
Resources from the top. The dialog box gives you information about the
ResourcesResources
Control PanelControl Panel
Control Panel.
Control PanelControl Panel
Device ManagerDevice Manager
Device Manager from the
Device ManagerDevice Manager
Page 35

7. Next, select the Interrupt/Request option, click
Change Setting, and use the Up/Down arrow keys to
select different IRQ number . If all IRQs ar e taken, you
need to contact your dealer or computer manufacturer to help on how to free up an IRQ in this range.
8. When all the settings are correct, click OK to save the
modifications. The dialog box should now show the
correct Interrupt Request and Input/Output address
settings. If you’re asked to shut down your computer ,
select No, then click Close. You will be asked whether
you wish to restart your computer . Click Yes and
restart your computer.
Q3: My SCSI card is detected by Windows 98, but the scanner cannot be
found in Scanner T est utility.
A3:
Follow the steps below:
1. In W indows, choose Start, then Shut Down to turn off computer power. Then turn off
the power of your scanner.
2. Check to make sure you have connected the correct SCSI cable to the SCSI port, not
the parallel port. If you connect the SCSI cable to the parallel port, your scanner will
not be found.
3. If your scanner has a SCSI terminator switch, set it to the On position. If the
scanner doesn’t have a SCSI terminator switch, plug the SCSI terminator on the SCSI
port.
4. If your scanner is chained to other SCSI device, the SCSI ID of the SCSI device should
not be set to the same ID number. By default, Micr otek’s scanner SCSI ID is 6.
5. Turn on your scanner power, then restart your computer .
English
Q4: What’s the recommended power up sequence?
A4: When using SCSI interface, be sure you have connected the SCSI cable and the
terminator first, then connect the DC power adapter.
Q5: I have followed the above instructions, but still cannot fix the problem.
A5: Visit the web site of the SCSI card provider (e.g., Adaptec or AdvanSys).
ArtixScan 4500t Installation and Operation Manual 31
Page 36

Questions and Answers for Windows NT 4.0
English
Q1: My SCSI card is detected by Windows NT 4.0, but the scanner cannot
be found in Scanner Test utility.
A1:
Follow the steps below:
1. In W indows, choose Start, then Shut Down to turn off computer power. Then turn off
the power of your scanner.
2. Check to make sure you have connected the correct SCSI cable to the SCSI port, not
the parallel port. If you connect the SCSI cable to the parallel port, your scanner will
not be found.
3. If your scanner has a SCSI terminator switch, switch it to the On position. If the
scanner doesn’t have a SCSI terminator switch, plug the SCSI terminator on the SCSI
port.
4. If your scanner is chained to other SCSI device, the SCSI ID of the SCSI device should
not be set to the same ID number. By default, Micr otek’s scanner SCSI ID is 6.
Q2: The SCSI card cannot be found by Windows NT.
A2:
Your interface card is not properly seated in the PCI card slot on your computer.
To fix this problem, power down your computer, r emove the SCSI interface card fr om
your computer. Then r e-install it, make sure the car d is seated all the way in and secure d
into the PCI card slot. The PCI card slot normally appears in white or ivory.
Q3: My interface card conflicts with another device.
A3:
Follow the steps below:
1. Restart your computer . Start up W indows NT 4.0. Log in as Administrator .
2. Click Start,
3. In the Control Panel window, find SCSI Adapters and double click it. A window like
the following will appear .
32 ArtixScan 4500t Installation and Operation Manual
Settings,
and select
Control Panel.
Page 37

DevicesDevices
The
Devices screen will list any SCSI controllers that may already have installed in your
DevicesDevices
computer.
NoteNote
::
Note
: Although IDE CD-ROM drives are not SCSI, because of the way the driver is
NoteNote
::
implemented, Windows NT 4.0 will still list it on this screen.
4. Click on the
and the corresponding Adaptec card driver on the right to install.
5. Click OK to bring up the following screen.
DriversDrivers
Drivers tab, and click on the
DriversDrivers
Add...Add...
Add... button to select
Add...Add...
AdaptecAdaptec
Adaptec on the left
AdaptecAdaptec
English
The SCSI card should now be listed, indicating the driver is installed.
6. Restart your computer.
Q4: What’s the recommended power up sequence?
A4: When using SCSI interface, be sure you have connected the SCSI cable and the
terminator first, then connect the DC power adapter.
Q5: I have followed the above instructions, but still cannot fix the problem.
A5: Visit the web site of the SCSI card provider (e.g., Adaptec or AdvanSys).
ArtixScan 4500t Installation and Operation Manual 33
Page 38

Questions and Answers for Macintosh G3/G4
English
Q1: The SCSI card cannot be found by Macintosh G3/G4
A1:
Y our interface card is not properly seated in the interface card slot on your Macintosh.
T o fix this problem, power down your Macintosh G3/G4, remove the SCSI interface card fr om
Macintosh. Then reinstall it, make sure the card is seated all the way in and secured into
the card slot.
Q2: My SCSI card is detected by Macintosh, but the scanner cannot be
found.
A2:
Follow the steps below:
1 If your scanner has a SCSI terminator switch, switch it to the On position. If the
scanner doesn’t have a SCSI terminator switch, plug the SCSI terminator on the SCSI
port.
2. If your scanner is chained to other SCSI device, the SCSI ID of the SCSI device should
not be set to the same ID number. By default, Micr otek’s scanner SCSI ID is 6.
Q3: What’s the recommended power up sequence?
A3: Power up your scanner first, then the computer.
Q4: I have followed the above instructions, but still cannot fix the problem.
A4: Visit the web site of the SCSI card provider (e.g., Adaptec or AdvanSys).
34 ArtixScan 4500t Installation and Operation Manual
 Loading...