

Page 1

Scanning Guide
ScanMaker i800 Scanning Scenarios with ScanWizard Pro
After
Before
Before
About This Scanning Guide
This Scanning Guide shows you how to use ScanWizard Pro, the professional-grade
scanning software included with the ScanMaker i800. While the Guide lays out only
the most basic scanning scenarios on these pages, ScanWizard Pro can be used for a
wide range of applications involving sophisticated functionalities and advanced
levels of image manipulation and control.
For information on more advanced scanning scenarios, refer to the ScanWizard Pro
User's Guide. Additional information can also be found in the ScanW izard Pro
Reference Manual for detailed discussions of individual scanning commands and
options. Both documents are in Adobe Acrobat PDF format, available for viewing and
printing from your Microtek ScanMaker i800 Pro CD-ROM.
Contents
About This Scanning Guide ...................................................................... 1
Installing Software .................................................................................... 2
Positioning Transparent Film .................................................................... 3
A. Using the EZ-Lock 35mm Slide Holder ....................................... 4
B. Using the EZ-Lock 35mm Filmstrip Holder ................................. 5
C. Using the EZ-Lock 6 x 22 cm (120) Film Holder ........................... 6
D. Using the EZ-Lock 4" x 5" Film Holder ......................................... 7
E. Using the Film Alignment Ruler .................................................. 8
Copyright © 2005 Microtek International, Inc. http://www.microtek.com
I49-003964 A, August 2005
Scanning Scenarios ................................................................................... 9
Scanning Regular, Non-Damaged Photos ............................................ 10
Scanning Damaged Photos .................................................................... 13
Scanning Regular, Non-Damaged Positive Film ................................... 16
Scanning Regular, Non-Damaged Negative Film .................................. 18
Scanning Damaged Film ......................................................................... 20
Page 2

Installing Software
Before scanning with ScanWizard Pro, make sure it has been installed correctly .
Follow the steps below for installation.
PC:
1 . Place the Adobe CD-ROM into the CD-ROM drive, and install the software.
2 . Place the Microtek ScanMaker i800 Pro CD-ROM into the CD-ROM drive, and
follow the on-screen instructions to install the driver and software.
Note: If the Microtek Software Installer screen does not come up automatically,
double-click the following in succession: “My Computer”; the CD-ROM icon; then
cdsetup.exe to start the installer program.
3 . Restart your computer at the end of all software installation.
MAC:
1 . Place the Adobe CD-ROM into the CD-ROM drive, and install the software.
2 . Place the Microtek ScanMaker i800 Pro CD-ROM into the CD-ROM drive, and
double-click the ScanWizard Pro folder and installer icon.
Note: After rebooting your Macintosh, the Microtek software will attempt to locate
your scanner on the system. Since this is your first install and you may have not yet
connected the scanner, simply ignore the message that appears.
2 ScanMaker i800 Pro Scanning Guide
Page 3
Positioning Transparent Film
To scan transparent film, use the EZ-Lock™ Film Holders or Film Alignment Ruler
included with your ScanMaker i800 package. Use the EZ-Lock Film Holders to scan
standard-size transparent film such as 35mm slides, 35mm filmstrips, 4" x 5" film,
6 x 4.5 cm, 6 x 6 cm, 6 x 7 cm, 6 x 9 cm, or 6 x 17 cm (120) film. Use the Film Alignment
Ruler to scan non-standard-size transparent film such as 8" x 10" film.
The EZ-Lock Film Holders ensure precise alignment of film and consistent scans
during film scanning. T o scan film, use the film holder that correctly matches the film
type to be scanned.
Before proceeding with film scanning, take note of the information presented in the
two sections below.
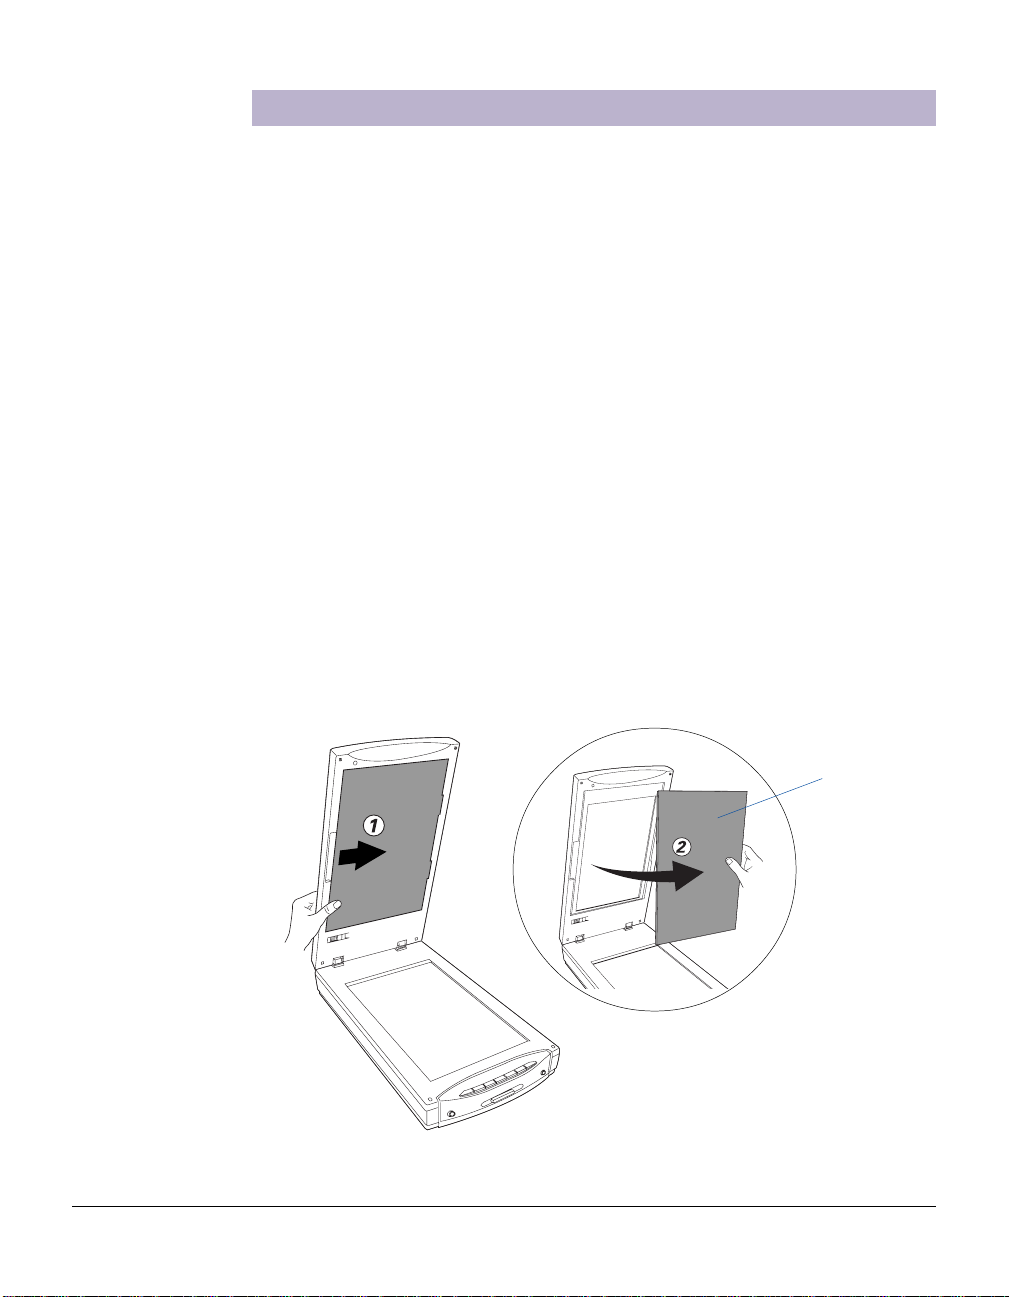
Removing the Black Mat
The Black Mat is designed to work with scanning of reflective materials such as
photos and printed matter. It is not designed to work with scanning of slides,
negatives, and transparencies. During film scanning, the Black Mat should be
removed to reveal the light source in the scanner for film.
T o remove the Black Mat:
Raise the scanner lid, push the Black Mat to the side (1 in diagram) to remove it from
the scanner lid (2 in diagram).
Black Mat
ScanMaker i800 Pro Scanning Guide 3
Page 4
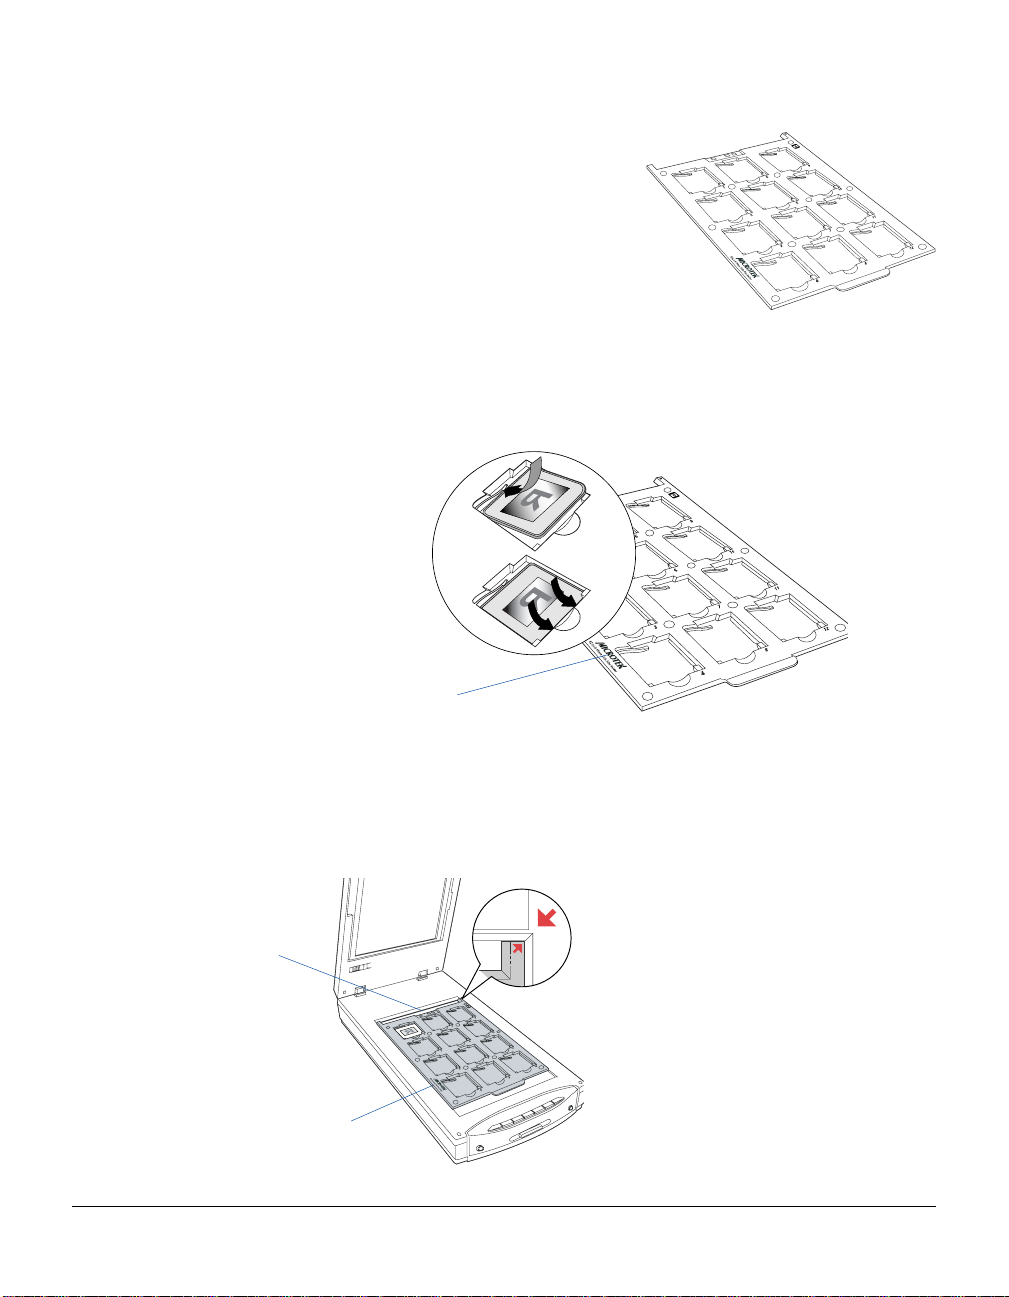
A. Using the EZ-Lock 35mm Slide Holder
To scan 35mm slides, use the EZ-Lock 35mm
Slide Holder, which can hold up to 12
mounted 35mm slides at a time.
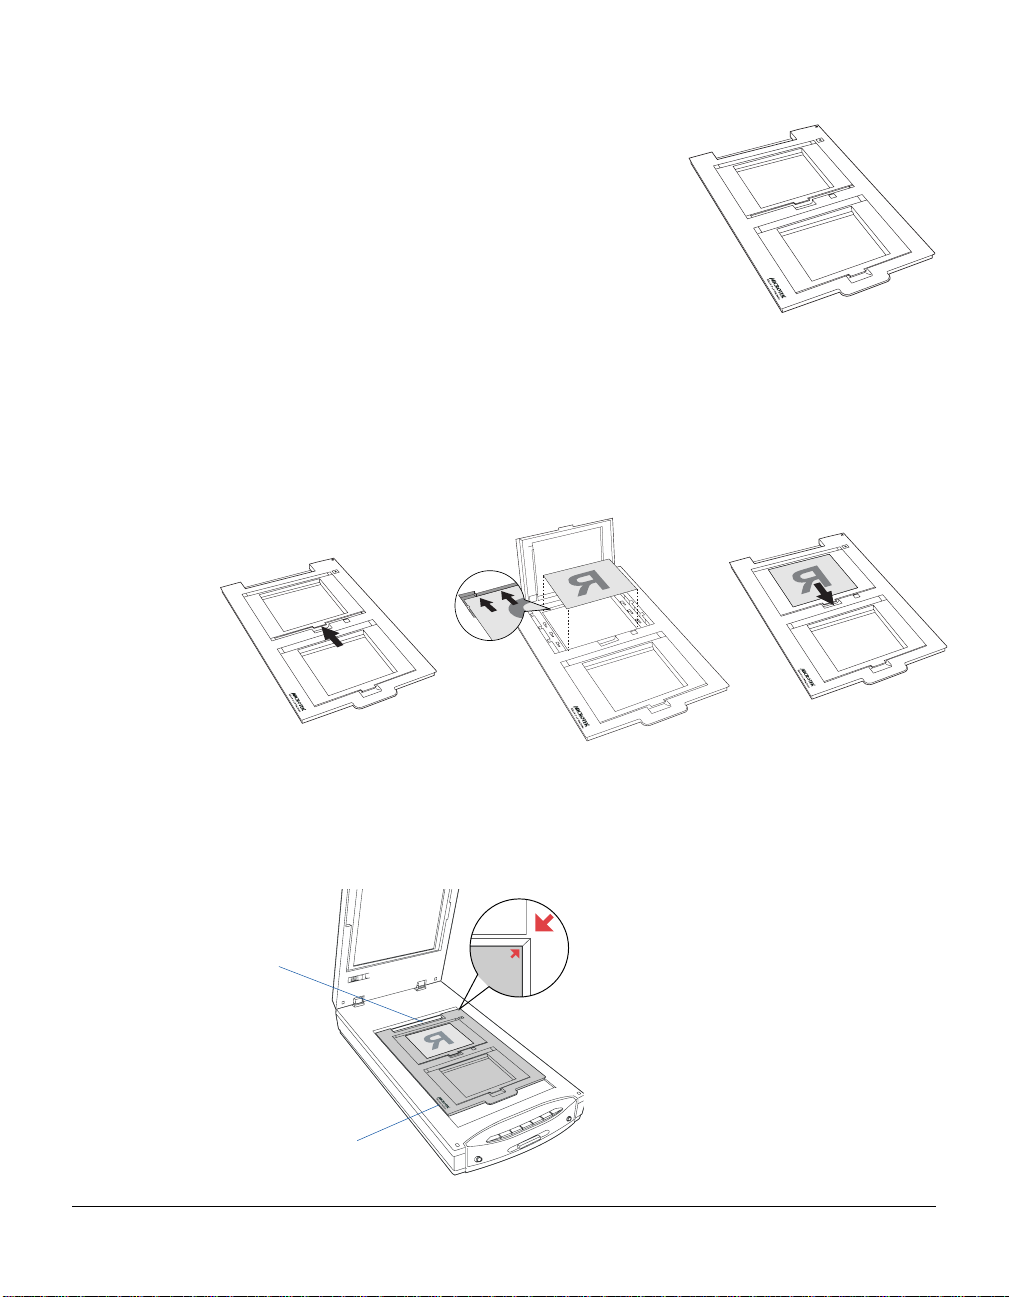
1 . Place the 35mm slides to be scanned inside the individual frames of the EZ-Lock
35mm Slide Holder. The shiny base of the 35mm slide should be facing down, and
the emulsion side of the slide should be facing up.
Orient the holder with
the “Microtek” logo
facing up
2 . Raise the scanner lid, then place the EZ-Lock 35mm Slide Holder towards the back
of the scanner, with the loaded film on the scanner glass surface.
Keep calibration strip
on the glass surface clear
and free of any obstruction
“Microtek” logo
4 ScanMaker i800 Pro Scanning Guide
To make sure film scanning performs
correctly, place the holder on the
scan bed, correctly oriented and
showing the side with the Microtek
logo face up. Align the red arrows so
that the holder’s front edge is flush
against the top ruler of the scanner.
Page 5
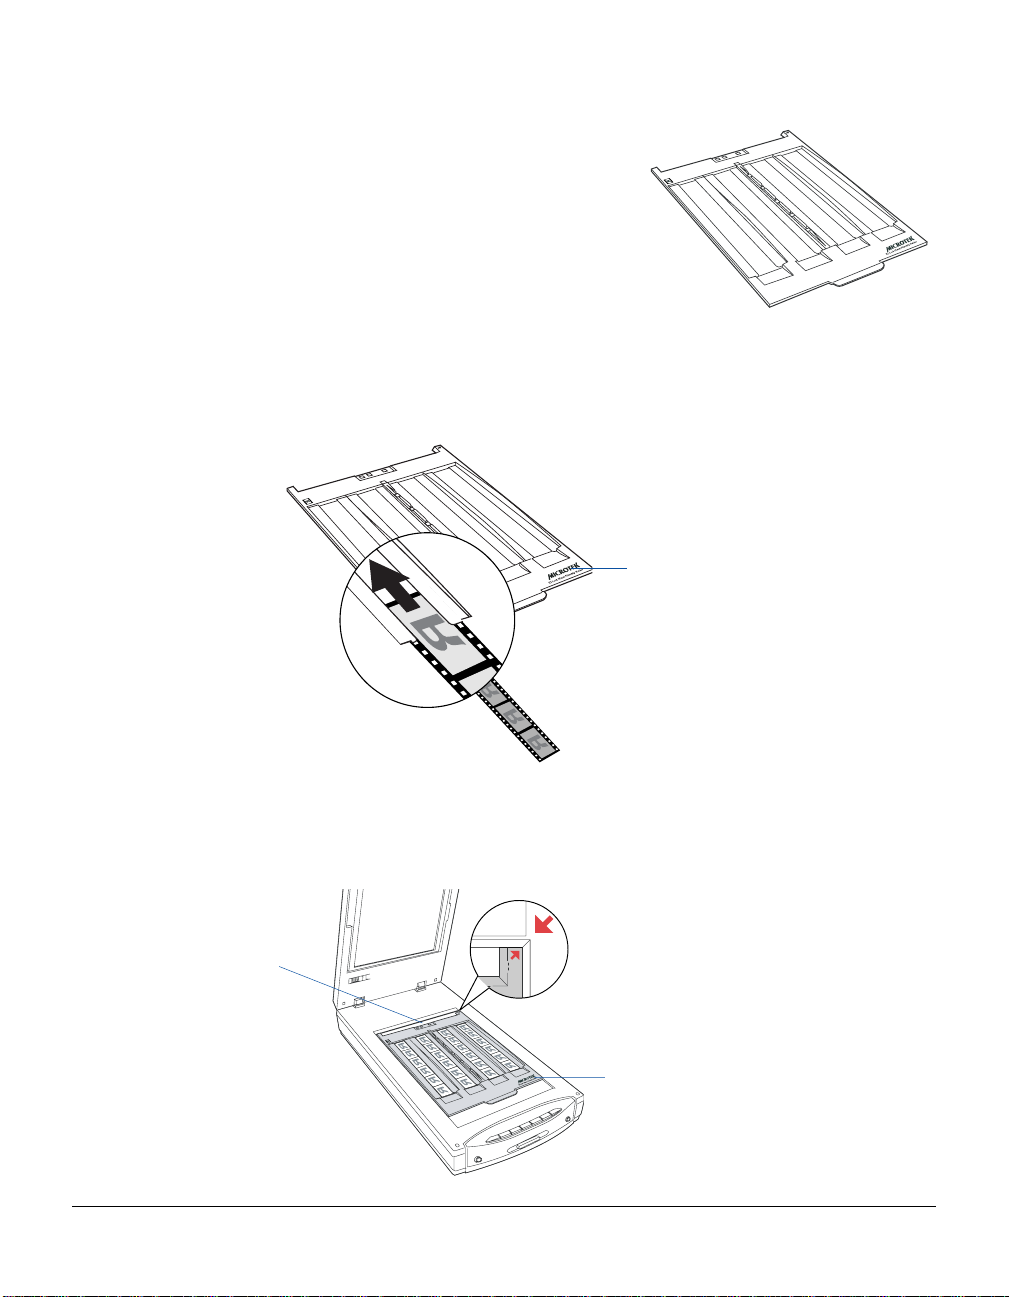
B. Using the EZ-Lock 35mm Filmstrip Holder
To scan 35mm filmstrips, use the EZ-Lock
35mm Filmstrip Holder, which can
simultaneously hold four strips of 6 frames
each, or a total of 24 frames.
1 . Place the 35mm filmstrip to be scanned inside the frame of the EZ-Lock 35mm
Filmstrip Holder. The shiny base of the 35mm filmstrip should be facing down, and
the emulsion side of the filmstrip should be facing up.
Orient the holder with the
“Microtek” logo facing up
2 . Raise the scanner lid, then place the EZ-Lock 35mm Filmstrip Holder towards the
Keep calibration strip
on the glass surface clear
and free of any obstruction
back of the scanner, with the loaded film on the scanner glass surface.
To make sure film scanning performs
correctly, place the holder on the
scan bed, correctly oriented and
showing the side with the Microtek
logo face up. Align the red arrows so
that the holder’s front edge is flush
against the top ruler of the scanner.
“Microtek” logo
ScanMaker i800 Pro Scanning Guide 5
Page 6
C. Using the EZ-Lock 6 x 22 cm (120) Film Holder
T o scan 6 x 4.5 cm, 6 x 6 cm, 6 x 7 cm, 6 x 9
cm, and 6 x 17 cm film, use the EZ-Lock 6 x
22 cm (120) Film Holder, which can hold up
to 4 pieces of 6 x 4.5 cm film, 2 pieces of 6 x
9 cm film, or a single piece of 6 x 17 cm film.
1 . Place the 120 film to be scanned inside the EZ-Lock 6 x 22 cm (120) Film Holder , as
indicated in the graphics below . The shiny base of the 120 film should be facing
down, and the emulsion side of the filmstrip should be facing up.
a) Push on the side to
2 . Raise the scanner lid, then place the EZ-Lock 6 x 22 cm (120) Film Holder towards
Keep calibration strip
on the glass surface clear
and free of any obstruction
open the lid.
b) Place the film face
down into the holder.
c) Pull down the side
to close the lid.
the back of the scanner, with the loaded film on the scanner glass surface.
To make sure film scanning performs
correctly, place the holder on the
scan bed, correctly oriented and
showing the side with the Microtek
logo face up. Align the red arrows so
that the holder’s front edge is flush
against the top ruler of the scanner.
“Microtek” logo
6 ScanMaker i800 Pro Scanning Guide
Page 7
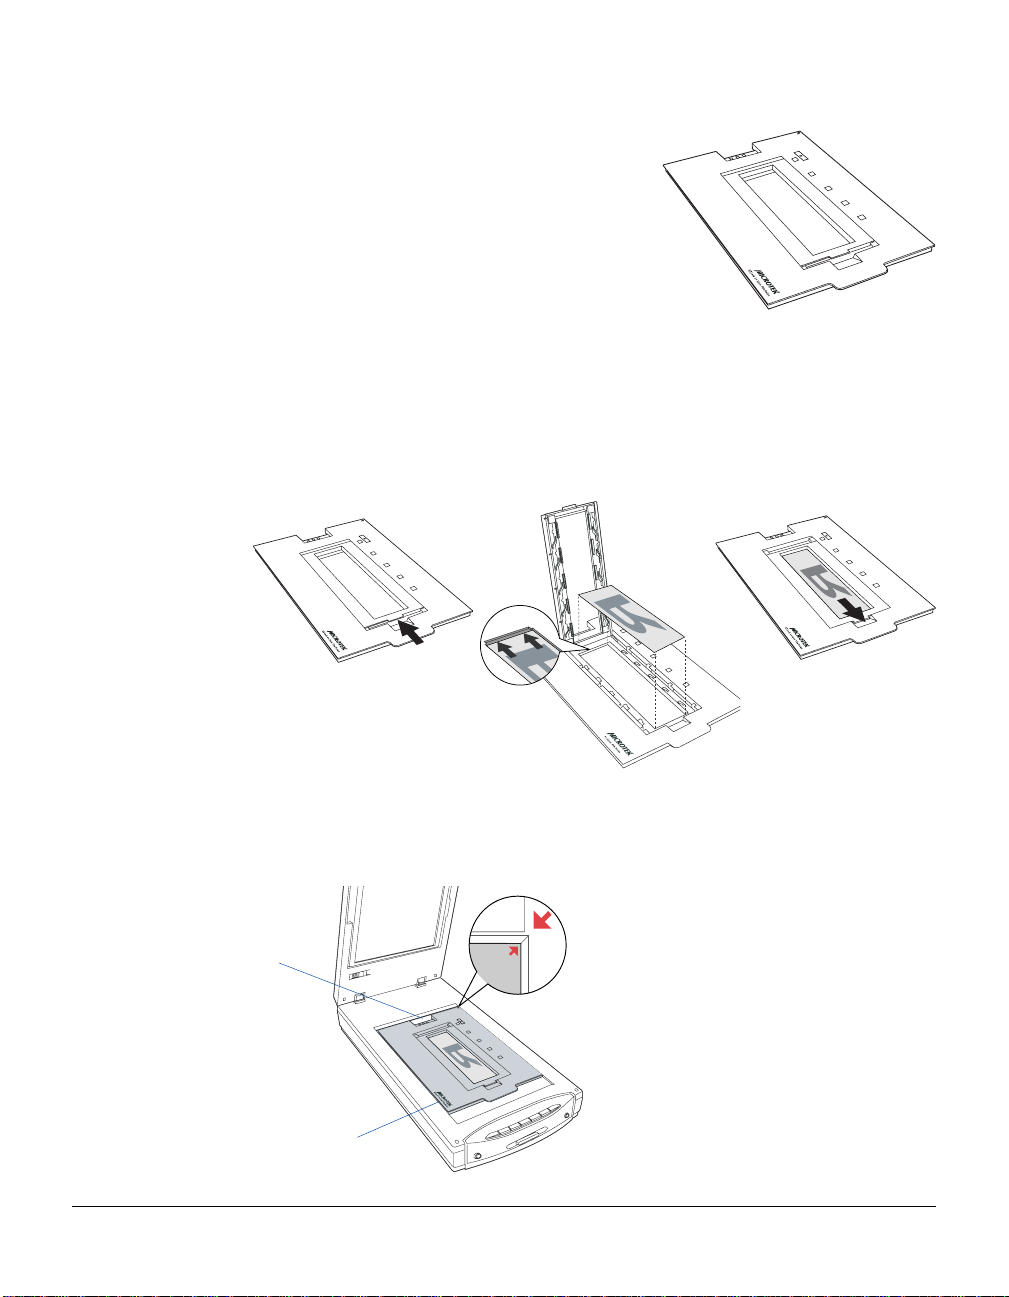
D. Using the EZ-Lock 4" x 5" Film Holder
T o scan 4" x 5" film, use the EZ-Lock 4" x 5"
Film Holder, which can hold up to 2 pieces of
4" x 5" film at a time.
1 . Place the 4" x 5" film to be scanned inside the EZ-Lock 4" x 5" Film Holder, as
indicated in the graphics below. The shiny base of the 4" x 5" film should be
facing down, and the emulsion side of the filmstrip should be facing up.
a) Push on the side to
2 . Raise the scanner lid, then place the EZ-Lock 4" x 5" Film Holder towards the back
Keep calibration strip
on the glass surface clear
and free of any obstruction
open the lid.
b) Place the film face
down into the holder.
c) Pull down the side
to close the lid.
of the scanner, with the loaded film on the scanner glass surface.
To make sure film scanning performs
correctly, place the holder on the
scan bed, correctly oriented and
showing the side with the Microtek
logo face up. Align the red arrows so
that the holder’s front edge is flush
against the top ruler of the scanner.
“Microtek” logo
ScanMaker i800 Pro Scanning Guide 7
Page 8
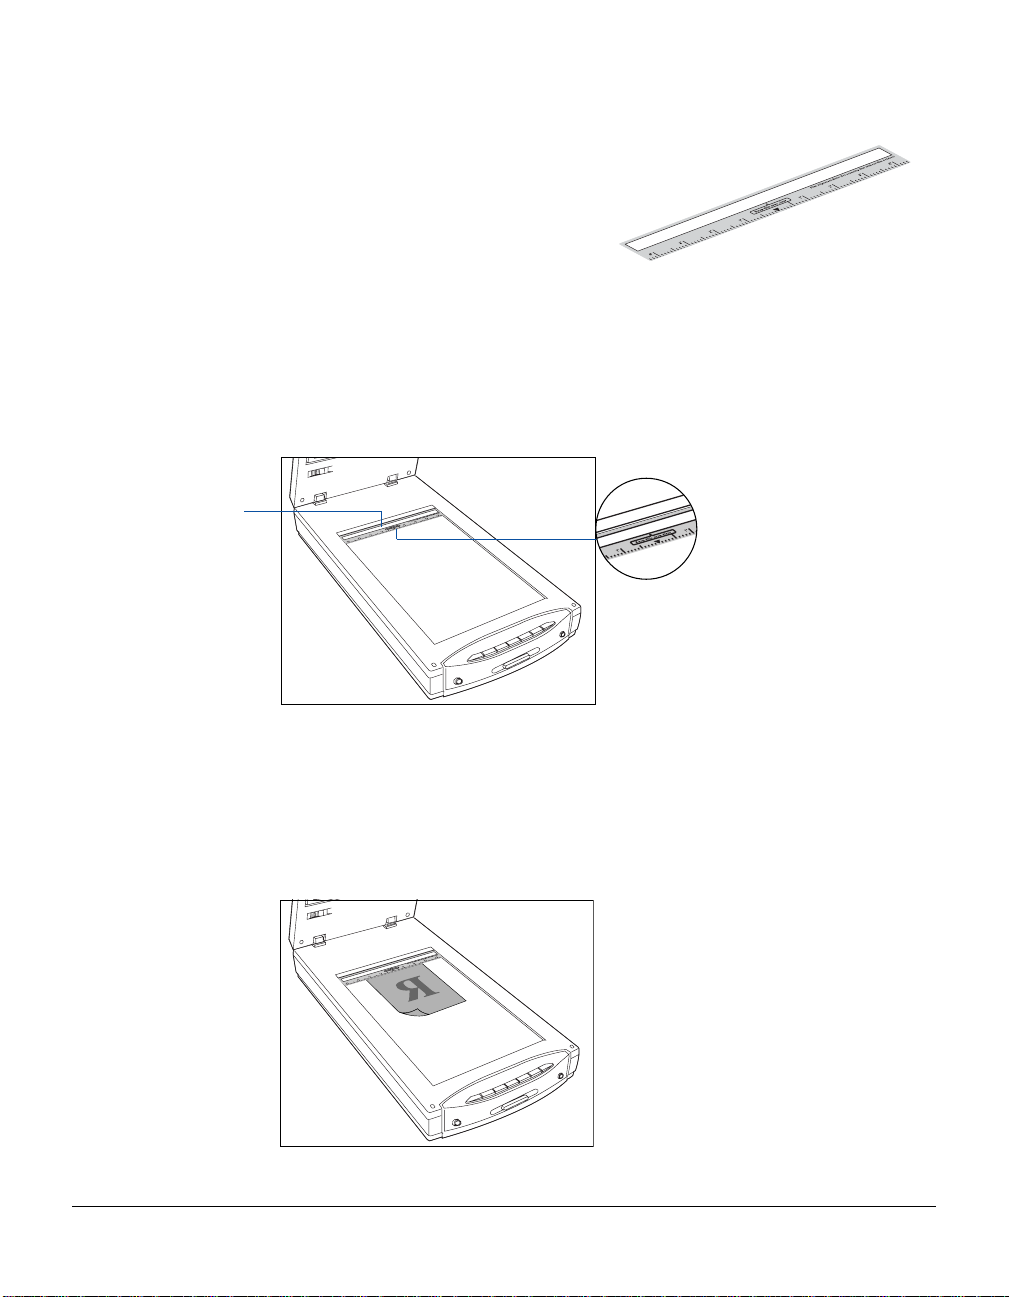
Calibration strip
E. Using the Film Alignment Ruler
To scan non-standard-size film such as
8" x 10" film, use the Film Alignment Ruler ,
which allows you to scan film up to
8" x 12" in size.
1 . Place the Film Alignment Ruler towards the back of the scanner on the scanner
glass surface.
Important: Align the Film Alignment
Ruler firmly against the top ruler of the
scanner, with the ruler oriented
correctly and with the correct side up.
During placement of the Ruler, make
sure that the calibration strip on the
Ruler is kept clear and free of
obstruction at all times.
2 . Place the film (non-standard size film) to be scanned on the scanner glass surface,
and center the film along the Film Alignment Ruler on the scanner .
8 ScanMaker i800 Pro Scanning Guide
Page 9

Scanning Scenarios
The following pages provide various scenarios for scanning with the ScanMaker i800
by using ScanWizard Pro, including the following:
• Scanning regular, non-damaged photos: This scenario can also be your first scan
in order to familiarize yourself with scanning basics.
• Scanning damaged photos: This scenario utilizes DIGIT AL ICE for reconstructing
damaged photos.
• Scanning regular, non-damaged positive film: This scenario details the steps for
scanning positive film, such as 35mm mounted slides.
• Scanning regular, non-damaged negative film: This scenario details the steps for
scanning negative film, such as 35mm filmstrips, 6 x 4.5 cm, 6 x 6 cm, 6 x 7 cm, 6 x 9
cm, 6 x 17 cm film, and 4" x 5" film.
• Scanning damaged film: This scenario utilizes DIGIT AL ICE for correcting flaws
that may be present in your slides, negatives, and transparencies.
T ake note that with the use of ScanWizard Pro, the Smart Touch buttons located on
the front panel of the ScanMaker i800 are deactivated and become unavailable for
use. The Smart Touch buttons are intended to be used in conjunction with
ScanWizard 5, Microtek's other scanning software also included with the ScanMaker
i800, geared for tasks assigned to the buttons.
Note: In the following pages that detail the various scanning scenarios, the
ScanWizard Pro interface is shown with the Preview, Settings, and Scan Job Queue
windows as they appear in Mac OS X.
The appearance of the windows will change slightly in Windows for the PC
platform, but the location of the various commands and icons remain in
approximately the same locations throughout the ScanWizard Pro interface.
ScanMaker i800 Pro Scanning Guide 9
Page 10

Scanning Regular, Non-Damaged Photos
1 . Raise the scanner lid, and place the
photo to be scanned face down on
the scanner glass surface. Position
the top end of the photo towards the
back of the scanner.
Make sure the Black Mat is attached
on the scanner lid, then close the
scanner lid before you launch
ScanWizard Pro.
2 . Launch ScanWizard Pro either as a stand-alone by clicking the program icon, or by
using the File-Import / File-Acquire command from your image-editing program
(such as Adobe Photoshop). Alternatively, you can start ScanWizard Pro from the
Applications folder in your Mac OS X.
The first time you launch ScanWizard Pro, you will be prompted to set up color
matching for your scanner. If you are not sure about what to do, simply click the
OK button to accept the settings. You can always change the settings at a later
time.
For more information, see the Color Matching Setup section in the ScanWizard
Pro Reference Manual in the Microtek ScanMaker i800 Pro CD-ROM.
The Black Mat
comes
preattached to
the scanner lid.
Color Matching
features
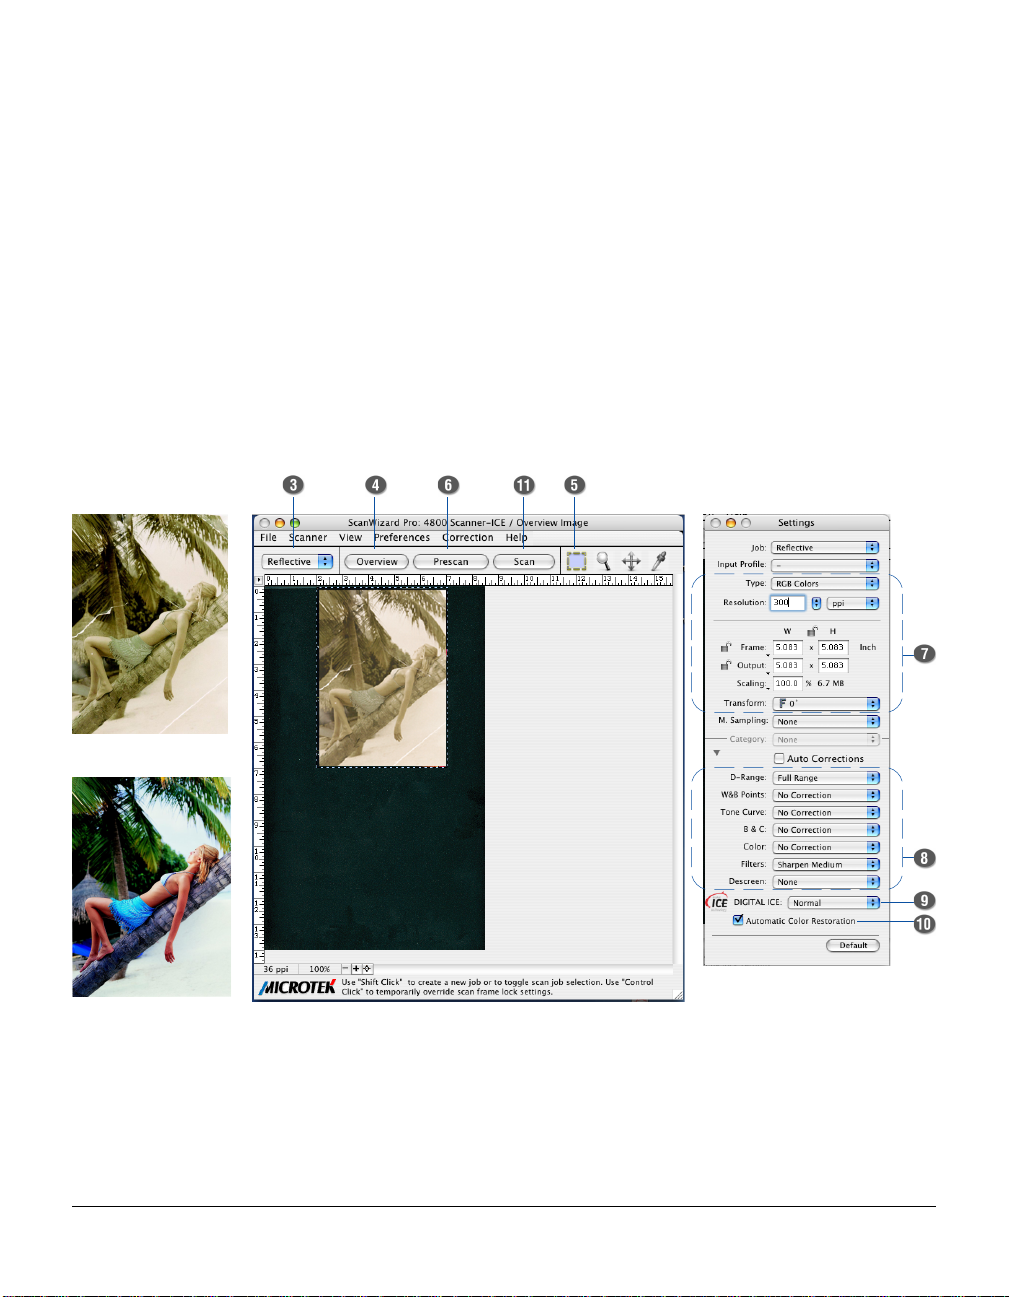
3 . Go to the Preview window of
ScanWizard Pro, and choose
Reflective from the Scan
Material menu.
10 ScanMaker i800 Pro Scanning Guide
Page 11

4 . Click the Overview button to perform a preliminary scan of the image, which will
appear in the Preview window .
5 . Select the Scan Frame tool from the Toolbar in the Preview window, and choose
the area to be scanned by dragging a rectangle around it. You will see a flashing
frame (marquee) around the selected area.
6 . Click the Prescan button to display a detailed image of area selected by the
Scan Frame tool. A thumbnail of the image appears as well in the Scan Job
Queue window.
7 . Specify your scanning requirements in the Settings window.
a) Select a desired image type.
b) Select a desired resolution.
c) Adjust the scan frame settings if necessary.
8. Adjust image quality if necessary, using the Advanced Image Correction (AIC) tools.
9. If the colors in your photo are faded and need restoring, check the "Automatic
Color Restoration" box in the Settings window .
10. Click the Scan (or “Batch”) button in the Preview window to start scanning.
• If ScanWizard Pro was launched from an application program, the image is then
delivered to your application, where the image can be saved, printed, or edited.
Note: In Mac OS X, you will be prompted to specify the file attributes for the
scanned image before scanning takes place.
• If ScanWizard Pro was launched in stand-alone mode, you will be prompted to
specify the file attributes for the scanned image after the Scan or Batch
button is pressed, such as entering the file name, specifying a folder name of
your own, etc. When you have completed the settings, press the Done/Save
button, and the scanner will automatically scan and save your image based on
your settings.
Click the Folder icon to specify a
folder or file name of your own.
ScanMaker i800 Pro Scanning Guide 11
Page 12

12 ScanMaker i800 Pro Scanning Guide
Page 13

Scanning Damaged Photos
1. Raise the scanner lid, then place the damaged photo to be scanned face down on
the scanner glass surface. Center the top of the photo along the horizontal ruler
towards the back of the scanner .
Note: Make sure the Black Mat is attached
Black Mat
to the scanner lid. This will ensure that
uneven photos lay as flat as possible, which
will enhance the accuracy of detecting
surface damage on photos.
Note: If the creases lie in the same
direction where the carriage is moving,
the creases may not be detected by the
scanner. To fix this problem, position your
photo slightly skewed (min. 10°, max.
45°), so that none of the creases are
parallel to the direction of the moving
carriage.
2 . Launch ScanWizard Pro.
3 . Go to the Preview window and
choose Reflective from the Scan
Material menu.
Direction of
carriage motion
ScanMaker i800 Pro Scanning Guide 13
Page 14

4 . Click the Overview button to perform a preliminary scan of the image, which will
appear in the Preview window .
5 . Select the Scan Frame tool from the Toolbar in the Preview window , and choose
the area to be scanned by dragging a rectangle around it. You will see a flashing
frame (marquee) around the selected area.
6 . Click the Prescan button to display a detailed image. A thumbnail of the image
appears as well in the Scan Job Queue window.
7 . Specify your scanning requirements in the Settings window.
a) Select a desired image type.
b) Select a desired resolution. Recommended resolution for DIGITA L ICE is
600 dpi.
c) Adjust the scan frame settings if necessary.
8. Adjust image quality if necessary, using the Advanced Image Correction (AIC) tools.
Important: The Descreen setting in the Settings window should be “None.”
Otherwise the “DIGIT AL ICE” option in the next step will be dimmed and will not
be available for selection.
9. To repair creases, tears, and
other surface defects from your
photo, choose the DIGIT AL ICE
option that works best for you in
the Settings window. Select from
Normal or Strong.
10. If the colors in your photo are
faded and need restoring, check
the “Automatic Color
Restoration” box in the Settings
window.
14 ScanMaker i800 Pro Scanning Guide
Page 15
11. Click the Scan (or “Batch”) button in the Preview window to start scanning.
• If ScanWizard Pro was launched from an application program, the image is then
delivered to your application, where the image can be saved, printed, or edited.
Note: In Mac OS X, you will be prompted to specify the file attributes for the
scanned image before scanning takes place.
• If ScanWizard Pro was launched in stand-alone mode, you will be prompted to
specify the file attributes for the scanned image after the Scan or Batch
button is pressed, such as entering the file name, specifying a folder name of
your own, etc. When you have completed the settings, press the Done/Save
button, and the scanner will automatically scan and save your image based on
your settings.
Before
After
ScanMaker i800 Pro Scanning Guide 15
Page 16

Scanning Regular, Non-Damaged Positive Film
1. Raise the scanner lid, then load the
positive film that you wish to scan and
place the EZ-Lock Film Holder on the
scanner glass surface.
Gently lower the scanner lid down onto
the scanner glass bed.
Important: Do not use the Black Mat. For
details on how to use the EZ-Lock Film
Holder and how to place film, see the
section “Positioning T ransparent Film”
elsewhere in this document.
2 . Launch ScanWizard Pro.
3 . Go to the Preview window and
choose Positive / Positive Film from
the Scan Material menu.
4 . Click the Overview button to perform a preliminary scan of your original.
5 . Select the Scan Frame tool from the Toolbar in the Preview window , and choose
the area to be scanned by dragging a rectangle around it. You will see a flashing
frame (marquee) around the selected area.
6 . Click the Prescan button to display a detailed image. A thumbnail of the image
appears as well in the Scan Job Queue window.
7 . Specify your scanning requirements in the Settings window.
a) Select a desired image type.
b) Select a desired resolution.
c) Adjust the scan frame settings if necessary.
8 . Adjust image quality if necessary, using the Advanced Image Correction (AIC)
tools.
9 . If the colors in your film are faded and need restoring, check the “Automatic Color
Restoration” box in the Settings window .
16 ScanMaker i800 Pro Scanning Guide
Page 17

10. Click the Scan (or “Batch”) button in the Preview window to start scanning.
• If ScanWizard Pro was launched from an application program, the image is then
delivered to your application, where the image can be saved, printed, or edited.
Note: In Mac OS X, you will be prompted to specify the file attributes for the
scanned image before scanning takes place.
• If ScanWizard Pro was launched in stand-alone mode, you will be prompted to
specify the file attributes for the scanned image after the Scan or Batch
button is pressed, such as entering the file name, specifying a folder name of
your own, etc. When you have completed the settings, press the Done/Save
button, and the scanner will automatically scan and save your image based on
your settings.
ScanMaker i800 Pro Scanning Guide 17
Page 18

Scanning Regular, Non-Damaged Negative Film
Note: Make sure you read the chapter “Addendum to ScanWizard Pro” in the
ScanWizard Pro Reference Manual for important information on new features
related to Negative Film Scanning.
1. Raise the scanner lid, then load the
negative film that you wish to scan and
place the EZ-Lock Film Holder on the
scanner glass surface.
Gently lower the scanner lid down onto the
scanner glass bed.
Important: Do not use the Black Mat. For
details on how to use the EZ-Lock Film
Holder and how to place film, see the
section “Positioning T ransparent Film”
elsewhere in this document.
2 . Launch ScanWizard Pro.
3 . Go to the Preview window and choose Negative / Negative Film from the Scan
Material menu. The Negative Scan Settings window appears.
4 . Click the Overview button to perform a preliminary scan of your original.
5 . Select the Scan Frame tool from the Toolbar in the Preview window, and choose
the area to be scanned by dragging a rectangle around it. You will see a flashing
frame (marquee) around the selected area.
6 . Click the Prescan button to display a detailed image. A thumbnail of the image
appears as well in the Scan Job Queue window .
7 . a) In the Negative Scan Settings window ,
choose the Film Brand, Film T ype, and
ISO settings that match your film.
b) The settings for the negative film you selected are
applied to the prescan image, and the adjusted
image is displayed in the Preview window.
c) You can save the selected negative film settings
into the Preset drop-down menu for easy access in
the future.
For more details on how to control settings for negative
film scanning, see the section “Negative Scan Settings
Window” in the ScanW izard Pro Reference Manual in the
Microtek ScanMaker i800 Pro CD-ROM.
18 ScanMaker i800 Pro Scanning Guide
Page 19

8. Specify your scanning requirements in the Settings window.
a) Select a desired image type.
b) Select a desired resolution.
c) Adjust the scan frame settings if necessary.
9. Adjust image quality if necessary, using the Advanced Image Correction (AIC) tools.
10. If the colors in your film are faded and need restoring, check the “Automatic Color
Restoration” box in the Settings window .
11. Click the Scan (or “Batch”) button in the Preview window to start scanning.
• If ScanWizard Pro was launched from an application program, the image is then
delivered to your application, where the image can be saved, printed, or edited.
Note: In Mac OS X, you will be prompted to specify the file attributes for the
scanned image before scanning takes place.
• If ScanWizard Pro was launched in stand-alone mode, you will be prompted to
specify the file attributes for the scanned image after the Scan or Batch
button is pressed, such as entering the file name, specifying a folder name of
your own, etc. When you have completed the settings, press the Done/Save
button, and the scanner will automatically scan and save your image based on
your settings.
ScanMaker i800 Pro Scanning Guide 19
Page 20
Scanning Damaged Film
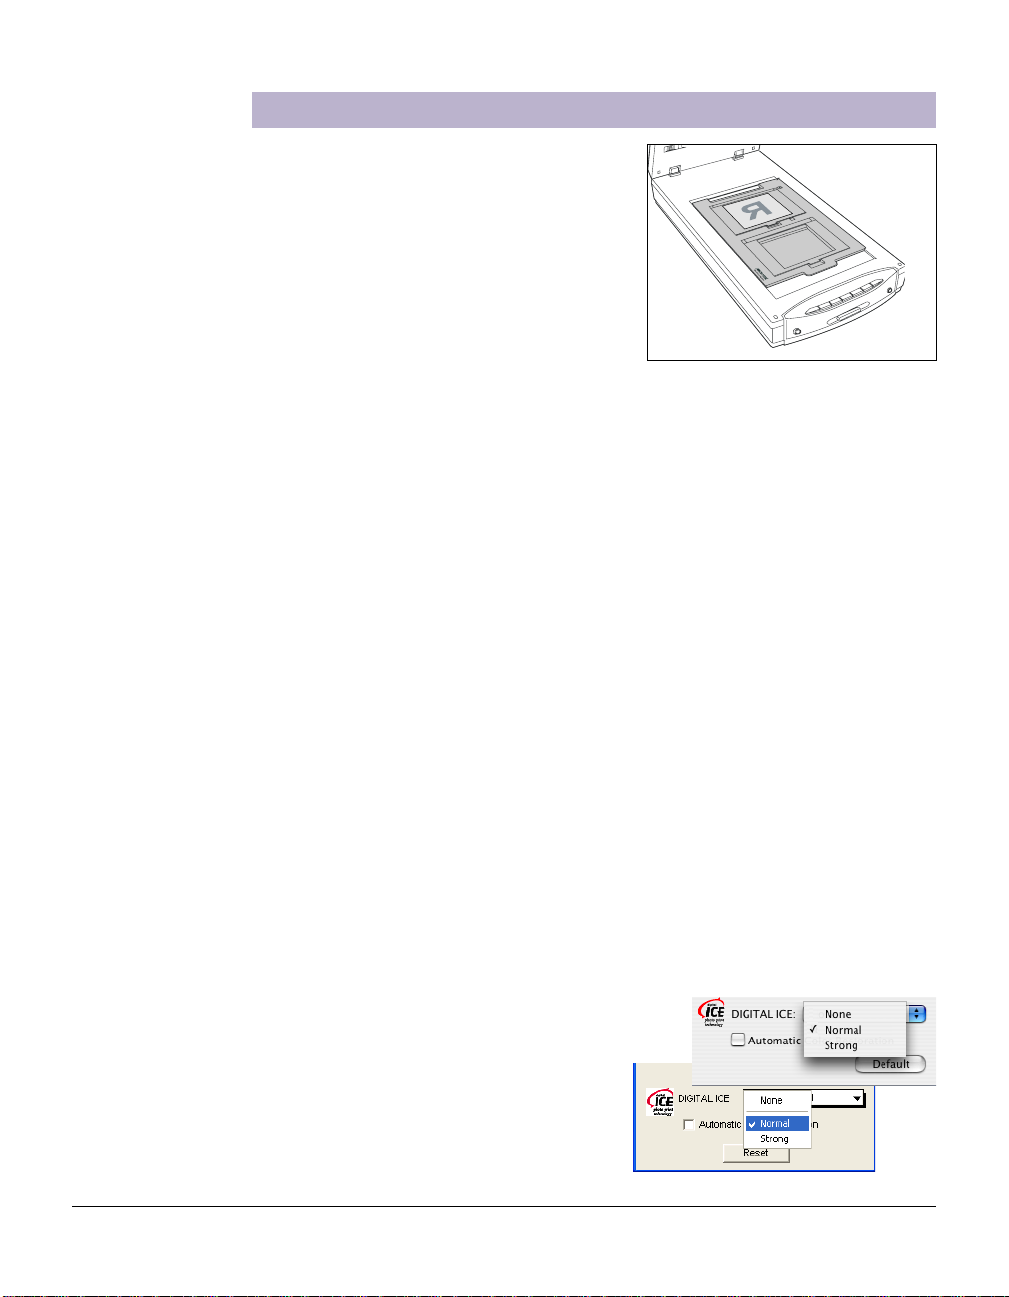
1. Raise the scanner lid, then load the
damaged film that you wish to scan and
place the EZ-Lock Film Holder on the
scanner glass surface.
Gently lower the scanner lid down onto the
scanner glass bed.
Important: Do not use the Black Mat. For
details on how to use the EZ-Lock Film
Holder and how to place film, see the
section “Positioning T ransparent Film”
elsewhere in this document.
2 . Launch ScanWizard Pro.
3 . Go to the Preview window and choose Positive / Positive Film for transparencies
and slides; choose Negative Film / Negative for negatives from the Scan Material
menu, depending on the film type you are using.
4 . Click the Overview button to perform a preliminary scan of your original.
5 . Select the Scan Frame tool from the Toolbar in the Preview window , and choose
the area to be scanned by dragging a rectangle around it. You will see a flashing
frame (marquee) around the selected area.
6 . Click the Prescan button to display a detailed image. A thumbnail of the image
appears as well in the Scan Job Queue window.
7 . Specify your scanning requirements in the Settings window.
a) Select a desired image type.
b) Select a desired resolution. Recommended resolution for DIGITA L ICE is
1200 dpi.
c) Adjust the scan frame settings if necessary.
8. Adjust image quality if necessary, using the
Advanced Image Correction (AIC) tools.
9 . Choose the DIGIT AL ICE option that
works best for you in the Settings
window. Select from Normal or Strong.
In Film mode, DIGIT AL ICE
automatically removes surface defects
from your slides, negatives, and
transparencies.
20 ScanMaker i800 Pro Scanning Guide
Page 21

10. If the colors in your film are faded and need restoring, check the “Automatic Color
Restoration” box in the Settings window . .
11. Click the Scan (or “Batch”) button in the Preview window to start scanning.
• If ScanWizard Pro was launched from an application program, the image is then
delivered to your application, where the image can be saved, printed, or edited.
Note: In Mac OS X, you will be prompted to specify the file attributes for the
scanned image before scanning takes place.
• If ScanWizard Pro was launched in stand-alone mode, you will be prompted to
specify the file attributes for the scanned image after the Scan or Batch
button is pressed, such as entering the file name, specifying a folder name of
your own, etc. When you have completed the settings, press the Done/Save
button, and the scanner will automatically scan and save your image based on
your settings.
Before
After
ScanMaker i800 Pro Scanning Guide 21
Page 22

22 ScanMaker i800 Pro Scanning Guide
 Loading...