

Page 1
Microtek Scanner
Installation Guide
for the ScanMaker® X12USL
This document provides information on how to install your Microtek scanner on a PC or Mac using the scanner's SCSI
interface. For PC SCSI installation, see pages 1 to 5. For Mac SCSI installation, see pages 6 to 8.
Version
for PC (Windows® 95/98/NT4.0)
& Mac (OS 8.1 or later)
SCSI Installation on the PC
1. Unpack scanner
Open your scanner package and check the
components as stated in your packing list. Install the
software first, then the hardware. Before proceeding
any further, check that you have the items listed on
the packing list. If any item is missing, contact
Microtek.
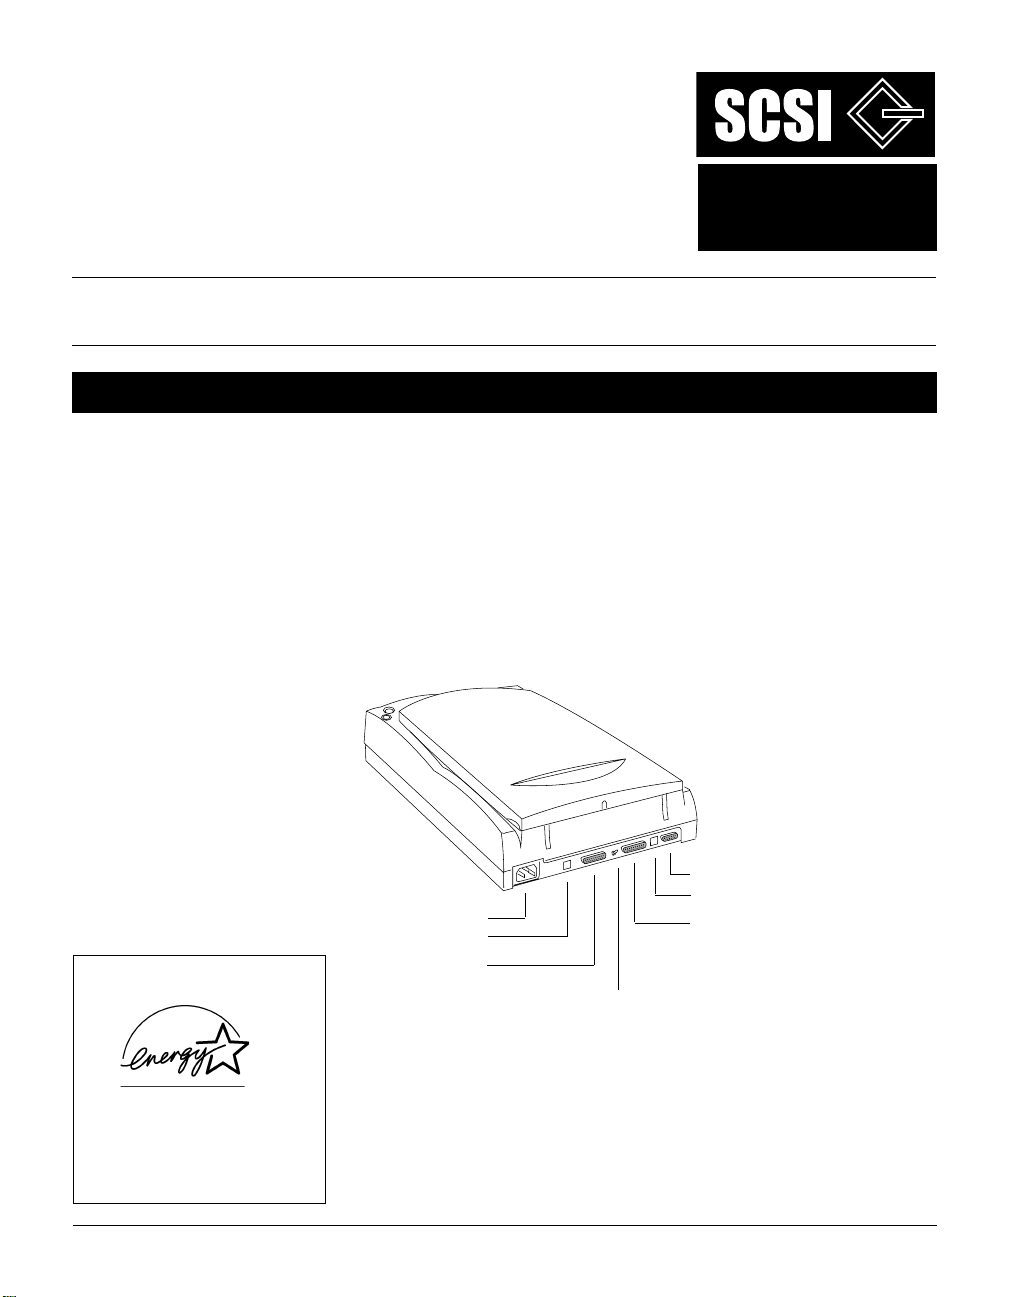
Your Microtek ScanMaker scanner comes with two
built-in interfaces: SCSI and USB. For SCSI
installation, use the scanner’ s SCSI port. See the
graphic below to locate the different ports on the
back of the scanner, including the scanner accessory
port.
Energy Star Notice
As an ENERGY STAR Partner,
Microtek International, Inc. has
determined that this scanner
meets the ENERGY STAR
guidelines for energy efficiency.
Copyright © 1999 Microtek International Inc.
Power Cord
SCSI ID Dial
SCSI Port 2
http://www.microtekusa.com
Accessory Port
USB Port
SCSI Port 1
Terminator Switch
Note: Make sure the SCSI ID number for your scanner,
which is preset to 6, does not conflict with the SCSI IDs of the
other devices on your SCSI chain. If you need to change the
SCSI ID on your scanner, turn the dial and choose a SCSI ID
number from 0 to 5 (do not use 7, 8, or 9).
I49-002681B
MQ0009109
Page 2

English
SCSI Installation on the PC
2. Install software
1. Turn on your computer. If you are using
Deutsch
Français
Italiano
Nederlands
Español
Windows NT 4.0, log in as “Administrator” in
order to install the software.
2. Insert the Microtek CD-ROM into your CDROM drive. The Microtek Software Installer
screen should automatically come up.
Note: If the Microtek Softwar e Installer screen does
not come up automatically , double-click “My
Computer” on your desktop; the CD-ROM icon; then
cdsetup.exe to start the installer program.
3. When the Microtek Software Installer screen
appears, click on each software program in the
order that it appears on the screen to install all
software components.
Click the “Install” button for each
software on the list to install.
In some applications, auxiliary information (such
as the Readme file) may be displayed after that
particular program finishes installing. Simply
click the “X” close box at the upper right corner
of the displayed window to return to the
Microtek Software Installer. Do not restart
your computer until all the software has
been installed.
a) Microtek ScanWizard 5. This is your scanner
controller program for capturing images from
your scanner. Follow the on-scr een instructions
during installation. After ScanWizard 5 finishes
installing, you will be prompted to restart your
computer . Select No to continue installing the
rest of the software.
b) ABBYY FineReader Sprint. This is your OCR
text-scanning software for converting scanned
documents for editing.
TT
rr
ellix Wellix W
ellix W
ellix Wellix W
eb Micreb Micr
eb Micr
eb Micreb Micr
c)
T
r
TT
rr
otek Editionotek Edition
otek Edition. T hi s i s your
otek Editionotek Edition
software to publish and update web sites.
d) Adobe Acrobat Reader. This is your
documentation reader for reading and printing
the manuals on the CD-ROM.
For each software, follow the on-screen
instructions during installation. Default values
are specified at every point during installation;
simply accept these values to continue
installation until you finish.
4. After all the software has been installed, click
EXIT at the bottom left of the Microtek
Software Installer screen.
2
Page 3
SCSI Installation on the PC
English
3. Connect scanner
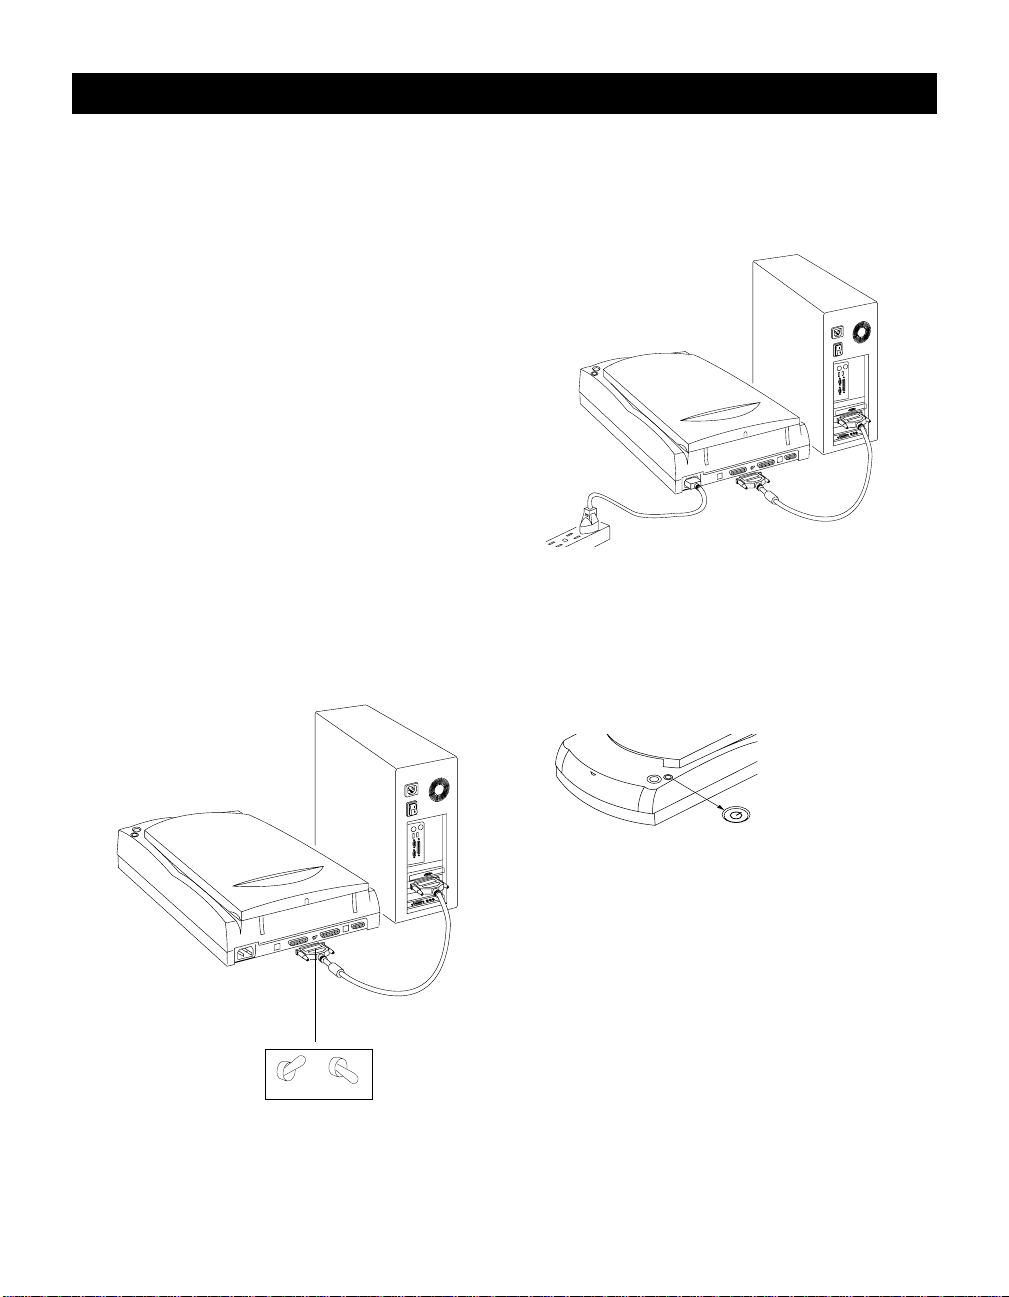
1. Turn off your computer.
Note: Before performing the next step, you must have
an ASPI-compliant SCSI interface card already
installed in your computer and working properly. If
you need help in setting up the ASPI-compliant SCSI
interface card in your computer, please view the
digital file SCSI_card_PC.pdf in the SCSI Car d
Installation Guide folder on your Microtek CDROM.
2. Connect the SCSI cable from one of the
scanner’s SCSI ports to the SCSI interface card
on the back of your computer. Then set the
terminator switch to the “ON” position.
Important: Make sure you connect to the SCSI
card on the back of your computer — not to the
parallel printer port. The SCSI port may be
indicated by this symbol:
3. Plug the power cord into the back of the
scanner, and plug the other end into a wall
outlet or power source.
4. Press the scanner’s power button; this will turn
on the scanner. The gr een light on the front of
the scanner will blink for a few seconds and
then stay on solid.
DeutschFrançais
Italiano
Nederlands
Español
Terminator
Switch
Power button
Press the scanner’s
power button to turn
the scanner on/off.
5. T urn on your computer . The system will find
your scanner automatically.
ON OFF
3
Page 4

English
SCSI Installation on the PC
4. Test your scanner
Note: Steps 1 and 2 are for Windows 98 and Windows 95
only , not for Windows NT 4.0.
Deutsch
1. In Windows, click Start, Settings, and select
Control Panel. Double-click the System icon
in Control Panel, then select Device Manager
Français
Italiano
Nederlands
Español
from the top.
2. Double-click Imaging Device or Microtek
Scanners. V erify that your scanner is listed here.
Click “OK” to close all dialog boxes.
3. In Windows, go to “Start, Programs, Microtek
ScanWizard 5 for Windows”, and select
Scanner T est. When started successfully, the
screen below appears.
Detected
scanner
Detected
Interface
Click the
“Flatbed”
button to
preview
4. Place your document face down on the scanner
glass, and click on the Flatbed button in the
Microtek ScanT est window.
Top of document faces
front of the scanner.
A
5. A preview of your image will be displayed in the
Microtek ScanT est window. Click OK, and exit
Microtek ScanTest; you are now ready to scan.
If you encounter problems with the scan test, see
the digital file SCSI_Troubleshootingpc.pdf in the
Techinfo folder on your Microtek CD-ROM.
4
Page 5

SCSI Installation on the PC
English
5.Scanning an Image
1. Place the image to be scanned on your scanner.
2. Press the scanner’s “Go” button, or double-click
the ScanWizard 5 icon on the desktop to launch
ScanWizard 5.
“Go” button
3. When ScanWizard 5 launches, it automatically
performs a fast preview of the material on your
scan bed and displays it in the preview area.
4. In the preview window, you can resize the
floating dotted line around the image by
dragging on the edge or corner of the scan
frame to determine the final size of the actual
scan.
5. T o make adjustments to the image, use the tool
buttons. T o scan the image, click the Scan to
button. The image is then scanned and saved to
a file. Aside from saving, you may also deliver the
saved image to an image-editing software, an email editor, or a web br owser.
Save the scanned image to a
file, or deliver it to an imageediting program, an e-mail
editor, or a web browser.
Click on this button
to switch to the
Advanced Control
Panel window
Click here to
exit ScanWizard 5
6.Reading the
documentation
1. Insert the Microtek CD-ROM into your CD-
ROM drive.
2. When the Microtek Software Installer comes up
on your screen, click the View Manual button
that corresponds to the manual you wish to
read. This will launch Adobe Acrobat Reader ,
and you can then read or print the manual.
Click the
“View
Manual”
button to
see the
manuals
7.Troubleshooting
If you encounter problems with software or
hardware installation, see the digital file
SCSI_Troubleshootingpc.pdf in the Techinfo folder on
your Microtek CD-ROM.
DeutschFrançais
Italiano
Nederlands
Español
Resize dotted line for size of
the actual scan
Tool
buttons
for
image
settings
5
Page 6

English
SCSI Installation on the Macintosh
1. Unpack scanner
Open your scanner package and check the
components as stated in your packing list. Install the
Deutsch
software first, then the hardware. Before proceeding
any further, check that you have the items listed on
the packing list. If any item is missing, contact
Microtek.
Français
Your Microtek ScanMaker scanner comes with two
built-in interfaces: SCSI and USB. For SCSI
installation, use the scanner’ s SCSI port. See the
graphic below to locate the different ports on the
Italiano
back of the scanner, including the scanner accessory
port.
Nederlands
Español
Accessory Port
Power Cord
SCSI ID Dial
SCSI Port 2
Terminator
Switch
USB Port
SCSI Port 1
2. Install software
1. Turn on your computer.
2. Install the image-editing application that came
with your scanner.
3. Insert the Microtek CD-ROM into your CD-
ROM drive, and double-click the CD-ROM when
it appears on your Macintosh desktop to open
it.
4. Install the software on your Microtek CD-ROM,
including the following:
• ABBYY FineReader Sprint. This is your OCR
text-scanning software for converting
scanned documents for editing.
• Microtek ScanWizard 5. This is your
scanner controller program for capturing
images from your scanner and delivering it to
your image-editing application.
• Adobe Acrobat Reader. This is your
documentation reader for reading and
printing the manuals on the CD-ROM.
To install each software, open the software
program's folder and then click the “Installer”
icon in that program's folder. Follow the onscreen instructions until installation is
completed.
Note: Make sure the SCSI ID number for your scanner,
which is preset to 6, does not conflict with the SCSI IDs of
the other devices on your SCSI chain. If you need to
change the SCSI ID on your scanner, turn the dial and
choose a SCSI ID number from 0 to 5 (do not use 7, 8 or
9).
6
Page 7

SCSI Installation on the Macintosh
English
3. Connect scanner
1. Turn off your computer.
2. Connect one end of the SCSI cable to your
computer, and connect the other end of the
cable to the SCSI port on the scanner. Then set
the terminator switch to the “ON” position.
Note: If your computer is a Power Mac G3/G4, you
must have SCSI card alr eady installed in your
computer and working properly befor e connecting. If
you need help in setting up the SCSI interface card in
your computer, please view the digital file
SCSI_card_MAC.pdf in the SCSI Car d Installation
Guide folder on your Microtek CD-ROM.
3. Plug the power cord into the back of the
scanner, and plug the other end into a wall
outlet or power source.
4. Press the scanner’s power button; this will turn
on the scanner. The gr een light on the fr ont of
the scanner will blink for a few seconds and
then stay on solid.
DeutschFrançais
Italiano
Nederlands
Español
Terminator
Switch
ON OFF
Power button
Press the scanner’s
power button to turn
the scanner on/off.
5. T urn on your computer . The system will find
your scanner automatically.
7
Page 8

English
SCSI Installation on the Macintosh
4.Scanning an image
1. Place the image to be scanned on your scanner.
2. Press the scanner’s “Go” button to launch
Deutsch
ScanWizard 5.
Français
3. When ScanWizard 5 launches, it automatically
performs a fast preview of the material on your
scan bed and displays it in the preview area.
Italiano
4. In the preview window, you can resize the
floating dotted line around the image by
dragging on the edge or corner of the scan
frame to determine the final size of the actual
scan.
Nederlands
5. T o make adjustments to the image, use the tool
buttons. T o scan the image, click the Scan to
button. The image is then scanned and saved to
a file. Aside from saving, you may also deliver the
Español
saved image to an image-editing software, an email editor, or a web br owser.
“Go” button
5.Reading the
documentation
1. Insert the Microtek CD-ROM into your CD-
ROM drive.
2. Launch the Adobe Acrobat Reader program.
From the File menu, choose the Open
command, and open the file for the manual that
you wish to view; manuals have a .pdf extension
to their file name. The manual is then ready to
be viewed or printed.
6.Troubleshooting
If you encounter problems with software or
hardware installation, see the digital file
SCSI_Troubleshooting_MAC.pdf in the Techinfo folder
on your Microtek CD-ROM.
Save the scanned image
to a file, or deliver it to an
Close
button
image-editing program, an
e-mail editor, or a web
browser.
Resize dotted line for size of
the actual scan
Click on this button
to switch to the
Advanced Control
Panel window
Tool
buttons
for
image
settings
8
 Loading...