

Page 1
Microtek MTMA
Installing and Getting Started
This document provides information
on how to connect the Magnetic Transparent Media
Adapter (MTMA) to your scanner and how to scan
transparent materials using the MTMA.
Installation
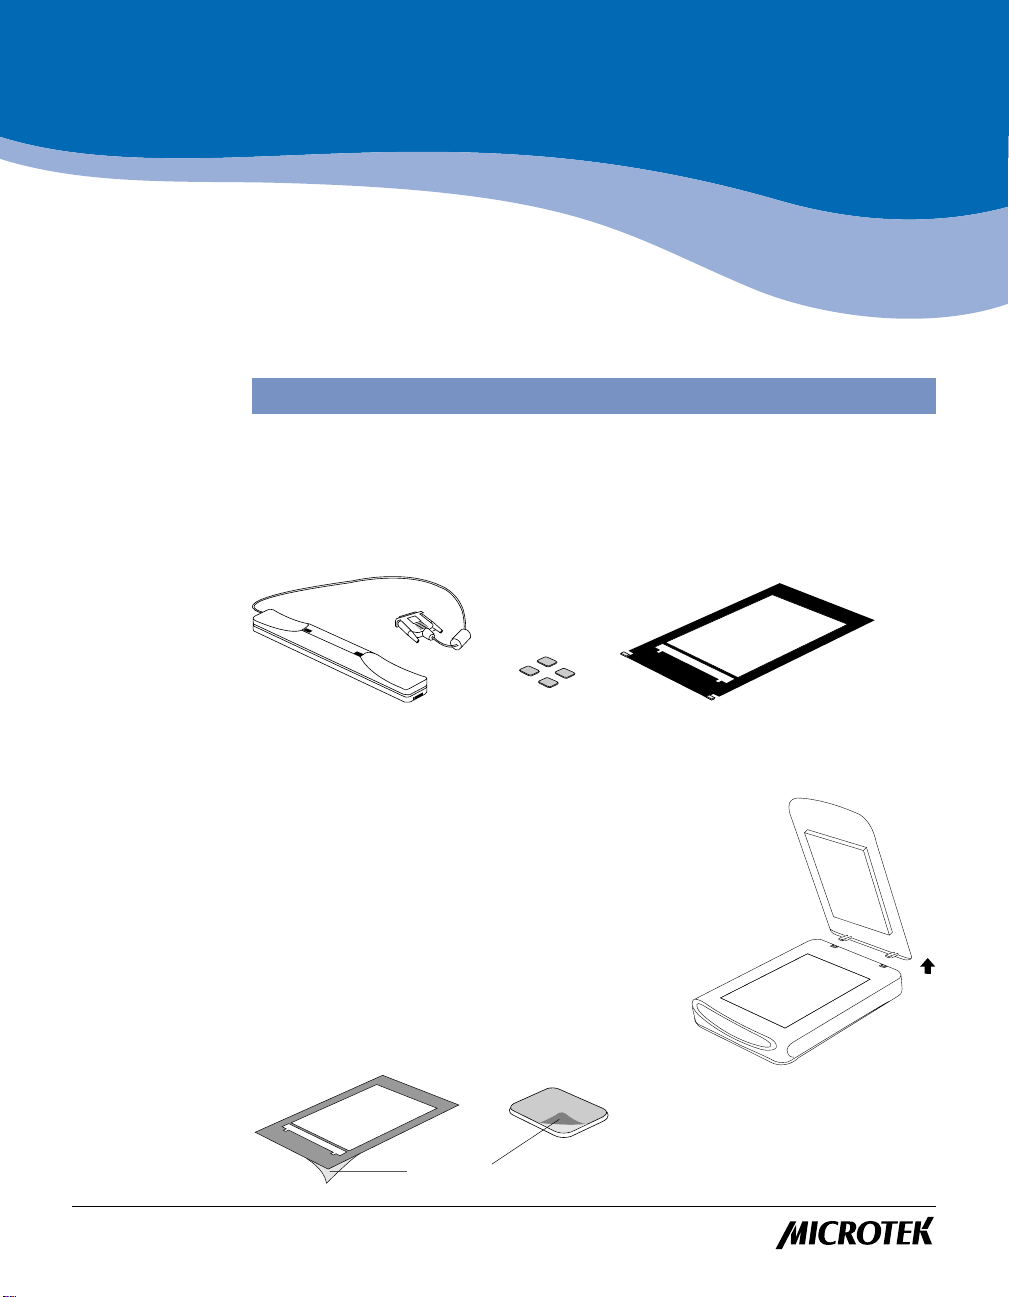
1. Unpack the MTMA
The MTMA is a scanner accessory that is used to scan transparent materials as large
as 7" x 10" with your flatbed scanner. Before proceeding any further, check to see that
all items are in the package. If any item is missing, contact Microtek Customer Service.
Template
4 film
stoppers
MTMA
Note
: Before installing the MTMA, your scanner should be set
up and ready to scan.
2. Power off your scanner, then
computer
3. Remove the scanner document cover
4. Peel off the vinyl film
Peel off the vinyl film that covers the back surface
of the template and the 4 film stoppers.
Vinyl film
Copyright© 2002 Microtek International, Inc. http://www.microtek.com
I49-003474 A, September 2002
Page 2

5. Position the template
Place the template on the scanner glass
surface. The calibration window of the
template should point toward the front
of the scanner.
Calibration
window
6. Press template firmly
on glass surface
Press the template firmly on the scanner
glass bed to make sure it adheres to the
glass surface.
Template should fit snugly
within the scanner glass
area and should not overlap
with the vertical/horizontal
rulers on the scanner.
7. Position the material to be scanned
Place the transparent material to be scanned (face down) on the scanner glass surface
and within the template. Then put the 4 film stoppers on the corners of the film.
Stoppers
Warning: To scan transparent or negative film, the template should always stay on
the scanning bed. If the template is removed or is incorrectly placed, your scanner will
not work properly. The calibration window or the slim rectangular opening is the color
calibration area. Y ou must keep this area clear and free from any obstruction.
Otherwise, the quality of your scanned image may be adversely affected or cause the
scanner to malfunction.
2 Microtek MTMA Installing and Getting Started
Note: Make sure that the anti-skid rubber part of all 4
stoppers are facing toward the glass surface.
The transparent material should not block,
obstruct, or overlap the calibration window
of the template in any way.
Page 3

8. Place the MTMA on the scanning surface
Place the MTMA horizontally on the top of the scanner bed. The MTMA will autoalign itself with the scanner through magnetic attraction. Normally , the MTMA
should be oriented as shown in the illustration below , with the back cliff of the
MTMA sitting on the front edge of the scanner glass.
The
back cliff
MTMA must sit on the
front edge of the scanner
glass.
When you click on the “Scan” button in step 10, the MTMA will move automatically
down the length of the scan bed and scan the image.
Note
you click the Scan button, this may be due to your use of a different “family” of
scanners (e.g., ScanMaker 4600, 4700, X12USL, etc.). In this case, turn the MTMA
180° around, making the front side of the MTMA sit on the front edge of the scanner
glass bed. Then retry by clicking the Scan button as explained in step 10.
of the
: If your MTMA does not move with the orientation shown above and after
The
front
MTMA must sit on the
front edge of the
scanner glass.
side of the
9. Connect the MTMA to your scanner
Plug the MTMA connector into the
15-pin Accessory port on the back of
your scanner.
Microtek MTMA Installing and Getting Started 3
Power
Page 4

10. Scan an Image
1. Power up your scanner and then the computer.
2 . Double-click the ScanWizard 5 icon on the desktop to launch ScanWizard 5.
3 . When ScanWizard 5 launches, it automatically performs a fast preview of the
material on your scan bed and displays it in the preview area.
4 . After launching ScanWizard 5, you may want to change the scan material. T o do
this, click on the Original button, select Film, then Positive Film or Negative Film.
5 . In the preview window, click the Preview button in Standard Mode or the
Overview button in Advanced Mode to preview the film or transparency being
scanned. If you wish to resize the image, drag on the edge or corner of the scan
frame (indicated by the floated dotted lines) to determine the final size of the
actual scan.
6 . To make adjustments to the image, use the tool buttons. To scan the image, click
the Scan to button. The image is then scanned and saved to a file. Aside from
saving, you may also deliver the saved image to an image-editing software, an
e-mail editor, or a web browser .
Standard Mode
Advanced Mode
Click on this button to
switch to the Advanced
Control Panel window
Click here to
exit ScanWizard 5
Scan Material
icon
Specifications
Type: Flatbed Scanner Option
Light Source: Cold Cathode Lamp
Warm-up Time: 3 min.
Scanning Area: Legal-size Scanner: 7" x 10" (177.8 mm x 254 mm)
Dimensions: 11.2" x 1.8" x 1.7" (284.4 mm x 45.7 mm x 43.2 mm)
Net Weight: 0.55 lbs (250g)
Power Consumption : 8 W Max.
Operation Environment
Temperature: Operating: +50° F to +104° F (+10° C to +40° C)
Humidity: Storage: 20% to 85%, non-condensing
A4-size Scanner: 7" x 8" (177.8 mm x 203.2 mm)
4 Microtek MTMA Installing and Getting Started
 Loading...