

Page 1

Energy Star Notice
As an ENERGY STAR Partner,
Microtek International, Inc.
has determined that this
scanner meets the ENERGY
STAR guidelines for energy
efficiency.
Trademarks
Microtek®, ScanMakerTM, and
ScanWizard® are trademarks
or registered trademarks of
Microtek International, Inc.
Macintosh® and Apple® are
registered trademarks of
Apple Computer, Inc.
Windows® is a registered
trademark of Microsoft
Corporation. All other
products or name brands are
trademarks of their
respective holders.
Important
Documents you scan may be
protected under copyright
law. The unauthorized use of
such documents could be a
violation of the rights of the
copyright holder. Microtek
bears no responsibility for
the unauthorized use of
copyrighted materials.
ScanMaker i300
Installing and Getting Started
The ScanMaker i300 with integrated Digital ICETM for Photo Prints is a 48-bit, highspeed color scanner with automatic photo restoration capabilities. It has a Hi-Speed
USB (USB 2.0) interface, 4800 x 2400-dpi optical resolution, and comes with 7 SmartTouch buttons plus a Power button for easy access to scanner functions. Important
features include:
• With the Digital ICE
feature built into the
hardware and software
of the ScanMaker i300,
this scanner can
automatically map,
identify and eliminate
unwanted surface
defects on your photos.
The ScanMaker i300
removes creases,
scratches and other
defects, bringing
photos back to nearoriginal condition.
• USB 2.0 is capable of data transfer rates of up to 480MB/sec. and is backward
compatible with the original USB standard, providing the high/low data transfer
rate via the included Hi-Speed USB cable.
• The Smart-Touch buttons provide you with an intuitive and easy way to access
frequently used scanner functions. For details on how to use the scanner buttons
and how to configure the parameters for each button, refer to the last page of this
document and additionally to the online help of the Microtek Scanner
Configuration (MSC) program.
Cancel/
Setup
Scan
Copy
E-mail
Power
Custom
OCR
Scan-to-Web
Copyright©2003 Microtek International, Inc. http://www.microtek.com
I49-003602 C, October 2003
Page 2

System Requirements
• CD-ROM drive (for installing software)
• Color display with 24-bit color output capability
• 128MB RAM (256MB or more to use Digital ICE for Photo Prints)
PC and compatibles
• Pentium III PC or higher with USB or Hi-Speed USB (USB 2.0) port
• Microsoft Windows 98, 98SE, Me, 2000 or XP
Macintosh
• iMac or Mac G3/G4 with built-in USB port
• Mac OS 9.x or OS X
Specifications
Scanning Modes Color, grayscale, and black-and-white in a single scanning
pass
True 48-bit color (approx. 281 billion colors)
16-bit grayscale (approx. 65,536 shades of gray)
Scanning Area 8.5" x 11.7" (216 mm x 297 mm)
Resolution Optical: 4800 dpi x 2400 dpi
Interpolated: 65,535 dpi
Dimensions (L x W x H) 19" x 11.5" x 2.3" (483 mm x 294 mm x 60 mm)
Weight 5.7 lbs (2.6 kg)
Voltage AC 100V to 120V (U.S. and Canada)
Environment Operating T emperature: 50° F to 104° F (10° C to 40° C )
Power Consumption 15W max. (12V/1.25A)
Power supply Voltage Manufacturer Model No.
(AC/DC adapter) 100V to 120V 1. D VE DSA-0151A-12
*Please note: Hi-Speed USB (USB 2.0) is a new standard which is backward compatible with USB
1.1. To achieve USB 2.0 throughput speeds, a USB 2.0 supported system is required.
2 ScanMaker i300 Installing and Getting Started
AC 200V to 240V (Europe and other parts)
50/60 Hz
Relative Humidity: 20% to 85%
2. HARD HDAD15W101-123
200V to 240V 1. D VE DSA-0151A-12
2. HARD HDAD15W101-124
Page 3
Step 1. Unpacking the Scanner
Open your scanner package and check the components as stated in your packing list.
If any component is missing, call Microtek Customer Service.
• ScanMaker i300 scanner
• Power adapter
• Hi-Speed USB cable (backward compatible with USB 1.1)
• Microtek CD-ROM (ScanWizard 5)
• Documentation: Includes ScanMaker i300 Installing and Getting Started,
ScanWizard 5 Quick Reference Guide, and other inserts
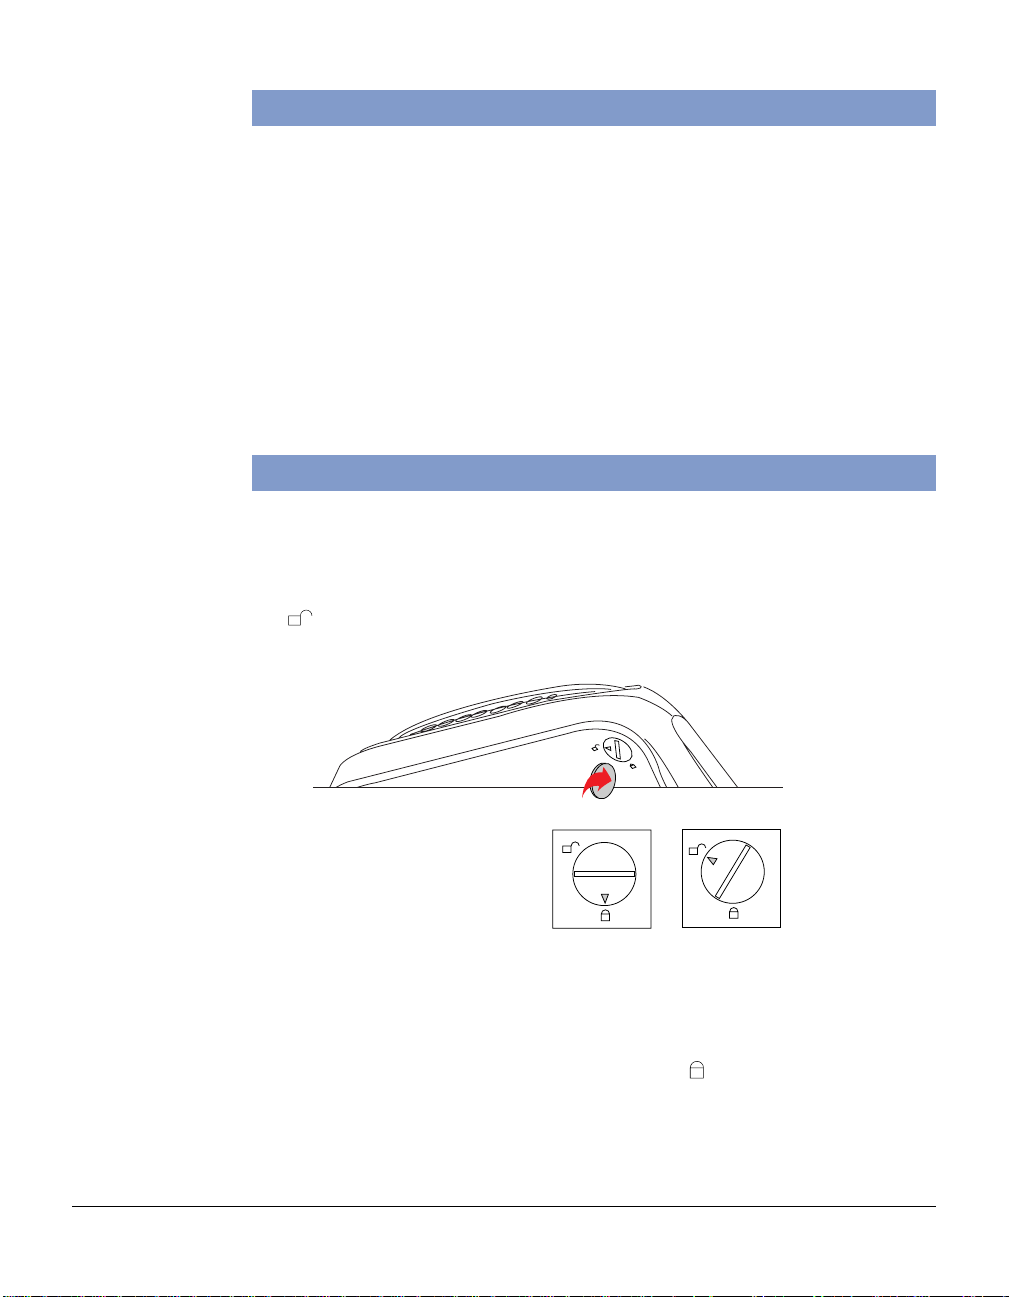
Step 2. Unlocking the Scanner
1. With the scanner power off, turn the scanner on its side to see the locking screw
at the bottom of the scanner.
2 . Using a coin, turn the locking screw clockwise until the arrow mark points to the
“ ” position.
Locked Unlocked
Note: To lock the scanner (for shipping and other reasons), tilt the front-right
corner of the scanner to see the locking screw. Use a coin to turn the locking screw
counterclockwise until the arrow mark points to the “ ” position. Do not turn the
scanner upside down and attempt to lock the scanner this way, as this may not
work.
ScanMaker i300 Installing and Getting Started 3
Page 4

Step 3. Installing the Software
For PC Users
1. Turn on your computer.
2 . Place the Microtek CD-ROM into your CD-ROM drive. The Microtek Software
Installer screen should automatically come up.
Note: If the Microtek Software Installer screen does not come up automatically,
double-click the following in succession: “My Computer”; the CD-ROM icon;
and cdsetup.exe to start the installer program.
3 . Click each software program in the order that it appears on the screen, and follow
the on-screen instructions to install. Do not turn off your computer during
software installation.
4. Click EXIT on the Microtek Software Installer screen when all the software has
been installed.
5 . Install the image-editing software application, which is on a separate CD-ROM
included in your scanner package.
6 . Restart your computer .
For Macintosh Users
1. Turn on your computer.
2 . Install the image-editing software application, which is on a separate CD-ROM
included in your scanner package.
3 . Place the Microtek CD-ROM into your CD-ROM drive and install all the software
components.
4 . Restart your computer .
Note: After rebooting your computer (PC or Macintosh), the Microtek software will
attempt to locate your scanner on the system. Since this is your first install and you
have not yet connected the scanner, simply ignore the message that appears and
proceed to the next step.
Additional Documentation in the CD-ROM
Additional documentation is provided in the Microtek CD-ROM that contains ScanWizard 5, Step-byStep Tutorial, Microtek Scanner Configuration (MSC), troubleshooting, etc. If you experience problems
with hardware or software, you can open the file that you wish to view with Adobe Acrobat Reader or
your browser, then read or print the information.
4 ScanMaker i300 Installing and Getting Started
Page 5

Step 4. Connecting the Scanner to your Computer
Check to see if your computer system has a built-in USB port (original USB standard),
or has been upgraded to include a Hi-Speed USB support port.
If you wish to transfer data at a high data rate, you should install a Hi-Speed USB
card that works properly in your computer. For more details on how to install the HiSpeed USB card in your computer, please refer to the documentation that came with
your Hi-Speed USB card.
1. Plug the power adapter connector into the back of the scanner, and plug the other
end into a wall outlet or other power source.
For PC users
(with a Hi-Speed
USB card installed)
2 . Connect one end of the Hi-Speed USB cable to your computer, and connect the
other end of the cable to the scanner’s USB port.
ScanMaker i300 Installing and Getting Started 5
Page 6

For PC users
(with a built-in
USB port)
For Macintosh users
(with a built-in
USB port)
For Macintosh
users, the USB
port is usually
labeled with the
“ ”
3. Press the scanner's power button to turn on the scanner; the light on the
scanner's front panel will illuminate and stay lit.
Y our system will detect the scanner automatically.
logo.
( )
Power button
6 ScanMaker i300 Installing and Getting Started
Page 7

Step 5. Your First Scan
A. Scanning Regular, Non-Damaged Photos
1. Position the photo to be scanned face
down on the scanner glass surface. Center
the top of the photo along the horizontal
ruler on the scanner.
2 . Double-click the ScanW izard 5 icon ( )
on your desktop to launch the ScanWizard
5 Standard Control Panel.
When ScanWizard 5 launches, it
automatically performs a fast preview of the material on your scanner glass
surface and displays it in the preview area.
3 . In the preview window , you can resize the scan frame (floating dotted line) around
the image by dragging on the edge or corner of the scan frame to determine the
final size of the actual scan.
4. Click the Original button, then select Photo.
5. Click the Scan to button to scan the image.
After the scan, the scanned and processed image can be saved as a file, opened
in an image-editing program, sent to a printer, attached in an e-mail, or uploaded to
a website.
Resize dotted line
scan frame for size
of the actual scan
• Allows you to switch to
the Advanced Control
Panel
• Shows the scanner type,
model, and status
• Contains the built-in
ScanWizard 5 help
• Exits ScanWizard 5
• Minimizes ScanWizard 5
(Windows only)
Selections and options for
image settings
ScanMaker i300 Installing and Getting Started 7
Page 8

Template
Place photo here for
photo restoration
B. Scanning Damaged Photos
When scanning damaged photos with the Digital ICE feature, take note that Digital
ICE is designed to work with continuous-tone reflective originals such as photos; it is
not designed to work with slides, transparencies, negatives, and printed matter.
While Digital ICE fixes damaged photos,
ScanWizard 5 also has the Automatic
Color Restoration feature for bringing
color-faded photos back to life. This
feature is for Windows and Mac OS X
only; see other printed material included in
your scanner package for more details.
1 . Raise the scanner lid, and place the template marked "Digital ICE Photo
Restoration Template" on the scanner bed. Position the damaged photo within
the cut-out area of the template, with the photo placed face down on the scanner
bed. Photo prints up to 6" x 9" in size can be accommodated within the template
area.
Direction of
carriage moving
Note: If the creases lie in the same direction
where the carriage is moving, the creases may
not be detected by the scanner. To fix this
problem, position your photo slightly skewed
(min. 10°, max. 45°), so that none of the
creases are parallel to the direction of the
moving carriage.
2. Double-click the ScanWizard 5 icon ( ) on your desktop to launch the
ScanWizard 5 Standard Control Panel.
3 . Click the Switch icon ( ) on the right corner of the Standard Control Panel to
switch to Advanced Control Panel.
4 . Click the Overview button to perform a preliminary view of the entire image.
When done, you will see an image appear in the preview window.
8 ScanMaker i300 Installing and Getting Started
Page 9

Note: When
executing the
Digital ICE
function, a message
will prompt you to
increase your
virtual memory and
preferred memory
size if your current
memory allocation
is insufficient.
In the preview window, you can resize the scan frame (floating dotted line) around
the image by dragging on the edge or corner of the scan frame to determine the
final size of the actual scan.
5 . Specify your scanning requirements in the Settings window when the ScanWizard
5 Advanced Control Panel appears.
a) Select RGB Colors/RGB Color (48-bit) or Gray Scale/Gray Scale (16-bit) in
the Type pull-down menu as your image output type.
b) Select a desired resolution in the Resolution pull-down menu for your image
output resolution.
c) Adjust the scan frame settings if necessary.
6 . If necessary, adjust image quality using the image corrections tools (White/Black
Points, T one Curve, Brightness/Contrast, Color Correction, Filter, and Descreen).
Important: The Descreen setting in the Settings window should be “None.”
Otherwise the “Enable Digital ICE for Photo Prints” option in the next step will be
dimmed and will not be available for selection.
7 . Click to check the “Enable Digital ICE for Photo Prints” option.
8. Click the Scan to button to scan the image. After the scan, defects such as dust,
scratches, cracks, creases, rips, folds and other artifacts on the original image are
all removed, resulting in an improved image.
Depending on your selection, the scanned and processed image can be saved to a
file, opened in an image-editing program, sent to a printer, attached in an e-mail, or
uploaded to a website.
4
8
Scan Material icon
Before
After
5a
5b
5c
6
7
Switch icon
Switches to
the Standard
Control
Panel
Note: Microtek is always working to enhance ScanWizard 5. For the most recent
version of ScanWizard 5 with the latest enhancements, visit
www .microtekusa.com
and download the most current driver.
ScanMaker i300 Installing and Getting Started 9
Page 10

How the Scanner Buttons Work
The ScanMaker i300 is equipped with 7 Smart-Touch buttons (+1 Power button) for
easy access to frequently used scanner functions. The Smart-Touch buttons are
Cancel/Setup, Scan, Copy, E-mail, OCR, Scan-to-Web, and Custom. T o carry out a
specific task, simply press the corresponding button on the scanner.
Note: The parameters for each Smart-Touch button are defined or set through the
Microtek Scanner Configuration (MSC) utility. For instance, you can use the MSC
to define the number of copies to be printed for your scan every time you hit the
"Copy" button. To launch the MSC, double-click the MSC icon on your desktop.
Please note that you need to exit ScanWizard 5 before launching the MSC utility.
Functions of the Smart-Touch buttons:
Cancel/Setup: Cancels an ongoing scan job, or launches the MSC utility when the
scanner is idle.
Scan: Captures high-resolution images with outstanding quality that can be
automatically saved as files or sent to another application for further processing.
Copy: Scans the image and sends it to your printer, transforming your scanner and
printer into a convenient copy station. Simply specify the number of copies you want.
E-mail: Scans the image and delivers it directly to your e-mail editor.
OCR: Performs OCR (Optical Character Recognition) of a document and converts it to
a fully editable digital file. Saves time from retyping documents into your word
processor.
Scan-to-Web: Scans the image and posts it instantly onto a photo-sharing website.
Custom: Customizes the four most commonly used functions
- Power Saving: Turns the scanner lamp ON or OFF to save power and lamp life.
- Scan: Defines another button to be a second “Scan” button. Use this if you need
a second “Scan” button with different parameters from the first Scan button.
- Fax: Launches a fax driver installed in your computer. (Windows and Mac OS 9.x
only)
- Launch Application: Defines an application to be launched.
How to use the Copy button to print a stack of documents:
1. Place the first page on the scanner glass surface.
2. Press the Copy button to scan an image to a file, then automatically output to
your specified printer.
3. Load the next page and press the Copy button again.
The scanner works in similar fashion to your printer, printing documents one after
another with no interruptions.
10 ScanMaker i300 Installing and Getting Started
 Loading...