

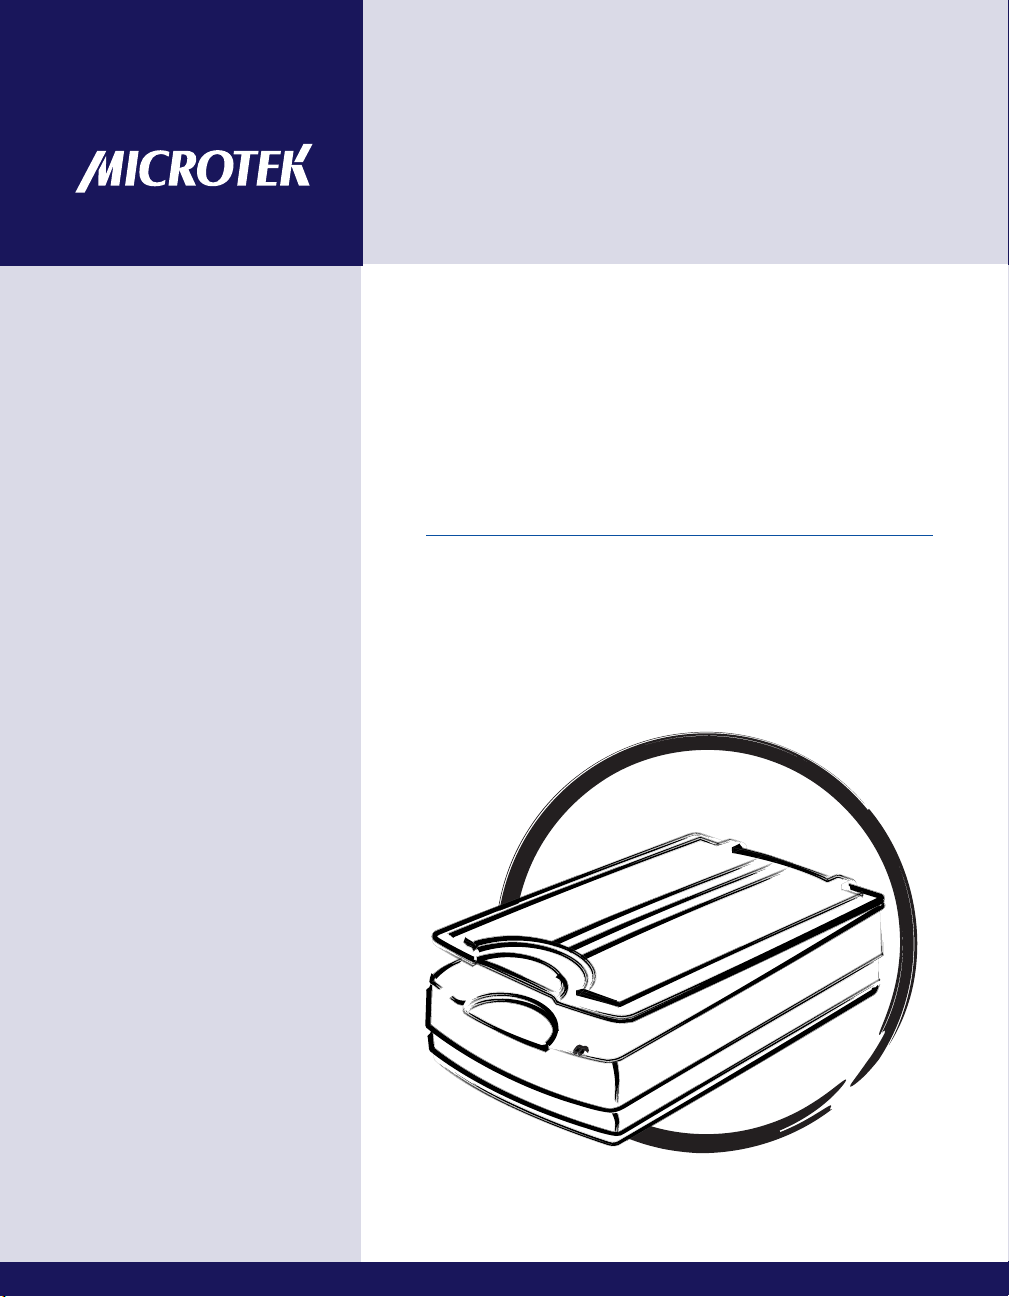
Document Imaging
Scanner
FileScan 1600XL
User's Manual
www.microtek.com

Preface
Copyright
Copyright © 2009, Microtek International, Inc., all rights reserved. This document
may not be reproduced or copied in any way, stored electronically, or translated
into any language, without the permission of Microtek International, Inc.
Trademarks
Microtek, ScanMaker, ArtixScan, ScanWizard and ColoRescue are trademarks or
registered trademarks of Microtek International, Inc. All other trademarks or
registered trademarks are the property of their respective holders. Specifications,
software and hardware bundles are subject to change without notice. Not
responsible for typographical errors.
Disclaimer
The contents of this manual have been checked carefully for accuracy, and every
effort has been made to ensure that there are no errors. However, Microtek makes
no guarantee as to the accuracy of the contents of this document and reserves the
right to make changes to the contents without prior warning.
I49-004381 A
April 2009
Microtek International, Inc.
6, Industry East Road 3, Science Based Industrial Park, Hsinchu, 30077, Taiwan
Tel: 886-3-5772155, Fax: 886-3-5772598, http://www.microtek.com
2 FileScan 1600XL User's Manual

FCC Compliance Statement
This equipment (Model: MRS-600A3) has been tested and found to comply with
the limits for a Class B digital device, pursuant to Part 15 of the FCC rules. These
limits are designed to provide reasonable protection against harmful interference in
a residential installation. This equipment generates, uses and can radiate radio
frequency energy and, if not installed and used in accordance with the
instructions, may cause harmful interference to radio communications. However,
there is no guarantee that interference will not occur in a particular installation. If
this equipment does cause harmful interference to radio or television reception,
which can be determined by turning the equipment off and on, the user is
encouraged to try to correct the interference by one or more of the following
measures:
• Reorient or relocate the receiving antenna.
• Increase the separation between the equipment and receiver.
• Connect the equipment into an outlet on a circuit different from that to which
the receiver is connected.
• Consult the dealer or an experienced radio/TV technician for help.
Note: A shielded Hi-Speed USB interface cable with ferrite core installed on the
scanner connector end must be used with this equipment.
Caution: Changes or modifications not expressly approved by the manufacturer
responsible for compliance could void the user's authority to operate the
equipment.
This device complies with Part 15 of the FCC Rules. Operation is subject to the
following two conditions: (1) This device may not cause harmful interference, and
(2) this device must accept any interference received, including interference that
may cause undesired operation.
FileScan 1600XL User's Manual 3

Safety Precautions
Before using your scanner, read the following safety guides carefully, which detail
the proper operation of the scanner and its accessories to prevent injuries or
damage to users or equipment.
Power Source and AC Power Cord:
• Use a power source only with a power rating specified on the marking label.
• Insert the plug completely into the outlet, as a loose connection may cause
arcing and result in fire.
• Place and route the power supply cord such that it is not likely to be walked
on or pinched by items placed upon or against them, paying particular
attention to the cord near the power plugs, convenience receptacles, and at
the point where it exits from the outlet.
• When the scanner is left unattended and unused for long periods of time,
unplug it from the wall outlet.
Moving and Storing the Scanner:
• Always lock the scanner when shipping or moving the scanner. Quick stops,
excessive force, and uneven surfaces may cause the product to overturn
when moving.
• When locking or unlocking the scanner back, do not turn the scanner upside
down.
• Do not place the scanner on any slippery, slanted, or unstable surface. The
product may slide or fall, causing serious injury to people as well as serious
damage to the product.
• Do not use this scanner near water. Never spill liquid of any kinds on the
product, or it may result in electric shock or other hazards.
• This scanner should be situated away from heat sources such as radiators,
heat registers, stoves, or other products (including amplifiers) that produce
heat.
Service:
• When you need a repair service, unplug the scanner from the power outlet
and consult qualified service personnel.
• When replacement parts are required, use replacement parts that are specified
by the manufacturer or have the same characteristics as the original parts.
4 FileScan 1600XL User's Manual

Table of Contents
Preface ............................................................................................... 2
FCC Compliance Statement ................................................................ 3
Safety Precautions ............................................................................. 4
Knowing about Your Scanner............................................................. 7
Features of the FileScan 1600XL ....................................................... 7
Installation Requirements .................................................................. 8
Taking a Closer Look ........................................................................ 9
Front/Open View ....................................................................... 9
Rear View ............................................................................... 10
Initial Setup ...................................................................................... 11
Following the Four Easy Steps ........................................................ 11
Step 1: Unpacking Package Contents ......................................... 1 1
Step 2: Installing the Software .................................................. 1 2
Step 3: Unlocking the Scanner .................................................. 13
Step 4: Connecting the Scanner ................................................ 1 3
To the Power Adapter ........................................................ 1 3
To the Hi-Speed USB Cable ................................................ 1 4
Positioning Documents ................................................................... 15
Scanning Documents ....................................................................... 16
Using ScanWizard DI ..................................................................... 16
Scanning a Single-sheet Document ............................................ 1 6
Scanning Documents with Mixed Contents ................................. 18
Utilizing Scanned Documents .......................................................... 20
Scanning for Archiving ................................................................... 2 0
Scanning for OCR .......................................................................... 21
Scanning for PDF ........................................................................... 23
Scanning for Copying ..................................................................... 2 4
Care and Cleaning ............................................................................ 25
Cleaning the Scanner Glass Surfaces ................................................ 2 5
Appendix .......................................................................................... 26
Troubleshooting ............................................................................ 2 6
Specifications ................................................................................ 27
FileScan 1600XL User's Manual 5

6 FileScan 1600XL User's Manual

Knowing about Your Scanner
The FileScan 1600XL is a tabloid-size (A3 or B-size) document imaging scanner
with a 12" x 17" scan bed, 800 x 800 dpi resolution, and one Hi-Speed USB
interface.
Features of the FileScan 1600XL
The FileScan 1600XL comes with several important features, including the
following:
• Large 12“ x 17“ scan bed — The tabloid-size scan bed of the FileScan
1600XL lets you easily scan oversized originals, contact sheets, large pieces
of art, and mechanical blueprints.
• Ultra high scanning speed — The FileScan 1600XL increases your
productivity with fast scanning speed, which is less than 3 seconds at 200
dpi for color scans.
• Hi-Speed USB port — Hi-Speed USB is capable of high data transfer rates of
up to 480 Mbit/sec, providing the high data transfer rate via the included HiSpeed USB cable.
• New and Advanced Microtek ScanWizard DI software — All-in-one control
panel offers a host of features and image adjustment controls. Supporting the
TWAIN driver, ScanWizard DI also features full document scanning tools and
on-screen proofing. Its multi-scanning area and preview option allow you to
obtain quick scans in the preview window. It comes out several distinguished
advantages:
– Auto-crop and auto-deskew — The auto-crop function automatically
detects the size of the original image, crops the full scan frame to fit the
image, and removes unwanted black borders. The auto-deskew function
automatically corrects distorted images for proper alignment.
– Color dropout — Red, green and blue colors can be dropped out to allow
for clearer and more accurate forms processing with problematic color
documents.
– Preset Setting — This feature allows you to save the pre-defined scanning
values, and then retrieve them later for scanning same types of materials,
which brings fast and convenient access for users.
– Document Enhancement — This feature brings out and improves the
readability of text in a document that includes other elements such as
color, pictures, or graphs.
FileScan 1600XL User's Manual 7

Installation Requirements
In order to use your FileScan 1600XL, your computer must satisfy the following
system requirements:
• CD-ROM drive (for installing software)
• Color display with 24-bit color output capability
• 256 MB RAM or above
• Pentium IV PC or higher with Hi-Speed USB (USB 2.0) port
• Microsoft Windows XP or Vista
8 FileScan 1600XL User's Manual
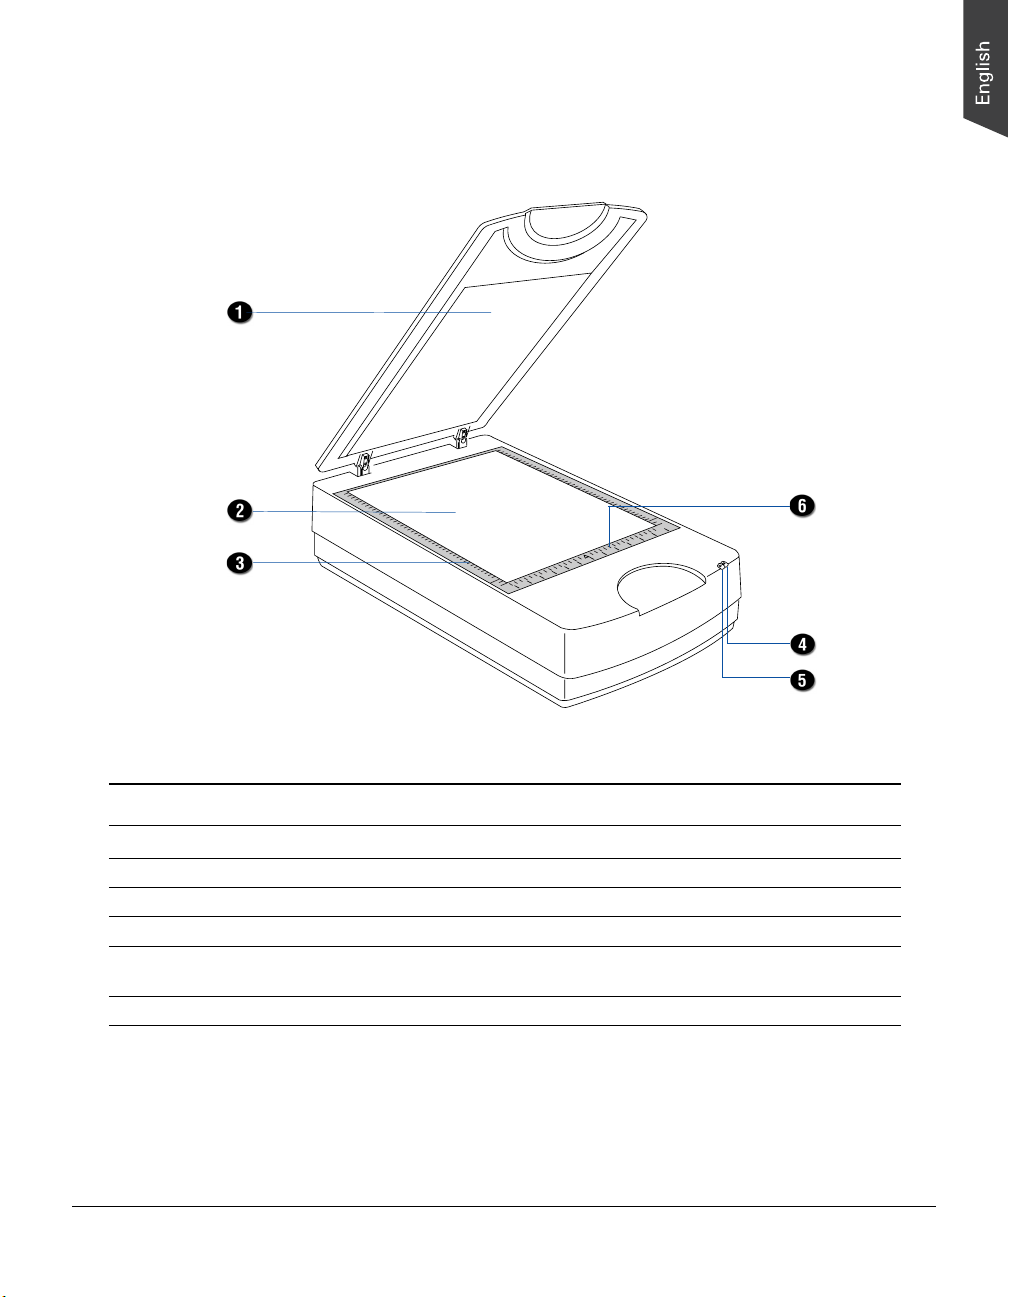
Taking a Closer Look
Front/Open View
3
4
5
6
6
5
4
3
1
0
1
2
No. Names of Parts Functions of Parts
1 Scanner Lid The top cover of the scanner.
2 Glass Surface For flatbed scanning of a single-sheet document.
3 Vertical Ruler Used to measure the length of a scanned document.
4 POWER Indicator (Amber) Indicates the scanner is on or off.
5 READY Indicator (Green) Indicates the status of the scanner. For more details, refer to
the “Troubleshooting” section of this manual.
6 Horizontal Ruler Used to measure the width of a scanned document.
FileScan 1600XL User's Manual 9

Rear View
No. Names of Parts Functions of Parts
1 Hi-Speed USB Port Connects the Hi-Seed USB (USB 2.0) cable to the computer.
2 Power Connector Connects the scanner to the power adapter.
3 Power Switch Turns the scanner on or off.
10 FileScan 1600XL User's Manual

Initial Setup
Following the Four Easy Steps
After unpacking your scanner package, you should see four yellow stickers, which
are marked from Step 1 to Step 4 and are placed on your scanner contents.
Follow the steps in order for a quick and easy installation process.
Step 1: Unpacking Package Contents
After unpacking your scanner package, please check for the major components
listed below.
Hi-Speed USB cable
FileScan 1600XL scanner
Power adapter
Power cord
Software CDs
FileScan 1600XL User's Manual 11

Step 2: Installing the Software
Important: Do not remove the yellow stickers from your scanner until you are
told to do so. You must install all software before connecting your scanner.
Always close any open programs and turn off Anti-virus utilities before installing
software.
1. Turn on your computer.
2. Place the Microtek CD-ROM into your
CD-ROM drive.
3. Follow the on-screen instructions to
install the driver and software.
Note: If the Microtek Software
Installer screen does not come up
automatically, double-click the
following in succession: “My
Computer”; the CD-ROM icon; then
cdsetup.exe to start the installer
program.
4. To install the software on the Microtek CD-ROM, click each software program
in the order that it appears on the screen to install, and follow the on-screen
instructions.
5. Click EXIT on the Microtek Software Installer screen when all the software has
been installed.
6. Restart your computer.
12 FileScan 1600XL User's Manual

Step 3: Unlocking the Scanner
1. Remove the yellow “Step 3” sticker
from your scanner.
2. With the scanner power off, turn the
scanner on its side and locate the
locking screw at the bottom of the
scanner.
3. Using a screwdriver, push and turn
the locking screw counterclockwise
to the unlock position.
When successfully unlocked, the
screw will push out a little,
protruding slightly from the bottom
of the scanner.
Note: To lock the scanner (for shipping and other purposes), follow the steps
below:
1. Turn off the scanner.
2. Turn the scanner back on.
When the indicators on the front of
your scanner stop blinking, use a
screwdriver, and then push and turn
the locking screw clockwise to the
locked position.
Unlocked
When the screw has been tightened,
this indicates that your scanner is
locked.
3. Turn off your scanner.
Locked
Step 4: Connecting the Scanner
To the Power Adapter
1. Remove the yellow “Step 4” sticker from your scanner.
2. Connect the power adapter to the back of the scanner.
3. Plug one end of the power cord into the power adapter, and plug the other
end of the power cord into a wall outlet or other power source.
FileScan 1600XL User's Manual 13

To the Hi-Speed USB Cable
4. Connect one end of the Hi-Speed USB cable to your computer.
5. Connect the other end of the Hi-Speed cable to the scanner’s USB port.
6. Turn the power switch at the back of
your scanner to “On”, and wait for the
on the front panel to stop
lights
blinking and stay on steady.
The system will detect your scanner
automatically.
Note: It takes a while for your scanner to warm up. Please do not turn the scanner
off when it is in the warming-up process; otherwise, it may cause serious damage
to your scanner.
14 FileScan 1600XL User's Manual
Power switch

Positioning Documents
This section shows you how to position a single-sheet document, such as
contact sheets, large pieces of art, and mechanical blueprints, on the flatbed.
1. Raise the scanner lid, and place the document to be scanned face down on
the scanner glass surface.
2. Place the top end of the document towards the front of the scanner, then
lower the scanner lid on the scanner glass surface.
With the document face down
on the scanning glass, align the
document against the Horizontal
Ruler of the scanner.
6
5
4
3
1
0
1
2
3
4
5
6
FileScan 1600XL User's Manual 15

Scanning Documents
Using ScanWizard DI
ScanWizard DI is a scanning software designed by Microtek for document
scanning in color, black and white, and grayscale. Its user-friendly interface
enables you to easily start the scanning process. Refer to the ScanWizard DI
software manual for more details.
The following sections will show you step by step how to use ScanWizard DI.
Scanning a Single-sheet Document
1. Place the single-sheet document to be scanned on the scanner glass surface.
2. Launch ScanWizard DI (either as a stand-alone by clicking the program icon,
or by using the “File-Import” or “Scan” command from an application
program).
3. Specify your scanning requirements in the ScanWizard DI control panel.
a) Select Flatbed as your image input device in the Scan Source drop-down
menu.
b) Select your image output type in the Scan Type drop-down menu.
– Select RGB Color (24 bits) to scan the image in color.
– Select Grayscale (8 bits) to scan the image in grayscale.
– Select Black & White (1 bit) to scan the image in black-and-white.
c) Select a dimension in the Paper Size drop-down menu as your preview
image size.
If the Auto-crop option is selected, the scanner automatically detects the
size of the original image, crops the full scan frame to fit the image, and
removes unwanted black borders after the scan.
d) Select your desired image output resolution in the Resolution
drop-down menu.
4. Click the Preview button to perform a preliminary view of the entire image.
When done, a preview image appears in the preview window.
5. Click the Scan Frame tool button to adjust the size of the scan frame
(enclosed within the red dotted lines and labeled with the tag “Main”). Drag
on the edge or corner of the scan frame to resize the scan frame.
16 FileScan 1600XL User's Manual

6. Select your image type in the Attribute drop-down menu.
– Select Line Art to scan line art images (images in one color or in black-
and-white, such as logos or mechanical blueprints).
– Select Photo to scan color prints.
– Select Text to scan text.
7. If necessary, adjust image quality by using the image correction tools.
8. Click the Scan or Scan To button to start scanning.
If ScanWizard DI is launched as a Plug-In from an image-editing program, the
scanned image is delivered after the scan to your application, where the image
can be saved, printed, or modified further.
If ScanWizard DI is launched as a stand-alone program, the scanned image
can be saved after the scan to a file, opened in an image-editing program, or
sent to a printer.
Scanning
settings
Image type
Image
correction
settings
Scan frame
(enclosed by
dotted lines and
labeled with the
tag “Main”)
Preview image
(the enclosed
frame bordered
in red)
Preview
window
FileScan 1600XL User's Manual 17

Scanning Documents with Mixed Contents
Many documents contain mixed content with both text and pictures on the same
page. You can use a function named “Multiple Scan Frames” to scan different
types of documents at the same time.
1. Place the single-sheet color print to be scanned on the scanner glass surface.
2. Launch ScanWizard DI (either as a stand-alone by clicking the program icon,
or by using the “File-Import” or “Scan” command from an application
program).
3. Follow the procedures (steps 3a through 3d) for “Scanning a Single-sheet
Document” to specify your scanning requirements in the ScanWizard DI
control panel.
a) Select your image input device in the Scan Source drop-down menu.
b) Select RGB Color (24 bits) in the Scan Type drop-down menu as your
image output type.
c) Select a dimension in the Paper Size drop-down menu as your preview
image size.
d) Select your desired image output resolution in the Resolution drop-down
menu.
4. Click the Preview button to perform a preliminary view of the entire image.
When done, a preview image appears in the preview window.
5. Click the Scan Frame tool button to adjust the size of the scan frame
(enclosed within the dotted lines and labeled with the tag “Main”). Drag on
the edge or corner to resize the scan frame.
6. Select Photo in the Attribute drop-down menu as your image type for the
main scan frame.
7. If necessary, adjust image quality by using the image correction tools.
8. Specify the first subframe.
a) Click the Create Subframe tool button. Move the mouse pointer to the
text area, then drag to create a rectangle and enclose the text area.
b) Select Text in the Attribute drop-down menu as your image type for the
selected scan frame.
c) If necessary, adjust image quality by using the image correction tools.
9. Specify the second subframe.
a) Click the Create Subframe tool button. Move the mouse pointer to the
drawing picture area, then drag to create a rectangle and enclose the
picture area.
18 FileScan 1600XL User's Manual

Scanning settings
b) Select Line Art in the Attribute drop-down menu as your image type for
the selected scan frame.
c) If necessary, adjust image quality by using the image correction tools.
10. Click the Scan or Scan To button to start scanning.
If ScanWizard DI is launched as a plug-In from an image-editing program, the
scanned image is delivered after the scan to your application, where the image
can be saved, printed, or modified further.
If ScanWizard DI is launched as a stand-alone program, the scanned image
can be saved after the scan to a file, opened in an image-editing program, or
sent to a printer.
Create Subframe tool*
Scan frame
(enclosed by dotted
lines and labeled
with the tag “Main”)
Image type
Image correction
settings
*Create Subframe tool
The Create Subframe tool lets you create a new scan frame within the enclosed scan frame that is labeled
with the tag “Main”. When a new scan frame is generated, the enclosed scan frame is selected in red
dotted lines. The newly added subframe is automatically labeled in series (with tag “1”, “2”, etc.).
FileScan 1600XL User's Manual 19
Preview image (the
enclosed frame
bordered in red)
Second subframe
First subframe

Utilizing Scanned Documents
Depending on your needs, you may save your scanned documents into the
following several ways:
Scanning for Archiving
The archiving function allows the scanner to scan documents for recording
purposes. For instance, an image “record” can be kept of multiple-page legal
documents or of other important documents, such as birth certificates and tax
records.
1. Place the document to be scanned on the scanner glass surface.
2. Launch ScanWizard DI in stand-alone mode by clicking the program icon on
the desktop.
3. Follow the procedures (steps 3 through 7) for “Scanning a Single-sheet
Document” to specify your scanning requirements.
4. Click the Scan To button to open the “Scan To: Save As” dialog box.
In the “Scan To: Save As” dialog box, specify the following settings:
a) Key in your preferred file name in the “File prefix” edit box, or use the
default “Image” as a root file name.
b) Select your required export
file format. Save the file as
TIF, PDF, or DCX, which
enables the “Save multiple
images as a single file”
option in the next step.
c) Check the “Save multiple
images as a single file”
option to store all the
scanned images as a single
file if desired.
5. Click the Save button to start
the scanning.
If the “Save multiple images as a
single file” option is checked,
when the scanning is finished,
ScanWizard DI will prompt you
a window to ask if you want to
place the next page. Click the
Continue button to scan or click
the Close button to save
multiple images as a single file.
20 FileScan 1600XL User's Manual

Scanning for OCR
The OCR (Optical Character Recognition) function allows the scanner to convert a
scanned document into text that can be edited from any word processing
application.
1. Place the document to be scanned on the scanner glass surface.
2. Launch ScanWizard DI in stand-alone mode by clicking the program icon on
the desktop.
3. Follow the procedures (steps 3 through 7) for “Scanning a Single-sheet
Document” to specify your scanning requirements.
a) In step 3d, the recommended resolution is 300 dpi or above for OCR.
b) In step 6, from the Attribute options menu, choose Line Art as your
image type to obtain best OCR results. When Black & White is your
chosen mode in the Scan Type options, Line Art should be the selected
image type.
4. Click the Scan To button and hold down the mouse until the options menu
appears, then select OCR to open the “OCR” dialog box.
In the “OCR: Save As” dialog box, specify the following settings:
a) Key in your preferred file
name in the “File prefix”
edit box, or use the default
“Document” as a root file
name.
b) Select your required export
file format. Save the files as
RTF and TXT, which
enables the “Save multiple
pages as a single file”
option in the next step.
c) Check the “Save multiple
pages as a single file”
option to store all the
scanned images as a single
file if desired.
d) Select your preferred
language from the “OCR Language” options. The available options are
English, German, French, Italian, Spanish, and Chinese.
e) Check the “Send document to application after saving” option, then
choose your word processing application from the options.
FileScan 1600XL User's Manual 21

5. Click the Save button to start the scanning.
If the “Save multiple images as a single file” option is checked, when the
scanning is finished, ScanWizard DI will prompt you a window to ask if you
want to place the next page. Click the Continue button to scan or click the
Close button to save multiple images as a single file.
The saved file can now be opened from your chosen application and is ready
to be edited.
22 FileScan 1600XL User's Manual

Scanning for PDF
The scanner can easily convert any paper document into an image and saves it as
an Adobe Portable Document Format (PDF) file for viewing with the Adobe
application software. It also offers variable compression levels for full controls
over file sizes and image quality.
1. Place the document to be scanned on the scanner glass surface.
2. Launch ScanWizard DI in stand-alone mode by clicking the program icon on
the desktop.
3. Follow the procedures (steps 3 through 7) for “Scanning a Single-sheet
Document” to specify your scanning requirements.
4. Click the Scan To button to open the “Scan To: Save As” dialog box.
In the “Scan To: Save As” dialog box, specify the following settings:
a) Key in your preferred file
name in the “File name” edit
box, or use the default
“Image” as a root file name.
b) Select “Portable Document
Format” as your file-saving
format from the “Save as
type” drop-down menu.
c) Check the “Save multiple
images as a single file”
option to store all the
scanned images as a single
file if desired.
d) Check the “Send image to
application after saving”
option, then choose your
Adobe application software
from the options.
5. Click the Save button to start the
scanning.
The File Option button is active when the
“RGB Color” or “Grayscale” is set as your
image output type and the PDF is chosen.
With this function, you can control the image
quality compression as your desired.
If the “Save multiple images as a single file” option is checked, when the
scanning is finished, ScanWizard DI will prompt you a window to ask if you
want to place the next page. Click the Continue button to scan or click the
Close button to save multiple images as a single file.
The saved file can now be opened from your chosen application and is ready
to be viewed.
Note: The scanner also allows you to scan a text document and convert it to an
editable PDF file for editing with the Adobe Acrobat writer. Follow the procedures
for “Scanning for OCR”, in step 4b, select the “Portable Document Format” as your
file-saving format.
FileScan 1600XL User's Manual 23

Scanning for Copying
The copy function allows the scanner to work like a copier using your printer, with
documents printed successively without interruption. This lets you transform
your scanner and printer into a convenient copy station.
1. Place the document to be scanned on the scanner glass surface.
2. Launch ScanWizard DI in stand-alone mode by clicking the program icon on
the desktop.
3. Follow the procedures (steps 3 through 7) for “Scanning a Single-sheet
Document” to specify your scanning requirements.
4. Click the Scan To button and hold down the mouse until the Options menu
appears, then select Copy to open the “Copy” dialog box.
In the “Copy” dialog box, specify the following settings:
a) Select a default printer
or any alternative
printer from the
options.
b) Specify the number of
copies to be made.
c) Select a scale ratio for
increasing or reducing
the size of the scanned
image.
If the “Fit to Page”
option is checked, the
“Scaling” setting is
disabled.
5. Click the OK button.
The document is scanned; when finished, the scanned images are sent to the
specified printer.
24 FileScan 1600XL User's Manual

Care and Cleaning
To ensure optimal performance from the FileScan 1600XL, it is important to clean
the glass surface of the scanner on a regular basis.
Cleaning the Scanner Glass Surface
1. Lift the scanner lid.
2. Then use a soft, non-abrasive and lint-free cloth to gently wipe the glass
surface area on the scanner flatbed.
6
5
4
3
1
0
1
2
3
4
5
6
6
5
4
3
1
0
1
2
3
4
5
6
Note: Do not use any detergents, synthetic cleaning solutions, cleaning naphtha,
or other solvents to clean the glass surface directly.
FileScan 1600XL User's Manual 25

Troubleshooting
The green LED on the front panel indicates the status of the scanner. The amber
LED beside it stands for power and should always stay on steady when the
scanner is on.
All On - Ready to scan
Green Flashing -
Warming up or scanning
All Off - Scanner is off
READY Indicator
(Green)
POWER Indicator
(Amber)
First, make sure that you have followed Steps 1 to 4 as described in the “Initial
Setup” section of this document (unpack, install, unlock, connect). Then if your
problem is listed here, try the suggested solution.
1. No light comes on when the scanner is turned on.
Make sure your scanner is connected to your computer and plugged into a
power source.
2. The Add/Remove Hardware Wizard appears on your screen.
Click the “Cancel” button and close the ScanWizard DI Control Panel.
Disconnect the Hi-Speed USB cable from the back of your computer, and refer
to the installation instructions in this document.
3. When trying to scan, an error message appears on your screen that reads,
“Can’t Find Scanners”.
Make sure your scanner is unlocked (see Step 3 in the “Initial Setup” section).
Make sure your scanner is connected to your computer and plugged in to a
power source (see Step 4 in the “Initial Setup” section).
Uninstall and reinstall the ScanWizard DI software.
4. After clicking “Scan,” a blank screen appears.
Make sure your scanner is unlocked (see Step 3 in the “Initial Setup” section).
Uninstall and reinstall the ScanWizard DI software.
5. Having trouble scanning the documents.
Make sure you place the document to be scanned properly on the scanner
glass surface.
Uninstall and reinstall the ScanWizard DI software.
26 FileScan 1600XL User's Manual

Specifications
Type Desktop color flatbed scanner
Image sensor CCD (Charge-Coupled Device)
Lamp Source Cold Cathode Tube
Scanning modes Color, grayscale, and black-and-white in a single
scanning pass
Input:
48-bit color input (Approx. 281 trillion colors)
16-bit grayscale (Approx. 65,536 shades of gray)
Output:
24-bit color (Approx. 16 million colors)
8-bit grayscale (Approx. 256 shades of gray)
Resolution Optical: 600 dpi x 600 dpi
Interpolated: 800 dpi x 800 dpi
Scanning area 12" x 17" (305 x 431.8 mm)
Interface Hi-Speed USB (USB 2.0)
Dimensions (L x W x H) 24.7" x 14.8" x 5.1"
(627.4 mm x 375.9 mm x 129.5 mm)
Weight 20.9 lbs. (9.5 kg)
Voltage AC 100V to 240V, 47-63 Hz, 1.5A Max (Input)
15V DC, 2.5A (Output)
Power consumption 38 W (Max)
Power supply
Environment Operating temperature: 50° to 105°F (10° to 40°C)
Important
Specifications, software bundles, and accessories are subject to change without
notice. Not responsible for typographic errors.
Voltage Manufacturer Model No.
100V to 240V HAIDER HDAD38W101
FAIRWAY VE50-150A
Relative humidity: 20% to 85%
FileScan 1600XL User's Manual 27
 Loading...