

Page 1
Page 2

© 2010 by Microtek International, Inc. All rights reserved.
Microtek™ and DocWizard™ are trademarks of Microtek International, Inc. Windows® is a
registered trademark of Microsoft Corporation. All other products or name brands are
trademarks of their respective holders.
Documents that you scan may be protected under copyright law. The unauthorized use of such
documents could be a violation of the rights of the copyright holder. Microtek bears no
responsibility for the unauthorized use of copyrighted materials.
To obtain optimal results from the Microtek scanning software and user's manual, you should be
familiar with such Windows concepts as pointing, clicking, dragging, and selecting from menus
and dialog boxed. If these things are new to you, refer to your Microsoft Windows User's Guide.
I49-004585 A
September 2010
Microtek International, Inc.
6, Industry East Road 3, Science Based Industrial Park, Hsinchu, 30077, Taiwan
Tel: 886-3-5772155, Fax: 886-3-5772598, http://www.microtek.com
ii
Page 3

Contents
Introduction ................................................................................................................ 1
System Requirements.................................................................................................. 2
Launching DocWizard ................................................................................................ 2
Exiting DocWizard....................................................................................................... 2
DocWizard Control Panel............................................................................................ 2
Getting Started ............................................................................................................ 4
A. Assign Y our Scan Software............................................................................. 4
B. Create a New Batch ......................................................................................... 4
C. Open an Existing Batch ................................................................................... 6
D. Output a Batch ................................................................................................ 7
Batch Menu ................................................................................................................ 8
New...................................................................................................................... 8
General Batch ............................................................................................... 8
By Count ...................................................................................................... 9
By Blank Pages........................................................................................... 10
By Barcode ................................................................................................. 11
By OCR....................................................................................................... 13
Open Batch ........................................................................................................ 16
Output Batch ..................................................................................................... 16
Open TIFF ......................................................................................................... 16
Save TIFF .......................................................................................................... 16
Exit ..................................................................................................................... 16
Scan Menu................................................................................................................ 17
Start Scan/Activate Scan Software .................................................................... 17
Scan Settings ..................................................................................................... 17
Select Scan Software.......................................................................................... 21
Display Scan Software Interface ........................................................................ 21
View Menu ................................................................................................................ 21
Image V iewer Display ......................................................................................... 21
First Page ........................................................................................................... 21
Previous Page .................................................................................................... 21
Next Page ........................................................................................................... 21
Last Page ........................................................................................................... 21
Show/Hide T oolbar ............................................................................................ 21
Show/Hide Status Bar........................................................................................ 2 2
Show/Hide Batch Explorer ................................................................................. 22
iii
Page 4

Show/Hide Information T ab............................................................................... 22
Customize .......................................................................................................... 22
Image Menu .............................................................................................................. 24
Replace a Selected Image................................................................................... 24
By a Scanned Image ................................................................................... 24
By an Image From Files .............................................................................. 25
Insert an Image .................................................................................................. 25
Insert a Scanned Image Before the Selected Image .................................... 2 5
Insert a Scanned Image After the Selected Image....................................... 26
Insert an Image From Files Before the Selected Image ............................... 26
Insert an Image From Files After the Selected Image.................................. 27
Delete................................................................................................................. 28
Rearrange Order................................................................................................. 28
Rotate ................................................................................................................ 29
90/180/270 ................................................................................................... 29
Angle.......................................................................................................... 29
Flip Horizontal ............................................................................................ 29
Flip V ertical ................................................................................................. 29
Crop ................................................................................................................... 30
Undo Crop ......................................................................................................... 3 0
Remove Black Borders ....................................................................................... 30
T ext Orientation ................................................................................................. 31
Merge/Split ........................................................................................................ 31
Split Horizontal ........................................................................................... 31
Spit V ertical................................................................................................. 31
Merge Horizontal ........................................................................................ 31
Merge Vertical............................................................................................. 32
Remove Punch Hole .......................................................................................... 3 2
Apply OCR to All Pages .................................................................................... 32
Apply OCR to Selected Page ............................................................................. 32
Blank Pages Menu .................................................................................................... 33
Examine .............................................................................................................. 33
Delete................................................................................................................. 33
Settings.............................................................................................................. 33
The Group Menu ...................................................................................................... 3 4
Reset Group ....................................................................................................... 34
General Group/By Count/By Blank Pages/By Barcode/By OCR ................ 34
Delete Group ...................................................................................................... 34
Merge Group...................................................................................................... 35
iv
Page 5

Move Files to Different Group ........................................................................... 3 6
The Book Menu ........................................................................................................ 38
Split Index .......................................................................................................... 38
Convert to Word ................................................................................................ 38
Convert to PDF .................................................................................................. 38
The Help Menu ......................................................................................................... 3 9
Toolbar ...................................................................................................................... 39
New tool ............................................................................................................ 39
Open Batch tool................................................................................................. 39
Output Batch tool .............................................................................................. 39
Start Scan/Activate Scan Software .................................................................... 39
Replace a Selected Image................................................................................... 39
Insert an Image .................................................................................................. 39
Preset Setting Menu .......................................................................................... 39
Scan Setting....................................................................................................... 39
Delete tool ......................................................................................................... 3 9
Order tool........................................................................................................... 40
Crop tool ............................................................................................................ 4 0
Undo Crop tool .................................................................................................. 40
Rotate 90 degree right tool................................................................................. 40
Examine All Blank Images tool ........................................................................... 40
Delete All Blank Images tool .............................................................................. 40
Blank Page Setup tool........................................................................................ 4 0
View tool ............................................................................................................ 40
Top Page tool ..................................................................................................... 40
Remove Black Borders tool................................................................................ 40
Examined by T ext Orientation tool ..................................................................... 40
Remove Punch Hole tool ................................................................................... 40
Merge V ertically tool.......................................................................................... 40
Merge Horizontally tool..................................................................................... 40
Split V ertically tool ............................................................................................. 40
Split Horizontally tool ........................................................................................ 40
Split a Book tool ................................................................................................ 4 0
Convert to Word tool......................................................................................... 41
Convert to PDF tool........................................................................................... 4 1
Information tool ................................................................................................. 41
v
Page 6

vi
Page 7

Introduction
Microtek DocWizard is an easy-to-install and easy-to-use production scanning
application for digitizing documents from scanners. DocWizard is ideal for imaging,
forms processing and workflow applications, and as a standalone application.
Batches can be easily exported to many popular applications. DocWizard allows you
to fully utilize your Microtek scanner capabilities for maximum productivity .
• All functions can be performed simply using DocWizard, no special hardware
acceleration is required.
• Allows you to batch the scanned documents into several groups based on their
attributes of nature, offering an effective shortcut to manage stacks of
documents in order.
• Multi-image display (1, 2, 4 and 8 images can be displayed at one time) lets you
screen scanned documents efficiently.
• Easy-to-use icon tools provide fast access to scan, insert, delete and move
scanned documents, providing instant and intuitive document management.
• By one simple click, you may scan one image in color and black-and-white
simultaneously. The color one is ideal for further use of image processing and the
monotone one is convenient for data saving.
• Blank Page tool lets you sort, examine and delete blank pages fast and esitly,
ideal for batch scanning and managing a stack of documents.
• Preset Settings allows you to save the predefined scanning values, and then
retrieve them later for scanning same types of materials, which brings fast and
convenient access for users.
• Text Orientation enables every scanned documents present in a readable
direction. No more fuzzy editing software is needed.
• Remove Black Borders and Remove Punch Hole keep your scanned documents in
neat and look professional.
• Barcode reading for automatic indexing.
• Regional OCR for automatic indexing.
1
Page 8

System Requirements
• Windows 2000, XP or V ista
• 512 MB RAM required; 1024 MB or more suggested for better performance
• Free hard disk space as required by the size of your scanned images and for
additional working files
• CD-ROM drive (internal or external)
• “Thousands of colors” display or better
• Microtek scanners that support DocWizard
Launching DocWizard
Double-click the DocWizard icon on the Windows desktop, or choose Start,
Programs, Microtek DocWizar d for Windows, then DocWizard.
Exiting DocWizard
Click the Exit button “X” located at the top right corner of the DocWizard control
panel or choose Batch then Eixt in the Menu bar of the Control Panel.
DocWizard Control Panel
The DocWizard Control Panel appears after you launch DocW izard. To adjust the
size of the control panel, simply drag the bottom right corner of the DocWizard
control panel. From the control panel, you can specify scanning requirements by
selecting the appropriate image settings and adjustments from this control panel.
2
Page 9
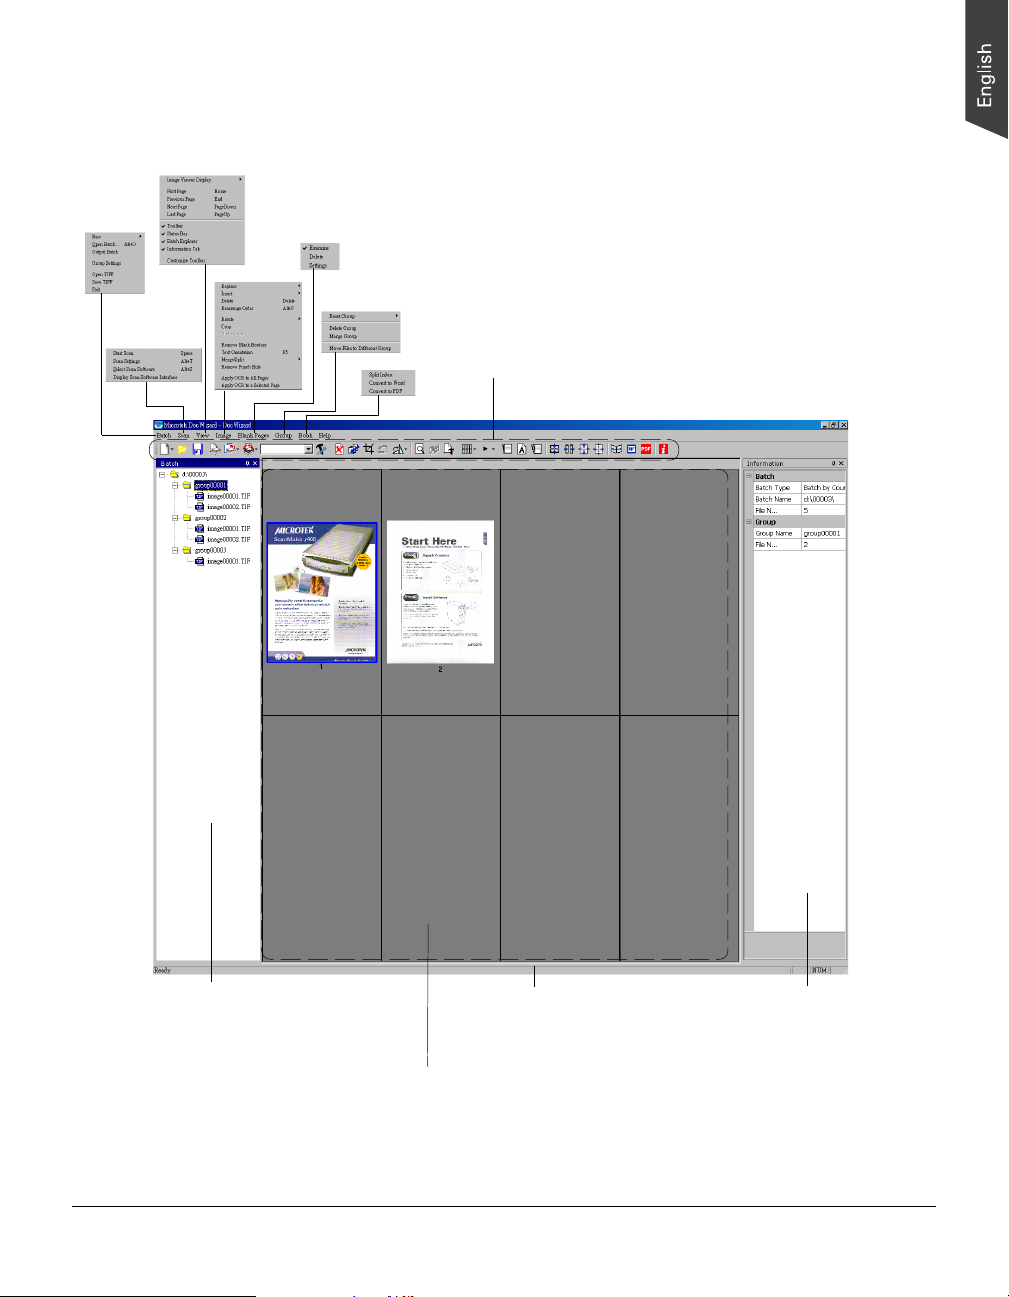
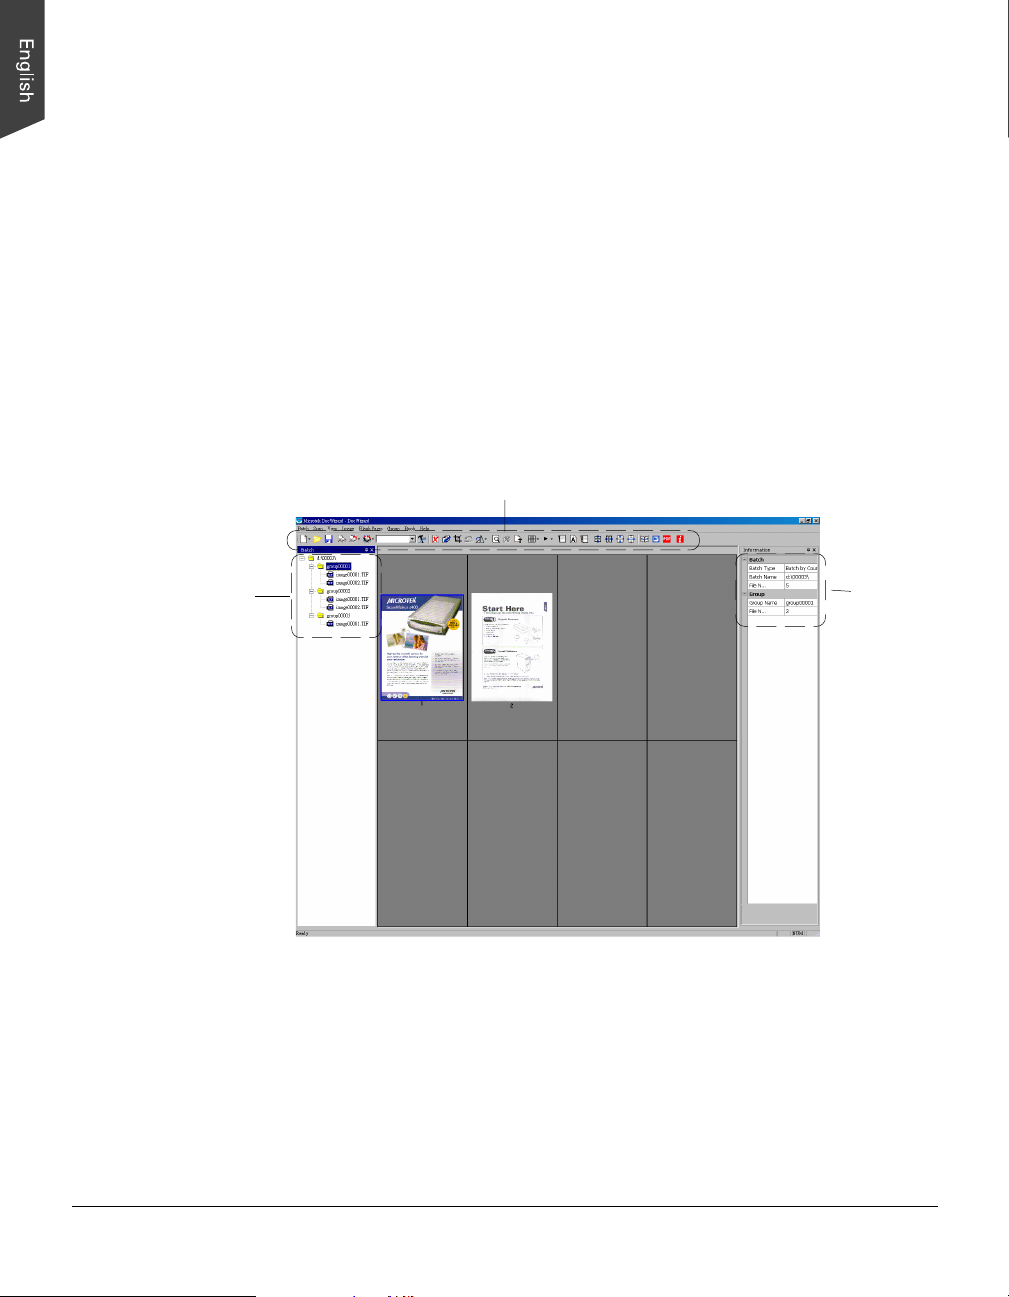
DocWizard Control Panel Interface
Toolbar
Batch Explorer Window - lists all the
group folders and image files in the
batch.
Image Viewer Window- displays the
images in a batch. It can show 1, 2,
4, or 8 at a time.
Status Bar
3
Information Tab - provides detailed
statistics about the batch, group
folders, and images.
Page 10
Getting Started
A. Assign Y our Scan Software
When you activate the DocWizard for the first time to use, you need to select
preferred scanning software which supports the scanner you are using in order to
input images into your batch files from the scanner. Unless you like to assign other
scanning software to cooperate with different scanners, you may bypass these steps
when you launch the software later.
1. Launch DocWizard (either as a stand-alone by clicking on the program icon, or
by using the File-Import or Scan command from an application program).
2. Select Scan from the Menu Bar to extend the sub menu of it and then choose
Select Scan Software.
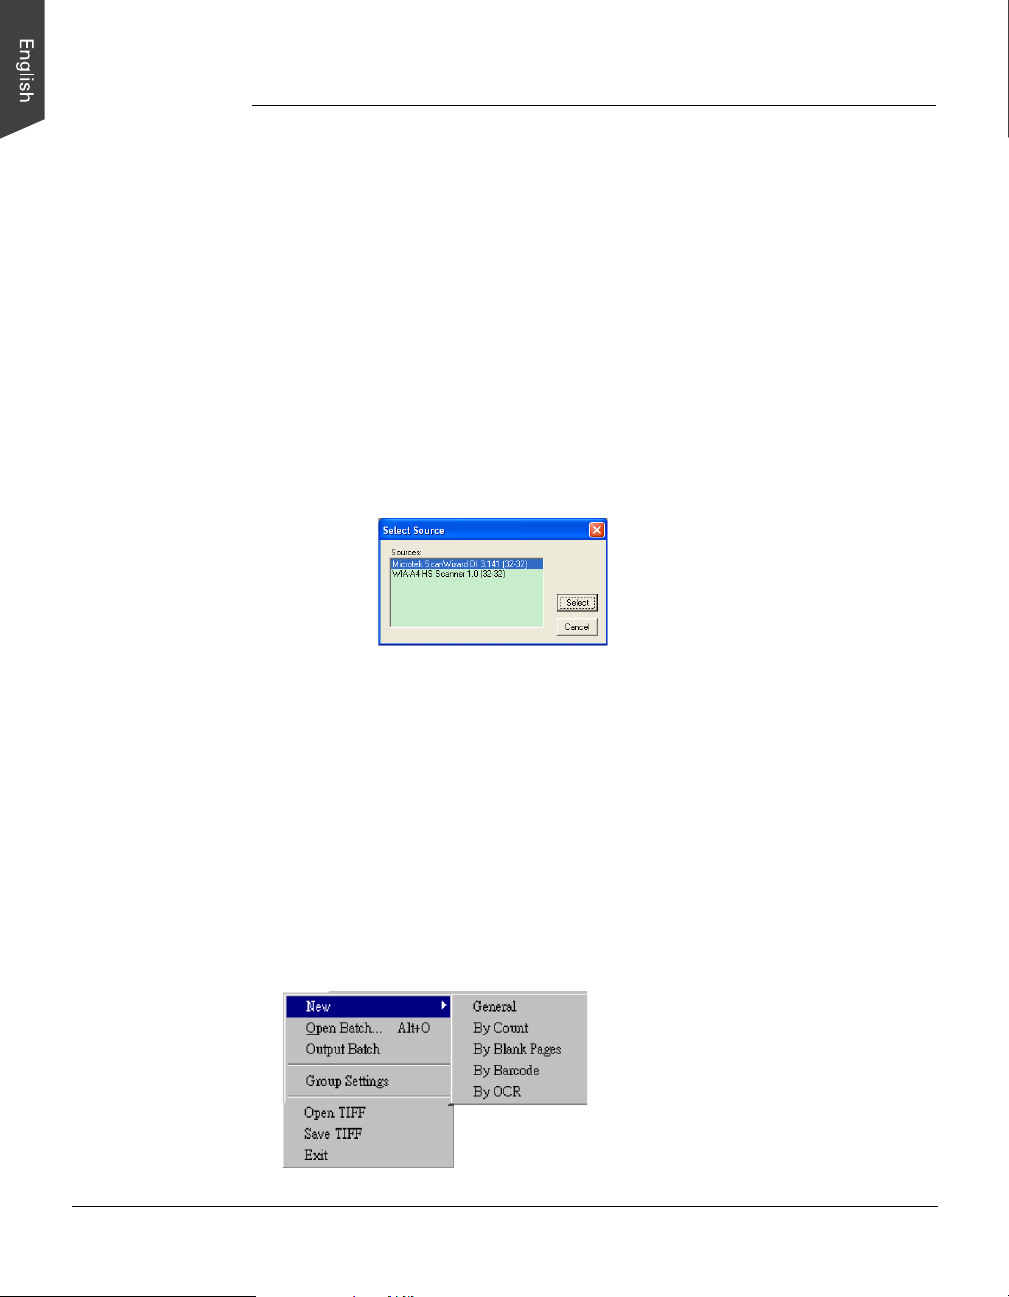
3 . A pop-up window appears on the screen immediately. Numbers of available scan
software are listed inside the window. Select the software you prefer and then
click the OK button.
Take note that the selected software will become the default scan software to
activate your scanner. Make sure if it supports the scanner you are using before
choosing it as the default scan software for the DocWizard.
B. Create a New Batch
When you want to scan images from scanners or import files from document folders,
you need to create a new batch first in order to manipulate these files later.
1. Select Batch from the Menu Bar to extend the sub-menu of it and then choose
New.
DocWizard allows you to create batches by dif ferent categories of file groups.
These categories include General, Count, Blank Pages, Barcode and OCR.
4
Page 11
• General: Select it as your batch category if you do not want differentiate
scanned or imported images into several groups.
• Count: Select it as your batch category if you want to differentiate scanned
images into several groups which are sorted by numbers of scanned pages.
• Blank Pages: Select it as your batch category if you want to differentiate
scanned images into several groups which are sorted by pixel value of
scanned images.
• Barcode: Select it as your batch category if you want to differentiate scanned
images into several groups which are sorted by barcode value of scanned
images.
• OCR: Select it as your batch category if you want to differentiate scanned or
imported images into several groups which are sorted by selected OCR
characters.
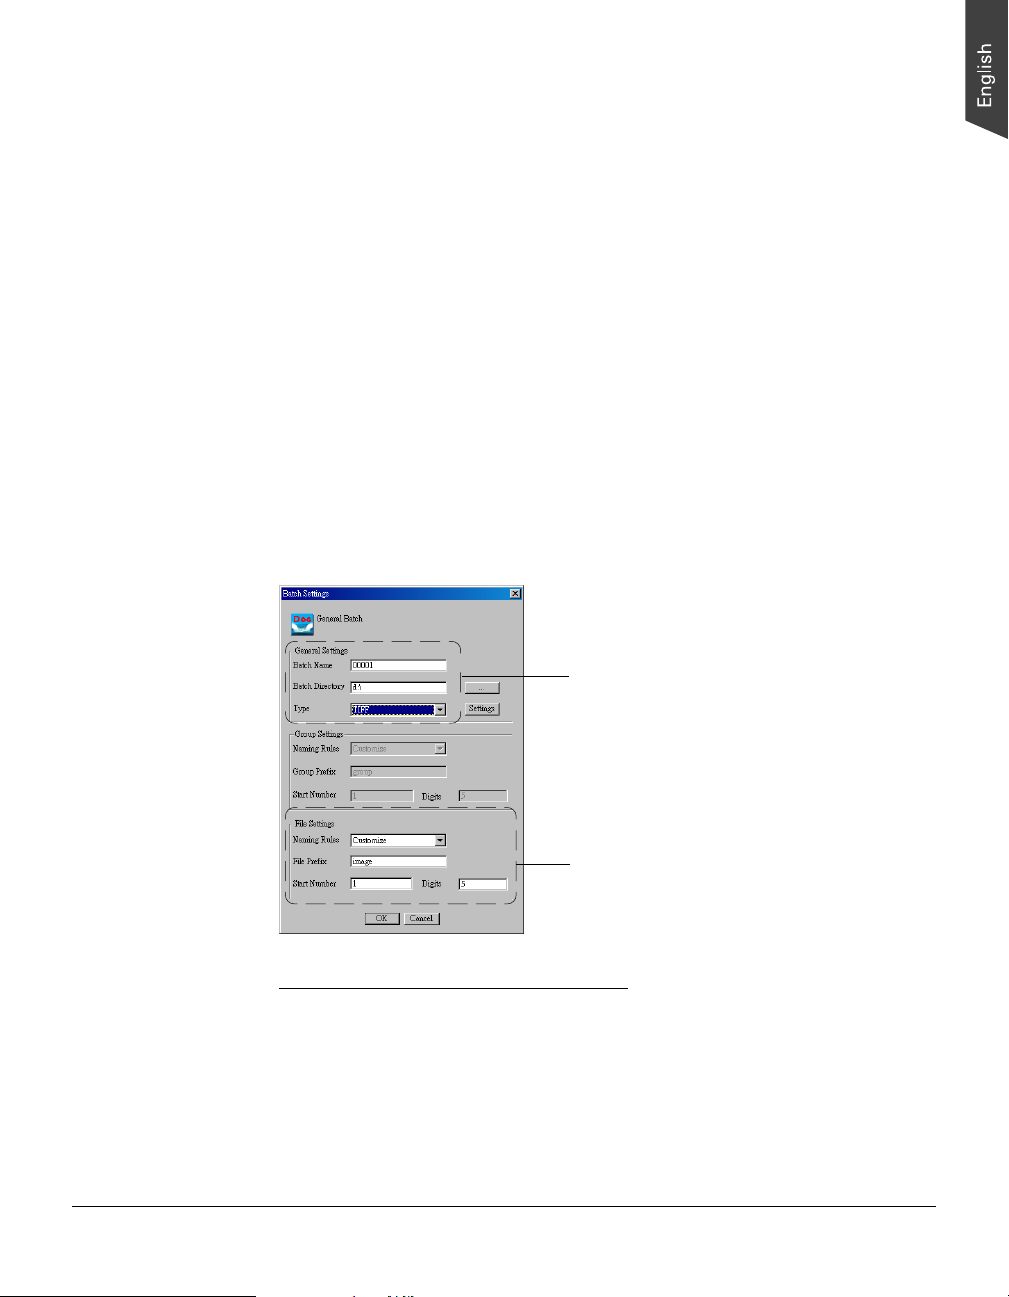
2. Ater selecting a specific batch category, a setup widow appears on the screen.
Follow the steps below to set up the options for a General Batch. Refer to the
later chapter for the detail descriptions about how to set up options for other
batch categories.
Settings for a batch folder
Settings for a file saved in the batch folder
General Setting is used for the batch folder:
A. Enter a name for a batch folder in the Batch Name column.
B. Assign the desired file saving directory in the Batch Directory column. The
default directory is where the DocWizard software is installed.
C . Select a file format for the saved file in the Type column. The selectable file
formats include TIFF , BMP, JPEG and PDF .
5
Page 12
File Setting is used for the files in the batch folder:
A. Select a naming rule for each file in the Naming Rule column. “Customize” is
the default.
B . Enter a root file name in the File Prefix column. “Image” is the default.
C. Enter a starting number to be appended to the file name in the Start Number
column. “1” is the default.
D . Enter a number of digits to be appended to the file name in the Digits column.
“5” is the default digit length.
3 . Click the OK button after done. A batch with the name you assigned will appear
in the Batch Explorer window .
C. Open an Existing Batch
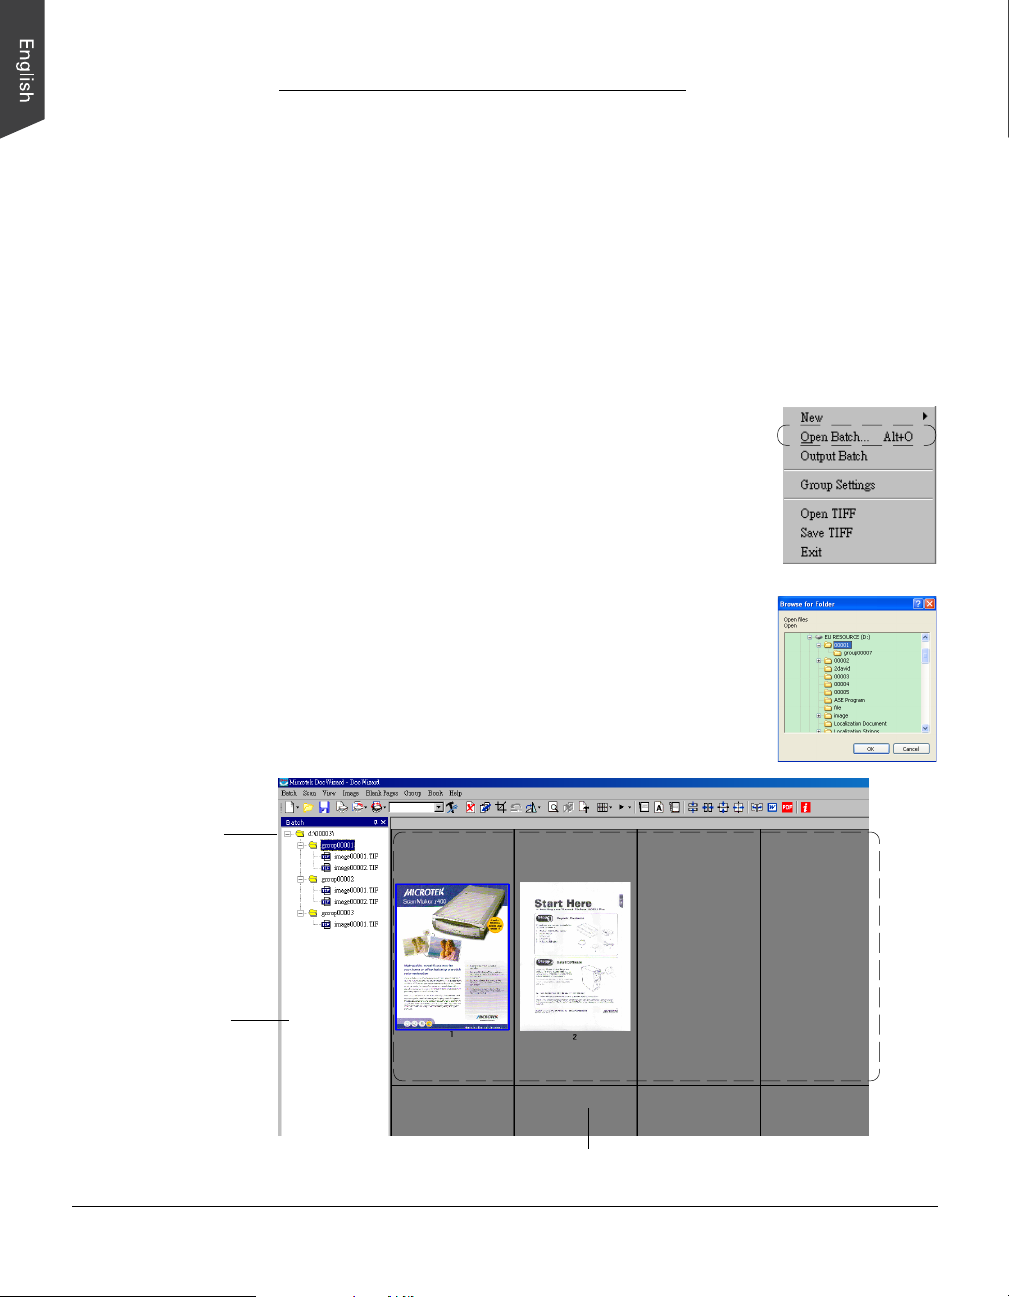
T o open an existing batch, select Batch from the Menu Bar
to extend the sub-menu of it and then choose Open Batch.
A pop-up window named “Open” appears on the
screen. Select the batch you want and click the Open
button. The batch you selected will be displayed in
the Image V iewer W indow and the Batch Explorer
Window. You can now work in this batch.
The selected batch
Batch Explorer
Window
Image Viewer Window
6
Page 13

D. Output a Batch
When all of your editing changes for the files in a batch are complete, you are ready
to output your batch.
To output the batch, select Batch from the Menu Bar to
extend the sub-menu of it and then choose Output Batch.
A pop-up windows appears to show where the
output batch is saved. The default saving
directory is where your DocWizard software is
installed. If necessary, assign another saving
directory the batch. Click the OK button after
done.
Immediately, a warning message window
appears on the screen to remind you that once
a batch is output, it cannot be opened again in
the DocWizard. Click the OK button to
terminate the batch outputting process.
7
Page 14
Batch Menu
New
This command lets you create a batch of documents based on different sorting
categories. These categories include General, Count, Blank Pages, Barode and OCR.
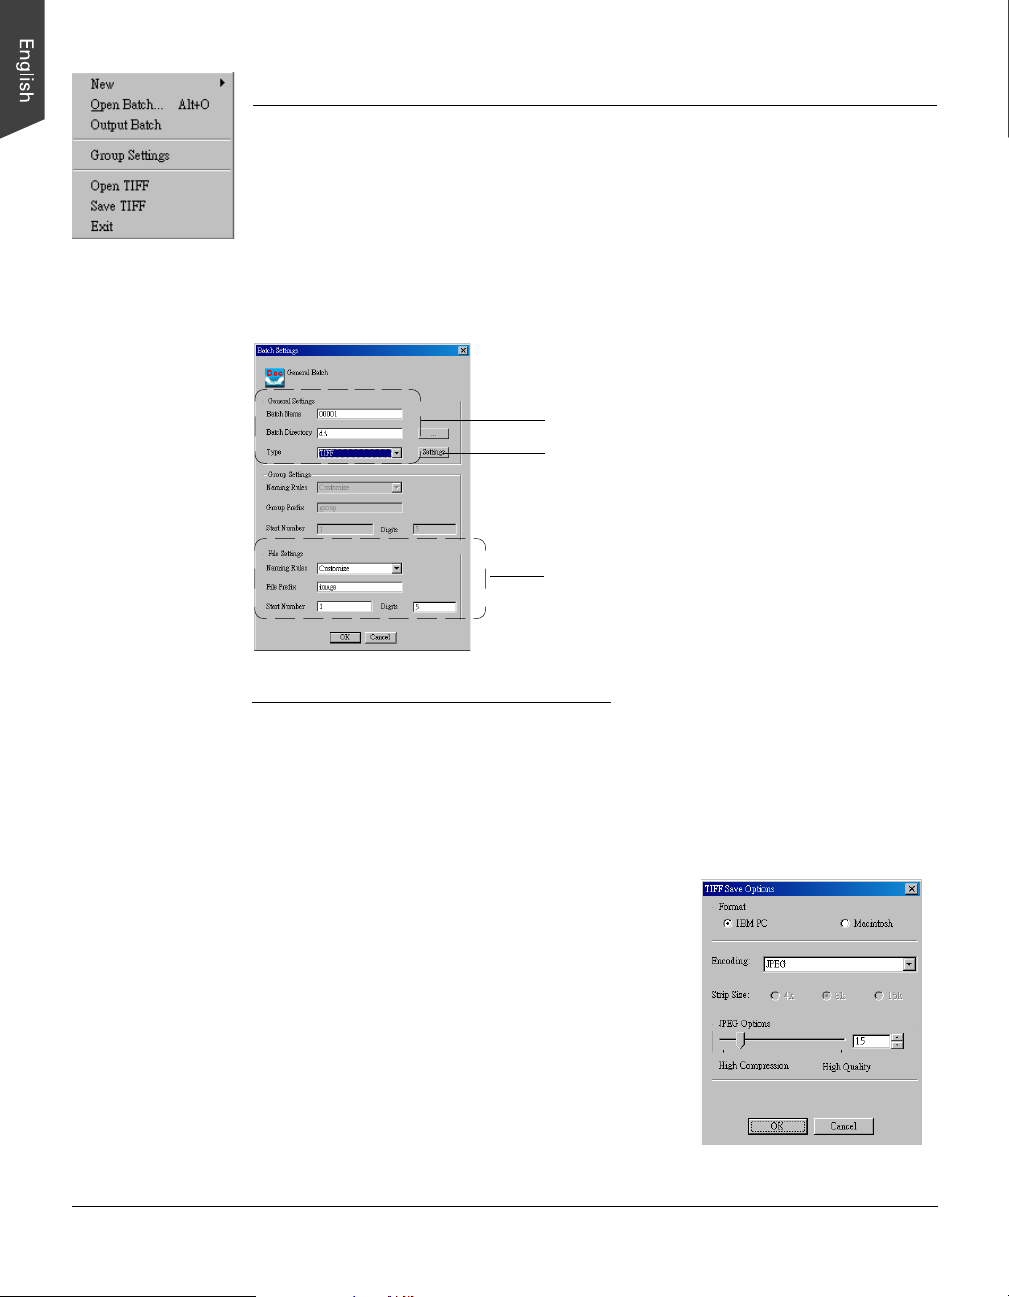
General Batch
Let you save scanned documents or imported documents from file folders into one
batch folder. All documents are saved under the same group.
Settings for a batch folder
Settings Button
Settings for a file saved in the batch folder
General Settings is used for the batch folder:
A. Enter a name for a batch folder in the Batch Name column.
B. Assign the desired file saving directory in the Batch Directory column. The
default directory is where the DocWizard software is installed.
C . Select a file format for the saved file in the Type column. The selectable file
formats include TIFF , BMP, JPEG and PDF .
Settings Button: This button is active only
when the file format is PDF , TIF , or JPG;
otherwise it will not appear.
When “TIF” is selected in the “Scan To: Save
As” dialog box and then you click the File
Option button, the “TIF Save Options” window
will appear.
• Format: Two options are provided for
saving the TIF file. The options are IBM
PC and Macintosh; default is IBM PC.
8
Page 15
• Encoding: Four options are provided for file compression. If “None” is
selected, image quality compression will not be available for adjustment.
The default is “None”.
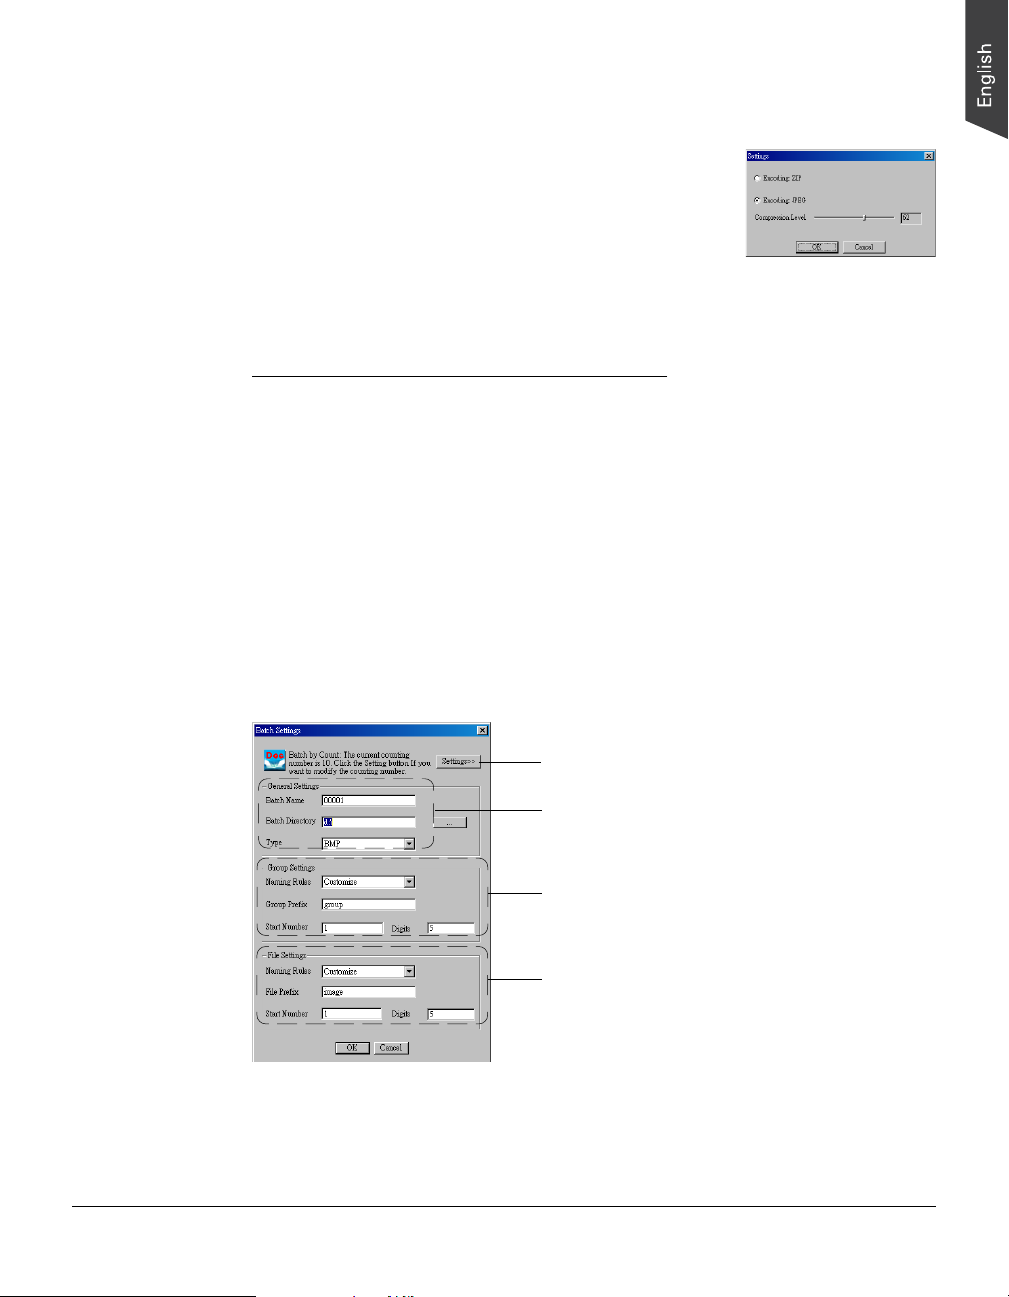
When “PDF” is selected in the Type column
and then you click the Settings button, the
“PDF Save Options” dialog box will appear.
• Encoding: The encoding options
include ZIP and JPEG. If ZIP is
selected, image quality compression will not be available for
adjustment.
File Settings is used for the files in the batch folder:
A. Select a naming rule for each file in the Naming Rule column. “Customize” is
the default.
B . Enter a root file name in the File Prefix column. “Image” is the default.
C. Enter a starting number to be appended to the file name in the Start Number
column. “1” is the default.
D . Enter a number of digits to be appended to the file name in the Digits column.
“5” is the default digit length.
By Count
Let you save scanned documents into several groups, sorted by numbers of
scanned pages.
Count Settings button
Settings for a batch folder
Settings for a group saved in the batch folder
Settings for a file saved in the batch folder
9
Page 16

Count Settings Button:
Click this button to change the numbers of pages used
to seperate pages into different groups. When this
button is clicked, the “Count Settings” box will appear
and then you can change the numbers of pages there.
The default is “12”.
General Setting is used for the groups in the batch folder:
Follow the steps in the section “General Setting is used for the batch folder” of
“Batch Menu: New: General Batch” to set up options for your batch folder.
Group Settings is used for the groups in batch folder:
A. Select a naming rule for each group in the Naming Rule column. “Customize”
is the default.
B . Enter a root group file name in the File Prefix column. “Image” is the default.
C. Enter a starting number to be appended to the group file name in the Start
Number column. “1” is the default.
D . Enter a number of digits to be appended to the group file name in the Digits
column. “5” is the default digit length.
File Setting is used for the files in the batch folder:
Follow the steps in the section “File Setting is used for the files in the batch folder”
of “Batch Menu: New: General Batch” to set up options for your files.
By Blank Pages
Let you save scanned documents into several groups, sorted by pixel value of
images on pages.
Blank Page Settings button
Settings for a batch folder
Settings for a group saved in the batch folder
Settings for a file saved in the batch folder
10
Page 17

Blank Page Settings Button:
Click this button to change pixel value of images used
to seperate pages into different groups.
When this button is clicked, the “Blank Page Settings”
box will appear.
• Auto Examine: The system automatically screens
scanned pages and examines blank pages.
• Examined by File Sizes: The system screens scanned pages and examines blank
pages by pre-defined pixel value of color, grayscal or black-and-white images.
The default value is 800 k .
General Setting is used for the groups in the batch folder:
Follow the steps in the section “General Setting is used for the batch folder” of
“Batch Menu: New: General Batch” to set up options for your batch folder.
Group Settings is used for the groups in batch folder:
Follow the steps in the section “Group Setting is used for the groups in the batch
folder” of “Batch Menu: New: By Count” to set up options for your groups.
File Setting is used for the files in the batch folder:
Follow the steps in the section “File Setting is used for the files in the batch folder”
of “Batch Menu: New: General Batch” to set up options for your files.
By Barcode
Let you save scanned documents into several groups, sorted by barcode value on
pages.
Barcode Settings button
Settings for a batch folder
Settings for a group saved in the batch folder
Settings for a file saved in the batch folder
11
Page 18

Barcode Settings Button:
Click this button to change the recognition settings applied with the selected
barcode value.
When this button is clicked, the “Barcode Settings” box will appear.
Selected Region
Command
Preview Window
Supported
Barcodes
Toolbar
• Toolbar: Contains buttons for executing certain tasks.
Open: Press to import an image from a selected file folder.
Get Images from Scanners: Press to get an image from a scanner.
Actual Size: Press to display the real size of the selected image.
Fit to Window: Press to increase or decrease the size of the selected image
in order to fit ot the size of the Preview W indow .
Zoom in: Press to increase the size of the selected image.
Zoom out: Press to decrease the size of the selected image.
Move: Press to move the enlarged image in orde to check the certain area
of the enlarged image.
Draw Region: Press to make the frame selection and adjust the size of the
frame on the selected image in the Preview Window.
Delete Drawed Region: Press to delete the pre-drawed frames on the
selected image in the Preview Window.
• Preview W indow: Displays the selected image which is either imported from a file
folder or scanned from a scanner.
• Supported Barcodes: Displays the types of supported barcodes.
12
Page 19

• Selected Region Command: Selects the region where the barcode is and needs to
be recognized. Check the “Whole Image Region” command if you want to
recognize all barcode values on the image. Check the “Selected Region”
command if you want to recognize the pre-selected barcode value on the image.
General Setting is used for the groups in the batch folder:
Follow the steps in the section “General Setting is used for the batch folder” of
“Batch Menu: New: General Batch” to set up options for your batch folder.
Group Settings is used for the groups in batch folder:
If “Use Barcode as Group Name” is selected in the Naming Rule column, the Group
Prefix, Start Number and Digits columns in this section will be grayed out and
cannot be modified. It is set as the default value.
If “Customize” is selected in the Naming Rule column, follow the steps in the
section “Group Setting is used for the groups in the batch folder” of “Batch Menu:
New: By Count” to set up options for your groups.
File Setting is used for the files in the batch folder:
If “Use Barcode as Prefix” is selected in the Naming Rule column, the File Prefix,
Start Number and Digits columns in this section will be grayed out and cannot be
modified. It is set as the default value.
If “Customize” is selected in the Naming Rule column, follow the steps in the
section “File Setting is used for the files in the batch folder” of “Batch Menu: New:
General Batch” to set up options for your files.
By OCR
Let you save scanned documents into several groups, sorted by OCR characters on
pages.
OCR Settings button
Settings for a batch folder
Settings for a group saved in the batch folder
Settings for a file saved in the batch folder
13
Page 20

OCR Settings Button:
Click this button to change the recognition settings applied with the selected OCR
characters.
When this button is clicked, the “OCR Settings” box will appear.
Selected
Region
Command
Supported
OCR
languages
• Toolbar: Contains buttons for executing certain tasks.
Open: Press to import an image from a selected file folder.
Get Images from Scanners: Press to get an image from a scanner.
Actual Size: Press to display the real size of the selected image.
Fit to Window: Press to increase or decrease the size of the selected image
in order to fit ot the size of the Preview W indow .
Zoom in: Press to increase the size of the selected image.
Zoom out: Press to decrease the size of the selected image.
Move: Press to move the enlarged image in orde to check the certain area
of the enlarged image.
Preview Window
Toolbar
Draw Region: Press to make the frame selection and adjust the size of the
frame on the selected image in the Preview Window.
Delete Drawed Region: Press to delete the pre-drawed frames on the
selected image in the Preview Window.
• Preview W indow: Displays the selected image which is either imported from a file
folder or scanned from a scanner.
• Supported OCR languages: Displays the supported OCR languages.
14
Page 21

• Selected Region Command: Selects the region where the OCR characters are and
need to be recognized. Check the “Whole Image Region” command if you want
to recognize all OCR characters on the image. Check the “Selected Region”
command if you want to recognize the pre-selected OCR characters on the image.
General Setting is used for the groups in the batch folder:
Follow the steps in the section “General Setting is used for the batch folder” of
“Batch Menu: New: General Batch” to set up options for your batch folder.
Group Settings is used for the groups in batch folder:
If “Use OCR as Group Name” is selected in the Naming Rule column, the Group
Prefix, Start Number and Digits columns in this section will be grayed out and
cannot be modified. It is set as the default value.
If “Customize” is selected in the Naming Rule column, follow the steps in the
section “Group Setting is used for the groups in the batch folder” of “Batch Menu:
New: By Count” to set up options for your groups.
File Setting is used for the files in the batch folder:
If “Use OCR as Prefix” is selected in the Naming Rule column, the File Prefix, Start
Number and Digits columns in this section will be grayed out and cannot be
modified. It is set as the default value.
If “Customize” is selected in the Naming Rule column, follow the steps in the
section “File Setting is used for the files in the batch folder” of “Batch Menu: New:
General Batch” to set up options for your files.
Open Batch
This command lets you open an existing batch of documents.
To check the detail descriptions about how to use this command, refer to the
previous section “Getting Started: How to Open an Existing Batch”.
Output Batch
This command lets you process and save a batch of documents when you have
finished all monifications for the files inside. Take note that once when a batch is
processed and output, all files inside cannot be opened and monified by the
DocWizard.
To check the detail descriptions about how to use this command, refer to the
previous section “Getting Started: Output a Batch”.
15
Page 22

Open TIFF
This command lets you open TIFF files in the DocWizard; however , you cannot
make any changes to these files in the DocWizard.
Save TIFF
This command lets you save all files in a batch in TIFF format.
Exit
This command lets you terminate the DocWizard software.
16
Page 23

Scan Menu
Start Scan/Activate Scan Software
This command lets you activate either the scanner to scan directly or the selected
scan software to scan, depending on if the command “Display Scan Software
Interface” is checked.
When the command “Display Scan Software Interface” is checked, you will see the
command “Activate Scan Software” appear in the Scan Menu, which means that you
need to perform the scan job in the selected scan software. When the command
“Display Scan Software Interface” is not checked, you will see the command “Start
Scan” appear in the Scan Menu, which means that you can perform the scan job
directly in DocWizard.
Take note that the command “Start Scan/Activate Scan Software” does not work
when either one of the following situations happens:
1. The DocScan is activated for the first time to use;
2. You do not create a new batch yet;
3. You do not open an existing batch yet.
Scan Settings
This command lets you predefine some scan settings when you directly activate the
scanner to scan in DocWizard.
When the command is selected, a “Scan Settings” dialog window appears on the
screen.
Preset Setting menu
Remove Settings
button
Create a new Preset
Setting from Current
Settings button
Basic settings for scan
Preview window
Image Correction Options
Advanced
Preview button
17
Page 24

Basic Settings:
Let you adjust basic settins for the scanned images in your scan software.
• Select Flatbed, ADF Simplex or ADF Duplex in the Scan Source as your image
input device.
• Select the appropriate image type (e.g., RGB Color) in the Image Type as your
image output type.
– Select B & W to scan the image in black-and-white.
– Select Gray 4 bits to scan the image in grayscale.
– Select Gray 8 bits to scan the image in grayscale.
– Select RGB 24 bits to scan the image in color.
– Select B & W + Color to scan the image in color and in black-and-white.
• Select a desired resolution in the Resolution for your image output resolution.
• Select the appropriate color element (e.g., Red) in the Channel as your image
output color. When the Image T ype is set as “RGB Color”, the Channel option
will be grayed out and does not work.
• If necessary, select the Rotate to rotate the image at increments of 90 degrees.
• If necessary, select the Merge/Split to merge or split the scanned images.
– Select Merge Horizontal to combine two images horizontally .
– Select Merge Vertical to combine two images vertically .
– Select Split Horizontal to divide an image to two images horizontally.
– Select Split V er tical to divide an image to two images vertically.
• Select a dimension in the Paper Size as your preview image size.
Image Correction Options:
Let you adjust the image attributes in your scan software.
• Brightness: Lets you control the brightness level of the scanned image.
Increasing the brightness makes all tones in the image lighter. Levels of
brightness are from -100% to 100%, where 0 means no brightness is applied.
• Contrast: Represents the range between the darkest and lightest shades in the
image, and increasing the contrast makes for greater separation between the
darkest and lightest areas of the image. Levels of contrast are from -100% to
100%, where 0 means no contrast is applied.
18
Page 25

• Threshold: Represents the dividing point between black and white; the range is 0
to 255, and the default is 128. Thus, gray levels below the Threshold are
converted to black, while gray levels equal to or above the Threshold are
converted to white, resulting in a high-contrast, black-and-white representation
of the image.
• Gamma: Lets you adjust the intensity of the midtones of an image. Acceptable
ranges are from 0.1 to 3.0. A value of 1.0 means that no gamma value is applied;
default is 1.0.
• Shadow: Lets you control the shadows of an image. Acceptable ranges are from
0 to 252. The default is 0.
• Highlight: Lets you control the highlights of an image. Acceptable ranges are
from 0 to 255. The default is 255.
Advanced Button:
Aside from Image Correction options, DocWizard
provides a few additional optional features for scanner
control such as Auto Threshold, Auto Crop, Remove
Black Borders, T ext Orientation, Remove Blank Pages
and Remove Punch Hole.
When you press the Advanced button, the Advanced
Settings window appears.
• Auto Threshold
The Auto Threshold is active only when the Image Type setting of the selected
image is Grayscale or Black-and-White. Check this option to enable the Auto
Threshold setting.
• Auto Crop
If Auto Crop box is checked, the software automatically detects the size of the
selected area, crops the full scan frame to fit selected area, and removes
unwanted areas after the scan.
• Remove Black Borders
If Remove Black Borders box is checked, the software automatically detects the
unwanted black areas around the selected area, crops and removes them to fit the
selected area after the scan.
• T ext Orientation
If Text Orientation box is checked, the software enables every scanned and saved
OCR files present in a readable direction.
• Remove Blank Pages
If Remove Blank Pages box is checked, the software automatically detects and
removs blank pages when scanning a stack of documents.
19
Page 26

• Remove Punch Hole
If Remove Punch Hole box is checked, the software automatically detects the
location of the punch holes on the scanned documents and fills them in white.
This function works for most common hole puncher standards.
Preset Setting:
This feature allows you to save current scan and
image settings as a preset setting and use it later
when necessary. Two options for choosing the
preset settings are available: Create a New Preset
Setting from Current Settings and Remove Settings.
• Create a New Preset Setting from Current Settings
This option allows you to save current images settings as a customized preset
setting with an user-defined name. The saved preset setting will be displayed
and selectable from the Preset Setting menu.
To customize a desired preset setting:
1 . After you finish the scan and image settings, click “Create a New Preset
Setting from Current Settings” button. A window appears.
2 . Give a desired name (e.g., test 1) for the created preset setting, and then click
OK to save.
The current images settings will be saved and added to the Preset Setting
menu as a customized preset setting. Next time when you wish to retrieve this
image setting, simply go to the Preset Setting menu and choose it.
• Remove Settings
This option allows you to remove unwanted preset settings from a list of the
Preset Settings.
To remove unwanted preset settings:
1. Highlight the setting you want to remove from the Preset Setting menu, and
then click the Remove Settings button.
The selected setting will be removed from the list and will not be displayed in
the Preset Setting menu.
3. Repeat the step 1 until all unwanted preset settings have been removed.
Preview button:
Click the button to perform a preliminary view of the entire image.
20
Page 27
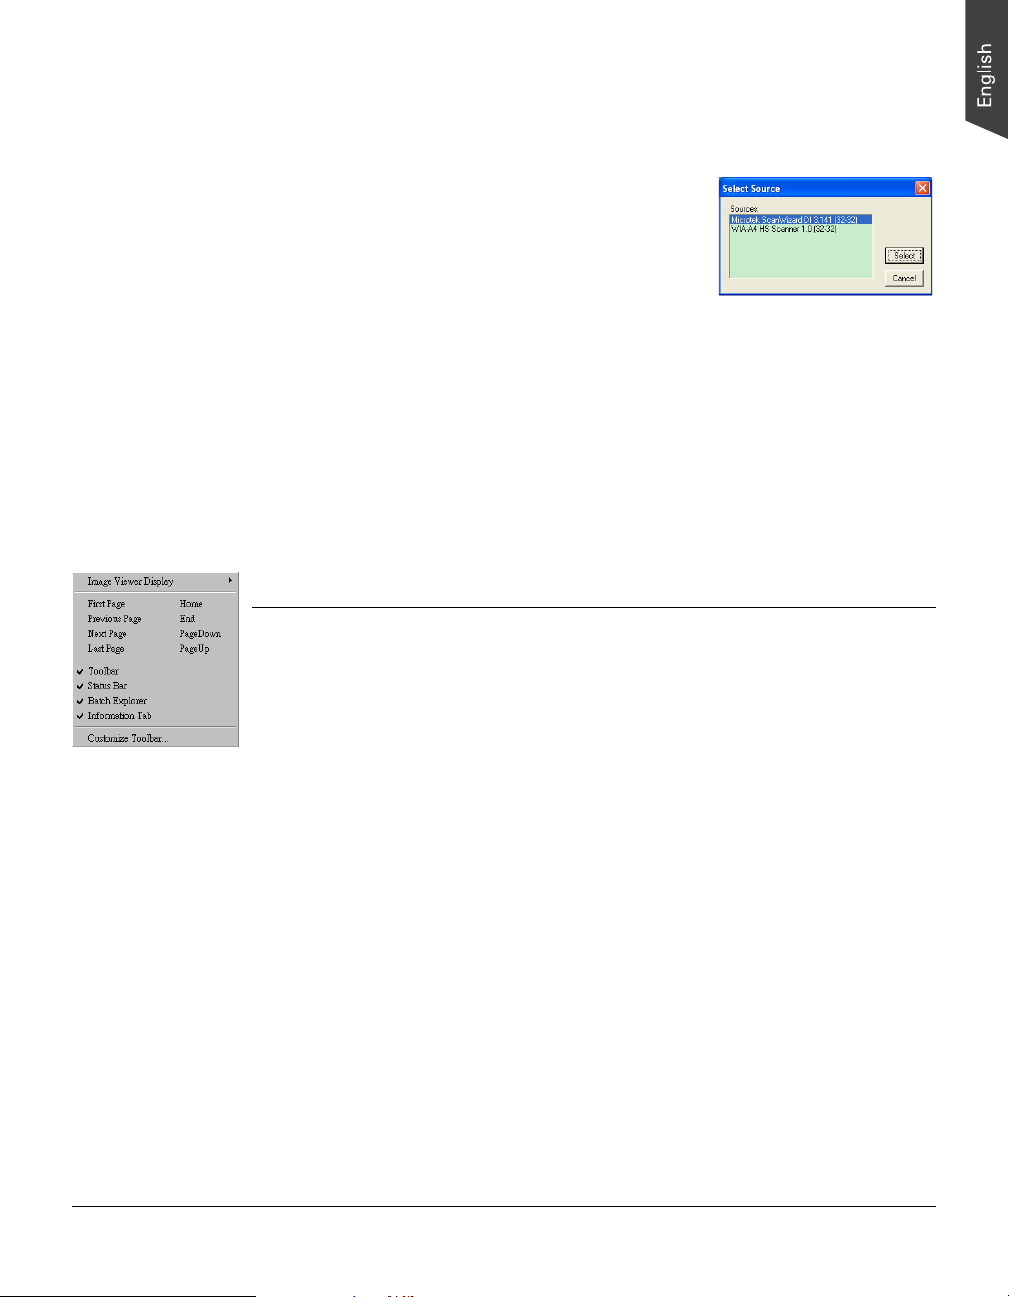
Select Scan Software
This command lets you choose a preferred scan software from a list of available scan
softwares in your computer.
T o carry out this command, select “Select Scan
Software” from the Scan menu. A window appears on
the screen. Highlight the scan software you want to
use from the list and then click the OK button. The
scan software you select becomes the default scan
software unless you change again.
Display Scan Software Interface
This command controls the appearance of the scan software interface you are using
when you perform a scan job in DocWizard.
When this command is checked, you need to perform the scan job in the preselected scan software. All scan and image settings are selected and adjusted in the
pre-selected scan software. When this command is not checked, DocWizard
automatically detects the scanner you are using and performs the scan job.
View Menu
Image Viewer Display
This command allows you to select a grid of 1, 2, 4 or 8 images to display in the
Image Viewer window .
First Page
This command allows you to move to the first image of a collection of images.
Previous Page
This command allows you to move to the image before the current image.
Next Page
This command allows you to move to the image immediately following the current
image.
Show/Hide Toolbar
This command allows you to show or hide the T oolbar, appear at the top of the main
interface. When you see a check mark before the command, you can see the
command displaying on the main interface.
21
Page 28
Show/Hide Status Bar
This command allows you to show or hide the Status Bar, appearing at the bottom of
the main interface. When you see a check mark before the command, you can see
the command displaying on the main interface.
Show/Hide Batch Explorer
This command allows you to show or hide the Batch Explorer window, appearing at
the left of the main interface. When you see a check mark before the command, you
can see the command displaying on the main interface.
Show/Hide Information Tab
This command allows you to show or hide the Information Tab, appearing at the
right of the main interface. When you see a check mark before the command, you
can see the command displaying on the main interface.
Toolbar
Batch Explorer
Window
Information
Tab
Customize
This command allows you to add or remove shortcut icons in the Toolbar, offering a
quick access to activate frequent-use functions in DocWizard.
T o carry out this command, select “Customize” from the V iew menu. A dialog
window appears on the screen. The left column of the window contains function
tools available to be added into the Toolbar. The right column of the window
contains function tools usable and appearing in the Toolbar.
22
Page 29

To add a new function tool into the Toolbar, highlight the item you want to add at
the left column and then click the Add button. The selected item is moved and
appears at the right column immediately. Repeat the step above until you finish
adding all items.
T o remove an existing function tool from the Toolbar, highlight the item you want to
remove at the right column and then click the Remove button. The selected item is
moved and appears at the left column immediately. Repeat the step above until you
finish removing all items.
Click the Close button to finish the actions of adding or removing functions tools
and to return to the main interface. The acting result is carried out immediately to
the T oolbar on the main interface.
Click the Reset button to clear previous actions of adding or removing functions
tools. Repeat the steps above to add or remove function tools or click the Close
button to execute the Customize window and return to the main interface.
Containing function tools available
to be added into the Toolbar
Click to move the highlighted item at the left
column to the right column
Click to close the setup
window
Click to reset previous
actions
Containing function tools
shown in the T oolbar
Click to move the highlighted item at the right
column back to the left column
23
Page 30

Image Menu
Replace a Selected Image….
This command allows you to replace a selected image by an image scanned from a
scanner or imported from file folders.
By a Scanned Image
1 . T o replace a selected image by a scanned image, highlight the image you want to
replace in the Image V iewer window .
The original and selected image
is enclosed by bold lines
2 . Select “Replace a Selected Image....” in the
Image Menu and then select “By a Scanned
Image” in the sublayer of the “Replace a
Selected Image....” command.
3. Depending on if you have activated the
“Display Scan Software Interface” command,
you can perform the scan job directly in
DocWizard or in the selected scan software.
4. After the scan job is finished, the scanned and saved image replaces the original
image in the Image V iewer window immediately .
The new image
24
Page 31

By an Image from Files
1 . To replace a selected image by an image from files, highlight the image you want
to replace in the Image V iewer window .
2 . Select “Replace a Selected Image....” in the Image Menu and then select “By an
Image from Files” in the sublayer of the “Replace a Selected Image....” command.
A directory window appears on the screen.
T oggle through the file folders to find the image
you want use to replace the old one. Highlight
it to select and then click the OK button. The
selected image from files replaces the original
one in the Image V iewer window immediately .
Insert an Image
This command allows you to insert an image scanned from a scanner or imported
from file folders before or after the selected image.
Insert a Scanned Image Before the Selected Image
1 . T o insert a scanned image before the selected image, highlight the image in which
you want to insert in the Image V iewer window .
2. Select “Insert an Image” in the Image Menu and then select “Insert a Scanned
The original and selected
image is enclosed by
bold lines
Image Before the Selected Image” in the sublayer of the
“Insert an Image” command.
3. Depending on if you have activated the “Display Scan
Software Interface” command, you can perform the scan
job directly in DocWizard or in the selected scan
software.
4. After the scan job is finished, the scanned and saved
image is inserted before the original image in the Image V iewer window
immediately.
25
Page 32

The new inserted image
before the original image
Insert a Scanned Image After the Selected Image
1 . Follow the step 1 to 3 in the section “Insert a Scanned Image Before the Selected
Image” to execute the command; however, select “Insert a Scanned Image After
the Selected Image” instead.
2. After the scan job is finished, the scanned and saved image is inserted after the
original image in the Image V iewer window immediately .
The original and selected image is
enclosed by bold lines
The new inserted image after the
original image
Insert an Image From Files Before the Selected Image
1 . To insert an image from files before the selected image, highlight the image in
which you want to insert in the Image V iewer window .
2. Select “Insert an Image” in the Image Menu and then select “Insert an Image
From Files Before the Selected Image” in the sublayer of the “Insert an Image”
command.
26
Page 33

3. A directory window appears on the screen.
Toggle through the directory folders to find
the image you want to insert. After done,
click the OK button to insert it into
DocWizard.
The selected image from files is inserted
before the original image in the Image V iewer
window immediately .
The original and selected image is
enclosed by bold lines
Insert an Image From FilesAfter the Selected Image
1 . Follow the step 1 to 3 in the section “Insert an Image From Files Before the
Selected Image” to execute the command; however, select “Insert an Image From
Files After the Selected Image” instead.
2. After the scan job is finished, the scanned and saved image is inserted after the
original image in the Image V iewer window immediately .
The original and selected image is
enclosed by bold lines
The new inserted image before
the original image
The new inserted image after
the original image
27
Page 34

Delete
This command allows you to delete an unwanted image from a batch folder.
1 . To delete an image, highlight the image you want to delete in the Image V iewer
window. The selected image is enclosed by bold lines.
2 . Select “Delete” in the Image Menu. Or, point your mouse to the selected image
and click the right button of the mouse to enable the fast-key menu and then
select “Delete” in the fast-key menu.
Delete command in the
Image Menu
Delete command in the fast-key menu
A reminding window appears on the screen to confirm if
you are sure to execute the Delete action. Click the OK
button to carry out the demand.
Rearrange Order
This command allows you to rearrange the index numbers of images in a batch folder.
After deleting some images in a batch, the index numbers of rest images in a batch
are not changed and remain same. Therefore, you will see that the index numbers of
rest images in a batch are not presented sequentially. If you select the Rearrange
Order command, the index numbers of rest images in a batch will be rearranged and
put in orders.
The index numbers of images before applying
the Rearrange Order option
28
The index numbers of images after applying
the Rearrange Order option
Page 35
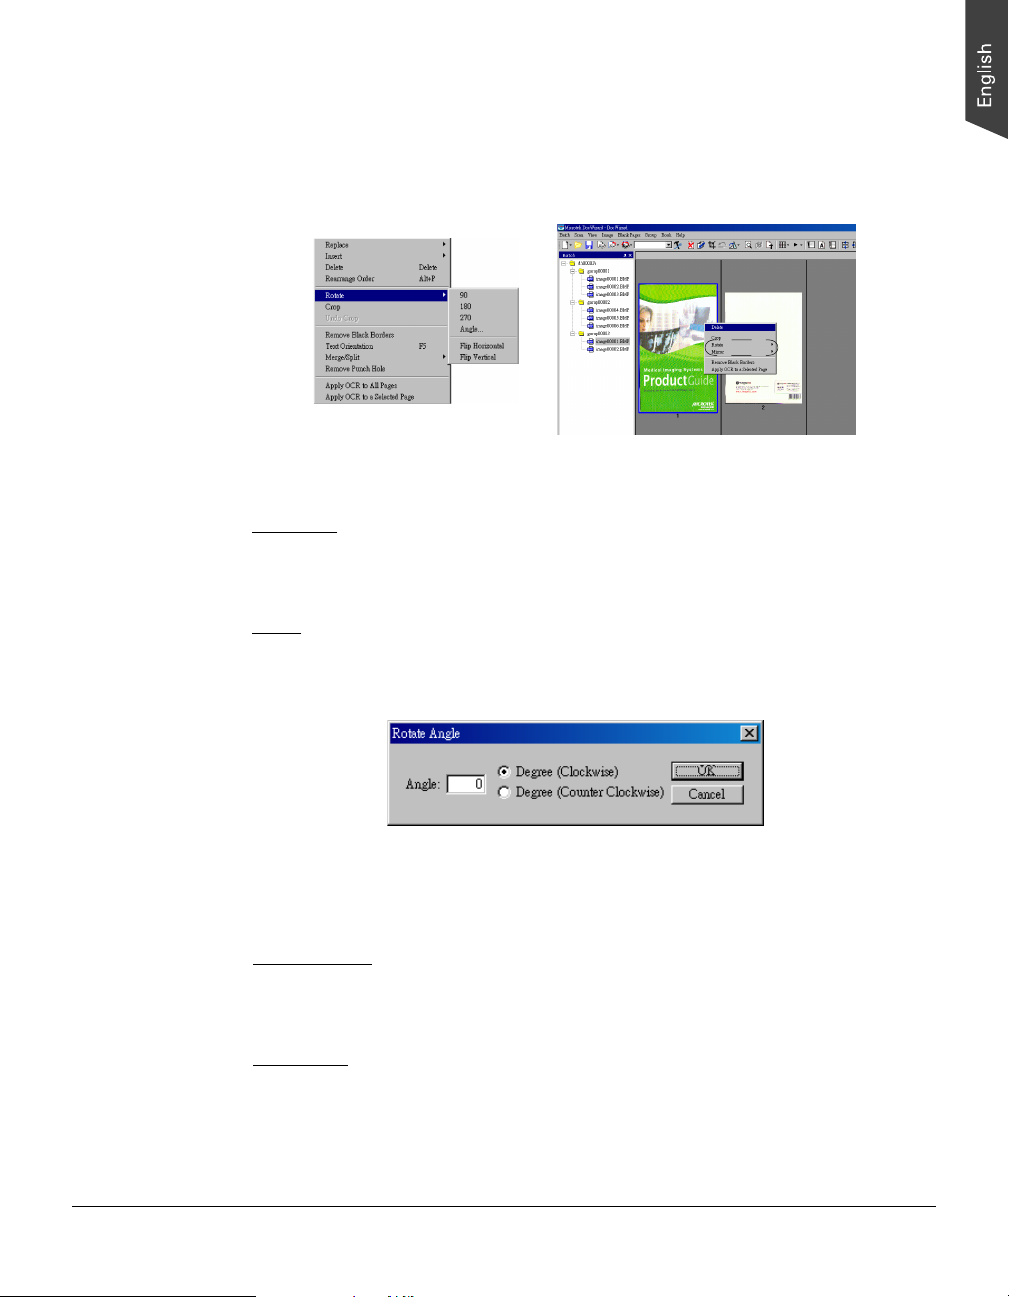
Rotate
This command allows you to rotate the selected image. Rotate options include: 90,
180, 270, Angle, Flip Horizontal and Flip Vertical. Take note that you can also point
your mouse to the selected image and click the right button of the mouse to enable
the fast-key menu and then select Rotate options in the fast-key menu.
The Rotate options in the
Image menu
The Rotate and Flip options
in the fast-key menu
90/180/270
90, 180 and 270 options allows you to rotate the selected image clockwisely at
increments of 90 degrees.
Angle
Angle option allows you to rotate the selected image at your desired angles and
directions.
When you select this option in the Image Menu, a window pops up. Key in your
desired rotating degrees first, and select the rotating directions. Click the OK button
when done. The effect is applied to the selected image immediately on the screen.
Filp Horizontal
Flip Horizontal option allows you to flip the selected image horizontally, along the
vertical axis.
Filp Vertical
Flip Vertical option allows you to flip the selected image vertically, along the
horizontal axis.
29
Page 36

Crop
This command allows you to decide the size of the selected area on an image and
then to crop the full scan frame to fit selected area, and removes unwanted areas.
1 . Select “Crop” in the Image Menu.
A “+” mark appears on your screen and replaces the cursor pointer. Move the
cursor onto the selected image and draw the size of the area you want.
2. After finished, a pop-up window appears to remind you that
after the selected image is cropped, you can cancel the
cropping action for one time only. Click the Yes button to
terminate the pop-up window and to perform cropping. The
effect applies to the selected image immediately on the
screen.
The image before cropped The image after cropped
Undo Crop
This command allows you to cancel the cropping action and to retrieve back the
original status of the selected image. You can execute this command for one time
only.
Remove Black Borders
This command allows the software automatically detect the unwanted black areas
around the selected image, crops and removes them to fit the selected area after the
scan.
The image before applying the Remove
Black Borders command
The image after applying the Remove
Black Borders command
30
Page 37

Take note that when you select this command, the Remove Black Borders ef fect will
apply to all the images in a batch, instead of the current and selected image only.
Also, you can point your mouse to the selected image and click the right button of
the mouse to enable the fast-key menu and then select “Remove Black Borders” in
the fast-key menu.
The Remove Black Borders option in
the Image menu
The Remove Black Borders option in the
fast-key menu
Text Orientation
This command allows the software to enable every scanned and saved image with
texts on present in a readable direction.
Merge/Split
This command allows you to merge or split all images in a
batch.
Split Horizontal
Split Horizontal option allows you to split one image into
two images horizontally, along the vertical axis. When you
select the Split Horizontal option, the effect will apply to all
images in a batch sequentially.
Split Vertical
Split Vertical option allows you to split one image into two images vertically, along
the horizontal axis. When you select the Split Vertical option, the effect will apply to
all images in a batch sequentially.
Merge Horizontal
Merge Horizontal option allows you to combine two images as one image
horizontally, along the vertical axis. When you select the Mer ge Horizontal option,
the effect will apply to all images in a batch sequentially .
31
Page 38

Merge Vertical
Merge Vertical option allows you to combine two images as one image vertically,
along the horizontal axis. When you select the Merge Vertical option, the effect will
apply to all images in a batch sequentially.
Remove Punch Hole
This command allows the software automatically detect the location of the punch
holes on the scanned images and fills them in white. This function works for most
common hole puncher standards.
Apply OCR to All Pages
This command allows the built-in OCR engine in the
software to automatically convert and save all images
in a batch in text file format.
When this command is selected, a “Apply OCR to
Batch” window pops up. You can set up the output
directory, file format and OCR language in use before
outputting the images. When done, click the OK
button to output your files.
Apply OCR to a Selected Page
This command allows the built-in OCR engine in the
software to automatically convert and save the
selected image in a batch in text file format.
When this command is selected, a “Apply OCR to a
Selected Page” window pops up. You can set up the
output directory and OCR language in use before
outputting the image. When done, click the OK button
to output your file.
32
Page 39

Blank Pages Menu
Examine
This command allows you to check if there are any blank pages in a stack of scanned
documents.
T o examine blank pages in a batch, select “Examine” in the Blank Pages menu. The
searching result is displayed on the screen immediately when done.
If there are more than one group in a batch, the software will expand out the group
folders where there are blank pages inside.
Delete
This command allows you to delete blank pages in a batch folder.
Settings
This command allows you to decide the pixel value of scanned images which is used
as a measurement for searching for blank pages.
When select “Settings” in the Blank
Pages menu, a Blank Page Settins
window pops up. Select “Auto
Examine” if you like use the default
pixel value as measurement for
searching for blank pages. The default
is 800k for RGB color, grayscale and
black-and-white images. If you prefer
to set up your own measurement value,
key in desired numbers in columns for
RGB color, grayscale or black-andwhite images.
33
Page 40

Group Menu
Reset Group
This command allows you to rearrange files of a batch folder and to gather them into
a new type of groups based on different grouping rules. Reset Group options
include General, By Count, By Blank Pages, By Barcode and By OCR.
• General: Select it if you do not want to seperate your files into different
groups.
• By Count:Select it if you want to group your files based on numbers of pages.
• By Blank Pages: Select it if you want to group your files based on different
pixel values.
• By Barcode: Select it if you want to group your files based on recognized
barcode values.
• By OCR: Select it if you want to group your files based on selected OCR
characters.
After selecting the desired group category, follows the steps listed in the section
“Batch Menu: New” to adjust settings for each group. Take note even though you
have changed settings for files and the groups into which these files are categorized,
the original settings for the batch folder remain same and cannot be modified.
Delete Group
This command allows you to delete an unwanted group and all files under the group.
To delete an unwanted group,
1 . Highlight the group you want to delete in the Batch Explorer window.
2 . Select “Delete Group” in the Group menu; or, point your mouse to the selected
group and click the right button of the mouse to enable the fast-key menu and
then select “Delete Group” in the fast-key menu.
The Delete Group command in the
Group menu
The Delete Group command in the fast-key menu
34
Page 41

A reminding window pops up to confirm if you
want to execute the delete command. Click the OK
button to carry out the delete action.
Merge Group
This command allows you to combine two group together. The files of the mer ged
group will be moved to the assigned group and the merged group will disappear from
the group lists in the Batch Explorer window.
T o mer ge groups:
1 . Select “Merge Group” in the Group menu; or , point your mouse to one of the
groups you want to combine together. Next, click the right button of the mouse
to enable the fast-key menu and then select “Merge Group” in the fast-key
menu.
The Merge Group command in the
Group menu
The Merge Group command in the fast-key menu
2. A “Merge Group” dialog window appears on the screen. Select two groups you
want to combine together from the drop-down menus of the Group 1 and Group 2
columns. Then, select your desired after-merging group from the drop-down
menus of the New Group after Merging column.
35
Page 42

Take note that the after-merging group can be either of the groups selected in
Group 1 or Group 2 column. The after-merging group will be the group left over
after the merging happens.
When done, click the OK button to execute the merging action.
Before merging After merging
(The merged group00003 disappears and all files inside are
moved to leftover group00002)
Move Files to Different Group
This command allows you to move files in one group into another selected group.
T o move files from one group to another one:
1 . Select “Move Files to Different Group” in the Group menu; or, point your mouse
to the group you want to move files from. Next, click the right button of the
mouse to enable the fast-key menu and then select “Move Files to Different
Group” in the fast-key menu.
The Move Files to Different Group
command in the Group menu
The Move Files to Different Group command
in the fast-key menu
36
Page 43

2. A “Move Files” dialog window appears on the
screen.
Check “Select All Files” to move all files of one
group to another group. Or, select the specific
files your want to move by checking the box
before the files. Next, assign your desired group
to which you want to move the selected files in
the drop-down menu of Move to Group. Finally,
click the OK button to execute the moving action.
(The selected all files are in their original
Before moving
group00002 folder)
37
(The selected all files in the group00002 is
After merging
moved away from group00002 folder and into
the group00001)
Page 44
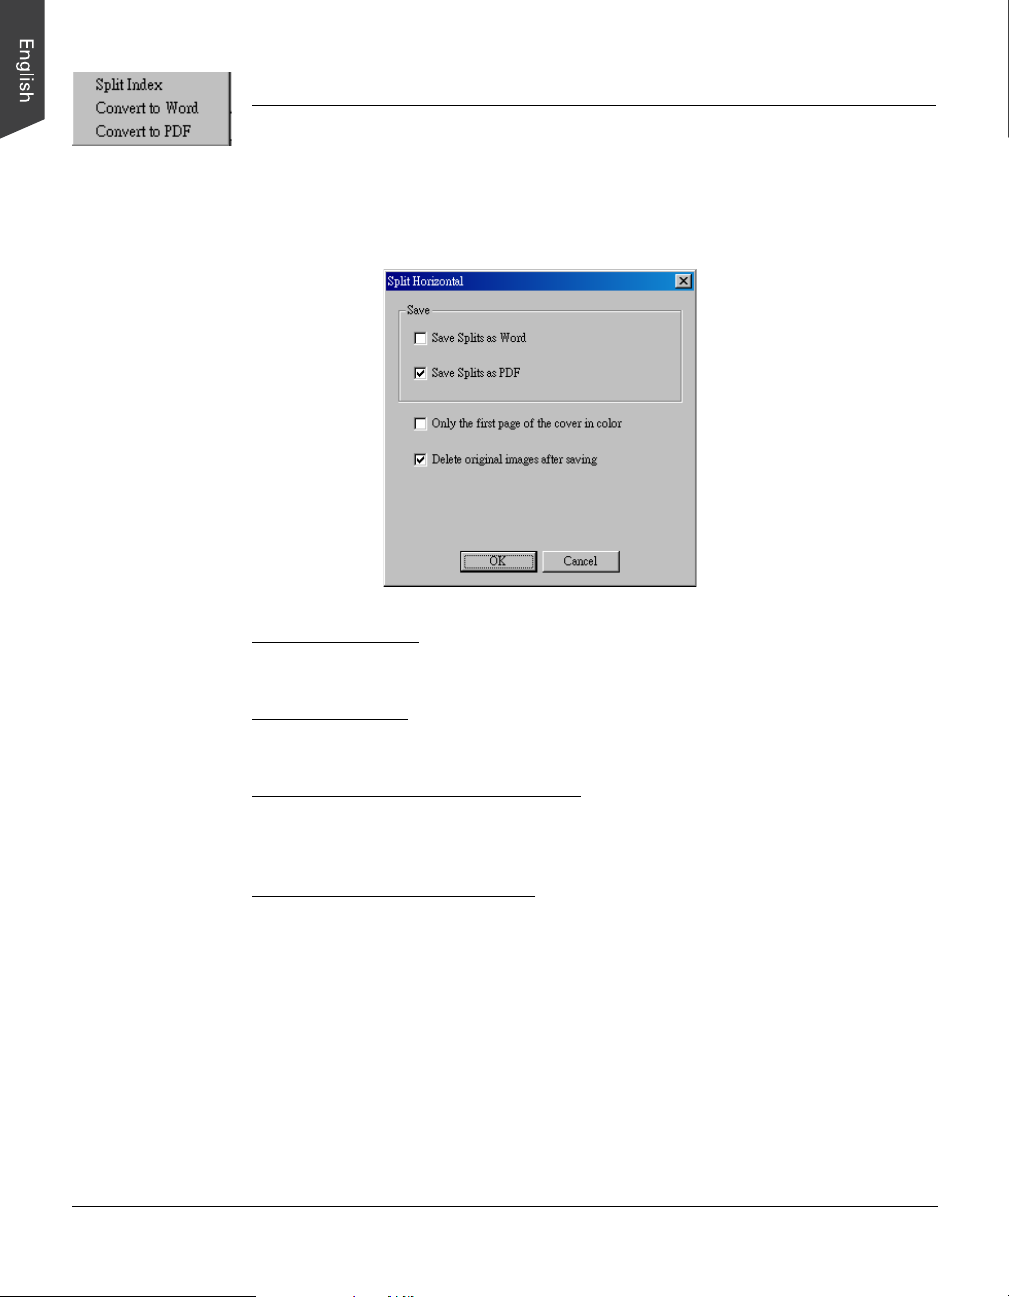
Book Menu
Split Order
This command allows you to split one page into two pages in a batch folder. When
clicking this command, a “Split Order” dialog box pops up for you to adjust settings
for the split page.
Save Splits as Word:
If checked, the split pages will be saved in Word format in your assigned directory .
Save Splits as PDF:
If checked, the splited pages will be saved in PDF format in your assigned directory.
Only the First Page of the Cover in Color
If checked, all color images on splited pages will be transferred into grayscale. Only
the images on the cover page remain in color.
Delete Original Images after Saving
If checked, after the original pages are split and saved in the format assigned, the
original pages will be deleted from the batch folder
Convert to Word
This command allows you to convert and save all files in a batch foler in Word
format.
Convert to PDF
This command allows you to convert and save all files in a batch foler in PDF format.
38
Page 45

Help Menu
The Help menu lets you access the built-in help feature of DocWizard, and gives you
some basic information about DocWizard software.
Toolbar
The toolbar has buttons for executing certain tasks. These buttons also provide a
quick access to commands or options in the Menu.
T oolbar buttons
New tool: Create a batch of documents based on different sorting
categories. These categories include General, Count, Blank Pages,
Barode and OCR.
Open tool: Open an existing batch of documents.
Output tool: Process and save a batch of document when you have
finished all monifications for the files inside.
Scan/Display Scan Software Interface tool: Activate either the scanner to
scan directly or the selected scan software to scan, depending on if the
command “Display Scan Software Interface” is checked.
Replace a Selected Image... tool: Replace a selected image by an image
scanned from a scanner or imported from file folders.
Insert tool: Insert an image scanned from a scanner or imported from file
folders before or after the selected image.
Preset Setting Menu: Display a preset setting used for the current scan
settings.
Scan Settings tool: Predefine some scan settings when you directly
activate the scanner to scan in DocWizard.
Delete tool: Delete an unwanted image from a batch folder.
39
Page 46

Order tool: Rearrange the index numbers of images in a batch folder.
Crop tool: Decide the size of the selected area on an image and then to
crop the full scan frame to fit selected area, and removes unwanted areas.
Undo Crop tool: Cancel the previous cropping action.
Rotate 90 degree right tool: Rotate the selected image. Rotate options
include: 90, 180, 270, Angle, Flip Horizontal and Flip V ertical.
Examine All Blank Images tool: Check if there are any blank pages in a
stack of scanned documents.
Delete All Blank Images tool: Delete blank pages in a batch folder .
Blank Page Setup tool: Set up pixel value of images used to examine if the
selected image is blank.
View tool: Select a grid of 1, 2, 4 or 8 images to display in the Image V iewer
window.
Top Page tool: Move to the first or last page of a collection of pages.
Also, you can use it to move to the previous or next page of the current
selected page.
Remove Black Borders tool: Enable the software to detect the unwanted
black areas around the selected image, crop and remove them to fit the
selected area after the scan.
Examined by T ext Orientation tool: Enable every scanned and saved image
with texts on present in a readable direction.
Remove Punch Hole tool: Enable the software to detect the punch holes
around on the selected image and to fill them in white.
Merge Vertically tool: Combine two images as one image vertically, along
the horizontal axis.
Merge Horizontally tool: Combine two images as one image vertically ,
along the vertical axis.
Split Vertically tool: Split one image into two images vertically, along the
horizontal axis.
Split Horizontally tool: Split one image into two images horizontally, along
the vertical axis.
Split a Book tool: Split a book into two pages.
40
Page 47

Convert to Word tool: Convert and save all files in a batch foler in Word
format.
Convert to PDF tool: Convert and save all files in a batch foler in PDF
format.
Information tool: Display the information about the DocWizard
41
 Loading...