

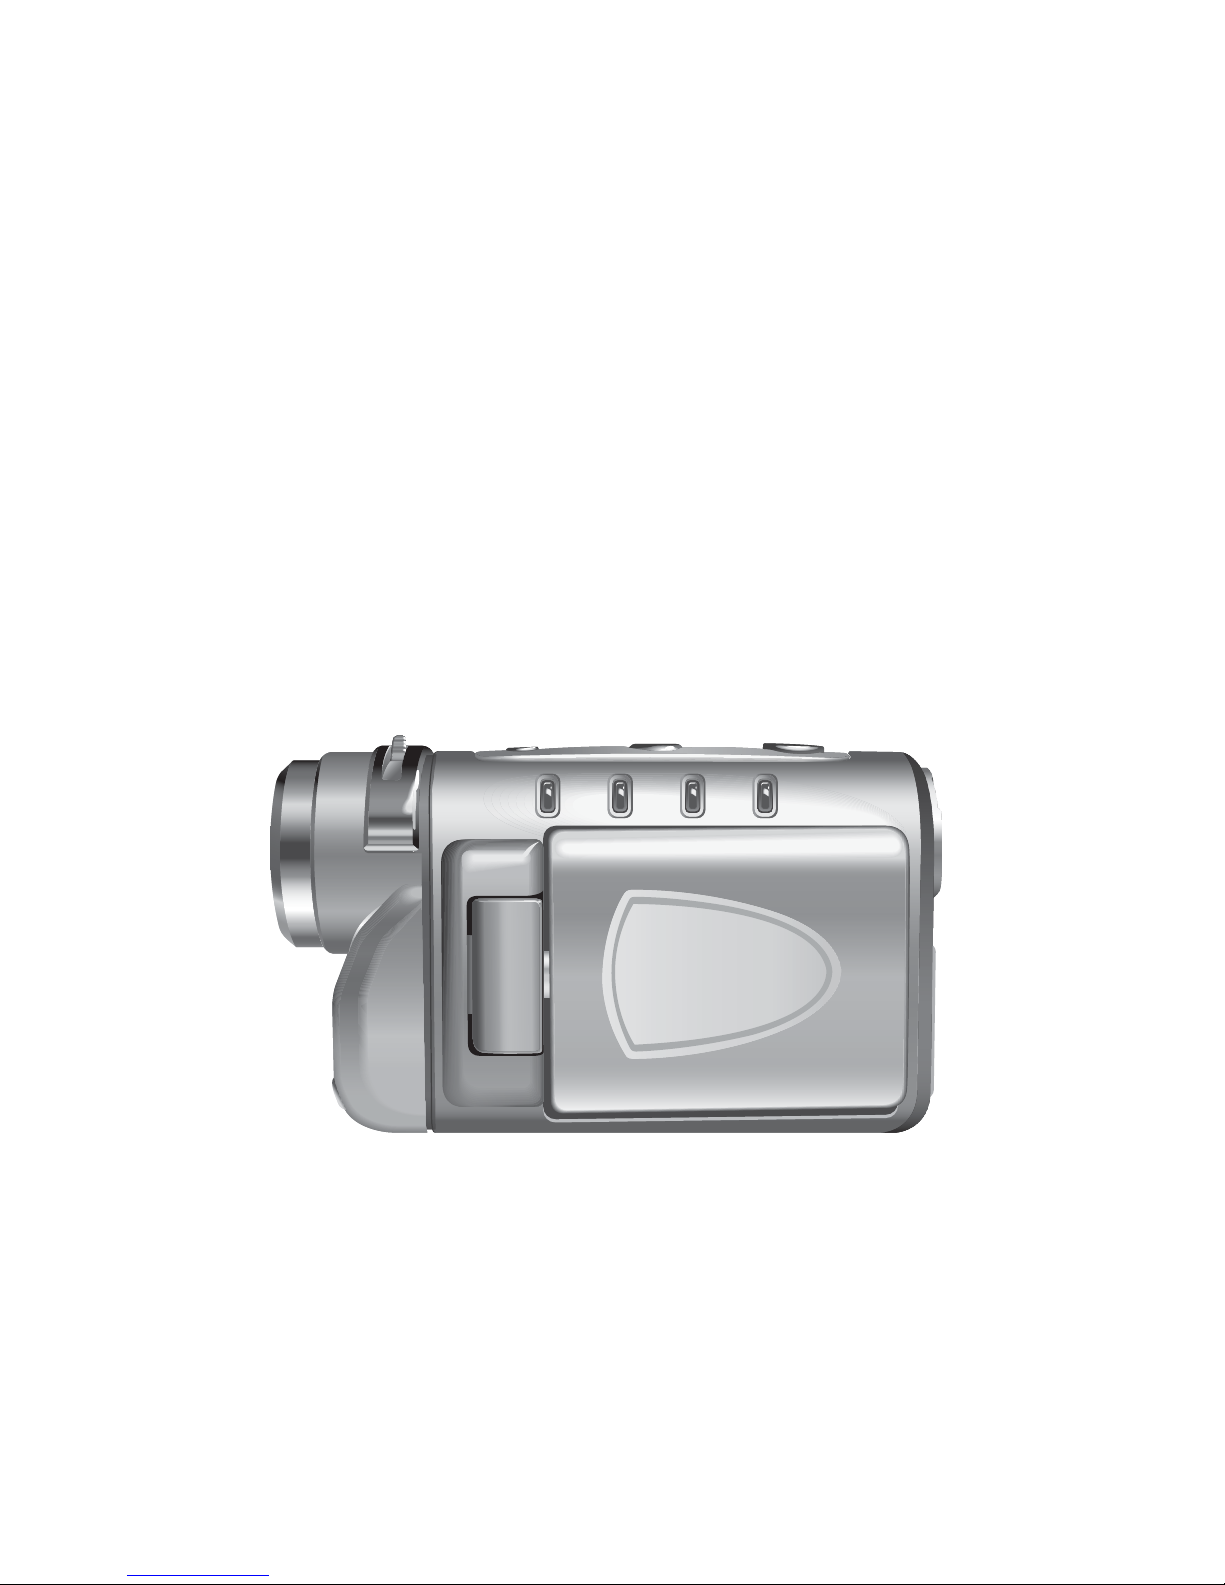
Page 1
Digital Video Camera
User Manual
Page 2

Page 3

Preface
Copyright
Copyright 2004, Microtek Corporation. All rights
reserved. No part of this publication may be reproduced, transmitted, transcribed, stored in a retrieval
system, or translated into any language or computer
language, in any form or by any means, electronic,
mechanical, magnetic, optical, chemical, manual, or
otherwise, without the prior written permission of this
company.
Disclaimer
Microtek makes no representations or warranties,
either express or implied, with respect to the contents
hereof and specifically disclaims any warranties, merchantability or fitness for any particular purpose. Further, Microtek reserves the right to revise this
publication and to make changes in the contents
hereof without obligation to notify any person of such
revision or changes.
Win dows, Windows Explorer, and Netm eeting are
trademarks of Microsoft Corporation. Other trade
names are copyrights of their respective companies or
organizations.
Page 4

ii
Taking Care of Your Camera
• Do not use your camera at temperatures below 0°C or
above 40°C.
• Do not use or store your camera in the environments
listed below:
– Direct sunlight
– High and dusty places
– Next to an air conditioner, electric heater or other
heat sources
– In a closed car that is directly under the sun
– Unstable locations
• If your camera becomes wet, wipe it with dry cloth as
soon as possible.
• Salt or seawater may cause severe camera damage.
• Do not use solvents, such as alcohol to clean your camera.
• If the lens or viewfinder is dirty, use a lens brush or
soft cloth to clean the lens.
• Do not touch the lens with your fingers.
• To prevent electrica l shoc k, do not attempt to disassemble or repair your camera by yourself.
• Water may cause a fire or electric shock. Store your
camera in a dry place.
• Do not use your camera outdoors when it is raining or
snowing.
• Do not use your camera in or near water.
• If a foreign substance or water gets inside your camera,
turn the power off immediately and disconnect the batteries and/or power supply. Remove the foreign substance or water, and send it to the maintenance center.
• Transfer the data to a computer as soon as possible to
avoid losing your image data.
Page 5

Table of Contents
Table of Contents
Getting started........................................... 1
Features................................................. 1
Digital still camera............................. 1
Digital video camera.......................... 1
Digital audio recorder........................ 2
webcam.............................................. 2
Picture and video player .................... 2
Unpacking............................................. 3
Camera components ............................. 4
Inserting the battery.............................. 6
Charging the battery ............................. 8
Inserting an SD card............................. 9
Taking your first still picture.............. 11
Shooting your first video.................... 13
Connecting.......................................... 15
Connecting to a TV.......................... 15
Connecting to a computer................ 16
Modes...................................................... 17
Photo mode......................................... 18
Zoom................................................ 19
Focus................................................ 19
Voice Memo .................................... 20
Video mode ........................................ 21
Page 6

Table of Contents
Audio mode ........................................ 23
Playback mode.................................... 25
USB mode .......................................... 27
Downloading files............................ 27
Webcam feature............................... 29
Using the setup menus............................. 31
Picture Menu ...................................... 32
Image size........................................ 32
Quality ............................................. 34
Drive mode ...................................... 36
Exposure adjustment........................ 37
White balance .................................. 39
Sharpness......................................... 41
Voice memo..................................... 42
Color mode ...................................... 44
Erase ................................................ 46
Slide Show....................................... 48
Rotate............................................... 49
Print.................................................. 50
Setup Menu......................................... 51
Brightness........................................ 52
Beep................................................. 53
Date.................................................. 54
Time................................................. 56
Page 7

Table of Contents
Date Stamp....................................... 57
Video Out......................................... 59
Format.............................................. 61
Reset ................................................ 62
Copy to SD ...................................... 63
Frequency ........................................ 65
Power Saving................................... 66
Language.......................................... 68
USBSwitch ...................................... 69
FileNoRST....................................... 70
Music Menu........................................ 71
Appendix A............................................. 75
Specification.................................... 75
Appendix B ............................................ 79
Troubleshooting............................... 79
Appendix C ............................................. 81
Installing Software........................... 81
Appendix D............................................. 82
Guarantee Certificate for Product
Services............................................ 82
Page 8

Page 9

Chapter 1: Getting started
This chapter introduces you to the features and functions of your new DV digital camera. You will also
find some simple instructions here to help you take
your first still photos and movies.
1.1 Features
Your new DV digital camera includes many exciting
features to help you take high quality digital still
images and movies. You can also record digital audio
footage with the DV and the high resolution LCD
screen can be used to playback movies or review still
pictures stored in the camera memory or on the
optional SD card. When connected to a host computer, the DV can also function as a webcam.
Digital still camera
The DV can take digital photographs in JPEG format
at resolutions of up to six megapixels. Pictures can be
stored in the 16 MB internal memory or on option a l
SD expansion card.
Digital video camera
The DV can record digital movies in ASF format with
QVGA quality (30 frames per second). Video footage
can be stored in the 16 MB internal memo ry or on
optional SD expansion card.
Page 10

2
Features
Digital audio recorder
The DV can record digital audio in WAV format.
Audio footage can be stored in the 16 MB internal
memory or on optional SD expansion card.
webcam
When connected to a host computer using a USB
cable, the DV can function as an advanced webcam
with QVGA quality.
Picture and video player
The DV features a 1.8-inch TFT LCD screen which
can be used to review the pictures and movies stored
on internal memory or on SD expansion card.
Page 11
3
Unpacking
1.2 Unpacking
All the items shown below should be present and
undamaged. If any items are missing or damaged,
consult your dealer straight away.
LITH
IU
M
IO
N
B
A
TT
ERY
AJS
User Manual
Warranty Card
DV digital camera
Pouch
CD
User manual and
warranty card
AC power adapter
Video and USB cables
Lithium battery
Strap
Page 12

4
Camera components
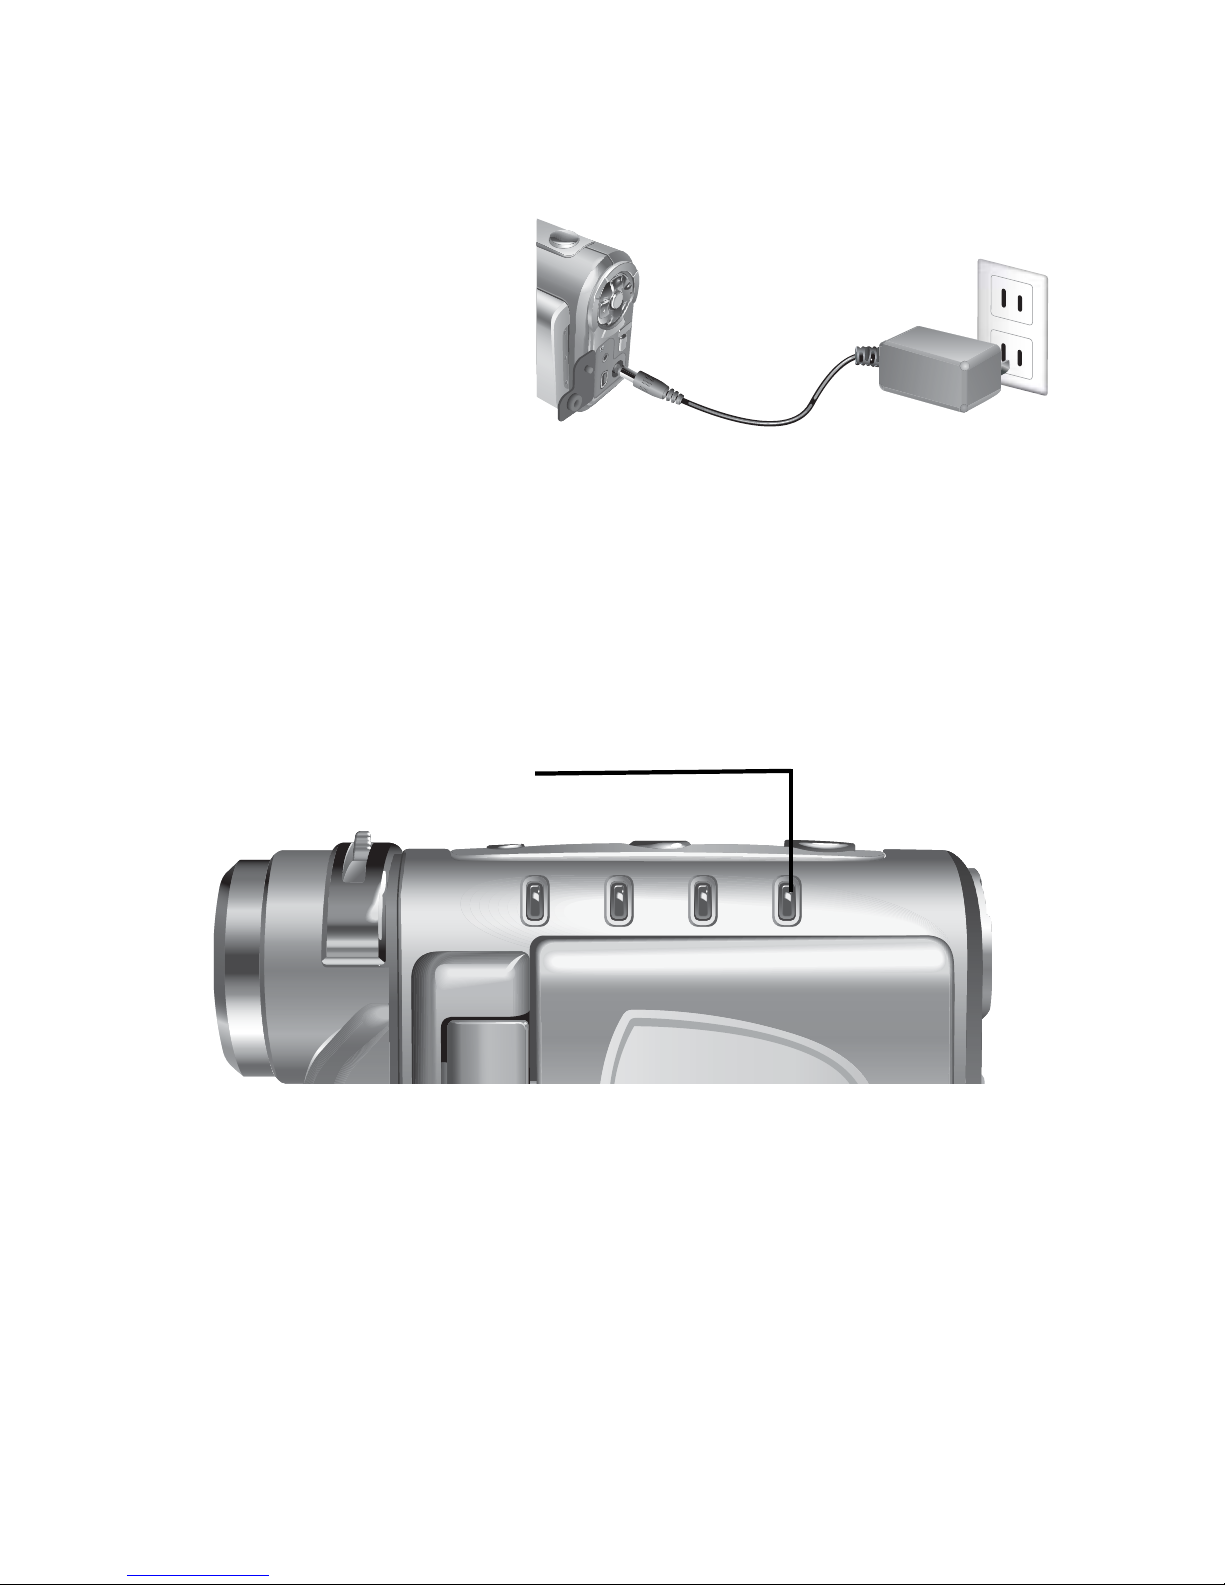
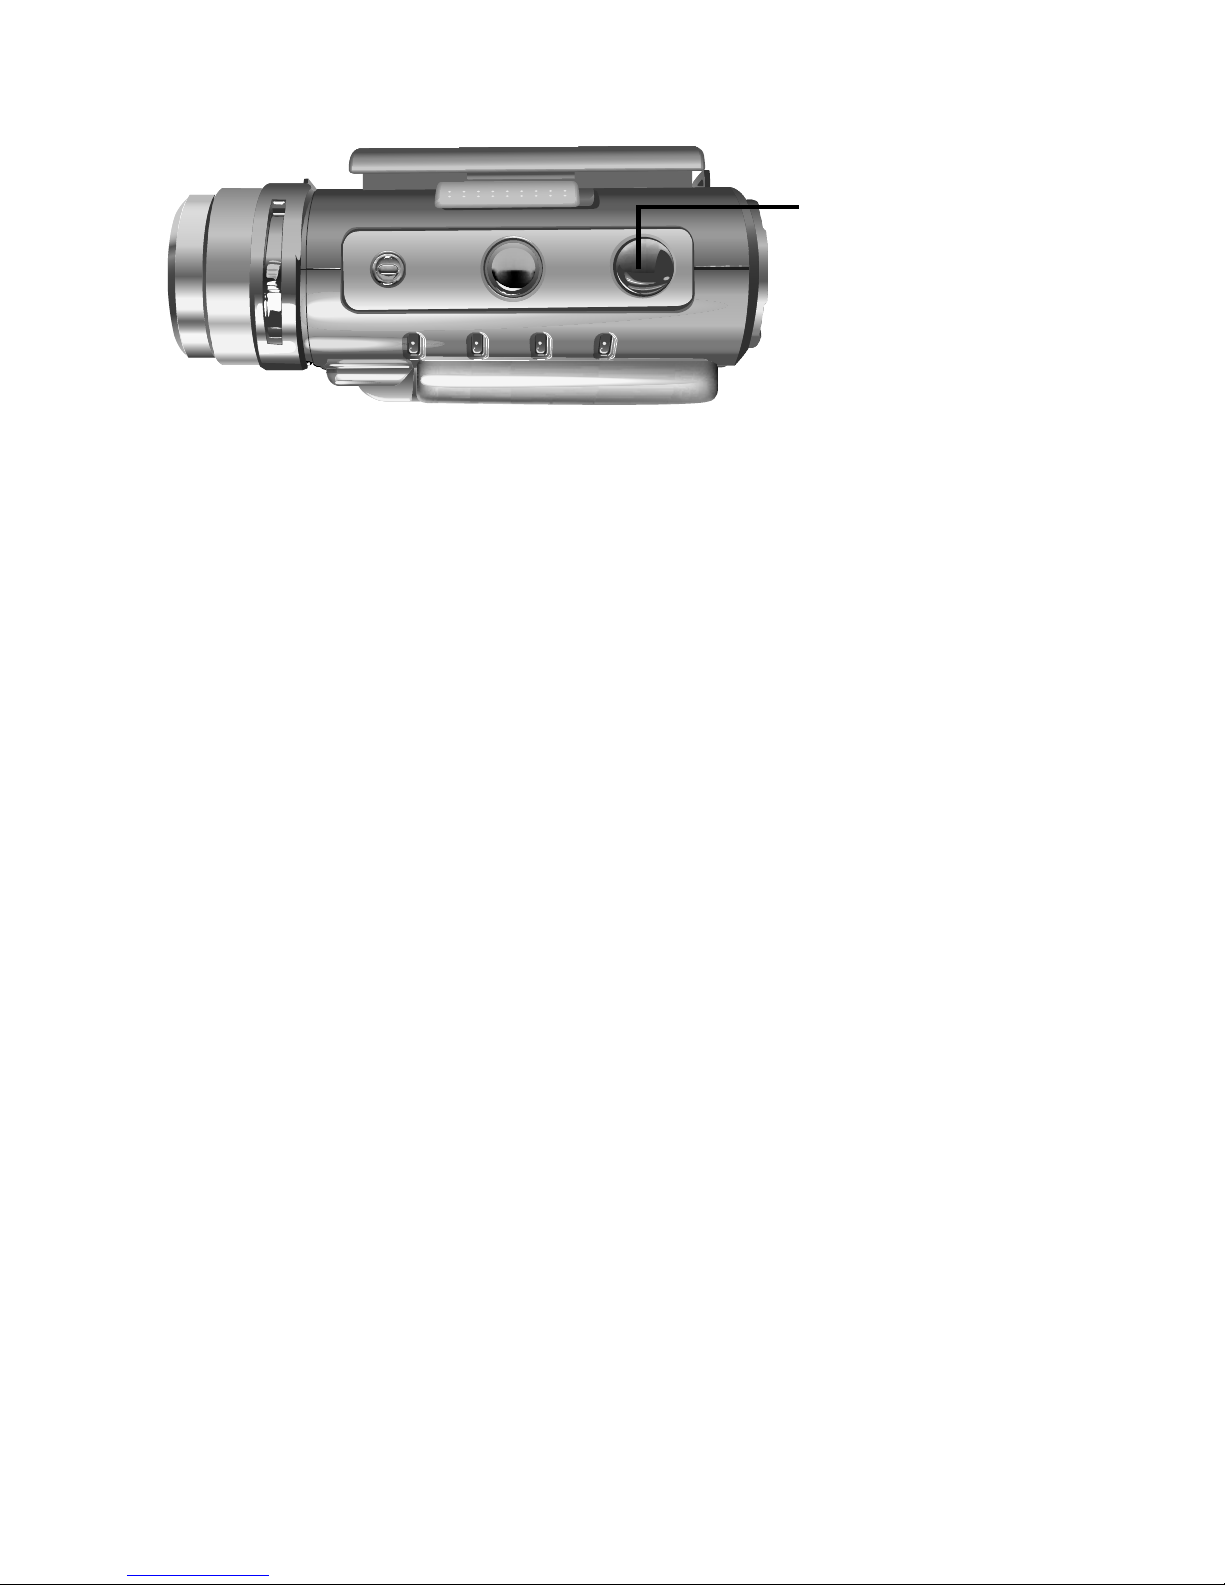
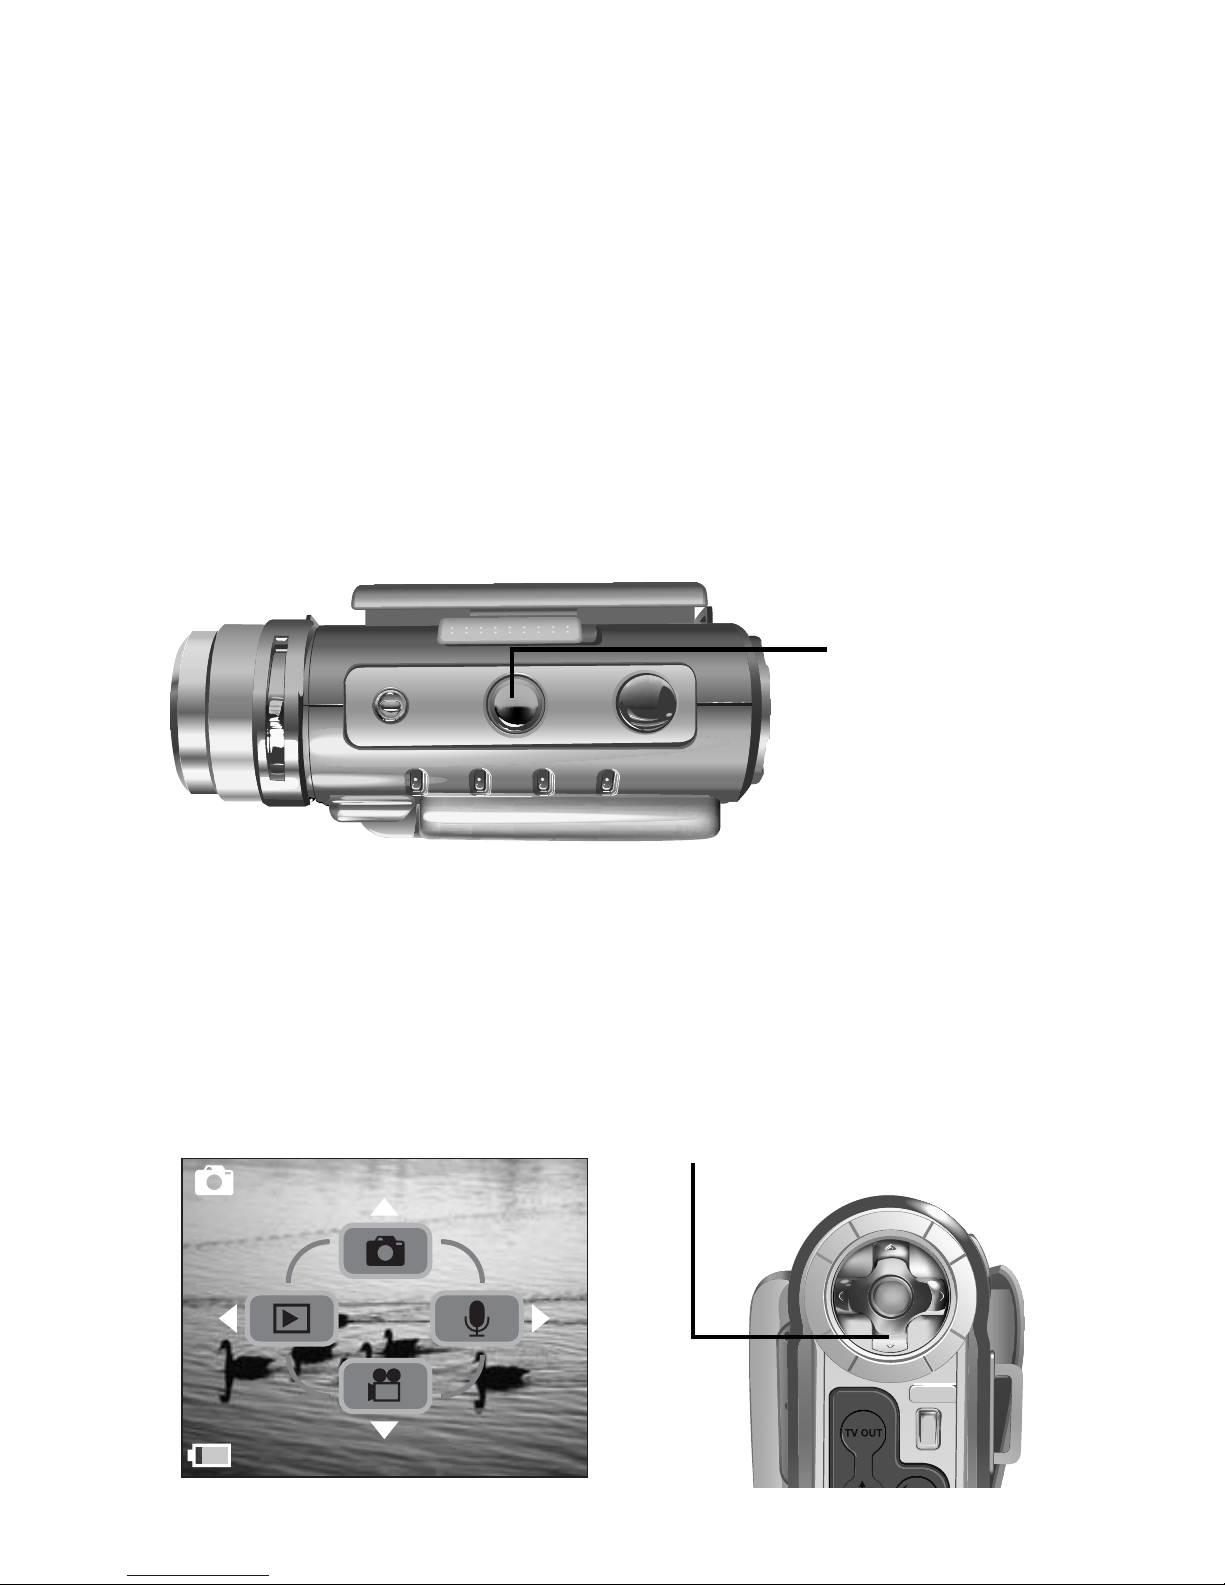
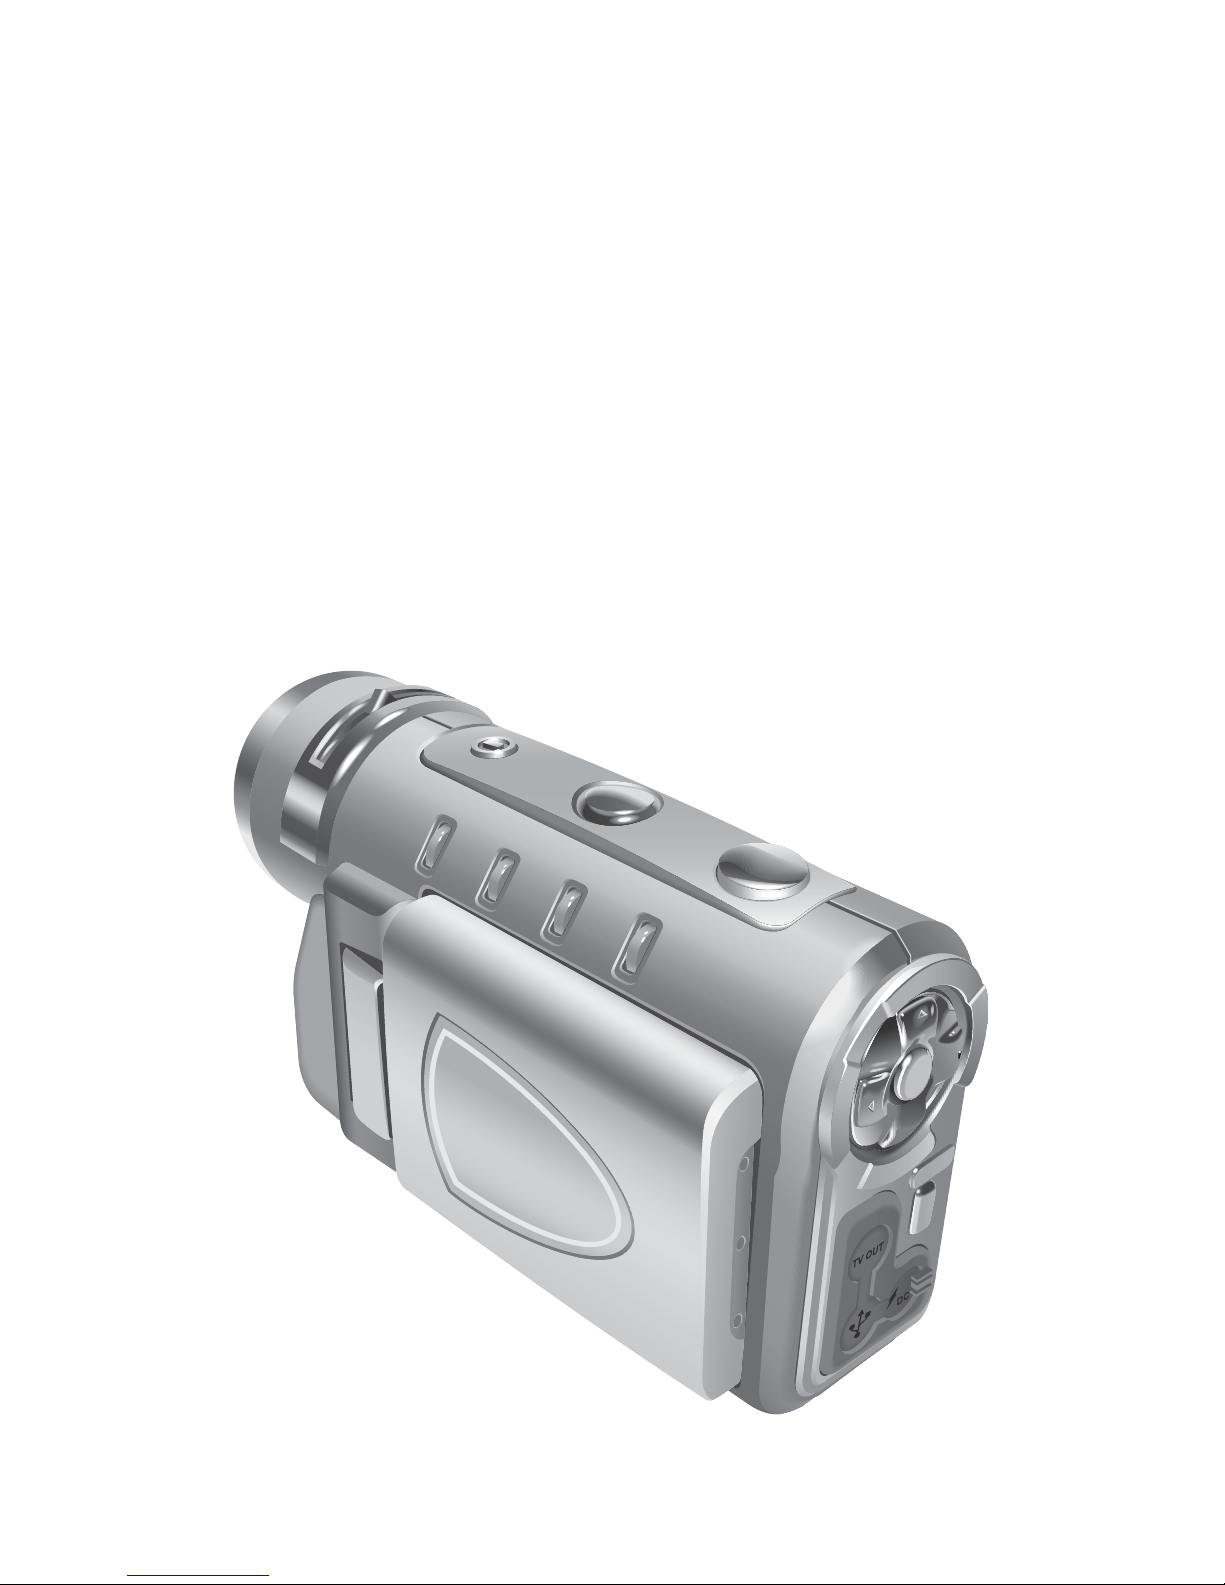
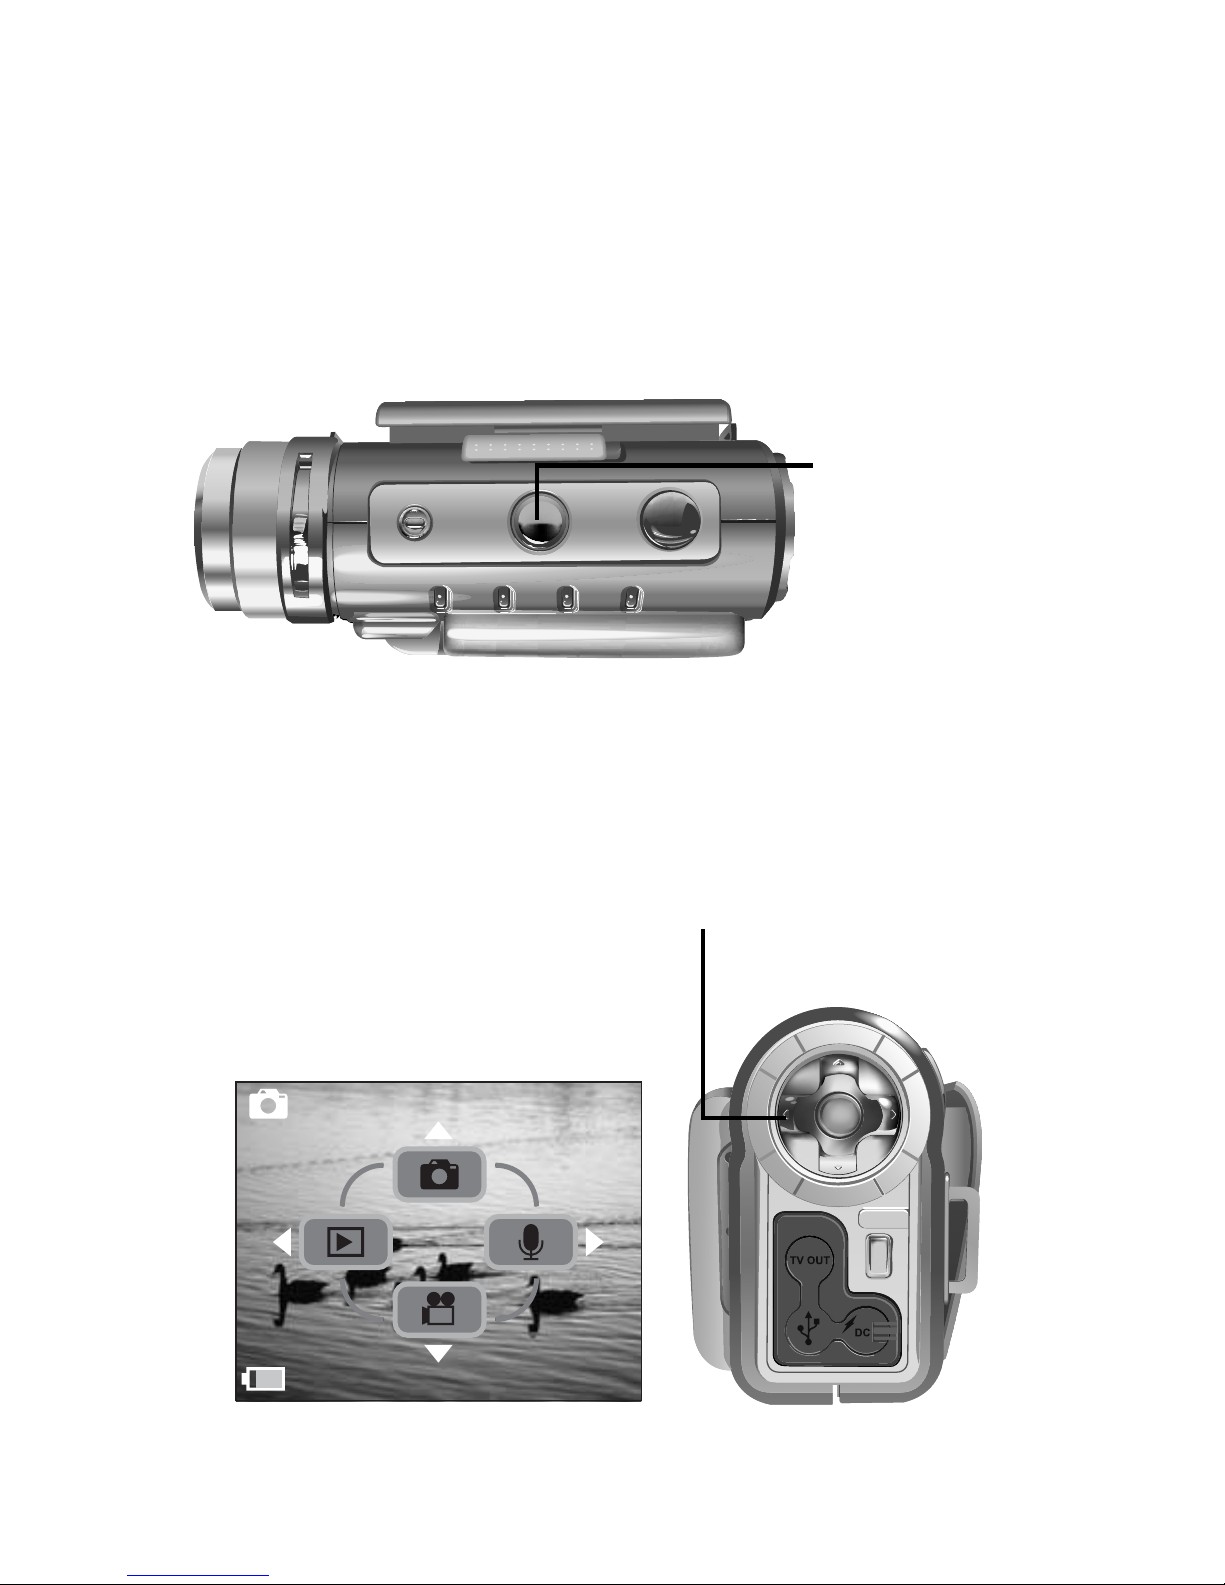
1.3 Camera components
Shutter button
Mode button
Power button
Battery compartment cover
Tripod mount
SD card slot
Page 13
5
Camera components
Focusing
lever
Playback
mode
LED
Photo
mode
LED
Video
mode
LED
Charge/
Audio
mode
LED
LCD screen
Flash
Lens
assembly
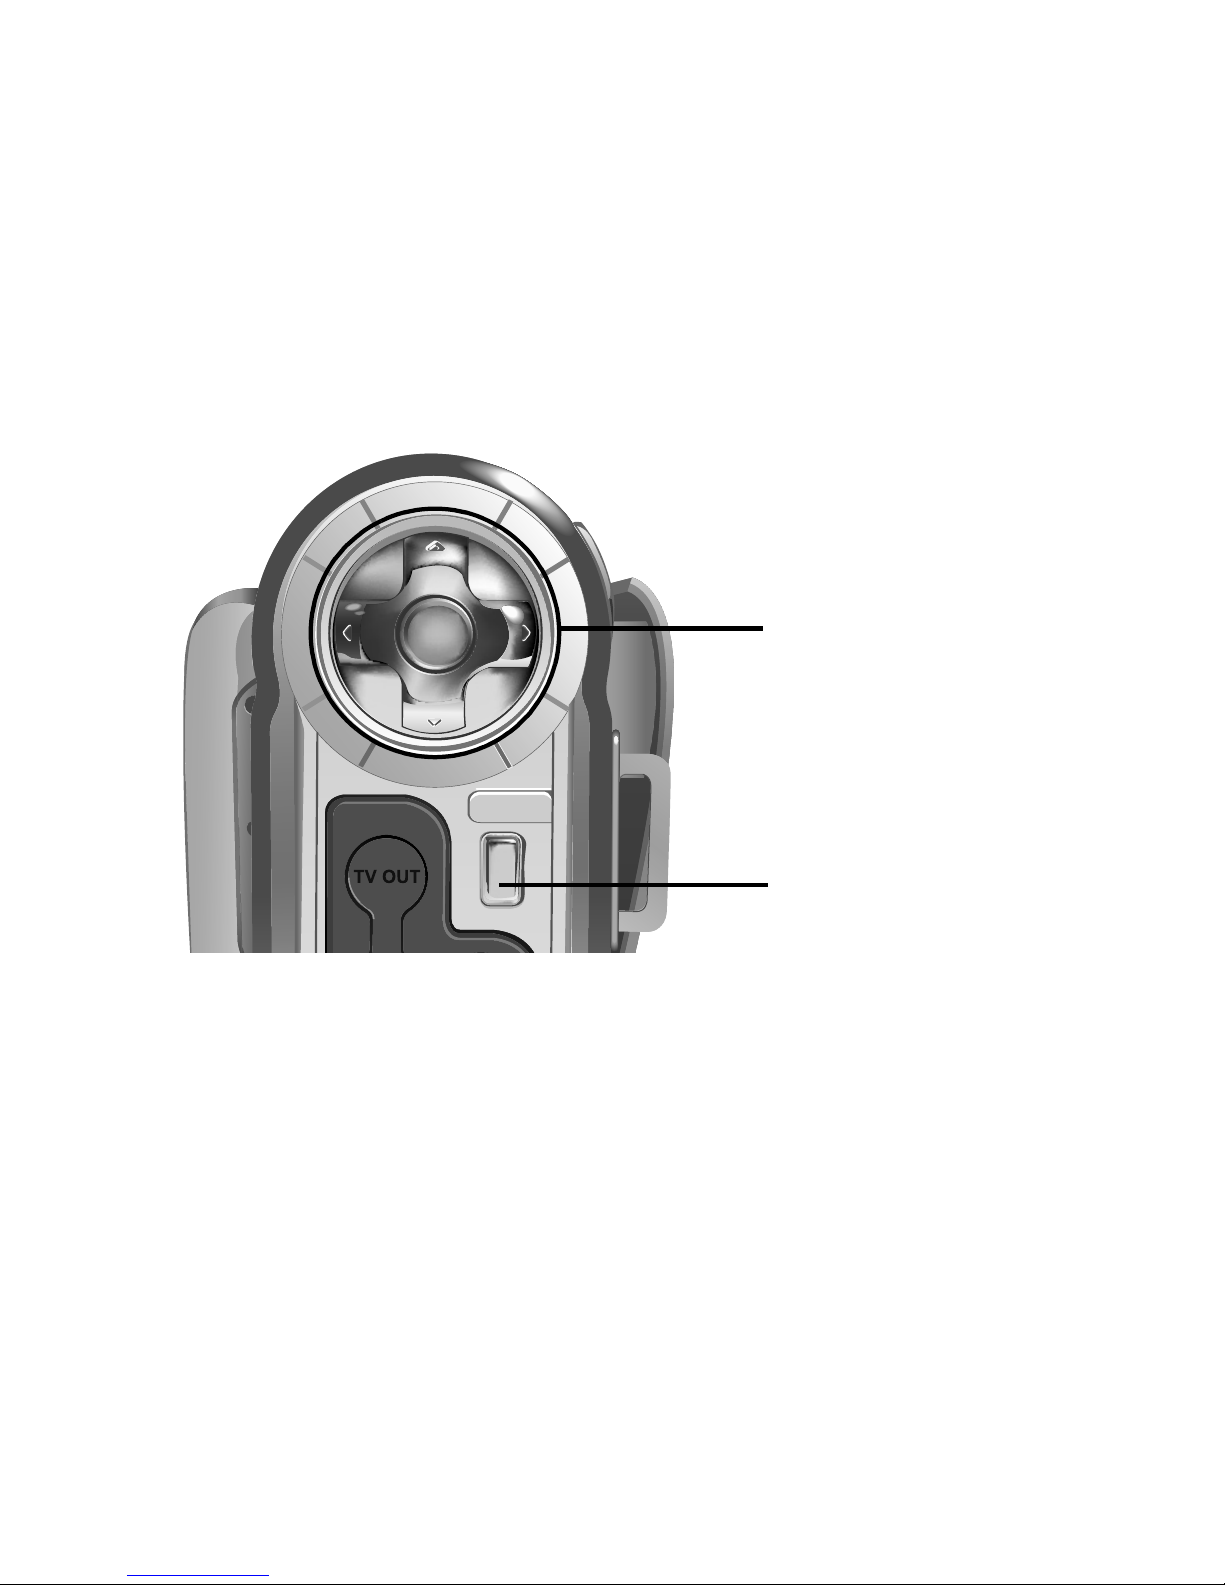
USB
port
TV
out
DC-in
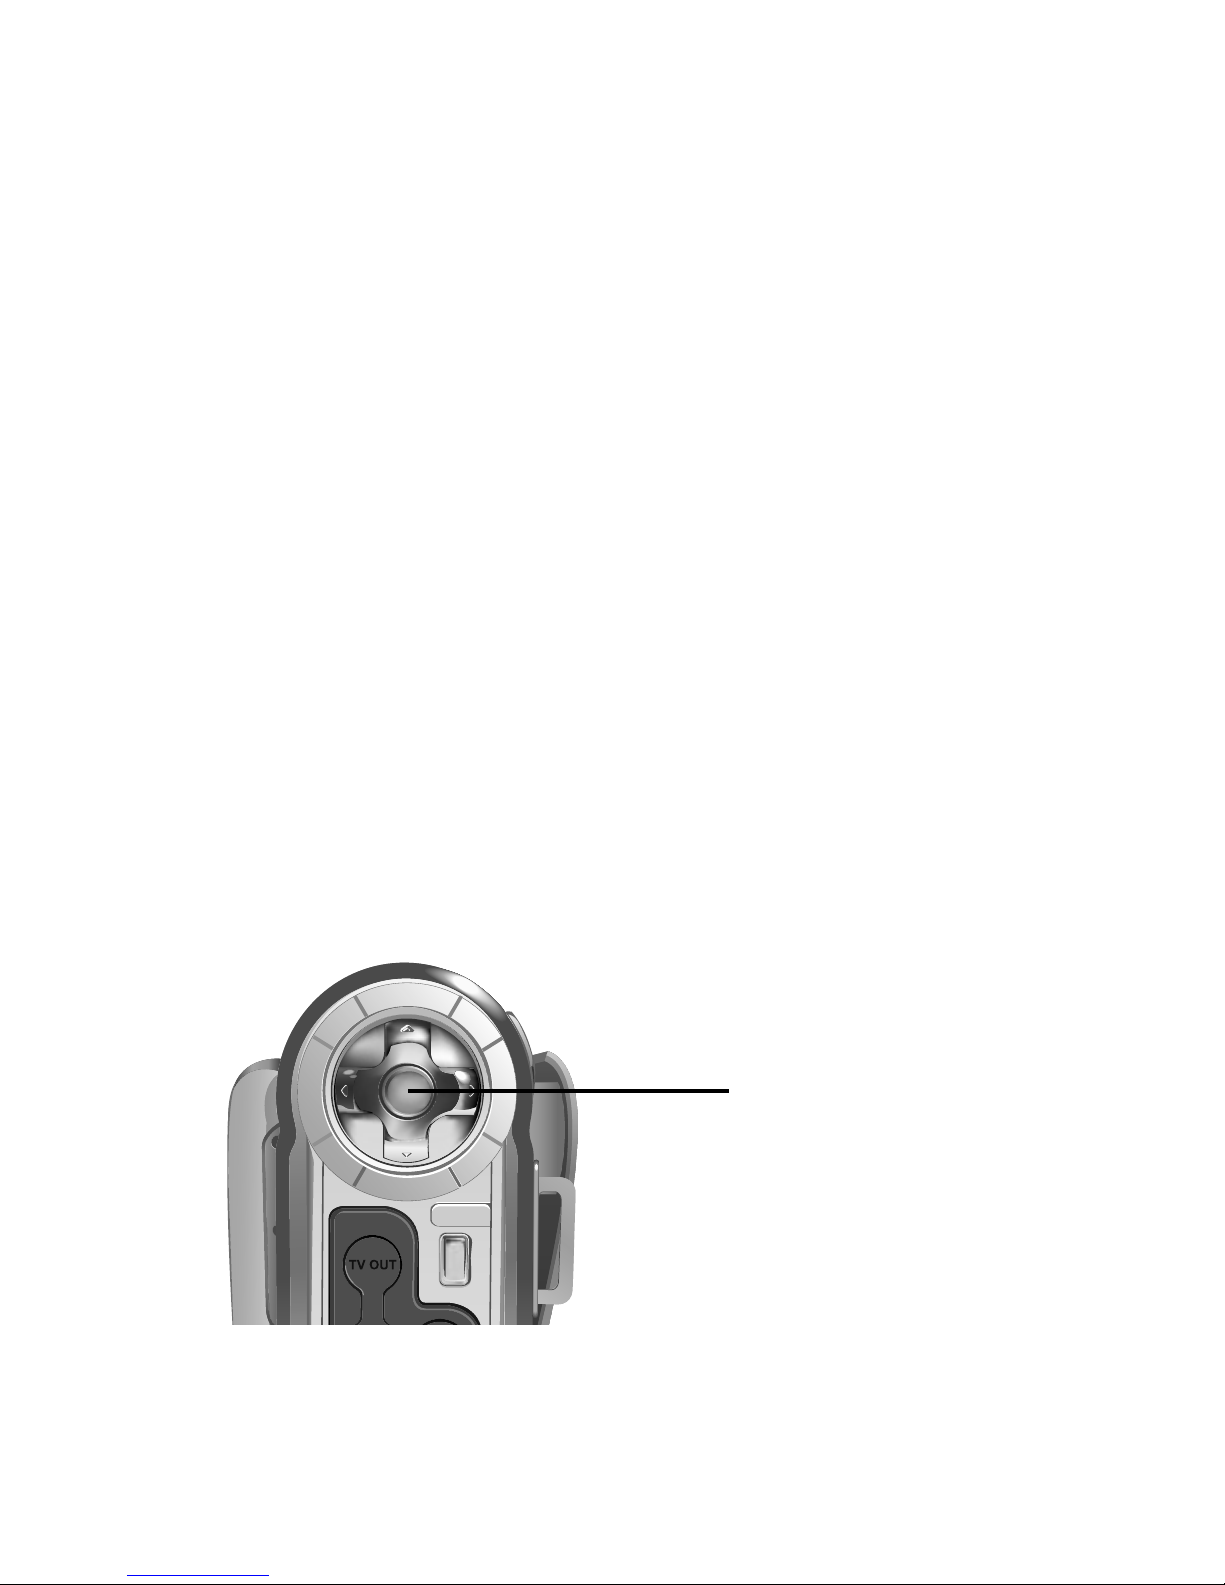
Up, Down, Left,
Right, and OK
buttons
Menu
button
Mic
Self timer
indicator
Page 14
6
Inserting the battery
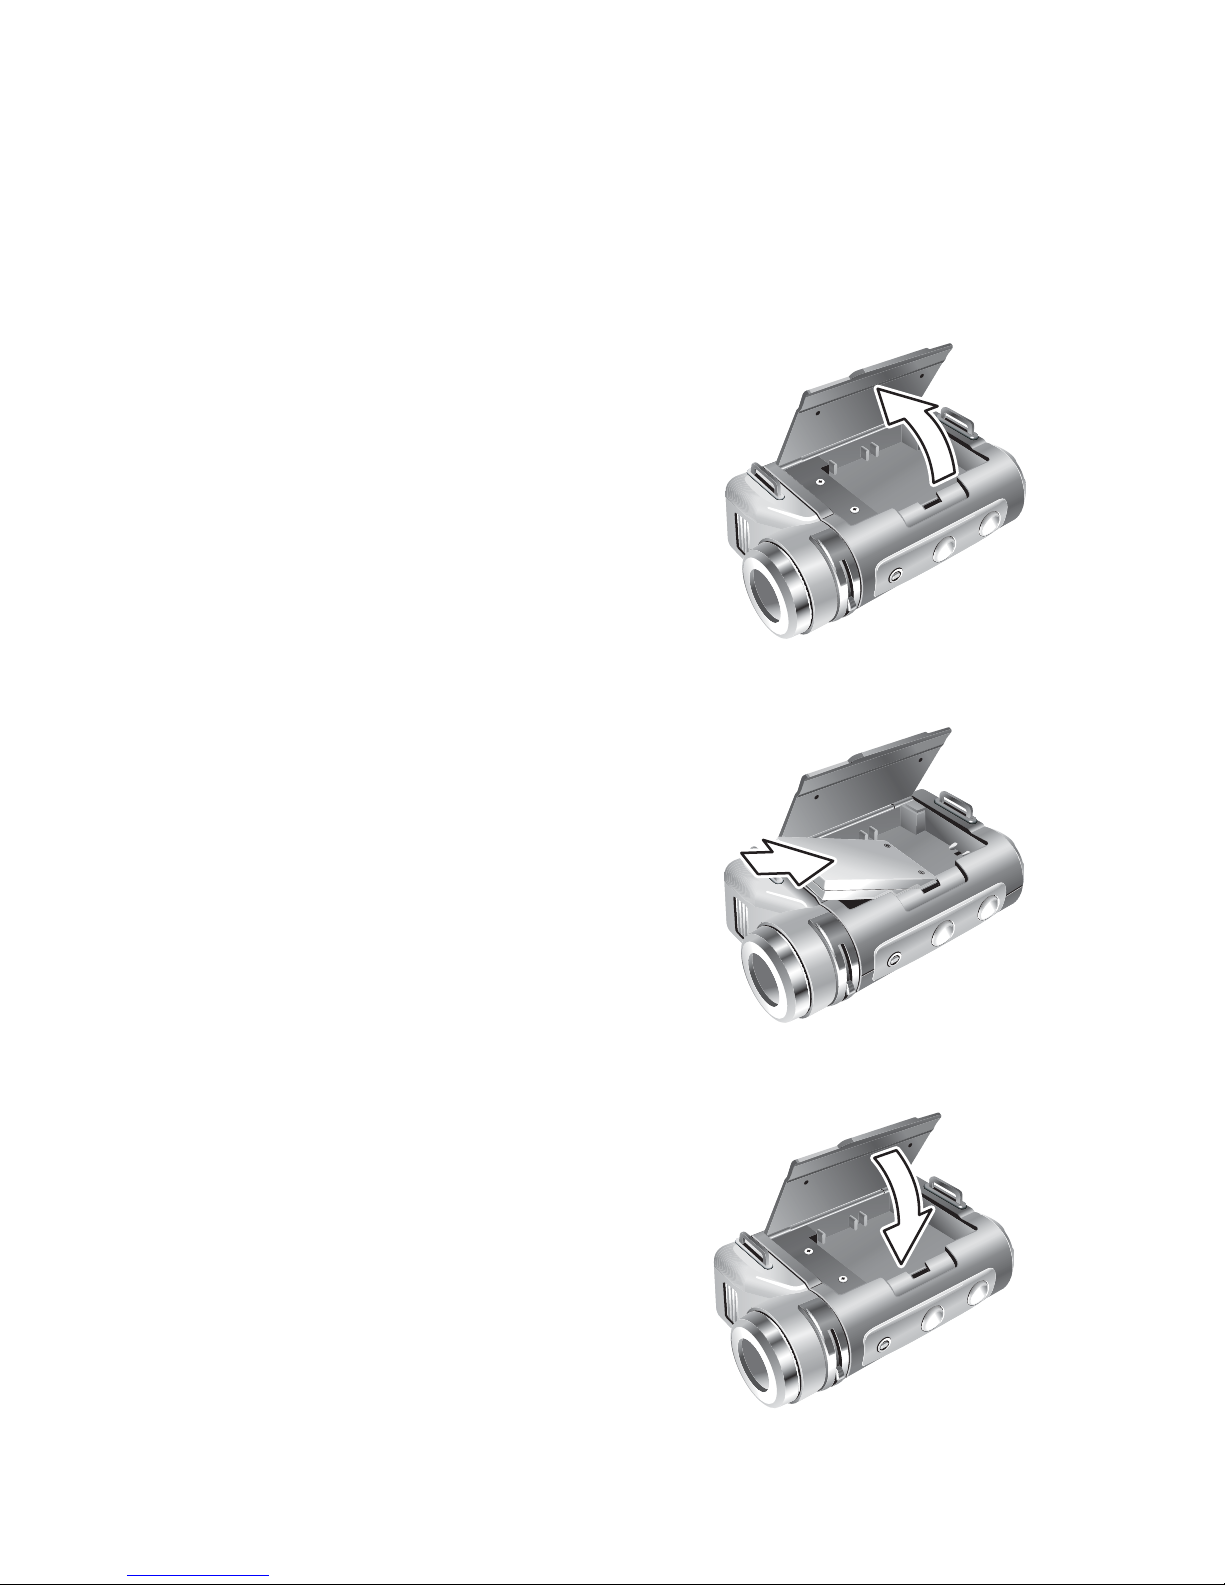
1.4 Inserting the battery
Your DV is powered by a 3.7V, rechargeable lithium
battery. Follow the in structions below to insert a battery.
1. Open the battery
compartment door.
2. Insert the battery as
shown.
3. Close the battery
compartment door.
Page 15

7
Inserting the battery
Your DV can also use non rechargeable alkaline batteries instead of a single rechargeable battery. Four
AAA size, alkaline batteries should be used in place
of the supplied lithium battery and should be inserted
as shown below.
Note: The AC adapter can still be used when
non rechargeable batteries are installed,
but it will not recharge the cells.
A battery level indicator is displayed in the bottom
left hand corner of the LCD display. When the indicator shows that the battery is nearly flat, you should
connect the AC adapter or change the battery.
Page 16
8
Charging the battery
1.5 Charging the battery
1. Charge th e battery using the
supplied AC
adapter. Plug
the AC adapter
into the DC-in
socket on the
rear of the camera.
2. Verify that the DC light illuminates to indicate
that the battery is being charged.
Note: Use only the AC adapter provided with
the DV to charge th e battery. Using any
other adapter may damage the camera.
Charge light
Page 17
9
Inserting an SD card
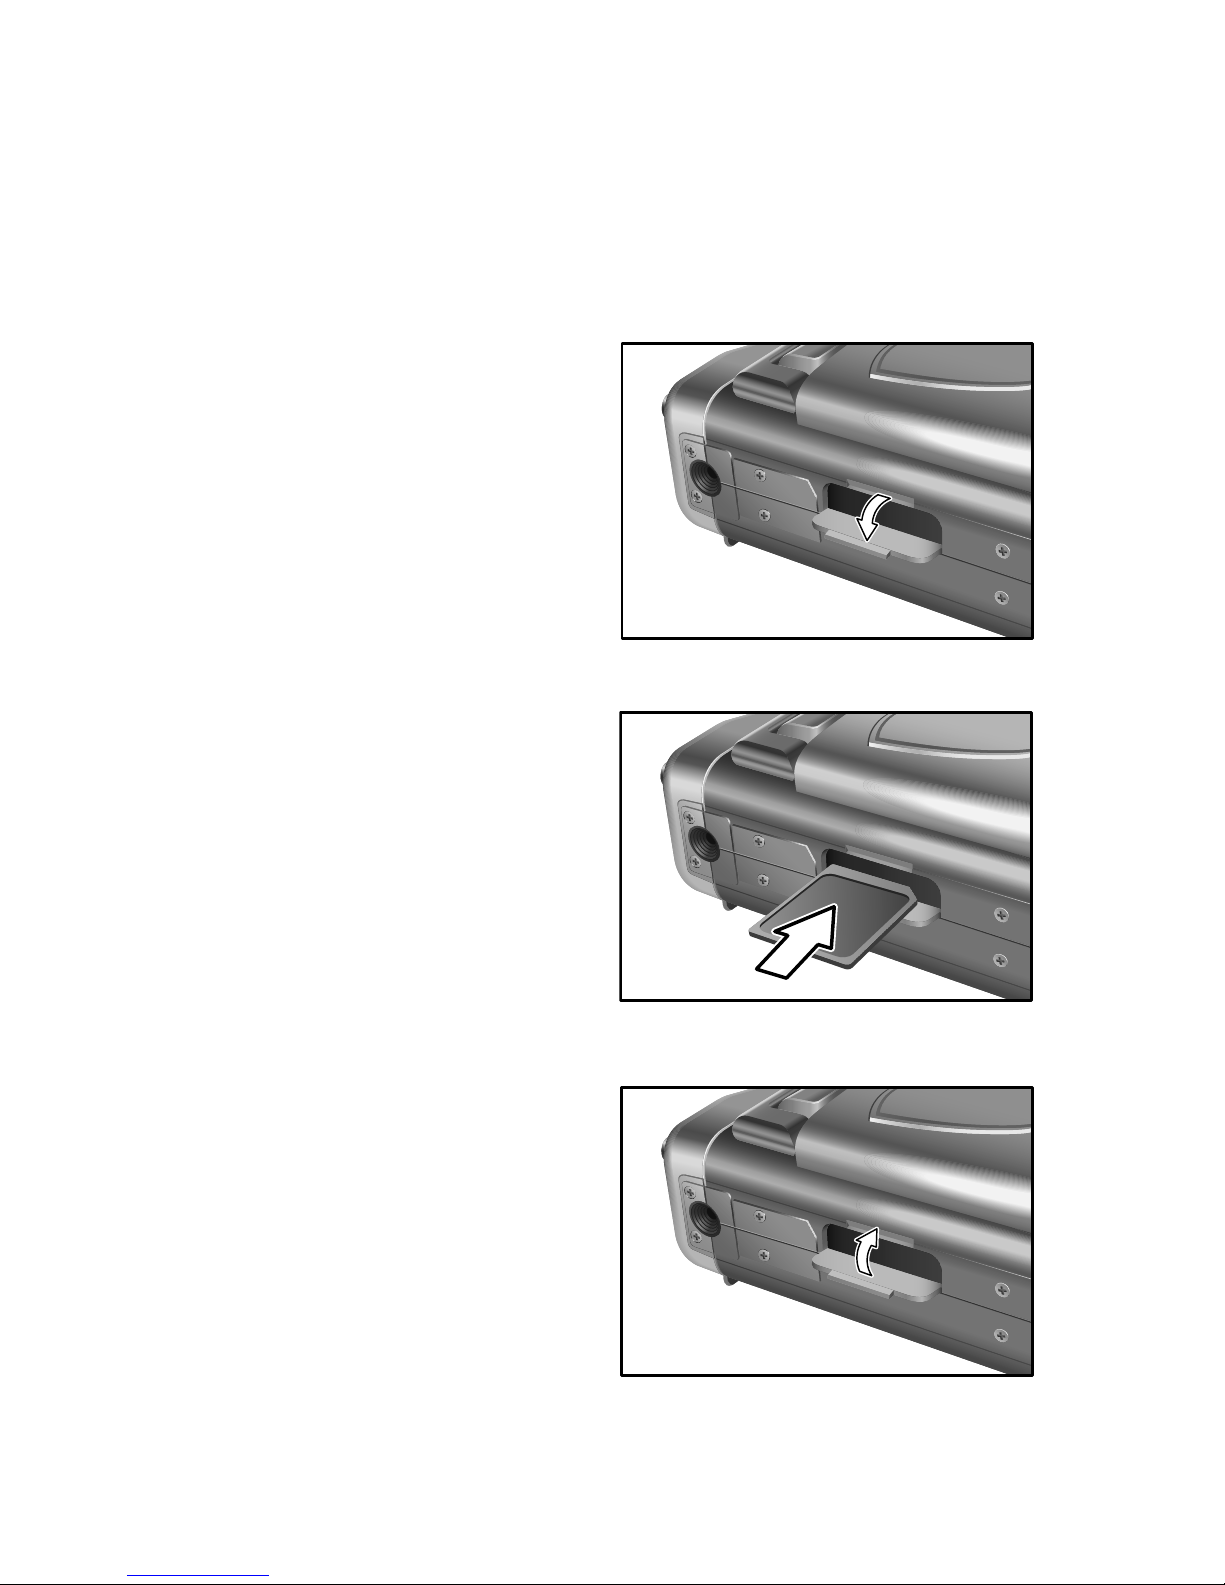
1.6 Inserting an SD card
You can install an SD memory card in your camera to
increase the memory capacity. Follow the instructions
below to install an SD card.
1. Open the SD card
compartment door
on the bottom of
the camera.
2. Insert an SD card
until it clicks into
place.
3. Close the SD card
compartment door.
Page 18
10
Inserting an SD card
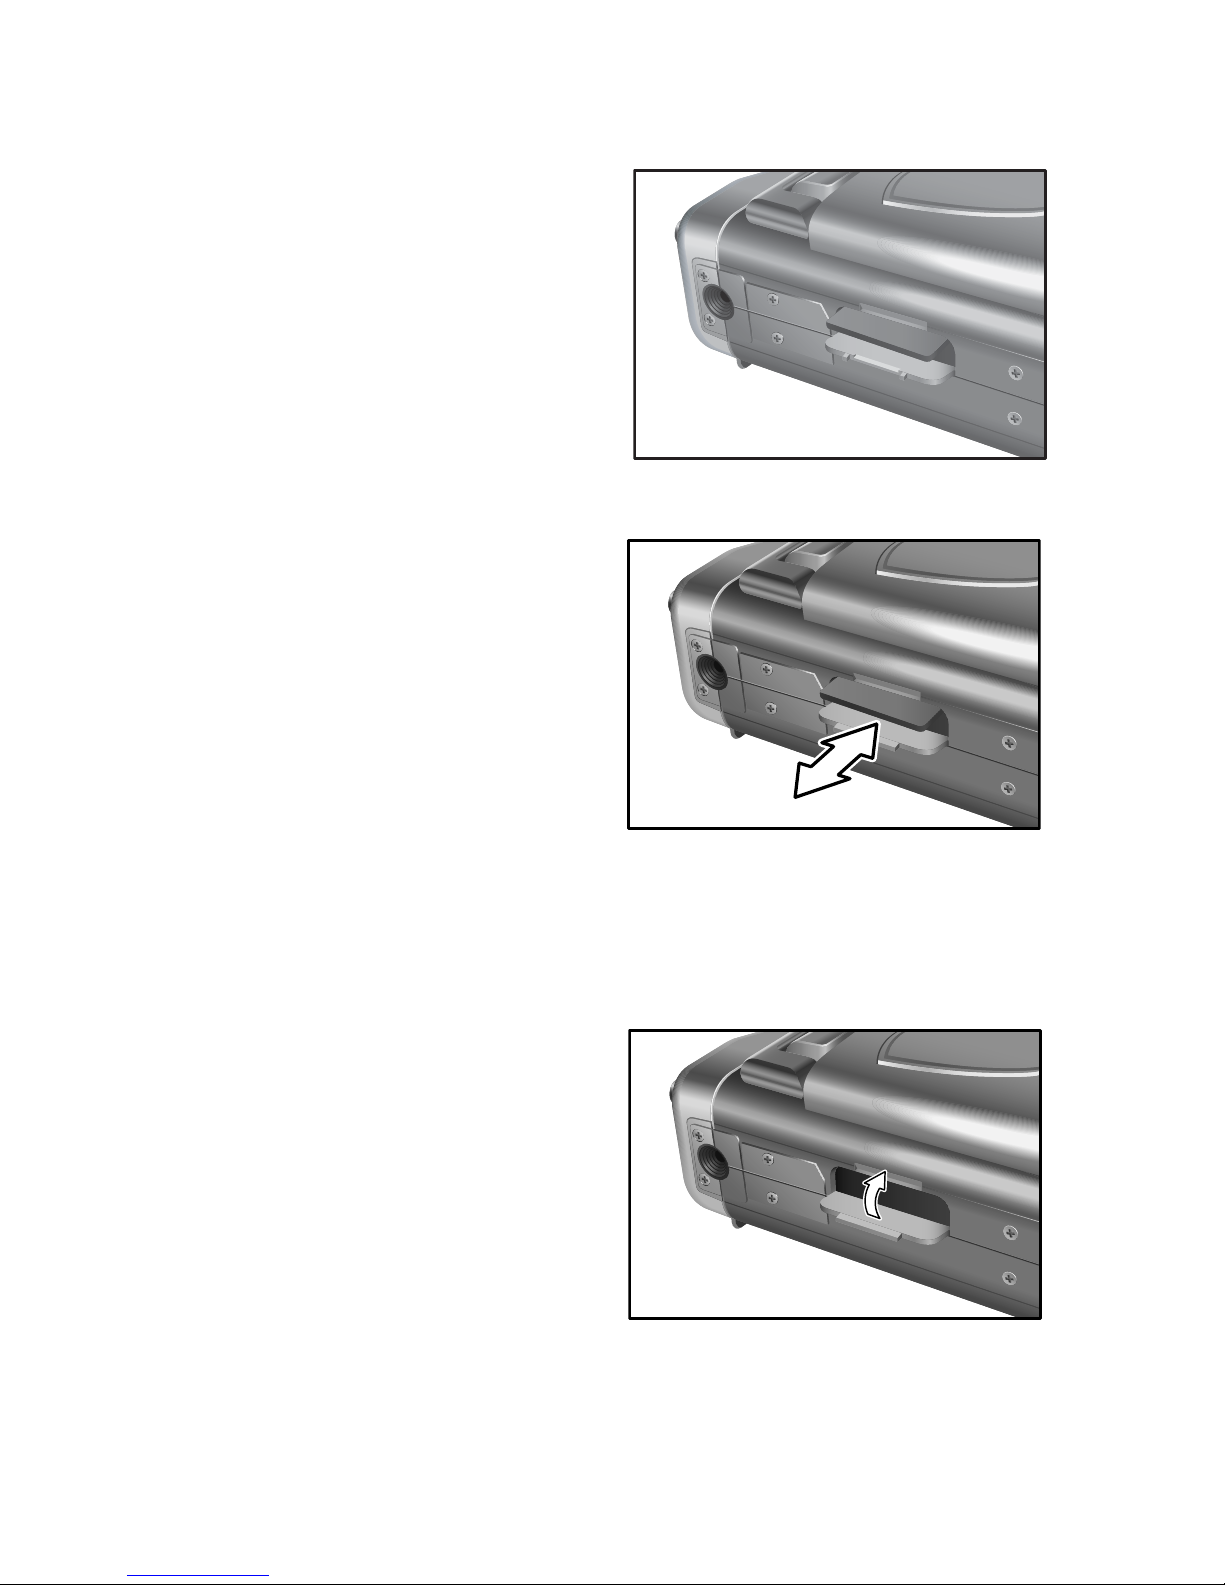
To remove the card:
1. Open the SD card
compartment
door.
2. Press the card into
the slot and
release.
The card will spring part way out and can be
removed.
3. Close the SD card
compartment
door.
Page 19
11
Taking your first still picture
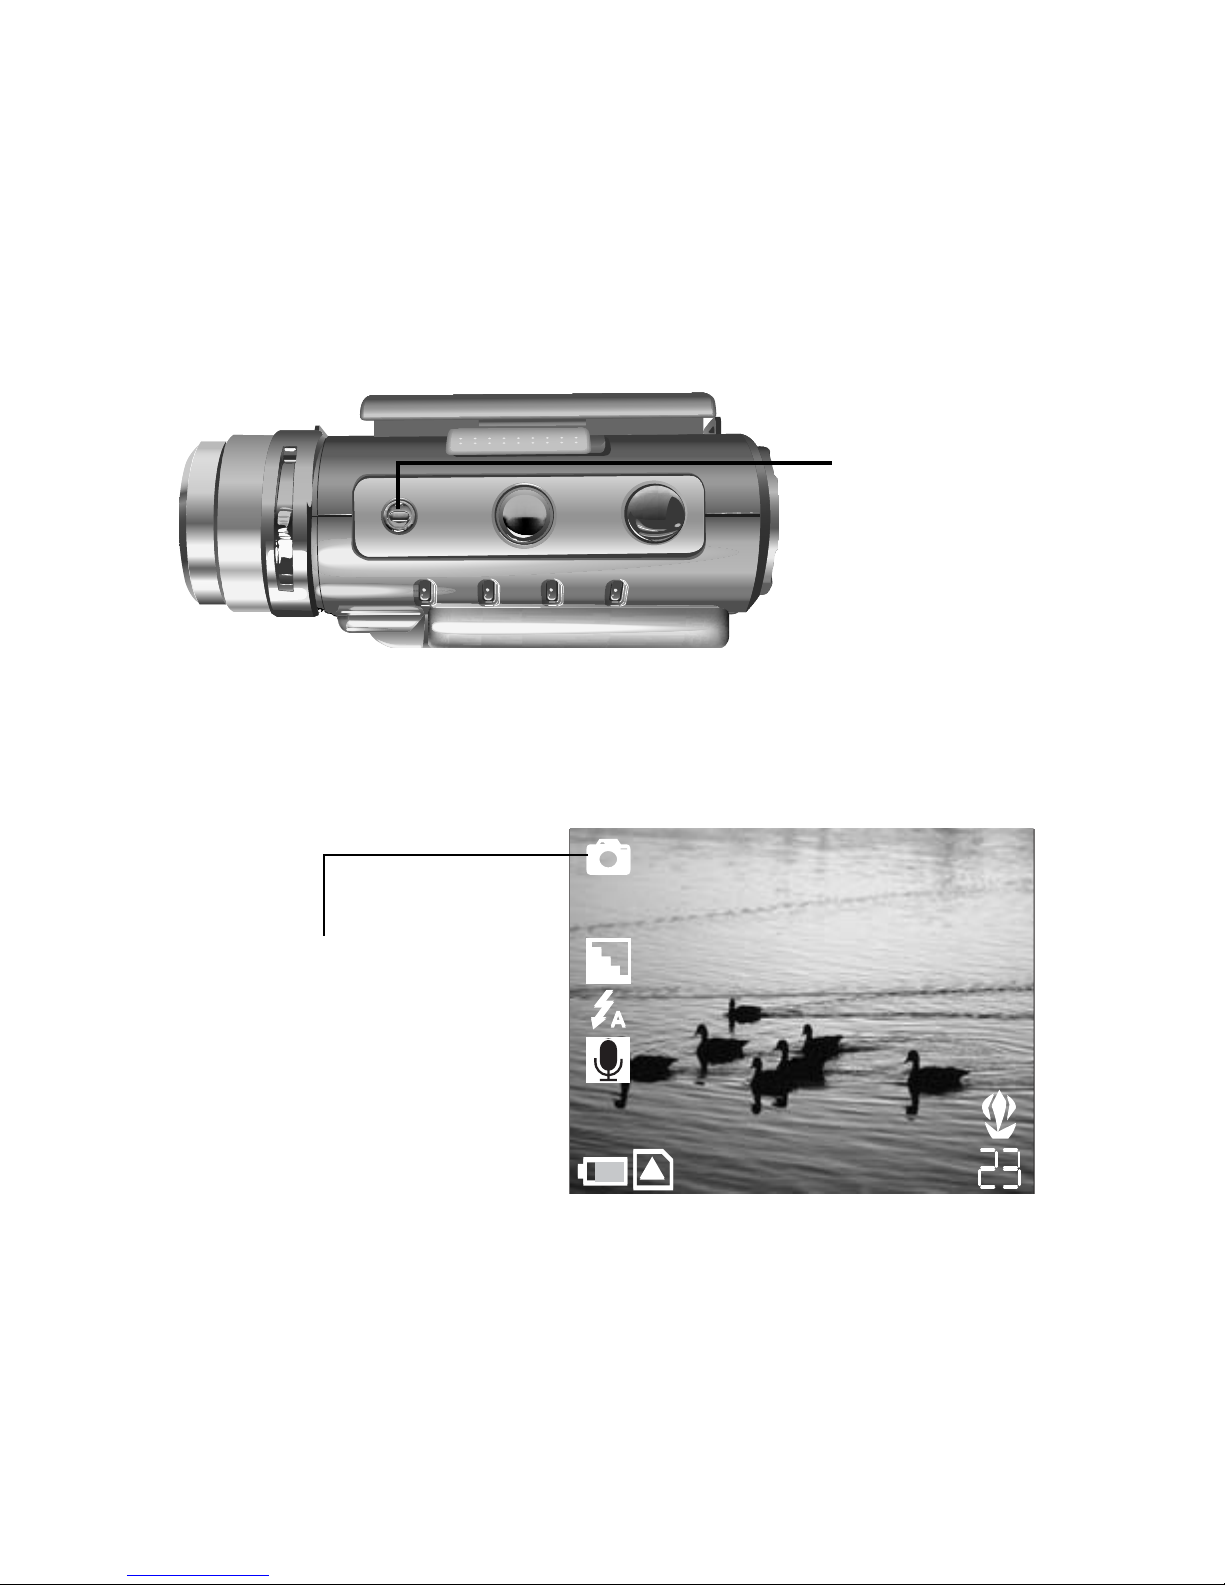
1.7 Taking your first still picture
Follow these instructions to take your first still photograph with you r DV digital camera.
1. Turn on the DV by pressing the power button for
2 seconds.
2. The camera must be in Photo mode to take still
pictures. Check for an icon in the top left corner
of the screen to confirm th i s .
Note: If the camera is not in Photo mode when
you turn it on, see Photo mode on
page 18.
3. Use the LCD screen to compose your picture.
Power button
3M
+2.0
3M
+2.0
Photo mode
icon
Page 20
12
Taking your first still picture
4. Press the shutter button to take the pi cture.
When you press the shutter button yo u will hear a
sound to indicate that the picture has been take n
(unless the sound has been disabled), and the captured
picture will remain on the screen for two seconds.
You can review your picture in Playback mode. See
Playback mode on page 25.
You can change various settings on the camera that
will affect the quality and appearance of the pictures
you take. You can adjust the exposure, size and resolution of the image, white balance, and other settings.
See Picture Menu on page 32.
Shutter button
Page 21
13
Shooting your first video
1.8 Shooting your first video
Follow these instructions to take your first video with
your DV digital camera.
1. Turn on your DV by pressing the power button
for two seconds.
The camera may start up in Photo mode and you will
need to switch to Video mode to shoot video.
2. Press the mode button on the top of the camera.
The LCD displays a graphic showing four mode
options.
3. Press the Down arrow button on the back of the
camera to select Video mode.
Mode button
Down arrow
Page 22
14
Shooting your first video
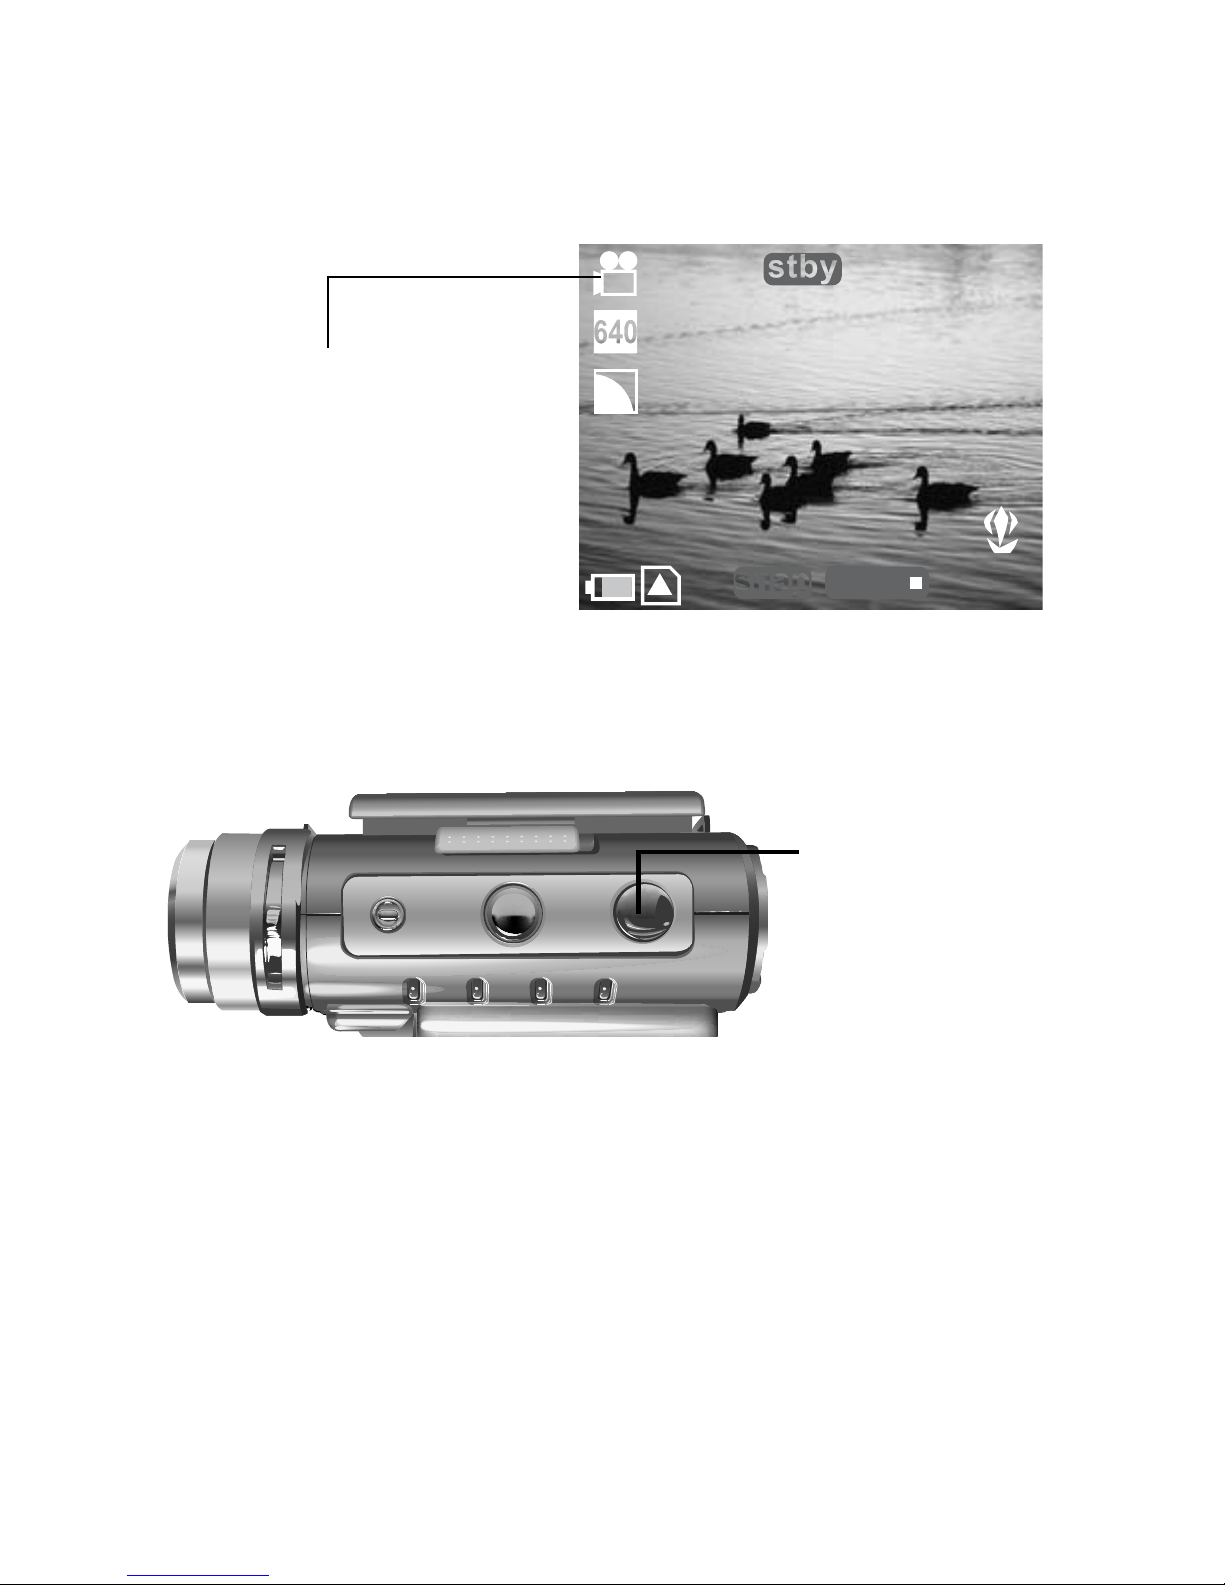
The DV changes to Video mode. Check for the Video
mode icon in the top left corner of the screen to confirm this.
4. Use the LCD screen to frame your shot.
5. Press the shutter button to begin recordin g.
6. Press the shutter button a second tim e to stop
recording.
You will be able to see your video on the LCD screen
as you record it. When you press the shutter button to
stop recording the footage is automatically saved to
memory. You can review your video in Playback
mode. See Playback mode on page 25.
08:10
Start
Video mode
icon
Shutter button
Page 23
15
Connecting
1.9 Connecting
You can connect your DV digital camera to a TV to
view either still pictures or video stored on the internal memory or on an SD card.
You can also connect the DV to a computer using a
USB cable and download pictures or videos to the
hard disk. When the DV is connected to a computer,
you can also use it as a webcam.
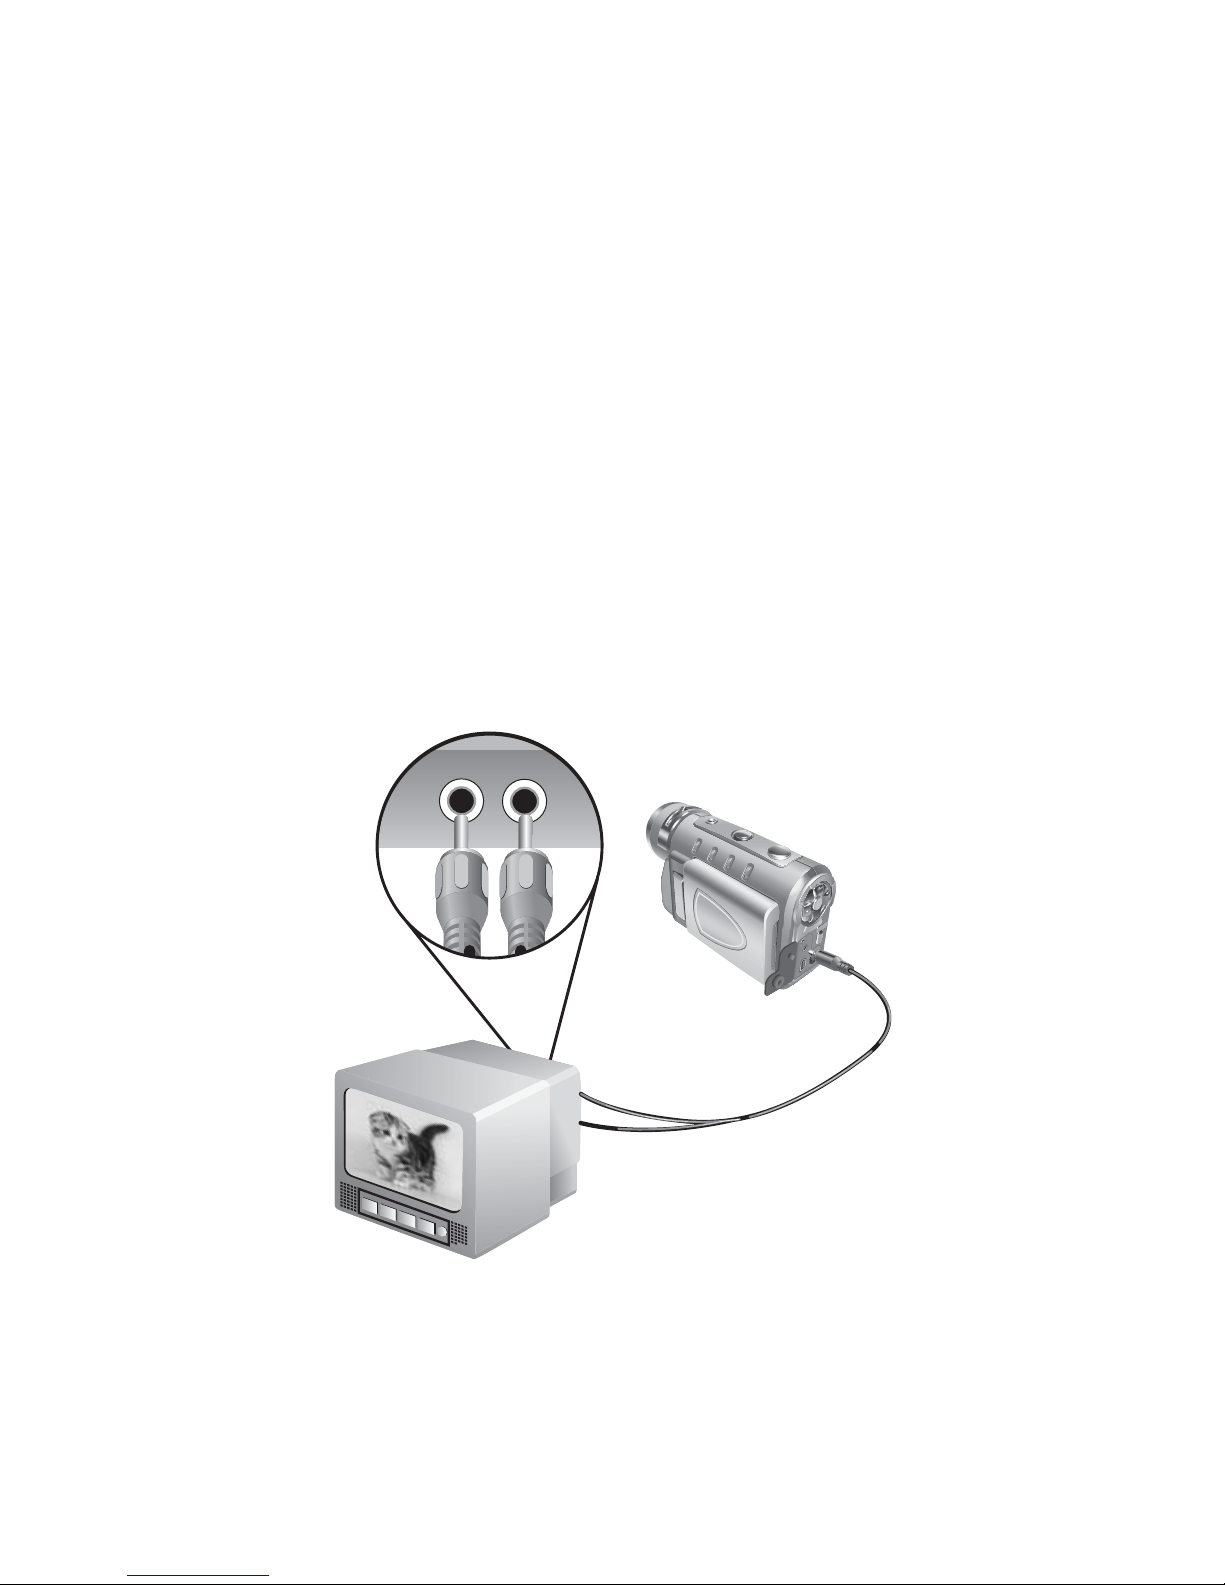
Connecting to a TV
Connect the DV to a TV using the supplied video
cable as shown below.
When your DV is connected to a TV, you can view
video or stil l images on t he TV screen. You may need
to configure the DV to work correctly with your TV.
See Setup Menu on page 51.
Audio
Video
Page 24
16
Connecting
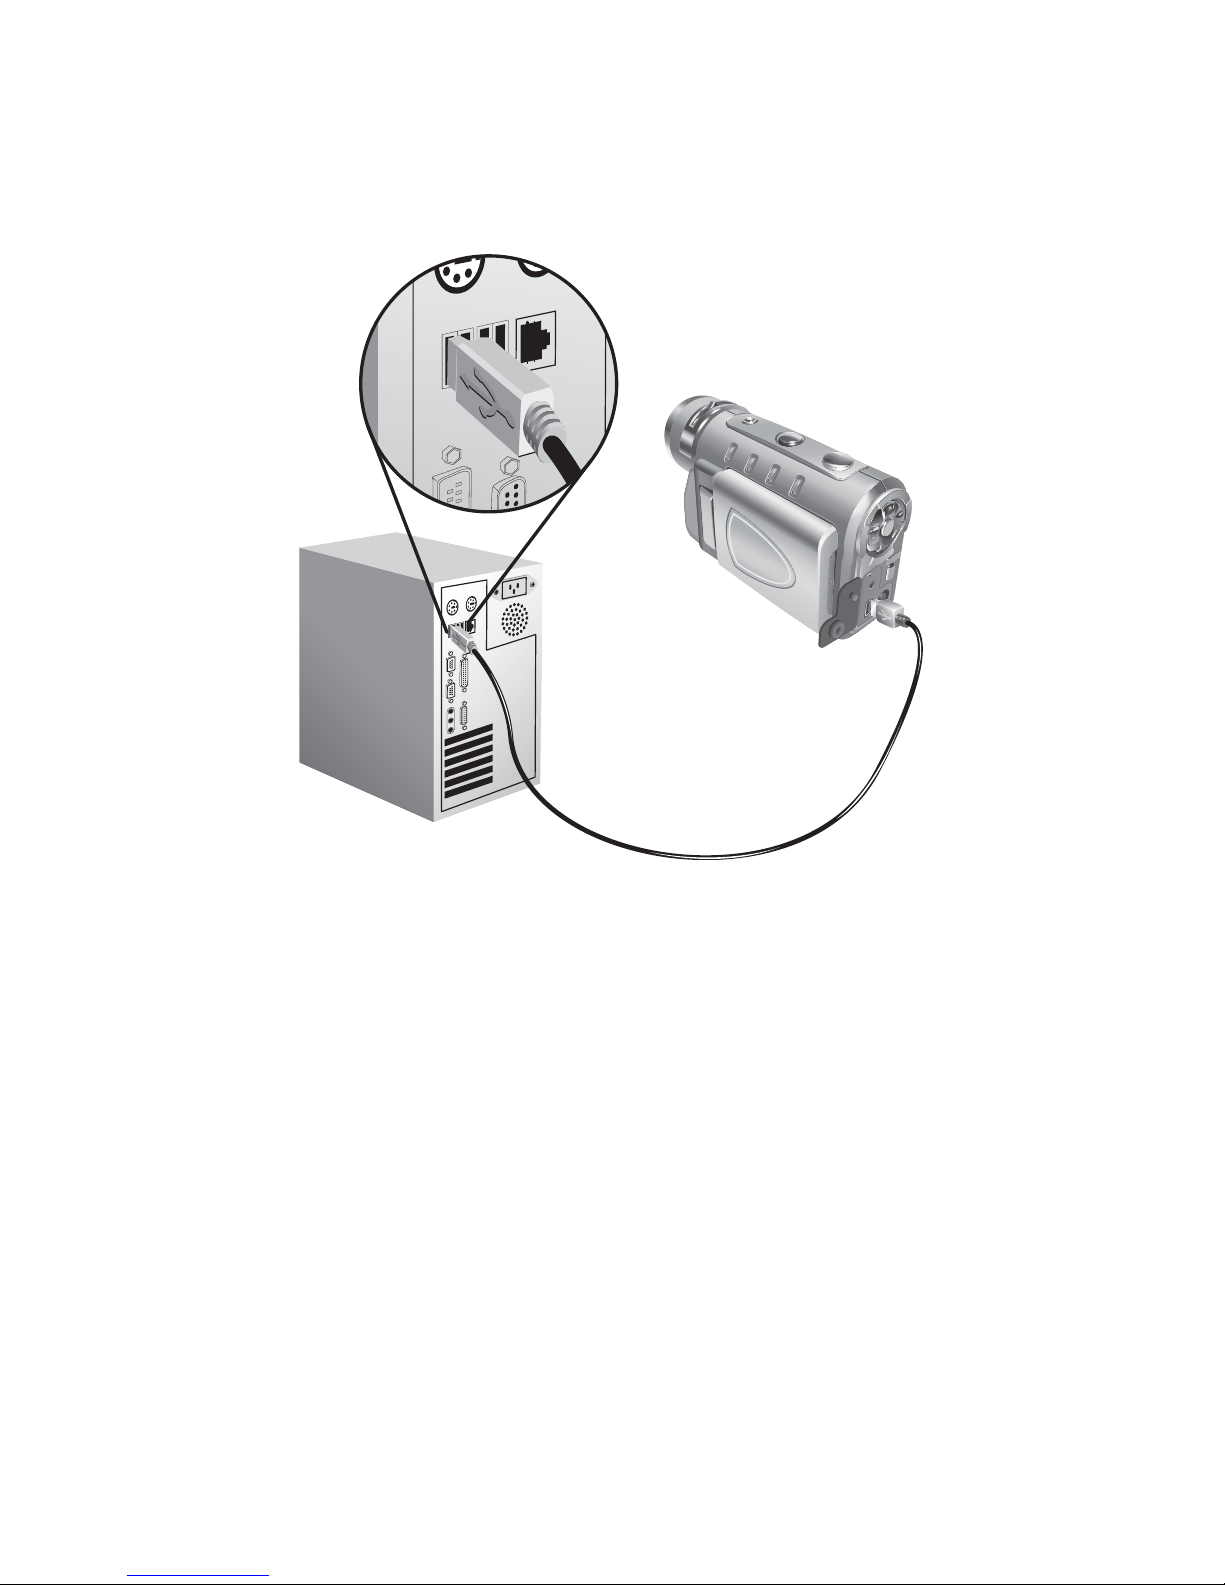
Connecting to a computer
Connect your DV to a computer using the supplied
USB cable as shown below.
When the DV is connected to your computer you can
download the images, videos and audio samples you
have made to your hard disk. You can also use the DV
as a webcam. See USB mode on page 27.
Page 25
Chapter 2: Modes
The DV digital camera can operate in four different
modes. Each mode offers different features and functions. In this section you will learn what each mode is
for and how to use them.
This section also covers how to use the DV as a webcam and how to download your pictures, videos, and
audio samples from the camera to your hard disk.
Page 26

18
Photo mode
2.1 Photo mode
Use Photo mode for taking still pictures in JPEG format. To switch the camera to Photo mode from
another mode:
1. Press the Mode button on the top of the camera.
The LCD displays the 4 mode options.
2. Press the Up arrow button on the rear of the camera.
The camera will switch to Photo mode.
In Photo mode you can change various settings on the
camera that will affect the quality and appearance of
the pictures you take. You can adjust the exposure,
Mode
button
Up arrow button
Page 27
19
Photo mode
size and resolution of the image, white balance, and
other settings. See Picture Menu on page 32.
See Taking your first still picture on pa ge 1 1 for
details on how to take pictures in Photo mode.
Zoom
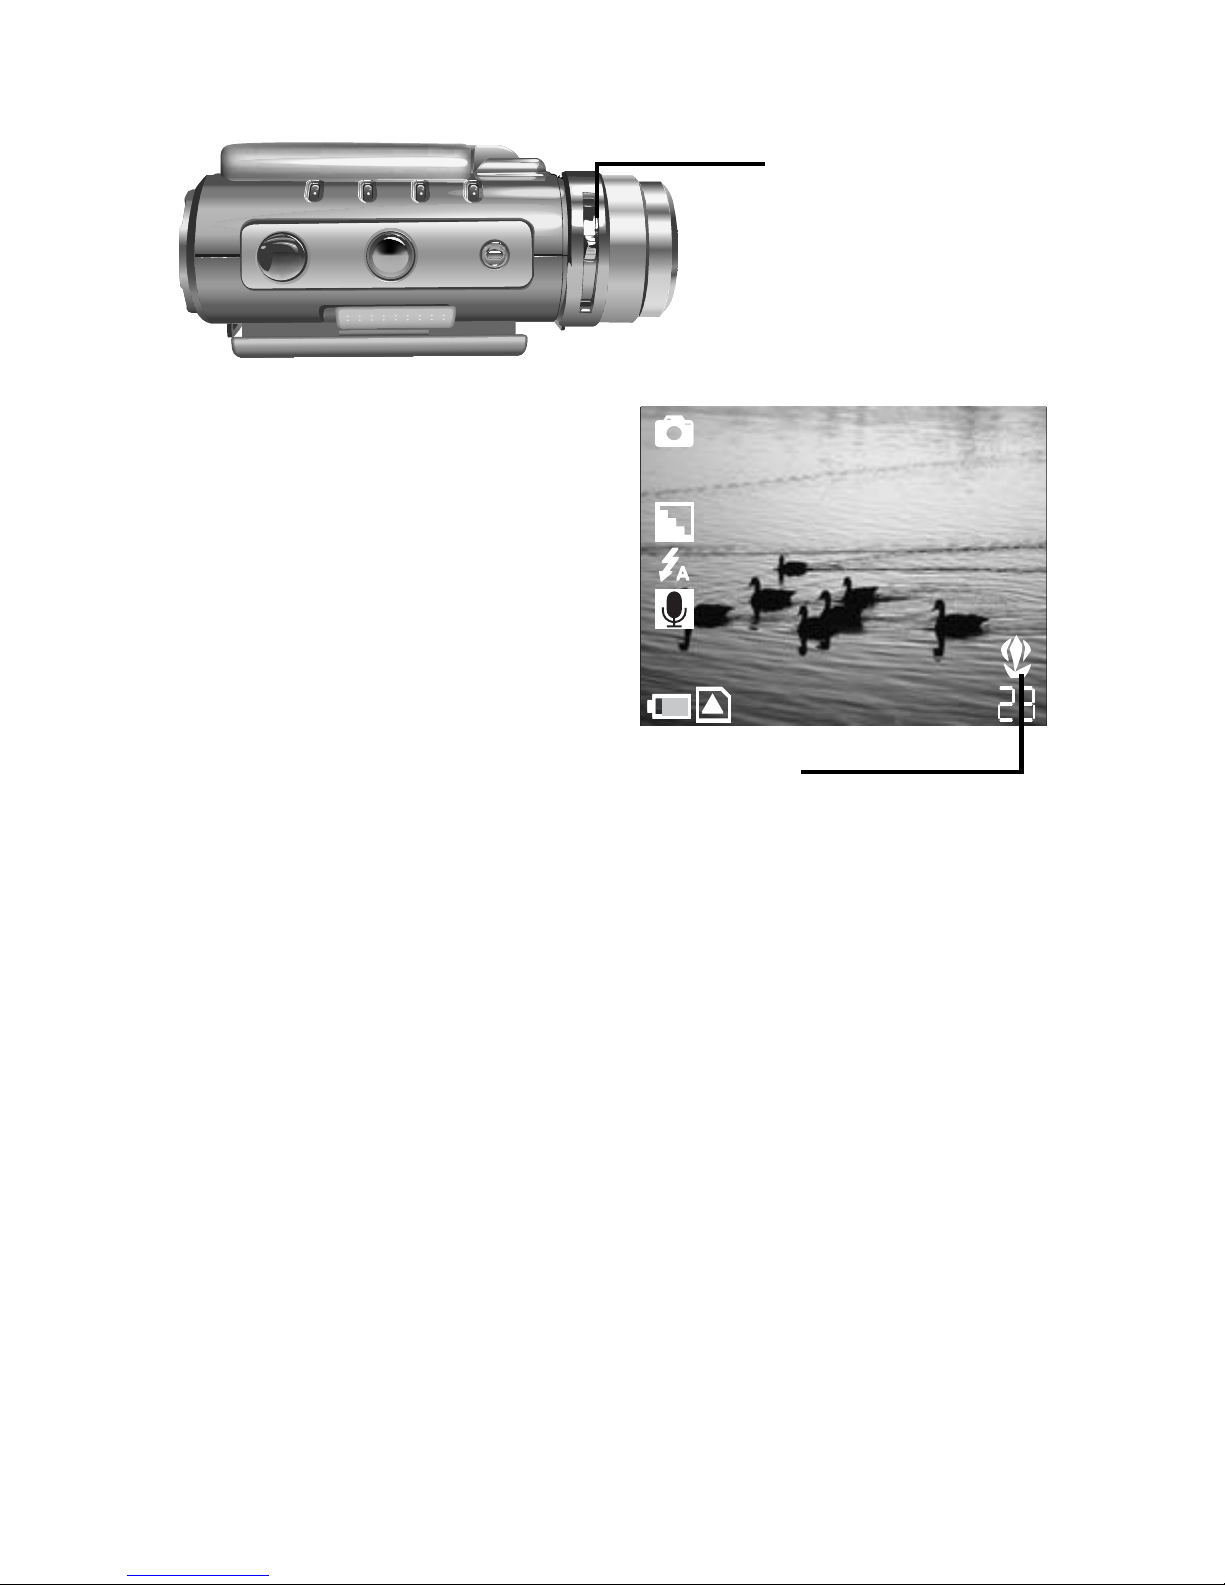
The DV is equipped with a digital zoom function.
You can zoom in on distant images by pressing the
Up arrow button on the rear of the camera. Use the
Down arrow button to zoom back out.
Focus
The DV is a fixed focus camera but there is a manual
focusing function that you can adjust to get the best
results. Move the focusing lever all the way to the
macro setting when taking pictures of very close subjects. Move the focusing lever to the other end of the
scale when taking pictures of far away subjects.
3M
+2.0
1.2x
Up and down arrow
buttons
Zoom bar
Page 28
20
Photo mode
.
When the focusing lever
is in the macro position,
an icon will appea r on the
LCD screen to warn you.
Voice Memo
You can also record a short audio clip when you take
a picture. To record an audio clip to go with your still
picture:
1. Make sure that the voice memo fu nction is turned
on. See Voice memo on page 42 for details on
how to do this .
2. Take the picture as normal.
3. Record your short voice memo after you take the
picture.
Focusing
lever
3M
+2.0
3M
+2.0
Macro i con
Page 29

21
Video mode
2.2 Video mode
Use Video mode for recording digit al moving images.
Video recordings will be in ASF format and will be
stored in memory. To switch the camera to Video
mode from another mode:
1. Press the Mode button on the top of the camera.
The LCD screen displays the 4 mode options.
2. Press the Down arrow button on the rear of the
camera.
The camera will switch to Video mode.
In Video mo de you can change various settings that
will affect the quality and appearance of the video
Mode button
Down arrow button
Page 30

22
Video mode
footage you record. You can adjust size and resolution of the image, white balance and other settings.
See Picture Menu on page 32.
See Shooting your first video on page 13 for details on
how to shoot video.
Focusing
The DV is a fixed focus camera but there is a manual
focusing function that you can adjust to get the best
results. Move the focusing lever all the way to the
macro setting when taking pictures of very close subjects. Move the focusing lever to the other end of the
scale when taking pictures of far away subjects. See
Focus on page 19.
Page 31

23
Audio mode
2.3 Audio mode
Use Audio mode for recording digital sounds. To
switch the camera to Audio mode from another
mode:
1. Press the Mode button on the top of the camera.
The LCD screen displays the 4 mode options.
Mode button
Page 32

24
Audio mode
2. Press the Right arrow button on the rear of the
camera.
The camera will switch to Audio mode.
In Audio mode the LCD screen will not display any
picture but the microphone icon will appear in the
center of the screen to indicate that the camera is
ready to record sounds.
To begin recording, press the shutter button.
To end recording, press the shutter button a second
time.
Recordings are made using the internal microphone at
the front of the DV.
Recordings will be stored in memory as WAV files.
Right arrow
button
Shutter button
Page 33
25
Playback mode
2.4 Playback mode
Use Playback mode to review all the pictures, movies
and sounds that you have stored on the DV. T o switch
your DV to Playback mode:
1. Press the Mode button on the top of the camera.
The LCD screen displays the 4 mode options.
2. Press the left arrow button on the back of the
camera.
Mode button
Left arrow button
Page 34
26
Playback mode
The camera will switch to Playback mode.
In Playback mode, the LCD screen displays all the
files stored in the camera memory. Still photographs
and movies are displayed as thumbnails of the image.
Audio files are displayed as the micro phone icon.
Use the arrow buttons on the back of the camera to
highlight a file to display, and press the OK button to
confirm your selection.
Movies and still photographs will be displayed on the
LCD screen. Audio files will be played using the
internal speaker.
You can zoom in or out on a displayed image using
the Up and Down arrow buttons on the rear of the
camera.
To return to the main screen, press the OK button on
the back of the camera.
To move to the next picture, press the right arrow button. To move to the previous picture, press the left
arrow button.
OK button
Page 35

27
USB mode
2.5 USB mode
The DV will automatically switch to USB mode when
it is connected to a USB port usin g the cable provided. See Connecting on pag e 1 5 for details on how
to connect your camera to a computer.
Note: When the camera is connected to a com-
puter with a USB cable, it automatically
goes into USB mode. Other modes cannot be selected using the Mode button
until the USB cable has been disconnected.
Downloading files
In USB mode you can download images, movies, or
audio recordings to your hard disk. The DV appears
as a removable disk on your Windows PC. To access
the images on your camera:
1. Turn on your DV and make sure that it is not set
to behave as a webcam. See USBSwitch on
page 69.
2. Connect your DV to your com put er USB port
using the cable provided. See Connecting to a
computer on page 16.
The first time you connect your DV to your computer,
the operating system will attempt to load driver soft-
Page 36

28
USB mode
ware. Win dows ME, 2000 and XP will do this automatically but if your computer uses Windows 98 SE,
you will have to insert the CD provided and follow
the on-screen instructions. See Installing Software on
page 81.
3. Open Windows Explorer and click on the My
Computer folder.
You will see a list of all your hard disks, optical disks
and floppy drives. The DV appears as a removable
disk and is assigned a drive letter.
4. Double click on the drive letter for the DV.
A folder named DCIM will be displa yed. This folder
contains the contents of your camera memory or the
SD card.
5. Double click on the DCIM folder to display the
contents.
A subfolder na med 100_MEDIA is displayed.
6. Double click on the 100_MEDIA fo lder to display your images, movies and audio files.
Note: You can move, copy, or d e lete ima ges in
the camera memory or SD car d in exactly
the same way as if they were on an external hard disk drive. If an SD card is
inserted in the camera, only the contents
Page 37

29
USB mode
of the SD card will be displayed. If no SD
car d is inserted, the contents of the camera internal memory will be di sp layed.
Tip: Before you connect your DV to a com-
puter, you may want to copy the contents
of the internal camera memory to the SD
card. See Copy to SD on page 6 3.
Webcam feature
Standard webcam enabled applications such as
Microsoft Netmeeting, or Yahoo Messenger will recognize the DV as a webacm when it is connected to
the USB port on your computer. You can then use the
DV for video chat.
To use your DV as a webcam:
1. Turn on your camera and make sure that it is set
to behave as a webcam. See USBSwitch on
page 69.
2. Connect your camera to your computer using the
USB cable provided. See Connecting to a com-
puter on page 16.
Page 38

30
USB mode
The first time you connect your camera to a computer
as a webcam the operating system will attempt to load
driver software. You will need to insert the CD provided and follow the on-screen instructions. See
Installing Software on page 81.
3. Start a webcam enabled application on your computer.
The application will detect that a webcam is connected and the DV will behave like a standard webcam. See the application user guide for more details
on how to use a webcam.
Page 39
Chapter 3: Using the setup menus
Your DV can be configured using three menus. You
can access the menus using the menu button on the
rear on the camera. Navigate through the menu system using the arrow buttons on the rear of the camera
and make selections using the OK button.
Note: Read this section carefully befor e making
any changes. If you make a mistake and
don’t know how to correct it, you may
have to reset all settings to the factory
default. See Reset on page 62.
Menu button
Arrow buttons and
OK button
Page 40

32
P
i
cture Menu
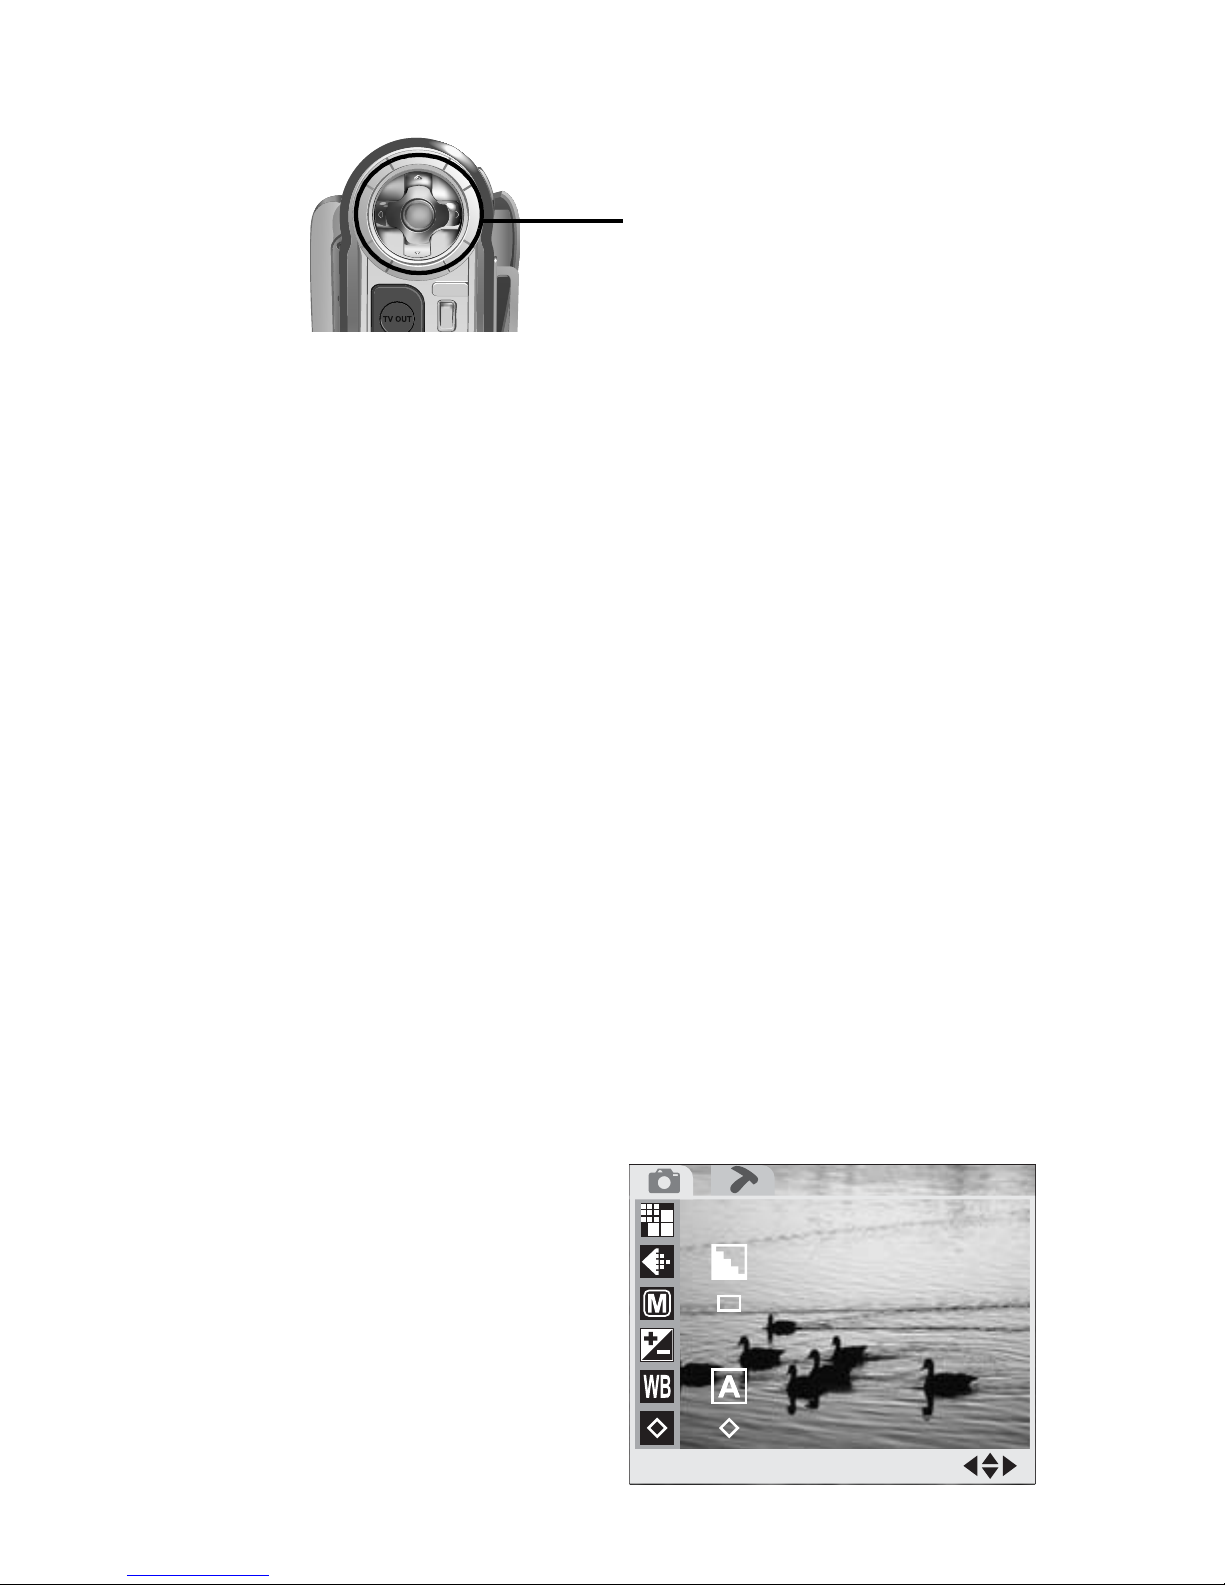
3.1 Picture Menu
Use the picture menu to set the si ze, quality, sharpness, and color properties of pictures. You can also
adjust the exposure, white balance, set the shutter
mode, and turn the voice memo feature on or off.
Note: The picture menu can be accessed from
either Photo mode, Video mode, or Play-
back mode. The menu will include different options for each mode. If you can’t
find the option you are looking for, try
exiting the menu and checking the camera mode.
Image size
The image size option can be accessed from either
Photo mode or Video mode. Choosing a bigger
image size will mean that more memory is required to
store each recorded picture or video. The DV can take
still pictures as large as 6M (mega pixels) or as small
as 1M. There are also two size options available for
video. To access the image size option:
1. Turn on the camera and make sure that it is in
either Photo mode or Video mode. See Modes on
page 17.
2. Press the Menu button at the rear of the camera
to display the main menu screen.
Page 41

33
Picture Menu
3. Use the Up and Down arrow buttons on the rear
of the camera to highlight the Size icon.
4. Press the Right arrow button to display the Size
options.
In Video mode you can select either VGA size or CIF
size. In Photo mode you can choose 1M-6M.
3M3M
+2.0+2.0
SizeSize
SelectSelect
Size
3M3M
+2.0+2.0
PHOTOPHOTO
SelectSelect
3M3M
+2.0+2.0
SizeSize
SelectSelect
6M6M 2816x21122816x2112
2304x17282304x1728
2048x15362048x1536
1600x12001600x1200
1280x 9601280x 960
4M4M
3M3M
2M2M
1M1M
+2.0+2.0
SizeSize
SelectSelect
640640
320320
640x480640x480
320x240320x240
Page 42

34
P
i
cture Menu
5. Use the Up and Down arrow buttons to highlight
the image size you require and press the Left button to confirm your choice.
6. Press the Menu button to exit the menu.
Quality
The quality option can be accessed from either Video
mode or Photo mode. Quality can be set to either
Fine, Normal or Best. Higher quality im ages require
more memory space and fewer images can be stored
on the camera.
To access the quality option:
1. Turn on the camera and make sure that it is in
either Photo mode or Video mode. See Modes on
page 17.
Arrow buttons and
OK button
Page 43

35
Picture Menu
2. Press the Menu button at the rear of the camera
to display the main menu screen.
3. Use the Up and Down arrow buttons on the rear
of the camera to highlight the Quality ico n.
4. Press the Right arrow button to display the Qual-
ity options.
5. Use the Up and Down arrow buttons to highlight
a quality option, Fine, Normal, or Best.
3M3M
+2.0+2.0
PHOTOPHOTO
SelectSelect
3M3M
+2.0+2.0
QualityQuality
SelectSelect
BestBest
FineFine
NormalNormal
3M3M
+2.0+2.0
QualityQuality
SelectSelect
Page 44
36
P
i
cture Menu
6. Press the Left button to confirm your choice
7. Press the Menu button to exit the menu.
Drive mode
Use the Drive Mode setting to switch between a standard shutter operation, a delayed shutter that allows
you to take pictures of yourself, and a multi-shot shutter that allows you to take three pictures in rapid succession every time you press the shutte r but ton. This
setting is available only in Photo mode.
To access the Drive Mode setting:
1. Turn on the camera and make sure that it is in
either Photo mode. See Modes on page 17.
2. Press the Menu button at the rear of the camera
to display the main menu screen.
Arrow buttons and
OK button
3M3M
+2.0+2.0
PHOTOPHOTO
SelectSelect
Page 45
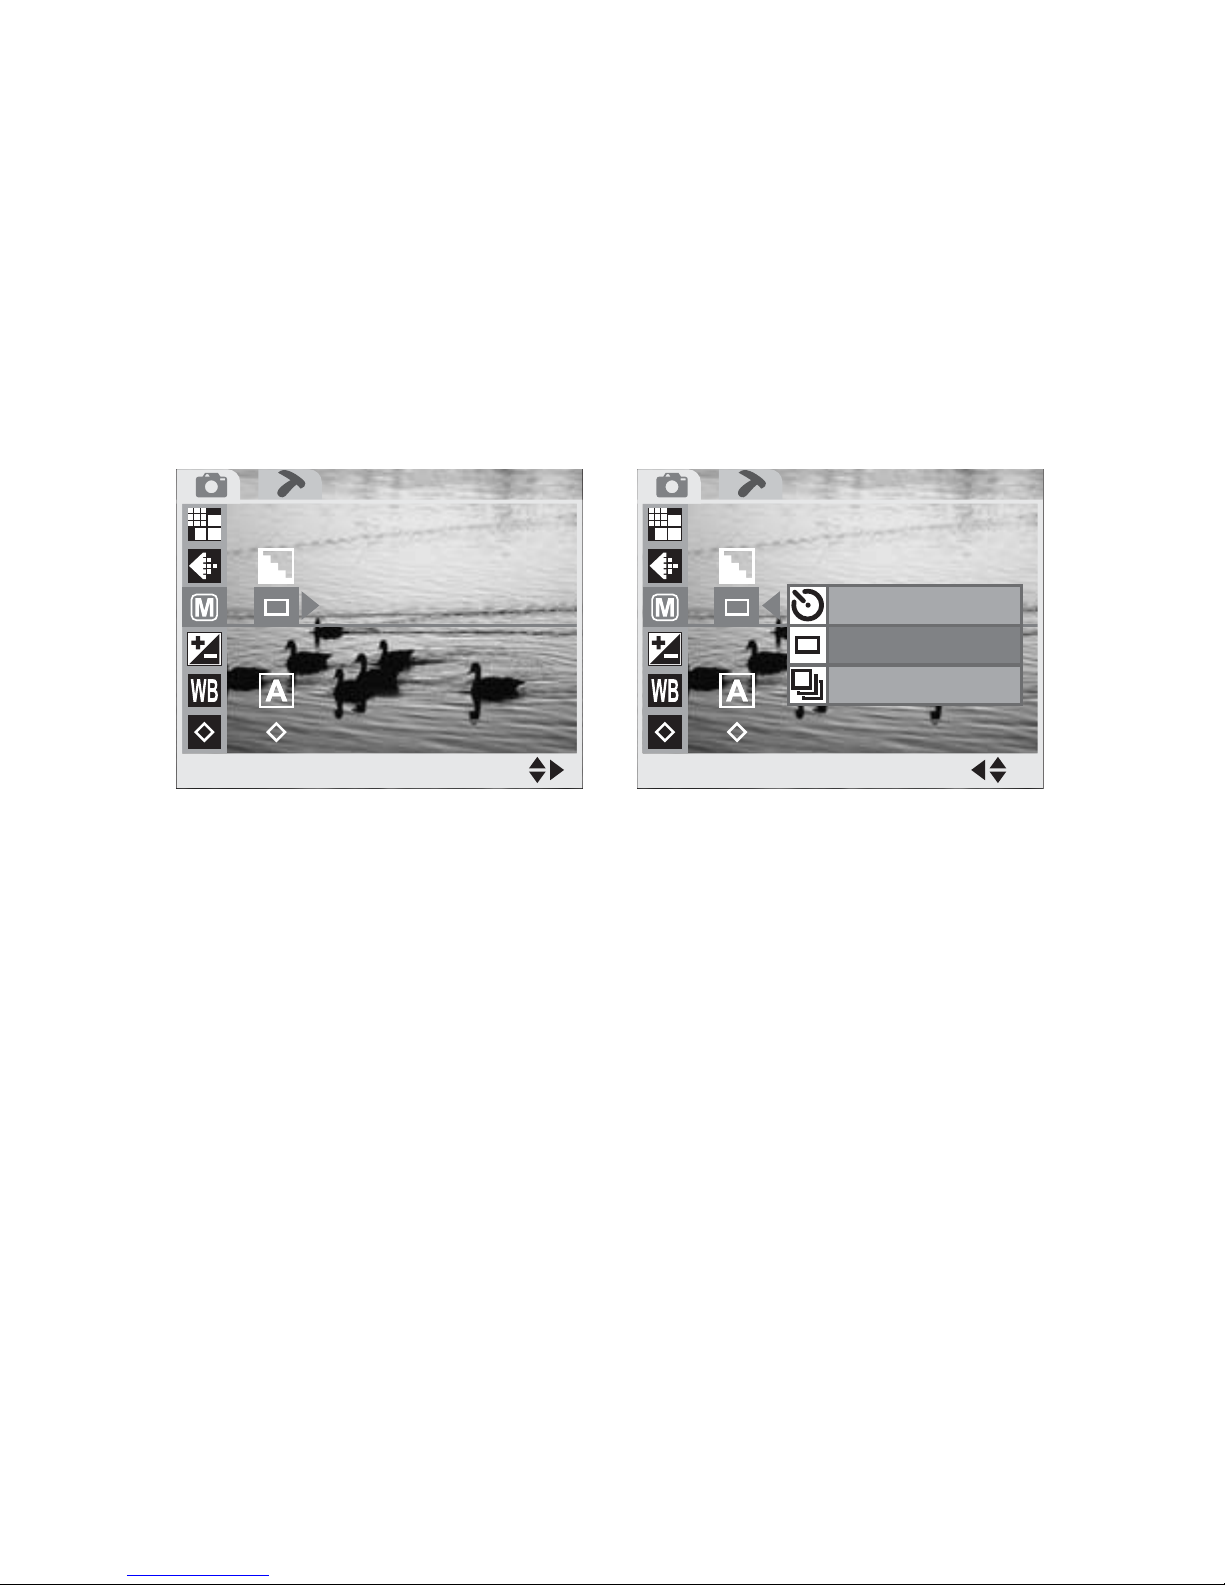
37
Picture Menu
3. Use the Up and Down arrow buttons on the rear
of the camera to highlight the Drive Mode icon.
4. Press the Right arrow button to display the Shut-
ter Mode options.
5. Use the Up and Down arrows to select the option
you require.
6. Press the Left button to confirm your choice.
7. Press the Menu button to exit the menu.
Exposure adjustment
The DV features automatic exposure control, but you
can adjust the exposure manually in either Photo
mode or Video mode. In most cases no adjustment is
necessary but in some conditions, when shooting into
the sun for instance, you may want to make a manual
adjustment. To change the exposure setting:
3M3M
+2.0+2.0
Drive ModeDrive Mode
SelectSelect
Self-TimerSelf-Timer
Single ShotSingle Shot
Conti. ShotConti. Shot
3M3M
+2.0+2.0
Drive ModeDrive Mode
SelectSelect
Page 46
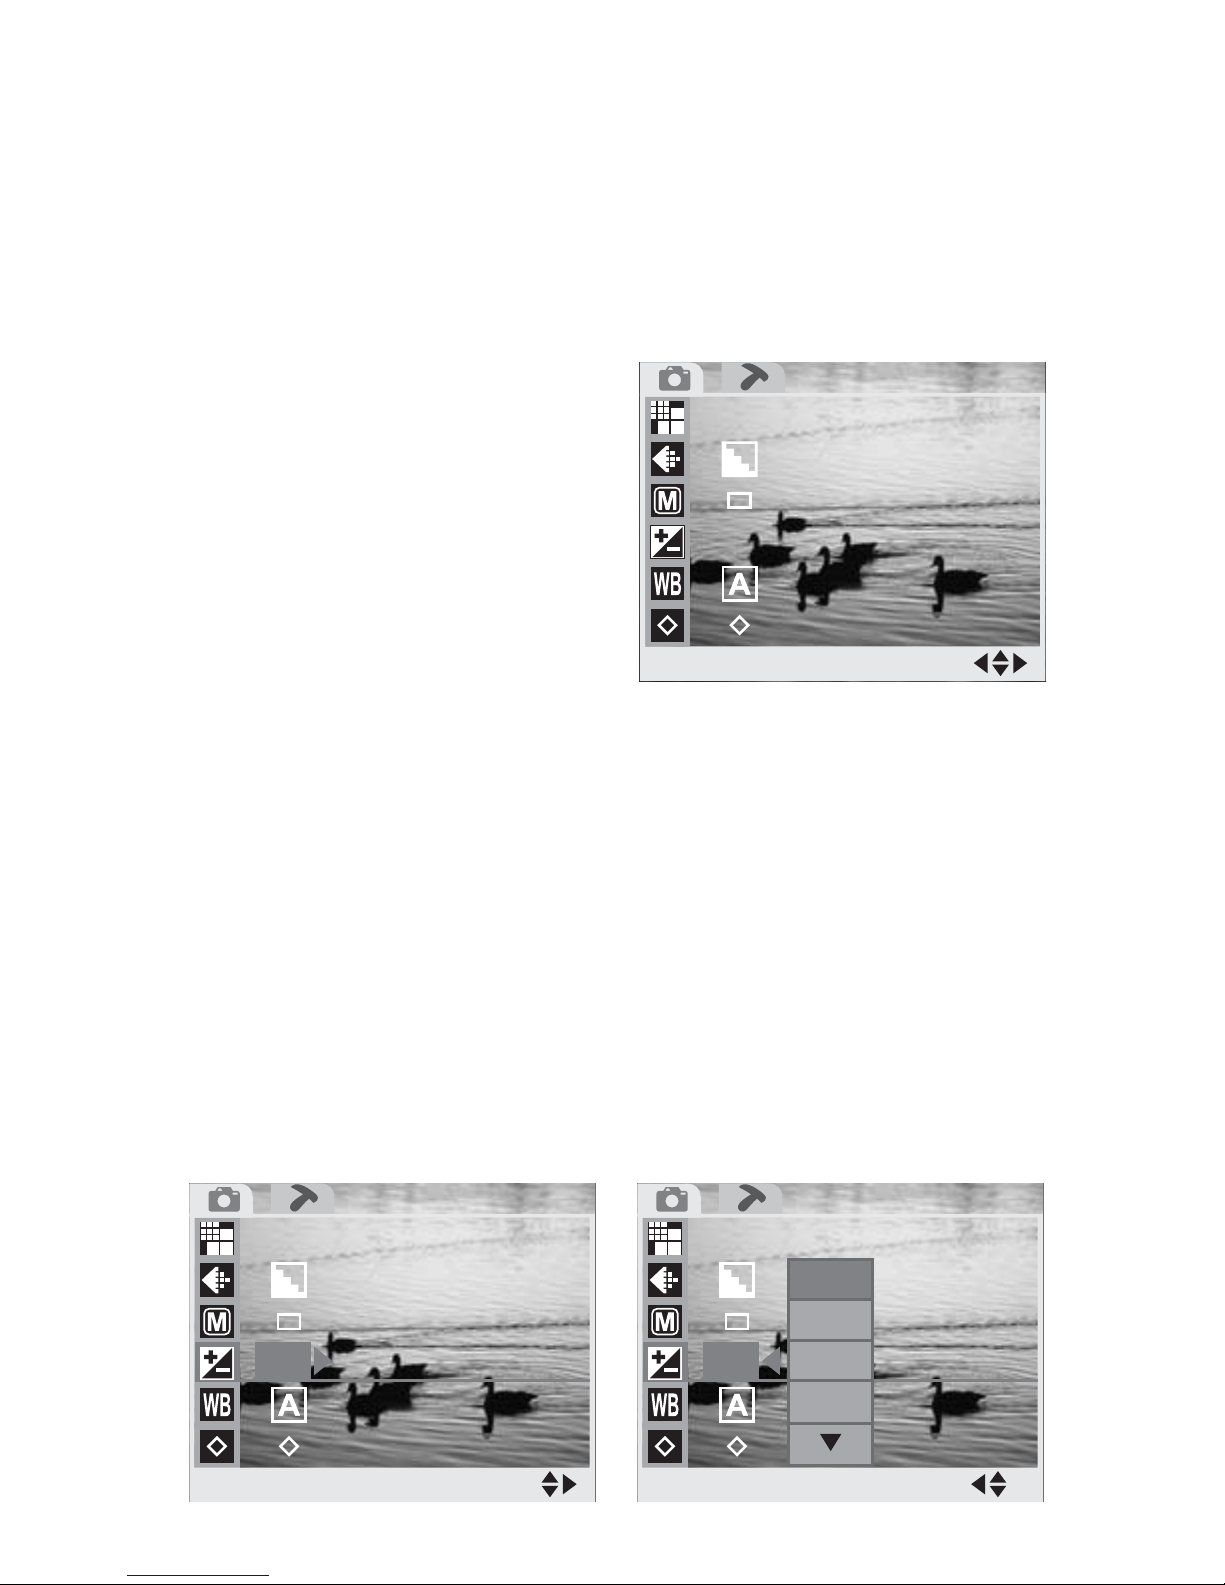
38
P
i
cture Menu
1. Turn on the camera and make sure that it is in
either Photo mode or Video mode. See Modes on
page 17.
2. Press the Menu button at the rear of the camera
to display the main menu screen.
3. Use the Up and Down arrow buttons on the rear
of the camera to highlight the Exposure icon.
4. Press the Right arrow button to display the EV
comp options.
5. Use the Up and Down arrow buttons to highlight
an exposure compensation option. You can chose
to increase or decrease the exposure by one or
two stops or set the value to zero.
3M3M
+2.0+2.0
PHOTOPHOTO
SelectSelect
3M3M
EV Comp.EV Comp.
SelectSelect
+2.0+2.0
+2.0+2.0
+1.5+1.5
+1.0+1.0
+0.5+0.5
3M3M
EV Comp.EV Comp.
SelectSelect
+2.0+2.0
Page 47

39
Picture Menu
6. Press the Left button to confirm your choice
7. Press the Menu button to exit the menu.
White balance
The white balance setting is used to set the correct
color balance under different lighting conditions.
Without the correct white balance setting, white
objects would look red under artificial lighting, or
blue in sunlight.
Your DV can automatically set the white balance for
you, but you may wish to set it manually for unusual
lighting conditions or special effects.The White Bal-
ance setting can be accessed from either Photo mode
or Video mode. To access the White Balance setting:
1. Turn on the camera and make sure that it is in
either Photo mode or Video mode. See Modes on
page 17.
Arrow buttons and
OK button
Page 48

40
P
i
cture Menu
2. Press the Menu button at the rear of the camera
to display the main menu screen.
3. Use the Up and Down arrow buttons on the rear
of the camera to highlight the White Balance
icon.
4. Press the Right arrow button to display the
White Balance options.
5. Use the Up and Down arrow buttons to highlight
a White Balance option.
You can choose to set the White Balance setting to
Sunlight, Cloudy, Lamp, Fluorescent, or Auto.
3M3M
+2.0+2.0
PHOTOPHOTO
SelectSelect
+2.0+2.0
OnOn
White Bal.White Bal.
SelectSelect
+2.0+2.0
OnOn
White Bal.White Bal.
SelectSelect
AutoAuto
SunlightSunlight
CloudyCloudy
TungstenTungsten
FluorescenceFluorescence
Page 49

41
Picture Menu
When set to Auto the camera detects the ambient
light and sets White Balance automatically.
6. Press the Left button to confirm your choice
7. Press the Menu button to exit the menu.
Sharpness
Use the Sharpness option to sharpen or soften the
outlines in your images. Three settings are available,
Normal, Sharper, and Softer. This setting is only
available in Photo mode.
To access the Sharpness setting:
1. Turn on the camera and make sure that it is in
Photo mode. See Modes on page 17.
2. Press the Menu button at the rear of the camera
to display the main menu screen.
Arrow buttons and
OK button
3M3M
+2.0+2.0
PHOTOPHOTO
SelectSelect
Page 50

42
P
i
cture Menu
3. Use the Up and Down arrow buttons on the rear
of the camera to highlight the Sharpness icon.
4. Press the Right arrow button to display the
Sharpness options.
5. Use the Up and Down arrows to select the option
you require.
6. Press the Left button to confirm your choice.
7. Press the Menu button to exit the menu.
Voice memo
The Voice Memo function allows you to add a sound
clip to still images. The Voice Memo setting can only
be accessed from Photo mode.
To access the Voice memo setting:
1. Turn on the camera and make sure that it is in
Photo mode. See Modes on page 17.
SharpnessSharpness
SelectSelect
+2.0+2.0
OnOn
SharpnessSharpness
SelectSelect
+2.0+2.0
OnOn
SharpSharp
NormalNormal
SoftSoft
Page 51

43
Picture Menu
2. Press the Menu button at the rear of the camera
to display the main menu screen.
The Voice Memo icon is not disp layed on the screen
when you first enter the setup menu screen. Use the
arrow buttons to scroll through the list of opt ions to
find the Voice Memo icon.
3. Use the Up and Down arrow buttons on the rear
of the camera to highlight the Voice Memo icon.
4. Press the Right arrow button to display the Voice
Memo options.
5. Use the Up and Down arrows to select either On
or Off.
3M3M
+2.0+2.0
PHOTOPHOTO
SelectSelect
Voice MemoVoice Memo
SelectSelect
+2.0+2.0
OnOn
OnOn
OffOff
Voice MemoVoice Memo
SelectSelect
+2.0+2.0
OnOn
Page 52

44
P
i
cture Menu
6. Press the Left button to confirm your choice.
7. Press the Menu button to exit the menu.
W i th the voice memo function turned on, you can
record a short audio clip with each photo. After you
have taken your photo in the usual way, the voice
memo icon appears on the screen. Press the shutter
button to record your audio clip, and press the shutter
button a second time to stop recording.
Color mode
Use the Color Mode setting to change the color of
your images or videos. Three settings are available,
Normal, Black & White, and Classic. The Color
Mode setting can be accessed from either Photo
mode or Video mode. To access the Color Mode setting:
1. Turn on the camera and make sure that it is in
either Photo mode or Video mode. See Modes on
page 17.
Arrow buttons and
OK button
Page 53

45
Picture Menu
2. Press the Menu button at the rear of the camera
to display the main menu screen.
3. Use the Up and Down arrow buttons on the rear
of the camera to highlight the Color Mode icon.
4. Press the Right arrow button to display the Color
Mode options.
5. Use the Up and Down arrows to select the option
you require.
3M3M
+2.0+2.0
PHOTOPHOTO
SelectSelect
Color ModeColor Mode
SelectSelect
+2.0+2.0
OnOn
SelectSelect
+2.0+2.0
OnOn
Color ModeColor Mode
NormalNormal
Black&WhiteBlack&White
ClassicClassic
Page 54

46
P
i
cture Menu
6. Press the Left button to confirm your choice.
Choosing the Normal option will produce standard
color pictures and video. The Black & White setting
produces monochrome st yle pictu res and vide o. The
Classic option produces pictures and videos tinted to
look like old fashioned sepia photographs.
7. Press the Menu button to exit the menu.
Erase
Use the Erase function to delete and files from the
camera or SD card memory. The Erase function can
be accessed only when your DV is in Playback mode.
To access the Erase function:
1. Turn on the camera and make sure it is in Play-
back mode. See Modes on page 17.
Arrow buttons and
OK button
Page 55
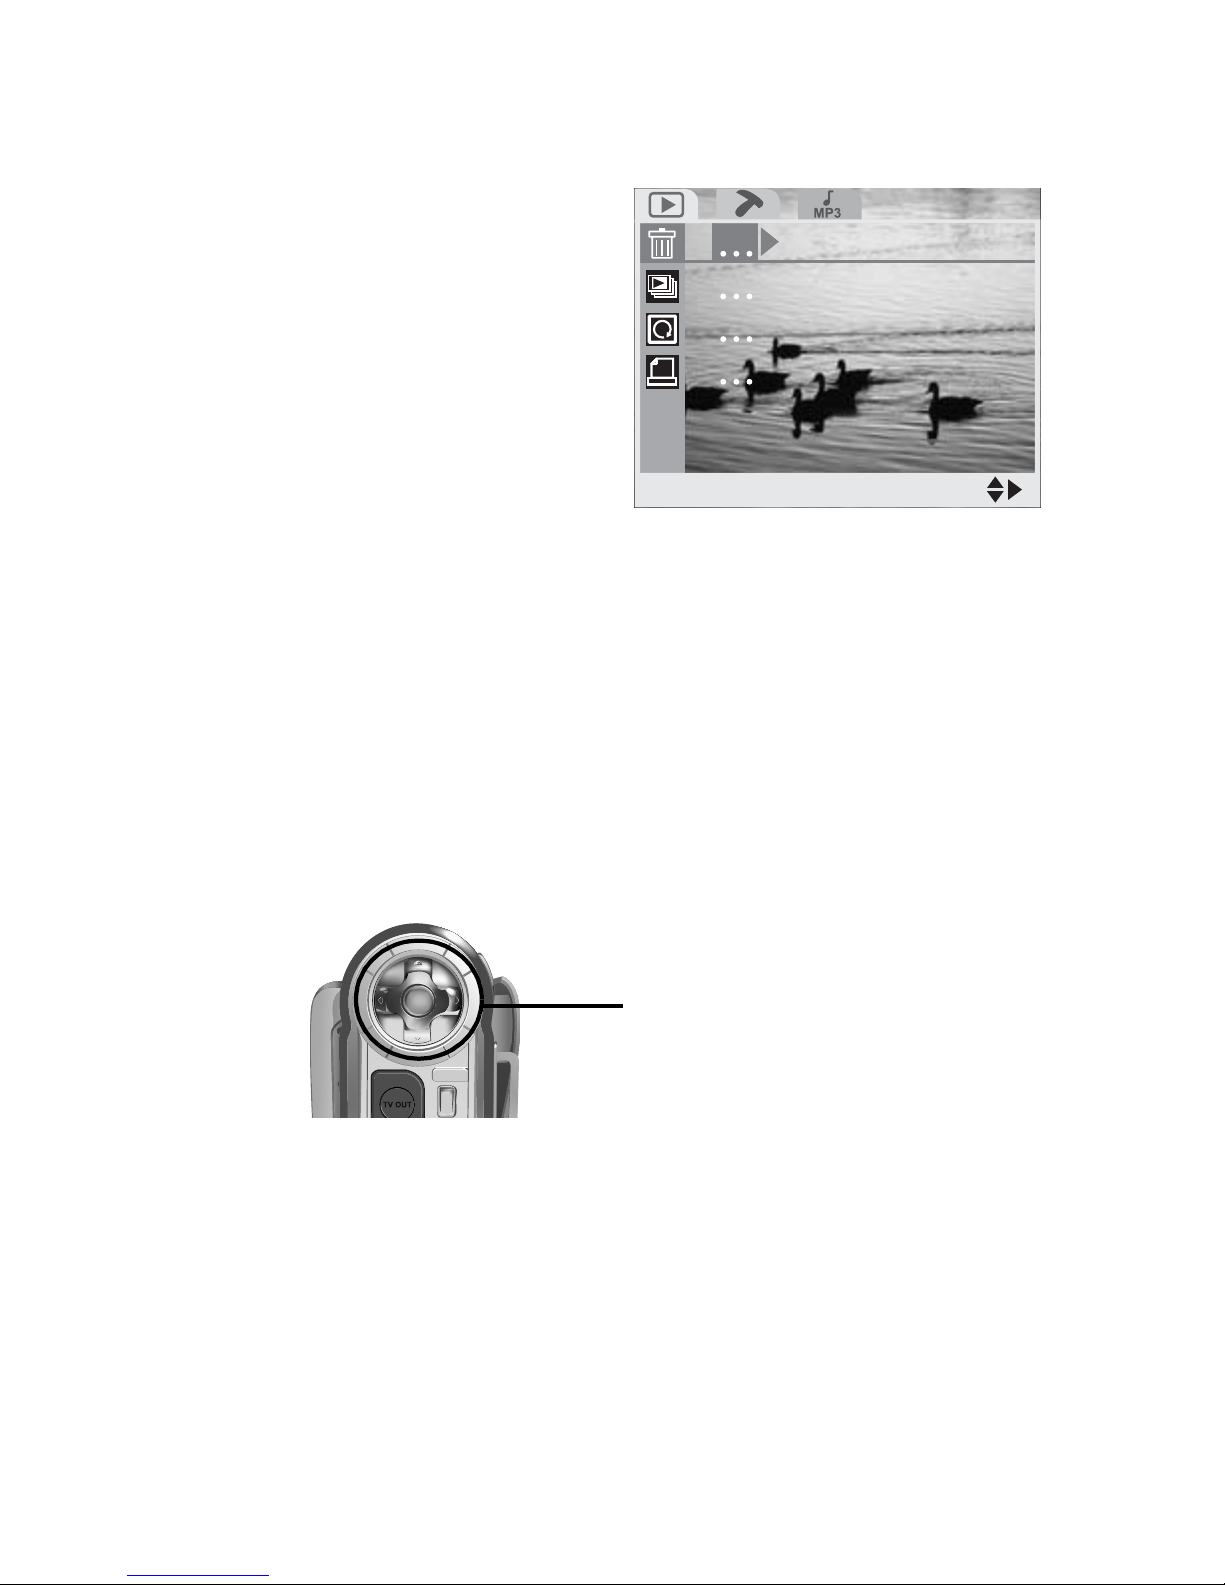
47
Picture Menu
2. Press the Menu button at the rear of the camera
to display the main menu screen.
3. Use the Up and Down arrow buttons on the rear
of the camera to highlight the Erase icon.
4. Press the Right arrow button to display the Erase
options.Use the Up and Down arrows to select
the option you require.
5. Press the OK button to confirm your choice.
Choosing the Erase One option will erase just the last
file to be selected in Playback mode. Choosing the
Erase Select option will return you to the Playback
mode screen where you can you the arrow keys to
select a file to delete and press the OK button to confirm your choice. Choosing the Erase ALL option
EraseErase
SelectSelect
Arrow buttons and
OK button
Page 56

48
P
i
cture Menu
will erase all the files on your camera and SD card if
inserted.
6. Press the Menu button to exit the menu.
Slide Show
Use the Slide Show function to display all the files
stored in your camera, one after the other. The Slide
Show function can only be accessed from Playback
mode. You can set the delay between files at two or
five seconds. To access the Slide Show function:
1. Turn on the camera and make sure it is in Play-
back mode. See Modes on page 17.
2. Press the Menu button on the rear of the camera
to display the main menu screen.
3. Use the Up and Down arrow buttons on the rear
of the camera to highlight the Slide Show icon.
4. Press the Right arrow butt on to d ispla y the Slide
Show options. Use the Up and Down arrows to
select the option you require.
Slide ShowSlide Show
SelectSelect
Slide ShowSlide Show
SelectSelect
CancelCancel
2S2S
5S5S
Page 57

49
Picture Menu
5. Press the OK button to confirm your choice.
Set the delay to either two or five seconds or cancel
the slide show and return to Playback mode. When
you have selected a delay, all files on the camera will
be displayed, one after the ot h er.
6. Press the Menu button to exit the menu.
Rotate
Use the rotate function to rotate an image stored on
the camera. This function will only work for still
images and can only be accessed from Playback
mode. To access the Rotate function:
1. Turn on the camera and make sure it is in Play-
back mode. See Modes on page 17.
2. Press the Menu button on the rear of the camera
to display the main menu screen.
3. Use the Up and Down arrow buttons on the rear
of the camera to highlight the Rotate icon.
4. Press the Right arrow button to display the
Rotate options. Use the Up and Down arrows to
select the option you require.
Page 58

50
P
i
cture Menu
You can choose to roate an image by 90°, 180°, or
270°. The image rotated will be the last one you
selected.
5. Press the Menu button to exit the menu.
Print
Use the Print function to print still images stored on
your camera. You can print either an individual image
or all your images. To access the Print function:
1. Turn on the camera and make sure it is in Play-
back mode. See Modes on page 17.
2. Press the Menu button on the rear of the camera
to display the setup menu screen.
3. Use the Up and Down arrow buttons on the rear
of the camera to highlight the Print icon.
CancelCancel
9090
180180
270270
RotationRotation
SelectSelect
RotationRotation
SelectSelect
Page 59

51
Setup Menu
4. Press the Right arrow button to display the Print
options. Use the Up and Down arrows to select
the option you require.
5. Press the OK button to confirm your choice.
If you chose to print just a single image, the last
image you selected in Playback mode will be printed.
If you chose to print all images, all your still images
will be printed. Choosing Cancel will return yo u to
Playback mode without printing any images.
6. Press the Menu button to exit the menu.
3.2 Setup Menu
Use the Setup menu to set various parameters for
your camera. The Setup menu can be accessed from
any mode and is always the same.
PrintPrint
SelectSelect
CancelCancel
SelectSelect
AllAll
PrintPrint
SelectSelect
Arrow buttons and
OK button
Page 60

52
Setup Menu
Brightness
Use the Brightness option to set the LCD screen
brightness level. There are five levels of brightness
available.
1. T urn on the camera and press the Menu button to
display the main menu screen.
2. Press the Right arrow button once to highlight
the Setup menu option at the top.
3. Use the Up and Down arrow buttons to highlight
the Brightness option.
4. Press the Right arrow button to display the available options.
5. Use the Up and Down buttons to highlight an
option.
SETUPSETUP
SelectSelect
OnOn
2004/05/152004/05/15
03:12:1503:12:15
OffOff
NTSCNTSC
3M3M
+2.0+2.0
PHOTOPHOTO
SelectSelect
Page 61
53
Setup Menu
6. Press the Left arrow button to confirm your
choice.
7. Press the Menu button to exit the menu.
Beep
Use the Beep option to turn on or off the beep noise
made by the camera when buttons are pressed. To
access the Beep option:
1. T urn on the camera and press the Menu button to
display the main menu screen.
2. Press the Right arrow button once to highlight
the Setup menu option at the top.
BrightnessBrightness
SelectSelect
OnOn
2004/05/152004/05/15
03:12:1503:12:15
OffOff
NTSCNTSC
BrightnessBrightness
SelectSelect
OnOn
2004/05/152004/05/15
03:12:1503:12:15
OffOff
NTSCNTSC
SETUPSETUP
SelectSelect
OnOn
2004/05/152004/05/15
03:12:1503:12:15
OffOff
NTSCNTSC
3M3M
+2.0+2.0
PHOTOPHOTO
SelectSelect
Page 62

54
Setup Menu
3. Use the Up and Down arrow buttons to highlight
the Beep option.
4. Press the Right arrow button to display the available options.
5. Use the Up and Down buttons to highlight an
option.
6. Press the Left arrow button to confirm your
choice.
7. Press the Menu button to exit the menu.
Date
Use the Date option to set the date. To access the
Date option:
1. T urn on the camera and press the Menu button to
display the main menu screen.
BeepBeep
SelectSelect
OnOn
2004/05/152004/05/15
03:12:1503:12:15
OffOff
NTSCNTSC
BeepBeep
Select
OnOn
2004/05/152004/05/15
03:12:1503:12:15
OffOff
NTSCNTSC
OnOn
OffOff
Page 63

55
Setup Menu
2. Press the Right arrow button once to highlight
the Setup menu option at the top.
3. Use the Up and Down arrow buttons to highlight
the Date option.
4. Press the Right button to display the submenu.
5. Use the Left and Right buttons to highlight the
field you want to change.
6. Enter a new value in the chosen field using the
Up and Down buttons.
3M3M
+2.0+2.0
PHOTOPHOTO
SelectSelect
SETUPSETUP
SelectSelect
OnOn
2004/05/152004/05/15
03:12:1503:12:15
OffOff
NTSCNTSC
DateDate
SelectSelect
OnOn
2004/05/152004/05/15
03:12:1503:12:15
OffOff
NTSCNTSC
Date
Select
YYYY / MM / DD
Set
2004 / 05 / 15
Page 64
56
Setup Menu
7. Press the Left button repeatedly to confirm your
changes and return to the Setup menu screen.
8. Press the Menu button to exit the menu.
Time
Use the Time option to set the time. To access the
Time option:
1. T urn on the camera and press the Menu button to
display the main menu screen.
2. Press the Right arrow button once to highlight
the Setup menu option at the top.
3. Use the Up and Down arrow buttons to highlight
the Time option.
3M3M
+2.0+2.0
PHOTOPHOTO
SelectSelect
SETUPSETUP
SelectSelect
OnOn
2004/05/152004/05/15
03:12:1503:12:15
OffOff
NTSCNTSC
Page 65

57
Setup Menu
4. Press the Right button to display the submenu.
5. Use the Left and Right buttons to highlight the
field you want to change.
6. Enter a new value in the chosen field using the
Up and Down buttons.
7. Press the Left button repeatedly to confirm your
changes and return to the Setup menu screen.
8. Press the Menu button to exit the menu.
Date Stamp
Your DV camera can be set to place a date stamp on
each image you take. To turn the Date Stamp function on or off:
1. T urn on the camera and press the Menu button to
display the main menu screen.
TimeTime
SelectSelect
OnOn
2004/05/152004/05/15
03:12:1503:12:15
OffOff
NTSCNTSC
06 : 07 : 00
Time
Select
HH : MM : SS
Set
Page 66

58
Setup Menu
2. Press the Right arrow button once to highlight
the Setup menu option at the top.
3. Use the Up and Down arrow buttons to highlight
the Date Stamp option.
4. Press the Right arrow button to display the available options.
5. Use the Up and Down buttons to highlight an
option.
6. Press the Left arrow button to confirm your
choice.
7. Press the Menu button to exit the menu.
3M3M
+2.0+2.0
PHOTOPHOTO
SelectSelect
SETUPSETUP
SelectSelect
OnOn
2004/05/152004/05/15
03:12:1503:12:15
OffOff
NTSCNTSC
Date StampDate Stamp
SelectSelect
OnOn
03:12:1503:12:15
OffOff
NTSCNTSC
2004/05/152004/05/15
OnOn
OffOff
Date StampDate Stamp
SelectSelect
OnOn
03:12:1503:12:15
OffOff
NTSCNTSC
2004/05/152004/05/15
Page 67

59
Setup Menu
Video Out
Use the Video Out option to define the type of TV
you want to use to display your camera pictures on.
You can set the video output to either PAL or NTSC
format. NTSC is a format used in North America and
some of Asia. PAL format is used in Europ e . If you
are unsure which system your TV uses, consult the
documentation that came with it. To set the Video
Out option:
1. T urn on the camera and press the Menu button to
display the main menu screen.
2. Press the Right arrow button once to highlight
the Setup menu option at the top.
3. Use the Up and Down arrow buttons to highlight
the Video Out option.
3M3M
+2.0+2.0
PHOTOPHOTO
SelectSelect
SETUPSETUP
SelectSelect
OnOn
2004/05/152004/05/15
03:12:1503:12:15
OffOff
NTSCNTSC
Page 68

60
Setup Menu
4. Press the Right arrow button to display the available options.
5. Use the Up and Down buttons to highlight an
option.
6. Press the Left arrow button to confirm your
choice.
7. Press the Menu button to exit the menu.
Video OutVideo Out
SelectSelect
NTSCNTSC
03:12:1503:12:15
OffOff
2004/05/152004/05/15
R
NTSCNTSC
PALPAL
Video OutVideo Out
SelectSelect
NTSCNTSC
03:12:1503:12:15
OffOff
2004/05/152004/05/15
R
Arrow buttons and
OK button
Page 69

61
Setup Menu
Format
Use the Format option to erase all files on the camera
and SD card.
Note: When you perform a format, all data on
the camera and SD card will be lost.
Make sur e you have saved everything you
need on your computer hard disk before
you perform a format.
To access the Format option:
1. T urn on the camera and press the Menu button to
display the main menu screen.
2. Press the Right arrow button once to highlight
the Setup menu option at the top.
3. Use the Up and Down arrow buttons to highlight
the Format option.
4. Press the Right arrow button to display the submenu.
3M3M
+2.0+2.0
PHOTOPHOTO
SelectSelect
SETUPSETUP
SelectSelect
OnOn
2004/05/152004/05/15
03:12:1503:12:15
OffOff
NTSCNTSC
Page 70

62
Setup Menu
5. Use the Up and Down arrow buttons to highlight
either OK or Cancel and press the Left arrow
button to perform the function.
All image files, audio files, and movie files will be
deleted.
Reset
Use the Reset option to restore all configurations to
factory default settings. To access the Reset option:
1. T urn on the camera and press the Menu button to
display the main menu screen.
2. Press the Right arrow button once to highlight
the Setup menu option at the top.
FormatFormat
SelectSelect
NTSCNTSC
03:12:1503:12:15
OffOff
R
Cancel
OK
Format
Select
WARNING !
All images will
be deleted.
Set
SETUPSETUP
SelectSelect
OnOn
2004/05/152004/05/15
03:12:1503:12:15
OffOff
NTSCNTSC
3M3M
+2.0+2.0
PHOTOPHOTO
SelectSelect
Page 71

63
Setup Menu
3. Use the Up and Down arrow buttons to highlight
the Reset option.
4. Press the Right arrow button to display the submenu.
5. Use the Up and Down arrow buttons to highlight
either OK or Cancel and press the Left arrow
button to perform the function.
When you perform this functi on, all settings are
returned to the original factory configuration and any
changes you made will be lost.
Copy to SD
Use the Copy to SD function to copy all files stored
in the camera memory to the SD card. You may need
this function if you want to use the SD card in another
device to download your movies, pictures, or images.
To access the Copy to SD function:
1. T urn on the camera and press the Menu button to
display the main menu screen.
Cancel
OK
Reset
Select
WARNING !
All settings will
be reset.
Set
ResetReset
SelectSelect
NTSCNTSC
OffOff
R
50HZ50HZHZHZ
Page 72

64
Setup Menu
2. Press the Right arrow button once to highlight
the Setup menu option at the top.
3. Use the Up and Down arrow buttons to highlight
the Copy to SD option.
4. Press the Right arrow button to display the submenu.
5. Use the Up and Down arrow buttons to highlight
either OK or Cancel and press the Left arrow
button to perform the function.
All images stored in the camera memory will be copied to the SD card.
3M3M
+2.0+2.0
PHOTOPHOTO
SelectSelect
SETUPSETUP
SelectSelect
OnOn
2004/05/152004/05/15
03:12:1503:12:15
OffOff
NTSCNTSC
Cancel
OK
Copy to SD
Select
WARNING !
All images will
copied to SD.
Set
CopyToSDCopyToSD
SelectSelect
NTSCNTSC
OnOn
50HZ50HZHZHZ
R
Page 73

65
Setup Menu
Frequency
To avoid flickering images on the LCD screen, you
should make sure that the camera Frequency setting
matches the frequency of mains electricity in your
country. China and Europe use a 50 Hz system.
America and Japan use a 60 Hz system. If you are
unsure what frequency your mains supply is, consult
your power company.
To access the Frequency setting:
1. T urn on the camera and press the Menu button to
display the main menu screen.
2. Press the Right arrow button once to highlight
the Setup menu option at the top.
3. Use the Up and Down arrow buttons to highlight
the Frequency option.
4. Press the Right arrow button to display the available settings.
3M3M
+2.0+2.0
PHOTOPHOTO
SelectSelect
SETUPSETUP
SelectSelect
OnOn
2004/05/152004/05/15
03:12:1503:12:15
OffOff
NTSCNTSC
Page 74

66
Setup Menu
5. Use the Up and Down arrow buttons to highlight
the required setting.
6. Press the Left arrow button to confirm your
choice.
7. Press the Menu button to exit the menu.
Power Saving
Turn the Power Saving function on to preserve battery life. When the power saving function is used, the
camera will turn itself off after a few minutes of inactivity. To access the Power Saving function:
1. T urn on the camera and press the Menu button to
display the main menu screen.
FrequencyFrequency
SelectSelect
50HZ50HZ
EnglishEnglish
OnOn
R
HZHZ
ENGENG
50HZ50HZ
60HZ60HZ
FrequencyFrequency
SelectSelect
50HZ50HZ
EnglishEnglish
OnOn
R
HZHZ
ENGENG
Page 75

67
Setup Menu
2. Press the Right arrow button once to highlight
the Setup menu option at the top.
3. Use the Up and Down arrow buttons to highlight
the Power Saving option.
4. Press the Right arrow button to display the available settings.
5. Use the Up and Down arrow buttons to highlight
the required setting.
6. Press the Left arrow button to confirm your
choice.
7. Press the Menu button to exit the menu.
3M3M
+2.0+2.0
PHOTOPHOTO
SelectSelect
SETUPSETUP
SelectSelect
OnOn
2004/05/152004/05/15
03:12:1503:12:15
OffOff
NTSCNTSC
PwrSavingPwrSaving
SelectSelect
50HZ50HZ
OnOn
R
HZHZ
EnglishEnglish
ENGENG
OnOn
OffOff
PwrSavingPwrSaving
SelectSelect
50HZ50HZ
OnOn
R
HZHZ
EnglishEnglish
ENGENG
Page 76

68
Setup Menu
Language
Use the Language setting to change the language in
which the camera menus are displayed. Available languages are, traditional Chinese, simplified Chinese,
German, French, Spanish and, English. To access the
language setting:
1. T urn on the camera and press the Menu button to
display the main menu screen.
2. Press the Right arrow button once to highlight
the Setup menu option at the top.
3. Use the Up and Down arrow buttons to highlight
the Language option.
4. Press the Right arrow button to display the available settings.
5. Use the Up and Down arrow buttons to highlight
the required setting.
6. Press the Left arrow button to confirm your
choice.
7. Press the Menu button to exit the menu.
LanguageLanguage
SelectSelect
EnglishEnglish
50HZ50HZ
OnOn
HZHZ
ENGENG
001001
EnglishEnglish
DeutscherDeutscher
FrancaisFrancais
EspanolEspanol
LanguageLanguage
SelectSelect
EnglishEnglish
50HZ50HZ
OnOn
HZHZ
ENGENG
001001
Page 77

69
Setup Menu
USBSwitch
The DV can be connected to your PC to download
your pictures to the hard disk It can also be used as a
webcam. Use the USBSwitch setting to switch
between webcam mode or standard USB mode. To
access the USBSwitch setting:
1. T urn on the camera and press the Menu button to
display the main menu screen.
2. Press the Right arrow button once to highlight
the Setup menu option at the top.
3. Use the Up and Down arrow buttons to highlight
the USBSwitch option.
4. Press the Right arrow button to display the available settings.
5. Use the Up and Down arrow buttons to highlight
the required setting.
SETUPSETUP
SelectSelect
OnOn
2004/05/152004/05/15
03:12:1503:12:15
OffOff
NTSCNTSC
3M3M
+2.0+2.0
PHOTOPHOTO
SelectSelect
Page 78

70
Setup Menu
6. Press the Left arrow button to confirm your
choice.
7. Press the Menu button to exit the menu.
FileNoRST
Each picture you take with the DV is given a number .
The file number is also the name of the file when you
download it to your hard disk . To reset the file number to zero, use the FileNoRST option. To access the
FileNoRST option:
1. T urn on the camera and press the Menu button to
display the main menu screen.
2. Press the Right arrow button once to highlight
the Setup menu option at the top.
3. Use the Up and Down arrow buttons to highlight
the FileNoRST option.
4. Press the Right arrow button to display the available settings.
USBSwitchUSBSwitch
SelectSelect
EnglishEnglish
50HZ50HZ
OnOn
GYGY
DMFDMF
//0//0
Web CamWeb Cam
USB ModeUSB Mode
USBSwitchUSBSwitch
SelectSelect
EnglishEnglish
50HZ50HZ
OnOn
HZHZ
ENGENG
001001
Page 79

71
Music Menu
5. Use the Up and Down arrow buttons to highlight
the required setting.
6. Press the Left arrow button to confirm your
choice.
7. Press the Menu button to exit the menu.
3.3 Music Menu
Use Music Menu to play MP3 files stored on the
camera.
To access the MP3 player function:
1. Turn on the camera and make sure it is in Play-
back mode. See Playback mode on page 25.
2. Press the Menu button to display the main menu
screen.
Cancel
OK
File No. Reset
Select
WARNING !
All images number
will be reset.
Set
FileNoRstFileNoRst
SelectSelect
EnglishEnglish
50HZ50HZ
OnOn
HZHZ
ENGENG
001001001001001
Page 80

72
Mu
s
i
c Menu
3. Press the Right arrow button twice to display the
Music menu.
A music note icon appears on the screen.
4. Press the OK button on the rear of the camera to
display a list of MP3 fi les stored in the camera.
5. Use the Left and Right arrow buttons on the rear
of the camera to highlight the MP3 file to play.
6. Use the Up arrow button to play the file.
Select:Select: OKOK
Exit:MENUExit:MENU
PLAYBACKPLAYBACK
SelectSelect
Stop
Play/Pause
Volume
Page 81

73
Music Menu
Use the Left and Right arrow buttons to adjust the
volume control. Press the Up arrow button during
playback to pause playback. Press the Down arrow
button to stop playback .
Page 82

Page 83

Appendix A
Specification
Resolution
Sensor resolution 3 megapixel (2048 x 1536)
Output resolution 6 megapixel
Functions
Digital still camera 6, 4, 3, 2, or 1 megapixel
Video recording VGA (12fps) QVGA (30fps)
Audio recording synchronize
Web camera VGA (12fps) QVGA (30fps)
Digital zoom 4 x (in increments of 0.1)
MP3 player Yes
Lens
Focal length 8.34 mm
Aperture F3
Focusing Fixed
Macro 20 cm
Focal range 1m - infinity
Page 84

76
Specification
Exposure
Exposure control Automatic
EV compensation -2 EV ~ 2 EV (in increments of 0.5)
Shutter speed 1/8 - 1/4000 second
White balance Auto/sunlight/tungsten/fluorescent/cloudy
Flash
Built-in flash Yes
Flash modes On (red eye reduction), auto (red eye
reduction), off
Effective range 1.5m - 2m
Display and main menu functions
LCD screen 1.8-inch TFT LCD panel (270° rotation)
Menu system On-screen display
Continuous shoot-
ing
Yes
Self timer 10 second delay
Power off Auto (1 or 2 minutes), manual
Erase function Delete single, all, or selection
Battery level indica-
tor
On-screen
Specification
Page 85

77
Specification
Memory
Internal memory 16 MB built-in flash
External SD card slot
Software
PC compatible Windows 98SE/ME/2000/XP
Mac compatible Mac OS (9.x or later)
Mass storage
device
Can function as a mass storage device
Connections
USB Yes (USB1.1)
TV-out NTSC and PAL compatible
Dimensions
Size 112 x 67 x 50 mm
Weight without bat-
tery
165g (5.8 oz)
Power
Battery 4 x AAA alkaline or lithium rechargeable
Specification
Page 86

78
Specification
Box contents
Accessories Pouch
Strap
CD-rom (drivers and applications)
Warranty card
User manual
Lithium battery
USB cable
TV out cable
AC power adaptpr
Application Wise cam for Windows 98SE/ME/2000
and XP
Specification
Page 87

79
Troubleshooting
Appendix B
Troubleshooting
Problem Cause Solution
Power does
not turn on.
•The batteries are
inserted incorrectly.
•The batteries are
dead.
Check that the battery is inserted correctly and recharge i f
necessary.
The camera
does not take
pictures.
•The camera is set to
Playback mode.
•The flash is charging.
•The memory is full.
•Check the camera
mode.
•Allow the flash to
charge.
•Check camera
memory.
Image is not
recorded
when the
shutter button
is pressed.
•The camera is set to
Playback mode.
•The flash is charging
•Memory is full.
•Check the camera
mode.
•Allow the flash to
charge.
•Check camera
memory.
The flash
doesn't fire.
The Flash mode is set
to OFF.
Set the flash to any
mode except OFF.
Images are
blurry or out
of focus.
•The camera was
moving when the
image was captured.
•The subject was
beyond the focal
range of the camera.
• Hold the camera
steady.
• Turn the Macro
mode on if the subject is very close.
• Turn Macro mode
off when shooting
distant subjects.
Page 88

80
Troubleshooting
Images are
not saved in
memory.
The camera was
turned off before t he
image was stored in
memory.
If the battery low
indicator appears on
the LCD screen,
replace the batteries
immediately.
Cannot transfer images to
a computer
after connecting the USB
cable.
The USB driver is not
installed.
•Install the USB
driver before you
connect the camera to a computer.
• Turn the camera on.
Images do not
appear on the
television.
•The cable is not connected securely.
•The TV Out se tting is
incorrect.
•Use the included
video cable to connect the camera to
a TV.
•Set the video system to the correct
setting, NTSC or
PAL.
Troubleshooting
Page 89

81
Installing Software
Appendix C
Installing Software
Your DV digital camera comes complete with a CDrom containing drivers and applications. If your computer uses Windows 98SE operating system, you will
need to load a driver from the CD-ROM before you
can download files from your camera to your computer.
If you have Windows ME, 2000, or XP operating system, you can plug the DV straight into the USB port
on your computer and a driver will instal l automatically without the CD-ROM.
If you want to use the DV as a webcam, you will need
to load a driver from CD-ROM whatever your operating system.
To load the application software or driveres from CDROM, insert the CD-rom in your PC CD-ROM drive.
The installation menu should automatically appear
after a few seconds. If it does not appear, use Windows explorer to run the setup.exe file in the root
directory on the CD-ROM. Follow the on-screen
instructions to complete the procedure.
Page 90

Appendix D
Guarantee Certificate for Product Services
1. This certificate is invalid without the stamp of the dealer. In the event
the date is not filled in, or the dealer's stamp is not present, the date of
guarantee begins on the production date of the machine.
2. The period of guarantee expires one year after the date of purchase.
3. Guarantee Coverage:
Malfunctions due to production, taking place under normal circumstances of usage, are covered by the one-year guarantee period, except
in the following cases:
a. Human negligence, accidents, or acts of God including, but not lim-
ited to, fire, flood, earthquake, water infiltration, pests, and lightning.
b. Inappropriate repair, alteration, or adjustment of the components by
user.
c. Use of consumables such as batteries, converters, or chargers not
specified by the manufacturer.
d. Failure to provide regular maintenance for the product.
e. Modification of this certificate.
Dealer’s Stamp:
Customer Name:.....................................................
Telephone Number: ................................................
Address:..................................................................
Date of Purchace:....................................................
The above information must be filled out to protect
your own rights.
Date Maintenance Performed
 Loading...