

Page 1
Page 2

2
Preface
Copyright
Copyright © 2006, Microtek International, Inc., all rights reserved. This document may not be
reproduced or copied in any way, stored electronically, or translated into any language, without the
permission of Microtek International, Inc.
Disclaimer
The contents of this manual have been checked carefully for accuracy, and every effort has been made
to ensure that there are no errors. However, Microtek makes no guarantee as to the accuracy of the
contents of this document and reserves the right to make changes to the contents without prior warning.
FCC Compliance
This device complies with Part 15 of the FCC Rules. Operation is subject to the following two
conditions:
(1) This device may not cause harmful interference.
(2) This device must accept any interference received, including interference that may cause undesired
operation.
Federal Communications Commission (FCC) Statement
This equipment (Model Type: ML42C1H) has been tested and found to comply with the limits for a
Class B digital device, pursuant to part 15 of the FCC Rules. These limits are designed to provide
reasonable protection against harmful interference in a residential installation.
This equipment generates, uses and can radiate radio frequency energy and, if not installed and used in
accordance with the instructions, may cause harmful interference to radio communications. However,
there is no guarantee that interference will not occur in a particular installation. If this equipment does
cause harmful interference to radio or television reception, which can be determined by turning the
equipment off and on, the user is encouraged to try to correct the interference by one or more of the
following measures:
• Reorient or relocate the receiving antenna.
• Increase the separation between the equipment and the receiver.
• Connect the equipment to an outlet on a circuit different from that to which the receiver is
connected.
• Consult the dealer or an experienced radio/TV technician for help.
Caution: Changes or modifications not expressly approved by the manufacturer responsible for
compliance could void the user's authority to operate the equipment.
I49-004082 A
September 2006
Microtek Lab, Inc.
16941 Keegan Avenue, Carson, CA 90746
Main: 310-687-5800, Fax: 310-687-5950, http://www.microtekusa.com
Microtek International, Inc.
6, Industry East Road 3, Science Based Industrial Park Hsinchu, 300, Taiwan
Tel: 886-3-5772155, Fax: 886-3-5772598, http://www.microtek.com
Page 3

3
42" LCD TV
Safety Precaution
Before you use the Liquid Crystal Display (LCD), be sure to read the following safety precautions, which
detail the proper operation of the LCD and its accessories to prevent injuries or damage to users or
equipment.
• TO PREVENT FIRE OR SHOCK HAZARDS, DO NOT EXPOSE THIS UNIT TO RAIN OR MOISTURE.
• TO REDUCE THE RISK OF ELECTRIC SHOCK FROM DANGEROUS VOLTAGES, DO NOT REMOVE
THE FRONT OR BACK COVER. THERE ARE NO USER-SERVICEABLE PARTS INSIDE. CONSULT
QUALIFIED SERVICE PERSONNEL FOR MAINTENANCE AND SERVICE.
1. Read the Instructions – Always read and understand all instructions before operation.
2. Retain the Manual – The safety and operation instructions should be kept in a safe place for future
reference.
3. Follow Warnings – The warnings on the product and in the instructions should be obeyed.
4. Follow Instructions – Always follow all operating instructions.
5. Socket Usage – Never use sockets not recommended by the manufacturer. The use of inappropriate
sockets may cause accidents.
6. Power Sources – This product should be operated only from the type of power source indicated on
the marking label.
7. Place and route the power supply cord such that it is not likely to be walked on or pinched by items
placed upon or against them, paying particular attention to the cord near the power plugs, and at
the point where it exits from the product.
8. Overloading – Do not overload AC power outlets and extension cords, as this can result in a risk of
fire or electric shock.
9. Object and Liquid Entry – Never push objects of any kind into this product through ventilation slots
or openings. For the same reason, never spill water or any kind of liquid on the product.
10. Servicing – Do not attempt to service this product yourself, as opening or removing covers may
expose you to dangerous voltage or other hazards.
11. Damage Requiring Service – Unplug this product from the AC outlet and refer servicing to qualified service
personnel under the following conditions:
A. The power-supply cord or plug is damaged.
B. Liquid has been spilled or objects have fallen into the product.
C. The product does not operate normally by following the operating instructions. Adjust only those
controls that are covered by the operating instructions, as an improper adjustment of other controls
may result in damage and will often require extensive work by a qualified technician to restore the
product to its normal operating condition.
D. The product has been damaged after falling or being dropped.
E. The product appears to be operating abnormally.
12. Parts Replacements – When parts are required to be replaced, ensure that the service technician use
parts that are specified by the manufacturer or have the same characteristics as the original parts.
Unauthorized substitutions may result in fire, electric shock, or other hazards.
13. Safety Check – Upon completion of any service or repairs to this product, ask the service technician
to perform safety checks to determine that the product is in proper operating condition.
14. Wall Mounting – To mount this product on the wall (mounting module is optional), please install
according to the manufacturer’s professional instructions to ensure safety and stability of the LCD.
15. Cleaning – Unplug this product from the AC outlet before cleaning. Use a damp cloth for cleaning.
DO NOT use liquid cleaners or aerosol cleaners.
16. Water and Moisture – Do not use this product near water--near a bath tub, washing bowl, kitchen
sink, or laundry tub; in a wet basement; or near a swimming pool, and other similar locations.
Never place any container with water on top of this product.
Page 4

4
17. Supported Stand – Do not place this product on an unstable cart, stand, tripod, table, as it may
cause the product to fall and result in injury to people and damage to the product. When mounting
this product on the wall, please follow the manufacturer’s professional instructions.
18. Ventilation – Slots and openings in the cabinet are provided for ventilation. Please do not cover or
block these slots and openings, as improper ventilation will cause overheating and shorten the life
of this product. The openings may also be blocked when placing the product on a bed, sofa, rug or
other similar surface. This product is not designed for a built-in installation. Do not install the
product in airtight places, such as a bookcase or rack, unless proper ventilation is provided or the
manufacturer’s instructions have been adhered to.
19. Move the product on a suitable cart or trolley, with care and caution. Quick stops, excessive force,
or uneven surfaces may cause the product and cart combination to overturn.
20. The LCD panel of this product is made of glass. If the product falls or is hit, the panel may break
and be damaged.
21. Heat – The product should be situated away from heat sources, such as direct sunlight, radiators,
heaters, stoves, or other products (including amplifiers) that produce heat, to prevent the cabinet
from deforming and the panel from malfunctioning.
22. When using this product in a low-temperature room, the picture may have the appearance of
ghosting or delayed reaction. This is not a malfunction. When the temperature returns to normal, the
display will normalize as well. Operating temperature is 50 F to 95 F (10 C to 35 C).
23. The LCD panel is a high-tech, high-quality product comprising of millions of thin film transistors.
Occasionally, functionless pixels may appear on the screen; these pixels will not affect the
performance of the LCD panel.
24. If an outdoor antenna or cable system is connected to the product, be sure that the antenna or cable
system is grounded in order to provide some protection against voltage surges and built-up static
charges. The 810th Section of the National Electrical Safety Code provides the following information
as to the proper grounding of antenna pole and supporting structure, grounding by implanting cords
to antenna discharging units, the size of grounding conductors, the position of antenna discharging
units, connection to the grounding electrodes and the requirement of grounding electrodes.
25. For added protection of this product during a lightning storm, or when it is left unattended and
unused for long periods of time, unplug it from the power outlet and disconnect the antenna or
cable system. This will prevent damage to the product due to lightning and power surges.
26. An outdoor antenna system should not be located in the vicinity of overhead power lines, street
lamps or power circuits, or where it can fall into such power lines or circuits. When installing an
outdoor antenna system, extreme care should be taken to keep them from touching such power
lines or circuits, as contact with them may prove fatal.
NOTE: If the screen flickers or if the image is unclear when playing AV sources (such as DVD, VCD, or
Video), check if the signal source (such as the output setting of the DVD — 480i, 576i, etc.) matches
the signal source of the video. Refer to the “Troubleshooting” section in this menu for more details.
Page 5

5
42" LCD TV
Table of Contents
Preface ................................................................................................................................2
Safety Precautions ..............................................................................................................3
CHAPTER 1
About Your LCD .................................................................................................................... 7
Unpacking the Package ................................................................................................................. 8
Package Contents .................................................................................................................. 8
Front View ................................................................................................................................. 9
Rear Connectors ........................................................................................................................ 10
Remote Control ......................................................................................................................... 11
CHAPTER 2
Making Connections .......................................................................................................... 12
Connecting Power ...................................................................................................................... 12
Viewing TV from Aerial Signals ................................................................................................... 13
Connecting the Cable ........................................................................................................... 13
A. Analog Antenna Connection ....................................................................................... 13
B. Digital Antenna Connection ........................................................................................ 13
Connecting a Cable TV Box ....................................................................................... 14
Connecting External Devices to Your LCD ............................................................................... 15
A. Connecting a Device with S-Video port ....................................................................... 15
B. Connecting a Device with Composite Video Port ........................................................... 15
C. Connecting a Device with Component Video Port .......................................................... 16
D. Connecting a Device with HDMI Port .......................................................................... 16
Connecting to a Second Display ............................................................................................ 17
Connecting to a Personal Computer ........................................................................................ 18
Specifications for Computer Modes .................................................................................. 19
CHAPTER 3
Getting Started .................................................................................................................. 20
Turning the LCD On ................................................................................................................... 20
Initial Setup for TV .................................................................................................................... 20
A. Selecting the TV Input Source .......................................................................................... 20
B. Selecting the Video Input Source ....................................................................................... 21
C. Selecting the TV System ................................................................................................. 21
D. Scanning for Channels ..................................................................................................... 21
Initial Setup for Digital TV (DTV) ................................................................................................. 22
A. Selecting the DTV Input Source ........................................................................................ 22
B. Activating the DTV OSD .................................................................................................. 22
C. Scanning for Channels ..................................................................................................... 23
Changing Channels .................................................................................................................... 24
Channel Return ................................................................................................................... 24
Adjusting the Volume ................................................................................................................. 24
Selecting Stereo or SAP Audio Transmission .................................................................................. 25
Muting the Sound ...................................................................................................................... 25
Page 6

6
CHAPTER 4
Using the TV Features ........................................................................................................ 26
Navigating the Menu .................................................................................................................. 26
Optimizing the Picture – Brightness, Contrast, Sharpness, Color, Hue, Backlight, Color Temp, Phase,
Frequency .......................................................................................................................... 27
Adjusting the Image – Image Size, H/V Position, Freeze Frame, PIP Adjustment, Auto ......................... 28
Displaying Setup – Language, Closed Caption, Sleep Timer, OSD Setting, NTSC, Reset ...................... 29
Setting the Sleep Timer ....................................................................................................... 30
Using the Closed Captions .................................................................................................... 30
Adjusting the Audio – Volume, Treble, Bass, Balance, Mute, Audio Source ........................................ 31
Adjusting TV Channel Settings – Auto Search Channels, Channel List, Edit Channels, Edit Favorites ...... 32
Displaying and Setting Up Your Favorite Channels .................................................................... 33
Selecting the Input Source – Source Enable, Layout ........................................................................ 34
Selecting the Window Layout ................................................................................................ 35
Viewing Picture-in-Picture (PIP) ............................................................................................. 36
Selecting the PIP Input Source ........................................................................................ 37
Customizing PIP Window Settings ................................................................................... 38
Alternating PIP and Main Screen Sources .......................................................................... 38
Changing the PIP Channel .............................................................................................. 38
Viewing Picture-out-Picture (POP) .......................................................................................... 39
Selecting POP Input Source(s) ......................................................................................... 40
Changing the POP Channel ............................................................................................. 41
Using the V-Chip Controls ........................................................................................................... 42
Turning the V-Chip on .......................................................................................................... 42
Changing the Password ........................................................................................................ 43
Locking Movie Programs ....................................................................................................... 43
Locking TV Programs ........................................................................................................... 44
CHAPTER 5
Using the Digital TV Features ............................................................................................ 45
Navigating the Menu .................................................................................................................. 45
Setting Channels – Edit, Auto Scan, Manual Scan .......................................................................... 46
Setting Up Your Favorite or Blocked Channels ......................................................................... 47
Displaying Your Favorite Channels ......................................................................................... 48
Scanning Channels Manually ................................................................................................. 49
Managing the Closed Caption – Font Size, Font Style, Font Color, Font Opacity,
Edge Style, Edge Color ......................................................................................................... 50
Displaying Setup – Formate, Sound, Opacity, I-Plate, Time Zone, About ............................................ 51
Setting the Time Zone ......................................................................................................... 52
Using the Lock .......................................................................................................................... 53
Turning the Lock on .............................................................................................................53
Changing the Password ........................................................................................................ 53
Locking Programs ................................................................................................................ 54
Getting More Information about Programs ...................................................................................... 55
Using the INFO ................................................................................................................... 55
Using the GUIDE .................................................................................................................55
Appendix ........................................................................................................................... 56
Programming Your Remote Control .............................................................................................. 56
How to Program Your Remote Control ................................................................................... 56
Auto Search ................................................................................................................. 56
Manual Setup ............................................................................................................... 57
Manufacturing Codes of Devices ............................................................................................ 58
Care and Maintenance ................................................................................................................ 63
Troubleshooting ......................................................................................................................... 64
Specifications ........................................................................................................................... 65
Page 7

7
42" LCD TV
CHAPTER 1
About Your LCD
Congratulations on your purchase of the 42" Liquid Crystal Display (LCD). The LCD, incorporated with
an attached optional multimedia module, supports the latest digital TV standards including a High
Definition Multimedia Interface (HDMI) and a digital TV receiver. With the HDMI feature, the LCD can
transfer uncompressed video and audio at same time, while the digital TV receiver enables the LCD to
receive signals transmitted from all available VHF/UHF bands in your area. Along with a variety of
options for connecting an input source and an easy-to-use on-screen display (OSD), the LCD helps you
in fine-tuning your viewing experience. The multilayer on-screen menus give you control and access to
the various LCD features. The LCD is also designed to be versatile to meet your viewing needs and fit
neatly into any room. It can be mounted on a wall or a stand.
Key features:
• Worldwide multistandard video support for NTSC, PAL, or SECAM systems
• Built-in High-Definition Multimedia Interface (HDMI)
• High-performance panel with 10-bit output format
• Inverse 3:2 NTSC/2:2 PAL pulldown for a smoother, superior picture
• Picture In Picture (PIP) and Picture Out Picture (POP) support
• Dual Tuners (NTSC and ATSC)
• Easy PIP swap and PIP placement, with built in de-interlace
• Multilayer on-screen display menus
• Progressive and interlaced Component Video inputs: 480i, 480p, 720p, 1080i, and 1080p
• Auto detection of input format with programmable input window
• Auto clock-phase adjustment
• Auto input timing mode detection
• V-Chip function for parental control of content
• Closed Caption function
• Dolby Digital (5.1-channel) support
• Built-in speakers and stand
Picture Effects
LCD displays provide you with an excellent viewing experience, providing images of high quality and
high resolution. The picture remains bright and vibrant under all types of lighting conditions; the image
is smooth and even because there are no visible scan lines.
This LCD not only supports the latest digital technologies, it also offers a superior way to view highquality images that only HDTV and DVD can provide. The color is rich and realistic, with a spectrum of
literally millions of color variations — far beyond what a conventional TV can offer. Your 42-inch LCD
takes LCD technology a step further with pixel enhancement and color space converters. The digital
comb filter eliminates blurred edges, so that the picture remains in sharp focus at all times.
Wide viewing angles let you watch comfortably from anywhere in the room, and the wide 16:9 aspect
ratio takes full advantage of the large screen, especially for viewing HDTV, which also uses the same
aspect ratio. And because many TV programs continue to broadcast in the narrower 4:3 aspect ratio, the
LCD also includes aspect ratio conversion to automatically convert to a 16:9 aspect ratio.
Picture features:
• Per-pixel Motion de-interlace, 3D comb filter (NTSC/PAL), 3D noise reduction
• Digital Picture Control
• Auto Film Mode detection with inverse 3:2 NTSC/2:2 PAL pull down
• Digital Color/Luminance Transient Improvement (DCTI/DLTI)
• Proprietary pixel enhancement technology
• 4:3 image display on 16:9 output and aspect ratio conversion
• Frame rate up/down conversion
• Full programmable color space converter
Page 8
8
Unpacking the LCD
Before unpacking the LCD, make sure that you have followed the steps listed below:
1. Set the LCD box in an upright position, and open from the top of the box. Do not open the box
from the bottom or put it upside down.
2. Prepare a stable, even and clean surface for your LCD.
3. Ensure that you have enough ventilating space for your LCD. Do not block the ventilation slots, and
do not place the rear of the LCD too close to a wall or furniture.
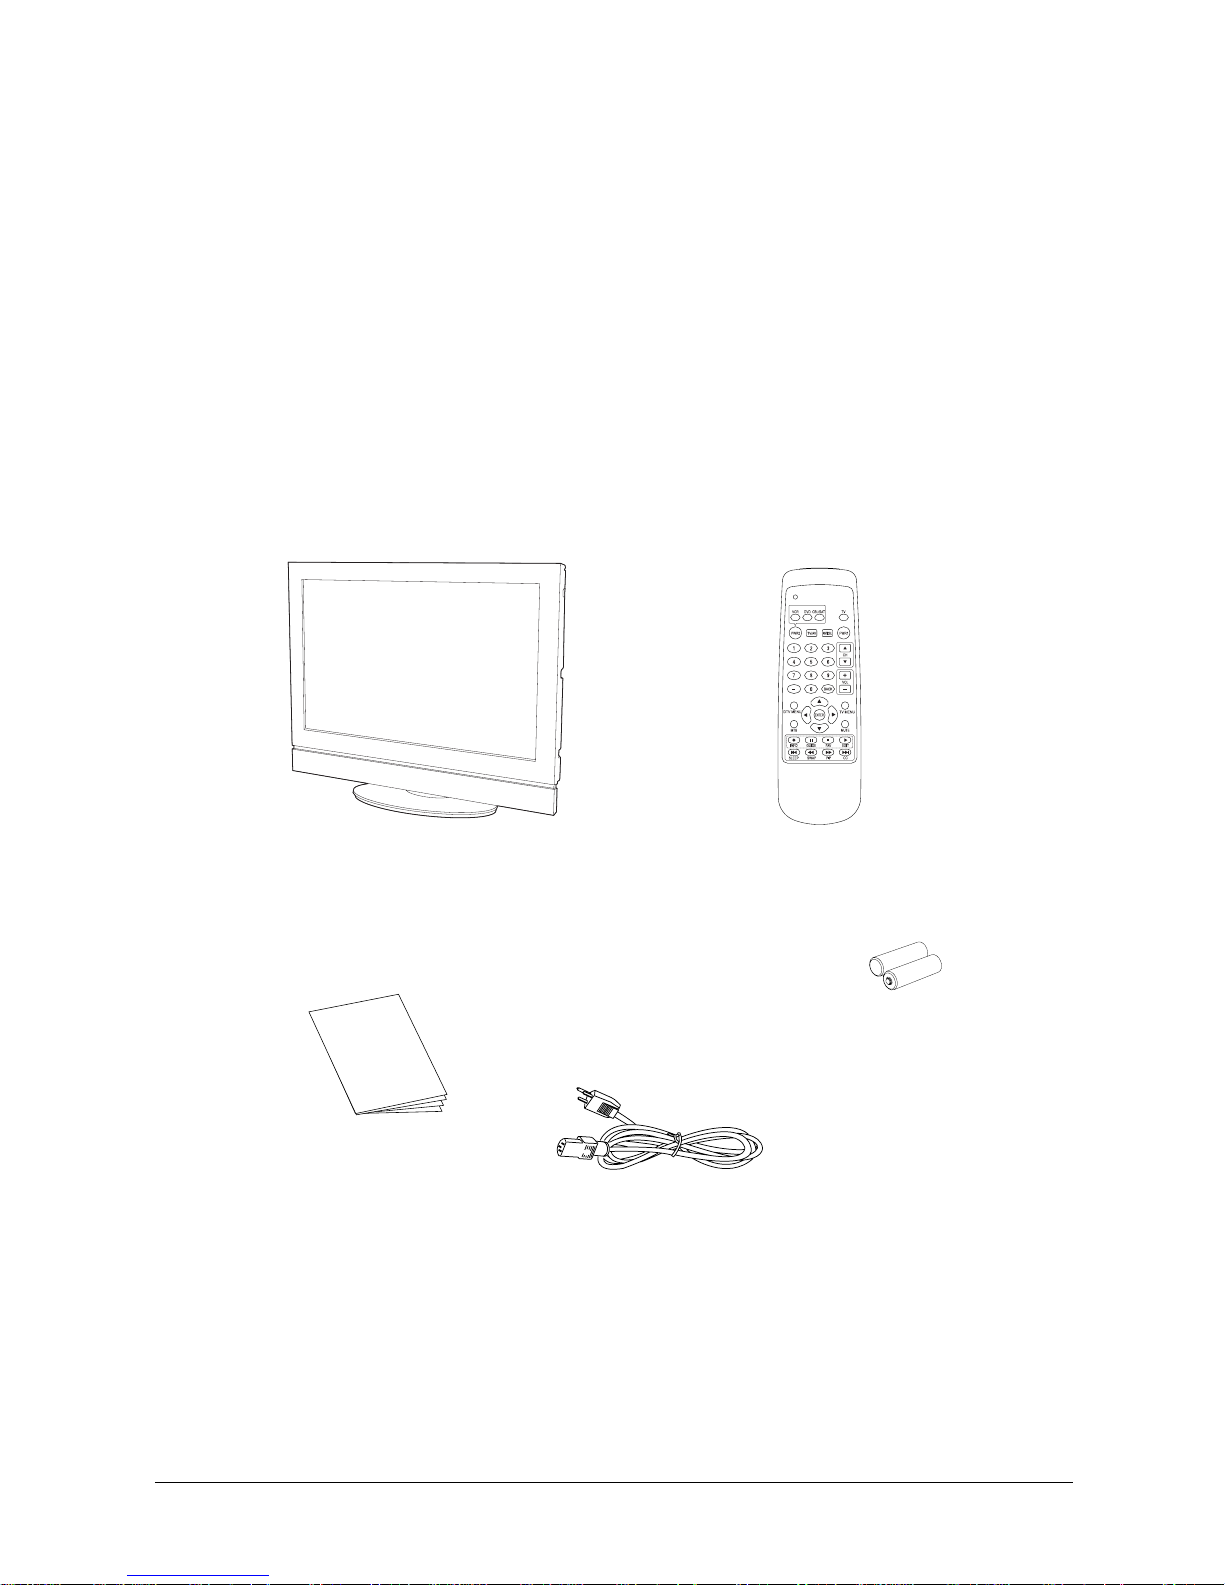
Package Contents
Ensure that the following items are included in your package. If there are any damaged or missing parts,
contact customer service.
LCD with attached speakers and base stand
Remote control
Two AAA batteries
(for use with remote control)
User Manual
Power cable
Page 9
9
42" LCD TV
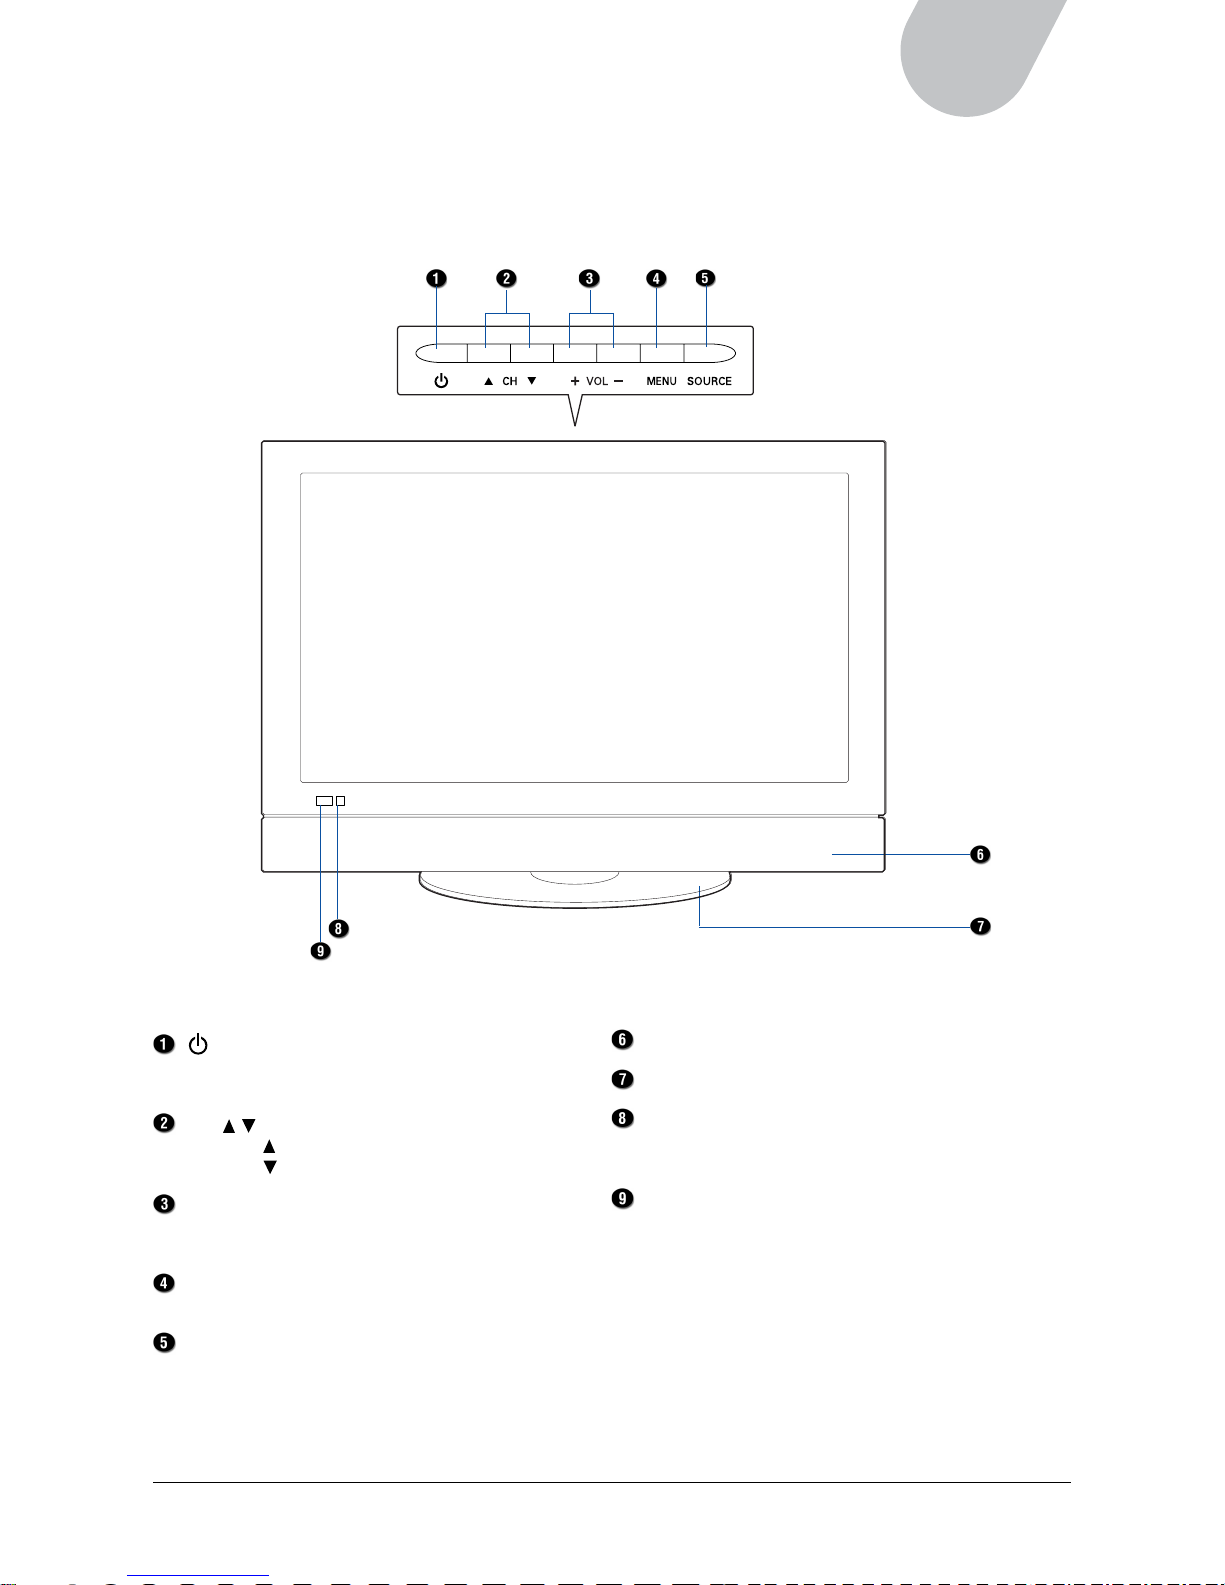
Front View
The following illustration shows the components on the front side of the LCD.
(Power/Standby) button
Press this button to turn on the LCD, or to
switch the LCD to standby mode.
CH ( / ) button
Press CH
to increase the channel number.
Press CH
to decrease the channel number.
VOL (+/–) button
Press VOL+ to increase the volume.
Press VOL – to decrease the volume.
MENU button
Press this button to open the on-screen menu.
SOURCE button
Press this button to switch among the different
source signals: VGA, Video 1, Video 2, SVideo 1, S-Video 2, HD1 (YPbPr), HDMI, DTV,
and TV.
Built-in speakers
Base unit
IR receiver
Point the remote control at the IR (Infrared Remote)
receiver to operate the LCD.
Power indicator
Indicates when the power is on.
Standby state — Red
Operating state — Green
Top Panel Buttons
Page 10
10
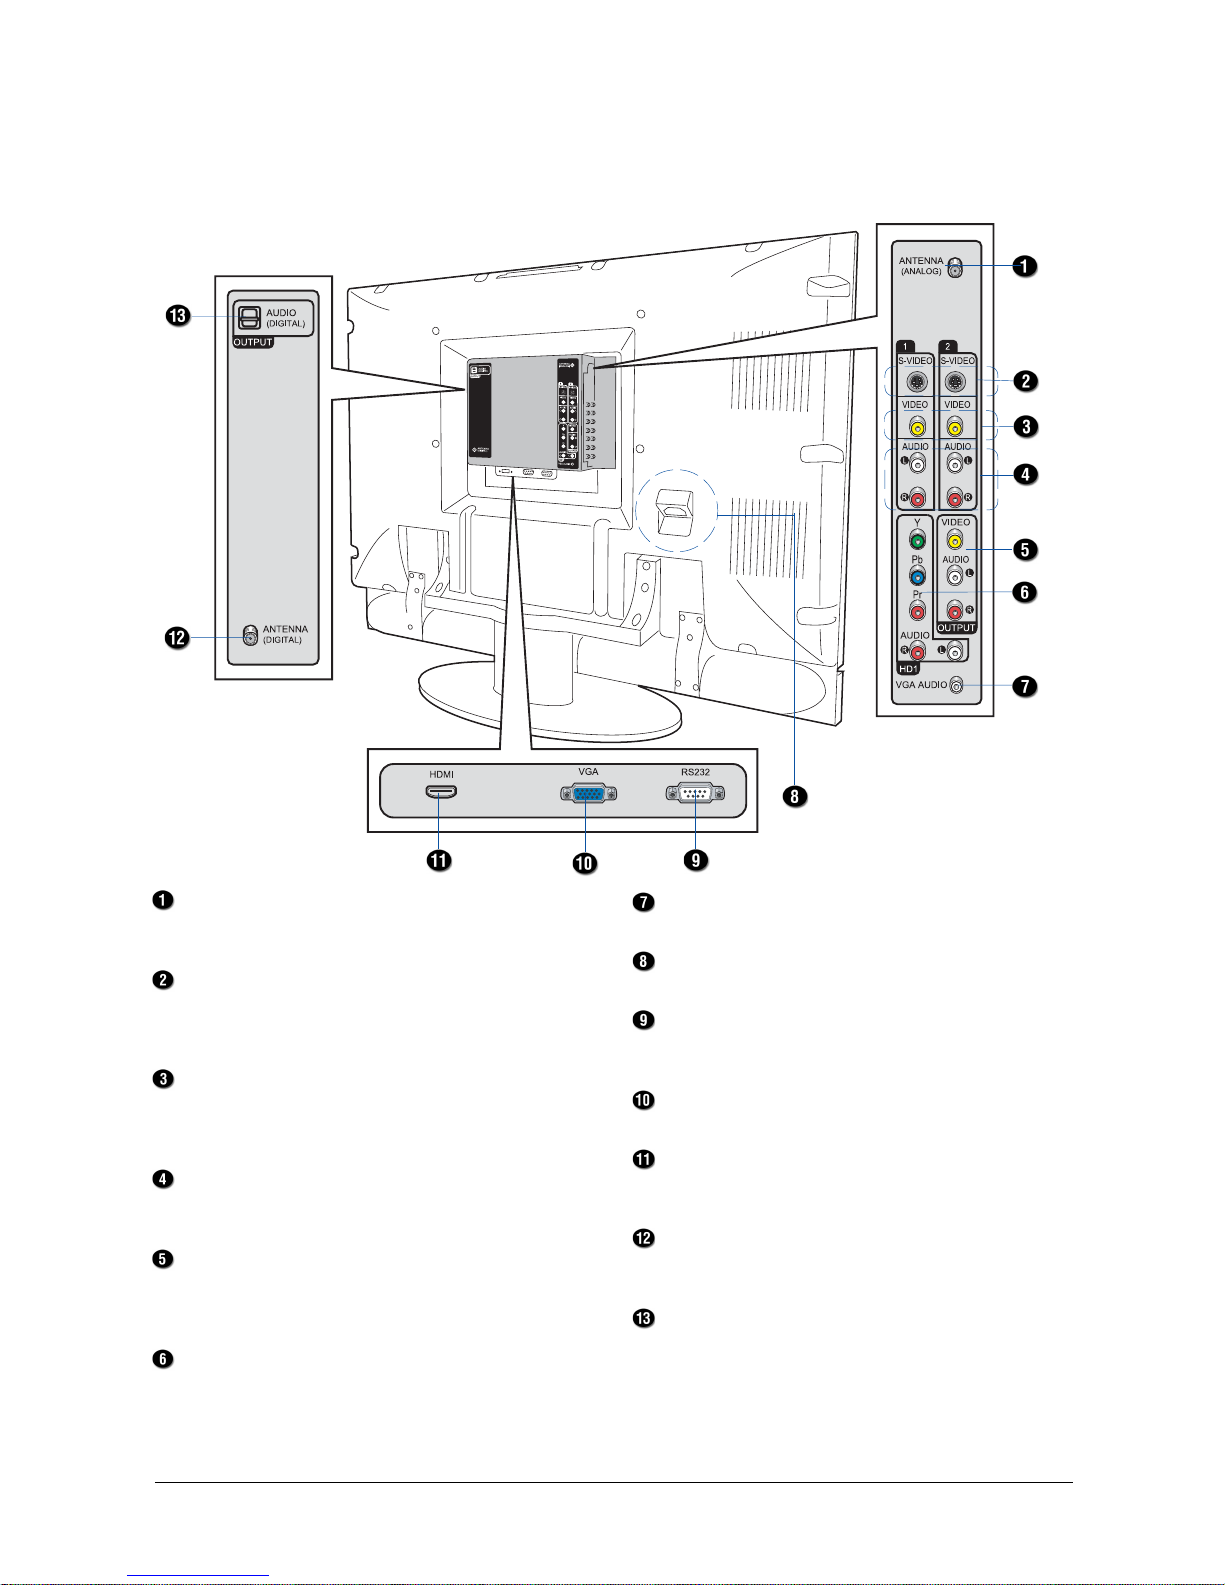
Rear Connectors
The following illustration show the connectors on the rear side of the LCD.
Antenna (Analog)
Connects to an antenna or a cable box with a coaxial
antenna cable.
S-Video 1 and S-Video 2
Connects to the S-Video output port from
devices such as a DVD player or VCR, using
an S-Video cable.
Composite Video 1 and Video 2
Connects to the Composite Video output of devices
such as a VCR or DVD player, using a Standard
Composite (AV) cable.
Audio (L/R)
Connects to the audio output of the input source,
using audio cables.
AV Output: Composite Video and Audio (L/R)
Connects to the video input of a second LCD or
monitor or to devices such as a VCR or DVD recorder,
using a Composite Video cable and audio cables.
HD1: Component Video (Y/Pb/Pr) and Audio (L/R)
Connects to video output from devices such as a
DVD player, set-top box, or high-definition TV
(HDTV), using a YPbPr (Component Video) cable
and audio cables.
VGA Audio
Connects to computer audio output.
Power Connector
Connects to the power cord.
RS232
For Factory use only. Do not make any connections
to this port.
VGA
Connects to a computer, using a VGA cable.
HDMI
Connects to devices such as a DVD player or settop box with an HDMI connector.
Antenna (Digital)
Connects to an antenna or a cable box to provide a
digital signal.
Audio Output (Digital)
Connects to digital stereo systems.
Page 11
11
42" LCD TV
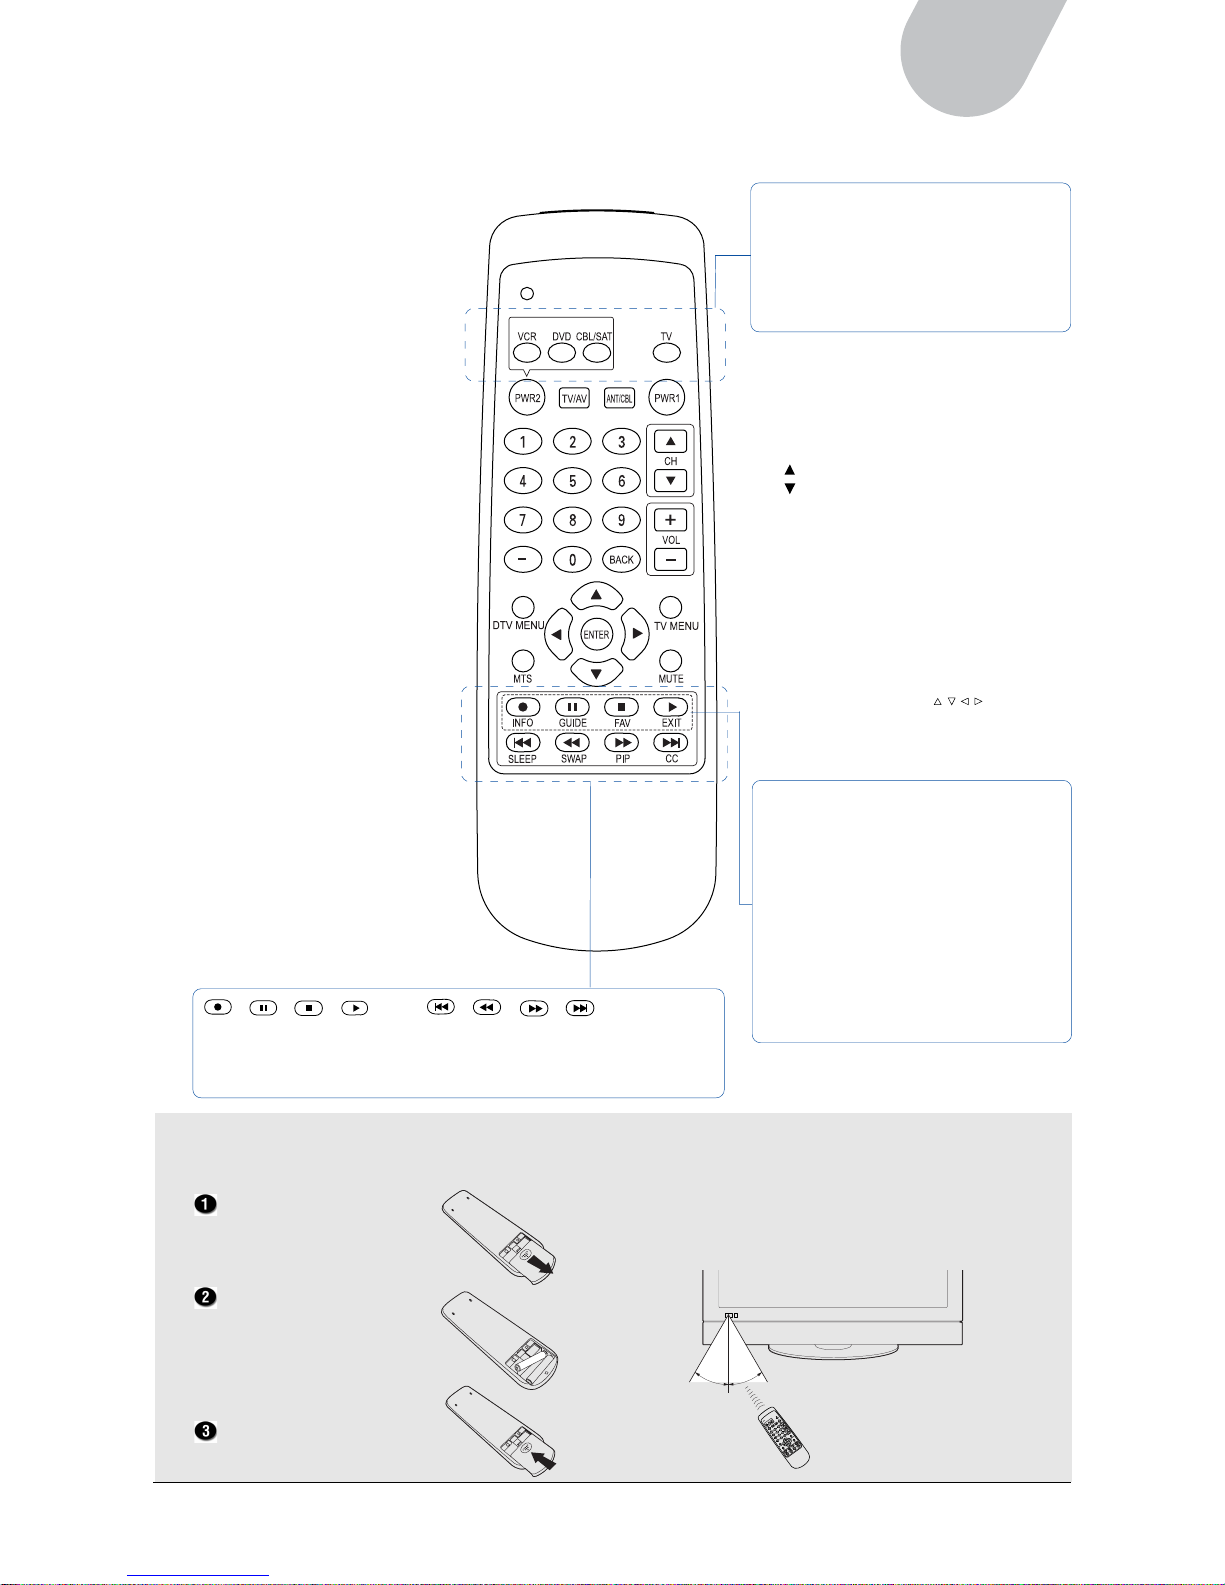
Inserting Remote Control batteries
Remove the cover from
the remote control
battery compartment.
Insert two AAA batteries
into the compartment,
aligned according to the
correct polarity.
Replace the cover.
Effective operating range
For best results, point the remote control
directly at the LCD, and make sure that nothing
is blocking the signal from the remote control
to the LCD.
Remote Control
Mode Buttons:
Switches to the function mode
• TV: Switches to TV mode
• CBL/SAT: Enters cable or satellite
receiver mode
• DVD: Enters DVD mode
• VCR: Enters VCR mode
PWR1 (Red):
Turns the LCD on and off.
PWR2 (Green):
Turns the VCR, DVD, cable, or satellite
receiver on and off
CH : Moves up to the next channel
CH : Moves down to the next channel
VOL+: Increases the volume
VOL–: Lowers the volume
BACK:
Returns to the previously viewed channel
TV MENU: Enters or exits the TV
on-screen menu
MUTE: Enables or disables audio
4-Way Arrow buttons ( / / / ):
Used for navigating the OSD menus
(up, down, left and right) or for
adjusting the settings
EXIT**:
Returns to the previous menu layer or
exits the on-screen menu
FAV**:
Toggles between ALL (all activated
channels) and FAV (favorite channels)
mode
GUIDE**:
Displays the Electronic Program Guide
(EPG)
INFO**:
Displays information on a particular show
TV/AV:
Selects the input source
ANT/CBL:
Selects the TV source
(antenna, cable TV)
Number Buttons (0-9):
Enters the channel or
code numbers directly
100/–:
In DTV mode, enters the
symbol “–” for a sub-channel.
ENTER:
Enters settings or executes
a command
DTV MENU:
Enters or exits the DTV
on-screen menu
MTS:
Multichannel Sound selection
(Mono, Stereo, SAP) for TV program.
Secondary language selection for
digital TV program.
CC:
Enables closed captions
PIP:
Enables PIP
(Picture In Picture) mode
SWAP:
Alternates between main screen and
PIP window input sources
SLEEP:
Sets the time when the LCD
turns off automatically
*/ */ */ *
Record/Pause/Stop/Play:
Used to record/hold/stop/
start the program
*/ */ */ *
Fast Backward/Backward/Forward/
Fast Forward: Advances or rewinds
the program or moves to the next/
previous program chapter
* These buttons function only in DVD and VCR mode.
** These buttons function only in digital TV mode.
Page 12
12
CHAPTER 2
Making Connections
Follow the instructions in this section to connect your LCD to various audio/video devices; or to view
TV programming from an aerial signal, cable box, or set-top box.
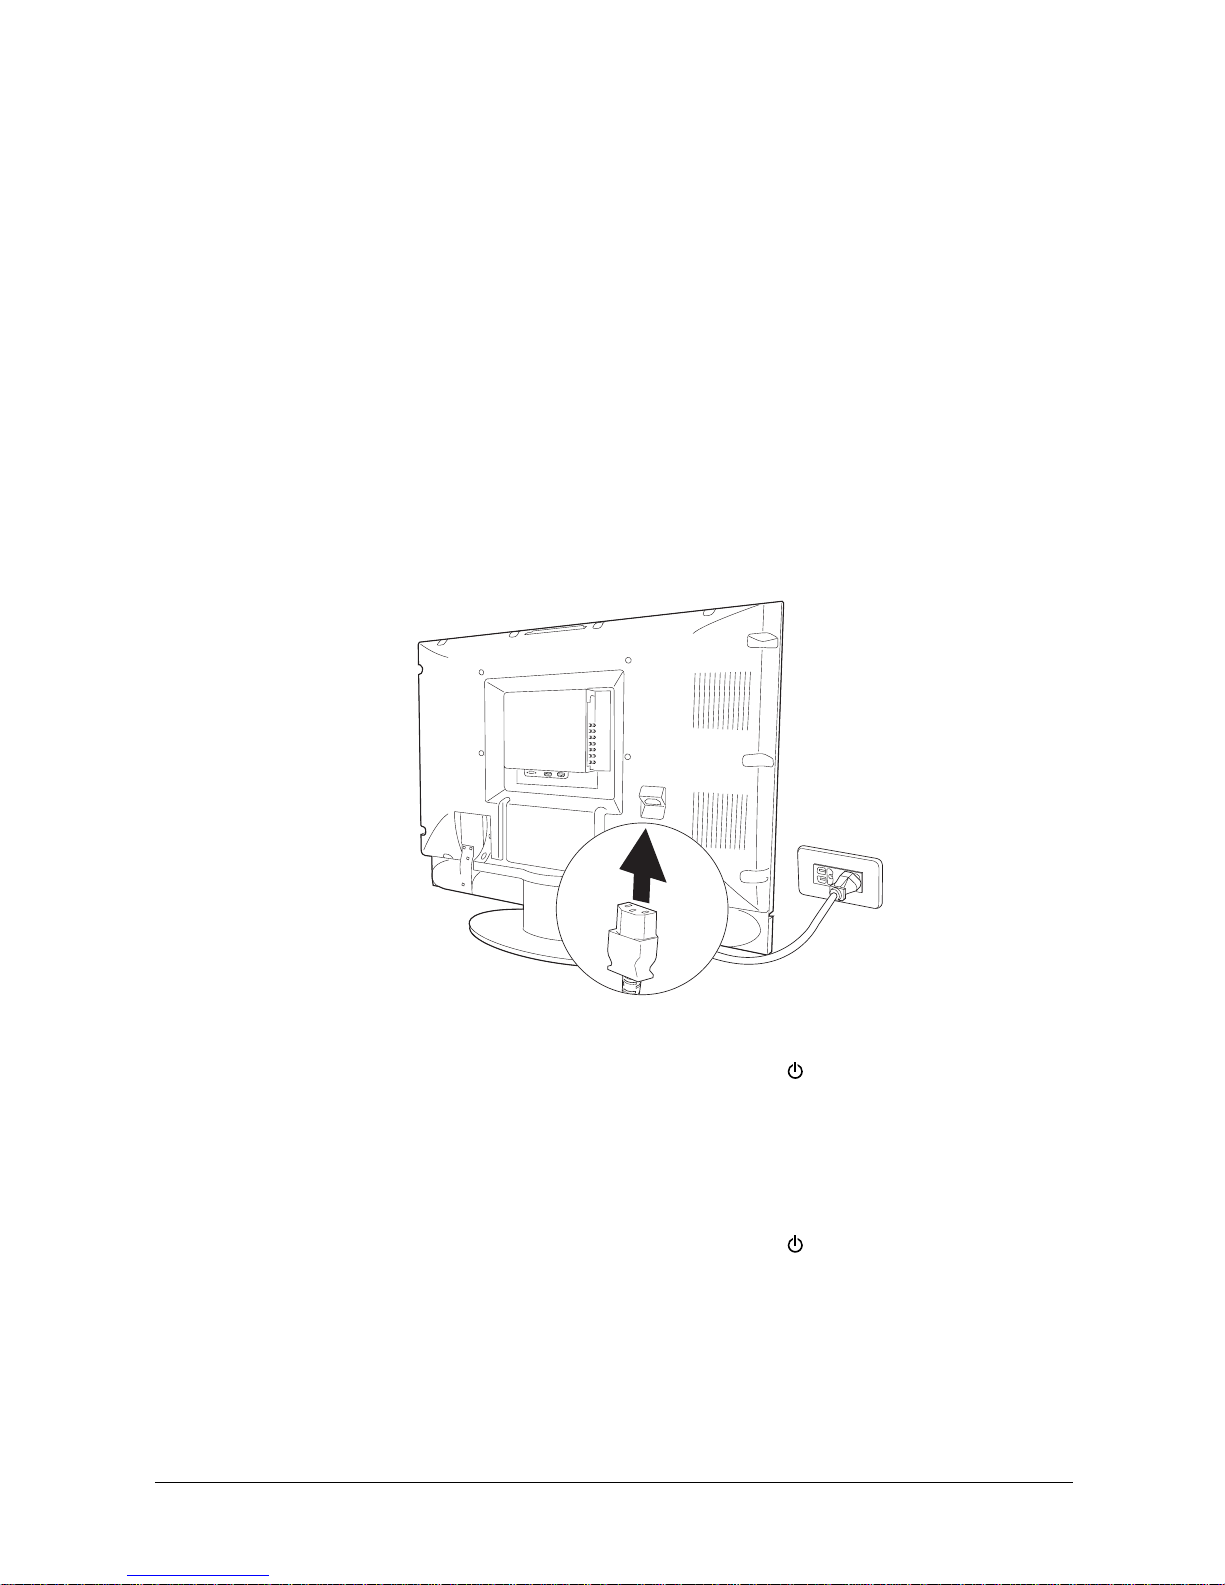
Connecting Power
A power connector located at the rear of the LCD allows you to control the LCD’s power on or off
directly. For everyday use, you can quickly and conveniently turn the LCD on or put it in standby mode
by pressing the PWR1 (Red) button on the remote control.
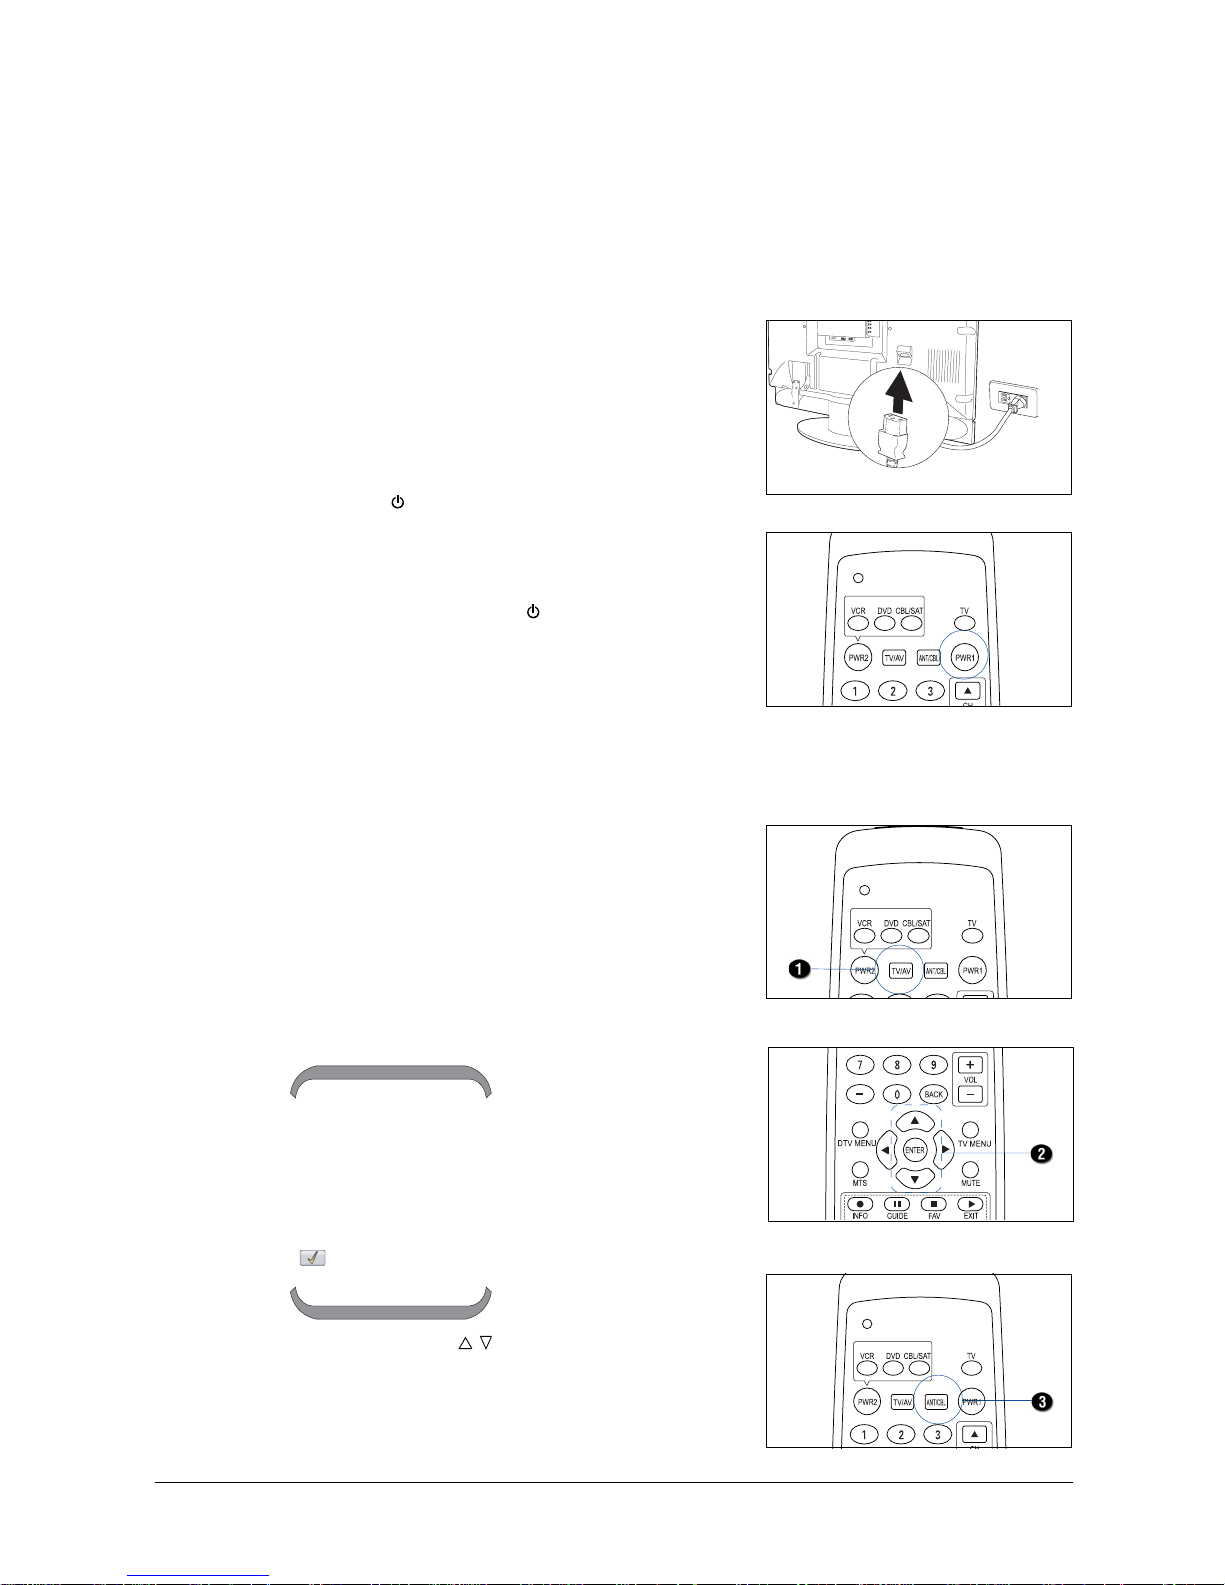
1. Plug the power cord into the power connector on the rear of the LCD unit.
2. Plug the other end of the power cord into a wall socket.
The power indicator on the front panel lights up in red, indicating that the LCD is in standby mode.
To turn on the LCD:
Press the PWR1 (Red) button on the remote control or the POWER ( ) button on the LCD unit to turn
on the LCD.
When the LCD is turned on, the power indicator changes from red to green; the LCD begins to detect the
previously set input signal source. When an input signal source is detected, the source will be displayed
on the LCD screen. If no signal is detected, a “No signal” message will be displayed on the LCD screen
To turn off the LCD:
Press the PWR1 (Red) button on the remote control or the POWER ( ) button on the LCD unit to turn
off the LCD. When the LCD is turned off, the power indicator then changes to red, indicating the LCD is
in standby mode. You can leave the LCD in this mode, or you can disconnect the power mode if the
LCD is not to be used for an extended period of time.
NOTE:
• Only use the provided power cable. The cable includes a three-prong grounded plug. To keep
power properly grounded, use an appropriate outlet or converter plug.
• Use only the indicated voltages (AC 100 – 240 V, 50/60 Hz) to avoid fire or electric shock.
Page 13
13
42" LCD TV
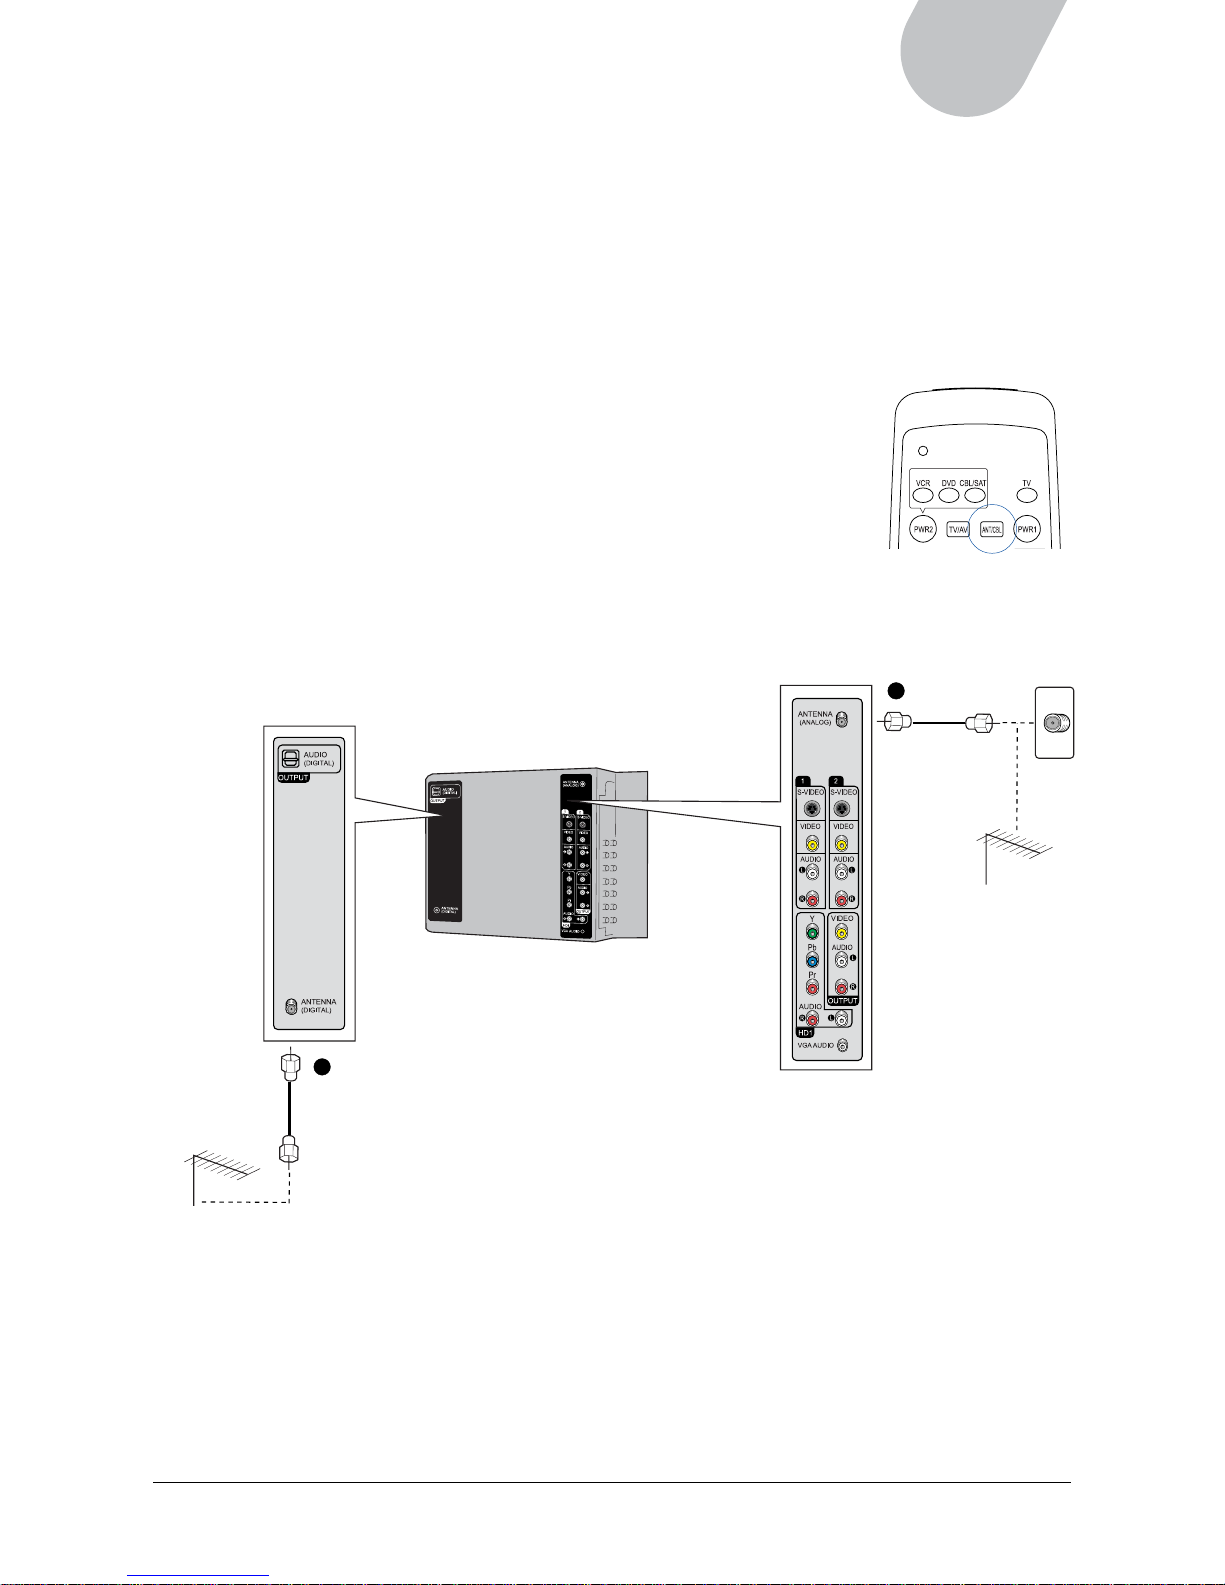
Viewing TV from Aerial Signals
Equipped with advanced technology, your LCD is able to receive both analog and digital signals in two
ways: 1) Directly through an antenna, or 2) From a cable service provider. The following section
describes how to connect your LCD from an analog or digital antenna port. As there are two antenna
ports — analog and digital -— on the rear of the LCD, make sure you use the correct port when
connecting the LCD.
Connecting the Cable
A. Analog Antenna Connection
Connect the coaxial cable from a VHF antenna or from the cable TV provider
to your LCD.
To view direct aerial TV signals through a VHF antenna, set the LCD source
to Antenna by using the ANT/CBL button on the remote control or through
Source from the on-screen menu. Otherwise, set the LCD source to Cable to
receive service from cable signal providers.
B. Digital Antenna Connection
Connect the coaxial cable from a UHF antenna or from the cable TV provider to your LCD.
NOTE:
• For optimum picture quality, you may need to adjust the direction of the rooftop antenna. Contact
your dealer for assistance if the antenna is installed incorrectly.
• The analog antenna port is located at the right side on the rear of the LCD; the digital antenna port
is located at the left side on the rear of the LCD. Make sure that you connect the antennas of these
two different bands to their correct input ports.
Antenna (VHF)
Coaxial cable
Antenna (UHF)
Coaxial cable
A
B
Page 14
14
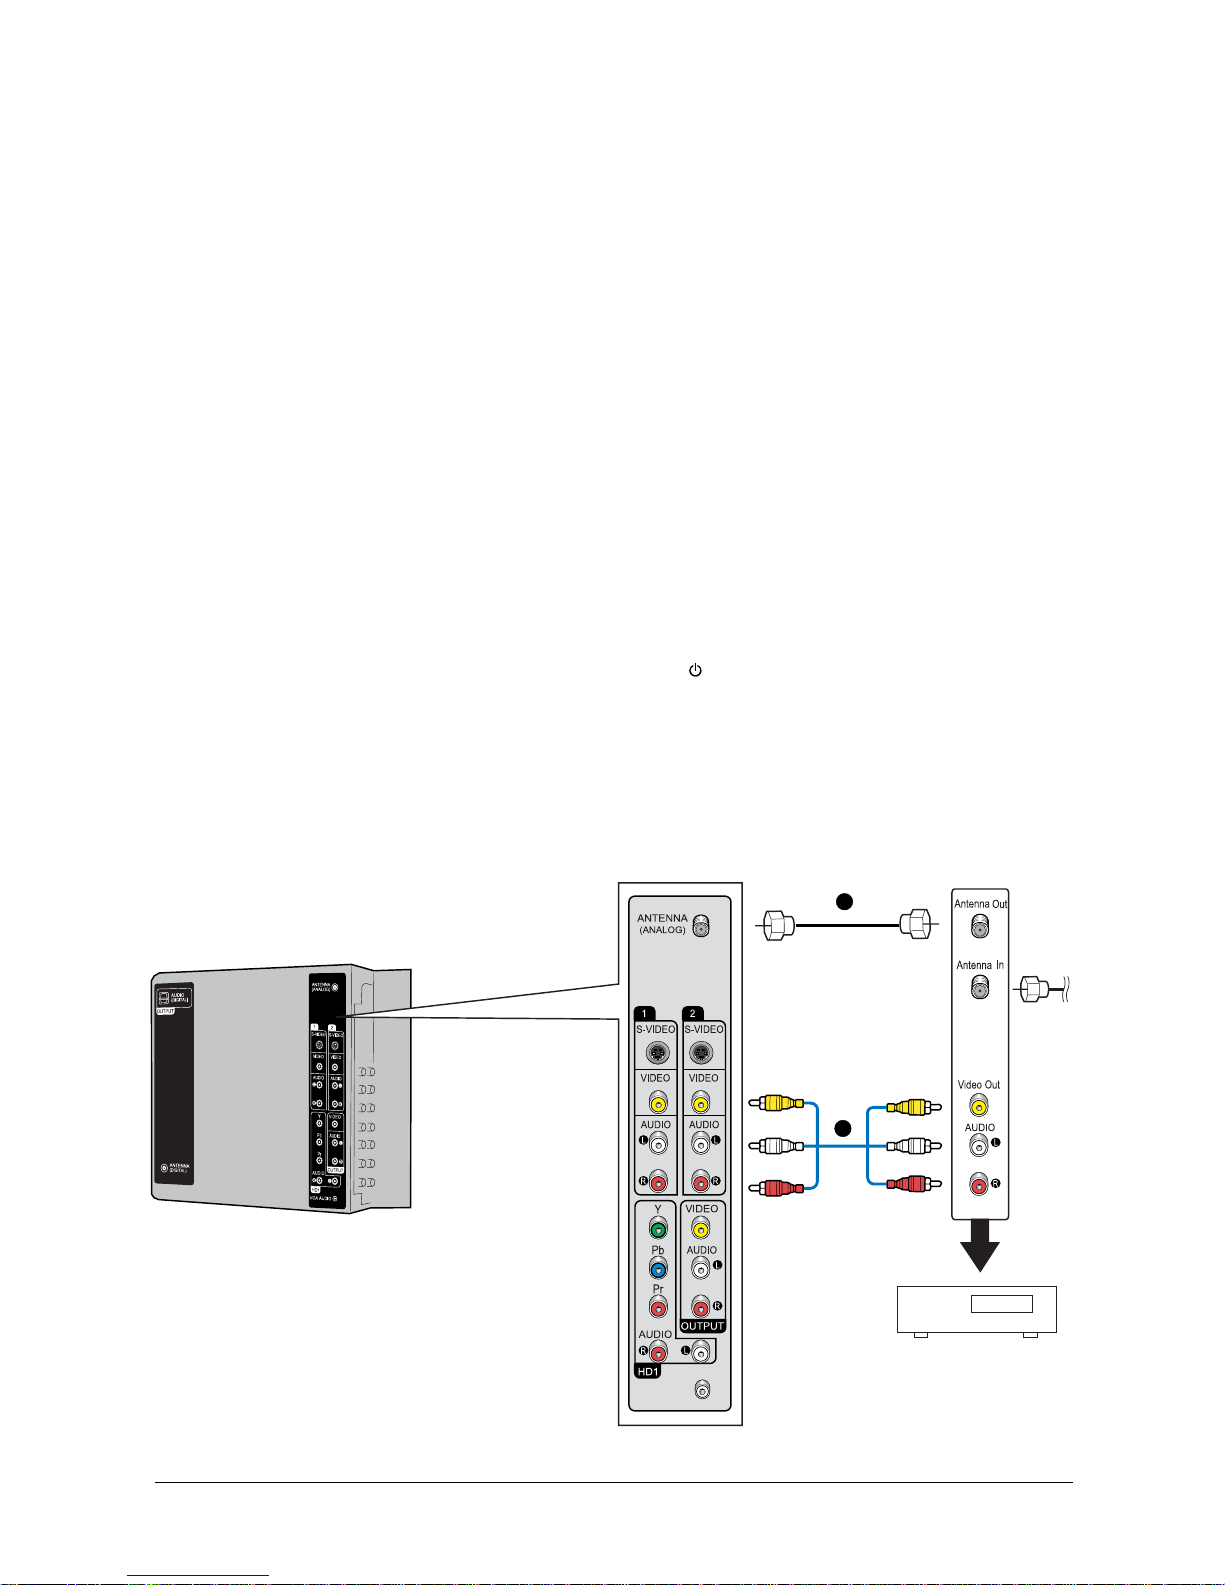
Connecting a Cable TV Box
You can watch cable TV programming after having subscribed to your local cable TV service. TV
programs can only be viewed when a cable TV box or multimedia module is connected to the LCD;
contact your local cable TV provider for more information on the services available in your area. When a
cable TV box is connected to the LCD, channels can be selected using the box, not the LCD.
A cable TV box should be connected to either the Antenna (Analog) port or to a video input port (Video
1 or Video 2). See the section below for a detailed description of connection options.
A. Antenna connection
1. Connect a coaxial antenna cable from the cable TV box’s Antenna (Analog) output port to the
LCD’s Antenna (Analog) input port.
2. Select channel 3 or channel 4, using the channel switching control on the cable TV box.
3. Tune the TV channel to the same channel as the cable TV box.
4. Select a channel to view, using the channel switching control on the cable TV box.
B. Video connection
1. Connect standard AV cables from the video/audio outputs on the cable box, to the video input port
(video 1 or video 2), and to the audio input ports on the LCD.
2. Plug the power cord into the power connector at the rear of the LCD, and then press the PWR1
(Red) button on the remote control or the POWER ( ) button on the LCD unit to turn the LCD on.
3. Press the TV/AV button on the remote control or the SOURCE button on the LCD unit to display a
list of available input sources.
4. Use the UP/DOWN buttons on the remote control to select the appropriate input source (Video 1 or
Video 2).
5. Select a channel to view, using the channel switching control on the cable TV box.
Cable Box
VGA AUDIO
A
B
Page 15
15
42" LCD TV
Connecting External Devices to Your LCD
You can connect many types of audio visual and entertainment devices to the LCD.
Most audio/video devices offer a choice of several connection types. The most common types of
connections are Composite (AV), S-Video, and Component (YPbPr). S-Video provides higher quality
picture transmission than the Composite interface, and Component (YPbPr) provides the highest quality
picture transmission. At present, HDMI* (High-Definition Multimedia Interface) is one of the most
common interfaces available for carrying and passing digital signals. Your LCD includes an HDMI feature
that allows your LCD to display high-definition images through an all-digital connection, ensuring the
purest image quality available.
You may choose any of the connection types offered on a device, based on the convenience or quality
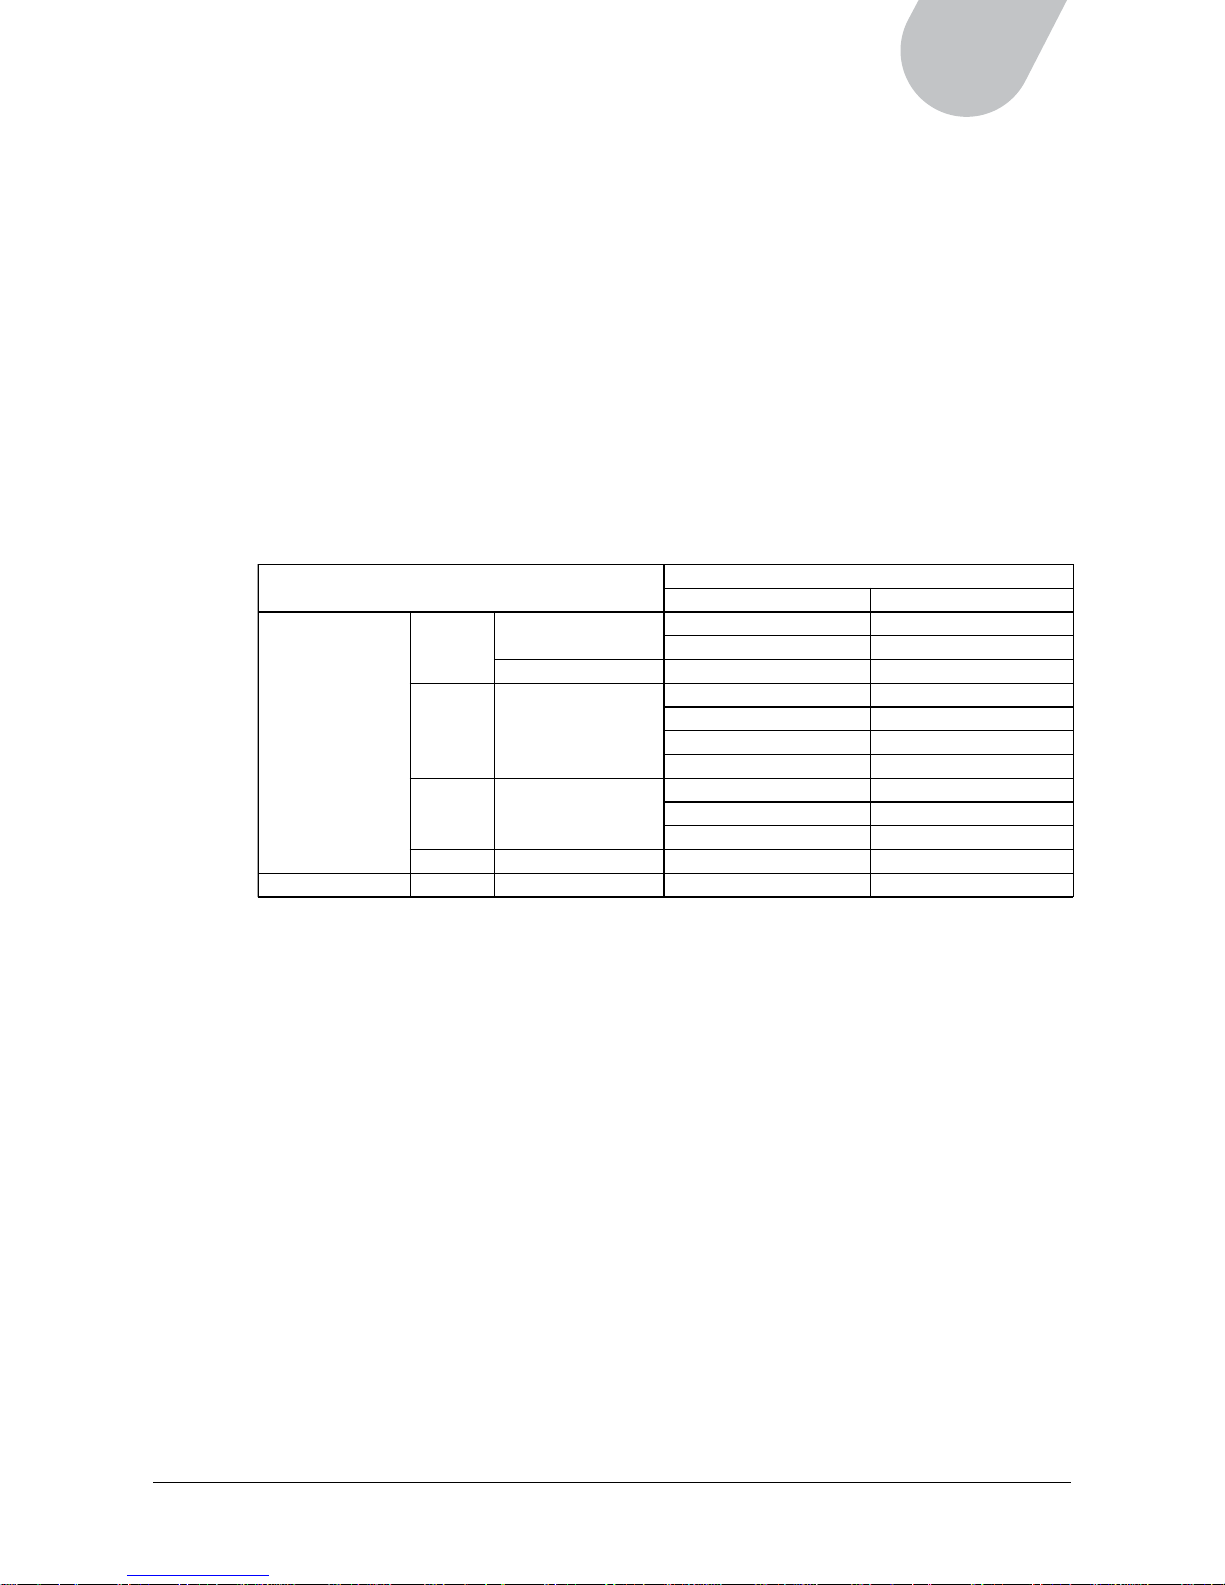
of the connection type. The table below shows device signals supported by the different connectors in
your LCD. Incorrect connections may cause devices or the LCD to malfunction, so be sure to refer to the
table before making any connections between your devices and the LCD.
(v: Available, —: Not available)
Prior to making any connections to your LCD, ensure that the power cord is disconnected from the LCD
unit. Please note that the cables mentioned in this section are not included with your LCD package.
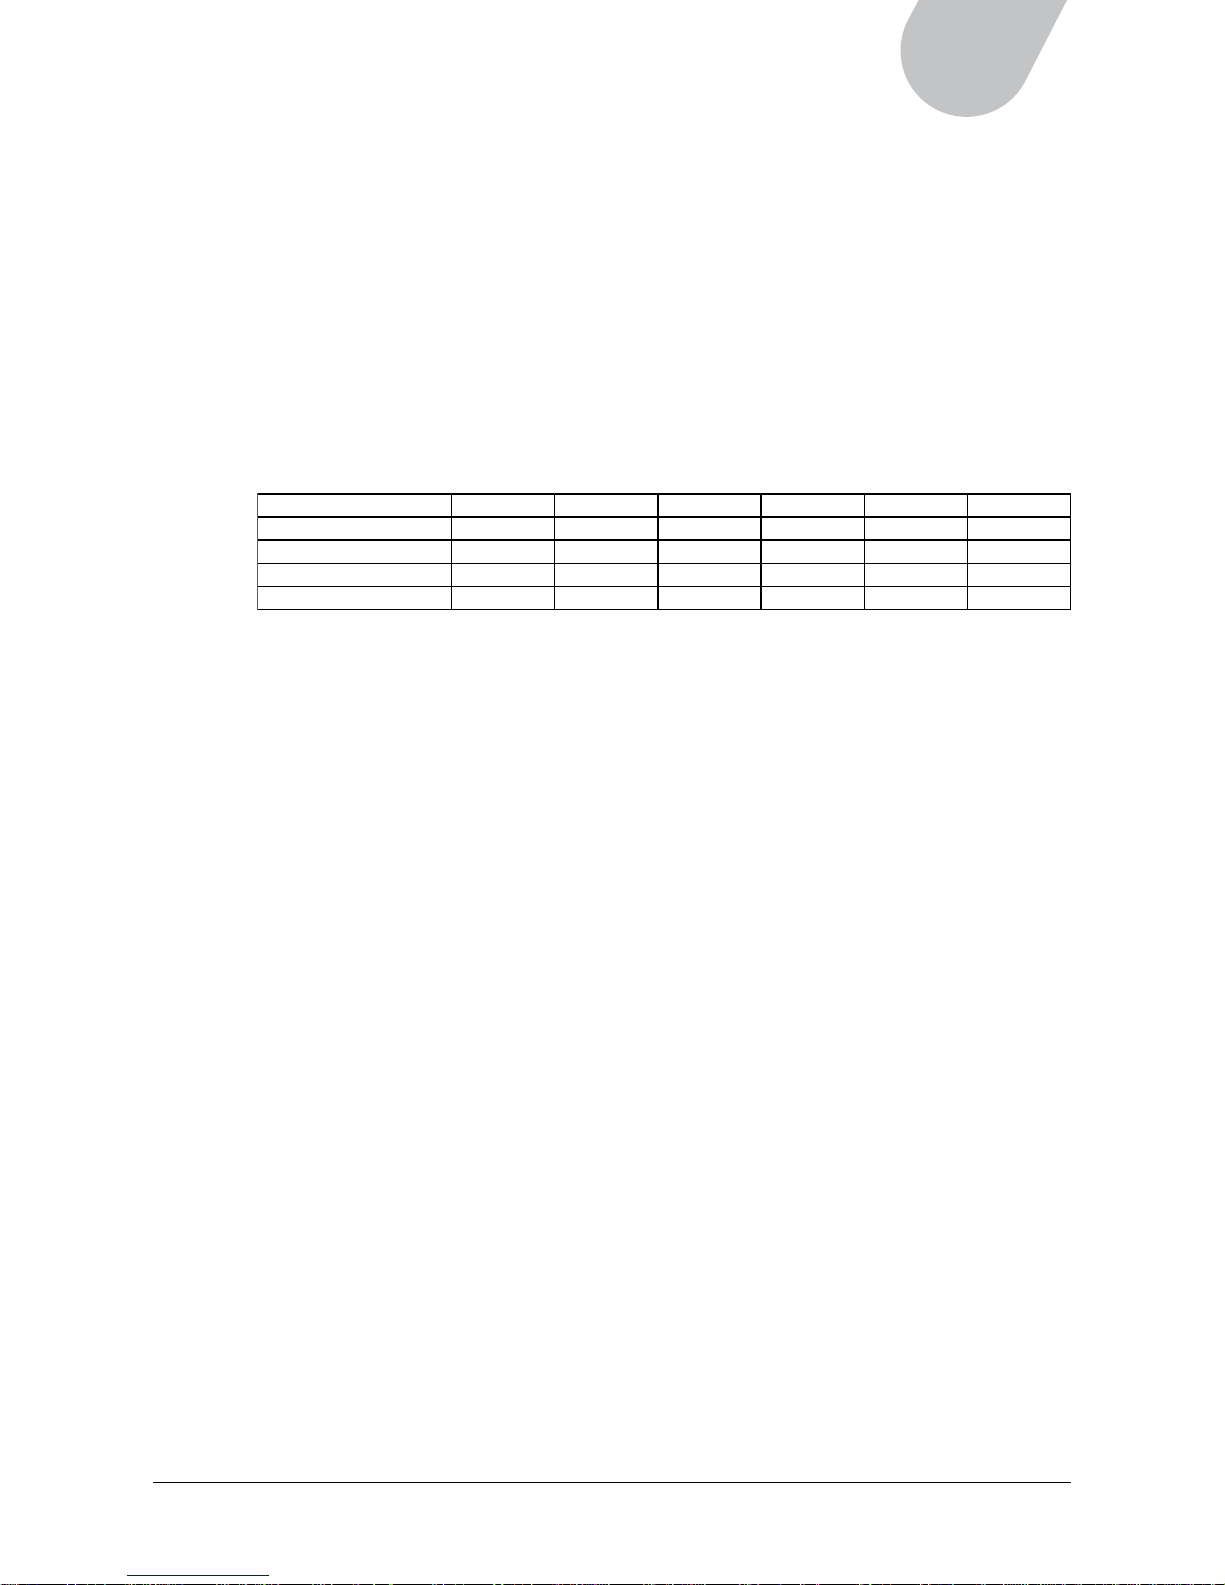
A. Connecting a Device with S-Video Port
Connect the S-Video cable to the S-Video 1 or S-Video 2 connector on the LCD. S-Video cable
does not include audio, and the audio cable (L/R) should be connected separately between the audio
connectors on the device and the LCD.
To watch programs:
1. Turn on the LCD; then, press the TV/AV button on the remote control or the SOURCE button
on the LCD unit to view and set the input source.
2. Select S-Video 1 or S-Video 2, depending on the connection you have made between the
device and the LCD.
B. Connecting a Device with Composite Video Port
Connect the Standard Composite (AV) cable video jack to the Video 1 or Video 2 connectors on the
LCD. Connect the audio jacks to the Audio (R/L) connectors. The Standard Composite (AV) cable is
color-coded as follows: Video = yellow, Audio Left = white, and Audio Right = red.
To watch programs:
1. Turn on the LCD; then, press the TV/AV button on the remote control or the SOURCE button
on the LCD unit to view and set the input source.
2. Select Video 1 or Video 2, depending on the connection you have made between the device
and the LCD.
*HDMI, High Definition Multimedia Interface, supports the uncompressed standard for delivering all
digital video and audio information. With only one HDMI cable, users can enjoy the delivering of both
the digital video and audio.
Video 1 Video 2 S-Video 1 S-Video 2 HD1 (YPbPr) HDMI
480i (720 x 480i) v vvvvv
480p (720 x 480p) _ _ _ _ v v
720p (1280 x 720p) _ _ _ _ v v
1080i (1920 x 1080i) _ _ _ _ v v
Page 16
16
C. Connecting a Device with Component Video Port
Connect the Component cable (YPbPr) to the HD1 (Y/Pb/Pr) connectors on the LCD. The
Component cable (YPbPr) is color-coded green, blue and red. Component cable (YPbPr) does not
include audio, and the audio cable (L/R) should be connected separately between the audio
connectors on the device and the LCD.
To watch programs:
1. Turn on the LCD; then, press the TV/AV button on the remote control or the SOURCE button
on the LCD unit to view and set the input source.
2. Select HD1 from the list of input sources to view programs.
D. Connecting a Device with a HDMI Port
Connect the HDMI cable to the HDMI connector on the LCD. Since the HDMI connection standard
also supports the transfer of uncompressed audio information, there is no need to use the audio
cable to connect the device to your LCD.
To watch programs:
1. Turn on the LCD; then, press the TV/AV button on the remote control or the SOURCE button
on the LCD unit to view and set the input source.
2. Select HDMI from the list of input sources to view programs.
DVD Player/Recorder
VCR or
VCD/DVD Player
Video Game Set
Camcorder
VCR or VCD/DVD Player
DVD Player or Recorder
A
B
C
D
NOTE: The examples given in this section reflect common connection types; actual connection types
may vary according to model. Refer to the user manual for the device if you need additional assistance.
Page 17
17
42" LCD TV
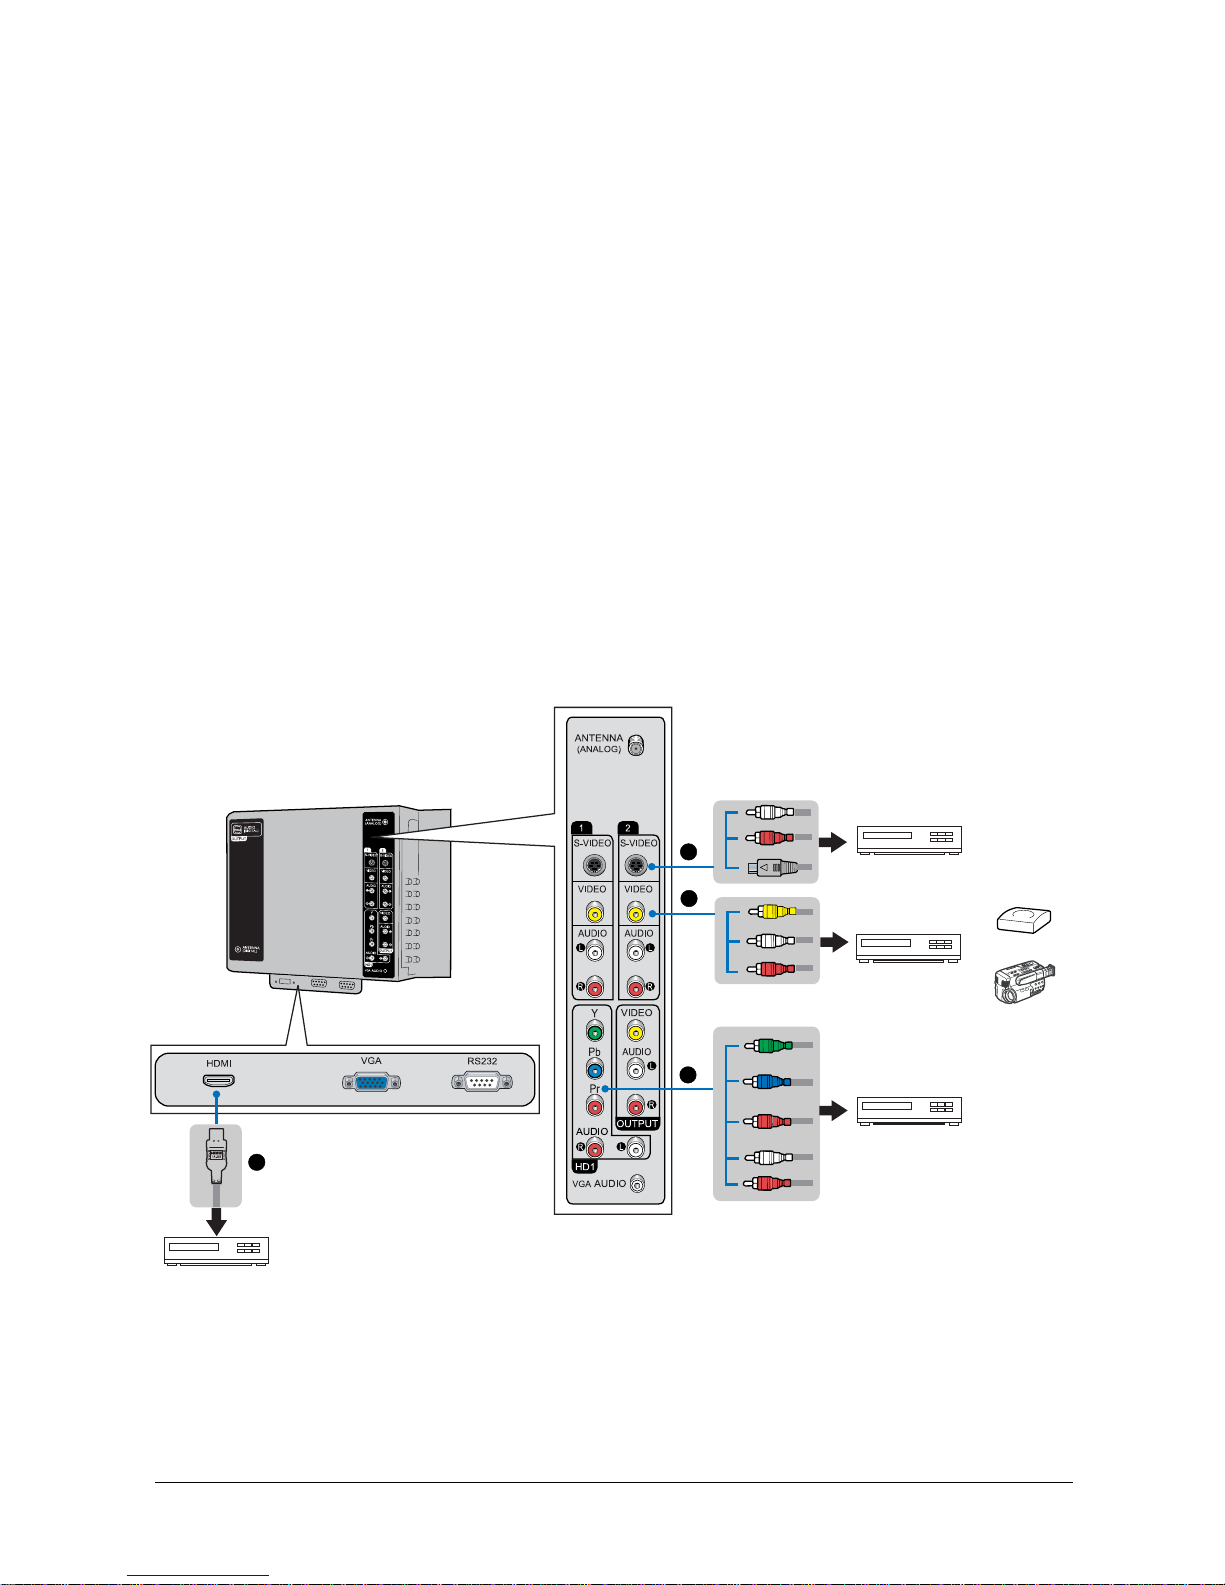
Connecting to a Second Display
You can send output from the LCD to a second display, such as a LCD with AV-In support. This can be
done by connecting a Standard Composite (AV) cable from the video and audio output ports on the rear
of the LCD.
To connect to a second display follow these steps:
1. Connect the Video/Audio output of the LCD to the Video/Audio input of the secondary display,
using a Standard Composite (AV) cable. Connect the audio (white and red) to Audio (L/R)
connectors.
2. Turn on the LCD and the second display.
3. Set the second display to receive Composite Video input. For more details, refer to the User Manual
of the second display.
NOTE:
• The output displayed on a second display is the same as the current input of the LCD.
• You can connect to a second display only by using the Video/Audio output connectors and the
Standard Composite (AV) cable.
Display
Page 18
18
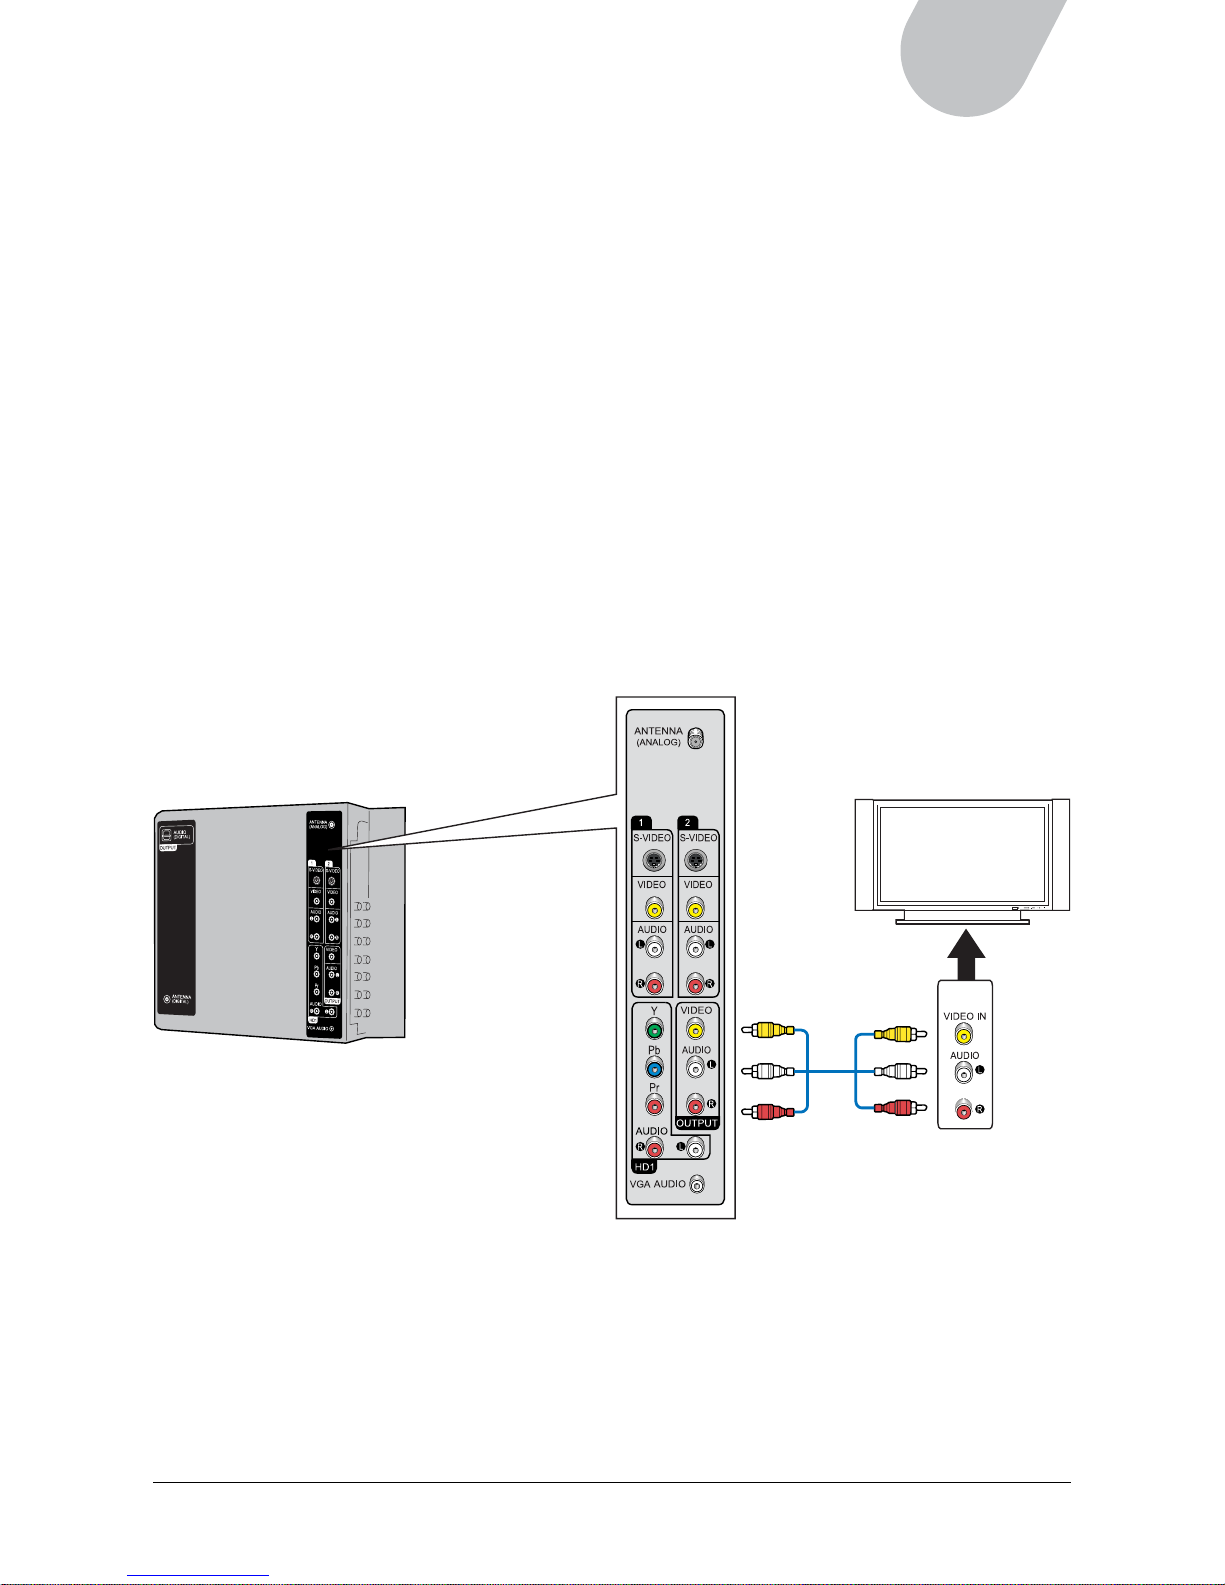
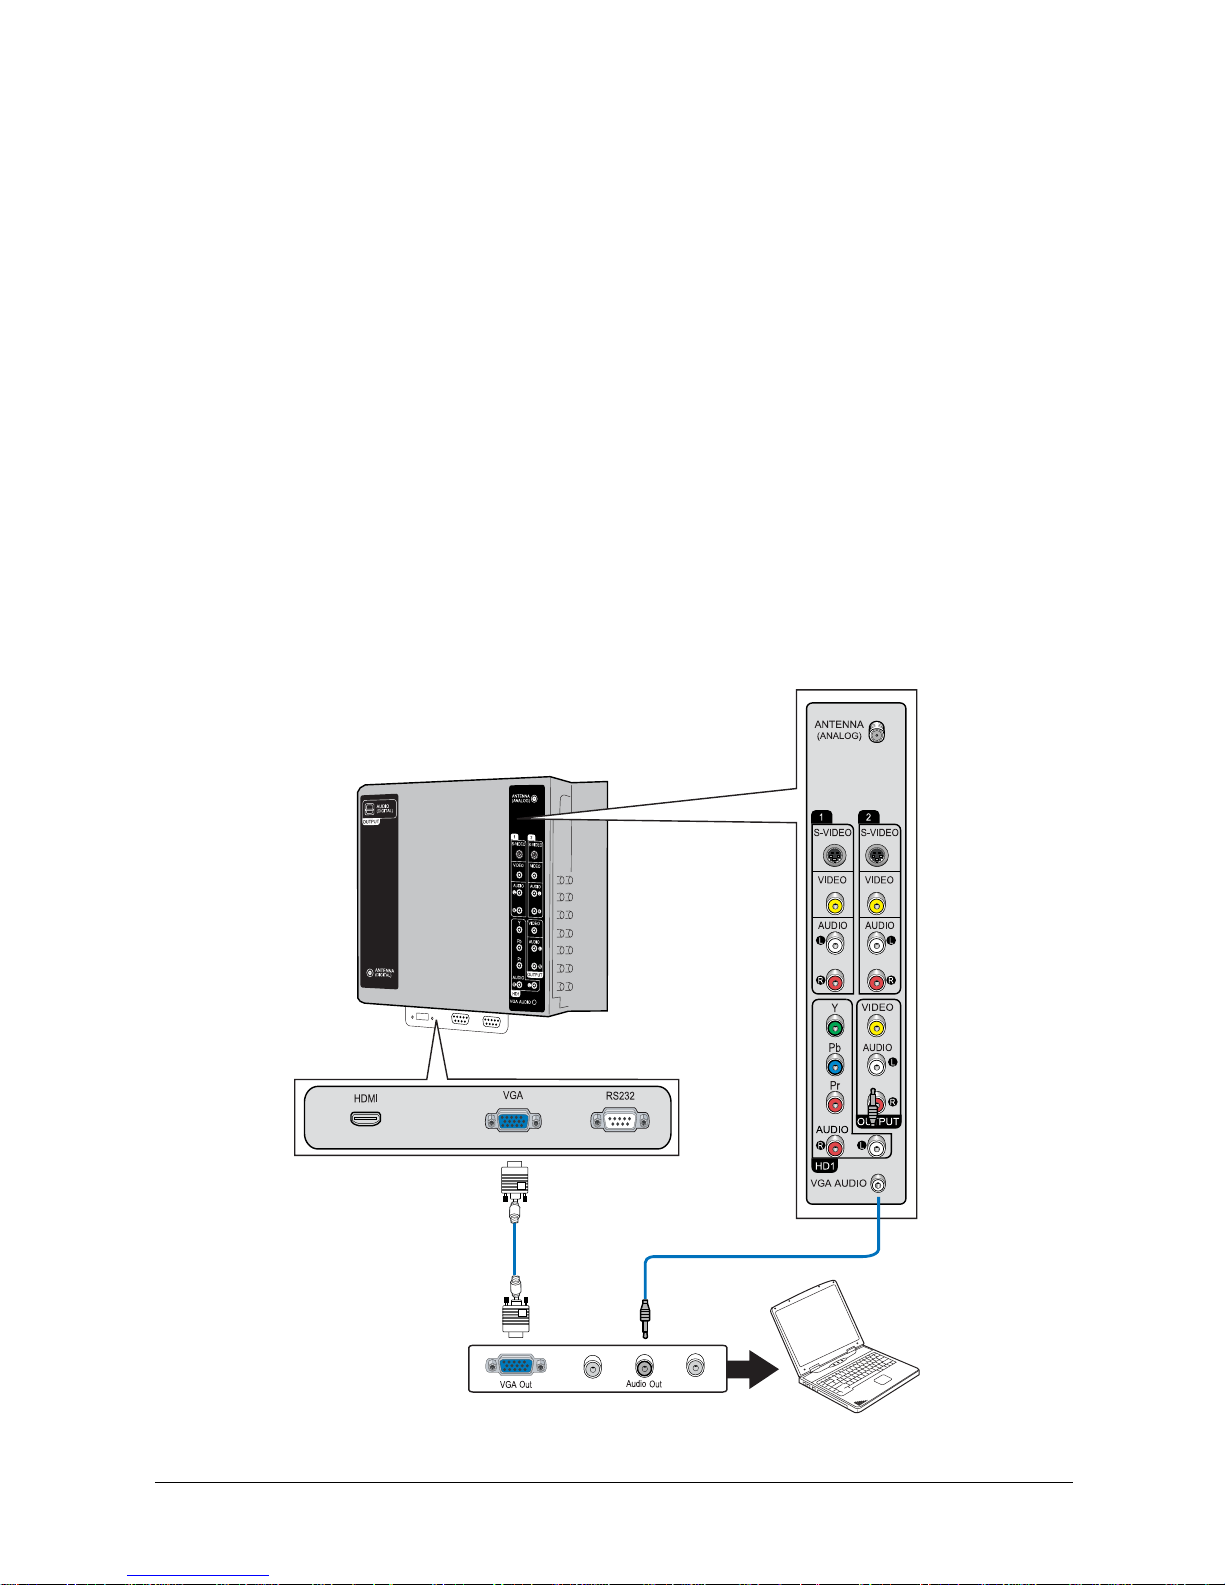
Connecting to a Personal Computer
You can use the LCD as a monitor for your PC. VGA is the most common type of connection for
this purpose.
To connect to a personal computer, follow these steps:
1. Connect the VGA cable from the computer to the VGA connector on the rear of the LCD unit.
2. For audio, connect the computer’s audio cable from the Line Out of the PC to the VGA Audio on
the rear panel of the LCD, using a phone audio cable.
3. Turn on the LCD and the computer.
4. Press the TV/AV button on the remote control or the SOURCE button on the LCD unit to set input
source to “VGA”.
NOTE:
• The LCD includes Plug-and-Play capability, which allows the computer to automatically adjust its
settings to match those of the monitor. Often, the image needs no adjusting. There may be some
variations in the image due to different models or different versions of operating systems.
If there are problems with the image, however, such as flicker or an unclear image, adjust computer
settings by using the LCD’s on-screen menu. To deal with an unclear image, you may need to
adjust the phase or frequency, or apply automatic settings by choosing “Auto” in the on-screen
menu to adjust image quality automatically.
Page 19
19
42" LCD TV
Display Mode
Analog
Horizontal Frequency Vertical Frequency
VESA
VGA
640 x 480
31.5 KHz 60.0 Hz
37.5 KHz 75.0 Hz
640 x 480 37.9 KHz 72.0 Hz
SVGA 800 x 600
35.2 KHz 56.3 Hz
37.9 KHz 60.3 Hz
46.9 KHz 75.0 Hz
48.1 KHz 72.0 Hz
XGA 1024 x 768
48.4 KHz 60.0 Hz
56.6 KHz 70.0 Hz
60.0 KHz 75.0 Hz
SXGA 1280 x 1024 64.0 KHz 60.0 Hz
MS-DOS 640 x 350 31.5 KHz 70.1 Hz
If you cannot improve the image, the problem may be in the graphic card in your computer. Consult
the user manual or manufacturer for your graphics card to see if there are settings such as the
refresh rate that can be adjusted in your graphics card. In some cases, the limitations of the graphics
card and its settings may require upgrading of the graphics card to improve the image.
Refer to the following section, “Specifications for Computer Modes,” for details about supported
configurations.
• With some computer models, the DOS or CMOS BIOS mode may not work with the LCD.
Specifications for Computer Modes
For most settings, the computer uses Plug and Play technology to adjust itself to the settings of the
LCD. For certain settings, however, the size and position of the image shown on the LCD may be
determined by the computer. The following table shows display elements determined by the computer
and supported by the LCD.
Supported Display Elements
VGA Input
NOTE:
• Select only standard display formats in your computer. If you select non-standard display formats,
the LCD may not display them properly.
• If your computer has vertical and horizontal frequency selection, select 60 Hz (vertical) and 31.5
KHz (horizontal).
• Interlaced refresh is not supported.
Page 20
20
VGA
Video 1
S-Video 1
Video 2
S-Video 2
HDMI
HD 1
DTV
TV
CHAPTER 3
Getting Started
This section explains some of the basic procedures for setting up the LCD, so that you can begin using
your unit right away. Some features will differ in either TV or digital TV mode; such differences will be
explained separately where relevant.
Turning the LCD On
1. Plug the power cord into the power connector on the
rear of the LCD unit, and plug the other end into a
power source outlet.
2. Press the PWR1 (Red) button on the remote control or
the POWER (
) button on the LCD unit to turn the
LCD on.
NOTE: If you need to disconnect power, first put the LCD
into standby mode by pressing the PWR1 (Red) button on
the remote control or the POWER ( ) button on the LCD
unit. Then disconnect the power cord from the rear panel of
the LCD unit.
Initial Setup for TV
Before viewing TV or video input, familiarize yourself with
the source and channel selection as described in the
following sections.
A. Selecting the TV Input Source
You can set the LCD to directly receive air signals, or to
receive cable signals from the cable attached to the Antenna
(Analog) input, if you have attached a cable from a rooftop
antenna or cable service provider.
1. Press the TV/AV button on the remote control or the
SOURCE button on the LCD unit.
When the button is pressed, a list of the available input
sources appears on the screen for selection.
2. Press the UP/DOWN (
/ ) button on the remote
control to select “TV”, then ENTER to confirm your
selection.
3. Press the ANT/CBL button on the remote control to
toggle between Antenna or Cable input.
Page 21

21
42" LCD TV
B. Selecting the Video Input Source
Press the TV/AV button on the remote control or the SOURCE
button on the LCD unit to select video input source from
another device connected to your LCD. For example, if you are
connected to HDTV (YPbPr), select “HD1”, then ENTER to
confirm your selection.
You can also set the video input source through the on-screen
menu. See the section, “Selecting Input Source” in Chapter 4:
Using the LCD’s Features.
C. Selecting the TV System
There are several TV standards in use around the world. The
two most common standards are NTSC and PAL. This product
supports both standards as well as SECAM. Your dealer should
be able to verify which TV system is in use in your area.
You can set the TV input standard through the on-screen
menu. Press the TV/AV button on the remote control. Use the
UP/DOWN (
/ ) buttons on the remote control to select TV,
then ENTER to confirm the selection.
1. Press the TV MENU button on the remote control or the
MENU button on the LCD unit.
2. Press the LEFT/RIGHT (
/ ) button on the remote control
to select “Setup”, then press the DOWN ( ) button to
enter the submenu.
3. Press the UP/DOWN (
/ ) button on the remote control to
select “NTSC...”, then LEFT/RIGHT (
/ ) to enable or
disable your NTSC system.
4. Press the TV MENU button to exit the menu.
D. Scanning for Channels
Your LCD can automatically scan for active channels. After
scanning for channels, only active channels appear when you
move through channels using CH
or CH .
To access the Auto Search Channels function:
1. Press the TV MENU button on the remote control.
2. Press the LEFT/RIGHT ( / ) button to select “TV”, then
press the DOWN (
) button to enter the submenu.
3. Press the UP/DOWN (
/ ) button to select TV Settings,
then press the RIGHT (
) button to open the options.
4. Use the UP/DOWN ( / ) button to select “Auto Search
Channels”, then press the RIGHT (
) button to begin the
channel search.
The channel scanning process begins automatically with a
progress bar shown on the screen. When auto scanning is
done, press the TV MENU button to exit the on-screen menu.
Page 22

22
VGA
Video 1
S-Video 1
Video 2
S-Video 2
HDMI
HD 1
DTV
TV
Initial Setup for Digital TV (DTV)
The LCD enables you to watch digital TV programs transmitted from all available UHF bands in your
area. To set up for digital TV, follow the sections below:
A. Selecting the D TV Input Source
Before watching digital TV programs, make sure that your
have attached the cable of the digital input source to the
Antenna (Digital) port on the rear of the LCD unit, and
choose the correct input source.
1. Press the TV/AV button on the remote control or the
SOURCE button on the LCD unit. A list of available
input sources appears on the screen for selection.
2. Press the UP/DOWN (
/ ) button on the remote control to select “DTV”, then ENTER to confirm
your selection.
B. Activating the DTV OSD
To control LCD settings, the LCD features two OSD modes: TV and DTV. Because TV mode is the
default setting each time when you power on the TV, you will need to activate DTV mode first before
you can start using any of the digital TV OSD controls.
To activate the DTV OSD, follow the steps below:
1. Press the DTV MENU button on the remote control.
2. If you do not see the on-screen menu shown below,
repeat step 1 until the DTV on-screen menu is activated
successfully.
NOTE:
1. To turn on the DTV OSD, you will need to first set up
your input source to the DTV.
2. When you activate DTV source for the first time, you
will see a warning screen (shown at the right). This
reminds you to perform the Auto Scan function first.
3. When the input source of the LCD has been set up for
DTV, you may see programs display on the LCD if your
LCD receives the digital signal. Remember, however,
that you will need to activate DTV OSD in order to use
DTV features.
4. To return to the default TV OSD, press the TV MENU
button.
Page 23

23
42" LCD TV
C. Scanning for Channels
Your LCD can automatically scan for active digital TV channels. After scanning for channels, only active
digital TV channels appear when you move through channels using CH
or CH .
To scan for active digital TV channels, follow these steps:
1. Press the DTV MENU button to display
the on-screen menu.
2. Press the LEFT/RIGHT (
/ ) button to select
“Channel”.
A password-enter widow will pop up immediately.
3. Use the digit number buttons (0-9) on the remote
control to key in the default password “0000” to enter
the submenu.
4. Press the UP/DOWN (
/ ) button to choose Auto
Scan, and ENTER to access the submenu.
An Auto-Scan window will pop up and start the
scanning procedure.
5. Allow some time for the TV to scan digital TV channels. Do not use other TV functions until
scanning is completed.
All available digital TV channels will be saved automatically in memory when scanning is done. You
will see a “Scan List” that shows available digital TV channel numbers and their names.
6. Press the DTV MENU button to exit the on-screen menu.
Page 24

24
Changing Channels
To change channels, use one of the following methods:
– Press the CH
or CH button on the remote control or
on the LCD unit to see the channels that the LCD has
memorized.
– Use the number buttons (0-9) and the dash “–” button
on the remote control.
• In TV mode:
For a 1-digit channel, the channel will appear on the
screen in 2-3 seconds after the number is entered. For
example, to enter the channel number 5, press 5
directly and wait 2-3 seconds; or press 5, then ENTER.
• Channel Return
The LCD has a channel return feature which allows you to
conveniently return to the previous channel viewed, even
when you don’t remember the channel number.
To return to the previous channel, press the BACK button
on the remote control.
Adjusting the Volume
To adjust the volume, press the VOL+ or VOL– button on
the remote control or on the LCD unit to raise or lower the
volume.
You can also adjust the volume using the on-screen menu.
See the section, “Adjusting the Audio” in Chapter 4: Using
the LCD’s Features.
For a 2-digit or 3-digit channel, the channel will appear on the screen immediately after the numbers
are entered. For example, to enter the channel number 21, press 2, then 1. To enter the channel
number 121, press 1, then 2, and then 1.
• In DTV mode:
To enter a channel number with no sub-channel number, use the number buttons (0-9). For
example, to enter the channel number 21, press 2, then 1.
To enter a channel number with a sub-channel number, use the number buttons (0-9) and the dash
button (–). For example, to enter the channel number 21-5, press 2, then 1, then –, and then 5.
Please take note that the channel appears on the screen with the channel number immediately or in
2-3 seconds after the numbers are entered.
Page 25

25
42" LCD TV
Selecting Stereo or SAP Audio Transmissions
Some TV broadcasts may include a secondary audio channel that may be in another language.
MONO
SAP
When an SAP audio channel is
selected, SAP appears on the screen.
Some programs are broadcast with
no SAP channel. If no SAP channel
is available, only the stereo audio
channel can be used.
• In DTV Mode:
Press the MTS button to activate the multi-language function. If a program provides different
language choices for selection, select the language you wish and then press the ENTER button to
confirm.
• In TV mode:
SAP operates on an NTSC television feature called MTS
(Multi-Channel Sound). Availability depends on the
program and on your service provider.
To select Stereo, Mono, or SAP audio channel, press
the MTS button on the remote control, or use the onscreen menu.
Pressing the MTS button cycles through the audio
channel options, Mono, SAP, and Stereo. Select Stereo
or Mono to hear the main audio channel in stereo or
mono, or SAP to hear secondary audio.
Muting the Sound
Press the MUTE button on the remote control to turn the
sound on or off. When the sound is muted, the “MUTE”
icon appears on the screen. Press the button again to turn
the sound on.
You can also mute the sound using the on-screen menu. See
the section, “Adjusting the Audio” in Chapter 4: Using the
LCD’s Features.
Page 26
26
CHAPTER 4
Using the LCD’s Features
The features in your LCD can be accessed through remote control buttons, the on-screen menu, or
sometimes both. The on-screen menu allows you to make adjustments to the picture and sound, change
source modes, enable picture-in-picture (PIP) or picture-out-picture (POP) mode, set the menu language,
and more. This chapter explains each submenu in order, noting also the functions that are accessed
through the remote control.
Navigating the Menu
1. Press the TV MENU button on the remote control
or on the LCD unit to display the on-screen menu.
Each main menu heading opens a submenu of
related items.
2. Press the LEFT/RIGHT (
/ ) button on the remote
control to move left and right in the menus.
The selected menu item is highlighted.
3. Stop the cursor on the item you wish to select, and
press the DOWN (
) button to enter the submenu.
4. Press the UP/DOWN (
/ ) button on the remote
control to select a submenu item. After selecting an
item, you can adjust settings.
The selected submenu item is highlighted.
5. Adjust settings using the LEFT/RIGHT (
/ )button.
Some item settings are controlled simply by shifting
slider bars, while others have two or more settings to
choose from.
Once a user setting is selected, the setting takes effect
on the screen immediately.
6. To leave a submenu and return to the main menu,
press the UP ( ) button on the remote control several
times until there are no longer any items highlighted in
the submenu.
7. To exit the on-screen menu, press the TV MENU
button once (or twice).
Page 27
27
42" LCD TV
Optimizing the Picture
The Picture menu enables you to adjust the appearance of the picture by using the Brightness, Contrast,
Sharpness, Color, Hue, and Color Temperature function settings. These controls in the Picture menu
offer a convenient way of optimizing your TV viewing experience.
To adjust picture settings:
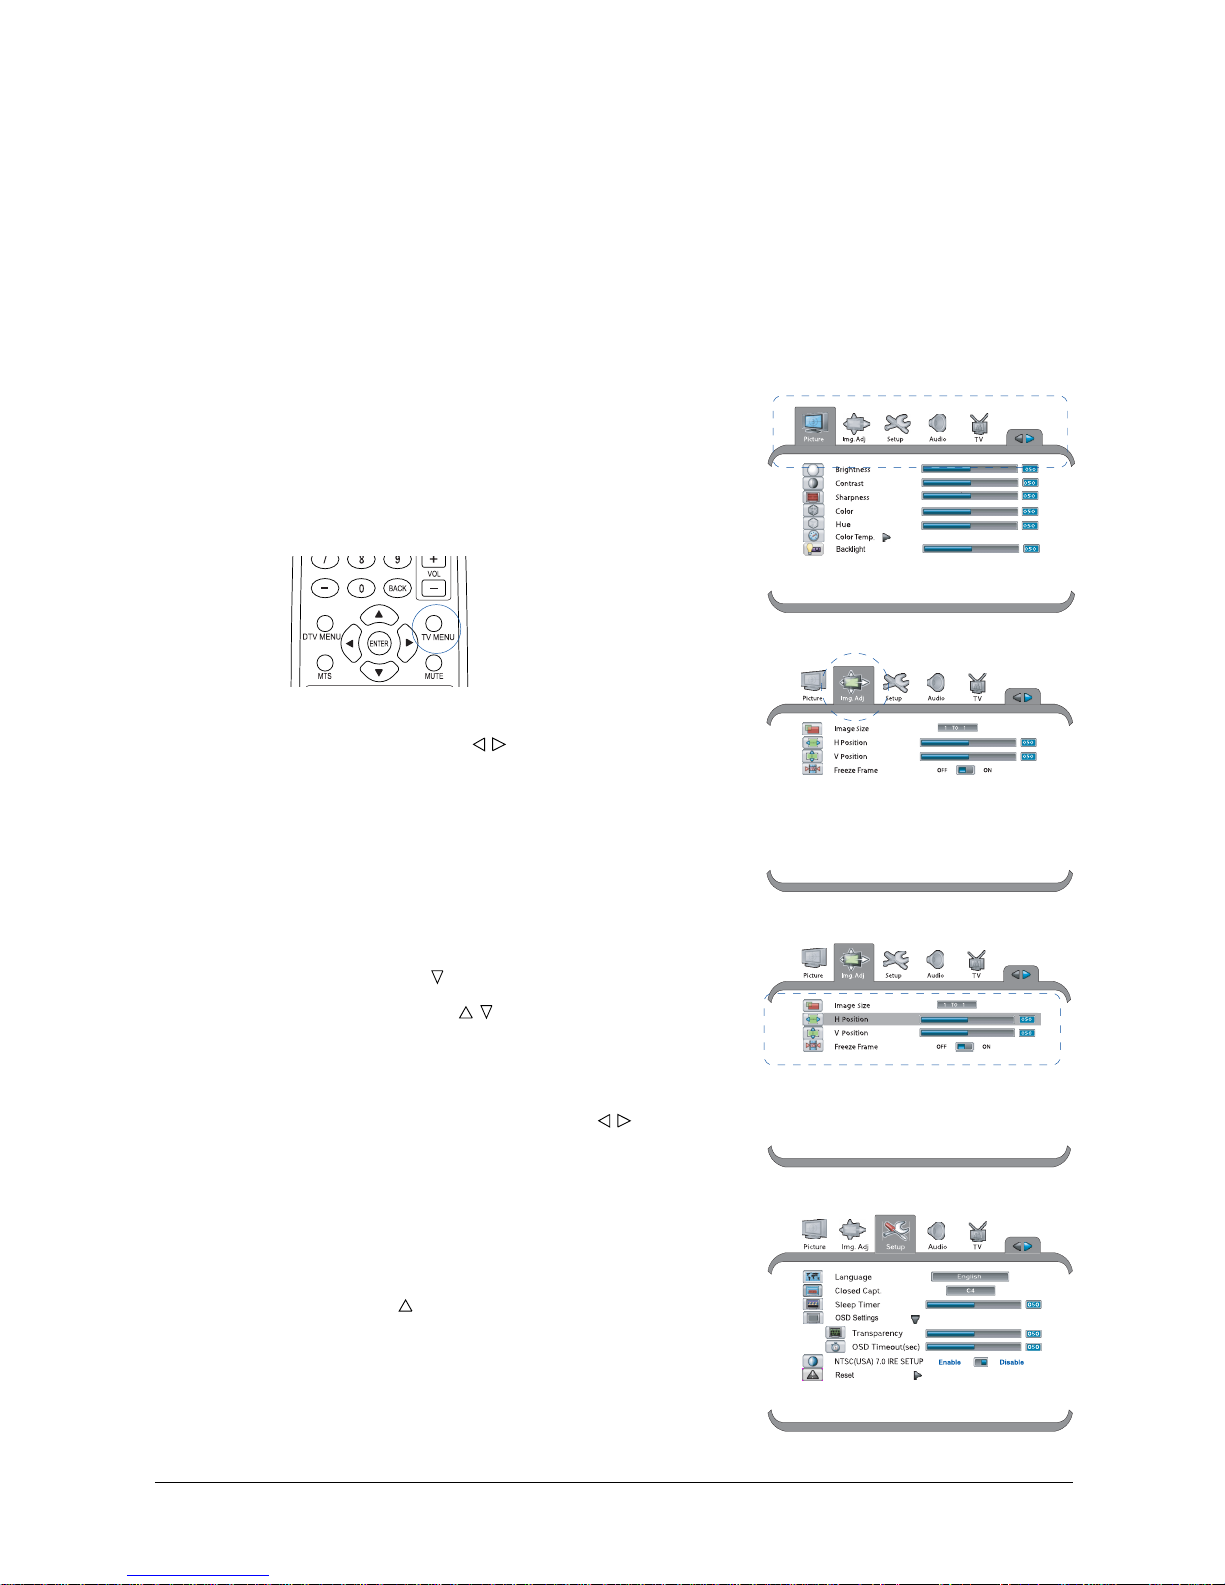
1. Press the TV MENU button to display the on-screen menu.
2 Press the LEFT/RIGHT ( / ) button to select “Picture”.
3. Press the DOWN ( ) button to select the item you would like to adjust.
4. Press the LEFT/RIGHT (
/ ) button to adjust slider bars in order to increase/decrease the value of a
user setting. Then press the TV MENU button once (or twice) to exit the on-screen menu.
The following table describes each item in the Picture menu:
Item Description
Brightness Adjusts the level of light on your screen.
Contrast Adjusts the difference between the lightest and darkest shades on your screen.
Sharpness Sharpens the picture on your screen.
Color Corrects the color saturation of the picture.
Hue Changes the intensity of the hues (colors) on your screen.
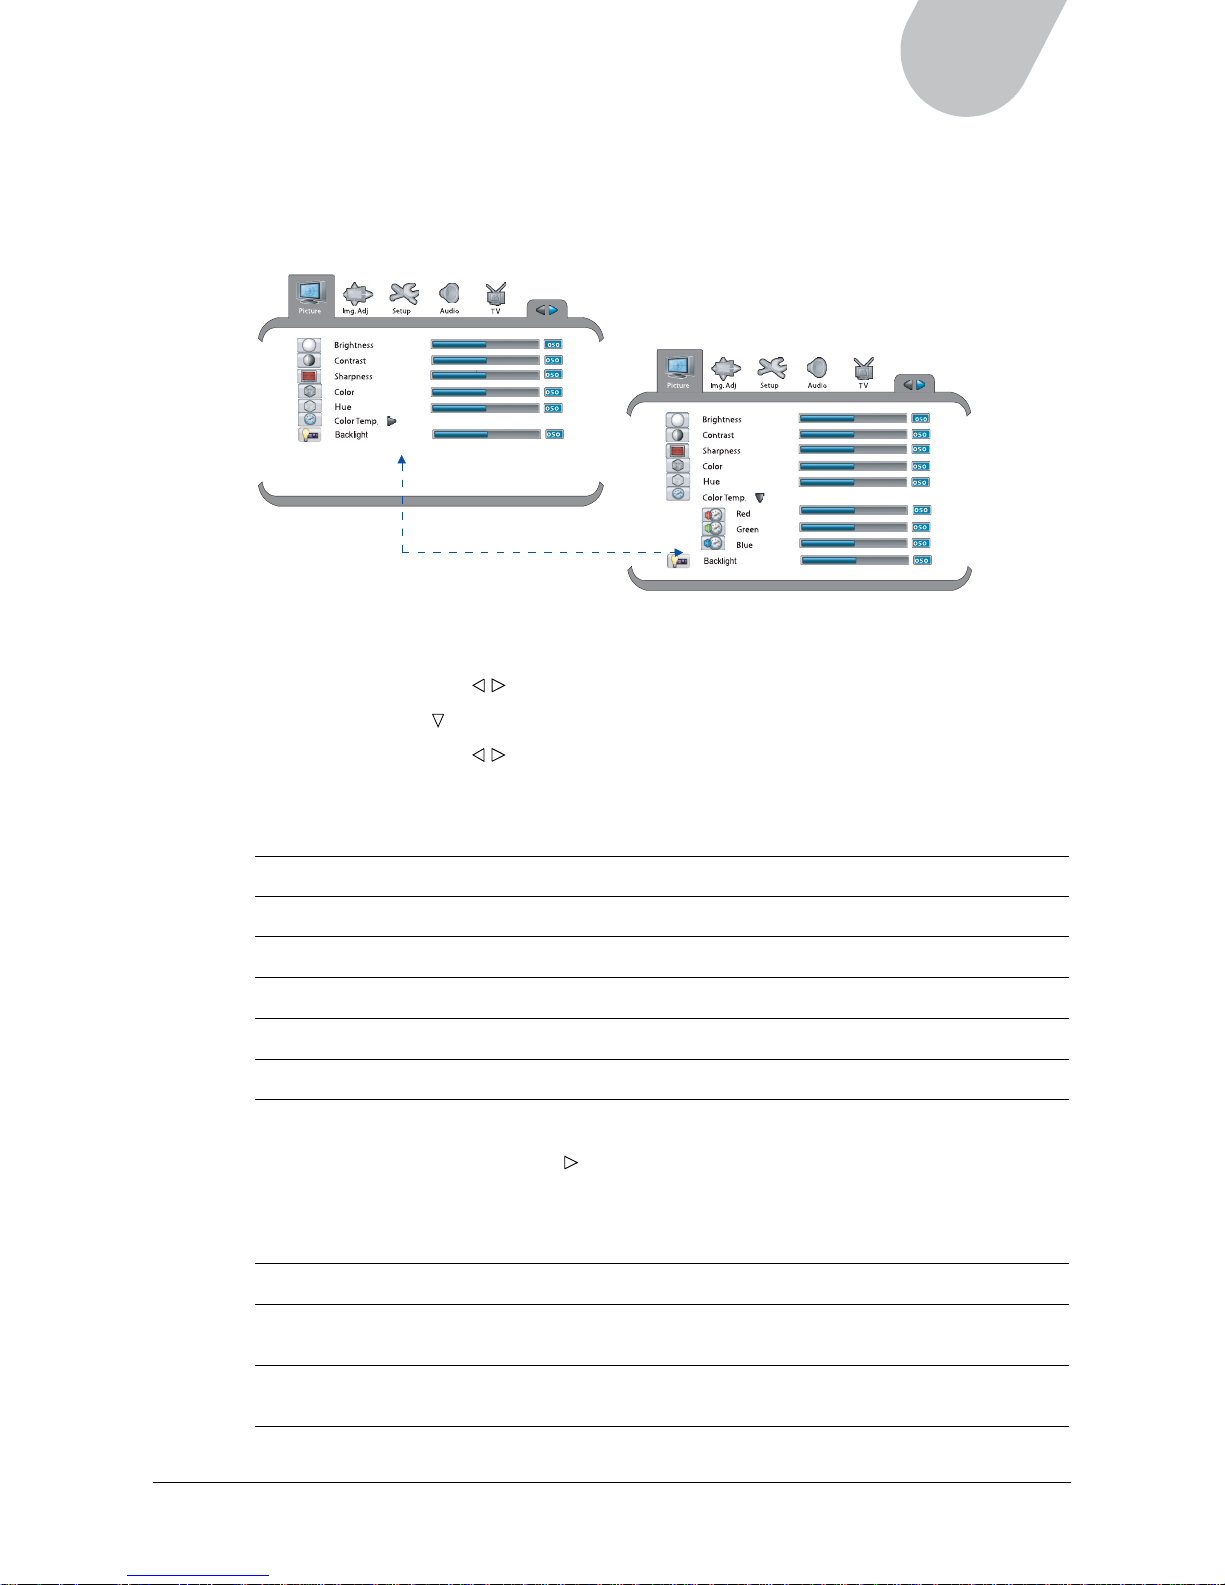
Color Temp. Alters the color temperature of the picture. Warmer colors are displayed in higher
percentage in red, and cooler colors are displayed in higher percentage in blue.
Press the RIGHT (
) button to display three color modes, then change the value
of the color individually for your screen setting.
• Red: Sets the color temperature to warmer.
• Green: Sets the color temperature to neutral.
• Blue: Sets the color temperature to cooler.
Backlight Adjusts the level of the rear light of the LCD.
Phase Adjusts the clarity and focus of the picture. This function is available only when
the incoming source is VGA.
Frequency Adjusts the frequency of the picture. This function is available only when the
incoming source is VGA.
Page 28
28
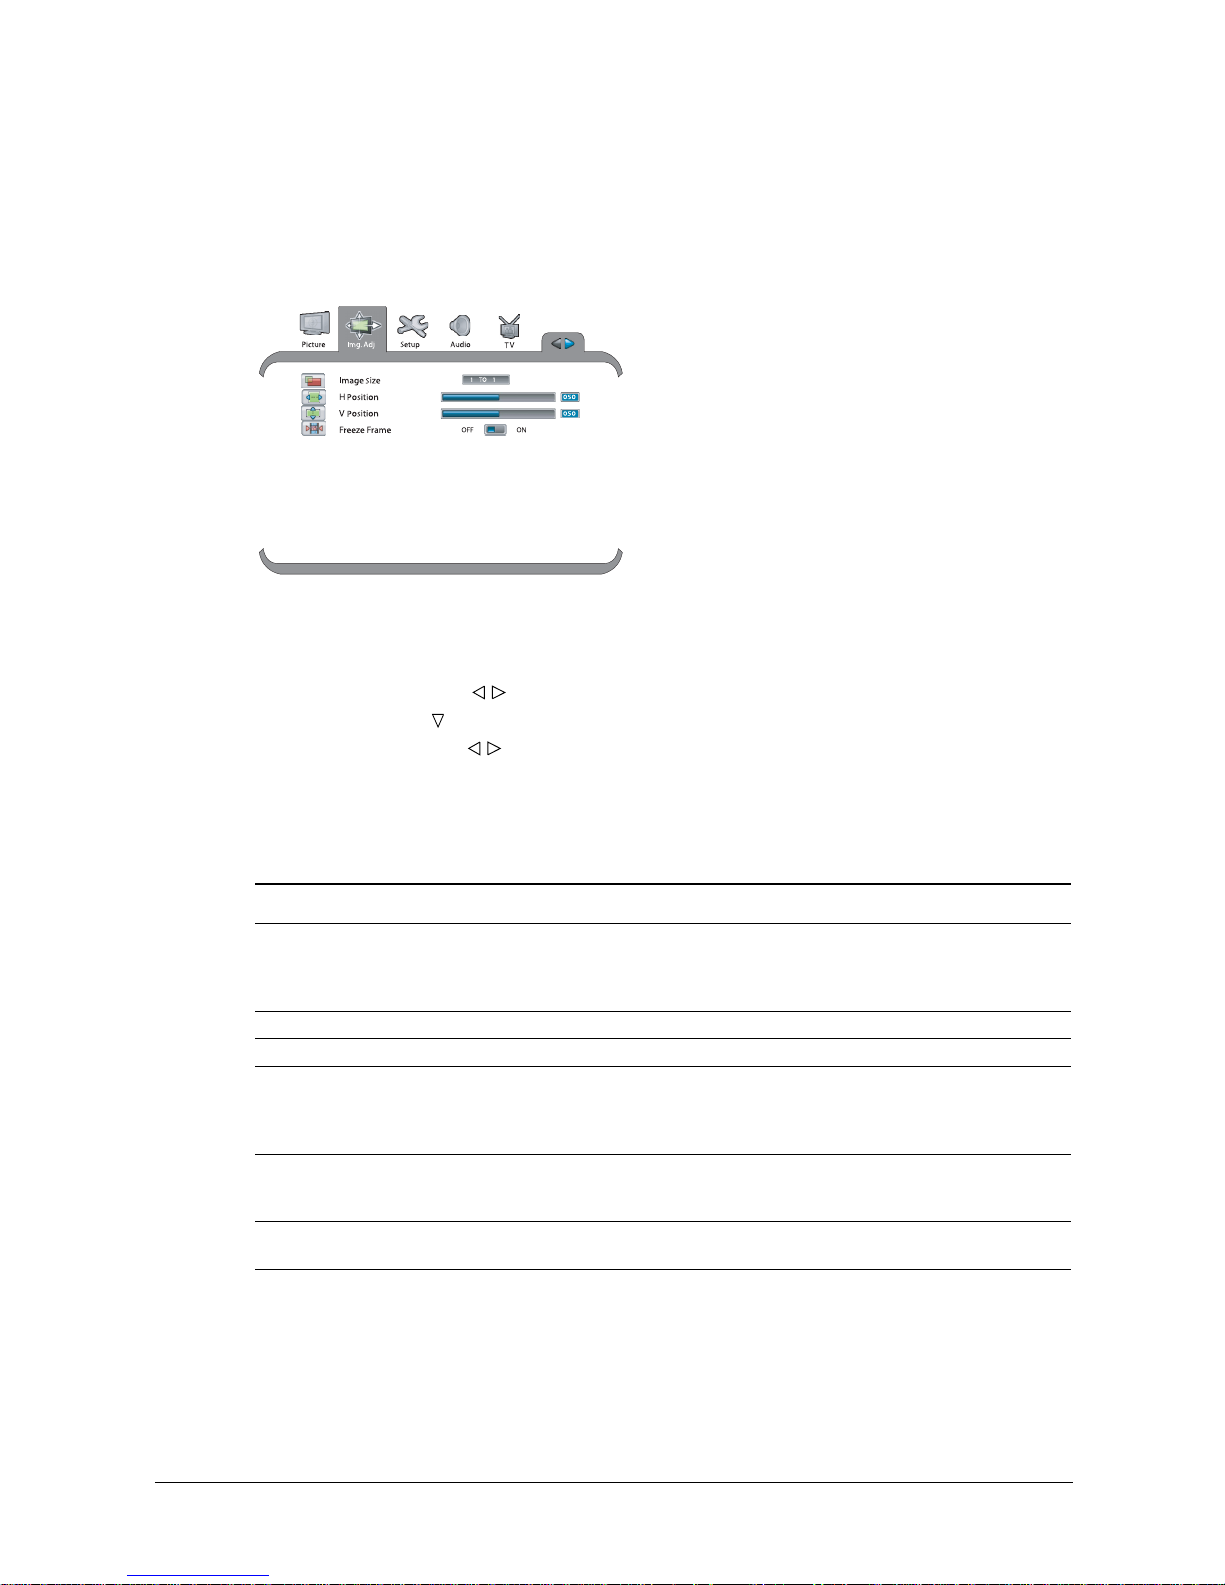
Adjusting the Image
The Image Adjustment menu enables you to set aspect ratios (ratio of width to height) for the display.
When watching a movie, it is recommended that the Aspect Ratio be set to the “Fill All” mode to fit the
dimensions of a theater screen for better viewing experience. The position of the image can be changed
as well to fit your viewing preferences.
To access image adjustment settings:
1. Press the TV MENU button to display the on-screen menu.
2 Press the LEFT/RIGHT (
/ ) button to select “Image Adj.”.
3. Press the DOWN (
) button to select the item you would like to adjust.
4. Press the LEFT/RIGHT( / ) button to toggle through option settings or to adjust slider bars in
order to increase/decrease the value of a user setting. Then press the TV MENU button once
(or twice) to exit the on-screen menu.
The following table describes each item in the Image Adj. menu:
Item Description
Image Size Sets the aspect ratio of the display. Three aspect ratio modes are available:
• Fill All: The picture fills the entire screen.
• 1 to 1*: Sets the picture to 4:3 aspect ratio.
• 16:9*: Sets the picture to 16:9 aspect ratio.
H Position Shifts the image horizontally.
V Position Shifts the image vertically.
Freeze Frame Freezes the current image on the screen when watching the program. This setting
can be set to On or Off.
On: The Freeze Frame function is enabled.
Off: The Freeze Frame function is disabled.
PIP Adjustments Sets the size and position of the PIP window within the main screen. This function
is available only when the PIP window is activated. For more details, see the PIP
section later in this chapter.
Auto Automatically sets the optimum picture settings for the display. This function is
available only when the input source is VGA.
* When viewing in “1 to 1” and “16:9” modes, black bars appear on the left/right and up/bottom sides
of the screen.
Page 29

29
42" LCD TV
Displaying Setup
The Setup menu allows you to set the on-screen display language, the sleep timer, OSD transparency,
OSD time out, and to enable your NTSC system.
To adjust display settings:
1. Press the TV MENU button to display the on-screen menu.
2. Press the LEFT/RIGHT ( / ) button to select “Setup”.
3. Press the DOWN (
) button to select the item you would like to adjust.
4. Press the LEFT/RIGHT( / ) button to toggle through option settings or to adjust slider bars in
order to increase/decrease the value of a user setting. Then press the TV MENU button once
(or twice) to exit on-screen menu.
The following table describes each item in the Setup menu:
Item Description
Language Sets the on-screen display language to your desired language.
Closed Caption Controls the caption decoder. Select closed caption (CC1, CC2, CC3, CC4) or
teletext (TT1, TT2, TT3, TT4). Select “OFF” to turn off closed captions. This
function is available only when the input source is from TV, Video 1/2, and SVideo 1/2. Refer to the next section to set up Closed Caption from the remote
control.
Sleep Timer Sets a time interval, after which the display is automatically turned off. The sleep
timer adjustments can be set from 0 to 180 minutes in 10-minute increments. You
can also set the sleep timer by pressing the SLEEP button on the remote control.
Refer to the next section to set up Sleep Timer from the remote control.
OSD Settings Two functions are available for adjusting the OSD by pressing the RIGHT (
)
button:
• Transparency: Sets the level of the OSD transparency, through which images
can be seen as the OSD is displayed on the screen.
• OSD Timeout: Defines how long the on-screen menus remain on the screen
when no action is taken. The setting ranges from 1-20 seconds.
NTSC (USA) Enables or disables the NTSC TV system.
Reset Restores default settings.
Page 30
30
Setting the Sleep Timer
Use the Sleep Timer function to set a time, after which the LCD will turn off automatically.
To set the sleep timer, press the SLEEP button on the
remote control, or use the on-screen menu.
When you press the SLEEP button, the LCD cycles
through the available sleep timer options: TIMER OFF,
30, 60, 90, 120, 150, and 180 minutes. The LCD will
turn off automatically after the length of time you set.
To cancel the sleep timer, press the SLEEP button
repeatedly until “TIMER OFF” is displayed on the screen,
or use the on-screen menu.
30 min
TIMER OFF
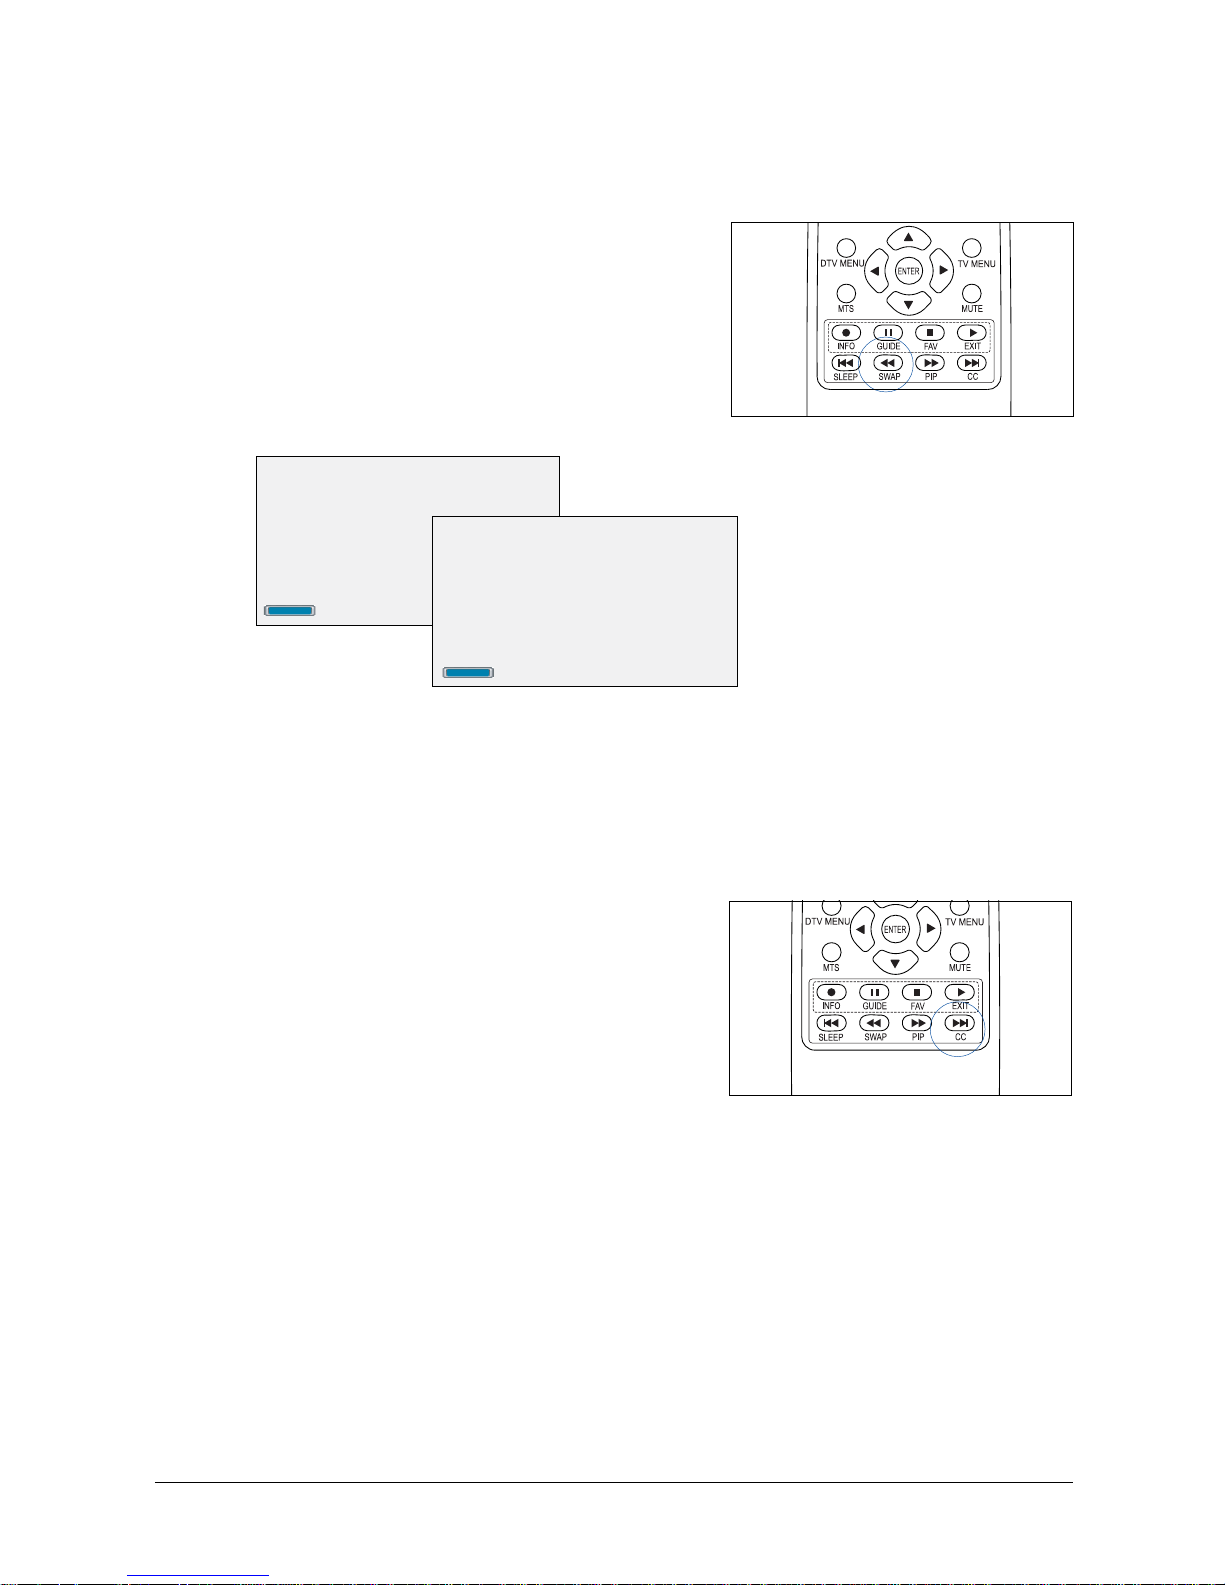
Using Closed Captions
Some programs offer closed captions, which are subtitles for the spoken portions of programming.
These subtitles are designed for the hearing impaired or for translations into other languages.
Programming with closed captions often carries the closed caption symbol, cc.
To view the captions or text:
Press the CC button on the remote control, or use the
on-screen menu to enable or disable closed captions.
Pressing the CC button also gives you a choice of several
different closed caption streams. Select from CC1, CC2,
CC3, and CC4 for captions; TT1, TT2, TT3, or TT4
for text.
To close the captions, switch option to “CC OFF”.
NOTE:
• No captions are displayed if the program or video does not have closed captions.
• If teletext is not available, there is no information displayed on the screen.
Page 31

31
42" LCD TV
Adjusting the Audio
The Audio menu gives you access to sound settings.
To adjust audio settings:
1. Press the TV MENU button to display the on-screen menu.
2. Press the LEFT/RIGHT (
/ ) button to select “Audio”.
3. Press the DOWN ( ) button to select the item you would like to adjust.
4. Press the LEFT/RIGHT(
/ ) button to toggle through option settings or to adjust slider bars in
order to increase/decrease the value of a user setting. Then press the TV MENU button once
(or twice) to exit on-screen menu.
The following table describes each item in the Audio menu:
Item Description
Volume Adjusts the overall volume of the speakers.
This feature can also be adjusted by pressing the VOL+ or VOL- buttons on the
remote control or LCD unit.
Treble Adjusts the high frequency portion of the audio range.
Bass Adjusts the low frequency portion of the audio range.
Balance Balances the volume of the left and right speakers.
Mute Disables the audio. This setting can be set to On or Off:
On: The mute function is enabled.
Off: The mute function is disabled.
It can also be set by pressing the MUTE button on the remote control.
Audio Source Selects the audio source from the main or secondary window. This function is
available only when the PIP and Side by Side functions are activated.
Page 32

32
Adjusting TV Channel Settings
The TV menu provides several functions that enable you to perform the auto search of active channels
and allow you to edit these channels for your needs.
TO access TV settings:
1. Press the TV MENU button to display the on-screen menu.
2. Press the LEFT/RIGHT (
/ ) button to select “TV”.
3. Press the DOWN (
) button to select the item you would like to adjust, then press the RIGHT( )
button to display available functions.
4. Press the LEFT/RIGHT( / ) button to toggle through option settings or to adjust slider bars in
order to increase/decrease the value of a user setting. Then press the TV MENU button once
(or twice) to exit the on-screen menu.
The following table describes each item in the TV layer:
Item Description
TV Settings • Auto Search Channels: Scans for active channels automatically when
you press the RIGHT (
) button.
• Antenna/Cable: Selects the TV source from the antenna or cable.
You can also set the TV source by pressing the ANT/CBL button
on the remote control. This functions only activates in “Single”
window layout .
Channel Settings • Channel List: Toggles between Valid and Favorites channel mode.
– Valid: Displays all validated channels.
– Favorites: Displays all favorite channels.
• Edit Channels: Adds or deletes individual channels from the list
of available channels.
• Edit Favorites: Adds an individual channel as a favorite, or removes a
channel from the list of the favorites. In default mode, there are no
memorized channels in the list of the favorites. You can add your
desired channel to list of favorites through this method; the LCD can
hold up to 10 favorite channels.
NOTE: Before accessing TV Settings, switch the input source to “TV” first.
Audio
TV
Page 33

33
42" LCD TV
Displaying and Setting Up Your Favorite Channels
The Channel Settings function allows you to set up the display of channels by either valid or favorite
mode and to edit channels based on your preference. Valid mode allows you to watch all validated
channels. Favorite mode allows you to watch the channels which have been set up in the list of favorite
channels.
To display and set up your favorite channels:
1. In the TV menu, select ”Channel Settings”, then press the RIGHT (
) button to enter an edit
screen.
2. Select “Favorites” from the Channel List by using the LEFT/RIGHT( / ) button.
3. Press the DOWN (
) button to select “Edit Favorites”, then press the RIGHT( ) button to enter an
edit screen.
4. Select the channel that you wish to add to the favorites by using the UP/DOWN ( / ) button.
5. Toggle between “Add” and “Delete” by using the LEFT/RIGHT( / ) button. Select “Add”, and the
selected channel will be added to list of favorites.
6. Press the TV MENU button once (or twice) to exit the on-screen menu.
7. Use the CH
or CH on the remote control to move through the list of favorite channels.
Page 34

34
Selecting Input Source
The Source menu enables you to set an input source when connecting an antenna or using video
equipment such as a DVD or VCR player. Set the source to match the type of connection you have
made between the LCD and the video equipment. For more information, see Chapter 2 “Making
Connections”.
To access input source settings:
1. Press the TV MENU button to display the on-screen menu.
2. Press the LEFT/RIGHT ( / ) button to select “Source”.
3. Press the DOWN (
) button to select the item you would like to adjust, then press the RIGHT( )
button to display available functions.
4. Press the LEFT/RIGHT(
/ ) button to toggle through option settings for a user setting, then press
the TV MENU button once (or twice) to exit the on-screen menu.
The following table describes each item in the Source menu:
Item Description
Source Enable Enables or disables the available input sources. When an input source is enabled,
it appears on the list of TV/AV sources. When an input source is disabled, it
disappears temporarily from the list of TV/AV sources.
• VGA: Computer input source
• Video 1: Composite Video input source.
• S-Video 1: S-Video input source.
• Video 2: Composite Video input source.
• S-Video 2: S-Video input source.
• HDMI: HDMI input source.
• DTV: Digital TV input source.
• HD1: Component Video (YPbPr) input source.
TV (Tuner) is a preset input source and cannot be disabled by users under any
circumstance.
Layout Allows users to view single or multiple programs in five different window
layouts at the same time. These options are Single, PIP, Side by Side, POP5,
and POP12.
Source
Source
Page 35

35
42" LCD TV
Selecting the Window Layout
The Layout setting allows you to select a window layout for the viewing of single or multiple programs
at the same time. There are five options for window layout: Single, PIP, Side by Side, POP5, and
POP12.
To select a window layout for your specific need:
1. Select “Layout” in the Source menu, then press the RIGHT (
) button.
2. Select a window layout from a series of settings by using the LEFT/RIGHT ( / ) button.
Single The Single window layout consists of one window that plays the
program you see on the screen.
PIP Within the main window, the PIP (Picture-in-Picture) window layout is
a small window that displays programs in another channel or from
other input sources.
Side by Side The Side by Side window layout consists of two equal-size
windows, allowing users to view two different programs on the
screen at the same time.
POP5 The POP5 (Picture-out-Picture) window layout consists of one main
window plus five secondary windows, allowing users to view 6
programs on the screen at the same time.
POP12 The POP12 (Picture-out-Picture) window consists of one main
window plus 12 secondary windows, allowing users to view a total
of 13 programs on the screen at the same time.
Once a user setting is in place, the setting takes effect on the screen immediately, and the numbers
of the windows will appear on the screen upon your selection. You can then view programs from
other channels or from different input sources at the same time.
Source
Source
Page 36

36
Viewing Picture-in-Picture (PIP)
The PIP (Picture-in-Picture) window is a small window that displays programs from other channels or
from input sources within the main window.
To open a PIP window, use either method below:
• Press the PIP button on the remote control directly.
The PIP window appears on the screen immediately.
• Press the TV MENU button, and select ”PIP” in
Window Layout in the Source menu.
Once the PIP is selected, the PIP window appears in a corner of the screen immediately.
NOTE: If the PIP window appearing on the screen is blank, press the TV/AV button on the remote
control to select an available input source for the PIP window. For more details, see the next section for
setting up the PIP input source.
To close a PIP window, press the PIP button again, or change the window layout setting to “Single” in
Window Layout in the Source menu.
Source
Source
Page 37

37
42" LCD TV
Selecting the PIP Input Source
To select an input source for a PIP window, use the TV/AV button on the remote control:
1. Make sure that the PIP window is activated on the
screen, then press the ENTER button to select a
window.
The selected window will be outlined by a colored
border.
Please note that window selection functions only when
the displayed window appearing on the screen does not
contain any information (such as a channel number).
2. Press the RIGHT/LEFT (
/ ) button to switch to the
PIP window.
3. Wait for the colored border around the selected PIP
window to disappear from the screen, then press the
TV/AV button on the remote control to display the input
source window.
Press the UP/DOWN (
/ ) button to move through
available sources, then ENTER to confirm your selection.
If the PIP window detects the input source, the detected
image is displayed in the PIP window immediately.
NOTE: Not every type of input source can be set up to become a secondary window in PIP mode.
Please refer to the table below on input sources for each PIP mode.
PIP (Pincture-in-Picture)
Main screen source VGA HDMI Video 1 S-Video 1 Video 2 S-Video 2 HD1 DTV TV
Seconda ry
screen
source
VGA _________
HDMI_________
Video 1vv_vvvvvv
S-Video 1 v v v _ v v v v v
Video 2 v v v v _ v v v v
S-Video 2vvvvv_vv v
HD1 _________
DTV _________
TV vvvvvvvv _
(v: Available, —: Not available)
Page 38

38
Customizing PIP Window Settings
The LCD allows you to customize PIP settings, such as size, location, and transparency for your PIP
window, by using the on-screen menu.
Size change
Position change
To customize the PIP window:
1. Make sure the PIP window is activated on the screen.
2. In the “Image Adj.” menu, select ”PIP Adjustments”,
then press the RIGHT (
) button to enter into an edit
screen.
3. Press the DOWN (
) button to select the item you
would like to adjust.
4. Press the LEFT/RIGHT(
/ ) button to adjust slider bars
in order to increase/decrease the value of a user setting.
Alternating between PIP and Main
Screen Sources
To switch between the PIP and main screen sources, press
the SWAP button on the remote control.
Changing the PIP Channel
If the PIP window is currently set to TV programming, make
sure you are in the PIP window. (Press ENTER to confirm
which window you are in, and press the LEFT/RIGHT
(
/ ) buttons to switch between the main and PIP
windows.) Wait till the window without the colored border
appears on the screen, and press the CH or CH buttons
on the remote control to move channels up or down.
Before
After
Each time you change the setting, the selected option takes effect on the screen immediately.
• PIP Size: Changes the size of the PIP window.
• H Position: Moves the PIP window right or left on a horizontal plane.
• V Position: Moves the PIP window up or down on a vertical plane.
• Transparency: Adjusts the transparency level of the PIP window.
Page 39

39
42" LCD TV
Viewing Picture-out-Picture (POP)
One major feature of the LCD is that it supports three POP (Picture-out-Picture) modes: Side by Side,
POP5, and POP12. These POP modes offer you more flexibility if you wish to watch more than one
program on the screen at the same time.
To open a POP window:
Press the TV MENU button, and select “Side by Side”,
“POP5”, or “POP12” in “Window Layout” in the Source
menu.
Once a POP mode is selected, the POP takes effect on the
screen immediately.
To close a POP window, change the window layout setting
to “Single” in Window Layout in the Source menu.
POP5
Source
NOTE:
If the POP window appearing on the screen is blank, press
the TV/AV button on the remote control to select an
available POP input source. For more details, see the next
section for setting up the POP input source.
Side by Side
POP5
POP12
Source
Page 40

40
Selecting POP Input Source(s)
To select a POP window source, use the TV/AV button on the remote control:
1. Make sure the POP window is activated on the screen,
then press the ENTER button to select a window.
The selected window is outlined in a colored border.
Please note that window selection functions only when
the displayed window appearing on the screen does not
contain any information (such as a channel number).
2. Press the RIGHT/LEFT ( / ) button to switch to any of
the secondary windows.
3. Wait for the colored border around the selected
secondary window to disappear from the screen, then
press the TV/AV button on the remote control to
display on the screen your available input sources.
Press the UP/DOWN (
/ ) button to move through the
available sources, then ENTER to confirm your
selection.
If the secondary window detects the input source, the
detected image is displayed in the secondary window
immediately.
NOTE: Not every type of input source can be set up to become a secondary window in POP mode.
Please refer to the table below on input sources for each POP mode.
POP 5 and POP 12 (Picture -out-Picture)
Main screen source VGA HDMI Video 1 S-Video 1 Video 2 S-Video 2 HD1 DTV TV
Secondary
screen
source s
VGA _ ________
HDMI_________
Video 1vv_vvvvvv
S-Video 1vvv_vvvvv
Video 2vvvv_vvvv
S-Video 2vvvvv_vvv
HD1 _________
DTV _________
TV vvvvvvvv _
(v: Available, —: Not available)
Page 41

41
42" LCD TV
Side by Side
Main screen source VGA HDMI Video 1 S-Video 1 Video 2 S-Video 2 HD1 DTV TV
Secondary
screen
source
VGA _ ________
HDMI_________
Video 1vv_vvvvvv
S-Video 1vvv_vvvvv
Video 2vvvv_vvvv
S-Video 2vvvvv_vvv
HD1 _________
DTV _________
TV vvvvvvvv _
Changing the POP Channel
Press the CH /CH or UP/DOWN ( / ) buttons on the
remote control to move channels up or down.
Before changing the POP channel, make sure you are in the
POP window. (Press ENTER to confirm which window you
are in, and press the LEFT/RIGHT (
/ ) buttons to switch
between the main and POP windows.) Wait till the window
without the colored border appears on the screen, and press
the CH or CH buttons on the remote control to move
channels up or down.
(v: Available, —: Not available)
Page 42
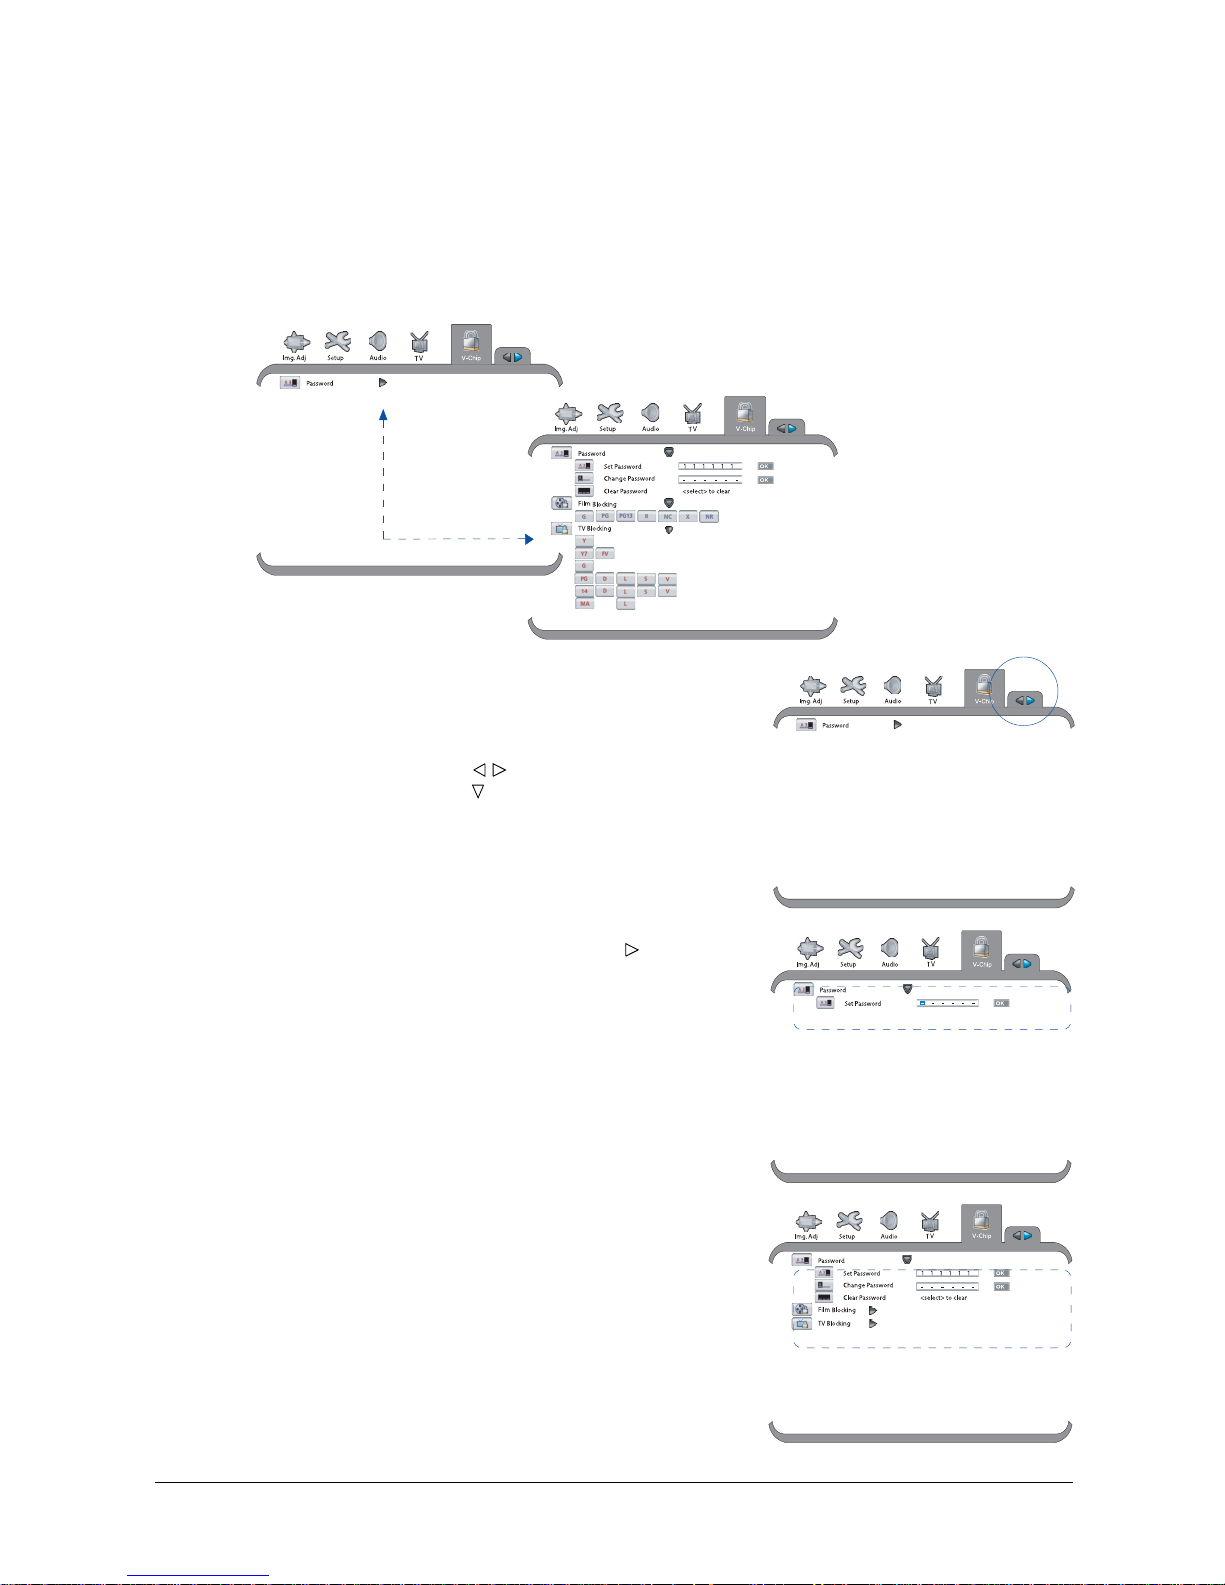
42
Using the V-Chip Controls
The V-chip is an electronic circuit that enables families to block content that may be unsuitable or
objectionable for children. V-chip-enabled programming is available in certain countries, including
Canada and the USA. Users must enter the password to change V-Chip settings; the default
password is 111111. Use the default password to access V-Chip settings for the first time, then to
change settings in subsequent occasions.
Turning the V-Chip On
1. Press the TV MENU button.
2. Press the LEFT/RIGHT (
/ ) button to select “V-Chip”,
then press the DOWN ( ) button.
3. Select “Password”, then press the RIGHT (
) button to
enter the “Set Password” editable box.
You will be prompted to enter a 6-digit password.
4. Enter the default 6-digit password “111111” by using
the number buttons (0-9) on the remote control, then
ENTER to confirm.
If the entered password is correct, the V-Chip controls
appear on the screen. You are then ready to adjust the
settings for TV and movie ratings.
Page 43
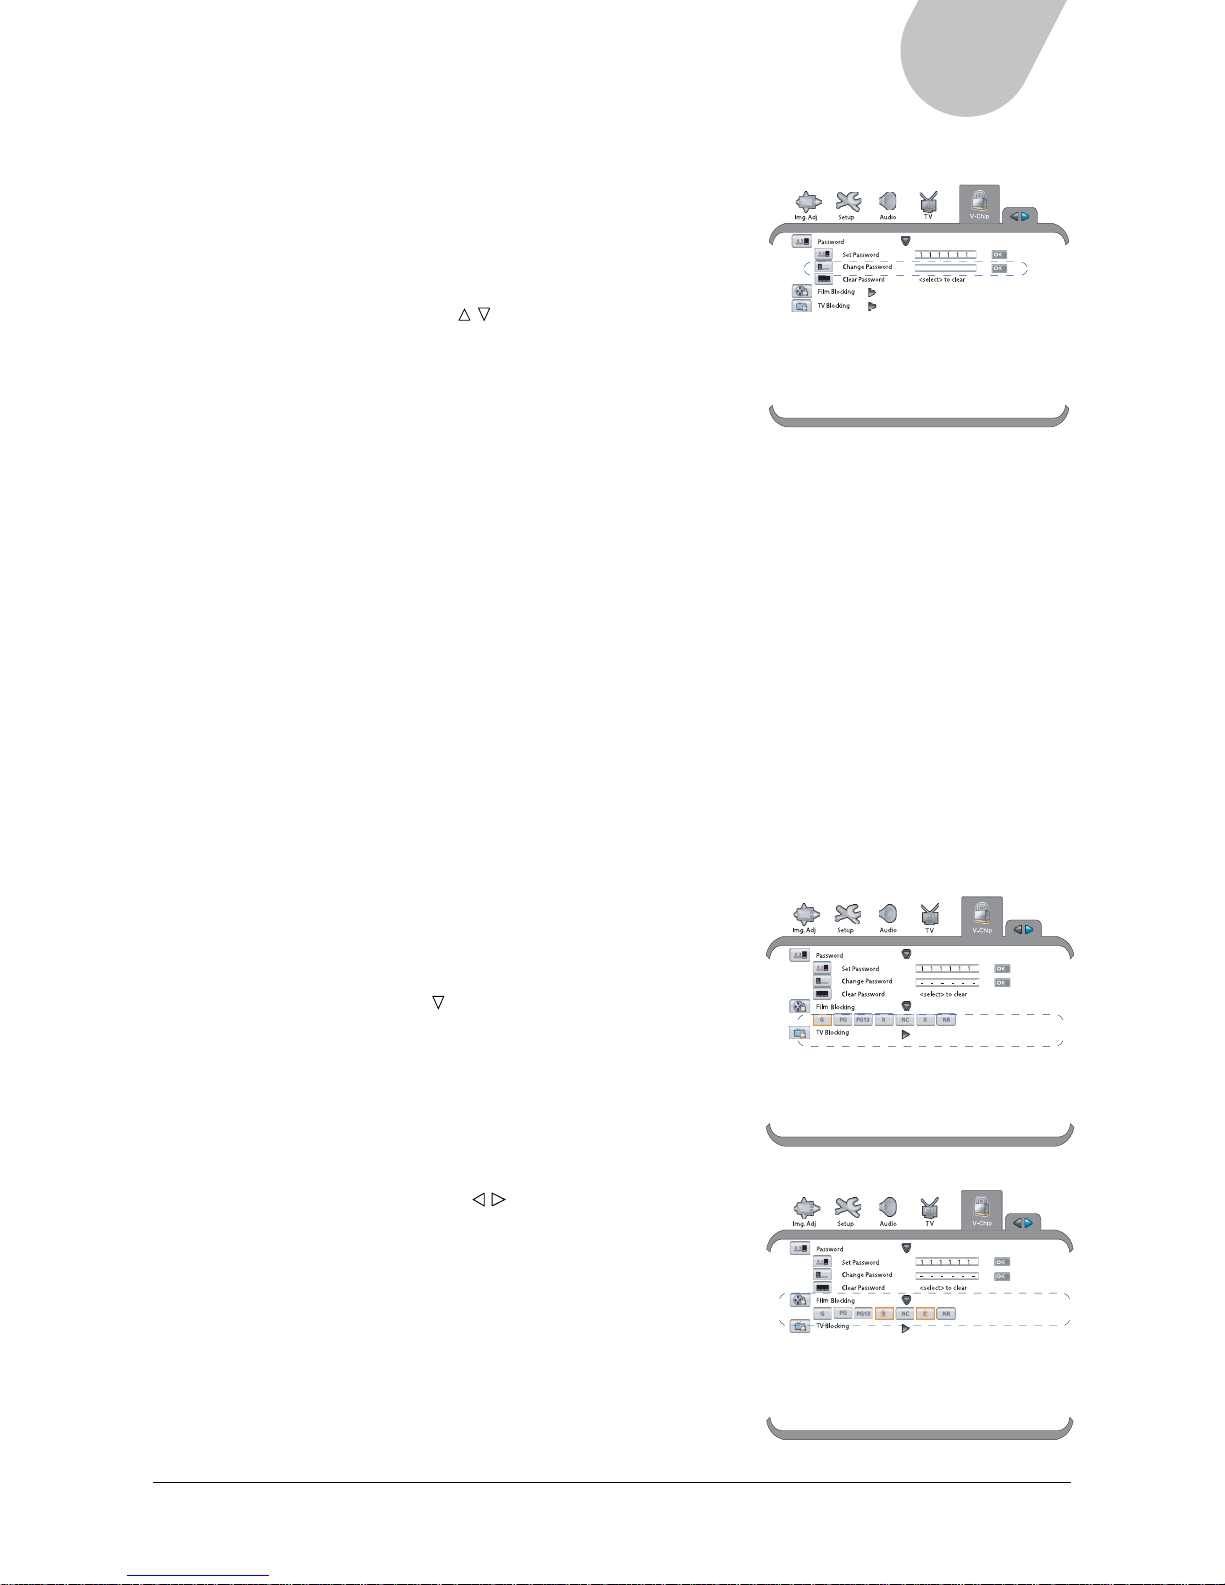
43
42" LCD TV
Changing the Password
The Change Password feature allows you to change the
current password to a new secret password to protect
certain settings from being changed.
1. Enable the V-Chip function, following the procedures
listed in the “Turning the V-Chip on” section.
2. Press the UP/DOWN (
/ ) button to select “Change
Password”.
3. Enter your new secret password, use the number
buttons (0-9) on the remote control, then ENTER to
confirm your change.
Once the ENTER button is pressed, the new password
is remembered and must be used when you use the
V-Chip again in the next time.
1 2 3 4 5 6
Locking Movie Programs
The movie rating system is defined as follows:
G - General audience. Suitable for all ages.
PG - Parental guidance suggested. Some parents may consider some elements of the movie not
to be suitable for children.
PG-13 - Parents strongly cautioned. Some parents may consider some elements of the movie to be
unsuitable for children under the age of 13.
R - Restricted. Viewers under the age of 17 must be accompanied by an adult or guardian
(age level may vary in some areas).
NC - No viewers under the age of 17 are permitted.
X - An obsolete rating that has now been replaced by NC-17.
NR - No rating.
To lock movie programs:
1. Enable the V-Chip function, following the procedures
listed in the “Turning the V-Chip on” section.
2. Press the DOWN ( ) button to select “Film Blocking”,
then ENTER to activate the rating system.
The selected rating is highlighted in color.
3. Press the ENTER button to lock or unlock content
programs.
The first time you press the ENTER button, all ratings
will be locked.
4. Press the LEFT/RIGHT ( / ) button to select the rating
you would like to adjust, then press the ENTER button
to lock or unlock it.
5. Select more ratings to adjust if so desired.
6. Press the TV MENU button to exit the menu.
Page 44
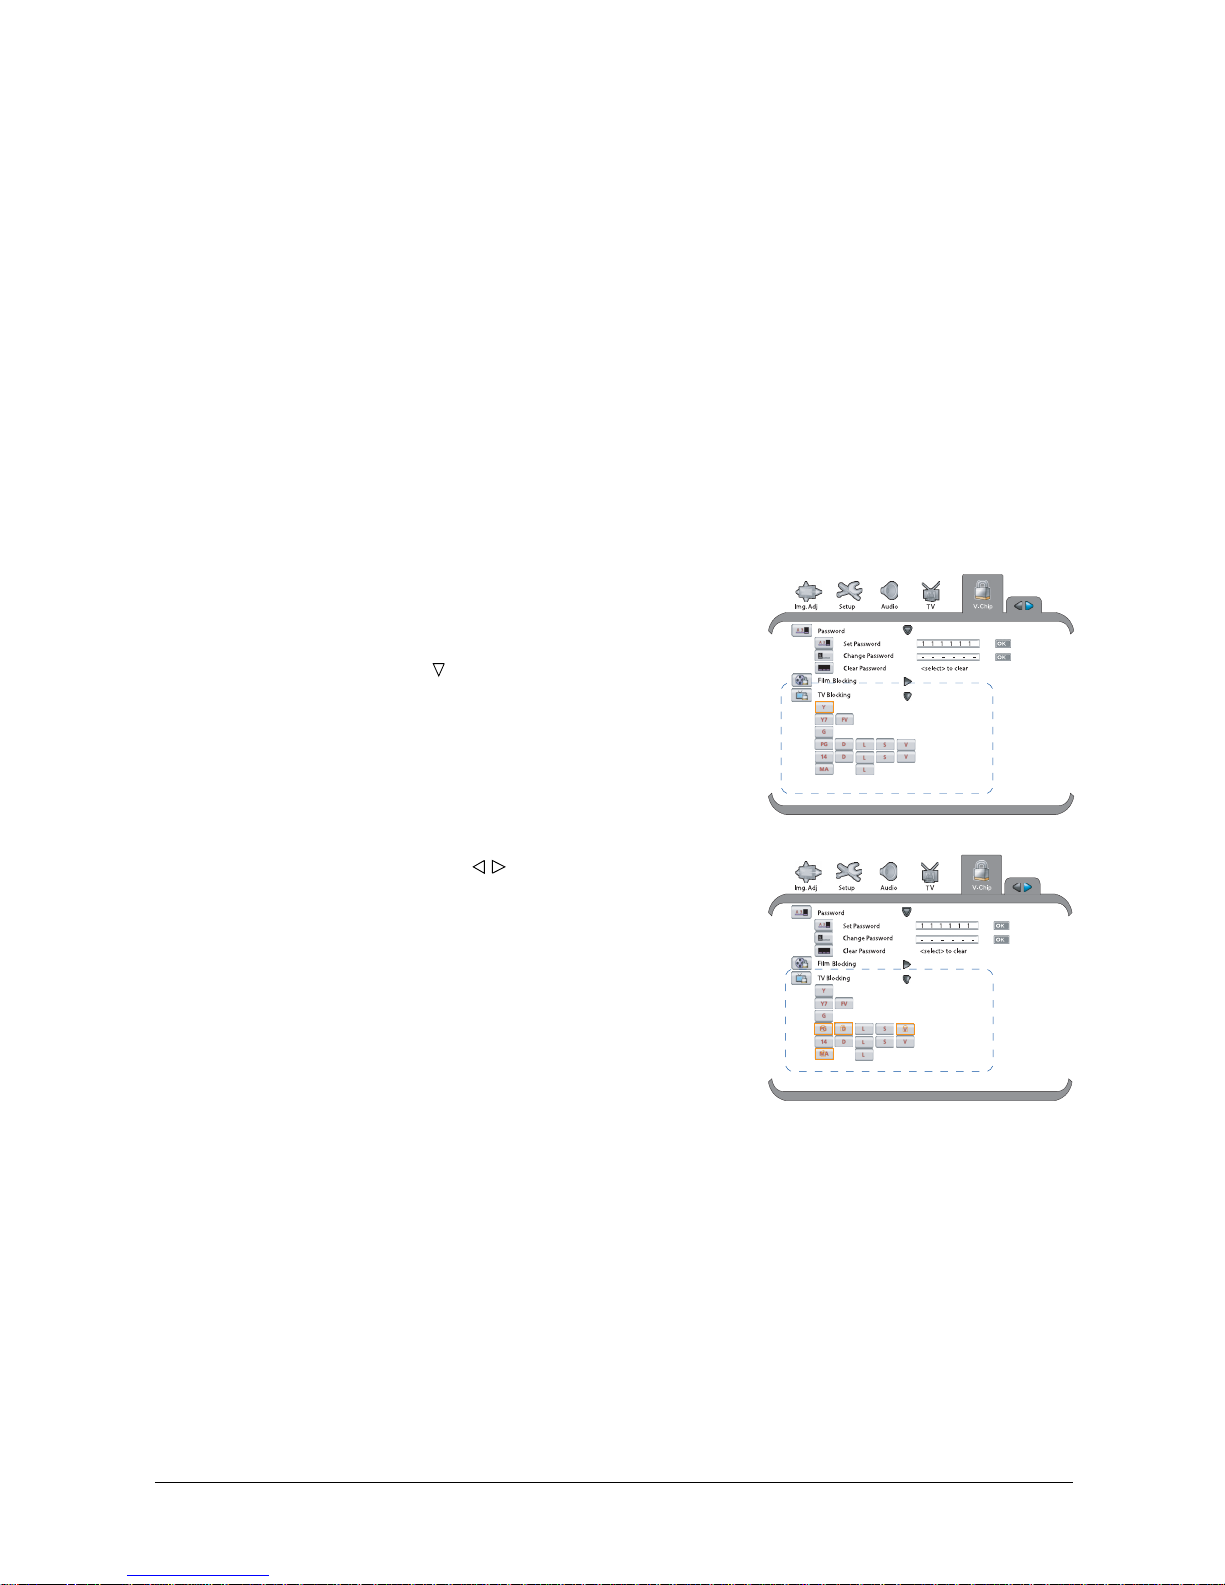
44
Locking TV Programs
The TV rating system is defined as follows:
Y - Suitable for all children.
Y7 - Suitable for children age 7 and above.
FV - Suitable for children age 7 and above, and some programs where fantasy violence may
be more intense or combative than others in this category.
G - Suitable for all-age audiences.
PG - Parental Guidance Suggested. The rating may be accompanied by one or more of the
following subratings:
D: Suggestive Dialogue / L: Mild coarse language / S: Mild sexual situations
V: Moderate Violence
14 - Parental Strongly Cautioned. Some programs categorized in this section may not be
suitable for children under the age of 14. The rating may be accompanied by one of the
following subratings:
D: Highly suggestive dialogue / L: Coarse language / S: Sexual situations
V: Intense violence
MA - Suitable for mature audiences: L: Coarse language
To lock TV programs:
1. Enable the V-Chip function, following the procedures
listed in the “Turning the V-Chip on” section.
2. Press the DOWN ( ) button to select “TV Blocking”,
then ENTER to activate the rating system.
The selected rating is highlighted in color.
3. Press the ENTER button to lock or unlock content
programs.
The first time you press the ENTER button, all ratings
will be locked.
4. Press the LEFT/RIGHT ( / ) button to select the
rating you would like to adjust, then press the ENTER
button to lock or unlock it.
5. Select more ratings to adjust if so desired.
6. Press the TV MENU button to exit the menu.
Page 45
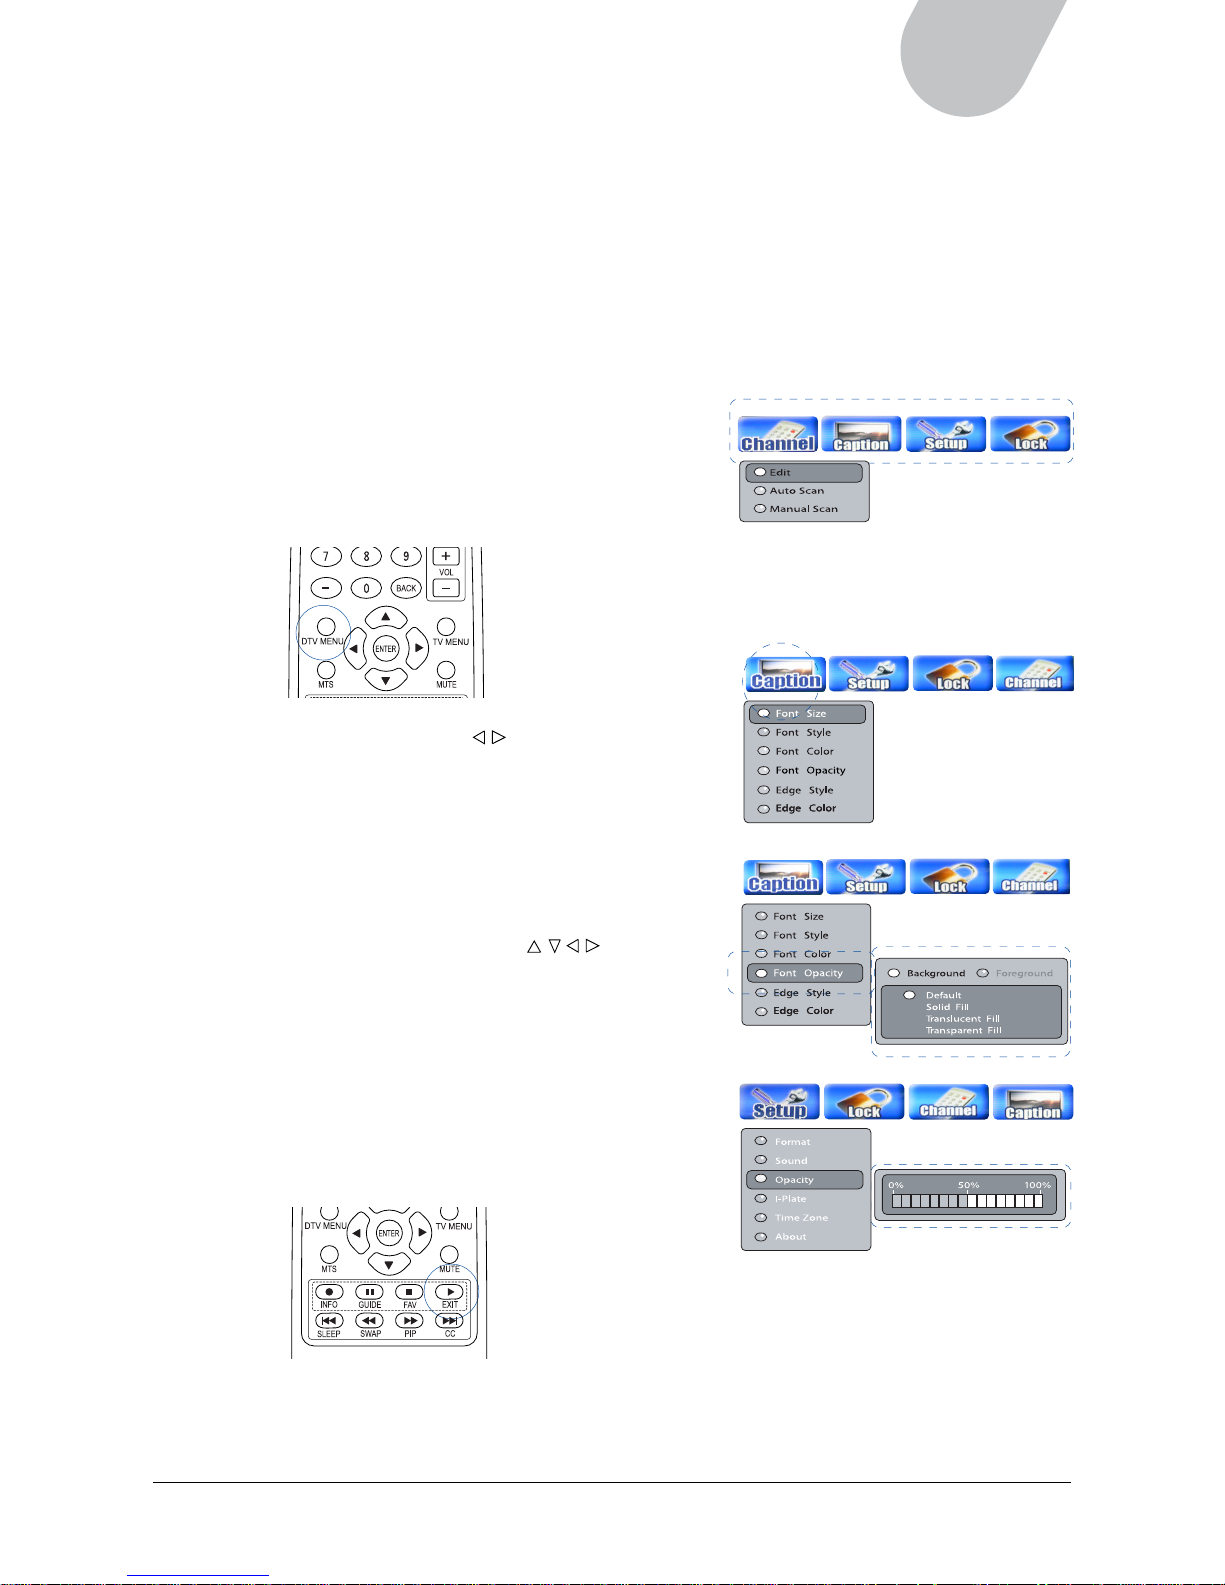
45
42" LCD TV
CHAPTER 6
Using the Digital TV Features
The on-screen menu under DTV mode is for the use of digital TV programs exclusively. Various
functions are included in the on-screen menu that let you adjust settings, and you can toggle through
these functions by using the 4-way arrow buttons. This chapter explains each submenu in order, noting
also functions that are accessed through the remote control.
Navigating the Menu
1. Press the DTV MENU button on the remote control
to activate the digital TV on-screen menu.
Each main menu heading opens a submenu of
related items.
2. Press the LEFT/RIGHT ( / ) button on the remote
control to move left and right in the menus.
The selected menu item is highlighted.
3. Use the 4-way arrow buttons (
/ / / ) to select
the item you wish to adjust. After the selected item
is highlighted, press the ENTER button to confirm.
Some item settings are controlled simply by shifting
slider bars, while others have two or more settings
to choose from.
Once a user setting is selected, the setting takes
effect on the screen immediately.
4. To leave a submenu and return to main menu, press
the EXIT button on the remote control.
5. To exit the on-screen menu, press the DTV MENU button.
Page 46
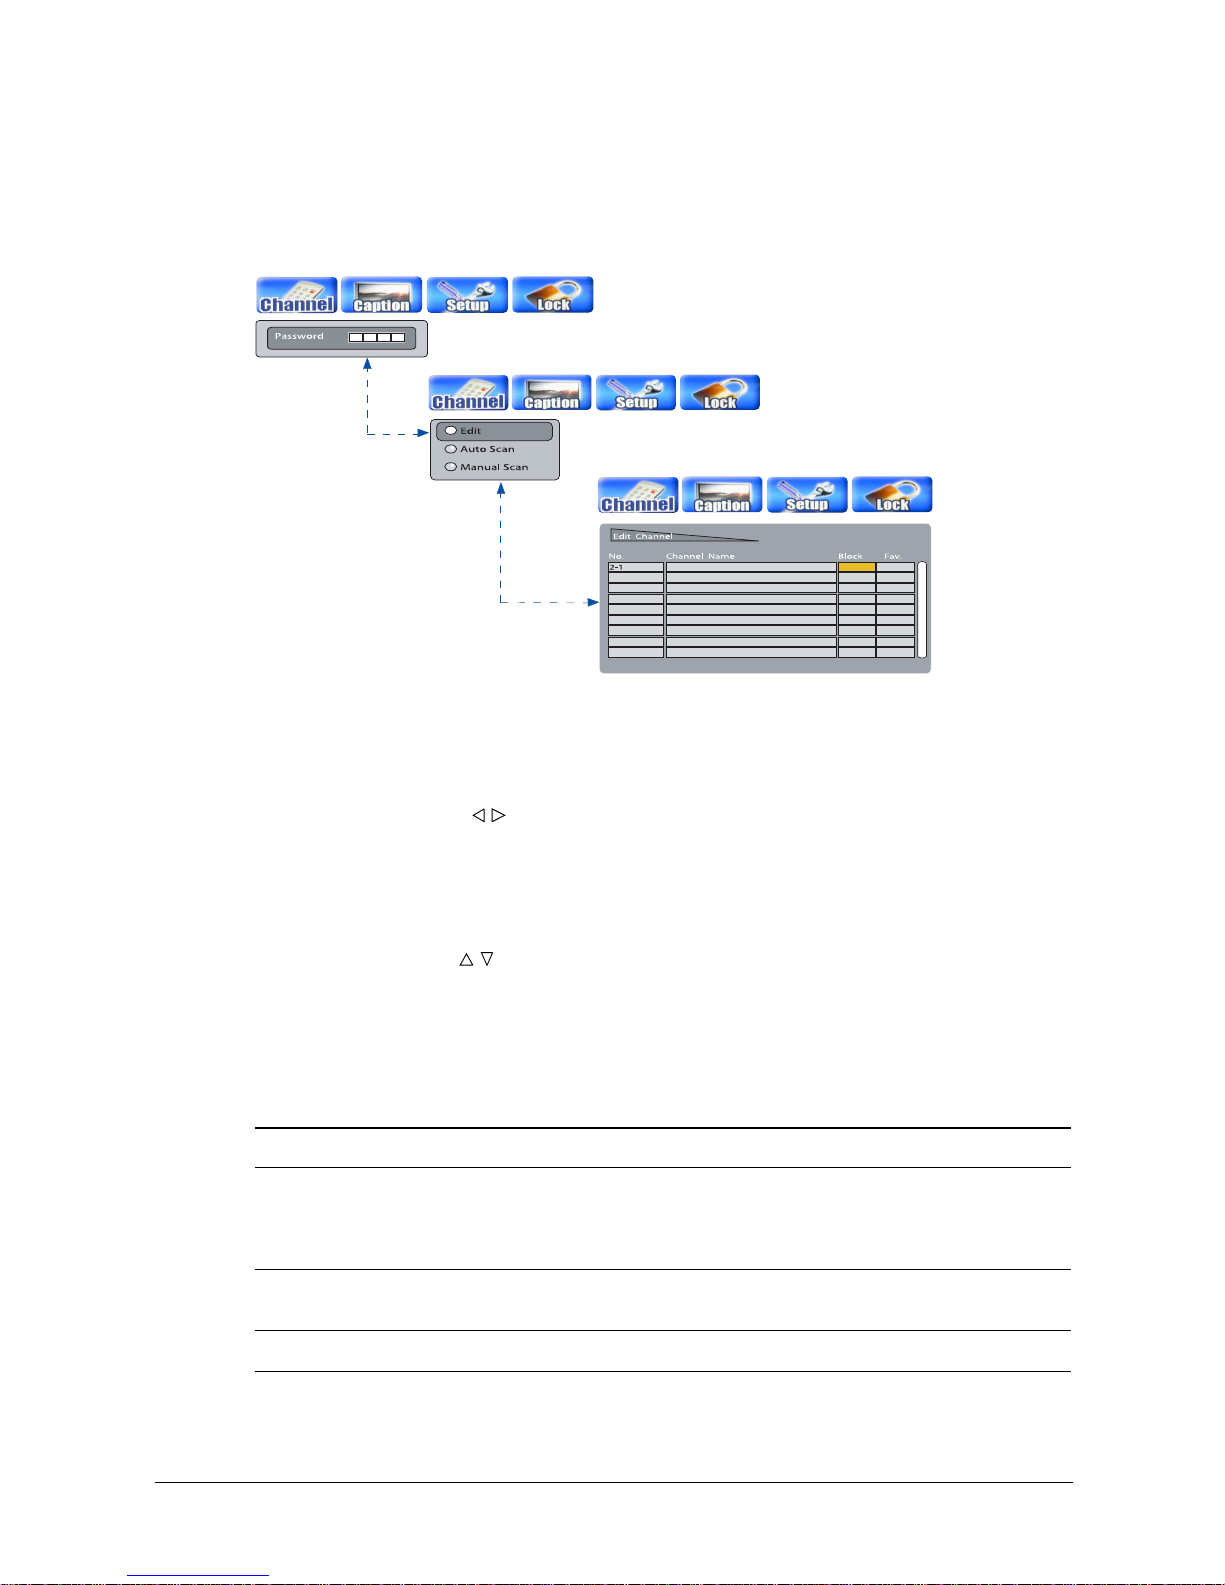
46
Setting Channels
The Channel menu allows you to perform auto or manual search of activated channels and lets you
group activated channels into lists such as blocked or favorite channels.
To access channel settings:
1. Press the DTV MENU button to display the on-screen menu.
2 Press the LEFT/RIGHT ( / ) button to select “Channel”; a window appears prompting you to enter
a password.
3. Enter the default password “0000”, using the number buttons (0-9) on the remote control to enter
the password.
If the password is entered correctly, the Channel menu appears on the screen at once.
4. Press the UP/DOWN (
/ ) button to select the item you would like to adjust, then press the ENTER
button to access the submenu.
5. Press the EXIT button to exit the submenu, or press the DTV MENU button to exit the
on-screen menu.
The following table describes each item in the Channel menu:
Item Description
Edit Allows you set the activated digital TV channels as favorite or blocked channels.
By default, there are no memorized channels in the list of favorite or blocked
channels, and the Edit function can be used to add desired TV channels to either
list.
Auto Scan Scans for active digital TV channels automatically. For more details, refer to
Chapter 4 “Initial Setup for Digital TV (DTV): Scanning for Channels.”
Manual Scan Scans for active digital TV channels manually.
3
4
5
QBC
NCC
OFF AIR
OFF AIR
WTCC
6
Page 47
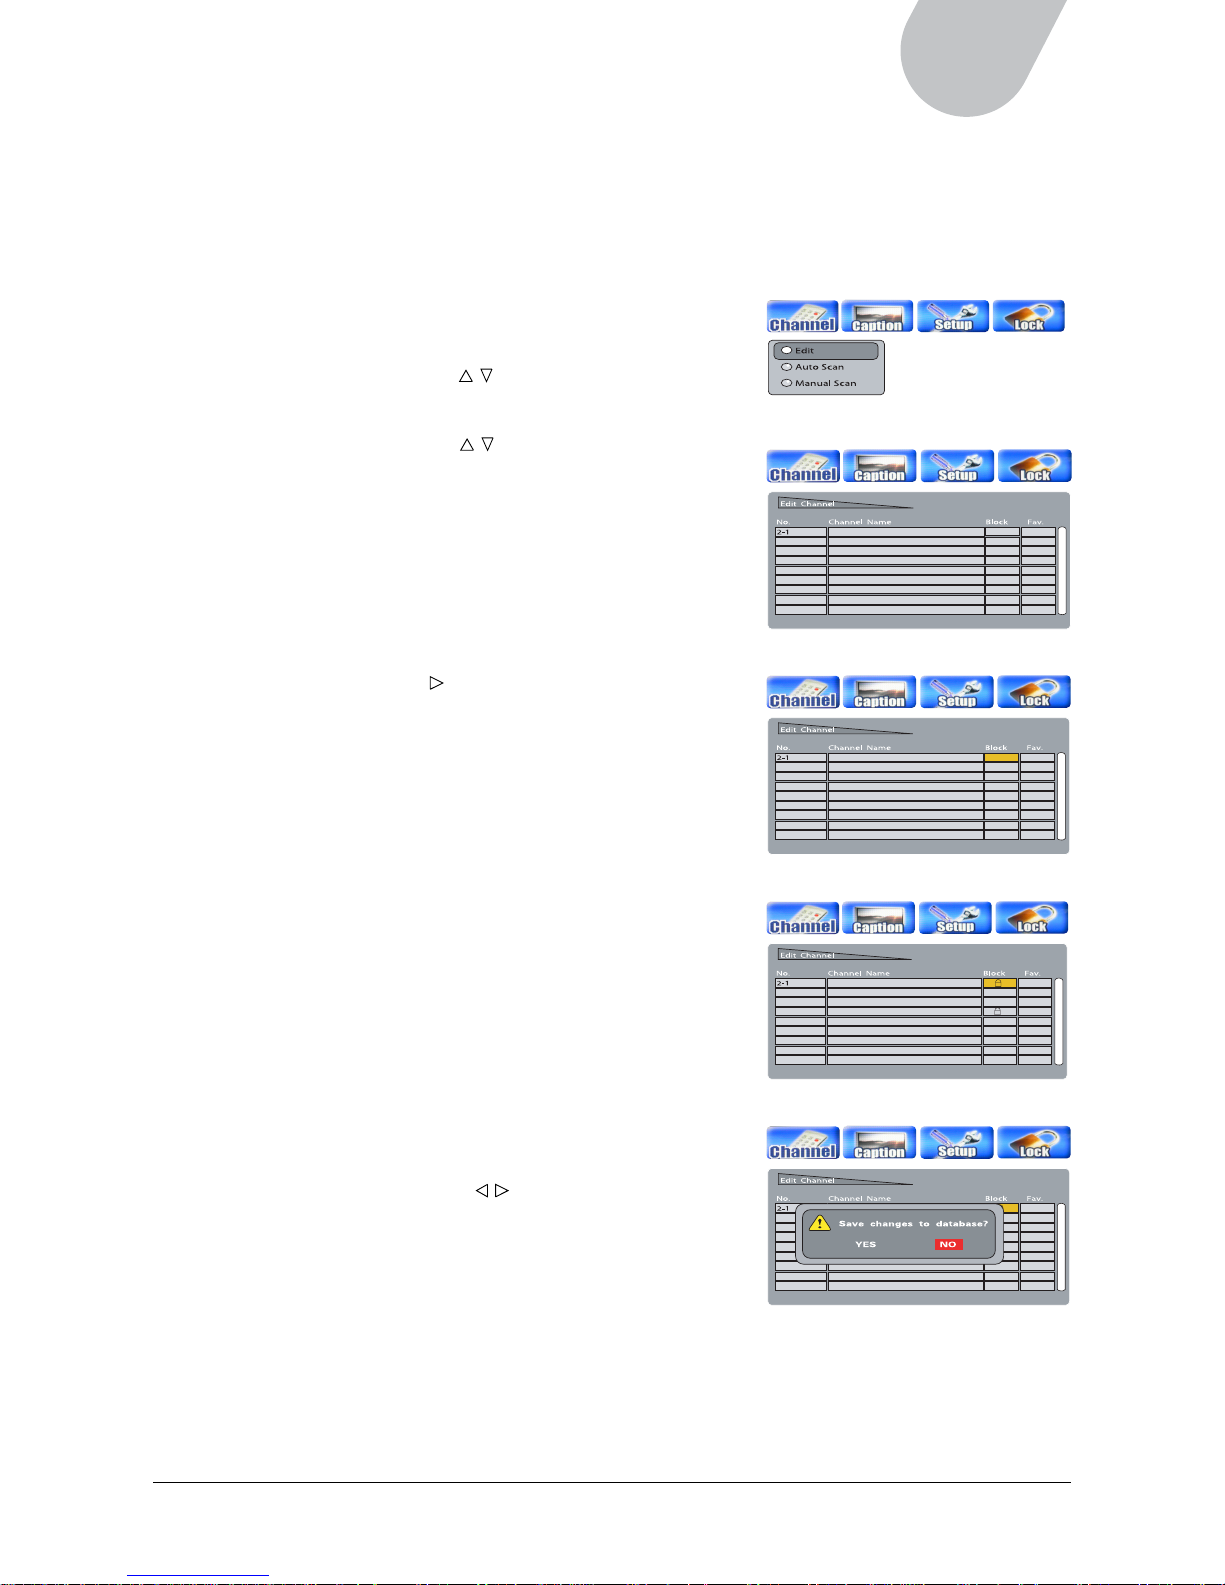
47
42" LCD TV
3
4
5
QBC
NCC
OFF AIR
OFF AIR
WTCC
6
3
4
5
QBC
NCC
OFF AIR
OFF AIR
WTCC
6
3
4
5
QBC
NCC
OFF AIR
OFF AIR
WTCC
6
F1
F1
3
4
5
QBC
NCC
OFF AIR
OFF AIR
WTCC
6
F1
F1
Setting Up Your Favorite or Blocked Channels
The Edit function allows you to set up lists of favorite or blocked channels. Favorite mode lets you add
or remove channels from the list of favorites, and Block mode allows you to bar a channel from viewing.
To set up your favorite or blocked channels:
1. Enable the Channel function, following the procedures
listed in the “Setting Channels” section.
2. Press the UP/DOWN (
/ ) button to select “Edit”, then
press ENTER.
3. Press the UP/DOWN (
/ ) button to highlight the
channel you wish to adjust.
4. Press the RIGHT ( ) button to highlight the “Block” or
“Fav.” cell, then ENTER to confirm your choice.
Select “Block”; the selected channel is added to your
list of blocked channels.
Select “Fav.”; the selected channel is added to your list
of favorite channels.
5. Repeat Step 3 and 4 to set up more channels
as desired.
6. Press the EXIT button to exit the submemu; a
confirmation window pops up.
Using the LEFT/RIGHT (
/ ) button, select “Yes” and
press ENTER to save the changes; select “No” and
press ENTER to cancel the adjustments you just made.
7. Press the DTV MENU button to exit the
on-screen menu.
Page 48

48
WNBC
WNBC
Displaying Your Favorite Channels
After you finish setting up your favorite channels in the Edit Channel window, you can set up your
favorite channels to be displayed.
To display your favorite channels:
1. Press the FAV button on the remote control.
A list of grouped channels shows on the screen as
shown below.
2. Press the RIGHT (
) button to highlight “Fav 1”, and
then ENTER to confirm your choice.
You can toggle between “All” and “Fav1” by using the
LEFT/RIGHT (
/ ) button. Select “All” to display all
validated channels; select “Fav1” to display all favorite.
3. Press the EXIT button to exit the window.
The next time you watch digital TV programs and move
through channels (by using the CH+ or CH- button),
you will see the channels that have been set up in your
favorite group.
If you wish to watch all validated channels, repeat steps
1 to 3, but choose “All” in step 2.
NOTE: When you watch a channel that has been previously
blocked, no programming will appear on the screen. Instead,
a warning message displays, saying “Channel is blocked.”
Page 49

49
42" LCD TV
Scanning Channels Manually
Aside from the auto-scan function, the LCD allows you to perform manual scanning if the digital TV
channel you wish to see is not on the list of activated channels.
To scan the channel manually:
1. Enable the Channel function, following the
procedures listed in the “Setting Channels” section.
2. Press the UP/DOWN ( / ) button to select
“Manual Scan”, then press ENTER.
3. In the “Channel No” input column, enter the
channel number you wish to watch, using the
number buttons (0-9) on the remote control.
For example, if you wish to watch channel 45,
enter “4” and then “5” in the input column, then
press ENTER.
If the entered channel number is correct, the
channel frequency will be shown on the right side
of the input column.
4. Press the ENTER button to start scanning for the
channel when you see the message “Press [ENTER]
to add Channel” on the screen, and press ENTER
again when “Add Channel” appears on the screen.
If the channel is found, you will see the message
“Get NO. XXXX channel success”.
If the channel cannot be found, you will see the
message “No channel No. XXXX”.
5. Repeat Steps 2 to 4 to scan all desired channels.
6. Press the EXIT button to exit the submenu, or press
the DTV MENU button to exit the on-screen menu.
45
Page 50

50
Managing the Closed Caption
The Caption menu offers you more options to manage closed captions. This function works only when
program providers afford the service.
To adjust the closed caption settings:
1. Press the DTV MENU button to display the on-screen menu.
2 Press the LEFT/RIGHT ( / ) button to select “Caption”.
3. Press the UP/DOWN (
/ ) button to select the item you would like to adjust, then press the ENTER
button to access the submenu. .
4. Press the UP/DOWN ( / ) button to select the option you desire. Then press the ENTER button to
confirm your choice.
5. Press the EXIT button to exit submenu or press the DTV MENU button to exit the on-screen menu.
The following table describes each item in the Caption menu:
Item Description
Font Size Adjusts the character size of the closed caption. There are four options to choose
from, including Default, Small, Middle, and Large.
Font Style Chooses the character style of the closed caption. There are nine options to
choose from, including Default and Style 0 to Style 7.
Font Color Sets the color of both the closed caption and the text box. There are nine colors to
choose from.
• Background: Adjusts the background color of the text box in which the closed
caption shows.
• Foreground: Adjusts the character color of the closed caption.
Font Opacity Adjusts the transparency level of both the closed caption and the text box,
through which images can be seen as the closed caption is displayed on the
screen. There are four kinds of transparencies to choose from, including Default,
Solid Fill, Translucent Fill, and Transparent Fill.
• Background: Adjusts the background transparency of the text box in which the
closed caption appears.
• Foreground: Adjusts the character transparency of the closed caption.
Edge Style Chooses the edge style of the closed caption. There are seven options to
choose from.
Edge Color Sets the edge colors of the closed caption. There are eight options to choose from.
Page 51

51
42" LCD TV
Displaying Setup
The Setup menu allows you to adjust digital audio settings. In addition, it allows you to set the
transparency level of the OSD, the time interval of the information plate, and the time zone where you
are located.
To activate the Setup menu:
1. Press the DTV MENU button to display the on-screen menu.
2 Press the LEFT/RIGHT (
/ ) button to select “Setup”.
3. Press the UP/DOWN (
/ ) button to select the item you wish to adjust, then press the ENTER
button to access the submenu.
4. Press the UP/DOWN ( / ) button to select your desired option, then press the ENTER button to
confirm your choice.
5. Press the EXIT button to exit the submenu, or press the DTV MENU button to exit the
on-screen menu.
The following table describes each item in the Setup menu:
Item Description
Format Sets resolution formats for your screen.
Sound Sets the digital audio for your LCD. There are two standards to choose from:
• PCM: Supports Pulse-code Modulation, a standard form for digital audio used in
computers and CDs.
• Dolby Digital: Supports the AC-3 standard and offers 5.1 channel audio source.
Opacity Sets the transparency level of the OSD, through which images can be seen as the
OSD is displayed on the screen.
I-Plate Defines how long the Information Plate remains on the screen when no action is
taken. It can be turned off or set from 2-6 seconds.
Time Zone Sets the time zone (including daylight savings time).
About Supplies information about the software and hardware used in your LCD.
Page 52

52
Setting the Time Zone
The Time Zone function sets the time and location where you are situated and displays the information
in the Information Plate. Time zones are U.S.-based, with options included for turning Daylight Savings
time on or off.
To set the time zone, follow the steps below:
1. Enable the Setup function, following the procedures
listed in the “Displaying Setup” section.
2. Press the UP/DOWN (
/ ) button to select “Time
Zone”, then press the ENTER button to access the
submenu.
3. Press the UP/DOWN (
/ ) button to choose “AREA”
or “Daylight Saving”.
Choose “Area”, and then press the LEFT/RIGHT ( / )
button to select the time zone.
Choose “Daylight Saving”, and then press the LEFT/
RIGHT (
/ ) button to turn Daylight Saving on
or off.
4. Press the EXIT button to exit the submenu, or press the
DTV MENU button to exit the on-screen menu.
NOTE:
1. The designs of the time zone and daylight saving is based on those used in the United States and
Canada. Other regions may not apply to these designs.
2. There are four time zone to choose: Eastern, Central, Mountain and Pacific.
Page 53

53
42" LCD TV
Using the Lock
Just like the providers of analog TV signals, providers of digital signals also use the MPAA and USTV
(FCC) Parental Ratings to categorize their programs. The Lock setting in digital TV mode offers the same
functions as the V-Chip does in TV mode, as well as allowing you to reset the password for the
“Channel” layer. Similarly, users must enter the password to change Lock settings; the default
password is 0000. Use the default password to access Lock settings for the first time, then to change
settings in subsequent times.
Turning the Lock On
1. Press the DTV MENU button.
2. Press the LEFT/RIGHT (
/ ) button to select “Lock”; a
password-enter window will show on
the display.
3. Enter the 4-digit password “0000” for the default value,
using the number buttons (0-9) on the remote control.
The entered password is displayed as a series of X's.
4. If the entered password is correct, the Lock controls
appear on the screen. You are then ready to adjust the
settings for TV and movie ratings.
Changing the Password
The Password feature allows you to change the current
password to a new secret password to protect certain
settings from being changed. Please note that this password
applies to both “Channel” and “Lock” layers.
1. Enable the Lock function, following the procedures listed
in the “Using the Lock” section.
2. Press the UP/DOWN ( / ) button to select “Password”,
then ENTER to access the submenu.
3. Enter your new secret password, use the number
buttons (0-9) on the remote control; then re-enter the
numbers in the confirmation column.
Once the new password is entered, the LCD memorizes
it immediately. Next time, when you wish to adjust
items in Channel or Lock layer, you must use the new
password.
4. Press the EXIT button to exit the submenu or press the
DTV MENU button to exit the on-screen menu.
Page 54

54
Locking Programs
The Rating feature allows you to lock programs using MPAA or USTV (FCC) standards. Please refer to
the section “Using the V-Chip Controls” in Chapter 5: Using the TV’s Features” for more information.
To lock programs:
1. Enable the Lock function, following the procedures
listed in the “Using the Lock” section.
2. Press the DOWN ( ) button to select “Rating”, then
ENTER to activate the rating system.
3. Press the UP/DOWN/LEFT/RIGHT (
/ / / ) button to
select the rating you wish to adjust, then ENTER to lock
or unlock content program.
4. Repeat the previous step for any other programs on
which you wish to lock or adjust ratings.
5. Press the EXIT button to exit the submenu, or press the
DTV MENU button to exit the on-screen menu.
Locking All Programs
In the Rating Control window, use the LEFT/RIGHT ( / ) button to highlight “Block All”. Then, press
the ENTER button to confirm your choice. You will see the symbol of locks appearing on both rating
systems.
Unlocking All Programs
In the Rating Control window, use the LEFT/RIGHT ( / ) button to highlight “Unblock All”. Then,
press the ENTER button to confirm. You will see the symbol of locks disappearing from the display.
Page 55

55
42" LCD TV
12 Animal Kingdom
12:00AM~1:00AM (None, None)
Introduce Animals in Africa.
12
6
8
7
10
12:30 Adam’s Midnight Show
2:00 WTT News
3:00 Cindy’s World
4:00 Movie
ABC
AFC 1
CNN
QSC
AFC 2
6:00 WTT Morning News
Tuesday 6/13 12:00 AM
Introduce Animals in Africa.
WTT
4 12:00 Animal Kingdom
12
6
8
7
10
12:30 Adam's Midnight Show
2:00 WTT News
3:00 Cindy's World
4:00 Movie
ABC
AFC 1
CNN
QSC
AFC 2
6:00 WTT Morning News
Tuesday 6/13 12:00 AM
Introduce Animals in Africa.
WTT
4 12:00 Animal Kingdom
Getting More Information about Programs
You can get more detailed information about the digital TV program you are watching by using the INFO
or GUIDE function button on the remote control.
Using the GUIDE
The GUIDE function displays a list of memorized channels,
along with information on what programs are being shown.
1. Press the GUIDE button on the remote control to
display the guiding page.
Using the INFO
The INFO function provides you with information about the
program you are watching, such as the channel number, the
program’s title, the program’s starting and ending time, and
so on. The LCD offers you two levels of information.
1. Press the INFO button on the remote control to display
the first level of INFO.
2. Press the INFO button again to display the second level of INFO.
3. Press the EXIT button to exit the info window.
2. Press the UP/DOWN (
/ ) button to select the channel
you wish to watch.
The selected channel will be highlighted.
Then, press the RIGHT (
) button to move the cursor
to the list of programs.
3. Press the UP/DOWN ( / ) button to toggle through the
list of programs.
The selected program will be highlighted.
Press the LEFT (
) button to move back to the list of
channels.
4. Repeat Step 2-3 to check the channels and programs
you wish to check.
5. Press the EXIT button to exit the window if done.
Page 56

56
APPENDIX
Programming Your Remote Control
The remote control that comes with your LCD is also a universal remote control. This lets you control
your LCD and the external devices connected to it, such as a VCR, DVD player, cable box receiver, and
satellite receiver.
How to Program Your Remote Control
There are two ways to program your remote control to control your devices: Through Auto Research,
and through manual code-entering.
Auto Research
Your remote control is able to distinguish the devices of different brands through its auto research
button. To start the auto research function, follow the steps below:
1. Turn on the power of the device that you would
use; e.g., your VCR.
2. Press and hold the device button (VCR, DVD, or
CBL/SAT) corresponding to the device you wish to
set up on the remote control.
The LED light start flashing (On, Off, and On) after
the device button is pressed.
3. Release the device button.
The LED light start flashing again, indicating that the
remote control is starting the automatic device search.
4. If your device has been found by the remote control,
your device will be turned off automatically. Turn on
the device again immediately, press any button on the
remote control, and then your remote control will be set
up as the remote control for your device.
5. If your device cannot be found by the remote control
automatically, refer to the next section for setting up the
remote control manually.
Page 57

57
42" LCD TV
Manual Setup
1. Turn to the list of "Manufacturing Codes of
Devices" on the next few pages, and find the 3digit code representing the manufacturer of your
device.
Please note that if more than one code number is
listed, use the number listed first.
2. Turn on the power of the device that you would
use; e.g., your VCR.
3. Press and hold the device button (VCR, DVD, or
CBL/SAT) corresponding to the device you wish to
set up on the remote control.
4. Hold on the device button and enter the 3-digit
code for the device, using the number buttons (0-9)
on the remote control.
For example, to enter the code 001 for a Sony
VCR, press the VCR button and then 0, 0, 1.
5. Release the device button after entering the code.
6. Turn off the power of the device, and then press
the PWR2 (Green) button to test if you are able to
turn on your device. If you cannot turn on your
device, repeat Step 2 to Step 6 again.
NOTE:
• Your remote control memorize codes as they were
entered at the most recent occasion. If you wish to
set up the remote control for other devices, you will
need to repeat the steps described above in the
Manual Setup Section.
• By pressing the TV button on the remote control,
you can set up the remote control to return to the
default TV mode.
• The PWR1 (Red) button can be used only to turn
your LCD on and off. Even when your remote
control has been set up as the remote control for
other devices, you can still use the PWR1 (Red)
button to turn your LCD on and off.
• The PWR2 (Green) button can be used to turn other
devices on and off, depending on how you program
Page 58

58
Manufacturing Codes of Devices
A. Supported Cable Receivers
Brand Code
AEON 015
Allegro 001,051,053
Antronix 067
Archer 001,067
Asiasat 029
Belcor 068
Bestlink 028
Cable star 068
Cabletenna 067
Cableview 067
Century 001,054
Citizen 000,001
Drake 044
Eastem 107
Electronics 009
Ensing 024
Esatern 011,012,014
Firsta Cyp 013
Fisher 02 4
Fuliness Firsta 013
Funai 001,020
Garrard 001
GC Electronics 068
GE 009
Gemini 006,007,008
General Instrunment 006,031,038,057,072
GI/Tocom 099
Hamilin 029,032,056,066
Hwalin 027
Inpohone 001,010
Jasco 000,001
Jebsee 009
Jerrold 003,004,009,033,034,035,
042,043,052,094,095
JVC 07 0
KoKa 0 15
Leon 007
Macom 038
Memorex 030,031,096
MS 010
NEC 071
Novaplex 054
NSC 058,059,060
Oak 020,023
Panasonic 018,030,031,037,069
096,103,104
Paragon 030,096
Philips 001,002,023,048,049
Pioneer 018,019,039,101,102
Popular Mechanics 009
Pulsar 03 0
PX 000,001,002,003,026
RCA 063
Regency 045,107
Rembrandt 001
Samsung 018
Scientific Atlanta 040,055,097,098,106,108
Skygiant 005
Skylite 000
Sony 01 3
Sprucer 037
Staragte 019
STS 083
Teec 010
Texscan 050,061
Tocom 041,042,046
Toshiba 030,031
Unika 001,067
Universal 001,051,067,068
Videoway 022
Viewstar 048,049,062
Walmart 009
Wiso 016,017
Zenith 003,021,022,030,031,036
044,047,064,065,100
Zentek 009
Elephant 025
Other 109
B. Supported Satellite Receivers
Brand Code
Aux Skyworth 090
Channel Master 073
Chaparral 076
Citoh 081
Drake 073
Eohostar 08 5
General Instrunment 074,086
Horne 08 4
IQ Prism 08 3
Janeil 080
Jerrold 086
Macom 073
Memorex 085
Panasonic 080
Primestar 086
RCA 088
Realistic 075
Sony 083,089
Star Trak 082,087
Toshiba 079
Uniden 075,077,078,084
US Electronics 08 7
Elephant 093
Others 091,092
Page 59

59
42" LCD TV
C. Supported VCR and DVD Players
Brand Code of VCR Code of DVD
Acer 031,032,077,
078,079
Action 062
Adelsound 00 4
Admiral 010
Adventura 026
Aiko 050
Aiwa 026,052,053,054, 060
056,057,067,079,
080,083,107
Akai 011,067,069,072,
073,100
Akiba 033
Akitan 091
Akura 067
Alba 011,030,050,083,
086,091,095,107
Align 099
Ambassador 011
American High 023,024
Amstrad 026,027,094,105
Anitech 033
Ansonic 00 4
ASA 023,065
Asha 029
Asuka 065
Audio Dynamics 042,071
Audioton 011
Audiovox 042,043,065
Baird 026,037,067,071,
088,100
Bang&Olufsen 111
Basic Line 011,030,033,050,
083
Beaumark 029
Bell&Howell 010,037,038
Bestar 011
Blaupunkt 033,087,106
Blusky 108
Bondstec 011
Brandt electronique 067,071,085,089,
092,093,109
Broksonic 018,047,049,050,
058,059,079
Bush 033,050,083,090,
095,107
California audio lab 046
Calix 065
Candle 042,065
Canon 02 4
Capehart 030
Carena 083
Carver 023 051,060
Ccatron 011
CCE 033,050
CGE 026,067
China 020,105
Chun Yun 084 016
Cimline 033,083
Citizen 024,026,029,050,
065
Clatronics 011,030
Colt 033
Combitech 107
Condor 011,030
Craig 029,033,039,065,
071
Crown 011,030,033,050 071
Curtis Mathes 024,032,066,071
Cybemex 02 9
Daewoo 003,011,030,031, 014,017,028
038,048,053,060,
080,081,113
Dansai 03 3
Daytron 030,048,050
DBX 042,071
De Graaf 020,068
Decca 026,023,067
Denon 031 063,064,085
Discmaster2 051 082
DKK 04 8
Domland 083
Dual 067,071
Dumont 003,029,042,082
Dynatech 02 6
Electrohome 013,029,052
Electrophonic 065
Emerex 000
Emerson 000,018,026,046,
049,050,053,058,
059,061,074,078,
079
Esc 011
Europhon 01 1
Ferguson 067,069,071,088,
092,093,109
Fidelity 026
Finlandia 010,020,021,026,
037
Finlux 018,020,023,026,
037,082
Firstline 003,007,013,020,
025,033,048,070,
083
Fisher 011,015,035,036, 041,056,072
038,041,056,072
068,075,041,056,
072
Flint 08 3
Frontech 011,030
Fujitsu 000,001,068,101,
102,103
Funai 024,026,027,029, 023
033
Funlandia 02 3
GAB 033
Garndin 033
Garrard 026,027
GBC 011
GEC 023
General Electric (GE) 011,024,029,032,
066
Genexxa 068
GO Video 029,062,063,064 103
Goldstar 016,018,024,030, 086
031,032,033,042,
043,050,064,065,
076
Goodmans 011,026,028,030,
033,050
065,083,090,096,
106
Gradiente 026
Graetz 067
Granada 010,024,068
Grandin 011,023,026,033,
065,090
Grundig 087,092,099,106
Hanimex 091,107
Page 60

60
Supported VCR and DVD Players (cont.)
Brand Code of VCR Code of DVD
Harley Davidson 0 26
Harman/Kardon 026 07 5
Hantor 011
Hanseatic 083
Harvard 033
Harwood 033
Headquarter 038
Hinari 004,029,033,
067,070,083,
090,096,107
HI-Q 0 39
Hisawa 083 ,107
Hitachi 004,008,020,021,
026,028,051,052,
067,071,080,082
Hsinkn 045
Hsinlin 045
Hypson 08 3
Imperial 026
Infinity 02 6
Ingersol 004
Inno Hit 01 1
Inpohone 05 5
Instant Replay 024
Interfunk 023
Intervision 08 3
ITT 029,037,038,067,
068,071,100
ITV 011
J.C.Penney 0 24
Jensen 0 05,071
JVC 005,006,007,019, 006,012,054
025,030,066,067,
071,089,101,104
Kaisui 033
KEC 033
Kendo 06 9,100
Kenwood 005,006,042,067, 015,055,056
071,086 057,058,059,
072
KLH 03 3
Kloss 03 3
Kneissel 08 3,107
Konka 024 ,065
Krell 060
Lakey 022
Leyco 070
LG 024
LinJaun 089
Lioyd’s 026,033,042,053,
061
Loewe Opta 004,082
Logik 004,033,083,100
Luxman 033
Luxor 028,037,038,052,
068,100
LXI 026,065
Magnavox 022,023,024,026, 049,061,062,
` 031,076,106 076
Magnin 029
Manesth 0 83
Marantz 023,024,031,042, 046,060
083,091
Marta 065
Mastsushita 023,024
Matsui 004,018,053,061,
070,083,086,091,
105,107
MCS 04 6
Medion 083 ,0 97
MEG 008,052
MEI 0 24
Memorex 010,022,024,026,
029,037,038,039,
065,068
Metz 0 24, 08 7
MGA 0 07
MGN Technology 029
Minerva 087
Minolta 020
Mission 06 0
Mitsubishi 006,007,008,009, 007,076
019,030,045,046,
058,098
Montgomery 02 9, 055
Montgomery Ward 010,024,026,029,
032,055
Motorola 010,024
MTC 026,029
Multitech 011,026,033
NAD 048,069,070
Nakamichi 051
NEC 005,006,019,030, 028,081,094,
042,043,044,067, 097
071,081,104
Neckermann 067
Nikkai 011
Nikko 012
Noblex 029
Nokia 029,037,067,068,
071,100
Nordmende 067,085,092,093,
110,112
NSM 06 0
Oceanic 067,068,100
Okano 083,097
Olympus 024
ONKYO 027 ,0 47
Optimus 010,037,065 011,047,050,
051,066
Optonica 0 28
Orion 004,018,047,049, 009,048
053,059,061,070,
074,083,091,095
096,097,107
Osume 0 90
Otake 095
Other 025,028,029,
030,031,032,
033,088,089,
090,091,097,
100,101,102,
106
Palladium 004,067,083
Panasonic 014,015,016,017, 009,025,042,
024,034,047,078 044,046,065,
092
Pantiac 113 081,084
Pathe Cinema 004
Pathe Marconi 067
Penney 024,029,030,042,
065
Pentax 020
Perdio 08 3
Philco 024
Philips 008,022,023,024, 008,049,060,
072,077,078,084 061,062,080,
084
Page 61

61
42" LCD TV
Brand Code of VCR Code of DVD
Pilot 06 2,0 65
Pioneer 027,083,084 011,013,016,
038,041,042,
050,065,066,
095
Prinz 07 0
Pro Scan 032,055,060 032
Prosonic 0 83
Proline 02 6,090
Protec 03 3
Protland 011,033,048
Pulsar 022,029,050
QED 060
Quarter 038
Quartz 03 8
Quasar 0 15,024 046
Radio Shack 010,013,024,026 055,065
Radix 0 65
Randex 065
RCA 010,020,024,029, 017,029,030,
032,055,060,066, 073,074
076,077
Realistic 010,012,024,026, 051
029,037,038,039,
065,074
Remote Controller 081
REX 067
RFT 011,106
Ricoh 002,024,059,101
Roadstar 104
Rotel 060
Runco 022
Saba 067,085,089,092,
093,110
SAE 060
Salora 068,083,100
Sampo 010,013,018,061 010,026,087
Sam sung 003,005,029,033, 018,034
082,108
Samurai 01 1
Sanky 008, 010
Sansui 005,033,069,067, 060
071,100
Sanwa 004
Sanyo 036,037,038,039, 019,043,051,
040,041,068,070 082,083
Sast 107
Saville 107
Schaub Lorenz 067, 100
Scott 003,007,047,049,
059,078
Sears 020,024,032,035,
037,038,039,064,
065
SEI 004,023
Seleco 011,067
Sentra 011 ,09 0
Sharp 010,011,012,013, 005,039,040,
034,035,115 044,055
Shinco 096
Shintom 026,029,033
Shogun 02 9
Shorai 004,0 70
Siemens 084,087,099
Signature2000 010,012,024,032,
055
Singer 029,033,064
Skyworth 021
Sinudyne 004
Solovox 01 1
Sony 000,001,002,048, 000,001,002
100,101 035,036,037,
038,039,045,
048,052,053,
093
STS 020
Sunkai 083,091,097
Sunley 088
Sylvania 023,024 062
Symphonic 026
Taisho 004,070,083
Tashiko 064
Tatung 003,005,006,026, 004
067,069,071,072,
083
Teac 026,071,104 067
TEC 01 1
Technics 0 24 044,046
TECO 010,018,025 035,098
Teknika 024,026,064,102
Teleavia 067,085
Telefunken 067,085,092,093,
109,110
Tensai 004
Thomson 067,089,092,093, 032
109,110,112
Thorn 067
TingTean 036,109
TMK 029,053,061
Tokai 067
Toshiba 003,004,067,073, 003,033,070
075,106,114
Totevision 024,065
Triumph 053,061
TVA 011
Unitech 02 9
Universum 087,094,097,100
Vector 003,005,006
Vector Research 042,052
Viaeosonic 026,029,033
Victor 054
Video 04 6 020
Videotronic 0 24
Vniversum 083
Wards 010,024,026,029,
032,033,039,055,
066,076
XR-1000 024,026,029,033
Yamaha 04 2
Yoko 011
Zenith 001,002,005,022,
028,101
Page 62

62
Care and Maintenance
Read and follow these instructions to keep your LCD in good condition.
Placement
• Do not place the LCD on uneven or unstable surfaces.
• Avoid extremes of hot and cold; humidity and dust.
• If the LCD is moved rapidly from cold to hot environments, disconnect power and allow two hours
for any condensation to dry.
• Keep the LCD at a distance from appliances that create magnetic fields.
• Do not block ventilation openings.
• Do not place liquids on or near the LCD.
• Arrange the power cord neatly. Knotting or bending with other cords may pose a fire hazard.
Cleaning
• Do not open the LCD or touch the parts inside.
• Use a soft cloth, tissue, or lint-free cloth to clean the LCD body.
• Use a soft eyeglass tissue/cloth or lint-free damp cloth to remove stains (e.g. dust, fingerprints)
from the glass surface of the LCD unit. Never use synthetic cleaning solutions or detergents
containing ammonia (e.g. Windex).
• Do not use water, petroleum, wax, paint thinner, chemicals (e.g. benzene, ammonia), synthetic
cleaning solutions, or other solvents to clean any part of the LCD unit, as this may damage the LCD
body and glass surface.
• Do not rub the screen forcefully or apply excessive pressure to it to avoid scratching the glass
surface.
Page 63

63
42" LCD TV
Troubleshooting
Below are some possible solutions to problems that you may encounter while using the LCD. After
trying these possible solutions, contact your dealer or service representative if you are still unable to
resolve the problem.
1. No Power
Solution: • Make sure the LCD is connected correctly.
• Check the power cord connection.
• Press the PWR1 (Red) button on the remote control or the POWER ( ) button on the
LCD unit to turn on the LCD.
2. Remote control unit does not function
Solution: • Check that the batteries are inserted, using the correct polarity.
• Ensure that the batteries are not worn out. If necessary, replace with new batteries.
• Ensure that the remote control is the correct device mode.
If the remote control is in TV mode, the LED indicator will flash in red when you
press any buttons on the remote control. If the LED indicator flashes in green, the
remote control has been set up for other devices. Press the TV button to return
to the default TV setting.
• Strong or fluorescent lighting may interfere with remote control operation.
Operate away from such sources.
3. No picture
Solution: • Check connections.
• Ensure that the correct input is selected.
• Ensure that cable signals are good and that cable connections are secure.
• Ensure that the LCD is set to the proper standard for your region.
4. Picture is not clear, or display has flurries
Solution: Ensure that cable signals are good and that cable connections are secure.
5. Picture is too light or too dark
Solution: Check brightness and contrast settings.
6. Picture is too large or too small
Solution: Check aspect ratio settings.
7. No sound
Solution: • Check connections for the speakers.
• Check the buttons and settings for Volume and for Mute.
• Check that the audio cable is connected properly when other devices are attached.
8. Incorrect color
Solution: • Check color saturation and color temperature settings.
9. Power suddenly turns off
Solution: • Check if the sleep timer in the Setup menu is set.
• Check the power cord connection.
• The internal temperature of the LCD unit may have become too high.
Turn off the LCD and allow it to cool.
10. Unable to view some channels
Solution: • Check if the channel list setting is in Valid mode.
• Check if some channels have been removed from the list of available channels.
If so, use the on-screen menu to scan for available channels.
Page 64

64
11. A black box appears on the screen
Solution: Closed captions may be set to one of the text modes. Turn closed captions off.
12. No stereo or SAP sound is coming from a known MTS broadcast
Solution: Set MTS to Stereo or SAP.
13. Unable to enter a channel number over 100 in TV mode
Solution: Press the ANT/CBL button on the remote control or use the on-screen menu to set TV
input source from Antenna to Cable; or retrieve the default settings by using the on-screen menu.
Page 65

65
42" LCD TV
Specifications
Model Type ML42C1H
Screen Size 42” diagonal
Display Color 16.78 million colors
Resolution 1920 (H) x 1080 (V) pixels
Dot Pitch 0.1615 (H) x 0.4845 (V)
Aspect Ratio 16:9
Brightness 500 cd/m² (Typical)
Contrast Ratio 1200:1 (Typical)
Viewing Angle 176°
Video System SDTV/EDTV/HDTV
480i/480p/720p/1080i/1080p
Color System NTSC, PAL, SECAM (The color system of the model equipped
depends on the LCD configuration that you purchased.)
PC VGA Support VGA/SVGA/XGA/SXGA
Power Source AC 100V to 240V; 50/60Hz
Power Consumption 275 Watts (Operation mode)
Dimensions (H x W x D) 31.6” x 42” x 3.86” (802 x 1067 x 98 mm) with speakers and
stand
Net Weight 79.3 lbs. (36 kg) with speakers and stand
Panel Life About 50,000 hours
Environment Operating Temperature: 50° F to 104° F (10° C to 40° C)
Relative Humidity: 20% to 85%
Audio Power 10 W x 2
EMI & Regulatory Compliance FCC, CE
Electrical Safety ETL, CB
Built-in Speakers Yes
Wall-mount Bracket Yes (Optional)
Inputs
Antenna (Analog) x1
Antenna (Digital) x1
VGA (D-Sub 15-pin) x1
HDMI x1
Composite Video x 2
S-Video x2
Component (YPbPr) x1 (480i, 480p, 720p, 1080i)
Audio L/R (RCA) x3 (Video, S-Video, Component)
VGA Audio x1
Outputs
Composite Video x 1
Audio L/R (RCA) x1
Speakers 10 W x 2 (8-ohm) max.
Audio (Digital) x 1
Important:
Specifications, on-screen menus, hardware bundles, and accessories are subject to change without
notice. Not responsible for typographic errors.
 Loading...