

Page 1
Start Here
I
nstalling your Microtek ArtixScan DI 6260S/6250S/6240S &
ArtixScan TS 630S
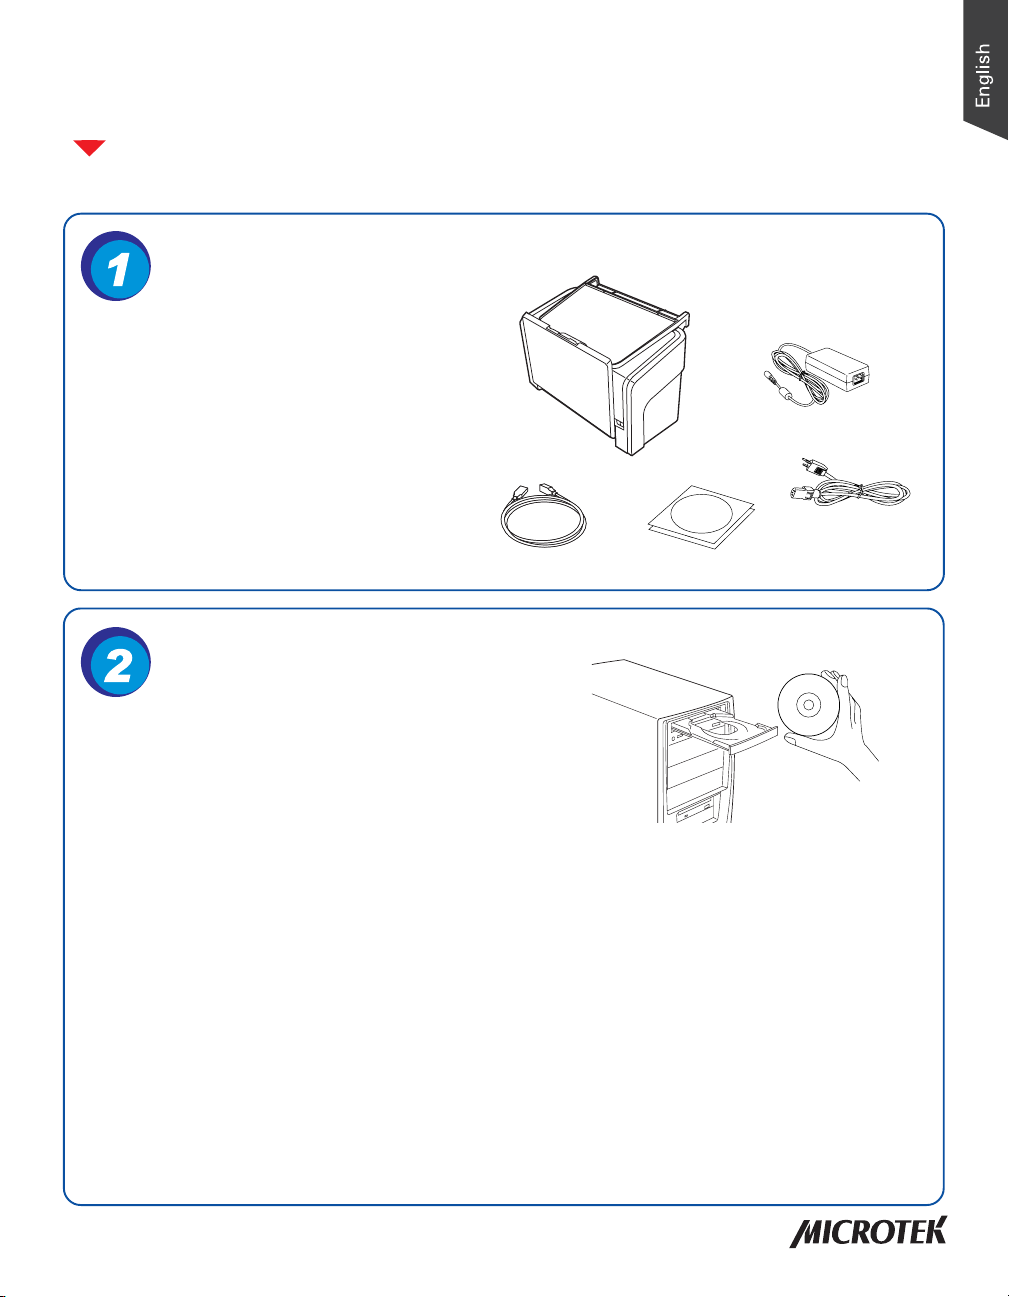
Unpack Contents
Unpack your scanner package and check for
major components.
1. Scanner
2. Hi-Speed USB cable
3. Software CDs/DVDs
4. Power cord
5. Power adapter
1
5
4
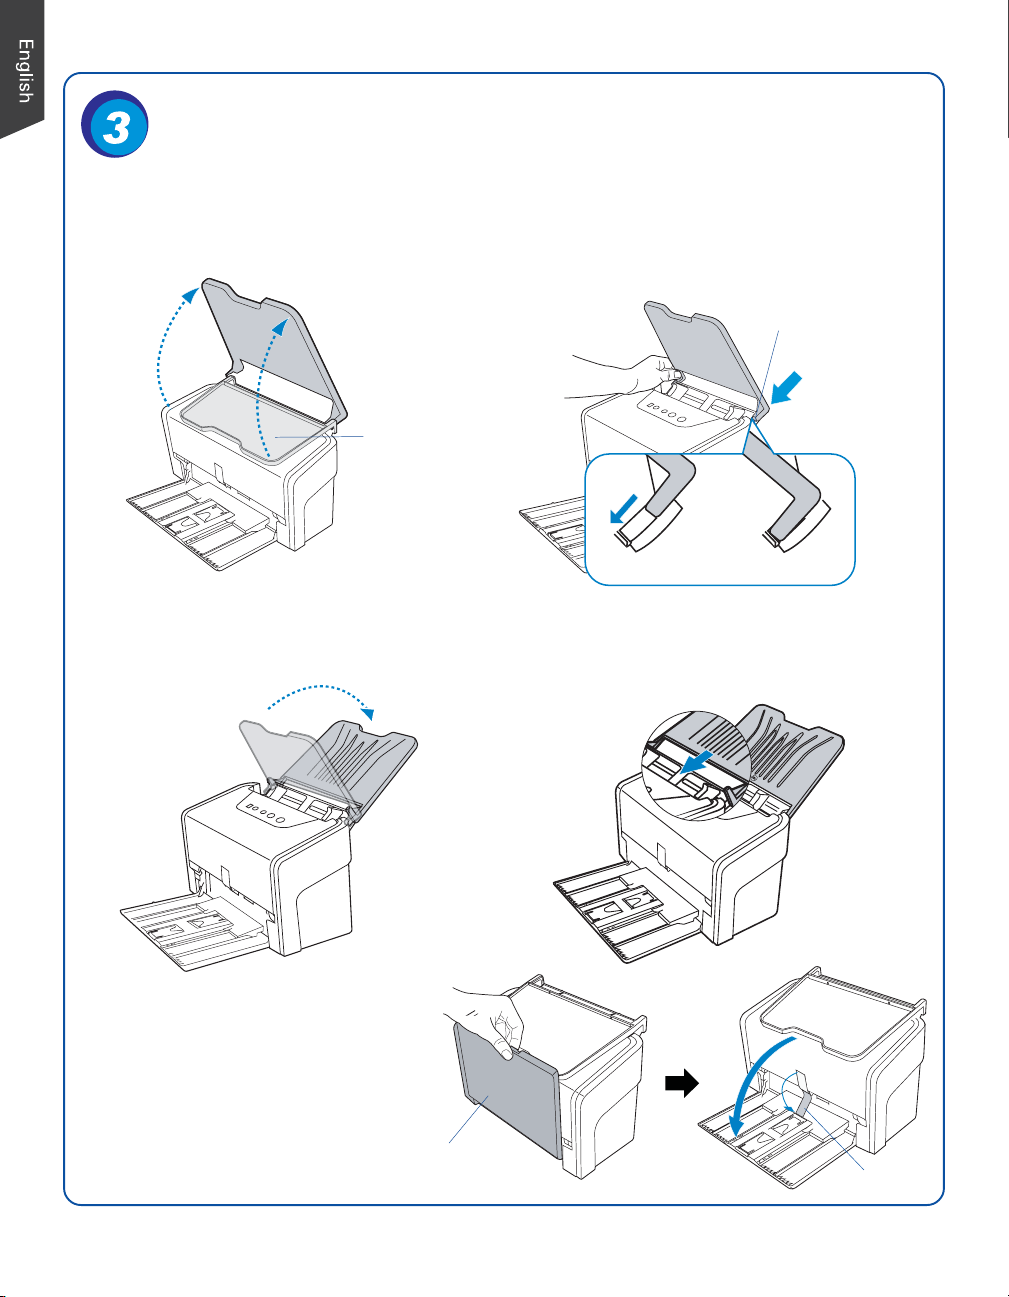
Install Software
Important: You must install software before connecting
your scanner. Always close any open programs, and
turn off Anti-virus utilities before installing software.
PC:
A. Place the Microtek Software CD/DVD
into a drive, and follow the on-screen
instructions to install the scanner
driver and software.
B. Restart your computer at the end of all
software installation.
NOTE: If the Microtek Software Installer screen
does not come up automatically, double-click the
following in succession: “My Computer”; the CD/
DVD-ROM icon; then cdsetup.exe to start the
installer program.
2
3
MAC:
A. Place the Microtek Software CD/DVD
(ScanPotter) into a drive, and double-click
the ScanPotter installer icon to install
ScanPotter.
B. Install the remaining software
components, then restart your computer
at the end of all software installation.
NOTE: After rebooting your Macintosh, the Microtek
software will attempt to locate your scanner on the
system. Since this is your first install and you have
not yet connected the scanner, simply ignore the
message that appears and proceed to the next step.
Copyright © 2013 Microtek International, Inc. http://www.microtek.com
I49-004856 D, September 2013
1
Page 2
Open Feed Tray & Output Tray
Before
After
Open Feed Tray
A. Lift up the Document Feed Tray to the
highest level which can be opened.
Document
Feed Tray
C. Tilt the Document Feed Tray backwards
in the direction as the arrow shown to
fully open the tray.
B. Along the tracks of the two sides of the
Document Feed Tray, slide the feed tray
down until the supporters of the tray
touch the bottom edge of the tracks.
Slide the feed tray down
D. Along the tracks of the two sides of the
Document Feed Tray, slide the feed tray
down until it locks in place.
Open Output Tray and
Paper Stabilizer
Bring down the a) Document Output
Tray and b) Paper Stabilizer from the
top towards the direction as shown in
the graph.
a
b
Document Output Tray
Paper Stabilizer
2
Page 3
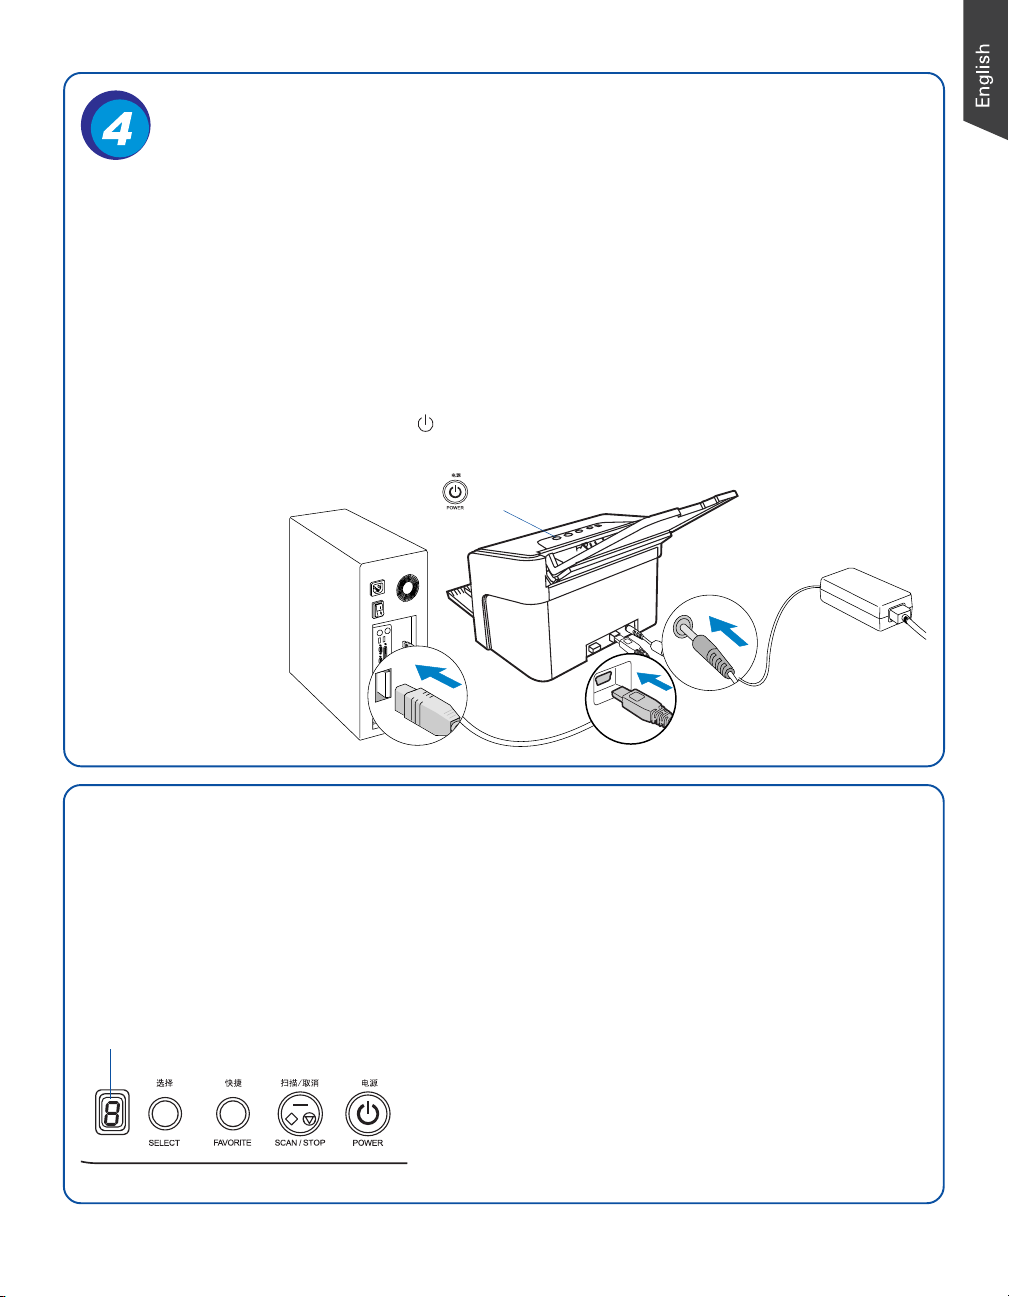
Connect Scanner
To the power adapter
A. Connect the power adapter to the back of the scanner.
B. Plug one end of the power cord into the power adapter, and plug the other end of the
power cord into a wall outlet or other power source.
To the Hi-Speed USB cable
C. Connect one end of the cable to your computer.
D. Connect the other end of the cable to the scanner’s USB port.
E. Press and hold the Power button ( ) until the orange LED lights on. Once the scanner is
powered on, the green LED will be lighted up, and the 7-segment LED display (SSD) will also
be activated as well.
The system will
detect the
scanner
automatically.
Power button
E
A
C
B
D
Customize the Function Button
Your scanner is equipped with one Select, one Scan/Stop and one Favorite buttons, plus a LED
display, used to automate a number of customized and predefined operations, such as scanning
to a file, sending an image to your printer, scanning for OCR, etc. Customizing is done through
the Save Settings to Function Button command in the ScanWizard DI, refer to the scanner’s
User’s Manual for more details.
LED display:
Display the selected function
button number.
• Select: Toggle through the numbers of predefined
function buttons (F1 to F5).
• Scan/Stop: Start scan immediately or cancel a
ongoing scan job.
• Favorite: Carry out the function defined to the
Favorite button directly.
3
Page 4
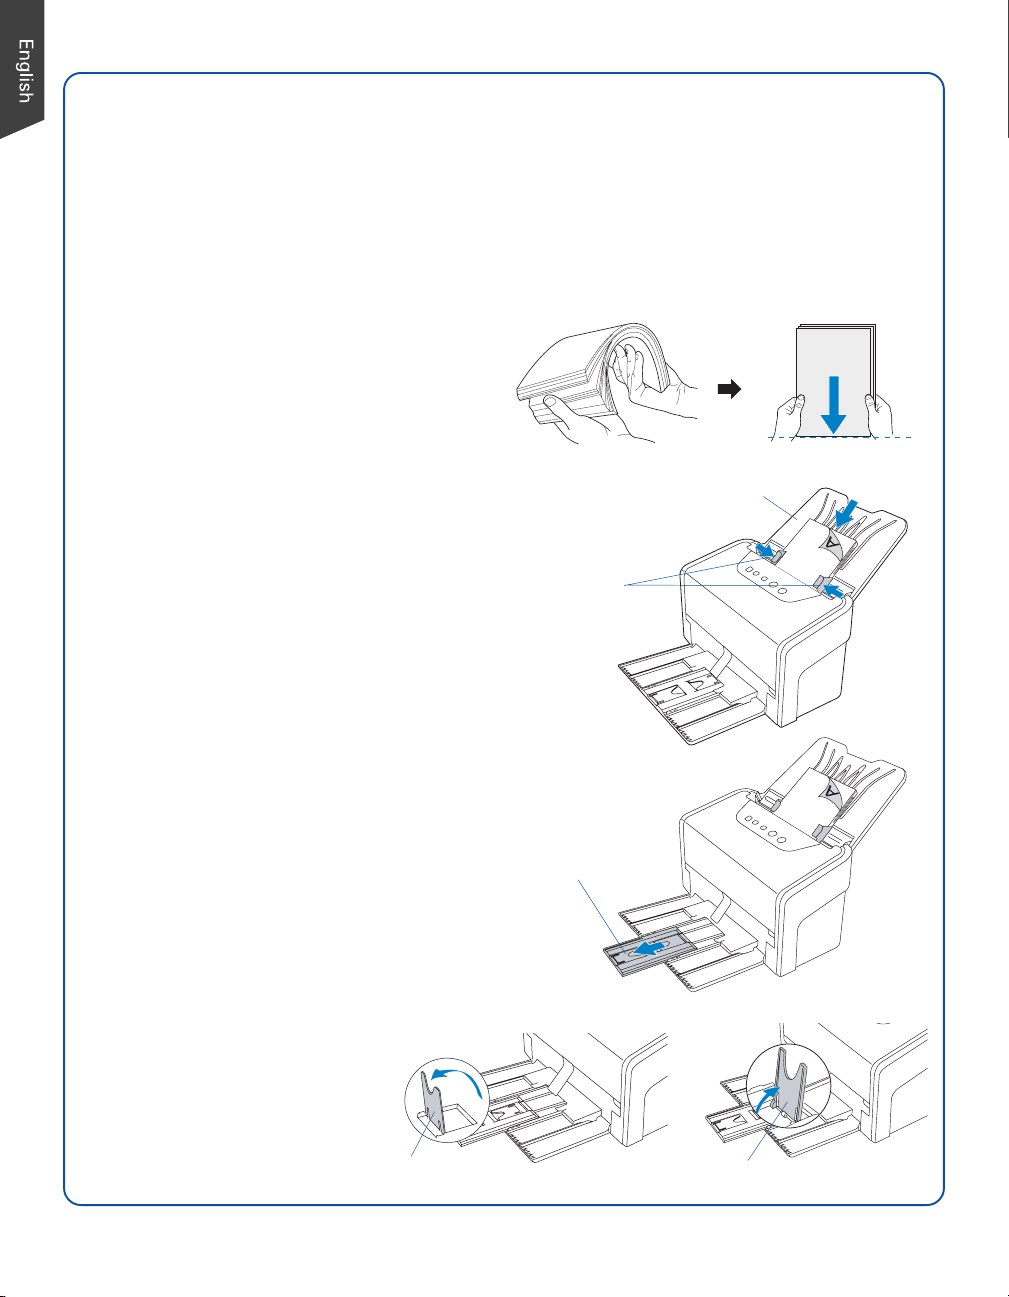
Position Documents
The scanner supports scanning of document in various materials, such as A4 printouts,
insurance papers, legal documents, postcards, credit cards, business cards, and etc. A stack of
up to 100 sheets of papers (17 to 18 lbs/63.75 to 67.5 g/m² ) or 2 pieces of cards (1.3 mm/
0.05”) can be fed in the scanner’s Document Feed Tray at one time. Paper sizes can range
from 2.75” x 3.149” (70 mm x 80 mm) to 8.85” x 118” (225 mm x 3000 mm) or to 8.85” x
25” (225 mm x 635 mm) depending on the scanner you purchased.
To load a stack of documents
1. Before loading the stack of papers onto
the scanner’s Document Feed Tray,
please fan the papers and then align the
top edges of the papers neatly.
2. Load the stack of papers onto the
scanner’s Document Feed Tray, with the
side to be scanned facing down and the
top edge facing toward the feeder.
Push the stack of papers into the tray
until the paper’s edge touches the bottom
edge of the feeder.
WARNING: The document feeder is not designed
for scanning photos; doing so may damage your
originals. Microtek accepts no responsibility for
damage that may arise from misuse of
equipment.
3. Align the stack of originals with the
center of the Document Feed Tray by
sliding the two Guide Arms toward the
stacked papers if needed.
4. Pull out the Output Tray Extender to carry
the longer paper if needed.
5. Lift up either of two Paper Stoppers to
keep a stack of output papers stay neatly
and tightly inside the Document Output
Tray if needed.
Document Feed Tray
Guide Arms
Output Tray
Extender
NOTE: For more details on
how to adjust the Output Tray
Extender and Paper Stoppers,
Please refer to the section
“Output Tray Notice” in the
guide.
Paper Stopper (1)
Paper Stopper (2)
4
Page 5
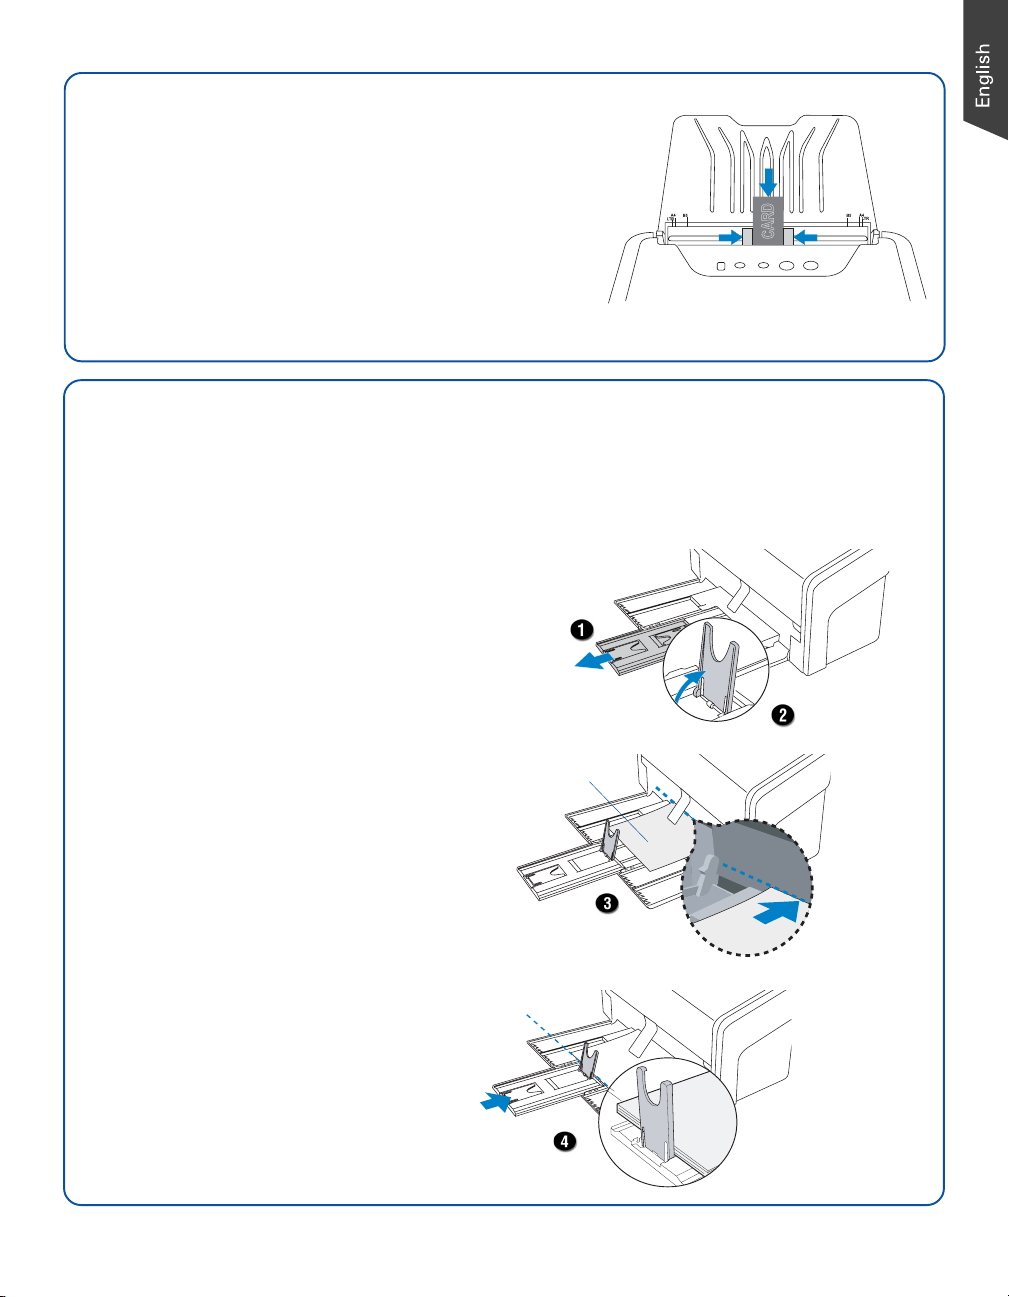
To Load Cards
1. Slide the Guide Arms toward the center of the feed tray
and free up the enough space to put the card inside.
2. Load and center the card onto the scanner’s Document
Feed Tray, with the front side facing up and the top
edge directing toward the feeder.
NOTE: When the card is loaded, launch ScanWizard DI. Then,
click the Custom Scan button and select “Card” to start your
card scanning.
Output Tray Notice
The Paper Stopper is designed to prevent the paper stacks falling in a mess after they were
scanned and output into the output tray. Before scanning a stack of papers, please follow the
steps below to fix the Paper Stopper into the right position in the tray, in order to keep output
papers stay neatly in the tary after the scan.
1. Pull out the Output Tray Extender.
2. Lift up either the Paper Stopper 1
or 2, depending on the length of
the paper.
3. Take out one piece of paper from
the stacks and put it in the output
tray, laying it completely flat and
bringing the top or bottom edge of
it into contact with the bottom of
the scanner.
4. Push back the Output Tray
Extender until the Paper Stopper
touches the edge of the paper.
Finally, load the papers to be
scanned into the feed tray to start
your scanning.
Load the paper inside
the space between
the stopper and the
output slot of the
scanner.
Align the
paper against
the side of
output slot
located at
the bottom
of the
scanner.
NOTE: The settling position for the
Paper Stopper on the tray must be
equivalent to the length of the paper.
Incorrect positioning of the Paper
Stopper will result in disorders and
mess for the after-scanned outputs.
Be sure the stopper
is lightly against the
edge of the paper.
5
Page 6

Basic Scanning for PC Users
1. Load the stack of documents to be scanned onto the ADF’s Document Feed Tray.
WARNING: Do not place photo paper or fragile sheets of paper on the feed tray, as doing this will
damage the original photo or frail papers during the feeding process.
2. Launch ScanWizard DI — either as a stand-alone by clicking the program icon, or by using
the File-Import or Scan command from an application program.
3. Specify your scanning requirements in the ScanWizard DI control panel.
a) Select ADF (Odd Pages), ADF (Even Pages) or ADF (Duplex) in the Scan Source drop-
down menu as your image input device.
b) Select the appropriate image type (e.g., Black & White) in the Scan Type drop-down
menu as your image output type.
– Select RGB Color (24 bits) to scan the image in color.
– Select Grayscale (8 bits) to scan the image in grayscale.
– Select Black & White (1 bit) to scan the image in black-and-white.
– Select Auto Color Detection to scan the image.
c) Select a dimension in the Paper Size drop-down menu as your preview image size.
d) Select a desired resolution in the Resolution drop-down menu for your image output
resolution.
e) If “Auto-crop & Auto-deskew” is selected, the scanner automatically detects the size
of the original image, crops the full scan frame to fit the image, and removes unwanted
black borders after the scan, as well as corrects the distorted image for proper
alignment.
f) If necessary, select a level of paper thickness for the ultrasonic double-feed detection
in the Double Feed drop-down menu.
g) If “Auto-crop & Auto-deskew” is selected, the scanner automatically detects the size
of the original image, crops the full scan frame to fit the image, and removes unwanted
black borders after the scan, as well as corrects the distorted image for proper
alignment.
4. Select the image type (e.g., Text) in the Attribute drop-down menu as your image type.
– Select Line Art to scan line art images (images in one color or in black-and-white, such
as logos or mechanical blueprints).
– Select Photo to scan color prints.
– Select Text to scan text.
5. If necessary, adjust image quality by using the image correction tools.
6
Page 7

6. Click the Scan button, or click the Custom Scan button and select “Save to File” to start
multiple-sheet, automatic scanning.
• If ScanWizard DI is launched from an image-editing program, the scanned image is
delivered after the scan to your application, where the image can be saved, printed, or
modified further.
• If ScanWizard DI is launched as a stand-alone program, the scanned image can be
saved after the scan to a file or opened in an image-editing program.
Alternatively, click the Quick Scan button to scan your documents directly to a PDF.
Scanning
settings
Image type
Image
correction
settings
For preview
purposes only
Toolbar
It appears only when ScanWizard DI is
launched as stand-alone program,
allowing you to scan documents to a
PDF file directly.
Scan frame
(enclosed by
dotted lines and
labeled with the
tag “Main”)
Preview image (the
enclosed frame
bordered in red)
Preview window
NOTE: For more details on other scanning scenarios applicable to your scanner, refer to the scanner’s User’s
Manual in the Microtek Software CD/DVD.
7
Page 8

Basic Scanning for Mac Users
1. Raise the scanner lid, and place the document (e.g. photo, check, etc.) to be scanned face
down on the scanner glass surface. Position the top end of the document towards the back
of the scanner.
2. Launch ScanPotter as a stand-alone by clicking on the program icon, or by selecting it from
the application folder in your Mac OS X system.
3. In the Scan Source options menu, choose ADF-Simplex or ADF-Duplex for as your input
image device.
4. Specify your scanning requirements in the Scanner Settings column.
a) Select the appropriate image type (e.g., RGB Color) in the Color Type as your image
output type.
- Select RGB Color to scan the RGB image in color.
- Select CMYK Color to scan the CMYK image in color.
- Select Grayscale to scan the image in grayscale.
- Select Black & White to scan the image in black-and-white.
b) Select a desired resolution in the Resolution for your image output resolution.
c) Select Automatic Detection or a desired dimension in the Scan Frame as your preview
image size.
5. If necessary, click the Preview button to perform a preliminary scan of the image in the
Preview window. Then, reload the document into the feed tray.
6. If necessary, resize the scan frame (floating dotted rectangle) around the image by
dragging on the square spots on the edge or on the corner of the scan frame to determine
the final size of the actual scan.
7. If necessary, specify file settings for your output image files, using the options offered in
the File Saving Settings column.
8. If necessary, click the Image Settings button to switch to a window in which you can
select an image effect to the image directly or adjust image quality manually by using the
additional image correction tools.
9. Click the Scan button to start scanning.
NOTE: For more details on using ScanPotter, refer to the ScanPotter Reference Manual in the Microtek
Software CD/DVD.
8
Page 9

Click the Scan Settings button
to switch back to the default
control panel of ScanPotter
Click the Image
Settings button to
switch to a window
where contains a
composite display
of image-effects
(Filter column) and
additional image
correction tools
(Additional
Adjustment column)
for your scanned
image.
Preview window
Scan frame
(enclosed by dotted lines)
9
Page 10

Fixing Paper Jams
1. Lift up the Release button in the direction
of arrow shown to open the scanner
cover.
2. Remove the jammed paper by taking out it
in an upward direction.
Release button
Scanner cover
3. Close the scanner cover. You should hear
a click sound when the scanner cover
returns to its original position.
NOTE: Do not take out a jammed paper by force
from the scanner when the scanner cover closes. If
doing so, it may damage the rollers and cause the
scanner work improperly.
10
Page 11

Care and Cleaning
To ensure optimal performance from the your scanner, it is important to clean several critical
parts of the scanner on a regular basis. Please follow the sections below to clean each part
carefully.
First of all, open the scanner cover, as detailed in the “Fixing the Paper Jams” section in this
guide. When the scanner cover is opened, locate the parts as you wish to clean.
Cleaning the Scanner Glass Surfaces
Spot two scanner glass surfaces, and then use
a soft, non-abrasive and lint-free cloth to
gently wipe the glass surface areas.
Cleaning the Sensors
Find 4 sets of sensors (Ultrasonic Double-feed
sensors, I/O sensors, and Tray sensors), and
then clean the sensors with a dust blower.
Cleaning the Rollers
Find several groups of rollers, and then clean
the rollers with a lint-free cloth or a swab
moistened with alcohol (ethanol) or water.
Cleaning the Recesses
Locate two recesses at the top of the roller
cover, and then clean the recesses with a lintfree cloth or a swab moistened with alcohol
(ethanol) or ECO cleaner.
NOTE:
• The recommended cleaning cycle time would be after approximately 3,000 to 5,000 scans.
• For more details on cleaning, refer to the scanner’s User’s Manual in the Microtek Software CD/DVD
and see the “Care and Cleaning” section on pages 44 to 47.
11
Page 12

Maintenance
After usage for a period of time, the rollers may become worn out, and problems such as
document double-feed may occur. In this case, check rollers and replace them with new ones
if needed.
First of all, open the scanner cover, as detailed in the “Fixing the Paper Jams” section in this
guide. When the scanner cover is opened, locate the rollers as you want to change.
Replacing Separation Roller
Locate the Separation Roller Assembly and then pull down the cover of the roller with your
finger. Take out the roller and replace it with the new one.
Replacing the Feed Rollers
Locate the Feed Roller Assembly and then pull down the cover of the rollers with your finger.
Take out the rollers and replace them with the new ones.
NOTE:
• The recommended replacement point for the Separation Roller is approximate after 150,000 scans; for
Feed Roller Assembly is around 100,000 scans.
• Please contact your local resellers for purchasing new rollers.
• For more details of replacement, refer to the scanner’s User’s Manual in the Microtek Software CD/DVD
and see the “Maintenance” section on pages 48 to 52.
12
Page 13

Problems?
The green LED lighting (the SCAN/STOP button) indicates the status of the scanner. The
orange LED lighting (the POWER button) stands for power and should always stay on steady
when the scanner is on.
Orange LED
All On: Ready to scan.
Flashing Green: Scanning.
All Off: Scanner is off.
First, make sure that you have followed Steps 1 to 4 as described in this guide (unpack, install,
connect). Then if your problem is listed here, try the suggested solution.
1. No light comes on when the scanner is turned on.
Make sure your scanner is connected to your computer and plugged into a power source.
2. The Add/Remove Hardware Wizard appears on your screen.
Click the “Cancel” button and close the ScanWizard DI or ScanPotter Control Panel.
Disconnect the Hi-Speed USB cable from the back of your computer, and refer to the
installation instructions in this guide .
3. After clicking scan, a blank screen appears.
Green LED
Uninstall and reinstall the ScanWizard DI or ScanPotter software.
4. When trying to scan, an error message appears on your screen that reads, “Can’t Find
Scanners”.
Make sure your scanner is connected to your computer and plugged into a power source
(see Step 4).
Uninstall and reinstall the ScanWizard DI or ScanPotter software.
5. When trying to scan, an error message appears on your screen that reads, “Code -206,
ADF paper jam or roller failure.”
Click OK first; then open the scanner cover, as illustrated in the pervious section “Fixing
Paper Jams”.
• If the problem is occurring from a paper jam, follow the procedures laid out in the
“Fixing Paper Jams” section of this guide.
• If the problem is occurring from situations other than a paper jam, follow the
procedures laid out in the “Position Documents” section.
Finally, close the scanner cover and restart scanning.
13
Page 14

Do You Need Assistance?
Manuals
If you have additional questions and need further instruction or information, we provide
electronic manuals for:
1. Using your scanner (scanner’s User’s Manual)
2. Using the ScanWizard DI or ScanPotter scanning software (Reference Manual)
To access the electronic manuals: Insert the scanner’s software CD/DVD into your
computer’s CD/DVD-ROM drive. Next, locate and click the “Manuals” option when the
software installer window appears on your screen. Finally, select and click the title of the
manual you wish to view.
Missing Items
If your package is missing items, please call the Microtek Customer Service Department.
Drivers & Software Upgrades
After you finish the installation of software, if you found that the installed drivers and software
cannot run your product or your computer system properly later, please go to the Microtek
Download Service site at ww7.microtek.com.tw/service.php to download and install any
updates you may require.
For additional information about Microtek products, please visit our website at
www.microtek.com.
Power Adapter
Use only power supplies (AC/DC adapters) listed below:
Voltage Manufacturer Model No.
AC 100V to 240V HARD HDAD38W101
NOTE: Please make sure that the electrical outlet to where the scanner will
be connected is nearby and readily accessible.
Copyright © 2013 Microtek. Microtek, ScanMaker, ArtixScan, ScanWizard and
ColoRescue are trademarks or registered trademarks of Microtek International,
Inc. All other trademarks or registered trademarks are the property of their
respective holders. Specifications, software and hardware bundles are subject
to change without notice. Delivery of technical support services subject to
change without notice. Not responsible for typographical errors.
14
 Loading...