

Microtek ArtixScan M1 Pro, ScanMaker 5, ScanMaker 9800XL, ScanMaker i800, ScanMaker i900 User Manual
...Page 1

Microtek
ScanWizard Pro
User's Guide
for Windows
Page 2

ii
English
Copyright © 2004 by Microtek International, Inc.
All rights reserved.
Trademarks
Microtek™, Artix™, ScanWizard™ Pro, and ArtixScan™ are trademarks of Microtek
International, Inc. Macintosh
®
and Apple® are trademarks or registered trademarks of Apple
Computer, Inc. Windows
®
is a registered trademark of Microsoft Corporation. All other products
or name brands are trademarks of their respective holders.
Important
Documents that you scan may be protected under copyright law. The unauthorized use of such
documents could be a violation of the rights of the copyright holder. Microtek bears no
responsibility for the unauthorized use of copyrighted materials.
To obtain optimal results from the Microtek scanning software and user's manual, you should be
familiar with such Windows concepts as pointing, clicking, dragging, and selecting from menus and
dialog boxed. If these things are new to you, refer to your Microsoft Windows User's Guide.
September 2004
I49-003135 B
Microtek Lab, Inc.
16941 Keegan Avenue, Carson, CA 90746
Main: 310-687-5800, Fax: 310-687-5950, http://www.microtekusa.com
Microtek International, Inc.
6, Industry East Road 3, Science Based Industrial Park, Hsinchu, 30077, Taiwan
Tel: 886-3-5772155, Fax: 886-3-5772598, http://www.microtek.com
Page 3

EEE
English
Contents
1 Introduction
What is ScanWizard Pro? ................................................................................ 1 -1
A Powerful New Software......................................................................... 1 - 1
The ScanWizard Pro Interface ................................................................... 1 - 2
Settings window (LCH mode) ............................................................... 1 -2
Scan Job window .................................................................................. 1- 2
Information window .............................................................................. 1 - 2
Preview window .................................................................................... 1-3
System Requirements ...................................................................................... 1-4
Installing ScanWizard Pro................................................................................ 1- 4
About this User’s Guide .................................................................................. 1-5
2 Getting Started
Using the Scan Mode ...................................................................................... 2-1
Using the Batch Mode..................................................................................... 2-1
Exiting ScanWizard Pro .................................................................................... 2-3
Color Matching................................................................................................ 2 - 3
3 Basic Scenarios
How to Scan a Color Photographic Print ......................................................... 3 - 2
How to Scan a Color Positive Transparency ................................................... 3 -4
How to Scan a Color Negative ......................................................................... 3- 6
How to Scan a Line Art Image ......................................................................... 3- 8
How to Scan a Newspaper or Magazine Image...............................................3-10
4 Using the AIC Tools
The LCH Color Model ..................................................................................... 4- 2
Selecting LCH or Native Color Space .............................................................. 4- 3
W orkflow for Optimizing Images...................................................................... 4-4
Adding a Custom Setting ................................................................................ 4 -5
How to Choose the Correct Image Category ................................................... 4 -6
Using the Dynamic Range T ool ....................................................................... 4 - 8
Using the White & Black Points T ool.............................................................4-10
Using the Gradation T ool (LCH Mode only)...................................................4-12
Using the Color Cast T ool (LCH Mode Only).................................................4-14
Using the Saturation Curve T ool (LCH Mode Only).......................................4-16
Using the Selective Color T ool (LCH Mode Only)..........................................4-18
Using the Tone Curve Tool.............................................................................4-20
Using the Filter T ool .......................................................................................4-22
Page 4

EL
English
5 Special Features & Advanced Scenarios
How to Edit Multiple Scan Jobs ...................................................................... 5- 2
How to Scan Multiple Jobs.............................................................................. 5 -4
How to Use ScanWizard Pro Working Directory ............................................. 5-6
How to Use the SnapTrans™ Templates ......................................................... 5-8
How to Use the Magic Diamonds...................................................................5-10
How to Customize Negative Film ....................................................................5-12
How to Scan and Display an Image on a 640 x 480 Monitor ...........................5-14
Appendix
A Color Matching for for Advanced Users
Display using monitor compensation ................................................................. 2
Display:............................................................................................................... 3
Native mode RGB color matching (Native Color Mode only) ............................. 3
Embed ICC destination profile in scan image...................................................... 3
RGB destination: ................................................................................................. 4
CMYK destination: ............................................................................................. 4
Add Profiles Button............................................................................................ 5
Info Button ......................................................................................................... 5
Preview Button ................................................................................................... 5
Refresh Button.................................................................................................... 5
B Available File Format Color for "Scan to File" Function
Page 5

Introduction 1-1
English
What is ScanWizard Pro?
ScanWizard Pro (version 6.0 or later) is an advanced scanner controller program that
is designed and engineered to provides many powerful, professional-level features
for scanning with Microtek ScanMaker and Artix scanners.
One important feature of ScanWizard Pro is that it lets you work in the LCH color
space, which is based on the LCH (Luminance, Chroma, Hue) model of colors. The
LCH model is a more intuitive way of editing and working with colors because it
defines colors the way we understand them -- based on the properties of brightness
(how light or dark a color is), saturation (how rich or dull a color is), and hue (“red” as
opposed to “blue”).
Another important function of ScanWizard Pro is the batch scan feature, a separate
but integrated program that lets you create and manipulate specific “contexts” or
batches of jobs. With Batch Scanning, you can lay out your jobs beforehand, make
adjustments to each scan, then start the scan when you are ready. The result? A
tremendously improved workflow and savings in time, with the additional advantage
of being able to call up the various “contexts” or batch jobs when required.
A Powerful New Software
With ScanWizard Pro, you can achieve a new level of efficiency in scanning. The
many powerful tools of the program work together to help you obtain the superior
color images you need, as well as provide you with the flexibility to adjust or improve
the images as needed.
And as you become increasingly familiar with the program, you will see how
ScanWizard can open up a whole new vista for or ganizing your workflow and
boosting your scanning productivity in as many ways as your creative imagination
will allow .
1 Introduction
Page 6
1-2 ScanWizard Pro for Windows Users Guide
English
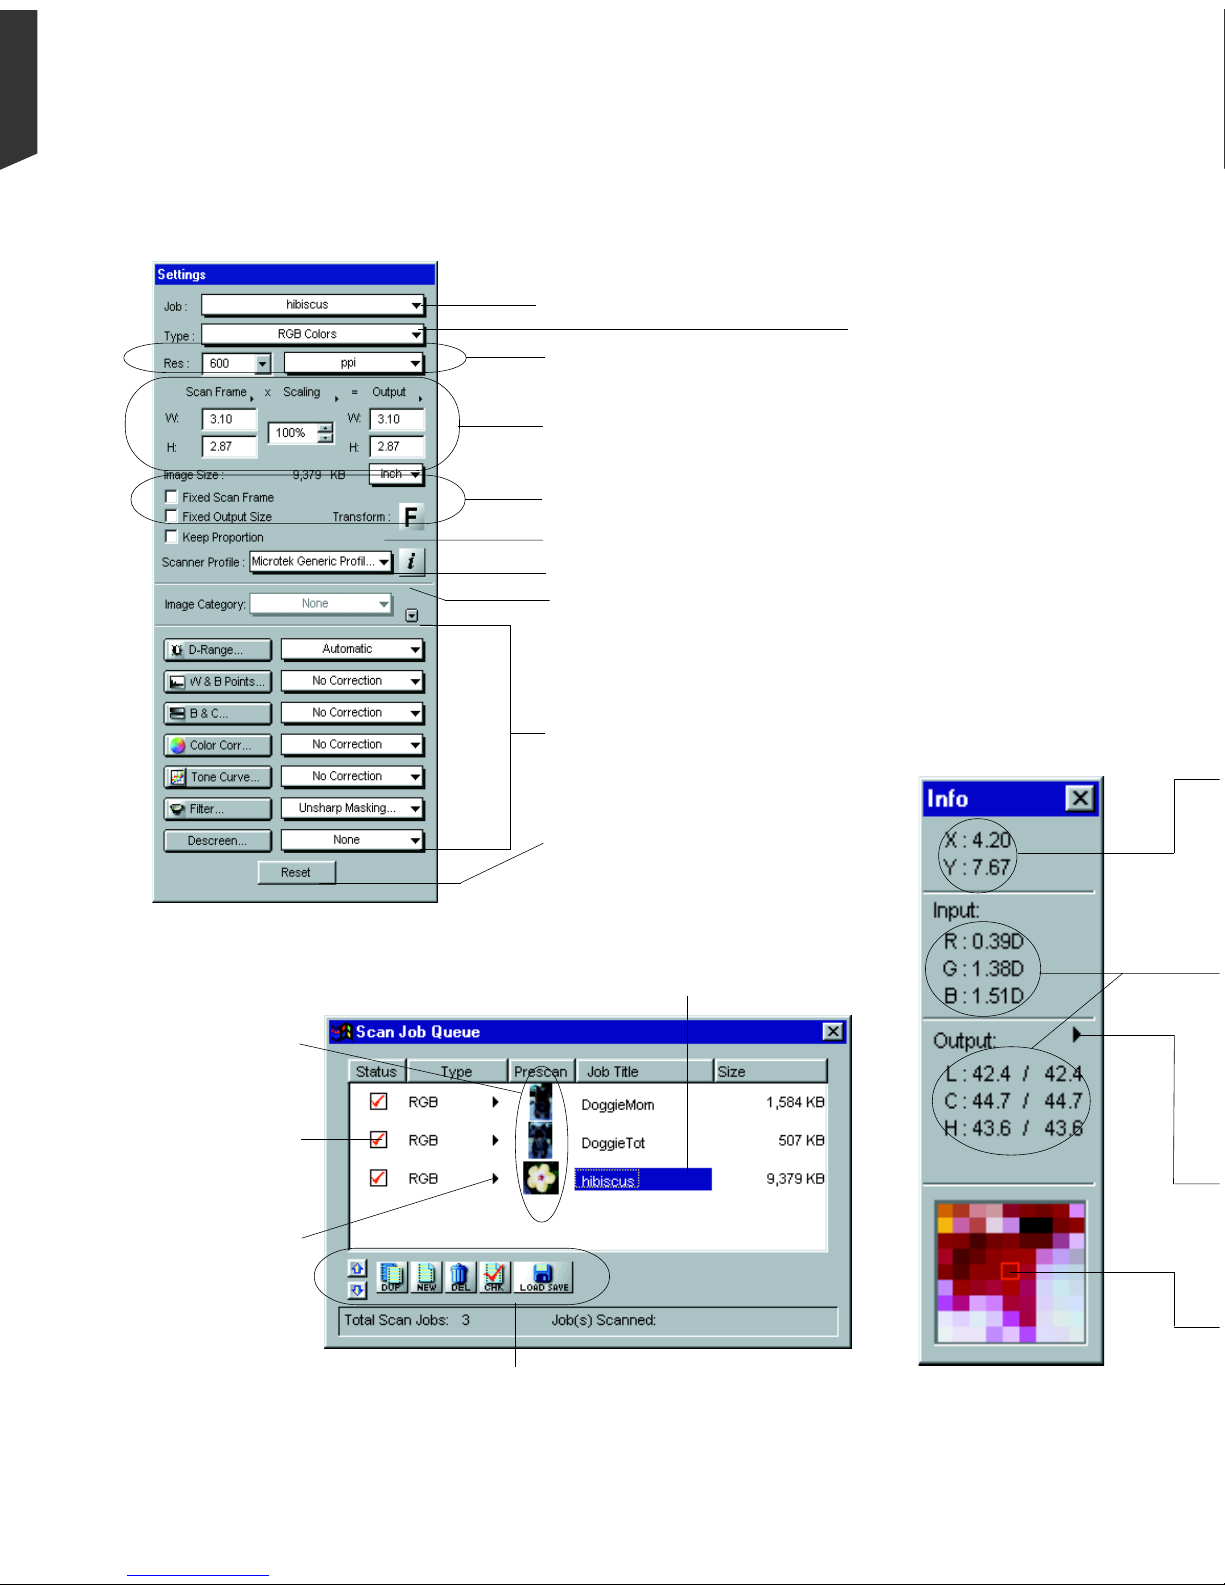
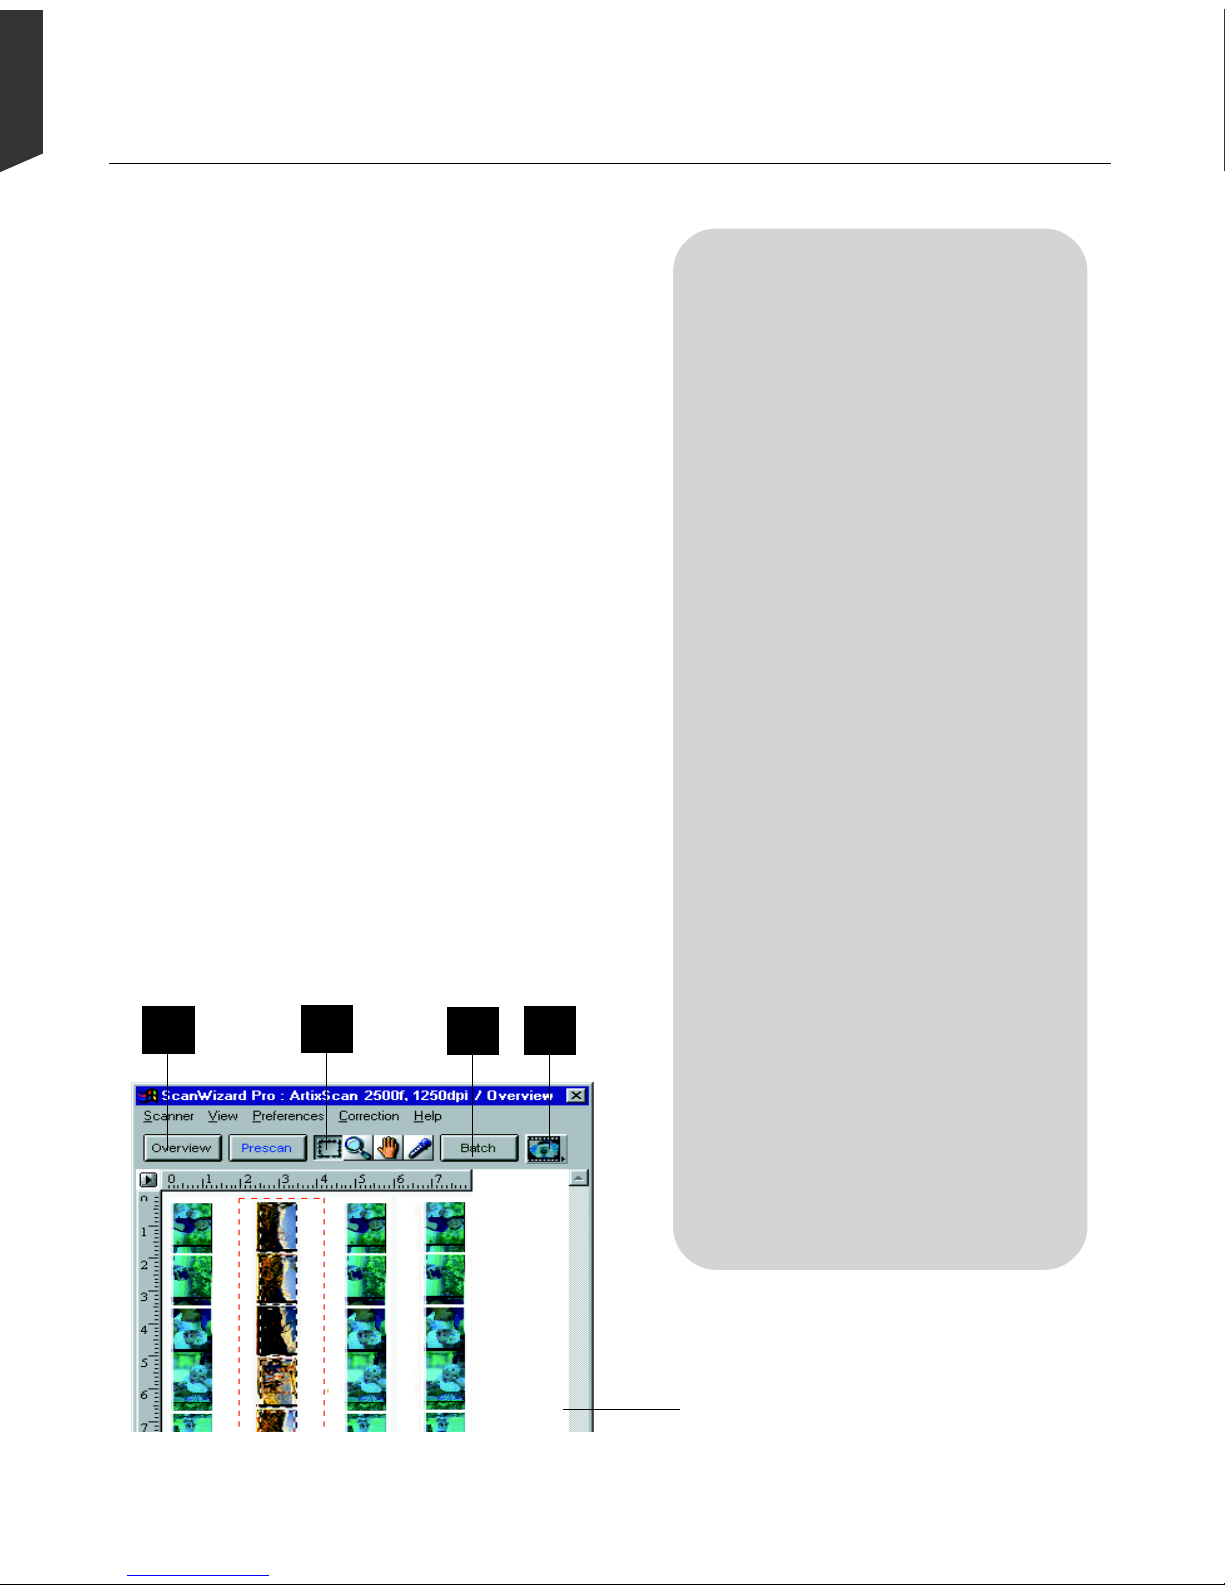
The ScanWizard Pro Interface
Shows current scan
job in preview
Resolution settings
Scan Frame dimension editing and
image Transformation options
Image output Type of the
current scan job.
Advanced Image Correction
controls for adjusting and
optimizing image quality
Information
window
Settings window (LCH mode)
Scan Job window
Function buttons for manipulating
scan jobs
Checked: Indicates
job will be scanned
when you press the
Scan button
Selected (highlighted) scan job. There
can be multiple selected scan jobs
(Shift + click), which may or may not
include the current scan job in preview
(only jobs with check marks are
scanned
Thumbnails showing
prescanned images
Lets you switch
image output into
other image type
(default RGB)
Scanner profile setup and info
Image category options
Image dimension input/output
settings and output memory
size info
Minimize Settings window
Reset custom setting(s)
Page 7
Introduction 1-3
English
Color Meter Display:
Displays input and output
pixel values relative to the
pointer position in
overview/prescan image as
previewed at the bottom
of the window (output
toggles between RGB &
LCH per Color Space Mode
in use)
Sample Display area: Shows
zoomed pixelized display of
the pointer position within
the preview image
Cursor Locator:
Shows x, y position of
mouse cursor on the
current overview /
prescan image
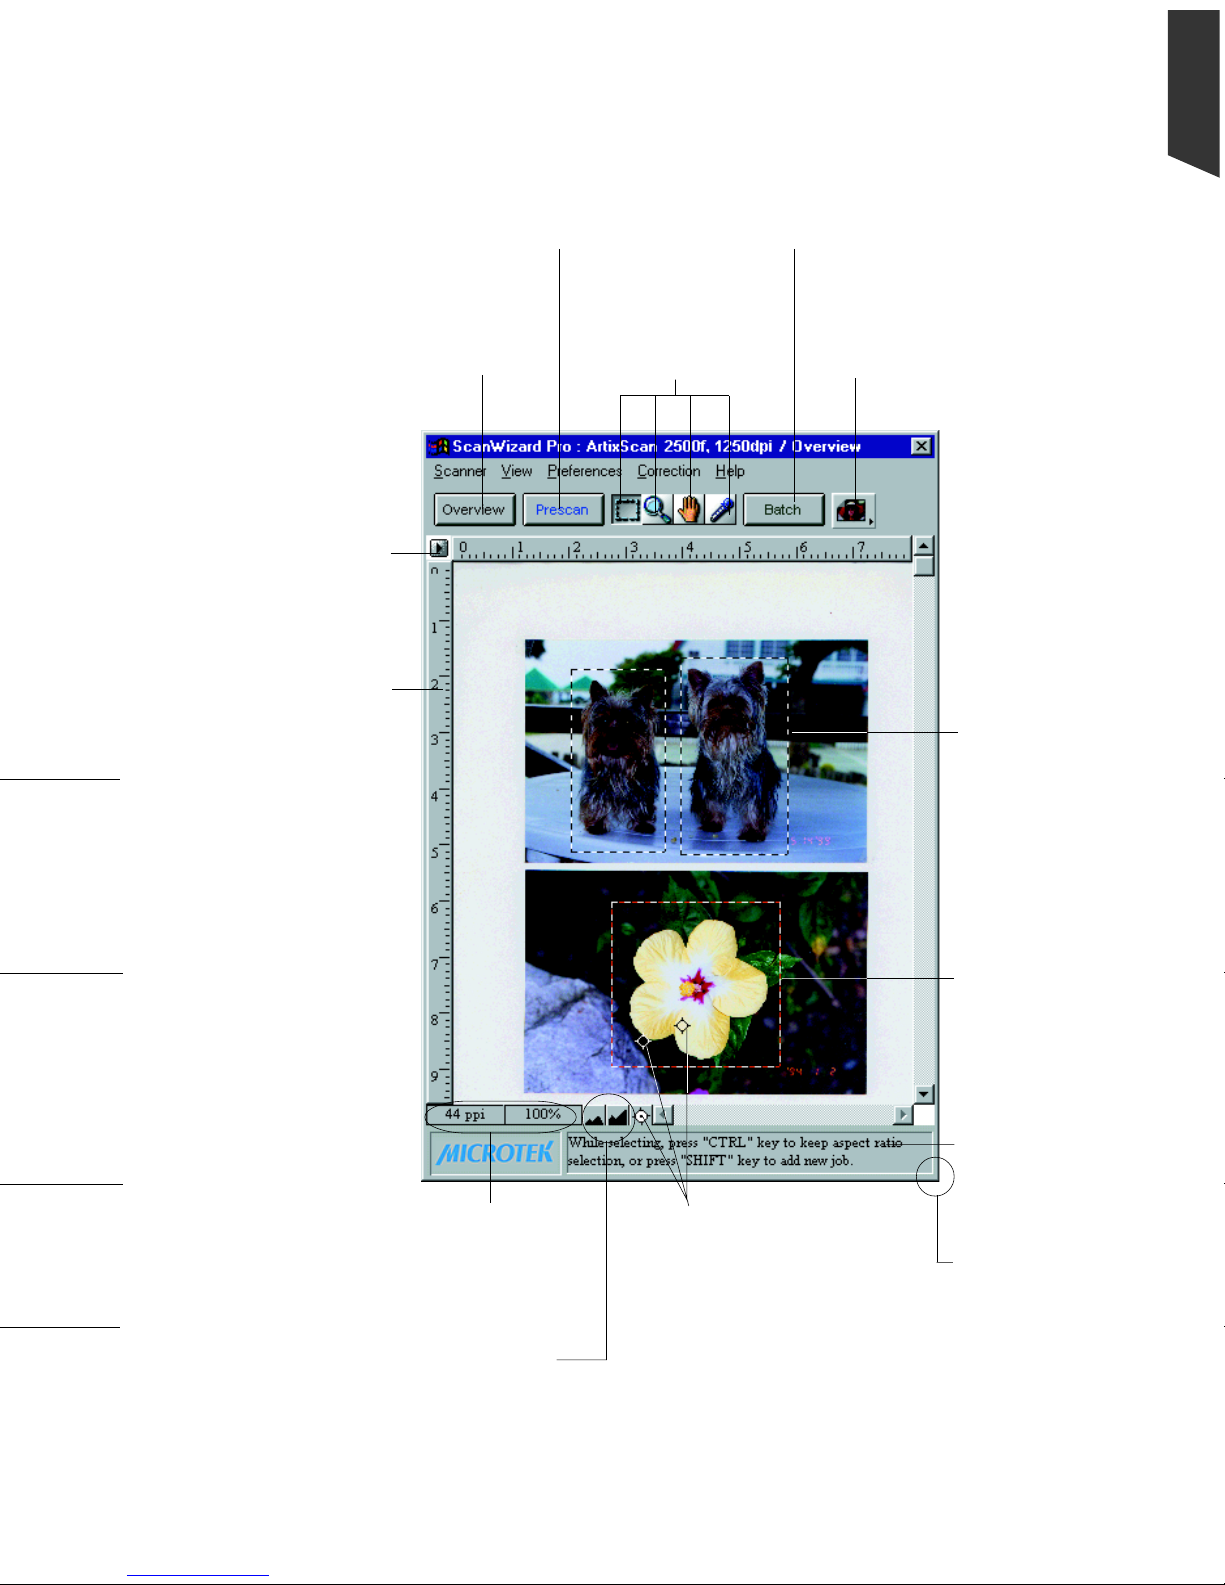
Preview window
Overview button:
Previews the
entire scan
material
Prescan button:
Previews a high-resolution
image of the area selected by
the scan frame.
Scan Material icon:
Selects the type of
scan material.
Scan button:
Starts the final scanning
process.
Unit of
measurement.
Options are inch,
cm, mm, point,
pixel, & pica
Ruler
Overview image
with multiple
Scan Frames
(press Shift key
to add new
frames)
Toolbar:
Left to right, Scan
Frame, Zoom, Pane,
Tag Windows
Color Meter Options: Let
you choose the area of the
sample size shown in the
Sample Display area
(described below)
Drag this corner
to resize the
Preview
window.
Status bar
provides useful
tips relative to
the Toolbar tool
in use
Handy buttons
for zooming in/
out at twofold
magnification
Current Scan
Job shown with
scrolling Scan
Frame. Drag any
side or corner of
the frame to
resize
Current Scan Job
resolution & zoom
in/out status
Magic Diamonds markers
pinpoint shadow &
highlight points of the
current Scan Job. The
Markers can be made to
blink by clicking the Flash
Marker button from the
Status Bar for easy
detection
Page 8

1-4 ScanWizard Pro for Windows Users Guide
English
System Requirements
• IBM-PC Pentium or compatibles
• W indows 95/98 or Windows NT4.0
• 64 MB RAM required; 128 MB or more suggested for better performance
• Free hard disk space as required by the size of your scanned images and for
additional working files
• CD-ROM drive (internal or external)
• “Thousands of color” display or better
• Microtek ScanMaker 3, 4, 5, 9600XL, 2000; the Microtek ArtixScan line of professional scanners; and other scanner models that support ScanWizard Pro.
Installing ScanWizard Pro
1 . Insert the Microtek ScanWizard Pro CD-ROM into your CD-ROM drive.
2 . Double-click the CD-ROM when it appears on your Windows desktop to open it.
3 . When the CD-ROM opens, double-click the ICC Profile Installer icon, and follow
screen instructions to install the desired profiles.
NOTE: If the ICC profile for your monitor is not found, contact your monitor
manufacturer.
4 . Next, double-click the ScanWizar d Pro Installer icon, and follow screen
instructions to install the program.
5 . Restart your computer.
NOTE: You may want to skip Step #3 and install the ICC profiles later. When
Step #4 is run, some default profiles will be installed as the default.
Page 9

Introduction 1-5
English
About this Users Guide
This manual provides basic information on the program and sketches out a variety of
scenarios that illustrate ScanWizard’s versatility and how best to use the program for
specific scanning tasks with applicable Microtek scanner .
For a more detailed listing of individual features, please refer to the companion
Reference Guide included in your documentation package.
Page 10
Getting Started 2-1
English
This ScanWizard Pro operates in two operating modes, Scan and Batch modes:
1. The Scan mode (or scan-to-application) “acquires” ScanWizard Pro from an
image-editing software program such as the Adobe Photoshop. The output
images are scanned and directly delivered (individually or in batches) to your
image editing software for further processing.
2. The Batch mode (or scan-to-file) launches the ScanWizard Pro from desktop
program icon or Windows Start menu. The output images are scanned and saved
to files individually or in batches.
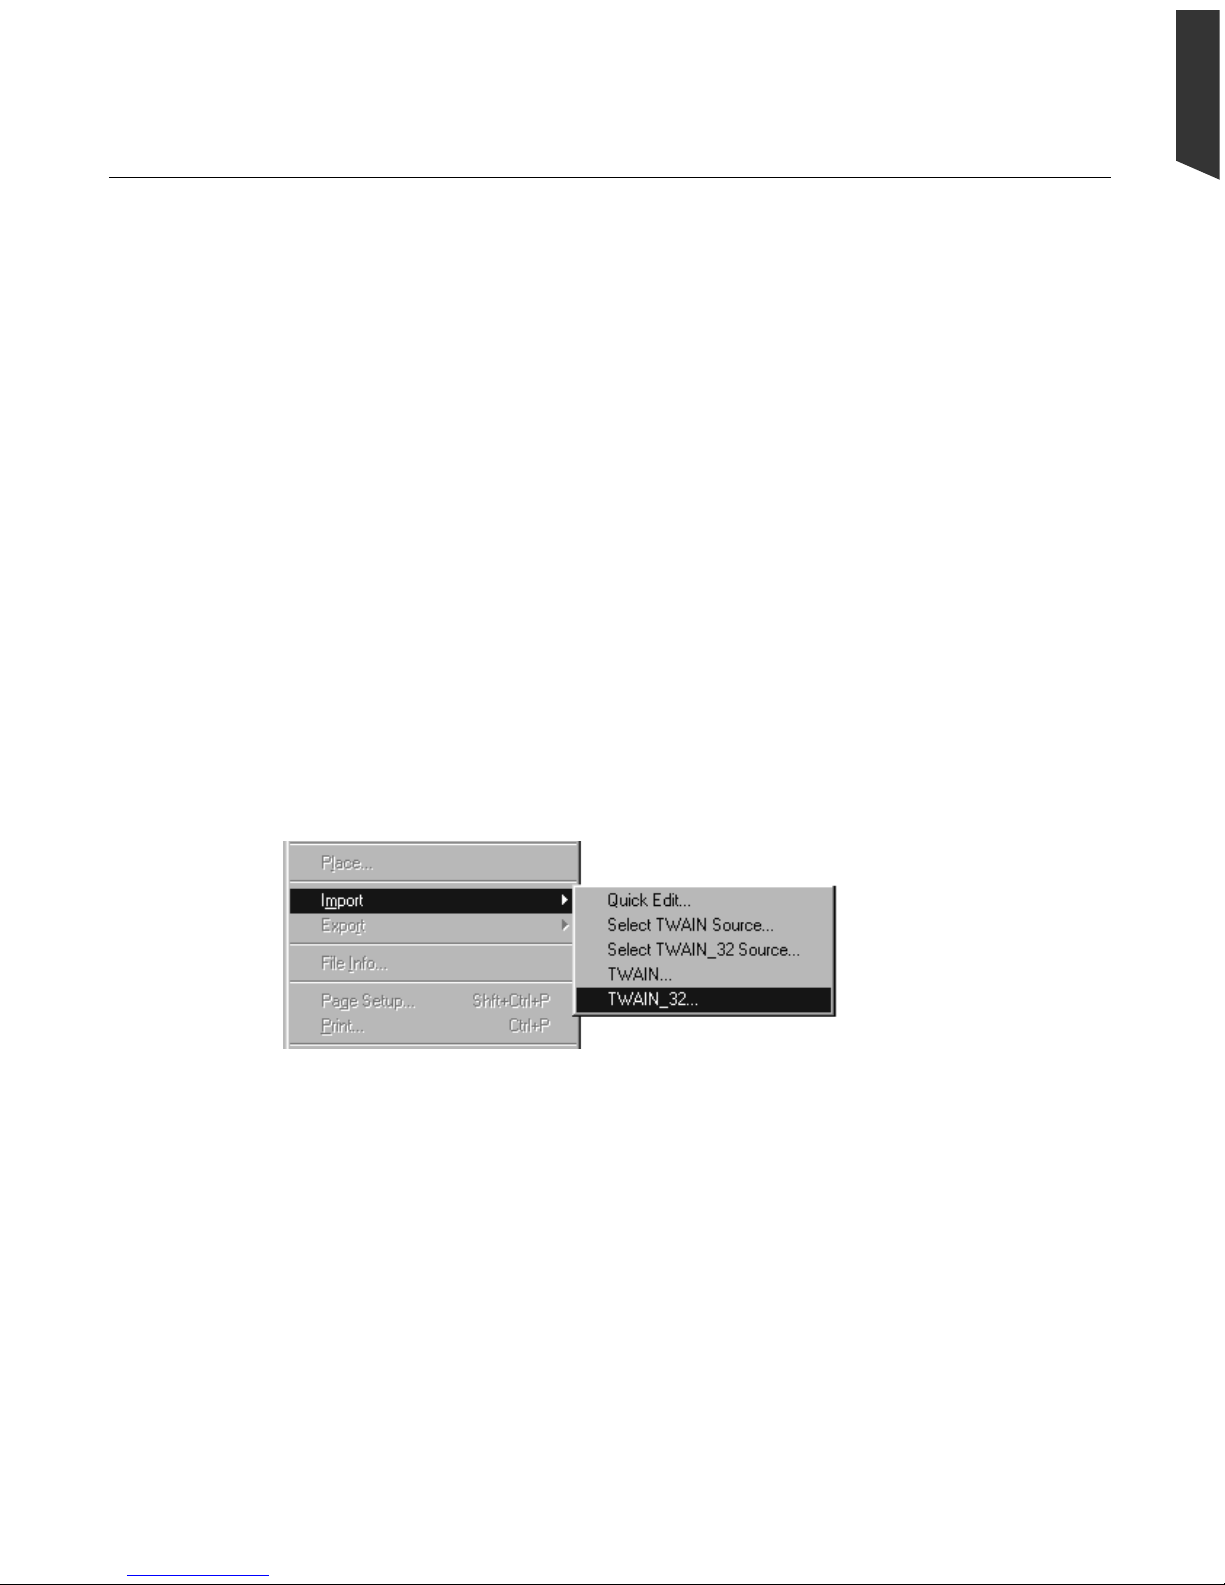
Using the Scan Mode
T o operate ScanW izard Pro in the Scan mode, launch the image-editing software (e.g.
Photoshop) of your choice. When the software program launches, go to the File
menu, and choose the Import or Acquire command, depending on the software you
are using (see sample menu from Photoshop below). This will automatically launch
ScanWizard Pro, and the four major windows that form the interface of ScanW izard
Pro will appear on your screen.
Using the Batch Mode
The Batch mode of operating ScanWizard Pro allows you to setup scan jobs
individually or in “batches” and then start the scanning and save-to-file processes
when you are ready to do so with a simple click of the Batch button.
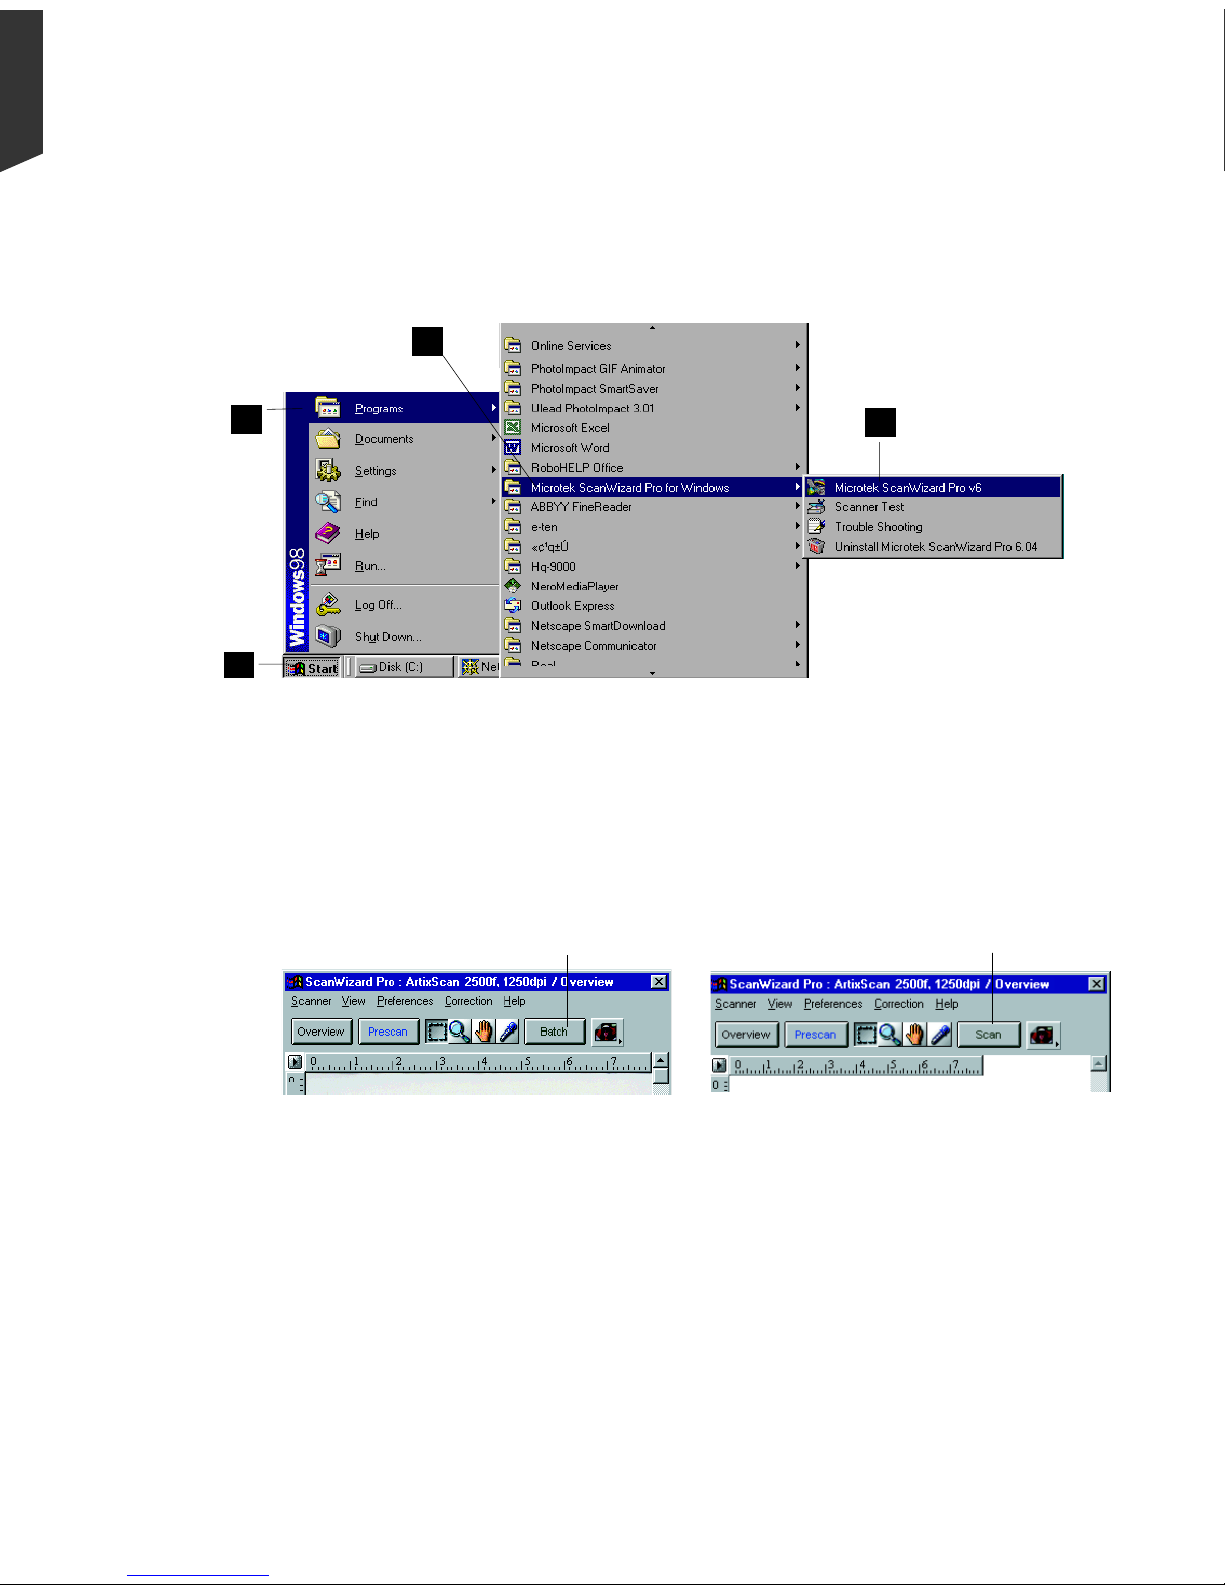
T o operate ScanW izard Pro in stand-alone Batch mode, click on the ScanW izard Pro
program icon on your desktop or go to the Start menu and simply follow the steps as
illustrated below .
2 Getting Started
Page 11
2-2 ScanWizard Pro for Windows Users Guide
English
1. Start button
2. Program
3 . Microtek ScanWizard Pro for W indows
4 . Microtek ScanWizard Pro 6.0
"Batch" button
displays for stand-
alone (scan-to-file)
operation
"Scan" button
displays for TWAIN
(scan-to-application)
operation
Note that the final scan button for stand-alone operation differs with that of
ScanWizard Pro operation under a TWAIN program as illustrated below .
For more details, refer to the batch scan scenarios and information presented in
Chapter 5, Special Features & Advanced Scenarios of this manual.
4
3
2
1
Page 12
Getting Started 2-3
English
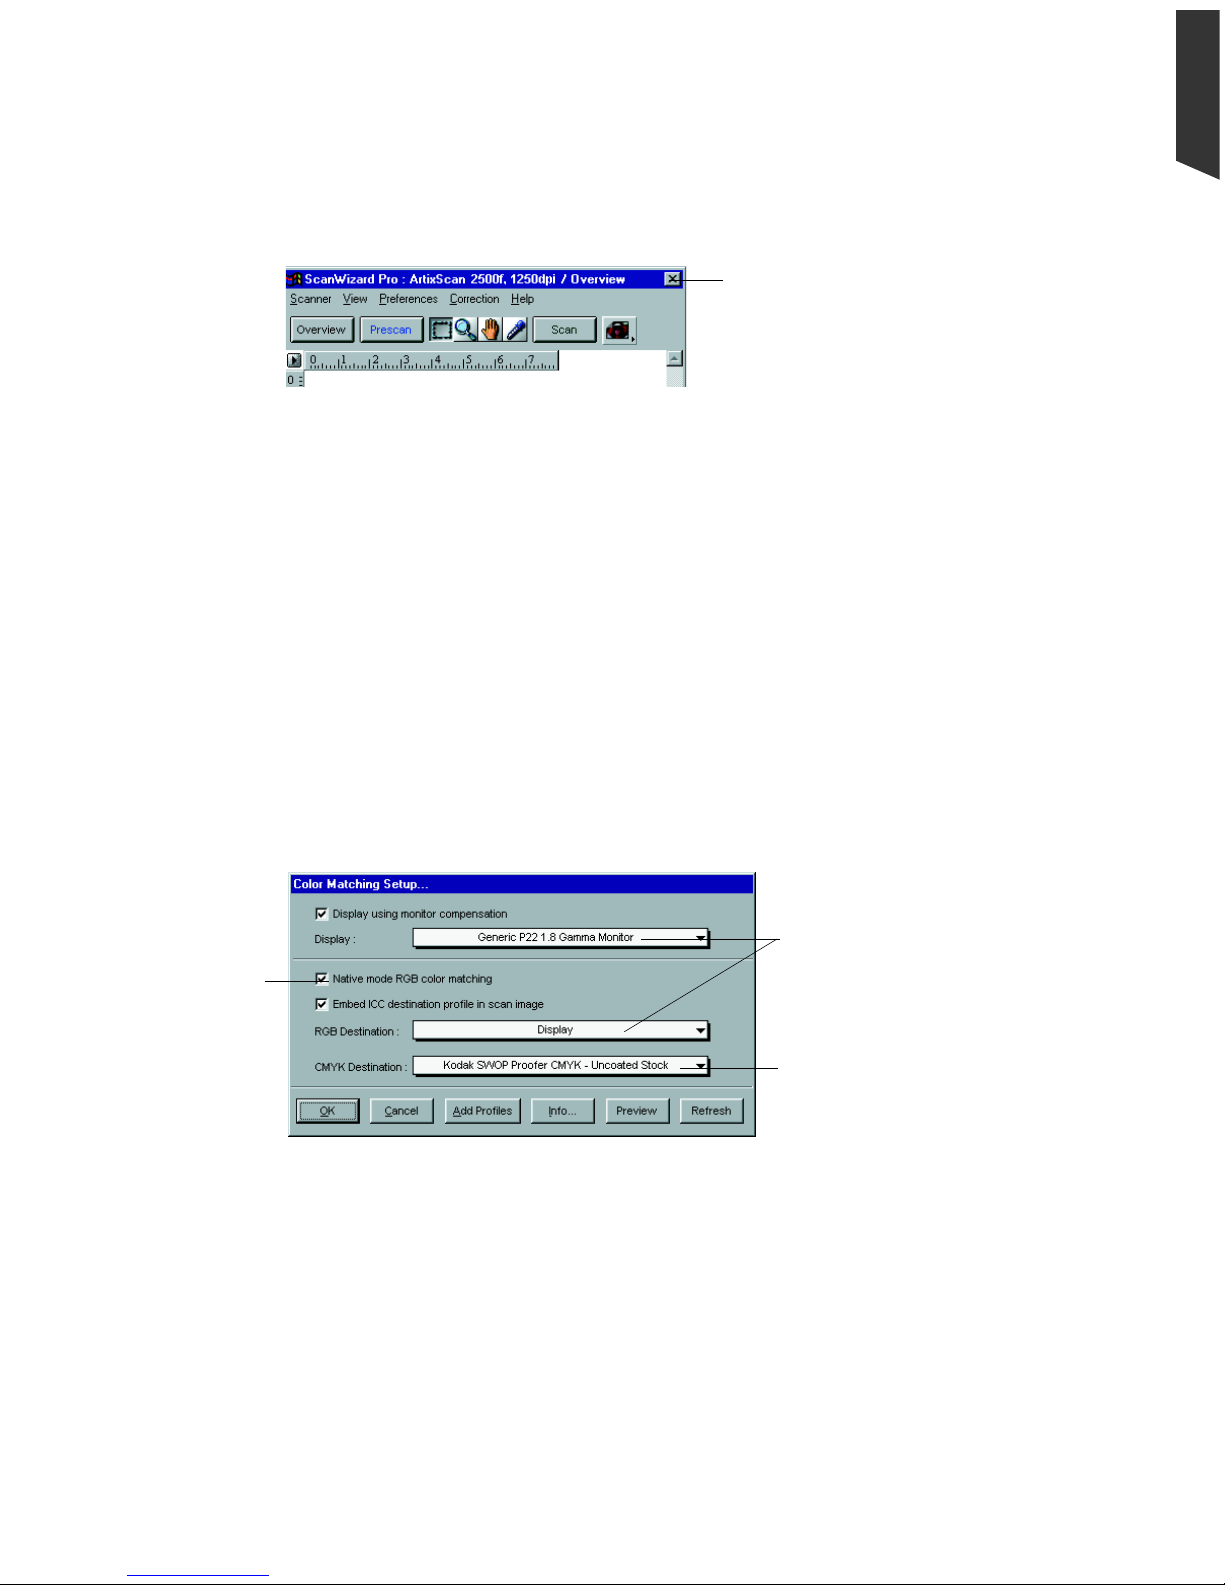
Exiting ScanWizard Pro
T o exit from ScanWizard Pro, go to the Preview window , and click on the Close button
at top-right corner of the window .
"Close" button
Click to quit from
ScanWizard Pro
Color Matching
The first time you launch ScanWizard Pro, you will be prompted to perform color
matching for your monitor and printer.
Color Matching is an important feature of ScanWizard Pro that ensures color
consistency — from the initial input phase when an image is captured by the scanner,
to the final output process when the image is output to your monitor or printer . Color
Matching allows you to gain the assurance that the colors captured by the scanner
are consistent with those displayed on your monitor and will be reproduced as
closely as possible when they are printed.
Y ou will be prompted with a dialog box (below) to select color matching settings
immediately after you launch ScanWizard Pro the first time.
You may redefine color matching settings whenever required. To do this, go to the
Preferences menu in the Preview window , and choose the Color Matching Setup
command.
For more detailed information on color matching, see Color Matching for Advanced
Users in the Appendix section of this manual.
This is dimmed
when
operating under
LCH mode
Monitor selection
shown here is set at
default profiles for
monitor and printer
CMYK printer
profile. No default
provided. Must
select one if required
Page 13

Basic Scenarios 3-1
English
This section of the manual sets out a few scenarios on how to do some basic scans,
using a color photograph, a positive slide, negative film, line art and magazine
images as scan material. The steps are laid out on the left-hand side of the page, and
supplementary information for each scenario can be found in a shaded sidebar next
to the procedures. Information on how to adjust and enhance images, as well as
more advanced scanning scenarios, are provided in the succeeding chapters of the
manual.
The following basic sample scenarios are discussed in the following pages:
• How to Scan a Color Photographic Print
• How to Scan a Color Positive Transparency
• How to Scan a Color Negative
• How to Scan a Line Art Image
• How to Scan a Newspaper or Magazine Image
3 Basic Scenarios
Page 14
3-2 ScanWizard Pro for Windows Users Guide
English
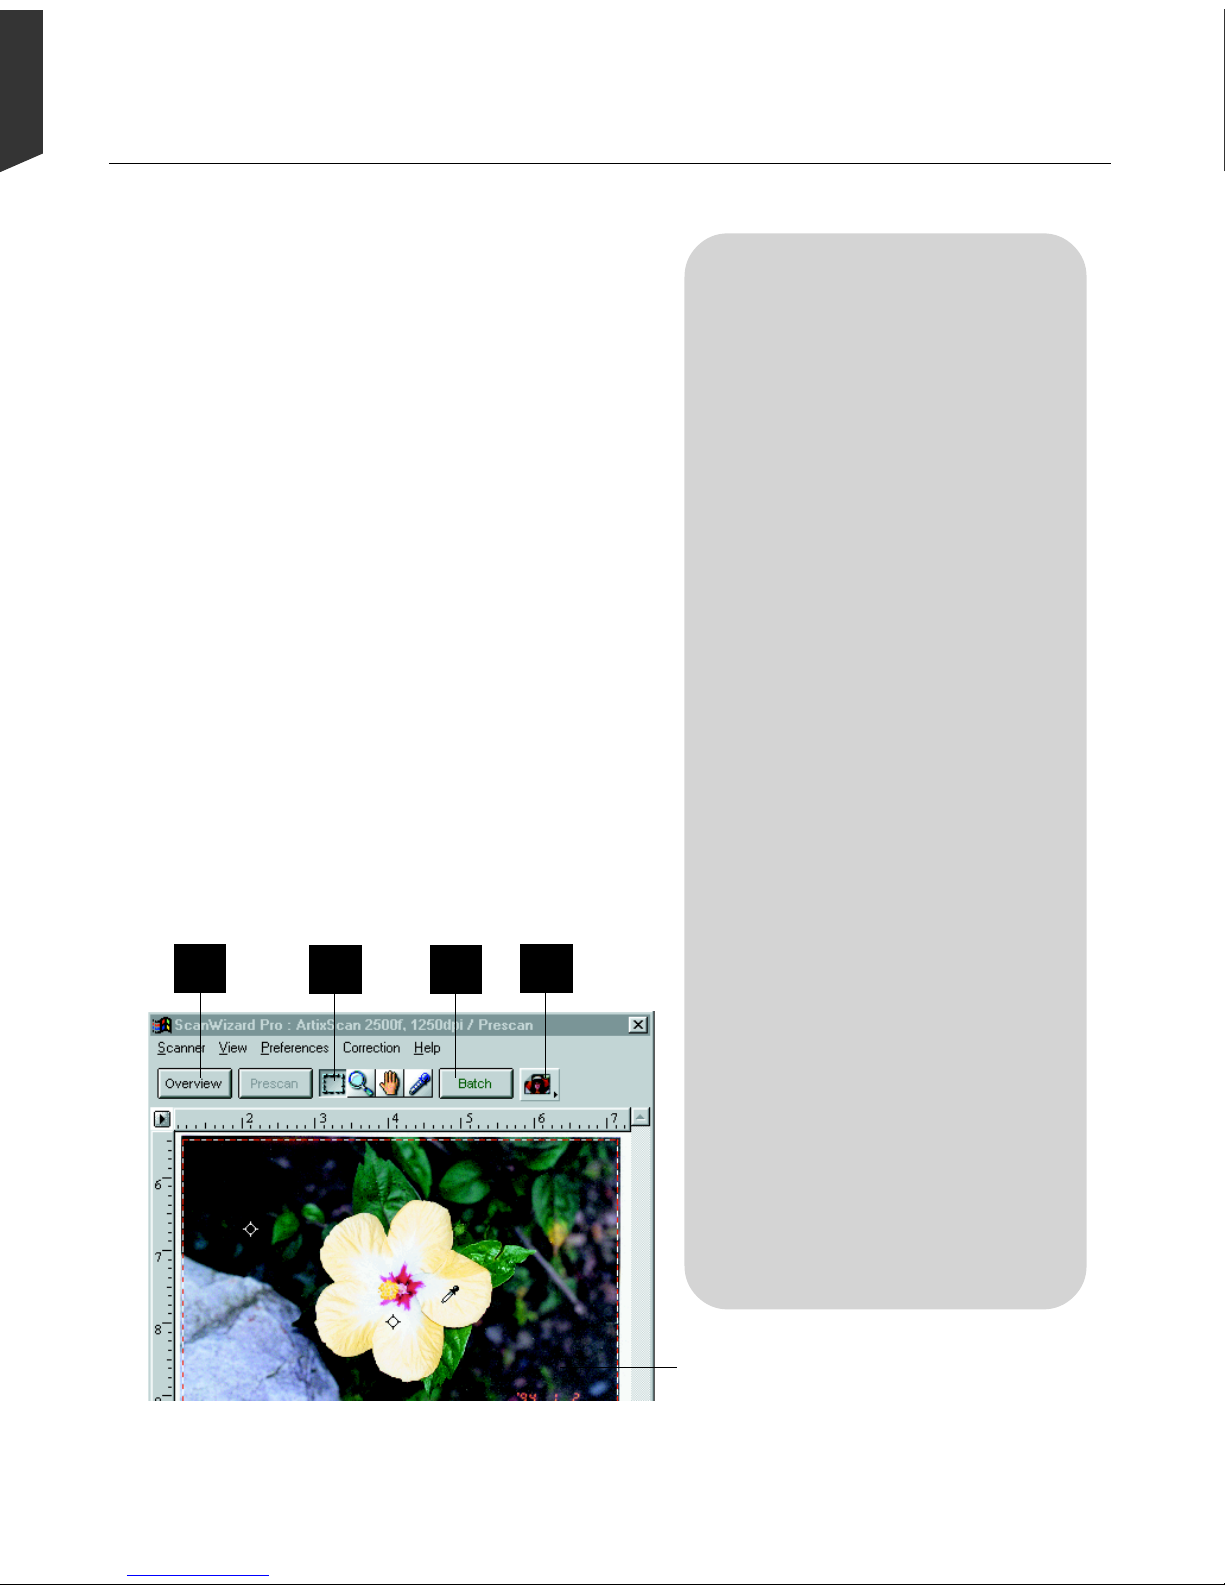
How to Scan a Color Photographic Print
1. Place the photograph to be scanned on your
scanner’s glass bed.
2 . Go to the Preview window and click the Scan
Material icon. From the submenu that appears,
choose Reflective. You will notice the change in
the appearance of the icon.
3 . Click the Overview button to start an overview ,
and you will see the image appear in your
Preview window .
4 . Select the Scan Frame tool from the T oolbar in
the Preview window, and choose the area to be
scanned by dragging a rectangle around it. You
will see a flashing frame (marquee) around the
selected area.
5 . If you like what you see in the Preview window ,
click the Scan (or Batch) button to start
scanning.
If you want to....
Before the Final Scan
Select an output image type (after
step 2)
Go to the Settings window, and from
the Type box, choose the appropriate
image type for the image to be scanned.
Specify output dimensions (after
step 2)
Go to the Settings window, and enter
the desired output dimensions (width
and height) in the output dimension edit
boxes. The scan frame may change
slightly, and you may want to go back
to the Preview window to readjust the
scan frame that selects the area you
want.
Change output image resolution
(before step 5)
Go to the Settings window, and enter
the resolution value in the Resolution
edit box.
See a more detailed preview image
(after step 4)
Go to the Preview window, highlight
the scan job you wish to see in detail,
and click the Prescan button.
Fine-tune the preview image with
image processing options (after step
4)
Go to the Preview window, and select
the desired image-processing option
from the Correction menu. Alternatively, you can go to the Settings
window and click an image processing
button; the Advanced Image Correc-
tion (AIC) dialog box will then appear.
View the prescanned image in the
Preview window to see a real-time
display of the fine tuning results
23
4 5
Page 15

Basic Scenarios 3-3
English
Typical Advanced Image Correction tool
dialog box for fine-tuning images
Define output image settings and
access Advance Image Correction
tools from Settings window
Page 16
3-4 ScanWizard Pro for Windows Users Guide
English
1. For dual bed-scanners (such as the ArtixScan
2500f), make use of the SnapTrans™ templates
feature explained in Chapter 5. Place the film to be
scanned on the appropriate template, and insert
the film and template into your scanner’s lower
bed. For flatbed scanners, use a Transparent
Media Adapter.
2 . Go to the Preview window and click the Scan
Material icon. From the submenu that appears,
choose Positive Transparency. You will notice
the change in the appearance of the icon.
3 . Click the Overview button to start an overview ,
and you will see the image appear in your Preview
window .
4 . Select the Scan Frame tool from the T oolbar in
the Preview window, and choose the area to be
scanned by dragging a rectangle around it. You
will see a flashing frame (marquee) around the
selected area.
5 . If you like what you see in the Preview window ,
click the Scan (or Batch) button to start
scanning.
How to Scan a Color Positive Transparency
If you want to....
Before the Final Scan
Select an output image type (after
step 2)
Go to the Settings window, and from the
Type box, choose the appropriate image
type for the image to be scanned.
Specify output dimensions (after step
2)
Go to the Settings window, and enter
the desired output dimensions (width and
height) in the output dimension edit
boxes. The scan frame may change
slightly, and you may want to go back to
the Preview window to readjust the scan
frame that selects the area you want.
Change output image resolution
(before step 5)
Go to the Settings window, and enter
the resolution value in the Resolution
edit box.
See a more detailed preview image
(after step 4)
Go to the Preview window, highlight
the scan job you wish to see in detail,
and click the Prescan button.
Fine-tune the preview image with
image processing options (after step
4)
Go to the Preview window, and select
the desired image-processing option
from the Correction menu. Alternatively, you can go to the Settings
window and click an image processing
button; the Advanced Image Correction
dialog box will then appear.
2
5
3
4
View the prescanned image in the
Preview window to see a real-time
display of the fine tuning results
Page 17
Basic Scenarios 3-5
English
Typical Advanced Image Correction tool
dialog box for fine-tuning images
Define output image settings and
access Advance Image Correction
tools from Settings window
Page 18
3-6 ScanWizard Pro for Windows Users Guide
English
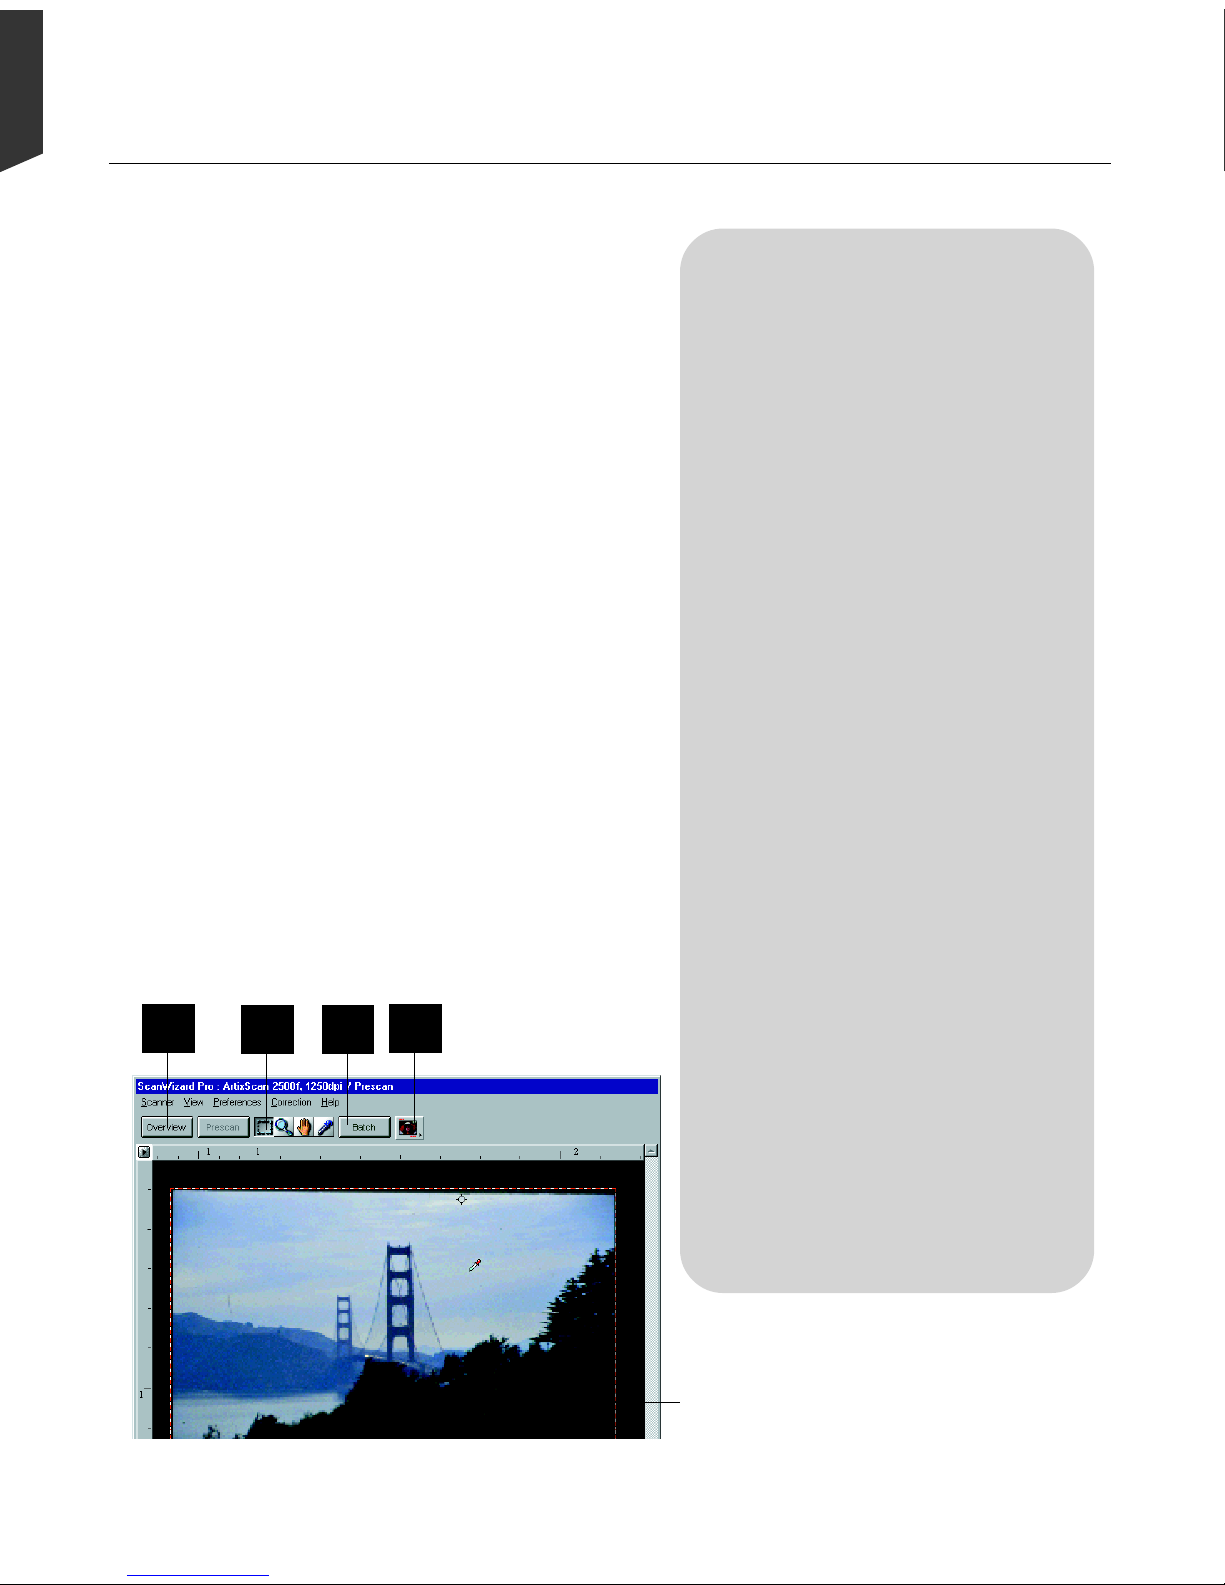
How to Scan a Color Negative
1. For dual bed-scanners (such as the ArtixScan
2500f), make use of the SnapTrans™ templates
feature explained in Chapter 5. Place the film to be
scanned on the appropriate template, and insert
the film and template into your scanner’s lower
bed. For flatbed scanners, use a Transparent
Media Adapter.
2 . Go to the Preview window and click the Scan
Material icon. From the submenu that appears,
choose Negative Film. Y ou will notice the change
in the appearance of the icon.
3 . Click the Overview button to start an overview ,
and you will see the image appear in your Preview
window .
4 . Select the Scan Frame tool from the T oolbar in
the Preview window, and choose the area to be
scanned by dragging a rectangle around it. You
will see a flashing frame (marquee) around the
selected area.
5 . If you like what you see in the Preview window,
click the Scan button to start scanning.
5
3
View the prescanned image in the
Preview window to see a real-time
display of the fine tuning results
If you want to....
Before the Final Scan
Select an output image type (after
step 2)
Go to the Settings window, and from the
Type box, choose the appropriate image
type for the image to be scanned.
Specify output dimensions (after step
2)
Go to the Settings window, and enter
the desired output dimensions (width and
height) in the output dimension edit
boxes. The scan frame may change
slightly, and you may want to go back to
the Preview window to readjust the
scan frame that selects the area you
want.
See a more detailed preview image
(after step 4)
Go to the Preview window, highlight
the scan job you wish to see in detail,
and click the Prescan button.
Fine-tune the preview image with
image processing options (after step
4)
Go to the Preview window, and select
the desired image-processing option
from the Correction menu. Alternatively, you can go to the Settings
window and click an image processing
button; the Advanced Image Correction
dialog box will then appear.
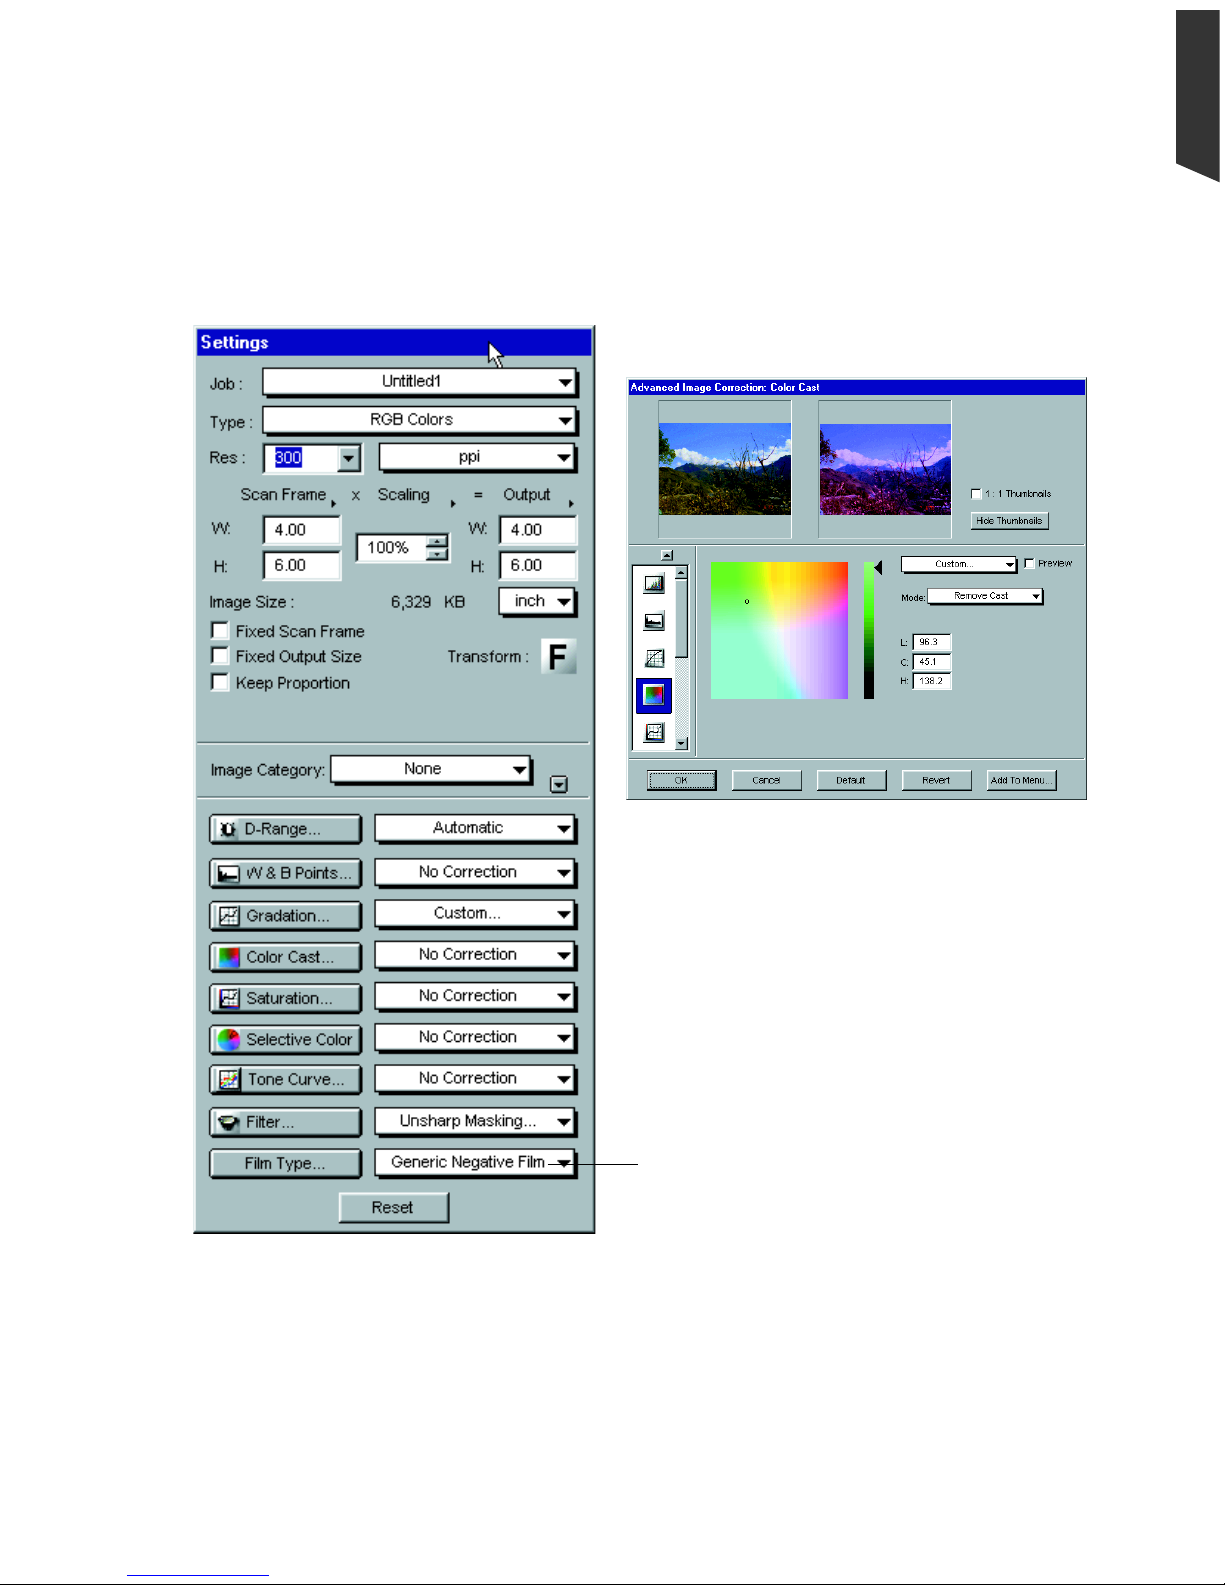
Adjust film type (before step 5)
Go to the Film Type menu in the
Settings window and select the film
type and manufacturer.
2
4
Page 19
Basic Scenarios 3-7
English
Typical Advanced Image Correction tool
dialog box for fine-tuning images
Define output image settings and
access Advance Image Correction
tools from Settings window
When scanning Negative Film, this pane
will switch into "Film Type" option.
Default is Generic Negative Film
Page 20

3-8 ScanWizard Pro for Windows Users Guide
English
How to Scan a Line Art Image
1. Place the image to be scanned on your scanner’s
glass bed.
2 . Go to the Preview window and click the Scan
Material icon. From the submenu that appears,
choose Reflective.
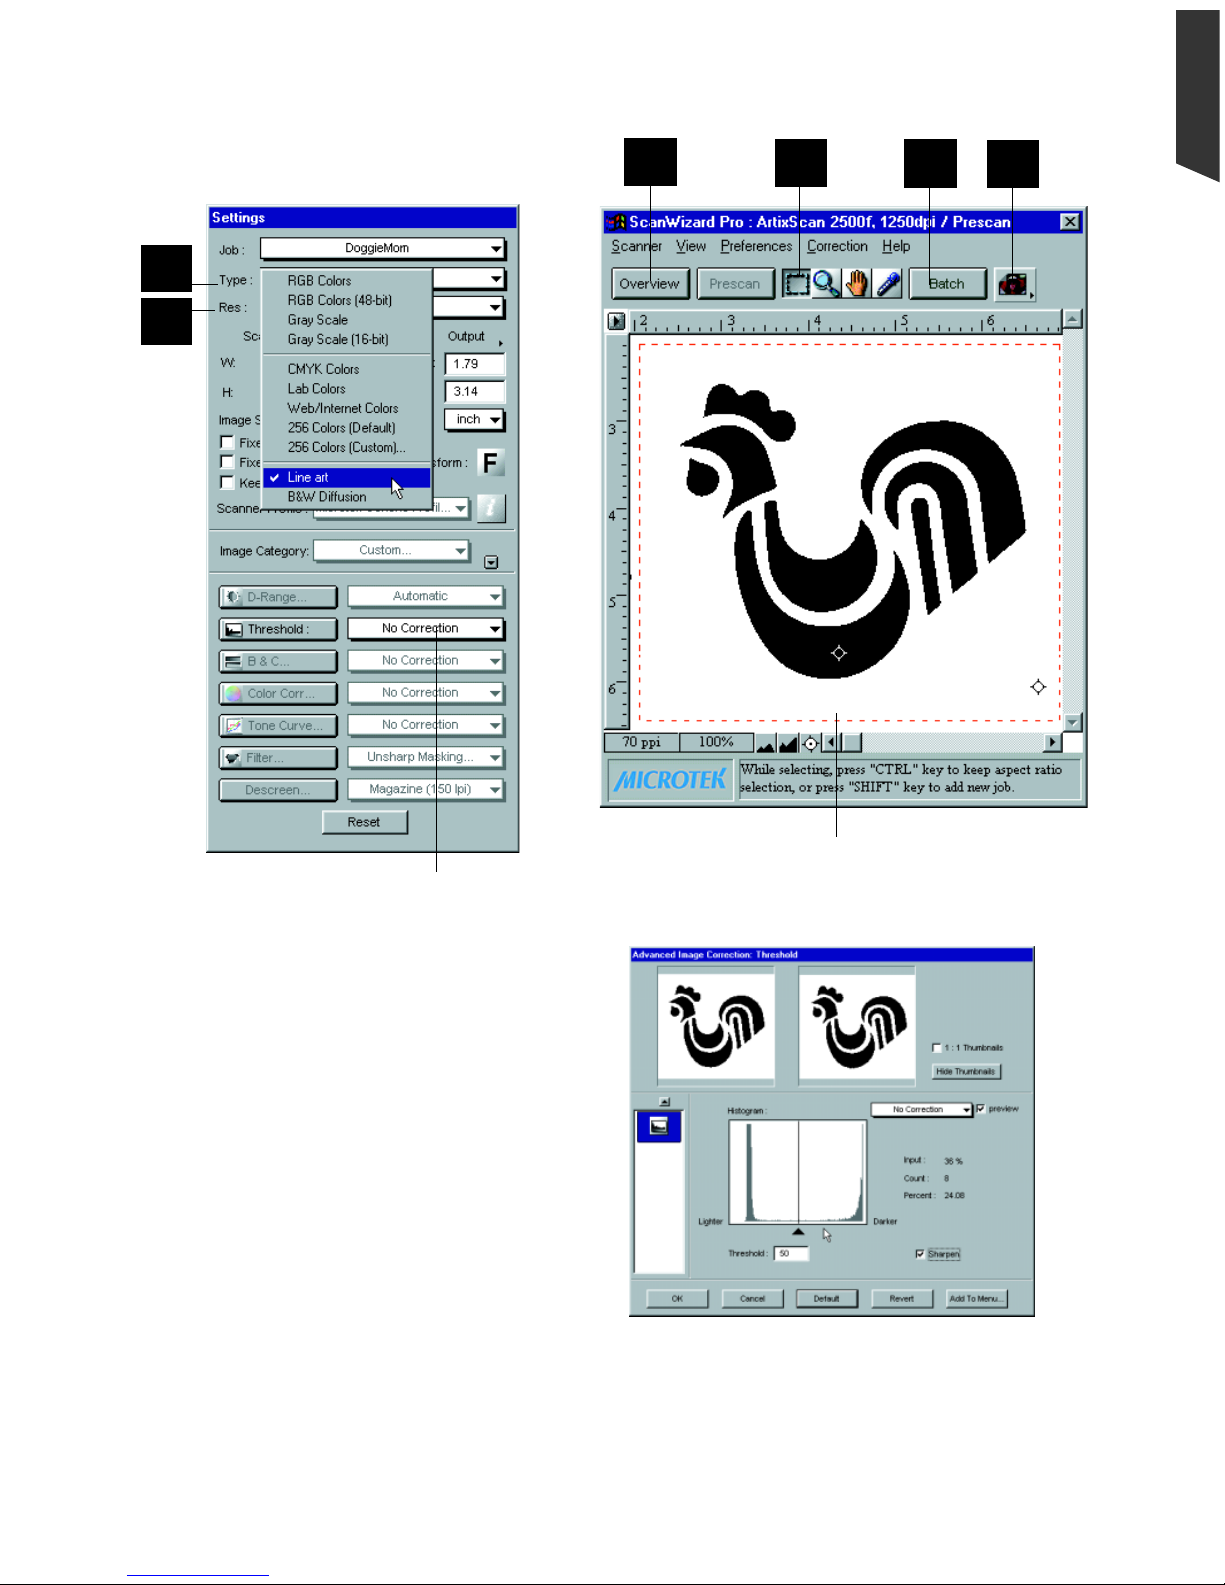
3 . Go to the Settings window , and from the Type box,
choose Line Art.
4 . Click the Overview button to start an overview .
5 . Select the Scan Frame tool from the T oolbar in
the Preview window, and choose the area to be
scanned by dragging a rectangle around it. You
will see a flashing frame (marquee) around the
selected area.
6 . On the Resolution box, enter a Resolution value
that matches the resolution of your printer (300 or
600 dpi, for example) to obtain optimal results.
7 . If you like what you see in the Preview window ,
click the Scan button to start scanning.
If you want to....
Before the Final Scan
Specify output dimensions (after
step 2)
Go to the Settings window, and
enter the desired output dimensions
(width and height) in the output
dimension edit boxes. The scan frame
may change slightly, and you may
want to go back to the Preview
window to readjust the scan frame
that selects the area you want.
See a more detailed preview
image (after step 5)
Go to the Preview window, highlight
the scan job you wish to see in detail,
and click the Prescan button.
Fine-tune the preview image with
image processing options (after
step 5)
For Line Art images, only the
Threshold option is available.
Threshold measures how gray levels
are converted to black and white,
with the value of 128 (middle gray
level) as the determining point of
conversion. Gray levels below the
threshold are converted to black,
while gray levels above the threshold
are converted to white.
Page 21
Basic Scenarios 3-9
English
3
6
Define output image settings and
access Advance Image Correction
tools from Settings window
Typical Advanced Image Correction tool
(Threshold ) dialog box for fine-tuning Line
Art images
When set to "B&W Diffusion," this
pane, and all the Advance Image
Correction (AIC) tools are dimmed
(unavailable).
When output image type is set to
"Line Art," this pane will switch
into "Threshold" while the rest of
the Advance Image Correction
(AIC) tools are dimmed
(unavailable).
View the prescanned image in the
Preview window to see a real-time
display of the fine tuning results
2
75
4
Page 22

3-10 ScanWizard Pro for Windows Users Guide
English
How to Scan a Newspaper or Magazine Image
1 . Place the printer matter material to be scanned on
your scanner.
2 . Go to the Preview window and click the Scan
Material icon. From the submenu that appears,
choose Reflective.
3 . Click the Overview button to start an overview , and
you will see the image appear in your Preview
window .
4 . Select the Scan Frame tool from the T oolbar in the
Preview window, and choose the area to be scanned
by dragging a rectangle (scan frame) around it. You
will see a flashing frame (marquee) around the
selected area.
5. Move the pointer to the menu next to the Descreen
tool in the Settings window . From the drop-down
menu that appears, select your source material -whether the image being scanned is from a
newspaper, magazine, or art magazine (higher-quality
printing).
NOTE: If you know the printed lpi (lines per inch)
for the image, you may enter the exact number. You
can measure the line screen by using a screen
finder, which can be purchased from your local
print shop.
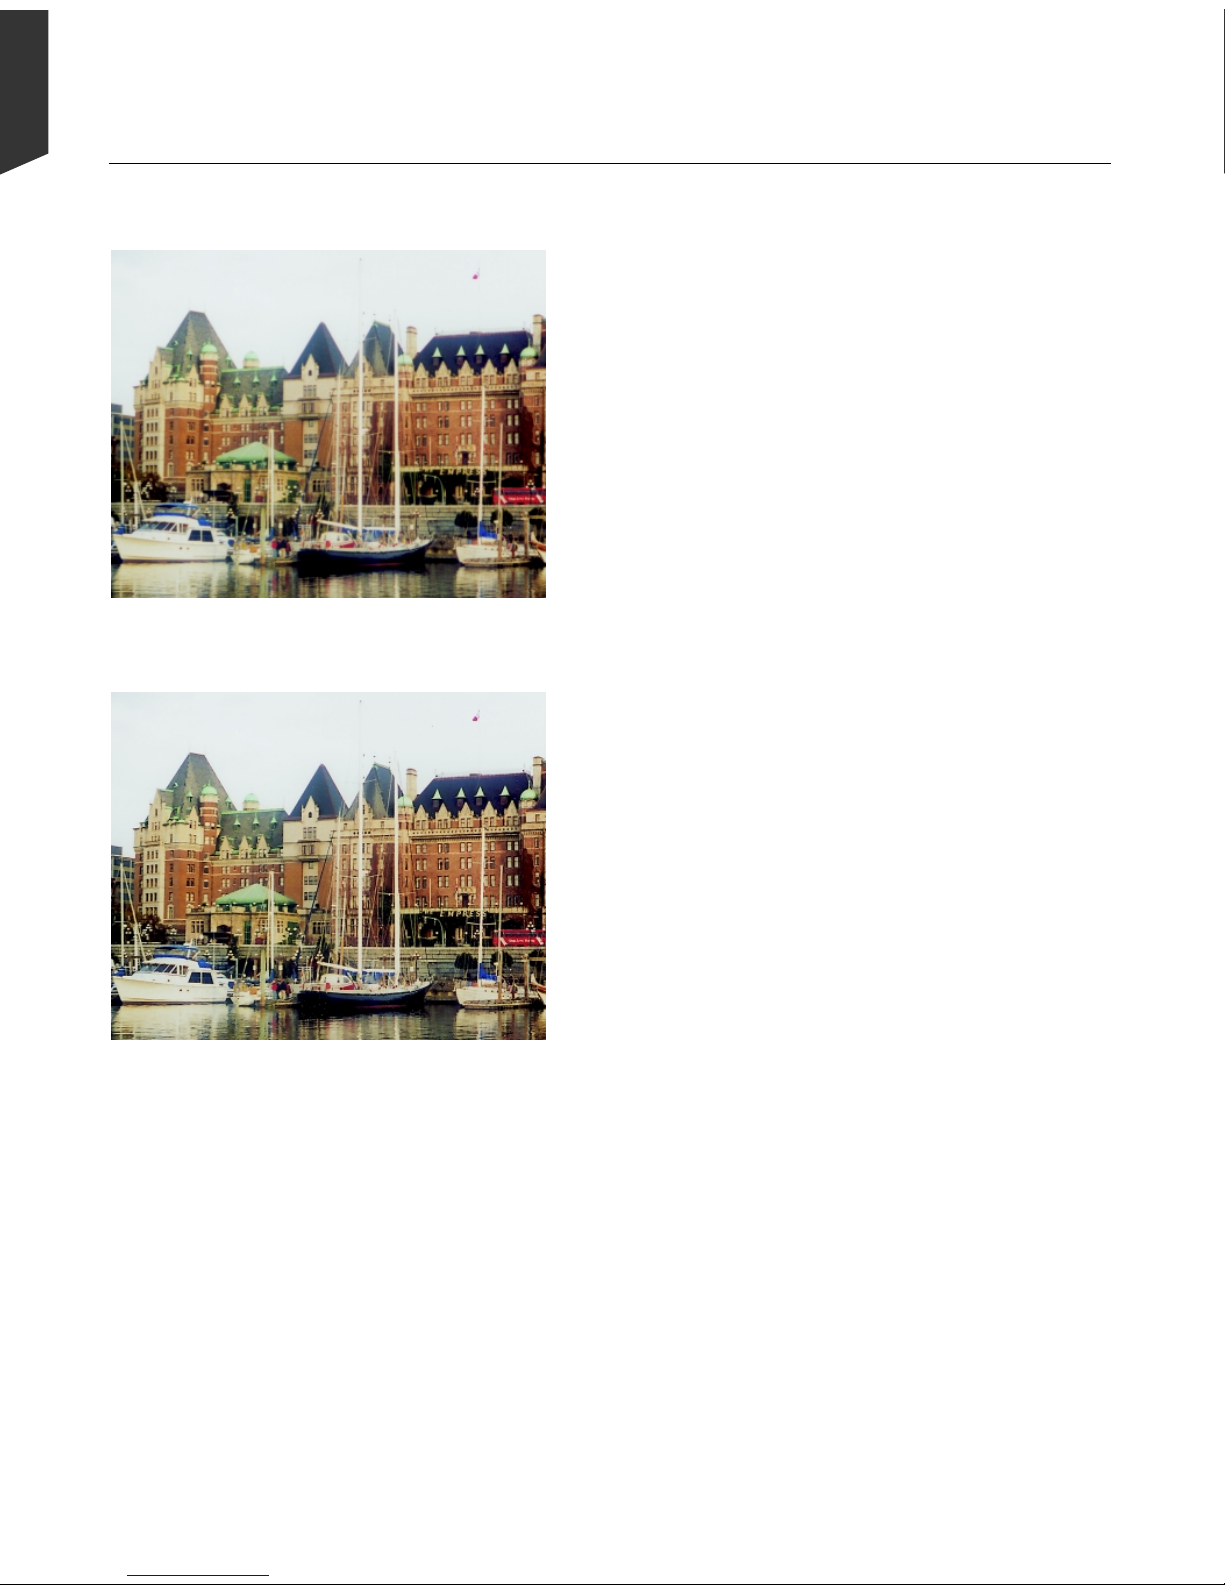
6. Click the Scan button. When the image is scanned,
no moiré patterns will be evident.
NOTE: Descreen result will not show in the preview
screen. You need to display or print the output
image under your application to see the
descreening effect.
If you want to....
Before the Final Scan
Specify output dimensions (after
step 2)
Go to the Settings window, and
enter the desired output dimensions
(width and height) in the output
dimension edit boxes. The scan frame
may change slightly, and you may
want to go back to the Preview
window to readjust the scan frame
that selects the area you want.
See a more detailed preview
image (after step 4)
Go to the Preview window, highlight
the scan job you wish to see in detail,
and click the Prescan button.
After Descreen
Before Descreen
Page 23

Basic Scenarios 3-11
English
The Descreen tool is used to remove “screens” or moiré patterns from appearing in
images. Moirés are interference patterns that show up on your scanned images when
you scan images from magazines and newspapers. Moiré patterns emerge as a series
of crosshatches or screens crisscrossing in the image.
In the example in previous page, the top image was scanned from a magazine,
resulting in an undesirable moiré pattern. The solution: rescan the image using the
Descreen tool. This will eliminate potential moirés from appearing in the resulting
image as illustrated by the bottom image.
View the prescanned image in
the Preview window to see a
real-time display of the fine
tuning results except descreen
result.
Define output image settings and
access Advance Image Correction
tools from Settings window
5
When using
"Descreen," printed
matter type must be
defined.
If you know the
printed lpi (lines per
inch) for the image
type, you may enter
the exact lpi value in
the Descreen Custom
dialog box. Click on
Descreen button to
display the dialog box
(right)
3
2 6
4
Page 24

Using AIC Tools 4-1
English
This section of the user’s guide describes the use of the various Advanced Image
Correction (AIC) tools, which form an integral part of ScanWizard Pro. All the tools
are available when you work in the default LCH color space, but a different set of
tools is available when you choose to work in the Native color space. Included at the
beginning of this section is a brief discussion of the LCH color model vs. the Native
color model, as well as other concepts important to optimizing your workflow . The
scenarios provided are based on the Advanced Image Correction tools available
through the LCH color model.
• The LCH Color Model
• Selecting LCH or Native Color Space
• W orkflow for Optimizing Images
• Adding a Custom Setting
• How to Choose the Correct Image Category
• Using the Dynamic Range T ool
• Using the Black & White Points T ool
• Using the Gradation T ool
• Using the Color Cast Tool
• Using the Saturation Curve Tool
• Using the Selective Color T ool
• Using the Tone Curve Tool
• Using the Filter T ool
4 Using the AIC Tools
Page 25

4-2 ScanWizard Pro for Windows Users Guide
English
The LCH Color Model
One of ScanWizard Pro’ s strengths is its ability to let you work in the LCH color
space. Unlike the RGB color model, which corresponds to the color space as defined
in monitors and printers, the LCH color model is a more intuitive way of working with
colors, based on the values of Lightness (the “L” in LCH), Chroma (C), and Hue (H).
For instance, if you wish to change the color of the sky in an image to a darker blue,
your own eye — and your own judgment — will be the guide to making those color
changes. This is easier than, say , knowing the mathematical equivalent in RGB or
CMYK values that would correspond to a “dark sky blue”.
The LCH model, in effect, makes it easier to comprehend colors as they are couched
in the terms we are familiar with: Lightness (how dark or light a color is), Chroma or
saturation (how rich or dull a particular hue of green is), and Hue (the property that
distinguishes, say , the color red from the color blue.)
In the LCH color model, colors of equal brightness lie on a single plane of the model,
as shown below . Red and green lie opposite each other on the horizontal axis, as blue
and yellow lie opposite each other on the vertical axis.
On the color sphere shown below , you can see how the dif ferent LCH properties play
out:
• The different hues (red, green, yellow, blue) are spread around the sphere.
• The chroma (saturation) for each hue increases from the center of the sphere
outward, with the most saturated colors lying on the edge of the sphere.
• The brightness values increase from the bottom of the model to the top.
Page 26
Using AIC Tools 4-3
English
Selecting LCH or Native Color Space
ScanWizard Pro lets you choose the color space in which you wish to edit and work
with color images.
• Select LCH mode if you wish to edit or correct images in terms of color perception
according to the human eye, based on the properties of Lightness, Chroma, and
Hue. This is the default mode.
• Select Native mode if you wish to edit or correct the individual RGB / CMYK
channels of an image.
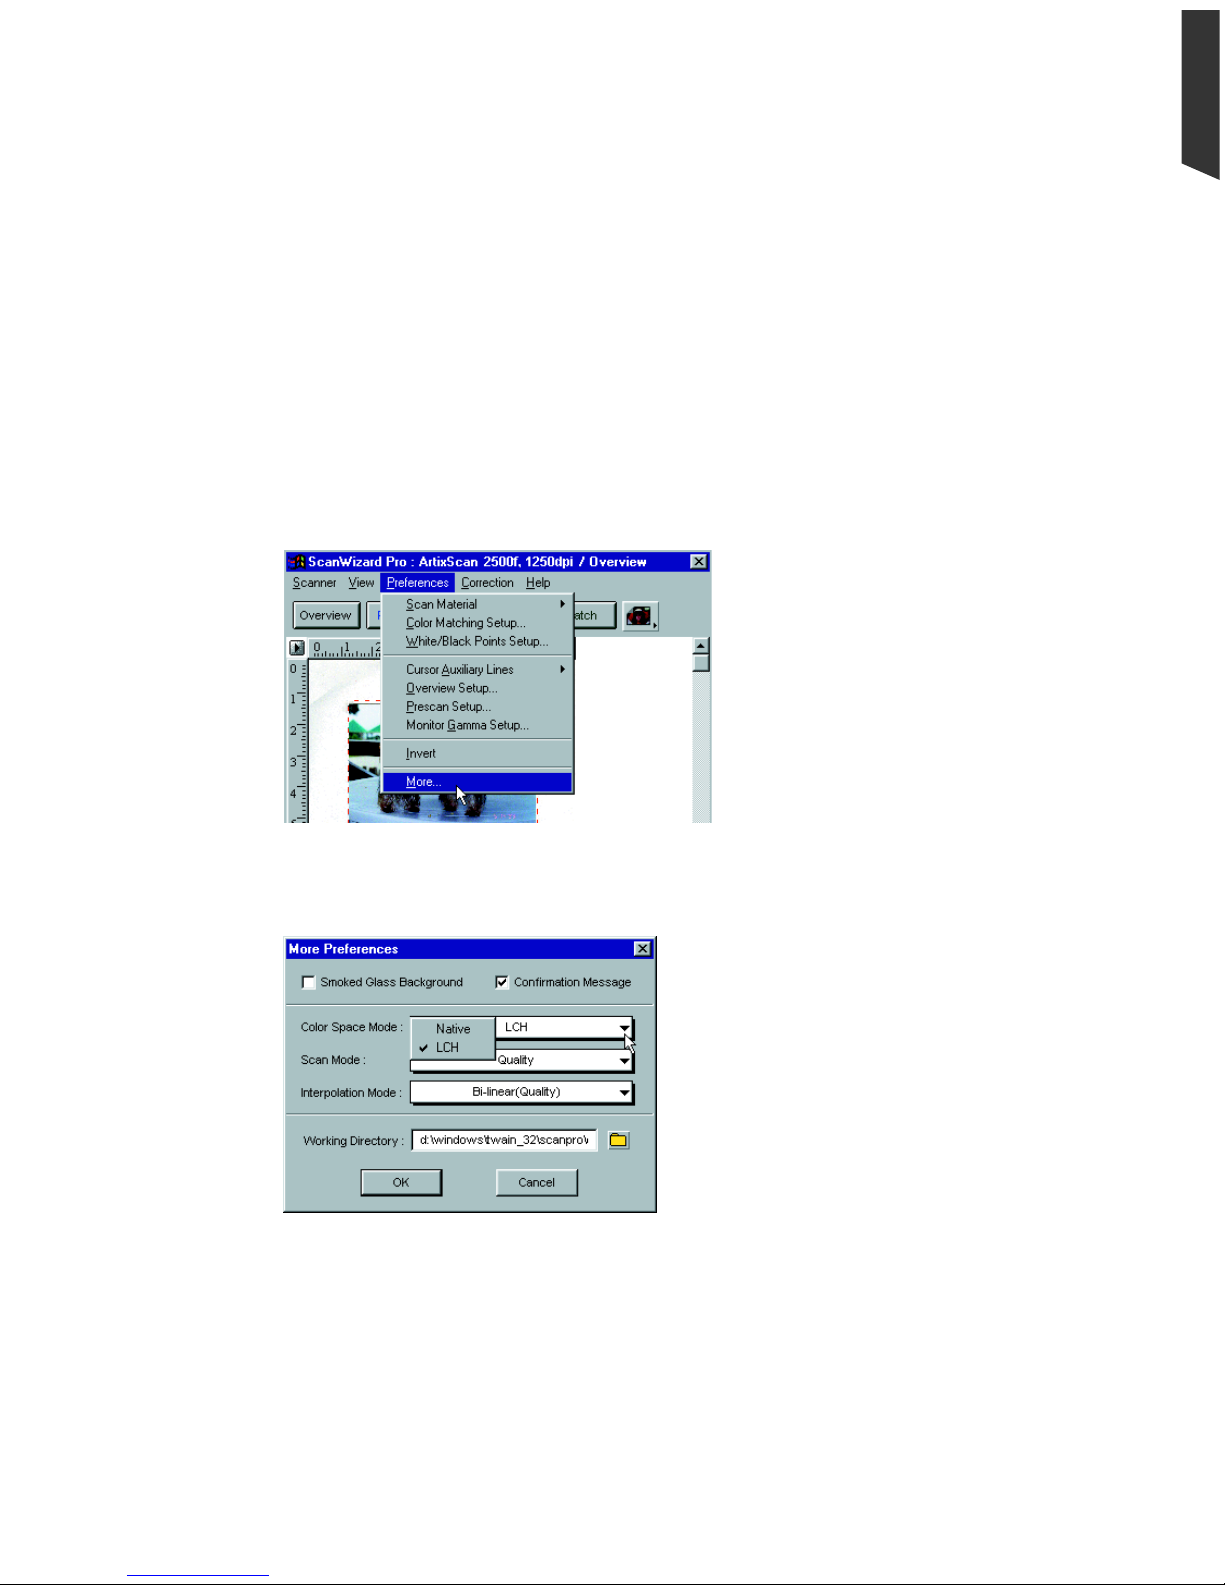
LCH mode is the default working color space when you first starts ScanWizard Pro.
T o switch to Native mode, click on Preference from Preview window menu bar. Then
click More... command from the bottom of the menu.
The following dialog box will then display .
From the dialog box, click on the Color
Space Mode: list box and choose Native.
The same procedure applies in switching
from Native back to LCH color space
mode.
Page 27

4-4 ScanWizard Pro for Windows Users Guide
English
Workflow for Optimizing Images
T o prepare and optimize images for final scan, it is recommended that the AIC tools
are used in accordance to their sequence (as they appear in the LCH Mode Settings
window shown below). Following this order will significantly influence the overall
quality of your images.
Dynamic Range
Manually or auto-adjust
color balance (darkest to
lightest tone)
Saturation Curve
Adjust image saturation
by manipulating the
saturation curve
5
White & Black Points
Manually or auto-adjust to fine-tune
the white & black points and neutral
gray
2
Color Cast
Adjust gray balance by
removing or adding color cast
4
Gradation Curve
Manually or auto-adjust
midtones of the
Lightness (Channel L)
Selective Color
Manipulate a specific color without
affecting other colors
6
Filter & Unsharp Masking
Apply special effects to image and
sharpen focus of blurry images with
unsharp masking (USM)
8
Tone Curve
Adjust tonal distribution
of each RGB/CMYK
channel in an image
Descreen (Use randomly)
Required only to remove
moiré patterns from scans
of newspaper/magazine
originals
LCH Mode AIC Tools
Native Mode AIC Tools
1
7
3
The sequence is practically the same under Native
Mode, except AIC Step 3 (Gradation) to Step 6
(Selective Color) of LCH Mode are not available in
Native Mode. The later mode however, of fers
Brightness & Contrast (B&C) and Color
Correction which are its nearest equivalent of the
more advanced tools.
Page 28
Using AIC Tools 4-5
English
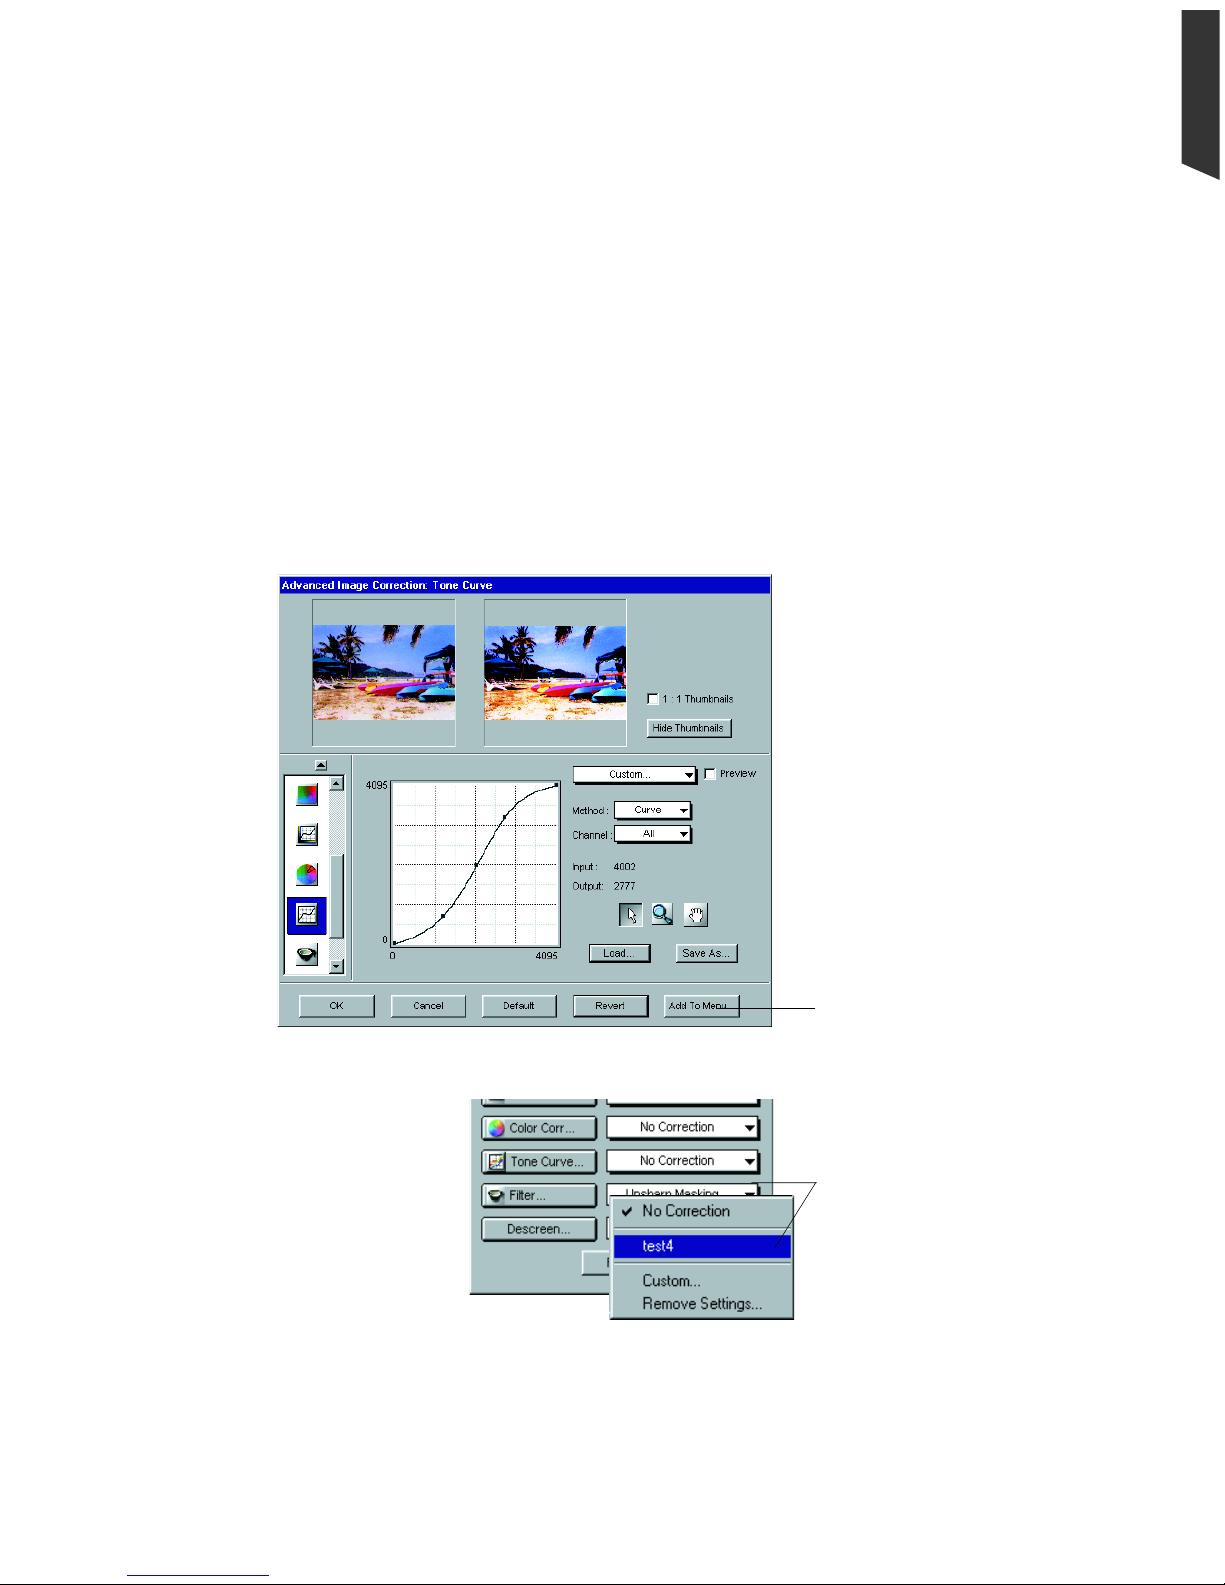
Adding a Custom Setting
To the right side of each AIC tool is a custom pull-down menu that features
predefined settings for the AIC tool. For instance, some of these settings include
Automatic or No Correction. Y ou can also add your own image correction setting for
each AIC tool. That way , you can retrieve or load the setting at any time in the future.
To do this, choose an AIC tool and make the adjustments you desire to the image.
Then click the Add to Menu button in the AIC dialog box.
When another dialog box comes up, enter the name for the new setting. The new
setting will appear in the custom pull-down menu of the Settings window for that
particular AIC tool.
Saved custom setting (e.g.,
test4) is stored here. To
retrieve and apply test4 to a
new image to be subjected to
a Tone Curve adjustment,
click on this expansion
arrowhead and choose test4
from the menu
Click to save current custom
setting and add into AIC (Tone
Curve in this example)
predefined settings menu in
the Settings window (see
below)
Page 29

4-6 ScanWizard Pro for Windows Users Guide
English
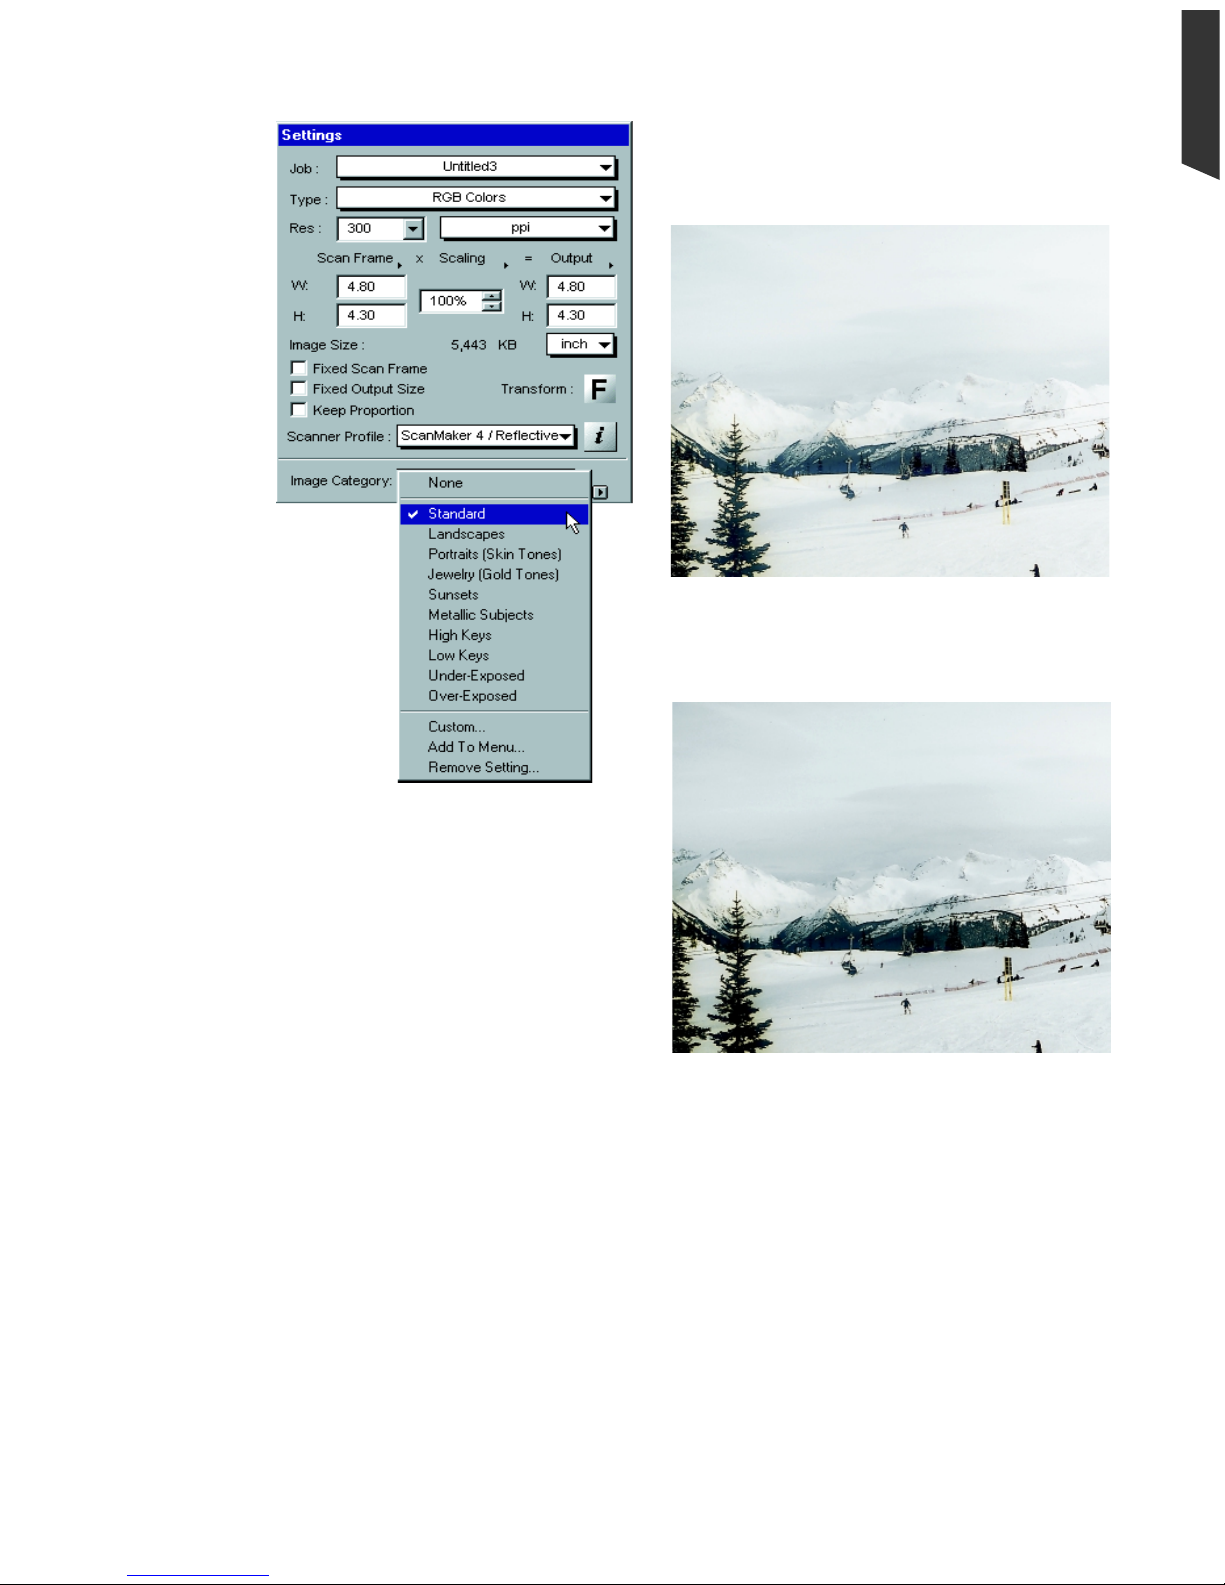
How to Choose the Correct Image Category
ScanWizard Pro provides several pre-defined image correction categories which can
be applied as shortcut auto-correction your image.
T o select the correct image category for your image, go to the Settings window and
choose the option you wish from the Image Category menu. Select the image
category that corresponds most closely to the image characteristics of your original.
The selected image category could be used as a starting point of enhancing your
prescan before proceeding to further optimize it with the AIC tools.
• None: No image category conversion (default).
• Standard: An image that does not fall into any of the d category described below .
You can also use this category for images of good quality (neither underexposed
nor overexposed, with accurate color and tones).
• Landscape: An image with cool atmosphere with broad tonal variation and a
wide hue range. Examples include natural scenery , skyline with an expanse of blue
sky , mountains and fields.
• Portraits (Skin Tones): An image with dominant skin tones and mid-tone details.
Examples include portraits and objects with fleece- or skin-like covering.
• Jewelry (Gold T ones): An image featuring dominant gold / silver hues. Examples
include gold and silver jewelry , silverware.
• Sunsets: An image with warm reddish hues or a color cast reminiscent of sunsets.
Examples include scenes at dusk or twilight and images of the Grand Canyon.
• Metallic Subjects: An image with broad highlight and shadow details but with
very narrow mid-tone details. Examples include audio equipment, TV sets,
cameras.
• High Keys: An image with broad highlight tonal variation but with less shadow
detail. Examples include snow-covered landscapes, wedding gowns, whitewashed structures.
• Low Keys: An image with broad shadow tonal variation but with less highlight
detail. Examples include nighttime scenery , dark suits and clothing, a coal pit.
• Underexposed: An image with compressed tonal variation particularly in the
shadow areas, characterized by an overall dark appearance typical of underexposed positive film.
• Overexposed: An image with compressed tonal variation particularly in the
highlight areas, characterized by an overall bright appearance typical of overexposed positive film.
Page 30
Using AIC Tools 4-7
English
In the example images at right, an
overexposed original is shown in two
different image categories. Because
the original was overexposed to
begin with, choosing the
Overexposed image category had the
result of neutralizing the exposure,
resulting in a better image.
The same original did not fare as well
when it was assigned the Standard
image category (too
bright overall, not enough contrast), because this image category is best used for
originals of fairly good quality (sharp, neither underexposed nor overexposed). In this
case, the original is with flawed exposure settings.
This example then shows the importance of choosing the correct image category that
corresponds most closely to your original to obtain optimal results.
Image defined as Standard image category
Image assigned Overexposed image category
Page 31

4-8 ScanWizard Pro for Windows Users Guide
English
The Dynamic Range tool is used to set the density
capture range of the scanner and displays the
density distribution (histogram) of the image to be
scanned.
The Auto range (default) feature automatically
determines the Dmin (minimum density , lightest
tone) and Dmax (maximum density, darkest tone) of
the image, and sets the scanner capture range.
In the example here, the original image has low
contrast and a limited range of tones, as can be seen
in the narrow image histogram. The solution;
truncate or narrow the scanner’s range of density to
the actual density range of the image (or smaller).
This would then redistribute the small density range
of the image to the maximum range of the scanner
output, and thus restore contrast to the image.
1. Place the image to be corrected on your scanner.
2 . Click the Overview button to start an overview,
and you will see the image appear in your
Preview window .
3. Select the area to be prescanned with the Scan
Frame tool, then click the Prescan button to
obtain a prescan image, and switch to the
Prescan view from the V iew menu.
4 . Click the Dynamic Range tool in the Settings
window . The Dynamic Range screen will then
appear.
5 . Adjust the Dmin and Dmax values to an
optimized range. T o do this, move the sliders to
the boundaries on both ends of the histogram.
6 . Click OK to confirm the correction.
NOTE: In the default Automatic setting,
ScanWizard Pro optimizes density capture range
automatically. You only need to use the
Dynamic Range tool if you wish to further
enhance image contrast.
Original image and
lightness histogram
without density
correction, showing
narrow tonal range
Using the Dynamic Range Tool
Corrected image and
lightness histogram with
density correction,
showing a broader tonal
range
Page 32

Using AIC Tools 4-9
English
6
4
Use the Dynamic Range tool to set the density
capture range of the scanner.
In the example below , the original has a narrow
image histogram skewed heavily to the right. In the
corrected version, the dynamic range is adjusted
more evenly or spread out toward the left,
enhancing contrast to the image.
6
5
Page 33

4-10 ScanWizard Pro for Windows Users Guide
English
Using the White & Black Points Tool
The White & Black Points tool is used to change the
shadow and highlight points of an image. (See note on next
page for additional descriptions.)
By using this tool, you can manipulate an image to either
bring out the highlights in a very dark image, or bring out
more of the shadows in a very light image.
The White & Black Points tool can also be used to
neutralize the color cast in the highlight and shadow
regions.
In the example here, we need to set the shadows and
highlights, as well as correct the color cast on both highlight
and shadow regions.
1. Place the image to be corrected on your scanner.
2 . Click the Overview button, and you will see the image
appear in your Preview window.
3 . Select the area to be prescanned with the Scan Frame
tool, then click the Prescan button to obtain a prescan
image, and switch to the Prescan view in the View menu.
4 . Click the White & Black Points tool in the Settings
window . The White & Black Points dialog box will
appear.
5 . Check the Shadows and Highlights Auto Neutralize
options to “On” (default). This helps to neutralize the
color cast in the shadow and highlight areas of the
image.
6 . Click the Auto button. This will automatically set the
optimal highlight and shadow points for the image.
7 . Check the Preview box so that the image in the Preview
window is updated with the latest image correction. The
update is done in the background and so may take a few
seconds to show.
8. Click OK to confirm the correction.
Image corrected with White &
Black Points tool
Original image
Page 34

Using AIC Tools 4-11
English
4
Use the White & Black Points tool to
set the shadow and highlight points of
an image, as well as to neutralize the
color cast in shadow/highlight regions.
In the example below , the original has a
slight color cast in the shadow and
highlight portions of the image. With
the use of the auto neutralizing and
auto adjustment features, the color cast
is removed, and the shadows and
highlights are remapped accordingly .
5
7
6
8
The shadow point is defined as the lightness value L in an image that is output as
black (mapped to the Minimum Output Level), while the highlight point is defined as
the lightness value L that is output as white (mapped to the Maximum Output Level).
The default values of the Minimum Output Level and Maximum Output Level are
L=5.0 and L=95.0, respectively.
Page 35

4-12 ScanWizard Pro for Windows Users Guide
English
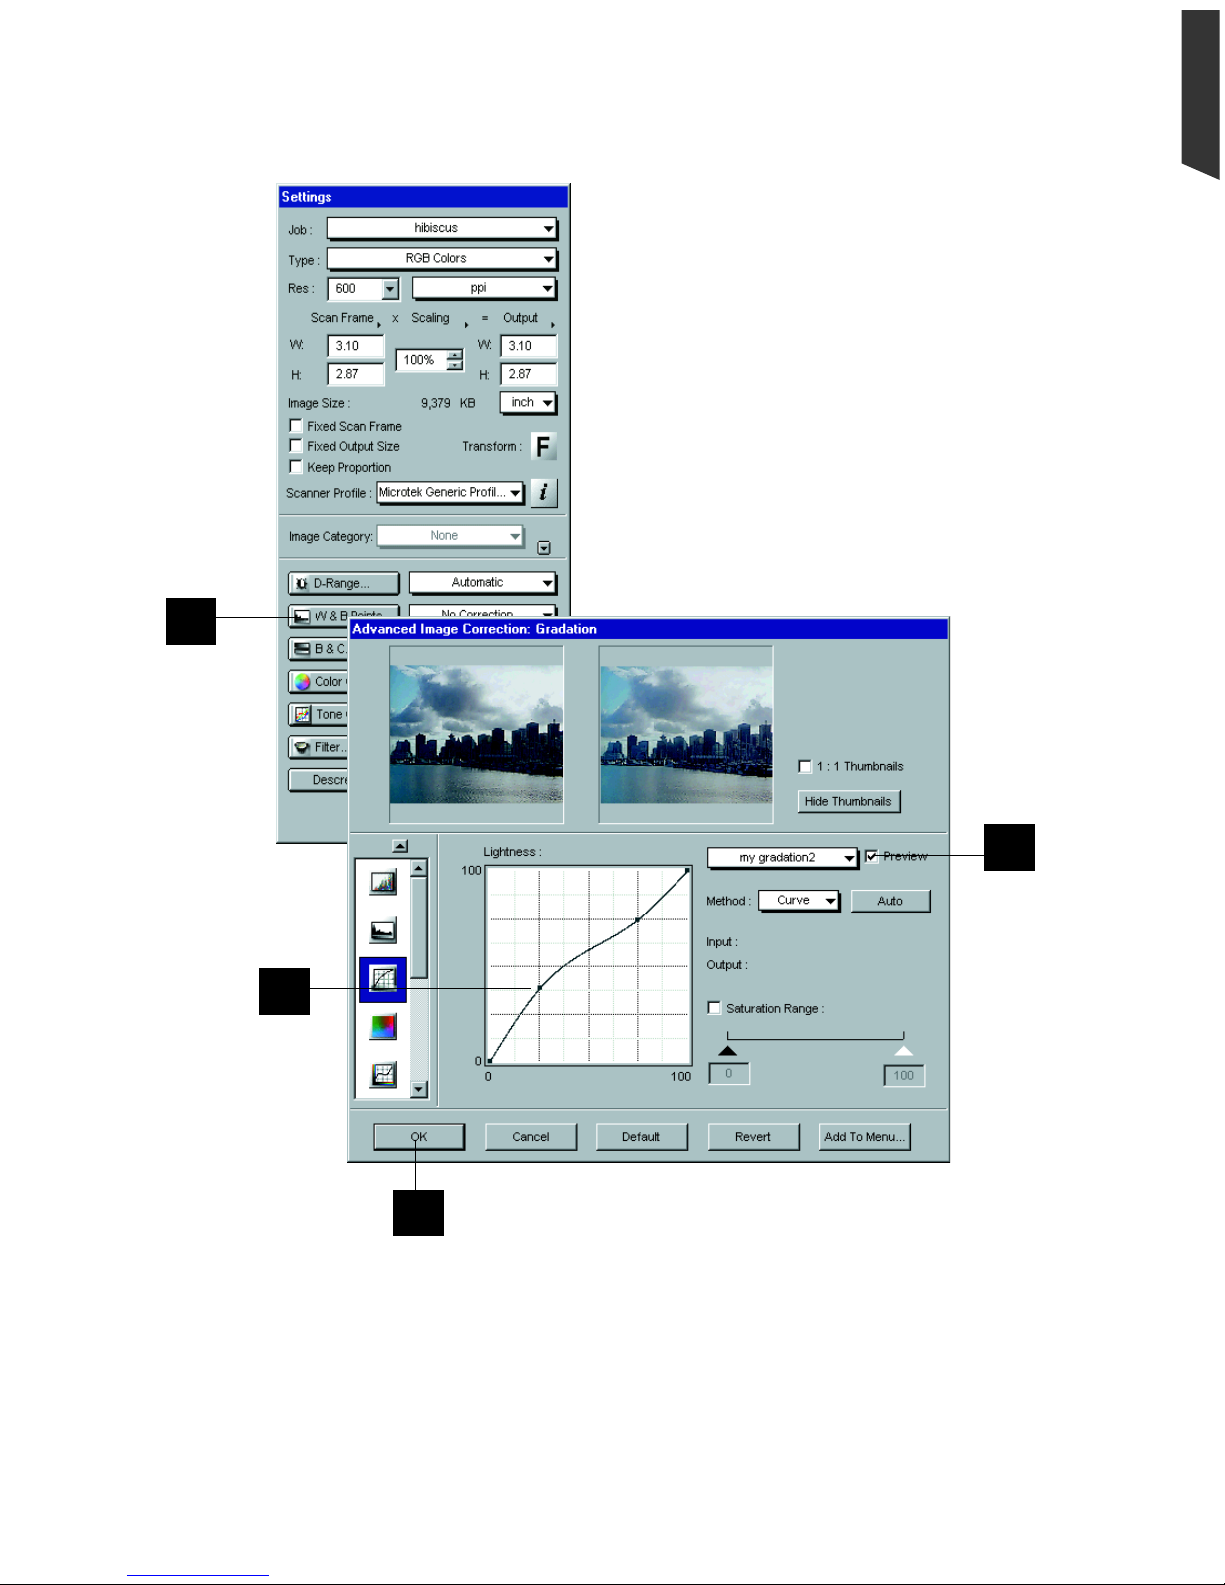
Using the Gradation Tool (LCH Mode only)
The Gradation tool lets you adjust the midtones
(the mid-level grays) of the lightness channel “L”
of an image without altering the color itself. This
is because even with changes to the luminance or
lightness value, the chroma and hue values are
kept constant.
T o prevent color images from losing saturation
when adjusting the lightness, ScanWizard Pro
provides a Saturation Range option. With this
option, colors outside of a given chroma range are
not affected by the manipulation of the gradation
curve.
In the example here, the original image is
underexposed, with the middle tones of the image
being too dark. The solution: Lighten the tones to
brighten up the image.
1. Place the image to be corrected on your
scanner.
2 . Click the Overview button, and you will see
the image appear in your Preview window.
3. Select the area to be prescanned with the Scan
Frame tool, then click the Prescan button to
obtain a prescan image, and switch to the
Prescan view in the V iew menu.
4 . Click the Gradation tool in the Settings
window . The Gradation dialog box will appear.
5. Move the pointer over the curve, and drag the
center of the curve to the left. This brighten
up the midtones of the image.
6 . Check the Preview box so that the image in the
Preview window is updated with the latest
image correction. The update is done in the
background and so may take a few moments
to show.
7. Click OK to confirm the correction.
Image corrected with Gradation tool
Original image
Page 36
Using AIC Tools 4-13
English
5
6
4
Use the Gradation tool to adjust the
midtones of the lightness channel “L”
of an image.
In the example below , the original is
underexposed, with the middle tones
of the image being too dark. The
corrected image shows the middle
tones being brightened, but the
saturation and hues of the image
remain untouched.
7
Page 37

4-14 ScanWizard Pro for Windows Users Guide
English
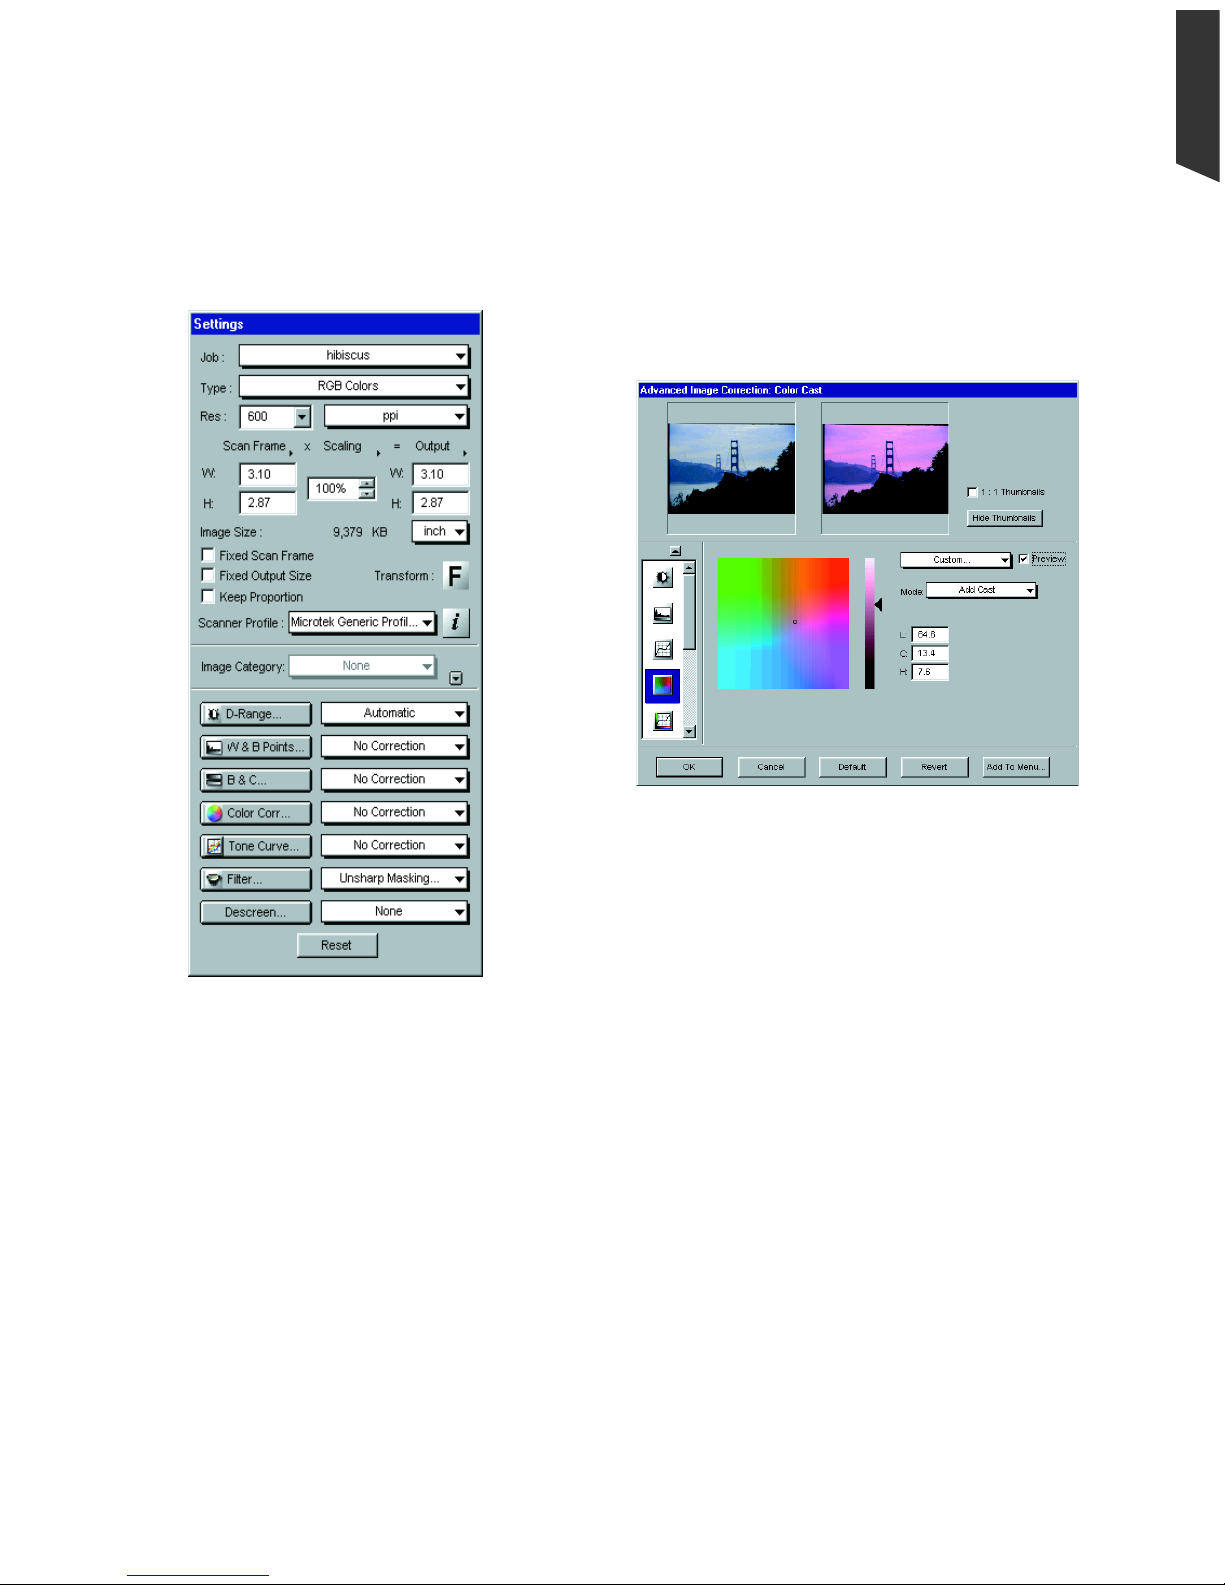
Using the Color Cast Tool (LCH Mode Only)
The Color Cast tool is used to eliminate any
unwanted color casts in an image, as well as to
add a color cast without altering the lightness
channel “L” values.
In the example here, the original has a slight
cyan cast that makes the image look cold and
unappealing. The solution: Remove the
undesirable color cast.
1. Place the image to be corrected on your
scanner.
2 . Click the Overview button, and you will see
the image appear in your Preview window .
3. Select the area to be prescanned with the
Scan Frame tool, then click the Prescan
button to obtain a prescan image, and
switch to the Prescan preview from the
View menu.
4 . Click the Color Cast tool in the Settings
window . The Color Cast screen will appear.
5 . Move pointer toward preview image (notice
that the pointer turns into Neutral
Eyedropper pointer). With the Eyedropper
pointer, click the color cast that you wish to
remove. In the example here, we click on the
“watch tower” of the fishing boat to remove
the unwanted cyan cast.
6 . Check the Preview box so that the image in
the Preview window is updated with the
latest image correction. The update is done
in the background and so may take a few
moments to show.
7 . Click OK to confirm the correction.
Image corrected with Color Cast tool
Original image
Page 38

Using AIC Tools 4-15
English
6
Use the Color Cast tool to remove an
unwanted color cast or to add a color
cast without altering the lightness
channel “L” values.
In the example below , the original has a
slight cyan cast to it. Using the Tag
Windows tool and clicking on the
“watch tower” of the fishing boat
removes the unwanted cyan cast from
the image.
4
8
5
Page 39

4-16 ScanWizard Pro for Windows Users Guide
English
Using the Saturation Curve Tool (LCH Mode Only)
The Saturation Curve tool lets you increase
or decrease the color intensity (chroma or
saturation) of an image without altering its
hue and lightness values.
In the example here, the colors in the original
are not as saturated as they should be,
resulting in a dull, lifeless image. The
solution: To increase the saturation or
intensity of the colors and restore vibrancy
to the image.
1. Place the image to be corrected on your
scanner.
2 . Click the Overview button to start an
overview , and you will see the image
appear in your Preview window .
3. Select the area to be prescanned with the
Scan Frame tool, then click the Prescan
button to obtain a prescan image, and
switch to the Prescan preview from the
View menu.
4 . Click the Saturation Curve tool in the
Settings window. The Saturation Curve
dialog box will appear .
5. Move the pointer over the curve, and
drag the center of the curve to the left.
This increases the saturation of the image.
6 . Check the Preview box so that the image
in the Preview window is updated with
the latest image correction. The update is
done in the background and so may take a
few moments to show .
7. Click OK to confirm the correction.
Image corrected with Saturation Curve tool
Original image
Page 40

Using AIC Tools 4-17
English
4
Use the Saturation Curve to increase or
decrease the color intensity (chroma or
saturation) of an image without altering the hue
and lightness values.
In the example below , the colors are not as rich
as they should be (notice the slightly muddied
wash to the overall image). The corrected image
shows deeper, richer tones, resulting in a more
vibrant, lifelike image.
6
7
5
Page 41

4-18 ScanWizard Pro for Windows Users Guide
English
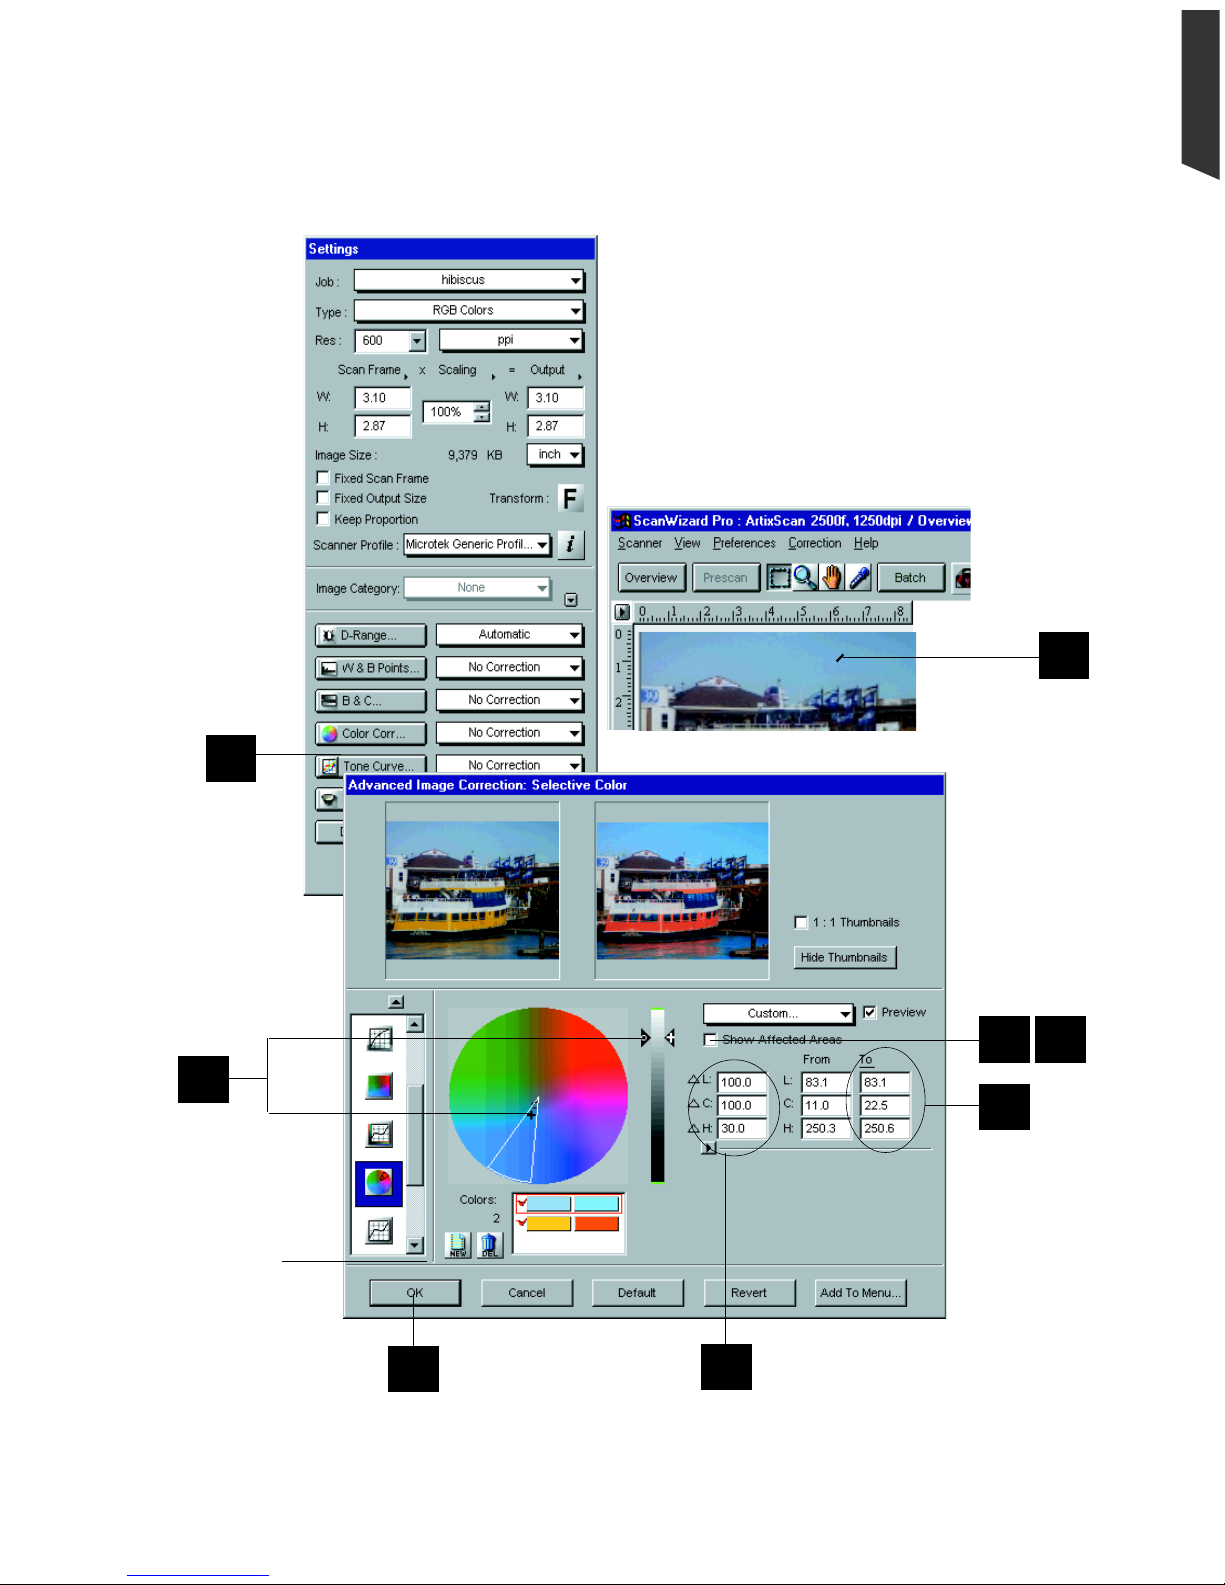
Using the Selective Color Tool (LCH Mode Only)
The Selective Color tool is used to perform color
correction to a specific color range without altering
the other colors in an image. This is done either to
increase the visual impact of a color or to completely
change the relationship of the targeted color(s) to the
other colors in the image.
In the example here, we want to increase the
saturation of the sky and change the boat color but
leave everything else untouched.
1. Place the image to be corrected on your scanner.
2 . Click the Overview button to see the overview
image in your Preview window .
3. Select the area to be prescanned with the Scan
Frame tool, then click the Prescan button to
obtain a prescan image, and switch to the Prescan
view from the View menu.
4 . Click the Selective Color tool in the Settings
window . The Selective Color dialog box will
appear.
5 . Select the From color or the color to be corrected.
In the example, move the pointer over the preview
image (notice that the pointer turns into Neutral
Eyedropper pointer). Point the Eyedropper over
the blue sky and click. (Steps 5 to 9 are repeated
for the change in the ship’ s color . Click the New
button to define a second color.)
6 . Check the Show Affected Areas option to see the
targeted color(s).
7. Adjust the color range to be affected (the Delta
LCH values). T o do this, drag the arc of the color
wheel and the sliders of the lightness bar until
only the sky’ s blue color is affected.
8 . Enter the To color or the color that will take the
place of the original. Enable the To color mode by
clicking on the To color label prior to entering the
color . In the Color Wheel, move the To color
marker to the desired chroma position.
Image corrected with Selective Color tool
Original image
9 . Uncheck the Show Affected Areas option to
see the corrected result, displayed on the
right thumbnail.
1 0 . Check the Preview box so that the image in
the Preview window is updated with the
latest image correction. The update is done
in the background and so may take a few
seconds to show.
1 1. Click OK to confirm the correction.
Page 42
Using AIC Tools 4-19
English
4
Use the Selective Color tool to perform color
correction to a specific color range without
altering the other colors in an image.
In the example below , the color of the blue sky is
changed with an increase in saturation, but all
other colors in the image are held constant and
remain unchanged.
New button
for defining
succeeding
colors to be
changed
8
7
6 9
10
7
5
Page 43

4-20 ScanWizard Pro for Windows Users Guide
English
Using the Tone Curve Tool
The Tone Curve tool is used to adjust the tonal
distribution of each channel of an image. It functions
very much like the Gradation tool, except that it
provides additional functions to allow separate
adjustments of the tones in each RGB or CMYK
channel, depending on the image type. This tool is
especially useful for correcting the “ink percentage”
distribution (i.e., dot gain correction) in CMYK
images.
In the example here, the original image looks cold, with
a decidedly blue-green cast to it. The solution:
Increase the “ink percentage” of the yellow and
magenta channels to bring out the warmer tones.
1. Place the image to be corrected on your scanner.
2 . Click the Overview button, and you will see the
image appear in your Preview window.
3. Select the area to be prescanned with the Scan
Frame tool, then click the Prescan button to
obtain a prescan image, and switch to the Prescan
view in the View menu.
4 . Click the T one Curve tool in the Settings window.
The Tone Curve dialog box will appear.
5. Select Curve as your “Method”.
6. Select Yellow as your “Channel”, and adjust the
yellow channel by moving the curve slightly
higher and towards the left, as shown.
7. Select Magenta as your next “Channel”, and do
the same thing you did with the yellow channel,
moving the curve slightly higher and towards the
left.
8 . Check the Preview box so that the image in the
Preview window is updated with the latest image
correction. The update is done in the background
and so may take a few moments to show .
9. Click OK to confirm the correction.
Image corrected with Tone Curve tool
Original image
Page 44

Using AIC Tools 4-21
English
5
8
4
Use the T one Curve tool to adjust
the tones separately or as a whole
for RGB/CMYK images.
In the example below , the original
looks cold, with a preponderance of
blue-green tones. The corrected
version shows the image with
adjusted tones in the yellow and
magenta channels, resulting in a
rosier, warmer look.
7
6
9
7
Page 45
4-22 ScanWizard Pro for Windows Users Guide
English
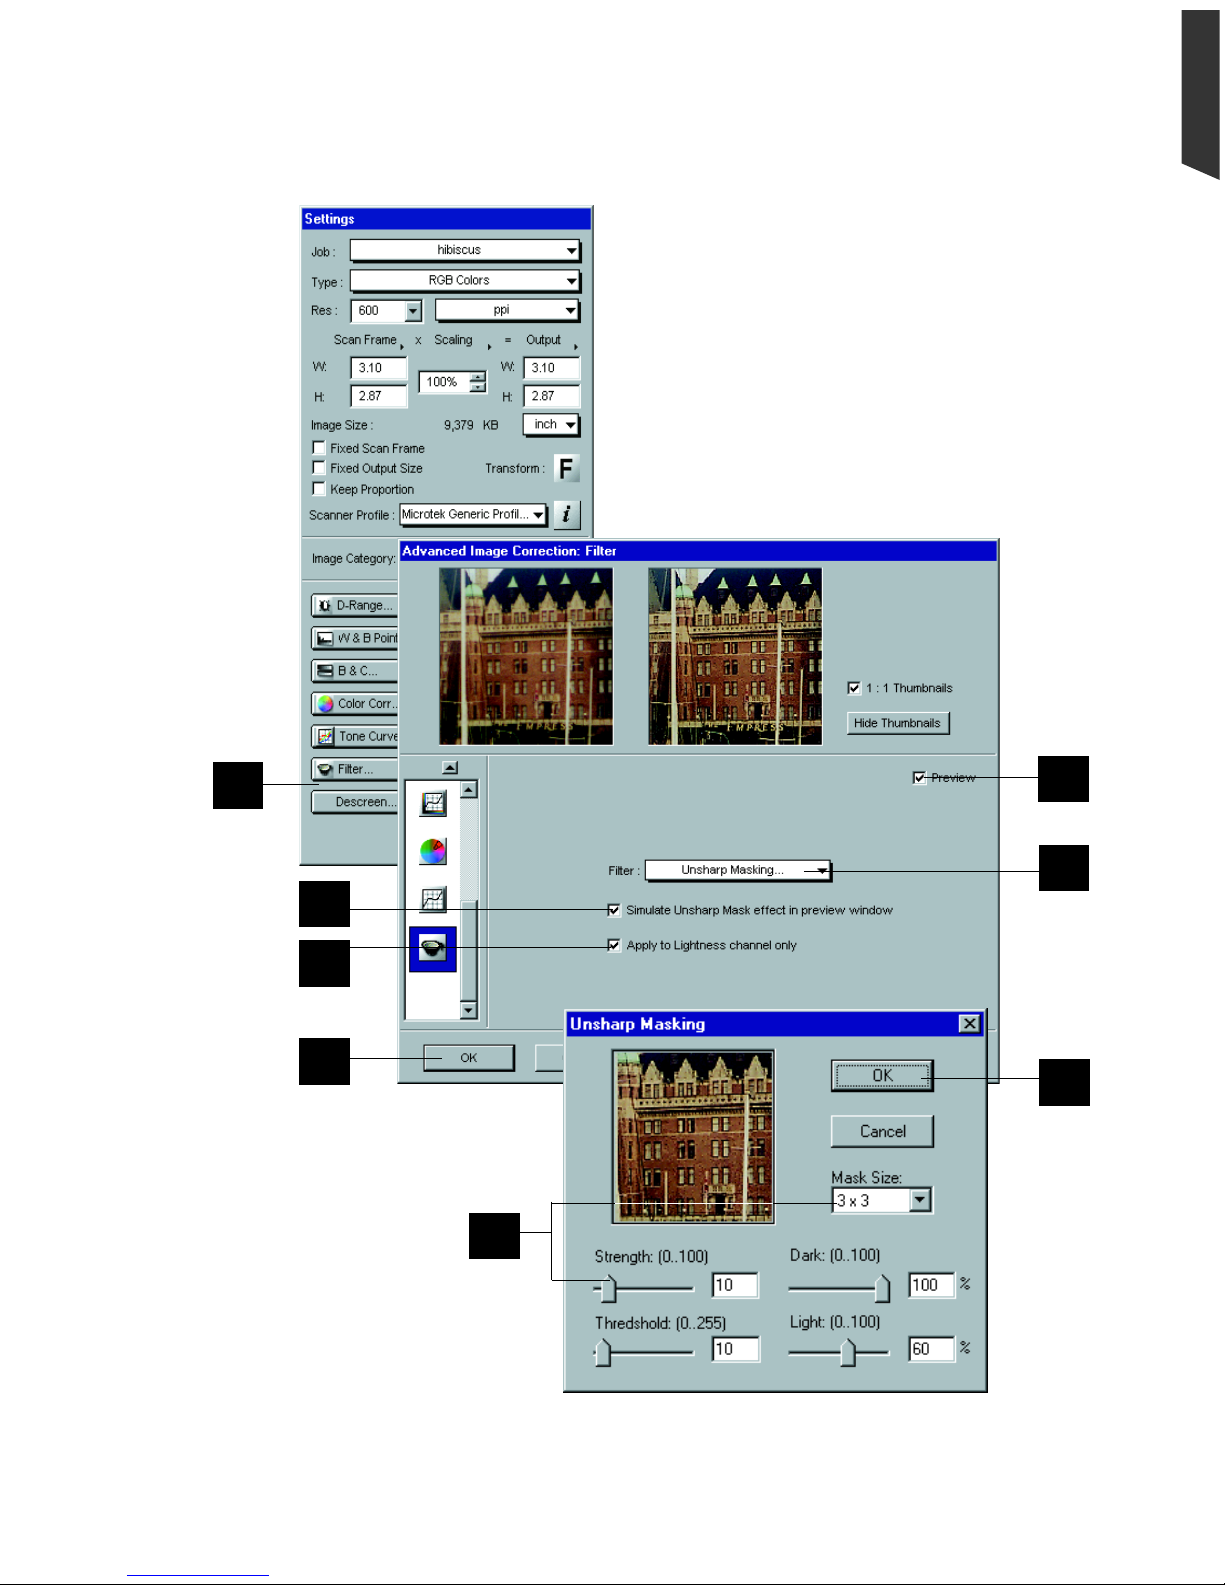
Using the Filter Tool
The Filter tool is used to apply special effects to
your images. Several filters are provided in
ScanWizard Pro, including various Blur / Blur More,
Sharpen / Sharpen More, Emboss, and Edge
Enhancement.
In the example here, the original is a bit blurry to
begin with. The solution: Use the Unsharp Masking
filter to increase sharpness in an image.
1. Place the image to be corrected on your scanner.
2 . Click the Overview button, and you will see the
image appear in your Preview window .
3. Select the area to be prescanned with the Scan
Frame tool, then click the Prescan button to
obtain a prescan image, and switch to the
Prescan view from the View menu.
4 . Click the Filter tool in the Settings window . The
Filter dialog box will appear .
5 . Check the option, Simulate Unsharp Mask Effect
on Preview Images.
6 . Check the option, Apply Filter to Lightness
channel only.
7. Select Unsharp Masking from the Filter drop-
down menu. The Unsharp Masking dialog box
will appear .
8. Adjust the Strength and Mask Size parameters
until you are satisfied with the effect displayed
by the thumbnail.
9. Click OK to return to the Filter screen.
1 0 . Check the Preview box so that the image in the
Preview window is updated with the latest image
correction. The update is done in the background
and so may take a few seconds to display the
result.
1 1. Click OK to confirm the correction.
Image corrected with Unsharp Masking filter
tool
Original image
Page 46
Using AIC Tools 4-23
English
4
The Filters tool applies special effects to your
images.
In the example below , the Unsharp Masking
(USM) filter is used to increase sharpness in
the image and improve image quality .
10
5
6
7
11
9
8
Page 47

Special Features 5-1
En
g
lish
This section of the manual touches on the special features of ScanWizard Pro and
provides more advanced scenarios on how to use the program.
• How to Edit Multiple Scan Jobs
• How to Scan Multiple Jobs
• How to Use ScanW izard Pro W orking Directory
• How to Use the SnapTrans Templates
• How to Use the Magic Diamonds
• How to Customize Negative Film
• How to Scan and Display an Image on a 640 x480 Monitor
5 Special Features & Advanced Scenarios
Page 48

5-2 ScanWizard Pro for Windows Users Guide
English
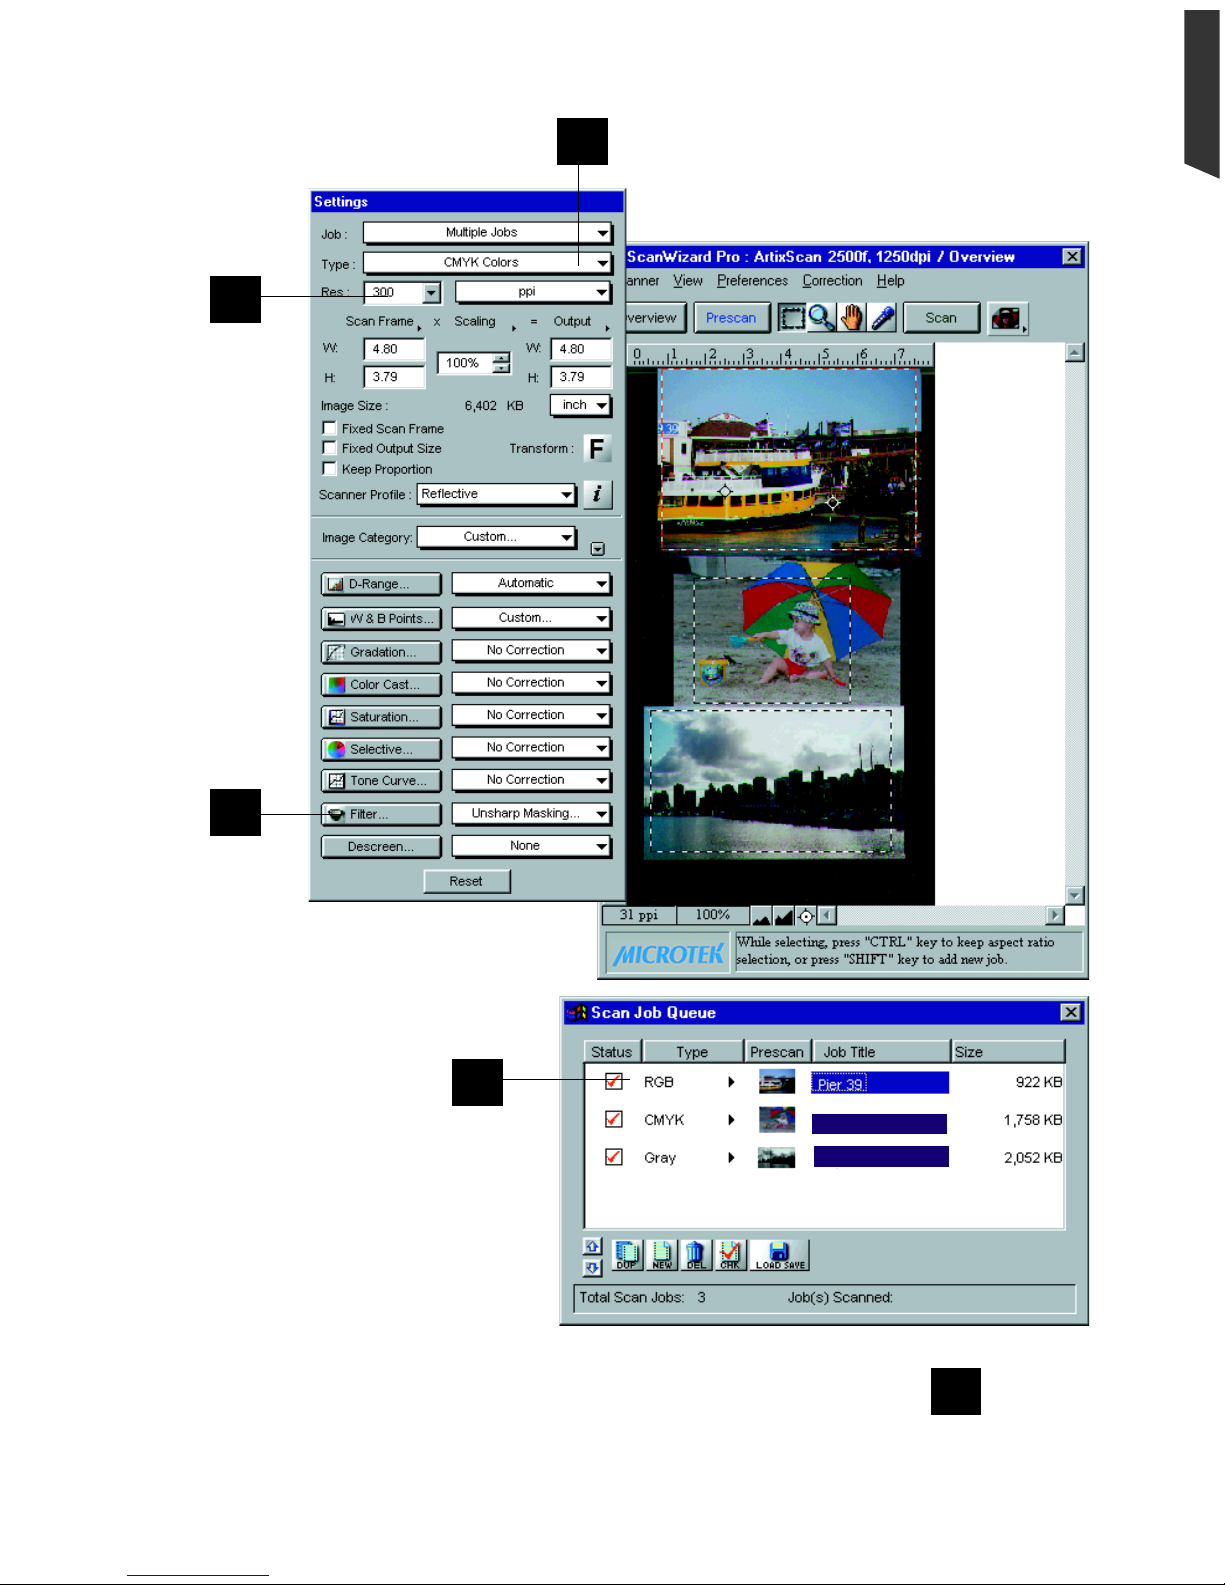
How to Edit Multiple Scan Jobs
ScanWizard Pro lets you edit multiple scan jobs at the
same time, increasing your efficiency in using the
software.
In the scenario below , each scan job has its own image
type setting (RGB, CMYK, Lab Color) and its own
resolution setting (from 100 to 300 dpi). With multiple job
editing, you can select all the jobs and then change their
image type and resolution in a few quick steps, and then,
say , apply a filter to all the images.
1 . Define the scan jobs in your Scan Job window. If you
wish to see how this scenario works, try setting up
each scan job as a different image type with its own
resolution, so that each of the jobs has varying
settings.
2 . Select all three scan jobs in the Scan Job window . To
include each scan job for selection, use the Shift + Click combination (pressing the Shift key while
clicking the mouse at the same time).
3. Go to the Settings window, and choose an image type that will apply to all the scan jobs. In the
example here, we selected CMYK.
4. Choose a resolution setting that will apply to all the scan jobs. In the example here, we selected
300 dpi.
5. As a last step, apply a filter to all the scan jobs. In the example here, we chose the Unsharp
Masking filter. Take note that any of the Advanced Image Correction tools (such as the filters)
can be applied to scan jobs simultaneously only if the jobs are of a similar image type (in this
case, all are CMYK).
If you want to....
Before the Final Scan
Fine-tune the preview image with
image processing options (after
step 5)
Go to the Preview window, and
select the desired image-processing
option from the Correction menu.
Alternatively, you can go to the
Settings window and click on an
image processing button. If all your
images are of the same type, you can
edit and apply image corrrections to
all the selected scan jobs simultaneously.
Page 49
Special Features 5-3
En
g
lish
2
1
3
4
5
Kid & Beach
City View
Page 50

5-4 ScanWizard Pro for Windows Users Guide
English
How to Scan Multiple Jobs
Oftentimes, you will need to scan several images at a
time or find yourself wanting to scan multiple jobs to
save time. The sample scenario below shows how this
can be done.
1. Place the images to be scanned on your scanner.
2 . Go to the Preview window , click the Scan Material
icon, and choose the correct scan material type.
3. In the Preferences menu, choose More, then check
the Smoked Glass option. This feature will help you
distinguish the different scan jobs created,
especially if each one is of a different image type
(RGB color, Lab color , grayscale; shown in example
here).
4 . Click the Overview button to start an overview . The
images will appear in the Preview window.
5 . If the Scan Job window is not open, go to the View
menu and choose Show Scan Job window.
6. Create the other scan jobs that you need. To do this,
use the Duplicate or New button, or Shift+Drag the
current scan frame to form new ones.
7. Define the settings for each scan job. To do this,
highlight one or more scan jobs in the Scan Job
window, then specify the appropriate settings (type,
resolution, etc.) in the Settings window for these
particular scan jobs.
NOTE: Changed settings will apply to all selected
jobs (highlighted jobs). For more information, see
the “How to Edit Multiple Scan Jobs” scenario.
8 . If you like what you see in the Preview window , click
the Scan button to start scanning.
If you want to....
Before the Final Scan
Select an output image type (after
step 7)
Go to the Settings window, and from the
Type box, choose the appropriate image
type for each scan job.
Specify output dimensions (after step
7)
Go to the Settings window, and enter the
desired output dimensions (width and
height) in the output dimension edit boxes
for each scan job. The scan frame may
change slightly, and you may want to go
back to the Preview window to move the
scan frame and enclose the area you want.
Change output image resolution
(before step 8)
Go to the Settings window, and enter the
resolution value in the Resolution edit
box for each scan job.
See a more detailed preview image or
do multiple prescans (after step 7)
Go to the Preview window, highlight the
scan job you wish to see in detail, and
click the Prescan button. You can also do
multiple prescans if you have multiple
scan jobs. Simply choose all the scan jobs
in the Scan Job window, then click the
Prescan button. To view the various
prescan images, go to the View menu and
switch among the different views possible.
Fine-tune the preview image with
image processing options (after step 7)
Go to the Preview window, and select the
desired image-processing option for each
scan job from the Correction menu.
Alternatively, you can go to the Settings
window and click on an image processing
button; the Advanced Image Correc-
tion dialog box will then appear.
Page 51

Special Features 5-5
En
g
lish
6
8
4
2
5 3
7
Page 52

5-6 ScanWizard Pro for Windows Users Guide
English
The ScanWizard Pro working directory helps you get the most productivity out of your scanner,
especially if you need to perform several multiple scanning jobs. You can assign your own working
directory for each scanning session or use the default directory at windows\twain_32\scanpro\data\.
Current scan jobs are automatically save in the working directory whenever you -
• change to a new working directory for your next scanning session.
• quit ScanWizard Pro.
This will also help in preventing accidental loss of scan jobs in case of inadvertent system failure.
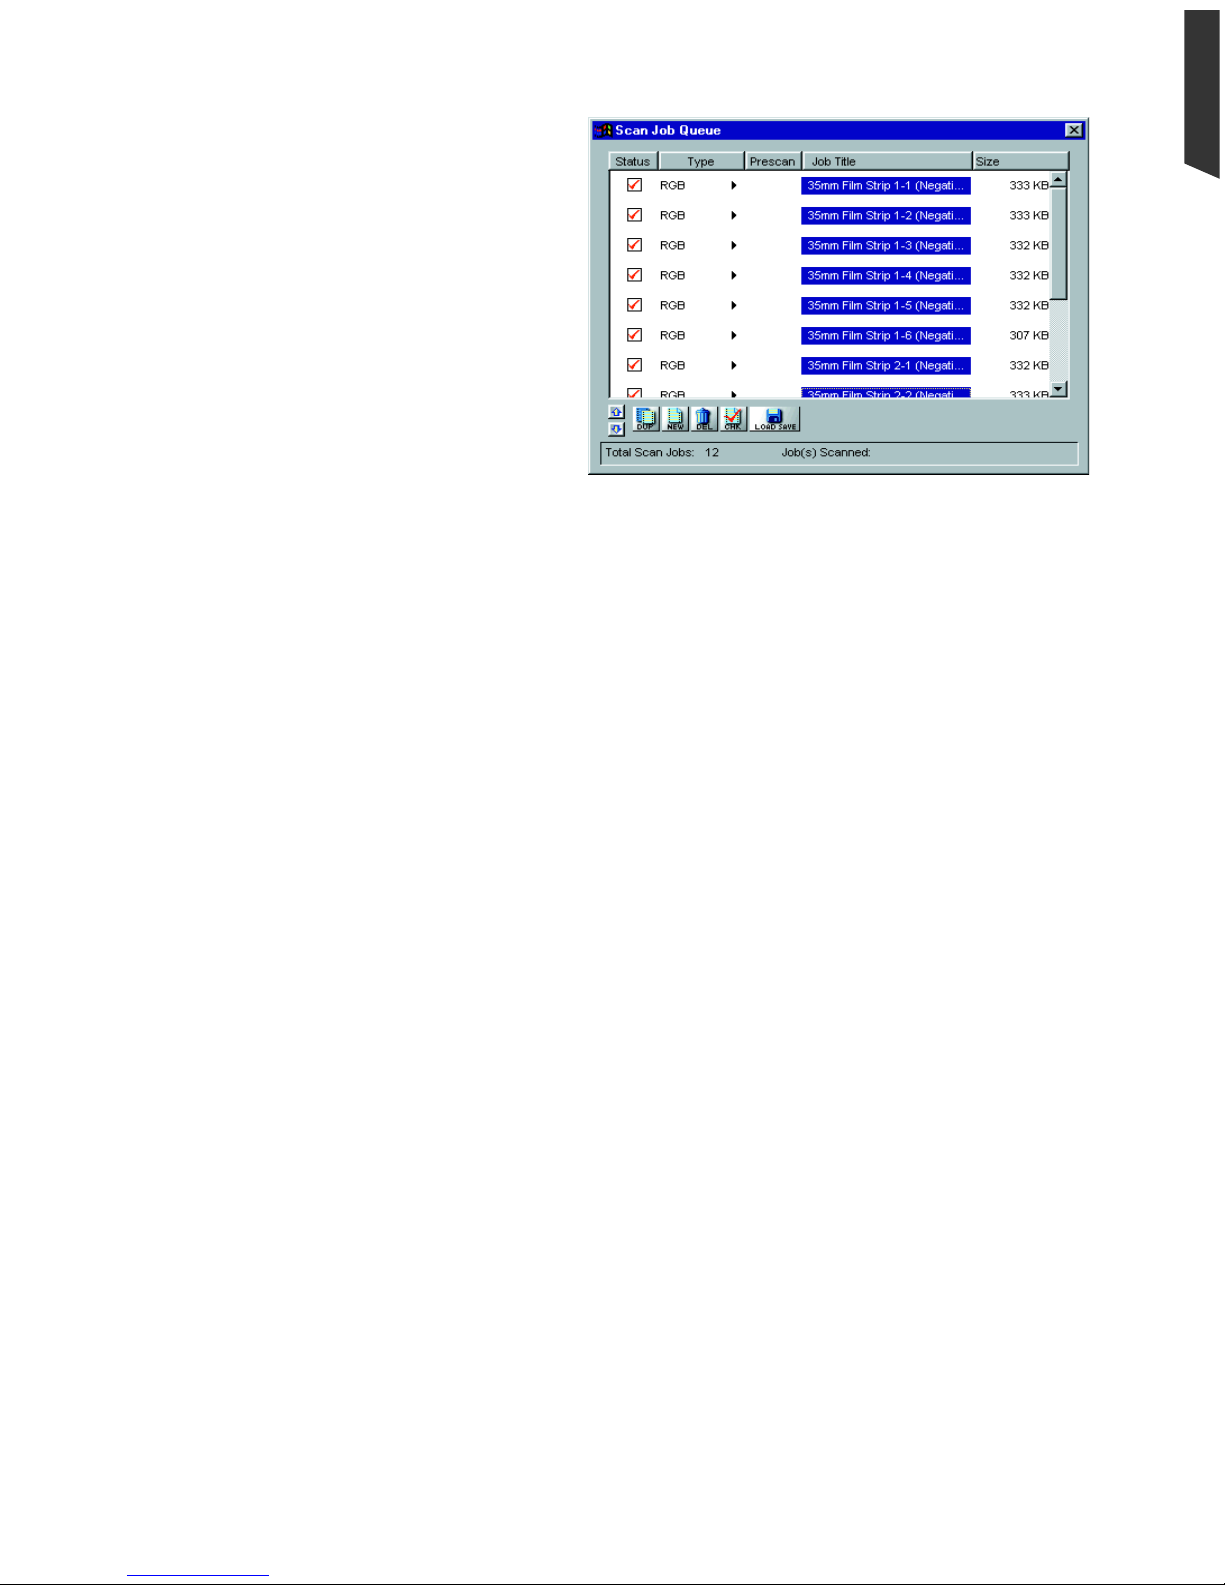
Suppose you want to scan several sets of 35 millimeter color filmstrips for your digital album. Here is
what you should do to allow the working directory helps speed up things for you.
1. If you are using a dual-bed scanner, load the
appropriate template with your first set of negative
filmstrips, and insert the tray into your scanner’s lower
bed. If you are using a flatbed, use a Transparent
Media Adapter.
2 . Go to the Preference menu and choose More. In the
dialog box, enter an appropriate folder name. e.g.,
Gallery I as your current scan session working
directory.
3 . Select the appropriate Scan Material type (Negative
Film in this example) in the Preview window , and click
the Overview button. Notice that each frame of the
filmstrips is auto-selected (enclosed in scan frames)
and each frame has been auto-assigned with jobnames
as shown in the Scan Job window . Y ou may on-line edit
the jobnames to provide your own jobnames.
How to Use ScanWizard Pro Working Directory
Page 53
Special Features 5-7
En
g
lish
4 . If you wish to provide all jobs with one
common settings, select all the scan jobs
and proceed to make the required settings
and image correction in the Settings
window . All adjustments you make will
apply to all selected scan jobs. See How to
Edit Multiple Scan Jobs in this chapter.
5. At this stage you may elect to change the
working directory or folder (e.g., Gallery
II) for the new set of filmstrips or quit
ScanWizard Pro. Whichever you do, the
current scan jobs are automatically stored
in the Gallery I folder .
6. If you are going to perform another scanning session with the next set of filmstrips, repeat from Step
2 again.
Page 54

5-8 ScanWizard Pro for Windows Users Guide
English
How to Use the SnapTrans Templates
ScanWizard Pro provides a way to use the SnapTrans™
templates on scanners featuring the E.D.I.T technology.
The templates are holders designed to secure a variety of
film, such as 4” x 5” film, 6cm x 9cm film, 35mm filmstrips,
and 35mm mounted slides (that can be mounted in either
landscape or portrait orientation).
This scenario shows you how to choose a particular
template, which then loads predefined scan jobs for you to
help in automating the scanning process.
1 . After mounting the film holder with your orignal, go to
the Scan Job window, and click on Load Save button.
2 . Then click the SnapT rans T emplates button. The
SnapT rans T emplates dialog box appears.
3 . From the SnapT rans T emplate, choose the correct
reflective scan material (Positive Film/Negative Film)
from the Material box.
4 . Select the template to be loaded for your reflective
material by clicking the appropriate template icon.
5 . Click the Add button to implement the chosen template.
The pre-defined set of scan frames (based of the
selected SnapTrans templated) are then displayed on
the Preview window. At the same time, the Scan Job
window will also show the pre-defined scan jobs.
6. From hereon, do an overview to see the images in the
Preview window, and continue with the process of
matching each overview image with each of the
predefined scan jobs in the Scan Job window .
7. When you are done, click the Scan button in the
Preview window to start scanning with the use of your
selected SnapTrans template.
NOTE: The pre-defined scan jobs that are created in
this process are in their default settings, and may not
what you want. To change the settings easily among
multiple scan jobs, see the “How to Edit Multiple
Scan Jobs” scenario.
If you want to....
Before the Final Scan
Select an output image type
(after step 6)
Go to the Settings window, and
from the Type box, choose the
appropriate image type for the image
to be scanned.
See a more detailed preview
image (after step 6)
Go to the Preview window, highlight
the scan job you wish to see in detail,
and click the Prescan button.
Fine-tune the preview image with
image processing options (after
step 6)
Go to the Preview window, and
select the desired image-processing
option from the Correction menu.
Alternatively, you can go to the
Settings window and click on an
image processing button.
Page 55

Special Features 5-9
En
g
lish
1
5
3
4
2
5
76
Page 56

5-10 ScanWizard Pro for Windows Users Guide
English
How to Use the Magic Diamonds
The “Magic Diamonds” that are a part of the Tag
Windows feature in ScanWizard Pro let you set the white
and black points, as well as remove any unwanted color
casts in an image without having to bring up the color
adjustment/correction screens.
In the example here, the image has a slightly grayish cast
(i.e., less contrast), which can be removed easily with the
use of the Magic Diamonds.
1. Place the image to be scanned on your scanner.
2 . Go to the Preview window and click the Scan
Material icon. From the submenu that appears,
choose the correct scan material type.
3 . Click the Overview button, and you will see the image
appear in your Preview window .
4 . Click the Eyedropper tool from the Preview window .
5 . Click a black or dark area in the image where you wish
to be your new shadow point. A black “Tag #1”
window will appear (indicated by a black strip at the
bottom of the Tag window) with the corresponding
RGB/LCH values of the spot where you had clicked.
Click the Black Diamond button to set the spot as
your new shadow point.
6 . Next, click a white area in the image where you wish
to be your new highlight point. A white “Tag #2”
window will appear (indicated by a white strip at the
bottom of the Tag window) with the corresponding
RGB/LCH values of the spot where you had clicked.
Click the White Diamond button to set the spot as
your new highlight point.
7 . Now, click on the area with unwanted color cast
which you wanted to remove. In the example here, we
clicked the light gray color on the boy’s T-shirt. From
the “T ag #3” window , click the Center Diamond
button to set remove the color cast and neutralize the
image. In case you want to add a color cast, press Alt
key while clicking on the centdr button.
If you want to....
Before the Final Scan
Select an output image type
(after step 2)
Go to the Settings window, and from
the Type box, choose the appropriate image type for the image to be
scanned. For monitor display of
images, choose RGB, Grayscale, or
Web / Internet colors.
See a more detailed preview
image (after step 3)
Go to the Preview window, highlight
the scan job you wish to see in detail,
and click the Prescan button.
Fine-tune the preview image with
image processing options (after
step 7)
Go to the Preview window, and
select the desired image-processing
option from the Correction menu.
Alternatively, you can go to the
Settings window and click on an
image processing button.
Page 57

Special Features 5-11
En
g
lish
7
2
4
3
5
6
Page 58

5-12 ScanWizard Pro for Windows Users Guide
English
How to Customize Negative Film
With ScanW izard Pro, you can create a customized film profile for your negative film, based on an
existing negative film profile. This lets you create film profiles at will or as the need arises, and allows
you to use the profiles for subsequent scans as well.
1 . Place the negative film (preferably with blank or unexposed frame) to be customized in the proper
film holder and insert into your scanner.
2 . Go to the Preview window and click the Scan Material icon. From the submenu that appears,
choose Negative Film.
3 . Go to the Settings window , and click the Film Type button. Select Custom at the bottom of the
menu.
4 . When the Customized Negative Film T ype dialog box appears, follow the steps outlined. First, click
the Overview (Step 2) option in the dialog box. When the overview image appears in the dialog box
window , plot a scan frame on the blank area of the film or on the blank space between two exposed
frames.
5. Click the Prescan (Step 4) option. When the prescan image appears, fine-tune the selection area
you made in step #4 to make sure that the film blank area is properly selected.
6 . Choose the base film type on which the custom negative film profile will be based for Step 6 of the
dialog box. In general, select an existing film profile closest to your new film type. Kodak Gold 100-
6 in this example .
7. Click the Customize (Step 7) option in the dialog box.
8 . When the customization process is completed, you will be promted by the Save Custom Film T ype
dialog box to enter a file name for the new negative film profile. A description is provided but may be
changed if you want to. T ake note that the new film will later appear in the Settings W indow Film
Type menu by description, not by file name.
9 . Click the Save button. The saved profile will now appear in the Film T ype menu in the Settings
window .
1 0 . Click the Close button in the Customize Negative Film T ype dialog box to return to the Preview
window .
1 1.Select the newly created customized profile from the Film Type menu to scan your customized film
type. In this example, it is Kodak Gold 100 New.
Page 59

Special Features 5-13
En
g
lish
2
Prescan image
showing blank
(unexposed) area of
film selected
10
3
6
4
5
7
9
8
11
Page 60

5-14 ScanWizard Pro for Windows Users Guide
English
How to Scan and Display an Image on a 640 x 480 Monitor
At times, you may wish to scan an image and then scale or
resize the image so that it can be displayed on your
monitor (either as a screen saver or wallpaper). The sample
scenario below shows how this can be done.
1. Place the image to be scanned on your scanner.
2 . Go to the Preview window and click the Scan Material
icon. From the submenu that appears, choose the
correct scan material type.
3 . Click the Overview button to start an overview , and
you will see the image appear in your Preview window .
4. Go to the Settings window, and choose pixels as your
unit of measurement. Then, enter the resolution value
in the Resolution edit box — 72 dpi in this case for
monitor display. If you change the resolution after
specifying the
output dimensions, the dimensions will change, and
you will then need to re-enter the correct output
dimensions again.
5 . Change to an initial scaling value of 200% in the
scaling menu. This step is necessary because most
scanners have a scan bed of only 8.5”, and this is not
enough to generate 640 pixels with the 72-dpi
resolution specified in Step #4 (8.5” x 72=576, not 640).
To compensate for the shortage in scan bed length, we
boost the scaling factor to 200%. Do not worry about
this; the final scaling will be changed but the output
dimensions will still be preserved.
6 . In the Output edit boxes, enter “640” for width and
“480” for height. Y ou will notice that the scan frame in
your preview image changes.
7 . Check the Fixed Output Size box. T ake note of the
flashing frame (marquee) around the selected area. If
you adjust or move the scan frame, the scaling will
change accordingly.
8 . If you like what you see in the Preview window , click
the Scan button in the Preview window to start
scanning.
If you want to....
Before the Final Scan
Select an output image type
(after step 2)
Go to the Settings window, and from
the Type box, choose the appropriate image type for the image to be
scanned. For monitor display of
images, choose RGB, Grayscale, or
Web / Internet colors.
See a more detailed preview
image (after step 7)
Go to the Preview window , highlight
the scan job you wish to see in detail,
and click the Prescan button.
Fine-tune the preview image with
image processing options (after
step 7)
Go to the Preview window , and select
the desired image-processing option
from the Correction menu.
Alternatively, you can go to the
Settings window and click on an
image processing button.
Page 61
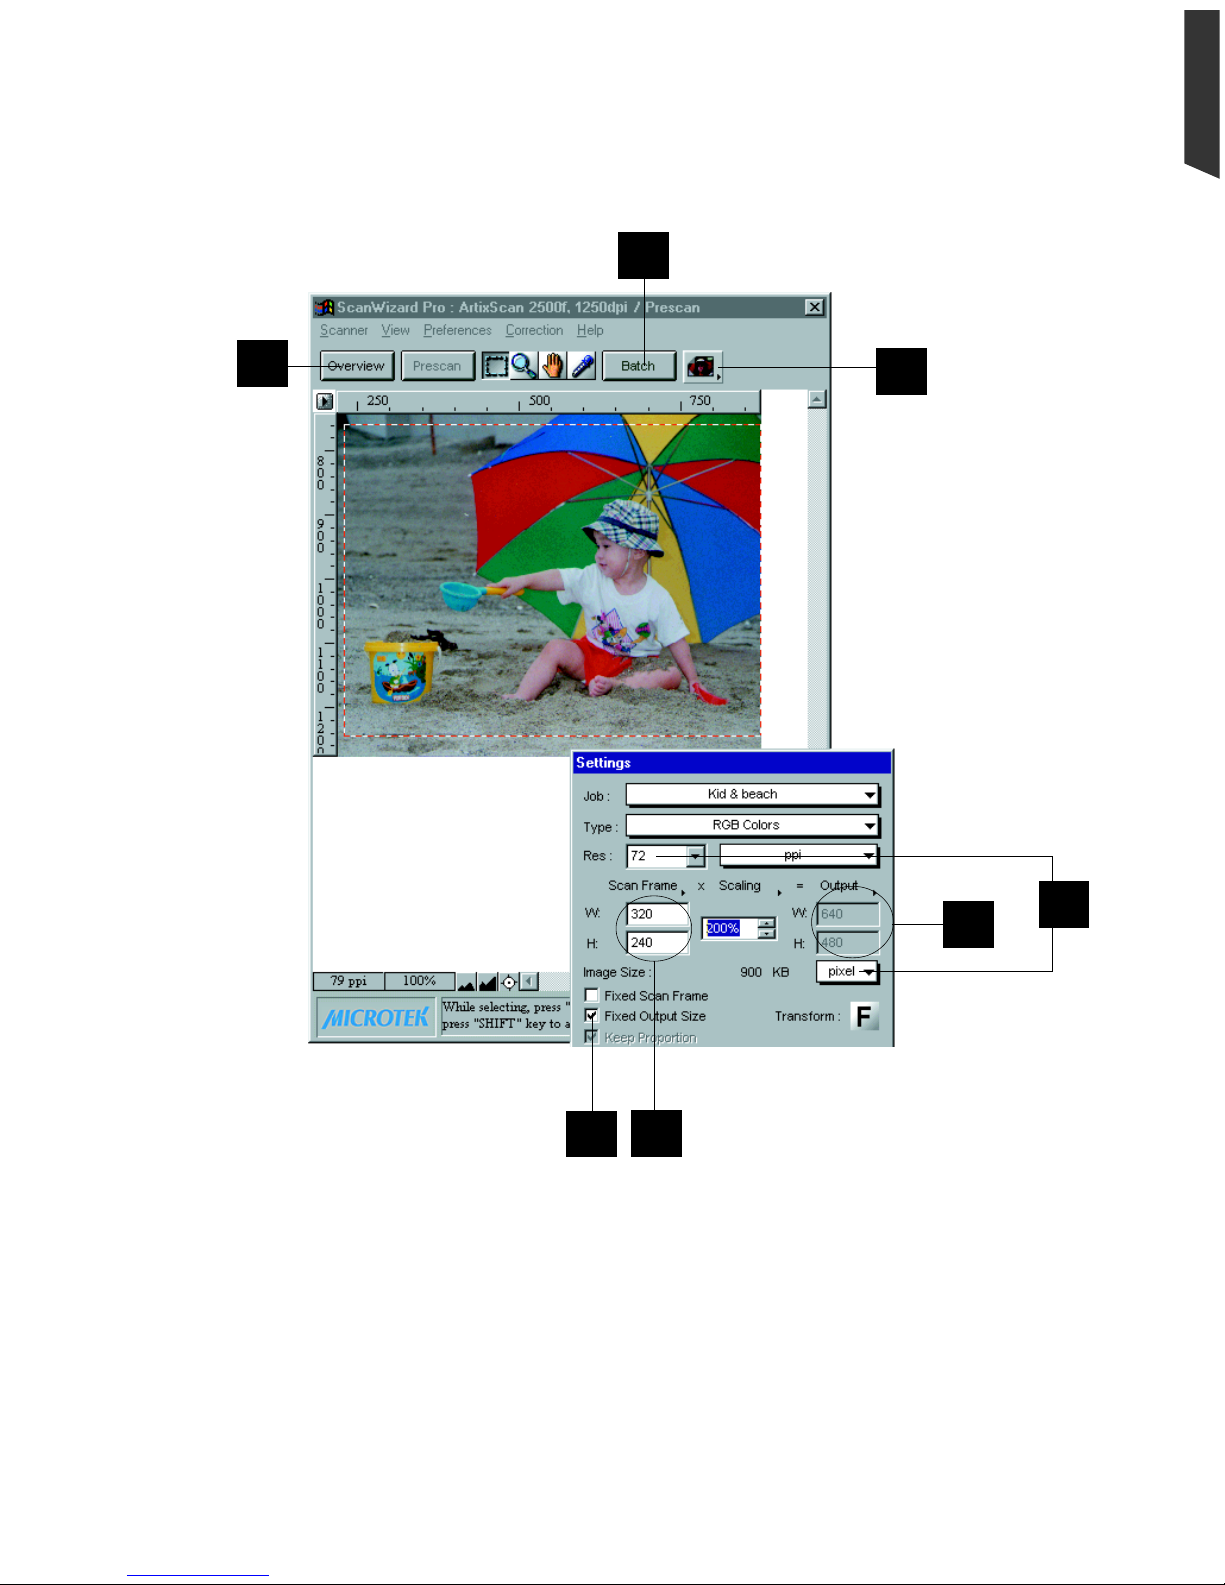
Special Features 5-15
En
g
lish
4
5
2
8
3
7
6
Page 62

Appendix-1
En
g
lish
Appendix
The following are the contents of the Appendix section:
A Color Matching for Advanced Users
B A vailable File Formats for “Scan to File” Function
Page 63
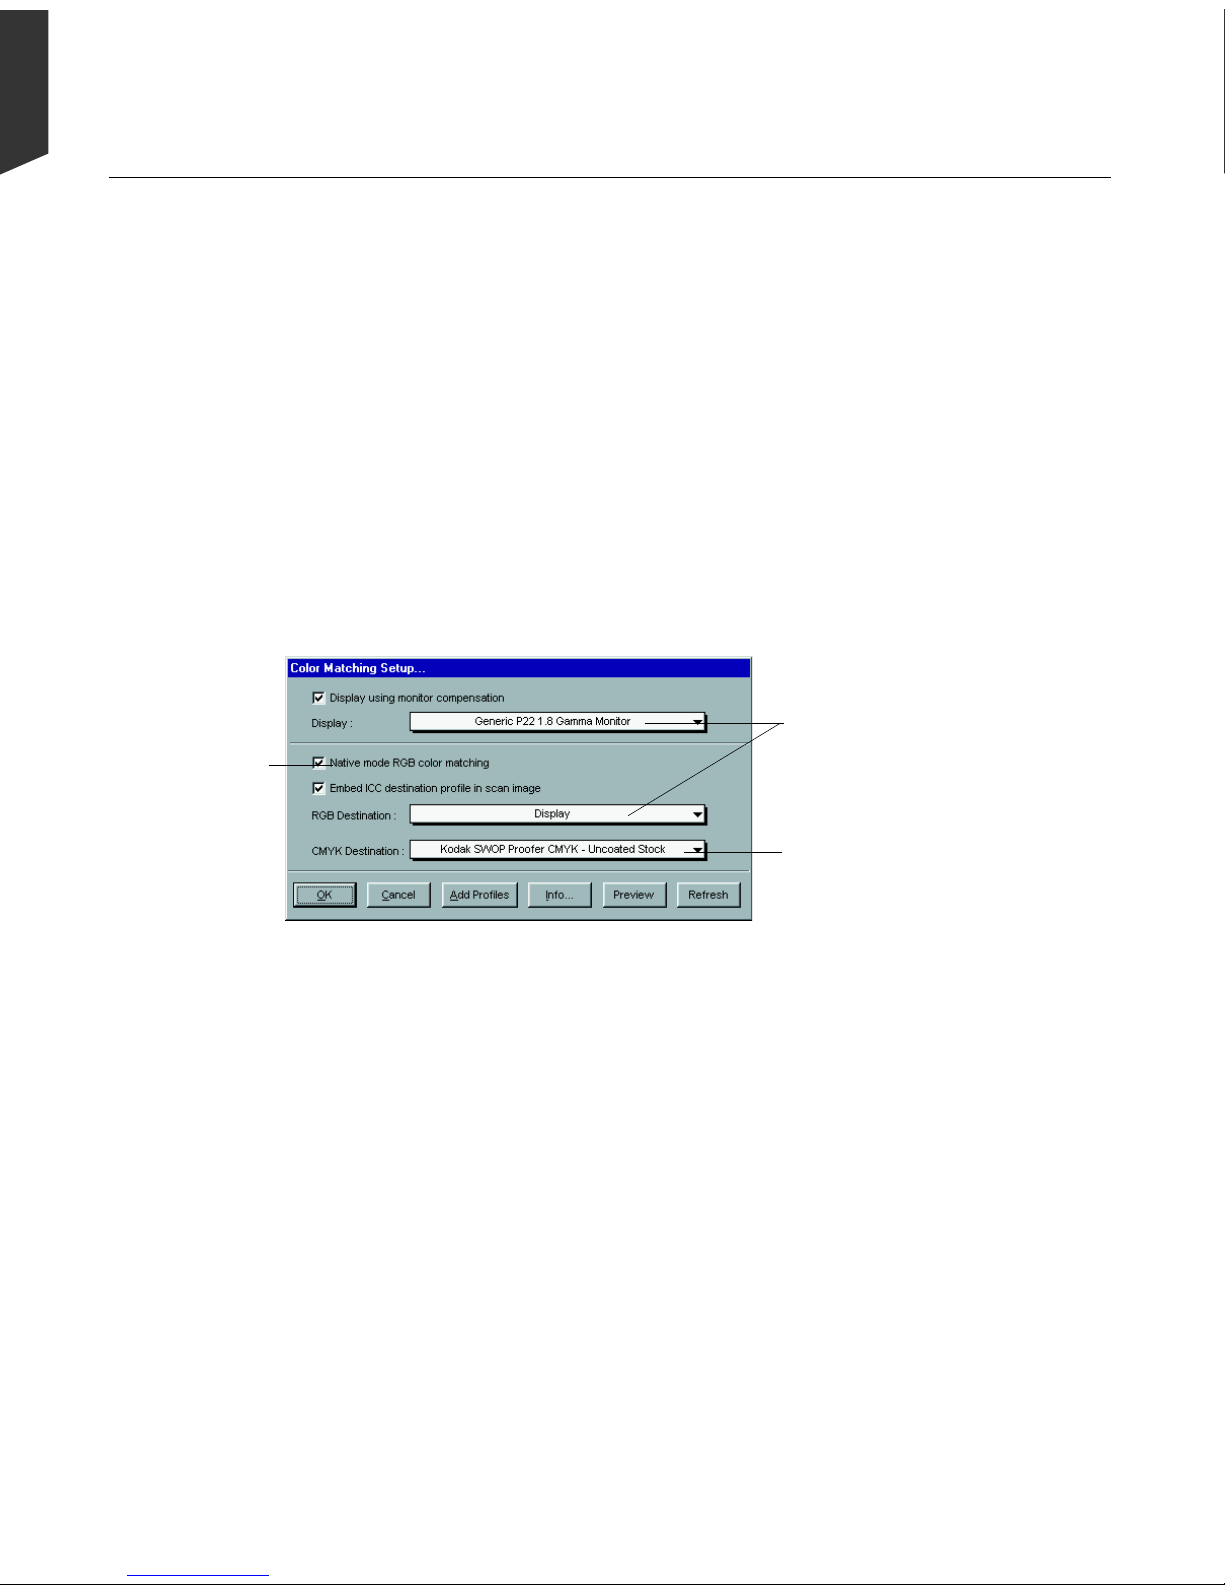
Appendix-2 ScanWizard Pro for Windows Users Guide
English
To keep color consistency between the scanner, monitor, and printing device,
ScanWizard Pro applies Kodak CMS (Color Management System) with ICC
(International Color Consortium) profile standards.
When you install ScanWizard Pro 6.0, the CMS installer will prompt you (with the
Color Matching Setup dialog box) to match your color monitor and printer with the
provided list. The dialog box allows you to select the correct ICC profile to match
your color monitor and color printer . You may , however , change and update your
existing settings after installation by clicking the Color Matching Setup command
from the Reference menu. The default profile for color monitor is “Generic P22 1.8
Gamma Monitor” and printer will set to “Display .”
This is dimmed
when operating
under LCH mode
Monitor selection
shown here is set at
default profiles for
monitor and printer
CMYK printer
profile. No default
provided. Must
select one if required
A Color Matching for Advanced Users
Display using monitor compensation
This check box controls the option on how the RGB destination data will be
displayed. If check box is unchecked (disabled), the RGB data is displayed directly to
the monitor. If checked, the RGB destination data will be simulated for the selected
type of display monitor.
Page 64
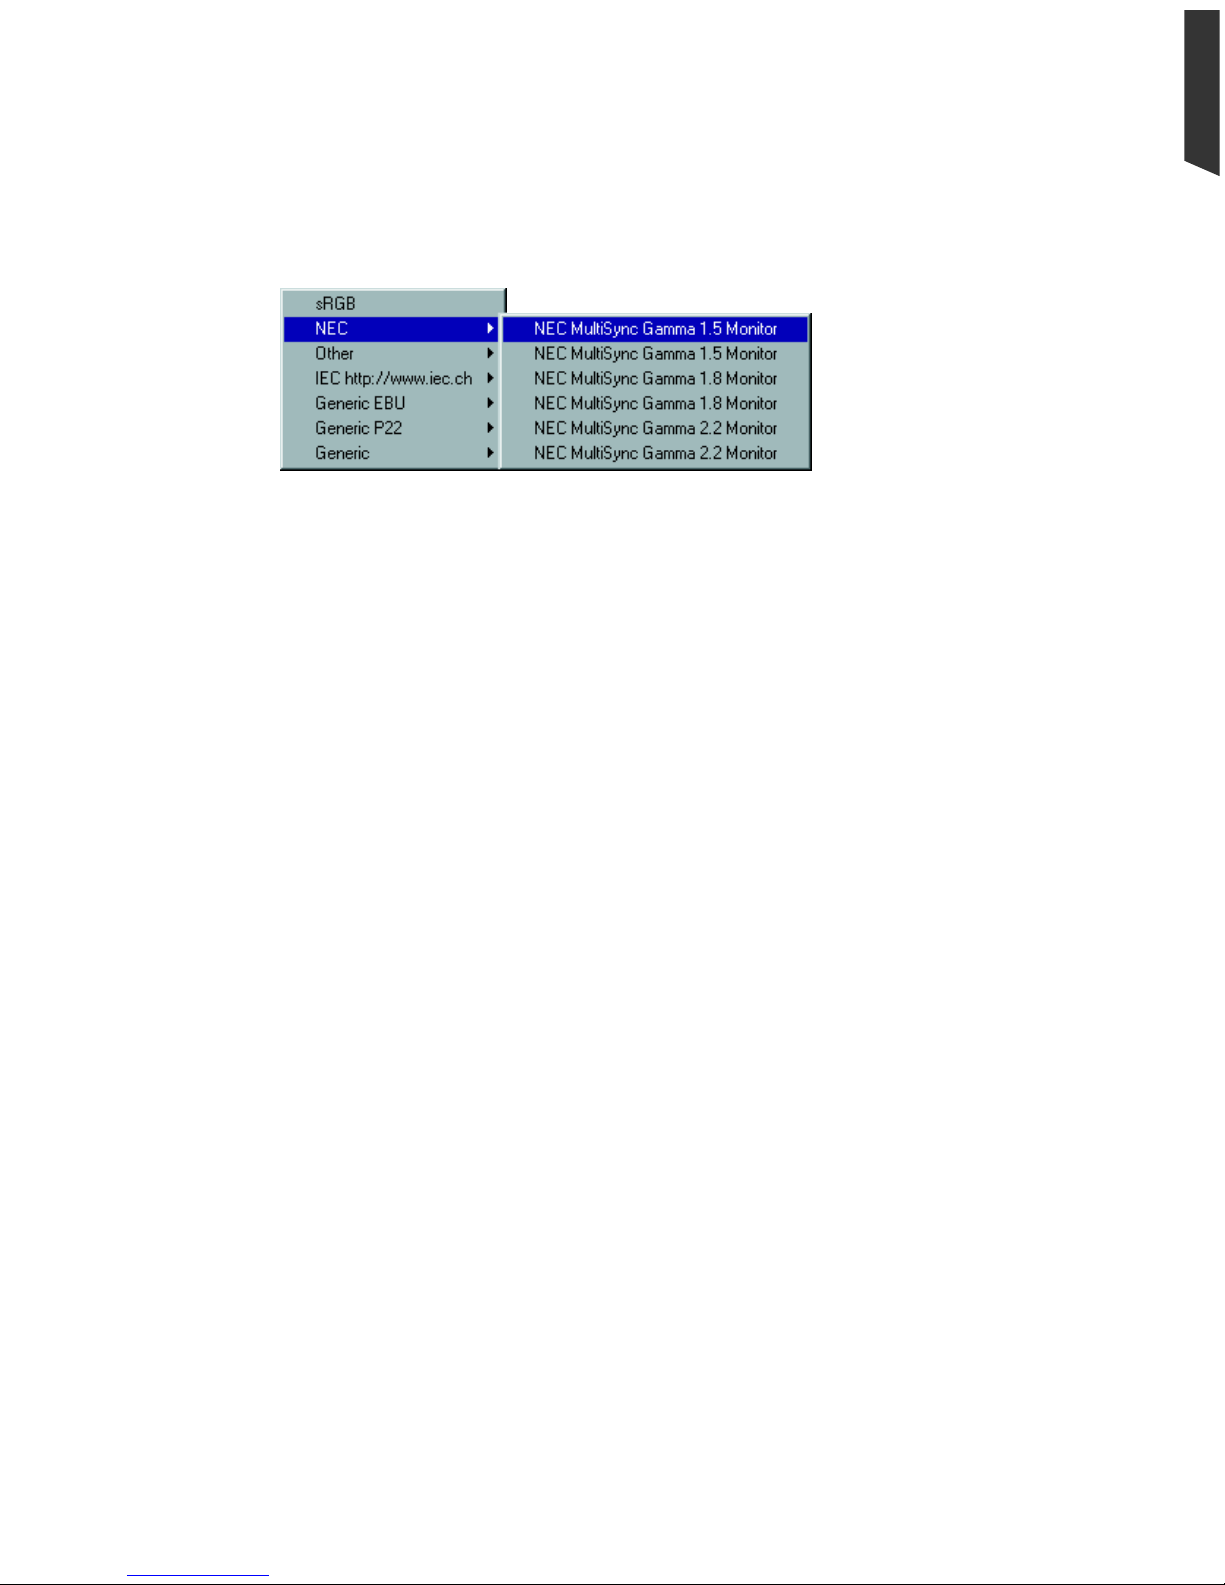
Appendix-3
En
g
lish
Display:
This feature allows you to select the type of color monitor that corresponds with the
one currently in use. The selected monitor profile is applicable only when the Display
using monitor compensation check box is enabled (checked).
NOTE: If the monitor type you need is not listed, select Generic P22 or Generic
EBU. These two profiles are compatible with most of the monitors.
Native mode RGB color matching (Native Color
Mode only)
If the Native mode RGB color matching checkbox is unchecked, the ICC profile only
applies to the RGB color for matching without applying to other output devices (e.g.,
printer or image typesetter). If checked the ICC profile applies to both the color
monitor and output devices.
This check box should generally be checked (enabled) unless you want to scan raw
color data, in which case you lose the compensatory effects of the Color Matching
system. Also note that it is not desirable to scan in raw data and then perform data
conversion. This will generate incorrect CMS effect.
Embed ICC destination profile in scan image
If chek box is checked, the ICC information is also saved and embedded with your
scanned image file. When the saved images are opened by an image editing
application (e.g., Photoshop), the embedded image data are also delivered to the
application. This will saves color matching conversion time and results to a well
preserved data of the image.
Page 65
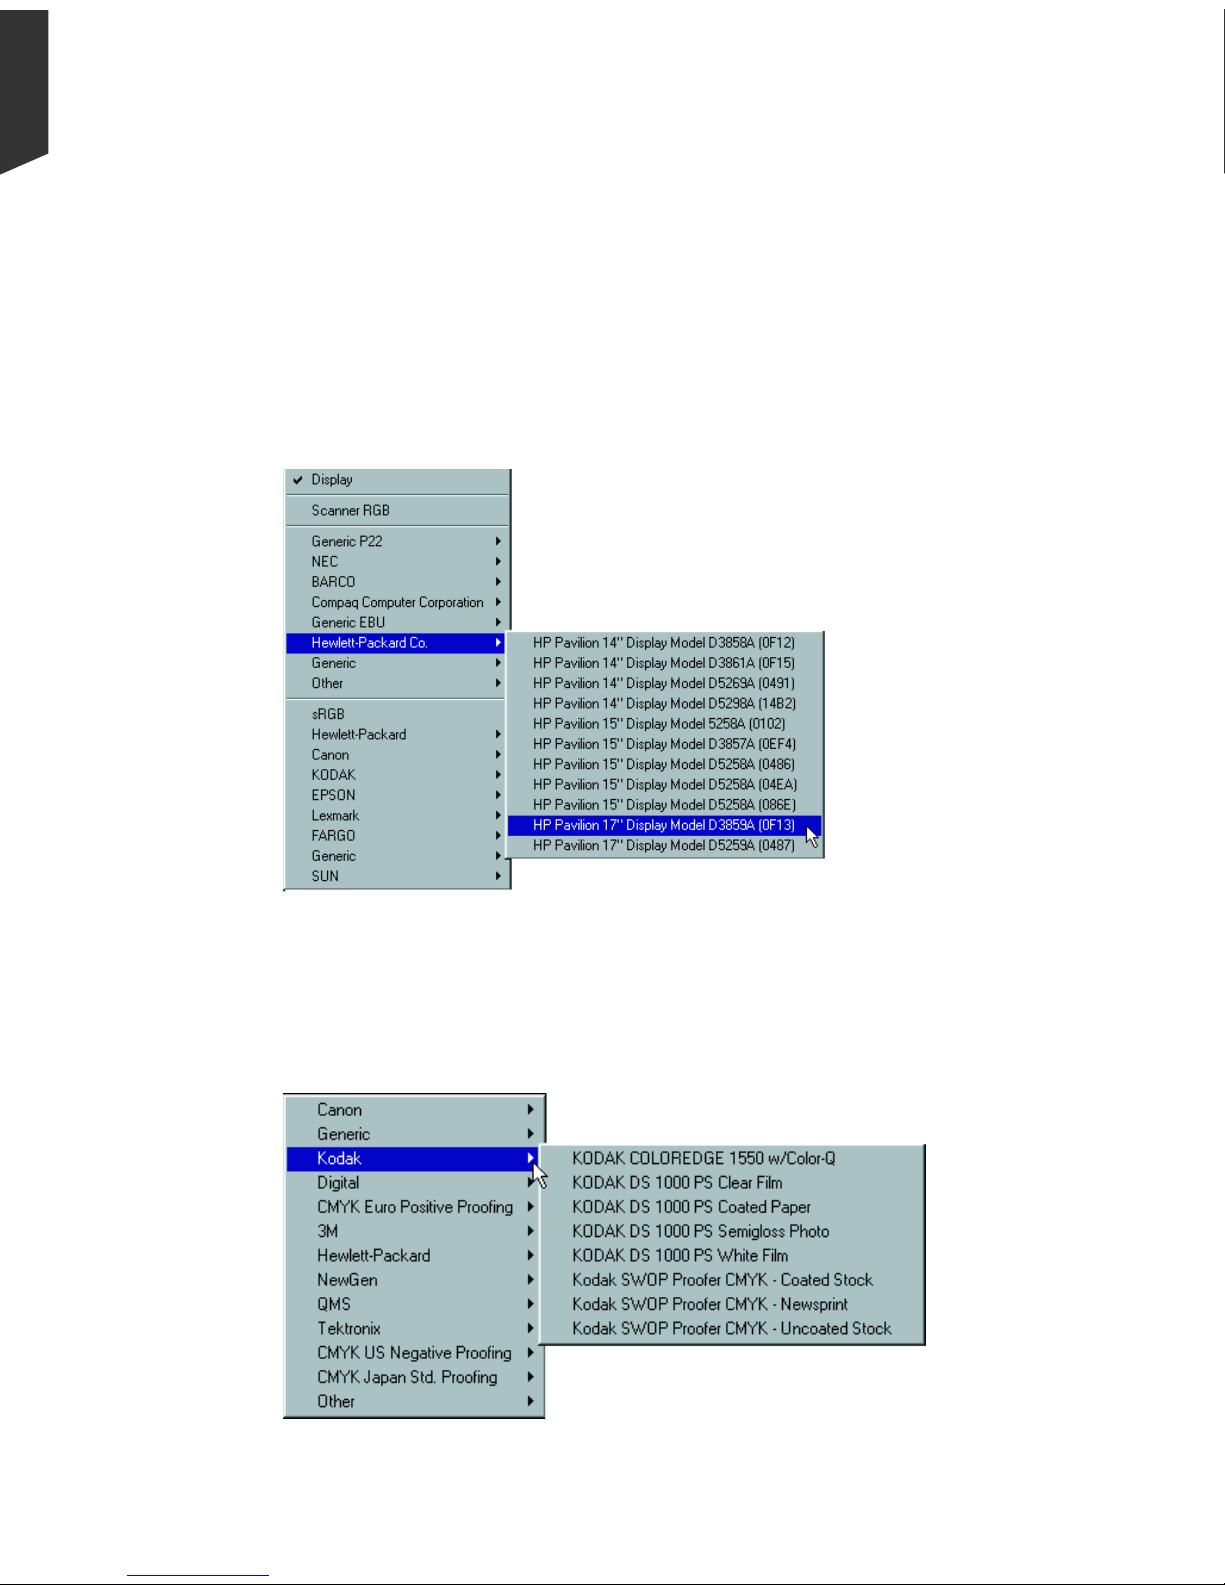
Appendix-4 ScanWizard Pro for Windows Users Guide
English
RGB destination:
This feature lets you select the RGB output device (e.g., display monitor, or RGBbased printer) for matching RGB Color family images (including RGB colors, 48-bit
RGB colors, and 256 colors image types).
A number of RGB profiles is provided with ScanWizard Pro 6.0. If you can not find the
ICC profile for your monitor or RGB device, contact your device manufacturer. To add
a specific ICC profile, click Add Profiles button to load the required ICC profile from
its source. Some device suppliers (e.g., HP , Kodak, etc.) have made their ICC profiles
available from the web sites.
CMYK destination:
If your image type is CMYK color, this function lets you select the CMYK based
color printer or commercial offset printing standards for color separation.
Page 66

Appendix-5
En
g
lish
Add Profiles Button
The Add Profiles button is provided which will allow you to add additional ICC
profiles that normally came with your device (e.g., display monitor or printer). Y ou
may add profiles when you can not find the ICC profile for your device from those
provided with the ScanWizard Pro 6.0.
You may also source additional
ICC profiles from web sites as
some device suppliers (e.g., HP,
Kodak, etc.) have made their
ICC profiles available from
Internet.
Select the profiles you need,
then click on the Open button
to load the additional profiles
into ScanWizard Pro 6.0. This
may take a while to process.
NOTE: When you purchase color monitor or color printer, check to make sure your
supplier provides the corresponding ICC profiles.
Info Button
This button displays basic
profile information for the
current selected devices
Preview Button
Clicking on the Preview
button immediately updates the Preview window image when a new color profile is
selected. This will reflect colors consistent with the newly selected profile.
Refresh Button
Clicking on the Refresh button updates the ICC profiles stored in \Windows\
System\color and \Windows\System32\color folder. This command is required only if
you have removed obsolete ICC profiles from the above mentioned folder to save
disk space.
Page 67

Appendix-6 ScanWizard Pro for Windows Users Guide
English
ScanWizard Pro TX’ s “Scan to File” features batch-scanning function, allowing you
to carry out scan-and-save images as several file formats. Not all file formats are
available for different image types, you should select the proper file format with the
image type that meets your requirements. For details, see the following crossreference table.
TIF EPS BMP PSD SCT JPG
RGB Colors üüüü ü
RGB Colors (48-bit) ü
Gray Scale ьььььь
Gray Scale (16-bit) ü
CMYK Colors ü üüü
Lab Colors ü
Web/Internet Colors
256 Colors (Default) üüü
256 Colors (Custom)
Line art üüüü
B & W Diffusion
B Available File Formats for Scan to File
Function
Page 68

Appendix-7
En
g
lish
 Loading...