

Microtek ArtixScan 1800f, ArtixScan 4000tf, ScanMaker 6400XL, ScanMaker 6700, ScanMaker 6800 Supplementary Manual
...Page 1
1
For Windows 98 SE/2000/Me
Q1: My computer cannot detect the FireWire card (IEEE
1394) I have just installed.
Follow the steps below:
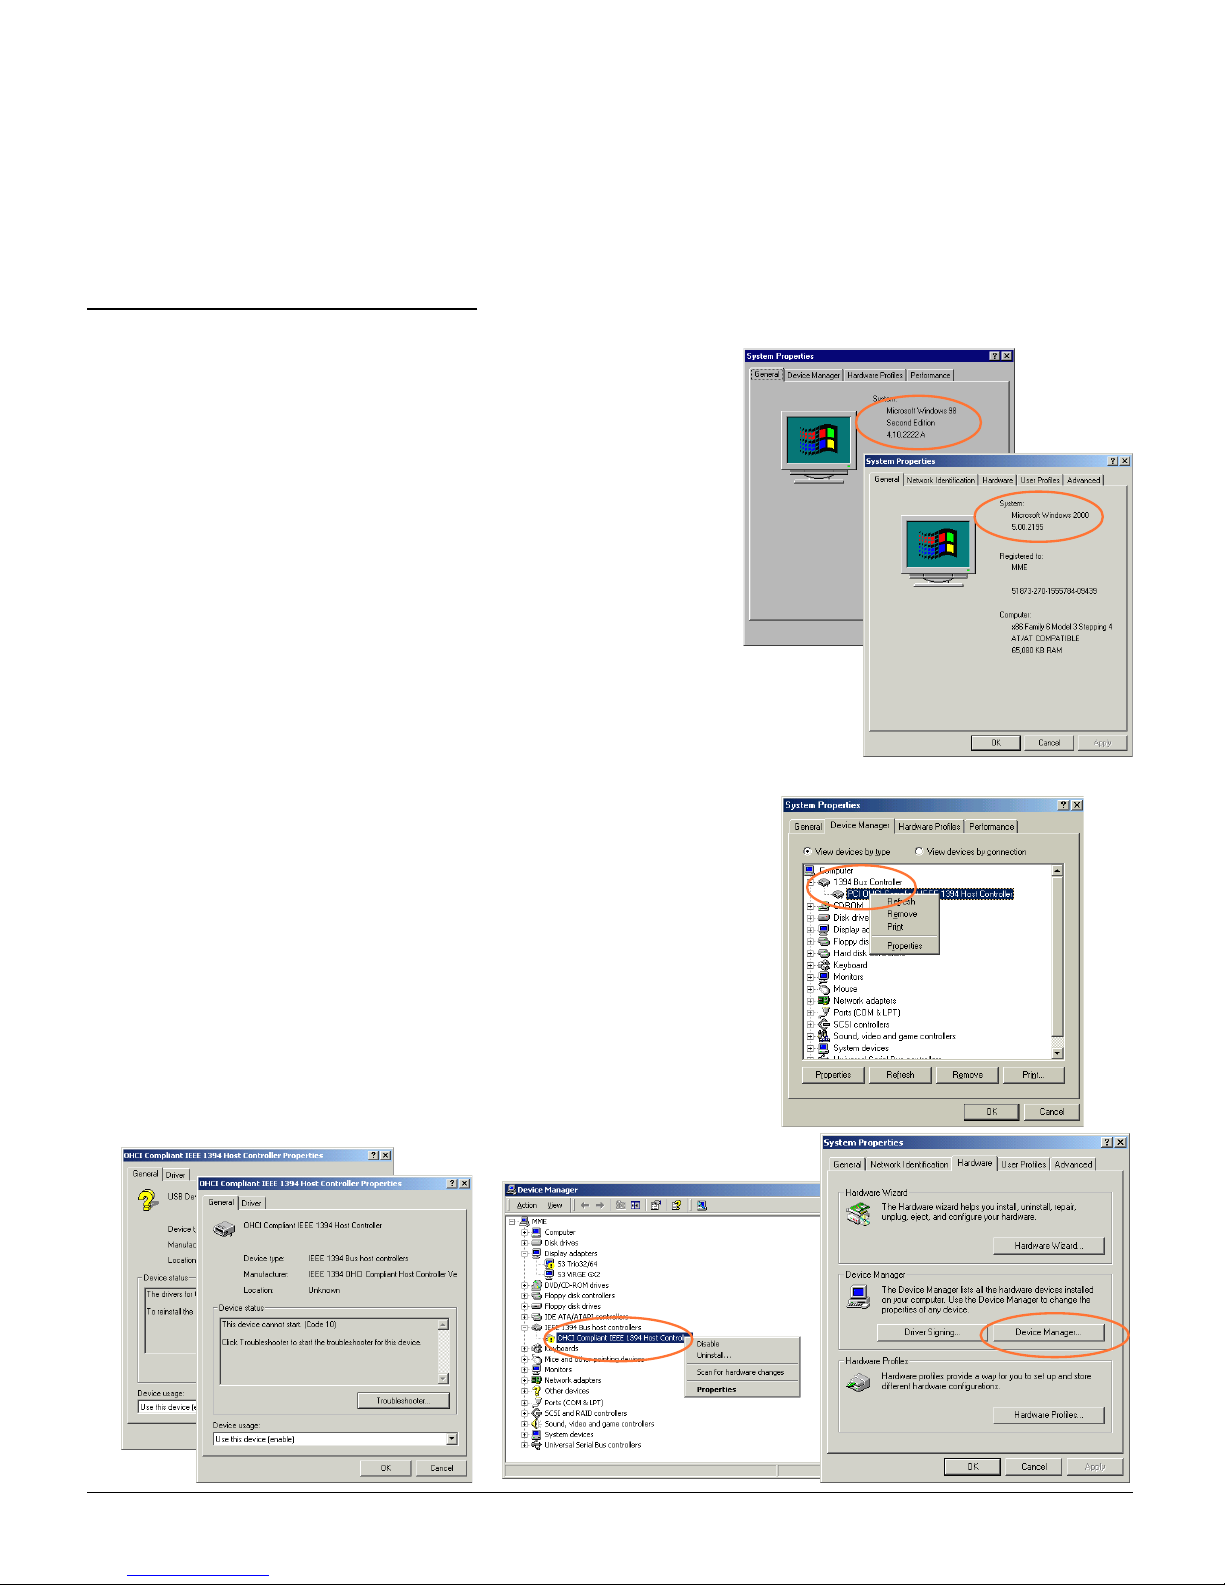
1. Check the version of your Windows operating software.
a) Click
StartStart
StartStart
Start,
SettingsSettings
SettingsSettings
Settings, and select
Control PanelControl Panel
Control PanelControl Panel
Control Panel.
b) From the
Control PanelControl Panel
Control PanelControl Panel
Control Panel, double click the
System System
System System
System icon.
c) The
System PropertiesSystem Properties
System PropertiesSystem Properties
System Properties w ill show the Windows version
currently installed and running in your computer.
d) If the version is not correct, update your operating system
to Windows 98 SE/2000/Me.
2. Check if Windows 98 SE/2000/Me has detected your FireWire
card (IEEE 1394) by going through the Start button on the
Taskbar.
a) Click
StartStart
StartStart
Start,
SettingsSettings
SettingsSettings
Settings, and select
Control PanelControl Panel
Control PanelControl Panel
Control Panel.
b) From the Control Panel, double-click the
SystemSystem
SystemSystem
System icon. For
Windows 98 SE/Me, select
Device ManagerDevice Manager
Device ManagerDevice Manager
Device Manager; for Windows
2000, select
HarHar
HarHar
Har
dwardwar
dwardwar
dwar
ee
ee
e, then
Device Manager Device Manager
Device Manager Device Manager
Device Manager.
c) Double-click the
1394 Bus Controller1394 Bus Controller
1394 Bus Controller1394 Bus Controller
1394 Bus Controller/
IEEE 1394 Bus hostIEEE 1394 Bus host
IEEE 1394 Bus hostIEEE 1394 Bus host
IEEE 1394 Bus host
controllerscontrollers
controllerscontrollers
controllers; the
Properties Properties
Properties Properties
Properties dialog box will display the status
of the device.
If any of these [?] [!] icons appear next to the device name, this
indicates that the driver has been disabled or was not properly
installed. See next section.
Windows 98 SE/Me
ê
Windows 2000
ê
Troubleshooting Tips
for Microtek/Artix scanners with the FireWire interface
Windows 98 SE
ê
Windows 2000
ê
April 2001
Page 2
2
3. Make sure that the FireWire card (IEEE 1394) is pr operly seated in your computer’s PCI slot.
a) Turn off your computer, then remove the cover.
b) Make sure the FireWire card is seated all the way in and secured into the PCI card slot. If the card is
not properly seated, REMOVE, and then REINSER T the FireWi re card again.
c) Restart your computer.
Q2: The FireWire card (IEEE 1394) was found but my scanner cannot be detected by
Windows.
Follow the instructions below:
1. Turn off your scanner .
2. Make sure that only one FireWire cable is connected to your scanner. (You can only use one cable or
interface at a time).
3. Make sure to properly connect the scanner's FireWire cable to your computer, then plug the power
cord into a power source.
4. Turn on your scanner and wait until all lights on the front of the scanner to stop blinking and remain on
solid. Windows should now be able to automatically detect your scanner .
Q3: The FireWire card (IEEE 1394) was found but my scanner cannot be detected by
Windows 98 SE.
If you are currently using the FireWire interface on Windows 98 SE, you need to follow the instructions
below to reinstall FireWire driver.
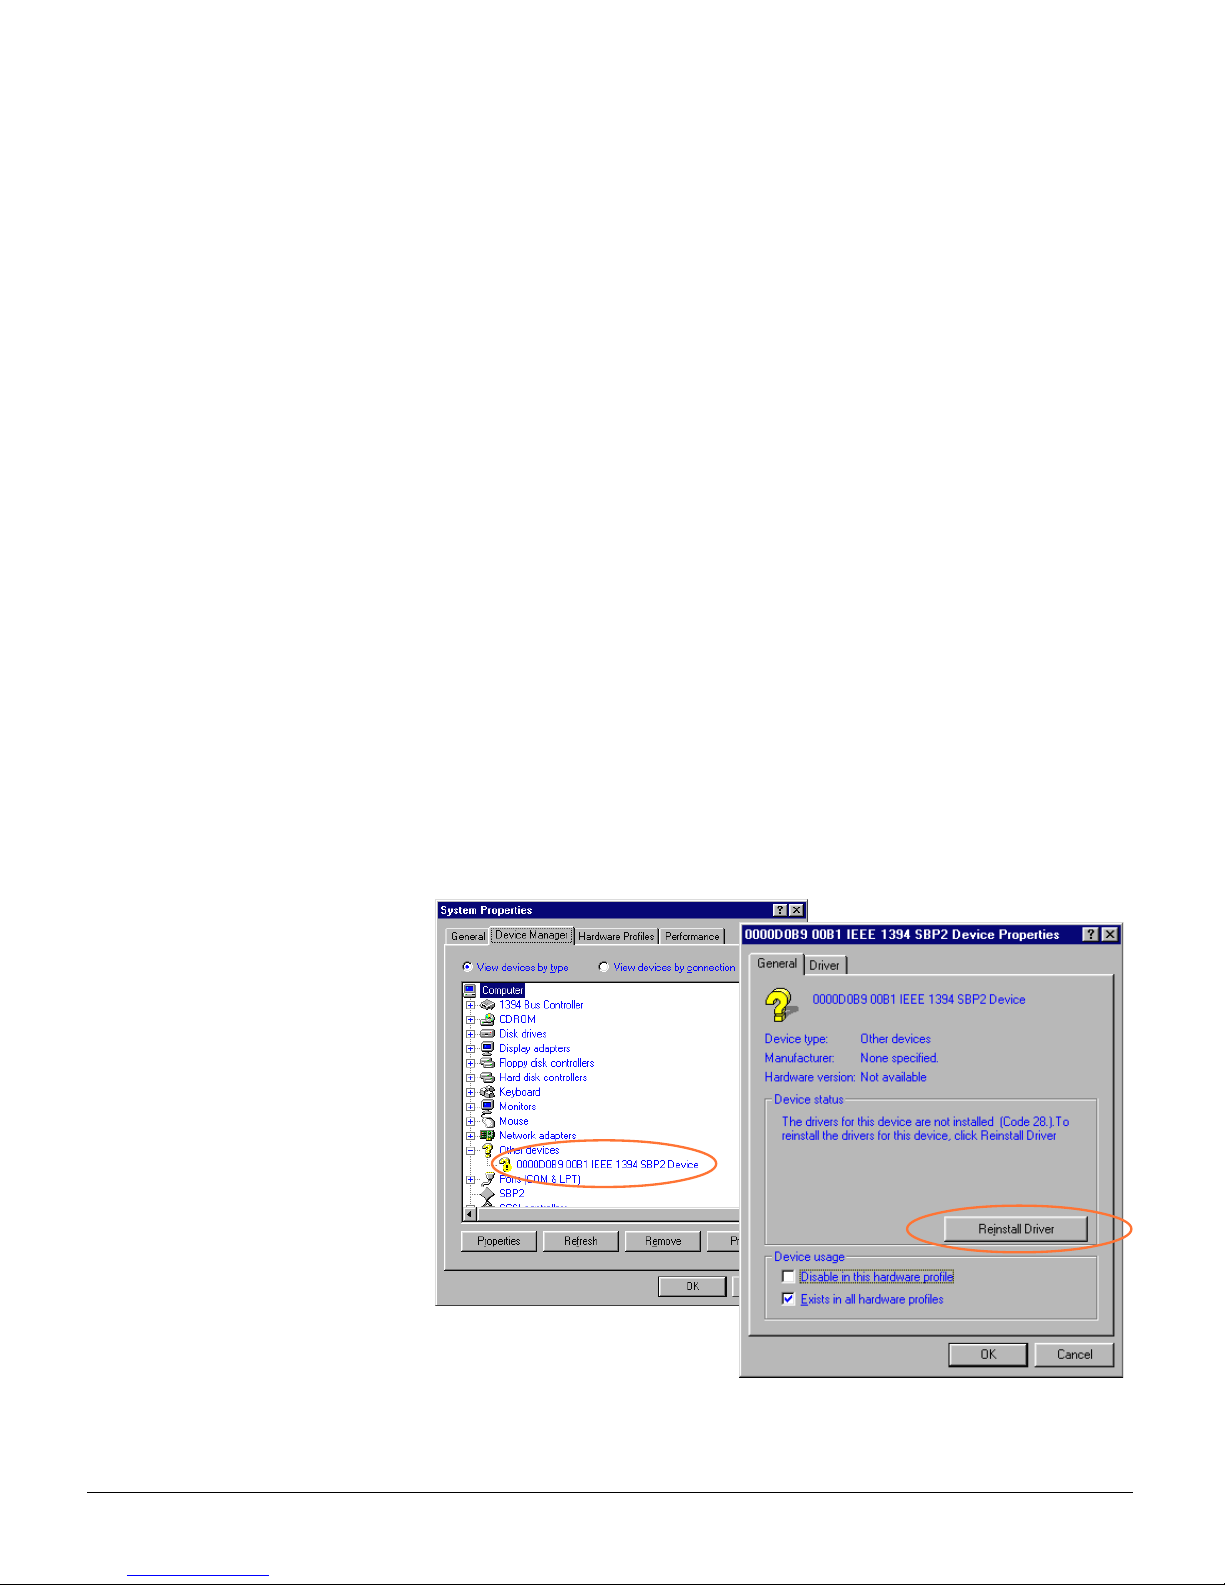
1. Open the
System PropertiesSystem Properties
System PropertiesSystem Properties
System Properties
dialog box by clicking the
following in succession:
StartStart
StartStart
Start,
SettingsSettings
SettingsSettings
Settings,
Control PanelControl Panel
Control PanelControl Panel
Control Panel, a nd
then double-click the
SystemSystem
SystemSystem
System
icon.
2. From the
System PropertiesSystem Properties
System PropertiesSystem Properties
System Properties,
select the
Device ManagerDevice Manager
Device ManagerDevice Manager
Device Manager
tab, then double-click
[?][?]
[?][?]
[?]
IEEE 1394 SBP2 Device IEEE 1394 SBP2 Device
IEEE 1394 SBP2 Device IEEE 1394 SBP2 Device
IEEE 1394 SBP2 Device to
open the its
DeviceDevice
DeviceDevice
Device
properties properties
properties properties
properties dialog box.
3. Click the
Reinstall Driver Reinstall Driver
Reinstall Driver Reinstall Driver
Reinstall Driver
button.
Page 3
3
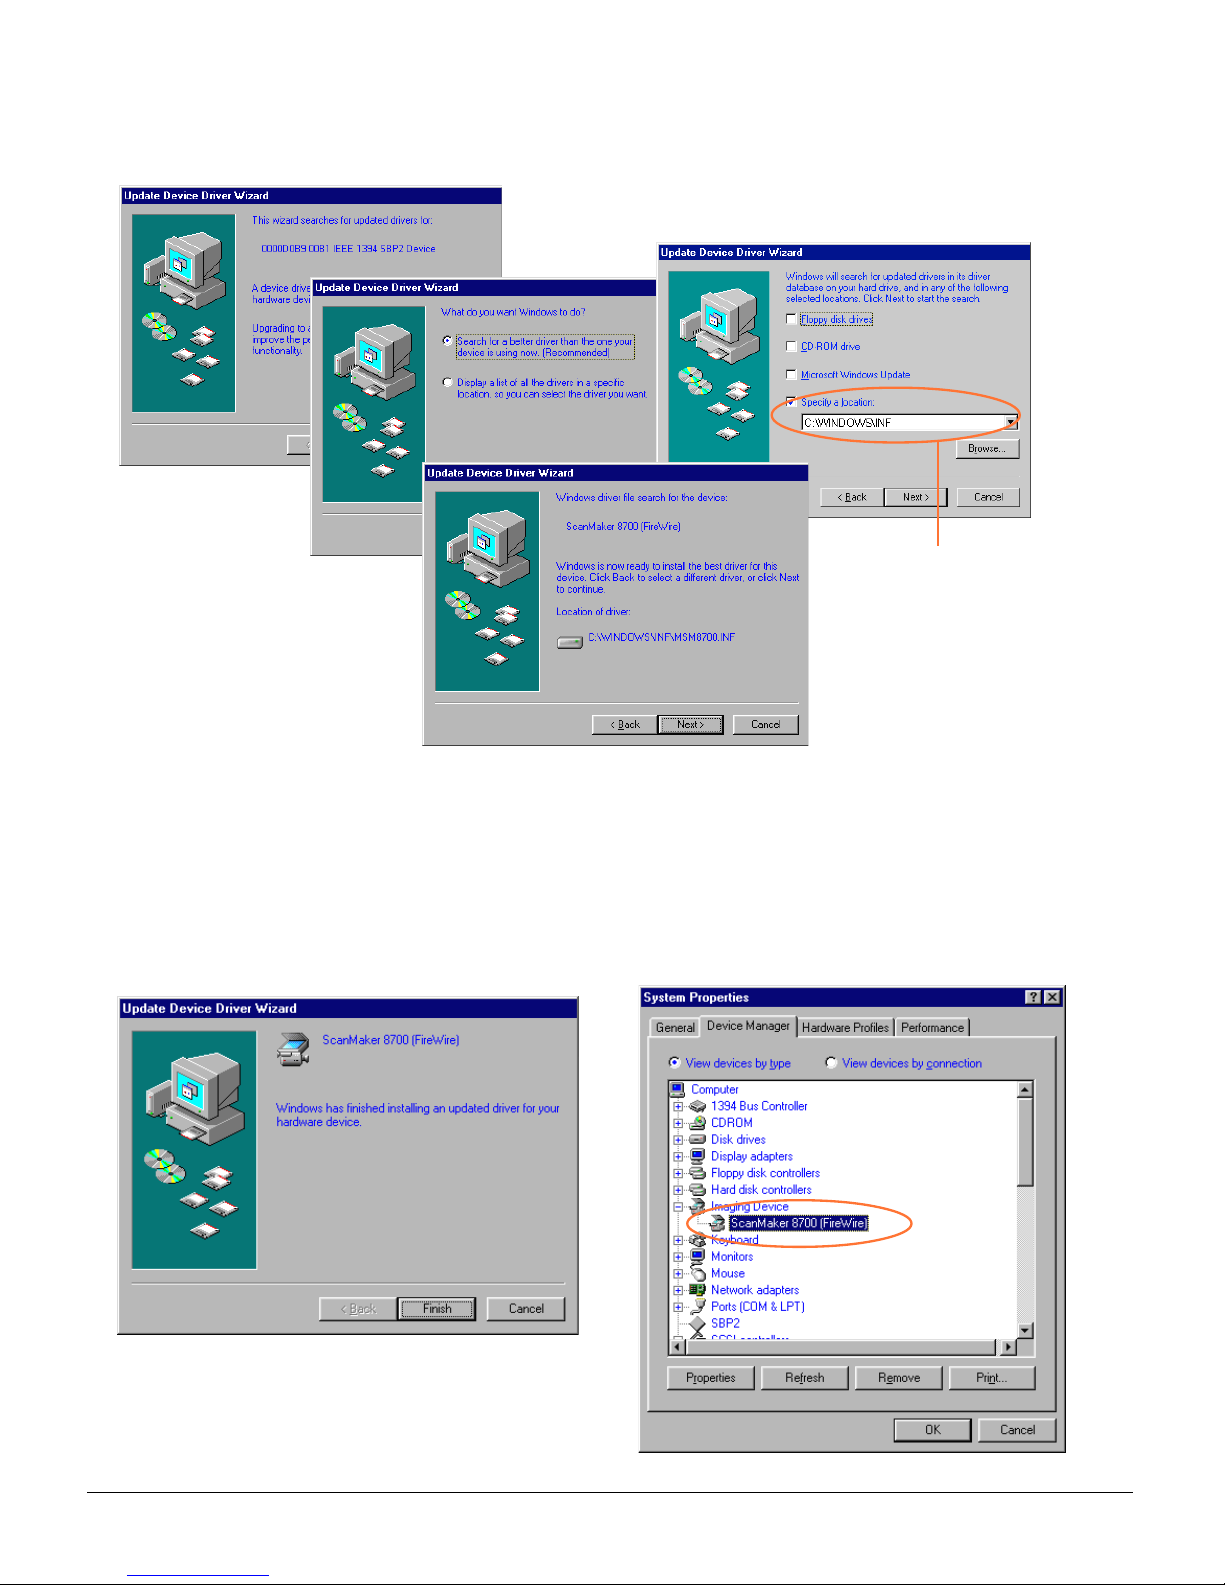
4. A series of dialog boxes will appear one at a time. Follow the on-screen instructions as shown below,
then click Next.
5. When the driver has been successfully updated, a dialog box will display this message: “Windows has
finished installing an updated driver for your hardware device”.
6. Open the
System PropertiesSystem Properties
System PropertiesSystem Properties
System Properties -
Device ManagerDevice Manager
Device ManagerDevice Manager
Device Manager dialog box (Step 1 and 2), then click the plus (+) sign
adjacent to the
Imaging Device. Imaging Device.
Imaging Device. Imaging Device.
Imaging Device. The scanner name and model appears on the list, indicating Windows
has detected and re-installed your device successfully.
Click Browse
to locate C:\WINDOWS\INF , and
then click Next (where
C:\WINDOWS is your system
folder).
Page 4

4
For Macintosh
Q1: My Macintosh computer cannot detect my scanner.
1. Check & make sure you have installed Mac OS 9.0 or later .
2. Make sure the FireWire cable is properly connected to your computer. (You can only have one cable
connected at a time.)
3. Turn the scanner on and wait until all the lights stop blinking and remain on solid.
If you have followed all the steps above and your Mac OS still cannot find your scanner , please visit
http://www.apple.com for more information about FireWire support for your Macintosh.
Page 5

1
(English)
Troubleshooting tips
for Microtek SCSI Interface
Introduction
This T r oubleshooting guide discusses the SCSI cards
that work with Microtek scanner.
A vailable SCSI car ds are Adaptec 2902, 2903, 2906
and AdvanSys 902 card.
Questions and Answers for
Windows 98/95
Q1: The SCSI card cannot be found by Windows
98.
A1:A1:
A1:A1:
A1: Your interface card is not properly seated in
the PCI card slot on your computer.
To fix this problem, power down your com-
puter, remove the SCSI interface card from
your computer. Then r einstall it, make sure the
card is seated all the way in and secured into
the PCI card slot. The PCI card slot normally
appears in white or ivory.
Q2: My interface card conflicts with another
device.
A2:A2:
A2:A2:
A2: Follow the steps below:
1. Click
StartStart
StartStart
Start,
SettingsSettings
SettingsSettings
Settings, and select
Control PanelControl Panel
Control PanelControl Panel
Control Panel.
2. Double-click on the
System System
System System
System icon in Control
Panel and select
Device ManagerDevice Manager
Device ManagerDevice Manager
Device Manager from the top.
3. Double-click on “
SCSI controllersSCSI controllers
SCSI controllersSCSI controllers
SCSI controllers” to display
the dialog box. A yellow exclamation mark “
“ appears next to the detected SCSI device.
4. Click on the option that has the yellow exclamation mark appeared at the left, and then
click
PropertiesProperties
PropertiesProperties
Properties.
5. Select
ResourcesResources
ResourcesResources
Resources from the top. The dialog box
gives you information about the Interrupt
Request (IRQ) and Input/Output (I/O) address
settings, including whether a conflict happens.
6. If a conflict exists in Input/Output option, then
click
Change SettingChange Setting
Change SettingChange Setting
Change Setting. Use the Up/Down arrow
keys to select a different range.
PCPC
PCPC
PC
Page 6

2
(English)
7. Next, select the Interrupt/Request option, click
Change Setting, and use the Up/Down arrow
keys to select different IRQ number . If all IRQs
are taken, you need to contact your dealer or
computer manufacturer to help on how to free
up an IRQ in this range.
8. When all the settings are correct, click
OKOK
OKOK
OK to
save the modifications. The dialog box should
now show the correct Interrupt Request and
Input/Output address settings. If you’re asked
to shut down your computer, select
NoNo
NoNo
No, then
click
CloseClose
CloseClose
Close. Y ou will be asked whether you wish
to restart your computer . Click
YY
YY
Y
eses
eses
es and restart
your computer.
Q3: My SCSI card is detected by Windows 98, but
the scanner cannot be found in Scanner Test
utility.
A3:A3:
A3:A3:
A3: Follow the steps below:
a) In Windows, choose Start, then Shut Down to
turn off computer power. Then turn off the
power of your scanner.
b) Check to make sure you have connected the
correct SCSI cable to the SCSI port, not the
parallel port. If you connect the SCSI cable to
the parallel port, your scanner will not be
found.
If conflicts
happen, the
message
shows here.
Currently no
conflicts
happen.
c) If your scanner has a SCSI terminator switch,
switch it to the On position. If the scanner
doesn’t have a SCSI terminator switch, plug the
SCSI terminator on the SCSI port.
d) If your scanner is chained to other SCSI device,
the SCSI ID of the SCSI device should not be set
to the same ID number. By default, Micr otek’s
scanner SCSI ID is 6.
e) Turn on your scanner power, then restart your
computer.
Q4: My Microtek scanner came with dual
interface -- USB and SCSI. Can I connect both
interface?
A4:A4:
A4:A4:
A4: When connecting dual interface scanner to
computer , you should choose either USB or
SCSI, not both.
If SCSI interface is chosen, the terminator has
to be connected to finish a complete connection. Depending on different configurations,
you may require 25-pin SCSI terminator .
If USBIf USB
If USBIf USB
If USB
is chosen, the SCSI cable along with theis chosen, the SCSI cable along with the
is chosen, the SCSI cable along with theis chosen, the SCSI cable along with the
is chosen, the SCSI cable along with the
terminator should all be removed.terminator should all be removed.
terminator should all be removed.terminator should all be removed.
terminator should all be removed.
Q5: What’s the recommended power up se-
quence?
A5:A5:
A5:A5:
A5: When using SCSI interface, be sure you have
connected the SCSI cable and the terminator
first, then connect the DC power adapter.
Q6: I have followed the above instructions, but
still cannot fix the problem.
A6:A6:
A6:A6:
A6: Visit the web site of the SCSI card provider
(e.g., Adpatec or AdvanSys)
Page 7

3
(English)
Questions and Answers for
Windows NT 4.0
Q1: My SCSI card is detected by Windows NT 4.0,
but the scanner cannot be found in Scanner
Test utility.
A1:A1:
A1:A1:
A1: Follow the steps below:
a) In Windows, choose Start, then Shut Down to
turn off computer power. Then turn off the
power of your scanner.
b) Check to make sure you have connected the
correct SCSI cable to the SCSI port, not the
parallel port. If you connect the SCSI cable to
the parallel port, your scanner will not be
found.
c) If your scanner has a SCSI terminator switch,
switch it to the On position. If the scanner
doesn’t have a SCSI terminator switch, plug the
SCSI terminator on the SCSI port.
d) If your scanner is chained to other SCSI device,
the SCSI ID of the SCSI device should not be set
to the same ID number . By default, Micr otek’s
scanner SCSI ID is 6.
Q2: The SCSI card cannot be found by Windows
NT.
A2:A2:
A2:A2:
A2: Your interface card is not properly seated in
the PCI card slot on your computer.
To fix this problem, power down your com-
puter, remove the SCSI interface card from
your computer . Then re-install it, make sure the
card is seated all the way in and secured into
the PCI card slot. The PCI card slot normally
appears in white or ivory.
Q3: My interface card conflicts with another
device.
A3:A3:
A3:A3:
A3: Follow the steps below:
1. Restart your computer . Start up Windows NT
4.0. Log in as Administrator .
2. Click
StartStart
StartStart
Start,
SettingsSettings
SettingsSettings
Settings,
and select
Control PanelControl Panel
Control PanelControl Panel
Control Panel.
3. In the Control Panel window, find
SCSISCSI
SCSISCSI
SCSI
AdaptersAdapters
AdaptersAdapters
Adapters and double click it. A window like the
following will appear .
The
DevicesDevices
DevicesDevices
Devices screen will list any SCSI controllers
that may already have installed in your computer.
NoteNote
NoteNote
Note
::
::
: Although IDE CD-ROM drives are not
SCSI, because of the way the driver is implemented, Windows NT 4.0 will still list it on this
screen.
4. Click on the
DriversDrivers
DriversDrivers
Drivers tab, and click on the
Add...Add...
Add...Add...
Add... button to select
AdaptecAdaptec
AdaptecAdaptec
Adaptec o n the left and
the corresponding Adaptec card driver on the
right to install.
Page 8

4
(English)
5. Click OK to bring up the following screen.
The SCSI card should now be listed, indicating
the driver is installed.
6. Restart your computer .
Q4: My Microtek scanner came with dual
interface -- USB and SCSI. Can I connect both
interface?
A4:A4:
A4:A4:
A4: When connecting dual interface scanner to
computer , you should choose either USB or
SCSI, not both.
If SCSI interface is chosen, the terminator has
to be connected to finish a complete connection. Depending on different configurations,
you may require 25-pin SCSI terminator .
If USBIf USB
If USBIf USB
If USB
is chosen, the SCSI cable along with theis chosen, the SCSI cable along with the
is chosen, the SCSI cable along with theis chosen, the SCSI cable along with the
is chosen, the SCSI cable along with the
terminator should all be removed.terminator should all be removed.
terminator should all be removed.terminator should all be removed.
terminator should all be removed.
Q5: What’s the recommended power up se-
quence?
A5A5
A5A5
A5 When using SCSI interface, be sure you have
connected the SCSI cable and the terminator
first, then connect the DC power adapter.
Q6: I have followed the above instructions, but
still cannot fix the problem.
A6:A6:
A6:A6:
A6: Visit the web site of the SCSI card provider
(e.g., Adpatec or AdvanSys)
Page 9

1
(English)
Troubleshooting tips for
Microtek SCSI Interface
Introduction
This T r oubleshooting guide discusses the SCSI cards
that work with Microtek scanner.
A vailable SCSI car ds are Adaptec 2903, 2906 and
AdvanSys 902 card.
Questions and Answers for
Macintosh G3
Q1: The SCSI card cannot be found by Macintosh
G3.
A1:A1:
A1:A1:
A1: Your interface card is not properly seated in
the interface card slot on your G3.
SCSI Card
To fix this problem, power down your G3,
remove the SCSI interface card from your
Macintosh. Then reinstall it, make sure the card
is seated all the way in and secured into the
card slot.
Q2: My SCSI card is detected by Macintosh, but
the scanner cannot be found.
A2:A2:
A2:A2:
A2: Follow the steps below:
a) If your scanner has a SCSI terminator switch,
switch it to the On position. If the scanner
doesn’t have a SCSI terminator switch, plug the
SCSI terminator on the SCSI port.
b) If your scanner is chained to other SCSI device,
the SCSI ID of the SCSI device should not be set
to the same ID number. By default, Micr otek’s
scanner SCSI ID is 6.
6
+
T erminator
Mac G3Mac G3
Mac G3Mac G3
Mac G3
Page 10

2
(English)
Q3: My Microtek scanner has dual interfaces --
USB and SCSI. Can I connect both interfaces?
A3:A3:
A3:A3:
A3: When connecting dual interface scanner to
computer , you should choose either USB or
SCSI, not both.
If SCSI interface is chosen, the terminator has
to be connected to finish a complete connection. Depending on different configurations,
you may require 25-pin SCSI terminator . If
USB is chosen, the SCSI cable along with the
terminator should all be removed.
Q4: What’s the recommended power up se-
quence?
A4:A4:
A4:A4:
A4: Power up your scanner first, then the com-
puter.
Q5: I have followed the above instructions, but
still cannot fix the problem.
A5:A5:
A5:A5:
A5: Visit the web site of the SCSI card provider (e.g.,
Adpatec or AdvanSys).
Page 11

1
(English)
Troubleshooting Tips
for Microtek USB (Universal Serial Bus) Interface
Q1: Why should I enable my computer’s USB port?
A1
::
::
: Microtek only supports USB scanners under the Windows 98 operating system. If your computer
cannot find your Microtek USB interface scanner, check to make sure that your computer BIOS is
configured as “USB enabled”. When you start your PC and before the Windows screen appears, the
screen displays a short message, reminding you to press a combination of keys to enter the BIOS setup
screen.
BIOS checking procedures:
To set the correct BIOS settings, the following settings must be set in your computer’ s BIOS:
1. Plug & Play OS Aware = YES
2. Plug & Play = AUTO if you have this option.
3. On board USB = YES or Enabled
Q2: How do I know the USB port of my computer is enabled?
A2
::
::
: When the USB port is enabled, also you have connected the USB cable to both the scanner and
computer , a message shows that your USB device (the scanner) is found the first time you start
Windows. If the message does not display, check the USB status from the Contr ol Panel window. Follow
these steps:
1. In Windows 98, select Start, Settings, then
Control Panel.
2. Double-click the System icon.
3. Click the Device Manager tab.
PCPC
PCPC
PC
Page 12

2
(English)
4. Click the plus (+) icon before the Universal Serial
Bus Controller item.
You must see the entries below the “Universal
Serial Bus Controller” and there should be no red
or yellow mark next to either options. If there is no
“Universal Serial Bus Controller” that means your
computer’ s USB port is disabled.
Q3: Even though I have enabled USB, my scanner still
doesn’t work.
A3
::
::
: This problem happens when you successfully install
scanner and then later reconnect the USB cable to
another USB port. In this case, reinstall your scanner
driver and the USB scanner.
Q4: Is there any quick and easy way to fix the USB
problem?
A4
::
::
: 1. Unplug the USB cable from your scanner, then uninstall and reinstall the scanner driver.
2. Reconnect it to both the scanner and the computer.
3. Turn off the scanner and turn it back on.
4. Restart your computer.
If the USB host controller and a USB root hub appear, it means that USB is enabled.
Q5: Just for reference, can Microtek provide a list of USB-implemented computer boards?
A5
::
::
: See the following list.
• ABIT BX6 (100 Mhz Motherboard)
- INTEL 440BX
- Intel 82371 AB/EB PCI to USB Universal Host Control
• GIGABYTE GA-5SMM (100 Mhz Motherboard)
- SIS5595 / SIS530
- SIS 7001 PCI to USB Open Host Controller
• ASUS P5A (100 Mhz Motherboard)
- ALIM1541 / M1543C
- ALI PCI to USB Open Host Control
• AOPEN AX63PRO (133 Mhz Motherboard)
- VIA Apollo PRO 133
- VIA T ech 3038 PCI to USB Universal Host Contr oller
Note: There are more vendors that may not be listed here. If you do not see your particular
motherboard listed here, it doesn’ t mean your computer and scanner will not work together.
Page 13

1
(English)
Troubleshooting tips
for Microtek USB (Universal Serial Bus) Interface
Q1 : Choose the right driver
A1 : Microtek USB-based scanners run on the Apple iMac and on the new PowerMac G3 systems. For the
iMac, visit www.apple.com web site to get the most recent iMac Update Driver. If your Macintosh is not
an iMac or a PowerMac G3 with USB ports, do not install iMac Update Driver. Installing the iMac driver
on a non-iMac system will have adverse the effects on your scanning operation.
Q2 : Scanner not found
A2 : Make sure you have correctly connected the USB cable, then restart your scanner.
Q3 : Keyboard inactive or mouse hang-up
A3 : Reconnect the USB cable, then restart your scanner and iMac. If the keyboard or mouse still cannot
function, power off iMac and the scanner, connect the USB cable to another USB port. The iMac has 4
USB ports; however , one occupied by the mouse, another by keyboard, the remaining available USB
ports are two.
Q4 : Device checkup
A4 : To verify whether your scanner has been detected by iMac, try using Apple System Profiler 2.0 (or
later) to see if the scanner is correctly detected on the USB port.
iMaciMac
iMaciMac
iMac
 Loading...