

Page 1

Microtek
Automatic Document Feeder
INST ALLA TION AND OPERA TION MANUAL
ADF-600L / ADF-600EL
Page 2

Copyright © 2000 Microtek International Inc.
All rights reserved.
I49-002924A
July 2000
Trademarks
MicrotekTM, ScanMakerTM, and ScanWizardTM are trademarks of Microtek International Inc.
Macintosh® and Apple® are registered trademarks of Apple Computer , Inc. W indows® is a
registered trademark of Microsoft Corporation. All other products or name brands are
trademarks of their respective holders.
Important
Documents you scan may be protected under copyright law. The unauthorized use of such
documents could be a violation of the rights of the copyright holder . Micr otek bears no
responsibility for the unauthorized use of copyrighted materials.
Microtek Lab, Inc.
3715 Doolittle Drive, Redondo Beach,
CA 90278-1226
Sales: 800-654-4160
Internet: http://www.microtekusa.com
Tech Support: http://www.support.microtek.com
Microtek Europe BV
Max Euwelaan 68
NL - 3062 MA Rotterdam
The Netherlands
T el: 31-10-242-5688
Fax: 31-10-242-5699
Internet: http://www.microtek.nl
Microtek International, Inc.
6, Industry East Road 3
Science Based Industrial Park
Hsinchu 30077, Taiwan, R.O.C.
T el: 886-3-5772155
Fax: 886-3-5772598
Internet: http://www.microtek.com
Adara International, Inc.
8F, No. 220 Ta Tung Road, Section 3
Hsi Chih County, Taipei, Taiwan,
R.O.C
T el: 02-2647-1488
Fax: 02-2647-1422
Internet: http://www.adara.com.tw
Microtek Computer Asia Pte. Ltd.
No. 160, Paya Lebar Road, 05-04
Orion Industry Building, 409022 Singapore
T el: 65-747-7851
Fax: 65-747-7852
Internet: http://www.microtek.com.sg
ii
Page 3

Contents
1 Introduction
Overview .................................................................................................................1
Applications .............................................................................................................1
2 Installation
Checkout .................................................................................................................2
Before you Begin ......................................................................................................2
Installation ...............................................................................................................3
3 Operation
Paper Loading .......................................................................................................... 5
Correcting Paper Jams..............................................................................................6
4 Maintenance
Guide Flap Cleaning and Replacement ......................................................................7
Roller Cleaning .........................................................................................................7
Appendix: Specifications
iii
Page 4
Automatic Document Feeder Installation and Operation Manual 1
1 Introduction
Overview
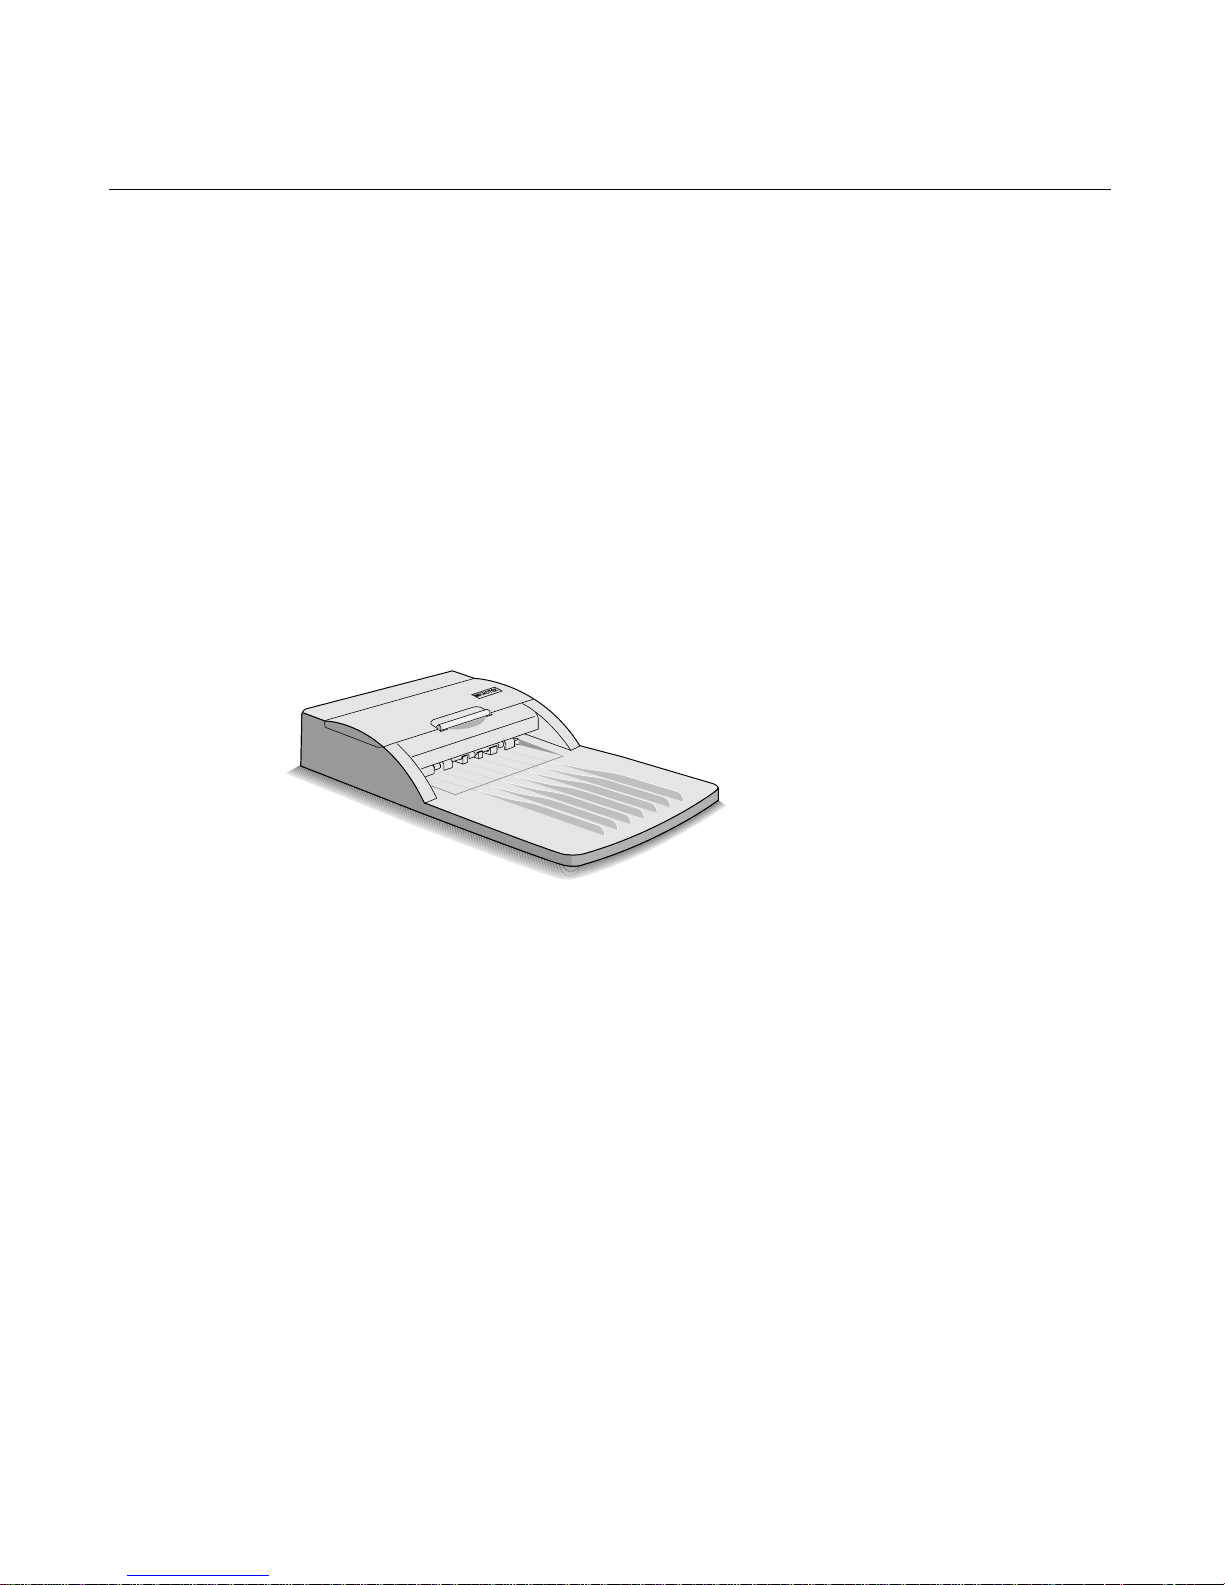
The Automatic Document Feeder (ADF-600L / ADF-600EL) is a companion sheet
feeder for Microtek's ScanMaker series scanners. It allows automatic scanning of up
to 25 sheets, with dimension of the document as large as 8 1/2" x 14". Sheets to be
scanned are fed from a stack in the Automatic Document Feeder's input tray, guided
past the scanner's image sensor , and placed in the feeder's output tray.
Automatic Document Feeder (ADF) mounts onto the scanner in place of a document
cover , using the original document guide holes of your scanner . The feeder is
preloaded by spring plungers so that it can be lowered into position for auto-feed
scanning or lifted off to allow use of the flatbed.
Applications
The Automatic Document Feeder is a must for high-volume document processing
with the ScanMaker series scanners. It increases operating convenience and efficiency
in multi-page scanning as well as OCR applications.
Page 5
2 Automatic Document Feeder Installation and Operation Manual
2 Installation
Checkout
The Automatic Document Feeder is delivered in assembled form, ready to be
mounted onto the scanner . After unpacking the package box, make sur e that you
have received all of the items.
The Automatic Document Feeder package includes these components:
• Automatic Document Feeder
• Warranty Card
• Automatic Document Feeder Installation and Operation Manual
• Spare Guide Flap, 2 sheets
Before you Begin
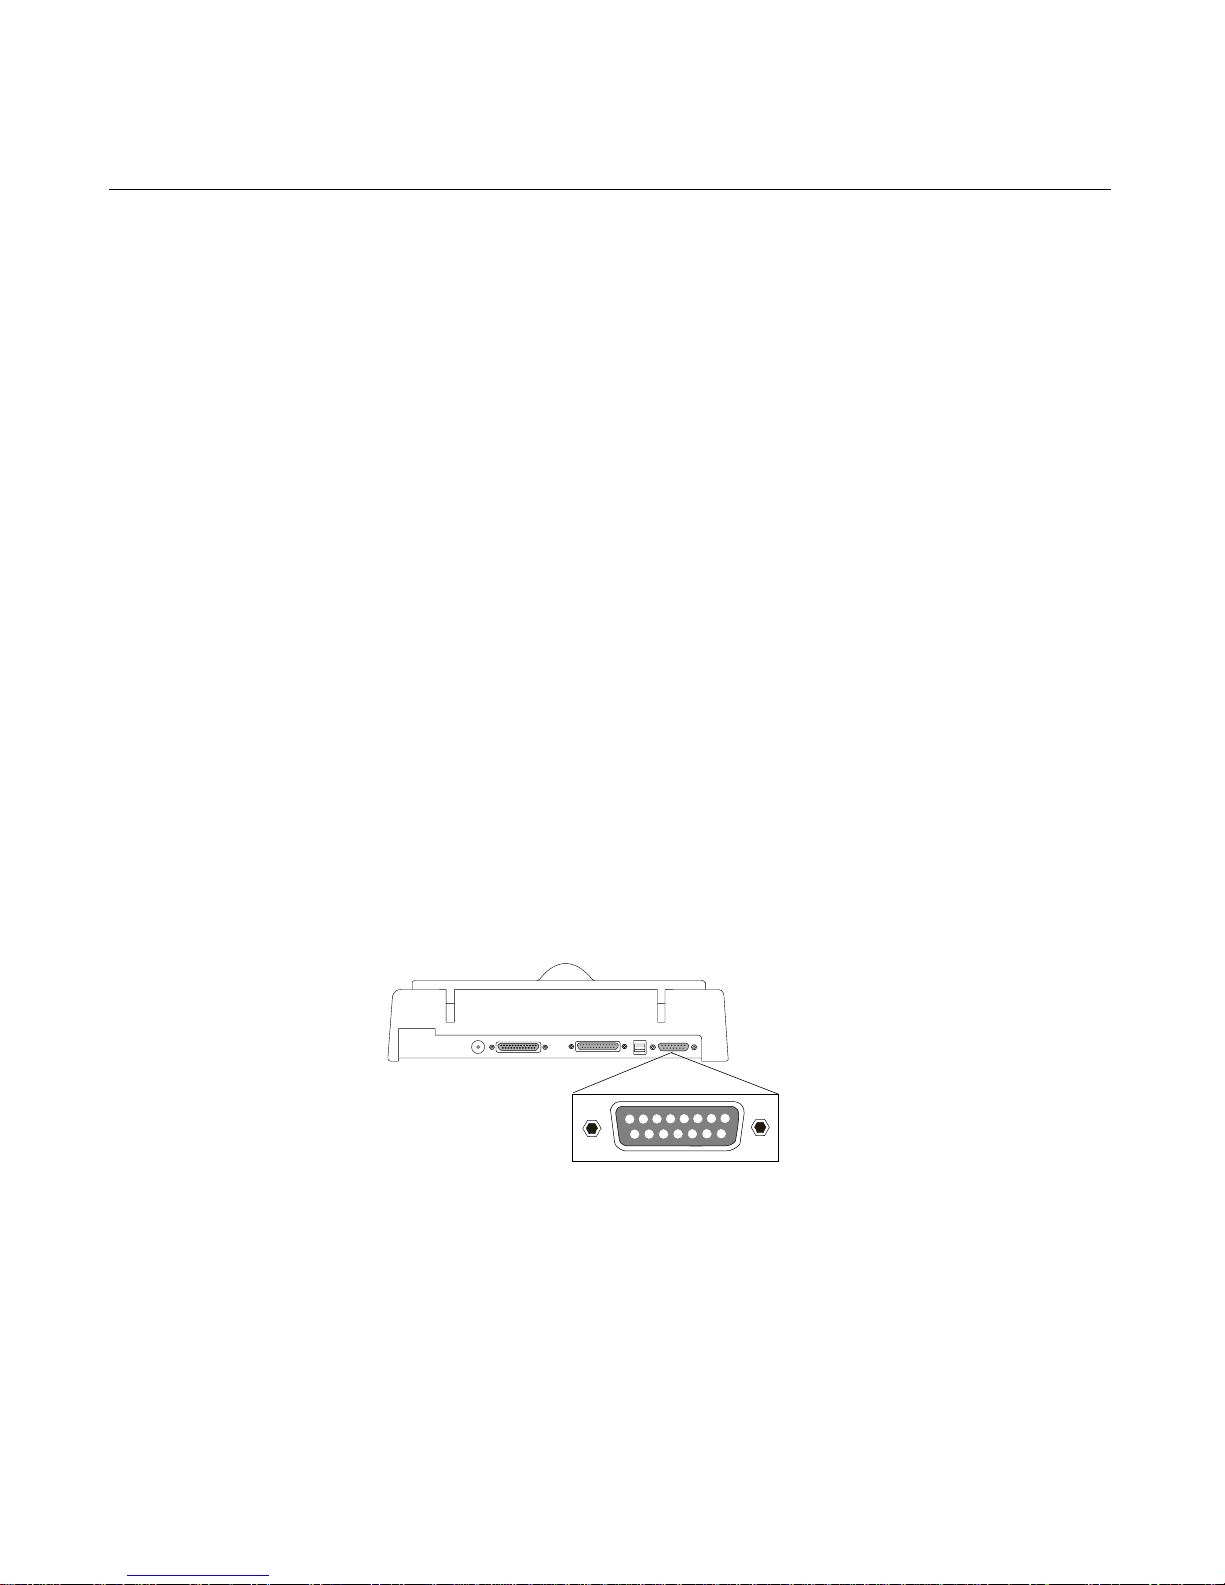
Follow these steps before installing the Automatic Document Feeder:
1. Make sure the scanner's back panel has a 15-pin Automatic Document Feeder
connector . Call Microtek if your scanner doesn't have one.
2. Install the scanner as described in your Installation Guide.
3. Make sure that the scanner, its peripherals, and the computer are all powered off.
Unplug the scanner's power cord.
Note: The Automatic Document Feeder (ADF) uses the same connector as a Transparency Media Adapter (TMA). If you own a TMA, disconnect the TMA and remove it
from the scanner.
15-pin Automatic Document
Feeder Connector
Page 6

Automatic Document Feeder Installation and Operation Manual 3
Installation
Follow these steps to install the Automatic Document Feeder:
1. Pull out the two pins holding the
scanner cover and lift off the cover.
2. Place the Automatic Document
Feeder on top of the scanner. Insert
the guide pins into the holes originally used by the scanner cover .
Note: The Automatic Document Feeder
for ScanMaker series scanners has
shorter guide pins than other scanner
models.
3. Plug the Automatic Document
Feeder's connector into the Automatic Document Feeder connector
of your scanner. Secure the connector by tightening its retaining screws.
4. After the Automatic Document
Feeder is securely attached, swing
the paper support up to over 60
degrees. The paper support should
stay in the raised position by itself.
5. Press the Locking Button at the right
side of Automatic Document Feeder .
This will cause the transport module
of Automatic Document Feeder to
pop up a little.
MICROTEK INTERNATIONAL INC.
Pressing the
Locking Button
Page 7
4 Automatic Document Feeder Installation and Operation Manual
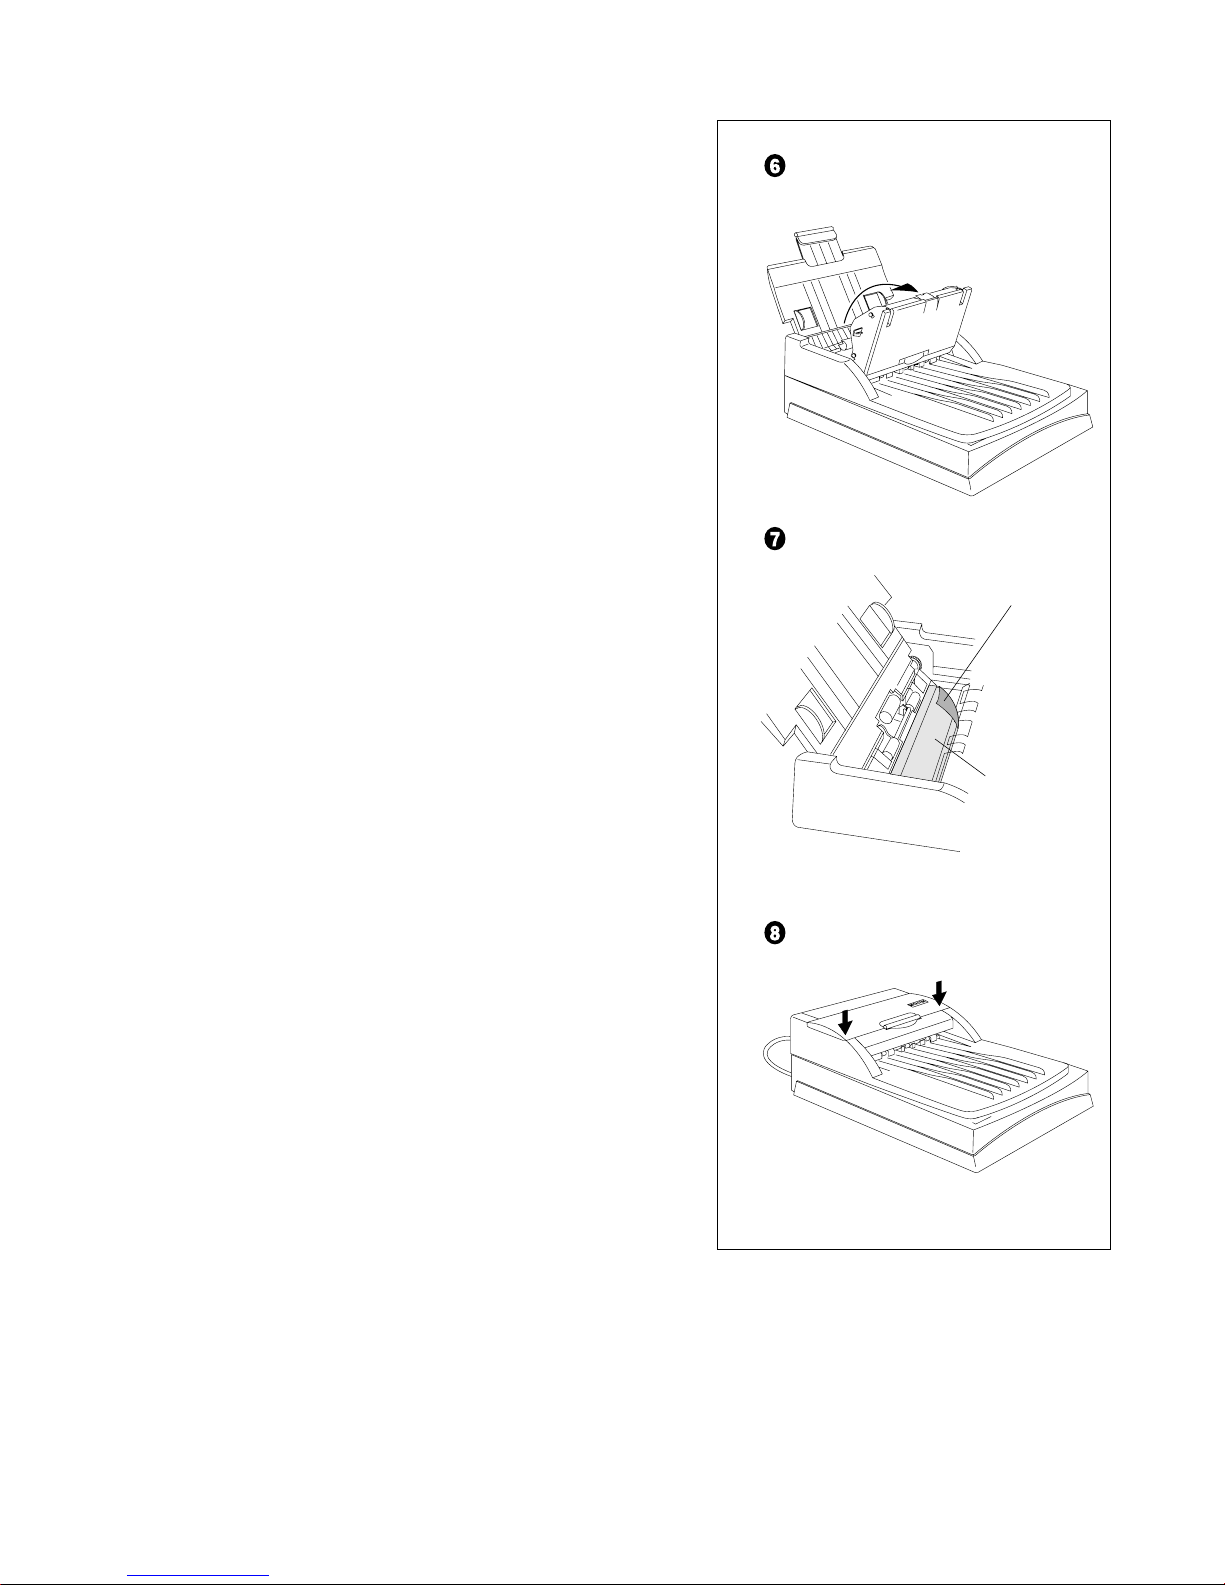
6. Raise the transportation module.
7. Check the transparent guide flap on
the base. Make sure the guide flap is
securely attached to the base, then
peel off the protective film that
covers the guide flap in factory
preset.
8. Close the Automatic Document
Feeder.
Raising the
Transportation
Module
Protective Film
Guide Flap
Page 8
Automatic Document Feeder Installation and Operation Manual 5
3 Operation
After installation of the Automatic Document Feeder is complete, power up the
computer and the scanner, then start up the scanner software.
Paper Loading
Before loading the Automatic Document
Feeder, check to see if the transparent
guide flap is firmly attached in place and
if the protective film is removed as
described in Chapter 2. If the film has
not been removed, scanned documents
will jam against the base of the feeder ,
rather than being moved into the output
tray.
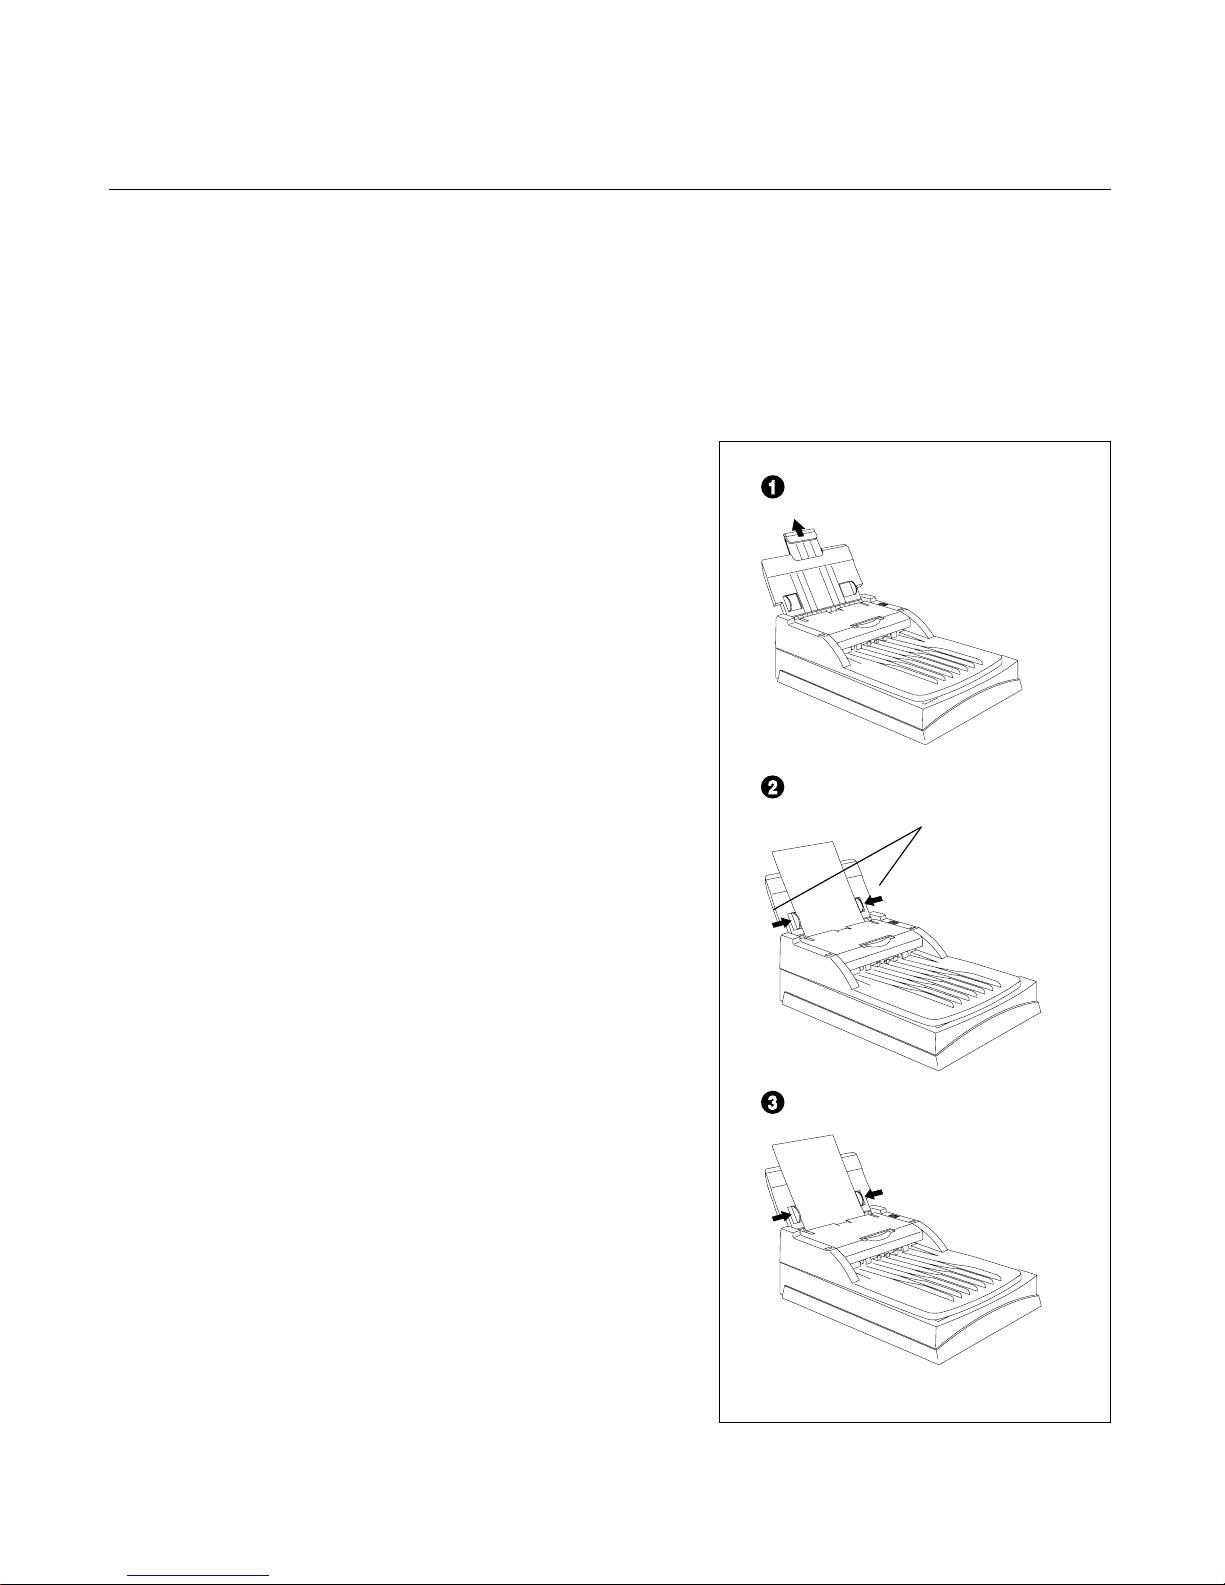
T o load documents:
1. Pull the paper support up. This
prevents the paper sheets from
bending down.
2. Place the documents in the input tray
with the side to be scanned facing
down. The document on the top will
be scanned in first.
3. Make sure the pages are aligned in
the center with the two guide arms.
If the documents are less than 8 1/2"
wide, use the sliding guide arms to
hold the stack in place.
Sliding the two
Guide Arms
Guide Arm
Pulling the paper
support up
Page 9

6 Automatic Document Feeder Installation and Operation Manual
Correcting Paper Jams
T o r emove the jammed pages:
1. Press the Automatic Document
Feeder locking button, this
disengages the Automatic
Document Feeder transportation module.
2. Lift the transportation module
and pull out the free end of the
guide flap, then grasp both free
corners of the jammed sheet
and pull it out slowly.
3. Lower the Automatic Document
Feeder transportation module
down, and snap to close it.
Pressing the
Automatic Document
Feeder Locking
Button
Page 10

Automatic Document Feeder Installation and Operation Manual 7
4 Maintenance
Guide Flap Cleaning and Replacement
The guide flap on the base of the ADF
keeps documents at the correct
scanning position and guides them into
the output tray after scanning. To
prevent printing ink and other contaminants from accumulating on the flap and
interfering with image quality, wipe it
periodically with a ink-free cloth or
swab cotton swab moistened with
industrial alcohol.
After prolonged use, the surface of the
flap may become scratched. This causes
lines to appear in scanned images which
can create OCR errors. Should the
scratches appear, detach the flap, and
replace it with a new one.
Roller Cleaning
Prolonged use of the ADF may result in
accumulation of ink and other contaminants on the feeder's input roller,
reducing the roller's ef ficiency. Check
for dirt on the roller if the ADF starts to
have trouble pulling paper through
properly. The input roller should be
cleaned periodically using a lint-free
cloth or swab moistened with ethylene
chloride.
Note: Do not attempt to turn the roller
while cleaning it; this may damage the
ADF's drive mechanism.
Cleaning the rollers
Wiping the Guide Flap with a
piece of ink-free cloth
Page 11

8 Automatic Document Feeder Installation and Operation Manual
Appendix : Specifications
Capacity 25 sheets of copy bond paper (unfolded)
Paper W eight 16 to 24 lb. bond paper
Paper Size Min. 5.5" x 5.5"
Max. 8.5" x 14" (US Legal size)
Accuracy Paper screw: ±1º
Paper length: ±1%
1 failure per 500 pages
(no-feed/double-feed/multi-feed/jam)
Connector 15-pin subminiature D-shell
Physical Dimension: 11.73" x 17.13" (298 mm x 435 mm)
Input tray height: 3.03" (77 mm)
Weight 5.816 lb. (2.65 kg)
Power 12V/15V < 1A (continuous)
Consumption 1.5A (peak)
5V < 0.5A
Operating 10ºC to 40ºC
Conditions 30% to 80% relative humidity
 Loading...