

Page 1
Automatic Double Location Heat Transfer Press Manual
Model. No.: APDL-20/24
CONTENTS
I. Assembly Drawing -----------------------------------------------------------------------------------2
II. Technical Parameters ------------------------------------------------------------------------------2
III. Operation Process ----------------------------------------- --------------------------------------3-4
IV. Maintenance -------------------------------------------------------------------------------------------5
V. Trouble Shooting For Transfer Print Quality-------------------------------------------------6
VI. Explosion View ---------------------------------------------------------------------------------------7
- 1 -
Page 2
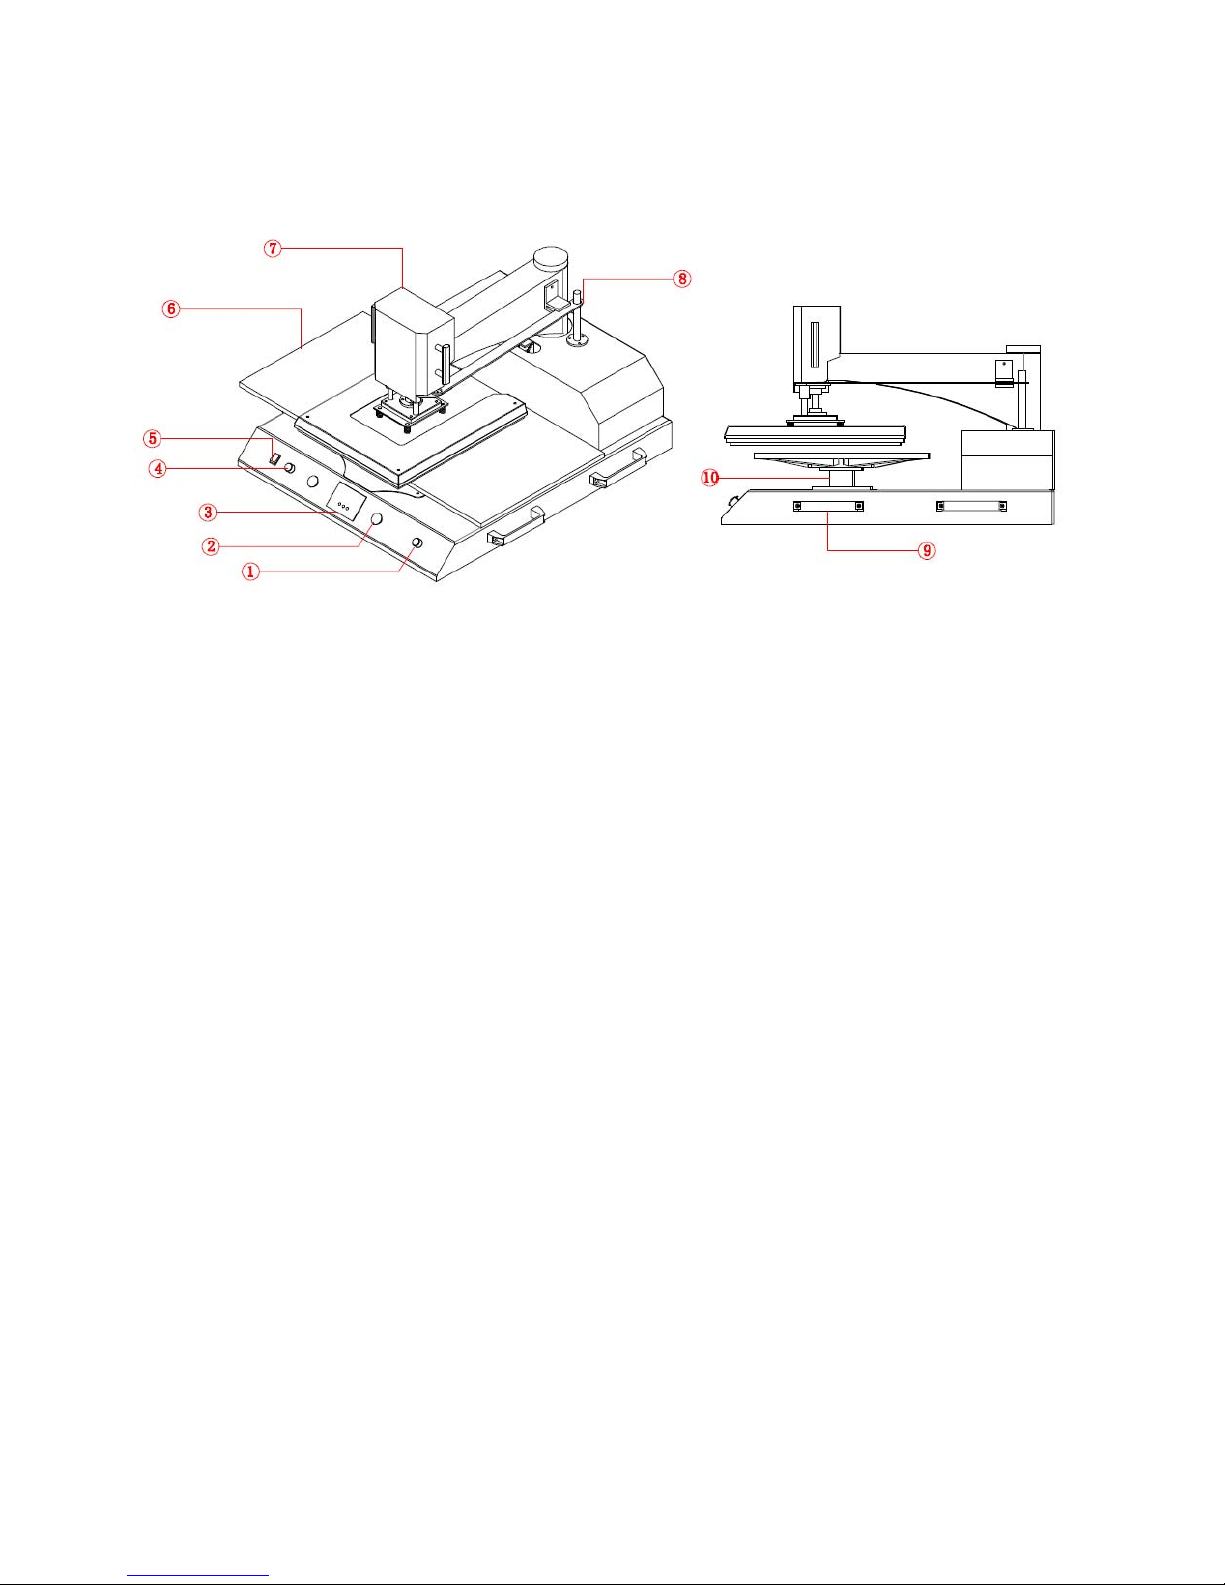
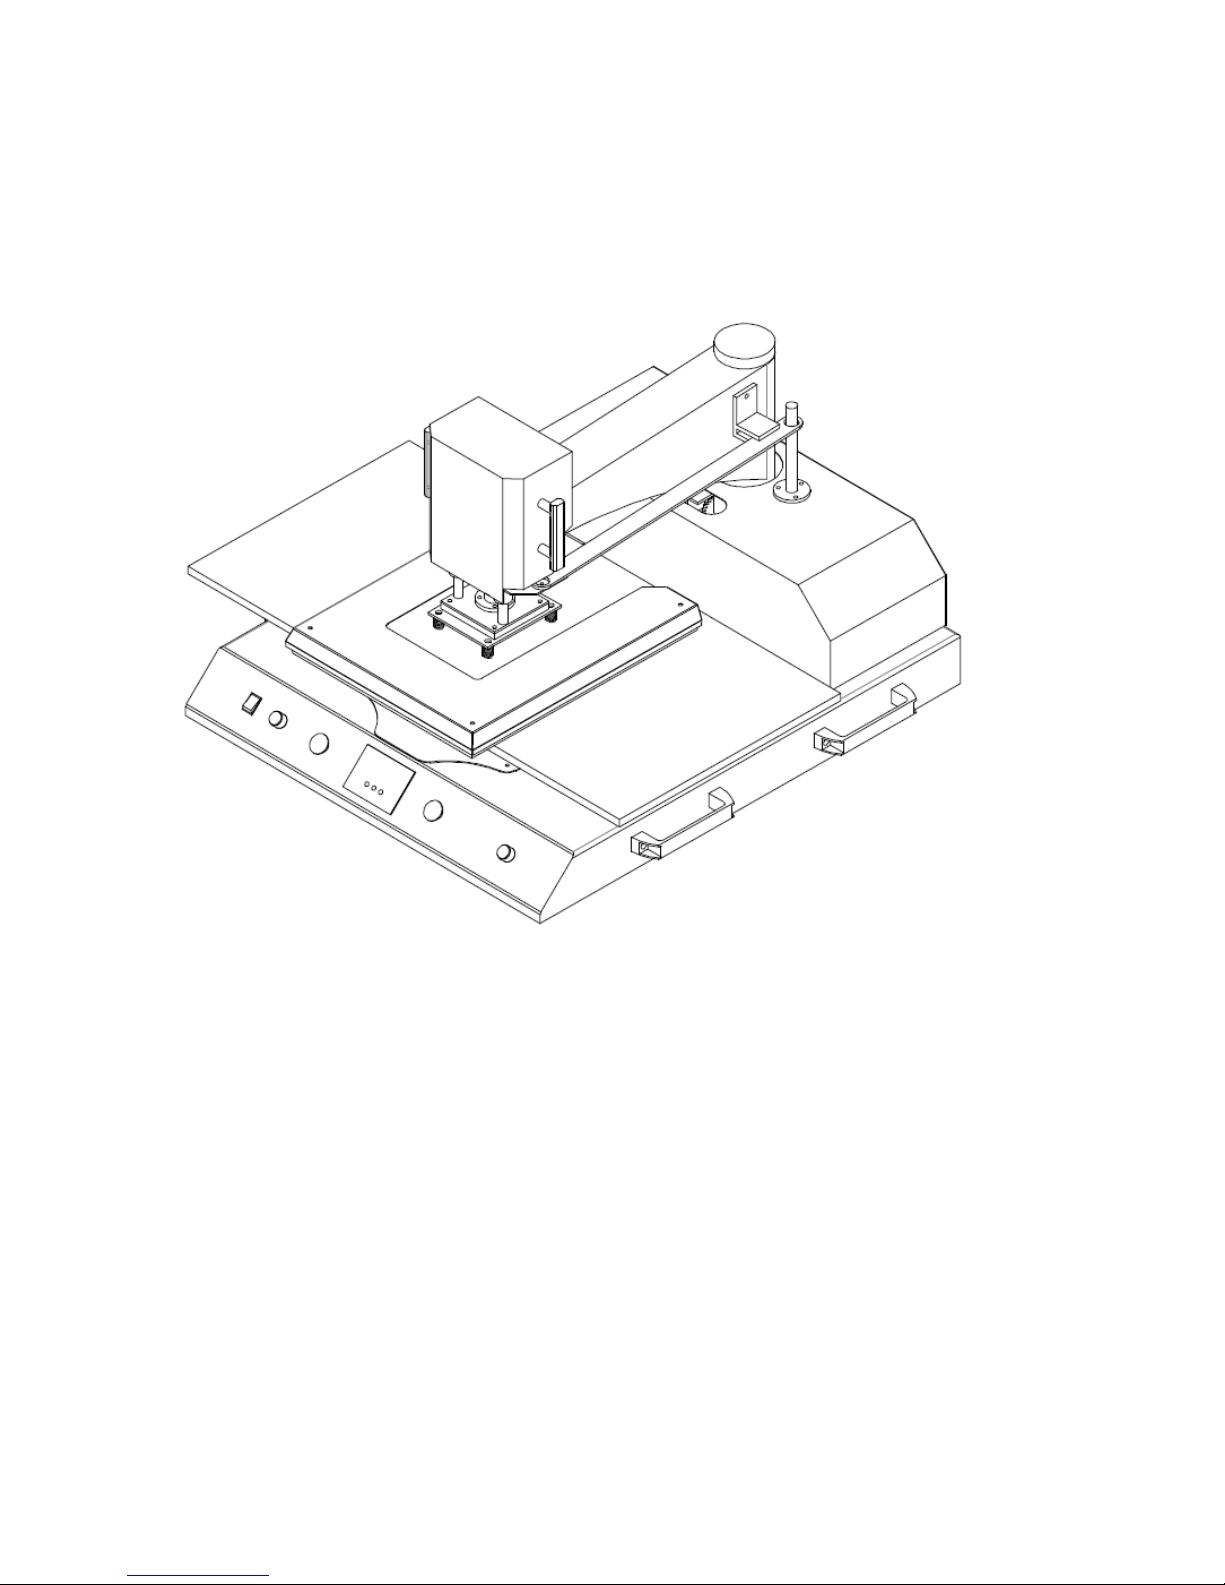
I. Assembly Drawing
① Emergency Stop Button ② Start Switch ③ GY-04 Digital Controller ④ Operation Mode Arrow Button
⑤ Power Switch ⑥ Under Plate ⑦ Swing Head ⑧ Shaft Fix plate
⑨ Side Handle ⑩ Installation Part for Base Plate
II. Technical Parameters
1. Model No.: APDL-20/24
2. Machine Dimensions: 1010*970*505mm
3. Heat Platen Size: 40x50cm/ 40x60cm
4. Printable Articles Max Size: 400*600*10mm
5. Voltage: 220V/1Phase; 120V/1 Phase
6. Power: 220V/1.8KW ; 110V/1.2KW
7. Recommend Setting: 30~280s; 180~210 .℃
Time Range: 0~999s
Maximum Temp: 225°C
8. Packing Size: 1100*1100*940mm
9. Gross Weight:: 231kg ( Wooden Package)
- 2 -
Page 3
III. Operation Process
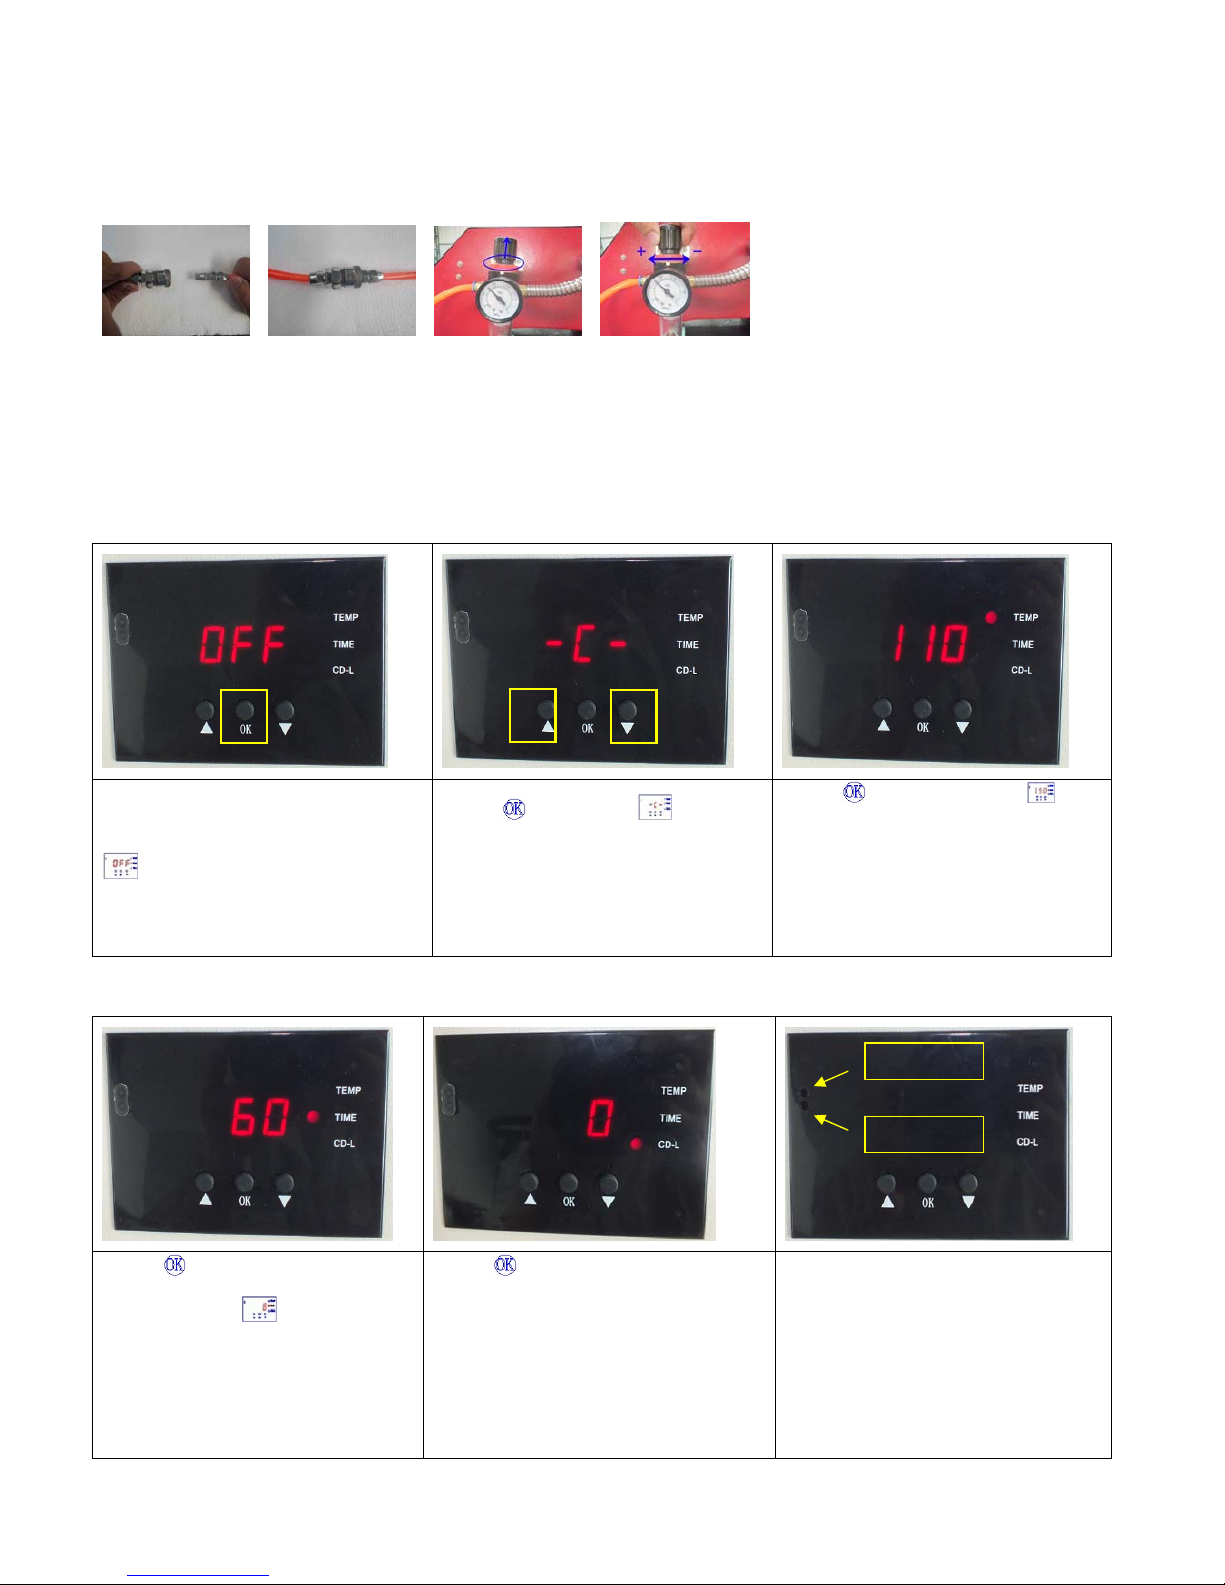
1. How to adjust the pressure:
1. Connect the heat press with air compressor or air sources.
2. Lift up the cap of air valve as the picture shown
3. Revolve the cap anticlockwise, the air pressure goes down; contrariwise, the air pressure goes up; when you
finish the pressure adjustment, push down the cap.
4. Suggested air pressure is 0.4~0.5Mpa/ 70-80Psi. It depends on the transfer materials.
2. Set temperature required
Turn on power switch, temperature
light is ON. The digital display shows
.
Press
button, the light is
on (C denotes Celsius). Press
arrows “△” or “▽” to select “℃” or
“℉” (F denotes
Fahrenheit)
according to your habits.
Press
button, the temp light
is on. Select with arrows the
temperature according to different
transfer material (Normally
180℃~200℃)
3. Set time required
Note: There are two small port in
front side of the digital display.
Press button after temperature
setting and the
time light is
on. Select with arrows the time
according to different transfer
material.
Press
button after time setting;
the display shows the temperature
starts to rise. “CD-L” shows the time
counting down during your transfer.
If the real temperature is lower than
digital controller shown, you can
adjust the “hot port”; Clockwise to
raise temperature; anticlockwise to
reduce temperature.
- 3 -
Page 4

4. Printing methods
Step 1: Make sure the cord is connected well to the wall socket. Place the object (i.e. T-shirt) on press bed, and
transfer paper with images facing down the object, adjust pressure to your requirement, and turn on the
power.
Step 2: Adjust the arrow knob to choose “MANUAL” or “AUTOMATIC” operation mode. This time, we set
the arrow point to “AUTOMATIC” mode.
Step 3: Set the temperature and time required, then temperature starts to rise.
Step 4: When the temperature rises to the set temperature, the buzzer sends out a short sound. Press the green
start-up switch, the heat platen will close down automatically. Time is counting down; once time is up, the
heat platen will open automatically.
Step 5: The heat platen will move to other side automatically on “AUTOMATIC” mode, then repeat the step 4
transfer process. (If it’s on “MANUAL” mode, then you need move heat platen to other side by hand.)
Step 6: Consult the Transfer Paper instructions on whether to peel cold or hot.
Ink-Jet Transfer Paper (fabric) 14-18 seconds
Laser Copier/Printer Transfer Paper (fabric) 18-25 seconds
Sublimation Transfers (onto Fabrics) 25-30 seconds
Sublimation Transfers (onto FR-Plastic/Woods) 60-70 seconds
4. Recommendations:
1) Ceramic tile transfer: (Mugs & Plates transfer is similar)
Set temperature: 180 .℃
Set time: 15 seconds
2) T-shirt transfer:
Set temperature: 180 .℃
Set time: (chemical fiber use for sublimation transfer paper: 30-50 seconds; pure cotton use for T-shirt
transfer paper: 10-20 seconds)
Emergency:
If any emergency happens, please press the red emergency stop button. After settled the emergency, please turn
the button clockwise and let it resume original status, and the machine will also resume working status.
NOTE:
1. Please switch off the machine power control valve if there is any problem.
2. The suitable air pressure is 0.4-0.5Mpa or 75-80Psi, neither too high (too high air pressure can destroy the
machine), nor too low (lower air pressure can’t let the heat platen work smoothly.)
3. Suggestion to power off for 1-2 hours after continuous working for 6-8 hours.
- 4 -
Page 5

- 5 -
IV. Maintenance
1. Air pressure
Checking the lubricating oil If it’s enough in the Cylinder. Use the pressure knob on the Air Regulator to adjust the
pressure, turn toward "+"direction to add the pressure, "-"direction to reduce the pressure.
2. Heat Platen Not Go Down: If digital display show normally, but when you press green start button, the
heat platen not goes down
1). The limit value under the bottom platen doesn’t touch the counting down switch because of its too high position.
Please loosen the value’s screw a little to make it longer.
2). Checking the circuit connecting with green start-up switch if it’s with problem.
3. No action after turn on the machine
1). Check the plug whether it connects well or whether it is broken.
2). Check the power switch or digital controller whether it is broken.
3). Check the fuse whether it has been burnt out.
4). Indicating light is on, but no display on screen, check the 5 cable of Railway transformer. If it’s loosening,
showing the problem is poor connection. If they connects well, showing that the Transformer is faulty.
4. The display screen are working well, but no temperature increasing on the heat platen.
1). Check whether the thermocouple of the heat platen touches well. If the thermocouple is loose, the display will
show 255 and machine keeps beeping.
2). Check if the indicating light of solid-state relay is on, if not, check if the relay or digital controller is broken.
3). If you already changed the new solid-state relay but the heat platen still can’t heating up, check if the heat platen
is faulty or the heat platen’s power cable is loose, need to change by new heat platen.
5. The heat platen works well, but suddenly the display screen show 255℃.
1). Check whether the thermocouple of the heat platen touches well.
2). If the thermocouple touches well but stills show 255℃, then it is faulty.
6. The machine is heating during 0~180℃, but display number jumps to above 200℃ or 300℃ suddenly, or
the numbers on display jumps irregularly.
1). Check whether the thermocouple of the heat platen touches well.
2). If the thermocouple is good, It shows that the program of digital controller is broken, which namely IC or is
broken, need to change by new controller.
7.
The temperature is out of control: Set 180℃,but the actual temperature is above 200℃。
1). It means the solid-state relay is broken, out of control, need to change the relay.
2). Or the digital controller is faulty and it keeps conveying electric to relay, need to change controller.
8. The setting temp and time becomes abnormal after exchange the heat platen
Please reset the temp and time according the operation process manual.
9. Other notice
1). In order to prolong the machine service life, please add the lubrication oil regularly on the joints.
2). In order to keep the heat platen's good transfer effect, you need to protect the heat platen carefully whenever
you are using it or not.
3). Please keep the machine in dry place.
4). If you are not able to solve the electrical parts problem, please kindly contact the supplier and get technical
support.
Page 6

V. Trouble shooting for transfer print quality
1. If the print color is pale: the temperature is too low / the pressure is not correct / or not pressed long enough.
2. If the print color is too brown or the transfer paper is almost burnt: reduce the setting temperature
2. If the print is blurring: too much transfer time causes proliferation.
3. If print color is different/ partial transfer effect is not good enough: the pressure is not enough / or not pressed
long enough / or poor quality transfer paper.
4. If transfer paper stick to the object after transfer: the temperature is too high/ or poor quality printing ink.
Motherboard Diagram
- 6 -
Page 7

VI. Explosion View
- 7 -
Page 8

- 8 -
No. Parts Name Qty.
1 Machine frame 1
2 Rubber Foot 4
3 Side Handle 4
4 Emergency Stop Button 1
5 Green Start-up Switch 2
6 GY-04 Digital Controller 1
7 Transfer Switch 1
8 Power Switch 1
9 Electrical Cover Plate 1
10 400*600 Heat Platen 2
11 400*500 Heat Platen 2
12 Air Cylinder 1
13 Electromagnet Valve 2
14 Air Cylinder Connector 1
15 Straight Tooth 1
16 Air Cylinder Fixing Plate 1
17 Straight Tooth Mounting Plate 1
18 Straight Tooth Back Fixing Plate 1
19 Casting Polyurethane 1
20 Back-Plane Connector 2
21 Hand Wheel Adjuster 2
22 Back-Plane Connector 2
23 Serpentuator Connector 1
24 Serpentuator 1
25 Small Fan 1
26 Motherboard 1
27 Spur Gear 1
28 Cover Plate 1
29 Back Cover Plate 1
30 Air Filter 1
31 Shaft Fix plate 1
32 Vertical shaft 1
33 Linear Bearing 2
34 Limit Location Plate 1
35 Guide Bar 1
36 Casing Swing Arm 1
37 Column Loading and Unloading Cover 1
38 400*600 Heat Platen 1
39 400*500 Heat Platen 1
40 400*600 Heat Platen Metal Cover 1
41 400*500 Heat Platen Metal Cover 1
42 400*600 Anti-scald protect metal cover 1
43 400*500 Anti-scald protect metal cover 1
44 Compression Spring 4
45 Under Adapter Plate 1
46 Upper Adapter Plate 1
47 Cylinder Lift Adapter 1
48 Lift Plain Shaft 2
49 Connect Plate 1
50 Linear Bearing 2
51 Thrust Bearing 1
52
Cylinder Block
1
53 Protection Block Fixing Plate 2
54 Air Cylinder 1
55 Pressure Regulating Value 1
56 Handle 2
57 Cylinder Protect Cover 1
 Loading...