

Page 1
ENGLISH
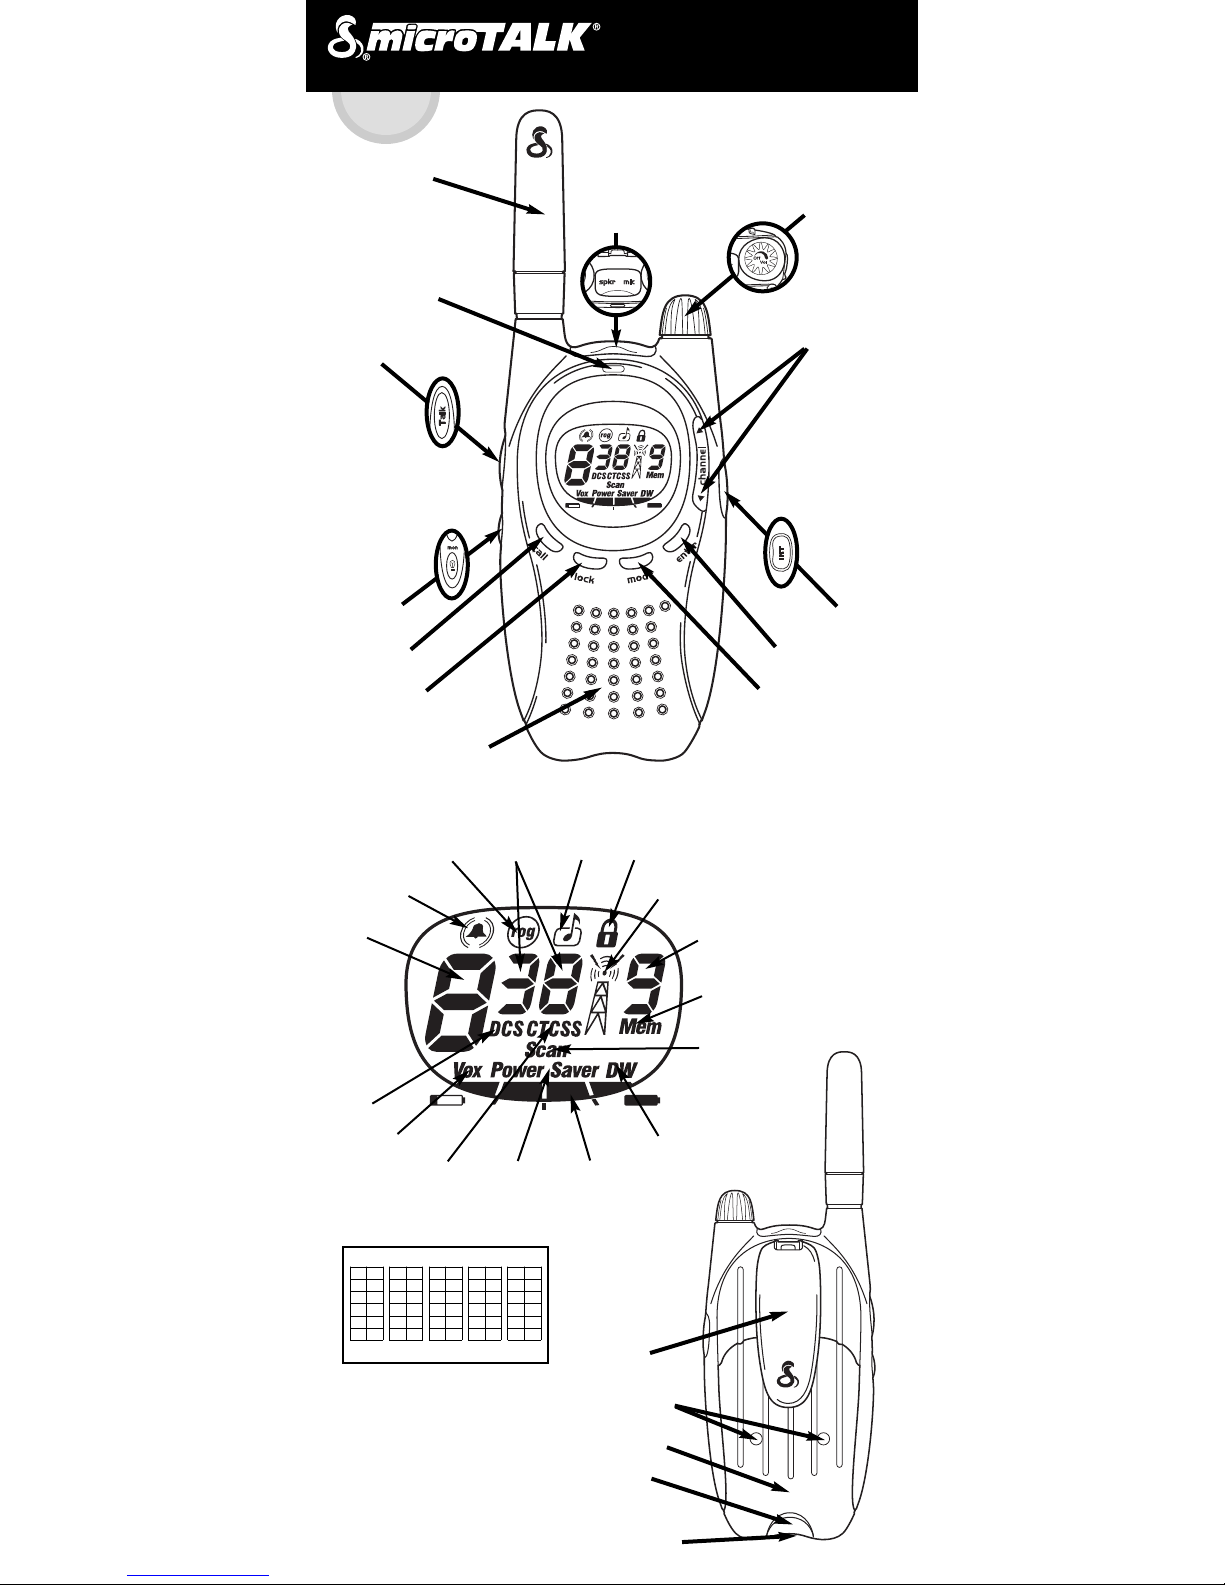
CALL Button ENTER Button
MODE Button
CHANNEL UP/
CHANNEL DOWN Buttons
Speaker/Microphone
Belt Clip
LOCK Button
External Speaker/
Microphone Jack
TALK Button
LIGHT/MAX RANGE
Button
Battery
Compartment
Lock Tab
Intercom Jack
Antenna
Two-Way Radio Model MT 925 PRO
Channel Number
CTCSS Privacy Code or
DCS Code Numbers
Receive/Transmit
Lock
Power Saver Battery Level
Dual Watch
ON-OFF/VOLUME Knob
VibrAlert®/Call Alert
DCS Code
Scan
Roger Beep Icon
Keystroke Tone
Wrist Strap
Connection Location
CTCSS Privacy Code
VOX
Memory Location
Number
Memory
Battery Charge Contacts
Power/Transmit-Receive
Indicator
This equiment is intended for use in:
• Countries of use
PT •
SE •
CH •
SI •
SK •
TR •
LI •
LU •
MT •
NL •
NO •
PL •
HU •
IE •
IS •
IT •
LT •
LV •
EE •
ES •
FI •
FR •
GB •
GR •
AT •
BE •
CY •
CZ •
DE •
DK •
Page 2
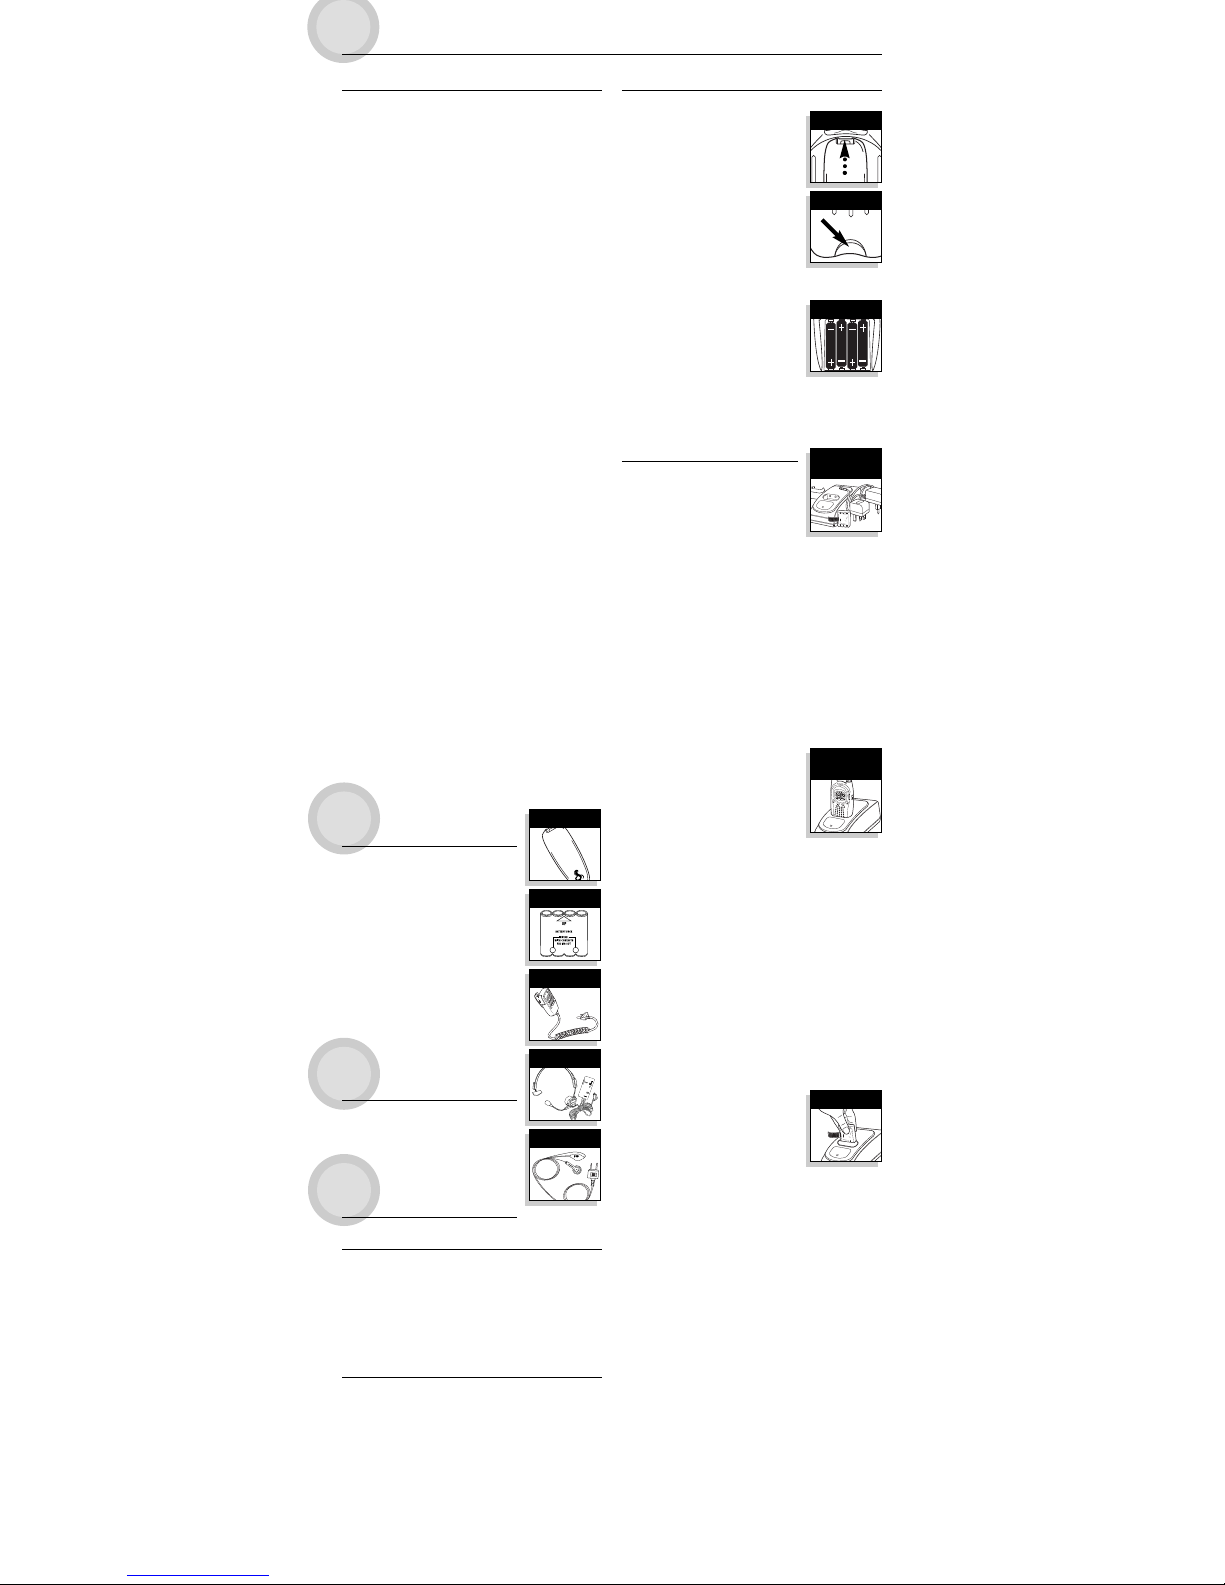
electrical socket. (A UK-compatible
connector is included, if required.)
2. Place the rechargeable NiMH BATTERY PACK
(part No. FA-BP) in the battery compartment
(see “Battery Installation”).
3. Place the RADIO in the charger base.
The CHARGE light on the charger base will indicate when the
radio is inserted into the charger properly.
A full charge will take approximately three (3) hours. You can
leave the unit in the charger indefinitely.
NOTE: Your microTALK®radio can also be operated with four
standard AAA alkaline batteries.
WARNING: Only the NiMH battery pack FA-BP can be recharged.
To Recharge the Rechargeable NiMH Battery Pack:
1. Attach the POWER SUPPLY to the charger base and plug it
into an electrical socket. (A UKcompatible connector is included, if
required.)
2. Insert BATTERY PACK GUIDE in the radio
charging well.
3. Place the rechargeable NiMH BATTERY
PACK (part No. FA-BP) in the charger base.
The CHARGE light on the charger base will indicate when the
rechargeable NiMH battery pack (part No. FA-BP) is inserted
into the charger properly.
A full charge will take approximately three (3) hours. You can
leave the the battery pack in the charger indefinitely.
NOTE: Your microTALK®radio can also be operated with four
standard AAA alkaline batteries.
WARNING: Only the NiMH battery pack FA-BP can be recharged.
OPTIONAL
ACCESSORIES
For accessory orders and availability,
please contact your local dealer.
PA-BC2 ........Replacement Belt Clip
FA-BP ..........NiMH Rechargeable Battery
Pack
MA-SM ........Lapel Speaker/ Microphone
MA-VOX ......VOX Headset Speaker/
Microphone
MA-EBM ......Ear Bud Microphone with
Push To Talk Button
WARRANTY &
CUSTOMER
SERVICE
For warranty and customer service
information, please contact your local
dealer.
OPERATION
Product Information
This microTALK®radio has been manufactured to meet all
required standards for radio equipment using PMR 446
frequencies as authorized. The use of this two-way radio product
involves the public airways and its use may be subject to local
laws or regulations. Contact your radio licensing authority for
more information.
Caring for Your Radio
Your microTALK®radio will give you years of trouble-free service
if cared for properly. Here are a few suggestions:
• Handle the radio gently.
• Keep it away from dust.
• Never put the radio in water or in a damp place.
• Avoid exposure to extreme temperatures.
Product Features
• Two-Way Radio
with up to a 3 km (2 mile) range
•
8 Channels*
•
38 CTCSS Privacy Codes
• 83 DCS Codes
• Backlit LCD Display
•
Water Resistant
• Battery Saver Circuitry
•
Maximum Range Extender
•
VOX Mode for Hands-Free Transmissions
•
VibrAlert®Silent Paging
•
Intercom Capability
•
10 Memory Locations
• Call Alert (10 Selectable Tones)
•
Scan (Channel, CTCSS Privacy Code,
DCS Code, Memory)
•
Dual Watch Programmable 2-Location Scan
•
Key Lock
• Auto Squelch
• Selectable On/Off "Roger Beep"
Confirmation Tone
• Selectable On/Off
Keystroke Tones
• External Speaker/Microphone Jack
•
Belt Clip
• Wrist Strap
• Battery Charge Contacts in Battery Compartment Door
•
Rapid Desktop Charger
• Rechargeable NiMH Battery Pack
• AC Adapter (220V, 2-Pin Euro Plug)
•
Plug Converter
(220V, 2-Pin Euro Plug to 240V, 3-Pin UK Plug)
*You are not allowed to use channels 1 and 2 in France.
This situation can change; please contact the French radio
licensing authority for more information.
Battery Installation
To Install or Replace Batteries:
1. Remove belt clip by releasing belt clip
latch and sliding clip Up.
2. Pull down on the BATTERY DOOR LOCK
TAB to remove the battery
compartment cover.
3. Insert the rechargeable NiMH battery
pack (part No. FA-BP) according to
instructions indicated on battery pack.
4. Replace battery compartment cover
and belt clip.
NOTE: Your microTALK®radio can also be
operated with four standard AAA
alkaline batteries. Always use highquality alkaline batteries. Position
batteries according to polarity
markings.
NOTE: See “Optional Accessories” for accessory availability and
ordering instructions.
Battery Pack
and Desktop Charger
Your microTALK®radio includes a
rechargeable NiMH battery pack (part No.
FA-BP) and a rapid desktop charger (part
No. PA-CX). In addition, a UK-compatible
connector is included, if required.
Your rapid desktop charger is capable of recharging one (1)
radio (with battery pack installed in battery compartment) or
one (1) battery pack using the included battery pack guide in
the radio charging well. See “Optional Accessories” to order
additional rechargeable NiMH battery packs (part No. FA-BP) or
other speaker/microphone accessories.
You should fully charge the included rechargeable NiMH battery
pack (part No. FA-BP) before using your microTALK
®
radio for
the first time.
To Recharge the Rechargeable NiMH Battery Pack
In Radio:
1. Attach the POWER SUPPLY to the
charger base and plug it in to an
FA-BP
Remove Belt Clip
Lock Tab
Insert Batteries
CHARGE
Battery Pack &
Desktop Charger
CHARGE
Battery Pack
In Radio
CHARGE
Battery Pack Only
FEATURES, ACCESSORIES and
OPERATION
English
PA-BC2
MA-SM
MA-VOX
MA-EBM
Page 3
Radio Power
To Turn Your Radio On:
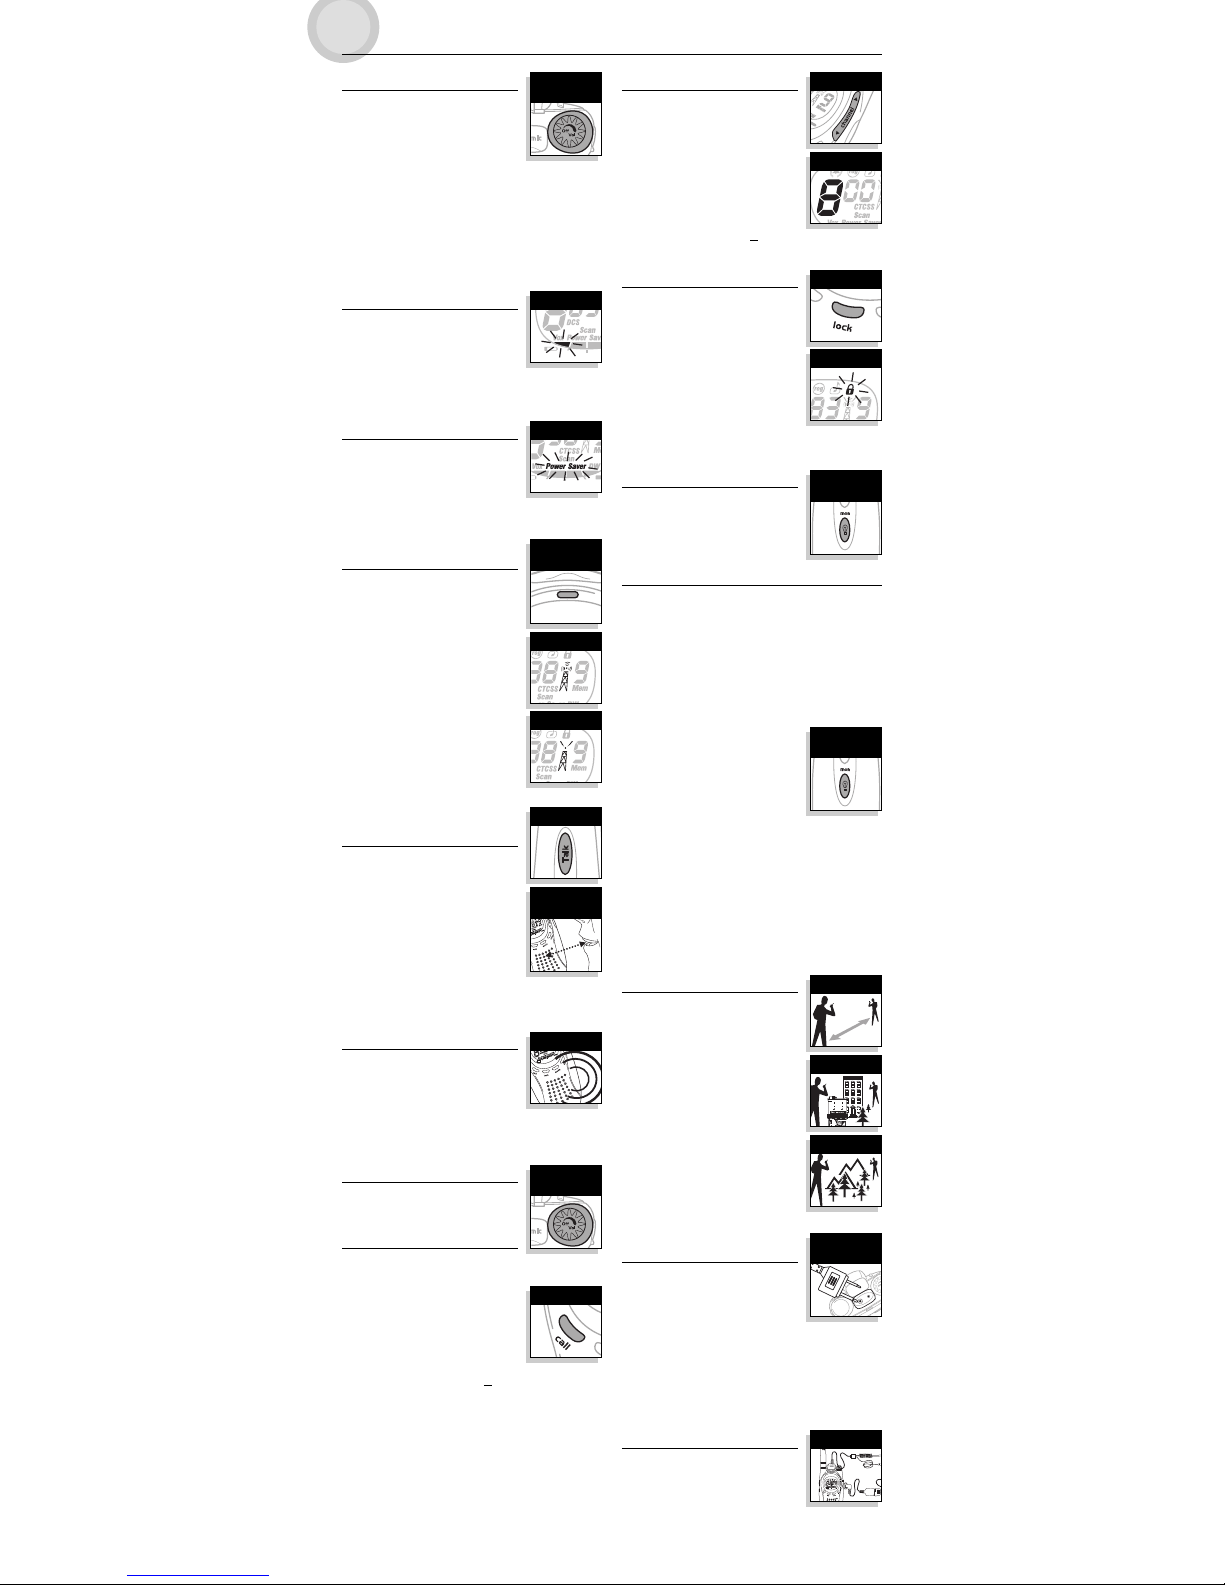
1. Rotate the ON-OFF/VOLUME knob
clockwise. An audible tone will indicate
that the radio is On.
Your microTALK
®
radio is now in LISTENING
MODE, ready to receive transmissions. The radio is always in
LISTENING MODE, except when the TALK, CALL or MODE buttons
are pressed.
To Turn Your Radio Off:
1. Rotate the ON-OFF/VOLUME knob anticlockwise until you
hear and feel a click.
Battery Low Indicator
Battery power is indicated by the segments
appearing at the bottom of the display. As
battery power decreases, fewer segments
will be visible. When the last segment
begins to flash, the batteries should be replaced or recharged.
WARNING: Only the NiMH battery pack FA-BP can be recharged.
Battery/Power Saver
If there are no transmissions within ten
(10) seconds, the unit will automatically
switch to Battery Save Mode and POWER
SAVER will appear on the display. This will
not affect the unit’s ability to receive incoming transmissions.
Power/Transmit-Receive
Indicators
The POWER/TRANSMIT-RECEIVE INDICATOR
flashes every three (3) seconds to indicate
that the radio is On.
While transmitting, the POWER/TRANSMITRECEIVE INDICATOR will stay on steady and
the rings of the TRANSMIT/RECEIVE ICON
will be displayed.
While receiving a transmission, the
POWER/TRANSMIT-RECEIVE INDICATOR will
flash rapidly and the lightning bolts of the
TRANSMIT/RECEIVE ICON will be
displayed.
Power Saver Icon
OPERATION
English
Communicating with
Another Person
To Talk To Another Person:
1. Press and hold the TALK button.
2. With the microphone about 5 cm
(2 inches) from your mouth, speak in
a normal voice.
3. Release the TALK button when you
have finished talking and listen for a
response.
You cannot receive incoming calls while pressing the TALK
button.
Listening for a Response
When You Have Finished Talking:
1. Release the TALK button to receive
incoming transmissions.
Your microTALK
®
is always in LISTENING
MODE except when the TALK, CALL or MODE buttons are
pressed.
Volume
To Adjust the Volume:
1. Rotate the ON-OFF/VOLUME knob.
Call Button
To Alert Another Person That You
Are Calling:
1. Press and release the CALL button.
The other person will hear a two (2)
second ringing tone. You cannot receive
transmissions while sending a call.
NOTE: Both radios must be tuned to the
same channel/privacy code or
channel/DCS code to
communicate.
Channels
To Select a Channel:
1. With the radio On, push the CHANNEL
UP or CHANNEL DOWN button.
You can press and hold the CHANNEL
UP or CHANNEL DOWN button for fast
advance.
NOTE: Both radios must be tuned to the
same channel/privacy code (see
“CTCSS Privacy Codes”) or
channel/DCS code (see “DCS Codes”) to communicate.
Lock Feature
The LOCK button locks the CHANNEL UP,
CHANNEL DOWN, MODE and ENTER
buttons to prevent accidental operation.
To Use the Lock Feature:
1. Press and hold the LOCK button for two
(2) seconds to turn the Lock Feature
On or Off.
A double beep sound is used to confirm
your Lock Feature On or Off request. When
the radio is in Lock Mode, the Lock icon will be displayed.
Display Illumination
To Illuminate Your Display:
1. Press and release the LIGHT/MAX
RANGE button to illuminate the display
for ten (10) seconds.
Auto Squelch/Maximum Range Extender
Your microTALK®radio is equipped with Auto Squelch, which
automatically shuts Off weak transmissions and unwanted noise
resulting from terrain, conditions, or from reaching your
maximum range limit.
You can temporarily turn Off Auto Squelch or turn On Maximum
Range Extender, allowing all signals to be received and
extending the maximum range of your radio.
To Temporarily Turn Off Auto Squelch:
1. Press the LIGHT/MAX RANGE button
for less than five (5) seconds.
If you hear two (2) beeps, you have
turned the Maximum Range Extender On (see below).
To Turn Maximum Range Extender On:
1. Press and hold the LIGHT/MAX RANGE button for at least
five (5) seconds until you hear two (2) beeps, indicating
that the Maximum Range Extender is On.
To Turn Maximum Range Extender Off:
1. Press and release the LIGHT/MAX RANGE button or change
channels.
microTALK®Range
Your microTALK®radio has a range of up to
three (3) kilometres (2 miles). Your range
will vary depending on terrain and
conditions.
In flat, open country your radio will
operate at maximum range.
Buildings and foliage in the path of the
signal can reduce the range.
Dense foliage and hilly terrain will
further reduce the signal.
Remember, you can achieve maximum
range by using Maximum Range Extender.
See above for details.
External
Speaker/Microphone Jack
Your microTALK®radio can be fitted with
an optional external speaker/microphone
(not included), freeing your hands for other
tasks.
NOTE: See “Optional Accessories” for accessory availability and
ordering instructions.
To Attach the External Speaker/Microphone:
1. Open the SPEAKER/MICROPHONE TAB on top of the unit.
2. Insert the plug into the SPEAKER/MICROPHONE jack.
Intercom
With the optional intercom adapter and
two external speaker/microphone
attachments, a single microTALK
®
radio can
be used as an intercom system. (Ideal for
motorcyclists.) Contact your local dealer for availability and
pricing.
On-Off/Volume
Knob
Talk Button
5 cm (2 inches)
From Mouth
On-Off/Volume
Knob
Battery Low
Listening
Channel Number
Channel Buttons
Call Button
Lock Button
Light/Max Range
Button
Lock Icon
Light/Max Range
Button
Reduced Range
Maximum Range
Reduced Range
External Speaker/
Microphone
Intercom
Power/TransmitReceive Indicator
Transmiting
Receiving
Page 4
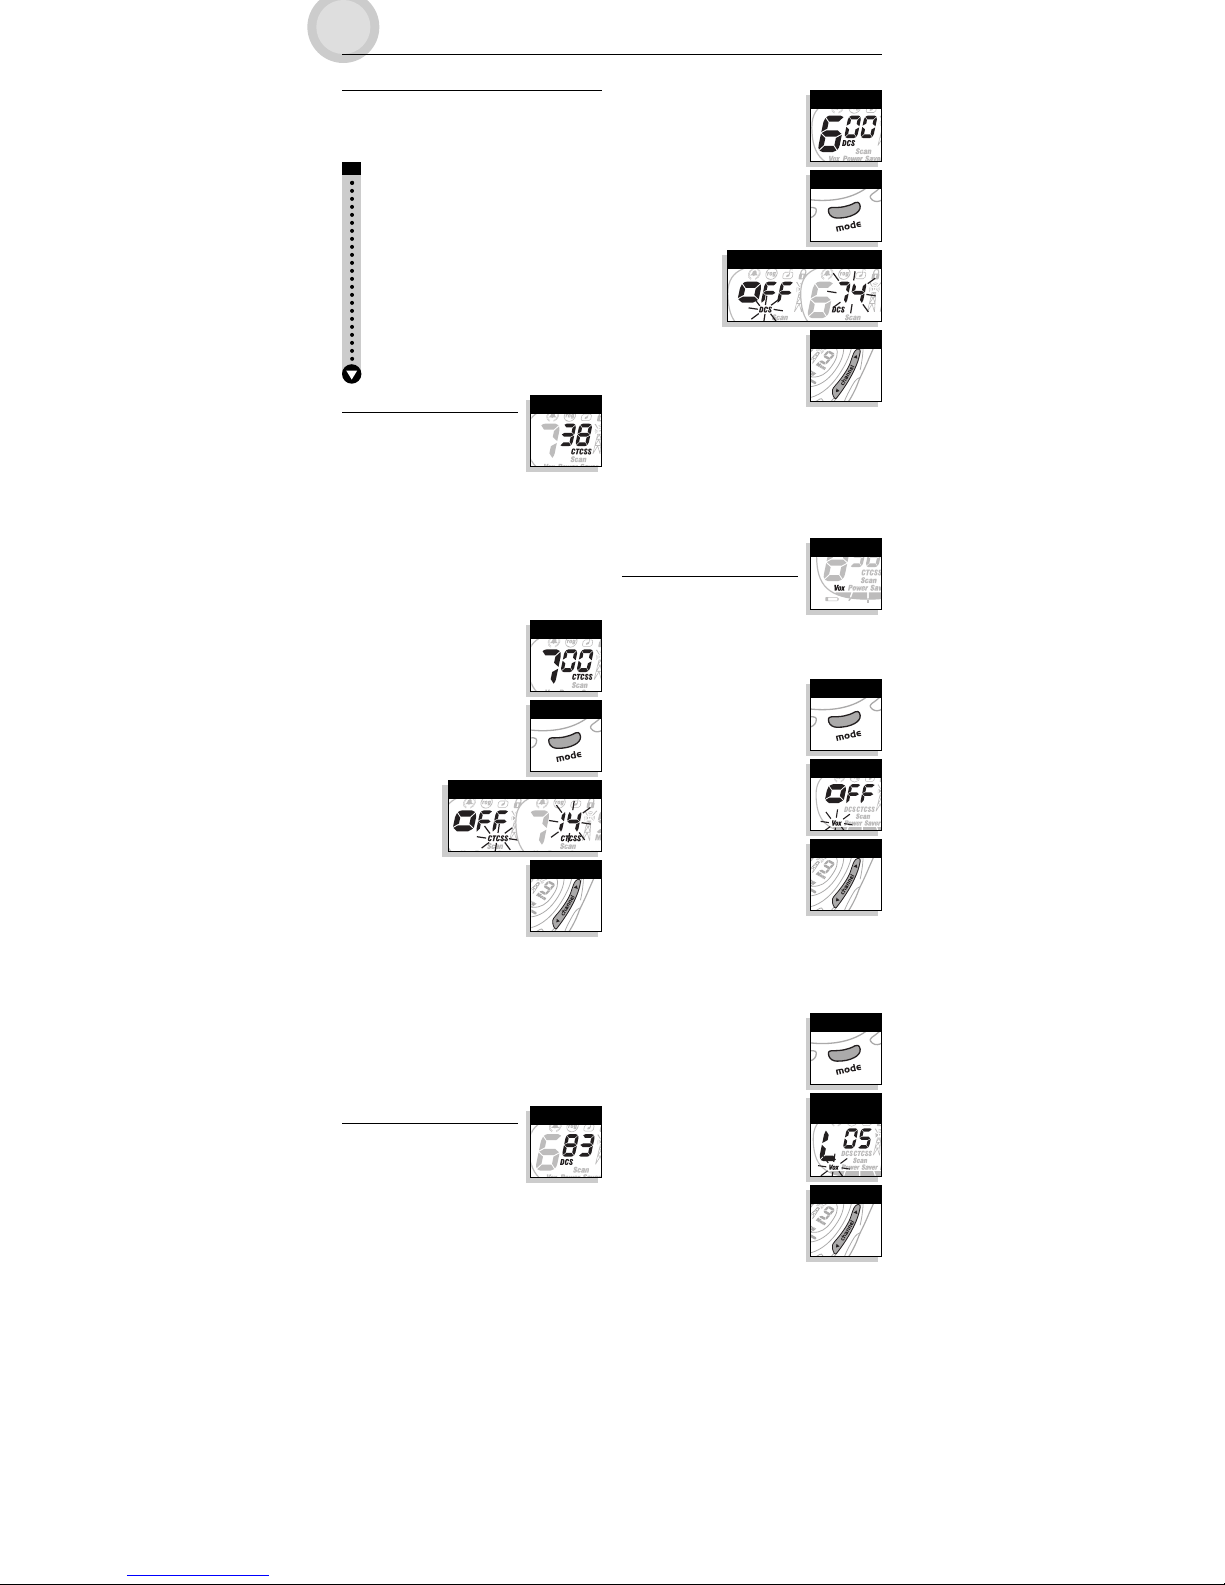
DOWN button to turn VOX On or Off.
3. When your desired VOX Mode setting
is displayed, choose one of the
following:
a. Press the MODE button to enter the
setting and proceed to other
functions.
b. Press the ENTER button to enter the setting and return to
LISTENING MODE.
c. Do not press any buttons for fifteen (15) seconds to
enter the setting and return to LISTENING MODE.
To Set the VOX Sensitivity Level:
1. Press the MODE button until the VOX
icon flashes and the current sensitivity
level is shown on the display.
The current sensitivity level is displayed
with the letter “L” and a number 1 to 5,
5 being the most sensitive level and
1 being the least sensitive level.
2. Press the CHANNEL UP or CHANNEL
DOWN button to change the sensitivity
level.
3. When your desired VOX sensitivity level
is displayed, choose one of the
following:
a. Press the MODE button to enter the
setting and proceed to other
functions.
b. Press the ENTER button to enter the setting and return to
LISTENING MODE.
c. Do not press any buttons for fifteen (15) seconds to
enter the setting and return to LISTENING MODE.
To Select a DCS Code:
1. After selecting a channel, press and
release the MODE button until the DCS
icon and current setting (the small
numbers next to the channel number or
Off) flash on the display.
2. Press the CHANNEL UP or CHANNEL
DOWN button to either:
a. Select a DCS code number.
b. Turn DCS Code mode On and select
a DCS code
number (00 to
83).
You can press and
hold the CHANNEL
UP or CHANNEL
DOWN button for fast advance through
DCS code numbers.
3. When your desired DCS code number is
displayed, choose one of the following:
a. Press the MODE button to enter the DCS code number
and proceed to other functions.
b. Press the ENTER button to enter the DCS code number
and return to LISTENING MODE.
c. Do not press any buttons for fifteen (15) seconds to
enter the DCS code number and return to LISTENING
MODE.
Voice Activated Transmit
(VOX)
In VOX Mode, your microTALK®radio can
be used “hands-free,” automatically
transmitting when you speak. You can set
the VOX sensitivity level to fit the volume of your voice and
avoid transmissions triggered by background noise.
To Turn VOX Mode On or Off:
1. Press the MODE button until the VOX
icon flashes on the display. The current
On or Off setting is shown on the
display.
2. Press the CHANNEL UP or CHANNEL
and select a
CTCSS privacy
code number
(00 to 38).
You can press and hold the CHANNEL
UP or CHANNEL DOWN button for fast
advance through CTCSS privacy code
numbers.
3. When your desired CTCSS privacy code number is displayed,
choose one of the following:
a. Press the MODE button to enter the CTCSS privacy code
number and proceed to other functions.
b. Press the ENTER button to enter the CTCSS privacy code
number and return to LISTENING MODE.
c. Do not press any buttons for fifteen (15) seconds to
enter the CTCSS privacy code number and return to
LISTENING MODE.
DCS Codes
DCS (Digitally Coded Squelch) is an
advanced digital coding system allowing
you to select one of 83 DCS codes to
reduce incoming transmissions from other
users on a channel.
NOTE: If you are using a DCS code, both radios must be tuned
to the same channel/DCS code to communicate. Each
channel will remember the last DCS code you selected.
IMPORTANT: When using DCS Codes, CTCSS Privacy Codes
cannot be used.
Scrolling Through the Mode Functions
By scrolling through the Mode Functions, you will be able to
select or change preferred features of your microTALK
®
radio.
While you are scrolling through the Mode Functions, your radio
features will be displayed in the same predetermined order:
Set CTCSS Privacy Codes
Set DCS Codes
Set VOX On/Off
Set VOX Sensitivity Level
Program or Recall Memory Locations
Set Channel Scan
Set CTCSS Privacy Code Scan
Set DCS Code Scan
Set Memory Location Scan
Set VibrAlert
®
and/or Call Alert
Program Dual Watch Location or Set Dual Watch On/Off
Set Call Tones
Set “Roger Beep” On/Off
Set Keystroke Tones On/Off
CTCSS Privacy Codes
CTCSS (Continuous Tone Coded Squelch
System) is an advanced tone coding
system allowing you to select one of 38
CTCSS privacy codes to reduce incoming
transmissions from other users on a channel.
NOTE: If you are using a CTCSS privacy code, both radios must
be tuned to the same channel/privacy code to
communicate. Each channel will remember the last
CTCSS privacy code you selected.
IMPORTANT: When using CTCSS Privacy Codes, DCS Codes
cannot be used.
To Select a CTCSS Privacy Code:
1. After selecting a channel, press and
release the MODE button until the
CTCSS icon and current setting (the
small numbers next to the channel
number or Off) flash on the display.
2. Press the CHANNEL UP or CHANNEL
DOWN button to either:
a. Select a CTCSS privacy code number.
b. Turn CTCSS Privacy Code mode On
Privacy Codes
Channel Buttons
Mode Button
Current Setting
Select Channel
Channel Buttons
Mode Button
DCS Codes
Current Setting
Select Channel
Select On/Off
Mode Button
Channel Buttons
VOX Icon
Select VOX
Sensitivity Level
Channel Buttons
Mode Button
MODE FUNCTIONS OPERATION
English
Page 5
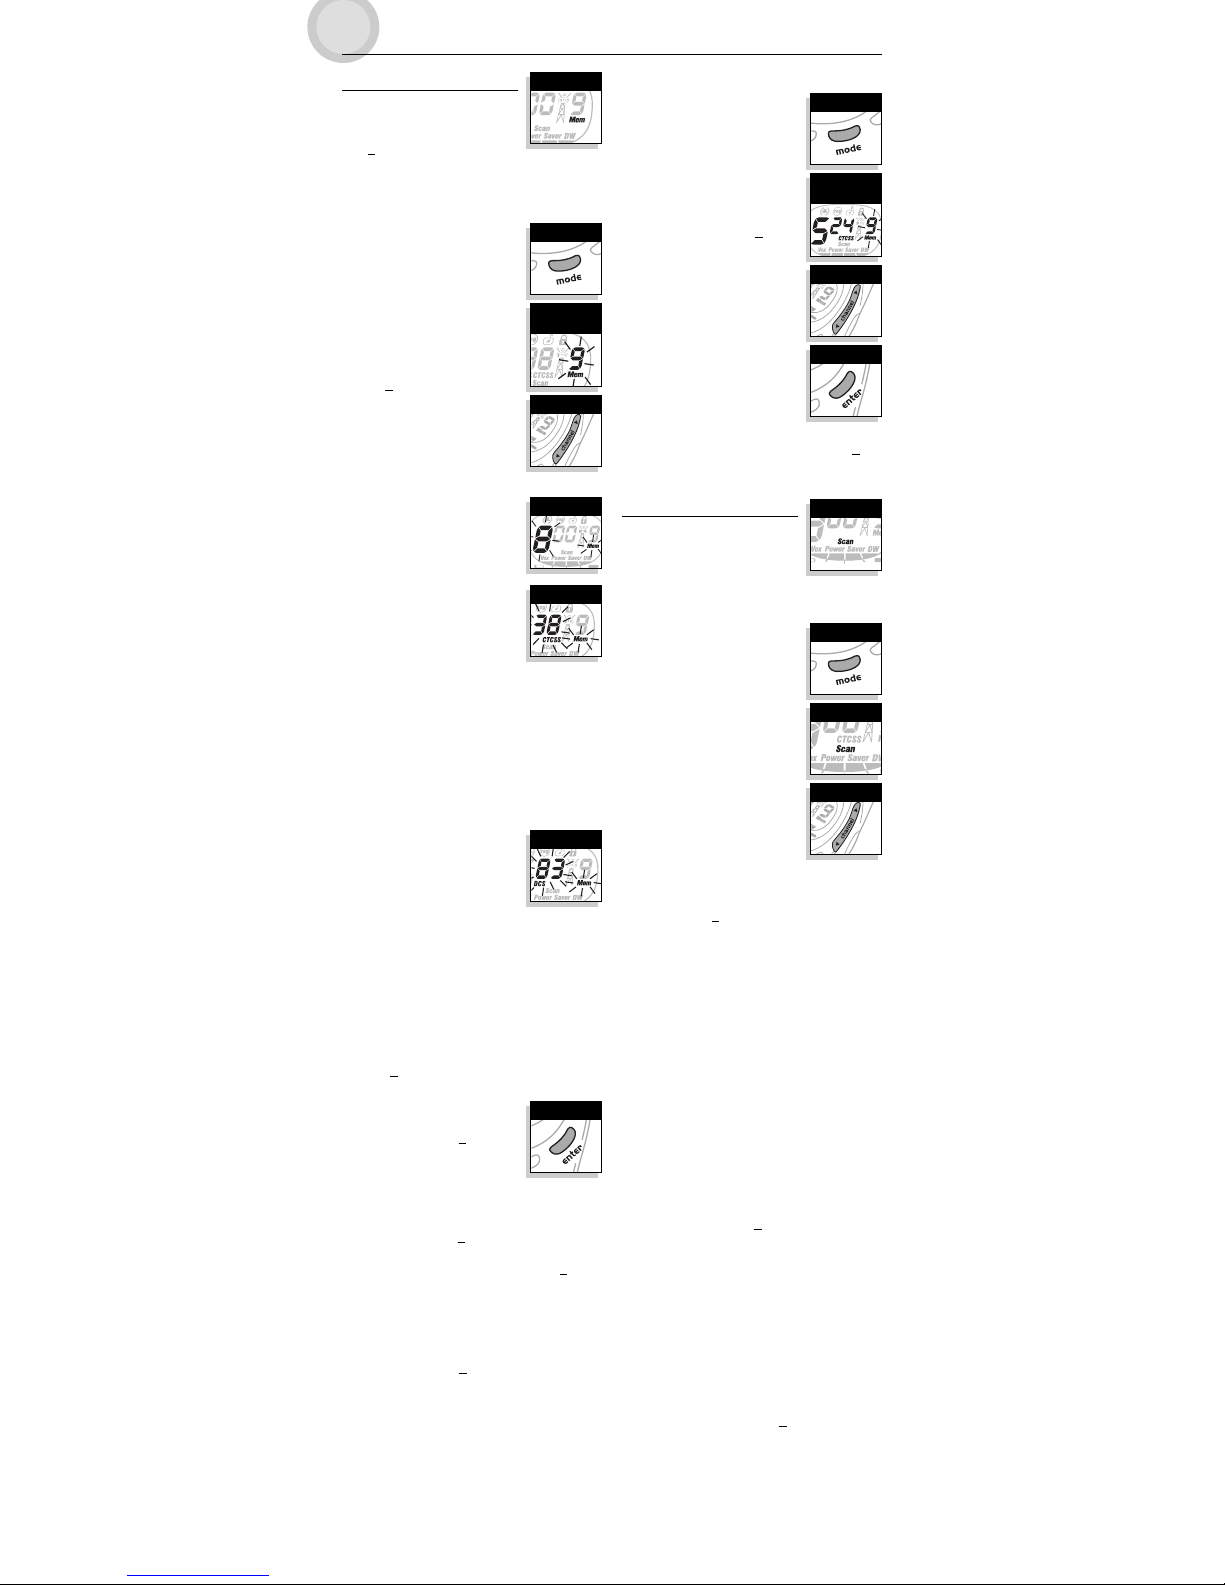
MODE FUNCTIONS OPERATION
10 Memory Locations
Your microTALK®radio has ten (10)
memory locations (0 to 9) for storing your
most frequently used channel/privacy
codes or
channel/DCS codes. While in
Memory Location options, you can program and/or recall
memory locations. These memory locations can also be scanned
(see “Scan Memory Locations”).
To Program A Memory Location:
1. Press the MODE button until the
Memory icon and the memory location
number (0 to 9) flash on the display.
2. Press the CHANNEL UP or CHANNEL
DOWN button to select a memory
location number (0 to 9).
NOTE: If a location has been
programmed before, its
associated channel/privacy code
or
channel/DCS code will be
shown on the display.
3. To enter a new memory location or edit
an already programmed memory
location, press the MODE button. The
channel number will flash on the
display.
4. Choose one of the following:
a. Select or edit a channel/privacy
code number:
1) Press the CHANNEL UP or
CHANNEL DOWN button to select
a channel (1 to 8; setting the
channel to “0” will clear or unprogram the memory location).
2) Press the MODE button. The
CTCSS icon and current setting
(the small numbers next to the
channel number or Off) will flash on the display.
3) Press the CHANNEL UP or CHANNEL DOWN button to
select a CTCSS privacy code (00 to 38).
b. Select or edit a channel/DCS code number:
1) Press the CHANNEL UP or CHANNEL DOWN button to
English
select a channel (1 to 8; setting the channel to “0”
will clear or un-program the
memory location).
2) Press the MODE button. The
CTCSS icon and current setting
(the small numbers next to the
channel number or Off) will flash
on the display.
3) Press the MODE button again. The DCS icon and
current setting (the small numbers next to the channel
number or Off) will flash on the display.
4) Press the CHANNEL UP or CHANNEL DOWN button to
select a DCS code (00 to 83).
5. Choose one of the following:
a. Press the ENTER button to enter the channel/privacy
code or
channel/DCS code in the selected memory
location and return to the beginning of Memory Location
options.
b. Press the MODE button to enter the
channel/privacy code or
channel/DCS code in the selected
memory location and return to
beginning of Memory Location
options.
c. Press the ENTER button TWICE to enter the
channel/privacy code or
channel/DCS code in the
selected memory location. This will return the radio to
LISTENING MODE on the channel/privacy code or
channel/DCS code displayed before you entered Mode
Functions.
NOTE: While setting a memory location, if you do not press any
buttons for fifteen (15) seconds your radio will
automatically return to LISTENING MODE on the
channel/privacy code or
channel/DCS code displayed
before you entered Mode Functions.
To clear or un-program a memory location, set the channel to
“0”.
To Recall a Stored Memory Channel Location:
1. Press the MODE button until the
Memory icon and the memory location
number (0 to 9) flash on the display.
2. Press the CHANNEL UP or CHANNEL
DOWN button to select a memory
location number (0 to 9).
NOTE: If a location has been
programmed, its associated
channel/privacy code or
channel/DCS code will be
shown on the display.
3. Press the ENTER button to return to
LISTENING MODE on the selected
memory location.
NOTE: Pressing the MODE button will
put you in “Program A Memory
Location”.
NOTE: While recalling a stored memory
location, if you do not press any
buttons for fifteen (15) seconds
your radio will automatically return
to LISTENING MODE on the channel/privacy code or
channel/DCS code displayed before you entered Mode
Functions.
Channel Scan
Your microTALK®radio can automatically
scan channels (1 to 8).
NOTE: The radio ignores specific CTCSS
privacy codes and DCS codes while
scanning channels.
To Scan Channels:
1. Press the MODE button until the Scan
icon and the channel number flash on
the display.
2. Press the CHANNEL UP or CHANNEL
DOWN button to begin scanning
channels.
The Scan icon will continue to be displayed
when Channel Scan is On. Your radio will
continue to scan all channels and stop if an
incoming transmission is detected. Your
radio will remain on that channel for ten
(10) seconds.
While setting Channel Scan, if you do not
press any buttons for fifteen (15) seconds your radio will
automatically return to LISTENING MODE on the
channel/privacy code or
channel/DCS code displayed before
you entered Mode Functions.
During An Incoming Transmission, You Can Choose
From The Following:
a. Press and hold the TALK button to communicate on that
channel. Your radio will remain on that channel and
return to LISTENING MODE.
b. Press the CHANNEL UP or CHANNEL DOWN button to
resume scanning channels.
If you press the TALK button while scanning and not within ten
(10) seconds of receiving a transmission, you will transmit on
the channel on which, during scanning, you last received a
transmission. This will return the radio to LISTENING MODE.
If you do not press any button within ten (10) seconds, your
radio will automatically resume scanning channels.
During Scanning (while not receiving a
transmission), You Can Choose From The Following:
a. Press and hold the TALK button to communicate on either
the channel/privacy code or
channel/DCS code that was
displayed before you entered Mode Functions or the
channel on which, during scanning, you last received a
transmission. This will return the radio to LISTENING
MODE.
b. Press the MODE button to proceed to set CTCSS privacy
code or DCS code scanning on the channel that was
either displayed before you entered Mode Functions or on
which, during scanning, you last received a transmission.
(see “CTCSS Privacy Code Scan” or “DCS Code Scan” for
further details).
c. Press the ENTER button to return to LISTENING MODE on
either the channel/privacy code or
channel/DCS code
that was displayed before you entered Mode Functions or
the channel on which, during scanning, you last received
a transmission.
Channel Buttons
Mode Button
Enter Button
Select Channel
Select DCS Code
Select Privacy Code
Enter Button
Select Memory
Location
Scan Icon
Channel Buttons
Mode Button
Select Scan Channels
Memory Icon
Mode Button
Select Memory
Location
Channel Buttons
Page 6
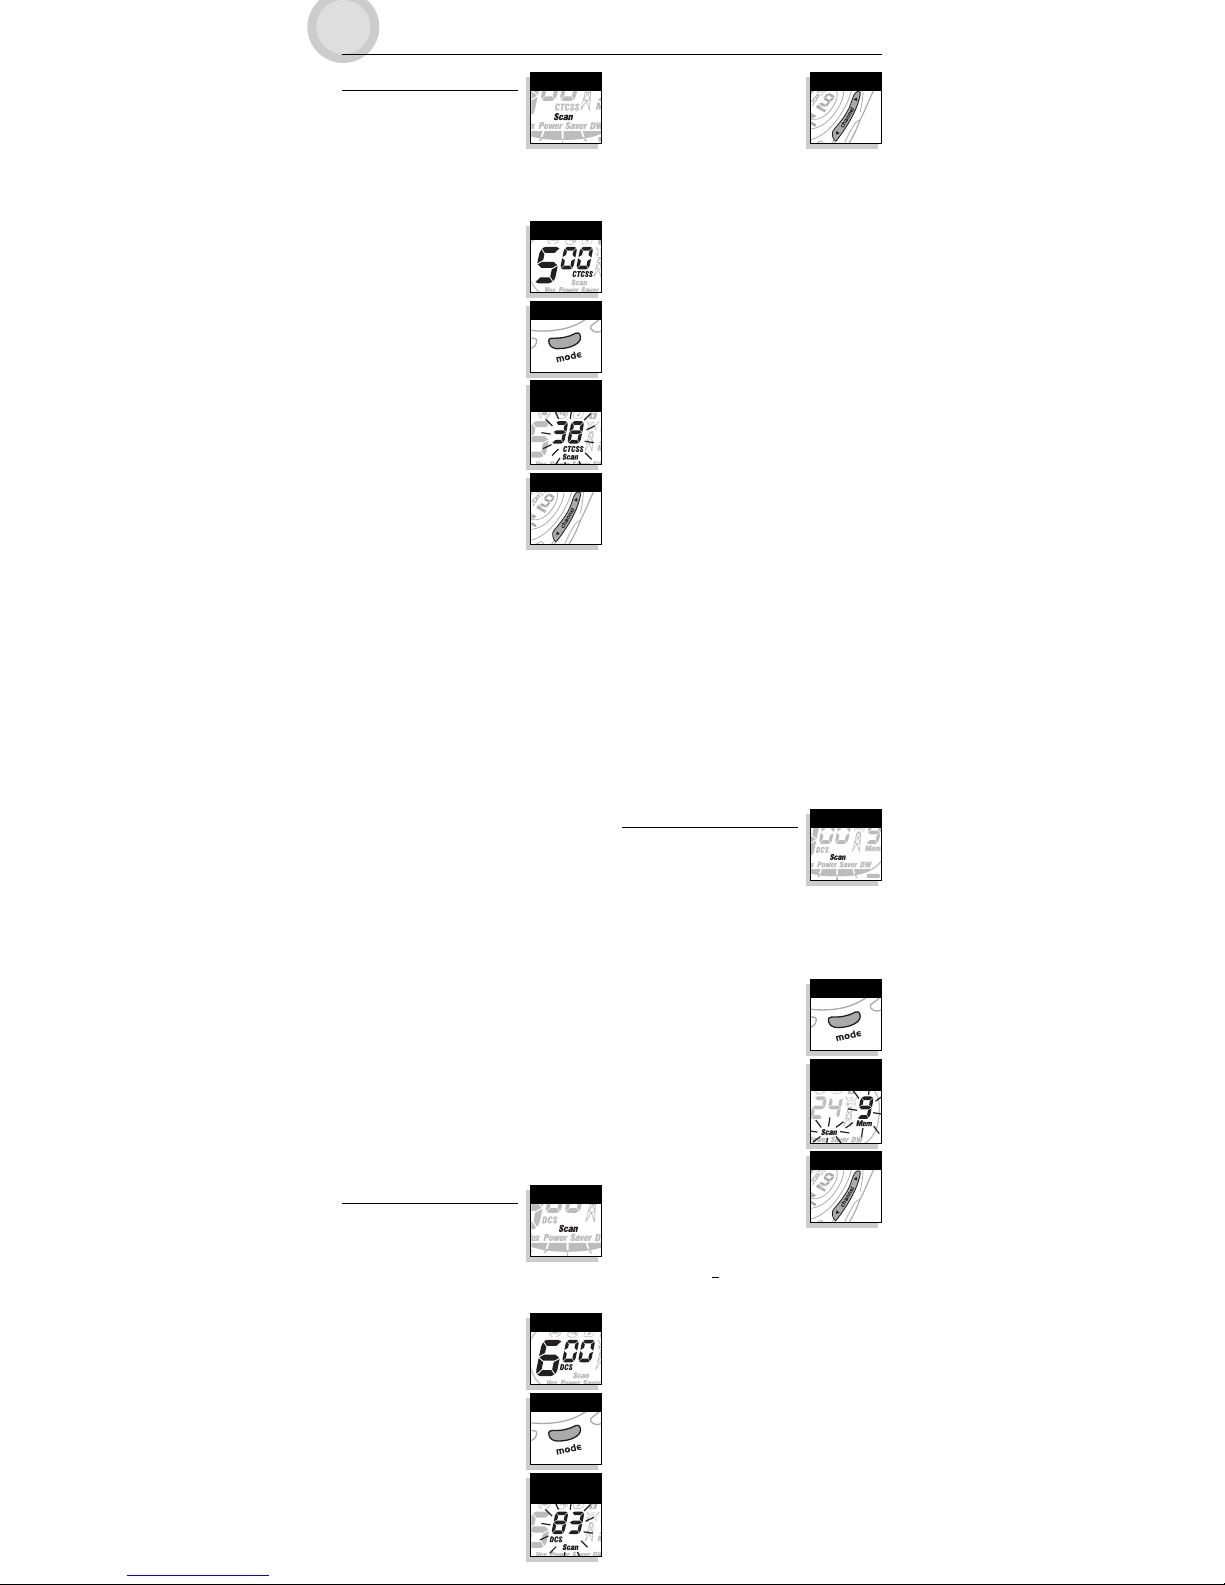
Memory Location Scan
Your microTALK®radio can automatically
scan up to ten (10) programmed memory
locations.
NOTE: If there are one (1) or fewer
memory locations programmed in your radio, the Scan
Memory Locations option will not be available. See “To
Program A Memory Location” to program at least two
(2) memory locations.
To Scan Memory Locations:
1. Press the MODE button until the Scan
icon, the Memory icon and the
memory location number flash on the
display.
2. Press the CHANNEL UP or CHANNEL
DOWN button to begin scanning
memory locations.
The Scan icon and the Memory icon will
continue to be displayed when Memory
Location Scan is On. Your radio will
continue to scan memory locations and
stop if an incoming transmission is
detected. Your radio will remain on that
memory location for ten (10) seconds.
While setting Memory Location Scan, if
you do not press any buttons for fifteen (15) seconds your
radio will automatically return to LISTENING MODE on the
channel/privacy code or
channel/DCS code displayed before
you entered Mode Functions.
If you press the TALK button while scanning and not within ten
(10) seconds of receiving a transmission, you will transmit on
the channel/privacy code on which, during scanning, you last
received a transmission. This will return the radio to LISTENING
MODE.
If you do not press any button within ten (10) seconds, your
radio will automatically resume scanning CTCSS privacy codes.
During Scanning (while not receiving a
transmission), You Can Choose From The Following:
a. Press and hold the TALK button to communicate on either
the channel/privacy code that was displayed before you
entered Mode Functions or channel/privacy code on
which, during scanning, you last received a transmission.
This will return the radio to LISTENING MODE.
b. Press the MODE button to proceed to scan memory
locations (see “Memory Location Scan” for further
details).
c. Press the ENTER button to return to LISTENING MODE on
either the channel/privacy code that was displayed
before you entered Mode Functions or the
channel/privacy code on which, during scanning, you last
received a transmission.
DCS Code Scan
Your microTALK®radio can automatically
scan the DCS codes (01 to 83) within one
(1) channel.
NOTE: If your radio is set to CTCSS Privacy
Code mode, the DCS Code Scan option will not be
available. See “DCS Codes” to turn DCS Code mode On.
To Scan DCS Codes:
1. While in LISTENING MODE, press the
CHANNEL UP or CHANNEL DOWN
button to choose the channel on which
you wish to scan the DCS codes.
2. Press the MODE button until the Scan
icon, the small numbers next to the
channel number and the DCS icon flash
on the display.
3. Press the CHANNEL UP or CHANNEL
DOWN button to begin scanning DCS
codes within the channel you selected.
The Scan icon and the DCS icon will
continue to be displayed when DCS Code
Scan is On. Your radio will continue to scan DCS codes and stop
as an incoming transmission is detected. Your radio will remain
on that channel/DCS code for ten (10) seconds.
While setting DCS Code Scan, if you do not press any buttons
for fifteen (15) seconds your radio will automatically return to
LISTENING MODE on the channel/DCS code displayed before
you entered Mode Functions.
During An Incoming Transmission, You Can Choose
From The Following:
a. Press and hold the TALK button to communicate on that
channel/DCS code. Your radio will remain on that
channel/DCS code and return to LISTENING MODE.
b. Press the CHANNEL UP or CHANNEL DOWN button to
resume scanning DCS codes.
If you press the TALK button while scanning and not within ten
(10) seconds of receiving a transmission, you will transmit on
the channel/DCS code on which, during scanning, you last
received a transmission. This will return the radio to LISTENING
MODE.
If you do not press any button within ten (10) seconds, your
radio will automatically resume scanning DCS codes.
During Scanning (while not receiving a
transmission), You Can Choose From The Following:
a. Press and hold the TALK button to communicate on either
the channel/DCS code that was displayed before you
entered Mode Functions or channel/DCS code on which,
during scanning, you last received a transmission. This
will return the radio to LISTENING MODE.
b. Press the MODE button to proceed to scan memory
locations (see “Memory Location Scan” for further
details).
c. Press the ENTER button to return to LISTENING MODE on
either the channel/DCS code that was displayed before
you entered Mode Functions or the channel/DCS code on
which, during scanning, you last received a transmission.
CTCSS Privacy Code Scan
Your microTALK®radio can automatically
scan the CTCSS privacy codes
(01 to 38) within one (1) channel.
NOTE: If your radio is set to DCS Code
mode, the CTCSS Privacy Codes Scan option will not be
available. See “CTCSS Privacy Codes” to turn CTCSS
Privacy Code mode On.
To Scan Privacy Codes:
1. While in LISTENING MODE, press the
CHANNEL UP or CHANNEL DOWN
button to choose the channel on which
you wish to scan the CTCSS privacy
codes.
2. Press the MODE button until the Scan
icon, the small numbers next to the
channel number and the CTCSS icon
flash on the display.
3. Press the CHANNEL UP or CHANNEL
DOWN button to begin scanning CTCSS
privacy codes within the channel you
selected.
The Scan icon and the CTCSS icon will
continue to be displayed when CTCSS
Privacy Code Scan is On. Your radio will
continue to scan CTCSS privacy codes and
stop as an incoming transmission is
detected. Your radio will remain on that
channel/privacy code for ten (10)
seconds.
While setting CTCSS Privacy Code Scan, if you do not press any
buttons for fifteen (15) seconds your radio will automatically
return to LISTENING MODE on the channel/privacy code
displayed before you entered Mode Functions.
During An Incoming Transmission, You Can Choose
From The Following:
a. Press and hold the TALK button to communicate on that
channel/privacy code. Your radio will remain on that
channel/privacy code and return to LISTENING MODE.
b. Press the CHANNEL UP or CHANNEL DOWN button to
resume scanning CTCSS privacy codes.
Select Scan
DCS Codes
Scan Icon
Channel Buttons
Mode Button
Channel Buttons
Mode Button
Select Scan
Memory Locations
Select Channel
Scan Icon
Mode Button
Select Scan
Privacy Codes
Select Channel
Scan Icon
Channel Buttons
MODE FUNCTIONS OPERATION
English
Page 7
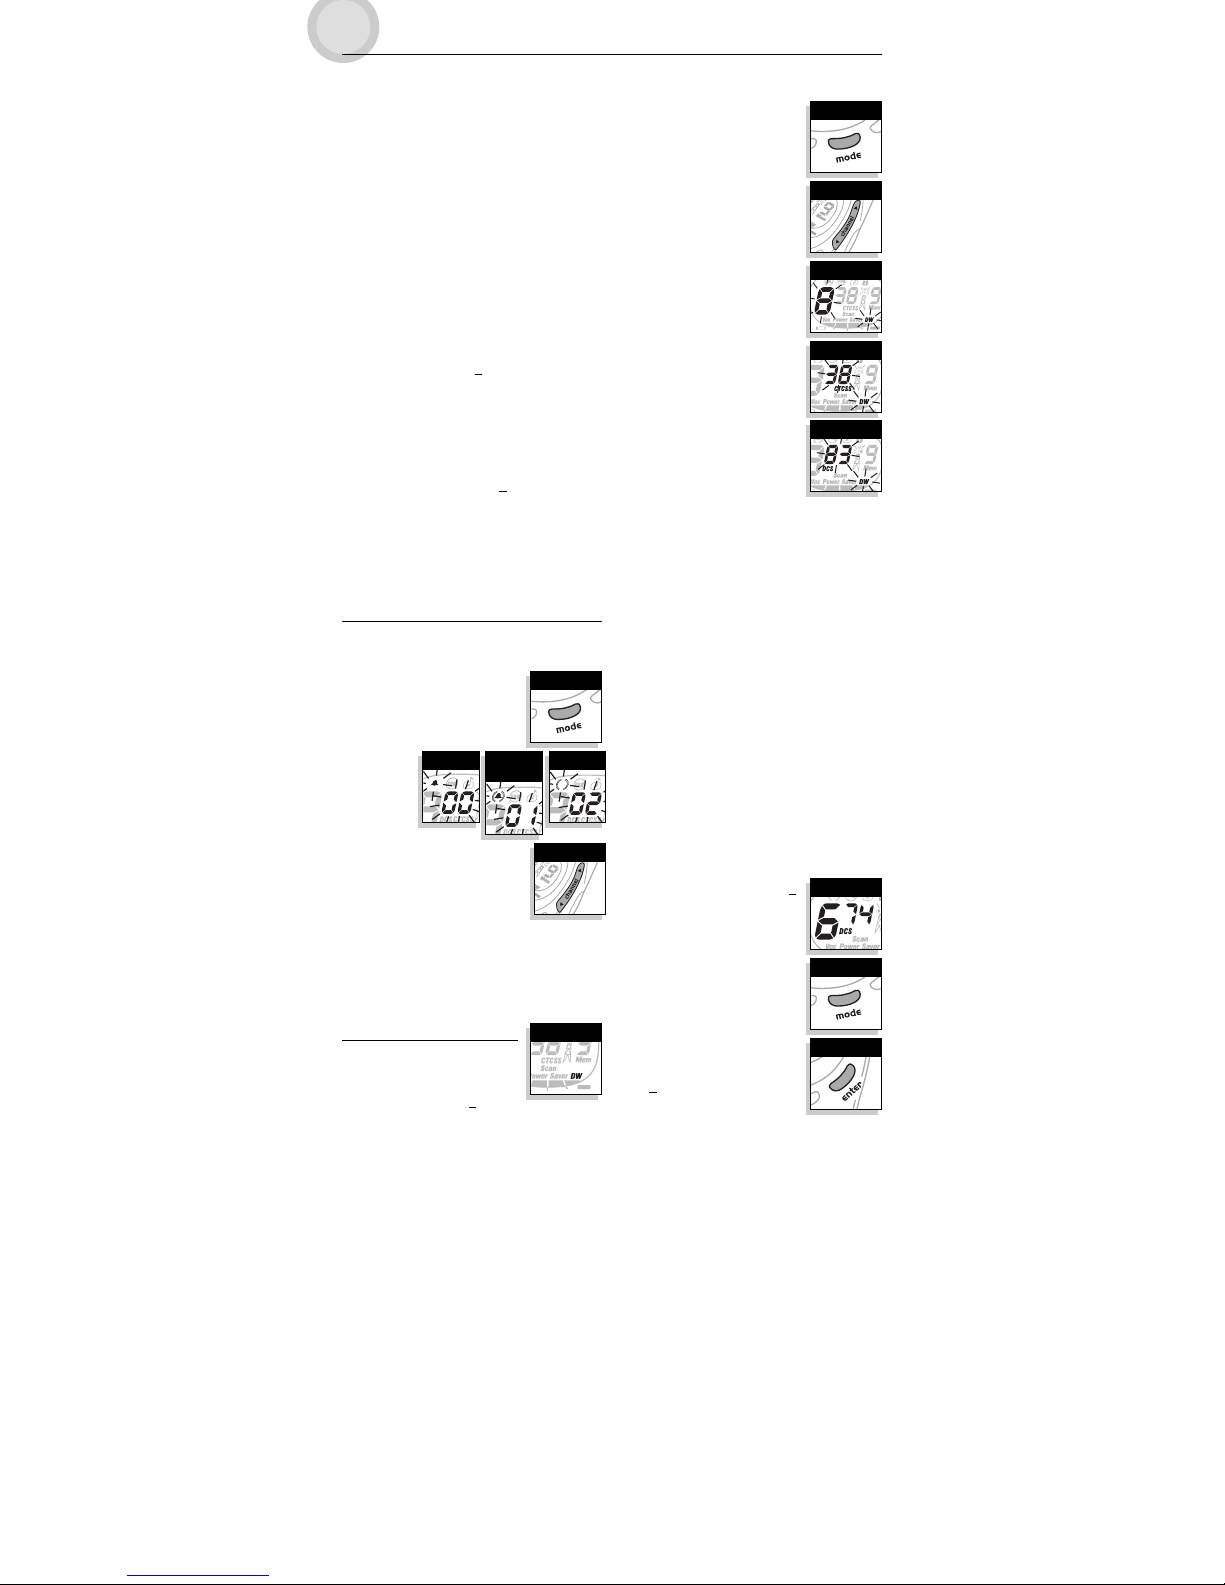
To Program Or Edit Dual Watch Location 2 And
Engage Dual Watch Mode:
1. Press the MODE button until the Dual
Watch icon and the channel number
flash on the display.
2. Choose one of the following:
a. Select or edit a channel/privacy
code:
1) Press the CHANNEL UP or
CHANNEL DOWN button to select
a channel (1 to 8).
2) Press the MODE button to set the
channel. The CTCSS icon and
current setting (the small
numbers next to the channel
number or Off) will flash on the
display.
3) Press the CHANNEL UP or
CHANNEL DOWN button to select
a CTCSS privacy code
(00 to 38).
b. Select or edit a channel/DCS code:
1) Press the CHANNEL UP or
CHANNEL DOWN button to select
a channel (1 to 8).
2) Press the MODE button to set the
channel. The CTCSS icon and current setting (the small
numbers next to the channel number or Off) will flash
on the display.
3) Press the MODE button again. The DCS icon and
current setting (the small numbers next to the channel
number or Off) will flash on the display.
4) Press the CHANNEL UP or CHANNEL DOWN button to
select a DCS code (00 to 83).
3. Press the ENTER button to set Dual Watch Location 2 and
engage DUAL WATCH MODE (see below for further details).
NOTES: To terminate Dual Watch and proceed to the next
available Mode Function, press the MODE button.
While setting Dual Watch Location 2, if you do not
press any buttons for fifteen (15) seconds your radio
will automatically return to LISTENING MODE on Dual
During An Incoming Transmission, You Can Choose
From The Following:
a. Press and hold the TALK button to communicate on that
memory location. Your radio will remain on that memory
location and return to LISTENING MODE.
b. Press the CHANNEL UP or CHANNEL DOWN button to
resume scanning memory locations.
If you press the TALK button while scanning and not within ten
(10) seconds of receiving a transmission, you will transmit on
the memory location on which, during scanning, you last
received a transmission. This will return the radio to LISTENING
MODE.
If you do not press any button within ten (10) seconds, your
radio will automatically resume scanning memory locations.
During Scanning (while not receiving a
transmission), You Can Choose From The Following:
a. Press and hold the TALK button to communicate on either
the channel/privacy code or
channel/DCS code that was
displayed before you entered Mode Functions or memory
location on which, during scanning, you last received a
transmission. This will return the radio to LISTENING
MODE.
b. Press the MODE button to proceed to other functions.
c. Press the ENTER button to return to LISTENING MODE on
either the channel/privacy code or
channel/DCS code
that was displayed before you entered Mode Functions or
the memory location on which, during scanning, you last
received a transmission.
To reduce the number of memory locations being scanned, you
may “un-program” any unwanted locations (see “10 Memory
Locations” for further details).
VibrAlert®and Call Tones
Your microTALK®radio can alert you to incoming signals by
sounding an audible call tone, by vibrating silently, or both.
To Change Call Settings:
1. Press the MODE button until the Call
Setting icon flashes on the display. The
current setting (“01” – Vibrate +
Ring, “02” – Vibrate Only, or “00” –
Ring Only) is
displayed.
MODE FUNCTIONS OPERATION
English
2. Press the
CHANNEL UP
or CHANNEL DOWN button
to change the call setting.
3. When your desired call setting is
displayed, choose one of the following:
a. Press the MODE button to enter the
setting and proceed to other functions.
b. Press the ENTER button to enter the setting and return to
LISTENING MODE.
c. Do not press any buttons for fifteen (15) seconds to
enter the setting and return to LISTENING MODE.
Dual Watch
Dual watch allows you to simultaneously
monitor any two (2) Dual Watch Locations.
Dual Watch Location 1 – is always the
channel/privacy code or
channel/DCS code displayed before you entered Mode
Functions. See “CTCSS Privacy Codes” and “DCS
Codes” sections for further details.
Dual Watch Location 2 – will be stored in the radio. It can
be edited and/or recalled for future engagements of
Dual Watch Mode.
Watch Location 1.
To Turn Dual Watch On:
NOTE: Dual Watch Location 2 must be programmed to turn Dual
Watch on.
1. Select the first channel/privacy code or
channel/DCS Code you wish to
monitor (see “CTCSS Privacy Codes”
and “DCS Codes” for further details).
2. Press the MODE button until the Dual
Watch icon and the channel number
flash on the display.
NOTE: While setting Dual Watch, if you do
not press any buttons for fifteen
(15) seconds your radio will
automatically return to LISTENING
MODE on the channel/privacy code
or
channel/DCS code displayed
before you entered Mode Functions.
3. Press the ENTER button to engage
DUAL WATCH MODE.
During An Incoming Transmission, You Can Choose
From The Following:
a. Press and hold the TALK button to communicate on that
Dual Watch Location. Your radio will remain on that Dual
Watch Location and return to LISTENING MODE.
b. Press the CHANNEL UP or CHANNEL DOWN button to
resume Dual Watch.
If you press the TALK button while in Dual Watch and not within
ten (10) seconds of receiving a transmission, you will transmit
on the last Dual Watch Location on which you received a
transmission. This will return the radio to LISTENING MODE.
If you do not press any button within ten (10) seconds, your
radio will automatically resume Dual Watch.
Dual Watch Icon
Channel Buttons
Mode Button
Mode Button
Enter Button
Select Channel
Channel Buttons
Mode Button
Select Channel
Select Privacy Code
Select DCS Code
Call Alert Icon VibrAlert®Icon
VibrAlert®&
Call Alert Icon
Page 8
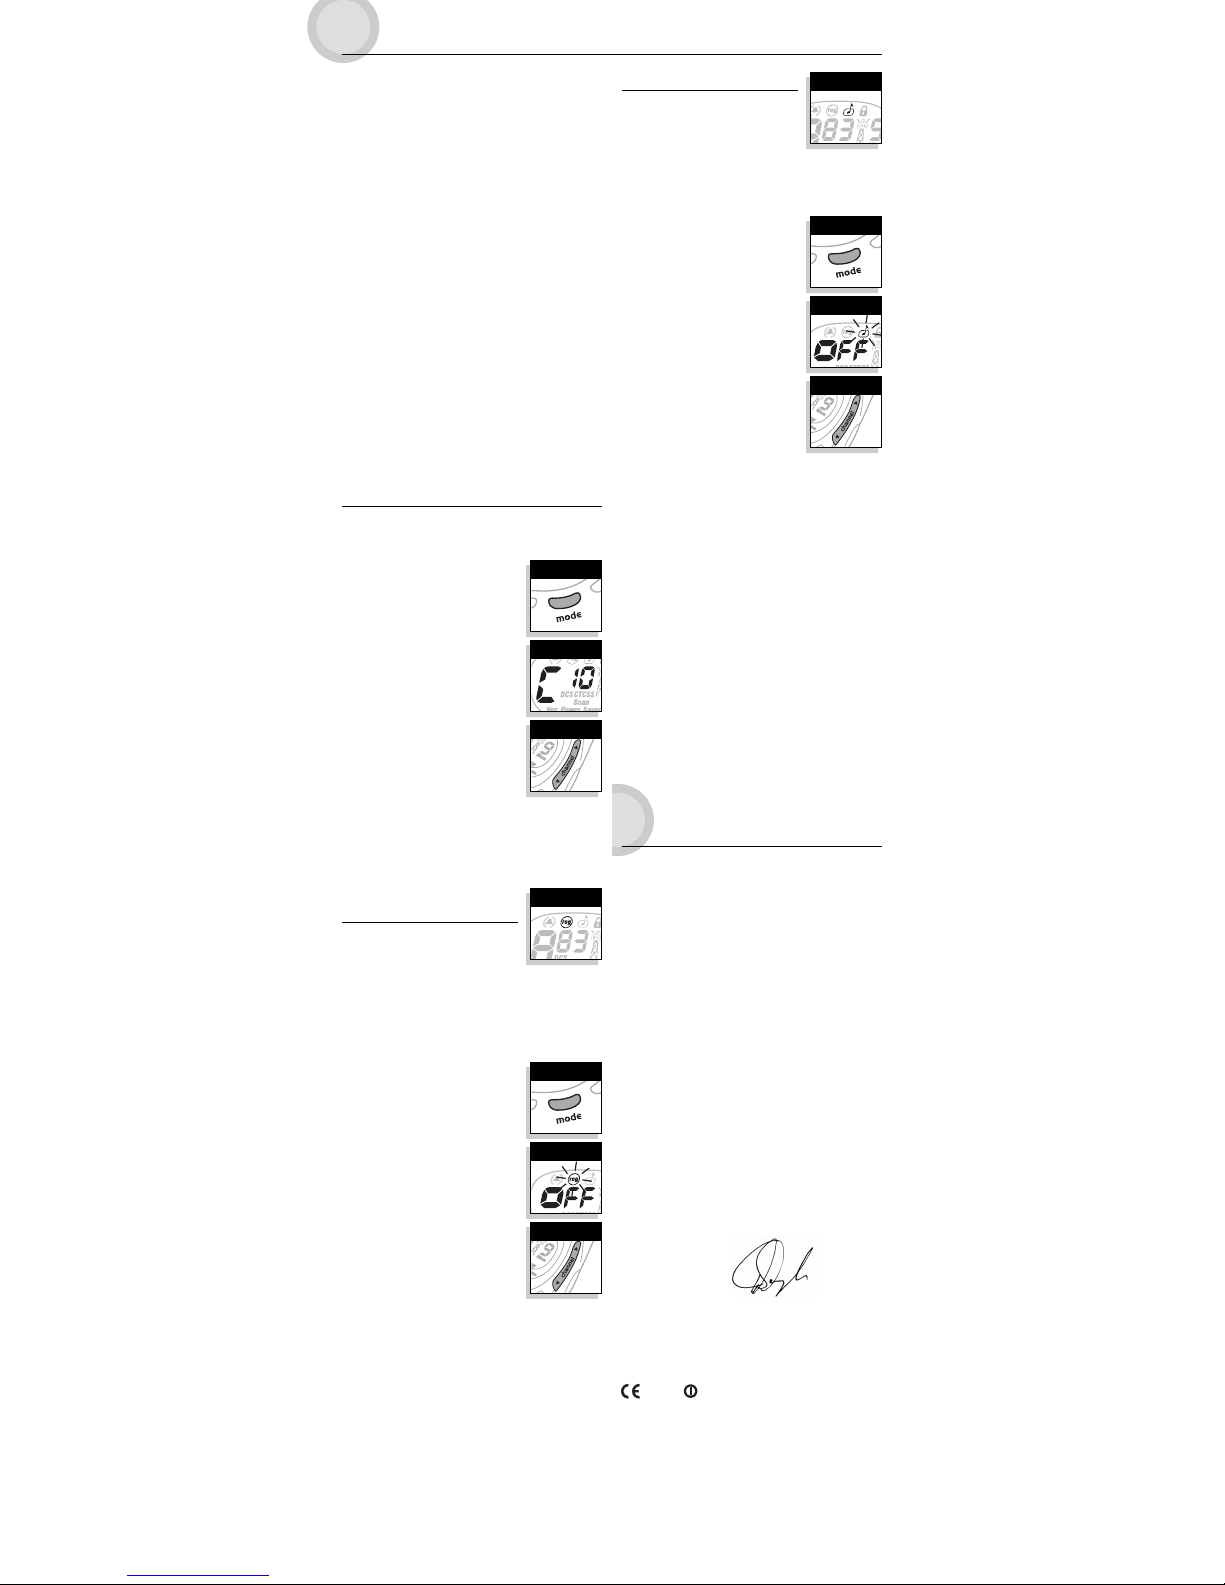
MODE FUNCTIONS OPERATION and
DECLARATION OF CONFORMITY
During Dual Watch (while not receiving a
transmission), You Can Choose From The Following:
a. Press and hold the TALK button to communicate on either
Dual Watch Location 1 or the Dual Watch Location on
which, during Dual Watch, you last received a
transmission. This will return the radio to LISTENING
MODE.
b. Press the MODE button to proceed to other functions.
c. Press the ENTER button to return to LISTENING MODE on
either Dual Watch Location 1 or the Dual Watch Location
on which, during Dual Watch, you last received a
transmission.
To terminate Dual Watch:
1. Choose one of the following:
a. Press the ENTER button to return to LISTENING MODE on
either Dual Watch Location 1 or the Dual Watch Location
on which, during Dual Watch, you last received a
transmission.
b. Press the TALK button to return to LISTENING MODE on
either Dual Watch Location 1 or the Dual Watch Location
on which, during Dual Watch, you last received a
transmission.
c. Press the MODE button and proceed to the next available
Mode Function.
10 Call Tone Settings
You can choose between ten (10) different call tone settings to
transmit a unique call alert.
To Change a Call Tone Setting:
1. Press the MODE button until the letter
“C” and the current call tone number
(1 to 10) is displayed. The current call
tone will sound for two (2) seconds.
2. Press the CHANNEL UP or CHANNEL
DOWN button to hear the other call
tone settings.
3. When your desired call tone setting is
displayed, choose one of the following:
a. Press the MODE button to enter the
setting and proceed to other
functions.
English
b. Press the ENTER button to enter the setting and return to
LISTENING MODE.
c. Do not press any buttons for fifteen (15) seconds to
enter the setting and return to LISTENING MODE.
"Roger Beep"
Confirmation Tone
Your listener will hear an audible tone
when you release the TALK button. This
alerts the other party that you have
finished talking and that it is OK for them to speak. This feature
can be turned On or Off.
To Turn “Roger Beep” On or Off:
When you turn On your microTALK®radio for the first time,
“Roger Beep” will be On.
1. Press and release the MODE button
until the “Roger Beep” icon flashes on
the display. The current On or Off
setting is displayed.
2. Press the CHANNEL UP or CHANNEL
DOWN button to select “Roger Beep”
On or Off.
3. When your desired Roger Beep Mode
setting is displayed, choose one of the
following:
a. Press the MODE button to enter the
setting and proceed to other
functions.
b. Press the ENTER button to enter the
setting and return to LISTENING
MODE.
c. Do not press any buttons for fifteen (15) seconds to
enter the setting and return to LISTENING MODE.
The setting you select will be saved when you turn your radio
Off and On again. When the “Roger Beep” is On, the “Roger
Beep” icon will be displayed.
Keystroke Tones
With Keystroke Tones turned On, your radio
will sound beeps each time you press a
button or change a setting. This feature can
be turned On or Off.
To Turn Keystroke Tones On or Off:
When you turn On your microTALK®radio for the first time,
Keystroke Tones will be On.
1. Press the MODE button until the
Keystroke Tones icon flashes on the
display. The current On or Off setting is
displayed.
2. Press the CHANNEL UP or CHANNEL
DOWN button to turn Keystroke Tones
On or Off.
3. When your desired Keystroke Tone
Mode setting is displayed, choose one
of the following:
a. Press the MODE button to enter the
setting and return to LISTENING
MODE.
b. Press the ENTER button to enter the
setting and return to LISTENING
MODE.
c. Do not press any buttons for fifteen (15) seconds to
enter the setting and return to LISTENING MODE.
The setting you select will be saved when you turn your
radio Off and On again. When Keystroke Tones are On, the
keystroke tone icon will be displayed.
DECLARATION OF
CONFORMITY
This declaration is the responsibility of the manufacturer/importer
Cobra Electronics Europe Limited
Dungar House
Northumberland Avenue
Dun Laoghaire
County Dublin, Ireland
Date: October 29, 2003
This certifies that the following designated product
PRIVATE MOBILE RADIO: MT 925 PRO
(Product Identification)
complies with the essential protection requirements of R & TTE Directive
1999/5/EC on the approximation of the laws of the Member States relating to
Radio Spectrum Matters, EMC and Electrical Safety.
This declaration applies to all specimens manufactured in accordance with the
attached technical documentation described in Annex II of the Directive which
forms part of this declaration.
Assessment of compliance of the product (class 2.6) with the requirements
relating to the essential requirements according to Article 3 R & TTE was based
on Annex IV of Directive 1999/5/EC and the following standards:
Radio Spectrum:
EN 300 296-2 v.1.1.1 (02/01)
(Identification of regulations/standards)
EMC:
EN 301 489-5 (07/2000)
(Identification of regulations/standards)
Electrical Safety:
EN 60065: 1998
(Identification of regulations/standards)
RF Exposure:
EN 50371: 2002
(Identification of regulations/standards)
DUBLIN, IRELAND MIKE KAVANAGH
Select On/Off
Channel Buttons
Mode Button
Roger Beep Icon
Channel Buttons
Mode Button
Call Tone Setting
Channel Buttons
Mode Button
Select On/Off
Keystroke Icon
1177
For use in EU countries, subject to local laws
and regulations.
CEEL™ is a trademark of Cobra Electronics
Corporation, USA.
Snake design and microTALK®are registered
trademarks of Cobra Electronics Corporation, USA.
©2003 Cobra®Electronics Europe Limited
Dungar House, Northumberland Avenue
Dun Laoghaire, County Dublin, Ireland
www.cobra.com
 Loading...