

Page 1

ENGLISH
Wireless 11g PCI Mini Card
MS-6834B
Page 2

FEDERAL COMMUNICATIONS COMMISSION
INTERFERENCE STATEMENT
This equipment has been tested and found to comply with the limits for a Class B
digital device, pursuant to Part 15 of the FCC Rules. These limits are designed
to provide reasonable protection against harmful interference in a residential
installation. This equipment generates, uses and can radiate radio frequency
energy and, if not installed and used in accordance with the instructions, may
cause harmful interference to radio communications. However, there is no
guarantee that interference will not occur in a particular installation. If this
equipment does cause harmful interference to radio or television reception,
which can be determined by turning the equipment off and on, the user is
encouraged to try to correct the interference by one or more of the following
measures:
-- Reorient or relocate the receiving antenna.
-- Increase the separation between the equipment and receiver.
-- Connect the equipment into an outlet on a circuit different from that to which
the receiver is connected.
-- Consult the dealer or an experienced radio/TV technician for help.
CAUTION:
Any changes or modifications not expressly approved by the grantee of this
device could void
the user's authority to operate the equipment.
FCC RF Radiation Exposure Statement
This equipment complies with FCC RF radiation exposure limits set forth for an
uncontrolled environment. This equipment should be installed and operated with
a minimum distance of 20cm between the radiator and your body.
Page 3

Before You Begin
This Quick Start Guide can be used for any current MSI Wireless
Network Adapter, providing you with easy installation steps to help
you build your network easily and quickly. For further instructions,
please refer to your User’s Guide. For the latest information or other
technical support, please visit MSI website at: http://www.msi.com.tw.
How to Use This Guide
If you want to
install your wireless network adapter page 5 ~ 6
install software page 7 ~ 8
connect the network page 9 ~ 12
... refer to...
4
Page 4
QuickStart Guide
Hardware Installation
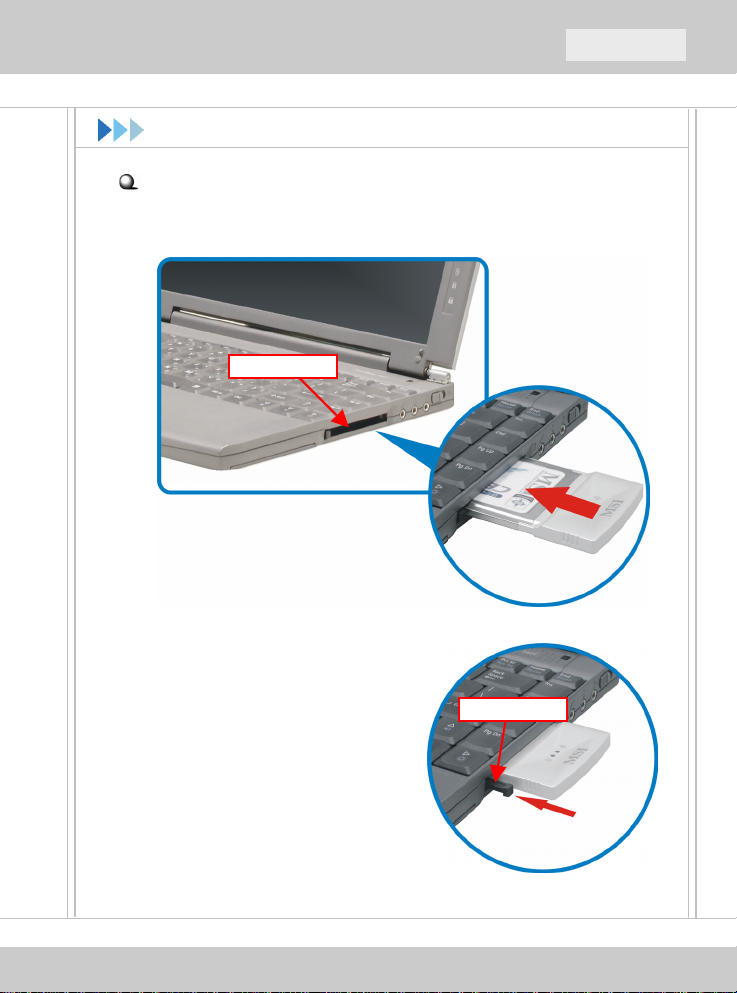
If you have a CardBus adapter (MS-6835)
Locate the available PC card slot on your computer, and then insert the
CardBus adapter into the PC card slot.
Installing CardBus adapter
To remove the CardBus adapter,
press the Eject Button of PC card
slot to make it stretch out. Then,
push the Eject Button and the
CardBus adapter will slide out
slightly. Pull it out of the slot.
Please note that before removing
the CardBus adapter, you should
stop the device in Windows.
PC card slot
Eject Button
5
Page 5

Hardware Installation (2)
If you have a PCI adapter (MS-6834)
First, confirm that the system is turned off. Remove the computer’s
case to locate the available PCI slot on the motherboard. Insert the
PCI adapter into the slot firmly; then, secure it with the bracket screw.
Replace the cover and connect the external antenna.
If you are not skilled at installing the PCI adapter, please ask the
vendor or an experienced technician for help.
PCI slot
Installing PCI adapter
6
Page 6

QuickStart Guide
Software Setup
After installing the wireless adapter to your computer and then turning
on the computer, the operating system will detect a new device and
start the configuration automatically. Please CANCEL the system’s
Add New Hardware Wizard here to install the required driver and
utility from InstallShield Wizard of your Software CD.
Insert the Software CD into your CD-ROM drive, and the Setup
X
program should launch automatically.
If the Autorun program does not launch automatically, click Start at
the taskbar and select Run.... Type E:\setup.exe (where E is your
CDROM drive) in the Open box and click OK to launch the Setup
program manually.
The main screen of Setup program will appear as below. Click the
Install Software button.
7
Page 7

Software Setup (2)
The welcome screen of InstallShield Wizard appears. Click Next.
Y
Read and accept the License Agreement; then, click Next.
In the following window, enter the user’s information (User Name and
Organization) in the respective fields; then, click Next.
Click Install and the program will copy the necessary files to the
Z
system. The progress indicator shows the installing status.
Click Finish when the installation is completed. The MSI Wireless
[
LAN icon will appear in the status area.
MSI Wireless LAN icon
8
Page 8

QuickStart Guide
Connecting Network
After installing the software, the MSI wireless adapter provides you
with a convenient and powerful utility that allows you to set up,
configure, and know your networking status easily and clearly.
Your MSI wireless adapter can be used by two networking modes:
Infrastructure mode and Ad-hoc mode.
Infrastructure Mode allows your computer to communicate with the
other computers in the network through an Access Point.
To connect the Access Point:
1. Click the MSI Wireless LAN icon to bring up the Wireless
Network Connection window.
2. In the list of Available wireless networks, select (highlight) the
network you want, and then click Connect.
click
select
9
Page 9

Connecting Network (2)
Advanced Settings for Infrastructure Mode
Follow the instructions below to configure advanced settings in the
Infrastructure mode.
1. Click Advanced in the Wireless Network Connection window.
2. You can click Refresh to search the available Access Points in the
network again. The results will be displayed in the Available
Networks field.
3. Select one network (Access Point) you want, and click Configure
to set up the selected network.
4. For security purpose, you can set up the Network Key and
Authentication.
5. Click OK to complete the configuration. The MSI Wireless LAN
icon indicates the connection status.
10
Page 10

QuickStart Guide
Connecting Network (3)
Ad-hoc Mode allows your computer to communicate directly with any
computer installed with compatible wireless adapter.
To build the Ad-hoc network:
1. Click the MSI Wireless LAN icon to bring up the Wireless
Network Connection window. Then, click Advanced.
2. Click Add.
3. Set up the Network Name (SSID) and Network Key (if needed)
for the Ad-hoc network.
Check “This is a computer-to-computer [ad hoc] network;
4.
wireless access points are not used” option and click OK to
enable the Ad-hoc mode, and return to the Wireless Connection
window.
11
Page 11

Setup the WEP and
Authentication for
your need
Check this option
Connecting Network (4)
Enter a Network
Name (SSID)
5. Click OK to complete the configuration. The MSI Wireless LAN
icon indicates the connection status.
The computer setting up this Ad-hoc network through the procedure is
the designated administrator of the network. Any computer can
access the network by selecting Connect in the Wireless Network
Connection window.
12
 Loading...