

Page 1

Wireless 11g MiniPCI Card MP54G2 User’s Guide
Frequency, Bandwidth, and Channels
- 2.4 ~ 2.4835 GHz Frequency Band
- 13 Channels
- Maximum 3 Non-Overlapped Channels
- 25 MHz Bandwidth Per Channel
Transmitter Output Power
- Output Power: 14 dBm ± 1 dB
Wireless Coverage
- Up to 500m
Receiving Sensitivity
-
-
≤ -82 dBm @ 11 Mbps (DSSS/CCK)
≤ -68 dBm @ 54 Mbps (OFDM)
Software Specifications
Security Mechanism
- 64-/128-Bit WEP Key
- AES-CCM Authentication Mode (driver update)
- WPA Support (driver update)
- LEAP/PEAP Support (firmware upgrade)
Authentication Mechanism
- Open Authentication (Default)
- Shared-Key Authentication
Operating System
- Microsoft® Windows® 98SE/ME/2000/XP
5
Page 2
Wireless 11g MiniPCI Card MP54G2 User’s Guide
>>> 1.4
>>> 1.5
System Requirements
Before installing the MP54G2, your PC should meet the
following:
Desktop/notebook PC with an available MiniPCI slot.
Windows® 98SE/ME/2000/XP operating system.
Minimum 5M bytes free disk space for installing the driver
and utilities.
CD-ROM drive, double speed or higher.
Package Contents
Unpack the package and check all the items carefully. If
any item contained is damaged or missing, please contact
your local dealer as soon as possible. Also, keep the box
and packing materials in case you need to ship the unit in
the future. The package should contain the following items:
One Wireless 11g MiniPCI Card - MP54G2.
One Quick Installation Guide.
One Installation CD including drivers, utilities, and the
manuals.
6
Page 3
Wireless 11g MiniPCI Card MP54G2 User’s Guide
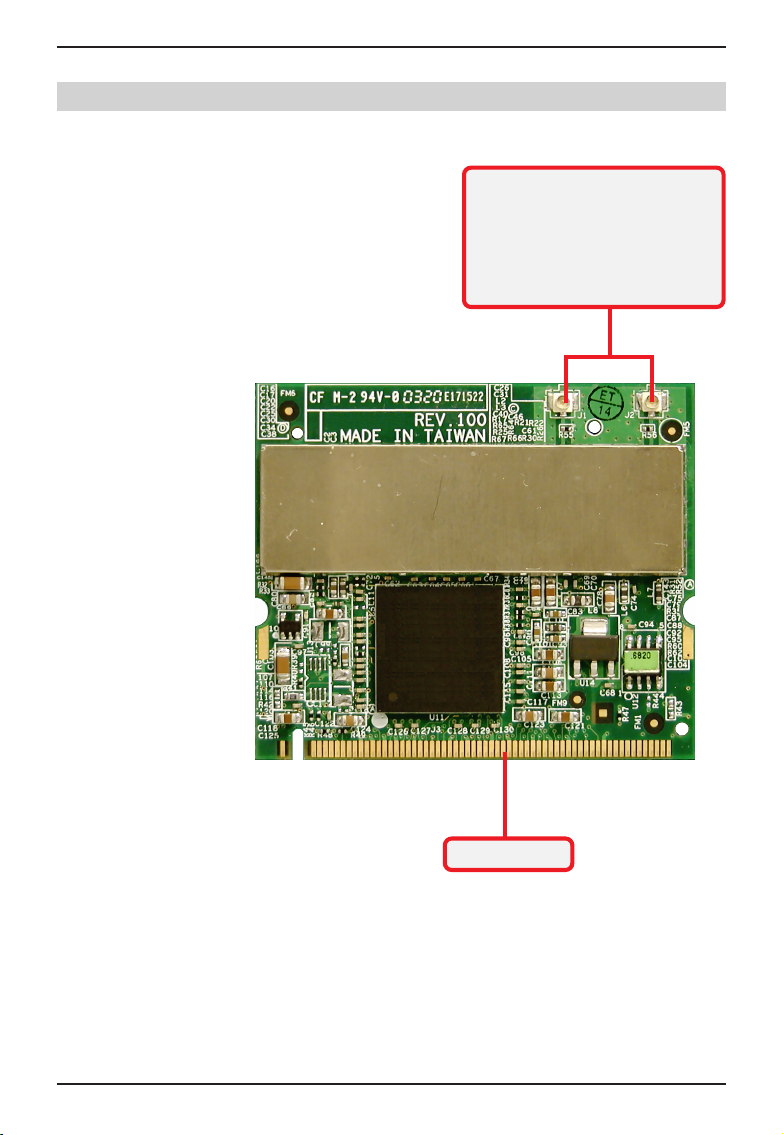
Product View>>> 1.6
External antenna connectors
Connect to external antennas for
enhanced data transmission and
reception. The external antennas
are well designed on the desktop
or notebook computers.
Golden Finger
7
Page 4

Wireless 11g MiniPCI Card MP54G2 User’s Guide
Hardware Installation
The following diagrams provide you a basic installation for
the MP54G2, including how to install and remove the
MiniPCI card. The instruction below is suitable for most
computers with MiniPCI slot. For more information about
the MiniPCI module, please refer to your computer’s
manual.
>>> 2.1
Installing the MP54G2
1. Locate the Mini PCI slot on the mainboard.
2. Place the MP54G2 over the MiniPCI slot (at an
angle of 30 degrees). Then, gently insert it into
the slot until the golden finger of the card
gets fully inserted.
3. Press down the card, and the retaining clips
(on two sides of the slot) will lock onto the
notches of the card.
Foolproof notch
8
Page 5

Wireless 11g MiniPCI Card MP54G2 User’s Guide
>>> 2.2 Removing the MP54G2
1. Locate the MiniPCI slot with MP54G2 installed.
2. Press the retaining clips outwards, and the
card should bound upwards slightly after being
released from the slot.
3. Remove the card from the MiniPCI slot carefully.
9
Page 6

Wireless 11g MiniPCI Card MP54G2 User’s Guide
Software Installation
This chapter describes the procedures of installing the
driver and utility. Follow the instruction step by step to
finish the installation. If you use Windows® 98SE/ME,
please prepare the Windows® Setup CD at hand before
installing the driver; because the system will ask you to
insert the Setup CD to copy files during the installation.
Please NOTE that the MP54G2 should be installed into
your computer before installing the driver and utility. Then,
the operating system will detect a new device and start to
configure the new device. Click Cancel here to start
installation from the InstallShield Wizard.
Tip: The wireless LAN adapter
should be installed into your
PC before installing the driver
and utility.
Your Wireless LAN adapter type
Step 1.
Click
Insert the software CD into your CD-ROM drive, and the
Setup program should launch automatically.
If the Autorun program doesn’ t launch automatically, click
Start at the taskbar and select Run.... Type E:\setup.exe
(where E is your CD-drive) in the Open box and click OK to
launch the Setup program manually.
The main screen of Setup program will appear as below.
Click the Install Software button.
10
Page 7

Click
Wireless 11g MiniPCI Card MP54G2 User’s Guide
Step 3.
The welcome screen of InstallShield Wizard appears. Click
Next.
Read and accept the License Agreement; then, click Next.
In the following window, enter the user’ s information (User
Name, Organization) in the respective fields; then, click
Next.
Step 2. Click Install and the program will copy the necessary files
to the system. The progress indicator shows the installing status.
If you use Windows 98SE/ME, you may be asked to insert the
Windows Setup CD during the installation. Please insert the Setup
CD by the on-screen instruction to continue the installation.
Step 4.
Click Finish when the installation is completed. The MSI
Wireless LAN icon* will appear in the status area.
MSI Wireless LAN icon
11
 Loading...