

Page 1

>>> 4.3 Encryption
To setup the Network Key,
check Encryption option
first, then cancel The key is
provided for me automatically option.
Check this
Cancel this
Wireless 11g MiniPCI Card MP54G User’s Guide
In the wireless network environment, the administrator
can set up password (Network Key) to protect the network
from being attacked or unauthorized access. When
building the network, you can set up 4 sets of WEP keys,
which can be 5 characters (10 hex-adecimal digital) or 13
characters (26 hex-adecimal digital) and specify one of
them to use.
Network key
Enter a key for the network.
Key format
You can decide the network key to be encoded by
ASCII characters or hexadecimal digitals.
Key length
In ASCII characters format, it can be 5 or 13 characters. In hexadecimal digitals format, it would be 10
or 26 digitals.
Key index
There can be up to 4 sets of WEP key (1~4). The 4
sets of WEP key must have the identical sequence
with the key settings on the Access Point.
27
Page 2
Wireless 11g MiniPCI Card MP54G User’s Guide
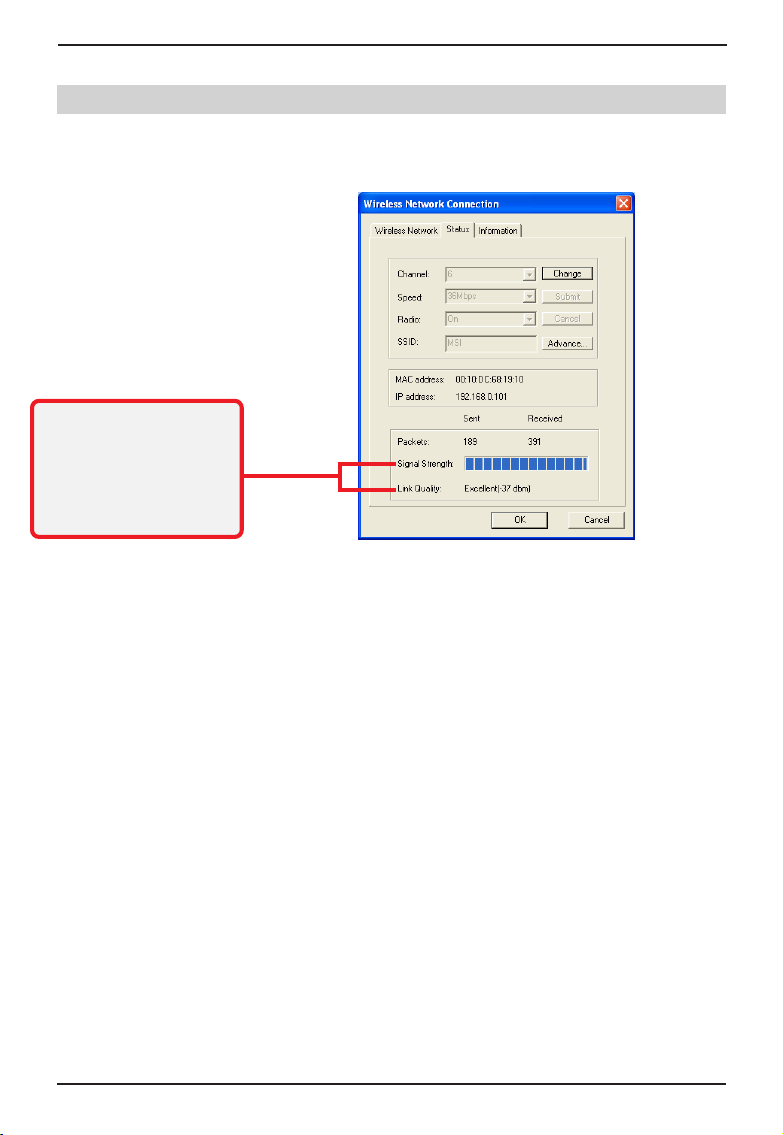
>>> 4.4
Signal Strength:
shows the received signal
strength level.
Link Quality:
shows the measured signal
level and connection status.
Status
In Status tab, you can configure more network settings.
Channel
Specify the operating radio frequency channel in
Ad-hoc mode, which should be set to the same
channel as the other points in the wireless network.
Speed
This field sets the current transmitting rate. The
speed should be set to Auto rate to optimize
performance and range, which will adjust the
transfer speed for best performance and longest
range automatically.
Radio
Set to On to activate the radio.
SSID
Means Service Set Identifier, a unique name
shared among all points in a wireless network. It
must be identical for all points in the network.
Then the card will be able to connect to an access
point with the same SSID.
28
Page 3
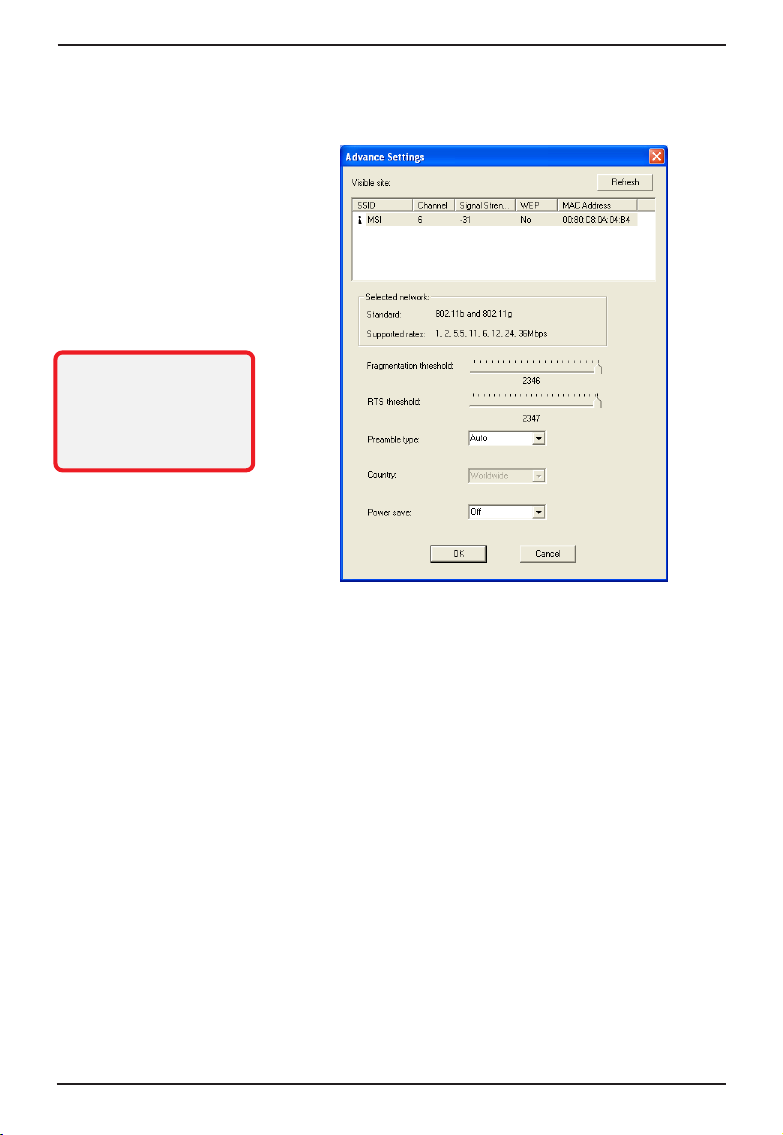
It is not recommended to
change these settings if
you are not familiar with
the advanced configuration.
Wireless 11g MiniPCI Card MP54G User’s Guide
Click Advance, and you can get more information about
the LAN traffic status and more detailed settings.
Fragmentation Threshold
You may set the length of the fragment in this field.
Please note that each fragment should not be
larger than the Fragmentation Threshold.
RTS/CTS Threshold
You may set the length threshold.
Preamble Type
You may set the length of preamble in this field.
Setting options are: Long - it is set to 144 bits.
Short - it is set to 72 bits. Auto - The card supports
an auto-detection feature, it automatically selects
the Preamble Type depending on the Access Point
Preamble Type if this option is selected.
Country
Select one option according to your location you are
in. The options are: Worldwide 1-13, Japan 1-13,
and USA 1-11. The default setting is Worldwide 1-
13.
Power save
The card will turn into power save mode when idle.
29
Page 4
Wireless 11g MiniPCI Card MP54G User’s Guide
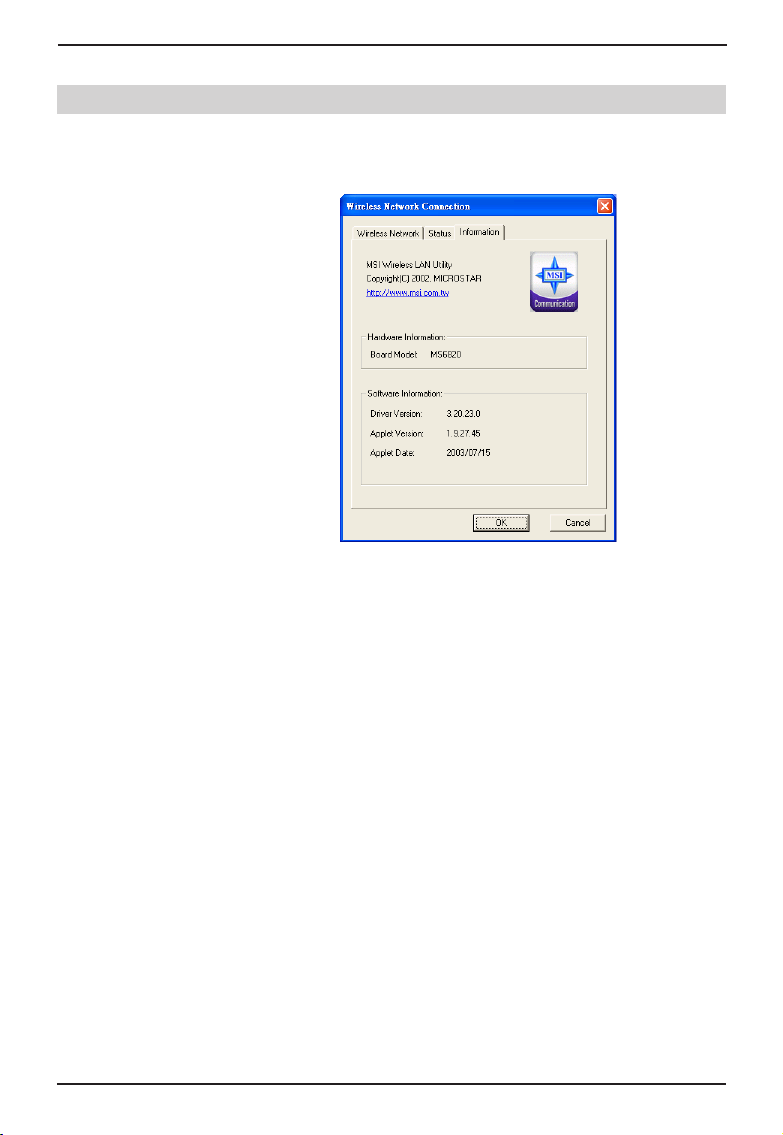
>>> 4.5
Information
In Information tab, you can get some information about the
manufacturer, hardware and software.
30
Page 5

Wireless 11g MiniPCI Card MP54G User’s Guide
>>> 4.6
Sharing Network under Windows® XP
Windows® XP provides a special feature to link two
networks.
1. Go to Start -> Settings -> Control Panel.
2. Select the Network Connections item in
Control Panel to open the Network Connec-
tions window.
3. Select Wireless Network Connection and Local
Area Connection simultaneously; then, right-click
to select Bridge Connections in the context
menu.
31
Page 6
Wireless 11g MiniPCI Card MP54G User’s Guide
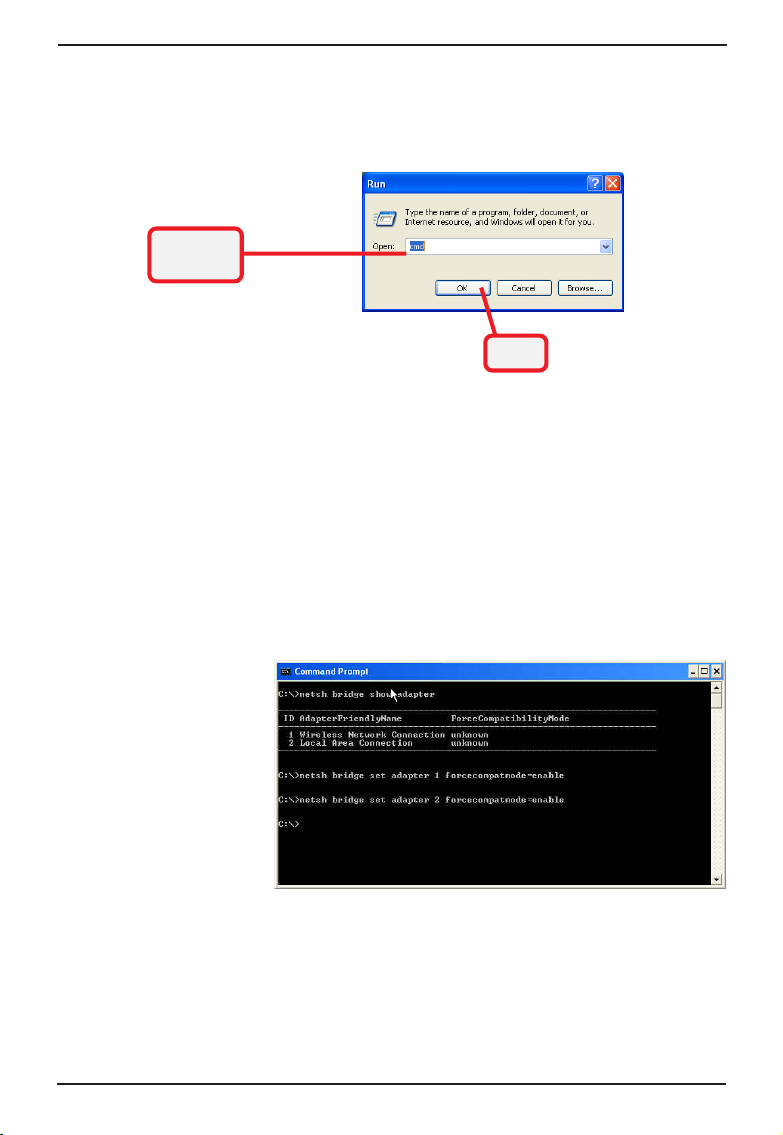
4. Go to Start -> Run and enter cmd in the Open
box; then, click OK, and a DOS prompt window
will appear.
Enter cmd
in the box
5. Type net bridge show adapter and press
[Enter].
6. Type netsh bridge set adapter X
forcecompatmode=enable, where X is your
ethernet identifier, and press [Enter].
7. Type netsh bridge set adapter Y
forcecompatmode=enable, where Y is your
wireless identifier, and press [Enter].
Click
32
Page 7
Wireless 11g MiniPCI Card MP54G User’s Guide
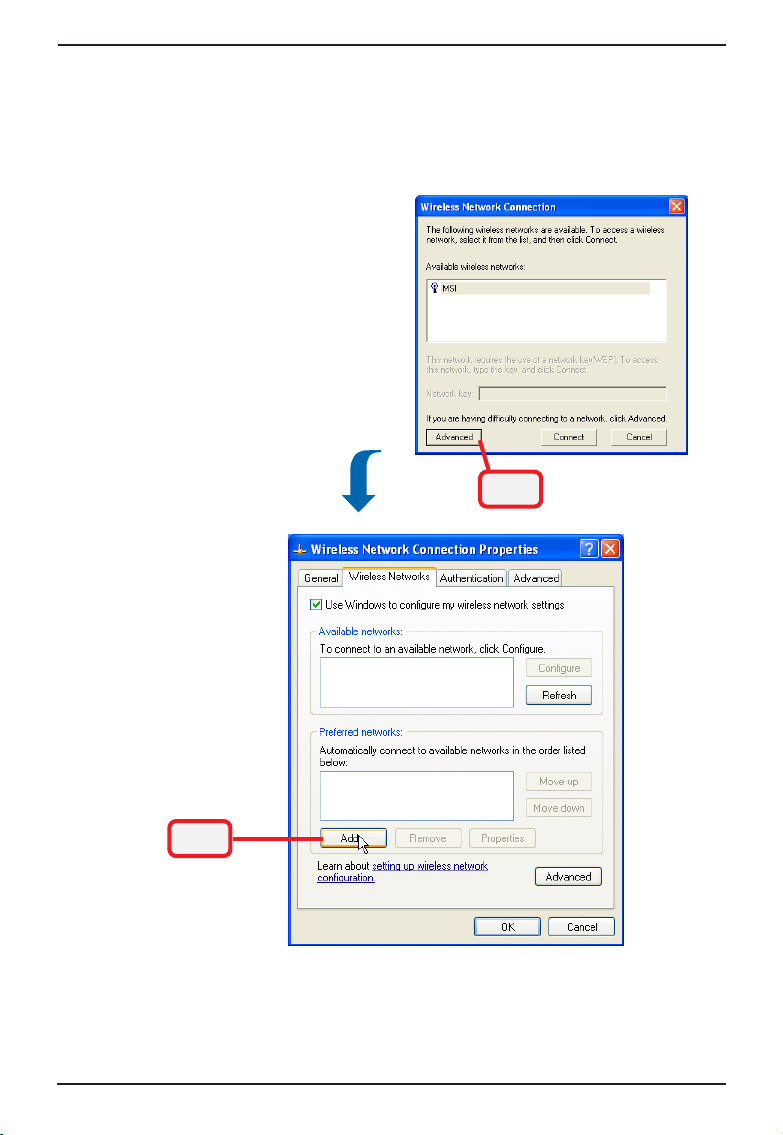
8. Click the MSI Wireless LAN icon in status area,
and click Advanced to bring up the Wireless
Network Connection Properties window. Click
Add... to add a new wireless network connec-
tion.
Click
Click
33
Page 8
Wireless 11g MiniPCI Card MP54G User’s Guide
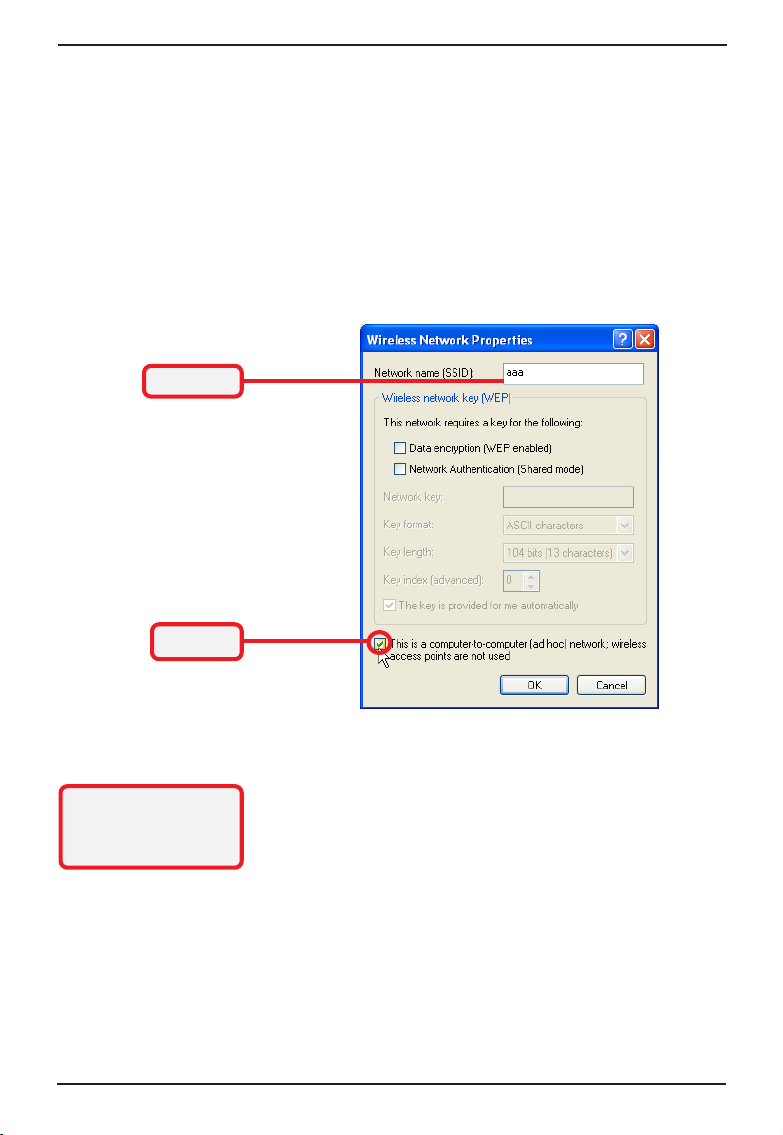
9. Enter a name for this new network in the Network name (SSID), and check the "This is a
computer-to-computer [ad hoc] network;
wireless access points are not used" option.
In this case, this computer will function as an
access point, while other computers can use
this network name (which is "aaa " in the picture
below) to access. Once they connect success
fully, they could access the ethernet LAN via
Network Neighborhood.
Enter SSID
Check this
Please also refer to
Windows XP help file
for more information.
34
Page 9
Wireless 11g MiniPCI Card MP54G User’s Guide
Network Connection
This chapter describes how to prepare for connection to
network and some basic outline of networking basics,
including sharing files, printing from a computer on the
network, or accessing the Internet on multiple computers
with one connection.
>>> 5.1
Check the required
elements from this
field.
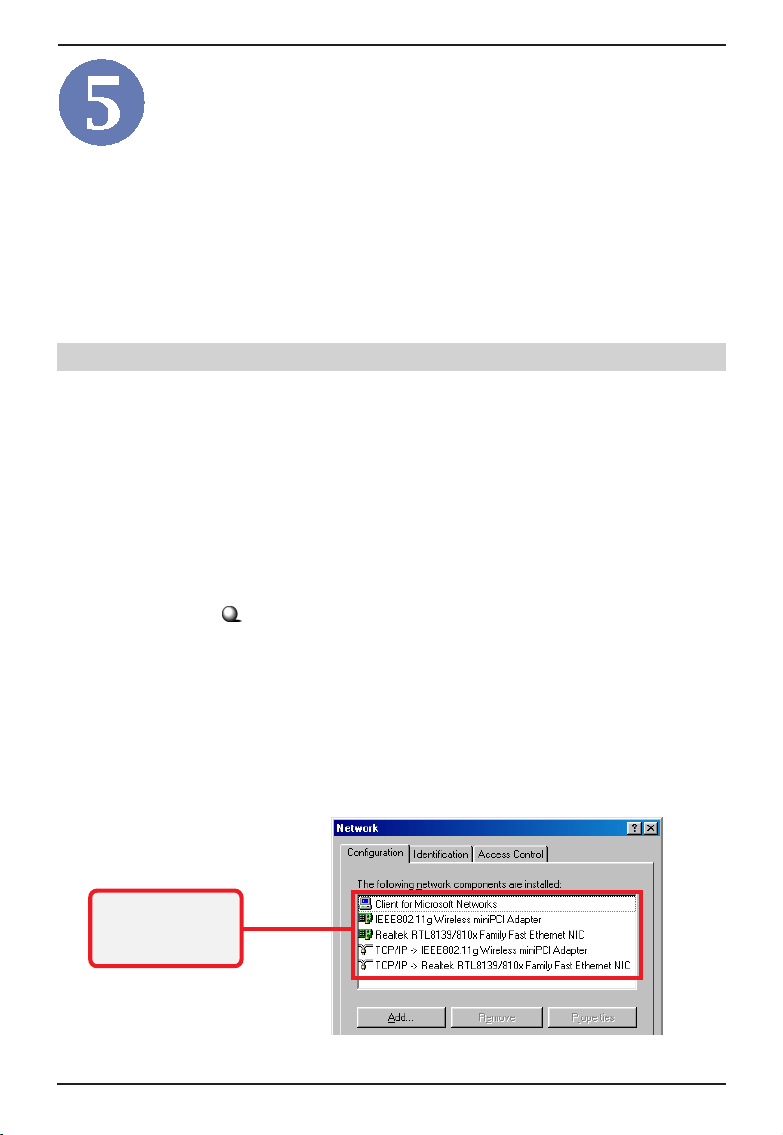
Checking the Network Elements
The following elements are required for all computers if
you want to connect to a network:
- Client for Microsoft Network
- TCP/IP (for MSI 6820 MiniPCI Card)
- File and printer sharing for Microsoft Networks
To check the required elements are installed in the
system, you can:
Under Windows 98SE/ME
1. Click Start and choose Settings; then, click
Control Panel to open the Control Panel win-
dow.
2. Double-click the Network icon.
3. The Network window appears to show the
current network settings of the system.
35
Page 10
Wireless 11g MiniPCI Card MP54G User’s Guide
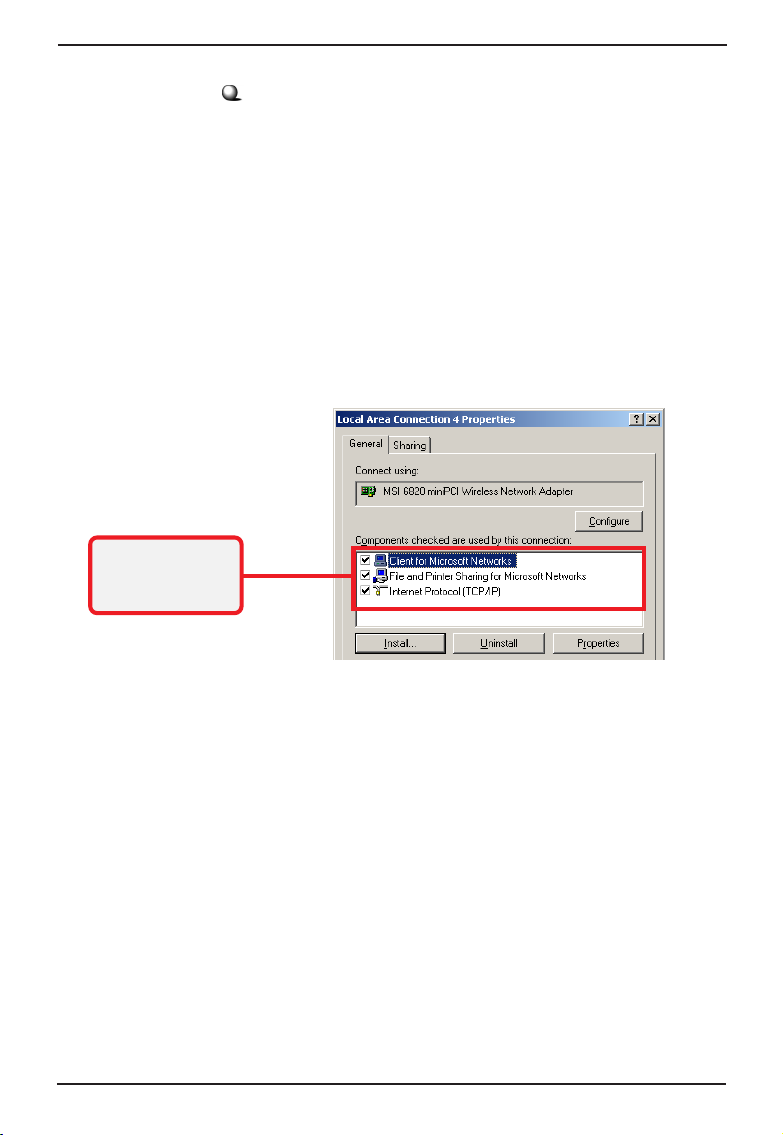
Under Windows 2000/XP
1. Click Start and choose Control Panel to open
the Control Panel window.
2. Double-click the Network Connection icon to
open the Network Connection window.
3. Right-click the Wireless Network Connection
icon and click Properties from the shortcut
menu.
4. The Wireless Network Connection Properties
window appears to show the current network
settings of the system.
Check the required
elements from this
field.
36
Page 11

Wireless 11g MiniPCI Card MP54G User’s Guide
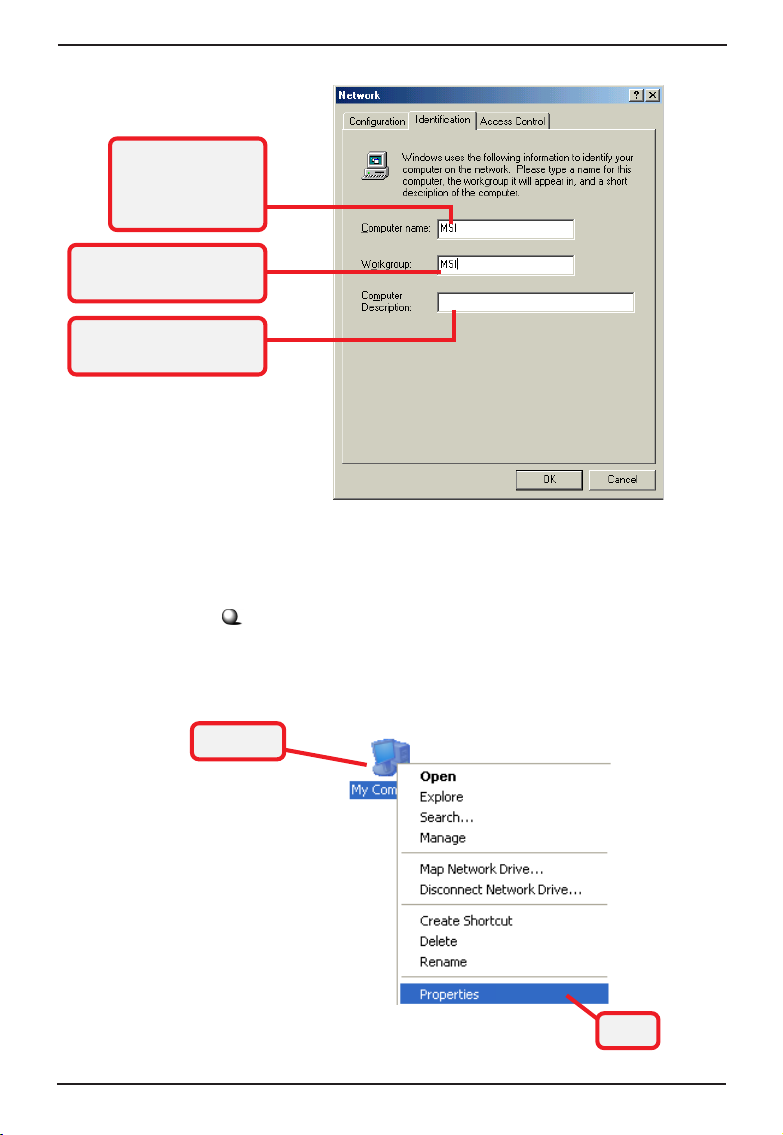
>>> 5.2
Computer Identification
Please verify that each computer has a unique name and
common workgroup name, if you had previously given
your Windows 98SE/ME/2000/XP computers names.
Under Windows 98SE/ME
1. Open the Network window as described in
previous section, and choose Identification tab.
2. Type a name for the computer In the Computer
name box. This will be the name of this computer used by other computers on your network to
communicate with. Please NOTE that each
computer’ s name must be unique on a particular network to avoid confusion.
3. Type the workgroup name that the computer will
belong to in the Workgroup box. All the computers on your network should have an identical
Workgroup name.
4. The Computer Description box is optional. You
may enter a description that helps to identify this
computer on your network. Then, click OK.
5. Repeat the procedure above for each computer
on your network to ensure that they all have unique
Computer Name and identical Workgroup.
37
Page 12
Wireless 11g MiniPCI Card MP54G User’s Guide
Enter a name for
your computer (less
than 15 characters
without space.
Your computer will
belong to this workgroup.
Enter some information
for reference.
Under Windows 2000/XP
1. Right-click My Computer icon on your Windows
desktop, and click Properties from the shortcut
menu.
Right-click
38
Click
Page 13

Enter some information
for reference.
Your computer’s
name.
Your computer will
belong to this workgroup.
Wireless 11g MiniPCI Card MP54G User’s Guide
2. The System Properties window appears;
choose Computer Name tab.
3. To rename the computer and join a workgroup/
domain, click Change.
4. The Computer Name Changes window appears
as below. Enter a Computer Name, select
Workgroup and enter the name of your
workgroup. Please NOTE that each computer’s
name must be unique on a particular network to
avoid confusion.
5. Click OK to save changes.
39
Page 14

Wireless 11g MiniPCI Card MP54G User’s Guide
Enter a name for
your computer (less
than 15 characters
without space.
Enter the name of the
workgroup.
40
Page 15

Wireless 11g MiniPCI Card MP54G User’s Guide
>>> 5.3
Select this
Configuring a Dynamic/Fixed IP Address
When the drivers are installed, the default setting here is
set to obtain IP dynamically through a DHCP server. If
you want to change the settings, please follow the steps
below:
Under Windows 98SE/ME
1. Go to Start -> Settings -> Control Panel.
2. Double-click the Network icon.
3. The Network window appears as below. Select
TCP/IP -> IEEE802.11g Wireless Network
miniPCI Adapter, and click Properties to bring
up the TCP/IP Properties window.
Click
41
Page 16

Wireless 11g MiniPCI Card MP54G User’s Guide
4.a To configure a dynamic IP address, choose IP
Address tab and check Obtain an IP Address
Automatically.
4.b To configure a fixed IP address, choose IP Address tab and check Specify an IP Address.
Then, enter an IP address into the empty field.
Suggested IP Address Range is
192.168.1.253, and suggested Subnet Mask is
255.255.255.0.
Check this
192.168.1.1 to
4.a Configuring a dynamic IP address
Check this
Enter a fixed IP
address and
Subnet Mask
5. Click OK. Then, click Yes when prompted to
reboot the computer.
4.b Configuring a fixed IP address
42
Page 17

Wireless 11g MiniPCI Card MP54G User’s Guide
Under Windows 2000/XP
1. Click Start and choose Control Panel to open
the Control Panel window.
2. Double-click the Network Connection icon to
open the Network Connection window.
3. Right-click the MSI 6820 miniPCI Wireless
Network Adapter icon and click Properties
from the shortcut menu.
Click
4. When the Wireless Network Connection
Properties window appears, choose General
tab and select Internet Protocol [TCP/IP], and
click Properties to bring up the Internet Proto-
col [TCP/IP] Properties window.
Select this
Click
43
Page 18

Wireless 11g MiniPCI Card MP54G User’s Guide
5.a To configure a dynamic IP address, check
Obtain an IP Address Automatically.
5.b To configure a fixed IP address, check Use the
following IP address. Then, enter an IP address into the empty field. Suggested IP Ad
dress Range is
and suggested Subnet Mask is 255.255.255.0.
Check this
192.168.1.1 to 192.168.1.253,
5.a Configuring a dynamic IP address
Check this
Enter a fixed IP
address and
Subnet Mask
6. Click OK to complete the configuration.
5.b Configuring a fixed IP address
44
Page 19

Wireless 11g MiniPCI Card MP54G User’s Guide
>>> 5.4 Checking TCP/IP Address
Under Windows 98SE/ME
1. Go to Start -> Run....
Type winipcfg here.
Check the configuration
of IP Address, Subnet
Mask, and Default
Gateway are correct.
2. Type
winipcfg in the Open box and click OK.
3. The IP Configuration screen will appear, click
More Info to bring up a screen containing detail
information of your wireless network adapter.
45
Page 20

Wireless 11g MiniPCI Card MP54G User’s Guide
Under Windows 2000/XP
1. Go to Start -> Run....
2. Type cmd in the Open box and click OK.
Type cmd here.
3. A DOS prompt window appears. Type ipconfig/
all and press [Enter] to display IP information.
Check the configuration
of IP Address, Subnet
Mask, and Default
Gateway are correct.
46
Page 21

Wireless 11g MiniPCI Card MP54G User’s Guide
>>> 5.5
You will get reply if the
pinging is successful.
Checking Connection by Pinging
1. Go to Start -> Run....
2. Type command (Windows 98SE/ME) or cmd
(Windows 2000/XP) in the Open box and click
OK.
3. A DOS prompt window appears. Type ping
www.msi.com.tw (or any URL address), which
is the IP address of the Gateway in this case,
and press [Enter].
47
Page 22

Wireless 11g MiniPCI Card MP54G User’s Guide
>>> 5.6
Sharing Files
You may now open and save files on other computers
once your computers are connected together on a
network. You will also be able to specify particular folders
or disk drives to share and even password to protect
them. Please verify that each computer has a unique
name and common workgroup name, if you had previously given your Windows
names. Follow the steps below to share specific files
and folders with other computers on your network.
1. On your Windows desktop, right-click My Net-
work Place icon and select Properties from the
context menu.
2. You will configure your computers network settings in this dialog. It is also available through
the Network icon in the Control Panel.
3. Click File and Print Sharing.
®
98SE/ME/2000/XP computers
Click
48
Page 23

Check this
Wireless 11g MiniPCI Card MP54G User’s Guide
4. Check the option I want to be able to give
others access to my files, and click OK.
Click
5. Click OK in the Network dialog box.
6. Provide the Windows Setup CD or direct the path
to the proper location of the installation files if
prompted. Then, reboot if prompted.
7. Now you can identify a particular folder or disk
drive to share, which means you can share a
folder that both you and your family member/
colleague needs to access occasionally. You
can also share your CD-ROM drive for others to
use if your other computers do not have one.
Both of these processes are the same. Only the
disk drives and folders that you specifically
identify as shared will be accessible to other
computers on your network.
8. Locate the disk drive or folder you want to share
in Windows Explore or My Computer icon on
your desktop.
9. Right-click the disk drive or folder and select
Sharing.
49
Page 24

Wireless 11g MiniPCI Card MP54G User’s Guide
10. Select Share As to set the parameters for
sharing this particular disk drive or folder.
- Share Name
This is used to identify the disk drive or folder you
are sharing to other computers in the network,
which can be helpful as more resources in your
network for others.
- Comment
This field is optional, which can be used to further
describe the disk drive or folder for others in the
network.
- Access Type
This option allows you to designate how much
someone else can do with this shared disk drive or
folder. Setting options are: Read-Only - only allows
others to look at or open the files in the disk drive or
folder. Full - allows others to read, write, open,
save, copy, move, and even delete files. Depends
on Password - gives other computers access
conditional on the password they provide.
50
Page 25

Wireless 11g MiniPCI Card MP54G User’s Guide
- Password
This option allows you to apply a level of security to
your shared disk drive and folder. Any other computer (user) will be asked to enter the password you
set here before accessing the disk drive or folder.
Two passwords are used to give two levels of
security (or access) to others in the network using
the Depends on Password setting. Leaving the
Password boxes empty will give everyone in the
network access to the disk drive or folder.
11. Click OK to continue. You will be prompted to
type the password(s) you provided for verification. Type the password(s) just as you typed
them again.
12. Now you may access this disk drive or folder
from another computer in your network. You may
do so by double-clicking the My Network Place
icon on your Windows desktop or inside Windows Explorer.
13. Navigate to the computer with the shared disk
drive or folder (recognized by the Computer
Name you provided), and double-click it. If you
specified a password when sharing this disk
drive or folder, you will be asked for the password.
14. You can access a disk drive of folder shared
over the network from most Windows 98SE/ME/
2000/XP applications. you can map these disk
drives and folders to a drive letter on another
computer to make this process easier. For
example, on a computer where you are accessing a shared folder from another computer,
inside Windows Explorer right-click and select
Map Network Drive. Now you are able to assign
an available drive letter. Checking Reconnect at
logon allows Windows to map this network drive
each time when you start your computer.
51
Page 26

Wireless 11g MiniPCI Card MP54G User’s Guide
Appendix
- MSI Software AP
Installing and Using the Software AP
A.1
To use the MSI Software AP, install the driver and utility
for your MSI wireless adapter (for more instructions on
installing, please refer to your adapter’s User’s Manual).
When you install the driver and utility successfully, you
can see the MSI Wireless LAN icon appears in the
status area.
MSI Wireless LAN icon
Right-click the MSI Wireless LAN icon, and select the
Switch to AP Mode option to enable the Software AP
mode.
Select this option
Right-click
Software AP Controller
52
Page 27

Wireless 11g MiniPCI Card MP54G User’s Guide
When the Software AP is enabled, right-click the Software AP Controller icon and a sub-menu containing
more settings will appear as below.
Language
Choose a language according to your operating system.
Launch AP configuration tool
Launch the utility to configure your network settings.
Switch to STA mode
Select to switch to the adapter’s normal function and disable the virtual AP mode.
Exit
Close the program.
53
Page 28

Wireless 11g MiniPCI Card MP54G User’s Guide
A.2 Launching the Configuration Utility
When the Software AP is enabled, click the icon to
launch the Configuration Utility (or select Launch AP
configuration tool option in the previous section).
First, enter the user’s information in the Connect dialog
box. By default, the User Name is
Password is admin. Then, click OK.
Click
Enter the User Name
and Password
admin and the
Check this option to
save the settings
Click
54
Page 29

Wireless 11g MiniPCI Card MP54G User’s Guide
The Home window of the Configuration Utility will appear
as below, which provides two options to select: Typical
Configuration and Customized Configuration.
Typical Configuration provides a step-by-step Setup
Wizard to guide you through the basic settings of the
gateway. Generally, after completing the three steps in
this option, your virtual AP can connect to the ISP and
your client computer can access to the Internet without
any problem.
Customized Configuration allows you to customize the
network settings of your virtual AP for some specific
purposes, such as changing password and other
network settings.
Factory Default Settings of the Virtual AP
SSID MSI
Channel 1
User Name admin
Password admin
Encryption Disable
DHCP client Enable
55
Page 30

Wireless 11g MiniPCI Card MP54G User’s Guide
Typical Configuration
A.3
In the Home window, click Typical Configuration and the
Setup Wizard appears from Step 1 to guide you through
the configuration.
The Menu Bar
The Menu Bar
During the Setup Wizard, whenever you click HOME in
the menu bar will make you return to the Home window;
click Logout to exit the Configuration Utility.
Step 1. Setting the SSID
Step 1.
The Menu Bar
Setting the SSID
SSID (Service Set Identifier) is the name designated for
a specific wireless local area network (WLAN). The
factory default setting is MSI.
After entering your SSID, click Next to continue step 2.
56
Page 31

Wireless 11g MiniPCI Card MP54G User’s Guide
Step 2.
Setting the Channel
Channel 1 is the default value. Please note that all
devices on the network must share the same channel.
Step 2. Setting the Channel
Make your choice and click Next to continue step 3.
57
Page 32

Wireless 11g MiniPCI Card MP54G User’s Guide
Step 3.
Tip: Hexadecimal
digits consist of the
numbers 0-9 and the
letters A-F.
WEP Setting
Step 3. Setting the WEP
Data Encryption
If Data Encryption is set to Required, the following
items must be answered. If it is set to Not Required,
you may skip Step 3 and click Next to close the 1-2-3
Setup Wizard.
Authentication Type
- Open System : communicates the key across the
network.
- Shared Key : devices must have identical WEP
settings to communicate.
Select your authentication type and continue on to the
next item.
Encryption Type
Select the level of encryption desired: 40-bit or 128-bit.
If you want to enable the encryption, for 40-bit key,
enter 10 hexadecimal digits; for 128-bit key, enter 26
hexadecimal digits.
WEP Key
Enter your 10- or 26-digit WEP Key.
When completed, click Next to close the 1-2-3 Setup
Wizard.
58
Page 33

Wireless 11g MiniPCI Card MP54G User’s Guide
Customized Configuration
A.4
Typically your virtual AP will have no problem to connect to
your ISP and let internal clients to access to the Internet
without any problem after going through the three steps in
Typical Configuration. However, if you want to customize
your virtual AP for some specific purposes, you may perform the configuration here.
Click Customized Configuration, and the main window
appears as below.
Main Window of Customized Configuration
The Menu Bar
There is a menu bar in the top of the Customized
Configuration window, where contains two options to exit
the configuration window (HOME and Logout, as
described in page 8); and three options for advanced
configuration: System, LAN, and Wireless, allowing you
to configure these respective settings and view the
system status.
The Menu Bar
59
Page 34
Wireless 11g MiniPCI Card MP54G User’s Guide
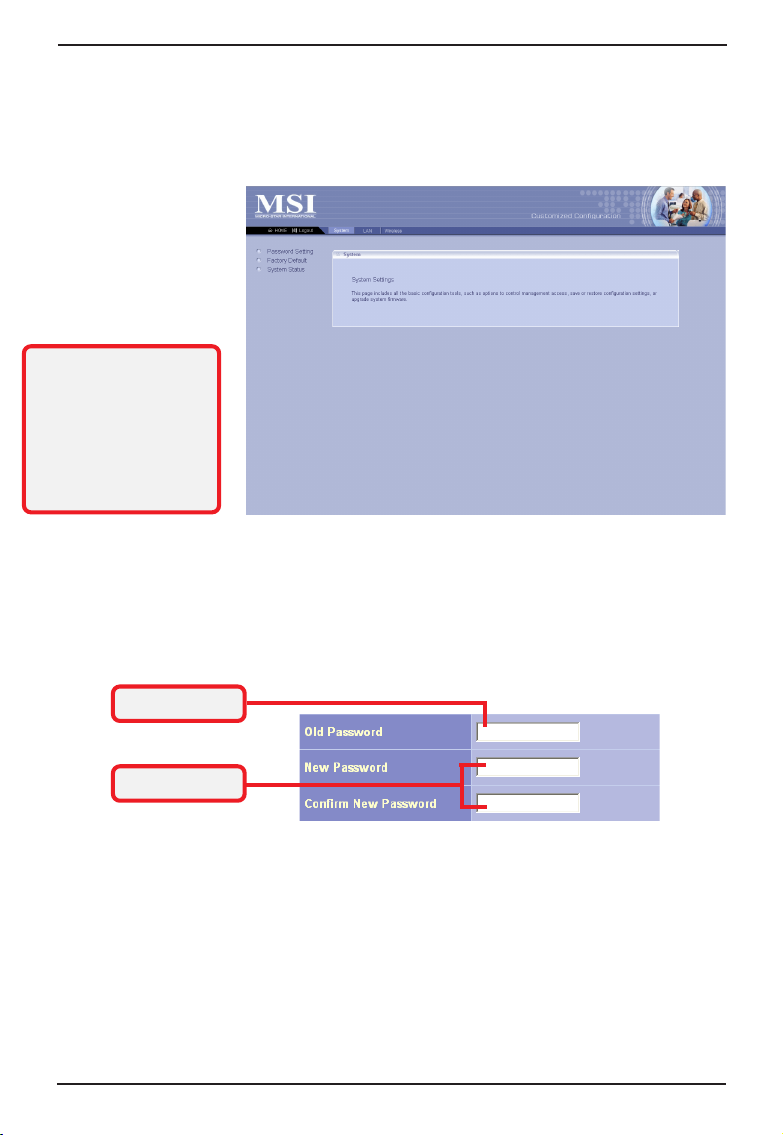
System
A.4.1
This page includes all the basic configuration tools such
as options to set up password, re-load the factory
default settings, and view system status.
This window includes:
Password Setting
>
>
Factory Default
> System Status
Tip: Once you have
changed the settings in
each option, click Apply
to save the settings, or
Cancel to abandon.
Clicking Help can bring
up the help window.
Password Setting
The default password of your virtual AP is admin. This
option allows you to use other password to replace the
old password. First, enter the old password, and then
enter the new password twice to confirm the password
changed. Then, click Apply to save the settings.
Old Password
New Password
Factory Default
You may re-load the factory settings of your Virtual AP.
System Status
This option contains detail information of your Virtual AP,
including general information and respective network
settings.
60
Page 35

A.4.2
This window includes:
> IP Setting
Wireless 11g MiniPCI Card MP54G User’s Guide
LAN
LAN is short for Local Area Network. This is considered
your internal network. In the LAN Setting window, you
can configure the IP setting.
IP Setting
The default setting of the IP address is obtained from
your DHCP server. If there is no DHCP server in your
network, uncheck the Enable DHCP client option and set
up the IP address for your virtual AP.
DHCP Client
When set to Enable, your virtual AP can obtain an IP
address automatically from the DHCP server. Please
note that once you enable DHCP Client, you might not
be able to configure your virtual AP in the browser unless
you know what IP address your virtual AP is assigned.
IP Address
The IP address of the LAN interface.
Subnet Mask
The subnet mask of the LAN interface.
Default Gateway
The IP address of the router/gateway in your network.
61
Page 36

Wireless 11g MiniPCI Card MP54G User’s Guide
Wireless
A.4.3
In this section, you can configure all wireless related
settings for your virtual AP.
This window includes:
>
SSID & Channel
>
Radio Settings
> Encryption
>
Associated Client List
>
Association Control
SSID & Channel
This option is used to set the SSID (Network Name) and
channel for your virtual AP. If you have changed the SSID
or Channel settings, click Apply to save the settings.
The virtual AP’s SSID
Select the Channel
* These settings are for
advanced users or MIS
staff only. If you do not
know how to set these
parameters, you are
recommended to use the
default value.
Radio Setting
This option allows you to configure the operation
parameters of the AP radio settings*.
62
Page 37

Enable WEP
Wireless 11g MiniPCI Card MP54G User’s Guide
Encryption
This option allows you to configure the setting of data
encryption. The WEP key must be set before the data
encryption is enforced.
Associated Client List
This option is to display information of stations that are
currently associating to your virtual AP.
Association Control
This option allows you to control which PC can connect
to the wireless LAN. If you enabled this feature, only
PCs with MAC address located in Association Control
List can connect to the wireless LAN.
63
Page 38

Wireless 11g MiniPCI Card MP54G User’s Guide
Index
A Access Point 1, 3
Ad-hoc mode 2, 24
ASCII 27
Available Networks 22
B
Bridge Connections 31
CCK 4
C
Channel 4, 28
Command 47
Computer Identification 37
Country 29
D
DBPSK 4
DOS 32
DQPSK 4
DSSS 4
Dynamic IP Address 41
Encryption 4, 27
E
F
File and Print Sharing 48
Fixed IP Address 41
Fragmentation Threshold 29
64
Page 39

Wireless 11g MiniPCI Card MP54G User’s Guide
Gateway 47
G
Hex-adecimal digital 27
H
IEEE802.11g 1
I
Information tab 30
Infrastructure mode 1, 3
InstallShield Wizard 11
Internet 2, 35
Key format 27
K
Key index 27
Key length 27
L
LAN 2
LED 7
Link Quality 28
Local Area Connection 31
MSI Wireless LAN icon 19
M
N
Network key 22
P
Power save 29
Preamble Type 29
Preferred network list 23
priority 23
Protocol 4
65
Page 40

Wireless 11g MiniPCI Card MP54G User’s Guide
Radio 28
R
Range 4
RTS/CTS Threshold 29
Service Set Identifier 28
S
Signal Strength 28
Speed 28
SSID 28
Status tab 28
Subnet Mask 42
TCP/IP 4, 45
T
WEP 22, 27
W
winipcfg 45
Wireless Network Connection 21
Wireless Network Connection Properties 33
66
 Loading...