

Page 1

Wireless 802.11b MS-6809(AP11B)
User’s Guide
Version 1.0
June 2003
G52-C6809X1-G22
Page 2

FCC Radio Frequency Interference Statement
This equipment complies with FCC radiation exposure limits set forth for an uncontrolled environment. The antenna(s) used for this equipment must be installed to
provide a separation distance of at least eight inches (20cm) from all persons.
This equipment must not be operated in conjunction with any other antenna.
CE Warning
This is a Class B product. In a domestic environment, this product may cause radio
interference, in which case the user may be required to take adequate measures.
Copyright Notice
The material in this document is the intellectual property of MICRO-STAR
INTERNATIONAL. We take every care in the preparation of this document, but no
guarantee is given as to the correctness of its contents. Our products are under
continual improvement and we reserve the right to make changes without notice.
Trademarks
All trademarks used in this manual are the sole property of their respective owners.
Windows is a registered trademark of Microsoft Corporation.
Revision History
Revision Revision History Date
V 1.0 First Release June 2003
Page 3

Important Safety Precautions
Always read and follow these basic safety precautions carefully when handling any
piece of electronic component.
1. Keep this User’s Manual for future reference.
2. Keep this equipment away from humidity.
3. Lay this equipment on a reliable flat surface before setting it up.
4. The openings on the enclosure are for air convection hence protects the
equipment from overheating.
5. All cautions and warnings on the equipment should be noted.
6. Never pour any liquid into the opening that could damage or cause
electrical shock.
7. If any of the following situations arises, get the equipment checked by a
service personnel:
Liquid has penetrated into the equipment
The equipment has been exposed to moisture
The equipment has not work well or you can not get it work according to User’s Manual
The equipment has dropped and damaged
If the equipment has obvious sign of breakage
8. DO NOT LEAVE THIS EQUIPMENT IN AN ENVIRONMENT
UNCONDITIONED, STORAGE TEMPERATURE ABOVE 700 C OR BELOW
-300C, IT MAY DAMAGE THE EQUIPMENT.
Page 4

Table of Contents
1. Introduction ................................................................................................... 1
1.1 What is AP11B .......................................................................................... 1
1.2 How AP11B works ..................................................................................... 2
1.3 Features & Benefits ................................................................................... 3
1.4 Specifications ............................................................................................ 4
1.5 System Requirements ................................................................................ 6
1.5 Package Content........................................................................................ 6
2. Unit Description ............................................................................................ 7
2.1 Front View ................................................................................................. 7
2.1.1 LEDs Display .......................................................................................... 8
2.2 Rear View ................................................................................................... 9
2.3 Side View ................................................................................................... 10
2.4 Installing Your AP11B ............................................................................... 11
2.4.1 Free-standing Installation ................................................................... 12
2.4.2 Wall-mounted Installation ................................................................... 14
3. Network Configuration ................................................................................. 16
3.1 Default Parameters ..................................................................................... 16
3.2 Web-based Configuration ......................................................................... 17
3.2.1 Typical Configuration.......................................................................... 19
3.2.2 Customized Configuration ................................................................... 22
System ...................................................................................................... 23
LAN .......................................................................................................... 27
Wireless .................................................................................................... 28
4. Technical Support ......................................................................................... 32
5. Troubleshooting ............................................................................................ 33
6. Glossary ........................................................................................................ 34
Index .................................................................................................................. 37
Page 5
Wireless 802.11b AP11B User’s Guide
1. Introduction
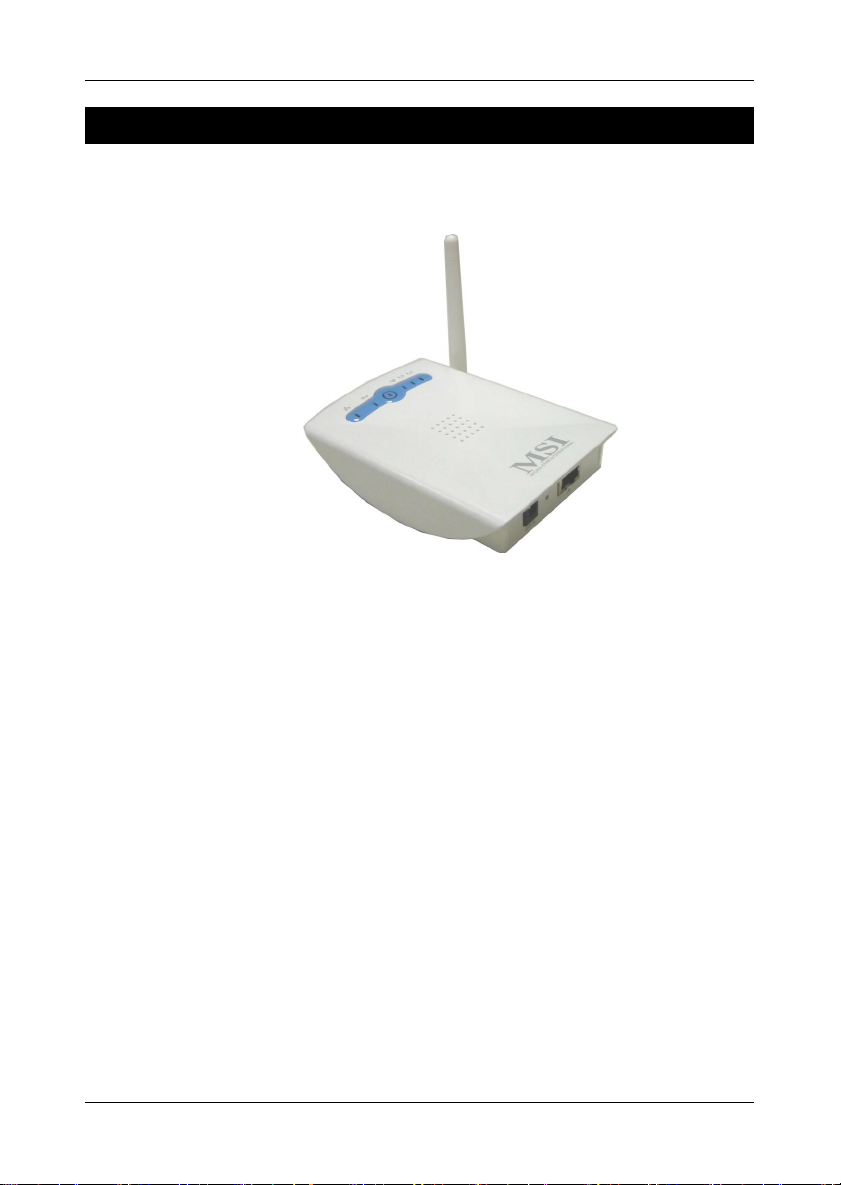
1.1 What is AP11B
MSI AP11B wireless access point is IEEE802.11b
compliant, and connects one or more wireless enabled
computers to an Ethernet network or Cable/xDSL modem for
high speed connection, anywhere in your home or office.
The AP11B wireless access point’s high-powered
antennae offer a range of operation of up to 500 feet indoor,
providing seamless roaming throughout your LAN
infrastructure. Advanced user authentication ensures a high
level of security for wireless networking, while easy-to-use
Windows-based diagnostics and statistic tools ensure that
you’ll always be in control. Best of all, the AP11B wireless
access point features easy installation---your choice to be
free-standing, wall- or ceiling-mounted.
With all these features come together in one compact,
lightweight, and power-efficient unit, you have the ultimate in
flexible networking---the AP11B wireless access point.
1
Page 6

Cable Modem / DSL
Wireless 802.11b AP11B User’s Guide
1.2 How AP11B Works
Infrastructure Networking Mode--- Infrastructure net-
working differs from Ad-hoc networking is that it includes an
Access Point. In an Infrastructure networking, the Access
Point can manage the bandwidth to maximize bandwidth
utilization. Additionally, the Access Point enables users on a
wireless LAN to access an existing wired network, allowing
wireless users to take advantage of the wired networks
resources, such as Internet, email, file transfer, and printer
sharing. The scale and range of the Infrastructure networking
are larger and wider than that of the Ad-hoc networking.
Internet
Router
RG11B
(optional)
Desktop PC with
CB11B
(The PCI to CardBus
module is optional)
wireless
L
NA
IO
A
T
N
T
ER
N
I
A
R
-
ST
O
MICR
○○○○○○
wireless
L
NA
IO
T
NA
R
NTE
I
AR
-
ST
M
ICRO
Laptop PC with
CB11B
○○○○○○○○○
Access Point
AP11B
○○○○
○○○○○○○○○○
wireless
wireless
L
NA
IO
A
T
N
NTER
I
AR
T
-
S
M
ICRO
Laptop PC with
L
NA
IO
T
NTERNA
I
AR
ST
-
M
ICRO
CB11B
Laptop PC with
CB11B
2
Page 7

Wireless 802.11b AP11B User’s Guide
1.3 Features & Benefits
h 11Mbps Data Rate/150-500ft Indoor Range
The AP11B runs with data-intensive applications like multimedia and streaming video/audio --- even through walls,
floors and ceilings. You get high speed networking without wires --- ideal for home office networking requirements.
h Superior Antennae Design
One external dipole and one internal patch antennae provide
superior polarized reception and transmission for the best
signal quality.
h Wi-Fi Certified
The AP11B complies with IEEE802.11b standard and Wi-Fi,
allowing full interoperability with any Wi-Fi certified wireless product.
h Easy Installation
User-friendly web-based interface and step-by-step setup
wizard make the AP11B fast and easy to install.
h WEP Security to Ensure Privacy
Supports 64/128-bit WEP encryption, which ensures that
your network signal is secure and private.
3
Page 8

Wireless 802.11b AP11B User’s Guide
1.4 Specifications
Data Rates 11, 5.5, 2, 1 Mbps, auto-fallback
Standard IEEE 802.11b
Range 150-500 feet (indoor), 1000-1600 feet (outdoor)
Frequency 2.4 GHz
Wireless Radio Type DSSS (Direct Sequence Spread Spectrum)
Modulation Type CCK, BPSK, and QPSK
WEP Data Encryption Options 64/128-bit
Antenna One External and one internal patch
Protocols Support TCP/IP, DHCP Client, HTTP for AP
configurability using HTML setup pages
Wired Interface One Ethernet IEEE 802.3u 10/100 Base-T,
RJ-45 with Auto MDI/MDI-X
User Selectable Settings Network Mode, ESSID, Channel, Tx Rate, RTS/
CTS Threshold, Fragmentation Threshold,
WEP, AES, Mac Filtering, Firmware Upgrade
LED Indicators Power, Wireless Traffic Status, WEP, Ethernet
Link
Output Power Up to +18dBm
Sensitivity 82dBm@11Mbps
85dBm@5.5Mbps
87dBM@2Mbps
88dBM@1Mbps
Power Consumption Transmit Mode 310mA
Power Adapter 110~120AC
220~240AC
DC output: 12V DC
Output current: 500mA
Optional Operation Mode Ethernet Bridging mode (for client use)
Dimensions 124.5 x 88.5 x 24.5 mm
4
Page 9

Wireless 802.11b AP11B User’s Guide
Weight TBD
Operating Environment Operating environment: 0~50OC (32~122OF)
Storage environment: -30~70OC (-22~158OF)
Humidity: Up to 40OC (104OF) with 85% non-
condensing
Input Voltage 5VDC (includes AC adapter)
Package Contents
Main unit One AP11B Wireless Access Point
Documentations & Driver Friendly User’s Guide on CD-ROM; Quick
Installation Guide
Peripherals & Accessories Power Adapter & Power Cord
Certifications
United States FCC Part 15 Class B
Europe CE
5
Page 10

Wireless 802.11b AP11B User’s Guide
1.5 System requirements
After installing the AP11B, you need the followings to
configure respective network settings:
h Computers with the following operating systems and
with an installed Ethernet adapter
--- Windows® ME/2000/XP
--- Linux
--- MAC
h Any browser compatible with Internet Explorer 6.0 and
later, or Netscape Navigator 6.0 and later
1.6 Package content
Unpack the package and check all the items carefully. If any
item contained is damaged or missing, please contact your
local dealer as soon as possible. Also, keep the box and
packing materials in case you need to ship the unit in the
future.
Your AP11B package should contain the following items:
--- AP11B
--- Supporting Stand
--- Quick Installation Guide
--- CD title including user’s manual and drivers
--- AC 12V/500mA Wall Power Adaptor
6
Page 11
Wireless 802.11b AP11B User’s Guide
2. Unit Description
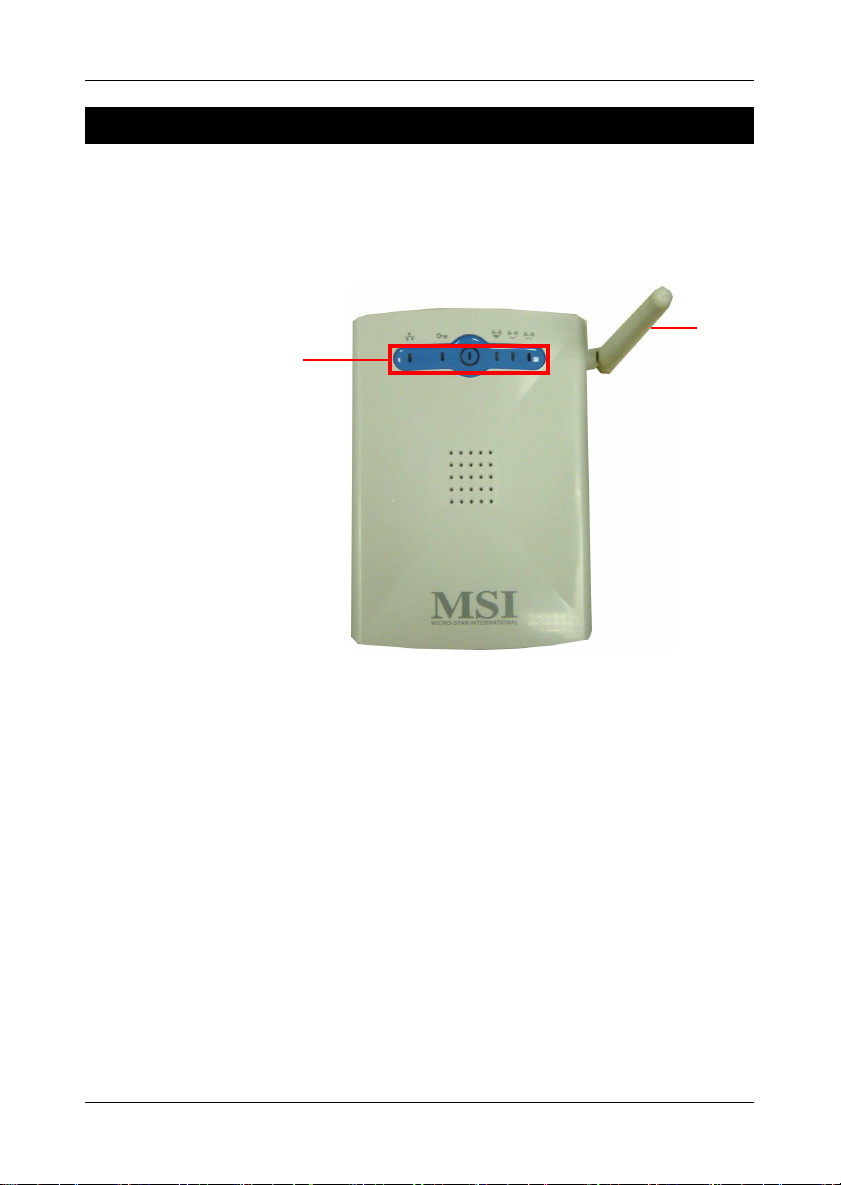
2.1 Front View
<1>
<2>
<1> LEDs
LEDs show the power and traffic utilization status.
<2> Antenna
External dipole antenna.
7
Page 12

Wireless 802.11b AP11B User’s Guide
2.1.1 LEDs Display
*Under this
condition, the
AP11B will not
work properly.
<3>
<2> <1>
<4>
<1> Power Indicator
Blue light on: power is attached.
Blue light off: power is not attached.
<2> Ethernet Link Indicator
Green light on: link is ready
Green light off: no link partner*
Green light blinking: traffic through this Ethernet port
<3> Encryption Indicator
Green light on: encryption function enabled
Green light off: encryption function disabled
<4> Wireless Status Indicators
There are three indicators showing the status of wireless
network.
Green light on: traffic utilization is good
Yellow light on: traffic utilization is fair
Orange light on: traffic utilization is low
8
Page 13
Wireless 802.11b AP11B User’s Guide
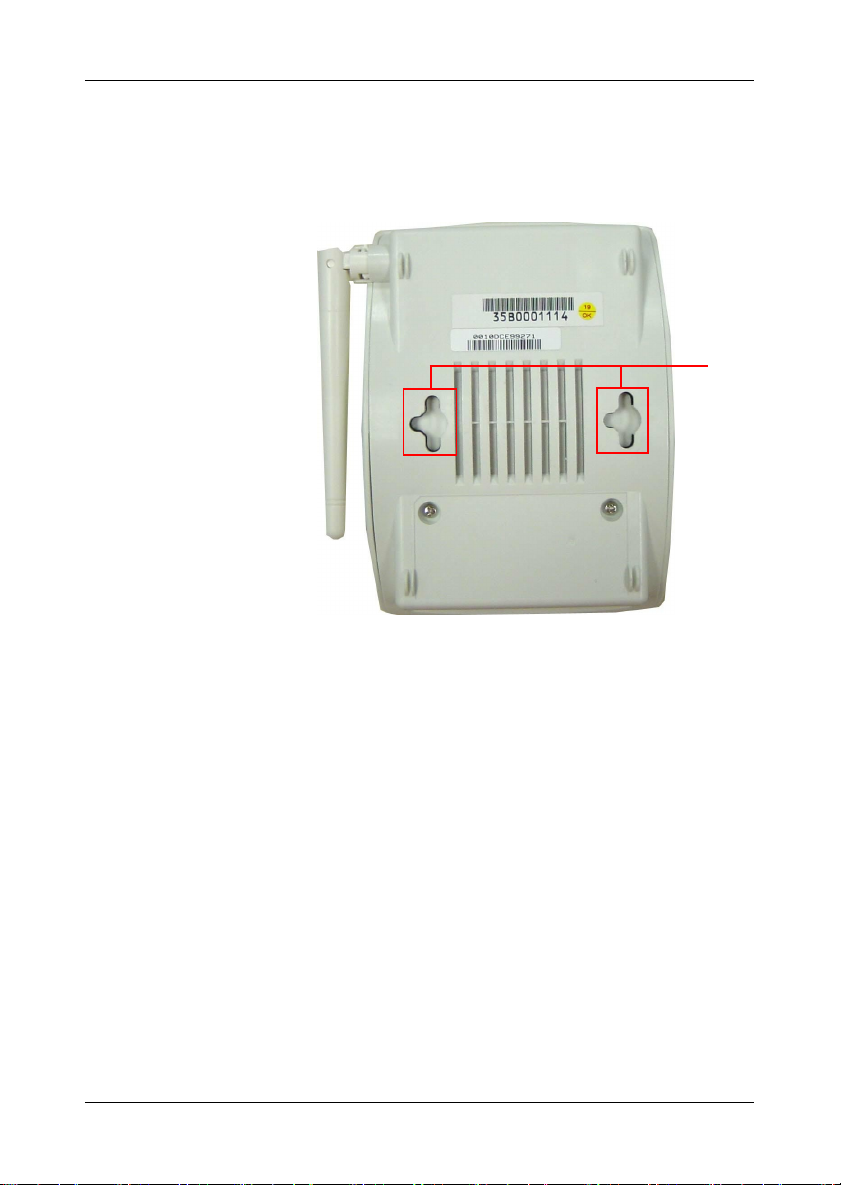
2.2 Rear View
<1>
<1> Mounting Holes
The ideal mounting distance between the mounting holes
is 5.5cm.
(For information on how to use the mounting holes, refer to
Free-standing & Wall-mounted Installation)
9
Page 14

Wireless 802.11b AP11B User’s Guide
2.3 Side View
<1> <3>
<2>
Figure 3: Side Panel
<1> Power Jack
Power jack with input voltage at 12VDC/500mA.
<2> Reset Button
Press and hold the button for more than five seconds to
reload the factory default settings.
10
<3> RJ-45 Ethernet Jack
RJ-45 connector allows your AP11B connected to a network
environment.
Page 15

Wireless 802.11b AP11B User’s Guide
2.4 Installing Your AP11B
Positioning
The AP11B can be free-standing, wall- or ceiling-mounted.
(Refer to 2.4.1 Free-standing Installation, 2.4.2 Wall-
mounted Installation for details.) Before connecting the
AP11B to your devices, please note that the AP11B should
be placed in a location with the followings:
- Easy accessibility: you can conveniently connect the
AP11B to the xDSL/Cable Modem through the Ethernet
port.
- Easy LEDs observation: you may monitor the real-time
networking status and take instant measures as
problems arise.
- Maximum wireless coverage: to achieve the maximal
coverage, the AP11B should be placed at a high level in
position without obstacles and defiladed space. No
matter how you install the AP11B--- in a wall-mounted
or free-standing fashion, remember the antenna should
always point vertically upward.
Connecting Cables
1. Plug the DC end of the power adapter into the
connector of the AP11B, and the AC end to the
wall outlet later.
2. For wired connection, connect the AP11B to the LAN
port.
Power Up
When the DC end of the power adapter is connected the
AP11B, plug the AC end of the power adapter to the wall
outlet can power up the system; and, the system will
perform POST (Power-On-Self-Test) to diagnose the system.
11
Page 16

Wireless 802.11b AP11B User’s Guide
2.4.1 Free-standing Installation
Take out the AP11B and its supporting stand.Step 1
Step 2
Step 3
Locate the mounting holes on the rear panel of the
AP11B and align them to the hooks of the stand.
The AP11B is hooked to the supporting stand.
12
Page 17

Wireless 802.11b AP11B User’s Guide
Step 4
Step 5
Hold and slide the AP11B to either right or left to secure
the access point in place.
The free-standing installation is completed.
13
Page 18

Wireless 802.11b AP11B User’s Guide
2.4.2 Wall- or Ceiling-mounted Installation
Step 1
Step 2
Take out the AP11B and screws.
Hammer the screws into the ceiling or the wall.
14
Step 3
The ideal distance between screws is 5.5cm.
Page 19

Wireless 802.11b AP11B User’s Guide
Step 4
Step 5
Hold and slide the AP11B to either right or left to secure
the access point in place. (Refer to Step 4 in
standing installation
.)
Free-
The wall- or ceiling-mounted installation is completed.
To have the maximum wireless coverage, point the
antenna vertically downward for ceiling-mounted
installation.
For wall-mounted installation, point the antenna vertically
upward.
15
Page 20

Wireless 802.11b AP11B User’s Guide
3. Network Configuration
Before You Begin...
To establish your wireless network connection, you will
need:
- AP11B(s)
- One or more network adapters
3.1 Default Parameters
Default Parameters
Password admin
IP 192.168.1.254
subnet 255.255.255.0
SSID AP11B
Channel 7
Encryption Off
DHCP client Disable
16
Page 21

Wireless 802.11b AP11B User’s Guide
3.2 Web-based Configuration
The AP11B provides you a convenient tool to customize
the network settings. Whenever you want to configure
the respective settings, open your web browser (eg.
Internet Explorer or Netscape Navigator), then type the
default IP address 192.168.1.254 in the Address bar and
press [Enter].
Enter
Password
“admin”
http://192.168.1.254
17
Page 22

Wireless 802.11b AP11B User’s Guide
The index window will appear as below, providing three
options to select: Logout, Typical Configuration and
Customized Configuration.
Typical Configuration (Section 3.2.1) provides a step-
by-step setup wizard to guide you through the basic
settings. Generally, after completing the four steps in
this option, your wireless gateway can connect to the
ISP and your client computer can access to the Internet
without any problem.
Customized Configuration (Section 3.2.2) allows you to
customize the network settings of your wireless gateway
for some specific purposes, such as changing password,
updating firmware, and other network settings.
Logout allows you to exit the configuration utility.
18
Page 23

Wireless 802.11b AP11B User’s Guide
3.2.1 Typical Configuration
Click Typical Configuration, and the 1-2-3 Setup Wizard
will appear to guide you through the 3 steps.
The Menu Bar
Enter SSID
“AP11B”
The Menu Bar
During the setup wizard, whenever you click HOME in
the menu bar will make you return to the Home window;
click Logout to exit the Configuration Utility.
press here
Step 1.
The Menu Bar
Setting the SSID
Service Set Identifier (SSID) is the name designated for a
specific wireless local area network (WLAN). The SSID’s
factory default settings is AP11B.
After entering your SSID, click Next to continue.
19
Page 24

Wireless 802.11b AP11B User’s Guide
Step 2.
Step 3
Setting the Channel
7 is the default channel. All devices on the network must
share the same channel. Make your choice and click Next
to continue.
WEP Settings
20
Page 25

Wireless 802.11b AP11B User’s Guide
Authentication Type
Open System - communicates the key across the
network
Shared Key - devices must have identical WEP settings to
communicate
Both - communicate using either open system or shared
key
Select your authentication type and move on to the next
item.
Encryption Type
Select the level of encryption desired: 40-bit or 128-bit.
If you want to enable the encryption, for 40-bit key,
Hexadecimal digits
consist of the numbers
0-9 and the letters AF.
enter 10 hexadecimal digits; for 128-bit key, enter 26
hexadecimal digits.
Enter WEP
Key here
WEP Key
Enter your 10- or 26-digit WEP Key.
press here
When completed, click Next to close the 1-2-3 Setup Wizard.
21
Page 26

The Menu Bar
Wireless 802.11b AP11B User’s Guide
3.2.2 Customized Configuration
If you want to customize your AP11B for some specific
purposes, you may perform the Customized Configuration here.
Click Customized Configuration, and the main window
appears as below.
Main Window of Customized Configuration
22
The Menu Bar
There is a menu bar in the top of the Customized Configuration window, where contains two options to exit
the configuration window (HOME and Logout, as
described in p. 11); and three options for advanced
configuration: System, LAN, Wireless, allowing you to
configure these respective settings and view the system
status.
The Menu Bar
Page 27

Wireless 802.11b AP11B User’s Guide
System
This page includes all the basic configuration tools such as
options to set up password, upgrade system firmware, view
system status and restart system.
Password Setting
The default password of your access point is “admin”.
This option allows you to use personal password to
replace the old one.
Once you have
changed the settings
in each option, press
Apply to save the
changes, or Cancle
to abandon. Press
Help can bring up the
help window.
23
Page 28

Wireless 802.11b AP11B User’s Guide
Firmware Upgrade
Once you obtained a new version of firmware (eg.
download from the MSI website), you can update the
firmware of your AP11B.
How to upgrade the firmware:
1. Obtain the latest version of the firmware and save it
to the designated location of your system.
2. Browse to the designated location and open the file.
24
Page 29

Wireless 802.11b AP11B User’s Guide
3. Make sure the file is correct. Press Upgrade
Firmware to continue.
make sure the
file is correct
4. Click OK to continue with upgrading.
press here
Select this
5. To check if the upgrading process is successfully
completed, click System Status to view the the firmware
version.
25
Page 30

Wireless 802.11b AP11B User’s Guide
Restart
You may restart your wireless gateway manually without
unplugging the power cable. Please NOTE that selecting
“Restart” will not lose your current configuration.
System Status
This option contains detail information of your AP11B, including general information and respecitve network settings.
26
Page 31

Wireless 802.11b AP11B User’s Guide
LAN is short for Local Area Network. This is considered
LAN
your internal network. In the LAN setting page, you can
configure the IP setting.
DHCP Client---default Disable
If you enable a DHCP capable router/gateway, you will not
need to assign a static IP address.
IP Address---default 192.168.1.254
The IP address of the LAN interface.
Subnet Mask---default 255.255.255.0
The subnet mask of the LAN interface.
Default Gateway---optional
The IP address of the router/gateway on your network.
27
Page 32

Wireless 802.11b AP11B User’s Guide
Wireless
3-1
1
2
In the section, you can configure all wireless related
settings for your AP11B.
SSID & Channel
This option is used to set the SSID (Network Name) and
channel for your AP11B.
28
How to change the SSID and Channel:
1. Enter you new SSID and Channel selection.
2. Press Apply to reset your SSID and Channel.
3. To check if the system has reset the SSID and
Channel, first click System and then select System
Status to view the Wireless Settings.
3-2
Page 33

Wireless 802.11b AP11B User’s Guide
Radio Setting
This option allows you to configure the operation parameters of the AP11B radio settings*.
* These settings are for
advanced users or MIS
staff only. If you do
not know how to set
these parameters, it is
recommended to use
the default value.
29
Page 34

Wireless 802.11b AP11B User’s Guide
Encryption
This option allows you to configure the settings of data
encryption. WEP key must be set before the data
encryption is enforced.
30
Page 35

Wireless 802.11b AP11B User’s Guide
Associated Client List
This option is to display information of stations that are
currently associating to your access point.
Association Control
This option allows you to control the association privilege
of client stations. The one which is added to the Association control List can be set to Allowed or Blocked to the
access point upon your permission configuration.
31
Page 36

Wireless 802.11b AP11B User’s Guide
4. Technical Support
Micro-Star International provides free technical support. If a
problem arises with your system and no solution can be obtained from this user’s manual, please contact your place of
purchase or local distributor. Alternatively, please try the following help resources for further guidance.
Visit the MSI website for FAQ, technical guide, driver and
software updates, and other information: http://www.msi.
com.tw/
Contact our technical staff at: support@msi.com.tw
32
Page 37

Wireless 802.11b AP11B User’s Guide
5. Troubleshooting
Connection
LEDs do not grow.
Connection Failed.
Cannot access the web-based configuration.
Cannot get an illegal IP address.
Link quality is always poor.
Cannot see other clients
Some clients cannot connect to AP11B
Configuration
Password is not working.
Setup page is not displayed properly.
Settings lost.
Cannot access the Internet
WEP key lost
33
Page 38

6. Glossary
Client Privileges
Your home network Gateway can block certain services to
computers on your network, using the Client Privileges page
in Setup. For example, you can block Internet access to
your child’s computer during times when you are not able to
supervise his/her computer use.
DHCP
Dynamic Host Configuration Protocol. This protocol
automatically configures the TCP/IP settings of every
computer on your home network.
DNS Server Address
DNS stands for Domain Name System, which allows Internet
host computers to have a domain name and one or more IP
addresses (such as 192.168.0.10). A DNS server keeps a
database of host computers and their respective domain
names and IP addresses, so that when a domain name is
requested, the user is sent to the proper IP address. The
DNS server address used by the computers on your home
network is the location of the DNS server your ISP has
assigned.
Wireless 802.11b AP11B User’s Guide
34
DSL Modem
DSL stands for Digital Subscriber Line. The DSL modem
uses your existing phone lines to transmit data at high
speeds.
Ethernet
A standard for computer networks. Ethernet networks are
connected by special cables and hubs, and move data
around at up to 10 million bits per second (Mbps).
Page 39

Wireless 802.11b AP11B User’s Guide
IP Address
IP stands for Internet Protocol. An IP address consists of a
series of four numbers separated by periods, that identifies
an single, unique Internet computer host. Example: 192.34.
45.8.
ISP Gateway Address
The ISP Gateway Address is an IP address for the Internet
router located at the ISP’s office. This address is required
only when using a cable or DSL modem. See ISP for
definition.
ISP
Internet Service Provider. An ISP is a business that
provides connectivity to the Internet for individuals and
other businesses or organizations.
NAT
Network Address Translation. This process allows all of
the computers on your home network to use one IP address.
Using the NAT capability of the HomeConnect home
network gateway, you can access the Internet from any
computer on your home network without having to purchase more IP addresses from your ISP.
PPPoE
Point-to-Point Protocol over Ethernet. Point-to-Point
Protocol is a method of secure data transmission originally
created for dial-up connections; PPPoE is for Ethernet
connections.
SPI
Stateful Packet Inspection. SPI is the type of corporategrade Internet security provided by your Home-Connect
home network gateway. Using SPI, the gateway acts as a
“firewall,” protecting your network from computer hackers.
35
Page 40

Wireless 802.11b AP11B User’s Guide
Subnet Mask
A subnet mask, which may be a part of the TCP/IP information provided by your ISP, is a set of four numbers
configured like an IP address. It is used to create IP address
numbers used only within a particular network (as opposed
to valid IP address numbers recognized by the Internet,
which must assigned by InterNIC).
TCP/IP
Transmission Control Protocol/Internet Protocol. This is
the standard protocol for data transmission over the
Internet.
WEP
WEP stands for Wired Equivalent Privacy. It is based on the
IEEE 802.11 standard and uses the RC4 encryption algorithm.
Enabling WEP allows you to increase security by encrypting
data being transferred over your wireless network
36
Page 41

Wireless 802.11b AP11B User’s Guide
Index
A
Accessibility 11
Ad-hoc 2
Antenna 3, 4, 7
AP11B 1
Authentication type 21
C
Channel 20
Customized configuration 18, 22
LAN 27
IP setting 27
System
Firmware upgrade 24
Password setting 23
Restart 26
System status 26
Wireless 28
Associated client list 31
Association control 31
Encryption 30
Radio setting 29
SSID & Channel 28
D
Data rates 4
Default gateway 27
37
Page 42

Default parameter 16
DHCP client 27
E
Encryption type 21
Ethernet Link 8
External dipole antenna 7
F
Free-standing 11 , 12
Frequency 4
H
Hexadecimal digits 21
I
IEEE802.11b 1
Infrastructure networking mode 2
Interface 4
IP address 17, 27
Wireless 802.11b AP11B User’s Guide
L
LAN 27
LEDs 7, 8
M
Modulation type 4
O
Open system 21
P
Protocols 4
38
Page 43

Wireless 802.11b AP11B User’s Guide
R
Range 4
RJ-45 Ethernet Jack 10
S
Sensitivity 4
Shared key 21
SSID (Service Set Identifier) 19
Standard 4
Subnet mask 27
T
Traffic utilization 8
Typical configuration 18, 19
1-2-3 Setup Wizard 19
W
Wall-mounted 11, 14
Web-based configuration 17
WEP key 21
WEP settings 20
Wi-Fi 3
Wireless coverage 11
Wireless radio type 4
Wireless status 8
WLAN (Wireless Local Area Network) 19
39
 Loading...