

Page 1

Wireless 11b PCI Card
MS-6807
User’s Guide
Page 2

FCC-B Radio Freque ncy Interference Statement
This equipment has been tested and found to comply with the limits for a class B
digital device, pursuant to part 15 of the FCC rules. These limits are designed to
provide reasonable protection against harmful interference w hen the equipment is
operated in a commercial environment. This equipment generates, uses and can
radiate radio frequency energy and, if not installed and used in accordance with the
instruction manual, may caus e harmful interference to radio communications.
Operation of this equipment in a residential area is likely to caus e harmful
interference, in which case the user w ill be required to correct the interference at his
own expense.
Notice 1
The changes or modifications not expressly approved by the party responsible for
compliance could void the user’s authority to operate the equipment.
Notice 2
Shielded interface cables and A.C. pow er cord, if any, must be used in order to
comply with the emission limits.
VO IR LA NOTICE D’INSTALLATION AVANT DE RACCORDER AU RESEAU.
FCC ID :I4L-MS6807
This device complies with part 15 of the F CC Rules Operation
is subject to the follow ing two conditions. (1) This device may
not cause harm full interference and (2) This device must
accept any interference received. Including interference that
may cause undesired operation
Page 3
Page 4

Copyright Notice
The material in this document is the intellectual property of MICRO-S TAR
INTERN ATIONAL. We take every care in the preparation of this document, but no
guarantee is given as to the correctness of its contents. Our products are under
continual improvement and we reserve the right to make changes without notice.
Trademarks
All trademarks used in this manual are the sole property of their res pective owners.
Windows is a registered trademark of Microsoft Corporation.
Revis ion History
Revision Revision History Date
V 1.0 First Release March 2003
Page 5

Impor tant Safety Precautions
Always read and follow these basic safety precautions carefully when handling any
piece of electronic component.
1. Keep this User’s Manual for future reference.
2. Keep this equipment away from humidity.
3. Lay this equipment on a reliable flat surface before setting it up.
4. The openings on the enclosure are for air convection hence protects the
equipment from overheating.
5. All cautions and warnings on the equipment s hould be noted.
6. Never pour any liquid into the opening that could damage or cause
electrical shock.
7. If any of the following situations aris es, get the equipment checked by a
service personnel:
Liquid has penetrated into the equipment
The equipment has been exposed to moisture
The equipment has not w ork well or you can not get it work according to User’s Manual
The equipment has dropped and damaged
If the equipment has obvious sign of breakage
8. DO NOT LEAVE THIS EQUIPMENT IN AN ENVIRONMENT
UN CONDITIONED, STORAGE TEMPERATURE ABOVE 600 C OR BELOW
-200C, IT MAY DAMA GE THE EQUIPMENT.
Page 6

Table of Conte nts
1. In troduction ............................................................................................. 1
1.1 What is Wireless 11b PCI Card ................................................................ 1
1.2 How Wireless 11b PCI Card works........................................................... 2
1.3 Specifications ......................................................................................... 4
1.4 System requirements............................................................................... 6
1.5 Package content ..................................................................................... 6
1.6 Layout ................................................................................................... 7
2. Hardware installation ............................................................................... 8
3. S oftware installation ................................................................................ 9
3.1 Installing on Windows 98SE/ME/2000/XP ............................................... 9
4. MS I wireless network utility .................................................................... 13
4.1 In wireless network tab ........................................................................... 13
4.2 Encryption ............................................................................................. 18
4.3 In status tab ........................................................................................... 19
4.4 In information tab ................................................................................... 22
4.5 Using Windows XP as Access Point....................................................... 23
5. Network connection ................................................................................. 27
5.1 Computer identification........................................................................... 28
5.2 How to install TCP/IP ............................................................................. 29
5.3 Configuring a dynamic IP address ........................................................... 31
5.4 Configuring a static IP address................................................................ 33
5.5 Checking TCP/IP address ....................................................................... 36
5.6 Checking the connection by pinging ....................................................... 38
5.7 S haring files ........................................................................................... 39
6. Troub leshooting ....................................................................................... 43
7. Tech nical Support .................................................................................... 45
Page 7
Wireless 11b PCI Card User’s Guide
1. introduction
1.1 What is Wireless 11b PCI Card
MSI’s Wireless 11b PCI Card is a cost effe ctive solution
for de sktop PC. It complies with IEEE 802.11b standard
and provides 11 Mbps data rate. The Wireless 11b PCI
Card enables any desktop PC to share a broadband
connection, files and printers over the net work without
the time and expense of Ethernet cabling. In addition,
with 64-/128 -bit Privacy Key and IEEE 802.11i TKP, network conn ection is highly secured.
Base d on direct sequence spread spectrum (DSSS) technology o perating in the 2.4 GHz Industrial, Science and
Medical band, the Wire less 11b PCI Card complies with
WiFi, ensu ring interoperability with other compliant wireless LAN products.
1
Page 8
Wireless 11b PCI Card User’s Guide
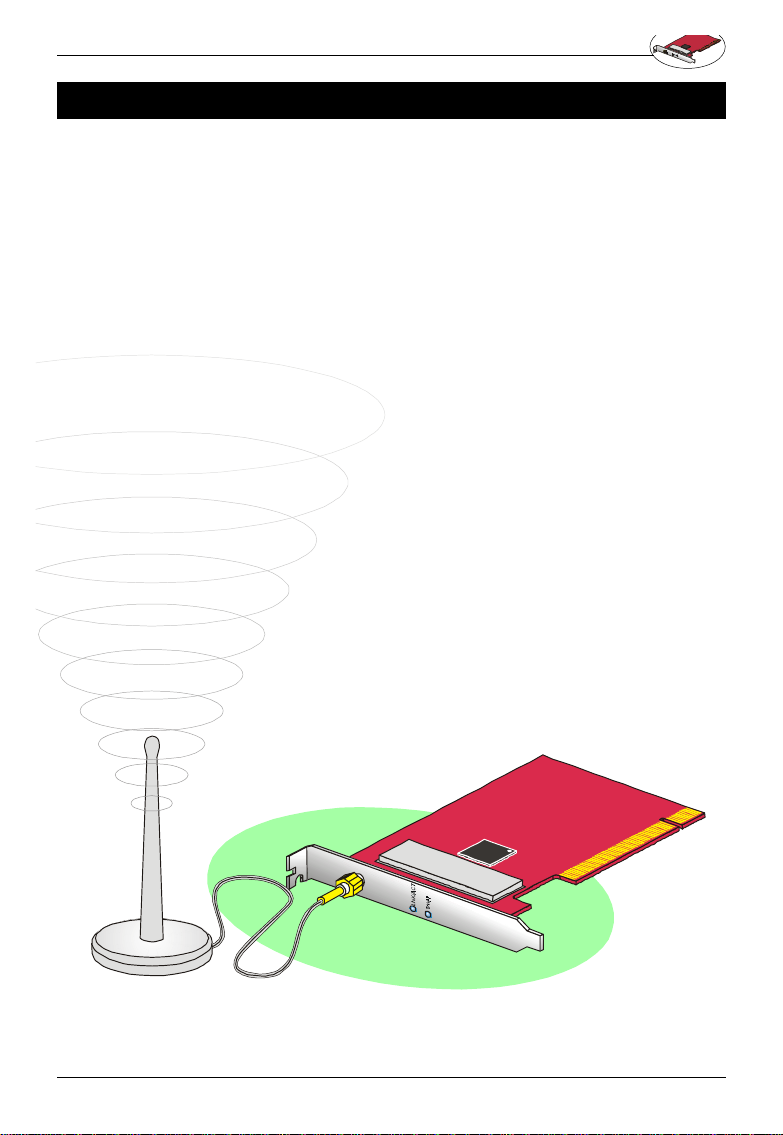
1.2 How Wireless 11b PCI Card works
Ad -hoc Networking Mode --- An Ad-hoc (or
"spontaneous") network is a local area netw ork or other
small network, especially one with wireless or temporary
plug-in connect ions, in which some of the network devices are part of the network only for the duration of a
communi cations session. Users on the network can share
files, print to a shared printer, and access the Internet
with a shared modem. In this kind of network, new devices can be q uickly added; however, users can only communicate with oth er wireless LAN computers that are in
the wireless L AN workgroup, and are within range.
Internet
Cable Modem / DSL
wireless
Desktop PC with
Wireless 11b PCI
Card
2
Desktop PC with
Wireless 11b PCI
Card
Page 9
Wireless 11b PCI Card User’s Guide
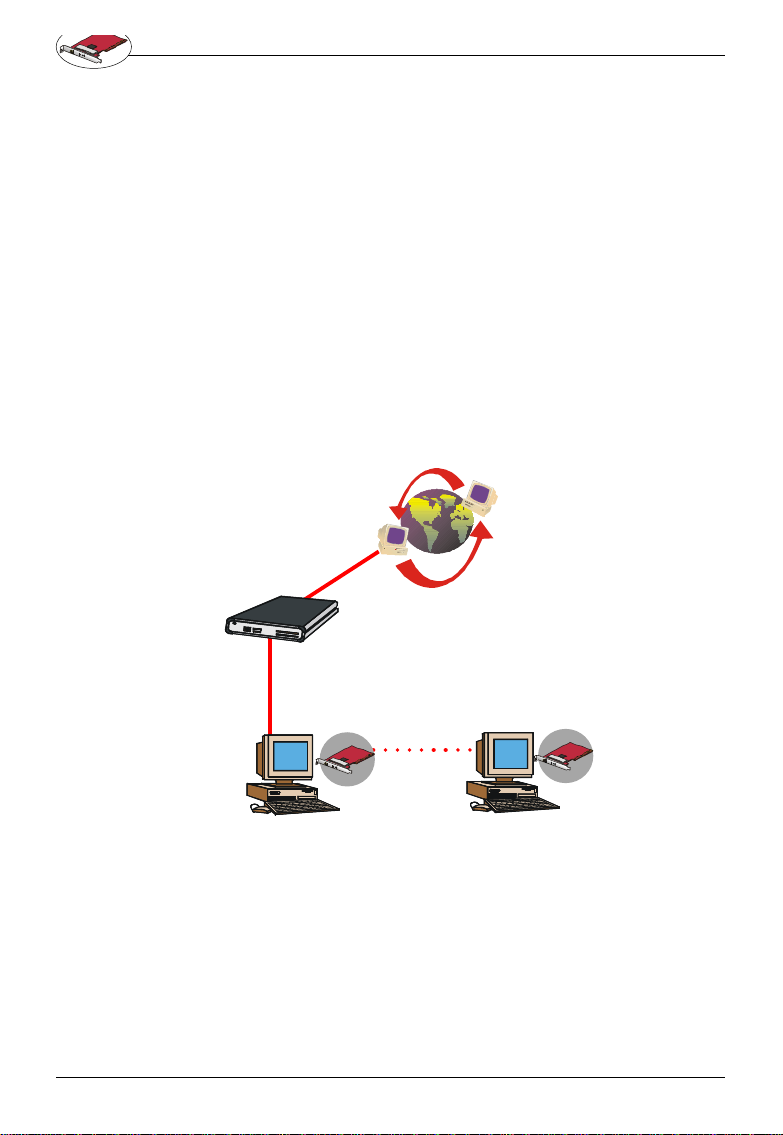
Infrastructur e Networking Mode--- Infrastructure networkin g differs from Ad-hoc networking is that it includes
an Access Point. In an Infrastructure networking, the
Access Point can manage the bandwidth to maximize
bandwi dth utilization. Additionally, the Access Point enables users on a wirel ess LAN to access an existing wired
netw ork, allowing wireless users to take advantage of the
wired networks resources, such as Internet, email, file
transfer, and printe r sharing. The scale and range of the
Infrastructure networking a re larger and wider than that of
the Ad-hoc networking.
Cable Modem / DSL
Internet
Router
Desktop PC with
Wireless 11b PCI
Card
wireless
wireless
Desktop PC with
Wireless 11b PCI
Card
Access
Point
wireless
wireless
Desktop PC with
Wireless 11b PCI
Desktop PC with
Wireless 11b PCI
Card
Card
3
Page 10

Wireless 11b PCI Card User’s Guide
1.3 Specifications
General
Operatin g System: Windows 98SE/ME/2000/XP
Compliance:
- IEEE 802.11b
- WECA WiFi
- WHQL
Operating Temperature: 0 - 55OC
Operating Humidity: 0 to 95% non-condensing
Physic al
Form Factor: 32-b it PCI v2.2
Dimension:127.3mm x 77.6mm x 18.4mm (5"x3"x0.
72")
Antenna : Dipole
Weight: 29g
Operation Voltage: 3.3 V
Radio
Frequency Ran ge: 2.4GHz to 2.4835 GHz,
Operating Cha nnels:
- 11 ch annels (US & Canada), 13 channels (Europe),
4 cha nnels (France), 2 channels(Spain), 14 channels (Jap an)
- Maximum 3 Non-Overlappe d Channels
- 25 MHz Bandwidth Per Channel
Wireless Medium: Direct Sequen ce Spread Spectrum (D SSS)
Media Access Con trol: Carrier Sense Multiple
Access with Collision Avoidance (CDMA/CA)
Modulation Technique: DBPSK @ 1 Mbps, DQPSK
@ 2 Mbps, CCK @ 5.5 an d 11 Mbps
Data Rate: 1 1 Mbps, 5.5 Mbps, 2 Mbps, 1 Mbps,
Auto Fa ll-Back
Transmitter output power: 1 5dBm
Performance
Sensitivity: less than -82 dBm at 11 Mbps
4
Page 11

Wireless 11b PCI Card User’s Guide
Range : Outdoor: >150m(492ft) @ 11 Mbps
Security
Security:
- 64-/128-Bit Pri vacy Key (WEP)
- IEEE 802.1 1i TKIP
5
Page 12
Wireless 11b PCI Card User’s Guide
1.4 System requirement s
Before Installing the Wireless 11b PCI Card, your PC
should meet the follo wing:
Desktop PC with standard PCI slot.
Windows® 98SE/ME/20 00/XP operating system.
Mini mum 5M bytes free disk space for installing the driver
and utilities.
CD-ROM drive , double speed or higher.
1.5 Package co ntent
Unpack the pa ckage and check all the items carefully. If
any item contained is damaged or missing, p lease contact your local dealer as soon as possible. Also, keep
the box and packing materia ls in case you need to ship
the unit in the future. The package should contain the
followin g items:
Wireless 1 1b PCI Card
External Antenna
Quick Guide
CD title inclu ding drivers and utilities
6
Page 13
Wireless 11b PCI Card User’s Guide
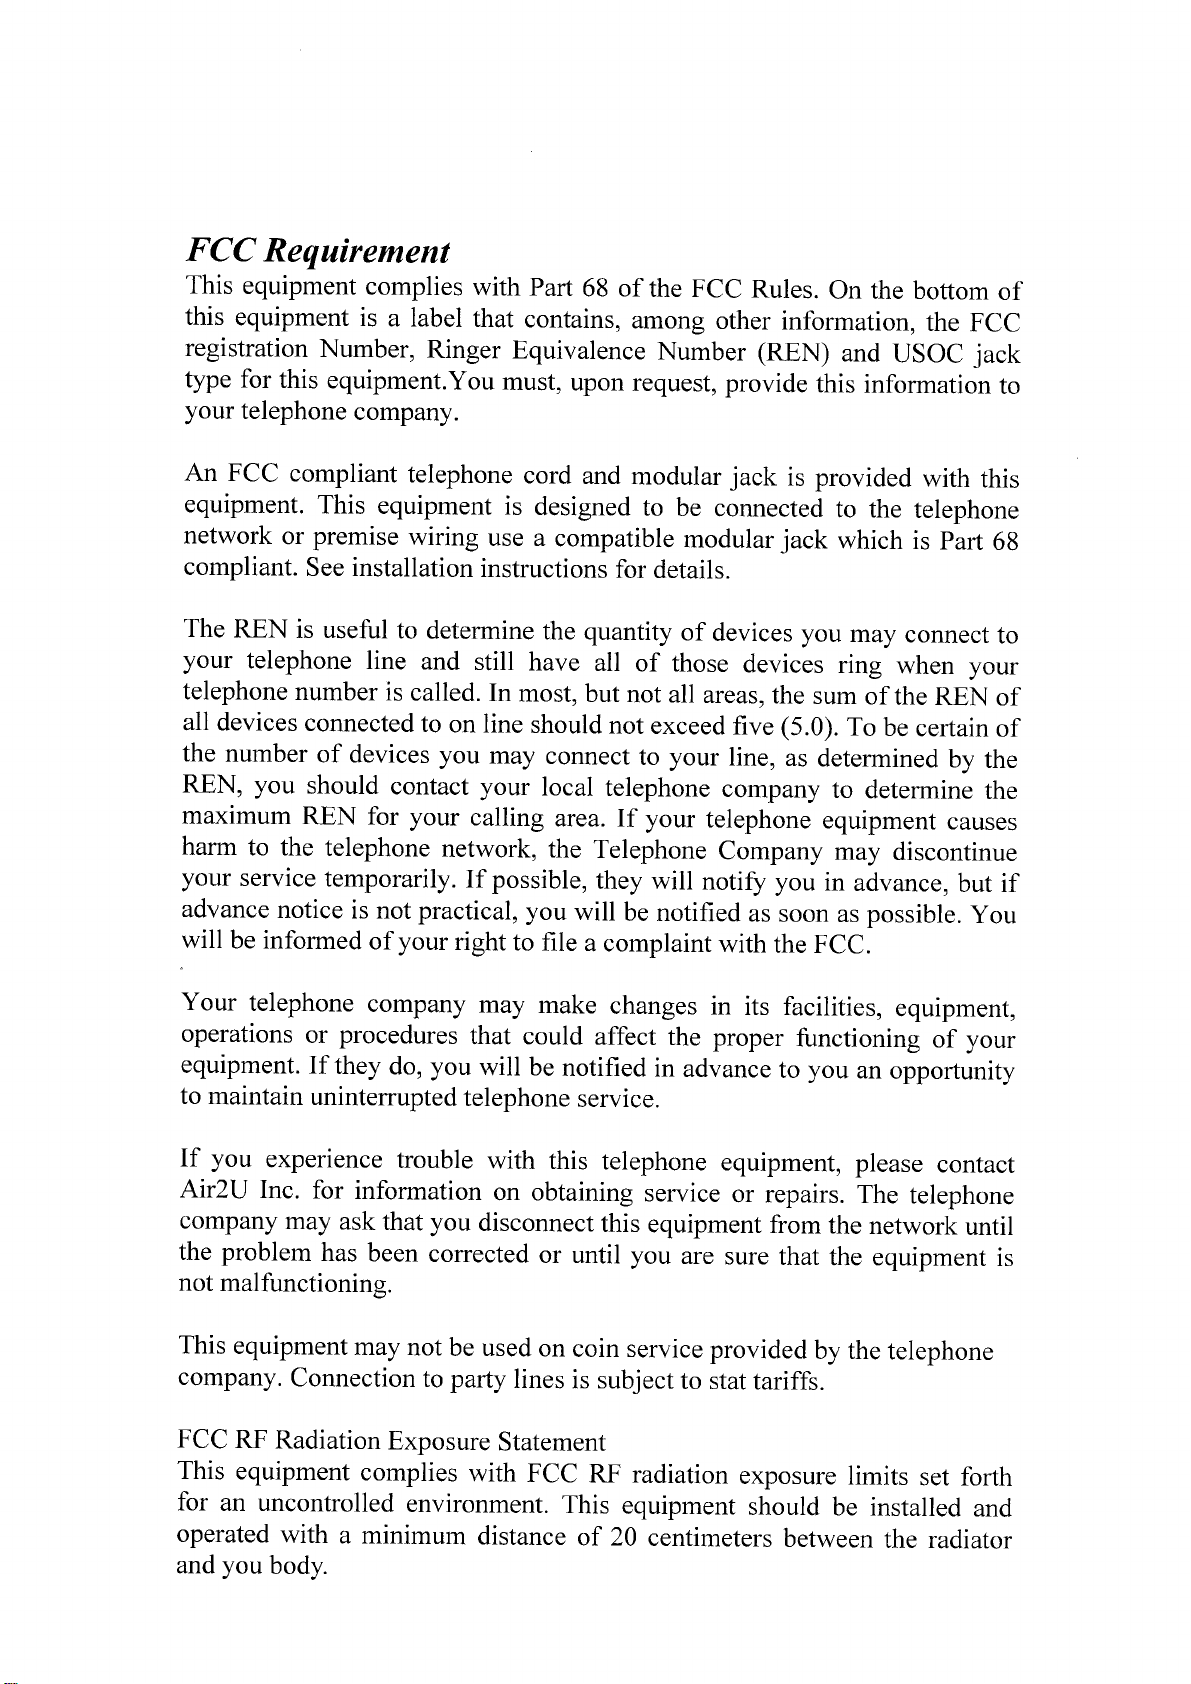
1.6 Layout
Anten na connector --- Provided for external
antenna connection.
ANT
LNK/ACT
PWR
Power LED --- Solid blue, indicates that the
Wireless 11b PC I Card is powered on.
Gold en Finger
Link/Act LED --- Blinking blue, indicates that
the Wireless 11b PCI Card is receiving or
transferri ng data.
ON --- Wi reless 11b PCI Card is ready.
Flash --- Searching for Access Point.
7
Page 14
Wireless 11b PCI Card User’s Guide
2. hardware installation
The i nstallation drawing below is suitable for most desktop comp uters. For more information about the PCI slot,
please re fer to your computer manual.
1. Remove the comp uter cover.
2. L ocate the PCI slot on your mainboard.
Put the Wireless 11b PCI Card directly
over th e PCI slot and press one end of
the card into the slot first. Sligh tly but
firml y press the other end until it is fully
seated in the slot. Secure the Wireless 11b PCI Card with a bracket
screw.
4.Connect the external antenna to the
connector on the bracket.
Do not hold the Wire less 11b PCI Card on the golden
finger be cause it may cause interference or damage.
8
3. Repl ace the computer cover.
ANT
PWR
LNK/ACT
Page 15
Wireless 11b PCI Card User’s Guide
3. software installation
This part provides the procedures to install drivers and
the utilities. Each installation procedure comes with a
drawing and instruction. Follow the instruction step by
step to fi nish the installation. During the installation, Windows® 98SE/ME/2000/XP may need to copy Windows
system files from the Windows® 98SE/ME/2000/XP installation disk/CD. Therefo re, please prepare a copy of
the Wi ndows® 9 8SE/ME/2000/XP installation disk/CD at
hand befo re installing the driver if possible.
3.1 Installing on Windows® 98SE/ME/
2000/XP
The card should be inserted into your computer while
installing the driver.
Installation Procedure:
1. Inse rt the driver CD into your CD-ROM drive, and then
the setup program should start automatically. If it doesn’t
start, click t he Start button at the Taskbar and then
select Run. En ter E:\setup.exe if E is your CD-drive.
Then click the driver option to continu e.
Click here to
start software
installation
9
Page 16
Click here
Wireless 11b PCI Card User’s Guide
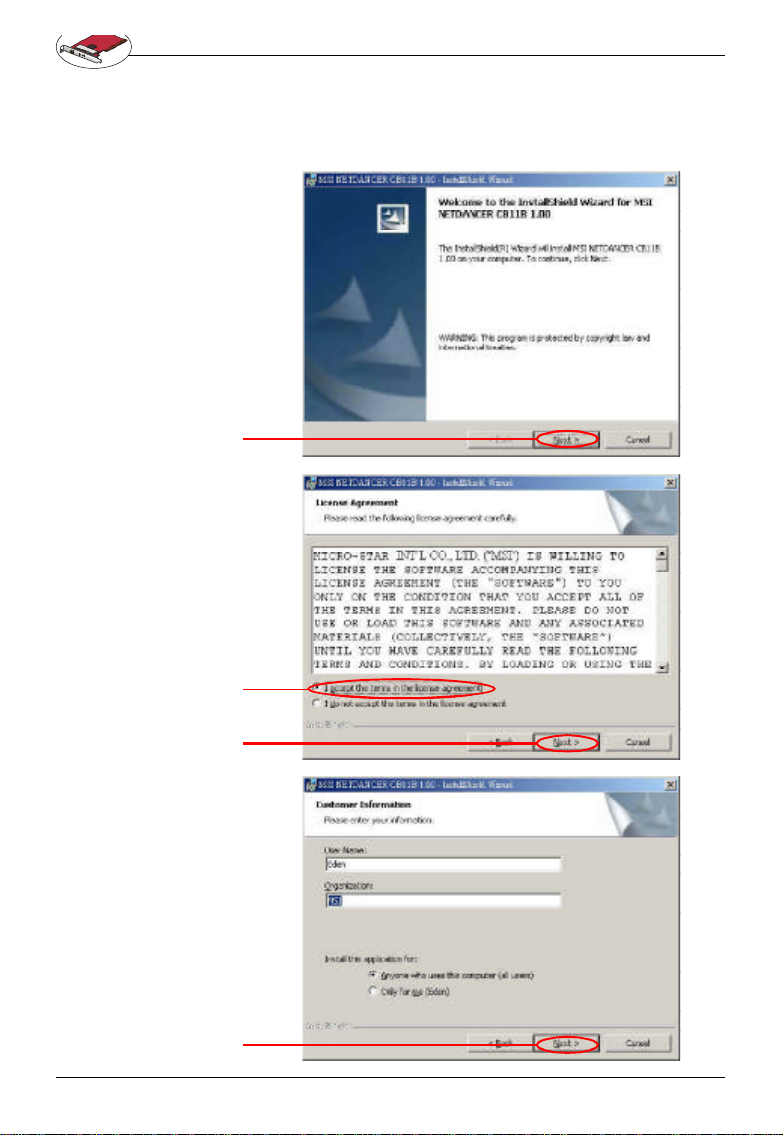
2. Cl ick Next to read the License Agreement. Check the
radio box to agree and click Next to continue, or No to
end the installation. Enter user’s information and then
click Next.
10
Check here
Click here
Click here
Page 17
Wireless 11b PCI Card User’s Guide
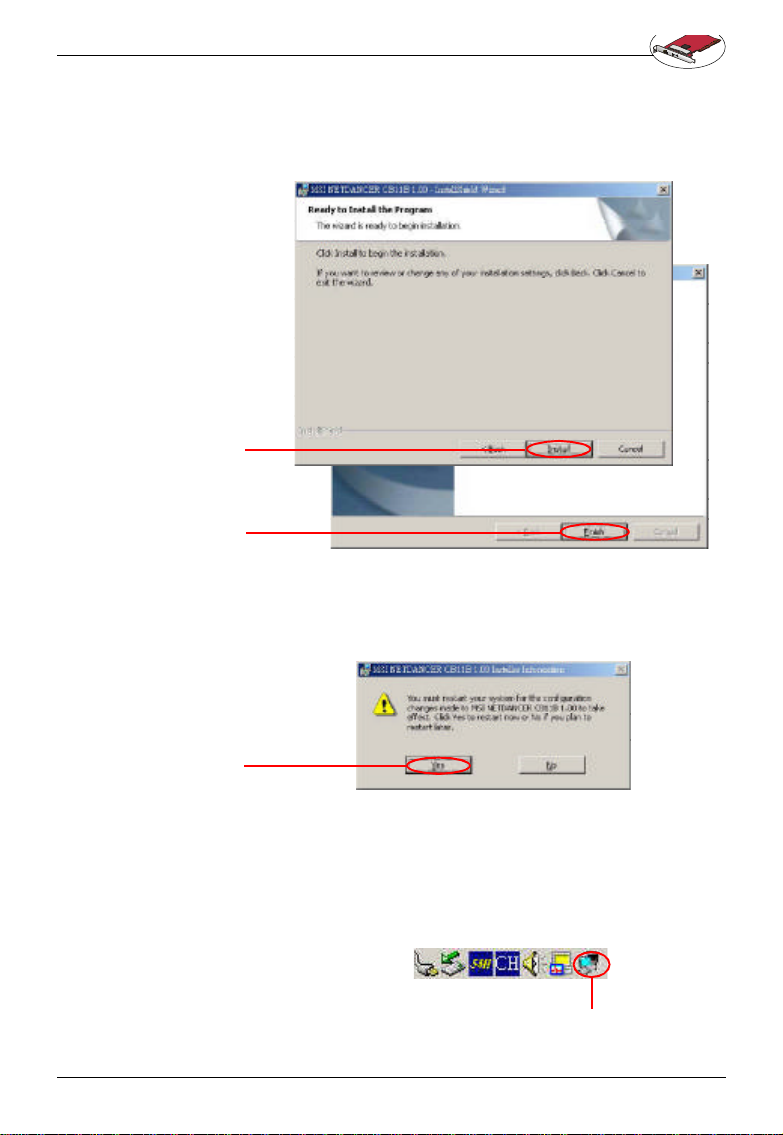
3. Click Install to start installation, then click Finish to
continue as you are notified the installation has been
complete d.
Click here
Click here
4. I nstallShield Wizard may ask you to restart your
computer. Cho ose Yes to restart your computer.
Click here
5. After restartin g your PC, you will find an icon indicated
MSI Wir eless LAN on your taskbar. Just double-click
on it for configu ration.
MSI Wireless LAN icon
11
Page 18

Note
Wireless 11b PCI Card User’s Guide
12
Page 19

Wireless 11b PCI Card User’s Guide
4 . msi wireless network utility
4.1 In wireless net work tab
If you are go ing to use the wireless network in Infrastructure mode, ple ase follow the steps:
1. Double click the MSI Wireless LAN ico n on the task
bar to launch th e network configuration window.
Double click the
MSI Wireless LAN
icon
2. The window appears. Click Advanced.
Enter network key
if the wireless administrator has set
a network k ey in
adv ance
Click here
13
Page 20

All available
networks list
Click here
Wireless 11b PCI Card User’s Guide
3. All available networks will show in the Available Net-
works list, and you can click Refresh button to refresh
or sea rch for the available networks. Click Configure
to configure the exi sting networks.
4. As an admini strator, you can change the network name
(SSID) and network key whi ch is encoded by 5/13 characters (10/26 hex-adecimal digital).
14
Network name
(SSID)
Network key
settings
Page 21

Wireless 11b PCI Card User’s Guide
5. You ma y also choose the networks you prefer from the
Available Networks list and use the Move up/Move
down to set the priority of your preferred networks.
Preferred network list
6. Click OK, and you can use the wireless network in
Infrastru cture mode.
15
Page 22

Double click the
MSI Wireless LAN
icon
Wireless 11b PCI Card User’s Guide
If you are going to use the wireless network in Ad-hoc
mode, p lease follow the steps:
1. Double click the MSI Wireless LAN ico n on the task
bar to launch th e network configuration window.
2. The window appears. Click Advanced.
16
Click here
Page 23

Wireless 11b PCI Card User’s Guide
3. Click Add to add a new network.
Add a new network
4. As an admini strator, you can change the network name
(SSID) and network key whi ch is encoded by 5/13 characters (10/26 hex-adecimal digital).
Enter a network
name(SSID) for this
ad-hoc network
Check Encryption
and cancel This key
is provided for me
automatically to
ena ble w eb k ey
settings. Also refer
to 4.2 Encryption.
Check here to enable
Ad-hoc network
17
Page 24

Wireless 11b PCI Card User’s Guide
5. Click OK to finish the Ad-hoc network for the first com-
puter (administrator).
6. Any one who wants to use the Ad-hoc network should
repeat step 1 to 3. In step 3, you will see the network
set by the first computer (administrator); then choose
it and click OK. You can use the wireless network in
Ad-hoc mode.
4.2 Encryption
In this wi ndow, you can set up 4 sets of WEB keys which
can be 5 chara cters (10 hex-adecimal digital) or 13 characters (26 hex-a decimal digital) and specify one of them
to use.
18
†Netwo rk key --- Enter a key for the network.
†Key format --- You can decide the network key to be
encoded by ASCII characters or hexadecimal dig itals.
†Key leng th --- In ASCII characters format, it can be 5 or
13 characters. In hexadecimal dig itals format, it would
be 10 or 26 digitals.
†Key inde x --- There can be up to 4 sets of WEB keys,
from 0 to 3.
Page 25

Wireless 11b PCI Card User’s Guide
4.3 In st atus tab
In Status tab, you can further configure the network
settings.
Click here
Channel:
Spe cify the operating radio frequency channel in “Ad-hoc”
mode, which should be set to the same channel as the
other points i n the wireless network.
Speed:
This field sets the current transmitting rate. There are
four fixed rates: 1 Mbps, 2 Mbps, 5.5 Mbps, and 11
Mbps. The sp eed should be set to Auto rate to optimize
perfo rmance and range, which will adjust the transfer speed
for best performance and longest ran ge automatically.
Radio:
Set to On to activa te the radio.
19
Page 26

Wireless 11b PCI Card User’s Guide
SSID:
Means Service Set Identifier, an unique name shared
among all points in a wireless network. It must be identical for all points in the network. Then the card will be
able to connect to an access point with the same SSID.
Status:
It sho ws status information about the radio link.
†Signal Strengh --- This bar shows the received signal
streng th level. The higher the blue bar is, the more power
the ra dio signal is received by the the card.
†Link Quality --- This bar shows the measured signal
level and connection status. The higher the blue bar is,
the be tter the radio signal is received by the card.
Click Advance, you can get some info rmation about the
LAN tra ffic status and more detailed settings.
20
Page 27

Wireless 11b PCI Card User’s Guide
Changin g the settings here is not recommended
unless you are familiar with those advanced
configurations.
Fragmenta tion Threshold:
Yo u may set the length of the fragment in this field. Please
note that each fragment should not be larger than the
Frag mentation Threshold.
RTS/C TS Threshold:
You may set th e length threshold.
Preamble Type:
You may set the length of preamble in this field. Setting
optio ns: Long, Short, Auto.
†Long --- It is set to 1 44 bits.
†Short --- It is set to 72 bits.
†Auto ---The card supp orts an auto-detection feature, it
automatically selects the Preamble T ype depending
on the Access Point Preamble Type if this option is
selected.
Country:
Select the co untry that you are in.
Power save:
The card will turn into power save mode when idle.
21
Page 28

Wireless 11b PCI Card User’s Guide
4.4 In in formation tab
In Information tab, you can get some information abo ut
the manufa cturer, hardware and software.
22
Page 29

Wireless 11b PCI Card User’s Guide
4.5 Using Windo ws® XP as Access Point
Window s® XP provides a feature in the Control Panel to
help to link two networks.
1. In the Control Panel, select Network Connections
and the windo w below will appear.
2. Select Wireless Network Connection and Loca l Area
Connection si multaneously, and right click to select
Bridge Connec tions.
23
Page 30

Wireless 11b PCI Card User’s Guide
3.Then go to Start -> Run. Enter cmd in the Open box,
then click OK . A DOS prompt window appears.
4.Then type net bridge show adapter.
5.Then type netsh bridge set adapter X
force compatmode=enable, where X is your ethernet
identifier.
6.Then type netsh bridge set adapter Y
forcec ompatmode=enable, where Y is your wireless
identifier.
24
Page 31

Wireless 11b PCI Card User’s Guide
7. Right click the MSI Wi reless LAN icon in the right
bottom of syste m bar, choose View Available Wire-
less Network ---> Advanced. You will get Wireless
Network Connec tion Properties window. Click Add
to add a new wireless network connection.
Click here
25
Page 32

Enter SSID
Wireless 11b PCI Card User’s Guide
8. Enter a name f or this new network in the Network
name (SSID):, a nd put a check mark next to This is a
computer-to-compute r (Ad-hoc) network; wireless
access point are not used. In this case, this compu-
ter will function as an access point, while other computers can use this network name (which is “aaa” in
the picture below) to connect to. Once they connect
successfully, they could a ccess the ethernet LAN via
Network N eighborhood.
26
Check here
Plea se also refer to Windows® XP help files for more
inform ation.
Page 33

Wireless 11b PCI Card User’s Guide
5. networ k connection
This pa rt describes how to prepare for connection to network and some basic outline of networking basics, including sharing files, printing from an computer on the
netwo rk, or accessing the Internet on multiple computers
with one connection.
The followi ng in Control Panel -> Network -> Configu-
ration is required for all computers if you want to connect to a netwo rk:
†Check Client for Microsoft Network is installe d.
†Check TCP/IP -> MSI NetDancer Wireless Network
Adapter is installed.
†Check File and printer sharing for Microsoft
Networ ks.
Preferred network list
27
Page 34

Wireless 11b PCI Card User’s Guide
5.1 Computer Identificat ion
Please veri fy that each computer has a unique name and
common workgroup name, if you had previously given your
Windows 98 SE/ME/2000/XP computers names.
1. On your Desktop, right-click the icon My Network
Places select Properties from the context menu.
2. Click the Identification tab in th e dialog box.
3. In the Computer name bo x, type a unique, identifying
name for this particular computer. This will be the name
of this computer used by other compute rs on your network to communicate with. Each computer’s name
must be unique on a particular network to avoid
conf usion. Please note that the computer’s name
should not be more tha n 15 characters without space.
Enter a name for your
computer
Your computer will belong to this workgroup
Enter some information for reference
28
Page 35

Wireless 11b PCI Card User’s Guide
4.Type the workgroup name which this computer will be-
long to in the Workgroup box. All the computers on
your network should have an identical Workgroup
name.
5.The Computer D escription box is optional. You may
enter a d escription that helps to identify this computer
on yo ur network. Then click Close.
6.Repeat t his process for each computer on your net-
work to ensure that they all have unique “Computer
Name” and identica l “Workgroup”.
5.2 How to install TCP/IP
By defa ult, Windows® 98SE/ME/200 0/XP will install TCP/
IP a utomatically.
1. Go to Start -> Settings -> Control Panel.
2. Doubl e-click Network icon.
29
Page 36

Click here
Wireless 11b PCI Card User’s Guide
3. If you do see the TCP/IP network as the following
screen , plese select MSI NetDancer Wireless Network
Adapter and click Add.
4. Select Protocal, and click Add.
30
Click here
Page 37

Wireless 11b PCI Card User’s Guide
5. Select Mic rosort, then scroll down to select TCP/IP.
Click Have Disk to instal l TCP/IP from a spicified drive
(for Windows® 98SE/ME) or click OK (for Windows
20 00/XP).
Please prep are a copy of the Windows® 98SE/ME/
2000/ XP installation disk/CD at hand if needed.
Click here
Click here
Now TC P/IP installation is finished.
5.3 Configuring a d ynamic IP address
®
When the drivers are instal led, the default setting here is
set to obtain IP dynamically through a DHCP server. If
you’d like check or change the settings, please follow
the step s below:
1. Go to Start -> Settings -> Control Panel.
31
Page 38

Wireless 11b PCI Card User’s Guide
2. Doubl e-click Network icon.
3. Select TCP/IP and the n click Properties.
32
Click here
Page 39

Wireless 11b PCI Card User’s Guide
4. When the TCP/IP Properties window appears, choose
IP Address tab and check Obtain an IP Address
Automatically.
Check here
5. When the Network properties window comes back
up, click OK. Then click Ye s to reboot the computer.
5.4 Config uring a static IP address
1. Go to Start -> Settings -> Control Panel.
33
Page 40

Wireless 11b PCI Card User’s Guide
2. Doubl e-click Network icon.
3. Select TCP/IP and the n click Properties.
34
Click here
Page 41

Wireless 11b PCI Card User’s Guide
4. When the TCP/IP Properties window appears, choose
IP Addre ss tab and select Specify an IP Address.
Check here
Enter static
IP address
5. Enter an IP add ress into the empty field. Suggested IP
Range is 172.16 .0.2 to 172.16.0.254, and suggested
Subnet Mask is 255.255.255.0 Then click OK. Wh en
the Network Prope rties window comes back up, click
OK. Th en click Yes to reboot the computer.
IP Addresses must be signed uniquely to each
netwo rk adapter.
35
Page 42

Enter command
here
Wireless 11b PCI Card User’s Guide
5.5 Checking TCP/IP address
For Windows® 9 8SE/ME:
1. Go to Start -> Run.
2. Enter command in the Open box. Click OK.
3. A DOS pro mpt window appears.
4. Ente r winipcfg and press Enter.
5. The IP Configuration screen will be displayed, and
the IP address will be displayed in the IP Address box.
Please make sure the configuration of IP Address,
Subnet Mask an d Default Gateway is correct.
36
Click here
Page 43

Wireless 11b PCI Card User’s Guide
6. Cli ck on More Info to display additional IP information.
For Windows® 2000/XP:
1. Go to Start -> Run.
2. Enter cm d in the Open box. Click OK.
3. A DOS pro mpt window appears.
4. Ente r ipconfig /all to display IP information.
37
Page 44

Wireless 11b PCI Card User’s Guide
5.6 Checking the conn ection by pinging
This ope ration is for Infrastructure Network only.
1. Go to Start -> Run.
2. Enter command in the Open box. Click OK.
3. A DOS pro mpt window appears.
4. Type ping www.msi.com.tw (or a ny URL address),
which is the the IP address of the Gateway in this case
, and press Enter ke y.
Then you’ll get repli es if the pinging is successful.
38
Page 45

Wireless 11b PCI Card User’s Guide
5.7 Sharing files
You may now open and save files on other comput ers
once your comput ers are connected together on a
netwo rk. You will also be able to specify particular folders
or disk drives to “share” and even password to protect
the m. Please verify that each computer has a unique name
and common workgroup name, if you had previously given
your Windows® 98SE/ME/2000/XP comput ers names.
Follw the steps below to share specific files and folders
with other computers on your network.
1. On your De sktop, right-click the My Network Places
icon and sel ect Properties from the context menu.
2. You will configure your computers network settings in
this d ialog mostly. It is also available through the Net-
work icon in the Control Panel.
3. Click File and Print Sharing.
Click here
39
Page 46

Check here
Wireless 11b PCI Card User’s Guide
4. Che ck the box next to I want to be able to give others acccess to my files.
5. Then click OK on the File and Pr int Sharing dialog
box.
6. Click OK on the Network dialo g box.
7. Provide the Windows® 98SE/2000/ME/XP C D or direct
Windows to the proper location of th e installation files
if prompted. Th en reboot if prompted.
8. Now you can identify a particular folder or disk drive to
share, which means you can share a folder that both
you and your family member/colleaque needs to access occassiona lly. You can also share your CD-ROM
drive for othe rs to use if your other computers do not
have CD-ROM. Both of these processes are the same.
Only the disk drives and folders that you specifically
identify as shared wi ll be accessible to other computers on your network.
9. Locate the disk drive or folder you want to share in
Windows Expl orer or the My Computer icon on your
desktop.
10. R ight-click the disk drive or folder and select Sharing.
40
Page 47

Wireless 11b PCI Card User’s Guide
1 1. Select Share As: to set the parameters for sharing
this particula r disk drive or folder.
12. The Share Name: box is used to identify the disk
drive or folder you are sharing to other computers on
the ne twork, which can be helpful as more resources
on your netwo rk for others.
13. The Comment: box is optional, which can be used to
further describe the disk drive or folde r for others on
the network.
14. Access Type: allows you to designate how much
someone else can do with this disk drive or folder.
Read-Only onl y allows others to look at or open the
files on the disk drive or in the folder. Full allows
others to read, write, open, save, copy, move, and
even delete files on the disk or in the folder. Depends
on Pa ssword gives other computers access conditional on the password they provid e.
41
Page 48

Wireless 11b PCI Card User’s Guide
15. Pa sswords: allow you to apply a level of security to
your shared disk drives and folders. Any other computer (user) wi ll be asked to enter the password you
designate here before accessing the disk drive or
folder. Two passwords are used to give two levels of
security (or access) to others o n the network using
the Depends on Password setting. Leaving the Pass-
word b oxes empty will give everyone on the network
access to the disk drive or folde r.
16. Click OK to co ntinue. You will be prompted to enter
the password(s) you provided for verification. Type
the pa ssword(s) just as you entered them again.
17. Now you may access this disk drive or folder from
another computer o n your network. You may do so
by double-clicking the My Networ k Places icon on
your d esktop or inside Windows Explorer.
18. N avigate to the computer with the shared disk drive or
folder (recognized by the Computer Name you
provide d) and double-click. Now you should see the
disk dri ve or folder, and double-click. If you specified
a password when sharing this disk drive or folder,
you wi ll be asked for the password.
19. You can access a disk drive or folde r shared over the
network from most W indows® 98/ME/2000/XP
app lications. You can map these disk drives and folers
to a drive letter on another computer to make this
process easier. For exampl e, on a computer where
you are accessing a shared folder from another
computer, inside Windows Explorer right-click and
select Map Network Drive. Now you are able to
assign an available drive letter. Checking Recon-
nect at logon allows Windows to map this network
drive each time when you start your compute r.
42
Page 49

Wireless 11b PCI Card User’s Guide
6. troubleshooting
This part descri bes the problems and corresponding solutions of driver in stallation.
To che ck if the wireless network adapter drivers are loaded
prop erly:
1. Go to Start -> Settings -> Control Panel.
2. Dou ble-click System icon.
43
Page 50

Wireless 11b PCI Card User’s Guide
3. Click the De vice Manager Tab.
4. Click the “+” symbol in front of Network Adapters.
5. H ighlight MSI NetDancer Wireless Network Adapter.
6. Click Propertie s.
7. C heck under Device Status to see if the card is work-
ing prop erly.
44
Page 51

Wireless 11b PCI Card User’s Guide
7. technical support
Micro-Star Intern ational provides free technical support. If
a problem arises with your system and no solution can
be obtaine d from this user’s manual, please contact your
place of purchase or local d istributor. Alternatively, please
try the follow ing help resources for further guidance.
Visit the MSI websi te for FAQ, technical guide, driver
and softwa re updates, and other information: http://
www.msi.com.tw/
Conta ct our technical staff at: support@msi.com.tw
45
Page 52

A
Availa ble Networks 14
B
Bridge Connections 23
C
command 36
Computer Identi fication 28
Country 21
D
Device Manag er 44
Device Status 44
DOS 24
dynamic IP address 31
Wireless 11b PCI Card User’s Guide
Index
F
File a nd Print Sharing 39
File and printer sharin g 27
Fragmentati on Threshold 21
G
Gateway 36
golden finger 8
H
hex-adecimal digital 14
46
Page 53

Wireless 11b PCI Card User’s Guide
I
information 22
InstallShiel d Wizard 11
interference 8
Interne t 2
K
Key format 18
Key index 18
Key length 18
L
LAN 20
Link LED 7
Link Quality 20
Local Area Connection 23
M
MSI Wirele ss LAN 11
N
network key 13
P
PC1 1B 1
PCI 1
Power LED 7
Power save 21
Preamble Type 21
Preferred network list 15
priority 15
47
Page 54

R
Radio 19
RTS/CTS Thresho ld 21
S
Service Set Identi fier 20
Signal Strengh 20
Speed 19
SSID 14
static IP address 33
Status 19
Subnet Mask 36
support 45
T
TCP/IP 2 7
W
Wireless 11b PCI Card User’s Guide
winipcfg 36
Wireless Network Co nnection 23
Wireless Network Conn ection Properties 25
48
 Loading...