

Page 1

MS-5654
User guide
1
Page 2

IMPORTANT
Satellite signals are required for this product to function in Navigation
Mode. There may be occasions within your home or surrounding area when
the signal strength is limited and Navigation Mode may not be possible.
This is quite normal for products of this type. If you experience difficulty in
receiving a signal in your car you may n eed to use an external antenna
(optional).
Safety
The Global Positioning Sy stem
The Global Positioning System (GPS) is a satellite based system that provides
location and tim ing information around the globe. GPS is operated and controlled
under the sole responsibility of the Government of the United States of America,
who are responsible for its availability and accuracy. Any changes in GPS
availability and accuracy, or in environmental conditions, may impact the
operation of your Personal Navigation Device (PND).
Using Your PND in the Car
When using your PND while driving it i s essential that you drive with due care
and attention. Never modify the settings or program your PND while dri ving. Only
look at the PND map when it is safe to do so. Only follow the PND instructions
when the road regulati ons allow you to do so. W hen mounting the PND in your
car make sure that it does not obscure your view or impede the operation of any
driving controls.
Prohibited Areas
Do not operate your PND in hospitals or near any electrical medical
equipment.
Do not operate your PND in aircraft.
Do not operate your PND in a petrol station forecourt.
Battery
Your PND uses a Li-ion battery. Do not use it in humid, wet or corrosive
environments. Do not o perate or store your PND in high temperatures (>60℃) or
in direct sun light. Do not pierce or break the battery casing.
area thoroughl y and seek medical attention.
The Li-ion batter y contained in this unit must be recycled or disposed of properly.
Do not dispose of in household waste or burn.
Failure to follow these cautions will invalidate the warranty and ma y
cause the battery to leak acid, become hot, explode or ignite and
cause injury or damage.
If you come into contact with leaked battery acid wash the contact
2
Page 3

CONTENTS
IMPORTANT.............................................................................................2
Safety........................................................................................................2
The Global Positioning System .......................................................................2
Using Your PND in the Car ..............................................................................2
Prohibited Areas ...............................................................................................2
Battery..............................................................................................................2
CONTENTS..............................................................................................3
Getting Started .........................................................................................4
Position of the controls ....................................................................................4
Car Adapter ......................................................................................................6
External Antenna (sold separatel y)..................................................................6
Switching On/ Off .............................................................................................6
Sleep Mode......................................................................................................7
Connect to PC..................................................................................................9
GPS ........................................................................................................10
Safety Instructions .........................................................................................10
Handsfree ...............................................................................................11
Paired List ......................................................................................................11
Dial .................................................................................................................13
Last Calls .......................................................................................................14
Auto Answer...................................................................................................15
Travel Kit ................................................................................................16
Music..............................................................................................................16
Video ..............................................................................................................18
Photo..............................................................................................................21
UnitConverter .................................................................................................24
Currency Converter........................................................................................25
Settings...................................................................................................26
Display ...........................................................................................................27
Language .......................................................................................................29
Restore...........................................................................................................30
System Info ....................................................................................................31
Firmware Upgrade (advanced feature)..........................................................32
FM Adjust .......................................................................................................33
Technical Specifications .........................................................................35
3
Page 4

Getting Started
This device combines GPS functionality with a photo viewer and Bluetooth
Hands-free. Before you begin to install and use this product, please read t his
manual carefully for fully exploiting the functions of this product. If you experience
any problems, go through the user guide before contacting the customer helpline.
Position of the controls
1. Power Button
2. SD Card Slot
3. Touch Panel
4. Menu Button
5. Indicator Light*
6. TMC Antenna Jack
7. USB Port
8. Strap Hole
9. Battery Switch
10. Headphone Jack
11. External GPS Antenna
Port
12. Speaker
13. Stylus Pen/ Slot (Slide
the stylus pen out of
the slot when needed.)
*: When charging the light will be red; when fully charged the light will become green.
** When not using the unit for a long period of time, you are advised to turn the unit off by this
switch. Use the stylus to operate the switch.
4
Page 5

Battery Information
The device is integrated with a 1000mAH/ 3.7V Li-pol ymer battery. It allows the
unit to be used for approximately 2 hours, without being connected to a pow er
source.
The battery icon which is shown at different point on the display depending on
which screen is currently being displayed. The icon indicates the current battery
status.
You can also go to the Main Menu / Settings / Power Status to view the actual
percentage of the remaining battery capacity.
The display shows the “Low Battery!” message automatically. When the battery
capacity drops below 15%, this message will be shown for 2 seconds. Howe ver,
when battery capacity drops below 5%, this message will stay on the screen until
the user connects the unit via the car charger or the battery capacity becomes
too low to power the unit.
: means the battery capacity is full.
: means the battery capacity is 80%.
: means the battery capacity is 60%.
: means the battery capacity is 40%.
: means the battery capacity is 20%.
Charging the Batter y
Before using your PND f or the first time, we recommend you to charge the unit
for 5 hours via the USB cable or 2 hours via the car charger in order to charge
the battery.
Plug the USB cable or the car charger into the USB socket .
When you use the PND in your car, we recommend that you always use the ca r
charger in order to maintain the batter y level.
*Disclaimer: some laptops could have insufficient power through the USB port to
charge the unit; this could lead to damage to your laptop U SB port. MS-5654 will
not be held in any way responsible for the damages caused to any laptop by
charging the device through the laptop U SB port
*It is recommended that when charging via the USB cable that the power switch
is set to the Off position.
When the device is connected to the car charger/USB cable the battery icon will
change to
When the battery is fully charged, and the car charger/USB cable is still
connected. The icon will change to
the unit will turn green.
, and LED indicator light on the front of the unit will be lit red.
, and the LED indicator light on the front of
5
Page 6

Car Adapter
r
When using your PND in the car we recommend that you always use the in-car
charger to power the unit, especially on long journeys.
Plug the in-car charger into the USB socket on the unit. Plug the other end of the
adapter into the car’s cigarette-lighter / 12V DC socket.
External Antenna (sold separately)
If the GPS receiver fails to acquire a valid signal when mounted in your car it may
be due to a heat reflecting coating or heating elements in your windscreen. In
these cases use an external antenna.
The antenna has a magnet and can be positioned in various locations in or
outside your car to obtain the best signal reception. Push the antenna into the
socket on the rear of the unit until it clicks into place. Then position the antenna
so that you recei ve a valid signal.
Position t he antenna on t he roof of your ca
Plugs into t he back of the P ND
*External Antenna Optional
Switching On/ Off
Use the stylus pen to switch the unit on by the power switch on the bottom of the
unit. You will see the booting screen for a short while, then the screen will change
to show the below m essage to warn you about driving safety. Tap on the
button to continue.
The screen will then change to the Main Menu screen shown below. This is the
starting point for using all of your MS-5654 features.
6
Page 7

Sleep Mode
You can use Sleep mode to conserve battery power if the unit is not going t o be
used for a short while, for example if you have scheduled a stop at a ser vice
station. NOTE: if the unit is not to be used for a long period of time, the unit
should be switched off by the On/Off switch.
Press the Power Button for 3 seconds to pu t the unit into Sleep Mode.
Press the Power button for 3 seconds to wake up the de vice, the displa y show
the same screen as when the unit was put into sleep mode.
7
Page 8
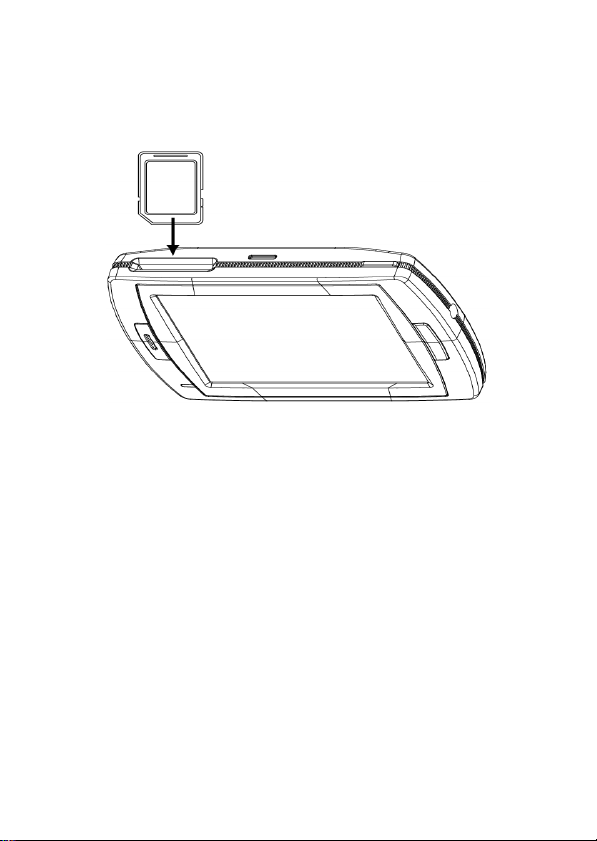
SD Card Installation
If you have a SD or MMC memory Card, you may install it to extend the storage
capacity of the unit, or to view photos saved on the card. When installing it can
only be fitted one way – the wording side facing towards you and the cut-off
corner at the bottom as shown. Insert the card and push it in so that it clicks into
place.
Insert a SD card into the slot, and you will see the below message.
If you need to remove the SD card, push the card in and it will eject from the slot.
You will then see the below message.
Note: the card slot can also be used as a card reader, refer to the following
section to operate the unit as an SD card reader..
8
Page 9

Connect to PC
You can connect the unit to a PC for transferring data. Insert a SD/ MMC card to
the card slot; you can then use the unit as a card reader.
1. Power on the unit.
2. Plug B-type end of the supplied USB cable to the mini USB port on the unit,
then plug the other end into your computer.
3. The system will try to recognize and connect to the device; the unit display will
show the below screen.
4. Once the device has been connected to you will find 2 new USB devices
under ”My Computer”. The second device represents the memory card slot,
and is only available when a SD/ MMC card is inserted. Copy or move the data
needed between your PC and the unit.
9
Page 10

GPS
You have chosen a cutting-edge navigation s ystem. Congratulations! Please
enjoy using it. T his navigation system leads you straight to your destinati on,
whether you are travelling by car or on foot. You can navigate a nd plan your
route with an easy-to-use and intuitive interface, just by using your finger or the
stylus. You can also use this application to plan your trip to suit your personal
preferences and interests and to save interesting destinations before you set off
on your journey. This manual leads you through the main features of the s ystem.
Safety Instructions
y The driver’s attention should always be on the road. If you are the dri ver of the
vehicle, we do not recommend you to operate this unit while driving. Plan your
route before departure and pull over if you need to change route parameters.
y The MS-5654 has a built-in Safety Mode that will prevent you from using the
screen functions if your car is in motion. Unless a passenger will be the only
one to operate the MS-5654, we strongly encourage you to turn on the Safety
Mode.
y It is also important that you look at the display only if it is absolutely safe to do
so.
y You should alwa ys observe traffic signs and road geom etry before obeying
instruction from the MS-5654.
10
Page 11

Handsfree
This device can be linked to a mobile phone as a Bluetooth Hands-free device.
After being linked to a mobile phone, you can use the MS-5654 to call and
answer the phone without holding your mobile phone. T ap on the Hands-free
icon on the Main Menu to enter.
To operate the Hands-free function, tap on Bluetooth option to switch it on. You
will see a message as below. Rem ember the passkey for later usage.
Then you can see the menu as below.
Paired List
To use the Hands-free function, you have to pair the device with a mobile phone
first. If the MS-5654 has been paired with any mobile phone , you can see it on
Paired List. If the Paired List option is dark in colour and can not be entered,
that means there is no paired phone.
Follow the procedure below to pair your phone with the device.
1. Switch on the Bluetooth feature on your mobile phone and on your MS-5654. A
pop-up message will prompt to tell the passkey, 0000.
11
Page 12

2. Place the MS-5654 and your phone nearby, and press relative keys on your
phone to make it search for new devices.
3. When the searching is complete, you should see a new device named
“MS-5654” on the list.
4. Select it from the list, and then your phone will ask you to enter a passkey.
Enter 0000 as the pop-up message prompts. Then the MS-5654 is now on th e
paired list of your phone.
5. Select the MS-5654 and press the required buttons to connect it. Now you can
see your phone on the p aired list of the MS-5654.
6. Or you can also connect your phone and the MS-5654 via the MS-565 4 when
you want to operate the Bluetooth feature. Tap on the pho ne name in the
paired list of the MS-5654 first and then tap on
You will see the “Connecting” message on the display.
7. Your phone will ask if you want to accept the connection request from the
MS-5654. Press Yes to continue. You will see the “Connection Completed!”
message on the display.
8. If you want to disconnect the Blueto oth connection, press the relati ve buttons
on your phone to disconnect it from the MS-5654.
9. If you connected several phones to t he MS-5654, the Paired List will list them
all. If need be, tap on a phone name an d tap on
the device list. A confirm window will prompt, tap on
tap on
to cancel and exit.
12
button to start connecting.
button to delete it from
button to delete, or
Page 13

Dial
Once a phone is paired and connected to th e MS-5654, the Hands-free features
of the MS-5654 are now enabled. You can dial from and answer your phone via
the MS-5654.
Tap on Dial to begin entering a number to dial out, you will see the number pad
as below.
Tap to enter the phone number you want to call, and then tap on the
button. If a number is dialled wrong, tap on
While dialling, the display will change to the below.
Wait until the call is answered, then the MS-5654 becomes a Hands-free device.
You do not have to hold the phone, nor the MS-5654 to m ake the phone call. This
once to erase a digit at a tim e.
13
Page 14

is useful when you are driving a vehicle.
y Tap on
y Tap on
y Tap on
y Tap on
When a phone call is received while the MS-5654 and your phone are connected,
you will see the below screen appear. The name or number of the caller will be
shown on the first line of the display.
y Tap on
y Tap on
y Tap on
y Tap on
y Tap on
Note: if Auto Answer is set to On, the call will be answered autom atically after 3
seconds automati cally.
Last Calls
The device records also the dialled calls, answered calls, and missed calls. You
can look them up and make a phone call to any of them when needed.
button to hang up the call.
/ button to adjust the volume.
button to mute the volume.
button to mute your voice.
button to answer the call.
button to hang up the call.
/ button to adjust the volume.
button to mute the ring volume.
button to mute your voice.
Dialled Num ber
If you have made a call via the MS-5654, you will see the number in the list.
14
Page 15

y Tap on a number and then tap on
button to call that number again.
y Tap on
prompt you to confirm.
Answered Calls
If you have answered a call via the MS-5654, you will see that number on the list.
y Tap on a number and then tap on
y Tap on
prompt you to confirm.
Missed Calls
If there are any incoming calls that you did not answer, you will see the numbers
on the list.
y Tap on a number and then tap on
y Tap on
prompt you to confirm.
If there are no numbers recorded in a list, you will see the “No record!” message
on the display.
Auto Answer
The MS-5654 supports answering incoming calls autom atically, tap on Auto
Answer to set it to On/Off. If it is set On, any received call will be answered
automatically after 3 seconds. If it is set Off, then you have to tap on the
button to answer the call when it com es.
if you want to delete the number from the list. A message will
button to call the number back.
if you want to delete that number from the list. A message will
button to call the number back.
if you want to delete the number from the list. A message will
15
Page 16

Travel Kit
This device integrates several multimedia programs. You can watch video clips,
view photo, and also listen to music. Enter each function to enjoy your media
files.
Music
This device supports MP3, WMA formats. Enter "Music" function to read music
list.
Note 1: if the music file was saved into the Memory card, enter the Memory card
folder to find it.
Note 2: if the music file was saved into a specific folder, enter the folder to find it.
Note 3: press Menu butto n to go back main menu.
Tap on the screen to select a file from the list to play; you will see the display
shows as below.
y Tap once to pause the playback.
y Tap
once to play the previous track. Or press it longer to rewind the
playback and find the section you need.
16
Page 17

y Tap
y Tap
y Tap on
y Tap on
once to skip and play the ne xt track. Or press it longer to fast-forward
the playback and find the section you need.
once to select the repeat mode.
to set Repeat One.
Tap
Tap
to repeat all.
to play the files once in regular sequence.
Tap
button to mute the volume.
/ button to adjust the volume.
17
Page 18

Video
This device supports MPEG4, WMV formats. Enter Video function to watch video
clips.
Note 1: if the video clip was saved into th e Memory card, enter the Memor y card
folder to find it.
Note 2: if the video clip was saved into a specific folder, enter the folder to find it.
Note 3: press Menu butto n to go back main menu.
Enter Video function, you will see the figure as below, supported video clips will
be listed.
You can set to preview the selected clip. If the icon is activated, the tapped
clip will be played in thumbnail. Press the
tapped again to make the icon become
screen without previewing.
Tap on the icon to enter Settings. You can select if to resize the clip to fit the
screen for watching. And you can set the Zoom Mode to be Letter Box or Pan
Scan. Tap on
to apply and exit the settings.
icon to play it in full screen. If you
, the tapped clip will be played in full
18
Page 19

Tap on the
icon to read the information of the software company.
Tap on the icon to view the detail information of the selected clip.
Once a clip is selected and being pla ying, you can tap on the screen to call the
function buttons.
19
Page 20

y
: Tap on this button to p ause the playback. Tap on to resume to pla y.
& : Tap on these buttons to adjust volume. Tap on to mute.
y
: Tap on this button to set playing mode as Random or Ordinal.
y
y
: Tap on this button to set repeat mode as Repeat Loop, Re peat One, or
Repeat List.
: Tap on this button to g o to the list and find a file to open.
y
20
Page 21

Photo
This device supports jpg, bmp, png, gi f formats (up to 12MegaPixel file). Enter
"Photo" function to see thumbnails for all the photo files.
Note: press Menu button to go back main menu.
If you see an
a photo you want to view, and then you can tap on the left or right triangle to view
the previous or next photo.
To view pictures (bmp and jpeg form ats only) from a SD card:
1) Cop y all the pictures you want to view into th e SD card.
2) Insert th e SD card into the slot. In Photo thumbnails list, tap on "SD Card"
folder to enter.
3) You will see thumbnails of photos on the card, view and operate as you do to
photos on unit.
Tap on the photo, you will see Exit
and lower corner of right side. T ap on
Tap on
the tool bar will disappear, tap the photo again to see and operate the buttons.
icon on the list, it means that photo is unsupported. Tap on
and More buttons on the upper
button to go to previous level menu.
button to open the Tool Bar. After 5 seconds idling, the buttons an d
21
Page 22

Slideshow
Tap on the
After tapping on the
y Tap on
y Tap on
y Tap on
y Tap on
Rotate
Tap on
y Tap on the
again.
y Tap on
button to view the photos show one by one automatically.
button again to stop slideshow.
button to set the slideshow interval among 2, 3, and 5 seconds.
button to mute the touch tones.
button to adjust the touch tones.
button to rotate the current photo.
button to restore the photo a nd zoom in.
button, slideshow tool bar will prompt instead.
button again to rotate the photo by 90 degree clockwise
22
Page 23

Zoom in
Tap on
y Tap on the
y Tap on the
tap and drag it to view the part you need.
y Tap on
Note: when the zoom i n or zoom out limitation is met, the zoom in/ zoom out
button will become in gray color and not selectable.
button to zoom in the photo.
button to zoom in.
button to zoom out. When the photo is zoomed in, you can
button to restore the photo.
23
Page 24

UnitConverter
This device integrates a UnitConverter to ol. You can use it to easily convert the
units of area, distance, speed, temperature, and weight.
Note: press Menu button to go back main menu.
Tap on
on the unit you need to convert.
For example, if you want to convert cm
button to select one option from measurement categories, depends
2
to m2, select Area.
Then tap on the number buttons to enter value To delete last digit, tap on
button. Then tap on
button, you can see the converted value.
The source and target units are both selectable. In this example, tap on cm2 and/
2
or m
button to select another unit to meet your need.
24
Page 25

Currency Converter
This device integrates a Currency Converter tool. You can use it to easily convert
the currency.
Note: press Menu button to go back main menu.
The source and target currencies are both selectable. Tap on either button to
select the needed source and target currencies.
After currencies are selected, you have to set the currency rate. Tap on
button to enter Currenc y Rate setting page.
Tap on the number buttons to set the rate of the source and target currencies. To
delete last digit, tap on
currency rate for further usage. And the device will go back to the previous menu.
Tap on the number buttons to enter the digits of source currency. To delete last
digit, tap on
value.
button. Then tap on button, you can see the converted
button. After entering, tap on button to save the
25
Page 26

Settings
NOTE: You do not need t o enter the Settings menu before you start to navigate.
Tap on the Settings icon on the Main Menu, the following screen is displayed.
To exit this page or a ny subsequent page, tap on the Exit
upper-right corner of the screen or press the menu button.
The
and button means there are more options available. T ap on one of
them to scroll through the list to view the other options.
Note: when there is no option above/ below, the
grey in colour and is no longer selectable.
button at the
/ button will become
Volume
Tap 'Volume' you can modify the volum e level of the T ouch tones and the
hands-free volume. You can increase or decrease the level by clicking
. Click to mute the volume.
You can also check or un-check the T ouch Tones, to enable or disable having
the beep sound when you touch the screen.
Note: when the minimum or maximum volume level is met, the volume down/
volume up button will become grey in colour and is no longer selectabl e.
26
or
Page 27

Displ ay
Tap on the Display option to enter display submenu. T here are 3 tabs to select
and adjust: Brightness, Backlight Timeout, and Screen Calibration.
Brightness: With this item, you can change the brightness of the screen. Adjust it
darker or brighter b y tapping
Note: when the minimum or maximum brightness level is met, the level down/
level up button will become grey in colour and is no longer selectable.
Backlight Timeout: Select an option to set the idling time to shut down the display
to save battery power. If you want it to display continuously, select “Never”.
Screen Calibration: This function calibrates the unit to respond to your screen
taps. You will need to use this function only if the unit begins to respond
inconsistently to your screen taps. T ap on
or butto n.
button to start.
27
Page 28

Follow the on screen directions to tap on the centre of the cross to calibrate.
When the steps are done, you will see the second screen, tap on the screen to
save and apply the new calibration settings.
28
Page 29

Language
Tap to select a language from the list to suit your need.
Power Status
Enter this option to find out the battery power status.
While charging, the status will be in motion, and de-noted “Charging”.
If the battery is fully charged and the unit is still on charge, the display will show
as the figure below.
29
Page 30

Restore
This is to allow you to restore the settings back to default values. W hen
necessary, tap on the “Restore” option.
Tap on
done, the message “Finished!” will be displayed.
Or tap on
button to restore all the settings back to default. After this has been
to cancel and exit.
30
Page 31

System Info
Tap on ‘System Info’ to access information about the unit and any inserted
memory card. There are 2 tabs to select and read: Devices and Storage.
Devices: The Devices page shows information about your software version and
capacity of the embedd ed internal memory.
Storage: The Storage page tells you the total capacity and free capacity of your
storage card (if installed) and the flash disk. If no storag e card is installed, the
information will show as N/A.
31
Page 32

Firmware Upgrade (advanced feature)
You can upgrade the firmware of the unit for better performance or/ and more
functions. Follow the steps below to do so.
Note 1: only advanced users are recommended to operate this feature.
Note 2: before upgrading, please make sure that the battery capacity if filled, or
power the unit w ith the car charger to ensure the upgrading will not be
corrupted by power failure.
Note 3: do not remove the memory card during upgrading!
Note 4: please visit www.binatonecarrera.com
1. Download the firmware file from our website. Uncompress the file and copy it
to a SD/ MMC memor y card. Insert the card into the card slot of the unit.
2. Tap to enter this option; you will see the screen as shown below on the right.
3. To start upgrading, tap on the
and the “Upgrading…” message will be shown. A few seconds later, the
“Finished!” message will be shown after the upgrading is done.
for more information.
button. The unit will restart automatically
4. If the upgrade is failed, you will see the below screen, which shows the
“Failed!” m essage.
32
Page 33

FM Adjust
The device has a FM broadcasting function. Enable this function, you can
broadcast audio signal of the device, G PS voice and Music tracks playing on the
device, then recei ve with the FM radio on your car, and ou tput with the speakers.
Enter this setting, you can see 2 options. Tap to select Speaker option to let the
device output audio b y itself. Or tap on FM Transmitter option to set the device
broadcast the audio signal to a FM frequency.
When FM Transmitter is selected, you will see the figure below. Here you can
adjust the frequency to broadcast.
Adjust a frequency to broadcast by tapping on the two triangles. Four frequencies
are able to be saved for further usage. After a frequenc y is adjusted, tap on the
button. You will see a window asking to select a number to save the
frequency. Tap to select a number, then the frequency is selectable on the l ist.
You can select it from the list when you need to broadcast the audio of the device
next time.
Note: select a frequency with no available stati on, or the audio signal will be
covered.
33
Page 34

34
Page 35

Technical Specifications
Model Name z MS-5654
Display z 480 x 272 WQVGA Resolution
Processor z Centrality A3 372MHz
Software z Microsoft Windows CE 5.0 Core Version
Memory z 1G/2G Onboard NAND Flash ROM
Card Slots z SD Card ( Memory type onl y)
GPS antenna z Embedded 15x15 mm patch antenna
Audio z 3.5mm Stereo Headphone Jack x 1
Special z TMC GNS(FM6)
Power z 1500mAH(Max)/3.7V Li-polymer batter y
Input z Styl us
Interface z USB 1.1
Digital frame z Digital photo stored in SD card should be displayed
Buttons z Power Button x 1
System / Power
Indicator
Temperature z Operator:0~50 Degree
Standard
Accessory
Dimension z (H x W x Depth) (mm): 131 x 78 x 19.8
Weight z Below 205 g (w/ battery)
z 4.3” TFT with Touch Panel
z 64 MB SDRAM
z External GPS connector x 1
z External TMC connector x 1
z 2.5mm Headphone Jack x 1(for TMC)
z Integrated 1W Speaker (Mono)
z Video playback function
z FM Transmitter
z Bluetooth function
z Battery Life: 3 Hrs for GPS
z Battery switch x 1
z Menu Key x 1
z Charger LED ( Yellow -charger/ Green-finish)
z Storage:-10~60 Degree
z USB Sync Cable
z Car charger
z Cradle for device
z Holder
z CD
z Manual x1
z TMC external antenna x1
35
Page 36

FEDERAL COMMUNICATIONS COMMISSION INTERFERENCE STATEMENT
This equipment has been tested and found to comply with the limits for a Class B digital
device, pursuant to Part 15 of the FCC Rules. These limits are designed to provide
reasonable protection against harmful interference in a residential installation. This
equipment generates, uses and can radiate radio frequency energy and, if not installed
and used in accordance with the instructions, may cause harmful interference to radio
communications. However, there is no guarantee that interference will not occur in a
particular installation. If this equipment does cause harmful interference to radio or
television reception, which can be determined by turning the equipment off and on, the
user is encouraged to try to correct the interference by one or more of the following
measures:
– Reorient or relocate the receiving antenna.
– Increase the separation between the equipment and receiver.
– Connect the equipment into an outlet on a circuit different from that to which the
receiver is connected.
– Consult the dealer or an experienced radio/TV technician for help.
CAUTION:
Any changes or modifications not expressly approved by the party responsible for
compliance could void the user's authority to operate the equipment.
This device complies with Part 15 of the FCC Rules. Operation is subject to the following
two conditions:
(1) This device may not cause harmful interference and
(2) This device must accept any interference received, including interference that may
cause undesired operation.
RF exposure warning ·
This equipment complies with FCC RF radiation exposure limits set forth for an uncontrolled
environment.
This equipment must be installed and operated in accordance with provided instructions.
The equipment must not be co-located or operating in conjunction with any other antenna
or transmitter.
 Loading...